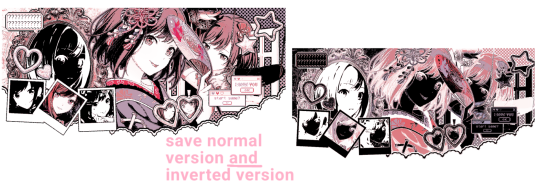
#one layer was inverted
Explore tagged Tumblr posts
Visit Tumblr Blog
Explore Tumblr blogs with no restrictions, modern design and the best experience.
Last Seen Tumblr Blogs


Fun Fact
Tumblr was created by web developers David Karp and Marco Arment.
Text

Fashion of the Great Houses of Westeros: House Arryn of the Eyrie
#asoiafedit#valyrianscrolls#valyriansource#asoiafsnet#housearrynedit#arrynedit#house arryn#asoiaf fashion#asoiaf#a song of ice and fire#ghf*#mine*#alrighty roo so for this one I was thinking we’ve still got thick fabrics and head coverings like the baratheons#but silhouettes are more loose and floaty with long sleeves and lots of layers#the vee neckline of the burgundian (but not burgundian bc this is westeros) is very popular#because it’s reminiscent of an (inverted) mountain#women wear hennins or other headdresses that have excess fabric that catch in the breeze while still keeping their hair out of the way#and when the weather gets colder fur and visible chemises start appearing#500*
1K notes
·
View notes
Text
"just blur the texture to hide the seam" "use the cloning tool" sir my texture is a Flat Fucking Color
#soda offers you a can#this feels. like a normal map thing. but im not finding helpful information on that either#there was like one unity thing that said to invert the green channel of a normal map which is the best i got#this might be something to do with the add-on im using to texture paint with layers it does funky shit#which may include normal maps? there was an option for those anyway
5 notes
·
View notes
Text
Had to get creative with the bubbles in that picture cuz like. I didn’t wanna draw a fuckton of bubbles by hand and I was getting to the point where I was sick of looking at the picture
#so basically#if you’re interested#there’s no bubble brush in there by default and I didn’t feel like trying to download one online#so I looked through the preset ones and#there’s this spray paint brush#called flicks#which. is exactly what it sounds#so I made the color white and turned down the opacity to whatever number#and increased the size and swiped the brush on a couple spots#and then I got my usual rendering brush (still white)#and loosely scribbled on some highlights#then on some of the bigger ones I did this sorta under light thing? by using the same brush and increasing the size a bit#and doing a brushstroke on the underside of the bubble#then I duplicated the base layer and set it to overlay#and inverted the color so it was black#then moved that later a bit to create a shadow#which. I’m not sure if underwater bubble shadows are a thing. I’m probably wrong
2 notes
·
View notes
Text
Unable to log into LD because I don't have enough free hours to care for my lions and it sucks bc this is where I need to stock up on my May markings kfdlksdlk
I keep asking for them in trades for rarer lions but no one ever gives me any. u_u
#lioden#i'm specifically looking for the newer ones#Blemish Inv Blemish and the main and inv of the new one#but i'll take grunge scraped grunge and inverted brawl as well#i'll take rumble but i stocked up on it the first year bc of the controversy and i don't think i'll run out anytime soon#the only one i hate is the regular Brawl#it's too clunky and noisy#i'm on the fence about squabble but it looks nice if you layer it a certain way
1 note
·
View note
Note
Hello hello!! I just wanna start off by saying how GORGEOUS your art is! Truly inspiring. I was wondering what your process was? Again, your art is truly impressive
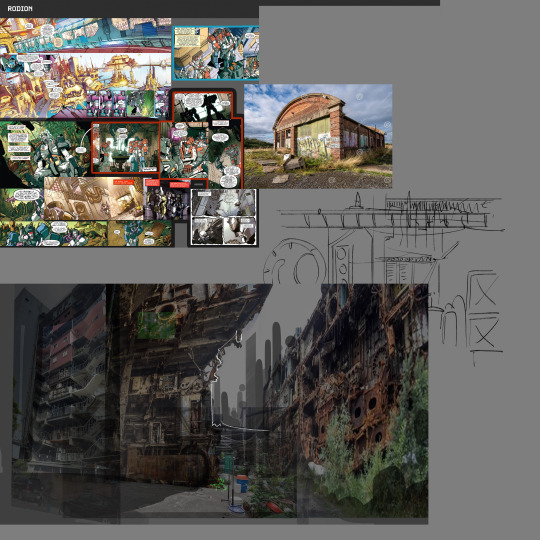
Thank you!! Oh man, it was a saga and you've opened a can of worms because my favorite thing to ramble about outside of sad gay space robots is our unholy overlord Photoshop (warning for length)
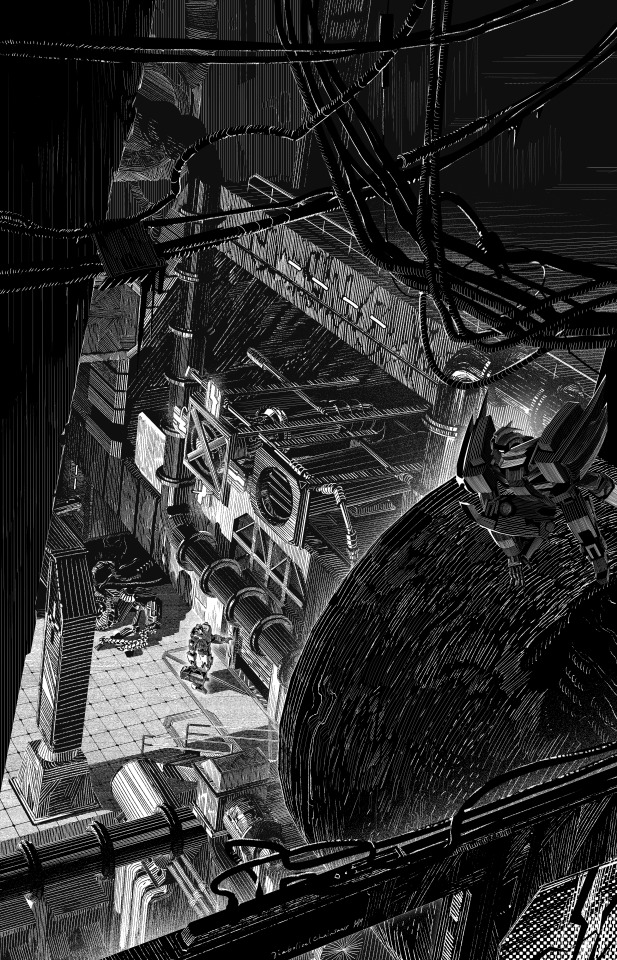
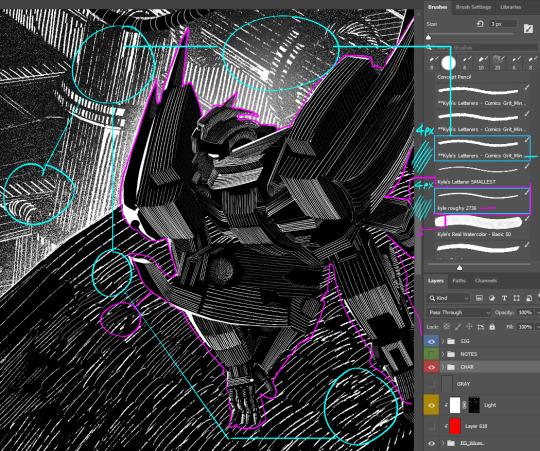
Hatching workflow: step 1: have too many Doré artbooks The refined process is thumbnail > cleaner sketch > black-and-white base OR 3D render > cut out whites > clean up edges > mask out each building/section > hatching lines with the upcoming layer setup
One:
And another:
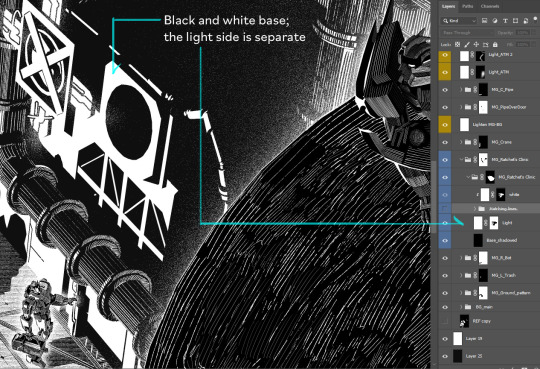
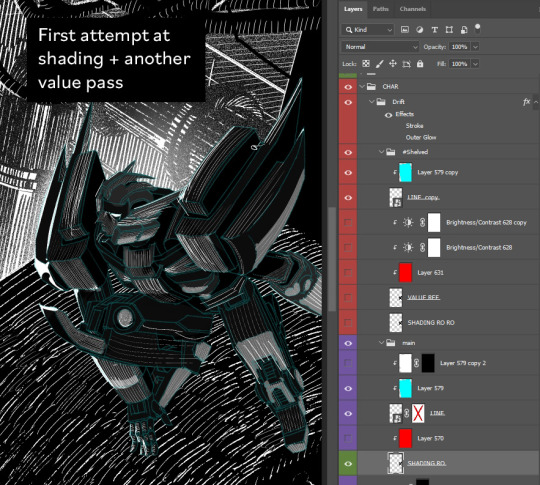
Below is the layer setup I use for hatching! First I separated each element into its own folder, with its own mask—
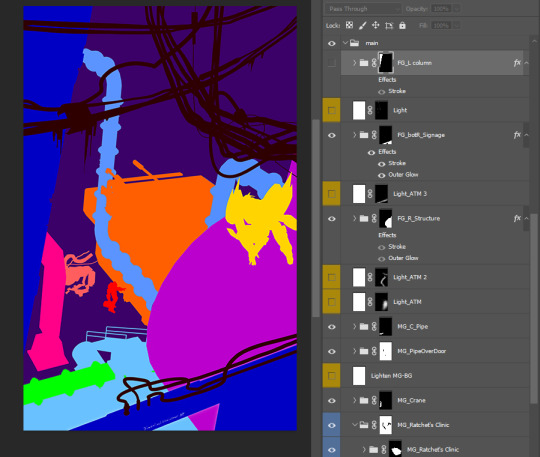
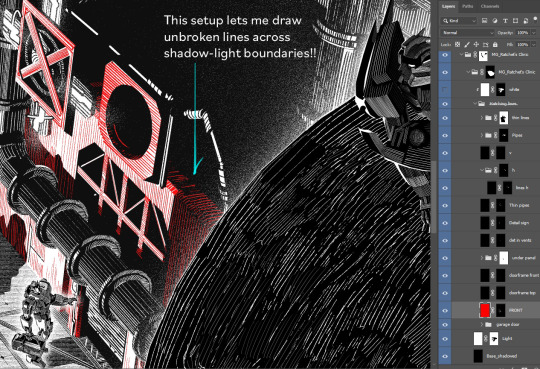
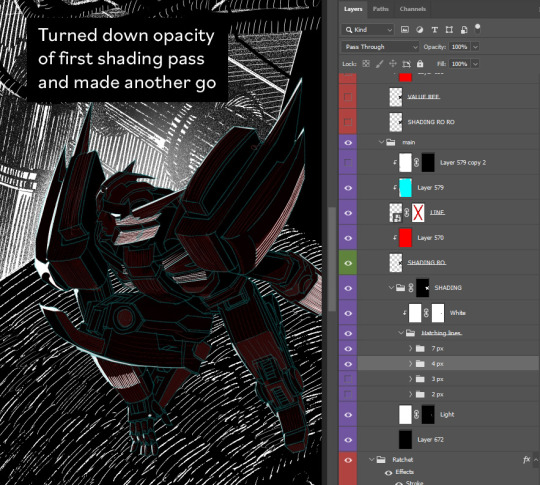
Then used this structure in each folder— I just want the hatching lines to appear black when on lit areas, and white on shadowed areas (as opposed to having to draw part of a line in white and another part in black). So, after separating the lit and shadowed sides, I copied the "Light" layer, clipped it on top of a folder of hatching lines, and inverted its layer mask.
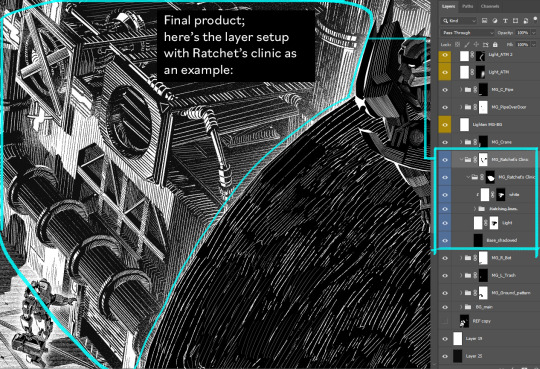

(*I draw on layer masks because it's easier to recolor lines + toggle between drawing and erasing with the "X" shortcut (I have fore- and background colors set to black and white for layer masks))
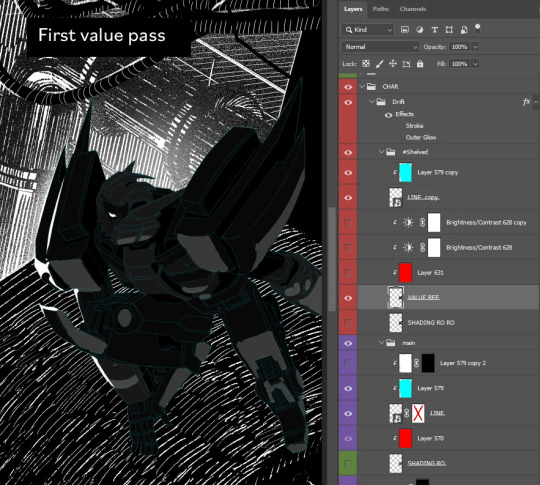
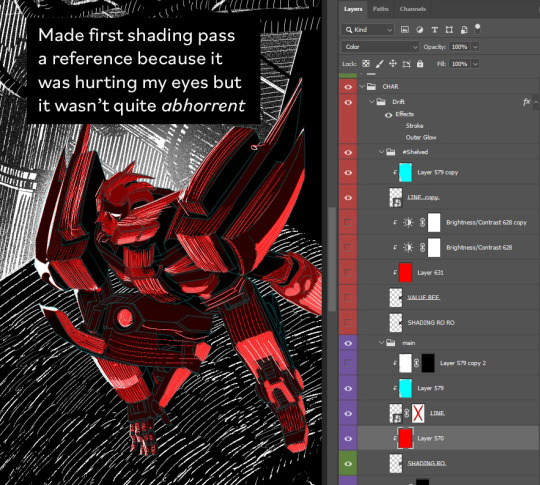
Sometimes I do a pass of grayscale values and overlay that layer on top as a reference while hatching.
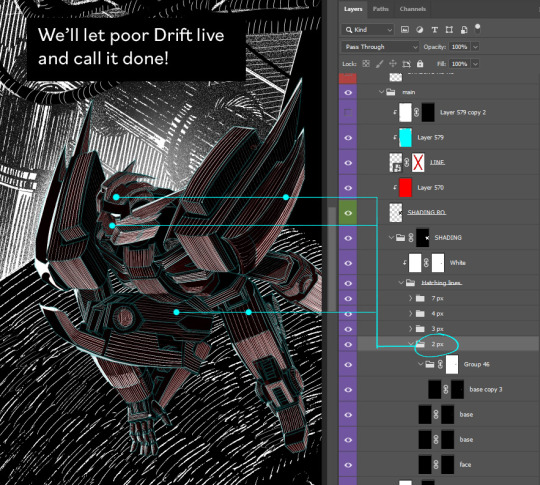
I've two main brushes: one choppier and one smoother and tapered at the ends (for thin lines, 2px-3px). Really thin horiz/vert lines are just the Pencil at 1px.
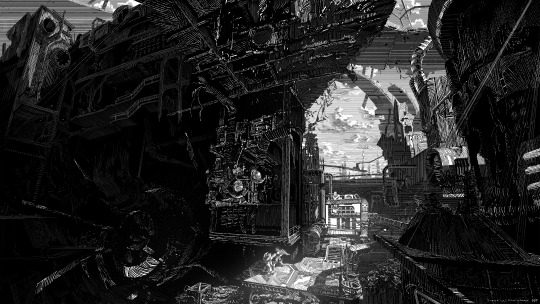
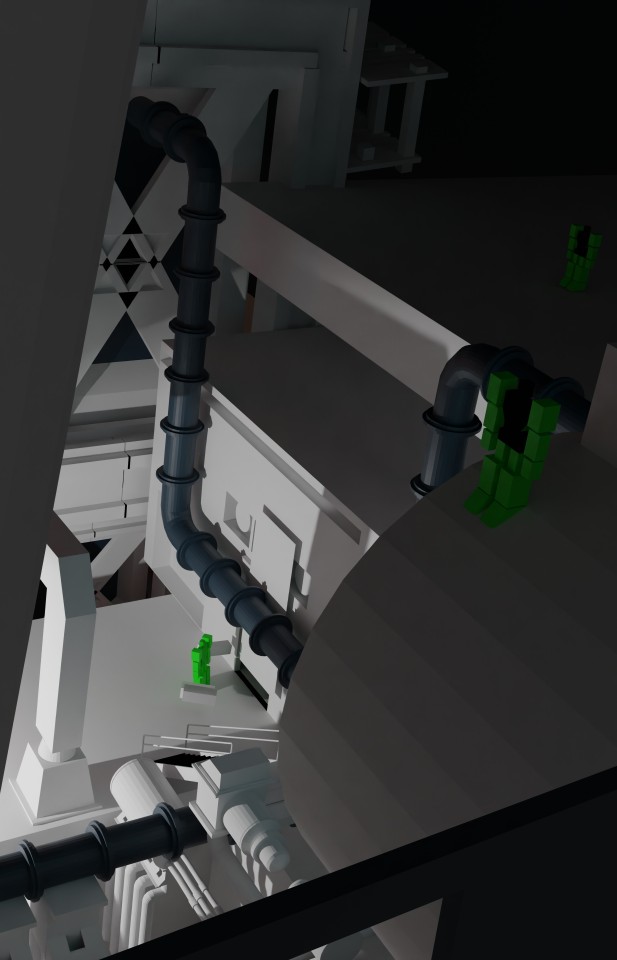
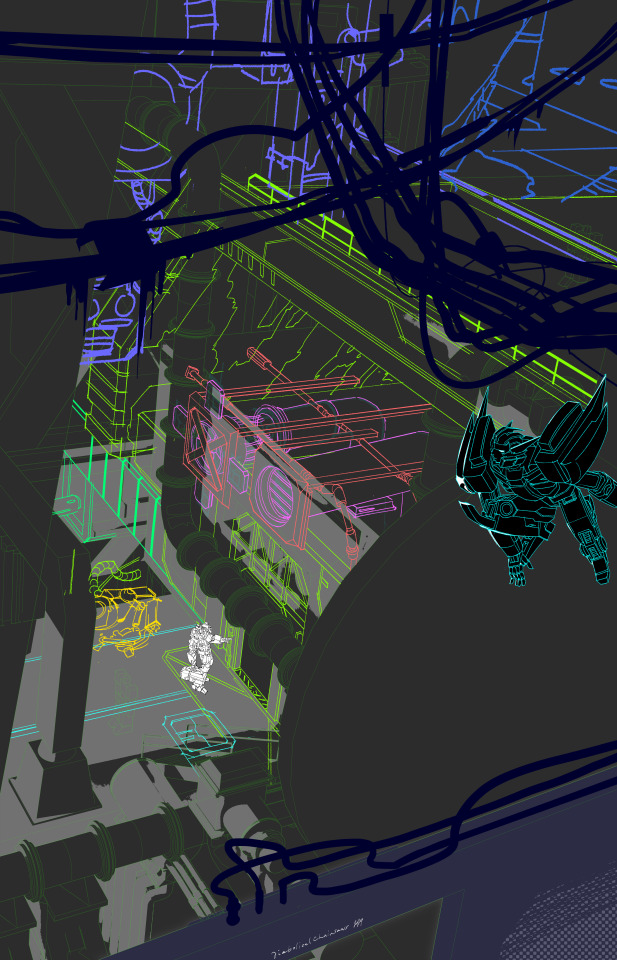
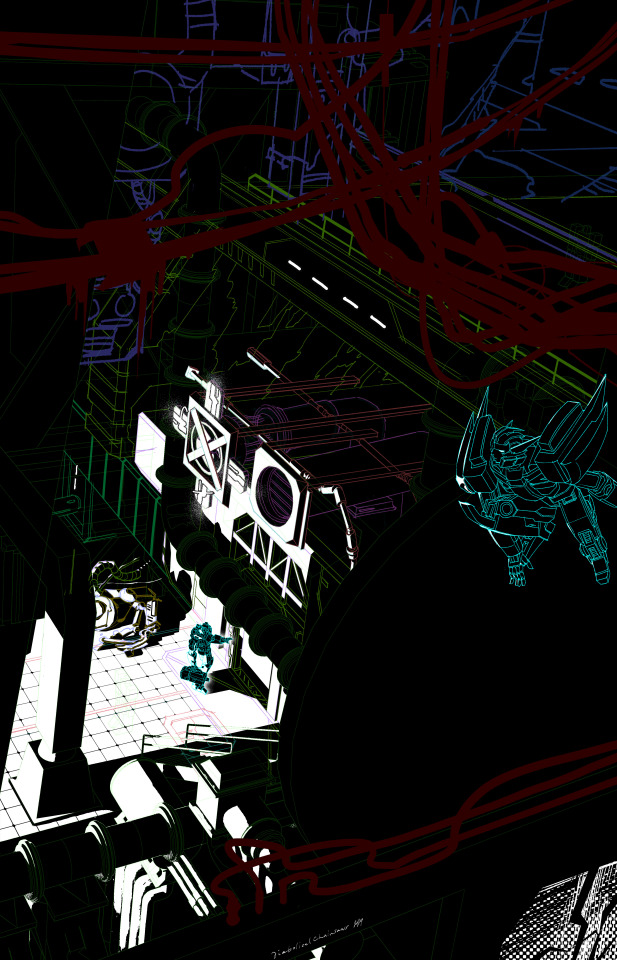
Black-and-white workflow with 3D:
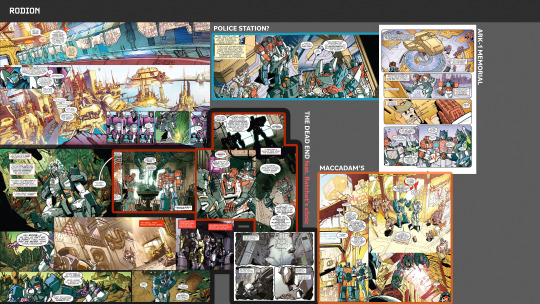
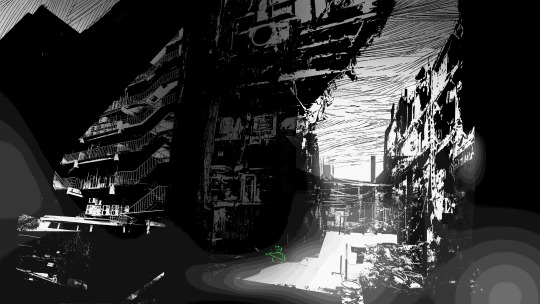
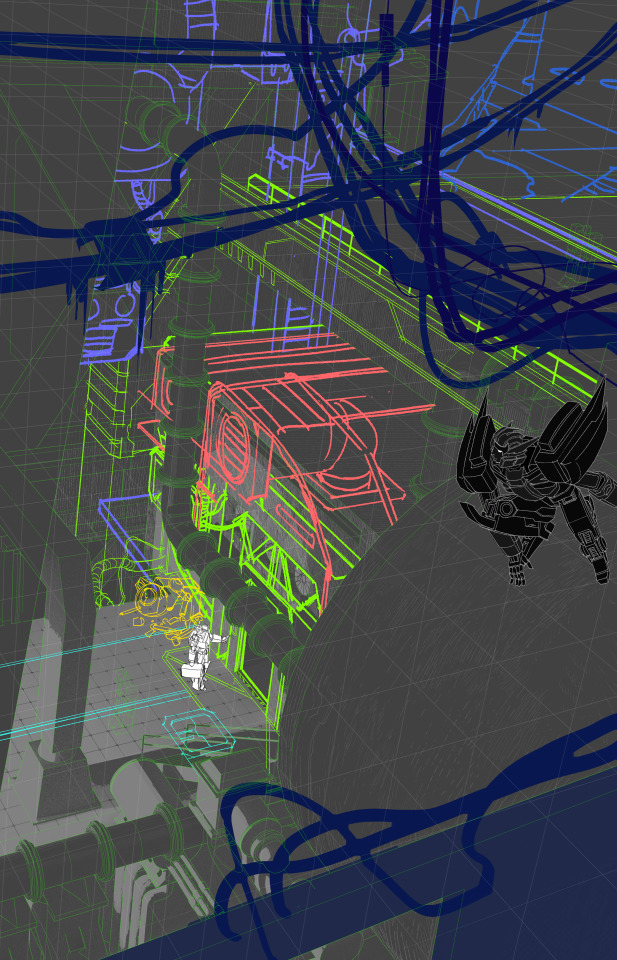
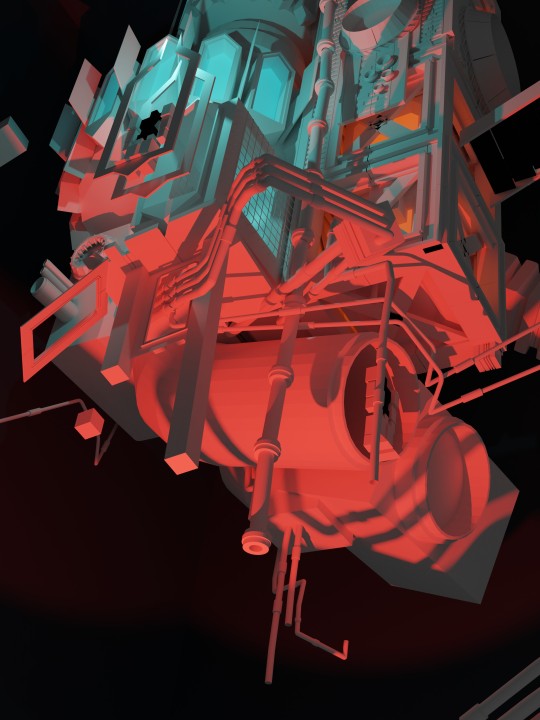
Tbh at first I only intended to make that one lurking Drift illustration. But I cower from 3D like it’ll kill me, so I turned it into a 3D assignment. First I used that "separate ways" piece to make myself model at low stakes (I just made items from the comic backgrounds and jammed them together), then I modeled the Dead End wide shot and got the final lurking Drift comp from that.

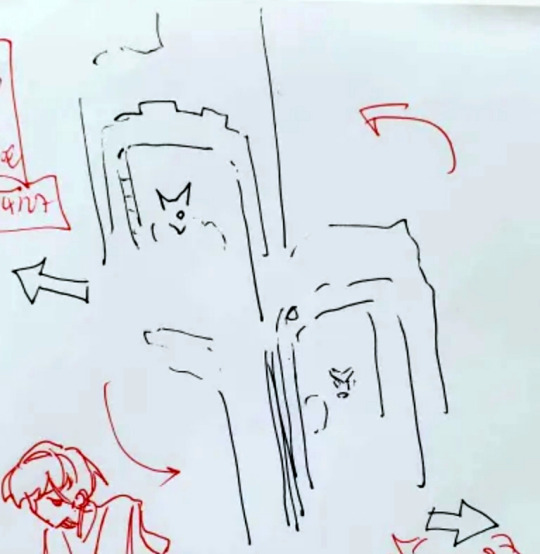
1. Drew enough detail to model (>see the 5th image in this post)
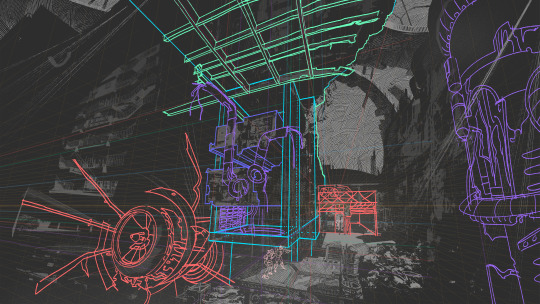
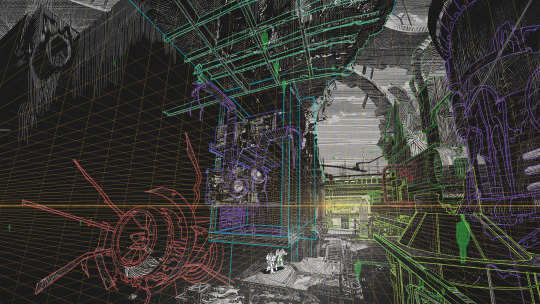
2. Used fSpy to generate a Blender camera that matched my perspective
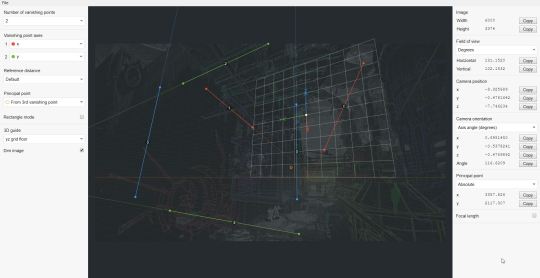
3. Shoved together the barest essentials of the clinic set in Blender (setting the 5th image in this post as a background image in Viewport)
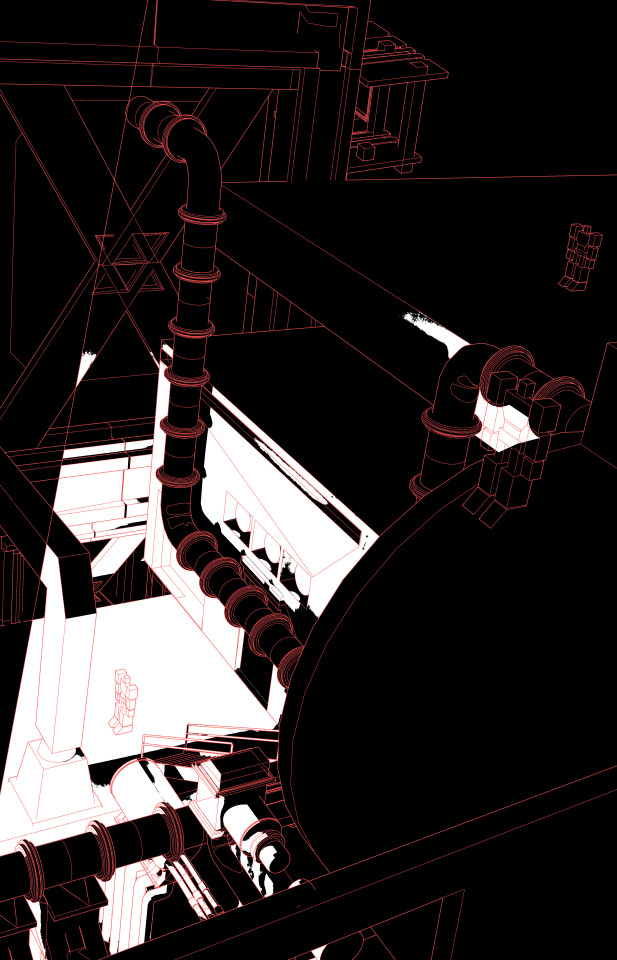
4. Rendered at hi-res twice: once with lighting, once with Freestyle outlines.
5. Changed clinic design in the close-up, so I went back to revise the wide shot.
In conclusion, my hobby is wrangling Photoshop to minutely speed up the extremely tedious and niche thing I can't stop myself from doing If anyone's got a faster way to do any of this, tell me!!
here's a gif for funsies because I get 1 more image on this post
#if anyone recognizes certain buildings from the photobash HELLO COMRADE where the hell can i get an idw megs flame toys kit in this country#i wrote this out before i realized you hadn't specified which process whoops#my brain's still full of fake engraving though so thank you for giving me an opening and well here ya go#process#photoshop#my art#blender#asks
428 notes
·
View notes
Note
Request:
fem!reader being OBSESSED with Viktor’s hands: the way they move, the way they hold things, the way they touch her.
I just need an ode to this man's hands ughhhh 😮💨
Oh Anon, you and me both. The Reader came out gn, because they are barely there :')

The Hollow of His Hand
Let's say viktorxgn!reader, mature. It really is just an ode to Viktor's hands; gif op, I apologize for using your brilliant work for something so depraved.
word count: 1,1K
author’s note: Freaktor this, Freaktor that, how about Reader is a freak for once? I'm not obsessed, you are obsessed.
—
It’s your favourite place—there, where his palm wrinkles, where fingers meet at the tips, extending whenever he passes something to you or reaches out, hand turned upward, letting you study the lines of the sole of his hand while he waits to receive something in it. Occasionally, your fingertips brush, sending a tingling sensation down to your elbow, making you linger.
It is either that Viktor knows or is entirely unaware of the shapes his hands take. When he writes, the pen rests strangely on his ring finger, with his index and middle keeping it in place, tendons flexing, wrist bending. You watch carefully, studying, memorizing for later—for when you are alone, so you can picture your own hand as his, were you ever so lucky.
You do not know which one it is in the workshop, when he adjusts the screws. If he knows, if he doesn’t. If he is aware of how the tendons in his hands pull taut, how the skin stretches over bone, how his knuckles bloom white when he tightens a bolt with precision. You watch the curl of his fingers, the way his nails, short and neat but never quite clean, catch the low light of the workshop’s lamps. The grease stains never quite leave, not entirely, dark crescents that sit beneath the nails like the shadowed banks of a river, tracing the paths of his labour. His hands bear no softness, no idle smoothness of a life untested. They are lined with the effort of creation, etched with the memory of every project he has built, repaired, torn apart, reassembled.
His forearms, dusted with hair that catches gold when he turns beneath the lamp, are a map of tension and movement. The veins rise to the surface when he grips the wrench, thick as the roots of an old tree pressing against damp soil. A freckle, then another, and another, scattered like a night sky inverted, the dark spots turned pale against the warmth of his skin. They sprawl up toward the hidden place where his sleeves remain stubbornly rolled, bunched at his elbows, the fabric wrinkled from long hours, from heat, from the constant shift of his limbs in motion. The muscle there is lean, work-honed, and when he leans into the machine, adjusting his stance, the curve of his bicep tightens, a flicker of strength beneath the skin.
But it is the place you have never seen that haunts you most. The place just beyond where the fabric ends, where his shoulder meets his neck, the juncture always concealed by layers of shirts, vests, coats, a guarded piece of him that only the mirror and the dark truly know. You imagine it warm beneath your lips, a hollow to rest your mouth against, to press into, to taste salt and heat and Viktor. The thought knots something low in your stomach, fingers twitching at your sides, the sheer want of it too much to swallow. You should not be watching. But how could you not?
What you do not know is whether it’s the labour-bared version of his hands or the relaxed one—the one resting on his cane, fingers curled idly; the one splayed across his thigh when he reads; or the one hovering close to yours on the desk as he writes—that haunts you most. It’s most likely the latter, the gentler version, the one that lingers in your mind unrestrained, creeping into the quiet hours of the evening when your chin rests on your knuckles, your gaze fixed, your thoughts drifting. To his thumb brushing your lower lip, then pressing inside.
Your mind fills with images of you taking him into your mouth, the way his fingers would press past your lips, the taste of salt and metal lingering on his skin, the faintest trace of ink at the pads. His knuckles would catch at the seam of your lips, but you’d open for him, let him slide in slow, let him feel the heat of your tongue, the soft press of it against the ridges of his fingerprints. You’d hollow your cheeks, suck him in deeper, and he—he would watch, breath uneven, eyes dark, lips parted as if he could feel the pull of it somewhere lower. His fingers would flex, testing the give of your mouth, the way your tongue curls around them, and you’d hum, a quiet, pleased sound, just to see how he reacts—to watch his throat bob with the effort of swallowing, his free hand gripping his thigh, his breath leaving in a sharp, unsteady exhale.
From that, you think of his fingers tracing down your spine, featherlight at first, then pressing, pressing, pressing until your skin dimples beneath the weight of his fingertips. His palm, broad and warm, spanning the small of your back, keeping you close, right where he wants you, God you wish. You think of the way his knuckles would drag over your ribs, slow, gentle, as if counting each one, mapping the cage that holds your breath, your heart—his now, if he asked.
His fingers, long and deft, would skim lower, curl under the hem of your shirt, just enough for his nails—sharp when they need to be—to scratch at your skin, raising gooseflesh in their wake. You imagine them undoing buttons with methodical ease, the same precision he gives to his work, until fabric slips from your shoulders, and you are left bare beneath his gaze. How he might pause, knuckles grazing your collarbone, his thumb finding the hollow at the base of your throat, pressing there just enough to make you swallow around it.
And then lower still, his hands bracketing your hips, thumbs digging into the soft flesh, fingers splaying, pulling, guiding. You can see it so clearly—his wrists flexing, his forearms tensing, the fine dusting of hair shifting as he moves. How he would grip, firm but never rough, his palms anchoring you to him as he drags you into his lap, until you are flush against him, breath mingling, the heat of his skin seeping into yours.
But it’s truly the hollow of his hand where you want to rest the most—to shrink yourself down and be cradled, warm and safe, there, where Viktor would pick you up and keep you in his chest pocket, close to his heart.
Suddenly, in the dim light of the workshop, he sighs deeply, and like through thick water, his voice reaches you: “Are you with me?”
The sound of your own name, spoken with quiet concern, breaks through the haze, and you finally look up. And oh—it’s his mouth, forming the syllables, shaping the sound. His lips, right there, moving, parting. His lips are, of course, an entirely different story.
#my writing#viktor arcane#viktor fanfic#viktor x reader#viktor x reader smut#viktor smut#viktor x gn!reader#viktor x oc#arcane#arcane fanfic#ao3#ao3 fanfic#viktor nation#requests
380 notes
·
View notes
Text

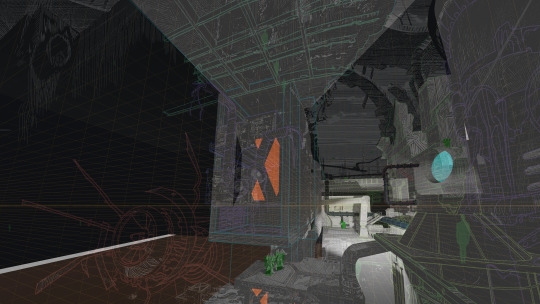
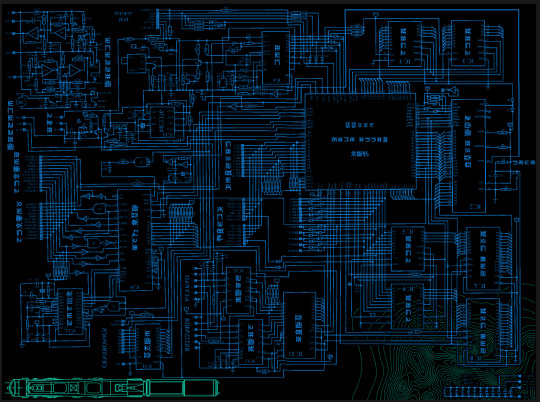
^ iterator projection tutorial!! ^
this post follows on from this one made by @prismsoup, intended to cover my slightly more extended process (including post-processing)
step -1 : pre-requisites
this tutorial is designed around clip studio paint for PC because its what i work with. its probable that whatever other program / platform you're using has these features but under different names
i use a rainworld typography font for text. find it here (or do it yourself)
i use scanline textures as a part of this. find them here
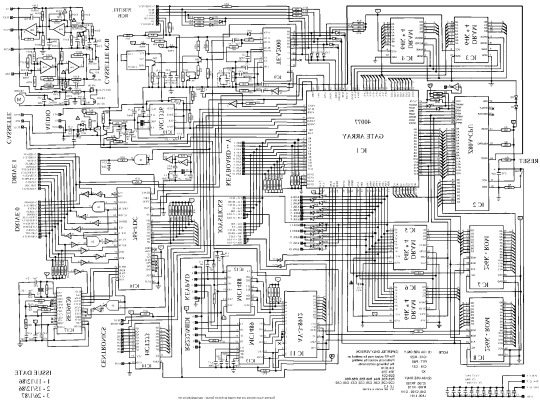
step 0 : select a base image

maps, blueprints and diagrams are favourable due to lots of detail without it derailing into noise. get experimental though, my favourite one came out from a picture of a nebula, and another from a friends factorio screenshot
step 1 : binarise & flip
this command can be found under edit > tonal correction (D) > binarization. this forces every pixel in the image to be either black or white. adjust its sensitivity to your liking
step 2 : remove background

add in a black layer below (not just paper layer, as will become important later). wand select the background colour and delete it. if the remaining colour is black, CTRL+I to invert it to white
step 3 : add details

replace any text with rainworld font or simply remove it. add in blueprints or other complex decals (drawingdatabase is a decent source). during importing remember to binarise (after resizing). for "lower layer" elements such as contour lines create outlines for higher layers to retain clarity
step 4 : add multiply layer(s)
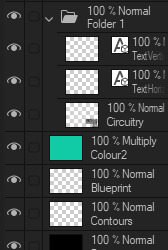
if you want to have multiple colours, put everything in the "higher" layer into a folder and set the top multiply to clipping above it
step 6 : post processing setup

copy all existing layers, create a new folder on top, and paste into that folder. right click the folder and "merge selected layers" set the resultant layer to add(glow). copy+paste and hide duplicate for now. from filters > blur apply a guassian blur with a strength of 130-170 (this creates the base bloom layer). set opacity to ~50%
step 7 : chromatic abberation
unhide not-blurred layer. guassian blur with a strength of 2. duplicate again. select top layer and move 1px up and 1px left (with arrow keys). CTRL+U then change the hue by 30. select bottom layer and move 1px down and 1px right, CTRL+U then change hue by -30.
stronger chromatic abberation can come from stronger gaussian blur and more change in hue
step 8 : scanlines
add the scan lines on top, invert so that they're white and set to add(glow). copy a multiply layer over it and make sure clipping is on. decrease layer opacity to ~10%. if it does not cover the whole image initially, paste more in and merge them together into one layer
tada! you now have one iterator projection. if you want to give it an extra affect, re-import the final PNG and filter > distort > convert to panorama. set distortion to 10 and scale to 101 (note that this drastically blurs the image)
299 notes
·
View notes
Text
Painting leather with clean long lasting results. A somewhat in-depth post

Materials used:
For painting: Scrap leather, watercolour pens, parchment paper/tracing paper, leather paints (ROC læderdækfarve is the best one I have ever tried. NO others compare to it), and small brushes (synthetic and sable)
For sewing: scissors, stitching wheel (optional), waxed thread, and leather needles
There are probably other ways to do this but this is what I came up with through trial and error over a few years and it has yet to fail me.

On the left is my reference. I traced it digitally to make a simplified mockup and added a white outline to get a feel for what it would look like on black leather. This isn’t necessary for all designs, but I’ve found that it also gives you a feel for the composition that does help when painting. I already knew that I wanted this on my belt bag so I stretched the image slightly to make the final patch fit it better.


I then inverted the colours and flipped the image. I taped a piece of parchment paper to the screen and traced the lines with a red watercolour pencil. (Shown on regular paper as my parchment paper is brown and does not show up well on camera)
the pencil being water based is important. If it isn't a watercolour pen, it will not transfer at all.
I use my ipad with procreate to create the stencil, but I used to do this on my phone with ibispaint for years, and it works the exact same. If you have access to a printer, you can skip this step and draw directly on the backside of the print if you have a lightsource behind it. Using a printer will make the tracing easier, but transferring with it might be a bit trickier.


Next I slightly wet the leather surface and press the stencil on the damp leather. This takes a lot of trial and error as different leathers need different amounts of water. Too little water and there will be no transfer, too much water and it will bleed into a blob and the stencil will be unusable. But if just the right amount of water is applied you will be left with a usable guideline for your design.
I start the painting process with watered down paint, following the guidelines I have made and referencing the mockup from before closely. After the stencil lines are painted, I wipe away all the excess red with a wet tissue. I also switch from referencing my mockup to referencing the original picture at this point.


Left: one layer. Right: two layers and cleanup
I forgot to take pictures between the guidelines and first paint layer being finished but this is like... the most straight forward part of the process. The most important thing is looking closely back and forth at the reference and comparing your painting to it every few strokes. I use a tiny brush LOADED with paint and a light hand to create pigmented lines and dots. When the first layer is dry to the touch I go in with black paint to clean up any imperfections. The black paint has a slightly different finish to the bare leather, so I do my best to avoid having to use it too much. After that I go in with a second layer of white. The white I use is fully opaque in two layers. I think I spent a total of two hours on this from start to finish.
Most leather paints take up to 48 hours to fully dry. Do not be impatient and cut out, sew, or wear the items you painted before it is fully dry, even if it feels dry to the touch. You WILL ruin your hard work.

I use a stitching wheel to mark out where I want the stitches to go. This is a totally optional step, but I like how neat it makes my stitches look. The thread I use is a thin waxed cotton thread. Don't skip out on leather needles. The type I use have a triangular point instead of a round one and slice through the leather instead of piercing it. Your joints will thank you.
Some of the many other projects I've done with this technique. I used to regularly do jacket commissions but I don’t have pictures of most of them due to changing phones. Both the sisters of mercy/paranoid jacket and the motörhead/znöwhite jacket has had about two years of daily wear and no touchups.

Some other stuff I didn't know where to add:
Your brushes matter. Different brushes are good for different techniques. Small springy synthetic brushes for lettering. Round tiny sable brushes for graphics like the one shown here. Flat eyeshadow brushes for covering large areas with no visible brush streaks.
If you are going to do something that isn't in black and white, you will need a base coat of white under any colour to get full pigment. Otherwise the colour will look dark and dull.
If your leather is a light colour, you can just do a regular transfer with tracing paper and a graphite pen.
Don't use leather that is too dry. If you drag your finger across the surface and it feels like suade, the paint will crack and flake off together with the surface of the material.
You can find scrap leather by thrifting leather clothing items and cutting them up. There are sometimes bags of leather scraps in the crafts sections of thrifts, or if you don't care for the ethical connotations of getting leather that isn’t second hand, you can often buy leather scraps by weight at fabric suppliers.
If you are gonna paint faux leather, you might want to switch from leather paint to vinyl paint.
Treat the finished product with care. As long as you don't scrub at it or keep it wet for a prolonged period, there is a good chance that it will last for years.
#my art#leatherwork#leather painting#crust punk#punk diy#diy#diy patches#onkel kånkel#motörhead#paranoid band#learherdyke#the sisters of mercy#znöwhite#speed metal#Spotify
112 notes
·
View notes
Text
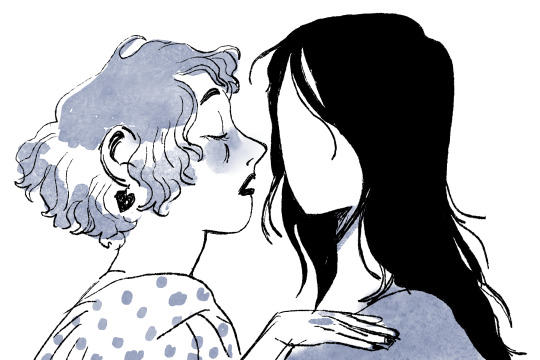
A post-mortem of "Good Morning, Rose"
A few weeks ago, I posted my addition to the comic anthology GLIMM*R, a short comic called "Good Morning, Rose".
The reaction to it has been so uplifting and exciting. It really seemed to struck a cord with people, which, really, the best thing for me to hear as a creator. I absolutely love writing and making short comics, you can do much with so little, explore such interesting stories. The feedback I've gotten has been very heartwarming! It makes me want to explore short stories even more!
But, first, I want to talk about some of my feelings and about the process of making "Good Morning, Rose". This got a bit long, so you'll have to indulge me a bit. You should also read the comic first before reading this. Don't worry, it's only 8 pages.
Now the preamble is out of the way, lets go back to the beginning.
The idea of "Good Morning, Rose" was a nugget in my brain for a long time! Originally it was actually from the Dreamwalker's point of view, where she was a faceless entity who had a long term relationship with Rose and was trying to figure out how to explain that their relationships only were in Rose's dreams. It was a story about seeing, accepting, and loving each other truly and fully, and the trials and tribulations of getting there. Also a cute girl with an ancient eldrich being is always fun to explore.
A lot of it was too convoluted, emotionally and storywise. It also required to get into what the Dreamwalker actually was, which I ended up really not liking. So, ultimately, the idea didn't work, and I put it down. I ended up going to do my short comic Twigs instead.
When I was invited into the wlw anthology GLIMM*R and was told that the theme was "dreams", I decided to take another stab at the concept. This time, I inverted the pov, it's now Rose's story. And instead of a long term relationship, it was about the powerful first feeling of a perfect (maybe even too perfect?) first date.
One of the hardest thing to write in romance is getting readers to care about the relationship in the first place. To have the readers believe in the character's feeling, to be invested in their romance. This is even harder to do when you only have 8 pages to do it. Focusing it around a first date helped a lot in that case. There I'm not trying to sell that these two character will love each other forever and forever, just the fluttering first butterflies of realizing you're developing feeling for someone. It's why I leave it so open-ended about whether the two of them meet again at the end of the comic, or even if it was real in the first place. It's just not the point of the story.
That's something important about writing short stories, I find. You really have to hone in on an idea, on a thought. Take a simple idea and try to find all of the interesting layers. It's too easy to try to stuff a short story with too many ideas that ultimately go unfulfilled. In fact, the first draft of the comic, at the time called "Dream Date", there was a big problem with this and the pacing.
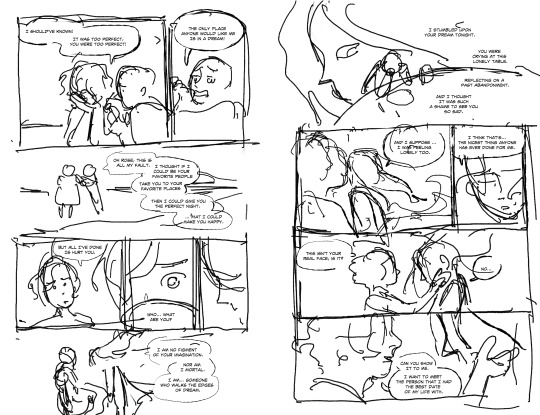
Here, take a look at the first stab at the roughs:


(BTW, there is something so fun about roughs for me lol. The art is so kinetic and loose, all about just getting the story across)/
As you can see, a lot of the ideas and imagery made to the final version of the comic. But both the initial readers and I agreed that the beginning and end were good, but the middle was messy and slowed things down. You can also see that I got stuck in the same problem I did when I first conceived of the story, it's bogged down trying to understand the Dreamwalker in a way that actually hurts the story. You simply dont have any room for bad pacing a short comic like this. I need to focus more on the character's and their emotions and exploring their actual relationship rather than blandly trying to explain the situation. A friend also suggested that I should hone in on the fluid dream-like aspects of the first couple of pages, especially since it's so fun to explore in the medium of comics. So I got to work gutting it out and trying again with the new, much stronger imo, direction.


Also there were some issues with the page format that needed changes for printing, thus the final spread had to be split up. Which is a shame, but oh well, it still works. I also honed in a lot more on Rose and her insecurities. I ended up putting a lot of myself into Rose. I'm glad readers seems to able to relate to her.
After figuring out the the story and the pacing, I went and, well, made the comic. Once you've done as many comic pages I have at this point, once you figure out a process, the actual drawing is fairly straightforward. Eventually, after thinking, and drawing, and toiling, and revising, and thinking hard about my life choices, I come out of the other end of the tunnel with a comic. One that I ended up really liking. One that other people ended up liking, which is always crazy to me.
I got a lot of interesting reactions to the comic. One demographic thinking it was sweet, wanting more of it (always a flattering thought), and enjoying the romance. Other remarking on the bittersweetness of it all, finding your soulmate in a dream, maybe never to see them again if they were even real in the first place. There were a lot of people remarking how they had a similar dream, one where they met someone they seemed totally and completely convinced that they were real and told the dreamer so, until the dreamer woke up. There was one person who asked if I had met the dreamwalker myself. Alas, my dreams are not this romantic and straightforward.
But all of us can hold hands, nod at each other, united by one universally true statement: big eldritch lady hot.
There's a lot of little bits I can talk about, like how Rose's dress is actively modeled after selkie dresses because I think they're cute, or some other trials and tribulations. But I think I've finished all I have had to say. I hope you enjoyed this and will stick around for my future projects! I definitely want to explore more short stories in the next year, especially as I am illustrating big graphic novels for my day job and don't have the time or energy for huge projects.
Till then, thank you so much! Happy holidays and have a good new year!
226 notes
·
View notes
Text
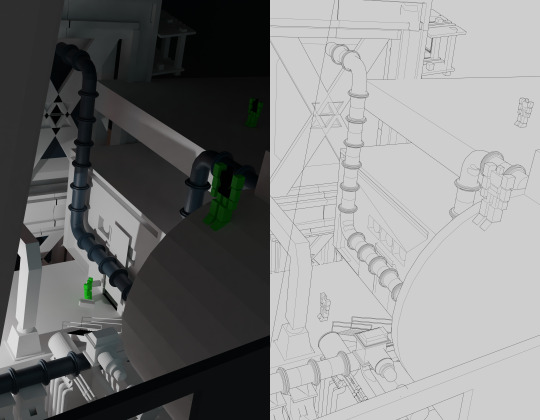
CC Creation Tutorial: Smooth Seams in Blender

In this tutorial, I will show you how to make your mesh seams smooth inside Blender (no Milkshape required!) and walk you through the process step by step. We will make a perfectly smooth mesh and transfer the normal data from that mesh to our main mesh using the Data Transfer modifier.
I am using Blender 3.6 in this tutorial (though you should be able to follow along using other versions as well)
You do not need to have much previous knowledge to follow this tutorial, but I assume you know some basics in Blender like how to select, things, navigate around, etc, and know how to import the meshes and put them into Blender.
For this tutorial, I exported the Sims 3 afbodyEP4DressPromBigBow mesh with TSR Workshop. You can use any clothing mesh you like though, and works on any meshes, not just Sims 3 ones.

This is our mesh. You can already tell that it has the dreaded seams on the neck and the rest of the body.

First, we need to make a copy of the mesh (in Object mode, select the mesh and hit Ctrl+D Shift+D to duplicate it, then hit Esc to stop it from moving around).
Rename the mesh (I added Seamless to the mesh name).
Make sure the original mesh is hidden (click the eye symbol) and select the Seamless mesh.
Press the Tab key to go into Edit Mode.

Now we select the parts that we want to have smooth seams. Let's select everything that is skin (you can select a litte piece of the mesh and then press Ctrl+L to select the entire piece)!

Now, press M and in the menu, choose By Distance. (in older versions, this is called Remove Doubles).
This will remove all double vertices at the seams on the selection we made.

It will show you how many vertices it removed. The skin looks nice and smooth!
Let's switch back to our original mesh: Make sure you deactivate the eye on the Seamless mesh and activate the eye again on the main mesh. Then, select the main mesh.

Now, let's add a data modifier to our main mesh. Click the blue wrench icon in the vertical list of the properties panel and then onto Add Modifier, then choose Data Transfer from the list.

As the source, we choose our Seamless mesh.

Also toggle on Face Corner Data and click the Custom Normals button.
Hold on, there is a message saying that we should enable Auto Smooth in Object Data Properties. Let's do that next! (if the message does not appear for you, maybe Auto Smooth is already on).

Click the green inverted triangle button and in the Normals section, toggle on Auto Smooth.

Now we can switch back to the modifier tab by clicking the blue wrench icon again.
But hang on, what happened to our mesh? There are now black spots over the dress and shadows on the legs!

This is due to the Data transfer modifier's Mapping setting. If we change it to Topology, our mesh goes back to normal again. Phew!

Now that the normals look good, we can start the transfer of our new smooth normals from the seamless mesh to our main mesh. To do that, we hit the Generate Data Layers button. This button works destructively, so you cannot undo what it did, just FYI.

Note: On newer versions of Blender, Generate Data Layers may not be enough to transfer the normals and you may need to apply the modifier instead.
You can toggle the modifier's visuals on and off with the little screen icon to see the results after you click Generate Data Layers to see if it stuck. If it did not (and you see the seams of your base mesh when toggling it off), try to apply it instead.

I switched from textured to solid shading because the differences are just more noticeable in this mode. This is how our mesh looks now with the modifier turned off.
Because we clicked the transfer button, the normals have been permanently applied to our mesh. The skin is smooth now, and so is the dress (even though we did not smooth that one, hmm...)

If we toggle the modifier back on, suddenly the dress has seams again! What's going on there? I'm not exactly sure why, but Auto Smooth seems to be doing some smoothing on the dress mesh as well.
I am not sure if this is normal behavior or not, but let's pretend that this did not happen and the modifier in fact did not smooth the dress.
Maybe we just forgot to smooth some areas on the Seamless mesh that we noticed only later on. That's no problem. We simply modify our Seamless mesh again!

So let's swap back to the seamless mesh and select it (remember to click the eye icons so only the Seamless mesh is visible).

Let's select the main dress parts and press M -> merge by distance on them. We cannot smooth the whole dress all at once, because then that would remove some seams that we want (like those for the backfaces and the middle section of the dress where the bow is attached).
If we remove the wrong seams, we ruin our normals and will have black splotches.

Now, let's select the backfaces and areas we left out before and repeat this process: M -> merge by distance.

Look at how perfect our Seamless mesh is looking now! Now, let's transfer those beautiful normals to our main mesh.
Select the main mesh and toggle the eye icons again, to hide our Seamless mesh and reveal our main mesh.

Once again, we will use the Generate Data Layers button in our Data Transfer modifier. If you have previously applied the modifier, just add the modifier again to the main mesh and use the settings shown here.
And that's it, you are done! You have a perfectly smoothed mesh that you can export now.

Final Note: it is best to transfer the normals at the very end of your meshing process because any action that recalculates the normals can reset our custom-made smooth normals again.
Of course, you can simply use the Generate Data Layers button again to re-add them, but it saves you time to only do this step at the end.
I almost forgot to say: You still have to use Mesh Toolkit to fix the seams on the edges of your mesh and do the usual shenanigans.
188 notes
·
View notes
Text
“And if dreams can come true — what does that say about nightmares?”
People who say that Chuuya must be able to dream are deeply mistaken and forget that he is an experimental project, whose life was sustained by liquid—and his REM phase wasn’t just reduced, dreams were eradicated from his brain entirely. He had no foundation upon which to build dreams. He lived in that tube like in a coma, unaware of anything except the fluid around him. His associative imagery simply didn’t form. He is blind in that regard. They took him as a child, and until adolescence, he sat in that tube with no memory of himself.
He doesn’t know how to dream. He has no reason to dream. He simply has nothing to dream with.
He may have developed chronic REM-sleep disorder because he never had a proper sleep cycle in the first place—it never developed and possibly never engaged afterward either. And without REM sleep, there are no dreams, even if you’re asleep.
Moreover, Stormbringer openly reveals Chuuya’s struggles with his sense of self. “Who am I?” And that “I” is the core of dreams. There are no dreams in which he could participate. He is like a newborn. He sleeps like a machine, just a robot. He has no dream-related brain activity. In this sense, he’s an eternal child.
The fact that he spent his entire life in a test tube also affects his height and weight. Starting with the basics: the body has no stimulus for growth. In fluid, under weak gravity, muscles and bones have no resistance to develop against. They simply don’t develop. On top of that, growth hormone is released during sleep. And as mentioned above, Chuuya didn’t sleep in the conventional sense—his state was closer to a coma.
Also, some of the hormones necessary for growth and development are produced through movement and proper nutrition. When a person doesn’t eat, doesn’t move, and doesn’t follow a circadian rhythm, hormonal signals become disrupted, and growth hormone production is suppressed. Add to this the fact that the cells don’t regenerate. Surrounded by fluid, with no oxygen, no micronutrients, no proper blood circulation or metabolism—cells can’t renew, be nourished, or receive the signal to grow. Hormones aren’t produced. Tissues aren’t stimulated. Nothing applies pressure or stretches them. Even if cells do divide, they remain in a suspended state, because without external stimuli, they don’t differentiate into specialized cells. They don’t mature.
In biological terms, all growth signals are dulled.
Now, seventh-grade physics: a body immersed in liquid is subjected to uniform pressure from all sides. Depending on the depth and density, this pressure varies. The fluid balances out the internal pressure of tissues—essentially creating resistance. This means tissue doesn’t “push” against its surroundings, because everything is compressed back. There is no space for growth. In fluid, as mentioned earlier, there’s no gravity. The body doesn’t know where up or down is. But all organs and bodily systems grow with orientation in mind. Without it, spatial awareness is lost.
And do you know why Chuuya’s mass might appear larger? Let me repeat the blobfish analogy. If the liquid he was suspended in was dense, then once he’s taken out onto dry land, where the pressure is different and the fluid no longer compresses his body, he would swell—only slightly, but still swell.
And to top it all off: asymmetry. The body stays stuck in one position. This leads to deformed limbs, a crooked spine, underdeveloped joints. The skin becomes thin, with no developed protective horny layer, leaving the body vulnerable to infections. Bones, without stress or load, become thin and soft—even hypoplastic. They never gain proper shape or density; they’re weak. The body was essentially preserved. Now, he has narrow lungs, potentially inverted organs (due to lack of gravity orientation), and even his face remains childlike.
It’s abnormal. It’s miniature. It’s asymmetrical.
People always overlook the key fact: no matter what kind of person Chuuya is, he’s still a child, subjected to experimentation by grown men—robbed of everything a “normal” child or human of his age is supposed to have.
#bsd#bungou stray dogs#bsd thoughts#bsd theories#bsd chuuya#chuuya nakahara#bungou stray dogs stormbringer#bsd stormbringer
75 notes
·
View notes
Text
I tried something new!

Usually when I edit photos I'm aiming to make things as life-like as possible but I've recently decided to challenge myself to play with color and different tools in PhotoPea. I'm really excited with how this one came out.
I used color to alpha (a lot), hue/saturation, color balance, invert colors, and posterize in a bunch of different layered iterations for different parts of the image til I ended up with the final piece, which I'm really delighted by.
The original photo is of a ruby octopus I got to see this summer while doing research.
Want a print?
Photo prints, shipped to the US, fulfilled by me: https://shop.noncompliantcyborg.com/products
Specialty Prints (canvas, metal, acrylic, etc) and/or photo prints shipped internationally: https://www.inprnt.com/gallery/noncompliantcyborg/ruby-octopus-rainbow-spiral/
#octopus#cephalopod#ocean art#art print#marine science#underwater#sea creatures#ocean#marine biology#my art#small business#not ai art#photopea#inprnt#science art#marine science art#rainbow#lisa frank vibes
202 notes
·
View notes
Text
TILE TRANSITION TUTORIAL

a couple of people have asked me for a tutorial on how I did the penultimate gif in this set, so here goes! this is my first tutorial, so please feel free to reach out with further questions if anything's unclear.
note: this tutorial assumes you know the basics of gifmaking, can create the base gifs, and are familiar with timeline mode.
STEP ONE: create the base gifs! I'd recommend staying between 25-40 frames for each gif, since the transitions we'll use later tend to increase gif sizes. these are the ones I'll be using for this tutorial:


STEP TWO: create the guide layouts for both base gifs. for this panel, I chose a 4x4 grid — I would recommend keeping the number of "tiles" low because it can get tedious, but have a minimum of 9 (3x3 grid).


now your canvas should look like this:

STEP THREE: create the tiles. this is where the going gets rough; there might be easier ways to do this that I couldn't think of 😭 if there are any please send me an ask!
essentially, in this step we'll cut up the base gifs into smaller squares so that each tile can be manipulated separately when we put both gifs together. to do this, first create a square using the rectangle tool and the guides. then duplicate the base gif, move it above the square, apply a clipping mask, and then convert the clipped gif and square (selected in the image below) into one smart object.


ALTERNATELY: you could duplicate the original base gif and use layer masks to isolate tiles. create a layer mask for the duplicated gif layer and, with the layer mask selected, drag your mouse over a square (using the guide layout) and press delete. then press ctrl/cmd + i to invert the layer mask so that the gif only shows in the square of your choosing.
now repeat until you've got the entire gif in tiles, and do the same for the other gif!
since the transition effect is achieved by staggering the crossfades for each tile of the final gif, you can cheat by having multiple tiles "flip" at a time, ideally no more than four. this means you need to cut the base gif up into fewer pieces. to do this, simply draw multiple squares instead of one and then merge the shapes, before duplicating and clipping the gif onto them.


if you do this, it's essential to remember that you have to divide both gifs up in the exact same way. each piece of the b/w gif has to correspond to a piece of the purple gif!
this is what the layers look like for each gif once I'm done:


I have them lettered so that it'll be easier to match them up in the next step.
STEP FOUR: this is the complicated bit that took me two days to figure out. I'll do my best to explain but don't hesitate to reach out if something isn't clear!
to begin, open up a new psd and import both base gifs into it. (remember to click "create video timeline" and ensure that your gifs are all in order before proceeding.)
now, the trickiest part about this transition is ensuring that all the little tiles sync up so that the larger gif is coherent. so first we'll create some markers (just empty layers) to ensure that everything lines up as it should. — marker 1: at about halfway through the first gif (b/w in this case) — marker 2: at about a quarter of the gif length — marker 3: close to the end of the gifs

at this point we're ready to start bringing in the tiles. I'm going to delete the base gifs from this new psd just to keep things cleaner!
first thing to do is import my b/w tile. move the timeline slider over to marker 1 and split the first gif. (if it helps, rename the split gifs and add (start) and (end) to the two halves.) then, move the (end) half to the beginning of the timeline, and the (start) half to line up with marker 3.
the purple tile is easier to manage. simply import it into the psd and line it up with marker 2.
your timeline should now look like this:

notice the overlap between the gifs at their beginnings and ends — this is where you'll be able to cascade the tiles flipping, so it helps to have a significant amount of overlap.
crop the three gifs for this tile as you see fit! since this is the first tile I want to flip from b/w to purple, I'll crop gif 1a (end) all the way to the current position of the timeline slider (red line with blue tip) and leave the beginning of gif 2a uncropped. for the flip from purple to b/w, I'll crop both gifs a bit.
once that's done, drag all three gifs onto the same level in timeline so they form a video group. your timeline should look something like this:

now you just repeat the process for all the other tiles! as long as you made sure that all the tiles in one gif correspond with tiles in the other gif in step three, this should be a fairly painless process. make sure to crop the starts/ends of the gifs separately so that they don't all flip together.
this is what my layers look once I've done all the tiles:

and the gif!

STEP FIVE: transitions! click on the half-white square (top right of the left column in the timeline, beside the scissors) and select the crossfade transition, then drag it between two gifs in a video group. it should create a two-triangle symbol and shorten the overall length of the video group.


apply the transition to all the tile flips, ensuring that the duration of all transitions is constant. this can sometimes be tricky because ps likes to change the duration of each transition, so right click on the transition symbol and manually change all your transition durations to be the same.
your layers should now look something like this:

STEP SIX: draw the grid. bring back the guide layout from step two and using the line tool (I like 2px thickness), trace the grid. adjust opacity as you see fit (50-80% is usually a good idea), so that the canvas looks like this:

STEP SEVEN: export and celebrate! you're done!
I hope this tutorial made sense and was easy to follow, and happy giffing! my inbox is always open for any questions <3
#tutorial#ps help#ps tutorial#userace#alielook#userabs#usercats#userhella#userfaiths#tuserabbie#usershreyu#usertreena#tuserlucie#uservivaldi#usertj#usergiu#userroza
837 notes
·
View notes
Text
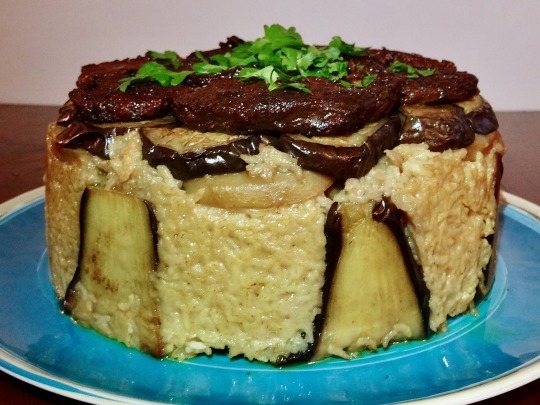
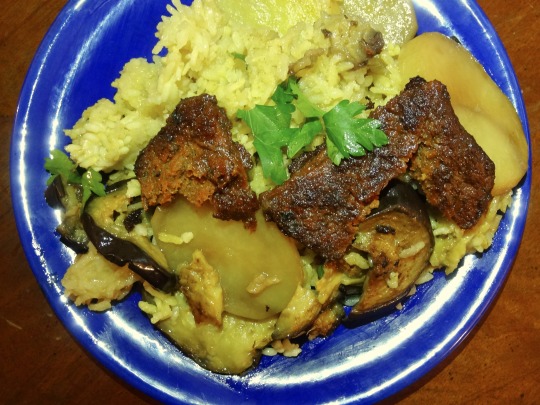
[ID: A wide cylindrical pile of rice, eggplants, and 'lamb' on a serving platter, garnished with parsley. End ID]
مقلوبة / Maqluba
مَقْلُوبَة ("maqlūba," "upside down" or "turned over") is a Levantine casserole in which spiced meat, fried vegetables, and rice are arranged in a pot and simmered; the entire pot is then inverted onto a serving tray to reveal the layered ingredients. Maqluba historically uses lamb and eggplant, but modern recipes more often call for chicken; tomato, cauliflower, potato, bell pepper, and peas are other relatively recent additions to the repertoire.
A well-made maqluba should be aromatic and highly spiced; the meat and vegetables should be very tender; and the rice should be cohesive without being mushy. A side of yoghurt gives a tangy, creamy lift that cuts through and complements the spice and fat in the dish.
Maqluba emphasizes communal eating and presentation. It is usually eaten during gatherings and special occasions, especially during Ramadan—a month of sunrise-to-sunset fasting which celebrates the revelation of the Qu'ran to the prophet Mohammad. The pot is sometimes flipped over at the table for a dramatic reveal.
History
Many sources cite Muhammad bin Hasan al-Baghdadi's 1226 Kitāb al-ṭabīkh (كتاب الطبيخ لمحمد بن حسن البغدادي) as containing the first known reference to maqluba. However, the recipes for "maqluba" in this book are actually for small, pan-fried patties of spiced ground meat. [1] The dish is presumably titled "maqluba" because, once one side is fried, the cook is instructed to turn the patties over ("أقلب الوجه الآخر") to brown the other; the identical name to the modern dish is thus coincidental.
References to dishes more like modern maqluba occur elsewhere. A type of مغمومة ("maghmūma," "covered" dish), consisting of layers of meat, eggplant, and rice, covered with flatbread, cooked and then inverted onto a serving plate, is described in a 9th-century poem by إبراهيم بن المهدي (Ibrāhīm ibn al-Mahdī):
A layer of meat underneath of which lies a layer of its own fat, and another of sweet onion, another of rice, Another of peeled eggplant slices, each looking like a good dirham honestly earned. [...] Thus layered the pot is brought to a boil first then enclosed with a disc of oven bread. On the glowing fire it is then put, thus giving it what it needs of heat and fat. When fully cooked and its fat is well up, turn it over onto a platter, big and wide. (trans. Nawal Nasrallah) [2]
These sources are both Iraqi, but one story holds that maqluba originated in Jerusalem. صلاح الدين الأيوبي (Ṣalāḥ ad-Dīn al-Ayyūbi; "Saladin"), after capturing the city from the Crusaders and reinstating Muslim rule in 1187, was served the dish, and was the first to describe it with its current name. Before this point, the Jerusalem specialty had supposedly been known as "باذنجانية" ("bāḏinjānīyya"), from "باذنجان" "bāḏinjān" "eggplant" + ية- "-iyya," a noun-forming suffix.
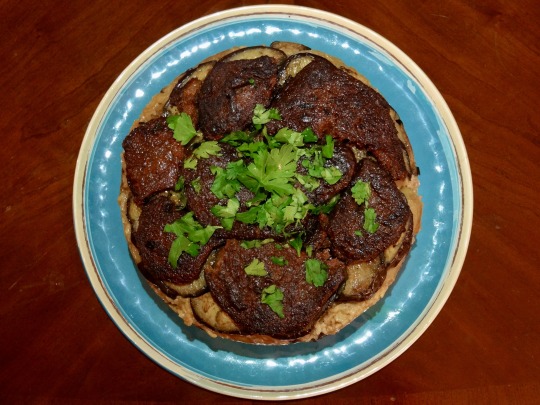
[ID: The same dish shown from directly above. End ID]
In Palestine
Maqluba is often invoked in the context of Palestinian strength and resistance, in defiance of its occasional description as an "Israeli" dish. Palestinian magazine writer Aleeya Rizvi reflects:
In the wake of the recent [2023] war in Gaza, our culinary endeavors, particularly in crafting and sharing traditional Palestinian dishes like Maqluba, represent a conscious effort to contribute to the preservation and resilience of Palestinian culture. In a time when cultural heritage is under threat, preparing and enjoying these time-honored recipes becomes more than a mere culinary activity; it transforms into a deliberate act of cultural continuity and solidarity.
Maqluba also has a more specific association with physical resistance against the backdrop of increased settler and police violence against Palestinians, including regular Israeli raids and attacks on the جامع الأقصى ("Jāmi' al-Aqṣā"; al-Aqsa mosque), during Ramadan.
The holiest month in the Islamic calendar, Ramadan is given over to fasting, prayer, and reflection; people gather together in homes and mosques to break their fast after sunset, and spend entire nights in mosques in worship. Khadija Khwais and Hanady Al-Halawani used to serve maqluba for افطار ("ifṭār," fast-breaking meal) in the Al-Aqsa mosque, until Israeli occupation authorities banned them from the mosque for "incitement."
In response, starting in 2015, Al-Halawani and other volunteer مرابطين ("murābiṭīn," lit. "holy people," guardians of the mosque) stationed themselves on the ground outside the mosque's gate (باب السلسلة; Bāb as-Silsila, "chain gate") to prepare and serve maqluba. Those who were banned from entering the mosque broke their fast and prayed at the mosque's gates, and in the nearby alleys of the Old City. The same year saw Israeli security personnel and settlers attack Palestinian protestors and guardians outside and inside the mosque with tear gas and stun grenades.
For Al-Halawani, the serving of maqluba at the al-Aqsa gates symbolizes "defiance, steadfastness, and insistence on continuing the fast [...] in spite of the occupation’s practices." The "Maqluba at al-Aqsa" ritual "has become one of the most disturbing Palestinian scenes for the occupation forces," who associate it with the defense of "Palestinian heritage" and the intent to "motivate worshipers and murabitin to repel incursions into the mosque." (Al-Halawani has been arrested, threatened, beaten, and detained by Israeli police multiple times for her role as a defender of Al-Aqsa. She was among the prisoners freed in trades between Israel and Hamas in December 2023.)
In 2017, occupation forces installed metal detectors, electronic gates, metal barriers, and police cameras to surveil worshipers following a shoot-out at one of al Aqsa's gates. Hundreds of protesters refused to enter the mosque until the repressive measures were removed, instead gathering and praying in its courtyard; surrounding families bolstered the sit-ins by serving food and drink. When the gates were dismantled, over 50,000 people gathered to eat maqluba in celebration, picking up on the earlier association of the dish with Saladin's victory (and its resultant alternate name, "أكلة النصر," "ʔakla an-naṣr," "victory meal").
The name "maqluba," meaning "upside-down" or "inverted," may be associated with victory and resistance as well. Fatema Khader noted in 2023 that the method of serving maqluba was a "symbolic representation of how Israeli policies and decisions against Palestinians will be flipped on their heads and become rendered meaningless." It is also relevant that maqluba is meant to be served to large groups of people, and can thus be linked, symbolically and literally, to solidarity and communal resistance.
This year in Gaza, Palestinians show steadfast optimism as they paint murals, hang lanterns, buy sweets, hold parties, and pray in groups amongst the rubble where mosques once stood. But despite these efforts at creating joy, the dire circumstances take heavy tolls, and the holiday cannot be celebrated as usual: Israel's campaign of slow starvation led Ghazzawi Diab al-Zaza to comment, "We have been fasting almost against our will for three months".
Donate to provide hot meals in Gaza for Ramadan
[1] Also reprinted in Mosul: Umm Al-Rubi'in Press (مطبعة ام الربيعين) (1934), p. 57. For an English translation see Charles Perry, A Baghdad Cookery Book (2005), pp. 77-8.
[2] This poem, as well as one of Ibn al-Mahdi's maghmuma dishes, were compiled in Ibn Sayyar al-Warraq's 10th-century Book of Dishes (كتاب الطبيخ وإصلاح الأغذية المأكولات وطيّبات الأطعمة المصنو; "Kitāb al-ṭabīkh waʔiṣlāḥ al-ʔaghdiyat al-maʔkūlāt waṭayyibāt ʔaṭ'ima al-maṣno," "Book of cookery, food reform, delicacies, and prepared foods"), p. 99 recto. For Nasrallah's English translation see Annals of the Caliph's Kitchens, pp. 313-4.
In the 14th-century Andalusian Cookbook (كتاب الطبيخ في المغرب والأندلس في عصر الموحدين، للمكلف المجهول; "Kitāb al-ṭabīkh fī al-Maghrib wa al-Andalus fī ʻaṣr al-Mawahḥidīn," "Book of cookery from the Maghreb and Andalusia in the era of Almohads"), a maghmuma recipe appears as "لون مغموم لابن المهدى", "maghmum by Ibn al-Mahdi". For an English translation see An Anonymous Andalusian Cookbook, trans. Perry et al.
Ingredients:
For a 6-qt stockpot. Serves 12.
For the meat:
1 recipe seitan lamb
or
2 cups (330g) ground beef substitute
1 cinnamon stick
1 bay laurel leaf
Pinch ground cardamom
Several cracks black pepper
For the dish:
3 cups (600g) Egyptian rice
2 medium-sized globe eggplants
2 large Yukon gold potatoes (optional)
Vegetarian 'chicken' or 'beef' bouillon cube (optional)
2 1/2 tsp table salt (1 1/2 tsp, if using bouillon)
Vegetable oil, to deep-fry
Fried pine nuts or sliced blanched almonds, to top
Egyptian rice is the traditional choice in this dish, but many modern recipes use basmati.
I kept my ingredients list fairly simple, but you can also consider adding cauliflower, carrots, peas, chickpeas, zucchini, bell pepper, and/or tomato to preference (especially if omitting meat substitutes).
For the spices:
1 1/2 Tbsp maqluba spices
or
1 4" piece (3g) cinnamon bark, toasted and ground (1 1/2 tsp ground cinnamon)
3/4 tsp (2.2g) ground turmeric
3/4 tsp (1.5g) cloves, toasted and ground
3/4 tsp (2.2g) black peppercorns, toasted and ground
15 green cardamom pods (4.5g), toasted, seeds removed, and ground (or 3/4 tsp ground cardamom)
Instructions:
For the meat:
1. Prepare the seitan lamb, if using: it will need to be started several hours early, or the night before.
2. If using ground meat: heat 2 tsp oil in a skillet on medium. Add cinnamon stick and bay leaf and fry for 30 seconds until fragrant.
3. Add meat and ground spices and fry, agitating occasionally, until browned. Set aside.
For the dish:
2. Rinse rice 2 to 3 times, until water runs almost clear. Soak in cold water for 30 minutes, while you prepare the vegetables.
3. Optional: to achieve a presentation with eggplant on the sides of the maqluba, remove the skin from either side of one eggplant (so that all slices have flesh exposed on both sides) and then cut lengthwise into 1/2" (1cm)-thick slices.
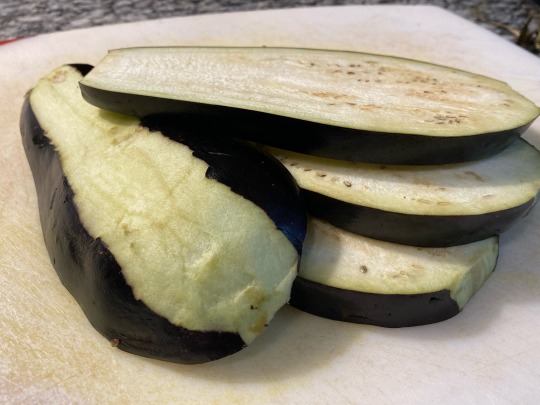
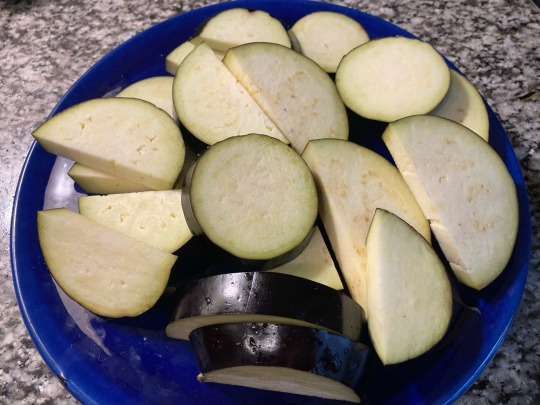
Cut the other eggplant (or both eggplants) widthwise into coins and half-coins.
4. Sprinkle eggplant slices with salt on both sides and leave for 10-15 minutes to release water.
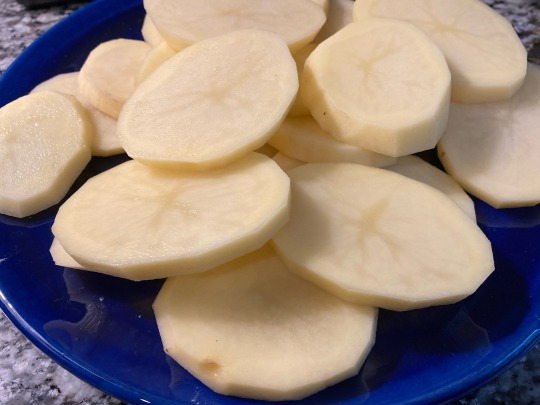
5. Peel potatoes and cut in 1/4" (1/2 cm) slices.
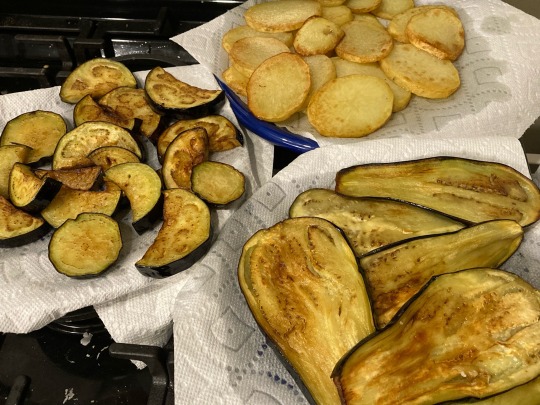
6. Heat about an inch of oil in a deep skillet or wok on medium (a potato slice dropped in should immediately form bubbles). Fry the potato slices until golden brown, then remove onto a paper-towel-lined plate or wire cooling rack.
7. Press eggplant slices on both sides with a towel to remove moisture. Fry in the same oil until translucent and golden brown, then remove as before.
Fry other vegetables (except for tomato, chickpeas, and peas) the same way, if using.
8. Drain rice. Whisk bouillon, salt, and ground spices into several cups of hot water.
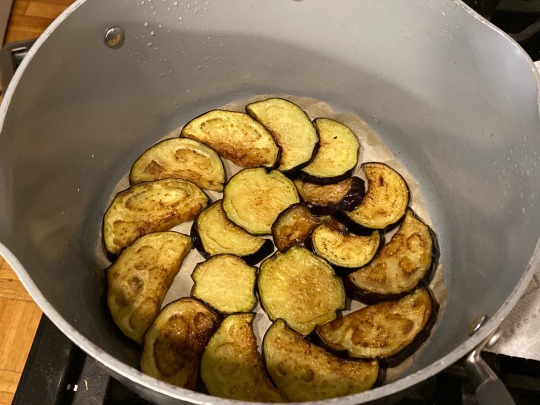
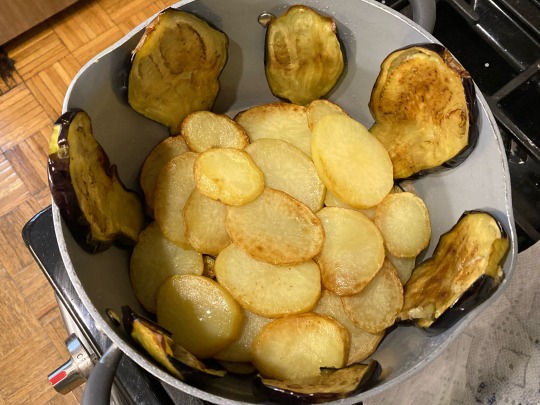
9. Prepare a large, thick-bottomed pot with a circle of oiled parchment paper (or with a layer of sliced tomatoes). Add ground meat, if using. Layer widthwise-sliced eggplants into the pot, followed by potatoes. Place longitudinally sliced eggplants around the sides of the pot, large side up.
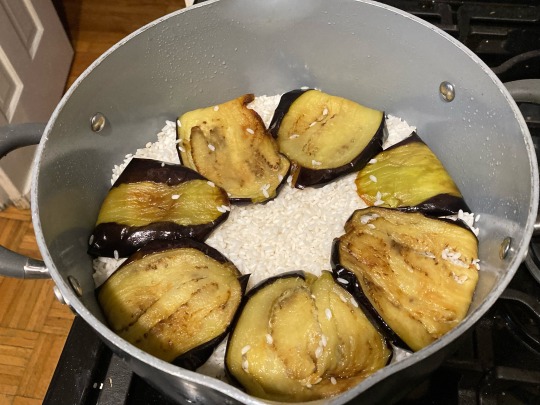
10. Add rice and pack in. Fold eggplant slices down over the rice, if they protrude.
11. Pour broth into the pot, being careful not to upset the rice. Add more water if necessary, so that the rice is covered by about an inch.
12. Heat on medium to bring to a boil. Reduce heat to low, cover with a closely fitting lid, and cook 30 minutes.
13. If rice is not fully cooked after 30 minutes, lightly stir and add another cup of water. Re-cover and cook another 15 minutes. Check again and repeat as necessary.
14. Allow maqluba to rest for half an hour before flipping for best results. Place a large platter upside-down over the mouth of the pot, then flip both over in one smooth motion. Tap the bottom of the pot to release, and leave for a few minutes to allow the maqluba to drop.
15. Slowly lift the pot straight up, rotating slightly if the sides seem stuck.
16. Top with fried seitan lamb, chopped parsley, and fried pine nuts or almonds, as desired.
371 notes
·
View notes
Note
hrhfhfh i was wondering how you achieved these effects on some of your edits ?? i hope you're okay with me asking
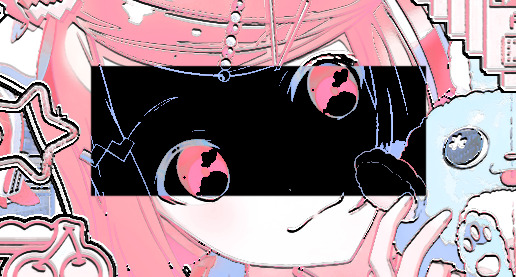
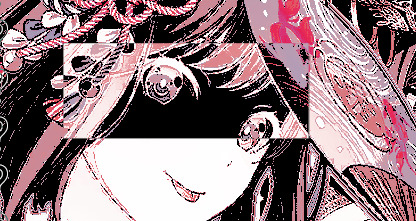
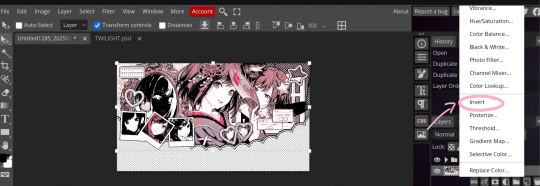
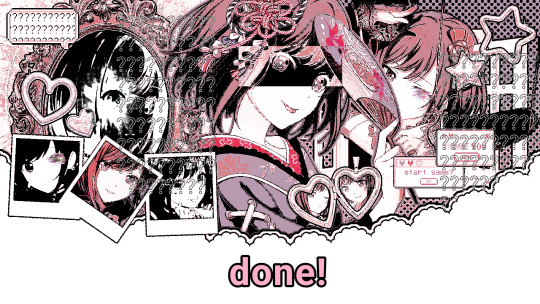
of course, of course! i just use the invert effect on photopea (although i suppose the ibis one also works), then i put the psd layer on top so the colors match
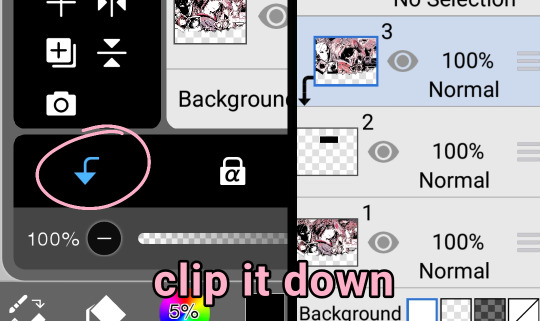
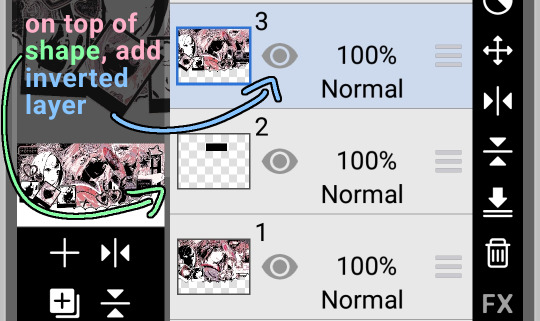
after that, i get a shape (in this case a rectangle), put it where i want the invert effect, then clip the inverted layer!
pictures / tutorial below cut
( psd is by nemuurin !!!! )


hope this clears it up :) feel free to ask any more questions, or ask me to explain in other way if you didnt understand
59 notes
·
View notes
Note
Hi Linda, hope you're well!
Love your comics, both Punderworld and Blood Stain.
From one webcomic artist to another, how do you make your backgrounds? What are your techniques? I would like to make better ones (sometimes I use 3D, but painting a natural one always bugs me)
Cheers from Brasil!
hello! Thank you so much!
The way I do nature is I made myself a lot of foliage brushes over the years which help me block out environments in an easy way, but what's most important is the lighting in all of those scenes. You can have the best brushes in the world but if the lighting is off the environment will not look real. So I always advise to study/observe from real life when going for a walk to learn how colors/light/shadows behave outside during certain part of the day/weather.
Also observing plants and grass and understanding how ground is a variation of different things like pebbles, earth, flowers, dead leaves and grass can help with making your nature look more interesting.


Another thing that's useful is to observe the sky and how time of day impacts the illumination. bright days cast blue shadows, while dusk and sunsets make a lot of distant things silhouetted and simplified.


My basic cheatcode for the sky is to have the gradient from darker color towards the brighter. For stormy weather it will be inverted. (clouds that gather lower will look darker and heavier in the bottom) For ground I like to have a grass field and then on top I add some rocks for variety, some tiny white flowers, some yellow dandelions (all of them are the same oval brush XD) some dry grass poking out, a couple of accents of bushes with branches. and then depending on the time of day I will use hard light layer to drop shadows down, and add some highlights.
Always works!
youtube
this was a rough 20 min sketch just for demonstration purposes.
62 notes
·
View notes