#operating System Tutorials
Explore tagged Tumblr posts
Visit Tumblr Blog
Explore Tumblr blogs with no restrictions, modern design and the best experience.
Last Seen Tumblr Blogs


Fun Fact
Premium Tumblr themes are available from anywhere between $9 to $49.
Text
Newsletter Operating System (Notion Dashboard)

Introducing the Newsletter Operating System (Notion Dashboard)—a comprehensive tool meticulously designed to streamline and enhance your newsletter creation journey. Whether you're an independent writer or planning to launch your own newsletter, this Notion-based dashboard offers an all-in-one solution to curate, write, and grow your publication effectively. Buy now - click here
#notion#notion app#notion productivity#notion database#notion productivity app#notion template#notion table#notion how to#notion pages#personal operating system#notion templates#notion pro#notion dashboard#notion project management#notion setup#operating system#notion knowledge management#notion knowledge hub#notion tutorial#small business systems#business operations system#systems#notion linked#notion operations dashboard
0 notes
Text
if you are on a Windows Operating system and need to take an image of your screen you can use three different options to take a screenshot
print screen button on keyboard - takes an image of the whole screen

alt + print screen - takes an image of just the highlighted window

window key + shift + s - opens the clipping tool allows for you to take whatever size of image you want
Depending on settings within your PC you may save the images to a screenshots folder, or save them to your clipboard where they can be pasted using ctl +v
0 notes
Text
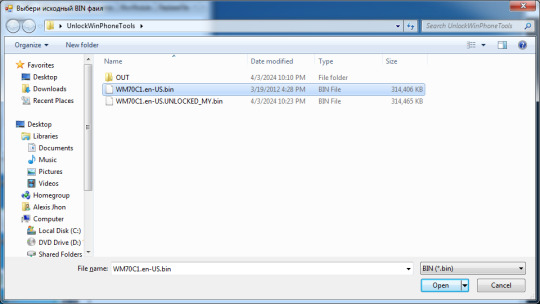
Sidetrack | Unlocking the Windows Phone 7 emulator 14 years later (Part 2)
This is the second part. This post is split into 2 due to photos being limited. Part 1 | Part 2
To rebuild the image (cont'd)
32. Close XIPPort and open BOOOFF.

33. Select NB0->BIN.
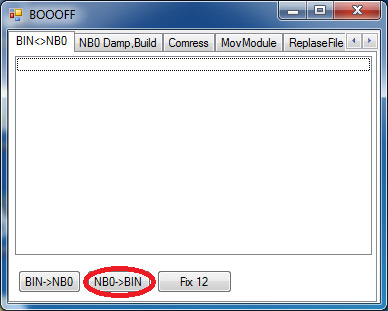
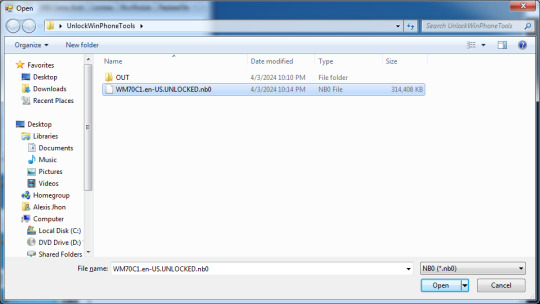
34. Select the .nb0 file XIPPort has generated earlier.
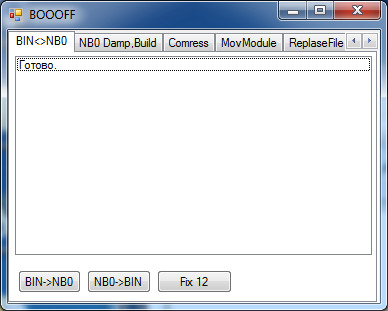
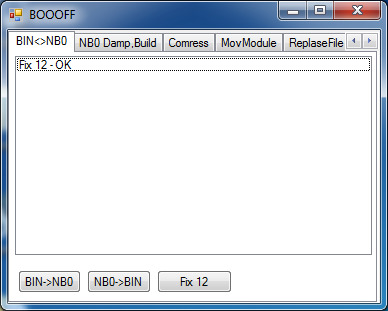
35. You should see this when it succeeds.
36. Select "Fix 12" after that.

37. You should select the unmodified image first...
38. ...and then the modified one.

39. You are officially finished when it says "Fix 12 - OK".
To test the image
Go to the emulator image's directory.
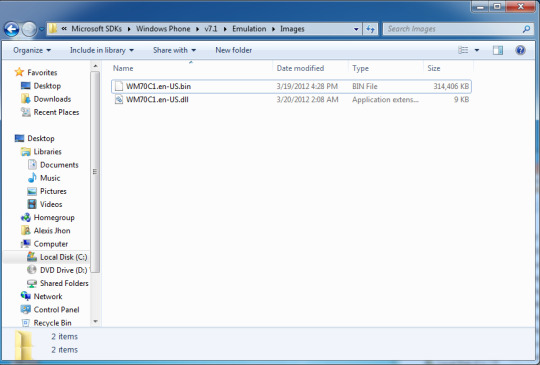
2. Delete the existing one. You will need administrator permissions. 3. Drag-and-drop the new one (via copy or move) to replace it. 4. Rename back the modified bin back to "WM70C1.en-US.bin" or the old filename.
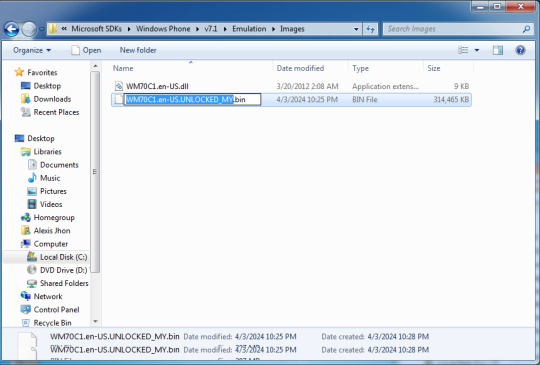
5. If you have the SDK already installed, go to the start menu and go to the "Windows Phone SDK 7.x" folder, and run the emulator as Administrator (Right click and Run as Administrator).
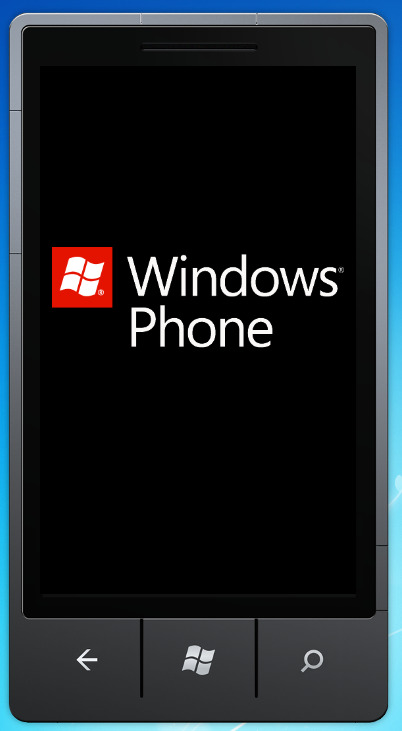
6. An unlocked image should appear with the Windows Phone logo on bootup, but please wait it to load completely. 7. And there you have it! Windows Phone 7 as god intended!

Conclusion
In conclusion, it is a mindbending and a specific task no one probably wanted to do in their free time, except for those with too much time with their hands. Anyways, I hope you enjoyed this sidetrip, and I would glad to say that you will expect new content, more quality content this year! Thank you and see you around!
#windows#windows phone#hacking#modding#tech#technology#mobile#smartphone#phones#operatingsystem#operating systems#tutorial#visual#long reads
1 note
·
View note
Text
iOS 17: Get the Most Out of Your iPhone
Introduction iOS 17 is the latest major version of Apple’s mobile operating system. It was released in September 2023, and it brings a number of new features and improvements to iPhones. In this blog post, we will take a comprehensive look at iOS 17. We will discuss the new features, how to get it, and which iPhones are compatible with it. We will also provide some tips on how to use iOS 17 to…
View On WordPress
#apple#compatibility#download#Improvements#iOS 17#iPhone#New Features#Operating System#release date#Software Update#Tips#Tutorials
1 note
·
View note
Text
How I ditched streaming services and learned to love Linux: A step-by-step guide to building your very own personal media streaming server (V2.0: REVISED AND EXPANDED EDITION)
This is a revised, corrected and expanded version of my tutorial on setting up a personal media server that previously appeared on my old blog (donjuan-auxenfers). I expect that that post is still making the rounds (hopefully with my addendum on modifying group share permissions in Ubuntu to circumvent 0x8007003B "Unexpected Network Error" messages in Windows 10/11 when transferring files) but I have no way of checking. Anyway this new revised version of the tutorial corrects one or two small errors I discovered when rereading what I wrote, adds links to all products mentioned and is just more polished generally. I also expanded it a bit, pointing more adventurous users toward programs such as Sonarr/Radarr/Lidarr and Overseerr which can be used for automating user requests and media collection.
So then, what is this tutorial? This is a tutorial on how to build and set up your own personal media server using Ubuntu as an operating system and Plex (or Jellyfin) to not only manage your media, but to also stream that media to your devices both at home and abroad anywhere in the world where you have an internet connection. Its intent is to show you how building a personal media server and stuffing it full of films, TV, and music that you acquired through indiscriminate and voracious media piracy various legal methods will free you to completely ditch paid streaming services. No more will you have to pay for Disney+, Netflix, HBOMAX, Hulu, Amazon Prime, Peacock, CBS All Access, Paramount+, Crave or any other streaming service that is not named Criterion Channel. Instead whenever you want to watch your favourite films and television shows, you’ll have your own personal service that only features things that you want to see, with files that you have control over. And for music fans out there, both Jellyfin and Plex support music streaming, meaning you can even ditch music streaming services. Goodbye Spotify, Youtube Music, Tidal and Apple Music, welcome back unreasonably large MP3 (or FLAC) collections.
On the hardware front, I’m going to offer a few options catered towards different budgets and media library sizes. The cost of getting a media server up and running using this guide will cost you anywhere from $450 CAD/$325 USD at the low end to $1500 CAD/$1100 USD at the high end (it could go higher). My server was priced closer to the higher figure, but I went and got a lot more storage than most people need. If that seems like a little much, consider for a moment, do you have a roommate, a close friend, or a family member who would be willing to chip in a few bucks towards your little project provided they get access? Well that's how I funded my server. It might also be worth thinking about the cost over time, i.e. how much you spend yearly on subscriptions vs. a one time cost of setting up a server. Additionally there's just the joy of being able to scream "fuck you" at all those show cancelling, library deleting, hedge fund vampire CEOs who run the studios through denying them your money. Drive a stake through David Zaslav's heart.
On the software side I will walk you step-by-step through installing Ubuntu as your server's operating system, configuring your storage as a RAIDz array with ZFS, sharing your zpool to Windows with Samba, running a remote connection between your server and your Windows PC, and then a little about started with Plex/Jellyfin. Every terminal command you will need to input will be provided, and I even share a custom #bash script that will make used vs. available drive space on your server display correctly in Windows.
If you have a different preferred flavour of Linux (Arch, Manjaro, Redhat, Fedora, Mint, OpenSUSE, CentOS, Slackware etc. et. al.) and are aching to tell me off for being basic and using Ubuntu, this tutorial is not for you. The sort of person with a preferred Linux distro is the sort of person who can do this sort of thing in their sleep. Also I don't care. This tutorial is intended for the average home computer user. This is also why we’re not using a more exotic home server solution like running everything through Docker Containers and managing it through a dashboard like Homarr or Heimdall. While such solutions are fantastic and can be very easy to maintain once you have it all set up, wrapping your brain around Docker is a whole thing in and of itself. If you do follow this tutorial and had fun putting everything together, then I would encourage you to return in a year’s time, do your research and set up everything with Docker Containers.
Lastly, this is a tutorial aimed at Windows users. Although I was a daily user of OS X for many years (roughly 2008-2023) and I've dabbled quite a bit with various Linux distributions (mostly Ubuntu and Manjaro), my primary OS these days is Windows 11. Many things in this tutorial will still be applicable to Mac users, but others (e.g. setting up shares) you will have to look up for yourself. I doubt it would be difficult to do so.
Nothing in this tutorial will require feats of computing expertise. All you will need is a basic computer literacy (i.e. an understanding of what a filesystem and directory are, and a degree of comfort in the settings menu) and a willingness to learn a thing or two. While this guide may look overwhelming at first glance, it is only because I want to be as thorough as possible. I want you to understand exactly what it is you're doing, I don't want you to just blindly follow steps. If you half-way know what you’re doing, you will be much better prepared if you ever need to troubleshoot.
Honestly, once you have all the hardware ready it shouldn't take more than an afternoon or two to get everything up and running.
(This tutorial is just shy of seven thousand words long so the rest is under the cut.)
Step One: Choosing Your Hardware
Linux is a light weight operating system, depending on the distribution there's close to no bloat. There are recent distributions available at this very moment that will run perfectly fine on a fourteen year old i3 with 4GB of RAM. Moreover, running Plex or Jellyfin isn’t resource intensive in 90% of use cases. All this is to say, we don’t require an expensive or powerful computer. This means that there are several options available: 1) use an old computer you already have sitting around but aren't using 2) buy a used workstation from eBay, or what I believe to be the best option, 3) order an N100 Mini-PC from AliExpress or Amazon.
Note: If you already have an old PC sitting around that you’ve decided to use, fantastic, move on to the next step.
When weighing your options, keep a few things in mind: the number of people you expect to be streaming simultaneously at any one time, the resolution and bitrate of your media library (4k video takes a lot more processing power than 1080p) and most importantly, how many of those clients are going to be transcoding at any one time. Transcoding is what happens when the playback device does not natively support direct playback of the source file. This can happen for a number of reasons, such as the playback device's native resolution being lower than the file's internal resolution, or because the source file was encoded in a video codec unsupported by the playback device.
Ideally we want any transcoding to be performed by hardware. This means we should be looking for a computer with an Intel processor with Quick Sync. Quick Sync is a dedicated core on the CPU die designed specifically for video encoding and decoding. This specialized hardware makes for highly efficient transcoding both in terms of processing overhead and power draw. Without these Quick Sync cores, transcoding must be brute forced through software. This takes up much more of a CPU’s processing power and requires much more energy. But not all Quick Sync cores are created equal and you need to keep this in mind if you've decided either to use an old computer or to shop for a used workstation on eBay
Any Intel processor from second generation Core (Sandy Bridge circa 2011) onward has Quick Sync cores. It's not until 6th gen (Skylake), however, that the cores support the H.265 HEVC codec. Intel’s 10th gen (Comet Lake) processors introduce support for 10bit HEVC and HDR tone mapping. And the recent 12th gen (Alder Lake) processors brought with them hardware AV1 decoding. As an example, while an 8th gen (Kaby Lake) i5-8500 will be able to hardware transcode a H.265 encoded file, it will fall back to software transcoding if given a 10bit H.265 file. If you’ve decided to use that old PC or to look on eBay for an old Dell Optiplex keep this in mind.
Note 1: The price of old workstations varies wildly and fluctuates frequently. If you get lucky and go shopping shortly after a workplace has liquidated a large number of their workstations you can find deals for as low as $100 on a barebones system, but generally an i5-8500 workstation with 16gb RAM will cost you somewhere in the area of $260 CAD/$200 USD.
Note 2: The AMD equivalent to Quick Sync is called Video Core Next, and while it's fine, it's not as efficient and not as mature a technology. It was only introduced with the first generation Ryzen CPUs and it only got decent with their newest CPUs, we want something cheap.
Alternatively you could forgo having to keep track of what generation of CPU is equipped with Quick Sync cores that feature support for which codecs, and just buy an N100 mini-PC. For around the same price or less of a used workstation you can pick up a mini-PC with an Intel N100 processor. The N100 is a four-core processor based on the 12th gen Alder Lake architecture and comes equipped with the latest revision of the Quick Sync cores. These little processors offer astounding hardware transcoding capabilities for their size and power draw. Otherwise they perform equivalent to an i5-6500, which isn't a terrible CPU. A friend of mine uses an N100 machine as a dedicated retro emulation gaming system and it does everything up to 6th generation consoles just fine. The N100 is also a remarkably efficient chip, it sips power. In fact, the difference between running one of these and an old workstation could work out to hundreds of dollars a year in energy bills depending on where you live.
You can find these Mini-PCs all over Amazon or for a little cheaper on AliExpress. They range in price from $170 CAD/$125 USD for a no name N100 with 8GB RAM to $280 CAD/$200 USD for a Beelink S12 Pro with 16GB RAM. The brand doesn't really matter, they're all coming from the same three factories in Shenzen, go for whichever one fits your budget or has features you want. 8GB RAM should be enough, Linux is lightweight and Plex only calls for 2GB RAM. 16GB RAM might result in a slightly snappier experience, especially with ZFS. A 256GB SSD is more than enough for what we need as a boot drive, but going for a bigger drive might allow you to get away with things like creating preview thumbnails for Plex, but it’s up to you and your budget.
The Mini-PC I wound up buying was a Firebat AK2 Plus with 8GB RAM and a 256GB SSD. It looks like this:

Note: Be forewarned that if you decide to order a Mini-PC from AliExpress, note the type of power adapter it ships with. The mini-PC I bought came with an EU power adapter and I had to supply my own North American power supply. Thankfully this is a minor issue as barrel plug 30W/12V/2.5A power adapters are easy to find and can be had for $10.
Step Two: Choosing Your Storage
Storage is the most important part of our build. It is also the most expensive. Thankfully it’s also the most easily upgrade-able down the line.
For people with a smaller media collection (4TB to 8TB), a more limited budget, or who will only ever have two simultaneous streams running, I would say that the most economical course of action would be to buy a USB 3.0 8TB external HDD. Something like this one from Western Digital or this one from Seagate. One of these external drives will cost you in the area of $200 CAD/$140 USD. Down the line you could add a second external drive or replace it with a multi-drive RAIDz set up such as detailed below.
If a single external drive the path for you, move on to step three.
For people with larger media libraries (12TB+), who prefer media in 4k, or care who about data redundancy, the answer is a RAID array featuring multiple HDDs in an enclosure.
Note: If you are using an old PC or used workstatiom as your server and have the room for at least three 3.5" drives, and as many open SATA ports on your mother board you won't need an enclosure, just install the drives into the case. If your old computer is a laptop or doesn’t have room for more internal drives, then I would suggest an enclosure.
The minimum number of drives needed to run a RAIDz array is three, and seeing as RAIDz is what we will be using, you should be looking for an enclosure with three to five bays. I think that four disks makes for a good compromise for a home server. Regardless of whether you go for a three, four, or five bay enclosure, do be aware that in a RAIDz array the space equivalent of one of the drives will be dedicated to parity at a ratio expressed by the equation 1 − 1/n i.e. in a four bay enclosure equipped with four 12TB drives, if we configured our drives in a RAIDz1 array we would be left with a total of 36TB of usable space (48TB raw size). The reason for why we might sacrifice storage space in such a manner will be explained in the next section.
A four bay enclosure will cost somewhere in the area of $200 CDN/$140 USD. You don't need anything fancy, we don't need anything with hardware RAID controls (RAIDz is done entirely in software) or even USB-C. An enclosure with USB 3.0 will perform perfectly fine. Don’t worry too much about USB speed bottlenecks. A mechanical HDD will be limited by the speed of its mechanism long before before it will be limited by the speed of a USB connection. I've seen decent looking enclosures from TerraMaster, Yottamaster, Mediasonic and Sabrent.
When it comes to selecting the drives, as of this writing, the best value (dollar per gigabyte) are those in the range of 12TB to 20TB. I settled on 12TB drives myself. If 12TB to 20TB drives are out of your budget, go with what you can afford, or look into refurbished drives. I'm not sold on the idea of refurbished drives but many people swear by them.
When shopping for harddrives, search for drives designed specifically for NAS use. Drives designed for NAS use typically have better vibration dampening and are designed to be active 24/7. They will also often make use of CMR (conventional magnetic recording) as opposed to SMR (shingled magnetic recording). This nets them a sizable read/write performance bump over typical desktop drives. Seagate Ironwolf and Toshiba NAS are both well regarded brands when it comes to NAS drives. I would avoid Western Digital Red drives at this time. WD Reds were a go to recommendation up until earlier this year when it was revealed that they feature firmware that will throw up false SMART warnings telling you to replace the drive at the three year mark quite often when there is nothing at all wrong with that drive. It will likely even be good for another six, seven, or more years.

Step Three: Installing Linux
For this step you will need a USB thumbdrive of at least 6GB in capacity, an .ISO of Ubuntu, and a way to make that thumbdrive bootable media.
First download a copy of Ubuntu desktop (for best performance we could download the Server release, but for new Linux users I would recommend against the server release. The server release is strictly command line interface only, and having a GUI is very helpful for most people. Not many people are wholly comfortable doing everything through the command line, I'm certainly not one of them, and I grew up with DOS 6.0. 22.04.3 Jammy Jellyfish is the current Long Term Service release, this is the one to get.
Download the .ISO and then download and install balenaEtcher on your Windows PC. BalenaEtcher is an easy to use program for creating bootable media, you simply insert your thumbdrive, select the .ISO you just downloaded, and it will create a bootable installation media for you.
Once you've made a bootable media and you've got your Mini-PC (or you old PC/used workstation) in front of you, hook it directly into your router with an ethernet cable, and then plug in the HDD enclosure, a monitor, a mouse and a keyboard. Now turn that sucker on and hit whatever key gets you into the BIOS (typically ESC, DEL or F2). If you’re using a Mini-PC check to make sure that the P1 and P2 power limits are set correctly, my N100's P1 limit was set at 10W, a full 20W under the chip's power limit. Also make sure that the RAM is running at the advertised speed. My Mini-PC’s RAM was set at 2333Mhz out of the box when it should have been 3200Mhz. Once you’ve done that, key over to the boot order and place the USB drive first in the boot order. Then save the BIOS settings and restart.
After you restart you’ll be greeted by Ubuntu's installation screen. Installing Ubuntu is really straight forward, select the "minimal" installation option, as we won't need anything on this computer except for a browser (Ubuntu comes preinstalled with Firefox) and Plex Media Server/Jellyfin Media Server. Also remember to delete and reformat that Windows partition! We don't need it.
Step Four: Installing ZFS and Setting Up the RAIDz Array
Note: If you opted for just a single external HDD skip this step and move onto setting up a Samba share.
Once Ubuntu is installed it's time to configure our storage by installing ZFS to build our RAIDz array. ZFS is a "next-gen" file system that is both massively flexible and massively complex. It's capable of snapshot backup, self healing error correction, ZFS pools can be configured with drives operating in a supplemental manner alongside the storage vdev (e.g. fast cache, dedicated secondary intent log, hot swap spares etc.). It's also a file system very amenable to fine tuning. Block and sector size are adjustable to use case and you're afforded the option of different methods of inline compression. If you'd like a very detailed overview and explanation of its various features and tips on tuning a ZFS array check out these articles from Ars Technica. For now we're going to ignore all these features and keep it simple, we're going to pull our drives together into a single vdev running in RAIDz which will be the entirety of our zpool, no fancy cache drive or SLOG.
Open up the terminal and type the following commands:
sudo apt update
then
sudo apt install zfsutils-linux
This will install the ZFS utility. Verify that it's installed with the following command:
zfs --version
Now, it's time to check that the HDDs we have in the enclosure are healthy, running, and recognized. We also want to find out their device IDs and take note of them:
sudo fdisk -1
Note: You might be wondering why some of these commands require "sudo" in front of them while others don't. "Sudo" is short for "super user do”. When and where "sudo" is used has to do with the way permissions are set up in Linux. Only the "root" user has the access level to perform certain tasks in Linux. As a matter of security and safety regular user accounts are kept separate from the "root" user. It's not advised (or even possible) to boot into Linux as "root" with most modern distributions. Instead by using "sudo" our regular user account is temporarily given the power to do otherwise forbidden things. Don't worry about it too much at this stage, but if you want to know more check out this introduction.
If everything is working you should get a list of the various drives detected along with their device IDs which will look like this: /dev/sdc. You can also check the device IDs of the drives by opening the disk utility app. Jot these IDs down as we'll need them for our next step, creating our RAIDz array.
RAIDz is similar to RAID-5 in that instead of striping your data over multiple disks, exchanging redundancy for speed and available space (RAID-0), or mirroring your data writing by two copies of every piece (RAID-1), it instead writes parity blocks across the disks in addition to striping, this provides a balance of speed, redundancy and available space. If a single drive fails, the parity blocks on the working drives can be used to reconstruct the entire array as soon as a replacement drive is added.
Additionally, RAIDz improves over some of the common RAID-5 flaws. It's more resilient and capable of self healing, as it is capable of automatically checking for errors against a checksum. It's more forgiving in this way, and it's likely that you'll be able to detect when a drive is dying well before it fails. A RAIDz array can survive the loss of any one drive.
Note: While RAIDz is indeed resilient, if a second drive fails during the rebuild, you're fucked. Always keep backups of things you can't afford to lose. This tutorial, however, is not about proper data safety.
To create the pool, use the following command:
sudo zpool create "zpoolnamehere" raidz "device IDs of drives we're putting in the pool"
For example, let's creatively name our zpool "mypool". This poil will consist of four drives which have the device IDs: sdb, sdc, sdd, and sde. The resulting command will look like this:
sudo zpool create mypool raidz /dev/sdb /dev/sdc /dev/sdd /dev/sde
If as an example you bought five HDDs and decided you wanted more redundancy dedicating two drive to this purpose, we would modify the command to "raidz2" and the command would look something like the following:
sudo zpool create mypool raidz2 /dev/sdb /dev/sdc /dev/sdd /dev/sde /dev/sdf
An array configured like this is known as RAIDz2 and is able to survive two disk failures.
Once the zpool has been created, we can check its status with the command:
zpool status
Or more concisely with:
zpool list
The nice thing about ZFS as a file system is that a pool is ready to go immediately after creation. If we were to set up a traditional RAID-5 array using mbam, we'd have to sit through a potentially hours long process of reformatting and partitioning the drives. Instead we're ready to go right out the gates.
The zpool should be automatically mounted to the filesystem after creation, check on that with the following:
df -hT | grep zfs
Note: If your computer ever loses power suddenly, say in event of a power outage, you may have to re-import your pool. In most cases, ZFS will automatically import and mount your pool, but if it doesn’t and you can't see your array, simply open the terminal and type sudo zpool import -a.
By default a zpool is mounted at /"zpoolname". The pool should be under our ownership but let's make sure with the following command:
sudo chown -R "yourlinuxusername" /"zpoolname"
Note: Changing file and folder ownership with "chown" and file and folder permissions with "chmod" are essential commands for much of the admin work in Linux, but we won't be dealing with them extensively in this guide. If you'd like a deeper tutorial and explanation you can check out these two guides: chown and chmod.

You can access the zpool file system through the GUI by opening the file manager (the Ubuntu default file manager is called Nautilus) and clicking on "Other Locations" on the sidebar, then entering the Ubuntu file system and looking for a folder with your pool's name. Bookmark the folder on the sidebar for easy access.

Your storage pool is now ready to go. Assuming that we already have some files on our Windows PC we want to copy to over, we're going to need to install and configure Samba to make the pool accessible in Windows.
Step Five: Setting Up Samba/Sharing
Samba is what's going to let us share the zpool with Windows and allow us to write to it from our Windows machine. First let's install Samba with the following commands:
sudo apt-get update
then
sudo apt-get install samba
Next create a password for Samba.
sudo smbpswd -a "yourlinuxusername"
It will then prompt you to create a password. Just reuse your Ubuntu user password for simplicity's sake.
Note: if you're using just a single external drive replace the zpool location in the following commands with wherever it is your external drive is mounted, for more information see this guide on mounting an external drive in Ubuntu.
After you've created a password we're going to create a shareable folder in our pool with this command
mkdir /"zpoolname"/"foldername"
Now we're going to open the smb.conf file and make that folder shareable. Enter the following command.
sudo nano /etc/samba/smb.conf
This will open the .conf file in nano, the terminal text editor program. Now at the end of smb.conf add the following entry:
["foldername"]
path = /"zpoolname"/"foldername"
available = yes
valid users = "yourlinuxusername"
read only = no
writable = yes
browseable = yes
guest ok = no
Ensure that there are no line breaks between the lines and that there's a space on both sides of the equals sign. Our next step is to allow Samba traffic through the firewall:
sudo ufw allow samba
Finally restart the Samba service:
sudo systemctl restart smbd
At this point we'll be able to access to the pool, browse its contents, and read and write to it from Windows. But there's one more thing left to do, Windows doesn't natively support the ZFS file systems and will read the used/available/total space in the pool incorrectly. Windows will read available space as total drive space, and all used space as null. This leads to Windows only displaying a dwindling amount of "available" space as the drives are filled. We can fix this! Functionally this doesn't actually matter, we can still write and read to and from the disk, it just makes it difficult to tell at a glance the proportion of used/available space, so this is an optional step but one I recommend (this step is also unnecessary if you're just using a single external drive). What we're going to do is write a little shell script in #bash. Open nano with the terminal with the command:
nano
Now insert the following code:
#!/bin/bash CUR_PATH=`pwd` ZFS_CHECK_OUTPUT=$(zfs get type $CUR_PATH 2>&1 > /dev/null) > /dev/null if [[ $ZFS_CHECK_OUTPUT == *not\ a\ ZFS* ]] then IS_ZFS=false else IS_ZFS=true fi if [[ $IS_ZFS = false ]] then df $CUR_PATH | tail -1 | awk '{print $2" "$4}' else USED=$((`zfs get -o value -Hp used $CUR_PATH` / 1024)) > /dev/null AVAIL=$((`zfs get -o value -Hp available $CUR_PATH` / 1024)) > /dev/null TOTAL=$(($USED+$AVAIL)) > /dev/null echo $TOTAL $AVAIL fi
Save the script as "dfree.sh" to /home/"yourlinuxusername" then change the ownership of the file to make it executable with this command:
sudo chmod 774 dfree.sh
Now open smb.conf with sudo again:
sudo nano /etc/samba/smb.conf
Now add this entry to the top of the configuration file to direct Samba to use the results of our script when Windows asks for a reading on the pool's used/available/total drive space:
[global]
dfree command = /home/"yourlinuxusername"/dfree.sh
Save the changes to smb.conf and then restart Samba again with the terminal:
sudo systemctl restart smbd
Now there’s one more thing we need to do to fully set up the Samba share, and that’s to modify a hidden group permission. In the terminal window type the following command:
usermod -a -G sambashare “yourlinuxusername”
Then restart samba again:
sudo systemctl restart smbd
If we don’t do this last step, everything will appear to work fine, and you will even be able to see and map the drive from Windows and even begin transferring files, but you'd soon run into a lot of frustration. As every ten minutes or so a file would fail to transfer and you would get a window announcing “0x8007003B Unexpected Network Error”. This window would require your manual input to continue the transfer with the file next in the queue. And at the end it would reattempt to transfer whichever files failed the first time around. 99% of the time they’ll go through that second try, but this is still all a major pain in the ass. Especially if you’ve got a lot of data to transfer or you want to step away from the computer for a while.
It turns out samba can act a little weirdly with the higher read/write speeds of RAIDz arrays and transfers from Windows, and will intermittently crash and restart itself if this group option isn’t changed. Inputting the above command will prevent you from ever seeing that window.
The last thing we're going to do before switching over to our Windows PC is grab the IP address of our Linux machine. Enter the following command:
hostname -I
This will spit out this computer's IP address on the local network (it will look something like 192.168.0.x), write it down. It might be a good idea once you're done here to go into your router settings and reserving that IP for your Linux system in the DHCP settings. Check the manual for your specific model router on how to access its settings, typically it can be accessed by opening a browser and typing http:\\192.168.0.1 in the address bar, but your router may be different.
Okay we’re done with our Linux computer for now. Get on over to your Windows PC, open File Explorer, right click on Network and click "Map network drive". Select Z: as the drive letter (you don't want to map the network drive to a letter you could conceivably be using for other purposes) and enter the IP of your Linux machine and location of the share like so: \\"LINUXCOMPUTERLOCALIPADDRESSGOESHERE"\"zpoolnamegoeshere"\. Windows will then ask you for your username and password, enter the ones you set earlier in Samba and you're good. If you've done everything right it should look something like this:

You can now start moving media over from Windows to the share folder. It's a good idea to have a hard line running to all machines. Moving files over Wi-Fi is going to be tortuously slow, the only thing that’s going to make the transfer time tolerable (hours instead of days) is a solid wired connection between both machines and your router.
Step Six: Setting Up Remote Desktop Access to Your Server
After the server is up and going, you’ll want to be able to access it remotely from Windows. Barring serious maintenance/updates, this is how you'll access it most of the time. On your Linux system open the terminal and enter:
sudo apt install xrdp
Then:
sudo systemctl enable xrdp
Once it's finished installing, open “Settings” on the sidebar and turn off "automatic login" in the User category. Then log out of your account. Attempting to remotely connect to your Linux computer while you’re logged in will result in a black screen!
Now get back on your Windows PC, open search and look for "RDP". A program called "Remote Desktop Connection" should pop up, open this program as an administrator by right-clicking and selecting “run as an administrator”. You’ll be greeted with a window. In the field marked “Computer” type in the IP address of your Linux computer. Press connect and you'll be greeted with a new window and prompt asking for your username and password. Enter your Ubuntu username and password here.

If everything went right, you’ll be logged into your Linux computer. If the performance is sluggish, adjust the display options. Lowering the resolution and colour depth do a lot to make the interface feel snappier.

Remote access is how we're going to be using our Linux system from now, barring edge cases like needing to get into the BIOS or upgrading to a new version of Ubuntu. Everything else from performing maintenance like a monthly zpool scrub to checking zpool status and updating software can all be done remotely.

This is how my server lives its life now, happily humming and chirping away on the floor next to the couch in a corner of the living room.
Step Seven: Plex Media Server/Jellyfin
Okay we’ve got all the ground work finished and our server is almost up and running. We’ve got Ubuntu up and running, our storage array is primed, we’ve set up remote connections and sharing, and maybe we’ve moved over some of favourite movies and TV shows.
Now we need to decide on the media server software to use which will stream our media to us and organize our library. For most people I’d recommend Plex. It just works 99% of the time. That said, Jellyfin has a lot to recommend it by too, even if it is rougher around the edges. Some people run both simultaneously, it’s not that big of an extra strain. I do recommend doing a little bit of your own research into the features each platform offers, but as a quick run down, consider some of the following points:
Plex is closed source and is funded through PlexPass purchases while Jellyfin is open source and entirely user driven. This means a number of things: for one, Plex requires you to purchase a “PlexPass” (purchased as a one time lifetime fee $159.99 CDN/$120 USD or paid for on a monthly or yearly subscription basis) in order to access to certain features, like hardware transcoding (and we want hardware transcoding) or automated intro/credits detection and skipping, Jellyfin offers some of these features for free through plugins. Plex supports a lot more devices than Jellyfin and updates more frequently. That said, Jellyfin's Android and iOS apps are completely free, while the Plex Android and iOS apps must be activated for a one time cost of $6 CDN/$5 USD. But that $6 fee gets you a mobile app that is much more functional and features a unified UI across platforms, the Plex mobile apps are simply a more polished experience. The Jellyfin apps are a bit of a mess and the iOS and Android versions are very different from each other.
Jellyfin’s actual media player is more fully featured than Plex's, but on the other hand Jellyfin's UI, library customization and automatic media tagging really pale in comparison to Plex. Streaming your music library is free through both Jellyfin and Plex, but Plex offers the PlexAmp app for dedicated music streaming which boasts a number of fantastic features, unfortunately some of those fantastic features require a PlexPass. If your internet is down, Jellyfin can still do local streaming, while Plex can fail to play files unless you've got it set up a certain way. Jellyfin has a slew of neat niche features like support for Comic Book libraries with the .cbz/.cbt file types, but then Plex offers some free ad-supported TV and films, they even have a free channel that plays nothing but Classic Doctor Who.
Ultimately it's up to you, I settled on Plex because although some features are pay-walled, it just works. It's more reliable and easier to use, and a one-time fee is much easier to swallow than a subscription. I had a pretty easy time getting my boomer parents and tech illiterate brother introduced to and using Plex and I don't know if I would've had as easy a time doing that with Jellyfin. I do also need to mention that Jellyfin does take a little extra bit of tinkering to get going in Ubuntu, you’ll have to set up process permissions, so if you're more tolerant to tinkering, Jellyfin might be up your alley and I’ll trust that you can follow their installation and configuration guide. For everyone else, I recommend Plex.
So pick your poison: Plex or Jellyfin.
Note: The easiest way to download and install either of these packages in Ubuntu is through Snap Store.
After you've installed one (or both), opening either app will launch a browser window into the browser version of the app allowing you to set all the options server side.
The process of adding creating media libraries is essentially the same in both Plex and Jellyfin. You create a separate libraries for Television, Movies, and Music and add the folders which contain the respective types of media to their respective libraries. The only difficult or time consuming aspect is ensuring that your files and folders follow the appropriate naming conventions:
Plex naming guide for Movies
Plex naming guide for Television
Jellyfin follows the same naming rules but I find their media scanner to be a lot less accurate and forgiving than Plex. Once you've selected the folders to be scanned the service will scan your files, tagging everything and adding metadata. Although I find do find Plex more accurate, it can still erroneously tag some things and you might have to manually clean up some tags in a large library. (When I initially created my library it tagged the 1963-1989 Doctor Who as some Korean soap opera and I needed to manually select the correct match after which everything was tagged normally.) It can also be a bit testy with anime (especially OVAs) be sure to check TVDB to ensure that you have your files and folders structured and named correctly. If something is not showing up at all, double check the name.
Once that's done, organizing and customizing your library is easy. You can set up collections, grouping items together to fit a theme or collect together all the entries in a franchise. You can make playlists, and add custom artwork to entries. It's fun setting up collections with posters to match, there are even several websites dedicated to help you do this like PosterDB. As an example, below are two collections in my library, one collecting all the entries in a franchise, the other follows a theme.

My Star Trek collection, featuring all eleven television series, and thirteen films.

My Best of the Worst collection, featuring sixty-nine films previously showcased on RedLetterMedia’s Best of the Worst. They’re all absolutely terrible and I love them.
As for settings, ensure you've got Remote Access going, it should work automatically and be sure to set your upload speed after running a speed test. In the library settings set the database cache to 2000MB to ensure a snappier and more responsive browsing experience, and then check that playback quality is set to original/maximum. If you’re severely bandwidth limited on your upload and have remote users, you might want to limit the remote stream bitrate to something more reasonable, just as a note of comparison Netflix’s 1080p bitrate is approximately 5Mbps, although almost anyone watching through a chromium based browser is streaming at 720p and 3mbps. Other than that you should be good to go. For actually playing your files, there's a Plex app for just about every platform imaginable. I mostly watch television and films on my laptop using the Windows Plex app, but I also use the Android app which can broadcast to the chromecast connected to the TV in the office and the Android TV app for our smart TV. Both are fully functional and easy to navigate, and I can also attest to the OS X version being equally functional.
Part Eight: Finding Media
Now, this is not really a piracy tutorial, there are plenty of those out there. But if you’re unaware, BitTorrent is free and pretty easy to use, just pick a client (qBittorrent is the best) and go find some public trackers to peruse. Just know now that all the best trackers are private and invite only, and that they can be exceptionally difficult to get into. I’m already on a few, and even then, some of the best ones are wholly out of my reach.
If you decide to take the left hand path and turn to Usenet you’ll have to pay. First you’ll need to sign up with a provider like Newshosting or EasyNews for access to Usenet itself, and then to actually find anything you’re going to need to sign up with an indexer like NZBGeek or NZBFinder. There are dozens of indexers, and many people cross post between them, but for more obscure media it’s worth checking multiple. You’ll also need a binary downloader like SABnzbd. That caveat aside, Usenet is faster, bigger, older, less traceable than BitTorrent, and altogether slicker. I honestly prefer it, and I'm kicking myself for taking this long to start using it because I was scared off by the price. I’ve found so many things on Usenet that I had sought in vain elsewhere for years, like a 2010 Italian film about a massacre perpetrated by the SS that played the festival circuit but never received a home media release; some absolute hero uploaded a rip of a festival screener DVD to Usenet. Anyway, figure out the rest of this shit on your own and remember to use protection, get yourself behind a VPN, use a SOCKS5 proxy with your BitTorrent client, etc.
On the legal side of things, if you’re around my age, you (or your family) probably have a big pile of DVDs and Blu-Rays sitting around unwatched and half forgotten. Why not do a bit of amateur media preservation, rip them and upload them to your server for easier access? (Your tools for this are going to be Handbrake to do the ripping and AnyDVD to break any encryption.) I went to the trouble of ripping all my SCTV DVDs (five box sets worth) because none of it is on streaming nor could it be found on any pirate source I tried. I’m glad I did, forty years on it’s still one of the funniest shows to ever be on TV.
Part Nine/Epilogue: Sonarr/Radarr/Lidarr and Overseerr
There are a lot of ways to automate your server for better functionality or to add features you and other users might find useful. Sonarr, Radarr, and Lidarr are a part of a suite of “Servarr” services (there’s also Readarr for books and Whisparr for adult content) that allow you to automate the collection of new episodes of TV shows (Sonarr), new movie releases (Radarr) and music releases (Lidarr). They hook in to your BitTorrent client or Usenet binary newsgroup downloader and crawl your preferred Torrent trackers and Usenet indexers, alerting you to new releases and automatically grabbing them. You can also use these services to manually search for new media, and even replace/upgrade your existing media with better quality uploads. They’re really a little tricky to set up on a bare metal Ubuntu install (ideally you should be running them in Docker Containers), and I won’t be providing a step by step on installing and running them, I’m simply making you aware of their existence.
The other bit of kit I want to make you aware of is Overseerr which is a program that scans your Plex media library and will serve recommendations based on what you like. It also allows you and your users to request specific media. It can even be integrated with Sonarr/Radarr/Lidarr so that fulfilling those requests is fully automated.
And you're done. It really wasn't all that hard. Enjoy your media. Enjoy the control you have over that media. And be safe in the knowledge that no hedgefund CEO motherfucker who hates the movies but who is somehow in control of a major studio will be able to disappear anything in your library as a tax write-off.
1K notes
·
View notes
Text
Venus enters Taurus
*A good time to create comfort and stability in your home and relationships. It’s giving self-care, cozy vibes, and movie night energy.
*Potential to attract abundance through creativity, beauty or natural talents.
*Watch out for control issues around money, security and relationships.
*Wardrobe, space updates, self- care focused around pleasure and comfort are key.
Where is Taurus in your chart ? Ground yourself there for abundance and beauty in your life.
*Most affected*:
Earth sign placements ( Taurus, Virgo, Capricorn )
Libra rising
Strong 2nd house placements
Taurus in 1st House :
BIG potential for glo ups if you focus on what YOU are called to look like, or the styles you've 'always wanted' to embrace.
Aesthetics that enhance your natural features will give you increased confidence, unexpected compliments and access to different rooms.
2nd House :
Your talents, creative projects, and natural beauty/charm are magnets when you guard against scarcity mindsets and limiting beliefs; You may find yourself buying things of lasting value or feeling a stronger sense of self worth.
Make sure your personal space (especially floors, kitchen, entryway) is clean to avoid energetic blockage
3rd House:
Communication could be more meaningful or more sensual/flirty. Baecations, romantic gestures & I love you’s may be exchanged for the first time or more freely than before.
You and your siblings may be leaning on each other or spending more time.
4th House:
Customizing or decorating your home environment to your liking to be able to ground yourself more easily is a major investment.
Treating yourself by disappearing into your happy place for a bit , nesting , and redefining what it means to fill your own cup first can bring much emotional stability.
5th House:
The urge to create different looks/art forms and engage in fun leisure activities will be heavily present.
Take this time for things you genuinely enjoy, including making art/projects alone if necessary
6th House:
Refine your self care and beauty routines to get your desired results. Watch or launch tutorials for new ideas.
If you don’t make time for mindful sleeping, eating, and rest vs activity patterns, your body (nervous & immune systems) will do it for you…
7th House:
Work on building long lasting relationships through quality time and paying more attention to ways you choose to show up for others.
Side note: How is your appearance and attitude positively or negatively affecting your home and work life ?
8th House:
There may be a challenge to let go and embrace the vulnerability that comes with uncomfortable conversations to get to the peaceful place on the other side…
Are there any issues that were swept under the rug that you need to address to protect your peace ?
Avoid being too attached to “mine” or control in your relationships and money.
9th House:
Try to have back up plans in play and be flexible, not frustrated, when things don’t go as planned. Redirection is a blessing and protection.
Do not dismiss anyone’s experience just because it doesn’t match your own, instead be open to learning different ways of operating.
10th House:
Delays in moving up/securing “good” jobs and overall career path may make you feel stuck.
When you find work in environments that are aligned with your natural interests, values, and talents (instead of staying in positions you chose in survival mode) you will be more fulfilled.
11th House:
Take others’ perspective into account, especially when it differs from yours,not only to avoid unnecessary tensions but to grow. You can relate to more people than you may think.
If you are feeling discomfort with larger crowds, focus on building just a few good connections. Find the partnerships that refresh you and share your values and cling to those instead of unhealthy ones.
12th House:
Getting some ‘beauty’ rest and taking the time to recharge, whatever that looks like for YOU, is essential. Learn to embrace your solitude and dig deeper into yourself and what makes YOU feel good.
This is a good time for dreamwork and overnight beauty rituals as well.
Spicy take : Hidden desires and private romances may occur.
#astrology#taurus#venus#venus in taurus#astro calendar#astrology content#astrology notes#astro notes#astro observations
106 notes
·
View notes
Note
do i have to play undertale to play deltarune? i don't know anything baout undertale but i've your deltarune art and it's making me want to play
not necessarily! we don't entirely know how dr and ut connect right now but the prevailing theory is that it's sort of simultaneously a prequel and an alternate universe. you might miss out on certain easter eggs and you're definitely going to have a handicap in the fandom/theory space if you don't know much about undertale, but the actual story of deltarune stands basically completely on its own. the only major gameplay-related handicap you might have is related to certain aspects of combat--deltarune kind of assumes that you played through the tutorial battles that exist in undertale and therefore doesn't explain the basic tenants of the combat system, only the new elements it adds. most of the combat is still pretty intuitive, but you might want to look up what different colored bullets mean and how they behave as well as what different colored soul hearts can do. the game is still pretty good at teaching you as you go, though!
I would also caution you as someone who knows nothing/very little about undertale to be sure you're not expecting deltarune to function in the same way as a "normal" video game. Undertale sort of like. eases the the player in to its meta-ness and critique of the system in which it operates, whereas deltarune seems to assume that the player has already had that primer and therefore launches you straight into the more uncomfortable parts of its story in a way that is very deliberately jarring and disturbing. so be prepared for that! and be sure to read and pay attention to small details, they often come back later in big ways.
#tldr you should be fine to understand about 90% of dr without the context of ut!! just be prepared for some insane stuff to happen#BUT all that being said I replayed the entirety of undertale last night in like 3 hours. its really not a long game so it might be worth it#to try it out!!!#asks#OH AND ALSO. UTDR as a series basically assumes you're going to die multiple times on tougher battles. it's built into ut deliberately#so try not to get frustrated if it takes you a long time and multiple deaths to beat certain battles!!! thats how the game is supposed to g#& that's another thing you're sort of primed for in undertale. you should basically never give up no matter what
73 notes
·
View notes
Text
in wake of yet another wave of people being turned off by windows, here's a guide on how to dual boot windows and 🐧 linux 🐧 (useful for when you're not sure if you wanna make the switch and just wanna experiment with the OS for a bit!)
if you look up followup guides online you're gonna see that people are telling you to use ubuntu but i am gonna show you how to do this using kubuntu instead because fuck GNOME. all my homies hate GNOME.
i'm just kidding, use whatever distro you like. my favorite's kubuntu (for a beginner home environment). read up on the others if you're curious. and don't let some rando on reddit tell you that you need pop! OS for gaming. gaming on linux is possible without it.
why kubuntu?
- it's very user friendly
- it comes with applications people might already be familiar with (VLC player and firefox for example)
- libreoffice already preinstalled
- no GNOME (sorry GNOME enthusiasts, let me old man yell at the clouds) (also i'm playing this up for the laughs. wholesome kde/gnome meme at the bottom of this post.)
for people who are interested in this beyond my tl;dr: read this
(if you're a linux user, don't expect any tech wizardry here. i know there's a billion other and arguably better ways to do x y and/or z. what i'm trying to do here is to keep these instructions previous windows user friendly. point and click. no CLI bro, it'll scare the less tech savvy hoes. no vim supremacy talk (although hell yeah vim supremacy). if they like the OS they'll figure out bash all by themselves in no time.)
first of all, there'll be a GUI. you don't need to type lines of code to get this all running. we're not going for the ✨hackerman aesthetics✨ today. grab a mouse and a keyboard and you're good to go.
what you need is a computer/laptop/etc with enough disk space to install both windows and linux on it. i'm recommending to reserve at least a 100gb for the both of them. in the process of this you'll learn how to re-allocate disk space either way and you'll learn how to give and take some, we'll do a bit of disk partitioning to fit them both on a single disk.
and that's enough babbling for now, let's get to the actual tutorial:
🚨IMPORTANT. DO NOT ATTEMPT THIS ON A 32BIT SYSTEM. ONLY DO THIS IF YOU'RE WORKING WITH A 64BIT SYSTEM. 🚨 (win10 and win11: settings -> system -> about -> device specifications -> system type ) it should say 64bit operating system, x64-based processor.
step 1: install windows on your computer FIRST. my favorite way of doing this is by creating an installation media with rufus. you can either grab and prepare two usb sticks for each OS, or you can prepare them one after the other. (pro tip: get two usb sticks, that way you can label them and store them away in case you need to reinstall windows/linux or want to install it somewhere else)
in order to do this, you need to download three things:
rufus
win10 (listen. i know switching to win11 is difficult. not much of a fan of it either. but support's gonna end for good. you will run into hiccups. it'll be frustrating for everyone involved. hate to say it, but in this case i'd opt for installing its dreadful successor over there ->) or win11
kubuntu (the download at the top is always the latest, most up-to-date one)
when grabbing your windows installation of choice pick this option here, not the media creation tool option at the top of the page:

side note: there's also very legit key sellers out there who can hook you up with cheap keys. you're allowed to do that if you use those keys privately. don't do this in an enterprise environment though. and don't waste money on it if your ultimate goal is to switch to linux entirely at one point.
from here it's very easy sailing. plug your usb drive into your computer and fire up rufus (just double click it).

🚨two very important things though!!!!!!:🚨
triple check your usb device. whatever one you selected will get wiped entirely in order to make space for your installation media. if you want to be on the safe side only plug in the ONE usb stick you want to use. and back up any music, pictures or whatever else you had on there before or it'll be gone forever.
you can only install ONE OS on ONE usb drive. so you need to do this twice, once with your kubuntu iso and once with your windows iso, on a different drive each.
done. now you can dispense windows and linux left and right, whenever and wherever you feel like it. you could, for example, start with your designated dual boot device. installing windows is now as simple as plugging the usb device into your computer and booting it up. from there, click your way through the installation process and come back to this tutorial when you're ready.
step 2: preparing the disks for a dual boot setup
on your fresh install, find your disk partitions. in your search bar enter either "diskmgr" and hit enter or just type "partitions". the former opens your disk manager right away, the latter serves you up with this "create and format hard disk partitions" search result and that's what you're gonna be clicking.

you'll end up on a screen that looks more or less like in the screenshot below. depending on how many disks you've installed this might look different, but the basic gist is the same. we're going to snip a little bit off Disk 0 and make space for kubuntu on it. my screenshot isn't the best example because i'm using the whole disk and in order to practice what i preach i'd have to go against my own advice. that piece of advice is: if this screen intimidates you and you're not sure what you're doing here, hands off your (C:) drive, EFI system, and recovery partition. however, if you're feeling particularly fearless, go check out the amount of "free space" to the right. is there more than 30gb left available? if so, you're free to right click your (C:) drive and click "shrink volume"

this screen will pop up:

the minimum disk space required for kubuntu is 25gb. the recommended one is 50gb. for an installation like this, about 30gb are enough. in order to do that, simply change the value at
Enter the amount of space to shrink in MB: to 30000
and hit Shrink.
once that's done your partitions will have changed and unallocated space at about the size of 30gb should be visible under Disk 0 at the bottom like in the bottom left of this screenshot (courtesy of microsoft.com):

this is gonna be kubuntu's new home on your disk.
step 3: boot order, BIOS/UEFI changes
all you need to do now is plug the kubuntu-usb drive you prepared earlier with rufus into your computer again and reboot that bad boy.
the next step has no screenshots. we're heading into your UEFI/BIOS (by hitting a specific key (like ESC, F10, Enter) while your computer boots up) and that'll look different for everyone reading this. if this section has you completely lost, google how to do these steps for your machine.
a good search term would be: "[YOUR DEVICE (i.e Lenovo, your mainboard's name, etc.)] change boot order"
what you need to do is to tell your computer to boot your USB before it tries to boot up windows. otherwise you won't be able to install kubuntu.
this can be done by entering your BIOS/UEFI and navigating to a point called something along the lines of "boot". from "boot order" to "booting devices" to "startup configuration", it could be called anything.
what'll be a common point though is that it'll list all your bootable devices. the topmost one is usually the one that boots up first, so if your usb is anywhere below that, make sure to drag and drop or otherwise move it to the top.
when you're done navigate to Save & Exit. your computer will then boot up kubuntu's install wizard. you'll be greeted with this:

shocker, i know, but click "Install Kubuntu" on the right.
step 4: kubuntu installation
this is a guided installation. just like when you're installing windows you'll be prompted when you need to make changes. if i remember correctly it's going to ask you for your preferred keyboard layout, a network connection, additional software you might want to install, and all of that is up to you.
but once you reach the point where it asks you where you want to install kubuntu we'll have to make a couple of important choices.

🚨 another important note 🚨
do NOT pick any of the top three options. they will overwrite your already existing windows installation.
click manual instead. we're going to point it to our unallocated disk space. hit continue. you will be shown another disk partition screen.
what you're looking for are your 30gb of free space. just like with the USB drive when we were working with rufus, make sure you're picking the right one. triple check at the very least. the chosen disk will get wiped.

click it until the screen "create a new partition" pops up.
change the following settings to:
New partition size in megabytes: 512
Use as: EFI System Partition
hit OK.
click your free space again. same procedure.
change the following settings to:
New partition size in megabytes: 8000 (*this might be different in your case, read on.)
Use As: Swap Area
hit OK
click your free space a third time. we need one more partition.
change the following settings to:
don't change anything about the partition size this time. we're letting it use up the rest of the resources.
Use as: Ext4 journaling system
Mount Point: /
you're done here as well.
*about the 8000 megabytes in the second step: this is about your RAM size. if you have 4gb instead type 4000, and so on.
once you're sure your configuration is good and ready to go, hit "Install Now". up until here you can go back and make changes to your settings. once you've clicked the button, there's no going back.
finally, select your timezone and create a user account. then hit continue. the installation should finish up... and you'll be good to go.
you'll be told to remove the USB drive from your computer and reboot your machine.
now when your computer boots up, you should end up on a black screen with a little bit of text in the top left corner. ubuntu and windows boot manager should be mentioned there. naturally, when you click ubuntu you will boot into your kubuntu. likewise if you hit windows boot manager your windows login screen will come up.
and that's that folks. go ham on messing around with your linux distro. customize it to your liking. make yourself familiar with the shell (on kubuntu, when you're on your desktop, hit CTRL+ALT+T).
for starters, you could feed it the first commands i always punch into fresh Linux installs:
sudo apt-get update
sudo apt-get upgrade
sudo apt-get install vim
(you'll thank me for the vim one later)
turn your back on windows. taste freedom. nothing sexier than open source, baby.
sources (mainly for the pictures): 1, 2
further reading for the curious: 1, 2
linux basics (includes CLI commands)
kubuntu documentation (this is your new best friend. it'll tell you everything about kubuntu that you need to know.
and finally the promised kde/gnome meme:

#windows#linuxposting#had a long day at work and i had to type this twice and i'm struggling to keep my eyes open#not guaranteeing that i didn't skip a step or something in there#so if someone linux savvy spots them feel free to point them out so i can make fixes to this post accordingly#opensource posting
122 notes
·
View notes
Note
Please, please explain how to install and use linux like I'm 5 years old. I'm so sick of windows adding AI and other bullshit to my already struggling elderly laptop but I'm really not good with computers at all so I have no idea where to start with Linux.
Okay, so, I'm going to break this down into steps I would give the average tumblr user first, and then if any of them are confusing or use words you don't understand, ask me and I'll explain that step in greater detail.
Step 0) BACK. UP. YOUR. SHIT.
NEVER EVER EVER CHANGE YOUR OPERATING SYSTEM WITHOUT A COMPLETE BACKUP OF ALL YOUR FILES.
Step 1) Learn your machine. You need to know:
How much RAM you have
If your processor is 32 or 64 bit
How big your hard drive is
On windows, you can find out all of this by going to the start menu, typing "about" and opening the first result on your system instead of the internet.
For additional instructions, visit this page.
Step 2) Pick your Linux.
There's like 10,000 kinds of Linux, each tailored to particular functions that the end-user (that is you!) might want to have. The sheer amount is very daunting, so first I'm going to give my suggestions, then I'll explain how to pick for yourself.
For Mac users, I suggest Kubuntu. For windows users, I suggest Mint Cinnamon. If your laptop is really REALLY old, I recommend Sparky Stable, which is the lightest weight Linux I would ever suggest for a new user. In every case, download the version suited to your processor (32 bit can be labelled "x86" or "32 bit"; 64 bit is always labelled "64 bit").
If you want to try a different type of linux, you'll need to make sure your laptop meets the "minimum specs" or "system requirements." These numbers tell you how much RAM, processor and hard drive space the linux will use. (That's why you needed those numbers at the beginning.)
Step 3) Collect your supplies. You're going to need:
An ISO burning program compatible with your current system, like Balena Etcher.
A copy of the ISO file for the Linux you want to use.
Your laptop.
An 8gb or larger USB flash drive.
Step 3) Make a bootable USB drive
Install Balena Etcher, hitting "okay" and "next" when prompted. Last I checked, Etcher doesn't have adware attached, so you can just hit next every time.
Plug your USB drive into the laptop.
Open Etcher.
Click "flash from file" and open the ISO file with your Linux on it.
Click "Select target" and open the USB drive location. Hit the "flash" button. This will start writing all the linux installer data to your flash drive. Depending on the speed of your machine, this could take as long as 10 minutes, but shouldn't be much longer.
Step 4) Boot to the USB drive
This is, in my opinion, the trickiest step for a lot of people who don't do "computer stuff." Fortunately, in a rare act of good will, Windows 10 made this process a lot easier.
All you'll need to do is go to settings, then recovery, then advanced startup and pick the button labelled "use a device."
This tutorial has images showing where each of those is located. It's considered an "advanced setting" so you may get a spooky popup warning you that you could "harm your system by making changes" but we're not doing anything potentially harmful so you can ignore that if you get it.
Step 5) Try out linux on the flash drive first.
Linux installs using a cool little test version of itself that you can play around in. You won't be able to make changes or save settings, but you can explore a bit and see if the interface is to your liking. If it's hideous or hard to navigate, simply pick a new linux version to download, and repeat the "make a bootable USB" step for it.
Step 6) Actually install that sucker
This step varies from version to version, but the first part should be the same across the board: on the desktop, there should be a shortcut that says something like "install now." Double click it.
Follow the instructions your specific linux version gives you. When in doubt, pick the default, with one exception:
If it asks you to encrypt your drive say no. That's a more advanced feature that can really fuck your shit up down the road if you don't know how to handle it.
At some point you're going to get a scary looking warning that says 1 of 2 things. Either:
Install Linux alongside Windows, or
Format harddrive to delete all data
That first option will let you do what is called "dual booting." From then on, your computer will ask every time you turn it on whether you want Windows or Linux.
The second option will nuke Windows from orbit, leaving only linux behind.
The install process is slower the larger your chosen version is, but I've never seen it take more than half an hour. During that time, most linux versions will have a little slideshow of the features and layout of common settings that you can read or ignore as you prefer.
Step 7) Boot to your sexy new Linux device.
If you're dual booting, use the arrow keys and enter key to select your linux version from the new boot menu, called GRUB.
If you've only got linux, turn the computer on as normal and linux will boot up immediately.
Bonus Step: Copy Pasting some code
In your new start menu, look for an application called "terminal" or "terminal emulator." Open that up, and you will be presented with an intense looking (but actually very harmless) text command area.
Now, open up your web browser (firefox comes pre-installed on most!), and search the phrase "what to do after installing [linux version you picked]"
You're looking for a website called "It's FOSS." Here's a link to their page on Mint. This site has lots and lots of snippets of little text commands you can experiment with to learn how that functionality works!
Or, if you don't want to fuck with the terminal at all (fair enough!) then instead of "terminal" look for something called "software manager."
This is sort of like an app store for linux; you can install all kinds of programs directly from there without needing to go to the website of the program itself!
297 notes
·
View notes
Note
Would your Lancer campaign be a good thing to run for someone who doesn't know the system or lore super well? It sounds like I might be GMing Lancer for a group of 3. I have spent some time playing around with pilot net and reading the mech creation rules.
I don't think it's a bad place to start. I'm not going to sell my campaign as the most beginner-friendly Lancer campaign out there - I think that might be Kai Tave's Operation Solstice Rain, although Kat's upcoming Shadow of the Wolf might be even better.
Calliope is a lore-rich setting with a lot of history and some of it is tied into the greater lore of Lancer, but you don't really need huge familiarity with either my setting's lore or the general lore of Lancer to be able to play it because it explains a lot to you.
You do start off at LL0, and the first mission is meant to be a sort of soft tutorial. You get to pick the first fight, and it will introduce you to some basic game concepts like enemy classes, templates, the action economy and movement. The second fight will teach you about sitreps, and that some fights will have a lynchpin enemy with a specific gimmick. The third fight will teach you about boss fights.
The second mission gives you two sets of two relatively difficult fights with a full repair between them, which gives them space to take bigger risks.
The third mission, which is the first mission at LL2 where they'll have access to non-starter frames, has an entire fight dedicated to just letting them get used to their new mechs. They can go absolutely wild and blow their core powers and even get their shit absolutely wrecked and there'll be a full repair right afterwards so they can just go absolutely ham on it.
56 notes
·
View notes
Text
Albert Gonzalez (born 1981) is an American computer hacker, computer criminal and police informer, who is accused of masterminding the combined credit card theft and subsequent reselling of more than 170 million card and ATMnumbers from 2005 to 2007, the biggest such fraud in history. Gonzalez and his accomplices used SQL injection to deploy backdoors on several corporate systems in order to launch packet sniffing (specifically, ARP spoofing) attacks which allowed him to steal computer data from internal corporate networks.
Gonzalez bought his first computer when he was 12, and by the time he was 14 managed to hack into NASA. He attended South Miami High School in Miami, Florida, where he was described as the "troubled" pack leader of computer nerds. In 2000, he moved to New York City, where he lived for three months before moving to Kearny, New Jersey.


While in Kearny, he was accused of being the mastermind of a group of hackers called the ShadowCrew group, which trafficked in 1.5 million stolen credit and ATM card numbers. Although considered the mastermind of the scheme (operating on the site under the screen name of "CumbaJohnny"), he was not indicted. According to the indictment, there were 4,000 people who registered with the Shadowcrew.com website. Once registered, they could buy stolen account numbers or counterfeit documents at auction, or read "Tutorials and How-To's" describing the use of cryptography in magnetic strips on credit cards, debit cards and ATM cards so that the numbers could be used. Moderators of the website punished members who did not abide by the site's rules, including providing refunds to buyers if the stolen card numbers proved invalid.
In addition to the card numbers, numerous other objects of identity theft were sold at auction, including counterfeit passports, drivers' licenses, Social Security cards, credit cards, debit cards, birth certificates, college student identification cards, and health insurance cards. One member sold 18 million e-mail accounts with associated usernames, passwords, dates of birth, and other personally identifying information. Most of those indicted were members who actually sold illicit items. Members who maintained or moderated the website itself were also indicted, including one who attempted to register the .cc domain name Shadowcrew.cc.
The Secret Service dubbed their investigation "Operation Firewall" and believed that up to $4.3 million was stolen, as ShadowCrew shared its information with other groups called Carderplanet and Darkprofits. The investigation involved units from the United States, Bulgaria, Belarus, Canada, Poland, Sweden, the Netherlands and Ukraine. Gonzalez was initially charged with possession of 15 fake credit and debit cards in Newark, New Jersey, though he avoided jail time by providing evidence to the United States Secret Service against his cohorts. 19 ShadowCrew members were indicted. Gonzalez then returned to Miami.
While cooperating with authorities, he was said to have masterminded the hacking of TJX Companies, in which 45.6 million credit and debit card numbers were stolen over an 18-month period ending in 2007, topping the 2005 breach of 40 million records at CardSystems Solutions. Gonzalez and 10 others sought targets while wardriving and seeking vulnerabilities in wireless networks along U.S. Route 1 in Miami. They compromised cards at BJ's Wholesale Club, DSW, Office Max, Boston Market, Barnes & Noble, Sports Authority and T.J. Maxx. The indictment referred to Gonzalez by the screen names "cumbajohny", "201679996", "soupnazi", "segvec", "kingchilli" and "stanozlolz." The hacking was an embarrassment to TJ Maxx, which discovered the breach in December 2006. The company initially believed the intrusion began in May 2006, but further investigation revealed breaches dating back to July 2005.
Gonzalez had multiple US co-defendants for the Dave & Buster's and TJX thefts. The main ones were charged and sentenced as follows:
Stephen Watt (Unix Terrorist, Jim Jones) was charged with providing a data theft tool in an identity theft case. He was sentenced to two years in prison and 3 years of supervised release. He was also ordered by the court to pay back $250,000 in restitution.
Damon Patrick Toey pleaded guilty to wire fraud, credit card fraud, and aggravated identity theft and received a five-year sentence.
Christopher Scott pleaded guilty to conspiracy, unauthorized access to computer systems, access device fraud and identity theft. He was sentenced to seven years.
Gonzalez was arrested on May 7, 2008, on charges stemming from hacking into the Dave & Buster's corporate network from a point of sale location at a restaurant in Islandia, New York. The incident occurred in September 2007. About 5,000 card numbers were stolen. Fraudulent transactions totaling $600,000 were reported on 675 of the cards.
Authorities became suspicious after the conspirators kept returning to the restaurant to reintroduce their hack, because it would not restart after the company computers shut down.
Gonzalez was arrested in room 1508 at the National Hotel in Miami Beach, Florida. In various related raids, authorities seized $1.6 million in cash (including $1.1 million buried in plastic bags in a three-foot drum in his parents' backyard), his laptops and a compact Glock pistol. Officials said that, at the time of his arrest, Gonzalez lived in a nondescript house in Miami. He was taken to the Metropolitan Detention Center in Brooklyn, where he was indicted in the Heartland attacks.
In August 2009, Gonzalez was indicted in Newark, New Jersey on charges dealing with hacking into the Heartland Payment Systems, Citibank-branded 7-Eleven ATM's and Hannaford Brothers computer systems. Heartland bore the brunt of the attack, in which 130 million card numbers were stolen. Hannaford had 4.6 million numbers stolen. Two other retailers were not disclosed in the indictment; however, Gonzalez's attorney told StorefrontBacktalk that two of the retailers were J.C. Penney and Target Corporation. Heartland reported that it had lost $12.6 million in the attack including legal fees. Gonzalez allegedly called the scheme "Operation Get Rich or Die Tryin."
According to the indictment, the attacks by Gonzalez and two unidentified hackers "in or near Russia" along with unindicted conspirator "P.T." from Miami, began on December 26, 2007, at Heartland Payment Systems, August 2007 against 7-Eleven, and in November 2007 against Hannaford Brothers and two other unidentified companies.
Gonzalez and his cohorts targeted large companies and studied their check out terminals and then attacked the companies from internet-connected computers in New Jersey, Illinois, Latvia, the Netherlands and Ukraine.
They covered their attacks over the Internet using more than one messaging screen name, storing data related to their attacks on multiple Hacking Platforms, disabling programs that logged inbound and outbound traffic over the Hacking Platforms, and disguising, through the use of proxies, the Internet Protocol addresses from which their attacks originated. The indictment said the hackers tested their program against 20 anti virus programs.
Rene Palomino Jr., attorney for Gonzalez, charged in a blog on The New York Times website that the indictment arose out of squabbling among U.S. Attorney offices in New York, Massachusetts and New Jersey. Palomino said that Gonzalez was in negotiations with New York and Massachusetts for a plea deal in connection with the T.J. Maxx case when New Jersey made its indictment. Palomino identified the unindicted conspirator "P.T." as Damon Patrick Toey, who had pleaded guilty in the T.J. Maxx case. Palomino said Toey, rather than Gonzalez, was the ring leader of the Heartland case. Palomino further said, "Mr. Toey has been cooperating since Day One. He was staying at (Gonzalez's) apartment. This whole creation was Mr. Toey's idea... It was his baby. This was not Albert Gonzalez. I know for a fact that he wasn't involved in all of the chains that were hacked from New Jersey."
Palomino said one of the unnamed Russian hackers in the Heartland case was Maksym Yastremskiy, who was also indicted in the T.J. Maxx incident but is now serving 30 years in a Turkish prison on a charge of hacking Turkish banks in a separate matter. Investigators said Yastremskiy and Gonzalez exchanged 600 messages and that Gonzalez paid him $400,000 through e-gold.
Yastremskiy was arrested in July 2007 in Turkey on charges of hacking into 12 banks in Turkey. The Secret Service investigation into him was used to build the case against Gonzalez including a sneak and peek covert review of Yastremskiy's laptop in Dubai in 2006 and a review of the disk image of the Latvia computer leased from Cronos IT and alleged to have been used in the attacks.
After the indictment, Heartland issued a statement saying that it does not know how many card numbers were stolen from the company nor how the U.S. government reached the 130 million number.
Gonzalez (inmate number: 25702-050) served his 20-year sentence at the FMC Lexington, a medical facility. He was released on September 19, 2023.
22 notes
·
View notes
Text
@fragilehiggs
HOW TO IMPORT HIGGS 3D MODEL INTO BLENDER / MODELS FROM GAMES INTO BLENDER
figured id make this a post because it’d be easier.. might help other people too!!! on how to put higgs into blender. you probably know some of the stuff i’m gonna explain but for good measure will bring up. this is extremely long because its the sort of thing i wouldve massively appreciated but i unfortunately instead basically had to figure it out going off of little to nothing
—
blender is a 3d program that allows you to import models from games into there which can then be rigged, posed, and animated. people take these models from games using programs called ninjaripper or greyhound. essentially this just goes into the files of the game and takes out the assets. if it’s an asset, it can be taken out. you would then have to rig the model yourself (basically put a skeleton to pose it.) this takes very long and is inconvenient.
luckily, people do this for you. you don’t need to rip your own assets out and rig, which is a hassle and you usually need to pay for these useful programs. a great spot for getting models that have been ripped from games is deviantart. however, there is no telling how these models can perform. they could be badly rigged, or could have messed up textures. unfortunately, such is the case for the one and only higgs model… https://www.deviantart.com/kanbara914/art/Death-Stranding-Higgs-XPS-864224744
the good news is that i fixed the textures. the bad news is that the rigging is absolutely beyond busy. he is poseable, yes, but the amount of points there are makes it really hard to. i’m yet to figure out a better way and might start ripping and rigging my own models. despite having fixed the textures i am unsure if i can export the fixed version. thus.. another tutorial will come through on to do that. unfortunately it takes awhile. all of this requires lots of patience, trial, and error.
so, now, how exactly do we start? FIRSTLY, we need to revisit downloading blender. the current up-to-date blender will NOT work. you need to download blender 2.80, NOT anything else. well, how do you get an older version?
in order to get an older version, navigate to blender.org/download/previous-versions/ and scroll down a bit to you see ‘download any blender version.’ here is a good tutorial but i believe that it is a little outdated so i will explain it furthermore. https://youtu.be/WmlijP9D67o?si=QHhpOQ_D_0LWJP9M this is the one i followed however so, the premise is the same.
we click on download any blender version and it looks quite overwhelming. dont be too worried, you just need to look closely and scroll till you see Blender2.80 . we then click on that and you need to find your operating system. im going to assume you run windows, and if so, pick blender-2.80-windows64.zip from the list.
navigate to your files, and then open up the zip file that you just downloaded. click blender 2.8 again and then what you see is going to look a little busy. dont be fooled, its actually not. just scroll down and find blender.exe. press this and itll bring up a simple process -- all you should have to do is press a few buttons and optimize it like any other download for an application such as blender. it should be installed like regular blender, and if its not on your desktop, simply go to blender.exe in your files in applications. i recommend pinning it to your taskbar.
here comes the next step. there is something called xnalara. i will keep the history of it rather brief but its quite interesting. xnalara was an older program that allowed people back then to rip models from games and import them into the xnalara program. that program is rather old and i rather not use it, however, im thinking about looking into it. its good to use blender regardless because of its studio-accredited attributes. its professional.
some awesome dude later down the line created something called a xnalara add-on for blender. this allowed you to download models ripped from games posted on deviantart that are optimized for xnalara. the file name for these xnalara optimized models end in .xps . these will not regularly be imported into blender, because it doesnt support it. however, this add-on will allow you to do such.
im going to explain how to download it but watching this video regardless is essential. you will probably need to go back to it now and then.
youtube
since youre particularly interested in importing higgs, i will keep it relatively broad but touch on his model a bit more because i am more familiar but this process applies to most models. navigate to https://www.deviantart.com/kanbara914/art/Death-Stranding-Higgs-XPS-864224744 and scroll down into the description of the post. click on the link, mega.nz/file/y88wyQpS#eDkcsSmW… so on and so forth. it will ask you if you want to leave deviantart and click the link again to go there.
you're now in MEGA. this website will allow you to store downloads for people, and i can assure you its safe. i would never download anything im not sure of -- my PC is my baby lol. look down to the bottom right and youll see "SAVE" and "SAVE TO MEGA." pick save. it will download, and you need to look to the top right and click where your downloads are. this will take a couple minutes, grab some water and a snack. when its done, click on it in the tray to open it.
youre going to be overwhelmed by everything you see. do not fret! just close it, dont unzip it. just make sure it exists. you can close MEGA and deviantart now. you now need to refer to the video i linked if you want to follow along with more resources. we need to install the XNALARA add-on for blender 2.80 which can allow us to put it into blender.
before i continue i want to say, being familiar will blender as a whole will be an insane help. unfortunately the only way i figured out some of the stuff that i did was because i knew how to just going off of the program. most tutorials will not have answers for this small issues... but i most likely do especially for this specific model.
here is the add-on. https://github.com/johnzero7/XNALaraMesh . github will look relatively the same as it does in the video. look to your right, youre going to see a bolded 'releases', and under it, XPSTools v2.0.2 or something along the lines of that. you dont need to see the other releases, it's best to have the latest one. click on it.
its going to open up the description of the file. the above is important to note because it says it works with the blender that you just downloaded. if there are any issues for whatever reason with using blender 2.80 (approximately the version from ~2020) those are other versions which are applicable. for the sake of my sanity im gonna explain how to open it in blender 2.80 .
go down to the bolded 'assets'. under it you will see 3 links -- click on the first one which ends in .zip . it will download in the download tray. if your computer tries to flag it or anything as unsafe, click away from that and allow it anyways. this program has been used by thousands for years. it will soon finish downloading. MAKE SURE THE XNALARA ADD ON IS SAVED ON YOUR DESKTOP!!!
go ahead and open up blender 2.80 now. if you have the newest blender installed already make sure youre picking the older version. it will open a terminal alongside of blender, while its running. dont close it. click general.
if you have never used blender, please watch a video on the basics such as this one. https://youtu.be/Z8sg0nHNTTo?si=zjR4aBHVF8XX_Qdn this is the only way to realistically be able to attempt messing with said model, unfortunately. unironically, rendering roblox avatars was a huge stepping stone and aid to my experience with this. i genuinely recommend you do it before you try and do something like this. here is an amazing, step-by-step tutorial that needs no explaining out of the video. https://youtu.be/kpALOtLhX-Q?si=4UrhkBTIK5qYOBfS
from here, this is a much better tutorial to follow >> https://youtu.be/8mqUqob3P3o?si=14a50v88IPZx6O8Y . find yourself at the time stamp of 1:46, the previous is the steps you have already done. go back to blender if you have made it this far, lmao. click on the cube and delete that motherfucker.
look at the top toolbar. it says things like file, edit, render, window, etc. you want to pick edit and scroll to preferences. youll see many options but youre going to want to click add-ons on the left. then, at the top left, click install. go to DESKTOP and click XNALaraMesh.2.02.zip and click install add-on from file on the top right. make sure its the ZIP. this is gonna bring you to a menu with potentially many other downloads. scroll down till you see XNALARA if so. MAKE SURE IT HAS A CLICKED CHECK MARK ON THE LEFT.
go down to the three bars on the bottom left and make sure to save preferences. you can then close that and go back to blender. it will now be one of your downloaded add-ons available! go to the top left again and hit file, import, and XNALARA / XPS. itll hover and youll see another option. make sure to pick XNALara/XPS Model (ascii./.mesh/.xps) . click it and pick Load an XNALara model file.
this will open up your file explorer within blender. click desktop and click on the higgs model you saved earlier. clicking it will lead to 2 files, click xps.xps . press Import in the top right. it will take a hot minute to pull everything into blender, be patient. once its imported scroll inwards and look at the son of a bitch. the rig is gonna be highlighted orange and hes gonna be gray. click to anywhere other than the model and face the enemy.
due to the shading settings, his textures arent showing. simply go to the top left where you see 4 ish circles, the second one should be selected. select the one to its right, viewport shading, and give it a second to load his textures in. its gonna look nothing like him. youre gonna have to fix the textures, brave soldier.
--
will post another tutorial if you decide to go through with this or if anyone does because unpacking all of that is such a pain in the ass but i promise it isnt rocket science. just not gonna do it if it isnt asked for because i spent 3 hours figuring out how to fix it the first time i imported his model -- the creator says nothing about this on the download or how to fix it unfortunately and its quite janky :(
if you even made it this far in reading, congratulations, youre a winner. IF YOU HAVE ANY QUESTIONS AT ALL PLEASE FEEL FREE TO ASK and i will answer them to the best of my ability.
SAVE THE IMPORTED MODEL TO REVISIT!!!!!!
#this took me so fucking long lmao#xnalara#blender#3d model#3d art#3d modeling#blender3d#ds higgs#higgs monaghan#higgs#death stranding higgs#tutorial#tut#tutorial blender#blender tutorial#xps#xnalara xps#Youtube
21 notes
·
View notes
Text
Free software recommendations for various things:
LibreOffice - A full home office suite comparable to Microsoft Office. Easy to use and you can choose the UI layout from several types; it can handle docx and other Microsoft Office document formats; it still does not include AI unless you specifically add that extension on purpose, so unlike other office suites it's not shoving AI down your throat.
Calibre - Ebook manager bundled with an ebook editor and ereader software. It can follow news feeds, downloading them into epub format. Convert ebooks from one format into (many) others. Run a server to make access your books from different computers/phones/tablets easier. And so much more... without even touching on the additional functionality that plugins can add. With plugins it can be used for DRM stripping (which can still remove DRM from even Kindle ebooks, if you have a kindle that you can download the ebook to and use to transfer to your computer). It can also handle downloading fanfics and their metadata using the FanFicFare plugin. (Which I've written tutorials about.) There are officially supported plugins (like FanFicFare) that are easy to install and unofficial plugins (like the DRM stripper) that take more work, so it's extremely customizable.
Syncthing - Want to host your own local file backup system? Have an old laptop that you can reformat with a linux distro? And maybe a spare hard drive? Perfect, you have what you need to set up a home file backup system. Reformat the computer with the new operating system, install syncthing on that computer and on the computer you want to back up files for and the two installations of the software can sync over your home network. Put it on your phone and back up your photos. The software is open source, encrypted, and you can turn it off so that your computer (or phone) is only running it on a trusted network. You control where the synced data lives, which computers on your network those synced folders are shared with (allowing for sharing between multiple computers) and even what type of file backups happen if data is, say, accidentally deleted. (File recovery!!!)
Plex or Emby - Both are free to install on any computer, point at any movie/tv show/audiobook/music files you've got sitting around, and bam you've got a home media streaming server. Both have paid tiers for more features (including tv tuner integration to act as a DVR), but what they can do for free is already impressive and well handled. Both have easy to use UI and it largely comes down to personal preference as to one is better than the other.
Notepad++ - A notepad type program that can also serve as a decent lightweight code editor. I use it for noodling around with code scripts and snippets, writing lists, and various other small tasks. It's not something I'd use for my professional code writing but it's great for just messing around with something on my own time.
16 notes
·
View notes
Text
Sidetrack | Unlocking the Windows Phone 7 emulator 14 years later (Part 1)
Introduction to Sidetrack
Hello there folks! Welcome to a series of original Tumblr content that I made called "Sidetrack". The series will often complement longer blog posts/articles and will include much more humorous ramblings and maybe tutorials as well! This also includes a wider range of topics from culture to memes to technology to media and anything in between, discussing and ranting about our dying civilization. In this series, expect it to be only on Tumblr, as to decongest the RSS feed and I see the main site as the appropriate place for much more deep commentaries nowadays. Anyways, in this post, I'll try and talk about the wild world of Windows Phone 7, and its software development kits, unraveling hints in the space of Windows CE development and hacking, as well as providing too much lighthearted commentary.
Overview
This is the first part. This post is split into 2 due to photos being limited. Part 1 | Part 2
As I am working with archiving official Microsoft SDKs for the sake of archival and fun, I delved into a much more complex problem that is the feature lock in Windows Phone 7 emulators.
Now you might ask, "why the heck are you talking about Windows Phone all of the sudden?", well, it's a part of my huge 1 month undertaking, with 25GB (and counting!) worth of emulators, so that puny little Joe Smith Jr. with a crazy addiction on Skibidi Toilet and knowledge on virtual machines can set up these emulators, to brag it on their Roblox friends (yada yada...), and since I embrace archiving said material for future use!
Of course, this ain't like easy work, though. Fiddling too much with the registry can also mean breaking an entire system, so be warned. (even if it involves an emulated environment.) So let's get started!
Prerequisites:
- mRegEdit.exe (Windows CE Registry Editor)
- BOOOFF
- XIPPort
All of these files are available via my GitHub repository. Clone the whole repository, as some programs rely on dlls.
Guide on how to unlock said emulators
Place the contents of the repository in a folder.
Extract the emulator image. It is usually found under C:\Program Files (x86)\Microsoft SDKs\Windows Phone\v7.x\Emulation\Images where v7.x is the version number (7.1 = WP7.5).
To extract the files
Open the XIPPort tool.
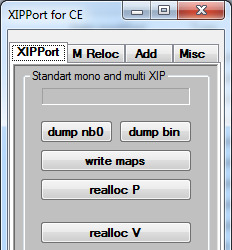
2. Select "dump bin".
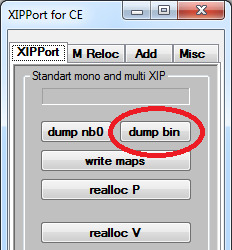
3. Select the .bin file.

4. Wait for a few minutes then it should say "dump .bin OK!!!"
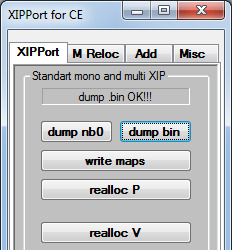
5. The resulting files are placed in the "OUT" folder. There, we would need to decompress three files. Those are:
default.hv
5BA3EEFF-F8BC-4c43-8175-BF218E964AA0.rgu
8C9C0C34-B77D-45FB-9E4E-D53AC5900244.rgu
6. In XIPPort, select Misc then Decompress.
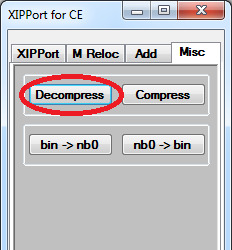
7. Select the file.
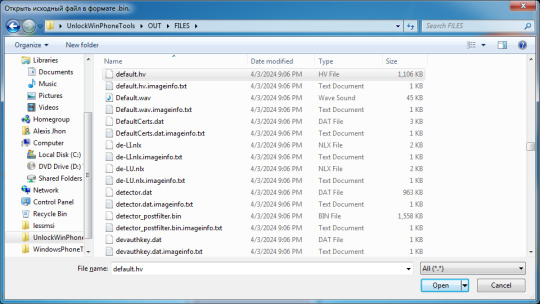
8. Repeat step 7 for the other files. 9. You will find the decompressed files in OUT\DECOMPRESSFILES.
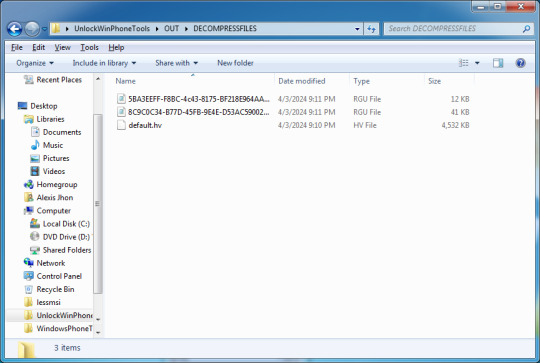
10. You are officially done extracting!
To unlock the emulators
1. Open mRegEdit.exe.

2. Locate the files.

3. First open up the 5BA3EEFF-F8BC-4c43-8175-BF218E964AA0.rgu file. 4. Go to HKEY_LOCAL_MACHINE/Software/Microsoft/PackageManager. 5. Delete the "Blacklist" key by pressing F4 or Delete.
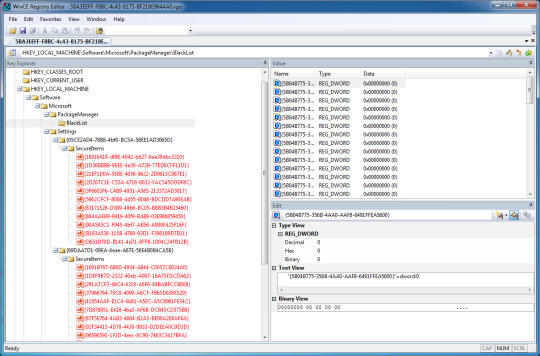
6. Save the file. 7. Open the default.hv file.
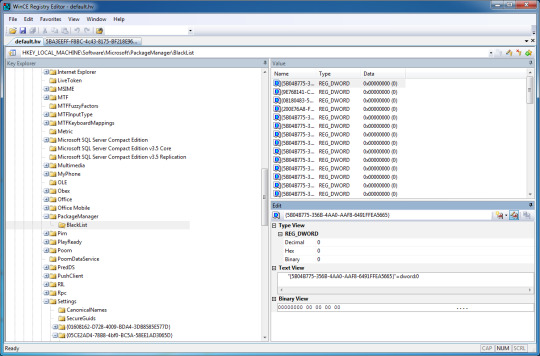
8. Repeat step 5. 9. After that open the 8C9C0C34-B77D-45FB-9E4E-D53AC5900244.rgu file. This contains the full application list in the keys that I would mention. 10. Go to the Window menu then "New Vertical Tab Group". 11. Go to HKEY_LOCAL_MACHINE/Software/Microsoft/Settings/{05CE2AD4-78B8-4bf0-BC5A-58EE1AD}\SecureItems in default.hv as well as in the 8C9C0C34-B77D-45FB-9E4E-D53AC5900244.rgu tab.
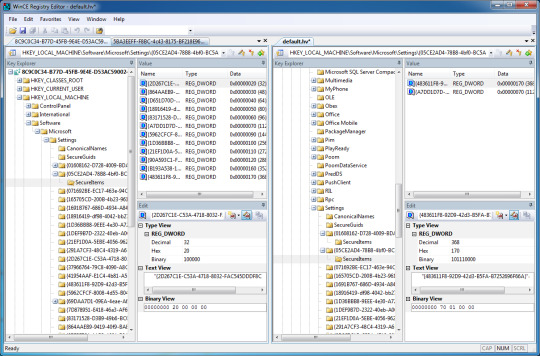
12. You would notice that the DWORD entries in 8C9C0C34-B77D-45FB-9E4E-D53AC5900244.rgu are not the same except for two. Either take note of it or not. 13. Recreate each DWORD entry from 8C9C0C34-B77D-45FB-9E4E-D53AC5900244.rgu to the default.hv file. 14. This can be done by going to the Edit window/panel (found below the Value panel), clicking on the first icon (with the down arrow), selecting "REG_DWORD".
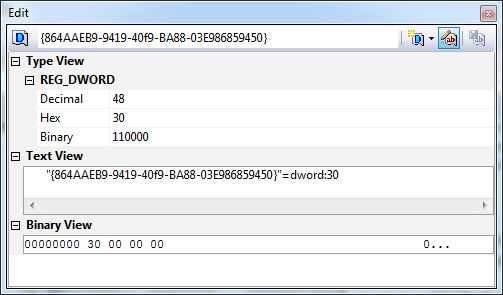
15. Copy and paste the key name from the left tab to the label box. 16. Edit the Decimal value to match with it's corresponding key on the left tab. 17. Press enter and your key would get into the database. Keys with same DWORD values would get replaced. 18. Repeat the process from step 14 to 17 to each key.
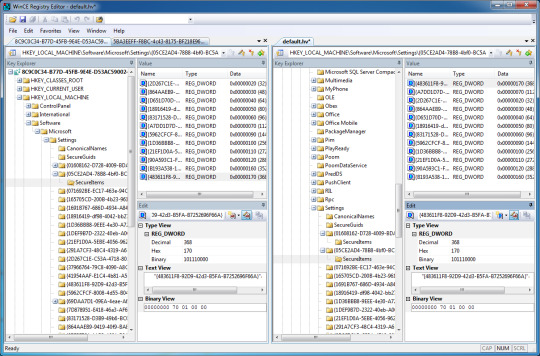
19. You should have accomplished, with this exact state. Double check for any missing values. 20. Go to HKEY_LOCAL_MACHINE\Software\Microsoft\Settings{69DAA7D1-09EA-4eae-A67E-56E4B0B4CA5B}\SecureItems in both files. 21. Repeat steps 13-18 with this one. 22. You should have accomplished, with this exact state. Double check for any missing values.
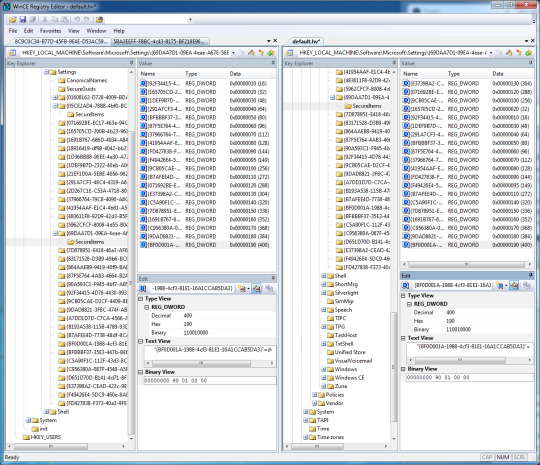
23. Save default.hv. Now close mRegEdit. Save any modified files if any.
To rebuild the image
1. Open XIPPort again. Select Misc then Compress.
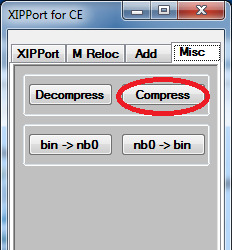
2. Go to the directory OUT\DECOMPRESSFILES.

3. Select the default.hv file. 4. Then after that, repeat step 1 and select the 5BA3EEFF-F8BC-4c43-8175-BF218E964AA0.rgu file. 5. It would drop files in the COMPRESSFILES folder. 6. Open the .imageinfo.txt file for default.hv in Notepad. This is found in OUT/FILES.
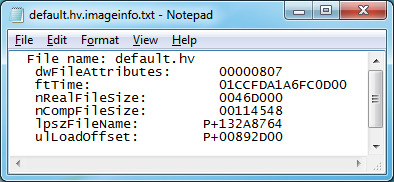
7. You would get some values. The one that we are the most interested in is nRealFileSize and nCompFileSize. 8. To get nRealFileSize, go to OUT/DECOMPRESSFILES/default.hv. 9. Right-click then go to properties. 10. We only need the one in the red circle, which is the file size in bytes.
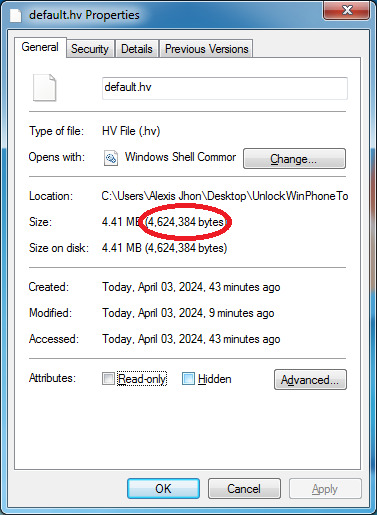
11. Go to the Windows calculator app.
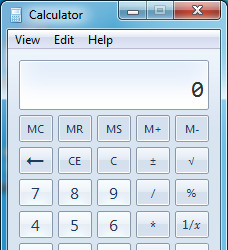
12. Select "View" then "Programmer", or press Alt-3 to switch to the Programmer's calculator.
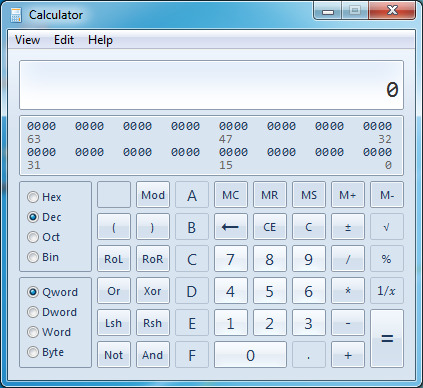
13. Enter the file size in bytes.
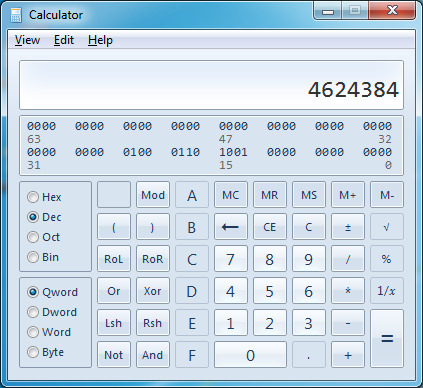
14. Select Hex to get the hexadecimal value.
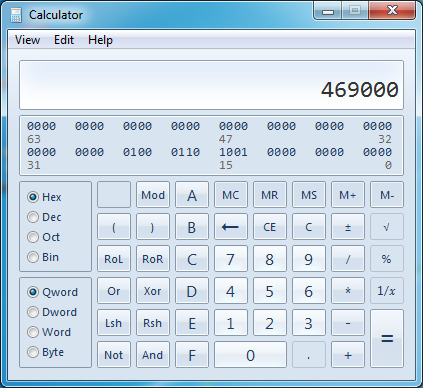
15. Copy that and switch back to Notepad. 16. Go to nRealFileSize and highlight the last digits.
17. Replace the value with the result you've copied earlier.

18. To get nCompSize, go to OUT\COMPRESSFILES\default.hv. 19. Repeat steps 9 to 17 to get the value. 20. In the end, you should have the new values set.
21. Save the file. 22. Open 5BA3EEFF-F8BC-4c43-8175-BF218E964AA0.rgu.imageinfo.txt from the same directory. 23. Repeat steps 7 to 20 when editing said file. 24. In the end, you should have the new values set.
25. Save the file. 26. Move the contents of OUT/COMPRESSFILES to OUT/FILES, replacing our old ones. 27. Delete both the DECOMPRESSFILES and COMPRESSFILES folders. 28. Open XIPPort again. 29. Click on "write nb0". This would generate a .nb0 ROM image of what we had done so far.
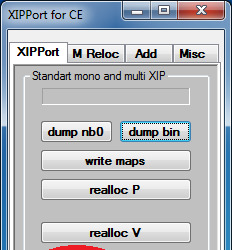
30. This would then ask for where to save the file. Save it on the same directory as the tool. Make the name unique, so that you wouldn't get confused later on. In this case, I appended "UNLOCKED".
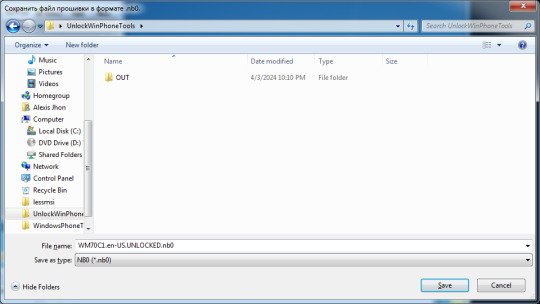
31. Hit save. You should see "write .nb0 OK!!!".
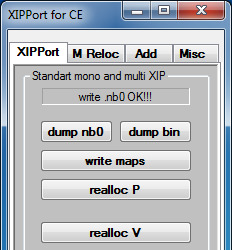
This post is split into 2 parts because of image limits. Part 2 is here.
#windows#windows phone#hacking#modding#tech#technology#mobile#smartphone#phones#operatingsystem#operating systems#tutorial#visual#long reads
0 notes
Text

so, i don't usually crosspost these posts, but this week's update on patreon is available to everyone and I know I have a bit of a larger following on tumblr, and I'd really like everyone on the same page so I'm dropping all I have to say here too.
good evening friends!! i hope you're all doing well! welcome to the first update of 2024. momentous for me personally, because this is the year we finish larkin. i am making this post available to all patrons, (paid or not) because I'd really like to start 2024 on the right foot with everyone aware of the road ahead. i am so determined to get it done you have no idea. this is my year. 2024, i christen thee: the year of the vampire cowboy.
okay, so big things ahead, lets talk about the update, explore some of the features we have in the game, plans for this weekends release, the schedule and a couple other things.
so, if you've played at all with the new version of the game, you'll take notice that it's a little bit different than my first image of the game. at first larkin was just a straight interactive fiction following the likes of cog like games, with choices and avenues and split stats and the like. but now, as of 2024 (crazy) we're seeing a game that is more reminiscent of a ttrpg, like dnd or cyberpunk, with stats, classes and dice rolls. admittedly, the very first encounter of the game is well (it's a little rigged) the game, of course, could not really get started if the preacher gets cooked before they've even made it to nevada, so, the odds are a little bit stacked in the players favor this round, but at least, it gives you a little bit of a taste of whats to come. to dive into the specifics of what's important with this first encounter (or just, how to avoid getting your ass really kicked) these first few rolls give bonuses to players with high dexterity and athleticism—-but that's not to say you need to make your character beefed up in these departments. each stat will get their time to shine later down the line.
but let's talk about what i'm really excited to discuss: classes. so with the new version of larkin, i've introduced a system of classes that operate somewhat like your standard dungeons and dragons class, but with a little bit more of that classic background from the original ttrpg mixed in—coloring the way your character sees the world of the game, sort of how a race might effect a dnd character--(a dwarf player is going to have a much different worldview than say, an elf.) for this i was heavily inspired by games like dragon age origins and baldur's gate, and while I do have those original background ready to be dropped a little bit later on the game in relation to your character's perspectives on the abrams family, I really like how these have come to form.
in total there are seven new classes: con-man, outlaw, healer, thief, gambler, showman and slayer. each of these classes warps the perspective of the player character, giving them new motivations, dialogue options, and affects their relationships with the other characters in the game and the world around them. to illustrate this, I'm thinking of making a little bit more of an in depth explanation screen to be added to saturday's update to really get that point across, but I'm still toying with how I want to phrase the specifics of it. what i might do is something similar to baldur's gate with little pop-up tutorials that can be turned off/on depending on how you'd like to play.
to give an example of some of the more in depth motivations/choices each class offers lets talk about the thief and the outlaw classes. the thief class i am especially excited for, because like the con-man class and similar to a few others, it really allows your character to be very money/materialistically motivated. it opens up routes later in the game, like romancing one of the sokolovs—with motivations reminiscent of gold-digging (hehehe very excited for that—i think it will be very fun to write—because you have this idea of a cold hearted player who is entering into a relationship with them strictly for business, versus a cold hearted player who is in it for the cash but also. might be falling in love with one of the sokolovs? ((a lot of fun dynamics afoot here.)) the outlaw class is also one i'm excited to work with because it really puts something of a strain on the preacher and wyatt's relationship—-mostly because you see a strong division in terms of their ethics—the preacher in that case is very 'do what you gotta do to survive,' whereas wyatt believes (key word—believes) he's living by some sort of moral code—that he's failed to instill in the person he views as his child. so like there are layers here boys. layers of resentment, failure—to connect, to teach, to bond. a final tidbit about the slayer class before I move on: if you would really like to play into the enemies to lovers trope with one of the vampires, I would highly recommend giving your player this class ((that's all I'll say))
so: saturday, that takes us to the bar, where each class will get a unique scene, similar to how the scheming tactic section worked in the original game. we're gonna finish up the encounter with the first vampires, meet our guild pursuers and move to the bar. I'm planning also to implement the character customization here—(sort of a way to prep before the player heads out to the bar.) most likely won't get to all classes by saturday's code, but after that, I'm planning to release again on next wednesday, so we're keeping on track. I'd really like to give a full picture of customization for the player character, with all the original options for physical appearance (i might keep clothes vague for now though and let you dress your character later on, until you get a taste of the inventory/bartering system-—you have to deal with MY poor fashion choices for a little bit.) but that being said, about character customization, if there's something that's lacking here and you'd like to suggest an addition I'd be all ears. This is what I'm planning to implement so far:
skin tone
body type*
hair color
hair texture
hair length
hair style**
height
skin details (acne, scars, vitiligo, rosacea)
facial hair
make-up
piercings
eyewear (glasses, no glasses, eyepatch, prosthetic eye)
gender-affirming customization (for ex. use of binding)
* a note on the body type section, I kind of had this idea of digitally drawing some silhouettes of different heights, shapes and sizes, and allowing the player to click through arrows to select a rough estimation of what their body-type might look like. I'm going to do an art dump later this month, and I have a few sketches of what I'd kinda like to do with that, but I'm still toying with it, because even that could be a little limiting in terms of options. if any of you had thoughts on that, I'd love to hear them.
**I think it might also be cool to kind of have drawings of different hairstyles available to the characters, arranged in the card formats like the previous gender options in that same red colored sketch format.
speaking of art though--and this is purely tangential so I apologize, I'm sure you've taken notice of some of the art being repetitive--for the moment that's purposeful. I'm planning to commission some work for the cards to be implemented in a later update--so what you're seeing are just placeholders for now.
okay! with saturday's notes out of the way, plans for the rest of the week. I need to finish the timeline and then I need to make it readable to people other than myself. it is currently incomprehensible and of the few people that have gotten their eyes on it only one (1) could make sense of my mad ramblings. (shout out to friend of the game bianca from exiled from court if any of you are familiar with her or her stuff, we are big bianca fans here.) After that I need to do some edits with the new update and such, and poke at the code.
Tonight after I post this, I'm specifically working on sending a few more emails to betas (know that sending emails is. my personal hell because of intense social anxiety. BUT we must persevere. emails will be sent tonight.) after that, I have to work on the phillip/kc/sam schedule + calendar for this month, just to keep the three of us on the same page. I'm in the process of looking at some stamps.com printers for sending out packages with this next round of physical rewards and ordering the merch (hehehe)
okay. super long update for our first one of the year, but I am so excited to get to keep working with you guys :) i'd like to thank you all for your continued support and I can't wait to show you more of the little universe i've crafted :)
until friday! i'm gonna be posting some cyrus asks/scenarios for you all to enjoy, so look forward to that! <3
95 notes
·
View notes
Note
How do you even save vods?
Do you just uh screen record it or is there a way to download them
It depends on which platform we save the vods from.
For Twitch we use a software called [Twitch Downloader]
The most recent release version of the software as of this post is version 1.55.0 which you can find on the release page here: https://github.com/lay295/TwitchDownloader/releases/tag/1.55.0
When you get to this page we recommend downloading the GUI version of the software if you have a Windows system. You can try using the CLI version of the software but I wouldn't recommend it if you aren't familiar with using command-line interfaces.

If you do download the CLI and aren't familiar with the interface, you can search for basic command line tutorials based on your operating system to have that foundation. This documentation will also help guide you in using CLI for the downloader: https://github.com/lay295/TwitchDownloader/blob/master/TwitchDownloaderCLI/README.md
For YouTube we use a software called [Youtube Downloader]
The most recent release version is 1.13. Just select your computer's operating system and system type: https://github.com/Tyrrrz/YoutubeDownloader/releases/tag/1.13
Instructions on how to use each software should be listed on the ReadMe section for their respective home pages. If you or anyone else have any questions feel free to ask!
Happy vod downloading!
53 notes
·
View notes