#photo editing software download
Text
I apologize to my followers for who I am about to be for the next 12 hours
but like ok. he could have picked any reference. and he picked the fucking album whose first song’s refrain is “it’s too late” the album with “you drive like a demon” the album with “you touch me I hear the sound of mandolins” the album with fucking, fucking word on a wing???????
michael sheen you glorious bastard
#you don’t understand what a great day this is for me#brb I gotta go download some photo editing software
13 notes
·
View notes
Text
thisisnotawebsitedotcom.com complete "riddle" questions and answers
When I first started looking through lists of keywords for thisisnotawebsitedotcom.com, I was confused by a bunch of them which, when entered, produced questions which seem completely unrelated to their trigger phrases. I realized that all the prompts are answers to other questions, meaning it's possible to put them in order and create a complete test. I doubt I'm the first to figure this out, but I still think it's super cool, so here's all the questions and how to find their answers!
(Apologies in advance for the photo quality, they're all described in alt text).
First, you enter the code "RIDDLE" to get "WOULD YOU LIKE TO PLAY A GAME?" which to me is proof that Bill at least has decent taste in movies.

Next, you can either type "NO" or "YES," to get either "YOUR LOSS..." or "WHAT"S MCGUCKET'S FAVORITE SODA"


The answer to this question is "MOUNTAIN DON'T," and while I swear I remember reading this someplace, I can't find the actual source.
Once you enter it, you get the question "WHAT'S A MEDIEVAL HOMONYM?"

Which can be found in the Dark Ages pages of The Book of Bill, in the border of the illuminated manuscript:

"LYRE LIAR"

"Anti-Cipher Tonic" appears near the end of the "Anti Cipher Society" pages, complete with an ingredients list:

The twentieth of which is "Harold's Ramblings"

When you enter it you get another question to which I cannot find the source of the answer, but going off the list of phrases that've been found, I'm guessing it's "UNION MADE"

Bill's government file can be found on the page about the 1940s, and is labeled with:

A number which gets you:

Okay and I swear this is the last one I can't show my work on, but wherever you find it the answer is "Grebley Hemberdreck"

A reference to the picture of Bill celebrating the bubonic plague on the Dark Ages page.

And that funky little rodent gives you:

A reference to Thurburt Mudget Waxstaff III of the Anti-Cipher Society and his eventual fate of being institutionalized:

Once you enter his number, you get a question about tracks in the snow:

Which is answered on Ford's missing journal pages about winter in Gravity Falls:

The tinsel snake gets you "THE 6TH OPTION ON BILL'S EDITING SOFTWARE?"

Which can be found on the page where Bill designs a cover for his book:

The sixth option, "Torture Mentally," leads to:

Which is yet another reference to the Dark Ages, and Bill's adventures with the wizard Xgqrthx the Unpronounceable.

Whose name produces:

An address which is provided on the 1990s Tri Angels page, in the mail order form:

Said address takes you to:

To answer this question, you need to do a little more digging around the website. When you enter the code "NAITSUAF," you get a letter from Bill attempting to recruit you into his MLM soul-selling scheme, complete with this note from his lawyer:

And once you enter the name "MULTILEVEL MARK," you get the final question:

(For some reason I haven't figured out, "CAESAR ATBASH VIGENERE" produces the same result as "MULTILEVEL MARK," so that's one way to skip to the end I guess).
Silas Birchtree is referenced in The Book of Bill on the Cults page:

But his full story isn't revealed until you enter "STOD EHT TCENNOC" on the website.
The whole document is definitely a worthwhile read, but there's really only one aspect that's relevant to our purpose:


It was Emmaline Butternubbins who killed Silas Birchtree (again) in 1952! And when you enter her name into the computer, it tells you that you've finally earned a treat. Huzzah!

(Interestingly to me a least, "EMMALINE BUTTERNUBBINS" and "BUTTERNUBBINS" both work as codes, but "EMMALINE" does not. I guess Bill's not on a first name basis with her).
Anyways, once you enter "DISPENSE MY TREAT," a folder is downloaded onto your device which is full of text-free versions of art from The Book of Bill, which you can use for desktop wallpapers or any other nefarious purposes your mind can conceive of.
I hope you've enjoyed going on this journey with me, because I've sure spent an amount of time on it.
#if anybody knows where to find sources for those three answers that'd be rad#gravity falls#the book of bill#thisisnotawebsitedotcom#bill cipher#silas birchtree#emmaline butternubbins
47 notes
·
View notes
Text
A Party To Die For Templates: SFS
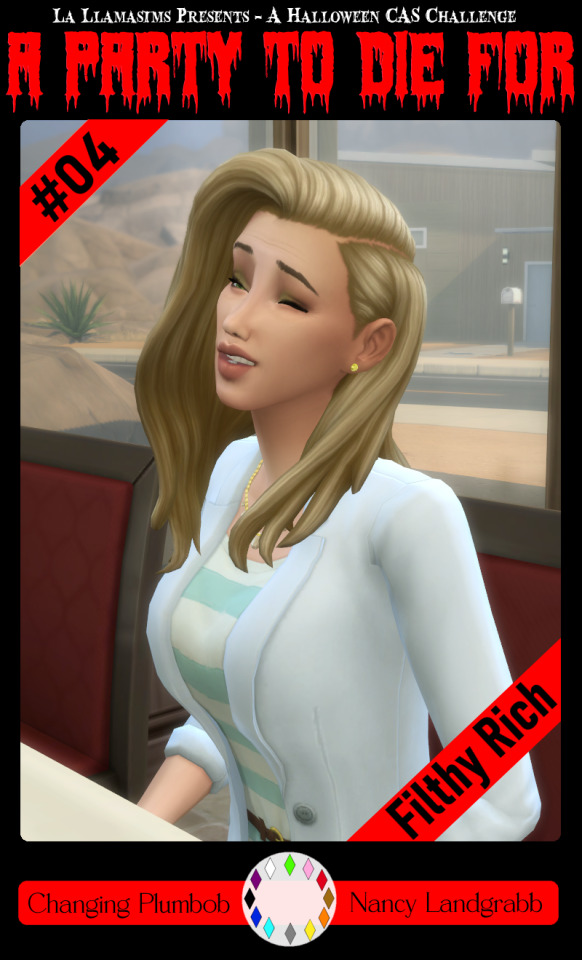
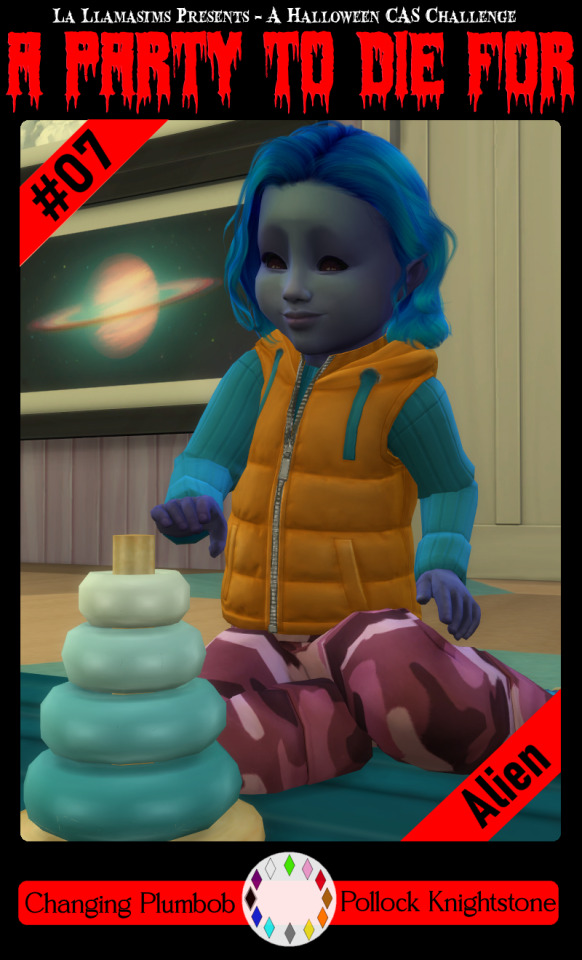
So I may have got a tad overexcited about the Halloween CAS Challenge created by @la-llama-sims, and I made templates for every prompt. I wanted to share them on the off chance someone wanted to also do the challenge but maybe didn't have time to do much other than screenshots.
Tutorial below on how to make your own cards using the templates if you are unfamiliar with photo software, all you need is the template and a screenshot of your sim! Very little technical skill required to so feel free to jump in for Simblreen (the month of October on simblr). Remember to go to the original creator post to check out the prompts and the hashtag given for creations is #LLPTDF. Hope to see some of your creations next month, keep them for the spooky season 🎃👻🦇
Strap in and follow along as I make Glenn here (he won't do the spellcaster prompt for Simblreen, it's dress up after all, but it makes sense for a demo)
Step one: Grab the zipped folder of templates on SFS HERE. Unzip the folder and put it somewhere easy to find in your documents, I have a tumblr specific folder my templates are normally sorted in.
Step two: Open your photo editing program of choice. I use paint.net which is old but for this demonstration I will use Photopea, the online free alternative to adobe. You will see the screen below
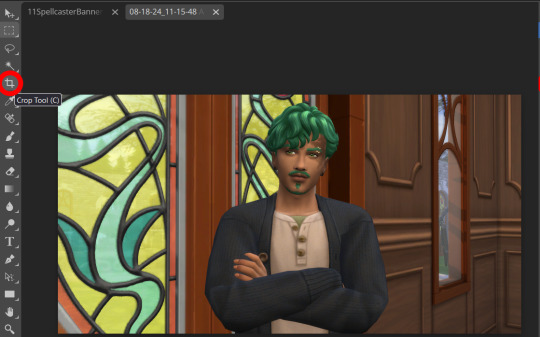
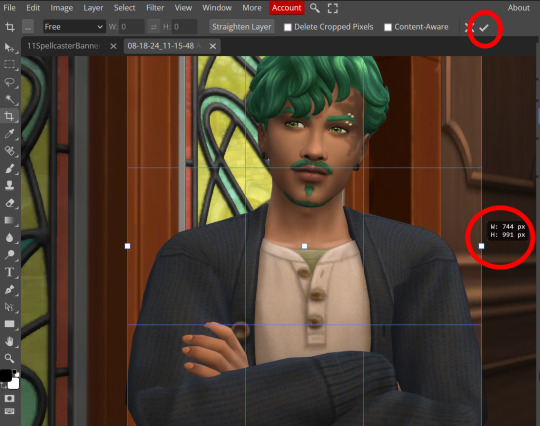
Step three: Click "Open From Computer" right in the middle under the main title. Find the screenshot you have taken that you would like to use and open it. Now the hole in my template is 744x991 but you can make it slightly bigger if you don't want to fuss as much with lining things up exactly. To resize image from the top bar (Image -> Image Size) We're going to use the crop tool when we have our picture.
Step four: Pull on the squares at the edges to change the size. If you need click View in the top bar and you can zoom in to allow finer selecting. When you have the right size click the tick and copy the image. Keyboard shortcuts are Ctrl+A to select all, then Ctrl+C to copy.
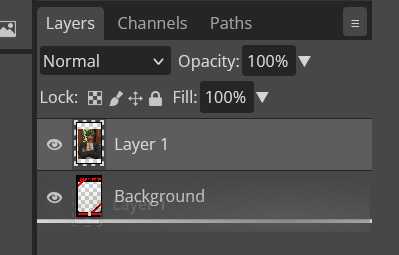
Step five: Open the template you want to use (File -> Open, from the top bar). Add a new layer using either the top bar (Layer -> New -> Layer) or the icons on the bottom right.
Step six: With the new layer selected paste the image, Ctrl+V.
Step seven: On the right of the screen you'll be able to see layer order. Drag the layer with your sim underneath the background layer. This is what will let you slot in your picture.
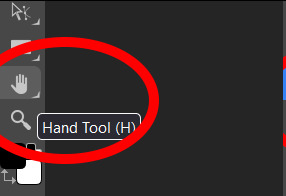
Step eight: Finishing touches! Unless you are super duper lucky your sim won't appear in the exact right place, you'll have to move them around using the move tool. For precision you'll need to zoom in and move your field of vision using the hand tool.

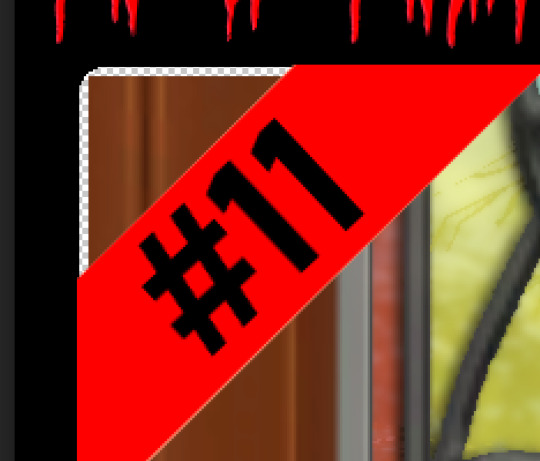
You'll know it's in the right place when you can no longer see any of the negative space behind it. I like to check both corners to make sure I've got it. This is where having a sim image slightly larger will make it easier.

If you like you can finish now. From the top bar File -> Export as -> PNG or JPG. The picture will save to your downloads folder. If you want to add your own text, keep reading, as I've left space at the bottom for your username, the sim name, and a profile pic or other logo.
Step nine: From the bar on the right select the large T to add some text, it will automatically spawn in a new layer. Scroll through text options and find one you like (the text style I used isn't in photopea so we will find another). Depending on the type of text you will likely need to play around with the size as well.
Step ten: Start typing. When you're done you can highlight what you have written and use that size box to adjust how big the text is. Select the move tool from the right to move your text where you want it. Repeat step nine if you want text on the other side. I've chosen to put my username on one side, and my sim's name on the other.
Step eleven: Logo time. Open a pre shrunk logo (I scaled my pride plumbobs down to 125x125) and copy. Back on the template add a new layer then paste your image (for some reason I had to copy twice before it would do the right thing, I don't have an explanation sorry). Then using the move tool and the hand tool get your image where you want it.

From the top bar File -> Export as -> PNG or JPG. Again it will have saved to your downloads folder.
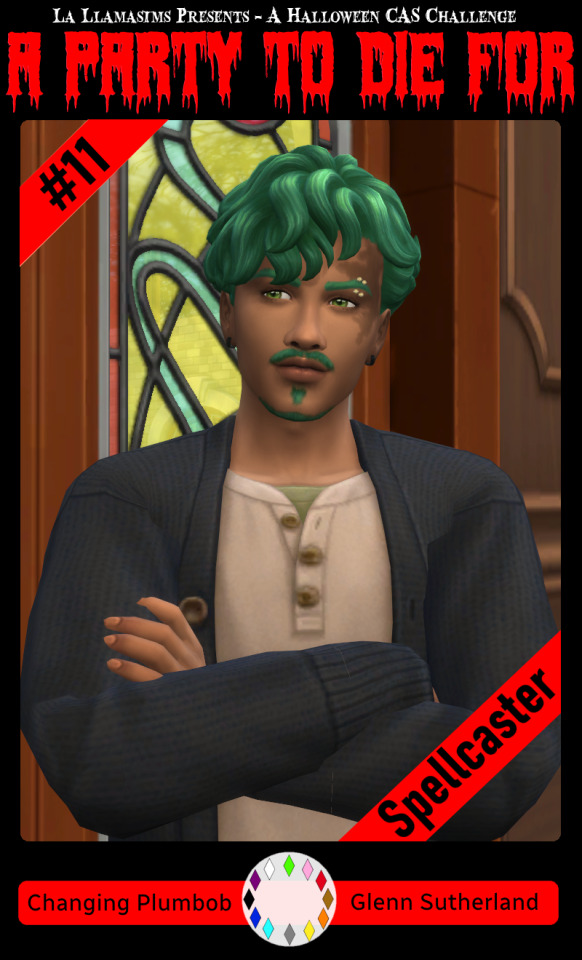
Voila, we have a Glenn card! Hopefully you have a your sim card. I spent hours doing up all the templates so feel free to fill them with your sims for the challenge. All I ask is that you don't claim templates as your own work or shove them behind a paywall because rude and the whole premise of Simblreen is free treats! Obviously you do NOT need the templates to participate in the challenge, the cards are just how I'll be presenting mine. Like CAS challenges the possibilities are most often only limited by your imagination.
#sims 4#the sims#simblr#my sims#ts4#active simblr#Enjoy my friends#I wanted all of us to be able to do Simblreen#Even if we don't have prior skills
48 notes
·
View notes
Text
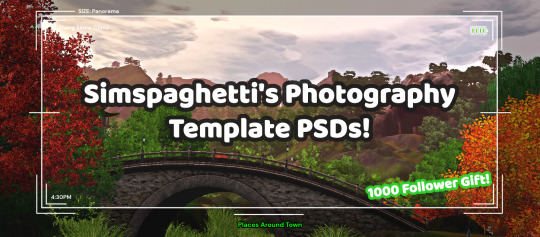
First of all, I want to say thank you so much for 1000 followers - that is truly a bonkers number I never thought I'd reach, thank you to everyone who interacts with my posts or follows along with my legacies or just occasionally sees my posts on your dash - I love this community so much, and I've felt so welcomed here since I joined simblr!! Mwah ily!
I come bringing gifts!! It's another PSD template, based off of the photography UI for Sims 3
I got the idea for this template way back when I was taking these screenshots in Gen 1 of my Blossom Random Legacy, and I figured they could really come in handy for people who are doing world adventures style gameplay :)
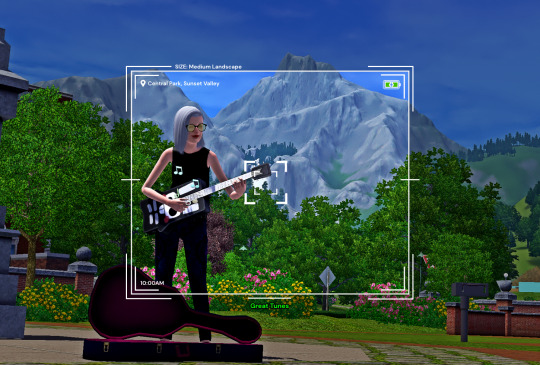
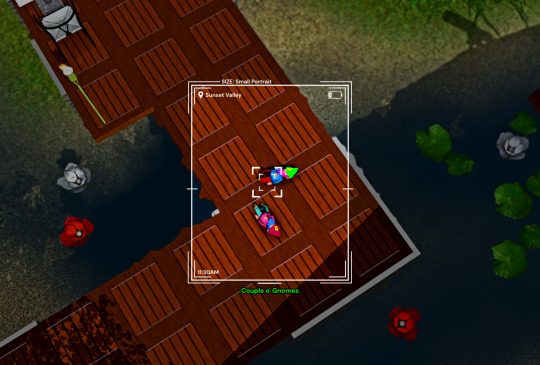
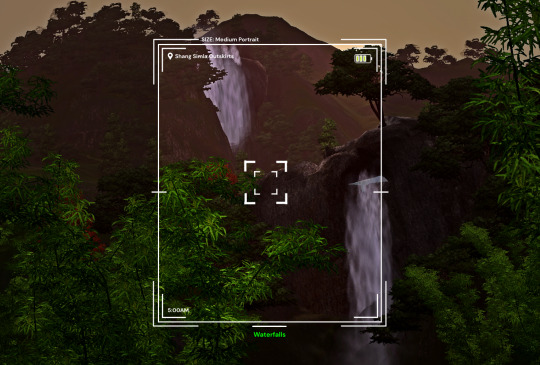
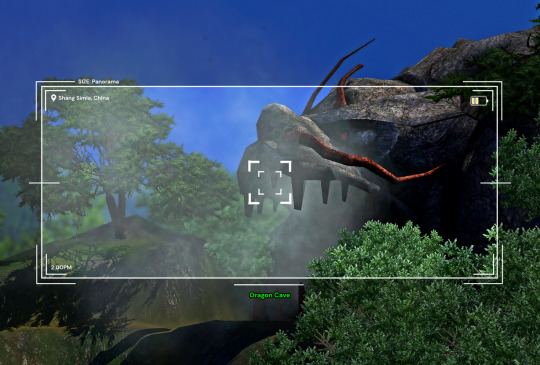
There are 4 sizes to choose from, each one is loosely based on a photo size in the game:
Medium Landscape
Medium Portrait
Panorama
Small Portrait
They're all on a 1450x980 canvas, but you can of course crop them however you want!
It's also pretty easy to create your own custom size if you want to, as long as you have a basic knowledge of photoshop tools - every layer is completely adjustable and customizable!
Terms of Use:
Please don’t claim as your own or reupload without my permission, and credits on posts aren’t necessary, but I’d love to see you use them in your game if you do tag me!
Alter and customize the templates literally however you want, but if you're gonna reupload a downloadable variation of them I'd appreciate a link back to my blog :)
The only font used in all the templates is DM Sans (bold) it can be found here
➡️ DOWNLOAD (Simfileshare, .psd files)
Instructions: These are .psd files, so you can open them in photoshop, photopea (my personal choice of editor), gimp or another similar photo-editing software
Then just place your image at the bottom of all the layers
You can alter the text in the boxes to whatever your needs are, I recommend referring to this page on Carl's guide to see all the photography collections which inspire the green text! :)
86 notes
·
View notes
Text
aesthetic ideas + tips for your phone
step 1: update your phone
make sure your phone is up to date and charged at least 80% before you begin! oh yeah and i should mention that this tutorial is for apple phones :)
settings >> general >> software updates >> install

step 2: declutter
clutter literally scares me, so i always try and keep everything (including my phone) clutter free!
remove ever single app that you can, not delete, remove. you can do this by:
hold down any random app button >> click edit home screen >> click the little minus sign at the top left of the app button you want to remove >> click move to app library >> you can now only view it in your app library if you scroll all the way to the right from your home screen
step 3: find inspiration
pinterest and yt are great places to look! i got these off of pinterest
you could also go on google and just type in the theme/color/whatever you're looking for.
step 4: home screen formatting
this part is a lil overwhelming but that's why i'm here! this is about customizing and decorating your home screen.
first off, look for design formats. you want it to be functional AND aesthetic. take out a sheet of paper or a digital whiteboard or whatever and sketch out what you want your home screen to look like. i find it really helpful to just go "okay, i want a small widget there there and there, my most used apps there, my social media here," etc. remember, it can't just be pretty, it also has to be functional.
step 5: add widgets
now you might be thinking, "how the heck do i do that?" don't worry i'll tell you right now :)
app store >> download widgetsmith >> choose from small, medium, or large widget >> click add widget >> tap it to see all the optiona and pick the one that best fits you (in this case i'm doing photo) >> select the picture you want >> go back to main screen, leave the app >> hold home screen >> press + >> scroll all the way down to widgetsmith >> hold down small >> place it >> hit done >> edit widget >> select the new small widget you created >> untap
don't worry, it's a lot easier once you start doing it!
step 6: customize your app icons
open shortcut app >> click create shortcut >> click add action >> type in open app (multi-colored little squares) >> click choose, look up the app you want and click the 3 dots at the top right >> title the new shortcut >> click add to home screen, rename again >> change image/picture >> click add
#aesthetic#girly aesthetic#pink aesthetic#dreamy#a e s t h e t i c#pinterest#that girl#it girl#pink#cute#iphone#aesthetic phone#customization#pastel dreamer✨
69 notes
·
View notes
Text
how i (try to) make my text readable
so as a lifelong glasses wearer north of 25, i cannot see shit! I love the look of text on screenshots, but also i have spent a nonzero amount of time squinting at pale text on a busy background and thought "i cannot fucking read that."
there are lots of ways to do this. my method is not perfect. I am constantly tweaking things to try and make the text more readable. if you have suggestions about making the text more readable, please share!
Step One: Open the screenshot in your photo editor
I start with a screenshot and a script. I use Gimp, a free and open-source photo editor, and I pretty much only use it to put captions on my screenshots, so please do not ask me how to actually edit pictures, I do not know. also, please do not ask me how to do this in any photo editor, i prefer to use this one because it is free, ad-free one that I can own legally and download safely.
open-source software RULES, btw.
Step One: Add a text layer with your dialogue

I use the text tool to add the dialogue to the image, copying and pasting from my script. This is not legible. My eyes hurt. I cannot read that, so I can't tell if I've made any typos.
Step Two: Add a black background to the text.
In, Gimp: Right click text layer > "Alpha to Selection." In the top menu, Selection > Grow > 3 pixels. Top menu: Layer > New Layer. (I name the new layer "Text BG ##") Use the bucket tool to fill the selection on the new later.
There's probably a shortcut to doing this in other photo editors (hell, might be a shortcut in Gimp.)
Step Three: Blur the background

In Gimp: Top Menu > Effect > Blur > Gaussian Blur. This may be a step backward in terms of readability, but I like how it looks. Let's try a few other things to help the reader, shall we?
Step Four: Drop Shadow
In Gimp: Top Menu > Light & Shadow > Drop Shadow. Makes the text stand out a bit more. Still not particularly readable, especially the blue on blue on the left side of the image.
Step Five: Gradient layer
Create a new layer underneath the Text BG, and then add a transparent gradient over the entire image.
This is step is slightly more involved, so I'll just link you to a guide instead of explaining myself: "How to create a gradient transparency in GIMP."
Step Six: Further Tweaks

I still wasn't satisfied with the readability of the text. I duplicated the gradient layer to create a darker background underneath the text. I also repeated the drop shadow step on the Text BG layer. You could also make the text larger or bolder, change font colors, grow the selection by 4 or 5 pixels instead of 3, or skip the blurring step. I change my method frequently to try to get the best look for each individual image, and I don't always do a perfect job.
This is an area where I constantly innovate. I want people to be able to actually read my text, so I try not to let myself be satisfied with "good enough." When I take screenshots, I try to do it with an eye for compositions that give me a nice, blank space on the bottom for text, ex.


131 notes
·
View notes
Note
hii i luv your work soo much and also the headers and the stuff you make is rlly good 😻 i was wondering if it’s too difficult to make the headers etc? specially the ones that are more like gifs? and also is it too hard to find the images? bc honestly i haven’t seen a lot of them, just wondering! i get it if you don’t want to share i just genuinely think that the work is rlly rlly good<3 (sorry for such a long ask omgg)
Omg thank you so much hi hi 🥹🥹💞💞💖💖🌸🌸 first of all thank you so much for liking my work and supporting me, I so so appreciate it ✨✨🫂🫂💐💐 And omgggg you’re making me BLUSH thank you thank you thank you for the kind words 😭😭🫂💞💞 I love when people compliment my works it makes me feel like I’m doing something right 😫💐💐 flowers for you for being so great ✨💐💐🌷🌷🌹🌹🌸🌸
To answer your question, the dividers and headers are actually very easy to make. The animated dividers I make aren’t difficult per se, they just involve a few more steps than making a normal divider does. As for my animated headers that I use for my fics or masterlists and what not those are also pretty easy. I’ll try to explain a little more about what I use in depth below. If you would like a detailed walk through explaining how I make them I could do that as well 💕 Prepare yourself, there’s a lot 😭💖

⋆ ˚。⋆୨୧˚ 𝐀𝐏𝐏𝐒 / 𝐖𝐄𝐁𝐒𝐈𝐓𝐄𝐒 𝐈 𝐔𝐒𝐄 — Picsart, Pinterest, PicCollage, Vita, Polarr, GIPHY, Photopea, Etsy, DeviantArt, Phonto, ezgif.com, onlinegiftools.com, Iloveimg.com, various fancy font generators (I don’t use these anymore, I use an app now for fonts, but this is what I used to use the most), various sparkle emoji combos + decorative text ( I use this one a lot + there are a lot of symbol apps on the App Store you can download, I have two apps that I use from time to time )
. ݁₊ ⊹ . ݁ ⟡ ݁ . ⊹ ₊ ݁. . ݁₊ ⊹ . ݁ ⟡ ݁ . ⊹ ₊ ݁. . ݁₊ ⊹ . ݁ ⟡ ݁ . ⊹ ₊ ݁.
⊹ ࣪ ˖ 𝑷𝒊𝒄𝒔𝒂𝒓𝒕 ⊹₊ ⋆ This is a photo editing service / app I use to make regular dividers. They have a lot of aesthetic / cute stickers and pngs like the ones I use in a lot of my dividers. They have a transparent background option I love that makes it easy to make a divider. You can save the stickers you like to a collection and follow artists / users you like as well. I 10/10 recommend this one. They also have a bunch of photo editing software like cropping, retouching, etc. if you’re into that.
.𖥔 ݁ ˖ 𝐂𝐎𝐍𝐒 — You have to buy Picsart Pro to use a lot of the “pro quality” services, and the better quality stickers not made by an individual user (I.e. stickers Picsart itself has created) are not accessible to users not subscribed to Pro. Also, when you crop an image Picsart has a certain limit to how thin it can go, so I use an image cropping website I mentioned above Iloveimg.com. I only use Picsart for divider making purposes though so I don’t have to worry about allat. Not compatible with animation / gifs

. ݁₊ ⊹ . ݁ ⟡ ݁ . ⊹ ₊ ݁. . ݁₊ ⊹ . ݁ ⟡ ݁ . ⊹ ₊ ݁. . ݁₊ ⊹ . ݁ ⟡ ݁ . ⊹ ₊ ݁.
⊹ ࣪ ˖ 𝑬𝒕𝒔𝒚 ⊹₊ ⋆ This is one of my favorite shopping apps in general. If you don’t know about Etsy it’s a small business / individually owned business kind of shopping app. There’s a lot of different stores / sellers that sell a bunch of different things. It’s a good place to buy dividers for very cheap, less than $5 dollars, I’ve also bought pngs / stickers as well. I’ll buy a divider pack from time to time and edit them however I please. I never just buy a divider pack and claim it as my own on Tumblr, I always edit them in some way that fits more to what I want. It’s just a good starting point in my opinion. Of course, you can probably find simple dividers online, only you know what’s best for you. Also, this is just a good place for anything web related in general ( they have sticker packs, dividers, procreate brushes, decorative elements, really anything you want for a relatively small price)
. ݁₊ ⊹ . ݁ ⟡ ݁ . ⊹ ₊ ݁. . ݁₊ ⊹ . ݁ ⟡ ݁ . ⊹ ₊ ݁. . ݁₊ ⊹ . ݁ ⟡ ݁ . ⊹ ₊ ݁.
⊹ ࣪ ˖ 𝑷𝒉𝒐𝒏𝒕𝒐 ⊹₊ ⋆ This is an app for fonts. Unlike the usual fonts you see in fancy font generators (𝔱𝔥𝔦𝔰, 𝓽𝓱𝓲𝓼, 𝚝𝚑𝚒𝚜, 𝐭𝐡𝐢𝐬, 𝒕𝒉𝒊𝒔, etc.) Phonto lets you upload your own fonts to use on pics. Using font websites you can upload whatever fonts you like in just a couple seconds. I personally like to use Dafont.com for my fonts. You can also use dingbat fonts / decorative element fonts. Not compatible with animation / gifs

. ݁₊ ⊹ . ݁ ⟡ ݁ . ⊹ ₊ ݁. . ݁₊ ⊹ . ݁ ⟡ ݁ . ⊹ ₊ ݁. . ݁₊ ⊹ . ݁ ⟡ ݁ . ⊹ ₊ ݁.
⊹ ࣪ ˖ 𝑷𝒊𝒏𝒕𝒆𝒓𝒆𝒔𝒕 ⊹₊ ⋆ Who doesn’t know Pinterest?? Literally my favorite app ever. I use Pinterest for image inspo / my aesthetic images. Here’s my Pinterest if you’re curious. This is besides the point but I used to be a Wattpad girly so I have a lot of boards relating to my past OC’s and wattpad stories (like 2016) 😭💕 You can search up literally anything / any aesthetic and the pictures / gifs that relate to it will pop up. Very easy to use and so much fun to make your own boards and stuff. I spend hours organizing my pins, I need to get back into it tbh 😿
.𖥔 ݁ ˖ 𝐂𝐎𝐍𝐒 — Users upload a lot of fan made art that isn’t always crediting the original artists who made it. I have found some jjk fan art I use for my headers but no source as to who the original creator is. A lot of profiles do give credit tho so that’s good.
. ݁₊ ⊹ . ݁ ⟡ ݁ . ⊹ ₊ ݁. . ݁₊ ⊹ . ݁ ⟡ ݁ . ⊹ ₊ ݁. . ݁₊ ⊹ . ݁ ⟡ ݁ . ⊹ ₊ ݁.
⊹ ࣪ ˖ 𝑷𝒊𝒄𝑪𝒐𝒍𝒍𝒂𝒈𝒆 ⊹₊ ⋆ This is the same service made by the people who created Picsart. I use this for many purposes. I mainly use it to combine my animated gifs with still images and combine animated dividers together with other dividers. To be honest it’s hard to explain what I use it for specifically but it’s just good for combining gifs and still images into one.
.𖥔 ݁ ˖ 𝐂𝐎𝐍𝐒 — I don’t think there is a transparent background option, so I have to use a certain website mentioned above to remove gif backgrounds. You also can’t crop the image and unless you pay for no watermark it gives you one. It saves animated dividers / gifs as videos, so I go to Ezgif to make it into a gif and crop the image to remove the watermark. Again, this one is a little hard to explain.

. ݁₊ ⊹ . ݁ ⟡ ݁ . ⊹ ₊ ݁. . ݁₊ ⊹ . ݁ ⟡ ݁ . ⊹ ₊ ݁. . ݁₊ ⊹ . ݁ ⟡ ݁ . ⊹ ₊ ݁.
⊹ ࣪ ˖ 𝑽𝒊𝒕𝒂 ⊹₊ ⋆ This is a free app I use that’s a rip off of the “real app” I used to have. The “real app” started charging for its services and so I moved to this one. It’s completely the same and FREE. This is where I apply text to my gifs and add the motion to it. Like how my masterlist header is, where it spins and flips, this is the app where I apply those effects. Side note, this is a good starting app for making edit videos like you see on Tiktok. You can turn off the watermark for free.
.𖥔 ݁ ˖ 𝐂𝐎𝐍𝐒 — This app also turns gifs / animations into a video when you go to save it, so again I go to Ezgif to turn it back into a gif.

. ݁₊ ⊹ . ݁ ⟡ ݁ . ⊹ ₊ ݁. . ݁₊ ⊹ . ݁ ⟡ ݁ . ⊹ ₊ ݁. . ݁₊ ⊹ . ݁ ⟡ ݁ . ⊹ ₊ ݁.
⊹ ࣪ ˖ 𝑷𝒐𝒍𝒂𝒓𝒓 ⊹₊ ⋆ This is my favorite filter app for photos. Has very aesthetic filters that I use for my still images and as of recently my Pinterest boards as well. Not compatible with animation / gifs
. ݁₊ ⊹ . ݁ ⟡ ݁ . ⊹ ₊ ݁. . ݁₊ ⊹ . ݁ ⟡ ݁ . ⊹ ₊ ݁. . ݁₊ ⊹ . ݁ ⟡ ݁ . ⊹ ₊ ݁.
⊹ ࣪ ˖ 𝑮𝒊𝒑𝒉𝒚 ⊹₊ ⋆ I use this app solely for its stickers. You can find sparkles, butterflies, hearts, anything you want with a transparent background and turn it into a divider. I use this app mostly for gathering animated stickers to make my animated dividers.
. ݁₊ ⊹ . ݁ ⟡ ݁ . ⊹ ₊ ݁. . ݁₊ ⊹ . ݁ ⟡ ݁ . ⊹ ₊ ݁. . ݁₊ ⊹ . ݁ ⟡ ݁ . ⊹ ₊ ݁.
⊹ ࣪ ˖ 𝑷𝒉𝒐𝒕𝒐𝒑𝒆𝒂 ⊹₊ ⋆ This is my go-to for applying effects / filters to gifs or animations. I use this to add filters to my animated headers. I download PSD’s from DeviantArt and use those filters for my gifs. This is not an app, just a browser I’ve added to my Home Screen. I recommend using on a computer because there’s a lot of stuff on the screen and you’ll want to see it all spread out. I use it on mobile only because I know which buttons I need to press so it’s not a problem.
.𖥔 ݁ ˖ 𝐂𝐎𝐍𝐒 — You have to upload your own filters to be able to add one to a gif. Once you open up the site it can be very overwhelming and confusing with all the buttons and drop downs and yada yada. Photopea is like an animations version of photoshop. I recommend searching for a tutorial, or if requested I can personally make a separate post showing you how to add filters to a gif.

. ݁₊ ⊹ . ݁ ⟡ ݁ . ⊹ ₊ ݁. . ݁₊ ⊹ . ݁ ⟡ ݁ . ⊹ ₊ ݁. . ݁₊ ⊹ . ݁ ⟡ ݁ . ⊹ ₊ ݁.
⊹ ࣪ ˖ 𝑬𝒛𝒈𝒊𝒇 ⊹₊ ⋆ my go-to website for literally anything gif related. Cropping, removing frames, optimizing a gif, making a gif, turning a video into a gif, and many more. I even use the effects tab from time to time to add a border around my gifs (like the one around the Sugar Water Series header) There’s other stuff you can do of course, I recommend checking it out, I’ve been using it for years.
. ݁₊ ⊹ . ݁ ⟡ ݁ . ⊹ ₊ ݁. . ݁₊ ⊹ . ݁ ⟡ ݁ . ⊹ ₊ ݁. . ݁₊ ⊹ . ݁ ⟡ ݁ . ⊹ ₊ ݁.
⊹ ࣪ ˖ 𝒐𝒏𝒍𝒊𝒏𝒆𝒈𝒊𝒇𝒕𝒐𝒐𝒍𝒔 ⊹₊ ⋆ This is a browser I use to remove the background from gifs.
.𖥔 ݁ ˖ 𝐂𝐎𝐍𝐒 — It doesn’t do the best job at removing a gif background unless it’s a solid color. I always do solid black and it removes it pretty well. If your background is white it will have a hard time differentiating the gif from the white background and will clip out parts of the gif and make it choppy. I recommend having a plain black background as that works best for me. Also it just recently had an update where you need to wait 10 seconds before you can download the finished product. It also claims you can only use it a certain amount of times a day but tbh I’ve used it a bunch in one day and never seem to have a limit. So idk. Like I said this update is recent. I guess a lot more people started using it and now they want to charge people.
. ݁₊ ⊹ . ݁ ⟡ ݁ . ⊹ ₊ ݁. . ݁₊ ⊹ . ݁ ⟡ ݁ . ⊹ ₊ ݁. . ݁₊ ⊹ . ݁ ⟡ ݁ . ⊹ ₊ ݁.
⊹ ࣪ ˖ 𝑰𝒍𝒐𝒗𝒆𝒊𝒎𝒈 ⊹₊ ⋆ This is the browser I mentioned in the picsart section where I crop really thin images. Does not have a limit on how thin you can make an image. I’m not positive but I’m pretty sure this is not animation / gif compatible.
. ݁₊ ⊹ . ݁ ⟡ ݁ . ⊹ ₊ ݁. . ݁₊ ⊹ . ݁ ⟡ ݁ . ⊹ ₊ ݁. . ݁₊ ⊹ . ݁ ⟡ ݁ . ⊹ ₊ ݁.
⊹ ࣪ ˖ 𝒇𝒐𝒏𝒕 𝒈𝒆𝒏𝒆𝒓𝒂𝒕𝒐𝒓𝒔 ⊹₊ ⋆ ONE TWO THREE
. ݁₊ ⊹ . ݁ ⟡ ݁ . ⊹ ₊ ݁. . ݁₊ ⊹ . ݁ ⟡ ݁ . ⊹ ₊ ݁. . ݁₊ ⊹ . ݁ ⟡ ݁ . ⊹ ₊ ݁.
⊹ ࣪ ˖ 𝒔𝒚𝒎𝒃𝒐𝒍 𝒅𝒆𝒄𝒐𝒓 ⊹₊ ⋆ ONE TWO THREE FOUR FIVE
. ݁₊ ⊹ . ݁ ⟡ ݁ . ⊹ ₊ ݁. . ݁₊ ⊹ . ݁ ⟡ ݁ . ⊹ ₊ ݁. . ݁₊ ⊹ . ݁ ⟡ ݁ . ⊹ ₊ ݁.
⊹ ࣪ ˖ 𝒉𝒐𝒏𝒐𝒓𝒂𝒃𝒍𝒆 𝒎𝒆𝒏𝒕𝒊𝒐𝒏𝒔 ⊹₊ ⋆ Evernote (a notes organizing app I use to organize my fics + I love it so so much), Amino (can find clubs / communities dedicated to bio decor & symbols), Gif Toaster (the og app I used in the very beginning to apply text to gifs), Canva (good stickers / elements + can find aesthetic / cute stickers with keywords on Pinterest), Videoleap (a video editing software I used to use), Remini (an app that upgrades the quality of an image), Symbol Pad & Symbol (apps I use for individual symbols) Snow (has cute animated effects I used to use sometimes a long time ago), VLLO (the app I used before Vita that charged for some of its services), DeviantArt (where I get all of my PSD’s + they have a lot of stuff you can use, pngs and whatnot, I just don’t really use it for those purposes)

51 notes
·
View notes
Note
Hi Maddy! I have several questions if that's okay I love the quality of the photos you take of your Sims! Do you have any tips for good programs or apps that allow you to edit photos well? (Sometimes your photos almost seem edited with Facetune or something and I think it's so beautiful) And do you perhaps have any tips for me on how I can get my tumble page organized, unfortunately I don't understand it at all. (Maybe a good tutorial that you know about) Thank you very much in advance!!🥰
Hi gorgeous, no worries at all!
My biggest tip in terms of quality is if your PC can handle it, use SRWE. It is the most game-changing application you can use when it comes to increasing the quality of your photos.
Example | 1027 x 1027 vs. 3000x3000


Even without editing, the photo quality is amplified perfectly. Although SRWE can get a bit..moody with you, it is a process of trial & error and what works for you.
As for editing applications I use, I only use Photoshop & I have my own filter/editing folder that I use on most of my photos. But besides that, I use the "Dodge" & "Burn" tool to add more dimension to my photos by lightening under eyes, intensifying contours, etc.
I personally prefer the way I edit as well because it adds more dimension to my photos which is something GShade doesn't do for me well enough on its own.
Example | With & Without Photoshop Editing (this was roughly edited but you get the gist)
I do not use any other editing softwares for photos besides Photoshop! However, before this I was using Remini and I am now so mad at how much money I wasted over that stupid app.
As for organizing your Tumblr, I recommend abusing using hashtags to sort your content! So for Anastasia Brownstone, anything she or content related to her is posted, I always use the hashtag "brownstone*". This way, I have everything sorted for her and have it linked on my Navigation post.
I do the same for Lookbooks, Interiors, Downloads, etc. and have found this the best way to organize my content!
I hope all this information is enough for your questions, but please let me know otherwise!
78 notes
·
View notes
Note
hello! i'm not sure if you remember me, a while ago i asked about digital art and if it's possible to do on an ipad or something similar. i was really grateful for your response and i got an ipad over christmas! i didn't realize how expensive the pencils were though and was only able to get one recently. now that i have all of that, i download the first art program i saw (ibispaint x, i don't know how good that is) and feel super overwhelmed by everything, all the tools and brushes and i have no idea where to begin. i know this is a super broad topic, but i don't know if you have any advice for a beginner hoping to become a digital artist? or know of any resources? thank you so much in advance and no worries if this topic is too broad to really get into properly!
Oh hey!! Congrats on getting an iPad! And yeah, shopping for the pens is a big pain in the butt, but I'm glad you finally got it all setup!
So most of the advice I'm gonna give you is very basic, starter advice that can apply to virtually any digital art software, as the vast majority of them are built with the exact same base tools, they just vary in their intended purposes which means they may differ in more advanced settings and what they offer beyond the basics (ex. Photoshop has more colors than Clip Studio because it's built for editing high quality photos whereas Clip Studio is meant to emulate comic art, but Clip Studio offers more in the way of comic-creating tools such as specialized rulers, 3D material support, built-in screentoning, etc. and all of the software available will tend to have different brush engines, meaning it doesn't always 'feel' the same to draw in one software as it does in another).
Your bestest friends:
Layers! This is the biggest pro to going digital, because now you can work with layers! So anything you draw on each layer is preserved and can't touch or affect whatever's on the other ones :3 You can find the layers tab in Ibis Paint X in the bottom right, don't be afraid to make a bunch of them and mess around with what you can do. Play around with the different blending mode settings (in Ibis Paint it's the menu that's labelled 'Normal' in the layers popup) especially Multiply, Color Dodge, and Overlay, as those three are the most commonly used to make coloring more efficient and give your art some extra pop.
Lasso/marquee/magic wand tools! These are basic selection tools that allow you to select an area within the layer you're working on, so that whatever you paint won't travel outside of that area. The Lasso is a free draw tool, the marquee tool is typically 4 sides by default (so squares/rectangles) and the magic wand detects and selects a closed area with one click! (just note that by default it's only on the layer you're on, so if you use it on a layer that has nothing, it will typically select the entire canvas).
Alpha locking! This is a simple button setting you can click to 'lock' the layer you're working on, which basically means that whatever you've drawn on that layer, anything you add can't travel outside of that drawing. So if you want to quickly shade something without going outside the lines, alpha locking is your solution!
Clipping groups/layers! This is a bit more advanced but is basically an even better version of alpha locking that you can use in conjunction with it. Clipping layers are basically additional layers that , when you click the 'clipping group' button, 'attaches' that new layer to the layer that's below it. It performs the same function as the alpha lock by preventing whatever you draw on that layer from travelling outside of it, HOWEVER it comes with the added benefit that it's on an entirely different layer, meaning you can erase and mess with whatever's on that new layer as much as you like and it won't hurt the base layer. It kinda follows the same logic as animation cels !
Masking! Y'know when you're doing a traditional painting, and you put down tape to cover the area so you can paint over it and later remove the tape and everything underneath is untouched? That's basically what masking is! Once you put down a layer mask, using the erase tool on it will 'erase' whatever the mask is applied to, and using the brush will make it magically return! This may sound silly at first, but I find masking is especially helpful if you want to erase something on the layer you're working on without it disappearing forever! It's also really helpful for comic work because you can mask whatever's outside of the panels and voila, nothing you draw will travel outside of those panels!
Stabilization! I don't know how extensive Ibis Paint X is with offering stabilization tools, but many digital art software comes with it and it's a LIFE SAVER for new digital artists adjusting to the feel of digital art. It essentially 'slows down' the output of the ink on the canvas which helps a lot with getting cleaner lines in fewer tries. It's not quite as big of a deal when drawing on iPads because obviously you have more control by default by drawing directly on the screen, but it can still be really helpful when you need to pace your hand ahead of the actual drawing tool to pull cleaner lines!
That's pretty much all I can think of for now! But here are some other commonly asked questions:
1.) There are so many brushes to choose from, which one do I use?
The round brush is small but mighty. Virtually anything can be painted with it, it's simple, but malleable, especially when you start messing around with the hardness and opacity settings. Don't get too lost in the sauce with the brushes that are available to you, it can be very easy to get overwhelmed by all the options and variety. Some artists still work purely with just round brushes, some artists have custom brushes they like to use to speed up their drawing process or achieve certain textures. Play around with them, but don't get too stressed about which one you use because there's no wrong answer, the right brush to use is the one that gets the job done ! <3
2.) What canvas size should I use?
It depends on a variety of factors such as whether or not you're planning to print, where you're going to be posting it, etc. By default I like to work on 8.5 x 11 inch canvases (standard printer paper size) at 350 dpi, which if you want to make that canvas in Ibis Paint X, means you just have to make a canvas with a pixel ratio of 2975 x 3850 pixels! Just note that the lower you go in either pixel count or dpi, the lower the resolution, so it's typically encouraged you work at a minimum of 300 dpi (but you usually don't have to go any higher than 600) to ensure you don't wind up with any blurry low res JPG's/PNG's.
3.) Should I export my final drawing as JPG or PNG?
This is usually just up to personal preference, but like the canvas size, it depends on what you're using the image for. You can always export as both, the biggest difference between them is that PNG is lossless meaning you won't experience image compression like you will with JPG, BUT you're also going to have much larger image sizes. JPG is often fine for any standard posting, PNG is typically recommended if you want to have a drawing with a transparent background for printing (as JPG can't do transparent backgrounds) or if you just want to have a really high res image file for sharing outside of social media sites (as social media sites like FB/IG/etc. will typically compress the hell out of your images anyways)
Here are some other super helpful resources as well if you need some visual and/or audio guides:
Sinix Design - How to Learn Digital Painting (Beginners)
Marc Brunet - The Beginner's Guide to Digital Art
Skynix Art - 50 Digital Art Tips in 5 Minutes
One thing I also like to do is watch speedpaints of digital artists as it can really help pull back the curtain on what they're doing (or at least, it can help you see what they start with which can help you better picture the process of turning a blank canvas into a finished work of art!) And though I don't do it as often, if there's an artist whose work I REALLY like, I'll try and find their actual work files (many bigger artists sell them on their crowdfunding sites/Gumroad/etc.) so that I can actually break the drawings apart layer by layer for the purpose of analysis. Of course, all that is something that you'll grasp better over time as you learn the tools and learn to recognize what artists are doing in their own workflow, so don't worry if you don't glean a whole lot of info from the "big guys" right away, you should always be referencing artists who are higher along the skill ceiling from you but not too high that they're using techniques and tools that are outside of your realm of understanding.
Other than that, just try to have fun, don't stress too much about it, and save often!!! Part of creating art is learning to be at peace with the process, so don't stress too much if it takes you a while to get adjusted to the layouts and tools - at the end of the day, digital art is another medium entirely, so it's not uncommon at all for traditional artists to need a lot of practice to 'switch' to digital, because they both utilize different tools and techniques. Be patient with yourself, always be on the hunt for new resources and guides and references, and don't be afraid to experiment and make mistakes (the best part about digital art? Mistakes don't cost you any paint or materials!)
Good luck!! And congrats again! 🥰
58 notes
·
View notes
Text

downloaded Affinity Photo (to attempt to replace photoshop for editing software) and Neil is my go to test-baby.
have a 15min sketch from a program I wouldn't normally use to draw anyways!
@stabbyfoxandrew told me to post this so I'm doing so.
#my posts#aftg#all for the game#the foxhole court#Neil Josten#aftg fanart#all for the game fanart#tfc fanart#pfate art#I refuse to believe Neil doesn't have this look on his face like a solid 80% of the time lmao
28 notes
·
View notes
Note
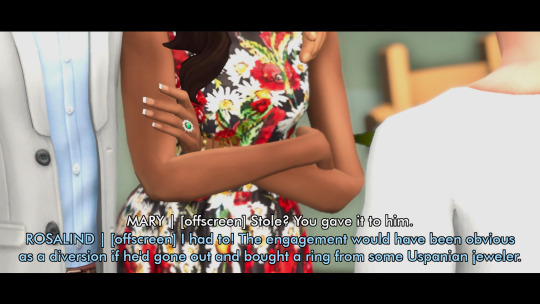
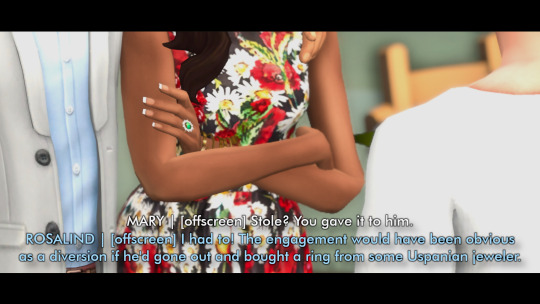
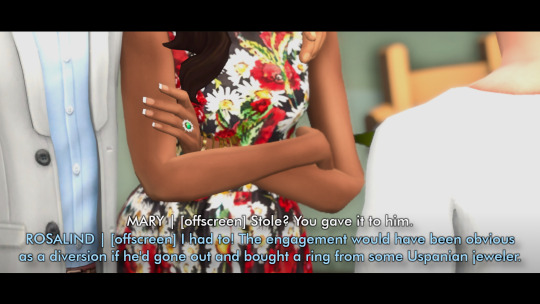
I have to ask, how did you edit your plus sized MCs? (I imagine my ID MC Mary to have a similar body type to that but slightly smaller)
I love it because I have been waiting a plus size protagonist in Choices and I'm been starving!
Ooh so the software I used to make these plus-sized edits is called Krita, which is open source and free to download for PC!
You also don't need to use Krita if you just want to try your hand at basic edits like changing a sprites clothes - you can stack up layers of Choices assets in something like Canva online.
There are plenty of amazing people who make Choices assets available -- @farizrz and @cassiopeiacorvus are my usual go-tos (thank you again for your hard work!)
You just download the images you need, and assemble your layers like so:
Hair - Front
Face
Accessories
Clothing
Body
Hair - Back
I'll ramble more under the cut about some of the specifics 💖 (Sprites in their underwear below!)
Spoilers: I made an edit of Mary for you ssdfklj
Let me preface this with: idk what I'm doing. I'm self taught, still learning, and I don't have an art background, so others can probably do a much better job than me, but here's my attempt at this stuff!
So, to start, we want to grab the bits that we'll need - the base "Student" body type, your MC face from Immortal Desires, and the new sprite we want to edit - in this case, its Dee/Maia's body from Getaway Girls

Then, you can begin by looking at the colour palettes of both sprites to see what you are working with - I used the eyedropper tool a few times to get an idea of the various colours used in the highlights, base colours, shadows, undertones, etc of these sprites. You can see the ID sprite seems a little lighter, cooler, and less saturated overall.

From here its a case of making a new group and adding various layers to it to achieve the effect you want through a combination of "Colour", "Screen" and "Multiply" layers, as well as using the "HSV Adjustment" and "Colour Adjustment Curves" tools.
Each skin tone is going to be a case by case thing -- some will want more reds in the shadows, or some will need parts of a multiply layer erased bc it's losing emphasis on highlighted areas, etc.
I recommend clicking this little symbol (I think its a clipping symbol? Again, I'm just learning this all by trial and error) to essentially keep you from drawing outside the lines.

And then its just lots of minute adjustments! Here is a comparison of the edited body with the original "Student" counterpart. The physical manipulations were done with the "Liquify", "Warp", and "Perspective" tools. (Unfortunately, the more you (well... I lol) edit things, the more detail gets lost and blurry, so you can see things like her hands are beginning to lose detail.)

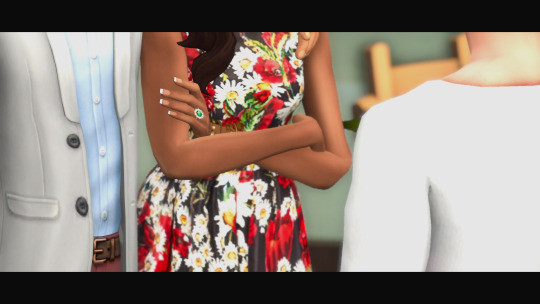
And then once you've made all your adjustments, you get something like this!! Here is a comparison between the original "Student" body type, one of my own MCs, and Mary, whose new body type is somewhere in between the two (hopefully) like you wanted!

Throw on a sleeveless version of one of the outfits from ID2, and some hair, and you're done! (Here are some transparents of our beloved Mary for you ft. some of the ID hair options, plus one that made me think of the photo you used in her "Meet My MC" profile ✨💛

Hope they turned out okay! Thank you for the ask lovely, I hope you are having a great day!
21 notes
·
View notes
Text
How I Make Gifs!
I've gotten multiple asks in my inbox about the method I use to make these animal crossing gifs:
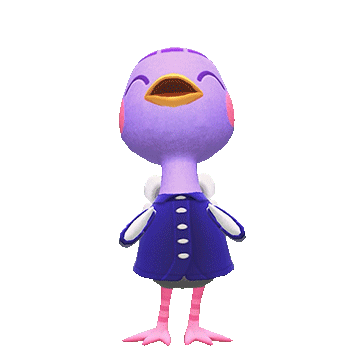
So I figured it was about I time I answer these asks in the form of a separate post using gifs and screenshots to help explain things! I will warn that this will be an EXTREMELY LONG explanation, but I want to give as much details as I can under the cut. I'm going to use Queenie as my example!
The first thing I do is go to Photopia on Harv's island, a place where you can take photos using any of the villagers in the game and all the items you've collected. I use the Custom Designs app on the nook phone to download different colored wallpapers and floors. The colors that I use depends heavily on the villagers. I've used different backgrounds to make these gifs: green, blue, magenta, and (very rarely) black. For Queenie's colors, it was best to use green! I usually place the villagers towards the back of the wall while I stand in the center of the room. From there, I take out the phone's camera and start recording different reactions.


To record these I use my capture card, the Elgato HD60 S, and the capture software that you can download from Elgato's website. Any capture card and recording application will work.
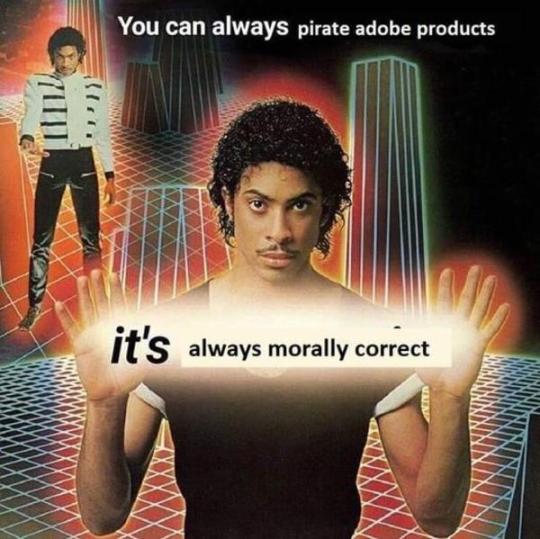
I use three adobe apps to make these gifs: Premiere Pro, After Effects, and Photoshop. I know not everyone has access to these, but I was able to obtain these with the help of some friends. I won't go into details, but I will leave you with this image as a friendly reminder:
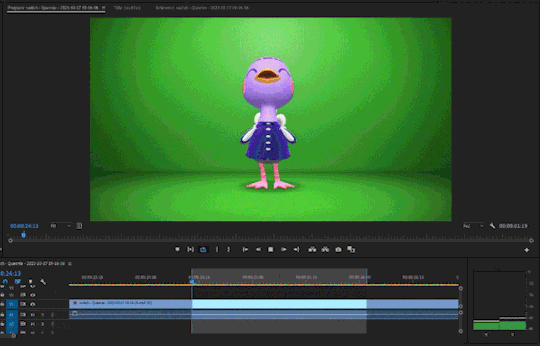
Premiere Pro - Here is where I drag all of my videos down onto the timeline and begin the editing process!
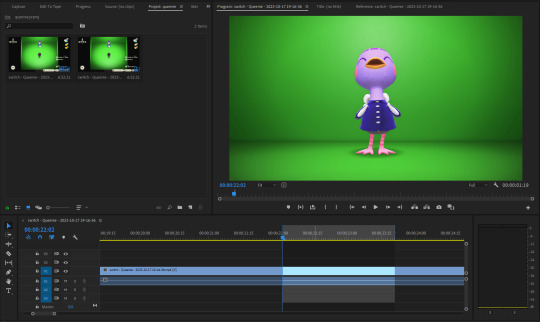
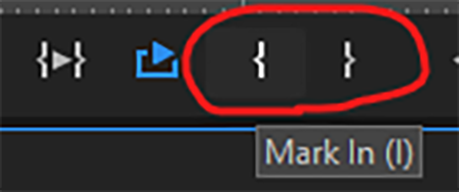
I try to find the best looping points for each reaction. I mark those points using the "Mark In" and "Mark Out" buttons located at the bottom of the preview window. The "Mark In" sets the starting position for the villager reaction and the "Mark Out" sets the ending point, creating a bracket for that specific reaction.
After marking these points, I use the "Play Video In and Out" button and then I make sure to click on the "Loop Playback."
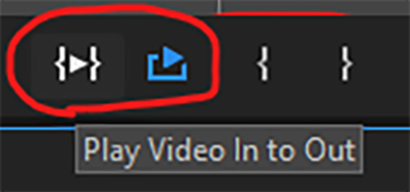
This will not only play the parts of the timeline that I've marked, but it'll loop that exact bracket.
From there, I go to File > Export > Media (or ctrl+m on keyboard). This will bring up the export settings window. I turn the "Source Range" tab to "Sequence In/Out," so it only exports the spots I've marked with the "Mark In" and "Mark Out" buttons.

I then go to the source tab at the top and select the cropping tool.
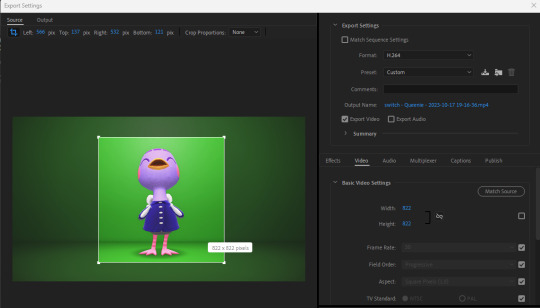
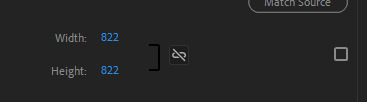
I make sure to click the box under the "Match Source" button to remove the check mark, and then click the chain icon next to height and width settings to put a slash through the symbol. This allows me to freely crop the video and adjust the height and width of the output, so I can make a perfect green screen box around the villager

I then export this video and move on to the next reaction.
I have folders for each gif set that I make. They usually look like this for all the villagers I've completed sets for:
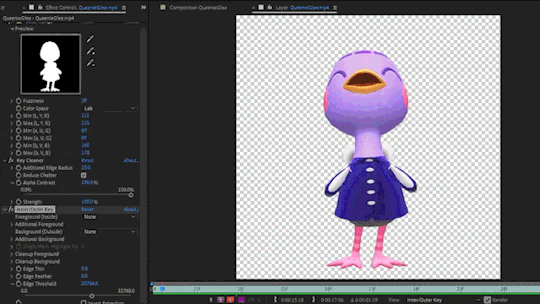
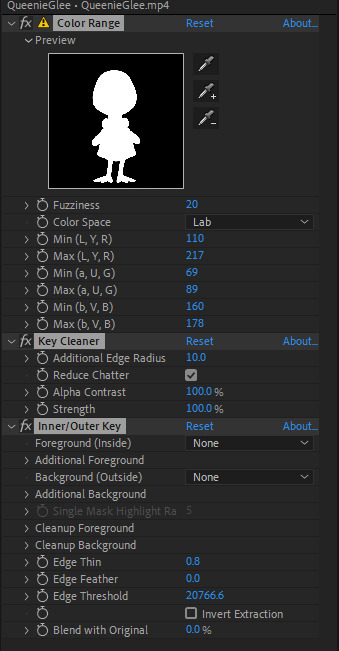
After Effects - Here's where I open all of the reaction files. I go to the effects panel and open the keying tab.
This is where the magic happens! There are three keying effects that I use: Color Range, Key Cleaner, and Inner/Outer Key.
First Effect : Color Range - Starting the keying process, I use dropper tool on any part of the green that's behind the villager. This will only remove some of the background elements because how unevenly colored the green is, due to the lighting of the game.
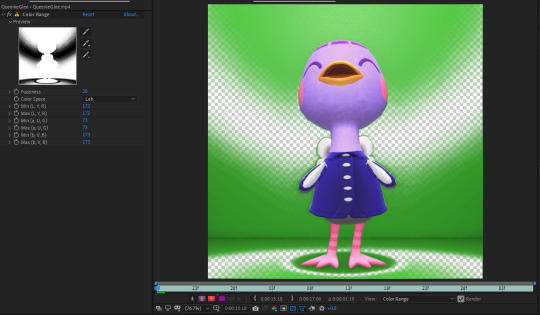
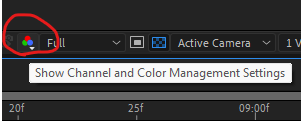
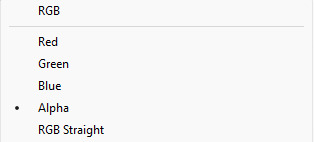
I then use the dropper with a "+" icon on the rest of the background. What helps me is clicking the "Show Channel and Color Management Settings" button at the bottom of the preview window and switching to the "Alpha" view. The alpha channel deals with the transparency of an object and switching to this view allows me to see every bit of the wallpaper and floor that remains. This is where I can apply that dropper+ tool to get rid of them. It doesn't have to be perfect, because the other keying effects that'll be used will help get rid of the loose pixels of green that may still be present.
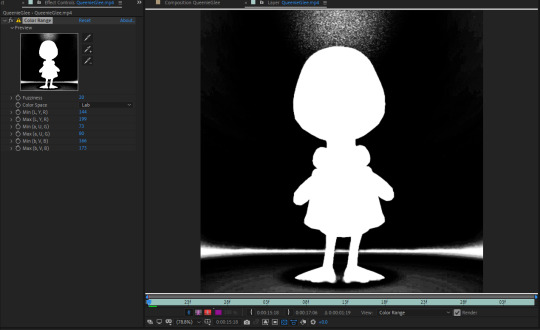
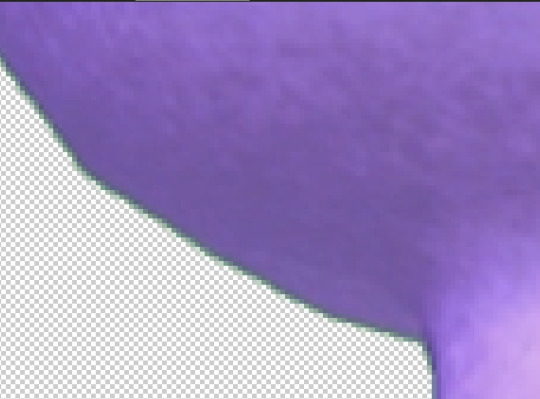
From here, the only adjustment that I sometimes use under this effect is the "Fuzziness" tool. Some villagers will have various color patterns that'll get keyed along with the background. Bringing down the fuzziness helps bring some of those colors back. This does run the risk of bringing some the background pixels back into the video, but that can easily be erased. I usually don't need to adjust the fuzziness. Again, it all largely depends on the colors of the villagers. After all of this is done, I now have a transparent background, but now there's a green outline around the villager:
Luckily, the next effect will help with that!
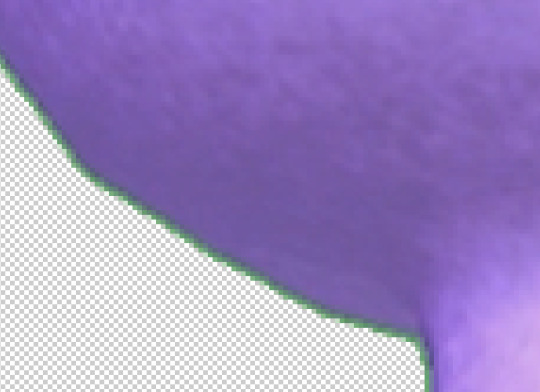
Second Effect: Key Cleaner - This plugin helps clean up the alpha channel around the edges of the villager. The only thing I do here is select the box labeled "Reduce Chatter" and turn the "Alpha Contrast" all the way to 100%.
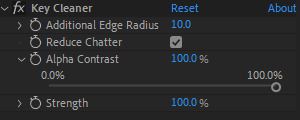
This helps erase most of the outline and makes the edges a little sharper, but there's still a tiny bit of green that surrounds the villager.
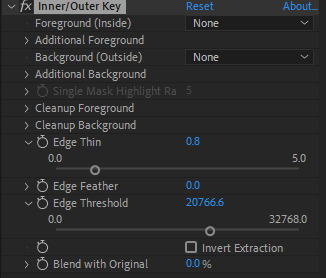
Third Plugin: Inner/Outer Key - I will admit that I don't utilize the entirety of this effect's capabilities. I only adjust the "Edge Thin" and "Edge Threshold" sliders, which should shave off the rest of the green outline.
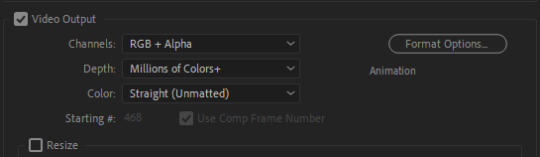
Using these tools, I've now completed the keying process and I have a nice, crisp villager reaction with a completely transparent background!
Next I go to File > Export > Add to Render Queue (or ctrl+m on keyboard). I bring up the output settings by clicking on the "Output Module." I then change the format to QuickTime, which will render the reaction as a ".mov" file. I then change the channel to "RGB + Alpha" to render the object (which is the villager) and the transparent background.
Once this is done, I hit the render button and the reaction has been exported! After doing all of this with the first video file, I highlight all of the effects that I've applied from the effects panel by clicking on the names:
I then hit ctrl+c on my keyboard, open the next reaction into the timeline, and then hit ctrl+v. This copies all the effects applied to the first reaction and pastes them to the next video. I repeat this process for each file so I don't have to redo the entire keying process for all of the reactions. After they're all rendered, I can move onto the final adobe step.
Photoshop - This is where I open all of the QuickTime files that I've exported from After Effects.
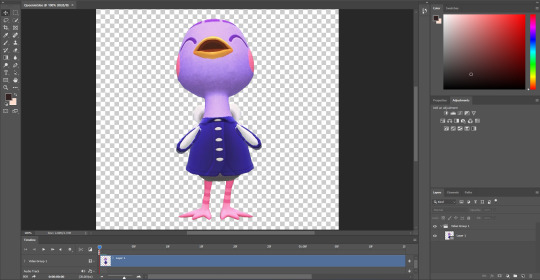
From here, I can apply any adjustments to the villager, whether it be adjusting the brightness, messing around with the hues and saturation, increasing the speed, etc. The main thing I do here is decrease the size. These files are usually huge so I have to adjust the size so I don't risk putting groups of extremely large gifs on peoples' dash. I go to Image > Image Size (or Alt+Ctrl+I on keyboard) and change the width and height to five inches. Of course, any size you choose will work. Five is just perfect for me because it's not too small to ruin the quality of the gif.

After this is done, I got to File > Export > Save for Web (or Alt+Shift+Ctrl+S on keyboard). This is where I can preview the gif.
I go to looping options on the bottom right and change it to "Forever," otherwise the gif won't loop. I then turn the matte to "None" so the gif doesn't export with an outline around it. I also make sure that the transparency box is checked. This is what my window looks like before I hit the save button:
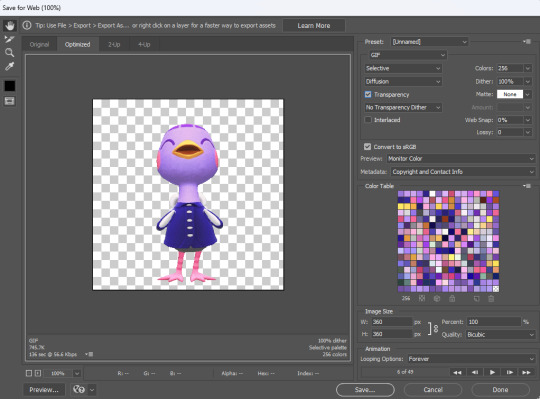
Once I hit save, that's it! Queenie has been exported as a gif. You can see that gif at the top of this post.
If you've made it this far, thank you for reading all of that! I know some parts of this could've been just a simple summary, but I really wanted to show all the details of how I use every application in this gif making process. I will say that I'm no expert at adobe. This is just a method that I pieced together after experimenting with different combinations of keying effects and I managed to make it all work. I apologize if this process seems messy to advanced users out there and I welcome any tips if they help make things easier!
96 notes
·
View notes
Text
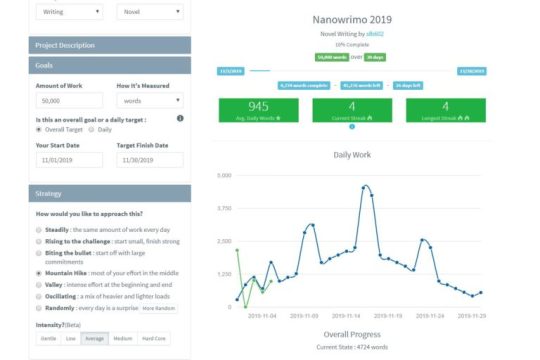
Best Tools to Track Your NaNoWriMo Progress
The NaNoWriMo site allows anyone who signs up for a free account to set their word count through their dashboard. There are plenty of other resources to help you too, but if that’s not your style, these are other tools to track your NaNoWriMo progress. See if you like any before November begins to tackle your manuscript even faster.
Note: None of these are paid promotions or affiliate links. They’re just recommendations based on what I and other writers have found helpful in the past!
1. FocusWriter
Writers often start exploring the world of creative writing tools by downloading FocusWriter. The free program hides everything on your screen except your document and shows a custom background instead, like the wooden background below.
Use the settings to customize each writing experience and keep track of your daily NaNoWriMo word count goals. It even spell checks for you, which speeds up your editing process.


2. NovProg
NovProg is a free writing resource that’s best for people who don’t want any hassle on their screens. If you’re into graphs, this might be the tool you love. The program makes graphs of your daily word count progress so you have more visual encouragement during your NaNoWriMo experience.


3. Scrivener
Scrivener is a popular software within the creative writing community. You can use the free trial to see if it’s your thing before Scrivener requires a $51 purchase for Mac users or $60 for PC users.
It’s expensive, but popular for a reason. The program has file organization options for planners and writers who don’t outline their work. Save character outlines, track your word count, save photos, and store links to inspirational Scrivener corkboards.
The software also lets writers research from within Scrivener. You won’t need to open a Google tab (and potentially whatever internet distractions await you) to double-check information or even transcribe an interview.

4. MyWriteClub
Name and update your word count goals automatically by writing alongside MyWriteClub. The simple progress bar even updates with encouragement from friends who use MyWriteClub. Their notes will pop up under your word count as you work on your NaNoWriMo projects together. It takes away the loneliness that can sometimes come with writing stories by yourself.
If you don’t have any in-person friends doing NaNoWriMo, there are global writing sprints available for MyWriteClub users. The 15-minute focus sessions connect writers as they work on their word count goal for the day. It might be the encouragement you need to stay on track, especially if you get bored writing by yourself.

5. Fighter’s Block
Merge your love of video games and creative writing with Fighter’s Block. After setting your word count goal within the website, you’ll become a character fighting a monster. The monster wants to destroy your words, but your word count progress keeps it at bay.

6. Write or Die
This is another infamous tool in the creative writing world. It’s what you might want to try when you need extreme help with knocking out your daily word count.
Input your word count goal and start writing. If you slow down or miss your goal, the program deletes random chunks of your work. You’ll get a few warnings, but the deletion often happens sooner than writers expect. It’s better to use this program when you know what you need to write, but need a push to stay with your manuscript until you’re done for the day.
Change the settings outlined in yellow below to match what you need from your writing experience. There’s also a setting to get encouragement instead of your work deleted, if you’d prefer that. Click the Ready button and your screen updates—you’ll have a blank space to work in the middle.
You can purchase this program for $10 for both Mac and PC, but the free version works for many writers who just want to do short writing sprints.
7. Coffitivity
Writing with background noises is one of my favorite things to do when I need to focus. It helps me stay away from anxious thoughts or external distractions. If you don’t want to use YouTube or another music app while you write, Coffitivity is here to help.
This program has a library of background noises that recreate ambient environments, like coffee shops. The low chattering and clinking of dishes could help you stay focused or defeat any writing anxiety associated with looming NaNoWriMo deadlines.
8. Pacemaker Planner
Remember how I mentioned that breaking your goals down makes NaNoWriMo easier? That might seem impossible if you’re not usually making lists and goals for yourself outside your writing routine.
Pacemaker Planner removes the guesswork. If you give it your overall word count, your final deadline (November 30), and how much time you estimate you’ll have for your writing each day, it’ll calculate your daily word count for you.
The graphing option also adds more flexibility to your goals. Let’s say you’ll be more free in the middle of November than the beginning or end. Select the Mountain Hike strategy. The program recalculates your daily goals according to your preferred writing strategy so you’ll get higher word counts when you’re actually free to write.
The free version is great for NaNoWriMo purposes, but there’s also a Premium version you can get to plan your full yearly calendar and daily schedule, if you enjoy the program.
-----
You don’t have to cross your fingers and hope to conquer NaNoWriMo this year. Try these tools while they’re still time to explore your options. Whether you want to plan the whole month or turn your word count into a game, you’ll have more success after seeing which tools are at your disposal.
#nanowrimo#nanowrimo 2023#nanowrimo resources#nanowrimo tips#writer's block#writeblr#writing tips#writers of tumblr#writing#creative writing#writing inspiration#writing community#writing help#writing advice#writing resources#writer things#writers life#writers block#writers on tumblr#writerscommunity#resources#free resources#creative writing resources
68 notes
·
View notes
Note
sorry i couldn't find out how to ask on your other blog.
that book binding you posted is gorgeous btw !!
I noticed that in one of the photos you included the disclaimer that you also edited it. I just had a question about how you formatted the text.
one of my biggest gripes with AO3 is text formatting (i often feel like i'm reading a legal document vs a novel/story) . Did you change how it is formatted on AO3 compared to printed?
I feel like i'm in the 0.5% that hate AO3 formatting but i thought i might as well ask in case you have any tips for that. >,>
(also how do you decide on the page size, do you just choose a standard size for all your projects? or do you vary it depending on what you are binding?)
thanks so much for taking the time to answer and for sharing your projects :) !!!!!!!!!!!
hey anon! I have asks turned off for the sideblog, but happy to answer here. Thanks very much!
I'm taking this opportunity to info-dump and link a lot of resources. I think they're useful for people new to either typesetting or bookbinding, but not all are directly related to your queries. That said, hope this is of use!
one of my biggest gripes with AO3 is text formatting (i often feel like i'm reading a legal document vs a novel/story) . Did you change how it is formatted on AO3 compared to printed?
I do a fair bit of editing when I'm binding a fic; typesetting is often the longest part of the process. Your mileage will vary depending on your experience with using word processor software, particularly the paragraph style and page style settings. Another factor is how simple/complicated you want your typeset to look. Replicating a published novel in format is difficult but learnable for a complete beginner.
I'm not equipped to give a full tutorial on how to typeset, but I'll point you towards some useful resources for ficbinding then talk about my own process.
ArmouredSuperHeavy has a tutorial on how to make Ao3's HTML downloads into a printable book in Microsoft Word. I use LibreOffice Writer myself, so this adaptation of the same tutorial is what I follow. Both are very helpful to reference as you're learning the typesetting ropes.
Personally, I don't mess around with HTML. I find it easiest to start by doing a Ctrl+A copy of the Entire Work fic view on Ao3 then pasting that into my word processor. This video tutorial by Beautifully Bound runs through how to do this in Microsoft Word using an AO3 fic as an example, including the associated steps needed to make the fic look novel-like. This is probably the best tutorial to address your gripe with AO3 formatting. Other than that, I'd recommend looking into videos or tutorials about typesetting novels for print. Same idea, and you may get more hits than searching for fanbind/ficbind typesetting tutorials.
More under the cut! Once I start yapping, it's hard to shut me up 🤷♀️
As a point of comparison, here's one of my fics on Ao3 and the corresponding typeset side by side:


Beautifully Bound explains this in far better detail than I will, but off the top of my head, the steps involved:
making a new document and setting the default page size to whatever size I want the book's pages to be (A5 or A6 usually). You can also set the margins at this point, taking account of your printer settings.
CTRL+A and copying the entire work's text on AO3 then pasting it into the document.
removing all hyperlinks and AO3 frontmatter, things like the author tags, summary, notes, etc as well as any website text that got copied over alongside the fic.
(optional) running a spell check and ensuring grammar usage is consistent. For me that's substituting em dashes for hyphens between clauses, enforcing curly double quotation marks for dialogue, etc. LibreOffice Writer automates a lot of this with customisable settings, via Tools -> Auto-Correct. Here's also where to make sure character names are all spelled right, convert the text to or from US to UK English, etc.
picking out fonts for the body text, headers, page numbers, etc. This is where you'll want to use paragraph style settings. Page style settings also comes in clutch if, for example, you'd like different headers on alternating pages. I like having the author on the right, the fic title on the left.
setting the body text first line indent to whatever makes sense visually). This in particular helps make the fic feel more like a novel. You can also play around with line spacing and space between paragraphs at this stage. For this A6 typeset, I had a 0.75cm first line indent, 1.15 line spacing, and 0.15 spacing between paragraphs.
(optional) formatting the first line of the work to use small capitals and to add a drop caps to the first letter of the first word. Again, this is a convention in publishing which add a novel-like feeling to a printed fanwork.
Inserting page numbers, adding images, coming up with how I wanted the "copyright" page to look—optional for the most part, but these are details that make a fic appear more like a novel.
For multi-chapter works, there's extra work in formatting chapter titles as headings so that they're referenced correctly in the automatic table of contents word processors can generate.
Once you have a typeset you're happy with, and if you're considering printing and binding it as a book, then you'll need to look into how to create and print signatures. Personally, this is something I had to actually try (and mess up a bunch of times) before I got to grips with it. Understanding how both your printer and your PDF reader work, particularly printer margins and booklet print settings, is key.
I won't go into as much detail on this, but if it's something you have an interest in, I'd recommend starting with DAS Bookbinding's tutorial. DAS has tutorials for everything bookbinding related so when in doubt, check his channel! Plenty of other YouTubers also have good videos on making signatures.
This resource is extremely useful once you've got your head around how to print signatures manually, so here's a link for anyone in that space: GitHub Bookbinding Imposer. Essentially, this does the signature creation for you, removing the need for booklet print settings in your PDF reader.
also how do you decide on the page size, do you just choose a standard size for all your projects? or do you vary it depending on what you are binding?
I have access to both A4 and A5 sized paper and my printer can handle printing on either size. In bookbinding, normally two pages are printed per side of the paper (which are then folded in half as part of a signature). That is, when I print on A4 paper, it's to make an A5 sized book. Printing on A5 paper will yield an A6 sized book.
Before I begin typesetting, I'll usually know what paper I plan to use, so the typeset will be one size down from the paper. So far, I've made softcover pamphlets at A6 size and casebound books in A5. No real method of choice for me, it's whatever I feel most suits the project.
---
If you made it this far anon, thanks for reading! Here's links to a few general resources if bookbinding is something you'd like to explore more:
DAS Bookbinding (YouTube, bookbinding in all forms)
Sea Lemon DIY (YouTube, bookbinding and other crafts)
bitter melon bindery (YouTube, bookbinding, particularly beginner friendly!)
Jess Less (YouTube, demonstrations of fanbinding and re-binding existing novels)
Papercraft Panda (blog, lots of detailed tutorial on bookbinding)
Renegade Bookbinding Guild (collective and website, loads of fanbinding-specific resources from their members and they have a helpful Discord).
16 notes
·
View notes
Note
I'm sorry this may be dumb but... what art artist grants? Are they just like academic grants where you write a proposal and someone pays you to make art?
Most metropolitan areas have an arts council, whose purpose is to encourage artists to create, thrive, and connect. Some councils set up grant programs to provide funding to artists in the area. You can get some money to work on your art.
They require you to say exactly how much you need, and there is a limit to how much you can make from the grant. In the case of the one I'm applying to, the limit is $500 and I have to outline exactly what I would use $500 for. I have to submit an artist's resume, a proposal, a budget, and a portfolio.
The council then looks at your proposal, and decides whether you get the grant. If you get the grant, that money is yours so long as you are using it specifically for your art. I've never gotten one before, so I'm not sure if its a check or if there's an account opened with limited use or what.
So like... in the example I'm doing here- I'm applying for a grant for photography. The amount is not nearly enough for a new camera, so forget it. But $500 would mean that I can:
expand my memory for my camera and for my computer
buy editing software thats more efficient in decrease my turnaround time because my ambitious ass has been doing one photo at a time on freeware and a batch editor would slice that work time into absolute fractions.
Upgrade my website so that I can host video and host more albums for client download.
pay for admission to more festivals for me to cover, since I can't always guarantee that they'll let a press person in for free.
Social media management software, because tagging people to make sure they get to see their own photos is time consuming.
In my artist's statement/proposal, I have to make a case for why my photography is art instead of 'journalism,' because they are the Arts Council and they have to make the distinction. Sucks, but here we are. I know how I want to spin it, I know what I'm about.
An artist's resume outlines all the things you've done as an artist. So if you were an arts student, yes. Did you have an internship- put it in. Have you sold pieces? Is your art hanging somewhere? Have you been in any shows? Stuff like that.
Not every city has opportunities like this, but some bigger cities will extend their jurisdiction to adjacent towns and townships.
Anyways.
The general spirit of the thing is- if you want some money to make art with and you qualify, the worst thing that can happen is they say no.
41 notes
·
View notes
Text

i didn't have a tutorial yet... so i made one lol. its longer than i wanted it to be, but i wanted to make sure it's easy to follow for people who've never made cc or have no experience with photo editing software, and fully explain my process. it's by no means hard at all though lol, i guarantee you making skin details is the easiest thing aside from recolors and if you want to learn this is a good place to start :-)
for people who are more experienced than that, and want to know specific things-- i've sectioned everything so it should be easy to skim through until you find what you need!
requirements.
this tutorial will only require sims 4 studio (free) and photoshop (not free) or gimp (free). i pirated photoshop 2022 myself. any version will do but i think 2022 just has nice new features for making content! if you don't want to buy or pirate, gimp is a similar alternative.
1.1 how to find skins to use as a base.
in case you don't have (a) skin(s) in mind to use for your skinblend, my tip is to download as much random ones as you can find. this way you have a lot to choose from and it's easier to get an idea of what you want.
go-to creators for maxis match skins: heihu, madmono, pyxiidis, faaeish, miikocc, emmibouquet and stretchskeleton.
creators for maxis mix/alpha skins: sims3melancholic, obscurus, ddarkstonee and pralinesims.
creators for maxis mix/alpha skins that only allow editing for private use: northernsiberiawinds, remussirrion and thisisthem.
go into cas and try them all out. if you like a part of a skin, write down which skin it is and what part(s) you want to use of it from which swatch if it has multiple.
for example, i almost always use one or two skins for just the nose shape, one for the eyebags, one to three for the lips and one for the basic shading of the face. don't be afraid to use the opposite style skins of what you're going for, you can always add or erase details.
1.2 exporting the skins.
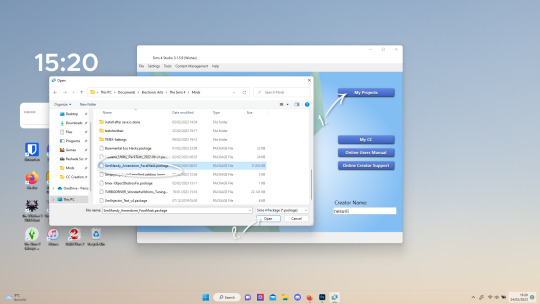
now we're gonna export the skins with sims 4 studio. click on "my projects" (1) and navigate to whereever you have the skins you want to use, and select one and click "open" (2).
the colored little boxes in the top right are the swatches. click whichever swatch you wanted to use something from (1), then click the "export" button (2). you'll get a window to save the exported skin now.
tip: i highly recommend making an organized folder for your skinblend, to have all your files together and easy to find. if you haven't made it already you can easily do so within this window.
i put mine in a folder called "resources" in a folder named "unnamed skin" for example.
name the exported skin file (3) and make sure the "save as type" is set to .png (4).
after saving the file, you can just click "cancel" on the bottom right to go back to sims4studio's starting screen. if you have multiple skins you want to use, repeat the above process for all the other skins to export them too.
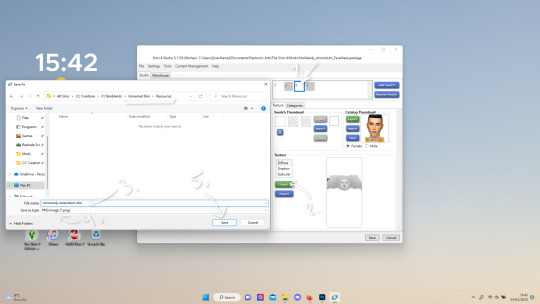
2.1 opening the exported files in photoshop/gimp.
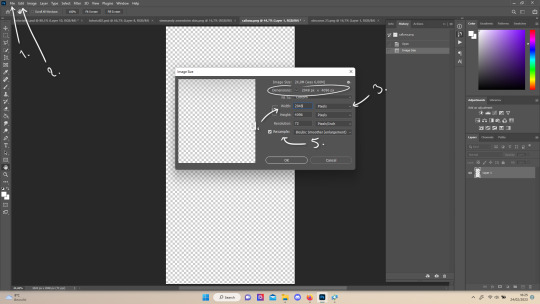
open your program of choice and click on "file" from the top bar (1) and then "open..." and navigate to the skin files. you can left click and hold down your CTRL key to select multiple at once to open.
we have to layer them all in one file, but before we do that we have to check if they're all the same size.
note: some skindetails might be 2048x4096, others may be 1024x2048. unless you want your skin to be compatible with the HQ mod, you should just opt for 1024x2048, as without the mod both resolutions look identical. the bigger one will just make your fize unnecessarily large.
click "image" at the top bar (2), then "image size". it'll say the size at dimensions. if it's at the size you want it to be at, just exit the window.
if you need to edit it, select "pixels" from the dropdown menu (3), and put in 1024 for width and 2048 for height OR 2048 for width and 4096 for height. if you're sizing up select "bicubic smoother (enlargement)" under resample (5).
repeat this for every skin you opened.
2.2 layering the skins together.

copy and paste all the skins individually onto one by selecting them with CTRL + A and CTRL + C on your keyboard, and pasting them into one of the other opened skins with CTRL + SHIFT + V. you can then close all the other tabs.
the file now has multiple layers. you can rename them by double clicking the layer name. this makes it easier to keep track of whats what. you can reorder them as well by dragging them with your mouse. put the skin you want to use as base (for the general facial shading, highlighting) at the bottom.
tip: i recommend making all white and all black background layers to see the skins better. you can do so by pressing D, then CTRL + SHIFT + N. for the white layer then press CTRL + BACKSPACE and for the black layer repeat the first two steps and then press ALT + BACKSPACE. now there should be two new layers in black and white. drag them to the bottom of the list. i prefer using white so i put black last.
2.3 changing the opacity in parts of the base skin layer.
to make ea's preset details (cheek/nose bridge sharpness, dimples) come through your skinblend, you need to change the opacity of the base skin sometimes. alpha skins tend to be fully opaque but maxis match skins are usually already transparant enough.
hide all the layers aside from this base layer by clicking the eye icon next to the layer names. you can see the transparancy with the visibility of the grey-white blocks or if you find it easier you can also unhide the black background to see it instead.
to change the opacity, you can either edit the entire layer's opacity (1) or use the eraser tool (E key) to add transparancy at specific parts.
if you have photoshop 2022, turn on vertical symmetry (+). if you don't have it, you can choose to edit only one side of the skin and mirror it later or do both sides and embrace some asymmetry.
i selected the eraser (2) and set the brush size to about 200px and 0% hardness. the opacity of the brush i set to about 10% (3). i used the eraser on the lower cheeks, the nose bridge and tip and the bottom of the chin. i also erase the upper eyelid 100%, cause i prefer to have eyelid freedom :p. it then looks like the above! this will very subtly let through details, if you want more you should make it more transparant.
2.4 optionally: editing out freckles, pores and/or eyelashes.
your base may have pores, freckles or moles you want to get rid of. to smoothen everything at once, click "filter" at the top bar (1), "noise" and then "reduce noise". i only edit the strength and sharpen details setting (2), this setting erased the pores and most of the freckles for me while keeping the details looking sharp, but you likely have to adjust it a little cause it depends on how large/fine the details are.
the remaining freckles, pores and eyelashes i remove by using the smudge tool, with 0% brush hardness and at 25% strength. (3) brush size depends on the size of the details. i just go over it in circular motions until the freckle or whatever it is has been blended away without pixelation.

for this part i'm going to only show how i do the nose as an example, however it works the same for editing in eyebags, lips, jaw lines or whatever you want to add in too.

unhide the layer of the skin you want to use a part of, and hide the base layer.
if you are going to use multiple parts of that skin (for example, you want both the nose and the lips of that skin), duplicate the layer by right clicking the layer name and choosing "duplicate layer...". then hide the duplicated layer. it's easier to edit one part at a time.
use the selection tool (M) to select the part. press CTRL + SHIFT + I and then DELETE. press CTRL + D to unselect. should look something like the above.
use the eraser tool (E) at a moderately small size like 30px~ with about 30% hardness and 100% opacity to erase around "hard lines", like the nostrils in this case and the bottom of the nose. the nose bridge has "soft lines", so if you were to use a hard brush for that, the shading of the nose bridge would look far too harsh and unblended.
for the soft lines, set the eraser tool at a bigger size like 100px~ with 0% hardness and a lowered opacity between 15-45%. erase soft lines "gradually", so the shadows blend in with the layers underneath it. should look something like the picture above.
always look at the newly added part with both a black and white background to see if there's anything you need to erase more. then look if it blends in properly with the layers underneath. if it's too dark or light, you can click on "image" on the top bar, then "adjustments" and "brightness/contrast", and lower or raise the brightness until it blends in better.
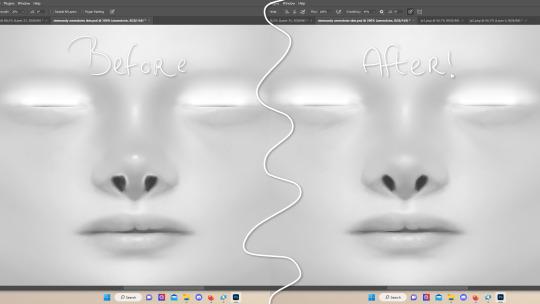
i'm using two separate skins to make the nose, so i've repeated the process above for the second nose skin, then used the method of step 2.3 to erase certain parts and make other parts more transparant / blended in. as you can see above, it's now the perfect offspring between the two noses i used.
note: for a maxis match nose, you'll want to avoid a completely opaque nose, mainly at the nose bridge it should be more transparant. i always make sure the lips and eyebags are fully opaque though, unless you're going for a vanilla type of skin it doesn't look good transparant.

at this point, i like to save the file with the white background layer on and see what it looks like in sims 4 studio. this gives you a better idea of what it looks like on sims and what you may want to change or add. press CTRL + SHIFT + S and name your file, and set the file type to .png.
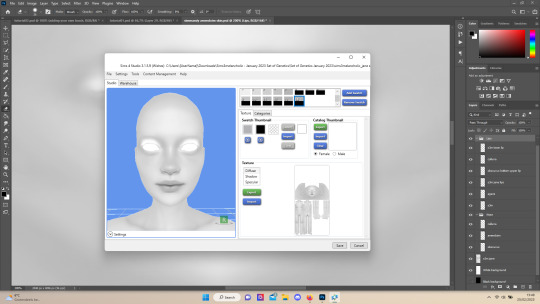
open any skin or skin detail cc file just like in step 1.2, and instead of exporting anything, click "import". now navigate to the file you just saved, and open it. the sim model now displays what your skin looks like. should look something like the above! you can click cancel after you've looked enough, so you don't have to worry about ruining the original cc file.

maybe you're happy with the skins current state... but in case you want to add or change some things, here's a step by step how i do it.
5.1 drawing shadows & highlights.
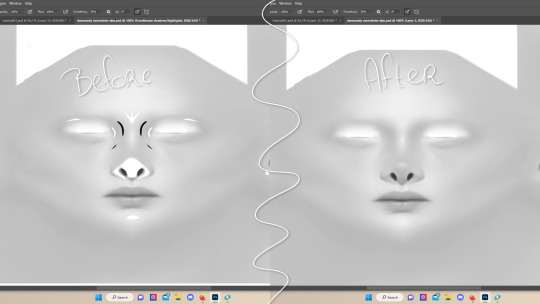
as you probably have noticed, everything needs to be done in greyscale, so select black (for shadows) or white (for highlights) in the top right colored box. make a new layer (CTRL + SHIFT + N). select the brush tool (B) and set the brush at about 0px with 100% opacity. draw the shape of the shadow or highlight where you want it. make sure to make a new layer for every shadow and highlight!
now you can either use the smudge tool to blend it out, but i prefer using "filter" from the top bar, "blur" > "gaussian blur". i just play around with the radius until it's blended out but still has some shape to it. it depends on how small or wide and blended you want it to be.
then i use the eraser to shape the shadow/highlight further. for example, i want the shadow in this case more blended out towards the eye, but harder towards the forehead and nose, so i use the eraser on that side. lastly i change the layer opacity to make the shadow/highlight less dark/light. my preference lays with subtle details, but of course you can make it as contrasted as you like!
5.2 drawing small details.
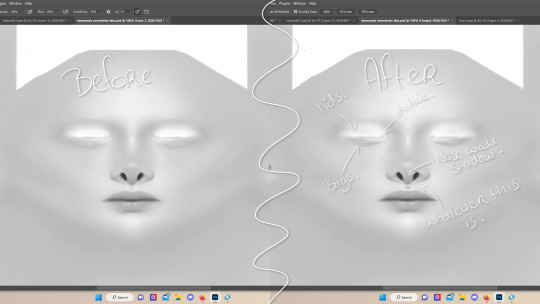
to draw your own details, use the brush in 1-3px brush size, 100% opacity in black. i can't help you here cause it's just drawing where you want and then blending it out with the smudging or blurring tool where needed, and using the eraser at lower opacity to blend it in.
to give you some ideas, i usually draw some details on the nose like sharper nostrils or a nose wall, some texture on the lips and the eyebags. i like using reference pictures of real peoples skins to see where and how to draw things. before and after pictured above! (i'm so proud of these eyebags yall T-T)
5.3 adding other creators cc skin details.
if you don't like drawing things yourself or know just the right cc skin detail your skin needs, you can also use other creators' skin details on yours.
maxis match + mix details: pyxidis about face, miikocc face kits, okruee face details, sammi-xox face details, lamingtonsims face details.
maxis mix + alpha details: detail overlays by obscurus-sims, ddarkstonee & sims3melancholic
like in step 1.2, just open the file in s4s and export whatever swatches you want to use. remember to make sure the resolution of the file is the same as your skin's before copy and pasting it on your skinblend! and remember you can lower the opacity layer for these too.
5.4 mirroring your skin.
if your skin isn't mirrored/symmetrical yet, save your file as a .psd and then right click the layers, click "merge visible", press CTRL + ALT + C, and set the canvas width to half what it is now (either 1024 or 512). (1) click the arrow in the left middle if you want to mirror the left side, or the arrow on the right middle for the right side. (2) press "ok".
press CTRL + A, then CTRL + X, then CTRL + SHIFT + V. delete the layer beneath the active one (it's empty). then press CTRL + ALT + C again, and put the canvas width back to the original (2048 or 1024). select the same arrow you selected before, and click "ok".
press CTRL + A again, then CTRL + C. now click "image" from the top bar, "image rotation" and then "flip canvas horizontal". now press CTRL + SHIFT + V .... and voila, your skin should now be mirrored.
note: ik there's a ridiculous amount of steps for such a simple thing so i feel like there's probably a much faster way to do this, but i hate following tutorials and guides (the irony) so this is just the way i taught myself lmao
5.5 last test & optional last touches.
at this point, i'm done with the skin. i erase everything aside from the face if the skin still has a full body texture cause i prefer face-only skinoverlays. i always save as .psd and .png, .psd is to edit it later on if need be. once again import your skin into s4s like in step 4, and see if you're happy with the skin. if not, just keep editing whatever you need!
i also like to add alternate versions of the skin lastly here. some examples: a soft nose or hard nose bridge (justice for flat soft noses, simblr loves to erase them lol), different eyebags, lighter or darker lip option, version with eyelid overlay or without.

6.1 creating the package file.

to make the package file for your skinblend, open s4s and select "create cas standalone" and then click "cas". (2) now select "skin detail forehead" from part type (3), click the most left forehead wrinkle and click "next" (4). name the skin file whatever you want, you can always change it later!
click "import" and open your skin file. and voila! you're pretty much done!
6.2 editing the age, gender & occult flags and category.
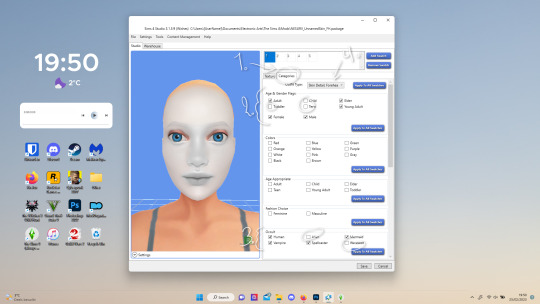
right now your skinblend is only available for young adult to elder sims, and not for aliens and werewolves, so you probably want to change this. go to "categories" (1) and check the boxes you want under "age & gender flags" and "occult" (2). you don't need to change any of the other things.
if you wish to change the skin detail slot it's in, you can change it at "outfit type". most people use either forehead or mouth crease, but you can use any of the ones that start with 'skindetail'.
6.3 adding swatch colors, thumbnails or additional swatches.
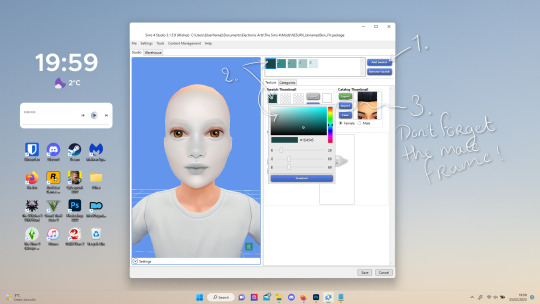
if you want, you can add multiple swatches (1). you can also edit the color of the swatches (2) and upload a custom thumbail with 104x148px resolution (3), make sure to upload for both male and female frames.
6.4 editing the sorting layer.
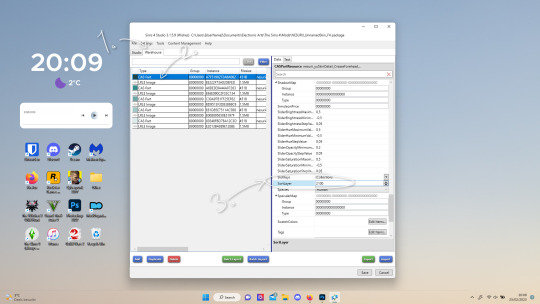
it's not the end of the world if you don't do this, but you may run into some skin details or freckles/moles that won't display on top of your skinblend if you don't edit it :).
click on the "warehouse" tab (1), select the first "cas part" (2). scroll down on the right to find "sort layer" (3) and put in 2100. you're gonna want to change this for each cas part individually.
now just save your file... and try it out in game!
if you need any help or have any questions please comment below <3 feel free to tag me in the end result if you want too.
(my end result)
265 notes
·
View notes
Last Seen Blogs

fuzeforge
Fuze Forge

zoesugg28-blog
Nastya@

kelpiencomplexities
Captain Saru

kelican
Keli Arslancan

kazihura
Kazihura