#programmable pixel matrix
Text
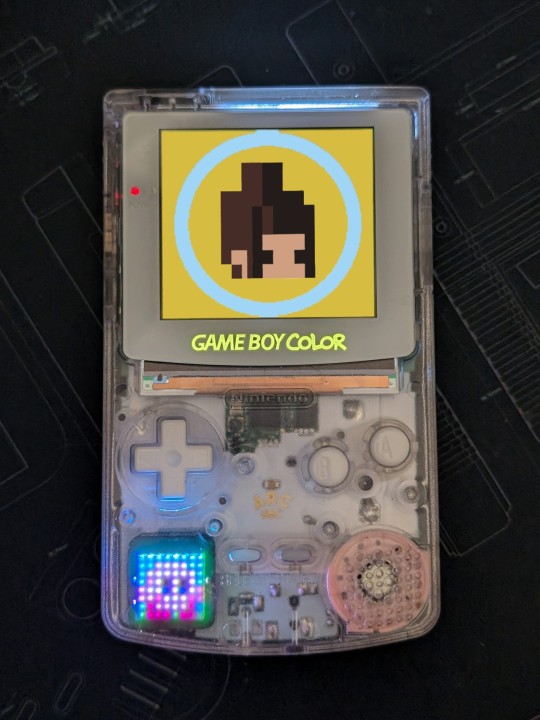
link
#Natalie Cursio#@natalie_thenerd#GBC DC Pixel#Game Boy Color#modded#mod#GBC#Modded GBC#style#design#hardware#tech#video games#programmable pixel matrix#PCB#retro gaming#modder
22 notes
·
View notes
Text
Programmer 3K
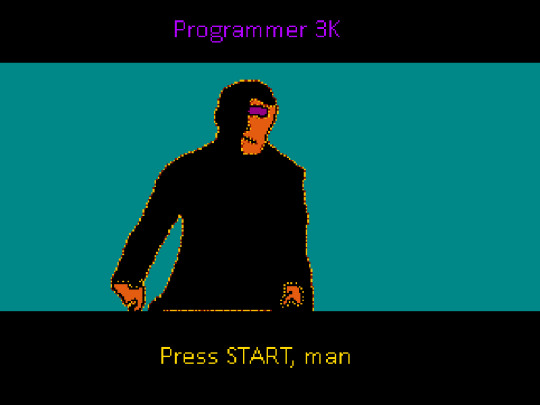
Pixel art for today based on videogame Hacker for game console NES. So, I know almost nothing about this game. I thank, it can be China game, some fanart, like this.
And this is my picture about the same theme. Joke, funny moment. As I get it, in original game, this picture is taken from movie Matrix. And rebuild in 8 bit. And I have this draining. It is super programmer 3000. Programmer 3K. Videogames, at first part, they need to be programmed. So here it is. So, press start!
#videogame#8 bit#ms dos#nes#sega#master#dendy#gamedev#pixel art#indie dev#retro dev#80s#retro#programmer#program#soft#tool#coder#funny#joke#press start
7 notes
·
View notes
Text
I feel like cross-stitchers, matrix LED programmers, and pixel artists have a symbiotic relationship.
2 notes
·
View notes
Text
Programmable LED Sign: All You Should Know Before Getting One
Email: [email protected]
WhatsApp & Wechat: +86 18038197291
www.xygledscreen.com
LED signs are a new and fast-developing tool for companies to engage with their consumers, enhance brand awareness and turnover, and generate more money, among other things.
Whatever sort of LED sign you want is up to you since each one has a different display that may show everything from plain text to photographs to movies. LED signage is also more energy-efficient. Unfortunately, other than your company name and hours and weather, there may not be much you can put in the way of text to display on the LED sign.
However, the good news is that this is an incredible opportunity to get exposure for small companies. So sit back and learn as we'll teach you all you need to know about programmable LED signs outdoors. We'll also talk about how they may be used to generate eye-catching graphic advertisements for your company.
What are programmable LED signs used for?
Most establishments where people gather, such as restaurants, motels, retail stores, movie theaters, and other gathering places, have programmable LED programmable signs. These signs may be used to market items, promote a brand, indicate where to go in an organization, or offer instructions.
This is where we are right now: in the digital signage world. Using LED signages is a new and more effective means of delivering information to people as they wait in line, shop, or go to school.
Retailers have had excellent success with LED displays because they put them in suitable locations and show the right stuff. Retailers enhance the consumer shopping experience by showcasing new inventory, notifying customers about promotions, and providing customers with fresh ideas that help them generate more sales.
How do programmable LED signs work?
Electronic pulses are sent to each LED (light-emitting diode) bulb using integrated circuits and software inside the lamp. These impulses activate the LED bulb when the LED is on. You can determine the LED screen's length and height by arranging the screen's single LED bulbs (pixels).
In order to find out how wide the screen is, you need to know how many pixels are in the matrix. When the sign is set up and switched on, each pixel may flash on its own and appear as it travels along with the signboard. An on-off pattern charges each LED light, resulting in eye-catching visual signage.
Different types of programmable LED signs
LED signage is a terrific way to bring attention to your brand and engage with consumers. If you want to get one for your company, there are several choices to pick from. LED signs may come in a wide variety of shapes, sizes, colors, and styles. Discover which one suits your business the best with these five types of LED signs listed below.
LED signage for inside and outdoors
It is possible to buy LED signage for indoor or outdoor use, and they are available in a variety of sizes, functions, and capabilities. Depending on your marketing and promotion objectives, your company may benefit more from one kind of promotion than the other.
To attract new clients to your town, particularly those traveling from afar, you may want to consider installing an outdoor programmable LED sign. On the other hand, if you're in a retail area with many people strolling by, a LED sign inside or outside your business might help you persuade more people to purchase right away by letting them know about offers and promotions.
Two-sided LED signage
You can significantly impact your area with a double-sided LED sign. This is one of the most aesthetically pleasing varieties. You may display the same photo, message, or video on both sides, or you can modify each side as you see appropriate.
LED signage with full-color lighting
Full-color LED signage may be used both indoors and outdoors. These flexible signages allow you to alter the high-definition display as frequently. Text messages, full-motion films, animations, and realistic graphics may all be used to get your message in front of a wider audience.
Three-color LED signage
Red, green, and yellow are the primary hues of the tri-colored LED signage. You may use text messages, attractive photos, and animations to connect with consumers. The wording or design may be changed, just as with full-color and double-sided signage!
A single-color version of LED signage
LED signs with only one color, such as a brilliant yellow or amber tint, are the simplest and nevertheless quite strong. If you're looking for something tiny enough to fit in a window or on a product, you'll have plenty of options. Simple graphics and messages may be sent to your audience in seconds.
Pros and cons of using a programmable LED sign
LED signs have several pros/advantages. The following are examples:
User-friendly
Your LED sign's colors, wording, and artwork may be easily changed. LED signs may be programmable, so you can make your character seem different at any moment. You don't have to purchase or install anything extra to use your LED signage to promote promotional bargains or discounts because of its versatility.
Durable
LED signs are not only versatile, but they are also long-lasting. LED signs have a bulb life of 100,000 hours or more, which is much more than traditional illuminated signs.
Cost-efficient
When you consider LED signs' extended lifespan and their low power consumption, you'll find that they're pretty budget-friendly. These signs put out a lot of light with very little electricity, making them ideal energy-saving alternatives for your business.
LED signage has a few drawbacks, as well, such as:
Expensive
LED signage has the drawback of being prohibitively expensive when first purchased. As a result of their low cost, they come with a high initial cost. LED light prices have dropped significantly in the previous several years, although they remain more than those of conventional light sources.
Temperature
Keep your LED lights cooled to prevent overheating. When LED signs using a lot of power become too hot, they may go into overdrive mode and not work. A heat sink is a must-have for your LED signage. They won't get too hot this way.
Low/poor quality
The market is filled with LED signs of varying quality ranging from the highest-end products to the most budget-friendly. A LED sign that has been improperly constructed will depreciate more quickly and give off undesirable visuals if it is purchased.
Are there better solutions to your advertising requirements?
Yes, even if you don't have LED signage, there are still many ways to advertise your business. LED signs can be a great place to start if you're new in the business world. You can also diversify your advertising efforts by setting up websites, social media accounts, and other types of online presence to reach a wider audience. Once your company has earned worldwide recognition, you now have the freedom to upgrade your marketing strategy at any time.
0 notes
Text
BEST ROG AND AMD GAMING LAPTOPS AND PC BUILD FOR STARFIELD

GAMING LAPTOPS:
First time Bethesda’s world-building is applied to space, Starfield is 2023’s most anticipated game. You’ll need top-notch gaming gear to fully experience this new world’s stunning graphics and endless possibilities. If you’re ready to build or upgrade your PC for this grand adventure, ROG has you covered.
We have enough laptops, desktops, displays, and keyboards to outfit your gaming space. The right hardware will ensure a smooth experience, a great image, and full control over your starship as you explore new planets. The options below will scale to your budget for the best Starfield experience, whether you want to save or go all-out.
Starfield’s best gaming laptops
Look no further than ROG’s wide selection of laptops for mobile gaming. We have a variety of devices to help you maximize your galactic explorations, from the dual-screen Zephyrus Duo to the ultra-portable Flow X13.
Starfield’s 2023 Zephyrus G14 is perfect for space travel since you’ll spend a lot of time there. The top-end model’s Nebula HDR display is powered by a Mini LED backlight, which dims its 504 zones for ultra deep blacks and super bright highlights and the lid’s programmable AniMe Matrix, a starfield in itself. It’s perfect for space games and won’t run out of frames thanks to its powerful CPU and GPU. For a larger screen, the 2023 Zephyrus Duo has a Mini LED display.
The Strix series will have the best framerates. The ROG Strix SCAR 17, a gaming beast, uses the AMD Ryzen 9 7945HX Mobile Processor with 16 cores and 32 threads. With the new AMD Ryzen 9 7945HX3D processor and 3D V-Cache, the Strix SCAR 17 X3D can go further. The ASUS TUF Gaming A16 Advantage Edition has an AMD Ryzen 9 7940HS CPU and a Radeon RX 7700S GPU in an ultra-rugged package. The Strix G17 offers similar performance at a lower cost.
The ROG Flow X13 is the most unique to finish. Due to its thin, light chassis with a 360-degree hinge and touch screen, you can play in laptop mode or stand mode with a gamepad. When used with the ROG XG Mobile ecosystem of external GPUs, a backpack-sized device can boost your graphics power.
The best Starfield computers, graphics cards, and displays
Build your own PC to play Starfield. The ROG Starfield Experience portal has a complete part-by-part configurator.
If a max-power, fully functional battlestation is not ready for Starfield, you have many options. Buy a prebuilt desktop from Digital Storm, Origin, or PCSpecialist, or buy parts to build a new computer or improve your setup. Our ROG Starfield Experience page has several pre-made build lists and a part-by-part configurator to build your own rig. Building your own PC lets you control how your money is spent, make room for upgrades, and manage every aspect of the experience, from pixel-perfect visuals to silent fans.
CPUs, the “core” of your starship, are ready for space travel with the AMD 7000 series. Starfield may be free with AMD CPUs and GPUs. The AMD Ryzen 5 7600X, with 6 cores and 12 threads, can handle any planet you want at a great price. Give yourself a boost with AMD Ryzen 7 7800X3D. It produces fast frames with 3D V-Cache. If you want to game, stream, and create on one machine, choose the AMD Ryzen 9 7950X3D, which has 3D V-Cache and more cores for incredible multitasking. The full AMD 7000 series processor lineup is here.
The best grav drive for a high-tech engine is made of premium components. Our ROG Crosshair X670E Hero motherboard is perfect for your Starfield fantasy computer due to its powerful power delivery, smooth edges, and polymo lighting. The ROG Strix B650-I motherboard is ideal for building compact and fast fighters with a Mini-ITX form factor. The ROG Strix B650-E Gaming WiFi and B650-F Gaming WiFi ATX motherboards, with their many features and unique color schemes for gamers of all stripes, are ideal for those who dare to innovate. The TUF Gaming X670E-Plus WiFi motherboard has only the essential features and can withstand a fierce dogfight. Click here to see all our motherboards.
These two parts give your computer a solid foundation, but the graphics card optimizes game performance. Build your rig around the TUF Gaming RX 7900 XTX to power Starfield with 4K detail and fast framerates for fluid motion. The ASUS Dual Radeon RX 6750 XT is a cheaper build with plenty of VRAM, while the ROG Strix Radeon RX 7600 OC Edition delivers plenty of frames for 1080p high-refresh. Use a high-wattage power supply like the ROG Thor P2 1000W, Thor P2 850W, or ROG Loki 850W with your next-generation GPU for a small form factor starship. View all of our graphics cards and next-generation power supplies here.
A powerful setup will perform well, but to see space as it was meant to be seen, you’ll need a large OLED monitor with pixel-perfect stars and ultra-deep blacks. ROG Swift OLED PG48UQ and PG42UQ offer 4K views over 40 inches for serious immersion, making them ideal for simulating your vessel’s cockpit. Our 27-inch ROG Swift OLED PG27AQDM has a 240Hz refresh rate.
In addition to our cutting-edge OLED monitor lineup, we offer ultra-wide panels like the ROG Strix XG49WCR, which can provide incredible immersion in the cockpit and while exploring on foot, and more affordable panels like the TUF Gaming VG32UQA1A. These displays use AMD FreeSync to avoid tearing and stuttering for a smooth experience.
Lastly, equip your desk with everything it needs. In a fierce firefight, the ROG Strix Scope II 96 Wireless and ROG Azoth keyboards provide the controls, while the ROG Harpe Ace Aim Lab Edition and ROG Gladius III Wireless AimPoint mice provide pixel-perfect aim. The ROG Raikiri Pro has many gamepad customization options. With the ROG Delta S Wireless headset’s immersive virtual surround sound and crystal clear audio, you can spend countless hours in Bethesda’s latest open world. Starfield can be bought on Gamesplanet or Xbox Game Pass, and our Starfield Experience page lists all recommended hardware.
News source:
0 notes
Text
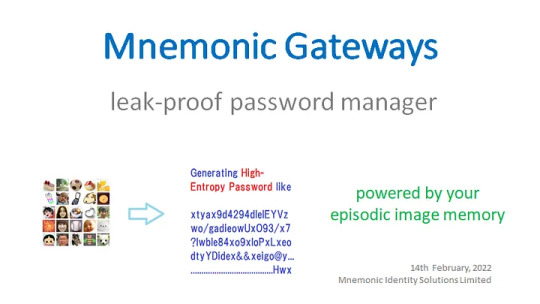
Image-based Login Misunderstood by Developers Themselves

A number of people have looked to the potential of picture passwords, sadly with a big misunderstanding of their own.
There have been basically two types of propositions.
A. Selecting several easy-to-remember points on a big image -
It is impossible for a human to remember the position of the correct point to the accuracy of a pixel (which computers cannot be poor at). The software is required to make a judgement of whether the pixel picked up is close enough or too distant to the registered pixel. The judgement is dependent on the threshold that the computer programmer adjusts. This makes this method ‘probabilistic’, which brings the same problem that we see in biometrics, say, the presence of false acceptance and false rejection.
One vendor seems to have misguided themselves into wrongly believing that this method would bring a huge mathematical strength, with the probabilistic nature ignored. They killed their solution by the misunderstanding of their own.
B. Selection of the registered images embedded among decoys on a grid/matrix -
It looks impossible for ‘several images among dozens of decoys’ to achieve the mathematical strength required to stand the brute force attacks that break the entropy of 80 bits, 160 bits and so on. Most of the picture password developers seemed to be trapped in this misunderstanding of their own.
We know that it is not the case; Threats of ‘visual-manual attacks on display’ are very different to ‘automated brute force attacks’ on the data server. A figure of ’20-bits’, say, a million attempts, for instance, would be just a bad joke against automated attacks, whereas it would make a pretty tall wall against visual-manual attacks on display.
More on this topic is available to “Entropy of Image-based Password” https://www.linkedin.com/posts/hitoshikokumai_identity-authentication-password-activity-7057219727273693185-Mpgq
and “Cost Benefit of Using Images for Login” https://www.linkedin.com/posts/hitoshikokumai_identity-authentication-password-activity-7068832232307654656-5js9
To be candid, (A) was among the first round of our patent applications in 2000 but we soon decided to forget it for the reason explained above. We have since been persistently on the course of (B)
As for where we are now, you could visit “Mnemonic Gateways as Leading Digital Identity App” (updated 30May2023) https://www.linkedin.com/pulse/mnemonic-gateways-leading-digital-identity-app-hitoshi-kokumai/
0 notes
Text
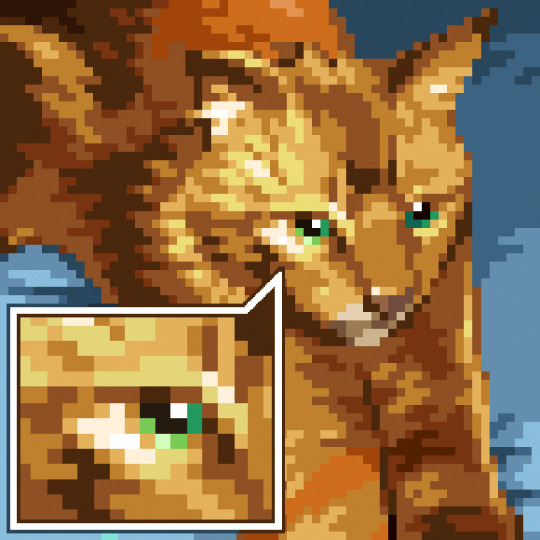
Pixel Art
Welcome back to the blog, last week we covered Pop Art and some of the notable artists that helped shaped that medium, and today we will tackle the ever-evolving art form of Pixel Art.
What Is It?
Pixel art is a distinct style of digital art that appears to have been purposefully constructed by the positioning of pixels. Each block is a brushstroke, and the pixels work together to form a cohesive artwork. In this sense, pixel art has a mosaic-like feel to it, as many mosaics generate images of tiny squares, which are akin to the blockiness of pixel art. This is such an intriguing feature because, while the notion of minimalist grid-based art isn't exclusive to pixel art, it may be the most identifiable.

Along with the standard form of pixel art that most people understand already, there are a couple of significant genre and subject breaks in this art form. Pixel art is a very flexible medium, and shares many traditions of figure drawing, landscapes, and abstract with traditional media. These genres can often overlap and can be hard to distinguish to the casual viewer, but a couple more prominent genres are:
Isometric: Pixel art drawn in a near-isometric dimetric projection. Originally used in games to provide a three-dimensional view without using any real three-dimensional processing. Normally drawn with a 1:2 pixel ratio along the X and Y-axis.

Sprites: Characters and game assets typically drawn in the fashion of platformer games and fighting games such as Streets of Rage or Streetfighter 2 or JRPGs (Japanese Roleplaying Game) such as Final Fantasy.

Along with the many genres/subjects, there are also several techniques that have become common in the creation of this form of art. Many of these strategies were developed in response to technical constraints, but have withstood the test of time. Some emerged and evolved during the span of Pixel Art's existence. Pixel art is distinguished from other types of digital art by the precise and planned positioning of pixels. Artists employ various brush sizes (e.g., 1x1 or 2x2 pixels) and tools such as free-hand / pencil, lines, and rectangles.

One key difference between pixel art and other digital art is that pixel artists tend to apply a single color at a time, avoiding tools such as soft edges, smudging or blurring.
Different restrictions are central to pixel art, and these are often traced back to technical limitations of hardware such as Amiga, Commodore 64, NES or early computers.
Origins and History
Pixel art may be most commonly associated with the rise of video games, however that was not it’s starting point. Some of the earliest examples of pixel art could be found in analog electronic advertising displays, such as the ones from New York City during the early 20th century, with simple monochromatic light bulb matrix displays extant circa 1937. Pixel art as it is known today largely originates from classic video games, particularly classic arcade games such as Space Invaders (1978) and Pac-Man (1980), and 8-bit consoles such as the Nintendo Entertainment System (1983) and Sega Master System (1985).

Video games were beginning to emerge in the entertainment industry by the early 1970s, but due to the severe limitations of early graphics, the first instances of pixel art in video games were somewhat abstract. Because of the poor resolution of computers and game consoles, game designers have to meticulously build game assets by painstakingly placing individual pixels to make recognized symbols, characters, or things. It wasn't all bad however, as abstraction, such as Pong's very simplistic design, sometimes resulted in better game readability and commercial success than trying more detailed realistic art.

The 1980s witnessed a period of innovation in video games, both as a new artform and form of entertainment, in what is frequently referred to as the "golden age of video games" or "golden era of arcade video games." During the early 1980s, most video game developers were programmers rather than graphic artists. As technology advanced, commercial pressure increased for more representational and "realistic" images in video games. As graphics technology advanced, it became feasible to substitute hand-drawn game elements with imported images or 3D polygons, contributing to the development of pixel art as a distinct art form.

Professional artists and graphic designers gradually gained a larger presence in the video game business. The style of 1980s video games has a significant influence on current and future pixel art, both in video games, demoscene visuals, and among independent artists.
As computers became more affordable in the 1980s, software like DEGAS Elite (1986) for the Atari ST, Deluxe Paint (1985) and Deluxe Paint 2 (1986) for the Commodore Amiga, and Paint Magic for the Commodore 64) inspired many subsequent pixel artists to create digital art through careful pixel placement. Some early pixel artists utilized joysticks and keyboards to pixel on the Commodore 64 and the Amstrad CPC.

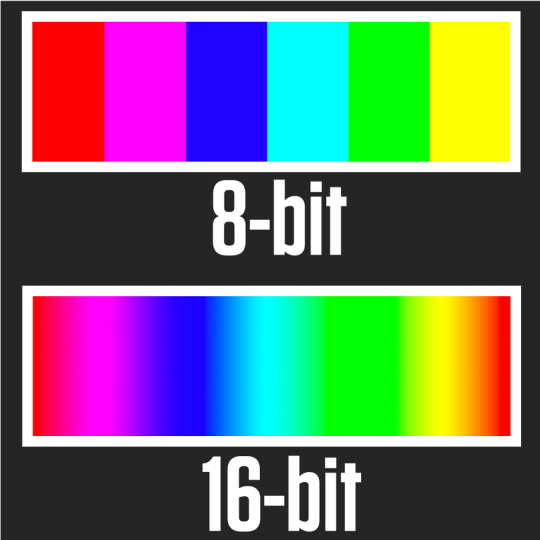
8-Bit vs. 16-Bit
One major question that is often brought up in regard to Pixel Art, is the difference between 8-bit and 16-bit graphics. First off, in terms of the time period, the 8-bit era spanned 1983 to 1987 while the 16-bit era lasted from 1987 to 1993. If you’re totally unfamiliar with what 8-bit and 16-bit are, it, in part, refers to the tonal variation of the image. An 8-bit picture, for instance, will have fewer amounts of tones available for each color than a 16-bit does. The more color tones available, the more detailed that you can get with your image-making. The bit in 8 or 16-bit refers to the capability of every pixel to use 8 bits for storing the amount of colors that can be displayed. That results in 8-bit graphics being capable of displaying a maximum of 256 colors, while 16-bit can go as high as 65,536 colors.
The Fall and Return of Pixel Art
Pixel art declined as software quality increased and new, 3D-capable systems such as the Sony PlayStation and Nintendo 64 were introduced. Pixel art lost its broad presence with the advent of contemporary technology, advanced computers, and 3D graphics, primarily in the realms of consoles and gaming, however, contrary to common assumption, it did not fade away.
By the mid-2000s, 3D graphics and gaming had become the standard, with pixel art regarded uncommon and archaic. This new image sparked a resurgence and respect for its 8-bit values. Many feel that pixel art games have made a resurgence due to nostalgia as the simplicity, minimalism, and lightness of the pixels, as well as the way they remind us of our childhood, make them so appealing.

Although it was never thought that pixel art would go beyond its virtual, cyber depiction, enclosed within a computer screen, it did, in the name of creating tangible artworks. Pixel art spread to other aspects of life, with artists creating pixel art posters, magazine covers, music album covers, desktop wallpapers, paintings, pixelated video advertising, and even pixelated tattoos. They were born pixel by pixel through this one-of-a-kind method of expression, borrowing influence from pop culture, the news, design, and more.
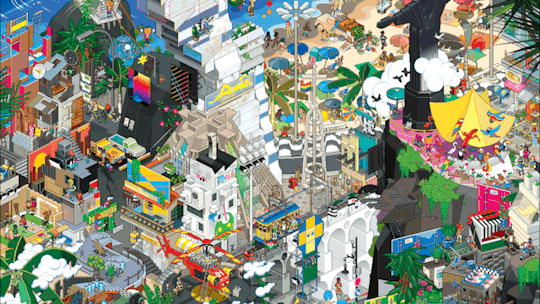
Artists
eBoy
With the rise of Pixel Art, also came its prominence in the art world, separate from its traditional view as strictly being reserved for video games or video displays. One of the artists, or in this case, group of artists that led to this evolution was eBoy, a collection of three men, Kai Vermehrr, Steffen Sauerteig, and Svend Smital. They may be the most famous group of pixel makers out there and are often affectionately reeffered to as “the Godfathers of Pixel”. These guys are famous for their complex illustrations called Pixoramas, city and landscape scenes pixelated, of course, on purpose. To date, they have made pixoramas of places like Tokyo, Paris, New York, Rio, Berlin and London, and are currently Kickstarting the one for San Francisco.
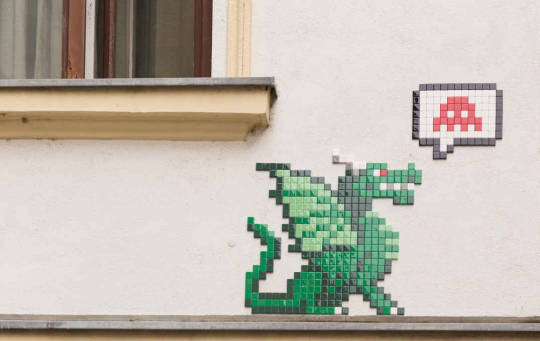
Invader
Another prominent pixel artist is the French urban artist who goes by the name Invader. He is known for his ceramic tile mosaics modeled on the pixelated art of 1970s–1980s 8-bit video games, many of which depict the titular aliens from the arcade games Space Invaders, Pac-Man and Super Mario Bros. (the inspirations for his pseudonym). As of December 2020, his real name is Franck Slama, his creations can be seen in highly visible locations in 79 cities in 20 countries. To accompany his citywide installations, or "Invasions", Invader publishes books and maps as guides to the locations of his mosaics.
In Conclusion
Pixel art is unlike any other art form, and that is likely due to its more unique origin. Deriving from video games and being an inherently limiting art form has led its artists to getting creative to create some of the most beautiful and retro looking art possible. Thanks for reading, come back next week for our final subject: Computer Graphics!
1 note
·
View note
Text
Ross carbonite saturation adjustments

#Ross carbonite saturation adjustments skin
This is ideal when shooting in rapidly changing lighting conditions (for example, when moving from an indoor to an outdoor location). One example would be to adjust the hue and saturation of a flower petal without changing other colours within the picture.Īuto Trace White (ATW) is a feature that automatically adjusts the white balance as lighting conditions change. It is also effective for manipulating the hue and saturation of specific selected colours within a scene. Multi Matrix provides further in-camera creative control and can be used to match colourimetry during multiple camcorder shoots.
#Ross carbonite saturation adjustments skin
This significantly improves the reproduction of natural skin tones. TruEye processes videa data in a similar way to the human eye - processing brightness, hue and saturation. TruEye virtually eliminates hue distortion, especially in extreme lighting conditions. Please note that 30P and 60i modes are not supported. 50i and 59.94i can be selected to acquire interlaced "TV look" pictures, with 23.98P, 24P, 25P and 29.97P also available for "film look" (progressive) images. You can select from a number of frame rates to match the required look for each production. Three 2/3-inch FIT CCDs each with 2.2 million-pixels provide excellent imaging quality acquiring pictures at 1920 x 1080 CIF (Common Interchange Format) resolution.ġ2 bit A/D conversion and advanced digital signal processing ensures excellent tonal reproduction, for the most demanding applications. The HDW-F900R uses Hyper HAD sensor technology incorporating the latest FIT sensor and on-chip lens structure. With the HDW-F900R, you avoid expensive operational retraining and can generate great pictures from day one. The latest in a long line of digital camcorders from Sony, the HDW-F900R retains the ergonomic design and familiar operation for which Sony camcorders have become renowned. In today's multi-channel world, shooting with the HDW-F900R ensures that your pictures stand out to grab the attention of the viewers, essential in today's multi-channel environment. The original HDW-F900 built an unrivalled reputation around the world for the production of the very best in quality programming, helping establish HDCAM as the preferred High Definition format worldwide. And even when downconverted to SD, pictures from HDCAM camcorders will look noticably better than those originated in SD. These include the lower cost associated with SD post production, and the benefit of retaining an exceptionally high quality HDCAM original recording for future distribution opportunities. Today more and more programme makers are shooting HDCAM, with many of them using existing SD suites for post production. You can relax in the knowledge that there is an HDCAM facility close by to add the finishing touches to your project.Įasy integration with Standard Definition Over 27,000 HDCAM VTRs and camcorders are in use worldwide, and the number of post houses equipped with HDCAM grows every day. Peace of mind for High Definition post production Shooting in HDCAM, especially at the internationally accepted frame rate of 24P, opens up new opportunities for international co-production and distribution. HDCAM has achieved an enviable reputation for quality, and programmes shot in HDCAM are accepted by many of the world's most prestigious broadcasters. Increased marketability of your programmes The HDW-F900R acquires pictures in 1080-line resolution, providing an unforgettable High Definition viewing experience for your audience. The picture shows the camcorder fitted with an optional HDVF-C30W HD LCD colour viewfinder. It joins the HDW-730S, HDW-750P and HDW-750PC camcorders within the HDCAM line-up.The HDW-F900R is supplied without a viewfinder. Power consumption has been reduced, new features have been added and the new camcorder meets the latest EU environmental legislation.The HDW-F900R features 12-bit A/D conversion, can record four channels of digital audio and provides HD-SDI output as standard. This new camcorder represents the flagship model within the HDCAM line-up, and has been designed for productions such as drama, commercials and feature films where a prestige 24P look is required.The HDW-F900R combines the imaging performance of the original HDW-F900 in a smaller, lighter chassis. Much of this reputation has been built upon the HDW-F900, the world's first 24P CineAlta HD camcorder, which received a Primetime Emmy® Engineering Award in 2004.For 2006 Sony has developed the HDW-F900R, the successor model to the HDW-F900. Sony HDCAM has become firmly established as the de-facto High Definition (HD) production format worldwide, with a unique track record for production of the highest quality programming. Sony HDW-F900R HD CineAlta camcorder, offering 2.2 million pixels per colour, HDCAM recording and switchable between multiple fr
1 note
·
View note
Photo


Gen 9
Watermelon Dessert • Sapphire Dessert
Hyperlink Dessert • Pixel Dessert • Glitch Dessert • Matrix Dessert
Went with a technology themed naming scheme since Watermelon’s a great programmer :)
(Also ignore Hyperlink’s hair being a little glitchy it’s stylish I promise...)
5 notes
·
View notes
Photo

FREE GUY (2021)
Starring Ryan Reynolds, Jodie Comer, Joe Keery, Lil Rel Howery, Utkarsh Ambudkar, Taika Waititi, Camille Kostek, Aaron W. Reed, Matty Cardarople, Leah Procito, Kimberly Howe, Tait Fletcher, Tyler Blevins, Anastasia Tsikhanava, Britne Oldford, Jacksepticeye, Ninja, Pokimane, DanTDM, LazarBeam, Channing Tatum, Chris Evans and Alex Trebek.
Screenplay by Matt Lieberman and Zak Penn.
Directed by Shawn Levy.
Distributed by 20th Century Studios. 115 minutes. Rated PG-13.
We’ve all seen them, those random background characters in video games who only exist to be shot, beaten, stabbed or run over. There is a reason why they are in the background – they are supposed to be nameless faceless masses that a gamer will not give a second thought to shooting with an AK-47.
But what about their lives? What about their hopes and dreams? Do they love? Do they care? Do they have a favorite ice cream flavor? Are they football or basketball fans? Do they want to go to the beach? Do they like their job? What do they feel about their tenuous lot in life?
That is pretty much the concept behind Free Guy, a surprisingly funny and charming action comedy which takes place (at least partially) in a video game world. It revolves around Guy (Ryan Reynolds) – one of those NPCs (non-playable characters) – a teller at a cyber bank which is robbed multiple times a day.
He goes through a daily ritual because it’s all he knows – wake up, talk to his pet fish, stop at the coffee shop (always the same order), walk to the bank, talk to his friend the security guard, get robbed (several times a day) and then go home. Sometimes he will get shot, or stabbed, or thrown across the room, but he always wakes up back in bed like nothing ever happened.
He lives in awe of the players – he only knows them as the ones with sunglasses – because their lives are so glamorous and exciting. He doesn’t realize that his entire world is a long stream of algorithms and pixels. What happens if he becomes discontented with his lot? What happens if he falls in love?
And fall in love he does, with an avatar named Molotovgirl (Jodie Comer) – who is actually the online presence of Millie, a gamer and programmer. Millie is trying to prove that the game “Free City” was built off of technology stolen from a game that she built with Keys (Joe Keery). It was bought by the monolithic Soonami games and quickly shelved by that company’s eccentric boss Antwan (Taika Waititi).
It turns out that it was, and that they had created an actual artificial intelligence program, letting the computerized characters grow and learn. Guy (known as the Blue Shirt Guy) is proof of that breakthrough, rebelling against his programming and trying to become a hero to prove his worthiness to Molotovgirl. However, Antwan is willing to burn down the “Free City” world in order to cover up what happened.
Free Guy is certainly not the most original film out there. It cribs ideas from everything from Tron to The Truman Show to The Matrix to Groundhog Day to Wreck-It Ralph to Ready Player One to Surrogates to Bliss to Space Jam. Still, it’s a clever idea and Free Guy does a surprisingly smart and funny job with the high concept, to the point that it is arguably better than most (or perhaps all) of those films just listed. (Only Groundhog Day, The Truman Show and Wreck-It Ralph even are in the race.)
One of the reasons that Free Guy works as well as it does is because it is not just a mindless action film. In fact, it works just as well (if not even better) as a romantic comedy. The relationships between Guy and Molotovgirl (and Millie and Keys in real life) are charming and sweet.
It also knows the gaming world – there are cameos by several YouTube and Twitch influencers portraying themselves.
I am not going to lie; I didn’t have high expectations going into the screening of Free Guy. I’m happy to say that I was wrong. Free Guy is one of the most enjoyable films I’ve seen this summer.
Jay S. Jacobs
Copyright ©2021 PopEntertainment.com. All rights reserved. Posted: August 13, 2021.
youtube
3 notes
·
View notes
Text
MMD FX file reading for shaders: a translation by ryuu
The following tutorial is an English translation of the original one in Japanese by Dance Intervention P.
This English documentation was requested by Chestnutscoop on DeviantArt, as it’ll be useful to the MME modding community and help MMD become open-source for updates. It’s going to be an extensive one, so take it easy.
Disclaimer: coding isn’t my area, not even close to my actual career and job (writing/health). I have little idea of what’s going on here and I’m relying on my IT friends to help me with this one.
Content Index:
Introduction
Overall Flow
Parameter Declaration
Outline Drawing
Non-Self-shadow Rendering
Drawing Objects When Self-shadow is Disabled
Z-value Plot For Self-shadow Determination
Drawing Objects in Self-shadowing
Final Notes
1. INTRODUCTION
This documentation contains the roots of .fx file reading for MME as well as information on DirectX and programmable shaders while reading full.fx version 1.3. In other words, how to use HLSL for MMD shaders. Everything in this tutorial will try to stay as faithful as possible to the original text in Japanese.
It was translated from Japanese to English by ryuu. As I don’t know how to contact Dance Intervention P for permission to translate and publish it here, the original author is free to request me to take it down. The translation was done with the aid of the online translator DeepL and my friends’ help. This documentation has no intention in replacing the original author’s.
Any coding line starting with “// [Japanese text]” is the author’s comments. If the coding isn’t properly formatted on Tumblr, you can visit the original document to check it. The original titles of each section were added for ease of use.
2. OVERALL FLOW (全体の流れ)
Applicable technique → pass → VertexShader → PixelShader
• Technique: processing of annotations that fall under <>.
• Pass: processing unit.
• VertexShader: convert vertices in local coordinates to projective coordinates.
• PixelShader: sets the color of a vertex.
3. PARAMETER DECLARATION (パラメータ宣言)
9 // site-specific transformation matrix
10 float4x4 WorldViewProjMatrix : WORLDVIEWPROJECTION;
11 float4x4 WorldMatrix : WORLD;
12 float4x4 ViewMatrix : VIEW;
13 float4x4 LightWorldViewProjMatrix : WORLDVIEWPROJECTION < string Object = “Light”; >;
• Float4x4: 32-bit floating point with 4 rows and 4 columns.
• WorldViewProjMatrix: a matrix that can transform vertices in local coordinates to projective coordinates with the camera as the viewpoint in a single step.
• WorldMatrix: a matrix that can transform vertices in local coordinates into world coordinates with the camera as the viewpoint.
• ViewMatrix: a matrix that can convert world coordinate vertices to view coordinates with the camera as the viewpoint.
• LightWorldViewProjMatrix: a matrix that can transform vertices in local coordinates to projective coordinates with the light as a viewpoint in a single step.
• Local coordinate system: coordinates to represent the positional relationship of vertices in the model.
• World coordinate: coordinates to show the positional relationship between models.
• View coordinate: coordinates to represent the positional relationship with the camera.
• Projection Coordinates: coordinates used to represent the depth in the camera. There are two types: perspective projection and orthographic projection.
• Perspective projection: distant objects are shown smaller and nearby objects are shown larger.
• Orthographic projection: the size of the image does not change with depth.
15 float3 LightDirection : DIRECTION < string Object = “Light”; >;
16 float3 CameraPosition : POSITION < string Object = “Camera”; >;
• LightDirection: light direction vector.
• CameraPosition: world coordinates of the camera.
18 // material color
19 float4 MaterialDiffuse : DIFFUSE < string Object = “Geometry”; >;
20 float3 MaterialAmbient : AMBIENT < string Object = “Geometry”; >;
21 float3 MaterialEmmisive : EMISSIVE < string Object = “Geometry”; >;
22 float3 MaterialSpecular : SPECULAR < string Object = “Geometry”; >;
23 float SpecularPower : SPECULARPOWER < string Object = “Geometry”; >;
24 float3 MaterialToon : TOONCOLOR;
25 float4 EdgeColor : EDGECOLOR;
• float3: no alpha value.
• MaterialDiffuse: diffuse light color of material, Diffuse+A (alpha value) in PMD.
• MaterialAmbient: ambient light color of the material; Diffuse of PMD?
• MaterialEmmisive: light emitting color of the material, Ambient in PMD.
• MaterialSpecular: specular light color of the material; PMD’s Specular.
• SpecularPower: specular strength. PMD Shininess.
• MaterialToon: shade toon color of the material, lower left corner of the one specified by the PMD toon texture.
• EdgeColor: putline color, as specified by MMD’s edge color.
26 // light color
27 float3 LightDiffuse : DIFFUSE < string Object = “Light”; >;
28 float3 LightAmbient : AMBIENT < string Object = “Light”; >;
29 float3 LightSpecular : SPECULAR < string Object = “Light”; >;
30 static float4 DiffuseColor = MaterialDiffuse * float4(LightDiffuse, 1.0f);
31 static float3 AmbientColor = saturate(MaterialAmbient * LightAmbient + MaterialEmmisive);
32 static float3 SpecularColor = MaterialSpecular * LightSpecular;
• LightDiffuse: black (floa3(0,0,0))?
• LightAmbient: MMD lighting operation values.
• LightSpecular: MMD lighting operation values.
• DiffuseColor: black by multiplication in LightDiffuse?
• AmbientColor: does the common color of Diffuse in PMD become a little stronger in the value of lighting manipulation in MMD?
• SpecularColor: does it feel like PMD’s Specular is a little stronger than MMD’s Lighting Manipulation value?
34 bool parthf; // perspective flags
35 bool transp; // semi-transparent flag
36 bool spadd; // sphere map additive synthesis flag
37 #define SKII1 1500
38 #define SKII2 8000
39 #define Toon 3
• parthf: true for self-shadow distance setting mode2.
• transp: true for self-shadow distance setting mode2.
• spadd: true in sphere file .spa.
• SKII1:self-shadow A constant used in mode1. The larger the value, the weirder the shadow will be, and the smaller the value, the weaker the shadow will be.
• SKII2: self-shadow A constant used in mode2. If it is too large, the self-shadow will have a strange shadow, and if it is too small, it will be too thin.
• Toon: weaken the shade in the direction of the light with a close range shade toon.
41 // object textures
42 texture ObjectTexture: MATERIALTEXTURE;
43 sampler ObjTexSampler = sampler_state {
44 texture = <ObjectTexture>;
45 MINFILTER = LINEAR;
46 MAGFILTER = LINEAR;
47 };
48
• ObjectTexture: texture set in the material.
• ObjTexSampler: setting the conditions for acquiring material textures.
• MINIFILTER: conditions for shrinking textures.
• MAGFILTER: conditions for enlarging a texture.
• LINEAR: interpolate to linear.
49 // sphere map textures
50 texture ObjectSphereMap: MATERIALSPHEREMAP;
51 sampler ObjSphareSampler = sampler_state {
52 texture = <ObjectSphereMap>;
53 MINFILTER = LINEAR;
54 MAGFILTER = LINEAR;
55 };
• ObjectSphereMap: sphere map texture set in the material.
• ObjSphareSampler: setting the conditions for obtaining a sphere map texture.
57 // this is a description to avoid overwriting the original MMD sampler. Cannot be deleted.
58 sampler MMDSamp0 : register(s0);
59 sampler MMDSamp1 : register(s1);
60 sampler MMDSamp2 : register(s2);
• register: assign shader variables to specific registers.
• s0: sampler type register 0.
4. OUTLINE DRAWING (輪郭描画)
Model contours used for drawing, no accessories.
65 // vertex shader
66 float4 ColorRender_VS(float4 Pos : POSITION) : POSITION
67 {
68 // world-view projection transformation of camera viewpoint.
69 return mul( Pos, WorldViewProjMatrix );
70 }
Return the vertex coordinates of the camera viewpoint after the world view projection transformation.
Parameters
• Pos: local coordinates of the vertex.
• POSITION (input): semantic indicating the vertex position in the object space.
• POSITION (output): semantic indicating the position of a vertex in a homogeneous space.
• mul (x,y): perform matrix multiplication of x and y.
Return value
Vertex coordinates in projective space; compute screen coordinate position by dividing by w.
• Semantics: communicating information about the intended use of parameters.
72 // pixel shader
73 float4 ColorRender_PS() : COLOR
74 {
75 // fill with outline color
76 return EdgeColor;
77 }
Returns the contour color of the corresponding input vertex.
Return value
Output color
• COLOR: output color semantic.
79 // contouring techniques
80 technique EdgeTec < string MMDPass = "edge"; > {
81 pass DrawEdge {
82 AlphaBlendEnable = FALSE;
83 AlphaTestEnable = FALSE;
84
85 VertexShader = compile vs_2_0 ColorRender_VS();
86 PixelShader = compile ps_2_0 ColorRender_PS();
87 }
88 }
Processing for contour drawing.
• MMDPASS: specify the drawing target to apply.
• “edge”: contours of the PMD model.
• AlphaBlendEnable: set the value to enable alpha blending transparency. Blend surface colors, materials, and textures with transparency information to overlay on another surface.
• AlphaTestEnable: per-pixel alpha test setting. If passed, the pixel will be processed by the framebuffer. Otherwise, all framebuffer processing of pixels will be skipped.
• VertexShader: shader variable representing the compiled vertex shader.
• PixelShader: shader variable representing the compiled pixel shader.
• vs_2_0: vertex shader profile for shader model 2.
• ps_2_0: pixel shader profile for shader model 2.
• Frame buffer: memory that holds the data for one frame until it is displayed on the screen.
5. NON-SELF-SHADOW SHADOW RENDERING (非セルフシャドウ影描画)
Drawing shadows falling on the ground in MMD, switching between showing and hiding them in MMD's ground shadow display.
94 // vertex shader
95 float4 Shadow_VS(float4 Pos : POSITION) : POSITION
96 {
97 // world-view projection transformation of camera viewpoint.
98 return mul( Pos, WorldViewProjMatrix );
99 }
Returns the vertex coordinates of the source vertex of the shadow display after the world-view projection transformation of the camera viewpoint.
Parameters
• Pos: local coordinates of the vertex from which the shadow will be displayed.
Return value
Vertex coordinates in projective space.
101 // pixel shader
102 float4 Shadow_PS() : COLOR
103 {
104 // fill with ambient color
105 return float4(AmbientColor.rgb, 0.65f);
106 }
Returns the shadow color to be drawn. The alpha value will be reflected when MMD's display shadow color transparency is enabled.
Return value
Output color
108 // techniques for shadow drawing
109 technique ShadowTec < string MMDPass = "shadow"; > {
110 pass DrawShadow {
111 VertexShader = compile vs_2_0 Shadow_VS();
112 PixelShader = compile ps_2_0 Shadow_PS();
113 }
114 }
Processing for non-self-shadow shadow drawing.
• “shadow”: simple ground shadow.
6. DRAWING OBJECTS WHEN SELF-SHADOW IS DISABLED (セルフシャドウ無効時オブジェクト描画)
Drawing objects when self-shadowing is disabled. Also used when editing model values.
120 struct VS_OUTPUT {
121 float4 Pos : POSITION; // projective transformation coordinates
122 float2 Tex : TEXCOORD1; // texture
123 float3 Normal : TEXCOORD2; // normal vector
124 float3 Eye : TEXCOORD3; // position relative to camera
125 float2 SpTex : TEXCOORD4; // sphere map texture coordinates
126 float4 Color : COLOR0; // diffuse color
127 };
A structure for passing multiple return values between shader stages. The final data to be passed must specify semantics.
Parameters
• Pos:stores the position of a vertex in projective coordinates as a homogeneous spatial coordinate vertex shader output semantic.
• Tex: stores the UV coordinates of the vertex as the first texture coordinate vertex shader output semantic.
• Normal: stores the vertex normal vector as the second texture coordinate vertex shader output semantic.
• Eye: (opposite?) stores the eye vector as a #3 texture coordinate vertex shader output semantic.
• SpTex: stores the UV coordinates of the vertex as the number 4 texture coordinate vertex shader output semantic.
• Color: stores the diffuse light color of a vertex as the 0th color vertex shader output semantic.
129 // vertex shader
130 VS_OUTPUT Basic_VS(float4 Pos : POSITION, float3 Normal : NORMAL, float2 Tex : TEXCOORD0, uniform bool useTexture, uniform bool useSphereMap, uniform bool useToon)
131 {
Converts local coordinates of vertices to projective coordinates. Sets the value to pass to the pixel shader, which returns the VS_OUTPUT structure.
Parameters
• Pos: local coordinates of the vertex.
• Normal: normals in local coordinates of vertices.
• Tex: UV coordinates of the vertices.
• useTexture: determination of texture usage, given by pass.
• useSphereMap: determination of sphere map usage, given by pass.
• useToon: determination of toon usage. Given by pass in the case of model data.
• uniform: marks variables with data that are always constant during shader execution.
Return value
VS_OUTPUT, a structure passed to the pixel shader.
132 VS_OUTPUT Out = (VS_OUTPUT)0;
133
Initialize structure members with 0. Error if return member is undefined.
134 // world-view projection transformation of camera viewpoint.
135 Out.Pos = mul( Pos, WorldViewProjMatrix );
136
Convert local coordinates of vertices to projective coordinates.
137 // position relative to camera
138 Out.Eye = CameraPosition - mul( Pos, WorldMatrix );
The opposite vector of eye? Calculate.
139 // vertex normal
140 Out.Normal = normalize( mul( Normal, (float3x3)WorldMatrix ) );
141
Compute normalized normal vectors in the vertex world space.
• normalize (x): normalize a floating-point vector based on x/length(x).
• length (x): returns the length of a floating-point number vector.
142 // Diffuse color + Ambient color calculation
143 Out.Color.rgb = AmbientColor;
144 if ( !useToon ) {
145 Out.Color.rgb += max(0,dot( Out.Normal, -LightDirection )) * DiffuseColor.rgb;
By the inner product of the vertex normal and the backward vector of the light, the influence of the light (0-1) is calculated, and the diffuse light color calculated from the influence is added to the ambient light color. DiffuseColor is black because LightDifuse is black, and AmbientColor is the diffuse light of the material. Confirmation required.
• dot (x,y): return the inner value of the x and y vectors.
• max (x,y): choose the value of x or y, whichever is greater.
146 }
147 Out.Color.a = DiffuseColor.a;
148 Out.Color = saturate( Out.Color );
149
• saturate (x): clamp x to the range 0-1. 0>x, 1>x truncated?
150 // texture coordinates
151 Out.Tex = Tex;
152
153 if ( useSphereMap ) {
154 // sphere map texture coordinates
155 float2 NormalWV = mul( Out.Normal, (float3x3)ViewMatrix );
X and Y coordinates of vertex normals in view space.
156 Out.SpTex.x = NormalWV.x * 0.5f + 0.5f;
157 Out.SpTex.y = NormalWV.y * -0.5f + 0.5f;
158 }
159
Converts view coordinate values of vertex normals to texture coordinate values. Idiomatic.
160 return Out;
161 }
Return the structure you set.
163 // pixel shader
164 float4 Basic_PS(VS_OUTPUT IN, uniform bool useTexture, uniform bool useSphereMap, uniform bool useToon) : COLOR0
165 {
Specify the color of pixels to be displayed on the screen.
Parameters
• IN: VS_OUTPUT structure received from the vertex shader.
• useTexture: determination of texture usage, given by pass.
• useSphereMap: determination of using sphere map, given by pass.
• useToon: determination of toon usage. Given by pass in the case of model data.
Output value
Output color
166 // specular color calculation
167 float3 HalfVector = normalize( normalize(IN.Eye) + -LightDirection );
Find the half vector from the inverse vector of the line of sight and the inverse vector of the light.
• Half vector: a vector that is the middle (addition) of two vectors. Used instead of calculating the reflection vector.
168 float3 Specular = pow( max(0,dot( HalfVector, normalize(IN.Normal) )), SpecularPower ) * SpecularColor;
169
From the half-vector and vertex normals, find the influence of reflection. Multiply the influence by the specular intensity, and multiply by the specular light color to get the specular.
• pow (x,y): multiply x by the exponent y.
170 float4 Color = IN.Color;
171 if ( useTexture ) {
172 // apply texture
173 Color *= tex2D( ObjTexSampler, IN.Tex );
174 }
If a texture is set, extract the color of the texture coordinates and multiply it by the base color.
• tex2D (sampler, tex): extract the color of the tex coordinates from the 2D texture in the sampler settings.
175 if ( useSphereMap ) {
176 // apply sphere map
177 if(spadd) Color += tex2D(ObjSphareSampler,IN.SpTex);
178 else Color *= tex2D(ObjSphareSampler,IN.SpTex);
179 }
180
If a sphere map is set, extract the color of the sphere map texture coordinates and add it to the base color if it is an additive sphere map file, otherwise multiply it.
181 if ( useToon ) {
182 // toon application
183 float LightNormal = dot( IN.Normal, -LightDirection );
184 Color.rgb *= lerp(MaterialToon, float3(1,1,1), saturate(LightNormal * 16 + 0.5));
185 }
In the case of the PMD model, determine the influence of the light from the normal vector of the vertex and the inverse vector of the light. Correct the influence level to 0.5-1, and darken the base color for lower influence levels.
• lerp (x,y,s): linear interpolation based on x + s(y - x). 0=x, 1=y.
186
187 // specular application
188 Color.rgb += Specular;
189
190 return Color;
191 }
Add the obtained specular to the base color and return the output color.
195 technique MainTec0 < string MMDPass = "object"; bool UseTexture = false; bool UseSphereMap = false; bool UseToon = false; > {
196 pass DrawObject {
197 VertexShader = compile vs_2_0 Basic_VS(false, false, false);
198 PixelShader = compile ps_2_0 Basic_PS(false, false, false);
199 }
200 }
Technique performed on a subset of accessories (materials) that don’t use texture or sphere maps when self-shadow is disabled.
• “object”: object when self-shadow is disabled.
• UseTexture: true for texture usage subset.
• UseSphereMap: true for sphere map usage subset.
• UseToon: true for PMD model.
7. Z-VALUE PLOT FOR SELF-SHADOW DETERMINATION (セルフシャドウ判定用Z値プロット)
Create a boundary value to be used for determining the self-shadow.
256 struct VS_ZValuePlot_OUTPUT {
257 float4 Pos : POSITION; // projective transformation coordinates
258 float4 ShadowMapTex : TEXCOORD0; // z-buffer texture
259 };
A structure for passing multiple return values between shader stages.
Parameters
• Pos: stores the position of a vertex in projective coordinates as a homogeneous spatial coordinate vertex shader output semantic.
• ShadowMapTex: stores texture coordinates for hardware calculation of z and w interpolation values as 0 texture coordinate vertex shader output semantics.
• w: scaling factor of the visual cone (which expands as you go deeper) in projective space.
261 // vertex shader
262 VS_ZValuePlot_OUTPUT ZValuePlot_VS( float4 Pos : POSITION )
263 {
264 VS_ZValuePlot_OUTPUT Out = (VS_ZValuePlot_OUTPUT)0;
265
266 // do a world-view projection transformation with the eyes of the light.
267 Out.Pos = mul( Pos, LightWorldViewProjMatrix );
268
Conversion of local coordinates of a vertex to projective coordinates with respect to a light.
269 // align texture coordinates to vertices.
270 Out.ShadowMapTex = Out.Pos;
271
272 return Out;
273 }
Assign to texture coordinates to let the hardware calculate z, w interpolation values for vertex coordinates, and return the structure.
275 // pixel shader
276 float4 ZValuePlot_PS( float4 ShadowMapTex : TEXCOORD0 ) : COLOR
277 {
278 // record z-values for R color components
279 return float4(ShadowMapTex.z/ShadowMapTex.w,0,0,1);
280 }
Divide the z-value in projective space by the magnification factor w, calculate the z-value in screen coordinates, assign to r-value and return (internal MMD processing?).
282 // techniques for Z-value mapping
283 technique ZplotTec < string MMDPass = "zplot"; > {
284 pass ZValuePlot {
285 AlphaBlendEnable = FALSE;
286 VertexShader = compile vs_2_0 ZValuePlot_VS();
287 PixelShader = compile ps_2_0 ZValuePlot_PS();
288 }
289 }
Technique to be performed when calculating the z-value for self-shadow determination.
• “zplot”: Z-value plot for self-shadow.
8. DRAWING OBJECTS IN SELF-SHADOWING (セルフシャドウ時オブジェクト描画)
Drawing an object with self-shadow.
295 // sampler for the shadow buffer. “register(s0)" because MMD uses s0
296 sampler DefSampler : register(s0);
297
Assign sampler register 0 to DefSampler. Not sure when it’s swapped with MMDSamp0 earlier. Not replaceable.
298 struct BufferShadow_OUTPUT {
299 float4 Pos : POSITION; // projective transformation coordinates
300 float4 ZCalcTex : TEXCOORD0; // z value
301 float2 Tex : TEXCOORD1; // texture
302 float3 Normal : TEXCOORD2; // normal vector
303 float3 Eye : TEXCOORD3; // position relative to camera
304 float2 SpTex : TEXCOORD4; // sphere map texture coordinates
305 float4 Color : COLOR0; // diffuse color
306 };
VS_OUTPUT with ZCalcTex added.
• ZCalcTex: stores the texture coordinates for calculating the interpolation values of Z and w for vertices in screen coordinates as the 0 texture coordinate vertex shader output semantic.
308 // vertex shader
309 BufferShadow_OUTPUT BufferShadow_VS(float4 Pos : POSITION, float3 Normal : NORMAL, float2 Tex : TEXCOORD0, uniform bool useTexture, uniform bool useSphereMap, uniform bool useToon)
310 {
Converts local coordinates of vertices to projective coordinates. Set the value to pass to the pixel shader, returning the BufferShadow_OUTPUT structure.
Parameters
• Pos: local coordinates of the vertex.
• Normal: normals in local coordinates of vertices.
• Tex: UV coordinates of the vertices.
• useTexture: determination of texture usage, given by pass.
• useSphereMap: determination of sphere map usage, given by pass.
• useToon: determination of toon usage. Given by pass in the case of model data.
Return value
BufferShadow_OUTPUT.
311 BufferShadow_OUTPUT Out = (BufferShadow_OUTPUT)0;
312
Initializing the structure.
313 // world-view projection transformation of camera viewpoint.
314 Out.Pos = mul( Pos, WorldViewProjMatrix );
315
Convert local coordinates of vertices to projective coordinates.
316 // position relative to camera
317 Out.Eye = CameraPosition - mul( Pos, WorldMatrix );
Calculate the inverse vector of the line of sight.
318 // vertex normal
319 Out.Normal = normalize( mul( Normal, (float3x3)WorldMatrix ) );
Compute normalized normal vectors in the vertex world space.
320 // world View Projection Transformation with Light Perspective
321 Out.ZCalcTex = mul( Pos, LightWorldViewProjMatrix );
Convert local coordinates of vertices to projective coordinates with respect to the light, and let the hardware calculate z and w interpolation values.
323 // Diffuse color + Ambient color Calculation
324 Out.Color.rgb = AmbientColor;
325 if ( !useToon ) {
326 Out.Color.rgb += max(0,dot( Out.Normal, -LightDirection )) * DiffuseColor.rgb;
327 }
328 Out.Color.a = DiffuseColor.a;
329 Out.Color = saturate( Out.Color );
Set the base color. For accessories, add a diffuse color to the base color based on the light influence, and set each component to 0-1.
331 // texture coordinates
332 Out.Tex = Tex;
Assign the UV coordinates of the vertex as they are.
334 if ( useSphereMap ) {
335 // sphere map texture coordinates
336 float2 NormalWV = mul( Out.Normal, (float3x3)ViewMatrix );
Convert vertex normal vectors to x and y components in view space coordinates when using sphere maps.
337 Out.SpTex.x = NormalWV.x * 0.5f + 0.5f;
338 Out.SpTex.y = NormalWV.y * -0.5f + 0.5f;
339 }
340
341 return Out;
342 }
Convert view space coordinates to texture coordinates and put the structure back.
344 // pixel shader
345 float4 BufferShadow_PS(BufferShadow_OUTPUT IN, uniform bool useTexture, uniform bool useSphereMap, uniform bool useToon) : COLOR
346 {
Specify the color of pixels to be displayed on the screen.
Parameters
• IN: BufferShadow_OUTPUT structure received from vertex shader.
• useTexture: determination of texture usage, given by pass.
• useSphereMap: determination of sphere map usage, given by pass.
• useToon: determination of toon usage. Given by pass in the case of model data.
Output value
Output color
347 // specular color calculation
348 float3 HalfVector = normalize( normalize(IN.Eye) + -LightDirection );
349 float3 Specular = pow( max(0,dot( HalfVector, normalize(IN.Normal) )), SpecularPower ) * SpecularColor;
350
Same specular calculation as Basic_PS.
351 float4 Color = IN.Color;
352 float4 ShadowColor = float4(AmbientColor, Color.a); // shadow’s color
Base color and self-shadow base color.
353 if ( useTexture ) {
354 // apply texture
355 float4 TexColor = tex2D( ObjTexSampler, IN.Tex );
356 Color *= TexColor;
357 ShadowColor *= TexColor;
358 }
When using a texture, extract the color of the texture coordinates from the set texture and multiply it by the base color and self-shadow color respectively.
359 if ( useSphereMap ) {
360 // apply sphere map
361 float4 TexColor = tex2D(ObjSphareSampler,IN.SpTex);
362 if(spadd) {
363 Color += TexColor;
364 ShadowColor += TexColor;
365 } else {
366 Color *= TexColor;
367 ShadowColor *= TexColor;
368 }
369 }
As with Basic_PS, when using a sphere map, add or multiply the corresponding colors.
370 // specular application
371 Color.rgb += Specular;
372
Apply specular to the base color.
373 // convert to texture coordinates
374 IN.ZCalcTex /= IN.ZCalcTex.w;
Divide the z-value in projective space by the scaling factor w and convert to screen coordinates.
375 float2 TransTexCoord;
376 TransTexCoord.x = (1.0f + IN.ZCalcTex.x)*0.5f;
377 TransTexCoord.y = (1.0f - IN.ZCalcTex.y)*0.5f;
378
Convert screen coordinates to texture coordinates.
379 if( any( saturate(TransTexCoord) != TransTexCoord ) ) {
380 // external shadow buffer
381 return Color;
Return the base color if the vertex coordinates aren’t in the 0-1 range of the texture coordinates.
382 } else {
383 float comp;
384 if(parthf) {
385 // self-shadow mode2
386 comp=1-saturate(max(IN.ZCalcTex.z-tex2D(DefSampler,TransTexCoord).r , 0.0f)*SKII2*TransTexCoord.y-0.3f);
In self-shadow mode2, take the Z value from the shadow buffer sampler and compare it with the Z value of the vertex, if the Z of the vertex is small, it isn't a shadow. If the difference is small (close to the beginning of the shadow), the shadow is heavily corrected. (Weak correction in the upward direction of the screen?) Weakly corrects the base color.
387 } else {
388 // self-shadow mode1
389 comp=1-saturate(max(IN.ZCalcTex.z-tex2D(DefSampler,TransTexCoord).r , 0.0f)*SKII1-0.3f);
390 }
Do the same for self-shadow mode1.
391 if ( useToon ) {
392 // toon application
393 comp = min(saturate(dot(IN.Normal,-LightDirection)*Toon),comp);
In the case of MMD models, compare the degree of influence of the shade caused by the light with the degree of influence caused by the self-shadow, and choose the smaller one as the degree of influence of the shadow.
• min (x,y): select the smaller value of x and y.
394 ShadowColor.rgb *= MaterialToon;
395 }
396
Multiply the self-shadow color by the toon shadow color.
397 float4 ans = lerp(ShadowColor, Color, comp);
Linearly interpolate between the self-shadow color and the base color depending on the influence of the shadow.
398 if( transp ) ans.a = 0.5f;
399 return ans;
400 }
401 }
If translucency is enabled, set the transparency of the display color to 50% and restore the composite color.
403 // techniques for drawing objects (for accessories)
404 technique MainTecBS0 < string MMDPass = "object_ss"; bool UseTexture = false; bool UseSphereMap = false; bool UseToon = false; > {
405 pass DrawObject {
406 VertexShader = compile vs_3_0 BufferShadow_VS(false, false, false);
407 PixelShader = compile ps_3_0 BufferShadow_PS(false, false, false);
408 }
409 }
Technique performed on a subset of accessories (materials) that don’t use a texture or sphere map during self-shadowing.
• “object-ss”: object when self-shadow is disabled.
• UseTexture: true for texture usage subset.
• UseSphereMap: true for sphere map usage subset.
• UseToon: true for PMD model.
9. FINAL NOTES
For further reading on HLSL coding, please visit Microsoft’s official English reference documentation.
5 notes
·
View notes
Photo
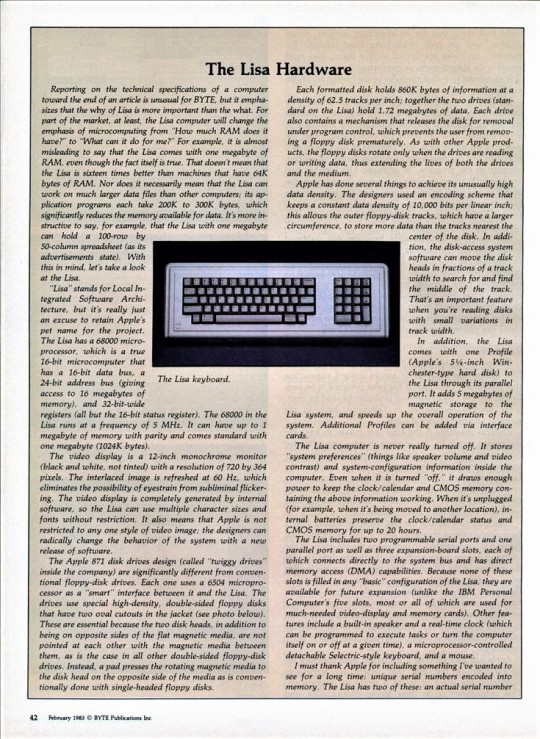
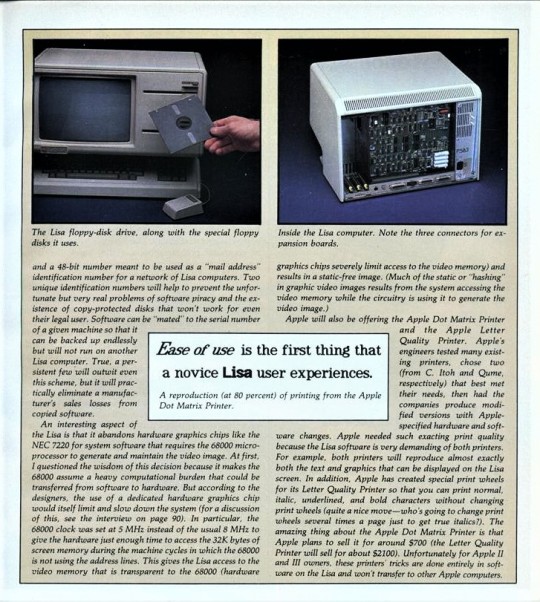
The Lisa Hardware
Reporting on the technical specifications of a computer toward the end of an article is unusual for BYTE, but it emphasizes that the why of Lisa is more important than the what. For part of the market, at least, the Lisa computer will change the emphasis of microcomputing from “How much RAM does it have?” to “What can it do for me?” For example, it is almost misleading to say that the Lisa comes with one megabyte of RAM, even though the fact itself is true. That doesn’t mean that the Lisa is sixteen times better than machines that have 64K bytes of RAM. Nor does it necessarily mean that the Lisa can work on much larger data files than other computers; its application programs each take 200K to 300K bytes, which significantly reduces the memory available for data. It’s more instructive to say, for example, that the Lisa with one megabyte can hold a 100-row by 50-column spreadsheet (as its advertisements state). With this in mind, let’s take a look at the Lisa.
“Lisa” stands for Local Integrated Software Architecture, but it’s really just an excuse to retain Apple’s pet name for the project. The Lisa has a 68000 microprocessor, which is a true 16-bit microcomputer that has a 16-bit data bus, a 24-bit address bus (giving access to 16 megabytes of memory), and 32-bit-wide registers (all but the 16-bit status register). The 68000 in the Lisa runs at a frequency of 5 MHz. It can have up to 1 megabyte of memory with parity and comes standard with one megabyte (1024K bytes).
The video display is a 12-inch monochrome monitor (black and white, not tinted) with a resolution of 720 by 364 pixels. The interlaced image is refreshed at 60 Hz, which eliminates the possibility of eyestrain from subliminal flickering. The video display is completely generated by internal software, so the Lisa can use multiple character sizes and fonts without restriction. It also means that Apple is not restricted to any one style of video image; the designers can radically change the behavior of the system with a new release of software.
The Apple 871 disk drives design (called “twiggy drives” inside the company) are significantly different from conventional floppy-disk drives. Each one uses a 6504 microprocessor as a “smart” interface between it and the Lisa. The drives use special high-density, double-sided floppy disks that have two oval cutouts in the jacket (see photo below). These are essential because the two disk heads, in addition to being on opposite sides of the flat magnetic media, are not pointed at each other with the magnetic media between them, as is the case in all other double-sided floppy-disk drives. Instead, a pad presses the rotating magnetic media to the disk head on the opposite side of the media as is conventionally done with single-headed floppy disks.
Each formatted disk holds 860K bytes of information at a density of 62.5 tracks per inch; together the two drives (standard on the Lisa) hold 1.72 megabytes of data. Each drive also contains a mechanism that releases the disk for removal under program control, which prevents the user from removing a floppy disk prematurely. As with other Apple products, the floppy disks rotate only when the drives are reading or writing data, thus extending the lives of both the drives and the medium.
Apple has done several things to achieve its unusually high data density. The designers used an encoding scheme that keeps a constant data density of 10,000 bits per linear inch; this allows the outer floppy-disk tracks, which have a larger circumference, to store more data than the tracks nearest the center of the disk. In addition, the disk-access system software can move the disk heads in fractions of a track width to search for and find the middle of the track. That’s an important feature when you’re reading disks with small variations in track width.
In addition, the Lisa comes with one Profile (Apple’s 5-1/4-inch Winchester-type hard disk) to the Lisa through its parallel port. It adds 5 megabytes of magnetic storage to the Lisa system, and speeds up the overall operation of the system. Additional Profiles can be added via interface cards.
The Lisa computer is never really turned off. It stores “system preferences” (things like speaker volume and video contrast) and system-configuration information inside the computer. Even when it is turned “off,” it draws enough power to keep the clock/calendar and CMOS memory containing the above information working. When it’s unplugged (for example, when it’s being moved to another location), internal batteries preserve the clock/calendar status and CMOS memory for up to 20 hours.
The Lisa includes two programmable serial ports and one parallel port as well as three expansion-board slots, each of which connects directly to the system bus and has direct memory access (DMA) capabilities. Because none of these slots is filled in any “basic” configuration of the Lisa, they are available for future expansion (unlike the IBM Personal Computer’s five slots, most or all of which are used for much-needed video-display and memory cards). Other features include a built-in speaker and a real-time clock (which can be programmed to execute tasks or turn the computer itself on or off at a given time), a microprocessor-controlled detachable Selectric-style keyboard, and a mouse.
I must thank Apple for including something I’ve wanted to see for a long time: unique serial numbers encoded into memory. The Lisa has two of these: an actual serial number An interesting aspect of the Lisa is that it abandons hardware graphics chips like the NEC 7220 for system software that requires the 68000 microprocessor to generate and maintain the video image. At first, I questioned the wisdom of this decision because it makes the 68000 assume a heavy computational burden that could be transferred from software to hardware. But according to the designers, the use of a dedicated hardware graphics chip would itself limit and slow down the system (for a discussion of this, see the interview on page 90). In particular, the 68000 clock was set at 5 MHz instead of the usual 8 MHz to give the hardware just enough time to access the 32K bytes of screen memory during the machine cycles in which the 68000 is not using the address lines. This gives the Lisa access to the video memory that is transparent to the 68000 (hardware graphics chips severely limit access to the video memory) and results in a static-free image. (Much of the static or “hashing” in graphic video images results from the system accessing the video memory while the circuitry is using it to generate the video image.)
Apple will also be offering the Apple Dot Matrix Printer and the Apple Letter Quality Printer. Apple’s engineers tested many existing printers, chose two (from C. Itoh and Qume, respectively) that best met their needs, then had the companies produce modified versions with Apple-specified hardware and software changes. Apple needed such exacting print quality because the Lisa software is very demanding of both printers. For example, both printers will reproduce almost exactly both the text and graphics that can be displayed on the Lisa screen. In addition, Apple has created special print wheels for its Letter Quality Printer so that you can print normal, italic, underlined, and bold characters without changing print wheels (quite a nice move who’s going to change print wheels several times a page just to get true italics?). The amazing thing about the Apple Dot Matrix Printer is that Apple plans to sell it for around $700 (the Letter Quality Printer will sell for about $2100). Unfortunately for Apple II and III owners, these printers’ tricks are done entirely in software on the Lisa and won’t transfer to other Apple computers.
Daily inspiration. Discover more photos at http://justforbooks.tumblr.com
10 notes
·
View notes
Text
Programmable LED Sign: All You Should Know Before Getting One
Email: [email protected]
WhatsApp & Wechat: +86 18038197291
www.xygledscreen.com
LED signs are a new and fast-developing tool for companies to engage with their consumers, enhance brand awareness and turnover, and generate more money, among other things.
Whatever sort of LED sign you want is up to you since each one has a different display that may show everything from plain text to photographs to movies. LED signage is also more energy-efficient. Unfortunately, other than your company name and hours and weather, there may not be much you can put in the way of text to display on the LED sign.
However, the good news is that this is an incredible opportunity to get exposure for small companies. So sit back and learn as we'll teach you all you need to know about programmable LED signs outdoors. We'll also talk about how they may be used to generate eye-catching graphic advertisements for your company.
What are programmable LED signs used for?
Most establishments where people gather, such as restaurants, motels, retail stores, movie theaters, and other gathering places, have programmable LED programmable signs. These signs may be used to market items, promote a brand, indicate where to go in an organization, or offer instructions.
This is where we are right now: in the digital signage world. Using LED signages is a new and more effective means of delivering information to people as they wait in line, shop, or go to school.
Retailers have had excellent success with LED displays because they put them in suitable locations and show the right stuff. Retailers enhance the consumer shopping experience by showcasing new inventory, notifying customers about promotions, and providing customers with fresh ideas that help them generate more sales.
How do programmable LED signs work?
Electronic pulses are sent to each LED (light-emitting diode) bulb using integrated circuits and software inside the lamp. These impulses activate the LED bulb when the LED is on. You can determine the LED screen's length and height by arranging the screen's single LED bulbs (pixels).
In order to find out how wide the screen is, you need to know how many pixels are in the matrix. When the sign is set up and switched on, each pixel may flash on its own and appear as it travels along with the signboard. An on-off pattern charges each LED light, resulting in eye-catching visual signage.
Different types of programmable LED signs
LED signage is a terrific way to bring attention to your brand and engage with consumers. If you want to get one for your company, there are several choices to pick from. LED signs may come in a wide variety of shapes, sizes, colors, and styles. Discover which one suits your business the best with these five types of LED signs listed below.
LED signage for inside and outdoors
It is possible to buy LED signage for indoor or outdoor use, and they are available in a variety of sizes, functions, and capabilities. Depending on your marketing and promotion objectives, your company may benefit more from one kind of promotion than the other.
To attract new clients to your town, particularly those traveling from afar, you may want to consider installing an outdoor programmable LED sign. On the other hand, if you're in a retail area with many people strolling by, a LED sign inside or outside your business might help you persuade more people to purchase right away by letting them know about offers and promotions.
Two-sided LED signage
You can significantly impact your area with a double-sided LED sign. This is one of the most aesthetically pleasing varieties. You may display the same photo, message, or video on both sides, or you can modify each side as you see appropriate.
LED signage with full-color lighting
Full-color LED signage may be used both indoors and outdoors. These flexible signages allow you to alter the high-definition display as frequently. Text messages, full-motion films, animations, and realistic graphics may all be used to get your message in front of a wider audience.
Three-color LED signage
Red, green, and yellow are the primary hues of the tri-colored LED signage. You may use text messages, attractive photos, and animations to connect with consumers. The wording or design may be changed, just as with full-color and double-sided signage!
A single-color version of LED signage
LED signs with only one color, such as a brilliant yellow or amber tint, are the simplest and nevertheless quite strong. If you're looking for something tiny enough to fit in a window or on a product, you'll have plenty of options. Simple graphics and messages may be sent to your audience in seconds.
Pros and cons of using a programmable LED sign
LED signs have several pros/advantages. The following are examples:
User-friendly
Your LED sign's colors, wording, and artwork may be easily changed. LED signs may be programmable, so you can make your character seem different at any moment. You don't have to purchase or install anything extra to use your LED signage to promote promotional bargains or discounts because of its versatility.
Durable
LED signs are not only versatile, but they are also long-lasting. LED signs have a bulb life of 100,000 hours or more, which is much more than traditional illuminated signs.
Cost-efficient
When you consider LED signs' extended lifespan and their low power consumption, you'll find that they're pretty budget-friendly. These signs put out a lot of light with very little electricity, making them ideal energy-saving alternatives for your business.
LED signage has a few drawbacks, as well, such as:
Expensive
LED signage has the drawback of being prohibitively expensive when first purchased. As a result of their low cost, they come with a high initial cost. LED light prices have dropped significantly in the previous several years, although they remain more than those of conventional light sources.
Temperature
Keep your LED lights cooled to prevent overheating. When LED signs using a lot of power become too hot, they may go into overdrive mode and not work. A heat sink is a must-have for your LED signage. They won't get too hot this way.
Low/poor quality
The market is filled with LED signs of varying quality ranging from the highest-end products to the most budget-friendly. A LED sign that has been improperly constructed will depreciate more quickly and give off undesirable visuals if it is purchased.
Are there better solutions to your advertising requirements?
Yes, even if you don't have LED signage, there are still many ways to advertise your business. LED signs can be a great place to start if you're new in the business world. You can also diversify your advertising efforts by setting up websites, social media accounts, and other types of online presence to reach a wider audience. Once your company has earned worldwide recognition, you now have the freedom to upgrade your marketing strategy at any time.
0 notes
Text
Friendship meme Solve (Locker 46)
https://pangenttechnologies.tumblr.com/image/185538124832

There is some green pixel data at the bottom.

https://imgur.com/a/uKvlQE7
I cleaned up the Friendship ended green matrix
the friendship ended one is inverted compared to how it should be, i think, it might even be upside down
so, based on how there’s a checkerboard pattern next to “General” on that file size post, I tried inverting the image along a checkerboard pattern
which also results in a more normal-looking data matrix, which doesn’t scan, unfortunately so i don’t know
I tried a few different things with the Friendship ended green matrix.
Previously, I had cleaned it up at a lower resolution and inverted the matrix along a checkerboard pattern and upscaled it or inverted and mirrored it and done other stuff but it wasn’t scanning.
I realized that the data matrix encoder I was using is also an encoder. So I typed in some text similar to a locker reservation to see what an encode would look like.
https://imgur.com/a/6FFVaAm
The difference with the test image was that it was presented as a square.
So I took the four blocks of the data matrix from my tests and arranged them as a square.
The upscaled, checkerboard-inverted one:

actually scanned this time, as:
“Locker 46 reserved by SeptaCube in dedication to the independent programmers of the world.”
1 note
·
View note
Text
My thoughts on AI
I’m working on a novel about space pirate goobers. Working title: The Wolves Between the Worlds. (It’s cumbersome. I’m not totally happy with it. There’s a Red Riding Hood metaphor I’m trying to work in. WE’LL SEE HOW IT GOES)
Anyway there’s AI in it and I figured, maybe I should set the conceptual piece of it aside so that programmer types can turn it around and see what they think of it, and if there’s easy ways to make the idea stronger, maybe I can work that into the novel while I’m writing rather than scrambling to explain a half-baked idea later!
So the AI. The principle here is just... the AI doesn’t look or feel like, you wake up one day and there’s a real coherent consciousness where before there was just pixels and scripts. No. That’s not how it happens. There’s not a bright line.
It’s more like, we get better and better at simulating human cognition for reasons of our own. Basically, there’s a lot of low-level bargaining and scheduling that it would be awfully useful to trade off to an agent or daemon, if you could trust it to predict your preferences within certain tolerances. I’m thinking of a world where people’s various collections of settings, fine-tuned app preferences, fuckin’ ringtones, like all that. All the ways we go about making the world more tolerable to ourselves and easier to get through. All that gets packaged and summarized and compressed.
And with that plus a million “which Hogwarts house would you be, which member of the landed gentry from a Jane Austen novel should you date” style quizzes, an actual science emerges from which it’s possible to compress a person’s personality into a small dataset in exactly the same way that it’s possible to compress their face--you take certain important points on the topographical map (a facial map or a personality mapping) and you save their relation to each other, and then from those points you’re able to recreate--not an exact simulation of their face or personality, but something that’s reasonably close. Close enough for real-world applications like setting up an automated marketplace where agents/daemons trade within the parameters that their users specify.
Trade for what? Trade for anything. It’s Uber but for everything. If you have a commute then your daemon goes out and determines what people with similar preferences to yours have decided to do about getting to work, and it comes back with “I bought you the monthly transit pass and set your alarm for 8am” or maybe “I was able to negotiate a steep discount on the latest-model hovercar for you, would you like beige or black on the trim?” or possibly “Jane down the street would be totally willing to drive you to BART and pick you up at the end of the day for gas money, she’s already doing that commute anyway.” If you’re lonely then your daemon goes out and negotiates for you to set up a date with someone whose preferences match. Also, you better believe the daemons are skinnable, so you can totally decide whether you’d like to be represented by a winged jaguar or Bowsette or what.
Anyway, so what we’ve got is compressed preference prediction matrixes, intelligent agents, and a marketplace. I’m calling it the��Autonomous Parallel Executor Exchange, or APEX.
I should say at this moment that I haven’t read any of MIRI’s technical papers, but I’m aware of the concept of Coherent Extrapolated Volition (CEV), and it seems to me that an APEX marketplace is the way you get from here to CEV. But there’s a lot that can go wrong, and the novel I’m writing will be about a way that it goes kind of horribly wrong. (Short version: the lapse in communication with space infrastructure ends up meaning that two separate APEXes are established and begin to compete against each other, and before people realize what’s happened they’re arms-racing to some terrible outcomes.)
So yeah I am literally just throwing this out there to see if anybody else will be interested.
#apex#world building#artificial intelligence#if I've missed an important piece of the Yudkowsky fanfic archives please let me know lol
106 notes
·
View notes
Text
Why is a Thermal Device So Expensive?
The revelation of 'infrared beams' dates to the start of the nineteenth century by Sir William Herschel, He closed through tests that there is an undetectable light that can warm articles. In 1963, after 163 years, the main warm camera was created. The warm imager doesn't depend on apparent light yet warm radiation from the item. It changes over it into Thermal Imaging Scope that is apparent to the unaided eye through a progression of sign handling.
It is at first restricted to military applications in light of its grouped use and excessive costs. Around 2000, following quite a while of advancement, warm imaging innovation has step by step developed and is broadly utilized for a considerable length of time. Notwithstanding, the cost of this innovation is still too far for most potential buyers today, and this article covers the reason why that is

While purchasing a warm gadget, we take a gander at the elements and the sticker price of the item and afterward contrast it and others on the lookout. Warm gadgets appear as cameras, riflescopes, optics, and so forth. Assuming you investigate the commercial center, you'll observe that the costs of these gadgets are somewhat high than standard day optics.
Presently, this could come as a shock from the get go, yet how about we investigate what makes these gadgets so expensive. Here are a few factors that conclude the sticker cost of various warm gear
Warm Imaging Detector
Germanium Lens
Field Programmable Gate Array (FPGA)
Warm Algorithm
Others (gathering, climate, tests, and so on.)
Cryogenic Cooler (for cooled warm imagers)
6 Reasons Why Thermal Devices are So Expensive
We should survey the elements referenced above in more detail.
1. Warm Detector
The indicator is essentially made out of a microbolometer and related circuits. It's answerable for getting warm radiation and changing over it into a computerized signal with radiation force data. The microbolometer is a matrix of hotness touchy materials on a comparing network of silicon. Infrared radiation from a particular scope of frequencies strikes heat-touchy materials, for example, vanadium oxide or shapeless silicon and changes its electrical obstruction. This opposition change is estimated and handled into temperatures which can be addressed graphically by related circuits. The microbolometer framework is normally planned and fabricated in three sizes, a 640×480 cluster, a 320×240 exhibit (384×288 nebulous silicon), or a more affordable 160×120 cluster.
The indicators cost a ton due to their weakness to different ecological circumstances, high power utilization, low large scale manufacturing strength, and reconciliation issues. Since the creation of identifiers requires high stage costs, the interest in innovation innovative work is additionally a sizeable consistent venture. The improvement of every boundary implies the redesign of the whole framework. There is still a lot of opportunity to get better in center markers, for example, NETD, pixel pitch, and amplification, which drives producers to proceed to research and move up to guarantee that they won't essentially fall behind their rivals.
2. Germanium Lens
A few top notch warm gadgets use germanium glass focal points. They have a high refractive record, permitting the IR scope of frequencies to go through and arrive at the sensor that recognizes an objective.
Due to the uncommonness of the germanium metal, it costs 1500 dollars for each kg; and that is only the expense in its crude structure. Whenever you add the cost of refining and handling germanium into an elite exhibition long-range warm reconnaissance focal point, the complete expense of the gear increments dramatically
Likewise, it relies upon the opening (the F-number of the gadget); the lower the F-number is, the more costly the focal point costs.
For more details, visit us :
Thermal Polaris 350RL
Thermal Imaging Sights
Thermal Scope for Sale Australia
Thermal Tracer 50 LRF
#Thermal Scope#Thermal Vision Australia#Thermal Scope For Sale#Thermal Monocular Australia#Thermal Tracer 50LRF
0 notes
Last Seen Blogs

cosmiconix
Cosmiconix

budzdorovanatasha
natasha romanoff

pendragonx4t
V3ROOM
flawlessbackflip
show me how to be whøle again

problematic-president
Was Ben Franklin even real