#resize browser window
Explore tagged Tumblr posts
Visit Tumblr Blog
Explore Tumblr blogs with no restrictions, modern design and the best experience.
Last Seen Tumblr Blogs


Fun Fact
The Tumblr office adopted Tommy, an 11-year-old Pomeranian.
Text
I've got the new dashboard layout since today, noooo....this legit feels like it's messing with my brain, though maybe that's just because I'm quite sleep-deprived today :/
#guess i'll just have to resize the browser window so that it takes up only half of the screen#then it looks pretty much the same as before and i often did that anyway....still a very stupid update thanks for nothing tumblr
2 notes
·
View notes
Text

Slowly trying to work out the logo. Not 100% there yet but in other news I did figure out the kind of base HTML & CSS and that all seems to be working ok so far, so as soon as I finish this and the rest of the welcome page I can finally put something up on the site!
#the trickiest parts were getting the border image to work ok#and getting the main div container to resize according to the browser window size while maintaining the right aspect ratio#but i think i got those both figured out#i was also going to see how it looked and then maybe rework the background image and border image i made but i think theyre ok for now#wip
0 notes
Text
Honestly I recommend everyone learn just a littttle bit of CSS because it really is powerful and just makes bits and pieces of your internet experience more convenient.
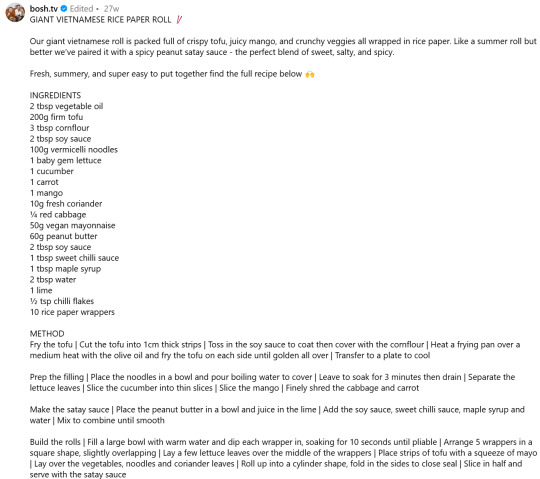
Right now I'm cataloguing recipes I've really enjoyed, just trying to get them all in one place. Many of these are instagram recipes and, because I don't trust link rot (aka the possibility that the instagram link goes dead one day), I'm including a screenshot of the recipe along with the link.
But instagram on desktop... looks like this
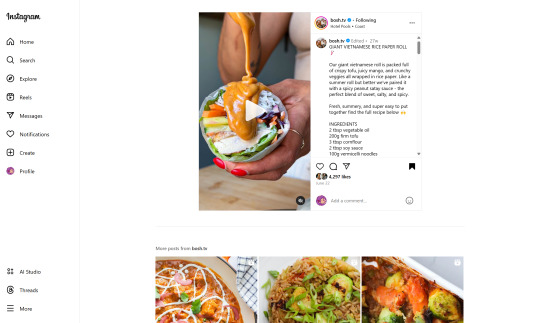
(Link, for credit. It's a good recipe)
I obviously could just copy-paste the recipe out of there. But a screenshot would be cleaner for how I'm cataloguing these.
And as-is, I'd have to scroll the whole height of that small right-side window about 4 times to fit it all.
But actually... I can just resize that div holding that whole right-side content
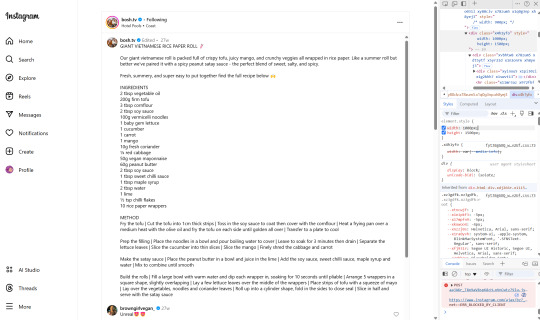
Basically I
hit f12 to open the dev tools
clicked the element finder
clicked on an element inside the recipe side
followed it up the tree until I found the element holding the whole recipe side (do this by hovering the div in the dev tools panel way on the right, then hovering upward and up until I find the element which is the highest up that still only contains the recipe-side content)
in the element.style part, set "width: 1000px" and "height: 1500px"
(I notice the width seems to still be less than 1000px, even though it got bigger)
likely suggests there's an element above it with a max-width set
go up the tree higher until I find the element with the max-width and uncheck that style
screenshot ready
Maybe that sounded complicated but it took me probably 20-30 seconds
And this isn't just about screenshotting recipes like.
website with an annoying gif? select gif, delete gif
do you want a clean screenshot of a digital receipt for record-keeping without a large company banner or irrelevant information? delete unnecessary elements, adjust widths, screenshot
SOMETIMES, you can bypass paywalls if they're relying on something like overflow: hidden, or an overlay in the way, or some JS that runs (you can disable JS in the dev tools)
lost the jpg/png file you used for your profile picture and size doesn't totally matter? grab it from the img src while logged in. (you might even be able to find it in a bigger size by changing the url query parameters)
color contrast on an article really bad? find and change background color. find and change font color
want to make a funny fake screenshot without learning photoshop? just edit the page content in the dev tools
This isn't about like being good enough to write scripts or browser extensions. Really if you just have some basic HTML/CSS understanding a hat worth of tricks, you can make so many little adjustments in your favor.
683 notes
·
View notes
Text

Hello folks! As someone who never did any celebrations nor tutorials for giffing, I decided it's finally the time now. So thank y'all for putting up with my horror shenanigans, 8k is just amazing and I hope y'all will keep enjoying my blog and posts!
PHOTOPEA GIF TUTORIAL
Moving to Photoshop after years of using Photopea, I can say while they both work very similarly, they're also different. Photoshop is far superior, you can still make very HQ and nice gifs in Photopea too! This post aims to show you my personal way of making crispy gifs while also covering the basics of getting the frames and uploading them to Photopea. (If you're looking for more detailed beginner tutorial, there's plenty of those out there, amazingly done!)
Photopea is completely free, video player is completely free, downloading movies is completely free. Only thing it'll cost you is your time.
WHAT YOU'LL NEED:
- photopea - potplayer - good quality movie file ( i go for the highest GB ones, above 10gb is amazing. Sometimes I get 40gb and prefer 1080p source. Note that higher file doesn't immediately mean higher quality - if the movie looks weird just download another one)
GETTING THE FRAMES: Once you get your source file and open it via PotPlayer, find the scene you want to gif. Using D and F keys you can go backwards or forward by single frames. When you get the perfect frame where you want the gif to start, I always go back 10 frames because PotPlayer tends to cut those out. It's better to get more frames than you need as you can always delete those extra ones later on.
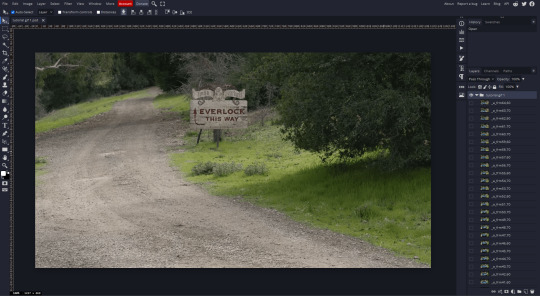
I'll be giffing scene from Longlegs alongside the tutorial.
PRESS CTRL + G. This will open the frame capturing window. Fix the setting to match these:

and press "START". Click back on the PotPlayer to bring focus back on the window and hold or press the forward key - F - to play the scene and capture the frames. You can see the frames number going up on your other window. If it stays on 0 you're not capturing anything. Once the desired scene is over, press "STOP" on the frame capturing window and voila - you have your frames in your selected folder. Delete any extra or unwanted ones. The amount of frames usually sits between 40-80 depending on what ratio you'll use later on for the gifs to fit the 10mb Tumblr upload limit.
Now it's time to open PHOTOPEA.
FILE > NEW: you have to write down the exact dimensions of your frames. This action will create a new file with single background. Go back to FILE > OPEN AND PLACE > SELECT ALL YOUR FRAMES and upload them. Depending on the size of the frames, this could take a while or even lag your browser. Make sure to not click anywhere within the app before all frames are done uploading.
Now lets finally make the gif. The following were my most used gif making steps in general, play around other options and find out what works - every gif or scene is different!
Delete the original empty layer at the bottom and then select all the frames (clicking the first/last layer and then click the last/first layer while holding shift to easily select all) and by pressing CTRL+G, group them. Select all layer again and
RIGHT CLICK (on the layers) > RASTERIZE LAYER (on the upper taskbar) > ANIMATION > MAKE FRAMES Now your frames should have _a_ in their names. CREATE NEW LAYER

and select all your frames again.
CROP the whole project to whatever ratio you want, Ill be using 64x44 ratio for wider gif.

By pressing ALT+CTRL+I open the RESIZE window. Tumblr gif dimension is 540px wide max (heres tutorial for other dimensions and why correct sizing is important) so using that and "bicupic sharper" option under resample, resize the gif.

Now you have the base gif done.

Its dark, muddy and unclear. We sharpen it and give it the clear crispy look using noise. FILTER > NOISE > ADD NOISE and set the Amount to 1% and select monochromatic FILTER> SHARPEN > SMART SHARPEN > 150% amount with 1px radius FILTER> SHARPEN > SMART SHARPEN > 50% x 10px

Now its time to bring the gif to life. Create NEW ADJUSTMENT LAYER. This is where all the editing options are.

For this specific gif Im doing:
BRIGHTNESS/CONTRAST +50 brightness, +10 contrast
VIBRANCE +20 vibrance, +10 saturation
HUE/SATURATION master -50 , red +50, cyan +50, blue +50 (the reason i tune all colors in master down by 50 is to mute them all down. Adding back on colors you want is making them stand out way more! It works on gifs with dominant few colors but if the gif is very colorful, you're better off leaving this option out completely and rather work with selective colors. As I said, try it out and see!)
another layer of BRIGHTNESS/CONTRAST +20 brightness
COLOR BALANCE range: midtones > magenta - green: -11, yellow - blue: +8
SELECTIVE COLOR red: cyan: -20%, yellow: +20, black: +10 yellow: yellow: +50% white: yellow: -10%, black: -20% black: black: +4%
CURVES(those are something I didnt use much in Photopea as in general youre just fine with brightness and selective color. Just move the point on the curve and see what it does! For this gif I went with Curves like these and it enhanced the gif nicely.)

another layer of SELECTIVE COLOR > black: black: +2%

Now Im satisfied with the gif and want to save it. Clicking FILE > EXPORT AS > GIF will open this window:

Make sure the quality is at 100%, the size in darker numbers lower than 10MB. Speed in Photopea is quite tricky for some reason, but 180% - 190% is the "normal 100% speed" of the gif.

Enjoy giffing and feel free to ask anything if unclear!
66 notes
·
View notes
Text
Friday, July 28th, 2023
🌟 New
We’ve updated the text for the blog setting that said it would “hide your blog from search results”. Unfortunately, we’ve never been able to guarantee hiding content from search crawlers, unless they play nice with the standard prevention measures of robots.txt and noindex. With this in mind, we’ve changed the text of that setting to be more accurate, insofar as we discourage them, but cannot prevent search indexing. If you want to completely isolate your blog from the outside internet and require only logged in folks to see your blog, then that’s the separate “Hide [blog] from people without an account” setting, which does prevent search engines from indexing your blog.
When creating a poll on the web, you can now have 12 poll options instead of 10. Wow.
For folks using the Android app, if you get a push notification that a blog you’re subscribed to has a new post, that push will take you to the post itself, instead of the blog view.
For those of you seeing the new desktop website layout, we’ve eased up the spacing between columns a bit to hopefully make things feel less cramped. Thanks to everyone who sent in feedback about this! We’re still triaging more feedback as the experiment continues.
🛠 Fixed
While experimenting with new dashboard tab configuration options, we accidentally broke dashboard tabs that had been enabled via Tumblr Labs, like the Blog Subs tab. We’ve rolled back that change to fix those tabs.
We’ve fixed more problems with how we choose what content goes into blogs’ RSS feeds. This time we’ve fixed a few issues with how answer post content is shown as RSS items.
We’ve also fixed some layout issues with the new desktop website navigation, especially glitches caused when resizing the browser window.
Fixed a visual glitch in the new activity redesign experiment on web that was making unread activity items difficult to read in some color palettes.
Fixed a bug in Safari that was preventing mature content from being blurred properly.
When using Tumblr on a mobile phone browser, the hamburger menu icon will now have an indicator when you have an unread ask or submission in your Inbox.
🚧 Ongoing
Nothing to report here today.
🌱 Upcoming
We hear it’s crab day tomorrow on Tumblr. 🦀
We’re working on adding the ability to reply to posts as a sideblog! We’re just getting started, so it may be a little while before we run an experiment with it.
Experiencing an issue? File a Support Request and we’ll get back to you as soon as we can!
Want to share your feedback about something? Check out our Work in Progress blog and start a discussion with the community.
854 notes
·
View notes
Text

Windows95 Paint layout by me :3
Static theme
Fully customizable with JS functionality
Mostly beginner friendly
Another free to use website layout that I’ve made! It is a pixel perfect (or, at least as close as possible!!!) recreation of the Windows95 desktop, with the content window being the Windows95 paint window~
It works almost like a browser, with a draggable and resizable window, working window controls, a navbar, and all the submenus you could ever need. Please do check it out if you find it interesting 💕💕💕
#i finally got it DONE can u guys believe it……..#god. i’m so proud of myself but relieved to be done. bc u guys…..ohhhhhh my god#my themes#neocities themes#neocities#windows 95#ok to rb <3
55 notes
·
View notes
Note
hi !!! with your gifs, theres also video with the rentry-like mask/frame, please can i get a tut ?? i love your graphics sooooo CUTE !!! ٩( 'ω' )و keep up the good work !!

Of course !!!! If I said no, you can throw bricks at my window
And thank you for the compliment anon (❁´◡`❁)
Anyways HERE WE GO---

Before we begin, I would like to let you know that I'm using Photopea for all of the edits that have gifs in them. It's free and you can use it on your device's browser. [ Better to use on a big screen, less of a hassle to work ]
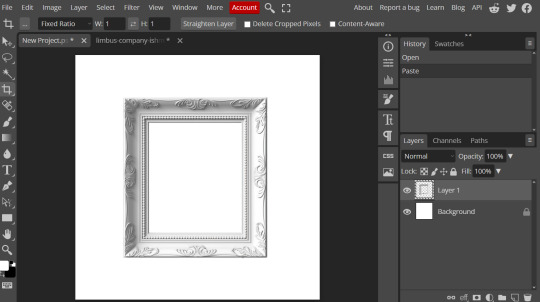
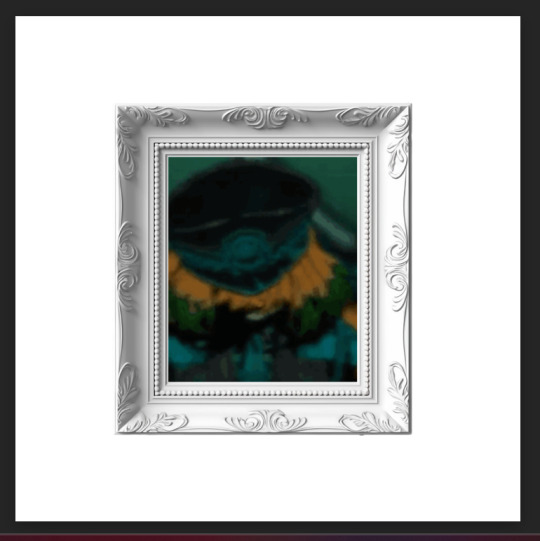
For my example I will be using this random frame I found on Google and a gif of Blind Obsession Ishmael !
But, you can use this tutorial for any Rentry frame or gif of your choosing. [ Though, if both are squared shape then it'll be a lot easier because you just put the gif under the frame with some resizing ]


Import them into Photopea in different canvases
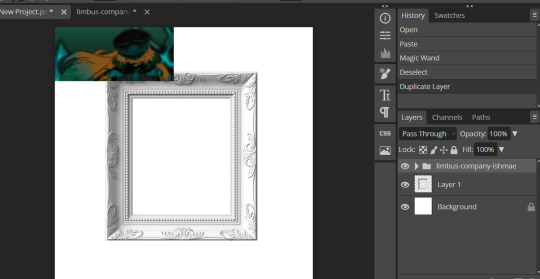
Go to the canvas where your gif is and then click on layer at the top and then ' Duplicate into '
A pop will appear and then click on ' Destination ' and select the one where your frame is [ for me it's New Project.psd, I was too lazy to name it LMAO ]


Boom ! There's Ishy with all her frames in a nice folder :D
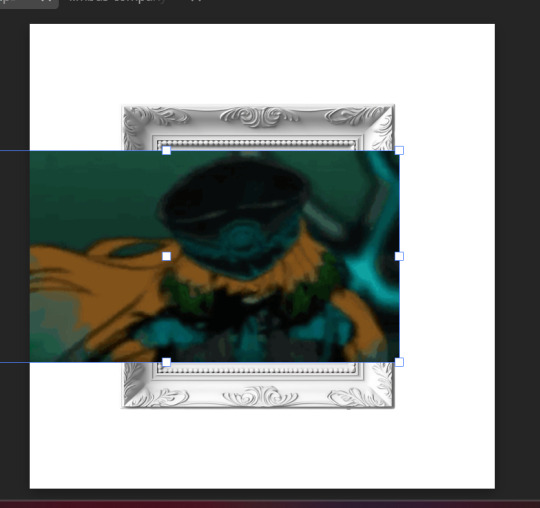
Now, if your gif is like mine where it's too small or too big, use the transformation tool to fit and arrange ! [ Edit > Free Transform ]
Now, click on the layer the frame is on, and then select the wand tool on the side. Then click on the area where you want your gif to show up
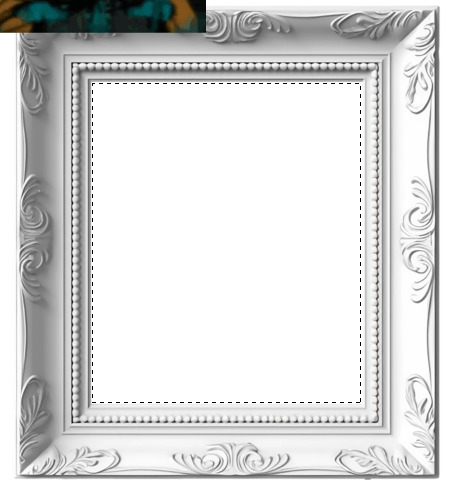
Click on the folder where it has the frames of your gif, then click on 'Layer' at the very top, go down to ' Raster Mask ' and click on ' Reveal Selection '

Boom ! Here is Ishy in her little frame :3
To save it, go to ' File ' at the top then down to ' Export as ' and choose GIF

And all done !

I hope this helps anon ! If you have any question, then please do not hesitate to ask me, I'm always happy to help ^-^

#( 🍓 ) request . . .#( 🍰 ) tutorial#rentry#rentry resources#gif#rentry tutorial#tutorial#rentry graphics
101 notes
·
View notes
Text

Avisynth Basics - Resizing and Sharpening for Gifs
Prerequisites
Avisynth (Wikipedia)
How to Use Avisynth For Gif Making by MichieTuts
Installing Avisynth by brandinator
Tumblr Dashboard Image Display Sizes by Unwrapping Tumblr
This post details my process for using Avisynth to resize a video file. The video file can then be edited and converted to a gif.
I learned how to use Avisynth through the posts linked above. I highly recommend reading through them; they're very detailed and easy to follow. By comparison, this is a basic guide as it only offers one method for using Avisynth.
In this post, I cover the following:
Why use Avisynth?
Using Avisynth to resize a video clip
This post assumes that you've already installed Avisynth.

💡 Why use Avisynth?
Avisynth is a frameserver that takes a video file as input and resizes it for editing. The width of a Tumblr post is 540 pixels (px); with Avisynth, we can resize video files so that they fit that criteria. (For context, a 1080p (HD) YouTube video is 1920 x 1080 px.)
While Photoshop is able to resize images (Image > Image Size), it's not as accurate as Avisynth is.
Here are two gifs that have been resized through different software:


The difference is subtle, but the left gif (Avisynth) appears more detailed to me!
However, please note that I didn't run any Photoshop sharpening on the right gif. When learning how to resize and sharpen gifs in Photoshop, I followed rubyredwisp's Gif Sharpening Tutorial.
🎥 Using Avisynth to resize a video clip
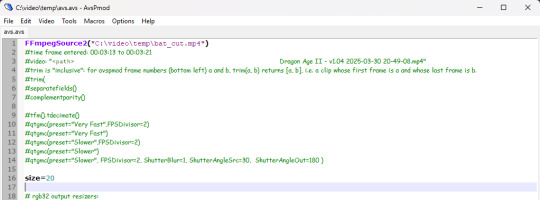
The following steps detail how I use Avisynth to resize videos. The final product, an .avi file, can be imported into your editor (eg. Photoshop) and edited there.
① Choose a video file that you'd like to gif.
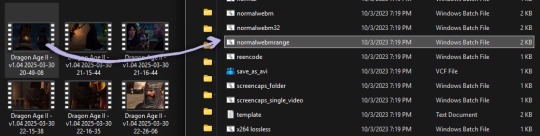
For the purpose of this tutorial, I work with a screenrecording that I took of Dragon Age 2.

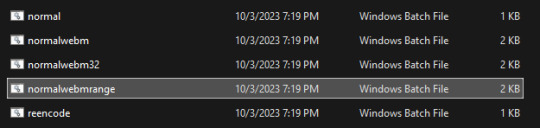
② Navigate to your Avisynth folder and locate the normalwebmrange script.
This may differ depending on how you installed Avisynth, but my Avisynth folder is located at \This PC\Windows (:C)\video.
normalwebmrange is a Windows batch file (.bat). I use this particular script because it allows you to clip out a few seconds of the video by specifying the start and end timestamps. These timestamps specify the video clip that will become your gif(s).
I recommend working with video clips that are 4-8 seconds long.
ⓘ This means that you may need to load your video file back into normalwebmrange to make a gif in a new timestamp range. While inconvenient, I recommend working with smaller video clips so that you're asking Avisynth to process multiple small videos rather than one large video. A larger video is more likely to crash the software.
③ Load the video file into normalwebmrange.
To do so, select and drag your video file into normalwebmrange.
④ Enter the timestamps of the portion of the video you want to clip out.
A pop-up window will appear that asks you for the "starting time in hh:mm:ss format."
For this example, I want my gif to start at about 3 minutes and 13 seconds into my video file. My start timestamp is therefore 00:03:13.
Enter this information, then hit the Enter key.
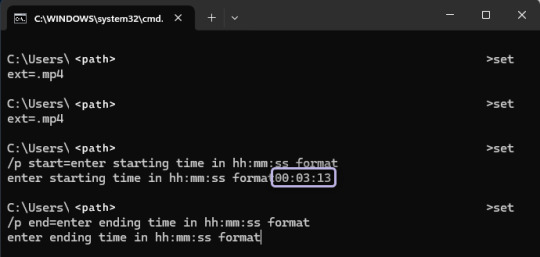
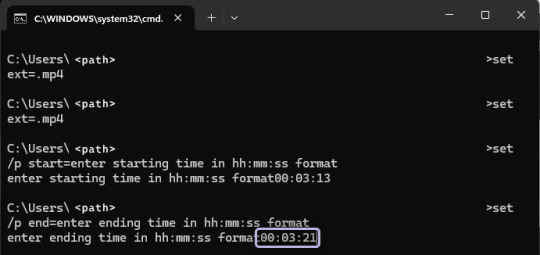
Next, enter the "ending time in hh:mm:ss format." (For this example, my end timestamp is 00:03:21.) Hit the Enter key.
normalwebmrange will then generate a bunch of log lines. After, it will automatically open two things:
A tab in your computer's default web browser.
An Avisynth window.
⑤ Specify the resizing details for your gif.
Navigate to the browser tab that normalwebmrange opened. There are several fields for you to fill out here.

GIF Size - This is the width and height of your gif. For more details on Tumblr post sizes, see Tumblr Dashboard Image Display Sizes. After filling this out, you may have to adjust your video clip in the preview box (below the white textbox).
Opacity - Leave this value at 100.
Preprocessor - I always use qtgmc 30 slow for the framerate and debilinear sharpening. "30" refers to how many frames per second (fps) you want your gif to display; I find that the alternative, 60 fps, is overkill for Tumblr gifs. "Slow" means that Avisynth will take longer to process your video, but this results in better quality.
Extra Sharpening - I don't use this field, but feel free to experiment!
After filling out all of the fields, copy all of the text in the white textbox.
⑥ Enter the resizing information in Avisynth.
Navigate to the Avisynth window that normalwebmrange opened.
Paste the text you just copied on line 17:
Your Avisynth window should now look something like this:

Select File > Save Script.
Close the Avisynth window.
This automatically launches another Avisynth window called VirtualDub. Here, you can watch Avisynth resize and sharpen your video clip in real time!
Once the VirtualDub window automatically closes, you'll know that your video clip has been fully processed and is now ready for editing.
? Where did my video clip save to? If you go back to your Avisynth folder (\This PC\Windows (:C)\video), open the \temp folder. The .avi file named "video" is your resized and sharpened video clip!
17 notes
·
View notes
Text
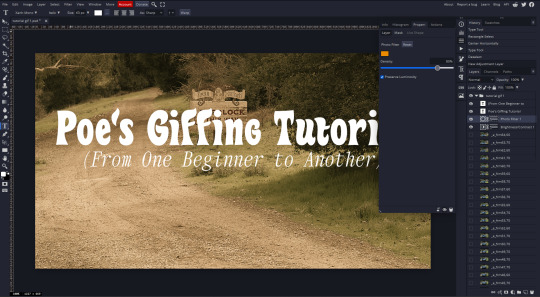
Poe's Giffing Tutorial (From One Beginner to Another)
Hey, everyone! So, I've been thinking about this for a while, and decided to finally make it happen. This post aims to be a giffing tutorial that isn't a bunch of technical jargon that nobody except experienced giffers understands. This is for the person that I was when I first started out: someone who wants to make gifs, for free, without having to learn the entirety of a new program. As such, if you're already familiar with the basics, this probably won't be super helpful to you.
In this, I'll cover the basics of actually capturing a gif, the how-to of color correction (though without getting into the nitty-gritty detail of it), some basic text effects, and some more decorative effects like overlays and ~fancy coloring. I'll also show you the program I use to resize gifs.
I don't have a fun quip to lead us into the next part, so, uh, let's just dive in.
Tools*:
A PC capable of handling heavy processor loads (I use a mid-range gaming laptop; it's a little slow sometimes, but it works)
Whatever you're giffing (obviously...)
ScreenToGif (a free, basic screencapture program)
Photopea (a free, in-browser Photoshop dupe)
RedKetchup (a free file resizer/converter)
*Note: These are not the end-all, be-all of gifmaking. They may not even be the best tools for the job! But they're free, they work well, and they're relatively intuitive.
Step 1: Capture your gif.
I'm going to use ScreenToGif for this. The first thing I do is open the program and click Recorder, which opens the recording interface.

I click and drag (or manually input dimensions in the boxes next to the recording button in the lower right corner) to set my dimensions, and then I press record. The red "Record" button will change to a blue square that says "Stop," and a timer will appear in the upper right corner, showing how many seconds your gif is.
Generally, I'll pause the video 5-10 seconds before my desired start time, to give myself a buffer (you'll be able to delete those frames later), start the recording, and then start the video. You'll probably find a system that works for you once you do it a few times.
Once the scene that I want to capture is done, I'll click the blue "Stop" button, and the overlay will close itself. A few seconds later, depending on how long/complex/large your gif is, the program will pop up with a new window where you can edit. Here's what it looks like:
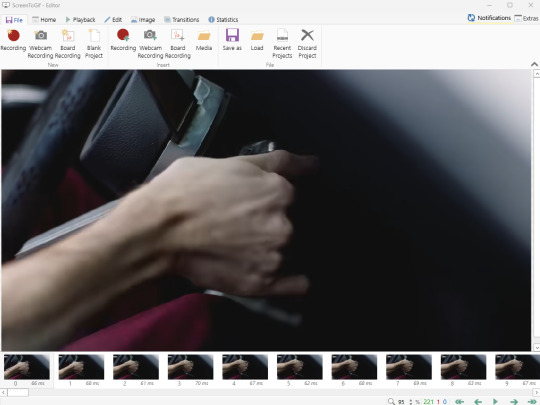
You can do a lot with ScreenToGif, but we'll be using the dead simple stuff today. Click the "Edit" tab, fourth from the left, and this will show up.

"Delete All Previous" and "Delete All Next" are our friends here. Go to the FIRST frame that you want in your gif, using either your arrow keys or just dragging the slider, and select it. Then hit "Delete All Previous." This will make that frame the first frame of your gif. Then, go to the LAST frame of your gif, and hit "Delete All Next." This makes the last frame of the scene that you want the last frame of the gif. You can also use the "Delete" option to delete frames by selecting them with your cursor if you want a more manual option.
Now you have your raw gif! Go to the "File" tab, the first one on the left, and select "Save As" from the menu. You want to make sure that it's saving as a .gif file, not an .mp4 or .apng --- you can check this up at the top. Don't worry, though, as .gif is the default, so unless you change it, you should be golden. Select whatever folder you want to put it in, name it, and save it.
You could absolutely stop here. It is by no means required to color your gifs or slow them down or any other number of things associated with giffing. But if you want to, here's how I do it.
Step 2: Edit your gif.
Head on over to Photopea. You'll see this:
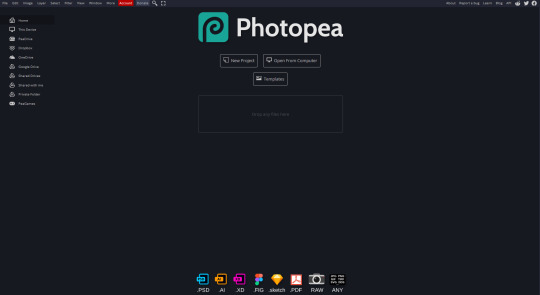
What we want is the "Open From Computer" option. Click it, and your File Explorer will show up. Navigate to whatever folder you saved your gif in and select it by double clicking or clicking once and hitting "Open."
It'll open in a new workspace that looks like this.
You may be saying, "Gee, Poe, that sure looks a lot like Photoshop!" Yes, it absolutely does. If you're familiar with Photoshop, you will most likely be able to find your way around Photopea just fine, and can probably go from here. But if you're not familiar with Photoshop, here's the basics.
First thing's first: gifs are frequently pretty fuzzy/blurry. Luckily, sharpening them is easy.
Select all your frames (the list on the right with all the numbered layers) by clicking one end, scrolling up/down, holding Shift, and clicking the other end. Then go up to the tabs and do Filter > Sharpen > Smart Sharpen. This will automatically sharpen each frame using a percentage; the default is, I believe, 150%, and this is usually what I use because I am fundamentally lazy.
If you don't select all your frames, only the one that you're currently on (the one highlighted in a lighter color) will get the effect applied to it. This goes for basically anything you do, so it's good to get in the habit of selecting all.
Now that it's sharpened, we can color it. Go up to the tabs again, and go to Layer > New Adjustment Layer > [whatever you want to adjust]. Most commonly in Escape the Night, you'll have to adjust brightness, because there's a lot of dark, moody scenes; Season 3 is also especially yellow/orange tinted, so you'll probably want to color correct it, too, using the Color Balance adjustment layer. This is a total guessing game based on the exact scene you're doing and my method is just selecting random things and adjusting sliders until it looks good (remember: fundamentally lazy). Honestly, I'm not an expert in coloring gifs, so I won't pretend to be — especially since people can and do write entire posts just dedicated to it. For this gif, I'm just lightening it a little.
And if this is all you want to do — no text, no effects — you're done! Go to File > Export As > GIF. It will take a few moments to load, so don't panic when your page freezes. A new window will pop up that allows you to do things like set looping, time, etc. but you can also just "Save" and you're done!
But let's say you want something fun. Maybe you'd like to overlay a quote or make it a cool color. If that's the case, continue on...
Step 3: Make your gif shine.
Three parts in this: text, fun colors, and overlays. You can combine these three to do some awesome things, and they're all very simple to do, once you know what you're doing. Think of them less like steps and more like a mix-and-match deal. You can use one, two, or all three!
So, here we go.
Option 3a: Add some text.
The easiest option of the three, this one works exactly like you think it does. The uppercase T symbol on the sidebar will create a new text layer where you can type something and set a font, size, and color.

I'll spare you the lecture on typography that I could give you — you can find better ones than I could make. Generally, though, you have a decorative/display font for headings and emphasis, and then a different, more generalized font for subheadings and other things. In this, the display font is Heavy Heap, which was used on the Season 3 tarot cards, and the general font is a relatively generic serif font.
(Sidenote: you can load fonts into Photopea! Just go to a font website like Dafont, download the font you want, and then open it as you would any other file by going to File > Open and selecting it from your files. You should get a message that says "Font [Your Font Name Here] Loaded," and then you'll be able to use it in your design. That's how I got Heavy Heap in there.)
You can change size and color with these, which will show up at the top when you select the text tool. Keep in mind that if you're making changes after you type something out, you will need to select (highlight) the text you want to change — it won't do it automatically.

I will admit that Photopea's text editor is not the cleanest, simplest, or nicest to use, especially at first. I came from Canva where it was much faster and easier. The downside, of course, is that Canva is highly limited with what you can do.
There are also ways to warp the text, change the blending, and do outlines, but I'll leave that for another time as to avoid making this any longer than it already is.
Option 3b: Make it a cool color.
You have a couple different ways to do this. Probably the most intuitive is to go to Layer > New Adjustment Layer > Photo Filter. Select the color box, pick the color you want using the picker or a hex code, select your desired density, and click OK. Boom, color over your gif.
It defaults to this vintage-y orange, but you can pick whatever color your heart desires.
However, I usually use a different method using Gradient Maps. This is also pretty easy; Layer > New Adjustment Layer > Gradient Map. If you leave it black and white, by the way, you get a B&W gif (you can also just select the Black and White option in the Adjustment Layer menu). Click on the gradient, select the white square on the right side of the gradient line, and then select the square down at the bottom of the window and change it to whatever color you want.

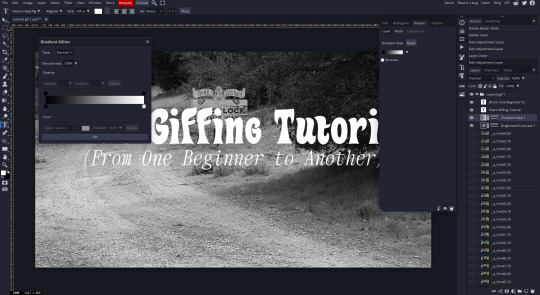
For this gif, I'm leaving it B&W.
(You can have a lot of fun with gradient maps. Play around with them!)
Option 3c: Overlay another gif on top.
Ooookay, so, this is the most advanced and tedious of effects to do (at least of the ones documented in this post), but it's worth it, I promise. For this, you'll need at least one other gif. I usually use a base gif that's relatively neutrally colored, oftentimes B&W but sometimes just faded or pastel, plus one (or more than one) colored, brighter gif. These are, of course, just guidelines — combine whatever gifs you want. The only real requirement, per se, is that they have the same amount of frames. If they don't, it'll look weird. (But if you do end up with two gifs that have different amounts of frames, you can delete the difference right in Photopea, so I don't stress about it too much.)
You also generally want to add text after this step, so if you're planning on doing this, save the text for last.
First things first: color your gifs the way you want and then save both of them. Then re-open them both in Photopea. Yes, this is annoying. I did say it was tedious.

So now I have both of them in my navbar, labeled as "tutorial base" and "tutorial overlay."
Go to your overlay gif and right-click on the gif folder. This is the top layer with a little arrow and folder icon next to the name of the gif.

Select "Duplicate Into" and then pick your base gif in the popup. In my case, it's named "tutorial base."

Now you'll click over to your base gif, and you'll see that your accent has been put on top of your base. Now you get to have fun with blending!
Right click on the overlay gif's folder again. Then, select Blending Options, which is the first menu item. It'll bring up a popup with all sorts of options for styling your layer.

The default setting is Pass Through, which is what we see here. If you want, you could just change the opacity to get your desired effect.
You could also play around with blending options such as Overlay, Color Burn, Lighten, and Screen. Every gif is different, and every gif will look different with different options, so experiment and see what looks best! You may have to go back and recolor it a few times, so I recommend just keeping the project open in your navbar for easy access.
For this gif, I think I'll go with Darker Color at 67%.
One last step, and then you're done with blending!
Go to Layer > Animation > Merge. This will merge each frame of your animation (the gifs) with each other, meaning that they'll play at the same time. If you forget this step, as I do frequently, you'll go to save your gif and find that it plays as a sequence.
Once you've merged your gifs, you can add texts, more effects, PNG overlays, whatever you want! Congrats! You did it!
Step 4: Resize your gif (if necessary).
Maybe you've made a gif, and it's beautiful, and it's amazing, and you wanna show everyone...but it's five million megabytes and you can't send or post it anywhere. Tumblr's max file size is 10 MB, while Discord's (standard) max file size is..7 MB, I think? Either way, if you try to upload something bigger than that, you'll get an error message and the familiar taste of disappointment.
Never fear, Redketchup is here!

This is Redketchup, and it's super simple.
Go to "GIF Resizer" under Animation Tools. Upload your gif, then scroll until you see the Resize GIF section. Input the percentage you'd like to reduce it by (presets are 25%, 50%, and 75% smaller, but you can set it manually, as well).
This is also the step where you can slow it down if you desire if you didn't do it in Photopea — it's in the next section down. Set the speed, if you'd like, and then go down to the bottom and hit Download.

It'll take you to a preview tab where you can check if your gif is small enough. If it is, hit Download again up in the top left, and that's that! Go share your gif with the world!
Conclusion:
Thank you for reading! I am by no means an expert gifmaker, but I want to spread the love and give other people the option to do it. I wouldn't know any of this stuff without the people who taught me, and I'll put a list of tutorials down at the bottom that I referenced when I was first learning to make gifs.
At any rate, if you use this post to make a gif, feel free tag me or send it to me so I can see! And for those of you who are on the fence about learning or starting to gif...
Do it. I double-dog dare you.
:)
References:
Blending Gifs by @the-mother-of-lions
Photopea Coloring Tutorial by @heroeddiemunson
Merging in Photopea by @bellamyblakru
And, though not a specific reference, I frequently browse @usergif for inspiration (they have tutorials there, as well, but I haven't checked them out yet).
#gifset#giffing#gif tutorial#how to gif#how to make a gif#photopea#escape the night#etn#I wrote this instead of socializing at my family's thanksgiving dinner#because that's just who I am
149 notes
·
View notes
Note
about the GIMP resizing issue, it's because your interpolation setting is not on "none"/"nearest neighbor." the image > scale image dialog has a dropdown menu for it at the bottom, you can use that setting to switch between pixel perfect upscales and sharpened versions for "regular" artwork
also sorry if this sent twice my browser shit itself trying to attach a screenshot of the dialog window lol
oh nice
@konizumi this might help
8 notes
·
View notes
Text
Somewhere Down the Line (We won't be Alone)
@psiroller let me play around in their chilaios early 2000's gamer au--please check out their other drabbles which are so delicious.
Thank you Psiroller for all your help and support! <3
-
Chilchuck and Laios teleport back to spawn and make their way towards the guildhall to meet up with Senshi somewhere “more atmospheric for cooking than at spawn.” Even caring a little less about the roleplaying aspect, Chilchuck can appreciate the appeal. There is a bar and kitchen built into the guildhall, every piece of decor purchased with crystals saved from monthly subscriptions and major events. The central room also houses trophies from some of their most grueling raids, Chilchuck forever proud of the jagged black wings with an animation like embers of a fire from beating Asmodeus during the Apocalyptic event, their guild being only one of few to boast such a feat.
Senshi’s avatar is doing a dancing emote in place when they arrive, Izutsumi’s catgirl sitting in her idle AFK animation curled up on a chair. “He’s still active at least,” Laios remarks into the voicecall, the sound of his keyboard clacks echoing into Chilchuck’s headset before the message sends into the chat.
>>LaiosTouden: Hey, @SenshiOfIzganda and @IZUTSUMI, we’ve returned from the hunt with ingredients.
Senshi continues his dance as Izutsumi’s character exits from sleep and idles instead.
>>IZUTSUMI: Took you long enough
>>IZUTSUMI: Senshi’s looking at some yeast cultures
>>LaiosTouden: Really? I thought he didn’t have to start prep for another hour.
>>IZUTSUMI: It’s for sourdough. You use the same starter culture for every batch.
“Senshi’s talking to her about baking, huh?” Chilchuck remarks, only the sound of keyboard clacks as text appears on screen.
>>LaiosTouden: Cool, did he say how long it would be?
Message sent, Laios sighs into the mic, “Yeah, I’m surprised she’s interested she doesn’t act like she’s interested in much of anything.”
Chilchuck snorts into his mic, “You thinking of waiting around for him? I can get some wood and make a chest if you need.”
>>IZUTSUMI: Not long
“That’s okay,” Laios replies out loud, his character going into a combat flourish emote, as a counterpoint to Senshi’s dancing, “It doesn’t sound like it’ll be long. I’m volunteering tomorrow afternoon, so I can sleep in.”
Chilchuck directs his character to sit down in one of the nearby chairs. “Volunteering? I didn’t know you volunteered anywhere.”
“I do! Have for a while, actually! Before going back to school.” His chair creaks as he leans back and stretches with a grunt, “I work with a wildlife sanctuary north of the university, I think this is my third year volunteering? But now that I’m in the vet tech program, some of it counts as exposure working with animals, when I’m doing that.”
“Hmm, yeah?” Chilchuck replies, shifting into another tab to play minesweeper. “When you’re doing what?”
“When I first started, I did a lot of busy-work, like mowing the lawn, putting stuff back in the gift shop, printing pamphlets, stuff like that.” Chilchuck can hear that he has opened a drawer somewhere, probably wandering around his room. “But now I help check in new patients and feed the animals. They have wolves there, most of them hybrid wolfdogs surrendered by their owners, and I get to feed and play with them now.
Now he’s curious, and Chilchuck tabs out of his minesweeper game, letting the time tick up, as he opens internet explorer and navigates to Google, looking up “North Carolina Wildlife Sanctuary,” glancing around at the ones he sees and their proximity to where he knows Marcille works through the new maps feature. There’s very few listed, but he’s able to find only a stub labeling “Roanoke Wildlife Sanctuary and Rehabilitation” within twenty miles of a community college. He looks it up in a new window and finds that they have a webpage with a forest green background and text that doesn’t resize automatically, making him stretch the browser window to see it correctly. “You want to work with wolves when you have your degree?” he asks, scrolling down the page’s comic sans introduction to see cute pictures of animals, the gift shop, and staff.
“I would like it, but it wasn’t what I thought I would be doing, not as a career.” Laios remarks, the squeak of the chair announcing his return to the computer desk. “There’s a lot of exotic pets like reptiles and birds, it would still have a full-time clinic and not rely only on donations as much. Most of the actual vets at the sanctuary are doing it on donation or for a really reduced rate when they aren’t at their own clinics, so I’d probably be doing that too.”
Chilchuck clicks on the “Tours” tab of the page. Images of school-aged children listening to an older woman wearing the refuge’s khaki uniform while a younger man stands by holding a snake around his shoulders, resting on his arm. “Reptiles, like snakes?”
“Yeah! The refuge has a few resident snakes, some from the wild who can’t be reintroduced for health reasons, and some that were pets who we can’t introduce into the environment. There’s this one milk snake that’s really chill, kids love her. Oh, Senshi’s back.”
Laios turns back to hammering away on his keyboard as Chilchuck stays tabbed out, continuing to look at the website. “Do you ever work with kids? Or just the animals?”
Laios grunts in acknowledgment, and there are the pinging sounds of items and messages being exchanged from the other tab. “I don’t talk with people very much, but I carry the animals for visitors to take pictures with them or pet them.”
There’s a picture of that same man crouching on the ground next to a squeamish child, who is petting the scales of the snake and forcibly smiling up at the camera. There’s no way, Chilchuck decides, looking at the proud smile of the man in the photo, young and fit and handsome, someone who would never spend all his evenings playing a niche MMO optimizing his character every night.
He keeps scrolling.
There’s the special notification of a ping, and he pops back into the Dungeon Delver’s window. Senshi sent a message, >>Thank you @LaiosTouden and @cctims for all your help getting these ingredients! I will cook these into a delicious meal, and you’re all invited to enjoy it when it is completed! Perhaps on our adventures tomorrow?
He quickly starts to reply, knocking his character out of it’s AFK animation. >>Sounds good, Let us know if there’s any other supplies you need, chef.
Senshi makes a smiling and laughing animation in response, then a thumbs up. Chilchuck types in the /wave command, giving a quick texted goodbye before logging off from the program, but not the voice call. “You like kids?”
Laios laughs, forced and awkward, “They don’t always like me. I think it depends on if they like the animals or not.”
“That’s pretty normal, for kids.” Chilchuck relaxes into his chair, “Sometimes it isn’t anything you’re doing, they got spooked by something they saw on tv, or because they’re tired and hungry.”
There is the loud typing noise from Laios’ mic as it takes him a minute to reply, “Yeah? Do you like kids?”
“Yeah, of course.” Chilchuck replies, glancing back at the minesweeper.
“You seem to know a lot about them,” Laios trails off at the end, typing furiously. Chilchuck furrows his brows, “Who are you talking to, Senshi still?”
“No, Marcille logged on. She’s asking me about some rp stuff. Trying to plan a time where we’ll both be online at the same time as Falin.”
“Oh yeah? What’s the plan?”
“Just tomorrow afternoon before the raid. It’s mostly for Falin and Marcille anyways, so I could hang out in voice call if you aren’t busy?”
“Sounds good.” Chilchuck murmurs and clicks on a square, grimacing as the yellow smiling face on the top of the screen turns to a frown and its eyes turn to X’s, a mine beneath his pointer. “You know, you can have your own rps, right? It doesn’t have to always be following your sister and her girlfriend.”
“I know,” Laios types a little more, “But I don’t mind, as long as everyone’s having fun.”
Chilchuck smiles, “That is the most important part.”
“What about you? You don’t do a lot of roleplay. Want to do something together sometime?”
“Us? What would we even do?” Chilchuck breathes a little laugh through his nose.
“Well, we do a lot of these hunts together, we can talk about that? Explore Laios and Chilchuck’s backstories a little?” His voice grows more stilted and awkward the more he talks, Chilchuck waiting for him to finish.
Chilchuck clicks to restart the level, reverting the emoticon back to its original cheerful state, “Sure, why not. We can always give it a try. They’re friends, in roleplay.”
“Yeah, it only makes sense they would hang out together too.” The chair creaks from Laios’ mic. “So, what about you? Do you like kids?”
“Yeah, I do.” He doesn’t know why he keeps talking. “I have a few of my own.”
“Oh.” Laios replies in a way that lilts upwards in the middle, like he’s surprised, judging, or. Who knows. Chilchuck jumps on it, “What, is that a surprise to you?”
“A surprise? Maybe? No? I mean, I didn’t know anything, but a lot of people have kids…”
“I don’t think any of us are like a lot of people.” Chilchuck flushes and turns back to the webpage. “I never said anything about it before.”
“But you were friends with Marcille before, and she and Senshi knew you for years.” Laios nonchalantly lays out, “And I know Marcille isn’t a college student. How many kids do you have?”
Chilchuck scrolls down the webpage to a picture of an older woman standing with the wolves. “Three, all girls.”
“All girls?” Laios sounds disbelieving.
Chilchuck grimaces, “Did I stutter? Don���t get any ideas, they’re all too young for you.”
“Oh, no I wasn’t thinking that,” Laios begins to talk more quickly, “It’s just nice to hear you talk about yourself.”
“Talk about myself? Those are my kids, not me.” Chilchuck replies, jumping to the review page.
Laios is silent as he clicks around his PC. “Are you married?”
Chilchuck sucks in a breath through his teeth, “Separated, but it’s a mutual thing.” It isn’t quite the truth, but he’s not ready to go there. There is still a raw edge from no longer walking in the door of his house to the sound of the rest of his family getting ready for bed, a plate covered in plastic wrap waiting for him to eat in front of the TV. And the bite of unfinished paperwork, arguing through the phone with a lawyer instead of his wife, leaves him in a bad mood even now. “What about you? I’ve never heard you say anything about kids or girlfriends.”
“I don’t have either of those,” Laios replies, “I’m not really looking for a girlfriend, or having any kids.”
“Yeah, you’re in school, that’s too young to have any kids if you ask me. Good for you to focus on your education.”
“I don’t think I’m ever going to have a girlfriend, honestly.” Laios chuckles awkwardly. “Do you think the Demon’s Blade would work well with the Hellfire plate? Or would the speed boost from having the whole set and weapon be better than the increased crit chance?”
“You should be critfishing, with your build.” Chilchuck grumbles, “Attack speed is good, but consistently hitting that higher damage will be better for your comp. Toss it in Marcille’s spreadsheet and look at the damage per minute and not just the average per attack, to make sure.”
“Thanks, I’ll check it out.”
“Now, what makes you think you’re never going to get a girlfriend?” Chilchuck teases, “There’s someone out there for everyone, I’m sure at least a few female characters have nice girls behind them, or veterinarians or something.”
Laios laughs even more awkwardly, almost scarily. “Yeah, I’m sure. It just isn’t for me.”
“What, girls?”
A moment passes in silence, and then another. Chilchuck scratches the side of his nose, thinking fast, “You know, my daughter had a girlfriend for a while, it’s not a big deal if you like guys too. Probably increases your chances of finding someone online, that’s for sure.”
Laios’ voice drops some of the fake cheerfulness that had been creeping through the last half of the conversation, and he sighs deeply before responding more authentically. “That would be nice.”
“So, no boyfriend either?”
“Nope, I have been focused on school and the sanctuary more, when I’m not gaming.”
“About that,” Chilchuck probes, clicking back to the outreach page, “Are you okay with telling me where it is?”
“What, where I work? Sure! They actually have a youtube channel, it’s a video platform. I can send you the link.”
That’s more than Chilchuck could have dreamed of. “Sure, let’s see it.”
The whoosh of a new chat message rattles through his headphones and he clicks on the link, finding it leading to a channel with the same Roanoke name as the webpage he had found earlier. There’s only three videos uploaded, a seven minute introduction video, and two with different animals in the thumbnail. He clicks on the introduction, halfheartedly watching the video recorded from a digital camera with a voiceover so much louder than the rest of the audio that it was distracting. “This is pretty official, having videos and a website.”
“I think it’s good, for educational purposes.” Laios’ chair creaks again, “I keep getting questions about pet snakes, so I thought it would be a good idea to have just some basics of snake care, and I know my boss is working on a wolf video soon.”
Immediately Chilchuck exits the introduction, mid-pan over the gift shop, and clicks on one of the other animal videos. A teal introduction frame with words in white font reading “Eastern Milk Snake” stays on screen for just a moment too long before fading into a video of the guy who was only a still image before. He opens his mouth and Chilchuck feels his stomach drop out, “Hi, uh, my name is Larry and I am a volunteer with the Roanoke Wildlife Sanctuary and Rehabilitation, and this is one of our residents, Mimi the milk snake!”
He continues to watch as Laios talks about snake care, the awkwardness fading as he gets more focused on describing Mimi’s diet and care. He’s hot. And he’s gay. Chilchuck had never felt uncomfortable with the idea of not being straight, he grew up watching pride parades and getting into fistfights when homophobes got too bold with his friends in high school, but he was dating his girlfriend, who then became his wife, and never questioned anything about himself seriously.
What is he thinking? Chilchuck settles back to watch, listening to Laios talk in one ear about Marcille’s spreadsheet and snake enclosures in the other. Laios is in school, barely older than his own kids. Besides, just because they spend time together and he fits the demographics of what Laios (or Larry?) says he likes doesn’t mean Laios is attracted to him. He’s not going to make that mistake of assuming every gay guy wants to fuck him.
“--But, it’s possible that paired with the Star’s Knight shield, I would have the increased defense without sacrificing speed.”
Chilchuck blinks, tuning back in, “Mhm, you aren’t a tank but you get hit sometimes.”
“That’s what I was thinking too. I think I can tailor the build depending on how much defense I need to survive being targeted between heal refreshes.”
“It’s a good plan, maybe you could get Marcille or your sister to make a spreadsheet for boss damage and healers.”
“Maybe, once they’re done with finals, we’ve definitely almost wiped from people forgetting that they couldn’t take one more hit.” Laios pauses. “Did you watch anything?”
“Not yet,” Chilchuck lies, “I’ll take a look after the call, it’s hard to listen to you and a video at the same time.”
”Okay! Let me know which ones you watch! It counts as community engagement.”
“Of course,” Chilchuck smiles against his better judgment. “You have any homework left? I remember you complaining about that essay-“
“-the one about legal issues with pet ownership, yeah.” He sighs. “I looked up some stuff. I get why they want us to do it, but it’s hard to read. I have tomorrow to work on it.”
Chilchuck is already scrolling through a page on the exotic pet market. “Come on, there’s nothing at least a little interesting about it.”
“It’s not that it isn’t interesting, honestly,” Laios comments ruefully, “It’s less fun thinking about how everything can go badly instead of making things better. But, I need to get six “writing course” credits and three for philosophy and ethics. Maybe I should have done creative writing and then taken a separate class for the philosophy and ethics stuff.”
“Maybe, but once you’ve finished this class, you don’t have to worry about it again, that seems nice.”
“Yeah,” Laios laughs, and it is sweet and addicting, making Chilchuck not want to do what he’s about to do next.
“You should take a look into it. I have to go pick up some groceries.” Yeah, some beer and cigarettes from the gas station, and a highly processed snack for tomorrow at work. “Maybe you can tell me about it, later?”
“Are you trying to talk me into doing my essay?” Laios asks, almost incredulous.
Chilchuck leans back in his chair, “Depends on if it’s working.” There is a flirtatious pause that Chilchuck quickly fills with gruff excuses, “I do want to hear what you find, it sounds neat. And, it’s not as late for me as it is for you, so…”
They never hang out without discussing Dungeon Delver quests and goals first, so the offer is definitely not normal. Honestly, Chilchuck doesn’t even care that much about pet ownership, but he does care about Laios. The other man seems to be aware of the abnormality of this conversation, the promise of Chilchuck’s company, a potent carrot on a stick, more than Chilchuck realizes.
“It’s working. Yeah. Uhm, do you want me to message you in a few hours?” Laios asks, cautiously.
“Sure, that works with me.”
“Okay.”
“Yep.”
Neither of them hang up, even when the signs are all pointing to the end of the conversation.
“Okay, talk to you soon, Chil,” Laios replies, breathing into his mic again, “Good luck with the shopping.”
“Hahaha, it’ll all be fine, Laios.” Chilchuck replies, mouse hovering over the disconnect button on his screen, “See you.”
He clicks.
—--Mature content (BDSM, long distance relationship, daddy kink)
They’ve only put a label on what they share a couple of months ago, but it hadn’t been a secret how much time and attention they gave each other since meeting last year.
What may have been more secret was how much deeper their relationship had gone beyond chaste in-game roleplay. How long they had danced right up to the edge of admitting their feelings, and then jerked off in private. How they frequently left the group teamspeak channels just to hop onto a private skype call. How willing they both were to make new characters that quickly devolved into avatars for their emotional and physical desires, before finally questioning the nature of their relationship.
When the episode ends, Laios is too busy touching himself to start another one. Chilchuck grins, the sounds piped into his ears have the shaky hisses from each too fast exhale whistling past the mic, while soft whines and hitches in his breath sound more muffled. Chilchuck traces his fingertips around the underside of his own cock, wanting this to last. "Are you hiding, pup?" He teases, letting his voice stay low, as the breathiness in his relaxed tone makes Laios whine nasally. "C'mon, I want to hear you, baby. Do you feel good?"
"Mhm," Laios doesn’t even open his mouth to reply, the response high-pitched and strained.
Chilchuck looks at the clock. They’ve spent ten minutes on this edge alone, the sweet torment starting at the beginning of the night, when Laios was still expecting just to rewatch his favorite show with Chilchuck. He takes on a firmer tone, "Louder, kid, full sentences."
Laios whines out loud, gasping for air; Chilchuck wraps his fingers around his cock in response, waiting.
"Y-yeah, daddy, I feel good." His voice is haggard and wet. "Please, Chil."
Chilchuck feels a pang of arousal shoot down to his groin. "Please what Laios?"
His partner on the other end of the line makes a frustrated growl as he struggles for words, "Please, touch me sir," and the next time he whines, it is open-mouthed, not competing as much with the breaths into the mic to be heard. "I need it."
As Laios struggles, Chilchuck begins to stroke himself at earnest again, "I know you do baby. Hands off."
There is a growl that falls into a hiss that grates through his headphones in the best way, and Chilchuck can't hold back a low laugh, the growl turning back to a pleading whine in response. Chilchuck's head feels fuzzy and heart aching. "You know what i'd do if I were there, puppy?"
Laios makes a bewildered whine, moments of silence passing before he replies, "...not touch me?"
There’s a bead of precum that Chilchuck swipes at with his thumb, adding to the slick slide of his hand against his cock. "Nah, I'd touch you, but you'd have to help me." He pauses to moan, putting on an easy show, "I'd make you spit on your own dick, so I wouldn't have to stop and get more lube."
Laios inhales sharply. Chilchuck presses, "Can you do that for me, baby boy?"
The mic is pushed away, Chilchuck holds his breath, receiving a shaking "Yessir," when Laios brings the mouthpiece back towards his lips. Chilchuck inhales and strokes faster, "You can touch yourself again, rub your palm against the head once it’s nice and slick, pretend it's me."
There is the squeak of the computer chair as Laios audibly jerks in his chair at the touch. Chilchuck shuts his eyes, imagining him fighting not to thrust into his own palm, teasing himself even more than usual, because that's what his daddy would want, nearly out of his mind with it. He wants to touch and look and tease so badly it hurts. "Good, good boy, so good for me."
Laios is whimpering into his ear, the sound so sexy that Chilchuck has to slow down before he blows his load early, "Good for you, please daddy, I'm so close-" he cuts himself off with a shuddering breath.
Chilchuck stretches in his seat as he speeds back up. "You gonna come for me?"
"Can I?" He's pleading.
But Chilchuck is still having fun, the clock not quite hitting ten. "I don't know, can you?"
"...May I come? Daddy."
"Hold it, give me one more minute. Stroke yourself."
The whines and words blend together in a continuous groan as Laios obeys. Chilchuck peeks at the arms on the clock as the second hand ticks down. "Thirty seconds left, pup. Are you close?"
"YES!" Laios cries out, exasperation seeping through the tears pricking his eyes.
"Good." Chilchuck glances at the clock again. "Ten. Nine...." He speeds up his own strokes, aiming to meet Laios at the end, "...Five. Four. Three."
He pauses, just to hear the growl forcing itself between clenched teeth from Laios’ side of the call, "Alright, pup, Two. One. Come for me."
He fucks his own fist to completion listening to Laios' ecstasy.
After they've already disconnected for the night, Chilchuck hears the ping of a new message, only a heart with a .jpg file attached. He jumps on the keyboard, You had better be studying or sleeping in this, it's past one am kid, getting no response. His ears burn as he renames and saves the fuzzy picture of a flushed torso, one hand smearing cum into its abs above a dick softening against its thigh, to a file within a file, Laios forgiven and forgotten (as always).
#unkat rants#chilaios#dungeon meshi tag#dunmesh gamer au#<- tag for this au#first part is sfw. ending is not so much
16 notes
·
View notes
Note
Hey what kinda font is that in your screenshots of Homestuck?
it’s plain ol courier new (which is what mspa had before viz acquired it, so im using the unofficial homestuck collection). i have windows text anti-aliasing turned off and i resized the text in-browser to be smaller so it was this size
this is the Official Homestuck Font. all the image-based text including glitched text, trickster mode text, and in-panel text are made with this font in mind as the assumed default; e.g. here’s homestuck dot com on my phone:


52 notes
·
View notes
Text
Drakmyth Castle (Classic Mac, James C. Gehrig & Virginia Batcheff, 1991)
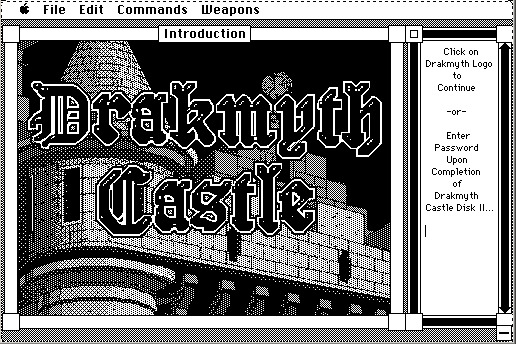
To run it on modern systems, follow these instructions. I believe in you!
Open this in-browser emulator.
Download drakmyth_castle.sit from here or here and drag it onto the emulator desktop.
Open The Outside World, then Downloads, and open the file you find there. Ignore the error that appears, then close and reopen Downloads if no new file appears.
Drag the new file into the Uploads folder that's in The Outside World. Your browser will soon download a .zip file all in one go.
Extract the .img file from the .zip file.
Close the in-browser emulator's tab or window to ensure it's properly un-loaded, then run this more retro in-browser emulator.
Drag the .img file onto the emulator desktop. Open the disk icon that appears, then open the upper-left icon.
To avoid confusing message about MultiFinder, drag each of the three icons you find onto Macintosh HD in the upper righ to copy them there. Then open Macintosh HD and resize or scroll the window to find and run the new copies.
Tips: Sound may not work in Firefox. For fullscreen, mouseover the Apple logo at the lower left, then click Full Screen. These games require both typing and clicking - certain commands are also included in the menu bar for convenience. To start playing, open the upper-left globe icon. The second part requires a password from the first (which is also given in the included text file). It seems that the second part also provides a password to be used in the first. To preserve save files between sessions, drag them onto Saved HD.
#internet archive#mac#macintosh#classic mac#classic macintosh#game#games#video game#video games#videogame#videogames#computer game#computer games#adventure games#obscure games#retro games#retro gaming#retro graphics#game history#video game history#gaming history#1991#1990s#90s
7 notes
·
View notes
Text
Ok so as you may know, once your boop-o-meter passes 999 for either value, that value becomes displayed only as a three letter combination. Initially, it will say MAX, then LOL, OMG, and so on as the value keeps rising, but the exact number is not displayed. Well, luckily, you can still see it if you open it in your browser on desktop.
Short version for the people who know their way around this stuff: All you need is the response from "https://www.tumblr.com/api/v2/boop" sent every few seconds while the boop-o-meter is loaded and updating.
Long version for people who are intimidated by the word "console" or otherwise not at all helped by the short version:
I use Firefox, and I don't know and I will not bother checking how exactly to do it on other browsers, but I doubt it's very different.
First, obviously, have tumblr open in your browser, on a page where the boop-o-meter is visible.
Secondly, open the dev tools panel. There are many ways to do this, but the most universal/simple might be to right click somewhere on the page and selecting "inspect" to open the inspector tab of the dev tools.
If your dev tools panel is on the side of the screen, tumblr might reformat itself in a way that hides the boop-o-meter. If this happens, you can try resizing the window, simulating a wider screen with the dev tools, resizing or moving the panel to the bottom/top, or going to the first page of your dashboard, which should display the counter at the top regardless of the size.
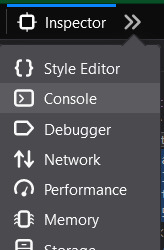
Next, open the console tab of the dev tools panel. The order of the tabs may vary depending on your preferences and use history, but it should be visible and labeled "Console" at the top of the panel or inside this dropdown menu:
(ID in alt)
The contents of this tab may be overwhelming if you're not used to messing with tech, but I promise it won't bite and I'll walk you through it. You're not gonna accidentally hack the Dutch government or delete your computer.
In this list, look for something that looks like this (a new one should appear at the bottom of the list every few seconds, containing the most recent information):

(ID in alt)
Click on this line to expand it, revealing a bunch of nonsense you probably don't care about, and then click on the "Response" tab under the header you clicked. It should now look something like this:
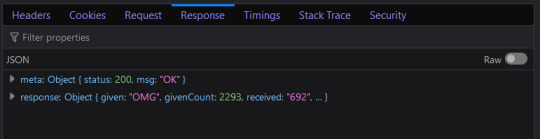
(ID in alt)
Click on the one that starts with "response: Object" to expand it, revealing the exact numerical values for how many boops you've given (labeled "givenCount") and how many boops you've received (labeled "receivedCount").
And that's it! I'm probably not the first to figure this out but hey the day is ending and I haven't seen anyone talk about this or even ask if it's possible, so I figured I'd do my part.
35 notes
·
View notes
Note
is there a place to see your stats and things like your adrenaline/energy %? the last two buttons on the top don't seem to do anything when i click them, is it one of those? (am on mac in the safari browser if this is a bug and that's helpful)
it is one of those, and they should be clickable....I'll have a look and see if I can do anything about that, but in the meantime if you can try it on mobile (or even just resize the browser window on desktop to make it narrower it should pop into mobile mode) and let me if the menu works there??
29 notes
·
View notes
Text
Friday, June 30th, 2023
🌟 New
You can now target your Blazed posts based on your blog’s specific language setting.
On web, when moving through feeds with the J and K keyboard shortcuts, the glow that appears is now a bit nicer to look at.
🛠 Fixed
Earlier today, password reset and verification emails were taking longer than expected to send from Tumblr, but it’s cleared up now.
On web, when using the site on a tablet device or with a narrow resized window, the navigation drawer no longer takes up a large amount of space when opened.
When using direct messaging on Tumblr in a mobile phone browser, the back button behavior is now more consistent when moving across conversations and your blogs’ inboxes.
🚧 Ongoing
We’re aware that some users are still experiencing audio from ads autoplaying (even when no ad is visible) in the mobile apps, we’re still chasing this issue down as quickly as we can.
🌱 Upcoming
We’re rolling out the ability to have more than one type of badge visible next to your blog. This option will be available in the next version of the mobile apps, and released soon on web!
Experiencing an issue? File a Support Request and we’ll get back to you as soon as we can!
Want to share your feedback about something? Check out our Work in Progress blog and start a discussion with the community.
332 notes
·
View notes