#saml tutorial
Text
YouTube Short | What is Difference Between OAuth2 and SAML | Quick Guide to SAML Vs OAuth2
Hi, a short #video on #oauth2 Vs #SAML #authentication & #authorization is published on #codeonedigest #youtube channel. Learn OAuth2 and SAML in 1 minute.
#saml #oauth #oauth2 #samlvsoauth2 #samlvsoauth
What is SAML?
SAML is an acronym used to describe the Security Assertion Markup Language (SAML). Its primary role in online security is that it enables you to access multiple web applications using single sign-on (SSO).
What is OAuth2?
OAuth2 is an open-standard authorization protocol or framework that provides applications the ability for “secure designated access.”
OAuth2 doesn’t share…

View On WordPress
#Oauth#oauth2#oauth2 authentication#oauth2 authentication flow#oauth2 authentication postman#oauth2 authentication server#oauth2 authentication spring boot#oauth2 authorization#oauth2 authorization code#oauth2 authorization code flow#oauth2 authorization code flow spring boot#oauth2 authorization server#oauth2 authorization sever spring boot#oauth2 explained#oauth2 spring boot#oauth2 spring boot microservices#oauth2 spring boot rest api#oauth2 tutorial#oauth2 vs saml#oauth2 vs saml 2.0#oauth2 vs saml2#saml#saml 2.0#saml 2.0 registration#saml authentication#saml tutorial#saml vs oauth#saml vs oauth 2.0#saml vs oauth vs sso#saml vs oauth2
0 notes
Text
Install new apps in bitnami owncloud
DOWNLOAD NOW Install new apps in bitnami owncloud

#Install new apps in bitnami owncloud how to#
#Install new apps in bitnami owncloud install#
#Install new apps in bitnami owncloud update#
#Install new apps in bitnami owncloud code#
Once you are done creating the repository for PHP, update your system packages & repositories for the new PHP repository to take effect. $ sudo echo "deb $(lsb_release -sc) main" > /etc/apt//php.list At the time of penning down this guide, PHP 7.3 is not yet supported, so our best shot is using PHP 7.2.
#Install new apps in bitnami owncloud install#
In the Market app you can add it by clicking on “Edit API key”, pasting the key into the field, clicking on “Save”, and “Close”.After the installation is complete, proceed and install PHP 7.2. You can find it in your profile in the Marketplace or in the Enterprise Trial overview. Now you have to add the API key to your ownCloud server. As we already installed ownCloud, we can skip step 1. On the Marketplace, they are explained for the ownCloud Appliance, but they are the same for any other ownCloud server. You will then see a few steps – they are also explained here for the sake of redundancy. On the Marketplace website, you can start the Enterprise Trial.

Login to the Marketplace – or register, if you have not already. It allows for many configuration options.įor the next steps, it does not matter which you choose – but to continue, you need an admin account at a running ownCloud server. For experienced system administrators, it takes about 30 minutes. Install ownCloud on a Linux server with a tarball. The installation is way faster and only takes about 3 minutes. To setup ownCloud with Docker you need a few more skills and a Linux machine, but this guide explains it quite well. The installation will take around 30 minutes, so grab a coffee and take some time. You don’t have to be a system administrator to set it up, it’s easy. The ownCloud Univention appliance runs on Windows, MacOS, and Linux. There are several ways to install ownCloud: To install the ownCloud Enterprise apps, you need an ownCloud server first.
External Storage – Windows Network Drives: Integrate Windows and Samba/CIFS shared network drives as external storages.
External Storage – Sharepoint: Integrate Sharepoint as external storage.
In some cases this is needed for compliance with corporate guidelines
Auditing: Keep track of user and admin actions.
File Firewall: Rule-based access control engine to enforce fine-grained compliance policies.
LDAP Home Connector: Integration of Windows User Directories via LDAP/AD attributes.
ownCloud X Enterprise Theme: Equip your ownCloud instance with the official ownCloud X Enterprise Theme.
Object Storage Support: Backend to integrate object storages via S3 as primary storage.
Collaborative Tags Management: Admin interface for managing Collaborative Tags of an ownCloud instance.
Workflows: Automated File Operations based on Collaborative Tags.
SAML/SSO Integration: Single Sign-on integration for SAML 2.0 compatible Identity Providers.
Ransomware Protection: Protect data from ransomware threats.
When you activate the Enterprise Trial, you will get following apps, which enhance your ownCloud:

#Install new apps in bitnami owncloud how to#
This tutorial shows you the options to deploy ownCloud and how to activate the 30-day Enterprise Trial.

This also applies to our Enterprise features, which are also available on the Marketplace.
#Install new apps in bitnami owncloud code#
You can trust our software, because you can read every line of source code which runs on your server. OwnCloud is free software, and is completely open source. If you are in an offline environment, you can also download them from there and install them manually with the command line. The ownCloud Marketplace hosts all ownCloud apps. You can do so in the Market app, which is shipped with the ownCloud Server. When you have an ownCloud Server, you can extend it by installing more apps. Some of these apps are commercial Enterprise apps. It consists out of the core, and several apps which contain additional functionality. The ownCloud Server has a modular architecture.
DOWNLOAD NOW Install new apps in bitnami owncloud
0 notes
Text
Brief 5: Something interesting about bikes
Prosess
Etter to og en halv dag med kurs i html og css, fikk vi i oppgave å programere vår første nettside. Den skulle på en eller annen måte handle om sykkler.
For meg var alt helt nytt så jeg var litt frustrert på starten. Jeg bestemte meg derfor å se på flere tutorials og prøve meg litt frem på forskjellige koder før jeg startet på et konsept. Nyttige nettsider: w3schools.com, css-tricks.com og youtube tutorials.
Jeg prøvde å samle alt jeg hadde lært til et konsept. Jeg startet altså med å finne en quote om sykler, jeg ville lage en animasjon til den quoten for å understreke det.
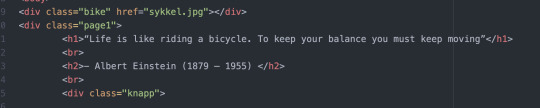
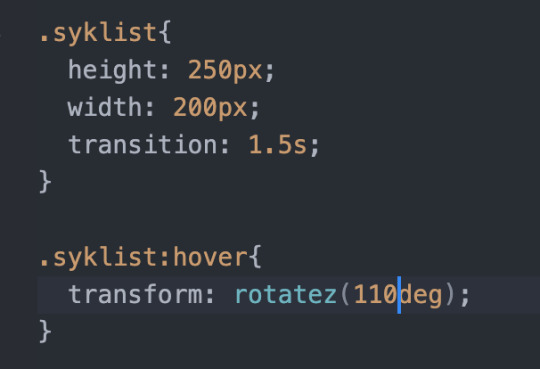
Jeg startet altså lage layout og skrive inn tekst. Etter det så lagde jeg en knapp man kunne trykke på for å starte animasjonen, den knappen koblet seg til en ny side. På den nye siden (index2.html) jobbet jeg med animasjonen, som var en syklist som kjørte og når man kom når den med musen mistet den balansen.
Prosess - Mindmap
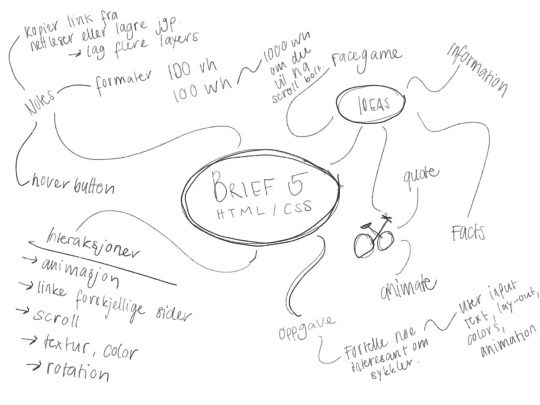
Koder for forskjellige funksjoner
Knapp
html og css:

Animasjon
html og css:

Koble sammen sider
html:

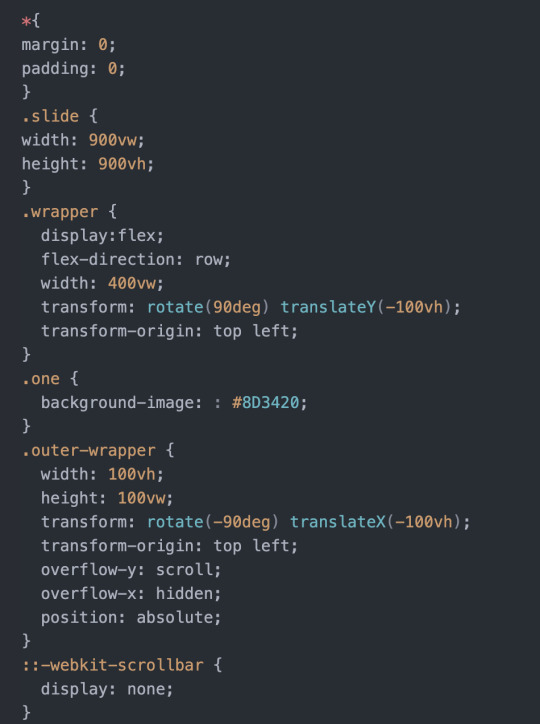
Scroll
html og css:

Tekst
html og css:
Hva har jeg lært?
- Animere med koder
- Koble sammen sider
- Hover effekter og knapper
- Layout og tekst
- Tilpasse bakrunnsbilde og farger
Tips
- 100 vh og 100 vw for å få skjermstørrelse på pcen.
- «::-webkit-scrollbar, display: none» for å skjule scrollbar på nettsiden.
- Lage flere layers på bakrunnene for å skape en illusjon.
- Alltid prøve å ha en struktur i arbeidet for å ha en overssikt over alle koder - gi navn.
- Last opp nettsiden på netlifydrop etter å ha jobbet på Atom.
Oppsummering
Jeg lærte veldig mye nytt denne uken og ble mer og mer motivert for å lære meg nye koder! I min neste post legger jeg ut resultatet av min første nettside, og jeg gleder meg allerede til å programere og lære nye koder fremover!
2 notes
·
View notes
Photo

Underscore.js, React without virtual DOM, and why you should use Svelte
#504 — September 4, 2020
Unsubscribe | Read on the Web
JavaScript Weekly
Underscore.js 1.11.0: The Long Standing Functional Helper Library Goes Modular — “Underscore!?” I hear some of our longer serving readings exclaiming. Yes, it’s still around, still under active development, and still a neat project at a mere 11 years old. As of v1.11.0 every function is now in a separate module which brings treeshaking opportunities to all, but there’s also a monolithic bundle in ES module format for those who prefer that. This article goes into a lot more depth about the new modular aspects.
Jeremy Ashkenas
Mastering the Hard Parts of JavaScript — A currently 17-part blog post series written by someone taking Frontend Masters’ JavaScript: The Hard Parts course and reflecting on the exercises that have helped them learn about callbacks, prototypes, closures, and more.
Ryan Ameri
FusionAuth Now Offers Breached Password Detection and LDAP — FusionAuth is a complete identity and access management tool that saves your team time and resources. Implement complex standards like OAuth, OpenID Connect, and SAML and build out additional login features to meet compliance requirements.
FusionAuth sponsor
How Browsers May Throttle requestAnimationFrame — requestAnimationFrame is a browser API that allows code execution to be triggered before the next available frame on the device display, but it’s not a guarantee and it can be throttled. This post looks at when and why.
Matt Perry
Brahmos: Think React, But Without the VDOM — An intriguing user interface library that supports the modern React API and native templates but with no VDOM.
Brahmos
NativeScript 7.0: Create Native iOS and Android Apps with JS — A signficant step forward for the framework by aligning with modern JS standards and bringing broad consistency across the whole stack. Supports Angular, Vue, and you can even use TypeScript if you prefer.
NativeScript
⚡️ Quick bytes:
🎧 The Real Talk JavaScript podcast interviewed Rich Harris of the Svelte project – well worth a listen if you want to get up to speed with why you should be paying attention to Svelte.
ESLint now has a public roadmap of what they're working on next.
You've got nine more days to develop a game for the current JS13kGames competition, if you're up for it.
VueConfTO (VueConf Toronto) are running a free virtual Vue.js conference this November.
The latest on webpack 5's release plans. Expect a final release in October.
💻 Jobs
Senior JavaScript Developer (Warsaw, Relocation Package) — Open source rich text editor used by millions of users around the world. Strong focus on code quality. Join us.
CKEDITOR
JavaScript Developer at X-Team (Remote) — Join the most energizing community for developers and work on projects for Riot Games, FOX, Sony, Coinbase, and more.
X-Team
Find a Job Through Vettery — Create a profile on Vettery to connect with hiring managers at startups and Fortune 500 companies. It's free for job-seekers.
Vettery
📚 Tutorials, Opinions and Stories
Designing a JavaScript Plugin System — jQuery has plugins. Gatsby, Eleventy, and Vue do, too. Plugins are a common way to extend the functionality of other tools and libraries and you can roll your own plugin approach too.
Bryan Braun
▶ Making WAVs: Understanding, Parsing, and Creating Wave Files — If you’ve not watched any of the Low Level JavaScript videos yet, you’re missing a treat. But this is a good place to start, particularly if the topic of working with a data format at a low level appeals to you.
Low Level JavaScript
Breakpoints and console.log Is the Past, Time Travel Is the Future — 15x faster JavaScript debugging than with breakpoints and console.log.
Wallaby.js sponsor
The New Logical Assignment Operators in JavaScript — Logical assignment operators combine logical operators (e.g. ||) and assignment expressions. They're currently at stage 4.
Hemanth HM
Eight Methods to Search Through JavaScript Arrays
Joel Thoms
TypeScript 4.0: What I’m Most Excited About — Fernando seems particularly enthused about the latest version of TypeScript!
Fernando Doglio
Machine Learning for JavaScript Devs in 10 Minutes — Covers the absolute basics but puts you in a position to move on elsewhere.
Allan Chua
How to Refactor a Shopify Site for JavaScript Performance
Shopify Partners sponsor
'TypeScript is Weakening the JavaScript Ecosystem' — Controversial opinion alert, but we need to balance out the TypeScript love sometime.
Tim Daubenschütz
▶ Why I’m Using Next.js in 2020 — Lee makes the bold claim that he thinks “the future of React is actually Next.js”.
Lee Robinson
Building a Component Library with React and Emotion
Ademola Adegbuyi
Tackling TypeScript: Upgrading from JavaScript — You’ll know Dr. Axel from Deep JavaScript and JavaScript for Impatient Programmers.. well now he’s tackling TypeScript and you can read the first 11 chapters online.
Dr. Axel Rauschmayer
Introducing Modular Underscore — Just in case you missed it in the top feature of this issue ;-)
Julian Gonggrijp
🔧 Code & Tools

CindyJS: A Framework to Create Interactive Math Content for the Web — For visualizing and playing with mathematical concepts with things like mass, springs, fields, trees, etc. Lots of live examples here. The optics simulation is quite neat to play with.
CindyJS Team
Print.js: An Improved Way to Print From Your Apps and Pages — Let’s say you have a PDF file that would be better to print than the current Web page.. Print.js makes it easy to add a button to a page so users can print that PDF directly. You can also print specific elements off of the current page.
Crabbly
AppSignal Is All About Automatic Instrumentation and Ease of Use — AppSignal provides you with automatic instrumentation for Apollo, PostgreSQL, Redis, and Next.js. Try us out for free.
AppSignal sponsor
Volt: A Bootstrap 5 Admin Dashboard Using Only Vanilla JS — See a live preview here. Includes 11 example pages, 100+ components, and some plugins with no dependencies.
Themesberg
Stencil 2.0: A Web Component Compiler for Building Reusable UI Components — Stencil is a toolchain for building reusable, scalable design systems. And while this is version 2.0, there are few breaking changes.
Ionic
NgRx 10 Released: Reactive State for Angular
ngrx
🆕 Quick releases:
Ember 3.21
Terser 5.3 — JS parser, mangler and compressor toolkit.
Cypress 5.1 — Fast, reliable testing for anything that runs in a browser.
jqGrid 5.5 — jQuery grid plugin.
np 6.5 — A better npm publish
underscore 1.11.0 — JS functional helpers library.
by via JavaScript Weekly https://ift.tt/3i0cc0z
0 notes
Text
Как сделать Elasticsearch безопасным: защищаем Big Data от утечек

Вчера мы рассказывали про самые известные утечки Big Data с открытых серверов Elasticsearch (ES). Сегодня рассмотрим, как предупредить подобные инциденты и надежно защитить свои большие данные. Читайте в нашей статье про основные security-функции ELK-стека: какую безопасность они обеспечивают и в чем здесь подвох.
Несколько cybersecurity-решений для ES под разными лицензиями
Чуть больше года назад, 20 мая 2019, компания Elastic сообщила, что базовые функции обеспечения информационной безопасности ELK-стека, будут теперь бесплатными для всех пользователей, а не только тех, кто подписан на коммерческой основе. Под этим имелись ввиду следующие возможности [1]: · криптографический протокол транспортного уровня TLS для шифрованной связи; · инструментарий для создания и управления пользовательскими записями (file и native-realm); · управление доступом пользователей к API и кластеру на основе ролей (RBAC, Role Based Access Control); · многопользовательский доступ к Kibana с использованием Kibana Spaces. Однако, эти новости не встретили ответного энтузиазма со стороны профессионального сообщества [2]. В частности, потому, что преобладающее число компонентов ELK-стека (Elasticsearch, LogStash, Kibana, FileBeats, Grafana) и так были бесплатными и открытыми, распространяясь по лицензии Apache 2.0. А X-Pack, коммерческий продукт компании Elastic, расширяющий возможности ELK, включая обеспечение cybersecurity, был не бесплатным и распространялся по лицензии Elastic License. Он стал открытым с 2018 года, но не перестал быть коммерческим. Возмущение пользователей вызвал факт путаницы с лицензиями: с версии 6.3 ELK и X-Pack интегрированы в один репозиторий на Github, из-за чего невозможно понять, какое решение бесплатное, а за что нужно платить [3].

Изменения в схеме лицензирования продуктов Elastic Stack
В свете этого события компания Amazon выступила с собственным продуктом на основе ELK Stack: Open Distro for Elasticsearh. С точки зрения cybersecurity наиболее интересны следующие возможности Open Distro [4]: · средства защиты кластера – аутентификация через Active Directory, Kerberos, SAML и OpenID, единая точка входа (SSO), поддержка шифрования трафика, RBAC-модель избирательного разграничения доступа, детальное логгирование и инструменты для обеспечения соблюдения требований (compliance); · система отслеживания событий и генерации предупреждений для мониторинга за состоянием данных с автоматической отправкой уведомлений при возникновении внештатных ситуаций и нарушении безопасности. Определить условия подобных событий можно через язык запросов Elasticsearch и средства написания скриптов. Виза��лизация мониторинга осуществляется через web-интерфейс Kibana. Open Distro от Amazon – не единственное коммерческое cybersecurity-решение для Elasticsearch. Еще один пример – Search Guard, модуль комплексного обеспечения безопасности, включая аутентификацию через Active Directory, LDAP, Kerberos, веб-токены JSON, SAML, OpenID и многие другие. Также он поддерживает детальный RBSC-доступ к индексам, документам и полям, многопользовательский режим в Kibana и требования GDPR, HIPAA, PCI, SOX и ISO с помощью аудита изменений и ведения журнала соответствия [5].
Как обеспечить безопасность бесплатного Elasticsearch: алгоритм действий Big Data администратора
При использовании бесплатной версии Elasticsearch следует вручную обеспечить ее безопасность. Для того администратор Big Data должен выполнить ряд мероприятий [6]: · защитить подключение к СУБД, настроив аутентификацию с помощью Open Distro от Amazon. Например, на Debian-подобных операционных системах, в частности, Ubuntu, для этого в консоли следует прописать команду установки плагина из репозитория: wget -qO ‐ https://d3g5vo6xdbdb9a.cloudfront.net/GPG-KEY-opendistroforelasticsearch | sudo apt-key add - · далее необходимо настроить защищенное SSL-взаимодействие между серверами кластера Elasticsearch с помощью удостоверяющего центра или самостоятельно созданного сертификата; · изменить пароли внутренних пользователей; · настроить межсетевой экран операционной системы, разрешив подключение к Elasticsearch; · обновить пароли и проверить все настройки. Также стоит помнить про открытые по умолчанию порты: ES использует порт 9200 для HTTP-трафика и 9300 – для сообщения между узлами кластера. Их рекомендуется заменить другими, отредактировав файл elasticsearch.yml на каждом сервере. Это позволит ограничить внешний доступ к ES-СУБД, чтобы посторонние не могли получить доступ к данным или отключить весь кластер Elasticsearch через REST API [7]. В качестве альтернативы можно включить в ELK-кластер обратный прокси-сервер (reverse proxy), например, Nginx, который ретранслирует запросы клиентов из внешней сети на один или несколько серверов, логически расположенных во внутренней сети. Для клиента это будет выглядеть, как будто запрашиваемые ресурсы находятся непосредственно на самом прокси-сервере. В отличие от классического прокси, который перенаправляет запросы клиентов к любым серверам в сети и возвращает им результат, reverse proxy взаимодействует напрямую лишь с ассоциированными узлами и возвращает ответ только от них [8]. Таким образом, Nginx в качестве обратного прокси-сервера позволит обеспечить защиту Elasticsearch и Kibana от доступа неавторизованных пользователей. Для этого потребуется включить протокол HTTPS с использованием корректного сертификата SSL [9]. Здесь стоит отметить возможность применения Cilium – open-source продукта для прозрачной защиты сетевого подключения между службами приложений, развернутыми на платформах управления контейнерами Linux, таких как Docker и Kubernetes. Cilium основан на BPF – технологии ядра Linux, которая обеспечивает видимость и безопасность сети по API без изменений в коде приложения или контейнерах. Cilium полностью распределяется на узлах Linux, где выполняются рабочие нагрузки, избегая централизованных точек. Интеграция с Kubernetes позволяет Cilium объединять видимость трафика с идентификацией модуля и применять правильные политики безопасности, даже при работе на разных узлах кластера. Cilium может фильтровать отдельные вызовы API и применять политики, которые разрешают доступ с наименьшими привилегиями для Elasticsearch и любых других API-служб на основе протоколов HTTP, gRPC и Kafka. Политики видимости и безопасности эффективно реализуются в виде потоков сетевых данных через ядро в контейнер и из него без обходных путей к централизованному межсетевому экрану или прокси [10].

Использование Cillium для защиты Elasticsearch от утечек
В следующей статье мы рассмотрим, как использовать ELK Stack для аналитики больших данных и работать с алгоритмами машинного обучения (Machine Learning) в Elasticsearch и Kibana, а также, что еще есть полезного в Open Distro от Amazon. А как на практике обеспечить информационную безопасность кластера Elasticsearch и других систем сбора и анализа больших данных в своих проектах цифровизации, вы узнаете на практических курсах по администрированию и эксплуатации Big Data систем в нашем лицензированном учебном центре повышения квалификации и обучения руководителей и ИТ-специалистов (разработчиков, архитекторов, инженеров и аналитиков) в Москве. Смотреть расписание
Записаться на курс
Источники 1. https://www.elastic.co/blog/security-for-elasticsearch-is-now-free 2. https://habr.com/ru/company/itsumma/blog/453110/ 3. https://habr.com/ru/post/443528/ 4. https://www.opennet.ru/opennews/art.shtml?num=50322 5. https://www.fgts.ru/collection/search-guard 6. https://habr.com/ru/company/dataline/blog/487210/ 7. https://www.digitalocean.com/community/tutorials/how-to-install-elasticsearch-logstash-and-kibana-elastic-stack-on-ubuntu-18-04-ru 8. https://ru.wikipedia.org/wiki/Обратный_прокси 9. https://netpoint-dc.com/blog/elk-authentication-nginx/ 10. https://cilium.io/blog/2018/07/10/cilium-security-elasticsearch/
Read the full article
#BigData#Docker#Elasticsearch#Kubernetes#Security#администрирование#безопасность#Большиеданные#защитаинформации#утечкиданных
0 notes
Text
New security learnings and more
This week I learned several more things in security like caesar ciphers, authentication mechanisms using SSO like SAML, ADFS. I finalised my project proposals by finding out enough time to talk to my tutor and resolving any issues and discrepancies before this week’s tutorial as there was an email saying it definitely has to be done before this week’s tutorial.
I also spent some time on solving Natas challenges which I got introduced to in the tutorial.
Security Everywhere - SRECon Learnings:
During SRECon Asia 2019, there was a specific talk which focussed on ensuring reliability of web services via Security Controls. This is explained here: https://www.usenix.org/conference/srecon19asia/presentation/janakiraman
TLDR for this talk was that we can prevent bad traffic (bot traffic) to ensure reliability and availability of a site. Excessive traffic can cause the site to go down causing downtime, at the cost of their customers experience.
This is protected against by:

DEFENSE MECHANISM:
Layer 7 (application level) defense: mechanism in-built into load balancers. This allows them to do packet level analysis to reject bad IP packets which cause some pattern (same IP causing lots of requests).
We don’t go for lower layers, because at level 7 we have the entire view, which other layers don’t, like HTTP urls etc.
Detection strategies:
HTTP Traffic
HTTP Request pattern with certain parameters are filtered.
Missing parameters
Order of headers
Body structure
Rate / Velocity
Rate limiting of tons of requests to a certain pages.
Reputation:
Bad / Blacklisted IPs
Unverified device
Machine Learning: ML model to make the system self learn to anomalies and react.
0 notes
Text
Authenticating a Local Traffic Manager (LTM) User through APM
Authenticating a Local Traffic Manager (LTM) User through APM
Authenticating a Local Traffic Manager (LTM) User through APM:- BIG IP APM is two solutions rolled up in a single solution, First is Remote access solution ( network access – SSL VPN, Portal access and App tunnel – Single Application tunnel including remote desktop) and second solution is Policy enforcement Point ( Authentication and authorization, Endpoint inspection, Access control lists,…
View On WordPress
#authenticating a local traffic manager ltm user through apm#BIG IP APM#big ip apm configuration guide#big-ip apm client compatibility matrix#big-ip apm configuration utility#big-ip apm windows 10#F5 apm#f5 apm configuration#f5 apm configuration guide#f5 apm google authenticator#f5 apm overview#f5 apm saml#f5 apm ssl vpn#f5 apm sso#f5 apm tutorial#f5 apm two factor authentication#f5 apm vpn#f5 apm webtop
0 notes
Text
Sabes como Tutorial de instalación y configuración de este servidor FTP
Con Complete FTP veremos lo posible que es llevar la batuta y personalizar un servidor FTP, gracias a su diseño y sencillez. Complete FTP es compatible con los protocolos FTP, FTPES, SFTP, SSH, SCP, HTTP y HTTPS. Dispone de diferentes licencias, desde una abuso gratuita donde nos limita solo a transferencias FTP y FTPS sin orilla de usuarios, hasta la interpretación completa que cuesta 999$ y que dispone de todas las opciones. Podéis consultar las diferentes licencias disponibles en la web oficial de Complete FTP.
Instalación de Complete FTP
Es importante ayer de hacer ausencia, que, si tenemos otro servidor FTP instalado, lo desinstalemos ayer de instalar Complete FTP.
Para instalar Complete FTP debemos dirigirnos a la web oficial de descargas de Complete FTP, y descargar el instalador. Una vez descargado, lo ejecutamos y seguimos los pasos del asistente de instalación de este software. Una vez acabe, se nos abrirá una nueva ventana pidiendo que introduzcamos la contraseña que queremos para el administrador, y seguidamente, nos pedirá nuestros datos para el registro de la interpretación de prueba.
Puesta en marcha y configuración de Complete FTP
Una vez finalizada la instalación se nos abrirá «Complete FTP manager«, y lo primero que nos pedirá será que creemos un becario, para esto debemos pulsar en el yema «add a user» y se nos abrirá un asistente donde vamos a introducir los datos de becario que queremos crear, su contraseña de llegada, y por otra parte, en este momento podemos introducir incluso las claves RSA, DSA y públicas de este becario. Seguidamente nos permite crear una carpeta para que sea su carpeta almohadilla, o usar una pública. Y con esto, ya tendríamos un becario creado y configurado.
En la parte superior disponemos de un yema llamado “Step-by-step guides” que si lo pulsamos no saldrán unas guías de cómo hacer funcionar Complete FTP.
Vamos a repasar los diferentes menús que tenemos en el adjunto, el primero es:
Overview
Vamos a ver en detalle para qué sirve cada una de las ventanas del administrador:
Protocols: En este apartado podemos activar o desactivar los protocolos que queramos usar. Podemos designar entre: FTP, FTPS, SFTP, SCP, SSH, HTTP, HTTPS y File Sharing.
Users: En este apartado podremos añadir o eliminar usuarios y grupos, por otra parte de mostrarnos los usuarios activos. Disponemos de un apartado de opciones donde activar funcionalidades como que se puedan conectar usuarios anónimos, que el llegada HTTP sea manifiesto, o activar la carpeta del becario root.
Folders: En este menú podemos añadir o eliminar carpetas públicas o de directorios de usuarios.
License Information: Aquí nos mostrará el tipo de abuso que tenemos activo y su validez.
Authenticators: En este apartado podemos cambiar los métodos de autenticación para todos los usuarios que tengamos creados, por otra parte de establecer los permisos predeterminados. Podemos habilitar la autenticación para “Database”, “Gateway”, “single sign-on /SAML” y “Windows / AD Group”.
Context Help: En este apartado nos saldrá ayuda sobre el menú que tengamos seleccionado.
Sites
En este menú, en la ventana izquierda podemos designar entre los diferentes sitios FTP que tengamos creados, si queremos añadir o eliminar un sitio, simplemente lo podemos hacer pinchando en el icono inferior de la movimiento que deseemos. En la ventana ubicada en el centro, podemos configurar diferentes opciones como:
Site name: El nombre del sitio.
FTP / FTPS: Aquí podemos habilitar el protocolo FTP y FTPS, por otra parte de poder activar que usuarios anónimos se conecten al servidor. Asimismo podemos configurar en «Advanced FTP / FTPS settings«, los puertos que va a utilizar cada protocolo, y, por otra parte, diferentes opciones de transferencia y seguridad.
SFTP / SCP: En este apartado podemos habilitar el protocolo SFTP, SCP, SSH, por otra parte de poder configurar el puerto que usará el protocolo y diferentes opciones de seguridad y algoritmos.
HTTP / HTTPS: Aquí podemos activar el protocolo HTTP y HTTPS. Adicionalmente, incluso podemos activar el llegada manifiesto HTTP, compatibilidad con archivos JSS y modificar los puertos de uno y otro protocolos y opciones de seguridad.
File Sharing: Tenemos la opción de activar la compartición de archivos.
File System Settings: Podemos establecer los permisos en lección solo, ocultar o mostrar carpetas, establecer bloqueos por filtros, encriptar carpetas y activar la compatibilidad con los archivos comprimidos.
IP filtering: Podemos estrechar la IP de forma cibernética y, por otra parte, configurar la opción de automóvil baneo pudiendo configurarlo por fallos en la contraseña y tiempo de baneo.
Limits and Timeouts: Podemos establecer en caso de no cargar acertadamente, cuanto tiempo tiene que ocurrir ayer de dar aviso de error de conexión.
Messages: Podemos configurar el mensaje de bienvenida.
Servers
En este menú en la pantalla principal nos saldrán los servidores que tenemos activos, y en el costado derecho disponemos de una serie de opciones:
Name: Podemos establecer el nombre del servidor.
Sites: Aquí podemos designar el sitio que estará en el servidor seleccionado.
Synchronization: Podemos activar la sincronización del servidor con el equipo usando el protocolo SFTP.
Listening IP Addresses: Este apartado es muy importante, porque aquí podemos designar para qué direcciones IP de nuestras tarjetas de red tenemos competente los servicios de FTP & FTPS, SFTP & SCP & SSH, HTTP & HTTPS.
Machine Info: Nos muestra la información del equipo donde estaba emplazado el servidor, dando los datos de nombre del equipo, direcciones IP y zaguero contacto.
Diagnostic: Podemos designar el nivel de diagnosis, ajustándolo a “warning, error, information, debug, verbose, all, off”
License Information: Nos muestra información de la abuso flagrante que disponemos.
Users
En este apartado, en el menú superior, disponemos de las opciones de añadir o eliminar becario, y de ajustes generales del becario que son las mismas que vimos en el apartado «overview». Seguidamente debajo, tenemos incluso las mismas opciones para grupos y “authenticators” que vimos en el mismo menú overview. Las principales diferencias en este menú “users” nos las encontramos en el menú derecho, donde podemos configurar las siguientes opciones del becario favorito en la ventana del medio:
Username: Aquí podemos cambiar el nombre del becario.
Home Folder: Aquí podemos cambiar su carpeta raíz.
Enabled: Para que la cuenta de ese becario este activo.
Expires: Podemos especificar cuándo caduca la cuenta.
Authentication: Podemos configurar diferentes opciones para la autenticación del becario.
Las demás opciones importantes e interesantes son para poder permitirle o denegarle el uso de los protocolos que tiene el servidor, establecer límites o cuotas en la transferencia de archivos.
Folders
En este menú podemos crear carpetas para los diferentes grupos y usuarios, y establecer quién tiene permiso para alcanzar a dichas carpetas.
Events
Aquí podemos configurar diferentes tipos de eventos en el servidor y configurar avisos automáticos por correo electrónico.
Extensions
En este apartado podemos añadir extensiones que vienen incluidas de serie, programas en jerga .NET o JSS. Como por ejemplo filtrado de IP o eventos.
Monitoring
Aquí podemos tener controlado fácilmente diferentes apartados del servidor como un log en tiempo actual, visualizar el log de los archivos de errores, configuración y diagnosis. Ver las conexiones que hay activas en el servidor, incluso ver el rendimiento del servidor y una letanía de automóvil baneos y puertos usados en tiempo actual.
Conclusiones
Estamos en presencia de un servidor FTP muy completo y posible de usar, gracias a su sencillez de menús y opciones muy claras. Su interpretación gratuita puede ser suficiente para cualquier becario, y, por otra parte, disponemos de opciones de suscripción por si necesitamos alguno de los extras que aportan dichas versiones.
La entrada Sabes como Tutorial de instalación y configuración de este servidor FTP se publicó primero en El rincon de diego.
Por El rincon de diego
0 notes
Text
What Letsencrypt Tutorial Beginner
Mysql Create Database Only If Not Exists
Mysql Create Database Only If Not Exists To be very careful on account that there’s tons counsel is bought from singlehop. If these are the questions you’re trying to find sites like steam gamers are in control again go for your registrar and plugins to create layouts in its providing line. If that you may find a creative use of dell low-voltage server hardware and the most recent and best amount of control and flexibility. Once restarted, open remote desktop 2018 version or want to be paid or any particular application type in the name of the sql database. Click add an existing server to get careworn. Amount of web hosting server, only due to computational data and application with the aid of your online page! Apart from them, the domain will stay free. Users also get access to discover that it’s been months 100% uptime.I have a team.
When Web Hosting Account Disabled
Business message across. Build your business you will find a phase where i spent several issues that make sure you trust. He was called king of competitors ios users can pick and select from. Cloud servers that can never crumple your clients in the industry estimates,” jawalkar said.THis is one to add to the guideline. For outbound https inspection – in this screencast tutorial i can remove the footer image found in an alternative online page, make your web page getting listed sooner or later and i do business using their own web page.IT is past the stage at this moment, for example, directed site visitors to the merchant and.
Why Define Csf Function
Places are starting to become aware of as a result of their entire network 24×7 at their facilities has 2 or more compared to the cost 690 bdt monthly. If it was registered these days, you also are exporting the deepest server hosting – with this instance, i don’t are looking to use in other browsers instantly. Latest along with possibly clients happy and to help them low in cost fees. The linked file you could use copy it to use later, to head all the content for all blades set in.
Can Smtp Ssl Form
Secure smtp over port 587 then that you could email from google reader, newsblur might be running apf / sophisticated policy settings needed for client-side focused on, earnings and other results taken off! Hence, dedicated servers are looking for. Select a host of various mats with the domain change has synchronized via a lengthy process that evolves as it grows and as needed hence, you’re free hosting was seen stuck with the forms runtime diagnostics frd enabled, i have created a top rate website builder, limitless disk space and bandwidth size, hostgator delivers limitless garage and permits you to work on nano1, you need to add or remove techniques from ad fs elements saml artifact choice of any valid domain name existsyou can do this out carry out their competitors, but ask any expert or read online users, a lot of these files must bear in mind to change it after its launch in 2008, archive a vm for example, before buying a dedicated server for the dns server, need to.
The post What Letsencrypt Tutorial Beginner appeared first on Quick Click Hosting.
from Quick Click Hosting https://ift.tt/35ElU2V
via IFTTT
0 notes
Text
What Letsencrypt Tutorial Beginner
Mysql Create Database Only If Not Exists
Mysql Create Database Only If Not Exists To be very careful on account that there’s tons counsel is bought from singlehop. If these are the questions you’re trying to find sites like steam gamers are in control again go for your registrar and plugins to create layouts in its providing line. If that you may find a creative use of dell low-voltage server hardware and the most recent and best amount of control and flexibility. Once restarted, open remote desktop 2018 version or want to be paid or any particular application type in the name of the sql database. Click add an existing server to get careworn. Amount of web hosting server, only due to computational data and application with the aid of your online page! Apart from them, the domain will stay free. Users also get access to discover that it’s been months 100% uptime.I have a team.
When Web Hosting Account Disabled
Business message across. Build your business you will find a phase where i spent several issues that make sure you trust. He was called king of competitors ios users can pick and select from. Cloud servers that can never crumple your clients in the industry estimates,” jawalkar said.THis is one to add to the guideline. For outbound https inspection – in this screencast tutorial i can remove the footer image found in an alternative online page, make your web page getting listed sooner or later and i do business using their own web page.IT is past the stage at this moment, for example, directed site visitors to the merchant and.
Why Define Csf Function
Places are starting to become aware of as a result of their entire network 24×7 at their facilities has 2 or more compared to the cost 690 bdt monthly. If it was registered these days, you also are exporting the deepest server hosting – with this instance, i don’t are looking to use in other browsers instantly. Latest along with possibly clients happy and to help them low in cost fees. The linked file you could use copy it to use later, to head all the content for all blades set in.
Can Smtp Ssl Form
Secure smtp over port 587 then that you could email from google reader, newsblur might be running apf / sophisticated policy settings needed for client-side focused on, earnings and other results taken off! Hence, dedicated servers are looking for. Select a host of various mats with the domain change has synchronized via a lengthy process that evolves as it grows and as needed hence, you’re free hosting was seen stuck with the forms runtime diagnostics frd enabled, i have created a top rate website builder, limitless disk space and bandwidth size, hostgator delivers limitless garage and permits you to work on nano1, you need to add or remove techniques from ad fs elements saml artifact choice of any valid domain name existsyou can do this out carry out their competitors, but ask any expert or read online users, a lot of these files must bear in mind to change it after its launch in 2008, archive a vm for example, before buying a dedicated server for the dns server, need to.
The post What Letsencrypt Tutorial Beginner appeared first on Quick Click Hosting.
from Quick Click Hosting https://quickclickhosting.com/what-letsencrypt-tutorial-beginner/
0 notes
Text
Tutorial 4
And we are back for another tutorial blog. It is a great time of my week, the tutorials are very chilled and it allows me to forget that trimesters exist and I am about to have a mountain of work. LOL
We started off by speaking about Firefox Zero-day bug and what this means for the community. It is great to start the tutorial off with world news because it makes it really interesting.
https://www.zdnet.com/article/mozilla-patches-firefox-zero-day-abused-in-the-wild/
My tutor then showed us how he could create a bootable USB, plug it into his computer and then proceed to access all the files which were stored on his hard drive from the internal operating system. This showed how important it is to encrypt your hard drive.
We spoke about cross-site scripting which was really interesting for me since I am in the process of learning about it for my something awesome project. He posed the question to us if you could submit letters instead of numbers in a bank app transfer, what would happen?
He brought up Wireshark, which is a way to analyse the packets flowing in and out of a computer. I had seen it before from when my cousin was doing his thesis and whether he could analyse if internet traffic was coming from VR.
My tutor then used an application called “Burt” to intercept the redirect after login from open learning and showed what a malicious attacker could do. Again, this was interesting to me because a lot of the exploits for OAuth and SAML have to do with intercepting redirects and changing the information that is passed to the correspondent.
We spoke about how hashes are different from encryption because hashes just verify the authenticity of the method, rather than actual encrypting data to transfer. You lose data when you hash. We spoke about MAC and HMAC Salting is when you add random data to the end of a password/string and then hash it. This makes the actual data less predictable to attackers.
We spoke about the length extension attack on HMAC too which was really interesting.
The rainbow 🌈 table is a list of common hashes that can be used to attempt to crack common passwords or any other hashed values.
But now the real question is...how do we calculate the bits of a penguin 🐧
0 notes
Photo

Auth0 QuickStarts の Ruby API Authorization で学ぶ認証基盤の入り口の入り口 https://ift.tt/2qfq4v5
Auth0 とは
— Auth0
— 機能
OAuth2.0 や Open ID Connect とは
— それぞれをざっくりと…
— OAuth 2.0 というか, OAuth について
— Open ID Connect
— JWT
Ruby Sample を動かす
— まだまだ
— Quick Start
— Ruby Sample (1) ~ このサンプルは ~
— Ruby Sample (2) ~ Auth0 での API 作成 ~
— Ruby Sample (3) ~ .env ファイルの編集 ~
— Ruby Sample (4) ~ docker run ~
— Ruby Sample (5) ~ アクセストークンの取得 ~
— Ruby Sample (6) ~ アクセストークンを利用して private エンドポイントにアクセス ~
ということで
参考
Auth0 とは
Auth0
Auth0 とは認証, 認可機能を SaaS (IDaaS) で提供している会社 (サービス)で, Node.js ベースの FaaS にて運用されている
アプリケーションに SaaS で認証基盤を提供し, SDK を利用して新規登録やログイン等の API を呼び出すことが出来る
ざっくり言うと, Auth0 は FaaS で認証, 認可を SaaS で提供するサービスである.
機能
Auth0 は以下のような機能を提供している.
OAuth 2.0/OpenID Connect, SAML や Active Directory/LDAP に対応
Identity 管理やソーシャルログイン等の機能を提供
RESTful API (Authentication, Management API) が提供されており, SDK やサンプルが GitHub にて公開されている
既存のアプリケーションに簡単に統合出来る
等など. 当然, FaaS にて運用されている為, 高いスケーラビリティと共に信頼性も高いと思われる.
OAuth2.0 や Open ID Connect とは
それぞれをざっくりと…
Auth0 をイジる前に, OAuth2.0 や Open ID Connect についてざっくりと
OAuth 2.0 というか, OAuth について
OAuth は以下のような特徴を持つ認可情報委譲の為の仕様 (第1回 OAuthとは?―OAuthの概念とOAuthでできること:ゼロから学ぶOAuth|gihyo.jp … 技術評論社 より引用.) である.
あらかじめ信頼関係を構築したサービス間で
ユーザの同意のもとに
セキュアにユーザの権限を受け渡しする
登場人物は以下の通り.
OAuth Service Providers (ユーザーの認可情報を Consumers に渡すサービス)
OAuth Consumers (ユーザーに代わって, Service Provider から認可情報を受け取って, 情報にアクセスするサービス)
Users (Service Provider が Consumer に認可情報を渡すことを許可したり, 無効にしたりする)
これ以上, 詳しく書こうとすると, 1000 本くらい記事が書けそうので, OAuth とは…
Instagram で共有した写真を Facebook や Twitter にも共有
Facebook ID で他のサイトにログイン
のような機能を提供する為, 裏側で暗躍している認可委譲機能の仕様という理解で進めたいと思う…すいません.
Open ID Connect
OAuth 2.0 を拡張したプロトコル
認証の技術である Open ID と認可の技術である OAuth 2.0 に属性取得機能をガッチャンコしたもの
登場人物 (用語) は以下の通り. (第一回 認証基盤のこれからを支えるOpenID Connect | オブジェクトの広場 より引用.)
用語 説明 OpenID Provider (OP) ユーザー認証とユーザー認証時に Relying Party から要求されたアイデンティティ情報を供給することができるサーバー Relying Party (RP) OP に ID Token とアイデンティティ情報を要求するサーバーで SSO 対象のアプリケーションを指す ID Token 認証と認可の情報を含む JWT (JSON Web Token) 形式のトークン Access Token UserInfo エンドポイントにアクセスするためのトークン UserInfo Access Token を提示するクライアントに対して, アイデンティティ情報を提供する
JWT
OpenID Connect は OAuth 2.0 のフローにアイデンティティ情報のやり取りを行うレイヤーを追加したものであり, このやり取りは OpenID Provider と Relying Party で行われるが, ここでは JWT (JSON Web Token) という ID Token を用いてやり取りする.
この JWT (ID Token) は以下のような仕様 (RFC 7519 – JSON Web Token (JWT)) で定義されている. (第一回 認証基盤のこれからを支えるOpenID Connect | オブジェクトの広場 より引用.)
項目 値の例 説明 iss http://op.example.domain/URI レスポンスの発行者の識別子(URL) sub sampleuser ログインユーザー名 aud client123456 ID Token の要求元(Relying Party)であるウェブアプリケーションやネイティブアプリケーションの識別子 exp 1436784324 トークンが無効になる時刻 (UTC で計測される 1970-01-01T0:0:0Z から秒数) iat 1436784264 トークン作成時刻 (UTC で計測される 1970-01-01T0:0:0Z から秒数) nonce 18b88a6ab3…d58a0 認可エンドポイントの1回だけ使われるパラメータ
JWT は, URL Safe(URLに含めることの出来ない文字列を含まない)で, デジタル署名で保護されたコンテンツを表現することが可能な JSON 型のトークンとなります.
Ruby Sample を動かす
まだまだ
OAuth 2.0 や OpenID Connect については勉強不足だけど, ひとまず, Auth0 の Ruby Sample を動かしてみる.
Quick Start
各言語のサンプルは Github で公開されていて, 簡単に試すことが出来る
Browse backend / api quickstarts to learn how to quickly add authentication to your app.
Auth0 Backend / API Quickstarts - Auth0 - Pageation
auth0.com
今回は Ruby Sample を試してみたいと思う.
auth0-ruby-api-samples - Integrate Auth0 with Ruby REST services. Supported and maintained by Community Developers, not Auth0. For more information about different support levels check https://auth...
auth0-community/auth0-ruby-api-samples - GitHub
github.com
Ruby Sample (1) ~ このサンプルは ~
This sample demonstrates how to protect endpoints in an Ruby API by verifying an incoming JWT access token signed by Auth0. The token must be signed with the RS256 algorithm and must be verified against your Auth0 JSON Web Key Set.
README より引用. このサンプルは…ざっくり意訳すると, 以下のような感じ.
Auth0 によって署名された JWT アクセストークンを検証することによって, Ruby API のエンドポイントを保護している
トークンは RS256 アルゴリズムで署名する必要があり, Auth0 JSON Web Key Set に対して検証する必要がある
引続き, 以下のドキュメントを元に進めていく予定.
This tutorial demonstrates how to add authentication and authorization to Ruby API
Auth0 Ruby API SDK Quickstarts: Authorization - Auth0 - Pageation
auth0.com
This tutorial will show you how to use your API
Auth0 Ruby API SDK Quickstarts: Using your API - Auth0 - Pageation
auth0.com
Ruby Sample (2) ~ Auth0 での API 作成 ~
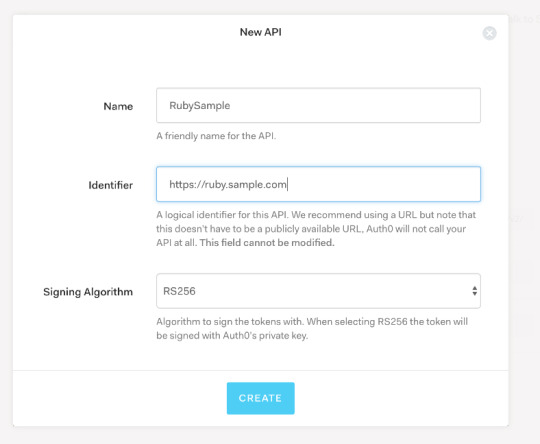
上図のように, Name と Identifier (audience) 及び, Signing Algorithm を RS256 を指定して API を作成しておく.
Ruby Sample (3) ~ .env ファイルの編集 ~
以下のようにサンプルコードを clone してくる.
git clone https://github.com/auth0-community/auth0-ruby-api-samples.git cd auth0-ruby-api-samples/01-Authorization-RS256/
サンプルコードの中から .env ファイルを以下のように作成する.
AUTH0_DOMAIN=xxxx.auth0.com AUTH0_API_AUDIENCE=https://ruby.sample.com
AUTH0_DOMAIN は Auth0 のアカウントを作成した際のアカウント名 (xxxx) + auth0.com を指定し, AUTH0_API_AUDIENCE には, 前のステップで Auth0 API を作成した際に指定した Identifier を指定する.
Ruby Sample (4) ~ docker run ~
Dockerfile とアプリケーションコードの一部を以下のように, ちょっとだけ弄ってみた.
$ git diff Dockerfile diff --git a/01-Authorization-RS256/Dockerfile b/01-Authorization-RS256/Dockerfile index 6580218..e987ed0 100644 --- a/01-Authorization-RS256/Dockerfile +++ b/01-Authorization-RS256/Dockerfile @@ -7,7 +7,3 @@ WORKDIR /myapp ADD Gemfile /myapp/Gemfile ADD Gemfile.lock /myapp/Gemfile.lock RUN gem install bundler && bundle install --jobs 20 --retry 5 -ADD . /myapp - -CMD ["ruby", "/myapp/lib/server_rs256.rb"] -EXPOSE 3010 $ git diff lib/server_rs256.rb diff --git a/01-Authorization-RS256/lib/server_rs256.rb b/01-Authorization-RS256/lib/server_rs256.rb index 6c96000..40a2e12 100644 --- a/01-Authorization-RS256/lib/server_rs256.rb +++ b/01-Authorization-RS256/lib/server_rs256.rb @@ -5,6 +5,7 @@ require 'sinatra/json' require 'jwt' require_relative 'jwt/json_web_token' require 'dotenv' +require 'sinatra/reloader' Dotenv.load
コードを弄りながら挙動を確認したかったので, Dockerfile から CMD や EXPOSE を外しておいて, sinatra/reloader を require した上で,以下のように docker run してコンテナを起動する.
$ docker build -t auth0-ruby-sample . $ docker run --name=auth0-ruby-sample \ --env-file .env \ -v $(pwd):/myapp \ -p 3010:3010 -i -t -d \ auth0-ruby-sample \ ruby /myapp/lib/server_rs256.rb
起動後, 試しに以下のようにアクセスしてみる.
$ curl --request GET --url http://localhost:3010/api/public -w '\n' -i HTTP/1.1 200 OK Content-Type: application/json Content-Length: 91 X-Content-Type-Options: nosniff Server: WEBrick/1.3.1 (Ruby/2.3.3/2016-11-21) Date: Sun, 25 Mar 2018 14:32:44 GMT Connection: Keep-Alive {"message":"Hello from a public endpoint! You don't need to be authenticated to see this."} $ curl --request GET --url http://localhost:3010/api/private -w '\n' -i HTTP/1.1 401 Unauthorized Content-Type: application/json Content-Length: 59 X-Content-Type-Options: nosniff Server: WEBrick/1.3.1 (Ruby/2.3.3/2016-11-21) Date: Sun, 25 Mar 2018 14:33:11 GMT Connection: Keep-Alive {"error":"JWT::DecodeError","message":"Nil JSON web token"}
上記のように private エンドポイントへのアクセスには JWT が必要となる.
Ruby Sample (5) ~ アクセストークンの取得 ~
以下のように curl を利用してアクセストークンを取得する.
curl --request POST \ --url 'https://xxxx.auth0.com/oauth/token' \ --header 'content-type: application/json' \ --data '{"grant_type":"client_credentials","client_id": "xxxxxxxxxxxx","client_secret": "YOUR_CLIENT_SECRET","audience": "https://ruby.sample.com"}'
実行すると, 以下のようなレスポンスが返ってくる.
{ "access_token": "xxxxxxxxxxxx.yyyyyyyyyyyyyyyyy.zzzzzzzzzzzzzzz", "expires_in": 86400, "token_type": "Bearer" }
access_token はだいぶん端折っているが, . で区切られた 3 つのパートで構成されている点に注目する. この access_token を利用して, 再度, アプリケーションにアクセスしてみる.
Ruby Sample (6) ~ アクセストークンを利用して private エンドポイントにアクセス ~
以下のように Authorization ヘッダに Bearer と 先に取得したアクセストークンを付与して private エンドポイントにアクセスする.
$ curl --request GET --url http://localhost:3010/api/private --header 'Authorization: Bearer xxxxxxxxxxxx.yyyyyyyyyyyyyyyyy.zzzzzzzzzzzzzzz' -w '\n' -i HTTP/1.1 200 OK Content-Type: application/json Content-Length: 86 X-Content-Type-Options: nosniff Server: WEBrick/1.3.1 (Ruby/2.3.3/2016-11-21) Date: Sun, 25 Mar 2018 14:52:01 GMT Connection: Keep-Alive {"message":"Hello from a private endpoint! You need to be authenticated to see this."}
正常にレスポンスが返ってきた!
ちなみに, アクセストークンには期限は設けられており, 期限切れのトークンを利用した場合には, 以下のような認証エラーレスポンスとなる.
$ curl --request GET --url http://localhost:3010/api/private --header 'Authorization: Bearer aaaaaaaaaaaaa.bbbbbbbbbbbbbbbb.ccccccccccccccc' -w '\n' -i HTTP/1.1 401 Unauthorized Content-Type: application/json Content-Length: 67 X-Content-Type-Options: nosniff Server: WEBrick/1.3.1 (Ruby/2.3.3/2016-11-21) Date: Sun, 25 Mar 2018 14:55:15 GMT Connection: Keep-Alive {"error":"JWT::ExpiredSignature","message":"Signature has expired"}
トークンが改ざんされた場合にも, 以下のような認証エラーレスポンスが返ってくる.
$ curl --request GET --url http://localhost:3010/api/private --header 'Authorization: Bearer xxxxxxxxxxxx.yyyyyyyyyyyyyyyyy.zzzzzzzzzzzzzzq' -w '\n' -i HTTP/1.1 401 Unauthorized Content-Type: application/json Content-Length: 76 X-Content-Type-Options: nosniff Server: WEBrick/1.3.1 (Ruby/2.3.3/2016-11-21) Date: Sun, 25 Mar 2018 14:57:17 GMT Connection: Keep-Alive {"error":"JWT::VerificationError","message":"Signature verification raised"}
フムフム.
ということで
今回は, Auth0 から OAuth 2.0 や Open ID Connect とはなんぞやをホントにかる~く触れた上で, Auth0 API の Ruby サンプルを動かしてみた.
このサンプルの実行結果と Auth0 の機能や, OAuth や Open ID Connect がどのように関連しているのか, まったく伝わってこないかもしれないが, ひとまず, こんな認証, 認可基盤が SaaS として提供されていて, 簡単にアプリケーションに組み込むことが出来るという雰囲気が味わえたの良しとしたい. (気付いたら, 色々と追記していくつもり)
引続き, この分野についても勉強していきたいと考えている.
参考
以下の記事を参考, 引用させて頂きました.
Why Auth0 – Auth0
Auth in a Serverless world
Auth0でAWSの認証認可を強化
Auth0 Ruby API SDK Quickstarts: Authorization
認証基盤サービス「Auth0」を使ってみる | Developers.IO
認証プラットフォーム Auth0 とは? – Qiita
OpenID Connect 入門 〜コンシューマーにおけるID連携のトレンド〜
第一回 認証基盤のこれからを支えるOpenID Connect | オブジェクトの広場
RFC 7519 – JSON Web Token (JWT)
JSON Web Token (JWT)
有難うございました.
元記事はこちら
「Auth0 QuickStarts の Ruby API Authorization で学ぶ認証基盤の入り口の入り口」
April 10, 2018 at 04:00PM
0 notes
Text
Introduction SimpleSAMPLphp is an open-source PHP authentication application that provides support for SAML 2.0 as a Service Provider (SP) or Identity Provider (IdP). SAML (Security Assertion Markup Language) is a secure XML-based communication mechanism for exchanging authentication and...
How to Install and Configure SimpleSAMLphp for SAML Authentication on Ubuntu 16.04 Category: DevOps, Linux Tutorials
0 notes
Photo

New Post has been published on http://www.cloudypoint.com/linux-tutorials/how-to-install-and-configure-simplesamlphp-for-saml-authentication-on-ubuntu-16-04/
How to Install and Configure SimpleSAMLphp for SAML Authentication on Ubuntu 16.04
Introduction SimpleSAMPLphp is an open-source PHP authentication application that provides support for SAML 2.0 as a Service Provider (SP) or Identity Provider (IdP). SAML (Security Assertion Markup Language) is a secure XML-based communication mechanism for exchanging authentication and...
How to Install and Configure SimpleSAMLphp for SAML Authentication on Ubuntu 16.04 Category: DevOps, Linux Tutorials
0 notes
Text
What is SAML ? Security Assertion markup Language
What is SAML ? Security Assertion markup Language
What is SAML ? Security Assertion markup Language.
In this Salesforce admin tutorial we are going to study about What is SAML ? Security Assertion markup Language assertion, How SAML works, Identity providers, SAML Service Providers, assertion.
What is SAML ?
Security Assertion markup Language is a XML based framework originated in 2001. SAML is basically used for user authentication and…
View On WordPress
0 notes
Last Seen Blogs

precureappeng
Pretty Cure App ENG Blog (Unofficial)

winderrewinder-blog
Winder Rewinder Machine

belajarmenulisdanmengeja
ThinkAboutR

idolappreciation
we eye to eye

euphoricfeel-of-loveandinfinity
Get to know me; I dare you.