#oauth2 authorization code flow
Text
YouTube Short | What is Difference Between OAuth2 and SAML | Quick Guide to SAML Vs OAuth2
Hi, a short #video on #oauth2 Vs #SAML #authentication & #authorization is published on #codeonedigest #youtube channel. Learn OAuth2 and SAML in 1 minute.
#saml #oauth #oauth2 #samlvsoauth2 #samlvsoauth
What is SAML?
SAML is an acronym used to describe the Security Assertion Markup Language (SAML). Its primary role in online security is that it enables you to access multiple web applications using single sign-on (SSO).
What is OAuth2?
OAuth2 is an open-standard authorization protocol or framework that provides applications the ability for “secure designated access.”
OAuth2 doesn’t share…
View On WordPress
#Oauth#oauth2#oauth2 authentication#oauth2 authentication flow#oauth2 authentication postman#oauth2 authentication server#oauth2 authentication spring boot#oauth2 authorization#oauth2 authorization code#oauth2 authorization code flow#oauth2 authorization code flow spring boot#oauth2 authorization server#oauth2 authorization sever spring boot#oauth2 explained#oauth2 spring boot#oauth2 spring boot microservices#oauth2 spring boot rest api#oauth2 tutorial#oauth2 vs saml#oauth2 vs saml 2.0#oauth2 vs saml2#saml#saml 2.0#saml 2.0 registration#saml authentication#saml tutorial#saml vs oauth#saml vs oauth 2.0#saml vs oauth vs sso#saml vs oauth2
0 notes
Text
Tumblr Blog Sync v1
I got tired of manually syncing my blocks between my main and side blogs. So I wrote a python script to do it for me and wanted to share it.
The script is in the pastebin since you can't post codeblocks. I'll also dump it below a read more but the formatting will be broken.
https://pastebin.com/raw/ePJuJDeA
You'll need to create a tumblr application to use it as you'll need your client_id and client_secret. Details on how to do that here: https://www.tumblr.com/docs/en/api/v2
It also relies on requests-oauthlib for managing the oauth flow.
CLIENT_ID='<CLIENT_ID>' CLIENT_SECRET='<CLIENT_SECRET>' REDIRECT_URI='<REDIRECT_URI>' python tumblrblogsync.py <BLOG_1> <BLOG_2> ... <BLOG_N>
I've only tested it on linux and the blogs must be under the same account to sync properly.
Run at your own risk, don't share your client id and secret with anyone, don't run code you don't understand.
Maybe if I feel motivated I'll work on a more user friendly version.
from requests_oauthlib import OAuth2Session
import time
import os
import sys
client_id = os.environ['CLIENT_ID']
client_secret = os.environ['CLIENT_SECRET']
redirect_uri = os.environ['REDIRECT_URI']
def get_session(client_id, client_secret, redirect_uri):
scope = 'write'
oauth = OAuth2Session(client_id,redirect_uri=redirect_uri,scope=scope)
authorization_url, state = oauth.authorization_url('https://www.tumblr.com/oauth2/authorize')
print('Please go to %s and authorize access.' % authorization_url)
authorization_response = input('Enter the full callback URL: ')
token = oauth.fetch_token('https://api.tumblr.com/v2/oauth2/token', authorization_response=authorization_response, client_secret=client_secret)
return oauth
def get_blocks(oauth, blog):
query = '/v2/blog/' + blog + '/blocks'
r = oauth.get('https://api.tumblr.com' + query)
blocks = set()
print('Retrieving blocks for:',blog)
while '_links' in r.json()['response']:
blocks = blocks.union({blog['name'] for blog in r.json()['response']['blocked_tumblelogs']})
query = r.json()['response']['_links']['next']['href']
time.sleep(1)
r = oauth.get('https://api.tumblr.com' + query)
if r.status_code == 200:
print('success')
else:
print('failure, status: ' + str(r.json()))
blocks = blocks.union({blog['name'] for blog in r.json()['response']['blocked_tumblelogs']})
return blocks
def permutate_blocks(blogs, blocks):
to_block = []
all_blocks = set()
for block in blocks:
all_blocks = all_blocks.union(block)
for i in range(len(blogs)):
to_block += [all_blocks.difference(blocks[i])]
return to_block
def block_blogs(oauth, blog, blocks):
print('blocking:', blocks, 'on:',blog)
r = oauth.post('https://api.tumblr.com/v2/blog/' + blog + '/blocks/bulk', data={'blocked_tumblelogs': ','.join(blocks), 'force': 'false'})
if r.status_code == 200:
print('success')
else:
print('failure, status: ' + str(r.json()))
def get_all_blocks(oauth, blogs):
blocks = []
for blog in blogs:
blocks += [get_blocks(oauth, blog)]
return blocks
def block_all_blogs(oauth, blogs, to_block):
for i in range(len(blogs)):
block_blogs(oauth, blogs[i],to_block[i])
def main():
if len(sys.argv) < 3:
print('Please specify at least two blogs, must be under the same account.')
return -1
if client_id == '' or client_secret == '' or redirect_uri == '':
print('CLIENT_ID, CLIENT_SECRET, and REDIRECT_URI must be specified as environment variables')
return -1blogs = sys.argv[1:] oauth = get_session(client_id, client_secret, redirect_uri) print('='*24) blocks = get_all_blocks(oauth, blogs) to_block = permutate_blocks(blogs, blocks) block_all_blogs(oauth, blogs, to_block) return 0
if name=='main':
sys.exit(main())
2 notes
·
View notes
Text
Oracle Apex Oauth2 Example

OAuth2 in Oracle APEX: A Practical Guide and Example
OAuth2 is a contemporary and secure authorization framework that allows third-party applications to access protected resources on behalf of a user. By implementing OAuth2 in Oracle APEX, you can provide controlled access to your APEX application’s data and functionality, enabling seamless integration with other services.
Why use OAuth2 with APEX?
Enhanced Security: OAuth2 offers a robust security layer compared to traditional username and password-based authentication. It uses tokens rather than directly passing user credentials.
Fine-grained Access Control: OAuth2 allows you to define specific scopes (permissions) determining the access level granted to third-party applications.
Improved User Experience: Users can conveniently authorize applications without repeatedly sharing their primary credentials.
Prerequisites
A basic understanding of Oracle APEX development
An Oracle REST Data Source (ORDS) instance, if you want to integrate with ORDS-defined REST APIs
Steps for Implementing OAuth2 in Oracle APEX
Create an OAuth2 Client:
Within your APEX workspace, navigate to Shared Components -> Web Credentials.
Click Create and select the OAuth2 Client type.
Provide a name, ID, client secret, and any necessary authorization scopes.
Obtain an Access Token:
The method for obtaining an access token will depend on the OAuth2 flow you choose (e.g., Client Credentials flow, Authorization Code flow).
Utilize the Access Token:
Include the access token in the Authorization header of your API requests to protected resources. Use the format: Bearer .
Example: Accessing an ORDS-based REST API
Let’s assume you have an ORDS-based REST API endpoint for fetching employee data that requires OAuth2 authentication. Here’s how you would configure APEX to interact with it:
Create a REST Data Source:
Go to Shared Components -> REST Data Sources.
Set the authentication type to OAuth2 Client Credentials Flow.
Enter your OAuth2 token endpoint URL, client ID, and client secret.
Use the REST Data Source in Your APEX Application:
Create APEX pages or components that utilize the REST Data Source to fetch and display employee data. APEX will automatically handle obtaining and using the access token.
Additional Considerations
Access Token Expiration: OAuth2 access tokens usually have expiration times. Implement logic to refresh access tokens before they expire.
OAuth2 Flows: Choose the most suitable OAuth2 flow for your integration use case. The Client Credentials flow is often used for server-to-server integrations, while the Authorization Code flow is more common for web applications where a user is directly involved.
youtube
You can find more information about Oracle Apex in this Oracle Apex Link
Conclusion:
Unogeeks is the No.1 IT Training Institute for Oracle Apex Training. Anyone Disagree? Please drop in a comment
You can check out our other latest blogs on Oracle Apex here – Oarcle Apex Blogs
You can check out our Best In Class Oracle Apex Details here – Oracle Apex Training
Follow & Connect with us:
———————————-
For Training inquiries:
Call/Whatsapp: +91 73960 33555
Mail us at: [email protected]
Our Website ➜ https://unogeeks.com
Follow us:
Instagram: https://www.instagram.com/unogeeks
Facebook: https://www.facebook.com/UnogeeksSoftwareTrainingInstitute
Twitter: https://twitter.com/unogeeks
0 notes
Text
Petit recapitulatif du flow OAuth2
OAuth2 permet a des 3ce partie d'acceder a des données utilisateurs sans reveler leur mot de passe via l'échange de tokens.
client: celui qui désire acceder à une resource
resource owner: l'utilisateur qui possède une resource
auth server: serveur qui authentifie les utilisateur et emet des jetons
resource server: héberge une resource protégée
Oauth2 flows
Authorization code:
le client désire acceder à une resource a nom de l'utilisateur
l'utilisateur est dirigé vers l' auth server pour login et donner les accès au client
ensuite l'auth server envoie un code d'authorisation au client
le client envoie le code d'authorisation à l'auth server en échange d'un token courte durée
le client contacte le resource server avec le token qui lui donne accès
Client credential:
le client désire accéder à des resources qui lui appartiennent
le client s'authentifie au serveur via ses credentials (clientId + clientSecret)
l'auth server envoie un access token au client
le client peut utiliser ce token pour accéder les données
0 notes
Quote
Ever since we announced our intention to disable Basic Authentication in Exchange Online we said that we would add Modern Auth (OAuth 2.0) support for the IMAP, POP and SMTP AUTH protocols.
Today, we’re excited to announce the availability of OAuth 2.0 authentication for IMAP and SMTP AUTH protocols to Exchange Online mailboxes. This feature announcement is for interactive applications to enable OAuth for IMAP and SMTP.
For additional information about non-interactive applications, please see our blog post Announcing OAuth 2.0 Client Credentials Flow support for POP and IMAP protocols in Exchange Online.
Application developers who have built apps that send, read or otherwise process email using these protocols will be able to implement secure, modern authentication experiences for their users. This functionality is built on top of Microsoft Identity platform (v2.0) and supports access to email of Microsoft 365 (formerly Office 365) users.
Detailed step-by-step instructions for authenticating to IMAP and SMTP AUTH protocols using OAuth are now available for you to get started.
What’s supported?
With this release, apps can use one of the following OAuth flows to authorize and get access tokens on behalf of a user.
1.OAuth2 authorization code flow
2.OAuth2 Device authorization grant flow
Follow these detailed step-by-step instructions to implement OAuth 2.0 authentication if your in-house application needs to access IMAP and SMTP AUTH protocols in Exchange Online, or work with your vendor to update any apps or clients that you use that could be impacted.
Announcing OAuth 2.0 support for IMAP and SMTP AUTH protocols in Exchange Online - Microsoft Community Hub
0 notes
Text
OAuth throws "missing code validator" in Google OAuth2
I am following this example in an attempt to authenticate my users with the Google API.
Here is the relevant code I am using, almost exactly as in the example:
@app.route('/login/')def login(): flow = google_auth_oauthlib.flow.Flow.from_client_secrets_file( 'client_secret.json', scopes=['https://www.googleapis.com/auth/drive.file']) flow.redirect_uri = 'https://localhost:5000/oauth2callback/' authorization_url, state = flow.authorization_url( access_type='offline', include_granted_scopes='true') session['state'] = state return redirect(authorization_url)#called by Google's oauth @app.route('/oauth2callback/')def oauth2callback(): state = request.args['state'] # Use the client_secret.json file to identify the application requesting # authorization. The client ID (from that file) and access scopes are required. state = session['state'] flow = google_auth_oauthlib.flow.Flow.from_client_secrets_file( 'client_secret.json', scopes=['https://www.googleapis.com/auth/drive.file'], state=state) flow.redirect_uri = url_for('oauth2callback', _external=True) authorization_response = request.url flow.fetch_token(authorization_response=authorization_response, code_verifier=False)
When I do this, it gives the error,oauthlib.oauth2.rfc6749.errors.InvalidGrantError: (invalid_grant) Missing code verifier.
I do not know what a code verifier is, nor did the examples mention one.
The stack trace is available if anyone thinks it will help
How can I solve this issue?Any help is appreciated!
https://codehunter.cc/a/flask/oauth-throws-missing-code-validator-in-google-oauth2
0 notes
Text
Start swagger editor on server

#START SWAGGER EDITOR ON SERVER CODE#
#START SWAGGER EDITOR ON SERVER DOWNLOAD#
Designed for REST: Swagger is really easy to use, because it’s a single-purpose tool for documenting REST Services.It also means that the API user has probably already experience with Swagger, which dramatically reduces the learning curve. This means that it’s already used in real production APIs, so you don’t have to be the beta tester. Industry Standard: Swagger is the most widely adopted documentation and specification standard for REST Services.There are 5 good reasons for using Swagger: Why use Swagger?īut why not use another standard (like RAML) or simply open your favorite word processor and start hitting the keys?
#START SWAGGER EDITOR ON SERVER CODE#
The real power of the Swagger standard comes from the ecosystem of powerful tools that surrounds it.įor example, there’s Swagger Editor for writing the Swagger spec, Swagger Codegen for automatically generating code based on your Swagger spec, and Swagger UI for turning your Swagger spec into beautiful documentation that your API users will love to read. Note that if using multiple servers, the resources specified by relative URLs are expected to exist on all servers.Swagger is the most widely used standard for specifying and documenting REST Services. # Relative URLs to OAuth2 authorization and token URLs Moreover, almost all other URLs in an API definition, including OAuth 2 flow endpoints, termsOfService, external documentation URL and others, can be specified relative to the server URL. For example, if the definition hosted at specifies url: /v2, the url is resolved to Relative URL resolution rules follow RFC 3986. This is useful in on-premises installations hosted on your customer’s own servers. In this case, the URL is resolved against the server that hosts the given OpenAPI definition. The URLs in the servers array can be relative, such as /v2.
#START SWAGGER EDITOR ON SERVER DOWNLOAD#
Deprecated but still functional endpoints.ĭescription: File upload and download operationsĭescription: Override base path for all operations with the /files pathĭescription: Override base path for the GET /ping operation Relative URLs.
Different base URL for file upload and download operations,.
This is handy if some endpoints use a different server or base path than the rest of the API. The global servers array can be overridden on the path level or operation level. api.staging # Staging server SaaS and On-Premise servers:ĭefault: # SaaS server Regional Endpoints for Different Geographical Areas servers: Production, Development and Staging servers: The second example explicitly sets the HTTPS server as default, whereas the first example does not have a default server.
Single API definition for SaaS and on-premise APIs.ĭefault: https Note: These two examples are semantically different.
Regional servers in different geographical regions (example: Amazon Web Services).
SaaS (hosted) applications where each customer has their own subdomain.
Specifying multiple protocols (such as HTTP vs HTTPS).
Variable description is optional, but useful to have and supports Markdown ( CommonMark) for rich text formatting. In any case, a default value is required, which will be used if the client does not supply a value. Variables can have arbitrary values, or may be restricted to an enum. Unlike path parameters, server variables do not use a schema. Variables are indicated by in the server url, like so:ĭescription: Customer ID assigned by the service provider If the servers array is not provided or is empty, the server URL defaults to /:Īny part of the server URL – scheme, host name or its parts, port, subpath – can be parameterized using variables. Note: Server URL must not include query string parameters. If the server URL is relative, it is resolved against the server where the given OpenAPI definition file is hosted (more on that below). WebSocket schemes ws:// and wss:// from OpenAPI 2.0 are also supported in OpenAPI 3.0. The host can be a name or IP address (IPv4 or IPv6). Server URL format follows RFC 3986 and usually looks like this: You can also have multiple servers, for example, production and sandbox:ĭescription: Production server (uses live data)ĭescription: Sandbox server (uses test data) Server URL Format Each server has an url and an optional Markdown-formatted description. servers replaces the host, basePath and schemes keywords used in OpenAPI 2.0. In OpenAPI 3.0, you use the servers array to specify one or more base URLs for your API. For example, assuming the base URL of, the /users endpoint refers to. API Server and Base URLĪll API endpoints are relative to the base URL. If you use OpenAPI 2.0, see the OpenAPI 2.0 guide.
0 notes
Text
OAuth 2 on the Tumblr API
Ten years ago HTTPS wasn't as nearly as widespread as today. It is hard to believe that HTTPS was essentially opt-in, if available at all! Back then, people also had to get creative when inventing means to delegate access to someone else. One solution was OAuth 1, conceived by the IETF, later adopted by Tumblr in 2011.
Time went by, and here we are in 2021, with hardly any popular website not shielded with HTTPS (including your own blog!). Today, it wouldn't make much sense to adopt OAuth 1 as inconvenient as it is. Yet here we are, still asking people to use outdated protocols for their new fancy Tumblr apps. Not anymore!
Starting today, you have another option: we're officially opening up OAuth 2 support for the Tumblr API!
Get started
OAuth 2 flow requires you to know two key URIs:
For authorization requests, you should use /oauth2/authorize
To exchange authorization codes and refresh tokens, you'll need to use /v2/oauth2/token
If you're familiar with OAuth 2, register an application and check out our API documentation (specifically the section on OAuth 2) to get up and running.
The future of OAuth 1
There are no plans to shut down OAuth 1. Your app will continue to work as usual. But be sure to keep an eye on this blog just in case anything new pops up that would prevent us from serving OAuth 1 requests.
What's more, if you wish to adopt OAuth 2 in your app, given its superior simplicity, you don't have to migrate entirely to OAuth 2 at once. Instead, you can keep the old sign-up / log-in flow working, and exchange OAuth 1 access token to OAuth 2 tokens on the fly. There's only one catch: this exchange will invalidate the original access token, so you should be using only the OAuth 2 Bearer authentication for any subsequent requests.
Next steps
We'll be adding support for OAuth 2 to our API clients in the coming months. Follow this blog to learn firsthand when this happens.
Although we do support client-side OAuth 2 flow, we can't recommend using it unless absolutely required. We might harden it with PKCE someday, though.
That's all from us today. Happy hacking!
116 notes
·
View notes
Text
How To Set Up Your Own Discord Bot: A Guide [v13 update]
Step 1: Go to https://discord.com/developers/applications
Make sure you are signed in to discord. On the top right hand corner, you will see a button that says New Application. Get to clicking!

Step 2: You will be asked for a name. This could be any name, but preferably the one you want your bot to have. Make sure it has a cool name, like Potato Queen, or Jack the Ripped Bot.
Once you have done that, click Create.

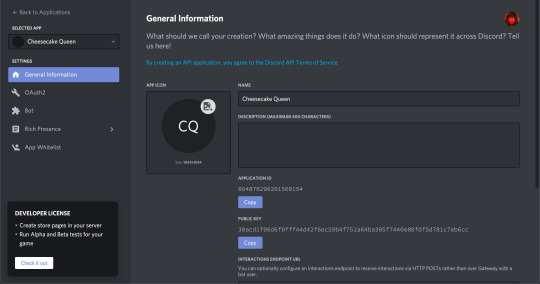
Step 3: You will come to a page that shows all the General Information. But you have not created your bot yet! This is just the application page. You can put in your App Icon, Description and the likes, before clicking on Bot at the side bar.
Step 4: You should reach a page with a button that says Add Bot. Well, what are you waiting for? Go ahead and click it!

A whole new page will pop up, with information about your new bot. Remember, you can’t destroy a bot, so make sure you’re definitely wanting a bot when you’re doing this.
From here, you can see your bot’s username as well as its profile picture. You can change it if you want.
IMPORTANT: There is also something called Token. YOU SHOULD NEVER SHOW THIS TO ANYONE ELSE. It is the one thing that will bring your bot to life (it basically controls your bot) and if it’s out in the open, it is best to regenerate a new one.
When you scroll down, you will see Authorization Flow. This is where you can choose to make your bot public or private. Making it public means that others can add it to their own servers, without your help. If it’s private, only YOU can add this bot to servers.

Step 5: Invite your bot into your server.
The link to do this should be: https://discord.com/oauth2/authorize?client_id=[clientidhere]&scope=bot&permissions=[permissionnumber]
An example is: https://discord.com/oauth2/authorize?client_id=707835242475421767&scope=bot&permissions=8 [this has admin permissions]
or you can just use: https://discord.com/oauth2/authorize?client_id=707835242475421767&scope=bot
And you’re done! At least with the application part.
NOW WE MOVE ON TO THE CODING PART. [Note: This is in JS because I love JS. Someday I might do a guide for Python too but we will see.]
The basic things you need:
1. Visual Studio Code
2. Node JS
You can see how to download either one from HERE.
Then, you will need to download discord.js.
Create a folder for your discord bot things, and then open up Visual Studio Code.
Create a new file called index.js and this will be your main page, where you get your bot running. The basic codes inside it would be:

TOKEN: Remember that token that I said you can’t tell anyone? Yeah, put it in there like client.login(”IWEUTWEITU”) where that keysmash is your token.
From here, if you’re using Visual Studio Code, just go to your console.
NOTE: If you do not know where to find the console, follow this:
Click Terminal from the top tab > New Terminal. This will pull up the console for you.
Make sure that the directory of your terminal is the place where your index.js file is at. If not, you can always use ls to list the different folders in that directory and cd to change into that directory as shown below:
My terminal was in the Github folder and I used ls to list all the folders in the Github folder. From there, I can see the cafe-bot folder where my hello.js file is located in. So I used cd cafe-bot to move into that folder.

From there, type npm install discord.js
Once you’re done with that, once again, type node index.js.
[Sometimes you might run into errors that let you know that “The term node is not recognized as the name of a cmdlet”. This either means that you have NOT installed Node JS, in which you can go to this post to see how to do it HERE
OR you might have some issues with directories in which you can look at this: https://www.youtube.com/watch?v=pg4t48BPmh8]
You should see “Bot is ready!” and with that, your bot is up!
Go ahead, explore it, enjoy it! You can do it!
#discord bot#discord js#discord.js#js#javascript#discord application#business guides#discord guide#discord beginner#coding#discord
83 notes
·
View notes
Text
Innovating on Authentication Standards
By George Fletcher and Lovlesh Chhabra
When Yahoo and AOL came together a year ago as a part of the new Verizon subsidiary Oath, we took on the challenge of unifying their identity platforms based on current identity standards. Identity standards have been a critical part of the Internet ecosystem over the last 20+ years. From single-sign-on and identity federation with SAML; to the newer identity protocols including OpenID Connect, OAuth2, JOSE, and SCIM (to name a few); to the explorations of “self-sovereign identity” based on distributed ledger technologies; standards have played a key role in providing a secure identity layer for the Internet.
As we navigated this journey, we ran across a number of different use cases where there was either no standard or no best practice available for our varied and complicated needs. Instead of creating entirely new standards to solve our problems, we found it more productive to use existing standards in new ways.
One such use case arose when we realized that we needed to migrate the identity stored in mobile apps from the legacy identity provider to the new Oath identity platform. For most browser (mobile or desktop) use cases, this doesn’t present a huge problem; some DNS magic and HTTP redirects and the user will sign in at the correct endpoint. Also it’s expected for users accessing services via their browser to have to sign in now and then.
However, for mobile applications it's a completely different story. The normal user pattern for mobile apps is for the user to sign in (via OpenID Connect or OAuth2) and for the app to then be issued long-lived tokens (well, the refresh token is long lived) and the user never has to sign in again on the device (entering a password on the device is NOT a good experience for the user).
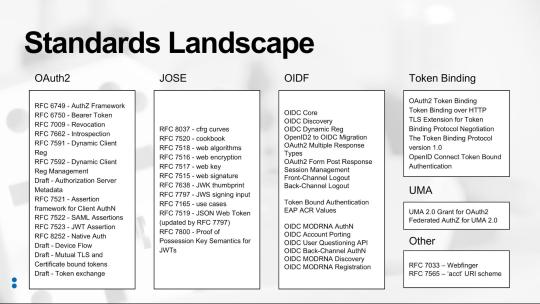
So the issue is, how do we allow the mobile app to move from one identity provider to another without the user having to re-enter their credentials? The solution came from researching what standards currently exist that might address this use case (see figure “Standards Landscape” below) and finding the OAuth 2.0 Token Exchange draft specification (https://tools.ietf.org/html/draft-ietf-oauth-token-exchange-13).
The Token Exchange draft allows for a given token to be exchanged for new tokens in a different domain. This could be used to manage the “audience” of a token that needs to be passed among a set of microservices to accomplish a task on behalf of the user, as an example. For the use case at hand, we created a specific implementation of the Token Exchange specification (a profile) to allow the refresh token from the originating Identity Provider (IDP) to be exchanged for new tokens from the consolidated IDP. By profiling this draft standard we were able to create a much better user experience for our consumers and do so without inventing proprietary mechanisms.
During this identity technical consolidation we also had to address how to support sharing signed-in users across mobile applications written by the same company (technically, signed with the same vendor signing key). Specifically, how can a signed-in user to Yahoo Mail not have to re-sign in when they start using the Yahoo Sports app? The current best practice for this is captured in OAuth 2.0 for Natives Apps (RFC 8252). However, the flow described by this specification requires that the mobile device system browser hold the user’s authenticated sessions. This has some drawbacks such as users clearing their cookies, or using private browsing mode, or even worse, requiring the IDPs to support multiple users signed in at the same time (not something most IDPs support).
While, RFC 8252 provides a mechanism for single-sign-on (SSO) across mobile apps provided by any vendor, we wanted a better solution for apps provided by Oath. So we looked at how could we enable mobile apps signed by the vendor to share the signed-in state in a more “back channel” way. One important fact is that mobile apps cryptographically signed by the same vender can securely share data via the device keychain on iOS and Account Manager on Android.
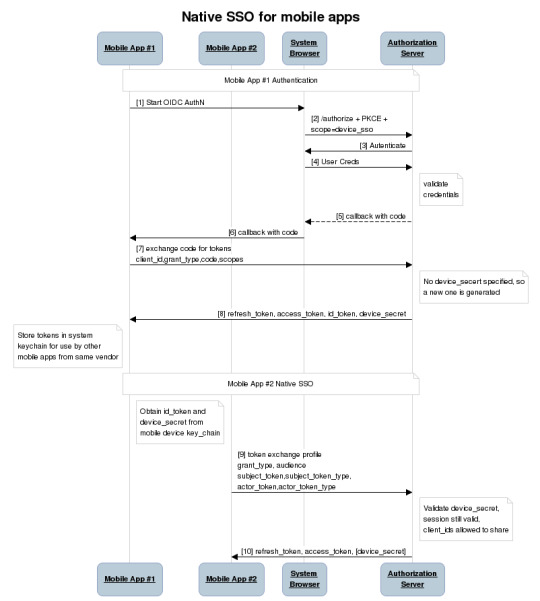
Using this as a starting point we defined a new OAuth2 scope, device_sso, whose purpose is to require the Authorization Server (AS) to return a unique “secret” assigned to that specific device. The precedent for using a scope to define specification behavior is OpenID Connect itself, which defines the “openid” scope as the trigger for the OpenID Provider (an OAuth2 AS) to implement the OpenID Connect specification. The device_secret is returned to a mobile app when the OAuth2 code is exchanged for tokens and then stored by the mobile app in the device keychain and with the id_token identifying the user who signed in.
At this point, a second mobile app signed by the same vendor can look in the keychain and find the id_token, ask the user if they want to use that identity with the new app, and then use a profile of the token exchange spec to obtain tokens for the second mobile app based on the id_token and the device_secret. The full sequence of steps looks like this:
As a result of our identity consolidation work over the past year, we derived a set of principles identity architects should find useful for addressing use cases that don’t have a known specification or best practice. Moreover, these are applicable in many contexts outside of identity standards:
Spend time researching the existing set of standards and draft standards. As the diagram shows, there are a lot of standards out there already, so understanding them is critical.
Don’t invent something new if you can just profile or combine already existing specifications.
Make sure you understand the spirit and intent of the existing specifications.
For those cases where an extension is required, make sure to extend the specification based on its spirit and intent.
Ask the community for clarity regarding any existing specification or draft.
Contribute back to the community via blog posts, best practice documents, or a new specification.
As we learned during the consolidation of our Yahoo and AOL identity platforms, and as demonstrated in our examples, there is no need to resort to proprietary solutions for use cases that at first look do not appear to have a standards-based solution. Instead, it’s much better to follow these principles, avoid the NIH (not-invented-here) syndrome, and invest the time to build solutions on standards.
36 notes
·
View notes
Text

Spring Security Oauth2 with Keycloak – PKCE Authorization Code Flow https://www.analyticsvidhya.com/blog/2022/06/spring-security-oauth2-with-keycloak-pkce-authorization-code-flow/?utm_source=dlvr.it&utm_medium=tumblr
0 notes
Text
XRPL's Xumm Wallet Gets Major Update, Inspired by Web2 Standard
XRPL’s Xumm Wallet Gets Major Update, Inspired by Web2 Standard
XRP Ledger’s leading wallet solution, Xumm Wallet, has added a login method similar to that of web2. So, in a recent update, XRPL developers rolled out the OAuth2 “PKCE Authorization Code” flow to allow users and developers to log in to their Xumm wallets using an XRPL account. With this implementation, the Xumm Wallet team aims to create a web3 product with the ease of use of web2.
A convenient…

View On WordPress
0 notes
Text
Configure IdentityServer for Xamarin Forms
In this new post, I explain how to configure IdentityServer for Xamarin Forms to integrate Web Authenticator using Xamarin Essentials.
First, I wrote a post about how to implement the authentication in Xamarin Forms with IdentityServer. So, my focus was only on the Xamarin side. Here I want to explain what the IdentityServer configuration is in order to succeed in the login.
Create a new client
Have you ever wondered how hard it would be to set up a minimal viable authentication server that uses industry standards and usable from your mobile Xamarin application? Well, I have, and I believe in having found a solution that can be a great starting point and will allow you to expand the answer should you ever need to do so.
One common industry standard is OpenID / OAuth2, which provides a standardized authentication mechanism that allows user identification securely and reliably. You can think of the identity service as a web server that identifies a user and provides the client (website/mobile app, etc.) to authenticate itself with another application server that said client uses.
The recommended flow for a mobile app
While the OAuth standard is open to anyone with a computer and an internet connection, I generally do not recommend writing your own implementation. My go-to solution for setting up an identity provider is the IdentityServer.
IdentityServer4 is built based on the OAuth spec. It is built on the trusted ASP.NET Core but requires quite some know-how to get the configurations and other settings ready for use. Luckily, there is a quickstart template that you can install via the dotnet command line and then make your server. You can find the repository here on GitHub. After following the install instructions, we can create a server with the following command:
dotnet new sts -n XamarinIdentity.Auth
The solution is pretty much ready to go but let’s look at the configuration of the IdentityServer in Config.cs and make some adjustments in the GetClients method.
Add a client
Based on the template, let’s make some changes that leave us with the following final configuration:
public static IEnumerable<Client> GetClients(IConfigurationSection stsConfig) { return new List<Client> { // mobile client new Client { ClientName = "mobileclient-name-shown-in-logs", ClientId = "the-mobileclient-id-of-your-choice", AllowedGrantTypes = GrantTypes.Code, AllowOfflineAccess = true, // allow refresh tokens RequireClientSecret = false, RedirectUris = new List<string> { "oidcxamarin101:/authorized" }, PostLogoutRedirectUris = new List<string> { "oidcxamarin101:/unauthorized", }, AllowedScopes = new List<string> { "openid", "role", "profile", "email" } } }; }
Generally, you can set the ClientName, ClientId, RedirectUris and PostLogoutRedirectUris to values of your choosing. The scopes represent the defaults. Further note that by setting AllowOfflineAccess to true, the user can request refresh tokens which means that as long as the refresh token is valid, the user will not have to log in but can use said refresh token to request a new access token. In mobile apps, this is generally the prefered behaviour since users usually have their personal device and therefore expect the app to “store” their login.
As you can see, The RedirectUris and PostLogoutRedirectUris are using a custom URL oidcxamarin101:/ that identifies my app.
IdentityServer Admin
So, very often we have to create the front-end to manage users, integrate the authentication with external services suck as Facebook and Twitter, make API calls secure. IdentityServer offers a nice UI for administration but it is quite expensive. Now, I found a very nice work on GitHub: Skoruba.IdentityServer4.Admin.
This is cool! The application is written in ASP.NET Core MVC using .NET5.
Skoruba IdentityServer4 Admin UI
Add a new client
So, adding a new client with this UI is quite easy. In the IdentityServer Admin website, create a new Client. Then, the important configuration are:
Under Basic
Add this RedirectUris : oidcxamarin101:/authenticated
Allowed Grant Types: authorization_code
Under Authenticaton/Logout
Add Post Logout Redirect Uris: oidcxamarin101:/signout-callback-oidc
Basic configuration
Authentication/Logout configuration
I hope this is useful! Do you know Microsoft is releasing .NET MAUI that will replace Xamarin? Here how to test it with Visual Studio 2022.
If you have any questions, please use the Forum. Happy coding!
The post Configure IdentityServer for Xamarin Forms appeared first on PureSourceCode.
from WordPress https://www.puresourcecode.com/dotnet/xamarin/configure-identityserver-for-xamarin-forms/
1 note
·
View note
Text
Top Practices to enhance Mobile App Security for Developers!

Mobile apps have brought a revolutionary shift in everything around us. It has made a paradigm shift in how businesses and individuals operate in their respective capacities. This has helped to connect with the target audience very easily thereby boosting the profits in a big way. No wonder there is a huge demand for mobile application development worldwide. However, with the development of apps, come security nuances that businesses should not ignore. If the apps are not well-engineered against security threats, they can become an easy target for hackers to do malicious activities. So, companies must ensure that they proactively work on ‘how to build secured apps’ and also follow certain mobile app security standards during the development process.
Do you know what the hackers with malicious intention do?
Tamper your app’s code and reverse-engineer to create a hoax app containing malware.
Hack customer data and use for fraud or identity theft
Induce malware in the apps to access data, grab passcodes for screens, store keystrokes, etc.
Steal sensitive data, intellectual property, business assets, etc.
Access your IP and launch harmful attacks
Would you ever want something like this happening to your app? Never! So, mobile app security cannot be taken for granted. Yet, it is quite shocking that over 75% of the mobile apps fail to meet the basic security standards.
This blog outlines some of the crucial mobile app security measures that every mobile application development company must employ while they architecture their apps. Before we delve deeper, let us quickly glance at some common security lapses that could occur while architecting secured mobile apps.
Notable Security Lapses in the Mobile Application Development Process
Not checking the cache appropriately and not using a cache cleaning cycle
Not doing thorough testing of the app
Applying weak encryption algorithms or no algorithms at all
Utilizing an unreliable data storage system
Neglecting the Binary protection
Picking up a code written by hackers by mistake
Neglecting the transport layer security
Not ensuring the server-side security
Mobile App Security Best Practices

Here are a few common security tips that are endorsed by various industry experts. These are applicable to both Android and iOS apps; however, some additional tips and guidelines are available for both platforms, which we will cover in another blog. That simply means, after applying the below practices, one can also implement best security practices for iOS app and Android app meant for respective platforms. For now, let’s get started with the common security measures for mobile apps.
App-code Encryption:
Encryption of the code and testing it for vulnerabilities is one of the most fundamental and crucial steps in the app development process. Before launching the app, mobile app developers protect the app code with encryption and practices like obfuscation and minification. Also, it is necessary to code securely for the detection of jailbreaks, checksum controls, debugger detection control, etc.
Data Encryption:
Along with the code encryption, it is essential to encrypt all the vital data that is exchanged over the apps. In the case of data theft, hackers shouldn’t be able to access and harm the data without the security key. So, key management must be a priority. File-level encryption secures the data in the files. The encryption of mobile databases is equally important. Also, various data encryption algorithms can be used like Advanced Encryption Standard (AES), Triple data integration standard, RSA technique, etc.
Robust Authentication:
If the authentication is weak, severe data breaches can take place. Hence, it is imperative to ensure a powerful authentication in the apps. Make sure that your app only allows strong passwords. Utilizing two-factor authentication is a good practice. Also, biometric authentications like a fingerprint, retina scan, etc. are widely being used these days in mobile apps to assure high security.
Protecting the Binary Files:
Negligence towards binary protection gives a free-hand to hackers for injecting malware in apps. It can even cause severe data thefts and lead to monetary losses ultimately. Therefore, binary hardening procedures must be utilized to ensure the protection of binary files against any threats. Several hardening techniques like Buffer overflow protection or Binary Stirring can be applied in this scenario.
Servers’ and other Network Connections’ Security:
The security of servers and network connections is an integral part of mobile app security as these are a leading target of hackers. To keep them secure, it is advisable to use an HTTPS connection. Also, the APIs must be thoroughly verified to shun from the spying of data that is transferred from the client to servers. Another security measure is to scan the app with the use of automated scanners frequently. Also, enhanced security can be ensured with encrypted connections or VPN i.e. a virtual private network.
API Security:
Since mobile application development hinges so much with the APIs, protecting them from threats is not an option but a necessity. APIs are the channels for the flow of data, functionality, content, etc. between the cloud, apps, and users. Vital security measures like authorization, authentication, and identification help in the creation of a secure and robust API. To enhance the app security, an API gateway can be integrated. Moreover, for secure communication between APIs, mobile app developers can use various authentications like OAuth and OAuth2.
Exhaustive Testing and Updating the Apps:
To speed up the time-to-market, testing usually falls to the sideways. But this step helps to avoid any anticipated security loopholes in the apps. So, before launching the apps and even after their launch, rigorous security testing must be conducted. Thus, potential security threats can be identified and resolved proactively. Also, updating the apps from time-to-time will help to eliminatethe security bugs apart from other issues that arise in the apps after it is out in the market.
Code Signing Certificates:
Code signing certificates help in enhancing mobile code security. In this process, the certificate authority needs to digitally sign the scripts and executables. These certificates help in authenticating the author and assure that the code won’t be edited or tampered by anyone else. A Code Signing Certificate is a must for every publisher or mobile app developer.
Final Verdict:
Thousands of mobile apps arrive in the market daily, but if, they aren’t protected well, they can pose a threat to the entire ecosystem. Needless to say, hackers and fraudsters are lurking around to steal important data and destroy app security. On the contrary, a well-secured mobile app can prove to be highly efficient, reliable, and profitable for the business as well as the end-users.
So we can conclude that mobile app security holds the utmost importance in the whole process. A smart strategy along with the guidelines mentioned in this blog can help you build a powerful impeccable app with high-level security.
To know more about our core technologies, refer to links below
React Native App Development Company
Angular App Development Company
Ionic App Development Company
0 notes
Link
Lightning Web Components is our open source UI framework to build enterprise-scale apps that run on Salesforce, Heroku, Google Cloud Platform, or anywhere else. When running these apps on these different platforms, you can choose your own backend stack and data source, or you may want surface data from Salesforce in them. In this blog post, we will explore some options and considerations when using Salesforce as the data source. Authentication Salesforce provides a comprehensive set of REST and SOAP APIs that can be used to access its data and services from a client or server. The first step before accessing the APIs, is to establish a session with Salesforce. You can either use a username and password, or any of the OAuth flows listed here. Depending on your use case, these flows can be executed by client-side or server-side JavaScript. You can either build this logic from scratch or use external libraries like JSforce. Here are some considerations when deciding on an Authentication Flow for your app. Client Side Authentication You can use the OAuth User-Agent Flow to execute the handshake process using client side JavaScript alone. It involves a simple redirection to the /oauth2/authorize endpoint and takes in the Consumer Key of a Connected App as a parameter. Once the authorization is successful, the access token is encoded in the redirection URL. When you run client-side JavaScript, all the code is executed on the user’s device, so sensitive data like passwords and client secrets are accessible and exploitable. For this reason, this flow doesn’t use the client secret. However, the access token is encoded into the redirection URL which is exposed to the user and other apps on the device. Hence, care must be taken to remove callbacks from browser history. You can call window.location.replace(); to remove the callback from the browser’s history. It is best to use this type of Auth flow when building Lightning Web Components for desktop or mobile apps that have an embedded browser. Once you have the access token, you can pass it in the header of any HTTP requests to access Salesforce APIs. Building and sending a request from client-side JavaScript poses a risk, because the access token becomes available to the client and can be exploited. Therefore, sensitive business logic involving access tokens, usernames and passwords must never be written in client side JavaScript, because they are inadvertently exposed. To increase security and provide a better level of abstraction between your custom application and the APIs, you should use a middleware like Express, MuleSoft or any other ESB of your choice. Server Side Authentication You can use the Web server flow or the JWT Bearer flow to execute the handshake process using server side JavaScript like Node JS or any other stack of your choice. In case of Lightning Web Components, the create-lwc-app tool provides an option to create and use an Express server as a backend. You can choose an OAuth flow that suits your requirements. For instance, you can use the JWT Bearer flow when you want to use a single integration user to access data on behalf of all users. Use cases include showing read-only data (e.g. product catalog) to unauthenticated users. The web-server flow on the other hand can be used for per-user authorization. Use cases include websites where data relevant to the logged in user is shown (e.g. cart, order history etc.). You can also refer to this Trailhead Module that talks in detail about the use cases for different OAuth flows. When running authentication flows on a server, it is expected that the server protects and securely stores all the secrets. In the case of Web Server flow, the client secret that prevents a spoofing server must be stored securely. In the case of JWT Bearer flow, an X509 Certificate that corresponds to the private key of the app must be created and stored in a keystore. These secrets and certificate aliases also have to be configurable (generally using Environment Variables) and should never be hardcoded into your codebase. This also allows you to change them without rebuilding the app and to deploy instances of your app in different environments with ease. When developing locally, for example with Node.js, these are stored in a .env file, which can then be accessed in your code by using libraries like dotenv, saving you the trouble of setting them manually every time. You should exclude sensitive configuration files like .env from version control by referencing them in specific files like .gitignore for git. Data Residency Securing access to Salesforce data doesn’t stop with authentication. Data must be stored and transmitted securely as well. Data on the Salesforce Platform is secured with its core security capabilities like Sharing Model, Object and Field Level Security and optionally Salesforce Shield for encryption and high compliance. Using Salesforce APIs allows you real time access to data without making a copy of it. The data returned by the API is bound by the permissions of the user accessing the API. Depending on your use case, you might want to replicate Salesforce data into a local/managed database. Since you can deploy Lightning Web Components Open Source (LWC OSS) apps on any platform, there are different options that each platform provides for data storage and replication. For example, Heroku Connect is an add-on by Heroku that provides a data synchronization service between Salesforce and Heroku Postgres databases. Add-Ons/Connectors like these are built to securely store tokens, and establish a session with Salesforce when needed. It is important to remember that once data is replicated locally, it is not bound by the same Sharing Model that is present in Salesforce. It is therefore necessary to implement your own access control mechanism. Also, never write the logic that queries for data or filters data based on access controls on the client side, because it can be easily tampered with. In the screenshot below, an if condition is being used by the component to only show the data relevant to the logged in user. This statement can be easily removed using browser tools which would then give the logged in user access to all the data that is being returned by the server. As a best practice, you should always use a middleware to abstract sensitive logic from the client-side and make sure that the middleware returns only the data that’s relevant to the user and nothing more. Summary In this blog post, you’ve learned about different approaches to authenticate to Salesforce from an app built with LWC OSS and what factors determine the approach you take. You’ve seen drawbacks of accessing data from the client side, and how a server can help you secure your implementation. You’ve also seen how the responsibility of data security varies with choice of data residency. However, it is also important to note that this blog post doesn’t exhaustively list all of the options available for secure Salesforce data access, but instead provides general indication patterns and principles that are used. Now it’s time to get hands-on! Below are a few resources to help you get started. Sample Code Lightning Web Components OSS foundation and documentation Trailhead Project: Access Salesforce Data with Lightning Web Components Open Source Trailhead Module: Connected App Basics About the Author Aditya Naag Topalli is a 13x Certified Senior Developer Evangelist at Salesforce. He focuses on Lightning Web Components, Einstein Platform Services, and integrations. He writes technical content and speaks frequently at webinars and conferences around the world. Follow him on Twitter @adityanaag.
0 notes
Text
OAuth2のリソースを自動化スクリプトのエンドポイントを使ってアクセスする
IBM Maximo CommunityにてOAuthハンドラーについての質問が挙がっていました。標準のOAuthエンドポイントはOAuth 1プロトコルのみサポートしており、かつOSLCアプリケーションからのみアクセスできるようです。Maximo 7.6.1.2ではE-mail リスナーでOAuth2のサポートが追加されています。こちらはGMailなどの認証に使われるもので統合IF (MIF) で使われることは想定していないようです。MIFでOAuth2リソースにアクセスするには自前で実装する必要があります。
OAuth2 認証フロー
OAuth2にはフロート呼ばれるいくつかの認証プロトコルが規定されています。こちらのサイトにはOAuth2 フローが解説されています。どのフローをサポートすべきかはどのフローがアクセスしたいリソースで提供されているかに依ります。例えば、GmailなどのGoogle APIではAuthorization code flowが提供されています。また、Microsoft Identity platformではサーバー間やデバイス・サーバー間で主に使用されるClient credential flowがサポートされています。本記事では多くのサービスで提供されている Authorization code flow の リフレッシュ・トークン・フローを実装してみたいと思います。
自動化スクリプトを使ったエンドポイント
OAuth2プロトコルではHTTPアクセスの際にリフレッシュ・トークン・フローによってトークンを取得する必要があります。これを自動化スクリプトを使ったエンドポイントを利用して標準のHTTPHandlerの実行前にスクリプトを挟み込む形で実装します。自動化スクリプトを使ったエンドポイントの実装はこちらのブログが参考になります。エンドポイントの定義にはハンドラー定義にScriptRouteHandlerを追加し、それを指定したエンドポイントのプロパティに自動化スクリプト名を入力します。スクリプトではrequestDataとresponseDataという特別な変数が定義されており、それぞれエンドポイントがMaximoから受け取るデータと返すデータに該当します。エンタープライズ・サービスなどからデータをこのエンドポイントにデータを送信すると、requestDataにはXMLのバイト列が入力されます。自動化スクリプトではエンドポイントを呼び出すことができますので、この要求・応答を使って標準のHTTPhandlerに流し込むことが可能です。
実装方法
OAuth2を実装するには以下の3つが必要になります。
OAuth2のClient IDとRefresh Tokenを格納するテーブル
Refresh token flowを実行する自動化スクリプト
自動化スクリプトのHTTPエンドポイント
エンドポイントには静的な情報のみ入力できるので、リクエストごとに認証情報をキャッシュしておくようなテーブルが必要になります。OAuth2のアクセス・トークンとそのリフレッシュ・トークンは変更される可能性があるため、エンドポイントのプロパティーに格納しておくことはできません。
まずはテーブルを定義しましょう。

属性定義は以下になります。アクセストークンは期限 (EXPIREAT) が切れるまで再利用されます。

次に自動化スクリプトの実装になります。

スクリプトはこちらです。
https://gist.github.com/nishi2go/e7f97032eaac2d741c4526aa4c99829a
最後に、自動化スクリプトの定義になります。上記で作成したスクリプト名をSCRIPTプロパティーにセットしてください。ハンドラーの作成はこちらを参考にしてください。

テスト
自動化スクリプトで呼び出す先のエンドポイントを作成します。以下の例ではMaximoのPingサービスにアクセスします。

OAuth2のフローをテストするにはOAuth Toolsを使用します。以下のようにAuthorization codeを取得します。

こちらのコードを上記で作成したテーブルに入力します。テーブル入力はSQLで直接書き込むか、カスタムアプリを作成します。以下はカスタムアプリの例です。

実際に実行した結果はこちらになります。OAuth Toolsにより取得されたアクセストークンはログに出力されています。フローでエラーが出ている場合は何らかのエラーメッセージが表示されているはずです。

今回は自動化スクリプトを使ってOAuth2リソースにアクセスできるエンドポイントの作成方法について解説しました。この他にも特殊なアクセス方法を要求するHTTPリソースなどにも応用できると思います。
0 notes
Last Seen Blogs

pjmg
題名未設定

khytal
clay terran if you're under there

bikes4me
Untitled

hildcit
Hi! o/

kumquatrec
KUMQUAT Records