#oauth2 authorization server
Explore tagged Tumblr posts
Visit Tumblr Blog
Explore Tumblr blogs with no restrictions, modern design and the best experience.
Last Seen Tumblr Blogs


Fun Fact
Tumblr posted its first advertisements in May 2012 and subsequently earned $13M in revenue.
Text
PSA: A pretty clever phishing email
I got a message warning me that my Twitter account was about to be suspended for suspicious activity, inviting me to click a button to prevent this. The URL the button went to *was* an x.com link, but it used a security vulnerability in Twitter's backend that allowed redirections to push me to an OATH server that would prompt me for my Twitter login and 2FA, and then send the attacker a valid token they could use to take over my account.
Here's the (redacted) attack link:
https://x.com/ [BREAK INSERTED] i/oauth2/authorize?response_type=code&client_id= [UNIQUE ID REMOVED] Q&redirect_uri=https%3A%2F%2Ftwo.opensourced.us%2Fapi%2Fcallback%3Fi%3Dtwit&scope=tweet.read+users.read+mute.write+tweet.write+tweet.moderate.write+offline.access&code_challenge= [UNIQUE ID REMOVED] &code_challenge_method=plain
123 notes
·
View notes
Text
I am happy to announce that MochiDex is now officially public and you can now invite it to your servers. The bot allows you to catch, collect, and trade mochis.
Each mochi has its own card that includes art, their stats and their ability. Currently around half the mochi's have original art in their card, but eventually every mochi will have art! The art has been made by many different artists in the fandom and I hope you enjoy their work .
Right now we have added 64 mochis, but we don't plan on stopping until every Hetalia character is in the bot . Only 29 of these mochis were designed by Himaruya, so we have had to design mochis for most of the cast.
MochiDex Setup:
Click this link that allows you to invite the bot: https://discord.com/oauth2/authorize?client_id=1151205638521770035&scope=bot+applications.commands&permissions=537193536
Once the bot joins the server an admin needs to do the "/config channel" command to choose in which channel they would like the mochis to spawn
After doing that you just have to wait! The mochis can take around 45 to 55 minutes to spawn, they can spawn even earlier, it all depends on server activity!
4. Whichever mochi spawns depends on it's rarity, each mochi has a rarity which decides its chance to spawn. Some mochis like America are very rare, and others like Latvia are very common. Keep that in mind when trading
Oh and by the way, currently until November 3, the bot is having a Halloween event during which you can get rare "spooky" variants that change the card's theme.


We also have a discord server where you can find the rarity list, see updates and make questions/suggestions! Feel free to join!
#aph#hws#hetalia#mochitalia#aph italy#hws italy#aph germany#hws germany#aph japan#hws japan#aph england#hws england#aph spain#hws spain#aph greece#hws greece#aph australia#hws australia#aph finland#hws finland#aph sweden#hws sweden#aph austria#hws austria#aph hungary#hws hungary#aph portugal#hws portugal
67 notes
·
View notes
Text
You can learn NodeJS easily, Here's all you need:
1.Introduction to Node.js
• JavaScript Runtime for Server-Side Development
• Non-Blocking I/0
2.Setting Up Node.js
• Installing Node.js and NPM
• Package.json Configuration
• Node Version Manager (NVM)
3.Node.js Modules
• CommonJS Modules (require, module.exports)
• ES6 Modules (import, export)
• Built-in Modules (e.g., fs, http, events)
4.Core Concepts
• Event Loop
• Callbacks and Asynchronous Programming
• Streams and Buffers
5.Core Modules
• fs (File Svstem)
• http and https (HTTP Modules)
• events (Event Emitter)
• util (Utilities)
• os (Operating System)
• path (Path Module)
6.NPM (Node Package Manager)
• Installing Packages
• Creating and Managing package.json
• Semantic Versioning
• NPM Scripts
7.Asynchronous Programming in Node.js
• Callbacks
• Promises
• Async/Await
• Error-First Callbacks
8.Express.js Framework
• Routing
• Middleware
• Templating Engines (Pug, EJS)
• RESTful APIs
• Error Handling Middleware
9.Working with Databases
• Connecting to Databases (MongoDB, MySQL)
• Mongoose (for MongoDB)
• Sequelize (for MySQL)
• Database Migrations and Seeders
10.Authentication and Authorization
• JSON Web Tokens (JWT)
• Passport.js Middleware
• OAuth and OAuth2
11.Security
• Helmet.js (Security Middleware)
• Input Validation and Sanitization
• Secure Headers
• Cross-Origin Resource Sharing (CORS)
12.Testing and Debugging
• Unit Testing (Mocha, Chai)
• Debugging Tools (Node Inspector)
• Load Testing (Artillery, Apache Bench)
13.API Documentation
• Swagger
• API Blueprint
• Postman Documentation
14.Real-Time Applications
• WebSockets (Socket.io)
• Server-Sent Events (SSE)
• WebRTC for Video Calls
15.Performance Optimization
• Caching Strategies (in-memory, Redis)
• Load Balancing (Nginx, HAProxy)
• Profiling and Optimization Tools (Node Clinic, New Relic)
16.Deployment and Hosting
• Deploying Node.js Apps (PM2, Forever)
• Hosting Platforms (AWS, Heroku, DigitalOcean)
• Continuous Integration and Deployment-(Jenkins, Travis CI)
17.RESTful API Design
• Best Practices
• API Versioning
• HATEOAS (Hypermedia as the Engine-of Application State)
18.Middleware and Custom Modules
• Creating Custom Middleware
• Organizing Code into Modules
• Publish and Use Private NPM Packages
19.Logging
• Winston Logger
• Morgan Middleware
• Log Rotation Strategies
20.Streaming and Buffers
• Readable and Writable Streams
• Buffers
• Transform Streams
21.Error Handling and Monitoring
• Sentry and Error Tracking
• Health Checks and Monitoring Endpoints
22.Microservices Architecture
• Principles of Microservices
• Communication Patterns (REST, gRPC)
• Service Discovery and Load Balancing in Microservices
1 note
·
View note
Text
How to archive a Discord channel
I'm going to say this way ahead of time: this is going to be waaaaaaay more of an annoying process than it should be. Discord should allow exporting the channel history to server owners, without the need of doing all this. I won't blame you if you give up.
Get the DiscordChatExporter application to download the chat history
This program has two versions
one that has a graphical interface, but works on Windows only
one that has a command line interface, but works on Windows, Linux and macOS
This guide covers the first. The second one maybe next time, in another post. The second version also makes it easier to download every channel on the server.
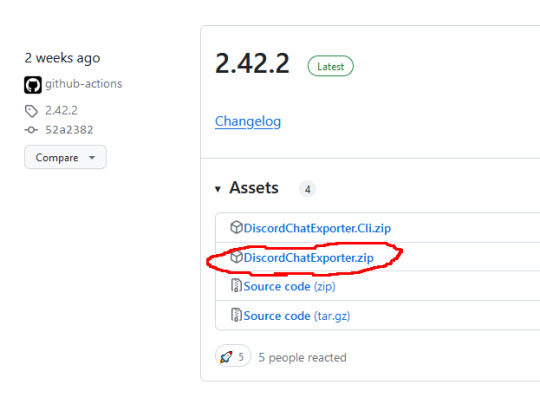
Step 1: Go to here, and download the latest version in the zip file named DiscordChatExporter.zip
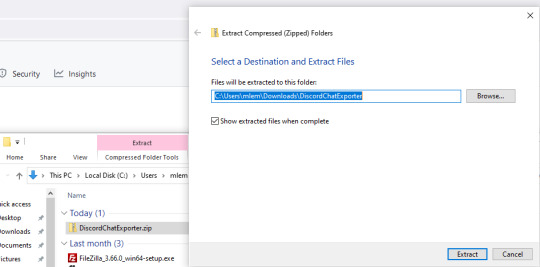
Step 2: Unpack the zip file
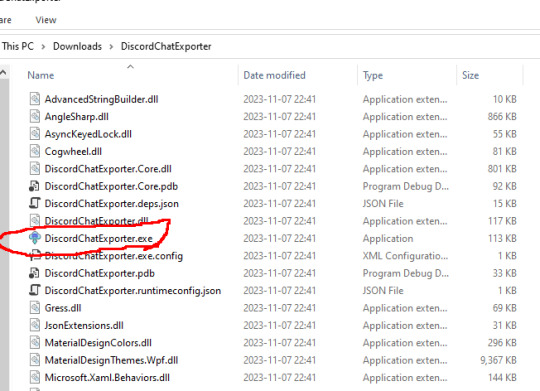
Step 3: Run DiscordChatExporter.exe
Step 4: Dismiss the scary looking warning as this will show up for any program that which developer can't afford paying $629 a year.

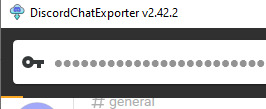
Step 5: Close the welcoming message and you'll see the application interface:
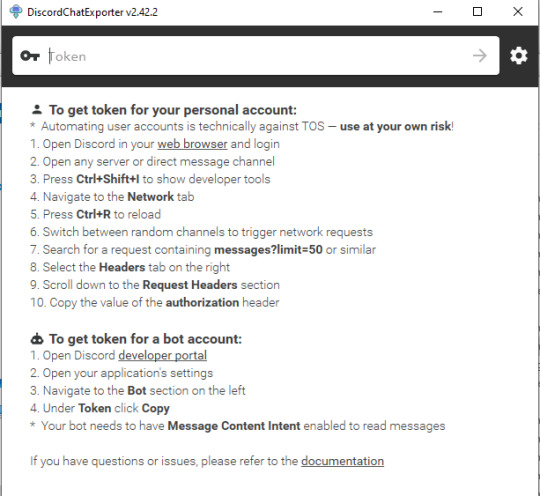
Prepare an access token. Do not share it to anyone else - treat it the same way as you treat your password.
There are two ways to do it:
Approach 1: use your own access token, will work with any channel you're able to access, including Direct Messages, but it is a violation of Discord Terms of Service, and therefore your Discord account could get banned for it. Use at your own risk.
Follow the instructions here, which are fairly detailed step-by-step instructions for Chrome, Firefox, and also the desktop app. I'm gonna expand more on approach 2 as I had to figure it out myself, and the current instructions for approach 2 are not really adequate enough. If you go with approach 1, skip down the entire section below, until the "Paste the token in the Token textbox and click the arrow button" section.
Approach 2: create a bot account, invite it to your server, and use its access token. This process assumes you have enough privileges to invite bots to the server ("Manage Server" permission), and therefore, but is also 100% okay as far as Discord's Terms of Service are concerned. It is also generally safer, as accidental leaking of the token will not risk you losing your user account.
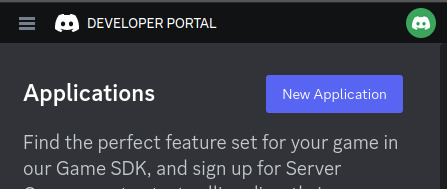
Step 1: Go to the Discord developer portal.
Step 2: Create a new application by clicking the "New Application" button
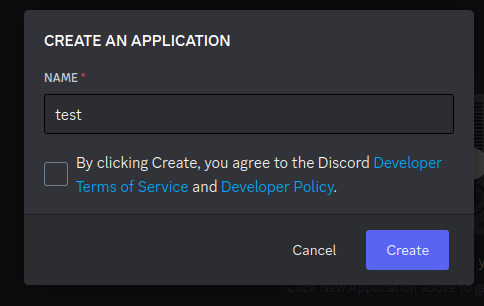
Step 3: Name it however you want, I personally named it "mlemgrab". Agree to the scary sounding long ass terms of service.
Step 4: Go to the Bot section, scroll down to the "Privileged Gateway Intents"

Step 5: Enable the "Message Content Intent". We don't have to worry about the "if your bot is in more than 100 servers" part because our bot will never be in this many servers.
Step 6: Save changes by pressing the green button "Save Changes"

Step 7: Go to "OAuth2" followed by "URL Generator"
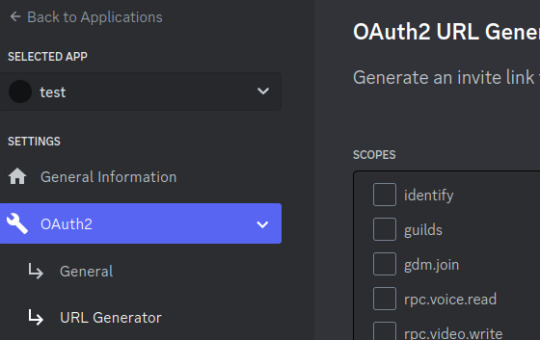
Step 8: Select the "bot" scope and then "Read Messages/View Channels" and "Read Message History" permissions

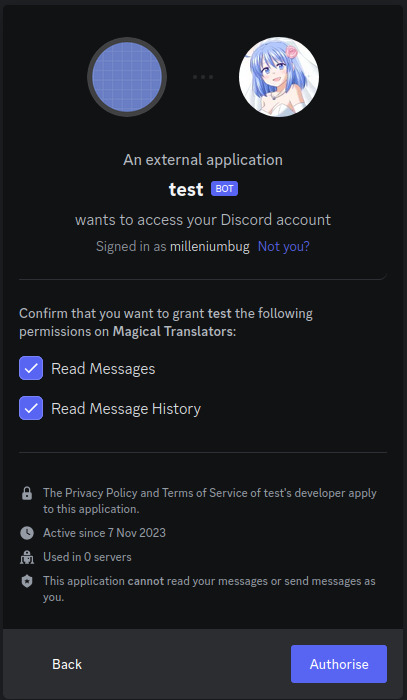
Step 9: Copy the link at the bottom and visit it:
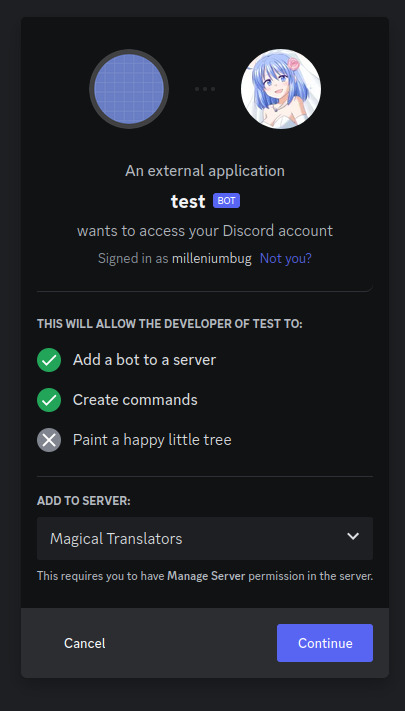
Step 10: Press "Continue", and approve the required permissions by clicking Authorize. Once you do it, the bot account is on the server.
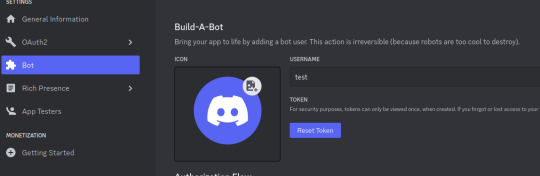
Step 11: Go to "Bot" and click the "Reset Token" button to get the token that will allow you to act (in our case, getting all the messages) using the bot user. If you lose that token, you can click reset again to get a new one.
Paste the token in the Token textbox and click the arrow button

Select the server, and then the channel you want to archive

Click the download button on the bottom right

Select where you want to save it, and the format. HTML is good for easy browsing and preview in a web browser, JSON is good for further processing (let's say someone else later writes a program for importing the conversation elsewhere).
For archivization purposes I recommend saving in both HTML and JSON.
Click "More" for more options.

By default the program will not download any message attachments nor avatars or emotes. If you want that, select "Download assets" option. Preferably while also selecting the "Reuse assets" option and selecting a single directory for assets if you want to archive multiple channels.
You can also select the specific time range and using the partition limit - split the archive into several files each containing N messages.
Press Export. Wait. The progress bar will move very slowly.
Once it is done, you should be able to open the HTML file with your web browser.
Treat anything on Discord as media that will be lost
Do not use Discord to host your files. Do not rely on Discord to preserve your text. DO NOT RELY ON DISCORD FOR ANY KIND OF PRESERVATION OR HOSTING!!
It CAN be lost, it WILL be lost! You must consider Discord as a part of the Core Internet, controlled by one company that hosts the servers.
I thought it was impressive at first that it replaced IRC, but now I am horrified. If the company behind Discord went under today, how many friends would you lose?
How many relationships? How much writing?
You may think this won't happen, but I remember when AIM went down and along with it, entire novels worth of interaction with my oldest friend.
IT CAN HAPPEN TO YOU. IT WILL HAPPEN AGAIN. NO COMPANY IS INFALLIBLE.
Back up your files! Download anything you've saved to Discord NOW, before the API changes go into effect! And DO NOT RELY ON THEM FOR HOLDING IMPORTANT FILES!
52K notes
·
View notes
Text
How to Secure Your Java Applications: Authentication, Encryption, and Best Practices

Introduction
Security is a critical concern in Java applications.
Overview of key security aspects: authentication, encryption, and best practices.
Importance of preventing unauthorized access, data breaches, and vulnerabilities.
1. Authentication in Java Applications
1.1 Role of Authentication
Ensures that only authorized users can access the application.
Prevents identity theft and unauthorized access.
1.2 Implementing Authentication in Java
1.2.1 Basic Authentication with Spring Security
java@Configuration @EnableWebSecurity public class SecurityConfig { @Bean public SecurityFilterChain securityFilterChain(HttpSecurity http) throws Exception { http.authorizeHttpRequests(auth -> auth .anyRequest().authenticated()) .httpBasic(Customizer.withDefaults()); return http.build(); } }
✅ Use Case: Protects REST APIs using Basic Authentication.
1.2.2 OAuth 2.0 with Spring Security
Secure APIs with OAuth 2.0 and JWT (JSON Web Tokens).
Integrate with Google, Facebook, or custom authorization servers.
Example: Configuring OAuth2 Loginjava@Configuration @EnableWebSecurity public class SecurityConfig { @Bean public SecurityFilterChain securityFilterChain(HttpSecurity http) throws Exception { http.oauth2Login(); return http.build(); } }
✅ Use Case: Implementing SSO (Single Sign-On).
2. Encrypting Data in Java
2.1 Why Encryption is Important
Protects sensitive information such as passwords, tokens, and user data.
Prevents data leakage in case of breaches.
2.2 Hashing Passwords with BCrypt
Avoid storing plain-text passwords.
Use BCrypt for secure hashing.
Example: Hashing a password using BCryptjavaimport org.springframework.security.crypto.bcrypt.BCryptPasswordEncoder;public class PasswordHashing { public static void main(String[] args) { BCryptPasswordEncoder encoder = new BCryptPasswordEncoder(); String hashedPassword = encoder.encode("securePassword123"); System.out.println("Hashed Password: " + hashedPassword); } }
✅ Use Case: Safely storing user passwords in databases.
2.3 AES Encryption for Data Protection
AES (Advanced Encryption Standard) is used for encrypting sensitive data.
Example: AES Encryption in Javajavaimport javax.crypto.Cipher; import javax.crypto.KeyGenerator; import javax.crypto.SecretKey; import java.util.Base64;public class AESEncryption { public static void main(String[] args) throws Exception { KeyGenerator keyGen = KeyGenerator.getInstance("AES"); keyGen.init(256); SecretKey secretKey = keyGen.generateKey(); Cipher cipher = Cipher.getInstance("AES"); cipher.init(Cipher.ENCRYPT_MODE, secretKey); byte[] encryptedData = cipher.doFinal("Sensitive Data".getBytes()); System.out.println("Encrypted: " + Base64.getEncoder().encodeToString(encryptedData)); } }
✅ Use Case: Encrypting credit card information in e-commerce applications.
3. Best Security Practices for Java Applications
3.1 Secure API Endpoints
Use HTTPS (SSL/TLS) to encrypt data transmission.
Validate and sanitize user inputs to prevent SQL Injection and XSS.
3.2 Secure Dependency Management
Regularly update dependencies to patch vulnerabilities.
Use OWASP Dependency-Check to identify security risks.
3.3 Implementing Role-Based Access Control (RBAC)
Restrict access permissions based on user roles.
java@Configuration @EnableWebSecurity public class SecurityConfig { @Bean public SecurityFilterChain securityFilterChain(HttpSecurity http) throws Exception { http.authorizeHttpRequests(auth -> auth .requestMatchers("/admin/**").hasRole("ADMIN") .anyRequest().authenticated()) .formLogin(Customizer.withDefaults()); return http.build(); } }
✅ Use Case: Restricting admin dashboard access.
3.4 Preventing CSRF (Cross-Site Request Forgery)
Use Spring Security CSRF protection (enabled by default).
Token-based authentication (JWT) can help mitigate CSRF risks.
3.5 Logging and Monitoring
Implement audit logging to track security events.
Use tools like ELK Stack (Elasticsearch, Logstash, Kibana) for monitoring.
Conclusion
Java applications need robust authentication, encryption, and security best practices.
Use Spring Security for authentication, AES for encryption, and RBAC for access control.
Stay updated with security patches and vulnerability scans.
WEBSITE: https://www.ficusoft.in/core-java-training-in-chennai/
0 notes
Text
Essential Components of a Production Microservice Application
DevOps Automation Tools and modern practices have revolutionized how applications are designed, developed, and deployed. Microservice architecture is a preferred approach for enterprises, IT sectors, and manufacturing industries aiming to create scalable, maintainable, and resilient applications. This blog will explore the essential components of a production microservice application, ensuring it meets enterprise-grade standards.
1. API Gateway
An API Gateway acts as a single entry point for client requests. It handles routing, composition, and protocol translation, ensuring seamless communication between clients and microservices. Key features include:
Authentication and Authorization: Protect sensitive data by implementing OAuth2, OpenID Connect, or other security protocols.
Rate Limiting: Prevent overloading by throttling excessive requests.
Caching: Reduce response time by storing frequently accessed data.
Monitoring: Provide insights into traffic patterns and potential issues.
API Gateways like Kong, AWS API Gateway, or NGINX are widely used.
Mobile App Development Agency professionals often integrate API Gateways when developing scalable mobile solutions.
2. Service Registry and Discovery
Microservices need to discover each other dynamically, as their instances may scale up or down or move across servers. A service registry, like Consul, Eureka, or etcd, maintains a directory of all services and their locations. Benefits include:
Dynamic Service Discovery: Automatically update the service location.
Load Balancing: Distribute requests efficiently.
Resilience: Ensure high availability by managing service health checks.
3. Configuration Management
Centralized configuration management is vital for managing environment-specific settings, such as database credentials or API keys. Tools like Spring Cloud Config, Consul, or AWS Systems Manager Parameter Store provide features like:
Version Control: Track configuration changes.
Secure Storage: Encrypt sensitive data.
Dynamic Refresh: Update configurations without redeploying services.
4. Service Mesh
A service mesh abstracts the complexity of inter-service communication, providing advanced traffic management and security features. Popular service mesh solutions like Istio, Linkerd, or Kuma offer:
Traffic Management: Control traffic flow with features like retries, timeouts, and load balancing.
Observability: Monitor microservice interactions using distributed tracing and metrics.
Security: Encrypt communication using mTLS (Mutual TLS).
5. Containerization and Orchestration
Microservices are typically deployed in containers, which provide consistency and portability across environments. Container orchestration platforms like Kubernetes or Docker Swarm are essential for managing containerized applications. Key benefits include:
Scalability: Automatically scale services based on demand.
Self-Healing: Restart failed containers to maintain availability.
Resource Optimization: Efficiently utilize computing resources.
6. Monitoring and Observability
Ensuring the health of a production microservice application requires robust monitoring and observability. Enterprises use tools like Prometheus, Grafana, or Datadog to:
Track Metrics: Monitor CPU, memory, and other performance metrics.
Set Alerts: Notify teams of anomalies or failures.
Analyze Logs: Centralize logs for troubleshooting using ELK Stack (Elasticsearch, Logstash, Kibana) or Fluentd.
Distributed Tracing: Trace request flows across services using Jaeger or Zipkin.
Hire Android App Developers to ensure seamless integration of monitoring tools for mobile-specific services.
7. Security and Compliance
Securing a production microservice application is paramount. Enterprises should implement a multi-layered security approach, including:
Authentication and Authorization: Use protocols like OAuth2 and JWT for secure access.
Data Encryption: Encrypt data in transit (using TLS) and at rest.
Compliance Standards: Adhere to industry standards such as GDPR, HIPAA, or PCI-DSS.
Runtime Security: Employ tools like Falco or Aqua Security to detect runtime threats.
8. Continuous Integration and Continuous Deployment (CI/CD)
A robust CI/CD pipeline ensures rapid and reliable deployment of microservices. Using tools like Jenkins, GitLab CI/CD, or CircleCI enables:
Automated Testing: Run unit, integration, and end-to-end tests to catch bugs early.
Blue-Green Deployments: Minimize downtime by deploying new versions alongside old ones.
Canary Releases: Test new features on a small subset of users before full rollout.
Rollback Mechanisms: Quickly revert to a previous version in case of issues.
9. Database Management
Microservices often follow a database-per-service model to ensure loose coupling. Choosing the right database solution is critical. Considerations include:
Relational Databases: Use PostgreSQL or MySQL for structured data.
NoSQL Databases: Opt for MongoDB or Cassandra for unstructured data.
Event Sourcing: Leverage Kafka or RabbitMQ for managing event-driven architectures.
10. Resilience and Fault Tolerance
A production microservice application must handle failures gracefully to ensure seamless user experiences. Techniques include:
Circuit Breakers: Prevent cascading failures using tools like Hystrix or Resilience4j.
Retries and Timeouts: Ensure graceful recovery from temporary issues.
Bulkheads: Isolate failures to prevent them from impacting the entire system.
11. Event-Driven Architecture
Event-driven architecture improves responsiveness and scalability. Key components include:
Message Brokers: Use RabbitMQ, Kafka, or AWS SQS for asynchronous communication.
Event Streaming: Employ tools like Kafka Streams for real-time data processing.
Event Sourcing: Maintain a complete record of changes for auditing and debugging.
12. Testing and Quality Assurance
Testing in microservices is complex due to the distributed nature of the architecture. A comprehensive testing strategy should include:
Unit Tests: Verify individual service functionality.
Integration Tests: Validate inter-service communication.
Contract Testing: Ensure compatibility between service APIs.
Chaos Engineering: Test system resilience by simulating failures using tools like Gremlin or Chaos Monkey.
13. Cost Management
Optimizing costs in a microservice environment is crucial for enterprises. Considerations include:
Autoscaling: Scale services based on demand to avoid overprovisioning.
Resource Monitoring: Use tools like AWS Cost Explorer or Kubernetes Cost Management.
Right-Sizing: Adjust resources to match service needs.
Conclusion
Building a production-ready microservice application involves integrating numerous components, each playing a critical role in ensuring scalability, reliability, and maintainability. By adopting best practices and leveraging the right tools, enterprises, IT sectors, and manufacturing industries can achieve operational excellence and deliver high-quality services to their customers.
Understanding and implementing these essential components, such as DevOps Automation Tools and robust testing practices, will enable organizations to fully harness the potential of microservice architecture. Whether you are part of a Mobile App Development Agency or looking to Hire Android App Developers, staying ahead in today’s competitive digital landscape is essential.
0 notes
Text
Oracle Apex Oauth2 Example

OAuth2 in Oracle APEX: A Practical Guide and Example
OAuth2 is a contemporary and secure authorization framework that allows third-party applications to access protected resources on behalf of a user. By implementing OAuth2 in Oracle APEX, you can provide controlled access to your APEX application’s data and functionality, enabling seamless integration with other services.
Why use OAuth2 with APEX?
Enhanced Security: OAuth2 offers a robust security layer compared to traditional username and password-based authentication. It uses tokens rather than directly passing user credentials.
Fine-grained Access Control: OAuth2 allows you to define specific scopes (permissions) determining the access level granted to third-party applications.
Improved User Experience: Users can conveniently authorize applications without repeatedly sharing their primary credentials.
Prerequisites
A basic understanding of Oracle APEX development
An Oracle REST Data Source (ORDS) instance, if you want to integrate with ORDS-defined REST APIs
Steps for Implementing OAuth2 in Oracle APEX
Create an OAuth2 Client:
Within your APEX workspace, navigate to Shared Components -> Web Credentials.
Click Create and select the OAuth2 Client type.
Provide a name, ID, client secret, and any necessary authorization scopes.
Obtain an Access Token:
The method for obtaining an access token will depend on the OAuth2 flow you choose (e.g., Client Credentials flow, Authorization Code flow).
Utilize the Access Token:
Include the access token in the Authorization header of your API requests to protected resources. Use the format: Bearer .
Example: Accessing an ORDS-based REST API
Let’s assume you have an ORDS-based REST API endpoint for fetching employee data that requires OAuth2 authentication. Here’s how you would configure APEX to interact with it:
Create a REST Data Source:
Go to Shared Components -> REST Data Sources.
Set the authentication type to OAuth2 Client Credentials Flow.
Enter your OAuth2 token endpoint URL, client ID, and client secret.
Use the REST Data Source in Your APEX Application:
Create APEX pages or components that utilize the REST Data Source to fetch and display employee data. APEX will automatically handle obtaining and using the access token.
Additional Considerations
Access Token Expiration: OAuth2 access tokens usually have expiration times. Implement logic to refresh access tokens before they expire.
OAuth2 Flows: Choose the most suitable OAuth2 flow for your integration use case. The Client Credentials flow is often used for server-to-server integrations, while the Authorization Code flow is more common for web applications where a user is directly involved.
youtube
You can find more information about Oracle Apex in this Oracle Apex Link
Conclusion:
Unogeeks is the No.1 IT Training Institute for Oracle Apex Training. Anyone Disagree? Please drop in a comment
You can check out our other latest blogs on Oracle Apex here – Oarcle Apex Blogs
You can check out our Best In Class Oracle Apex Details here – Oracle Apex Training
Follow & Connect with us:
———————————-
For Training inquiries:
Call/Whatsapp: +91 73960 33555
Mail us at: [email protected]
Our Website ➜ https://unogeeks.com
Follow us:
Instagram: https://www.instagram.com/unogeeks
Facebook: https://www.facebook.com/UnogeeksSoftwareTrainingInstitute
Twitter: https://twitter.com/unogeeks
0 notes
Text
Petit recapitulatif du flow OAuth2
OAuth2 permet a des 3ce partie d'acceder a des données utilisateurs sans reveler leur mot de passe via l'échange de tokens.
client: celui qui désire acceder à une resource
resource owner: l'utilisateur qui possède une resource
auth server: serveur qui authentifie les utilisateur et emet des jetons
resource server: héberge une resource protégée
Oauth2 flows
Authorization code:
le client désire acceder à une resource a nom de l'utilisateur
l'utilisateur est dirigé vers l' auth server pour login et donner les accès au client
ensuite l'auth server envoie un code d'authorisation au client
le client envoie le code d'authorisation à l'auth server en échange d'un token courte durée
le client contacte le resource server avec le token qui lui donne accès
Client credential:
le client désire accéder à des resources qui lui appartiennent
le client s'authentifie au serveur via ses credentials (clientId + clientSecret)
l'auth server envoie un access token au client
le client peut utiliser ce token pour accéder les données
0 notes
Text
🚀 Best way to increase your server activity
Come check out our new bot Interly a powerful bot filled with minigames, events, and a shop system.
How It Works: Once you invite Interly into your server, users can start grinding on minigames with: /winter-evening, /battle, /guess-the-cookie, and /event-currency-drop
Where after each successful completion of a minigame, they will earn event points! Those points can be spendable inside your custom /shop, filled with whatever unique items you come up with.
This allows you to make things fun in your own discord servers, helping increase your server activity.
Invite Bot: https://discord.com/api/oauth2/authorize?client_id=983914571154731008&permissions=8875158552&scope=bot
Support Discord https://discord.gg/GfTtXz2aBN
1 note
·
View note
Text
Top Advantages of Hiring a Java Spring Boot Developers For Your Business:

Hiring a Java Spring Boot developer for your project can bring numerous advantages and benefits.
Listed below are some of the top advantages of hiring a Java Spring Boot developer and explain why they are valuable for your project.
Robust and Efficient Development:
Java Spring Boot is a powerful and mature framework that provides a comprehensive set of features for developing enterprise-grade applications. Hiring a Java Spring Boot developer ensures that your project will benefit from the robustness and efficiency of the framework. Spring Boot offers built-in support for many common tasks, such as dependency management, configuration, and auto-configuration, which accelerates development and reduces boilerplate code.
Rapid Application Development:
Spring Boot promotes rapid application development by providing a convention-over-configuration approach. It reduces the need for manual configuration and eliminates much of the boilerplate code, allowing developers to focus on implementing business logic. With Spring Boot, developers can quickly set up a project, leverage the extensive library of reusable components (such as security, database access, and web services), and build applications rapidly.
Microservices Architecture:
Java Spring Boot is well-suited for developing microservices-based architectures. Microservices promote the development of loosely coupled, independently deployable components, which can be beneficial for scalability, maintainability, and fault isolation. Spring Boot provides the necessary features for building microservices, such as embedded servers, lightweight containers, and easy integration with other Spring projects like Spring Cloud and Spring Cloud Netflix.
Broad Community and Ecosystem:
Spring Boot has a large and vibrant community of developers, which means there is ample support, resources, and knowledge available. The Spring community actively contributes to the framework's development and provides valuable libraries, extensions, and integrations. By hiring a Spring Boot developer, you gain access to this extensive ecosystem, enabling you to leverage existing solutions, troubleshoot issues effectively, and stay up-to-date with the latest trends and best practices.
Robust Testing and Debugging Capabilities:
Java Spring Boot encourages the use of test-driven development and provides excellent support for testing. The framework includes testing utilities, such as the Spring Test Framework and JUnit integration, which allow developers to write comprehensive unit, integration, and end-to-end tests. Additionally, Spring Boot's built-in logging and debugging capabilities aid developers in diagnosing and resolving issues efficiently.
Scalability and Performance:
Java Spring Boot applications can be easily scaled to handle increased load and demand. The framework supports horizontal scaling by deploying multiple instances of an application, and it provides integration with cloud platforms, containerization technologies like Docker, and orchestration tools like Kubernetes. Spring Boot also offers features like caching, connection pooling, and asynchronous processing, which contribute to improved application performance.
Security and Reliability:
Spring Boot emphasizes security and provides robust mechanisms for implementing authentication, authorization, and secure communication. The framework integrates well with industry-standard security protocols and frameworks, such as OAuth2, JWT, and Spring Security. By hiring a Spring Boot developer, you ensure that your application follows security best practices and can withstand potential threats, thus enhancing the overall reliability of your project.
Maintenance and Support:
Java Spring Boot promotes maintainable code by encouraging modular and well-structured designs. It follows established design patterns and coding principles, which simplifies future enhancements, bug fixes, and maintenance tasks. Furthermore, the Spring community provides regular updates, bug fixes, and long-term support for major releases, ensuring that your application remains compatible and secure in the long run.
Cross-platform Compatibility:
Java Spring Boot applications are platform-independent and can run on various operating systems and environments. The Java Virtual Machine (JVM) allows Spring Boot applications to be deployed on Windows, Linux, macOS, and other platforms without the need for major modifications. This cross-platform compatibility ensures that your application can reach a wide audience and adapt to different deployment scenarios.
Industry Adoption and Job Market:
Java Spring Boot is widely adopted in the industry, and many organizations rely on it for their critical applications. By hiring a Java Spring Boot developer, you align your project with a proven technology stack that is trusted and supported by numerous enterprises. Additionally, from a hiring perspective, there is a considerable pool of experienced Java Spring Boot developers available in the job market, making it easier to find skilled professionals for your project.
In conclusion, hiring a Java Spring Boot developer brings a multitude of advantages to your project, including robust development, rapid application development, support for microservices architecture, a broad community and ecosystem, testing and debugging capabilities, scalability and performance, security and reliability, ease of maintenance, cross-platform compatibility, and industry adoption. These advantages contribute to efficient development, high-quality applications, and the ability to adapt and scale as your project evolves.
0 notes
Text
Palettey is a Discord bot created by Tadeas Jun in PHP. The bot generated color palettes based on an input color. It uses multiple generation algorithms.
The bot can be invited to a Discord server using this link: https://discord.com/oauth2/authorize?client_id=1111650904563798017&permissions=0&scope=bot%20applications.commands
The source code for the bot can be found on its GitHub page: https://github.com/Tadeas-Jun/Palettey
This blog posts some of the nicer palettes <3
Support the project on PayPal (https://paypal.me/TadeasSalvatoreJun) or hire the author as a freelance coder through their portfolio website (https://www.tadeasjun.com/).
1 note
·
View note
Text
Hey there! If you're a developer building web applications with ASP.NET Core, you know that authentication and authorization can be a complex and challenging aspect of the development process. Luckily, there's a solution that can simplify this process: Identity Server.
Identity Server is an open-source framework that provides a secure and flexible solution for implementing authentication and authorization in your ASP.NET Core applications. It allows you to implement single sign-on (SSO) and access control in a centralized manner, reducing the amount of code you need to write and maintain.
One of the biggest advantages of using Identity Server is that it supports a wide range of authentication protocols, including OpenID Connect, OAuth2, and SAML2. This means that you can easily integrate with external identity providers like Facebook, Google, and Microsoft, giving your users a seamless and secure experience.
Identity Server also provides a variety of features that make it easy to customize the authentication process to fit your specific needs. For example, you can create your own implementation of the interfaces provided by the framework to add custom authentication schemes, or customize the UI of the login pages to match the look and feel of your application.
Another advantage of using Identity Server is that it provides comprehensive documentation and a supportive community of developers who can help you if you run into any issues.
In conclusion, Identity Server is an excellent solution for simplifying authentication and authorization in your ASP.NET Core applications. If you're working on a project that requires user authentication, be sure to check out Identity Server and see how it can streamline your development process!
1 note
·
View note
Text
YouTube Short | What is Difference Between OAuth2 and SAML | Quick Guide to SAML Vs OAuth2
Hi, a short #video on #oauth2 Vs #SAML #authentication & #authorization is published on #codeonedigest #youtube channel. Learn OAuth2 and SAML in 1 minute. #saml #oauth #oauth2 #samlvsoauth2 #samlvsoauth
What is SAML? SAML is an acronym used to describe the Security Assertion Markup Language (SAML). Its primary role in online security is that it enables you to access multiple web applications using single sign-on (SSO). What is OAuth2? OAuth2 is an open-standard authorization protocol or framework that provides applications the ability for “secure designated access.” OAuth2 doesn’t share…
View On WordPress
#Oauth#oauth2#oauth2 authentication#oauth2 authentication flow#oauth2 authentication postman#oauth2 authentication server#oauth2 authentication spring boot#oauth2 authorization#oauth2 authorization code#oauth2 authorization code flow#oauth2 authorization code flow spring boot#oauth2 authorization server#oauth2 authorization sever spring boot#oauth2 explained#oauth2 spring boot#oauth2 spring boot microservices#oauth2 spring boot rest api#oauth2 tutorial#oauth2 vs saml#oauth2 vs saml 2.0#oauth2 vs saml2#saml#saml 2.0#saml 2.0 registration#saml authentication#saml tutorial#saml vs oauth#saml vs oauth 2.0#saml vs oauth vs sso#saml vs oauth2
0 notes
Text
HOW TO MAKE A SIMPLE DISCORD BOT THAT RESPONDS TO MESSAGES!!!
(updated tutorial! trust me, it's super easy!!)
Pretty much every Discord bot tutorial I’ve seen is either outdated, way too complicated, or a video... so I’ve decided to take matters into my own hands and make my own tutorial!!!
So here’s how to make a response bot with Python and Repl.it, step by step, with pictures. NO CODING EXPERIENCE NEEDED
Step 1: HAVE A DISCORD ACCOUNT AND A SERVER!
Seeing as you’re here, I’ll assume you know what discord is and have an account. I won’t explain this bit to you (:
Step 2: MAKE A REPL.IT ACCOUNT
Repl.it is where your bot’s code is gonna live, so you need to make an account for it!!
https://repl.it/signup?goto=%2F~
Step 3: STARTING THE BOT!
Now you’re gonna go to https://discord.com/developers/applications and make an application!
Once you’re there, click that blue “New Application” button and make a new application!

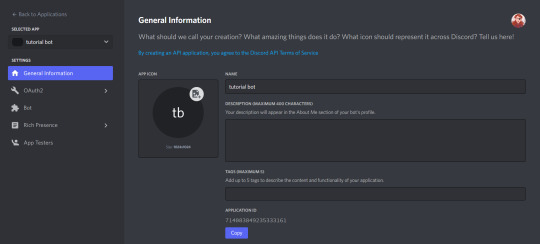
Once you've done that, you should be here
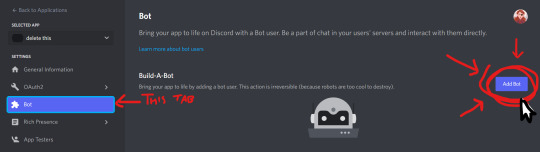
Now go to the bot section and click add bot
Congrats! You've got the beginnings of a robot! Do not close this tab, we'll need it later!
Step 4: ADDING THE BOT!
Now, you need to add the bot to a server so you can use it!
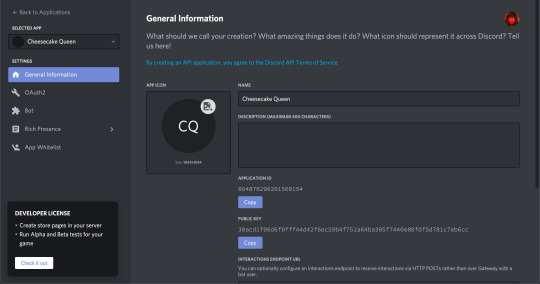
Go to the “General Information” page of your bot/ app, and copy the application ID by clicking the handy little copy button
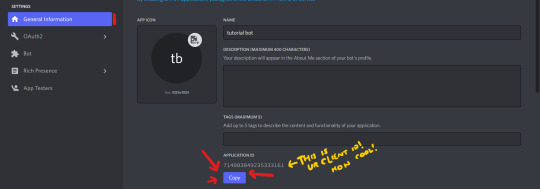
now, replace where this link says [YOUR CLIENT ID HERE] with your client ID and go to said link:
https://discordapp.com/api/oauth2/authorize?scope=bot&client_id=[YOUR CLIENT ID HERE]
(example: https://discord.com/oauth2/authorize?scope=bot&client_id=714083849235333161)
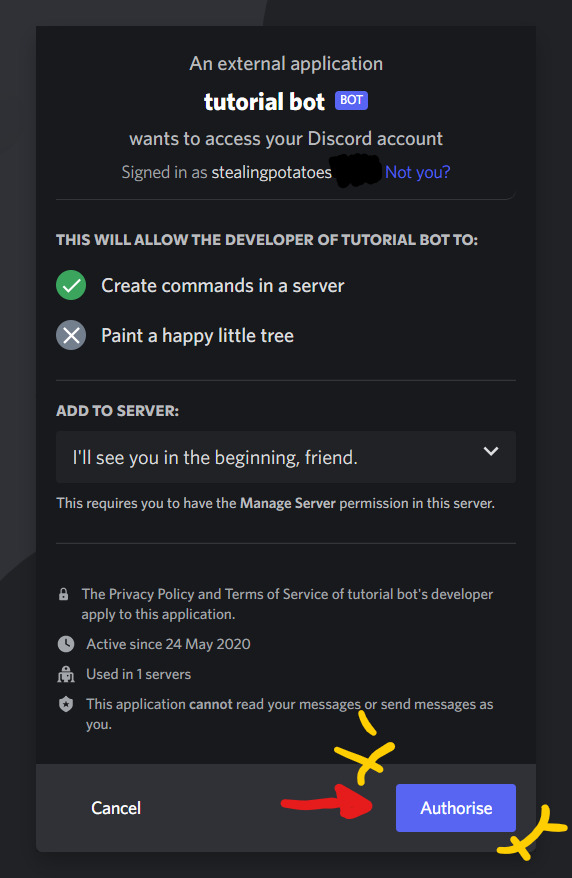
Authorise it and bam! It's in your server!
Step 5: ACTUALLY CODING THE BOT!!
FINALLY!
This bit is REALLY easy, because I’ve made you some base code, so you don’t have to do much!!
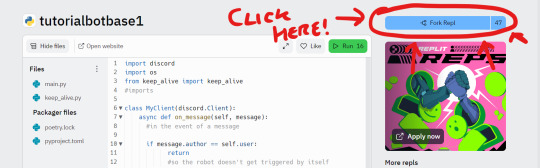
Go to: https://repl.it/@stealingpotatos/tutorialbotbase1
Now click the "Fork" button and you've got your own copy of the code!!! Well done!!
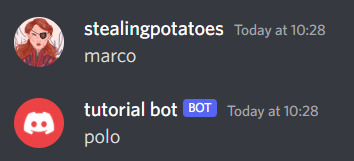
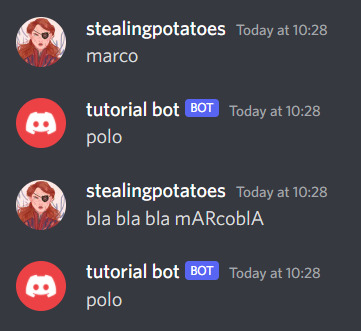
Here comes the actual coding! Replace "trigger word" with whatever you want to trigger the bot, and "response" with the-- well I'm sure you can work it out!
THE TRIGGER NEEDS TO BE IN ALL LOWER CASE

But your bot won't work just yet!
step 6: JOINING YOUR BOT AND CODE
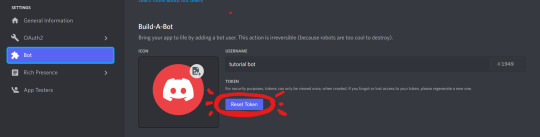
Back in the Discord Dev Portal, go to the Bot tab and click "RESET TOKEN" and then copy it!

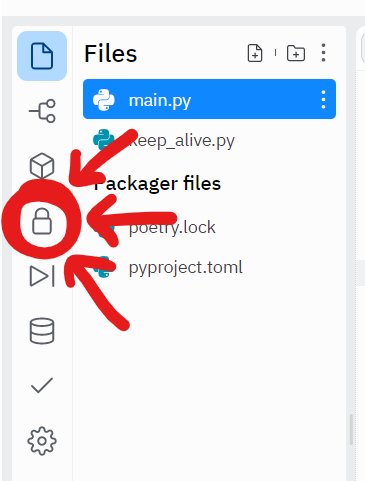
Back on repl.it, click the lock icon to enter the Secrets tab
Once you're there, add a new secret called "SUPER_SECRET_BOT_TOKEN" and make the value your copied bot token!
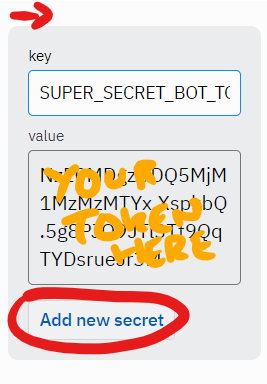
AND THATS IT!!! You have a working bot!!
I'm so proud of you!!!! :D
Have fun botting!!
extras: KEEPING YOUR BOT ONLINE
Because of the “keep_alive” function, your bot will continue to be online for about an hour after you close the tab.
But if you want it online all the time, here's a tutorial I made a while back on keeping your bot online 24/7!
extras: ADDING MORE RESPONSES
Super simple!!
If you want multiple triggers for the same response, copy & paste the “(””) in message.content.lower()” part of the statement, + add an or

Like that!
And for adding another trigger/response entirely, just copy & paste the statement entirely, and change the “if” to an “elif” if you don’t want both things to trigger at once.

Like this!!
If you don’t already know python, I’d very much recommend learning it if you’re going to be doing more bot coding!!
Thank you for reading, and if you have ANY QUESTIONS AT ALL, my askbox is open (and has anon if you think the question is kinda dumb and don’t want your name on it. It’s not a dumb question, ask me!)
Also if you have any questions about adding new functions, I’ll try to help you too! This blog is gonna be all abt that!!
81 notes
·
View notes
Text
How To Set Up Your Own Discord Bot: A Guide [v13 update]
Step 1: Go to https://discord.com/developers/applications
Make sure you are signed in to discord. On the top right hand corner, you will see a button that says New Application. Get to clicking!

Step 2: You will be asked for a name. This could be any name, but preferably the one you want your bot to have. Make sure it has a cool name, like Potato Queen, or Jack the Ripped Bot.
Once you have done that, click Create.

Step 3: You will come to a page that shows all the General Information. But you have not created your bot yet! This is just the application page. You can put in your App Icon, Description and the likes, before clicking on Bot at the side bar.
Step 4: You should reach a page with a button that says Add Bot. Well, what are you waiting for? Go ahead and click it!
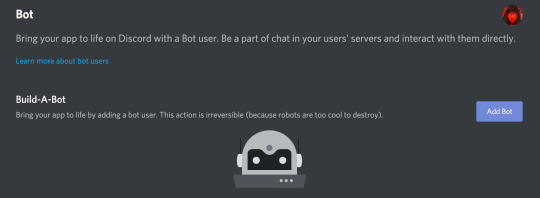
A whole new page will pop up, with information about your new bot. Remember, you can’t destroy a bot, so make sure you’re definitely wanting a bot when you’re doing this.
From here, you can see your bot’s username as well as its profile picture. You can change it if you want.
IMPORTANT: There is also something called Token. YOU SHOULD NEVER SHOW THIS TO ANYONE ELSE. It is the one thing that will bring your bot to life (it basically controls your bot) and if it’s out in the open, it is best to regenerate a new one.
When you scroll down, you will see Authorization Flow. This is where you can choose to make your bot public or private. Making it public means that others can add it to their own servers, without your help. If it’s private, only YOU can add this bot to servers.

Step 5: Invite your bot into your server.
The link to do this should be: https://discord.com/oauth2/authorize?client_id=[clientidhere]&scope=bot&permissions=[permissionnumber]
An example is: https://discord.com/oauth2/authorize?client_id=707835242475421767&scope=bot&permissions=8 [this has admin permissions]
or you can just use: https://discord.com/oauth2/authorize?client_id=707835242475421767&scope=bot
And you’re done! At least with the application part.
NOW WE MOVE ON TO THE CODING PART. [Note: This is in JS because I love JS. Someday I might do a guide for Python too but we will see.]
The basic things you need: 1. Visual Studio Code 2. Node JS
You can see how to download either one from HERE.
Then, you will need to download discord.js.
Create a folder for your discord bot things, and then open up Visual Studio Code.
Create a new file called index.js and this will be your main page, where you get your bot running. The basic codes inside it would be:

TOKEN: Remember that token that I said you can’t tell anyone? Yeah, put it in there like client.login(”IWEUTWEITU”) where that keysmash is your token.
From here, if you’re using Visual Studio Code, just go to your console.
NOTE: If you do not know where to find the console, follow this:
Click Terminal from the top tab > New Terminal. This will pull up the console for you.
Make sure that the directory of your terminal is the place where your index.js file is at. If not, you can always use ls to list the different folders in that directory and cd to change into that directory as shown below:
My terminal was in the Github folder and I used ls to list all the folders in the Github folder. From there, I can see the cafe-bot folder where my hello.js file is located in. So I used cd cafe-bot to move into that folder.

From there, type npm install discord.js
Once you’re done with that, once again, type node index.js.
[Sometimes you might run into errors that let you know that “The term node is not recognized as the name of a cmdlet”. This either means that you have NOT installed Node JS, in which you can go to this post to see how to do it HERE OR you might have some issues with directories in which you can look at this: https://www.youtube.com/watch?v=pg4t48BPmh8]
You should see “Bot is ready!” and with that, your bot is up!
Go ahead, explore it, enjoy it! You can do it!
#discord bot#discord js#discord.js#js#javascript#discord application#business guides#discord guide#discord beginner#coding#discord
83 notes
·
View notes
Text
HOW TO MAKE A DISCORD BOT THAT RESPONDS TO THINGS!!!
TRUST ME IT’S SUPER EASY!!!
Pretty much every Discord bot tutorial I’ve seen is either outdated, way too complicated, or a video... so I’ve decided to take matters into my own hands and make my own tutorial!!!
So here’s how to make a response bot with Python and Repl.it, step by step, with pictures. (Dw, you don’t even need to know how to code, I’ll run you through everything!!)

Step 1: HAVE A DISCORD ACCOUNT AND A SERVER!
Seeing as you’re here, I’ll assume you know what discord is and have an account. I won’t explain this bit to you.
Step 2: MAKE A REPL.IT ACCOUNT
Repl.it is where your bot’s code is gonna live, so you need to make an account for it!!
https://repl.it/signup?goto=%2F~.
Step 3: STARTING THE BOT!
Now you’re gonna go to https://discord.com/developers/applications and make an application!
Once you’re there, click that blue “New Application” button and make a new application!

Once you’ve done that, you should be here:

Ok, now go to the “Bot” section and add a robot to this thing!!

Keep this tab open, we need it for the rest of the tutorial.
Right, now we’re getting somewhere!!!!!
Step 4: ADDING THE BOT!
Now, you need to add the bot to a server!
Go to the “General Information” page of your bot/ app, and copy the client ID

now, replace where this link says [YOUR CLIENT ID HERE] with your client ID and go to said link:
https://discordapp.com/api/oauth2/authorize?scope=bot&client_id=[YOUR CLIENT ID HERE]
(example: https://discord.com/oauth2/authorize?scope=bot&client_id=714083849235333161)

Authorise it, and bam! It’s in your server!
Step 5: ACTUALLY CODING THE BOT!!
FINALLY!
This bit is REALLY easy, because I’ve made you some base code, so you don’t have to do much!!
Go to: https://repl.it/@stealingpotatos/tutorialbotbase1

Click the “fork” button, and you’ve got your own copy of the code!!!
Now, replace trigger word with whatever sentence/ word you’d like your bot to respond to. IT’S GOTTA BE IN LOWER CASE. IT WON’T WORK IF IT’S NOT.
Then replace response with whatever you’d like your bot’s response to be!

But you’re not done yet!! Your bot still won’t work!!
For your bot to work, you’re gonna need to make a new file called “.env”

This is where your super secret bot token is gonna go! You’re putting it in a seperate file due to how repl.it code is public, and we don’t want people messing with your bot!
In your .env file, write “SUPER_SECRET_BOT_TOKEN=”, like this:

Now, we need to go back to your bot page, and copy the bot token

Now, paste that bot token after “ SUPER_SECRET_BOT_TOKEN=“

(that’s a made up token by the way)
NOW YOU’RE DONE!!!!
Click that big green “run” button at the top, give it a minute, and test your bot!

I’M SUPER PROUD OF YOU, LOOK AT YOU GO!!!!
Your bot will respond to anyone saying the trigger word/ sentence in a message.
If it’s not working, double check you followed the tutorial right. If it’s still not working, send me a message or ask, and I’ll try to help you!!
Extras: KEEPING YOUR BOT ONLINE
Because of the “keep_alive” function, your bot will continue to be online for about an hour after you close the tab.
If you want to keep your bot online all the time, make an https://uptimerobot.com/ alert for the link in the bot alive page!

Extras: ADDING MORE TRIGGERS/RESPONSES
Super simple!!
If you want multiple triggers for the same response, copy & paste the “(””) in message.content.lower()” part of the statement, add an or

Like that!
And for adding another trigger/response entirely, just copy & paste the statement entirely, and change the “if” to an “elif” if you don’t want both things to trigger at once.

Like this!!
If you don’t already know python, I’d very much recommend learning it if you’re going to be doing more bot coding!!
Thank you for reading, and if you have ANY QUESTIONS AT ALL, my askbox is open (and has anon if you think the question is kinda dumb and don’t want your name on it. It’s not a dumb question, ask me!)
Also if you have any questions about adding new functions, I’ll try to help you too!
36 notes
·
View notes