#oauth2 tutorial
Explore tagged Tumblr posts
Visit Tumblr Blog
Explore Tumblr blogs with no restrictions, modern design and the best experience.
Last Seen Tumblr Blogs


Fun Fact
Tumblr has a low social media market share in South America.
Text
Secure Java REST APIs: OAuth2 and JWT Implementation Guide
24.3.20 Secure Java REST APIs: Implementing OAuth2 and JWT This tutorial provides a comprehensive guide on enhancing the security of Java REST APIs using OAuth2 and JWT. It is designed for developers who have a basic understanding of Java, Spring Boot, and REST APIs, and are looking to secure their applications. Table of Contents Introduction 1.1. Importance of Securing Java REST APIs 1.2.…
0 notes
Text
Hey there! If you're a developer building web applications with ASP.NET Core, you know that authentication and authorization can be a complex and challenging aspect of the development process. Luckily, there's a solution that can simplify this process: Identity Server.
Identity Server is an open-source framework that provides a secure and flexible solution for implementing authentication and authorization in your ASP.NET Core applications. It allows you to implement single sign-on (SSO) and access control in a centralized manner, reducing the amount of code you need to write and maintain.
One of the biggest advantages of using Identity Server is that it supports a wide range of authentication protocols, including OpenID Connect, OAuth2, and SAML2. This means that you can easily integrate with external identity providers like Facebook, Google, and Microsoft, giving your users a seamless and secure experience.
Identity Server also provides a variety of features that make it easy to customize the authentication process to fit your specific needs. For example, you can create your own implementation of the interfaces provided by the framework to add custom authentication schemes, or customize the UI of the login pages to match the look and feel of your application.
Another advantage of using Identity Server is that it provides comprehensive documentation and a supportive community of developers who can help you if you run into any issues.
In conclusion, Identity Server is an excellent solution for simplifying authentication and authorization in your ASP.NET Core applications. If you're working on a project that requires user authentication, be sure to check out Identity Server and see how it can streamline your development process!
1 note
·
View note
Text
YouTube Short | What is Difference Between OAuth2 and SAML | Quick Guide to SAML Vs OAuth2
Hi, a short #video on #oauth2 Vs #SAML #authentication & #authorization is published on #codeonedigest #youtube channel. Learn OAuth2 and SAML in 1 minute. #saml #oauth #oauth2 #samlvsoauth2 #samlvsoauth
What is SAML? SAML is an acronym used to describe the Security Assertion Markup Language (SAML). Its primary role in online security is that it enables you to access multiple web applications using single sign-on (SSO). What is OAuth2? OAuth2 is an open-standard authorization protocol or framework that provides applications the ability for “secure designated access.” OAuth2 doesn’t share…
View On WordPress
#Oauth#oauth2#oauth2 authentication#oauth2 authentication flow#oauth2 authentication postman#oauth2 authentication server#oauth2 authentication spring boot#oauth2 authorization#oauth2 authorization code#oauth2 authorization code flow#oauth2 authorization code flow spring boot#oauth2 authorization server#oauth2 authorization sever spring boot#oauth2 explained#oauth2 spring boot#oauth2 spring boot microservices#oauth2 spring boot rest api#oauth2 tutorial#oauth2 vs saml#oauth2 vs saml 2.0#oauth2 vs saml2#saml#saml 2.0#saml 2.0 registration#saml authentication#saml tutorial#saml vs oauth#saml vs oauth 2.0#saml vs oauth vs sso#saml vs oauth2
0 notes
Link
This is a brief introduction to OAuth 2.0. You may have already heard terms like authorization, authentication, OAuth, OAuth 2.0, OpenID, OpenID Connect, JWT, SSO... etc.. It is just like a mess for beginners. When it comes to security the major points are Authentication and Authorization. Before we learn about these things, let's discuss some basics.
#OAuth2#java#security#authorization#authentication#javafoundation#beginners#learning#tutorial#developers#oauth
0 notes
Text
HOW TO MAKE A SIMPLE DISCORD BOT THAT RESPONDS TO MESSAGES!!!
(updated tutorial! trust me, it's super easy!!)
Pretty much every Discord bot tutorial I’ve seen is either outdated, way too complicated, or a video... so I’ve decided to take matters into my own hands and make my own tutorial!!!
So here’s how to make a response bot with Python and Repl.it, step by step, with pictures. NO CODING EXPERIENCE NEEDED
Step 1: HAVE A DISCORD ACCOUNT AND A SERVER!
Seeing as you’re here, I’ll assume you know what discord is and have an account. I won’t explain this bit to you (:
Step 2: MAKE A REPL.IT ACCOUNT
Repl.it is where your bot’s code is gonna live, so you need to make an account for it!!
https://repl.it/signup?goto=%2F~
Step 3: STARTING THE BOT!
Now you’re gonna go to https://discord.com/developers/applications and make an application!
Once you’re there, click that blue “New Application” button and make a new application!

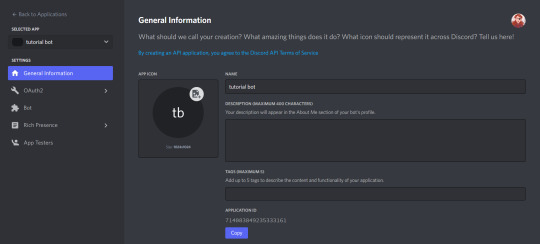
Once you've done that, you should be here
Now go to the bot section and click add bot
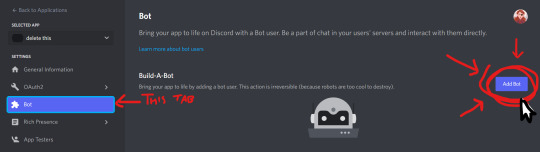
Congrats! You've got the beginnings of a robot! Do not close this tab, we'll need it later!
Step 4: ADDING THE BOT!
Now, you need to add the bot to a server so you can use it!
Go to the “General Information” page of your bot/ app, and copy the application ID by clicking the handy little copy button
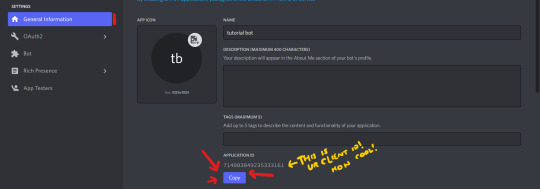
now, replace where this link says [YOUR CLIENT ID HERE] with your client ID and go to said link:
https://discordapp.com/api/oauth2/authorize?scope=bot&client_id=[YOUR CLIENT ID HERE]
(example: https://discord.com/oauth2/authorize?scope=bot&client_id=714083849235333161)
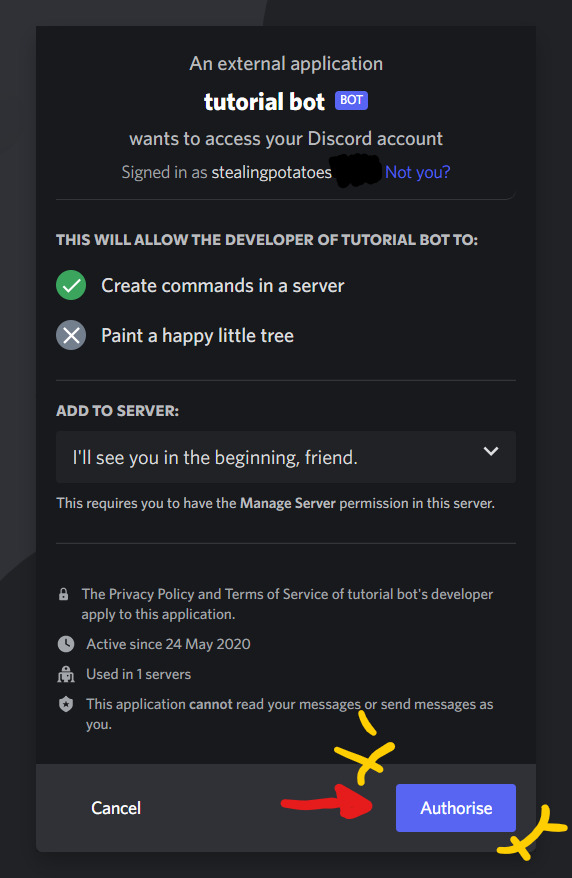
Authorise it and bam! It's in your server!
Step 5: ACTUALLY CODING THE BOT!!
FINALLY!
This bit is REALLY easy, because I’ve made you some base code, so you don’t have to do much!!
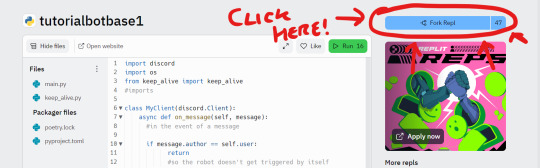
Go to: https://repl.it/@stealingpotatos/tutorialbotbase1
Now click the "Fork" button and you've got your own copy of the code!!! Well done!!
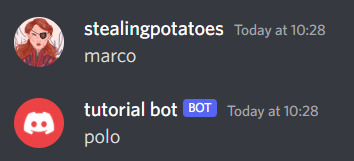
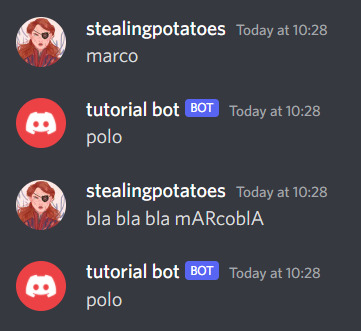
Here comes the actual coding! Replace "trigger word" with whatever you want to trigger the bot, and "response" with the-- well I'm sure you can work it out!
THE TRIGGER NEEDS TO BE IN ALL LOWER CASE

But your bot won't work just yet!
step 6: JOINING YOUR BOT AND CODE
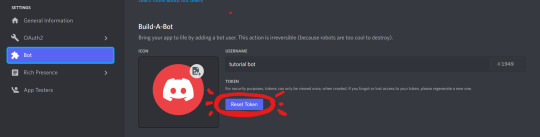
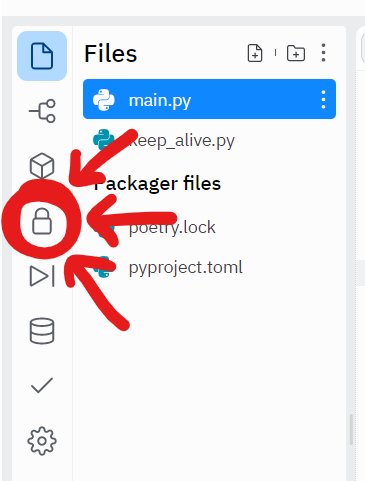
Back in the Discord Dev Portal, go to the Bot tab and click "RESET TOKEN" and then copy it!

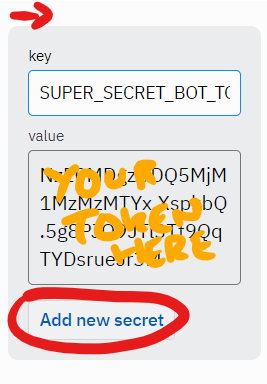
Back on repl.it, click the lock icon to enter the Secrets tab
Once you're there, add a new secret called "SUPER_SECRET_BOT_TOKEN" and make the value your copied bot token!
AND THATS IT!!! You have a working bot!!
I'm so proud of you!!!! :D
Have fun botting!!
extras: KEEPING YOUR BOT ONLINE
Because of the “keep_alive” function, your bot will continue to be online for about an hour after you close the tab.
But if you want it online all the time, here's a tutorial I made a while back on keeping your bot online 24/7!
extras: ADDING MORE RESPONSES
Super simple!!
If you want multiple triggers for the same response, copy & paste the “(””) in message.content.lower()” part of the statement, + add an or

Like that!
And for adding another trigger/response entirely, just copy & paste the statement entirely, and change the “if” to an “elif” if you don’t want both things to trigger at once.

Like this!!
If you don’t already know python, I’d very much recommend learning it if you’re going to be doing more bot coding!!
Thank you for reading, and if you have ANY QUESTIONS AT ALL, my askbox is open (and has anon if you think the question is kinda dumb and don’t want your name on it. It’s not a dumb question, ask me!)
Also if you have any questions about adding new functions, I’ll try to help you too! This blog is gonna be all abt that!!
81 notes
·
View notes
Link
1 note
·
View note
Text
HOW TO MAKE A DISCORD BOT THAT RESPONDS TO THINGS!!!
TRUST ME IT’S SUPER EASY!!!
Pretty much every Discord bot tutorial I’ve seen is either outdated, way too complicated, or a video... so I’ve decided to take matters into my own hands and make my own tutorial!!!
So here’s how to make a response bot with Python and Repl.it, step by step, with pictures. (Dw, you don’t even need to know how to code, I’ll run you through everything!!)

Step 1: HAVE A DISCORD ACCOUNT AND A SERVER!
Seeing as you’re here, I’ll assume you know what discord is and have an account. I won’t explain this bit to you.
Step 2: MAKE A REPL.IT ACCOUNT
Repl.it is where your bot’s code is gonna live, so you need to make an account for it!!
https://repl.it/signup?goto=%2F~.
Step 3: STARTING THE BOT!
Now you’re gonna go to https://discord.com/developers/applications and make an application!
Once you’re there, click that blue “New Application” button and make a new application!

Once you’ve done that, you should be here:

Ok, now go to the “Bot” section and add a robot to this thing!!

Keep this tab open, we need it for the rest of the tutorial.
Right, now we’re getting somewhere!!!!!
Step 4: ADDING THE BOT!
Now, you need to add the bot to a server!
Go to the “General Information” page of your bot/ app, and copy the client ID

now, replace where this link says [YOUR CLIENT ID HERE] with your client ID and go to said link:
https://discordapp.com/api/oauth2/authorize?scope=bot&client_id=[YOUR CLIENT ID HERE]
(example: https://discord.com/oauth2/authorize?scope=bot&client_id=714083849235333161)

Authorise it, and bam! It’s in your server!
Step 5: ACTUALLY CODING THE BOT!!
FINALLY!
This bit is REALLY easy, because I’ve made you some base code, so you don’t have to do much!!
Go to: https://repl.it/@stealingpotatos/tutorialbotbase1

Click the “fork” button, and you’ve got your own copy of the code!!!
Now, replace trigger word with whatever sentence/ word you’d like your bot to respond to. IT’S GOTTA BE IN LOWER CASE. IT WON’T WORK IF IT’S NOT.
Then replace response with whatever you’d like your bot’s response to be!

But you’re not done yet!! Your bot still won’t work!!
For your bot to work, you’re gonna need to make a new file called “.env”

This is where your super secret bot token is gonna go! You’re putting it in a seperate file due to how repl.it code is public, and we don’t want people messing with your bot!
In your .env file, write “SUPER_SECRET_BOT_TOKEN=”, like this:

Now, we need to go back to your bot page, and copy the bot token

Now, paste that bot token after “ SUPER_SECRET_BOT_TOKEN=“

(that’s a made up token by the way)
NOW YOU’RE DONE!!!!
Click that big green “run” button at the top, give it a minute, and test your bot!

I’M SUPER PROUD OF YOU, LOOK AT YOU GO!!!!
Your bot will respond to anyone saying the trigger word/ sentence in a message.
If it’s not working, double check you followed the tutorial right. If it’s still not working, send me a message or ask, and I’ll try to help you!!
Extras: KEEPING YOUR BOT ONLINE
Because of the “keep_alive” function, your bot will continue to be online for about an hour after you close the tab.
If you want to keep your bot online all the time, make an https://uptimerobot.com/ alert for the link in the bot alive page!

Extras: ADDING MORE TRIGGERS/RESPONSES
Super simple!!
If you want multiple triggers for the same response, copy & paste the “(””) in message.content.lower()” part of the statement, add an or

Like that!
And for adding another trigger/response entirely, just copy & paste the statement entirely, and change the “if” to an “elif” if you don’t want both things to trigger at once.

Like this!!
If you don’t already know python, I’d very much recommend learning it if you’re going to be doing more bot coding!!
Thank you for reading, and if you have ANY QUESTIONS AT ALL, my askbox is open (and has anon if you think the question is kinda dumb and don’t want your name on it. It’s not a dumb question, ask me!)
Also if you have any questions about adding new functions, I’ll try to help you too!
36 notes
·
View notes
Text
Discord stock

DISCORD STOCK HOW TO
DISCORD STOCK SOFTWARE
Before we add our bot, we want to make sure we’ve got our permissions selected as well.įor this project we’ll only need Send Messages, Attach Files, and Add Reactions. We’ll select the bot OAuth scope, which will generate an invite link that we can use to add our bot to a server. Permissions and scopes we’ll need for this project We can get our bot going without requiring us to setup user authentication and redirects. This is done by going to the OAuth2 side menu option. I’m speaking from experienceįinally, the last step is to invite your bot to your server. Once our bot is created, we can grab our DISCORD_TOKEN for our Dockerfile.ĭO. This is an irreversible action and Discord will make sure to tell you that. Before we made our bot After we added a bot. YOU HAVE TO DO THIS TO CREATE A BOT USER. To make our application an actual bot, we need to click on the Bot sidebar option and then Build-A-Bot. This will bring us to the General Information page. Once you’re logged in you should find a page that looks similar to this screenshot: Taken from my own developers homepageįrom here, we’ll click on New Application and name our wonderful new application. I’m assuming that you, the reader, have a discord account. Since we’re only making a chat bot without any special kinds of permission, we don’t need to worry about messy OAuth stuff.
DISCORD STOCK HOW TO
Note that I’m writing this tutorial after slash commands were introduced, but before I really explored how to use them. With this file structure and docker installed, all we need to do to get up and running is just run the following command.Īny time we add a change, we just rerun docker build and docker run and we’ll be able to see our changes deployed live!Īt the end of this step, we’ll have a Discord bot user that we can invite to our server, as well as an application token to add to our Docker file.įirst thing we need to do is get our Discord bot set up and ready to go. The base image for this Dockerfile was built with the discord.py library in mind. This corresponds to our Docker looking like this. We’ll be starting this project off with the following file structure. We’ll be deploying Dockerfiles to Caprover in this tutorial, so any other hosting options or local docker runs will work just as well. Just make sure that you’ve got a domain name ready to go. Their marketplace has an easy to deploy image that gets you started pretty quickly. I found Caprover since I use DigitalOcean as my hosting provider.
DISCORD STOCK SOFTWARE
This tutorial won’t go into the nitty-gritty details of my development setup, but I will discuss how I’m hosting this bot and my process in getting changes out into 'production.'Ĭaprover is a deployment platform that I’ve found myself using over the last couple of months to simplify self hosting some of the open source software I use (bitwarden, etc.), as well as small personal projects. Here are some useful resources in general: Any actions you take outside of that recommendation is your own decision. My recommendation is that you too don’t give other people control over your money. I do not know what those ramifications are the knowledge that they exist is enough to keep me away from giving other people that sort of control. If you decide to use real money, be very mindful that there could be legal and tax ramifications for allowing other people trading securities in your name. This tutorial will be using a paper account on, so there is no real money involved. I’ll walk through my steps of building this potentially horrible idea so that others can also share their wealth amongst their friends, with no accountability (yet… stay tuned for part 2). Personally, I decided to help my friends find financial ruin with a stock trading Discord bot!Īlong this journey I’ve decided to build my new Discord friend, Dispaca the Alpaca! Sitting at home for a year, one starts to explore a variety of new and different hobbies to try and keep their sanity. This article originally appeared on Medium, written by Irving Derin Alpaca does not recommend any specific securities or investment strategies. The views and opinions expressed are those of the author and do not reflect or represent the views and opinions of Alpaca. All screenshots are for illustrative purposes only. Please note that this article is for educational and informational purposes only.
0 notes
Text
The Kubernetes Dashboard is a Web-based User interface that allows users to easily interact with the kubernetes cluster. It allows for users to manage, monitor and troubleshoot applications as well as the cluster. We already looked at how to deploy the dashboard in this tutorial. In this guide, we are going to explore integration of the kubernetes dashboard to Active Directory to ease user and password management. Kubernetes supports two categories of users: Service Accounts: This is a default method supported by kubernetes. One uses service account tokens to access the dashboard. Normal Users: Any other authentication method configured in the cluster. For this, we will use a project called Dex. Dex is an OpenID Connect provider done by CoreOS. It takes care of the translation between Kubernetes tokens and Active Directory users. Setup Requirements: You will need an IP on your network for the Active Directory server. In my case, this IP will be 172.16.16.16 You will also need a working Kubernetes cluster. The nodes of this cluster should be able to communicate with the Active Directory IP. Take a look at how to create a kubernetes cluster using kubeadm or rke if you don’t have one yet. You will also need a domain name that supports wildcard DNS entry. I will use the wildcard DNS “*.kubernetes.mydomain.com” to route external traffic to my Kubernetes cluster. Step 1: Deploy Dex on Kubernetes Cluster We will first need to create a namespace, create a service account for dex. Then, we will configure RBAC rules for the dex service account before we deploy it. This is to ensure that the application has proper permissions. Create a dex-namespace.yaml file. $ vim dex-namespace.yaml apiVersion: v1 kind: Namespace metadata: name: auth-system 2. Create the namespace for Dex. $ kubectl apply -f dex-namespace.yaml 3. Create a dex-rbac.yaml file. $ vim dex-rbac.yaml apiVersion: v1 kind: ServiceAccount metadata: name: dex namespace: auth-system --- apiVersion: rbac.authorization.k8s.io/v1beta1 kind: ClusterRole metadata: name: dex namespace: auth-system rules: - apiGroups: ["dex.coreos.com"] resources: ["*"] verbs: ["*"] - apiGroups: ["apiextensions.k8s.io"] resources: ["customresourcedefinitions"] verbs: ["create"] --- apiVersion: rbac.authorization.k8s.io/v1beta1 kind: ClusterRoleBinding metadata: name: dex namespace: auth-system roleRef: apiGroup: rbac.authorization.k8s.io kind: ClusterRole name: dex subjects: - kind: ServiceAccount name: dex namespace: auth-system 4. Create the permissions for Dex. $ kubectl apply -f dex-rbac.yaml 5. Create a dex-configmap.yaml file. Make sure you modify the issuer URL, the redirect URIs, the client secret and the Active Directory configuration accordingly. $ vim dex-configmap.yaml kind: ConfigMap apiVersion: v1 metadata: name: dex namespace: auth-system data: config.yaml: | issuer: https://auth.kubernetes.mydomain.com/ web: http: 0.0.0.0:5556 frontend: theme: custom telemetry: http: 0.0.0.0:5558 staticClients: - id: oidc-auth-client redirectURIs: - https://kubectl.kubernetes.mydomain.com/callback - http://dashtest.kubernetes.mydomain.com/oauth2/callback name: oidc-auth-client secret: secret connectors: - type: ldap id: ldap name: LDAP config: host: 172.16.16.16:389 insecureNoSSL: true insecureSkipVerify: true bindDN: ldapadmin bindPW: 'KJZOBwS9DtB' userSearch: baseDN: OU=computingpost departments,DC=computingpost ,DC=net username: sAMAccountName idAttr: sn nameAttr: givenName emailAttr: mail groupSearch: baseDN: CN=groups,OU=computingpost,DC=computingpost,DC=net userMatchers: - userAttr: sAMAccountName
groupAttr: memberOf nameAttr: givenName oauth2: skipApprovalScreen: true storage: type: kubernetes config: inCluster: true 6. Configure Dex. $ kubectl apply -f dex-configmap.yaml 7. Create the dex-deployment.yaml file. $ vim dex-deployment.yaml apiVersion: extensions/v1beta1 kind: Deployment metadata: labels: app: dex name: dex namespace: auth-system spec: replicas: 1 selector: matchLabels: app: dex strategy: rollingUpdate: maxSurge: 1 maxUnavailable: 1 type: RollingUpdate template: metadata: labels: app: dex revision: "1" spec: containers: - command: - /usr/local/bin/dex - serve - /etc/dex/cfg/config.yaml image: quay.io/dexidp/dex:v2.17.0 imagePullPolicy: IfNotPresent name: dex ports: - containerPort: 5556 name: http protocol: TCP resources: terminationMessagePath: /dev/termination-log terminationMessagePolicy: File volumeMounts: - mountPath: /etc/dex/cfg name: config - mountPath: /web/themes/custom/ name: theme dnsPolicy: ClusterFirst serviceAccountName: dex restartPolicy: Always schedulerName: default-scheduler securityContext: terminationGracePeriodSeconds: 30 volumes: - configMap: defaultMode: 420 items: - key: config.yaml path: config.yaml name: dex name: config - name: theme emptyDir: 8. Deploy Dex. $ kubectl apply -f dex-deployment.yaml 9. Create a dex-service.yaml file. $ vim dex-service.yaml apiVersion: v1 kind: Service metadata: name: dex namespace: auth-system spec: selector: app: dex ports: - name: dex port: 5556 protocol: TCP targetPort: 5556 10. Create a service for the Dex deployment. $ kubectl apply -f dex-service.yaml 11. Create a dex-ingress secret. Make sure the certificate data for the cluster is at the location specified or change this path to point to it. If you have a Certificate Manager installed in your cluster, You can skip this step. $ kubectl create secret tls dex --key /data/Certs/ kubernetes.mydomain.com.key --cert /data/Certs/ kubernetes.mydomain.com.crt -n auth-system 12. Create a dex-ingress.yaml file. Change the host parameters and your certificate issuer name accordingly. $ vim dex-ingress.yaml apiVersion: extensions/v1beta1 kind: Ingress metadata: name: dex namespace: auth-system annotations: kubernetes.io/tls-acme: "true" ingress.kubernetes.io/force-ssl-redirect: "true" spec: tls: - secretName: dex hosts: - auth.kubernetesuat.mydomain.com rules: - host: auth.kubernetes.mydomain.com http: paths: - backend: serviceName: dex servicePort: 5556 13. Create the ingress for the Dex service. $ kubectl apply -f dex-ingress.yaml Wait a couple of minutes until the cert manager generates a certificate for Dex. You can check if Dex is deployed properly by browsing to: https://auth.kubernetesuat.mydomain.com/.well-known/openid-configuration Step 2: Configure the Kubernetes API to access Dex as OpenID connect provider Next, We will look at how to configure the API server for both a RKE and Kubeadm Cluster. To enable the OIDC plugin, we need to configure the several flags on the API server as shown here: A. RKE CLUSTER 1. SSH to your rke node. $ ssh [email protected] 2. Edit the Kubernetes API configuration. Add the OIDC parameters and modify the issuer URL accordingly. $ sudo vim ~/Rancher/cluster.yml kube-api: service_cluster_ip_range: 10.43.0.0/16 # Expose a different port range for NodePort services service_node_port_range: 30
000-32767 extra_args: # Enable audit log to stdout audit-log-path: "-" # Increase number of delete workers delete-collection-workers: 3 # Set the level of log output to debug-level v: 4 #ADD THE FOLLOWING LINES oidc-issuer-url: https://auth.kubernetes.mydomain.com/ oidc-client-id: oidc-auth-client oidc-ca-file: /data/Certs/kubernetes.mydomain.com.crt oidc-username-claim: email oidc-groups-claim: groups extra_binds: - /data/Certs:/data/Certs ##ENSURE THE WILDCARD CERTIFICATES ARE PRESENT IN THIS FILE PATH IN ALL MASTER NODES 3. The Kubernetes API will restart by itself once you run an RKE UP. $ rke up B. KUBEADM CLUSTER 1. SSH to your node. $ ssh [email protected] 2. Edit the Kubernetes API configuration. Add the OIDC parameters and modify the issuer URL accordingly. $ sudo vim /etc/kubernetes/manifests/kube-apiserver.yaml ... command: - /hyperkube - apiserver - --advertise-address=10.10.40.30 #ADD THE FOLLOWING LINES: ... - --oidc-issuer-url=https://auth.kubernetes.mydomain.com/ - --oidc-client-id=oidc-auth-client ##ENSURE THE WILDCARD CERTIFICATES ARE PRESENT IN THIS FILE PATH IN ALL MASTER NODES: - --oidc-ca-file=/etc/ssl/kubernetes/kubernetes.mydomain.com.crt - --oidc-username-claim=email - --oidc-groups-claim=groups ... 3. The Kubernetes API will restart by itself. STEP 3: Deploy the Oauth2 proxy and configure the kubernetes dashboard ingress 1. Generate a secret for the Oauth2 proxy. python -c 'import os,base64; print base64.urlsafe_b64encode(os.urandom(16))' 2. Copy the generated secret and use it for the OAUTH2_PROXY_COOKIE_SECRET value in the next step. 3. Create an oauth2-proxy-deployment.yaml file. Modify the OIDC client secret, the OIDC issuer URL, and the Oauth2 proxy cookie secret accordingly. $ vim oauth2-proxy-deployment.yaml apiVersion: extensions/v1beta1 kind: Deployment metadata: labels: k8s-app: oauth2-proxy name: oauth2-proxy namespace: auth-system spec: replicas: 1 selector: matchLabels: k8s-app: oauth2-proxy template: metadata: labels: k8s-app: oauth2-proxy spec: containers: - args: - --cookie-secure=false - --provider=oidc - --client-id=oidc-auth-client - --client-secret=*********** - --oidc-issuer-url=https://auth.kubernetes.mydomain.com/ - --http-address=0.0.0.0:8080 - --upstream=file:///dev/null - --email-domain=* - --set-authorization-header=true env: # docker run -ti --rm python:3-alpine python -c 'import secrets,base64; print(base64.b64encode(base64.b64encode(secrets.token_bytes(16))));' - name: OAUTH2_PROXY_COOKIE_SECRET value: *********** image: sguyennet/oauth2-proxy:header-2.2 imagePullPolicy: Always name: oauth2-proxy ports: - containerPort: 8080 protocol: TCP 4. Deploy the Oauth2 proxy. $ kubectl apply -f oauth2-proxy-deployment.yaml 5. Create an oauth2-proxy-service.yaml file. $ vim oauth2-proxy-service.yaml apiVersion: v1 kind: Service metadata: labels: k8s-app: oauth2-proxy name: oauth2-proxy namespace: auth-system spec: ports: - name: http port: 8080 protocol: TCP targetPort: 8080 selector: k8s-app: oauth2-proxy 6. Create a service for the Oauth2 proxy deployment. $ kubectl apply -f oauth2-proxy-service.yaml 7. Create a dashboard-ingress.yaml file. Modify the dashboard URLs and the host parameter accordingly. $ vim dashboard-ingress.yaml apiVersion: extensions/v1beta1 kind: Ingress metadata: name: kubernetes-dashboard namespace: kube-system annotations: nginx.ingress.kubernetes.io/auth-url: "https://dashboard.kubernetes.mydomain.com/oauth2/auth" nginx.ingress.k
ubernetes.io/auth-signin: "https://dashboard.kubernetes.mydomain.com/oauth2/start?rd=https://$host$request_uri$is_args$args" nginx.ingress.kubernetes.io/secure-backends: "true" nginx.ingress.kubernetes.io/configuration-snippet: | auth_request_set $token $upstream_http_authorization; proxy_set_header Authorization $token; spec: rules: - host: dashboard.kubernetes.mydomain.com http: paths: - backend: serviceName: kubernetes-dashboard servicePort: 443 path: / 8. Create the ingress for the dashboard service. $ kubectl apply -f dashboard-ingress.yaml 9. Create a kubernetes-dashboard-external-tls ingress secret. Make sure the certificate data for the cluster is at the location specified or change this path to point to it. Skip this step if using a Certificate manager. $ kubectl create secret tls kubernetes-dashboard-external-tls --key /data/Certs/ kubernetes.mydomain.com.key --cert /data/Certs/ kubernetes.mydomain.com.crt -n auth-system 10. Create an oauth2-proxy-ingress.yaml file. Modify the certificate manager issuer and the host parameters accordingly. $ vim oauth2-proxy-ingress.yaml apiVersion: extensions/v1beta1 kind: Ingress metadata: annotations: kubernetes.io/tls-acme: "true" ingress.kubernetes.io/force-ssl-redirect: "true" name: oauth-proxy namespace: auth-system spec: rules: - host: dashboard.kubernetes.mydomain.com http: paths: - backend: serviceName: oauth2-proxy servicePort: 8080 path: /oauth2 tls: - hosts: - dashboard.kubernetes.mydomain.com secretName: kubernetes-dashboard-external-tls 10. Create the ingress for the Oauth2 proxy service. $ kubectl apply -f oauth2-proxy-ingress.yaml 11. Create the role binding. $ kubectl create rolebinding -rolebinding- --clusterrole=admin --user= -n e.g kubectl create rolebinding mkemei-rolebinding-default --clusterrole=admin [email protected] -n default // Note that usernames are case sensitive and we need to confirm the correct format before applying the rolebinding. 12. Wait a couple of minutes and browse to https://dashboard.kubernetes.mydomain.com. 13. Login with your Active Directory user. As you can see below: [email protected] should be able to see and modify the default namespace.
0 notes
Text
Flask and OAuth2: Securing Your API with Industry-Standard Authentication
Introduction Flask and OAuth2: Securing Your API with Industry-Standard Authentication is a crucial aspect of building secure and scalable web applications. In this tutorial, we will explore the world of Flask, a lightweight Python web framework, and OAuth2, an industry-standard authentication protocol. We will delve into the technical background, implementation guide, code examples, best…
0 notes
Text
discord bot tutorial
im just doing it on tumblr cus its easy :pensive:
first install node js
and then visual code but u dont need it for a while
then u go to here and log in to discord, and create an application

once u created it, on the left hand side panel theres a button that says Bot, click it and click create a new bot

ok now go back to the general info tab

and on this page under ur app’s name it should have the client id, paste this link into your browser but replaces YOURCLIENTIDHERE with... your client id...
https://discordapp.com/oauth2/authorize?&client_id=YOURCLIENTIDHERE&scope=bot&permissions=3147776
and this allows u to add the bot to a server. i recommend making a server with only u and the bot in it so u can test everything and make sure it works before u add it to a server with other people cus example sometimes when i fuck up my code jiminbot starts spamming shit and its annoys everyone else
Ok next step is make a folder on ur computer, just name it something like Bot or whatever that u will remember idk
but first u need to get ur bots token, its on the bot page on the discord site just copy it

now u need to open the visual code software u installed earlier, and u need to save 3 files to the folder
FILE 1:
paste this into visual code but replace YOURTOKEN with your token that u copied SAVE IT AS auth.json it has to be .json not .txt or anything else or i will be mad
{ “token”: “YOURTOKEN” }
FILE 2:
paste this into a NEW code file, replace all the stuff with whatever u want and save as package.json , again if its not .json i will be pissed
{ “name”: “YOURBOTNAME”, “version”: “1.0.0”, “description”: “YOURBOTDESCRIPTION”, “main”: “bot.js”, “author”: “YOURNAME”, “dependencies”: {} }
FILE 3:
this file is ur bots code, just make it and save it as bot.js and ill come back to it later
ok before u can do code u have to install dependencies which is annoying bc u need different ones for different things but basic ones should be fine.. u need to open ur command prompt FROM ur bot folder. u right click on the folder and it should say Open Command Window here, sometimes on windows its called powershell and thats ok its the same. on mac sometimes u have to enable an option to do it in preferences i think
so once u open the command window paste this
npm install discord.io winston --save
and press enter. then paste this
npm install discord.js
and press enter again. ok done
for coding the actual bot go to this post i made them seperate so the post wasnt too longgg
1 note
·
View note
Text
Create API Rest with Laravel 7 & 8 Passport Authentication
Create API Rest with Laravel 7 & 8 Passport Authentication
In this tutorial we are going to create a authentication system with API Laravel Authentication Passport OAuth Step 1. Install Laravel In first step, we require to get fresh Laravel application using bellow command, So open your terminal or command prompt and run bellow command: laravel new auth Step 2. Install Laravel Passport Package Laravel Passport provides a full OAuth2 server…

View On WordPress
#laravel#laravel 8#laravel api#laravel api with passport#laravel apis#laravel vue js#passport#postman
0 notes
Text
MVVM Login Example Android using RESTFul API with OAuth2 - Android Coding by DMTechnolab
MVVM Login Example Android using RESTFul API with OAuth2 – Android Coding by DMTechnolab
Hi all welcome MVVM login example Android Tutorial. An authentication system is required in almost any type of application. You name any application, Facebook, WhatsApp, Ola, Uber and you will get an authentication system there. The commonly used authentication method is email and password authentication, which we see almost everywhere. And in this post we will learn to implement a proper…

View On WordPress
0 notes
Text
Cross Platform Google OAuth2
It was way more challenging than we expected in order to implement Google’s OAuth on the various platforms involved in one of our projects. We needed to implement OAuth on a .NET server, .NET MVC web app, Reactjs, Chrome Books, and iOS. Each one required a unique library and flow.
.NET server
download the library here: https://www.nuget.org/packages?q=Google.Apis.oauth2&prerelease=true&sortOrder=relevance
general guide: https://developers.google.com/api-client-library/dotnet/guide/aaa_oauth
how to exchange a authentication code from a web app and get a refresh token: https://developers.google.com/identity/sign-in/web/server-side-flow
Chrome App
Use the chrome.identity library: https://developer.chrome.com/apps/app_identity
In the chrome.identity library you can use identity.getAuthToken to get an access token, or you can use the identity.launchWebAuthFlow to get a authentication code you can then send to your API and get a refresh token. See my StackOverflow answer here: https://stackoverflow.com/questions/42562115/access-code-for-google-oauth2-in-chrome-app-invalid-credentials/49696037#49696037
Reactjs Web App
https://github.com/anthonyjgrove/react-google-login
iOS Cordova App
https://github.com/EddyVerbruggen/cordova-plugin-googleplus
.NET MVC
We were not able to get the .NET MVC tutorials to work, and ended up using the js library. Followed this guide: https://developers.google.com/identity/sign-in/web/sign-in, then this one in order to get the refresh token: https://developers.google.com/identity/sign-in/web/server-side-flow
2 notes
·
View notes
Text
C# CQRS+ES framework - few questions and concerns
Is there any enterprise level cqrs+es framework for c# (.net core or standard)? Something like AxonIQ for Java.
Context: I am in team that is investigating and about to propose new system architecture for multi million business. Main requirements are that system should be scalable and developed as microservices. I imagine most important of our microservices to be developed using cqrs+es pattern.
I found many articles about cqrs+es, lot of examples (usually basics), however what I am missing is some production ready framework that can be safely used.
No one sane will agree to use simple github projects that have no big community support nor big company behind it, as a technology to backup million dollar business. What is more Nlnon of these simple cqrs+es projects that I can find on github covers more advance concepts like aggregate snapshots or event replying.
P.s. What I have is mind is something like "asp.net mvc framework" which you can safely use because it is backed by Microsoft. Or Angular, because it is backed by Google, etc.
To sum it up: 1. I don't understand why if CQRS+ES is such great thing, gaining popularity from over a decade, why no major player created "industry standard" framework yet?
How team of developers can apply this pattern with confidence while there isn't any tutorial that covers this topic in depth neither on pluralsight, udemy, nor YT. As an example I can say that nobody that I know implements own OAuth2 service in commercial apps. There are exisiting solutions for OAuth, yet nothing AFAIK for CQRS+ES.
... or maybe I am wrong and I am missing some pice of information?
submitted by /u/bzq84 [link] [comments] from Software Development - methodologies, techniques, and tools. Covering Agile, RUP, Waterfall + more! https://ift.tt/2MUtvDo via IFTTT
0 notes