#sims 3 buydebug
Explore tagged Tumblr posts
Visit Tumblr Blog
Explore Tumblr blogs with no restrictions, modern design and the best experience.
Last Seen Tumblr Blogs


Fun Fact
Forty percent of Tumblr users are between the ages of 18 to 25.
Text
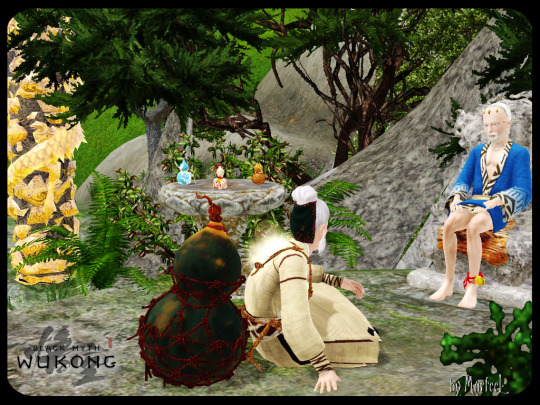
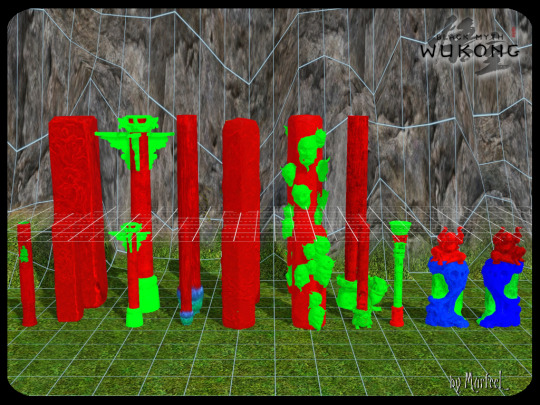
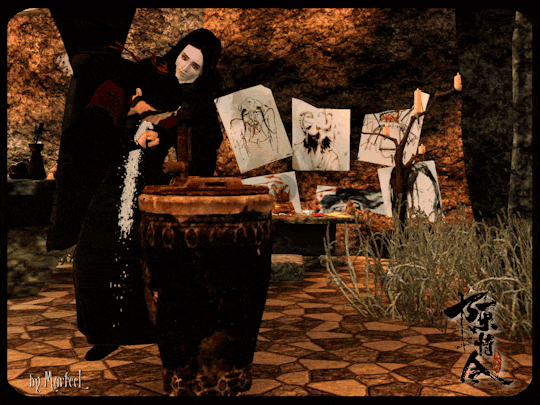
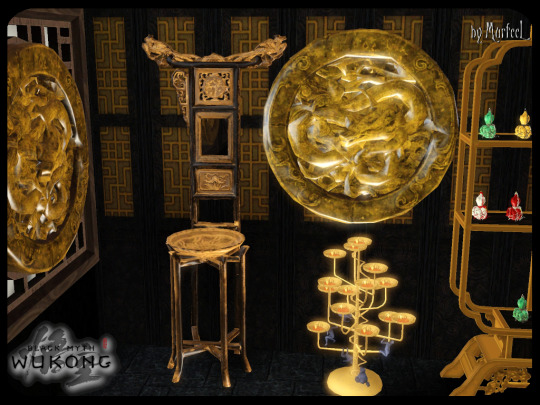
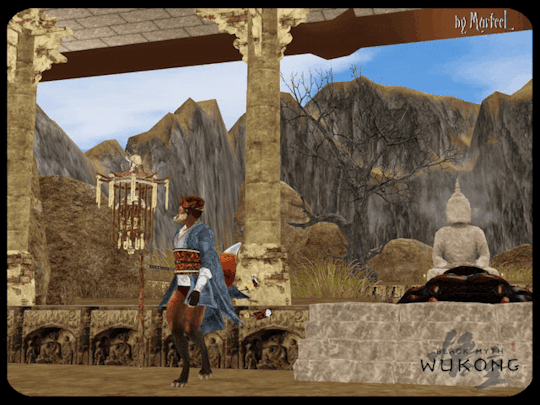
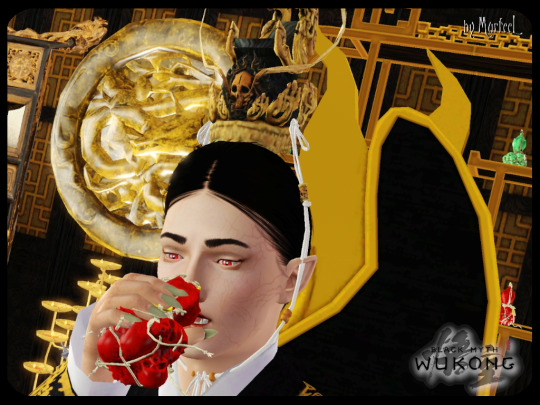
Black Myth: Wukong - 108 Contents Collection
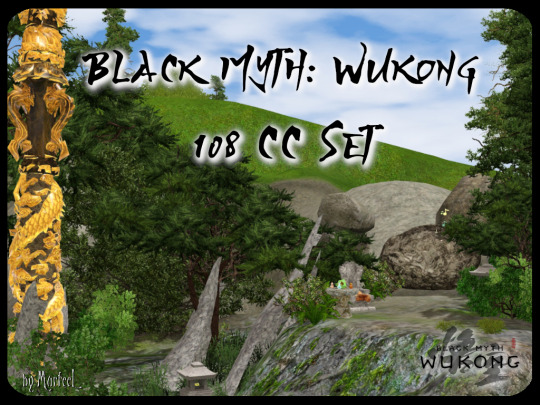
The number 108 is sacred in Hinduism, Jainism, and Buddhism. So this set includes 108 recolorable Build/Buy/CAS items converted from Black Myth: Wukong for TS3, as your sims await the birth of the Destined One! 🐒🍑🐵
FLAWS: Apologies in advance for the high poly meshes--some of these were 100k+ polys before I decimated as much as possible without utterly obliterating the mesh quality. The highest offenders (that say High Poly in the name) are like 10k, so you've been warned.
There's 7 sets for download separately, or just nab them all in 1 file:
BMW Buddhism Set (Mediafire | Simfileshare)
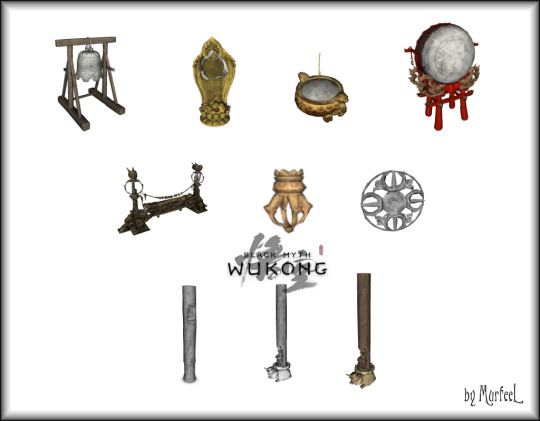
Bell as Radio
Buddhist Halo Niche as Misc Surface (High Poly)
Incense (WA EP) (under Debug)
Large Drum as Radio
Partition Decor (High Poly)
Vajra Ceiling Light
Vajra Wall Decor (for use with round windows)
Carved Column
Turtle Column
Turtle Column (2-Story) as Decor
BMW Clouds Set (Mediafire | Simfileshare)
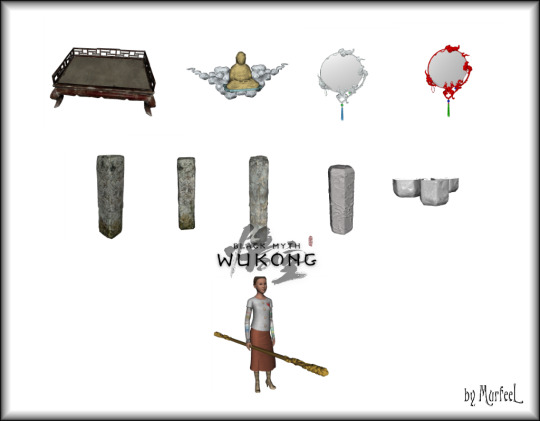
Chinese Couch as Bedframe (Decor)
Cloudy Meditation Wall Shelf (SN EP)
Cloudy Mirror
SN EP Magic Mirror
Cloud Column
Cloud Column (2-storey) as Decor
Octagonal Column
Octagonal Column (2-Storey) as Decor
Octagonal Stalactites Decor (under Misc Decor)
Cloud Staff ACC
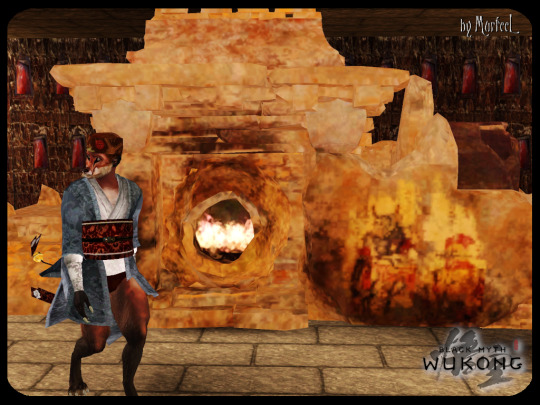
BMW Fire & Brimstone Set (Mediafire | Simfileshare)

Bungalow Fireplace 1 (High Poly)
Cauldron as Spherefish Modded Fireplace (Mod REQUIRED)
Fire Rat Vessel as Smoke Alarm
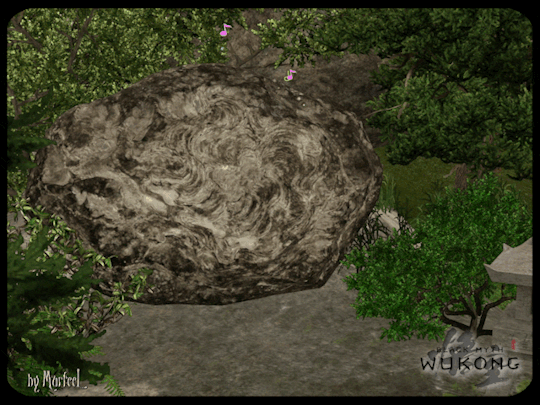
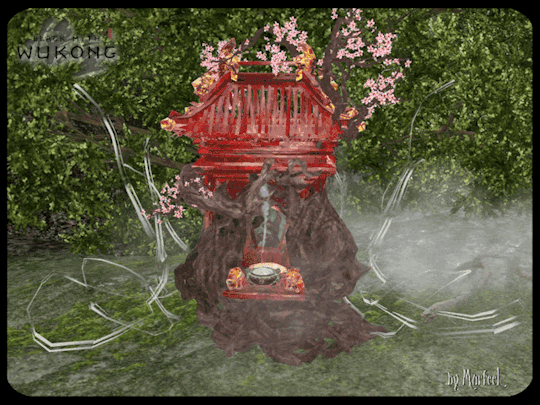
Huaguoshan Tian di Ling Shi as SN EP Faery House
LN EP Pub Table
Tiny Cauldron as Pedestal Cube (Misc Decor/Surface)
Magic Furnace as SN EP Gemcutter (High Poly) (under Hobbies & Skills)
Magic Furnace as SN EP Philosopher's Stone (High Poly) (under Debug)
Magic Furnace as Fireplace (High Poly)
Medicines Furnace as Fireplace
BMW Floral Set (Mediafire | Simfileshare)
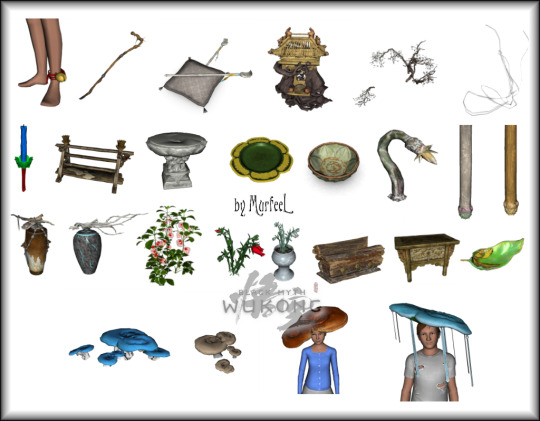
Keeper's Bell Anklet as Male ACC
GEN EP Keeper's Cane (Hobbies & Skills) | Keeper's Cane ACC (DR Mod)
Keeper's Wand (SN EP)
Keeper Shrine C1 as Wishing Well
Keeper Shrine C1 Flowers (High Poly)
INSP Smoke Trails as Table Light
Lotus Candle as Table Light
Lotus Shelf as End Table
Lotus Dining Table
Lotus Plate (Stackable)
Lotus Planter Bowl (SN EP)
Lotus Yaoguai as LN EP FX Machine
Lotus Column
Lotus Column (2-Story) as Decor
Horn Vase Decor
Branch Vase Decor
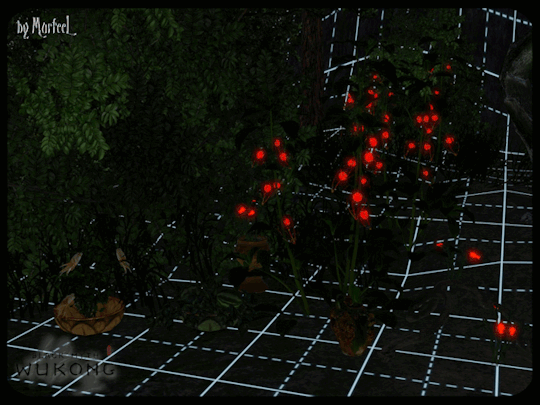
Hozuki Plant (Fullbright Glows)
Trumpet Flowers as Outdoor Light
Trumpet Flowers (Glows)
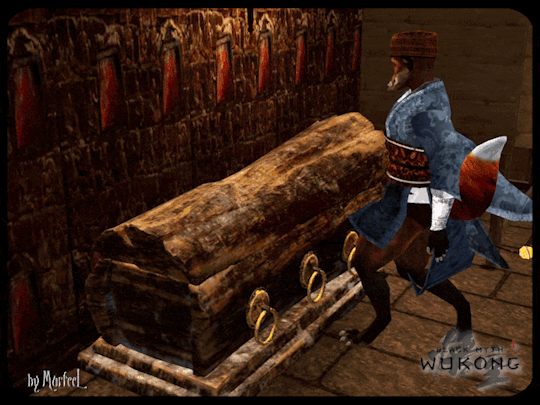
Coffin as IP EP Treasure Chest (under Debug)
Floral End Table
Leaf Plate (Misc Slots)
Shrooms (under plants)
Shrooms as AMB EP Hygienator (under Plumbing)
Shroom Hat ACC (Plain Flip)
Shroom Hat ACC (High Poly)
BMW Gourds Set (Mediafire | Simfileshare)
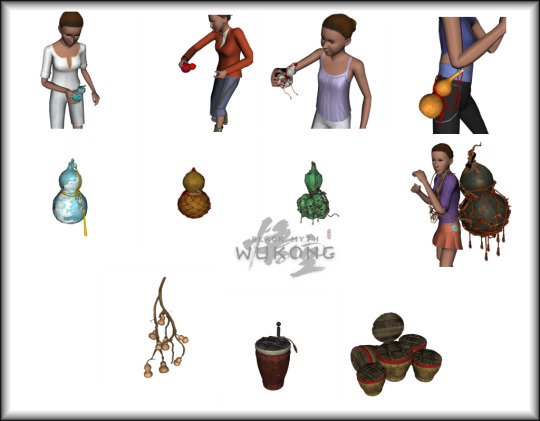
Gourd Clouds ACC (Unisex, under Rings)
Gourd Net ACC (Unisex, under Rings)
Gourd Skulls ACC (Unisex, under Rings)
Gourd on Hip ACC (Unisex, under Bracelets)
Gourd Clouds (Arsil Beverage Mod REQUIRED - Tea)
Gourd Net (Arsil Beverage Mod REQUIRED - Booze)
Gourd Skulls (Arsil Beverage Mod REQUIRED - Booze)
Yuan Shoucheng Goard ACC (High Poly) (Unisex, under Necklaces)
Hanging Gourds Decor
Pot as UNI EP Juice Keg
Pot as IP EP Treasure Chest (under Debug)
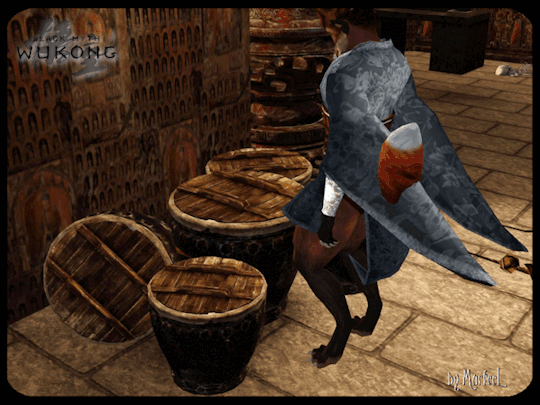
BMW Sundries Set (Mediafire | Simfileshare)
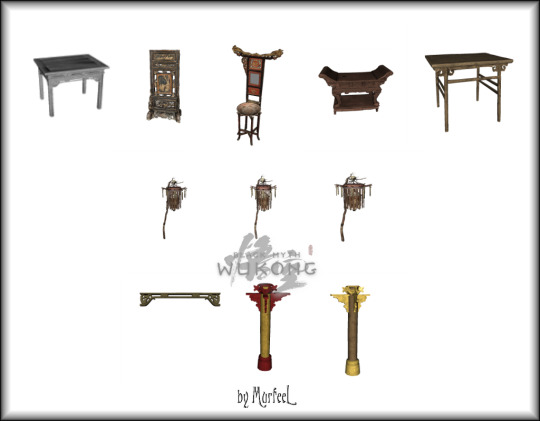
Desk 1x1
Divider Decor (High Poly 10k)
Pedestal Sink
Sidetable
Wooden Dining Table 1x1
Skull Flag as SN EP Teleporter (under Transportation)
Skull Flag as Teleporter (under Debug)
Skull Flag as Outdoor Lamp
Chinese Arch Decor as Curtain
Corners Column
Corners Column (2-Story) as Decor
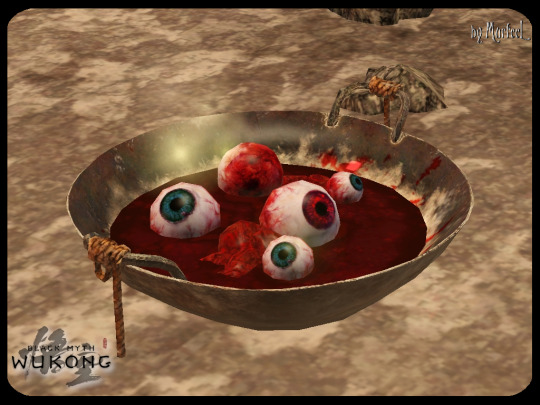
BMW Yaoguai Set (Mediafire | Simfileshare)
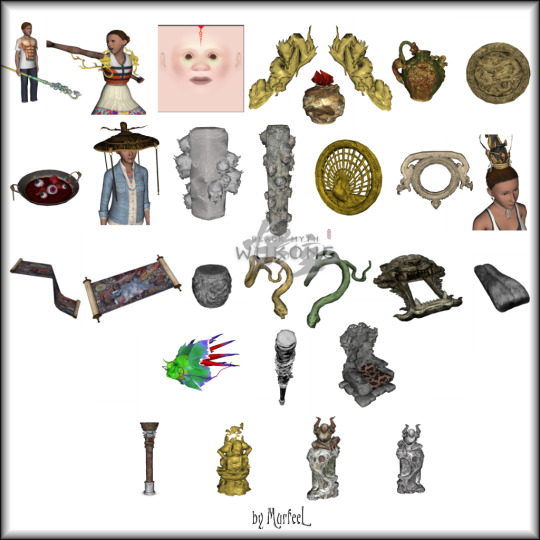
Dragon Stave ACC (Unisex, under Rings)
Kang-Jin Star Dragon Necklace ACC
Kang-Jin Star Face Tatts (CmarNYC Tatt mod REQUIRED)
Dragon Stair Risers Decor (Left | Right)
Jar as Decor (High Poly)
Dragon Vase
Dragon Wall Decor (for use with round windows)
Bowl of Eyes as Pets EP Dog Bowl (Bottomless)
Carapace Hat ACC
Octagonal Column
Octagonal Column with Heads (2-Storey) as Decor
Peacock Wall Decor (High Poly) (for use with round windows)
Porthole Wall Decor (for use with round windows)
Skull Topknot ACC (Unisex, under Earrings)
INSP Long Scroll as Decor
INSP Yuxi Scroll Decor
Snake Stool as Dining Chair
Snake Decor
Snake as LN EP FX Machine
Cave of Wonders Tiger as Decor (High Poly)
Cave of Wonders Tiger Tongue as §108 Moneybag (LiveDragEnabled) (ANI Moneybag Script REQUIRED)
Carp-Squid Relic as LN EP FX Machine (15k Polys!)
Giant Jingubang as Decor (HIGH POLY!)
Monkey King Throne as Arm Chair
Yaksha Column
Yaksha Column Base Decor
Yaksha Inscription Column (Regular | Flipped)
Enjoy!
Download ALL sets together: Mediafire | Simfileshare
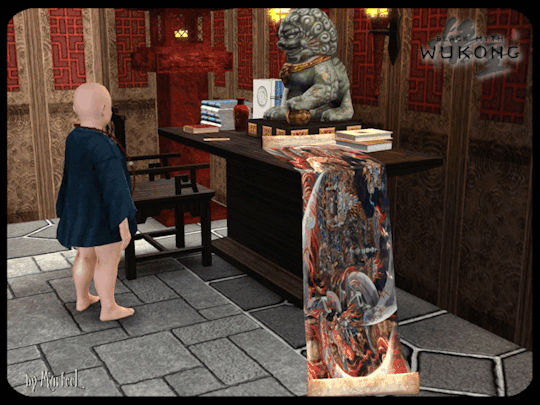
Descriptions & preview pics under the cut:
Most of this CC is straightforward, but I wanted to highlight some important stuff real quick. Click the links for extra images--Tumblr's 30 pic limit is NOT conducive to closely examining 100 pieces of CC:
The 2-storey column versions are only decorative, cuz IDK how to make them as real multi-storied columns.
The Chinese Couch as Bedframe (Decor) is the spiritual successor to the other one I made here--it's just a new design for variety's sake, since BMW had one I could convert too:

I actually HATE how the Cloudy SN EP Magic Mirror turned out; it's really bad, seeing the transition from a round mirror to a rectangular magic mirror (TBH my gif actually removed several frames)--but heck if I know how to fix it. Which is why I also included just a regular basegame Clouds Mirror:

The Octagonal Stalactites are under Misc Decor, fully routable. They also have no backfaces, so you can easily see your room from a birdseye pov.
The Cloud Staff ACC & Dragon Staff ACC are Unisex, Teen - Elder, Everyday - Outerwear, etc etc.

The Bungalow Fireplace 1 (High Poly) is freaking enormous, but I couldn't resist.
As usual, the Cauldron as Spherefish Modded Fireplace 100% REQUIRES Spherefish's cauldron/fireplace mod at MTS to work. The mesh is a tad too big &Y bulky, but I wanted it that way, so....

Huaguoshan Tian di Ling Shi as SN EP Faery House is the magic rock Sun Wukong is believed to have been born/asleep inside of. Only the fae know for sure what's going on in there, though! 👀👀👀
The Magic Furnace as a Fireplace is self explanatory, but it also comes in 2 extra types:
SN EP Gemcutter (High Poly) (under Hobbies & Skills)
SN EP Philosopher's Stone (High Poly) (under Debug)
I'm REALLY sad that I don't know how to add a fire FX, so they burn like an actual furnace/fireplace would. Instead, you'll just have to use the Fog Emitter. I used s30_fireplace3x1raging in my gameplay pics. (I warned y'all that it's high poly AF, but tbh I have like a dozen of these on the same lot and everything's fine, so.... YOLO? 🤷)
The GEN EP Keeper's Cane (Buy Mode) | Keeper's Cane ACC (DR Mod) made me so frikkin happy. (I used it with the Canes for All Ages mod at MTS, but that mod is NOT required!)
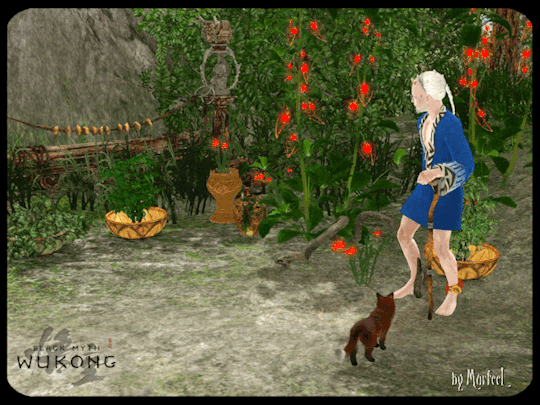
Buy the Cane in Hobbies & Skills with the rest of the GEN EP canes. The ACC file isn't an actual accessory you can pick in CAS, it's the cane animation that the sim uses when walking around. Without it, EA's default cane will appear instead, so you NEED both files for it to work right (I didn't wanna risk Merging the files in S3PE).
Ngl I kinda borked the Keeper Shrine C1 as Wishing Well | Flowers (High Poly) | Smoke Trails as Table Light (Animated Texture).
Because there's a decorative slot on the shrine (for the Incense), you might have to place the Flowers and Smoke down FIRST, and THEN place the Shrine. So just a heads up! (If you squint you can barely see the Snake as FX Machine on the right in the gif.)
I wanted the Lotus Yaoguai to be a functional Cowplant SO DANG BAD, but I couldn't get it to work for the life of me. 😔 So instead it's just a LN EP FX Machine.

Y'all know me: when I see Hozuki in the game files, I HAVE to convert them. This time, I gave them the Fullbright Glow effect. (The Trumpet Flowers have the Fullbright Glow, too, btw.)
The Coffin and Pot are both IP EP Treasure Chests, found under Debug.
There are regular basegame Shroom plants, but I also added Shrooms as AMB EP Hygienator (under Plumbing), so that they spray out air freshener (read: SPORES) whenever sims walk past.
The Shroom Hat ACCs are direct matches, ofc.
I made the Gourd ACCs (Unisex, under Rings) specifically to go with my No Ghost Hunter Gun mod; to try mimicking the spirit-absorbing ability BMW gourds have. Otherwise I wouldn't've bothered; esp. since I also made the Gourds functional drinks (see my gif here) with the Arsil Beverage Mod (which is REQUIRED).
Pot as UNI EP Juice Keg
I'm experimenting with more plumbing, and made a Pedestal Sink.
FLAWS: There are no faucet pieces, so the animation is kinda goofy-looking, but oh well.
There are 3 different Skull Flags:
SN EP Teleporter/TARDIS/LLAMA (under Transportation)
Basegame Teleporter (under Debug)
Outdoor Lamp
The Dragon Stair Risers (Left | Right) are just Decor, and best believe I was giddy AF to have these in my game. 😍

Bowl of Eyes as Pets EP Dog Bowl (Bottomless) (under Debug) includes 3 different eye color variations (Red, Blue, Mixed).
I forgot to take proper pics of the Carapace Hat ACC, oops.
The Skull Topknot ACC, Unisex, under Earrings, etc etc I'm so tired.
The Long Scroll as Decor & Yuxi Scroll Decor only include the 6 chapter mural scrolls. (I'll do the Ruyi Scroll separately, later.)
The Cave of Wonders Tiger as Decor (High Poly) can be used on 2-tile stairs without routing issues.
FLAWS: I wanted the Tongue to be a functional WA EP Rubble Pile for Tombs, so it could actually obstruct entrance unless sims demolished it, but nothing I did made it work. In the end I decided to make it a §108 Moneybag that REQUIRES Ani's Moneybag Script. It's LiveDragEnabled, so you can just drag it into your sims' inventory if they're too stupid to autonomously pick up the "money bag" to collect the cash themselves. 🤦
I was really stumped on what else I could do with the Tongue that made sense. If anyone has any bright ideas, please feel free, cuz I got nuthin! 🤷
And that's that--for now! 😈
Enjoy!
Download ALL sets together: Mediafire | Simfileshare
#sims 3 cc#sims 3 conversions#sims 3 wukong#sims 3 asian#sims 3 mods#sims 3 transportation#sims 3 foodstuffs#sims 3 plants#sims 3 lighting#sims 3 storage#sims 3 surfaces#sims 3 build mode#sims 3 accessory#sims 3 pets#sims 3 world adventures#sims 3 supernatural#sims 3 university#sims 3 late night#sims 3 ambitions#sims 3 decor#sims 3 buy mode#sims 3 buydebug
50 notes
·
View notes
Text
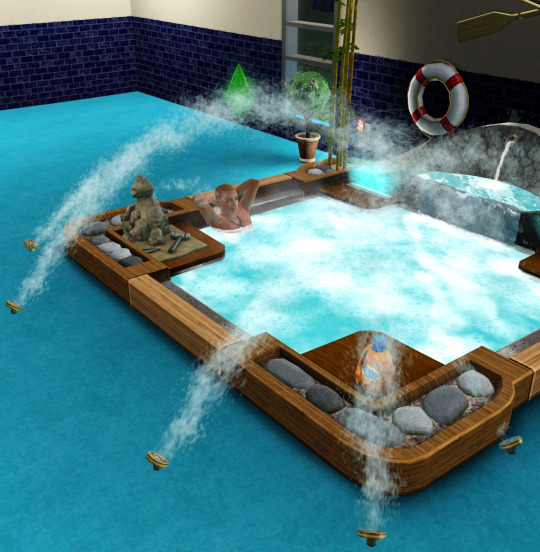
How to make hot tubs look better

Use the fountain sprays from Build Mode and make them spray more or less into the tub. It's hard to deny that this looks better.
(This would probably be applicable in real life too, but I don't have the well over 20,000€ needed to consistently test this. While I do have a bit of money in the banks, I'm not exactly Richard Branson. Whatever happened to that guy anyway?)
#sims 3#the sims 3#ts3#hot tub#fountain spray#fountain nozzle#jacuzzi#architecture#luxury#luxury aesthetics#spa aesthetics#top tip#I did not use buydebug or moveobjects for this#that's how good I'm at architecture#if snøhetta reads this hire me#richard branson#los sims 3#les sims 3#de sims 3
0 notes
Text

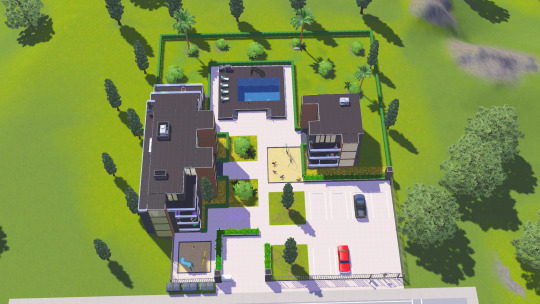
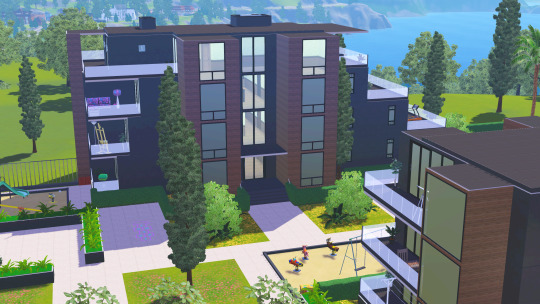
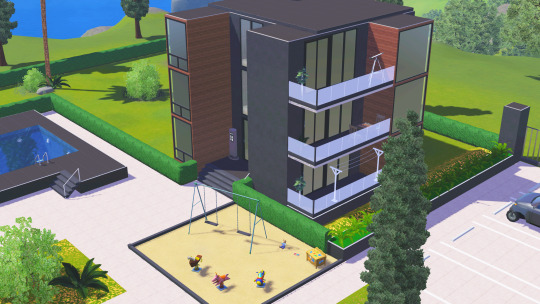
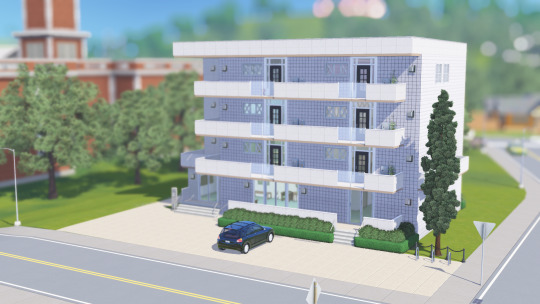
Apartment Complex for The Sims 3
No CC, no Stuff Packs. All Addons, but maingly BG (If there are any other add-ons, it means I used one item from that pack. :D)
I tried my best to make it without extra content.
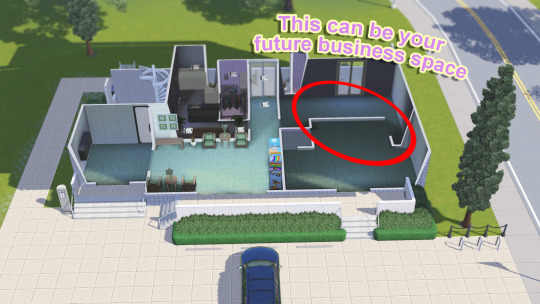
The apartment on top is empty because I prefer to build rooms myself.
If you want to choose another apartment for gameplay, simply use testingcheatsenabled on and buydebug on, then find the Hidden Room Markers and either remove or move them elsewhere.
The idea isn't mine; I just rebuilt it in The Sims 3. Credits: SoSimsy and their SpeedBuild.
❤️Download❤️
#ts3#the sims 3#ts3cc#ts3 cc finds#сімс 3#сімс#sims 3 apartment complex#sims 3 apartment#sims 3 build download#sims 3 build
294 notes
·
View notes
Text
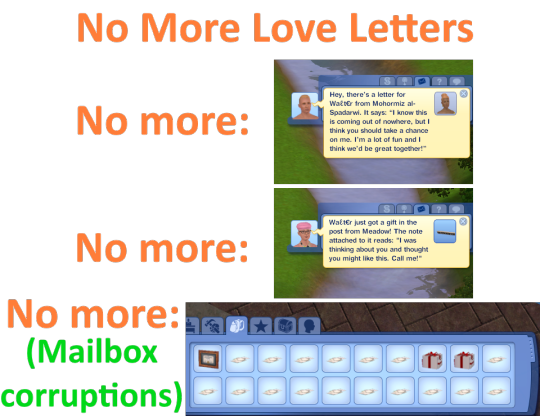

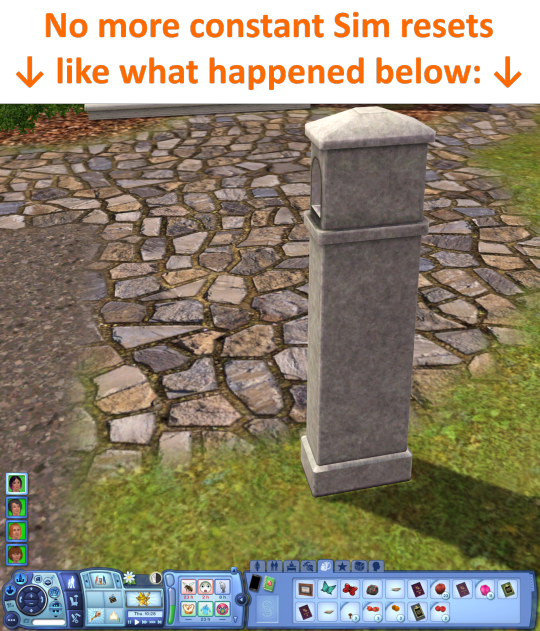
Prevent Love Letters to Avoid Game Corruption by Dandelion Sprout
"Arguably the most severe glitch in The Sims 3 that had not yet been consistently fixed in gamemods, is when an active household all of a sudden has their Sims be reset almost every time they choose "Get Mail" from their mailboxes, and the mailboxes would get continuously stuffed with unusable and unpayable bills and Omni Plant boxes, which are also very difficult to get rid off without e.g. NRaas Debug Enabler. The "No Bills" lifetime reward doesn't fix it, and replacing the mailbox with Buydebug doesn't fix it. No consistent widely working fixes for it have been found (NRaas Overwatch was listed in 2012 as being able to replace the "Get Mail" interaction with a fixed one, but is not listed as such in 2025). This overall situation left the glitch as a nightmare that made long-running savefiles near-unplayable... ...until now!
...continued on MTS."
More Info + Download @ MTS.
176 notes
·
View notes
Text

Pest Control by Twinsimming 🐞
Sims with dirty homes now run the risk of roaches spawning around their lot, similar to The Sims 2.
This is a script mod that can be placed in your Packages folder. It was built and tested on 1.69 but should work fine on 1.67.
Roaches
Once a day the number of dirty objects on your sim's home lot will be counted, and if the Dirty Threshold is met or exceeded, roaches have a chance of spawning.
There are three thresholds: Dirty, Filthy, and Vile. The dirtier the lot is, the more likely roaches are to spawn and in greater numbers.
Dirty Threshold = 5 dirty objects, 10% spawn chance (2 to 4 roach spawners)
Filthy Threshold = 10 dirty objects, 20% spawn chance (4 to 6 roach spawners)
Vile Threshold = 15 dirty objects, 30% spawn chance (6 to 8 roach spawners)
All sims in the active household will get the new Vermin custom moodlet that lasts 12 hours and subtracts -15, -20, or -25 points from your sim's mood depending on the threshold the lot meets.
Roaches spawning also carries a 10% chance of a sim getting sick (like TS2).
New Moodlet
Vermin: Given when roaches spawn on a sim’s home lot, lasts 12 hours, -15. -20, or -25 mood (inspired by TS2 memory)
Tuning
All of the tunable values can be found on the mod download page under the header “Tuning”.
Conflicts & Known Issues
Depending on the terrain paint, roaches may be harder to see. To find any roach spawners you may have missed:
Enter build/buy mode.
Enable buydebug cheat.
Look for any white boxes on your lot. Those are the roach spawners.
Enter live mode.
Stomp on the roaches.
Success!
This is a new script mod so there shouldn’t be any conflicts.
Credits
EA/Maxis for The Sims 2 and The Sims 3, Visual Studio 2019, ILSpy, s3pe, Notepad++, Gimp, and Script Mod Template Creator.
Thank You
Thank you to @monocodoll for helping with a scripting issue!
If you like my work, please consider tipping me on Ko-fi 💙
Download @ ModTheSims
647 notes
·
View notes
Text

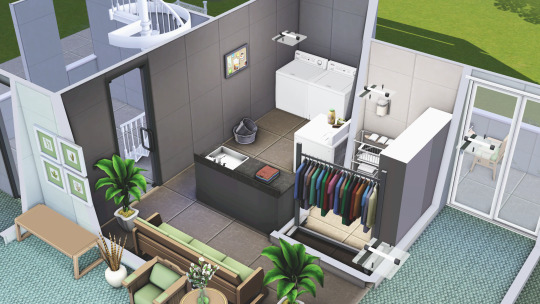
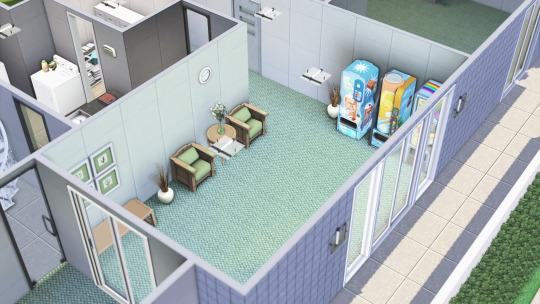
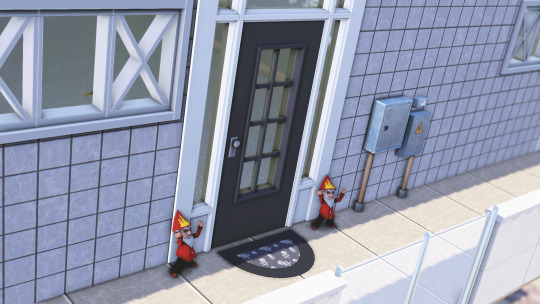
SimCare Medical Clinic

Sim File Share (currently slow due to traffic/site errors. I will keep trying to upload so check my Downloads page for updates.) Dropbox

Our SimCare team is dedicated to nurturing your health through proactive care and patient-centered treatment - whether you're seeking routine check-ups or specialized care. We’re here to support your journey toward a healthier life and ensure that you receive the best support for your health, every step of the way.

Price: 184, 065 Lot Size: 30x20 Lot Type: No Visitors Allowed Store Content: Click here CC Used: Click here File Type: Package Min. Required Game Version: 1.42 Packs Needed: The Sims 3, Pets (buydebug object), LN (elevator, floor, wallpaper), Ambitions, Generations, Seasons Simlish Clinic Signs (Add-on CC): Price: 1500 Environment: 7 HLOD: 122 Features: Shiftable, Frame is CASTable Category: Buy > Decor > Wall Decor Room: Living, Dining, Bedroom, Study EA Mesh Used: Painting Ranch 2x1 from The Sims 3 File Type: Package Min. Required Game Version: 1.42 Packs Needed: The Sims 3, Late Night
Hello and welcome back to my blog!
It’s been a minute, hasn’t it? Life got in the way and honestly, I’ve been taking my sweet time with this new build. It also didn’t help that the Sim File Share site kept giving me errors whenever I tried to upload it and I was supposed to post this last month.
Even now, I’m still dealing with errors on the site and after some frustration, I’ve decided to look into alternative sites for uploading content in the future. But after all the setbacks, it’s finally ready!
Thanks for sticking around and I really appreciate all the likes/reblogs, you all are the best! 💜
Click on the ’Keep Reading’ below for more information and pictures on this lot.


📣 Right-click on a picture and select ’Open image in new tab’ for a clearer view.

This clinic is designed to give a real-life feeling of visiting a healthcare facility. Inside, you’ll find a: reception area, consultation/exam rooms, pharmacy, laboratory, x-ray/radiology, restroom, locker room, staff break room, doctors office and a large empty room for the rabbit hole rug/door. Now, a couple of things to keep in mind - the layout is designed with a small staff in mind but you can use the extra space in the second floor, where the rabbit hole rug/door is placed, if you want to add more offices or any other services. Just make sure that there is enough space for the rabbit hole rug/door to avoid routing issues. I had to get creative with the signs for this build as I couldn’t find anything that felt right or any CCs that matches the layout of the clinic so I made my own directory signs. It is included in the download file and I’ve posted the details along with this post as it is an add-on for the clinic. I’m using a font called Simlish Deja Vu by gazifu@MTS for the signs and I’ve also included translations in the picture above. It’s not perfect but you know what? It does the job! I have also placed a big sign shown on the clinic that translates to 'Pharmacy' and I know it might seem a bit out of place but honestly, it’s the only large sign I liked that fit the building aesthetic I was going for. 📣 Please note that the CC included in the lot are not included on the download file. I’ve compiled a list for those interested in downloading them separately (please click the links above or go to WCIF Navigation page) but those are not required and will be automatically replaced in the game. Any expansion packs with build items listed in the Details section above may be required for this lot to show up in your game. This clinic has been such a fun build to put together and I hope you all enjoy the build. This lot has been play-tested and let me know if you experience any problems on your end!

TSR Tutorial - Create Custom Paintings Sims Wiki - Poly Counts for Creators TSR Workshop Simlish Deja Vu font by gazifu Pixabay
#petalruesimblr#community lot#the sims 3#the sims 3 hospital#the sims 3 clinic#decorative obj#lots#ts3#sims 3#sims 3 lots#ts3 simblr#ts3 simmer#ts3 download#ts3 screenshots#ts3 community#sims 3 download#sims 3 screenshots#ts3 hospital#ts3 clinic#ts3cc#the sims 3 custom paintings#ts3 custom paintings#s3ccfinds#s3cc download#the sims 3 wall decor#ts3 wall decor
182 notes
·
View notes
Text
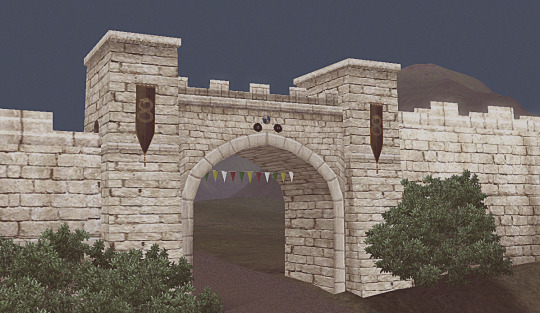
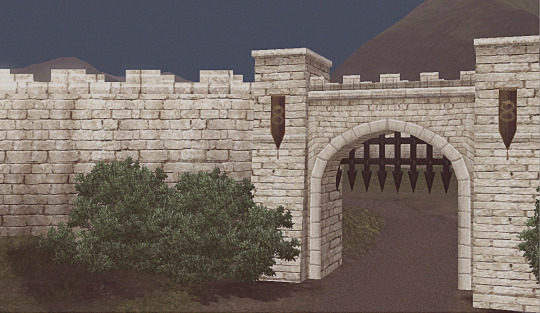
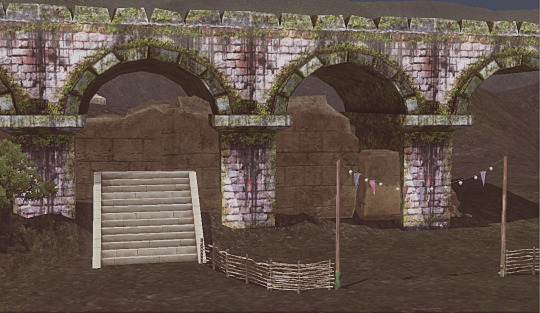
Simblreen Gifts 👻
Don't know if these are precisely Halloween-ish gifts but it's all I have to offer :p My pics really suck and were taken on CAW okay but the items are still cute <3
>Basically a bunch of medieval items to decorate your lots... or towns! Most items are available in Create A World and Edit Town (;
>Most items are low poly and way under 1k, with a few exceptions aka the shield (1,9k poly) & the medieval bridge (1,9k poly)
>General notes: I can't load buydebug in my own game so all items can be found either in sculptures or misc decor / The gates/arches don't come with the banner/flags, those are separate items! / The shield has two versions: the one that says "CAW" is a merged package with each of the shield variations, as CAW and Edit Town don't use swatches, so ONLY download it if you plan on using the items in edit town or CAW - if you don't then download the other version (:
>Last but not least, mesh/texture credits go to The Sims 3/4 for the Monte Vista walls and the items I converted from ts4; to Assassin's Creed Valhalla for the shield mesh I recycled from a previous post of mine (lol); to Nikolayy at Sketchfab for the bridge & to Reramil at Sketchfab for the deco fences and the flags. Also the shields' textures are from ArtStation and the original links are >here< >here< & >here<
>As usual, item names can be found under the cut or on my Patreon post (:
>Happy Simblreen!<
Medieval City Gate (+small version) - 292 poly
Medieval City Portcullis (+half up version) - 12 poly
Medieval City Wall 1 (+short version) - 32 poly
Medieval City Wall 2 - 92 poly
EP14 Old Well - 451 poly (not pictured... it's just a well with ivy)
Medieval Bridge - 1,9k poly
EP10 Mountain Hiking Stairs - 202 poly (decor only)
Medieval Fence V1 (straight version) - 56 poly
Medieval Fence V2 (angled version) - 56 poly
Medieval Entrance Flags - 290 poly
Viking Shields (+CAW version) - 1,9k poly (these look small because the gate is huge but they're actually the same size as EA's lifebuoy)
#ts3cc#s3cc#download#ts3 download#s3 download#happy simblreen#simblreen#conversion#4to3 conversion#4to3
276 notes
·
View notes
Text
youtube
Watch the trailer on youtube
Awakening of the Dragons – The skies have begun to stir...
🟢 EARLY ACCESS LAUNCH – v1.0 🐉
Witness the first signs of the return of dragons in your medieval Sims 3 worlds. In this early version (v1.0), dragons will appear flying across the skies in the distance, randomly soaring above your lands, bringing an eerie and powerful presence to the game.
⚠️ Please note: This version is still in testing phase. Dragons do not land yet — they are currently distant figures, adding atmospheric depth to your world. But fear not... Over the coming weeks, they'll grow bolder, louder, and eventually begin to descend. 👀🔥
✨ Want to help bring this mod to life? Support me on Patreon to get access and help me test this long-awaited project!
🛠️ How to add dragons to your game (for now):
Enter Build/Buy mode
Press Ctrl + Shift + C, then type: buydebug
Locate the Fog Emitter in the debug menu
With Shift held, click to place it
In the search, type "dragons"
While your lot is loaded, you'll see them soaring in the distance
World Used:
Lord Of The Rings Middle-Earth – @sims3medieval no Tumblr
This is just the beginning. 👉 Join the Early Access now and be part of the awakening. #AwakeningOfTheDragons #TheSims3Mod #DragonsHaveReturned #MedievalSims #EarlyAccess #PatreonSupport
#awakeningofthedragons#thesims3#ts3 wip#effects#sims3#sims 3 mods#mathmodder#the sims 3#the sims#ts3 mod#medieval sims#dragons#lord of the rings#fantasy sims#the sims 3 medieval#medieval#middle ages#Youtube
88 notes
·
View notes
Text
Not-a-tutorial - Lighting (Basics)
I really loved @nocturnalazure Storytelling tips, and figured I'd add one more chapter that I, personally, feel can be helpful to add the mood or maybe a bit more 🌶 to your pictures! (with or without reshade ;))
But first, go check out these tips by Nocturnalazure!
Camera Shots
Dialogues Part I
Dialogues Part II
Things to note before beginning:
This technique can be used with and without reshade/gshade/sweetfx or even editing images. (but I would recommend it!)
Make sure you're playing with at least "Lighting and Shadows" to highest settings. Otherwise this won't work.
All of the images in this post have been taken without being edited/haven't used reshade/gshade for them. (So, just the good ol' C button 😉)
A lighting mod can already go a long way! So, if you haven't yet, go find one before reading!
All Base Game compatible! No EPs/SPs needed
I'm in no way a colourist! But it may be cool to check the science behind it if you want to go more advanced on this :)
And with that said... let's get to it!
What do we need?
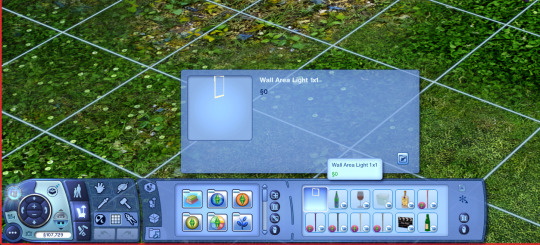
1. "Wall Area Light 1x1", (since it's simpler for sims)
You can find it under BuyDebug on (But first make sure you have Testingcheatsenabled true on!).
Pssst! I would recommend adding it to a catalogue! I made a "story" catalogue and added it so it's much easier to find it!
How to use lighting, the very basics:
Here we have Lolita Goth, outside with no lighting except for the world's.

Not to bad, eh? Well. there are a few reasons why we want to add lights to this scene.
Lolita's face is quite dark.
The reader will be very focused on the background AND the sim. (I personally keep looking at the bench, and less at Lolita right now.)
It's interesting, partially because of the lighting mod installed, but we can make it even more appealing.
NOTE: These techniques will work no matter if your sim is facing the sun or facing away from the sun! The results will always be the same with the lights.

Setup:
The basic setup is simple! You'll need 3 lights. One behind your sim(s), one sideways and one in front.
Back light = used for darker colours (blue, red, green, purple, orange)
Sub light = Used as helper colour for Back light. Can remove if not necessary. (helper in the sense of: Backlight is blue, adding purple can help being more interesting).
Front light = always white, flame, orange.

An example with the 3 lights used.
Setup:
Backlight = Red
Sub-light = Orange
Front Light = White
Why can't I just use the front light?
While it's not a bad approach in certain scenes, often the result is a bit too... tense:

(Left is with backlighting, right is with only front-light).
Personally I find the left image much more appealing, and more interesting to look at. But if trhe right picture is more your cup of tea, the feel free to use it!
Here's an example with the same principle but at night:


(Left is with backlighting, right is with only front-light).
Here, I think it shows it even more, how nice backlights can make something more captivating!
Now that we know about the basics of setting up our scenes... Let's get into the details a bit more!
How to use lighting for nighttime (Outdoors):
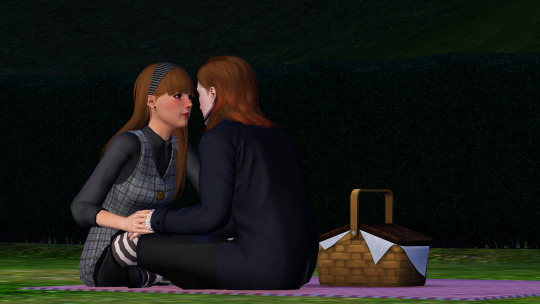
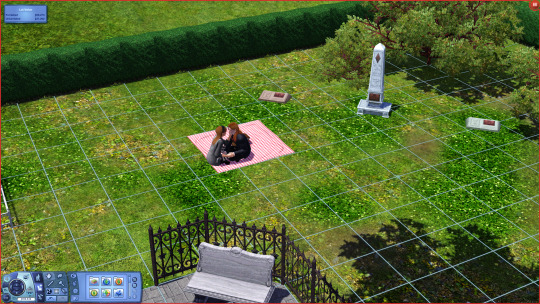
Here we got a scene with Lolita and Gunther Goth in a dark spooky graveyard, having a gothic-y picnick. In-game, this is the lighting setup as of right now:

It's lit up enough, right? While in regular gameplay this is definetly true, in a story setup we can actually make this much more interesting! But before that, here's our scene image:

The thing though is... while there is light, currently the eyes aren't drawn to Lolita's face at all:
So... how do we fix this?
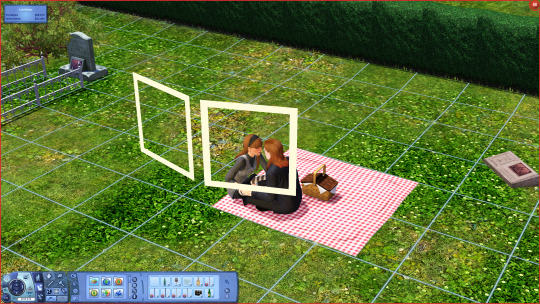
There are a few ways. But all require our Wall Area Light!
Setup 1:

One light can go a long way! In this instance, I added only one light, and used "Dimmed" so it still shows as if they're in the dark. (To select different light settings, use Shift + Click to see them ;))
There are scenes where this would be enough (though, having 2 facing from different directions would work better), it dosn't really in this instance.
The problem, however, is that it almost feels like there's a spotlight that is facing them. The scene may have got a bit more interesting (as we are more focused on Lolita's face), but just isn't there yet.
Setup 2:


By adding in a blue colour, facing the back and a little bit the front of our subject(s) we get a much more "fake" nightlight representation.
Though, a few thoughts here:
While in this scene I personally liked making the back colours blue, we can always experiment a little and change one of the blue into purple!
Now, the part of Lolita's face that isn't blue, we do want a non-blue colour. For this, I like to cycle through the following colours:
White
Flame
Orange
(Rarely! But sometimes red).
See result here:


This all depends on your preference, and if you want a deeper colour. Or maybe, to even set a certain dramatic effect! (this is where red may be nicer).
Make sure to also play around with the intensity settings of each light! This can really change things up!
Currently, I've set up the intensities like so:
Blue 1 = Bright
Blue 2 = Bright
Orange/white/flame/red = Dim
Though, if Blue 2 is purple for you, I'd recommend setting this one to normal or even dim.
How to use lighting for Daylight (Outdoors):
This one is much easier, and more straightforward! While backlighting is important here as well, it's less of a necessity in this setting.
Okay! So you've posed all the characters, set up objects, etc... and now we're ready for the lighting! Here's what I currently have:

Not bad, not bad at all without any lights... but what if we add them!


Here I added a White-dimmed light.
Better! In fact, if this is the kind of lighting you want in your scene, then feel free to leave it here!
What about a little more complicated lighting... sort of what we did with our night scene?

Here the left light is a white-dimmed light, and on the right we got a orange dimmed light.
it's not much, but it definitely added a nice shade to the scene! :)
Let's get to how we do this same thing, but indoors!
#the sims 3#ts3#sims 3#the sims#sims#sims 3 story#sims 3 storytelling tips#storytelling tips#ts3 screenshots#ts3 simblr#ts3 gameplay#thesims3#sims 3 blog#sims 3 gameplay#sims 3 screenshots#sims 3 simblr#sims3
248 notes
·
View notes
Text

It's the tutorial that no one asked for! And I blew my entire day on it, so you better appreciate it! :) No, seriously, this is as much for me as for anyone else. I don't do this process often, and when I do, I have to re-remember the steps, and sometimes I forget some of them and have to figure it out again. This will save future me from having to do that.
Even if you aren't me, if you're interested in being able to place diving lots in most any world you like and that has ocean, this will be relevant to your interests. Unfortunately, it is a sometimes fiddly process to get a working lot at the end, and I went into a lot of detail, so the tutorial is long, but please do follow it closely because if you skip a step or mess anything up, your lot will be wonky or it might not work at all, and I don't want to hear your whining. :)
Note that this is a tutorial for placing a new, empty diving lot, which is the first step in placing a downloaded diving lot or one that you yoinked from another world, but this tutorial doesn't cover how to get such lots working. This just shows you how to place an empty lot, which I'm assuming for this tutorial's purpose that you will then build/decorate yourself. Frankly, I've discovered that building your own is much easier than trying to ram square pegs into round holes, which is what placing downloaded dive lots often feels like, even if you know what you're doing. It can be as time-consuming, if not more time-consuming, to get a pre-made lot placed and working than it does to just build your own.
So, here we go.
Step 1: Pick Your Poison. Choose the world/save you'd like to plop a dive lot into, open it, and go into Edit Town. You can use any world you want, EA or custom, so long as it has accessible ocean in it. (More on that in Step 3.) I'm going to use Sunlit Tides, just because many people want to put dive lots in it yet can't always get them working.
Step 2: Cheats! You need some cheats, so open the cheat box by pressing Control+Shift+C and then enter these three:
testingcheatsenabled true buydebug on enablelotlocking on
Note that you need to enable testing cheats first because the other two aren't available otherwise.
Step 3: Placing the Lot. Go into World Editor and in the Lots submenu of it choose the lot size you want:

As far as I know, a dive lot can be any size you want from the minumum 10x10 to the maximum 64x64, any of the EA standard sizes or any custom size you might add using this mod. If you are bound and determined to try and place a downloaded/yoinked lot, then in my experience, it's best to make the new lot a little bigger than the lot you want to place, if possible, so that you have some wiggle room to get it to fit better. But, I'm assuming you're going to build your own here.
If you plan to do lots of terrain sculpting on your dive lot, bigger is better. That said, unless you're going to do something really elaborate, it doesn't have to be 64x64, the largest possible size, either. Smaller will mean that your prospective lot will fit in more places on the map. So, it's up to you. For this, I'm just going to place a 30x30 lot, because I'm not going to build/decorate it or anything.
Now, it needs to be said that not every world will be able to have diving lots. The world must have ocean, obviously, and that ocean must be routable or else sims won't be able to get to it. The ocean also has to be deep enough. Generally speaking, "deep enough" is if the water is dark blue. (Or green, or whatever color the lighting mod you use might make it.)
For instance, in Sunlit Tides here, it's pretty obvious where the deeper water is:
But you know what? I'm going to place a dive lot in some of the shallower water, anyway, because I/you actually can, within reason. And if you're interested in doing this in Sunlit Tides, I'll warn you that the deep spot in the pic above has a very uneven bottom. It's really not a good place to put a dive lot. And I'm not sure what the deep water on the outskirts of the map is like, but the good news is that much of the deeper and flat-bottomed shallows, as I've noted, work well.
So: With your chosen lot size selected, move your cursor around in the ocean where it seems to you that the water is "deep enough" until you come to a spot you like and where the lot grid is green. If the grid is never green, then the ocean likely isn't routable at all and you won't be able to place diving lots in that world. I have never run into that, myself, but I also haven't done this all that often, so it's certainly possible. Anyway, I'm picking here:
My advice would be to not make your lot too far off-shore even if you can do so, or else it will take sims a long time to get to it. Especially merfolk, because they always swim out to dive lots rather than take a water taxi, and they swim much more slowly than a water taxi moves. Once you find your spot, go ahead and place the lot. Doing so will create a square island, not a sunken lot. That's fine. We'll fix it in a moment.
Step 4: Change the Lot Type. Click the lot's icon and change the lot type to community and then choose "Diving Area" as the subtype:
Note that this option will only show if you've enabled lot locking. So if you didn't enter that cheat up in Step 2 or if you entered it incorrectly, rectify that situation now so that you can set the lot type.
Step 5: Sinking the Lot Enter the lot and flatten it with this tool in build mode:


This will submerge the lot so that it's level with the sea floor rather than being an island. You can now move the camera down under the water and have a look at your potential diving area, like so:

In particular, check the edges of the lot to see if there are any huge drop-offs or other great differences between the level of your lot and the surrounding terrain. Whether or not this will happen is world-dependent. Some worlds have very uneven/jagged underwater areas, which is what will make you end up with drop-offs, while others, like Sunlit Tides here, are (mostly) pretty flat.
You can see in the above pic that this lot is a little sunken along two of its sides. That's fine; that small amount of difference can easily be smoothed out with the terrain sculpting tools. If there are steep drop-offs or upward slopes, you can sculpt the lot to try to blend it with its surroundings, but be advised that 1) Interactable objects like dive caves can't be placed on uneven terrain and still be usable and 2) If you end up really deep down, the camera goes wonky and it's frustrating-to-impossible to build or play the lot. So, if you've got a huge drop-off and/or a steep upward slope on one or more of the edges of your lot, I'd recommend just trying a different spot. But, it's up to you. If you feel you can work with the uneven edges in some way, have at it. You are braver than me.
Step 6: Save that MFer. Once you have a lot you're satisfied with, this is a good time to save. So, go back to Edit Town and do that.
I recommend saving often during this entire process because, I don't know about your game, but sometimes mine will "hang" or even crash when moving between Edit Town and Build/Buy, especially if I do it a lot. And with this process, you will be doing it a lot, not to mention exiting out to the main menu and then going back into the save a few times. Since getting a dive lot placed can be a fiddly business, it sucks to lose a lot of progress to a hang/crash. So, in my opinion, you can't save too often, but in this tute I'll only prompt you to do it when you must.
Step 7: Exit Stage Right Remember long ago in the last step how I said you'll be exiting to the main menu a few times? Yeah, the first time is now. You do this because, for whatever reason, the game doesn't register changes made to the "structure" of dive lots without exiting and re-entering the save. So do that. Once it's reloaded go back into Edit Town and then back into the new diving lot. Because now it's time to place a dive buoy.
Step 8: Deploy Buoy The dive buoy is located in the debug items, so if you haven't turned on access to that yet, do so now. Then, go into the buy menu, sort it "by function," not the default "by room," and you should see this question mark here:
Click that, and then I recommend that you go to the filters on the right-hand side of the menu and choose just Island Paradise objects. Because you'll be going into the "Misc. Objects" tab and, especially if you have all EPs/SPs, there's a crap-ton of objects in there to sort through. So, filter, then choose the "Misc. Objects" tab, and you'll see this much-more-manageable selection:

Choose the dive buoy, as indicated, and place it anywhere on your dive lot. It doesn't matter where because (spoiler alert) this one's going to be deleted, anyway.
Step 9: Ogle That Shapely Buoy Once your buoy is placed, move your camera down to the ocean surface and have a closer look at it. Like so:
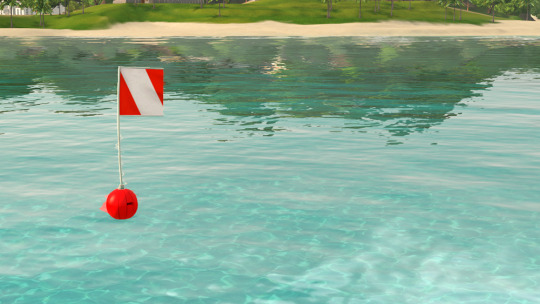
See how the ball part of it is just sitting on the surface of the ocean? That's bad. If you were to leave it like that, you'd have sims (and sharks, if you place a surface shark spawner) swimming/snorkeling in the air, if the lot would work at all. But don't panic! We can fix it. We just need to shift the entire lot down a l'il bit, so let's do it!
Step 10: Copy the Lot to the Library Go back out to Edit Town. Check to make sure that your lot designation is still "Diving Area." (Because during this process, it will sometimes change.) Then, save the lot to your library. The game will give you a warning about cancelling all sim interactions or something. That's fine. Just put a copy of the lot in the library. The thumbnail in the community lot catalog will look like a blue square.
Why are you doing this, you ask? Because now you're going to bulldoze the original. Why? Because we need to move the entire lot down a little bit, and you can only do that by placing a fresh copy of the lot. And you may need to do this several times until you get it at the right depth, so having a copy of the lot in your library is necessary. You can delete it out of the library once you've got your dive lot in the right place, if you want.
Step 11: I'm a Steamroller, Baby Once you've got a copy of the lot safely in your library, bulldoze the original lot you placed. Once bulldozed, the game will change the lot designation back to "No Visitors Allowed," so you'll need to change it back to "Diving Area."
Step 12: Go Down on That Lot To move the lot down when it's placed, you need this cheat activated:
setimportedterrainoffset -0.1
The value at the end can be whatever you want, as many decimal places as you want. A positive number will move the lot up, and a negative number will move it down. (You can use a larger negative number to make deeper a lot that's too shallow, and it can also be helpful if you're intending to try to place a downloaded diving lot on this lot so that it might better match the depth of the water in whatever world it came out of, but this won't always have the effect you want. For one, your lot will be down in a hole.) For the purposes of this tute, all I need to do is move the lot down a teeny bit so that the dive buoy on the lot is sitting IN and not ON the surface of the water. Hence, the -0.1 value.
(Now, I should mention that other tutes I've seen will have you just lower the terrain right under the buoy to sink it a little bit rather than doing this bulldoze-and-replace-with-a-whole-lowered-lot thing I do. This method can work, but I don't like it for various reasons that I won't go into for brevity's sake. I'm just telling you what I do, which has worked every time I've placed a dive lot, including shallow-water ones like this one.)
Step 13: Re-Placing the Lot Go into your library and place your saved lot back where it was. DO NOT ROTATE IT or else things will get screwed up. (Namely, your lot will become an island again and resinking it won't really work.) Just click "Accept." And then check its lot designation and change it to "Diving Area" again, if necessary, which it probably will be because stupid game.
Step 14: Ogle that Shapely Buoy 2, Electric Boogaloo Now, enter build mode and move the camera down to the ocean surface again to check the dive buoy. Ideally, it will now be sitting IN, not ON, the water, like so:

If it's still sitting on the surface, the lot needs to be deeper and therefore moved down farther, so go back to Edit Town, bulldoze the lot again, change the value of the imported terrain offset cheat to a larger negative number (Perhaps -0.5) and try again. Be aware that, as I said, once you get to larger numbers (as in greater than -5 or so) you start ending up with your diving lot down in a hole, which may or may not be workable.
Now, there is a marker on the buoy, the little black rectangle I outlined in the pic above. If the ball part of the buoy is at least partly in the water but that marker is still above the water, as in the above pic, the lot will still work, but there will be a "hop" (and sometimes a pause) when a water taxi or a swimming merperson crosses the boundary of the lot. The higher the marker is above the water line, the larger that "hop" will be. (Because, if you haven't figured it out yet, the dive buoy is what tells the game where sims can swim, vertically, on a dive lot.)
If such a hop doesn't bother you, you can leave the buoy as-is. If you're a perfectionist like me, you go back to Edit Town, bulldoze the lot, and change the value of the terrain offset cheat to try again. Do this as often and with as many decimal places as your level of perfectionism demands. :) I'm not that fussy, so I usually just move the lot down in increments of 0.1 until the marker is at or below the water line but the ball of the buoy is not completely underwater because you don't want the ball completely underwater, either. At least some of it needs to be above water. So, fiddle as much or as little as you feel you need to.
(For reference/scale, the gap between the marker and the water line in the above pic would probably be fixed by an offset of about -0.15 instead of -0.1. But it would also be fine as-is unless a little hop at the lot boundary will bother you.)
Step 15: Bye-Bye Buoy! Once you have the lot so that the buoy is where you want it, DELETE THE BUOY. I repeat: DELETE THE BUOY. Yes, DELETE THE BUOY. For whatever reason, dive lots drawn from your library that contain buoys won't work. I don't know why. They just don't. You need to place a fresh buoy. (I'm pretty sure this is why lots of people can't get downloaded dive lots or lots that they pulled from other worlds to work. Sometimes the answer is simply to delete the buoy, if the lot came with one, and place a fresh one.)
Step 16: Exit Stage Left Once you have DELETED THE BUOY and only once you have DELETED THE BUOY, go back to Edit Town, check to make sure the lot is still designated as a diving area (and change it back if necessary) and save. Why? Because now you need to exit to the main menu and reload the save again. So do that.
Step 17: Fresh Meat Buoy! Once the save is reloaded, go back into Edit Town, and check to make sure the dive lot is still designated as one. Redesignate, if necessary. Then, go into build/buy and place a fresh buoy, just as you did before. This one will be staying permanently, so place it where you actually want it to be. (Which really doesn't matter; aside from defining the vertical space of the diving lot, it just designates where your sim "enters" the lot.) If you want the lot to generate sharks on the surface, you can also place surface shark spawners now, too, as few or as many as you want, and because you have properly adjusted the height of the lot, the spawned sharks will not be swimming in the air. The spawners are also in debug mode, under the fish spawners. (There is also a spawner for underwater sharks. Do not put that one on the surface. Make sure you only put surface shark spawners on the surface.)
Step 18: Set the Lot's Skill Level You set the required skill level for the diving lot by going to buy mode (if you left it), making sure the hand tool is active, and then holding down control and shift while clicking on the dive buoy. Choose the option "Set Required Diving Level…" from the menu that comes up:
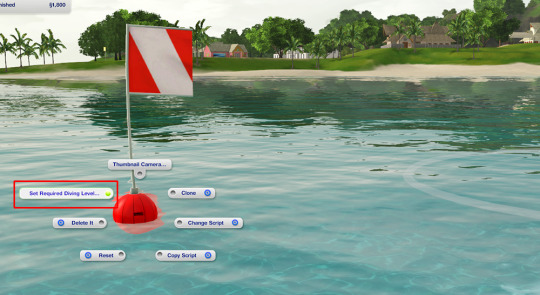
…and then from the resulting options under that choose a NON-ZERO number. For some bizarro reason, buoys default to level zero when placed, and a diving lot set to skill level zero is inaccessible even if a sim has level 10 scuba skill. (Good move, EA! Why is zero even an option if it doesn't work??) So, pick whatever skill level you'd like, so long as it ISN'T ZERO. (I suspect that this is another reason why people can't get downloaded dive lots that they place in a world to work.) Once you have the skill level set, go back to Edit Town and save.
Step 19: Test And now you're pretty much done. All that's left is to test the thing to make sure the lot works before you bother with building/decorating it. So, return to the game and send a victim to your new, empty lot and see if they successfully arrive (with or without a "hop" at the lot boundary) and successfully get themselves underwater. (My advice, for testing purposes, is to just give the sim you pick enough diving skill to use the lot. This can be done with NRAAS Master Controller.) Don't bother with doing anything further with the lot until you make sure it works.
Here is evidence that my lot, though shallow, works:
If your lot doesn't work, then something went wrong somewhere. Most likely, you missed a step or did a step wrong. I know there are a lot of words here, but they're all necessary to (more or less) guarantee a working lot in the end. So, try again. It's possible that you will have to pick a different location and start over, but I've been able to get a lot working wherever I've placed one, so long as it was in deep-enough routable ocean.
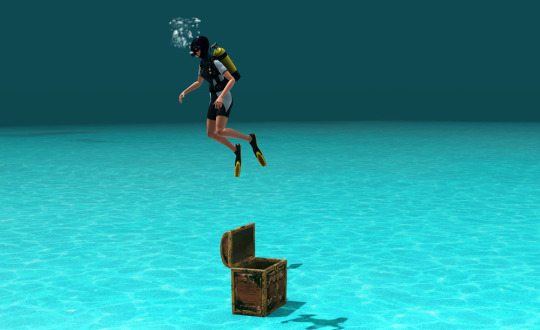
Step 20: PROFIT! Assuming that your lot works, "all" that's left is to build it! :D I'm not going to go into detail about that. It's all up to you. You can sculpt the terrain, paint it with whatever terrain paints you want, place objects, whatever. If you're in shallower water, any objects you place that are tall enough to stick out of the water will just be chopped off at the water line; you won't be able to see the rest above water. The corals and stuff are in debug mode under "Underwater Objects," but if you don't want the tropical look, so long as you have moveobjects turned on, you can place (almost) any object you want down there, aside from things like walls and fences and other build items that can't be drawn underwater. Rocks, plants, trees, columns, and anything from the buy and debug catalogs are all good. If such an object has a function, sims won't be able to use them, though. They'll just become deco. (So, no underwater basketweaving sculpting. Sorry.) So, go to town. Have fun. For this tute, I'll just mention a couple objects and their settings and we'll finally be done.
Miscellaneous Objects:
First, treasure chests. Like the dive buoy, they're located in the "Misc. Objects" of debug mode. There are two versions, one for land and one for water. Obviously, on a diving lot, you want the water one if you want any at all. If you do want to use them on your lot, place down as many as you want, and then set the diving skill level necessary to open each one and designate the treasure each one will hold. You do both by holding down control and shift while in buy mode with the hand tool active and clicking on a chest, just like setting the skill level of the lot on the buoy. This brings up this menu:
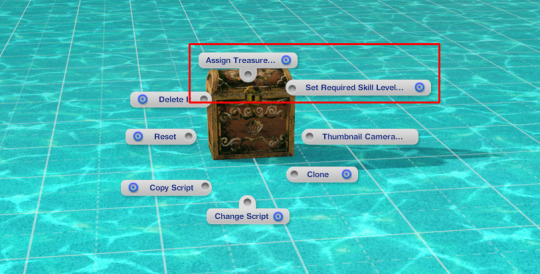
The "Assign Treasure" option gives you eight different treasures for the chest. You simply pick the one you want. The "Set Required Skill Level" option allows you to assign the diving skill necessary to open the selected chest. You can choose any number you like from 0 to 10. (Yes, zero is OK for this purpose, even though no one with zero skill can scuba dive, so…Yay EA.)
Then there's the dive caves. I think they are in the "Underwater Objects" section of the debug catalog; I'm not sure because a mod I use moves them to the regular rock section. Anyway, there are two styles, which you're probably familiar with, but they both function the same way. If you have more than one of them in the world, even if they're all on the same lot, your sims can travel between them, much like a subway. Unfortunately, I can't show you how to set this up because that mod I use to move the caves to the rock section also makes them recolorable, but it breaks setting up this functionality and I don't feel like hunting the mod down and taking it out. But it's pretty easy. You Control-Shift-Click on each one, give them a name, and then you can connect them by using the names you give them. Again, it works much like subways. It's pretty self-explanatory.
Finally, there's the fog emitter. If you're unfamiliar with this object, it's a base game object located in the "Misc. Objects" section of the debug catalog. The thumbnail in the catalog looks like this:
And it looks like this when it's placed:
They can be used on any lot, they disappear in live mode, and they can generate not just fog but many, many different effects. Literally thousands of different effects. You place the emitter where you want, and then control-shift-click on it and choose "Set Visual Effect" from the resulting menu:
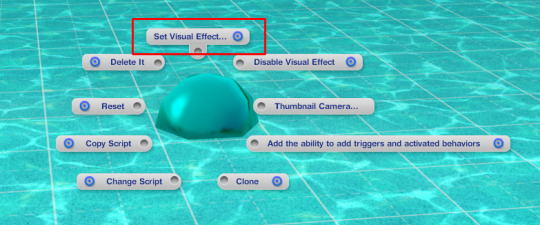
When you click on it, you get this:
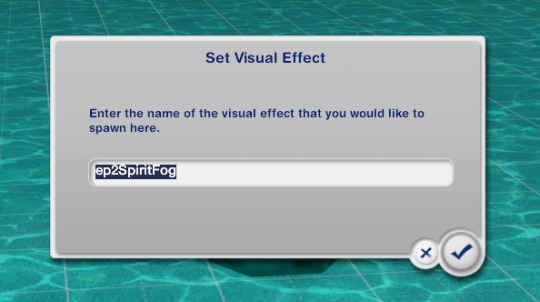
In that window, you type/paste the code for the effect you want. Of course, you will need to know the code for the effect you want. For your convenience, I've uploaded my list of effect codes, which is complete and includes the codes from all EPs, here. It's just a text file, and the codes are in alphabetical order. Since the list is all-EPs, some of them may not work if you don't have the EP the effect comes from, but if that's the case, then any such code you enter simply won't do anything.
The most relevant effects for a diving lot all start with "ep10," but there are others you could possibly use, too. Some of the names of the codes are more helpful than others in terms of knowing what it will do. Generally, you need to experiment. But, you can add schools of fish, single (but non-catchable) fish of all kinds (if you want catchable fish to spawn, you need to use the spawners, not the fog emitter), sharks (non-interactable), light rays, bubbles, glows, fog, all sorts of things, if you're patient enough to go through the list, look for interesting possibilities, and try them out to see if they will work for you. There are whole tutorials dedicated to the object, if you look for them. There's also a mod that makes them shiftable, which can be very useful, here.
One final suggestion: If you go through this process in a world that you know or even just suspect that you'll want to use again and you'll want the dive lot(s) you made in that future save, for the love of pie keep a copy of this save file somewhere. That way you won't have to go through all this crap again. Because even if you save a copy of your finished lot, unless you manage to place the empty initial lot in the new save in the exact spot you placed it when you built the lot, it's not likely to be quite right. So beware.
And with that, I think we're done here. If anyone has any questions, or if you decide to try to make your own diving lot and have questions along the way, feel free to hit me up and I'll do my best to help. Just keep in mind that I'm not an expert by any means.
358 notes
·
View notes
Text
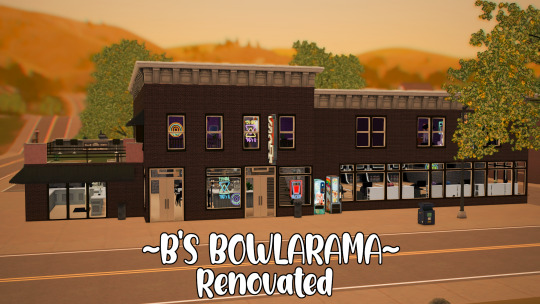
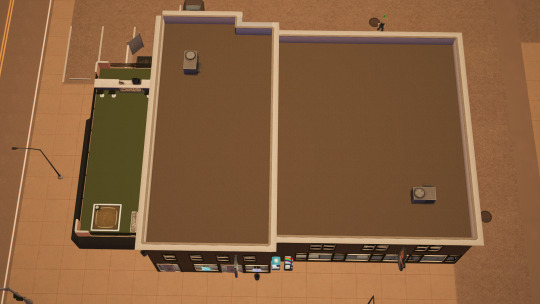
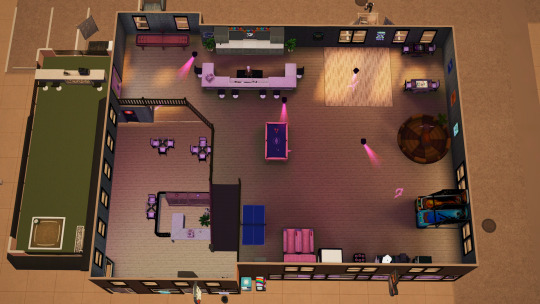
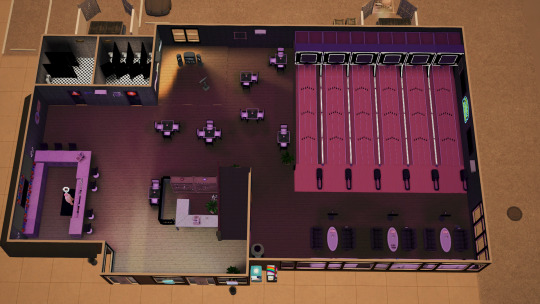
B's Bowlarama Renovation
Here is a renovation of the B's Bowlarama in University. I'm currently thinking about renovating the whole world because i absolutely ADORE AND LOVE the sims 3 university expansion pack. BUT there's not a lot to do and i rarely go to the university world because of it. So here is PART ONE OF RENOVATING THE SIMS 3 UNIVERSITY WORLD. (PS: I did change some things off camera so the build will look different than what you seen from the video.)
EPS USED: I don't remember which ones specifically, but I had all expansion packs enabled. SPS USED: None
~cc under cut~
CC LIST:
WALLPAPER:
Wanderingsims Brick Pattern: https://www.tumblr.com/wanderingsimsfinds/703528101689360384/advent-day-13-there-are-11-seamless?source=share
SEATING:
Martassimsbook- Cowbuild My Home Set: https://martassimsbookcc.wixsite.com/website/post/cowbuild-my-home-set
LIGHTING:
Sweetdevil Recategorized Buydebug Lights: https://sweetdevil-sims.tumblr.com/post/159223537483/so-youre-super-awesome-at-modding-things-and-i
Rose and Lips Neon Lights: https://www.tumblr.com/catharsim/182706509387/so-ive-had-most-of-these-done-for-like-a-year
Martassimsbook- Novvvas Neon Signs: https://www.tumblr.com/martassimsbookcc/638365981383737344/click-on-picture-for-better-quality-preview-is?source=share
CLUTTER DETAILS:
Lost & Found Stuff Animals: https://www.tumblr.com/pis3update/615957447888273408/breadslicesims-hello-eceryone-next-conversion
Bowling Shoes (#60): https://www.tumblr.com/tinudecocoon-blog/108114228472/clutteredcloset-shoes
Scattered/Lost & Found Shoes: https://www.tumblr.com/kitty-pixelz/656766343146782720/i-posted-these-awhile-ago-before-i-deleted-my-old?source=share
Bowling Balls: https://www.thesimsresource.com/downloads/details/id/1406602
Bowling Ball Cabinets: https://www.tumblr.com/over-waxedbanister/182590772685/ikea-malsj%C3%B6-cabinet-converted-to-sims-3-original
Menus: https://www.nraas.net/community/Business-As-Unusual-Bistro
Name/Score Board: Martassimsbook- Cowbuild My Home Set ^under the same set
Sweet Nothing Simoleon Register: https://blamseastore.tumblr.com/post/624161223027654656/sweet-nothing-simoleon-register
Shoes Rack: https://blamseastore.tumblr.com/post/617019209306734592/rustic-bakery-rack
ARCADE ITEMS *wink*:
Deceased Defenders Arcade Machine: https://blamseastore.tumblr.com/post/665831441763074048/deceased-defenders-arcade-machine
Classic Gumball Machine: https://blamseastore.tumblr.com/post/665827163179778048/classic-gumball-machine
Aces Gone Wild: https://blamseastore.tumblr.com/post/665822766829813760/aces-gone-wild
Free Throw Machine: https://blamseastore.tumblr.com/post/187639357587/buzzer-beater-free-throw-machine
OPITIONAL MOD:
The Transmogrifier: https://modthesims.info/d/592332/the-transmogrifier-aka-object-script-changer.html
Some of the items I used for this build I ended up changing the script of the objects to make them nonfunctional. I'm not sure if it will take affect without this mod, but if it does YAY, if not here's the mod you need to make those objects nonfunctional. Check the video at the top to see how to change the script of an object. PLEASE READ THE DESCRIPTION OF THIS MOD BEFORE DOWNLOADING! :)
DOWNLOAD: https://www.mediafire.com/file/o16xwj5309pv9g3/B%2527s_Bowlarama_Renovation.package/file
135 notes
·
View notes
Text
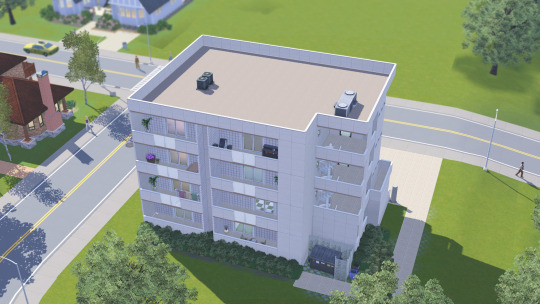
Apartment Complex 2 for The Sims 3
No CC, no Stuff Packs. All Add-ons
I left a bit space for business >:) (I personally wanted there to be BAKERY)
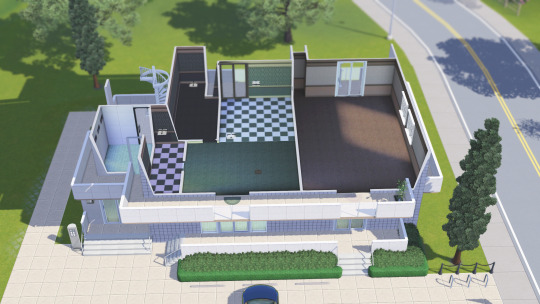
If you want to choose another apartment for gameplay, simply use testingcheatsenabled on and buydebug on, then find the Hidden Room Markers and either remove or move them elsewhere.
The idea isn't mine; I just rebuilt it in The Sims 3. Credits: Seenderella and their SpeedBuild.
❤️Download❤️
#ts3#the sims 3#ts3cc#the sims 3 apartment complex#the sims 3 apartment#the sims 3 build#the sims 3 lot
230 notes
·
View notes
Text
Infinite loading/saving screens glitch fix.
Infinite loading and saving screens can be caused for multitude of reasons. From save files too big or corrupted, to not turning off cheats in-game or store content missing appropriate fixes. Below the cut we'll delve into both situations and ways to handle it.
Before trying anything, we recommend for the players to give the next steps a go:
Clearing their cache
Following Steam guide, or our guide, to optimise their game.
Should the tips from these guides not work, we suggest the following solutions.
Infinite loading can be caused by: bloated (big) or corrupted files, too many mods, mods getting corrupted (broken or outdated) or incompatible with one another, duplicated or broken CC, too much of CC, Sims2 files in package form within your Packages folder, in-game options referenced in guides haven't fully been adjusted, long save files with large households and builds, gaming device issues. When the loading persists and doesn't move from the same point for a prolonged time, we suggest attempting to bring up Task Manager to "kill" the TS3 program. We do not recommend hard shutdown (holding power button), as it can cause device damage, unless the game is impossible to shut down through Task Manager.
Solutions:
Removing save files ending in .bad, and reverting to a previous save,
Removing missingdeps.idx from DCCache folder,
Steps of getting ErrorTrap, Overwatch, MasterController from the guides above - reset the town with MC on City Hall, use MC or Overwatch to delete all Sims' inventories in town, run daily town clean-up with ET and OW. Get Traveler if you have World Adventures, University Life and/or Into The Future,
Running a Save Cleaner on your problematic Save file,
Redownloading new copies of your mods, and making sure they're the latest updated versions which match your game version,
Researching to check if mods used are incompatible (if they edit the same thing), and removing the mods which clash,
Using Delphy's Dashboard for previous bulletin, along for checking CC in .package forms and making sure they're not Sims2 content,
Using Delphy's CUSTARD to check your CC in Sims3Pack,
Removing unnecessary (unwanted or duplicated) Mods, Custom and/or Store content,
in-game options of Memories and InteractiveLoadingScreens disabled + removing Memories from Scrapbook,
Using NRAAS Porter to pack up and move your household to another town with their relationships intact,
Using NRAAS Saver to Save thoroughly, under new name each title, instead of always saving over the same file,
Removing extra saves from your Saves folder (Documents > Electronic Arts > The Sims 3 > Saves) to another trusted device (we suggest an external disk), and keeping under a handful of wanted ones - the folder shouldn't have 4GB & more of files.
No space on Disk - the game requires at least 35GB extra free space to be able to run smoothly. Free up some space or reinstall the game on another disk/drive with more space (back up your The Sims 3 folder before this).
Gaming device ran out of memory or is incapable of running that specific save.
If all else fails, removing your current The Sims 3 folder outside of Documents to somewhere safe, and generating a new one. See if the issue persists with other towns and other families.
Infinite Saving is often caused by the same or similar reasons as Loading above, but there are few other things which can cause the saving loop. Besides using tips from above, we also recommend:
Turning off cheats - sometimes using cheats like moveobjects and buydebug can cause saving issues. Simply bringing up the cheat console and turning them with typing moveobjects off or buydebug off can help.
Also remember to turn off all cheats before saving, testingcheatsenabled false included.
For Store Content users, Store Content needs fixes to work properly. For those who've used Games4TheWorld's KT Store Fixes or those who never tried Store Fixes, we strongly advise to download and install Phantom99's Store Fixes.
Gameplays should be shorter (no longer than a couple of hours) for different reasons. Create a few save files. Fully exit the game. Clear the cache and remove unnecessary saves (or all except the last one). This allows your device to cool off and possibly regain the memory it lent to the game. You can get back into your gaming again.
Useful websites, forums and posts on the topic:
[FAQ] Troubleshooting Steps - Answer HQ (ea.com)
Steam Community :: Guide :: Toubleshooting for The Sims 3
SimsPlayer's detailed post on Fixing Problems with Custom Content and Mods on Reddit
Bad CC – Crinrict's Sims 3 Help Blog
Incompatible Mods – Crinrict's Sims 3 Help Blog
Long Loading Times – Crinrict's Sims 3 Help Blog
Sims 3 won't save :( : r/Sims3 (reddit.com)
Fix for Infinite Save loop? : r/Sims3 (reddit.com)
Game is on the infinity saving screen? : r/Sims3 (reddit.com)
Mod The Sims - Infinite saving loop + Continuous loading loop - any solutions?
Game take long load on loading screen. (Stuck sometime) :: The Sims™ 3 General Discussions (steamcommunity.com)
14 notes
·
View notes
Text
Unavailable objects made available by Dandelion Sprout
"There's a lot of objects in Sims 3 that Maxis didn't trust anyone who bought their game to do anything with, but which still remain in the game's code, and which can be made accessible again with relatively simple parameter changes in S3PE OBJD files. That's right: No item cloning, no custom content, these are the real deal objects that Maxis used when developing the game and its expansion packs. This mod makes approximately 136 objects available in one or more of Buy Mode (often in BuyDebug), Build Mode, and/or Edit Town, contingent on the relevant expansion packs and/or one stuff pack being installed. For instance, if only the base game is installed and nothing else, 52 objects would be made available by this mod.
...continued on MTS."
More Info + Download @MTS.
100 notes
·
View notes
Text

Turn your average Sims experience into a city simulation game.
A challenge for The Sims 3 by Junoivyy at Twitch. Check out my streams of the challenge!
twitch_live
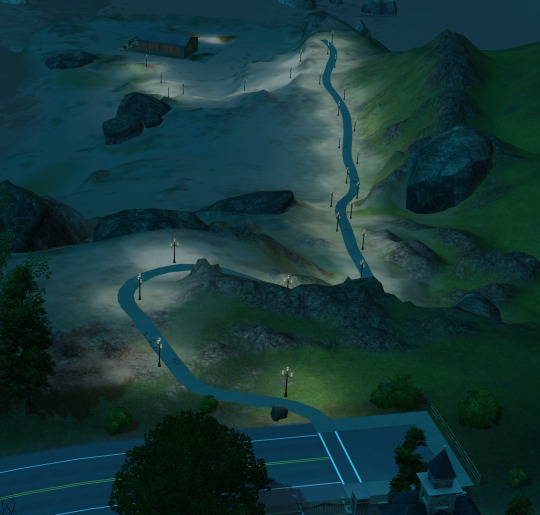
About the Challenge
This challenge will let you start a fresh canvas - a new society - where everything is created by you and your active sims. You start a new life in a completely empty world. Create your own story! The catch is that the challenge is played similarly to a city builder sim, whereas all public buildings and lots must be funded by a tax system. Buildings also have skill requirements and other restrictions. There is a chart for this, no worries!
Similar challenges exist and I do not take credit for the idea of building a new world with restrictions and a tax system.
"May your new society be a perfect hippie utopia
or a breeding ground for drama and chaos."
Starting the Challenge
Recommended Mods
Cazarupt's Custom Rabbit Holes
Will make it possible to build your own rabbit hole buildings that fit the aesthetic your town is going for.
Nrass MasterController
Has a setting to retain dreams and opportunities when switching between active households, and switching households can be done in live mode by clicking on a house’s icon (less lag).
Nrass Story Progression
If you want to keep story progression on while still being in control of your unactive sims this mod is perfect as you can choose whether or not your sims can move out, get pregnant, etc, while being unactive.
Recommended Settings
Turn off automatic vampires, werewolves, witches, etc. (NOT pets)
If it is not turned off it will turn your households that are not currently active into occults to fill a quota.
Turn “Retain dreams and opportunities” under “All” settings in Nrass MasterController.
Accessible by using a computer since a city hall will not be present in the beginning of the challenge.
If you don’t want your sims to get pregnant, move or do too much without you playing with them, turning off story progression completely is recommended. (I prefer this setting). OR use Nrass story progression for custom settings.
Warnings
Do not switch households while a pregnant sim is giving birth.
The pregnant sim will never leave the hospital.
You will need
An empty world.
Do not remove lots unless you know what you are doing. They can be hard to place back. (Tip: Removing buildings takes forever! There are downloads of emptied world versions out there.)
A founder household.
An empty lot.
A park (or more of them).
Do as you please with the parks, but they should only have a naturally occurring landscape with trees and lakes, for example. No park benches or lights, for example. Plants that carry harvest are also allowed in the parks and can be added with BuyDebug.
Harvestable plants should only be plants that are available from gardening skill 1.
The reason for starting with parks is so that there is a place for your sims to hang out, collect items and potentially harvest from plants.
5000 simoleons as your starting funds.
How to: first use the "testingcheatsenabled true" cheat, then use "familyfunds yourfamilyname 5000"
Rules and guidelines
BuyDebug is generally not allowed.
Can be allowed to add cosmetic items such as a "hidden room marker" for your custom rabbit holes. Use your discretion when it comes to what is helping you progress or not.
The free future portal is not allowed.
It must be bought to be used. Also remove the simoleons you gain from selling the future portal for the first time.
All public lots and buildings must be funded by tax money and cannot be built freely.
Everything must be created by you; both sims, lots and buildings.
All rabbit hole buildings are allowed.
Each public lot allows for two households to live in the world.
If you have built two public lots, you are allowed to have four households.
The existing parks do not count, and the first public lot built will allow for one new household. The next after that will allow for two more, for example.
5 public lots = 10 households, including your founder household.
You don't have to add new households, though, add them when you want to.
A sim moving away from their family counts as a new household. If you do not have enough public lots for them to become their own household the sim cannot move out.
New households' starter money
Households added before the City Hall is built will start with 5000 simoleons
Households added after the City Hall is built will start with the standard starter simoleons amount.
Do not play the same household for too long
All your households in the town should be in rotation but there are no strict rules. Play the household you want just as long as you remember to switch every couple of weeks or so.
Tax system and "Town's Funds"
Town's Funds
It is the money that will be spent on public lots.
It will be filled by collected taxes and bills.
Households can "donate" to the Town's Funds if they wish.
How I recommend to keep track of the Town's Funds
Use a calculator and a percentage calculator website (or google).
Keep a physical notebook, excel sheet or a different digital documenting method in front of you.
Do your taxes calculation every Sunday.
Note all bills as soon as they get paid so you have them ready until the end of the week.
Tax rules
Taxes will go into to the Town's funds.
10% of an active households's simoleons will be taxed every week.
15% of an active household’s simoleons with a house value of 50,000 or more will be taxed every week.
Bills also go to the Town's funds.
The 10-15% tax amount should be removed from the household's funds with the familyfunds cheat.
Taxes should be calculated every Sunday.
1 public lot = 2 households allowed
This also applies to lots that do not have restrictions like a library or a bar.
If a rabbit hole building includes two instances or more the requirements for them are merged and will cost 10,000§ less for two instances or 20,000§ less for three instances.
Anything that is placed on a public lot must be funded by the Town's Funds. Pay attention to the lot value window.
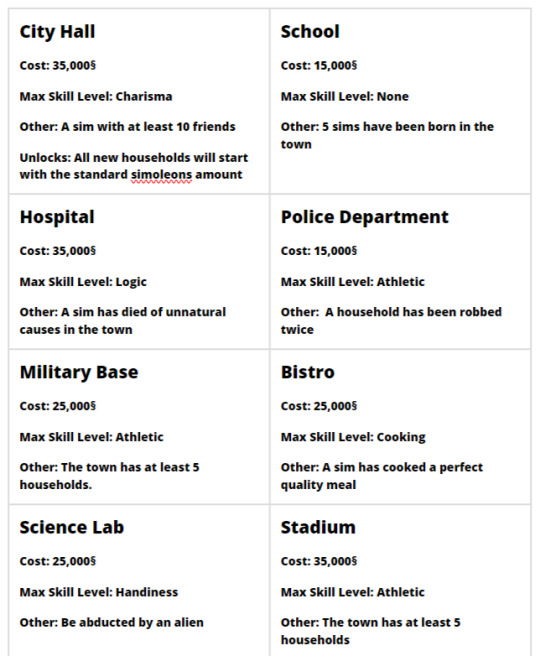
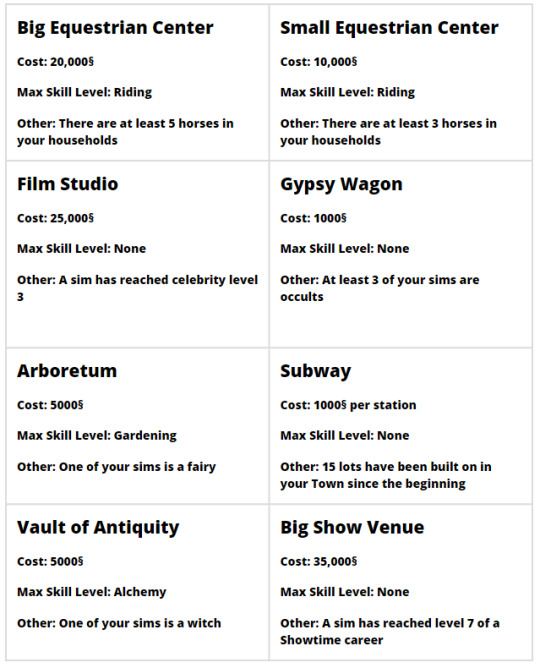
Base Game
IMPORTANT: Costs only apply to the rabbit hole buildings, if you have custom rabbit holes you can use your own budget. Other special lots like a library, karaoke bar, art gallery and such do not have a set budget or requirement.

Other
#the sims challenge#the sims 3#the sims#sims challenge#the sims 3 challenge#BYSC#build your society challenge#build your society#junoivyy#twitch#sims 3 challenge#sims 3#sims 3 gameplay#ts3#ts3 gameplay#ts3 challenge
10 notes
·
View notes
Text
Banyan Bend
While looking for something else the other day, I came across a link for this world and all of its original lots that were created by the 3 administrators of the old Sims Crossing site. Plus, the original sims created to live here were also up for grabs. Someone over on the Sims Cave uploaded them all. Which was great, since I had lost some of the stuff during my last 2 computer meltdowns and it was impossible to find any of them previously. So, if any of you want to play this world, hop on over to the Sims Cave and type in Sims Crossing - or Banyan Bend.
Anyway, this world was created right after Late Night came out and has no CC. It's their vision of how Twinbrook should have been. And while I like parts of it, there is room for improvement. But CAW hates me, so it is what it is.
I'm currently redoing lots. They placed the movie studio lot from Bridgeport on probably the only 64x64 lot in this town. And since I want to use that for my festival lot, I needed to find a movie lot on something smaller. They placed 2 of those dome thingies - that thing next to the science center in Sunset Valley - on 2 different 60x60 lots in town. One is for butterflies, while the other is... well, I'm not sure what it is. The butterfly one is down by the industrial lots - just down the street from their movie lot. So, I bulldozed it. Yes, I did! My greenie sims are not happy, but I'll let them have that other dome lot to keep their bugs in. I know! I'm way too nice to my sims.
I tried several different lots on this space before I accidently came across a lot over on MTS, created by someone called mccorade. It was created with Riverview in mind. And while it wasn't exactly what I wanted, it was a good start. And it was on a smaller lot. I think maybe 50x50. So, thank you!
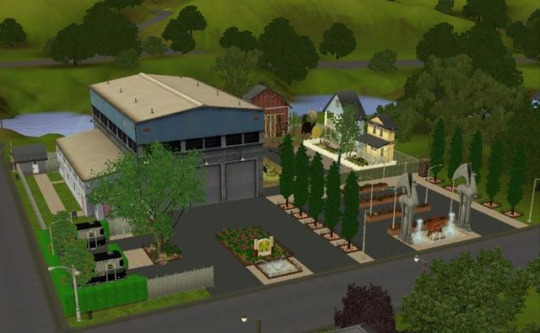
Anyway, here it is now. I have made several changes - as I normally do - but the bones are mccorade's.
First thing I did was resurface the parking areas and change out the fencing. This is Banyan Bend! These rednecks can't afford fancy fences, so chain-link it is! I also added the fountains and those 2 large statues. Just because. I also made that main flowerbed smaller - so delivery trucks could access the main building. Then, on the backlot, I redid the houses - mostly used different finishes and added some more landscaping.
Then I made that area where the 'stars' can hang out in their trailers. Oh! And I switched out all the trees.
And finally, in the back, I added a guard shack, more fencing and that driveway to the back doors of the main building. And viola! Banyan Bend has a new place to make movies! Go me!
While I was in the area, I also got rid of the old science center lot. Since I used that hospital from Supernatural on the lot in town where they had their hospital RH, I really didn't need another lot wasted on my science sims. (This world was created before EA came out with their combo lots). So, I decided to make another 'movie' type lot.
This one is loosely based on that KWLW Studio lot from the Sims 1. This is where the hit series, "As the Stomach Churns," and the "Next Great Sim Nation Idol" are filmed. And the local Banyan News channel churns out their daily feed. I used that smaller stage - the 6x7 - one for my Idol stage. If any of you want it, it's over on TFM's Naughty Sims Asylum. You have to be a member, but sign-up is super easy. Once you get over there, type in Shimrod's mods. It's his BuyDebug Genie Lamp and smaller showtime stage mod. Pop it into your overrides folder and viola! A smaller stage is yours! Easy-peasy!
Anyway, I'll post interior pictures later. I was moving in sims today - after redoing the generic cemetery they had. Had to kill off sims and then replace all the fake graves with ones that will generate ghosts. Plus, I write bios for all my families and then - with the help of MasterController - create conflict amongst all of them. It's a dirty job but someone has to do it. Which is why I am the simgoddess and my sims aren't!
#sims 3#Banyan Bend#a BIG thanks to mccorade over on MTS and#Shimrod and#the lovey people over on the Sims Cave#Thank you all!
9 notes
·
View notes