#sims 3 installation error
Explore tagged Tumblr posts
Visit Tumblr Blog
Explore Tumblr blogs with no restrictions, modern design and the best experience.
Last Seen Tumblr Blogs


Fun Fact
Tumblr Inc. is using 66 technologies for its website.
Text
Sims 3 Installation question
I have a new laptop. And I'm setting everything up now. Installing all Sims 3 EPs and SPs again. I'm old school, so everything is on discs. It was smooth sailing (though a test of patience) until the installation of Showtime. I ran into a cyclic redundancy check. So I did a little search, but the only work around I found was downloading the EP through Origin and installing it using the registration key from the disc. But, Origin is now replaced by the EA app for windows, which doesn't have that option.
So, who has the answer? Is there any other way to solve the CRC error? Or anywhere else I can download this EP? I obviously have a registration key. I don't really want to go through something like Steam, since I installed all the others from disc.
34 notes
·
View notes
Text
Right, so, after reading some error logs, obtaining a copy of the objects.package that shipped with the Sims 2 rerelease, and talking about this with Lazy Duchess, I have a conspiracy theory about why the rerelease is so damn broken

So first, I looked at an error log that was happening in the Enthusiasm Tracker. It was coming from the function that signs sims up for a magazine subscription after they choose that option on the phone. It's a very short function, all it does is 1) check to see if the family has a magazine subscription token, 2) create one if it does not already exist, and 3) set a property on the token regardless of whether 2 was necessary or not. All three of these actions make use of the Manage Inventory primitive, which controls not just sim inventories, but also tokens like this, memories, and gossip. I compared all like five lines of this function to the one in my objects.package, that I have from the Ultimate Collection, and they were exactly the same. But for some reason, in the rerelease, this throws an error. There is no explanation at the level of this function. I kind of scratched my head and thought, maybe they changed how the magazine subscription token works in this version, and forgot to update this function? Or something?
Next, there was an Too Many Iterations error log that had a very obvious cause: for some reason, the active family had over 500 tokens in its inventory. The family inventory isn't listed in the error log, so have no idea what those tokens were, or how there came to be 500+ of them. BUT. The aforementioned magazine subscription token is a token that goes in the family inventory. Maybe these two problems are somehow related. Are those 500 tokens all magazine subscription tokens, or something?
And then there is the infamous error that the game now throws when a sim goes to get abducted. I didn't see an error log for this one, but I was making a post on MTS listing all of the known issues with the rerelease, and someone mentioned there that the issue is not so much with the abduction as it is with other sims reacting to the abduction, and if there are no sims on the lot to react to the abduction, the error does not occur. Someone else then mentioned that the Abduction Reaction Fix mod that I made actually fixes this error. I made that mod, I know exactly what it does. What does it do?
Well, you see, objects in the game all have what is called a tree table, which is a table of interactions and the functions that need to be called when those interactions are triggered. One of the interactions on the telescope is the interaction to run to the telescope after someone has been abducted. But, in the Free Time expansion, a lot of new interactions were added to the telescope, and for some reason, EA decided to renumber all of the functions when they did that. They forgot to update the tree table, which references functions by their numbers, and as a result, the function that was called when sims were supposed to do the run-to-telescope interaction was actually the function that gives sims credit for discovering a new planet. In my mod, I fixed this, so that when sims are supposed to run to the telescope, the proper run-to-the-telescope function is called instead.
So, the error happens when my mod is not installed (when the planet discovery function is being called erroneously) and not when it is (when the run-to-the-telescope function is called instead). So the error must be coming from the planet discovery function. What is in the planet discovery function? It is almost identical to the magazine subscription function. It checks for the planet discovery token, adds it if it isn't there, and then modifies a property on it, using Manage Inventory. So this is exact same bug. And other people are reporting that some sims cannot gain memories - another game function that is handled by Manage Inventory. There is also an error that happens after a sim cooks food - one thing that happens at that point is that tokens and memories are added to the sim's inventory marking that they have successfully (or unsuccessfully) learned to cook that food.
So at this point, my theory is that EA somehow broke the Manage Inventory primitive. It's used all over the code, to do all sorts of stuff, if you break something that ubiquitous and fundamental, of course it's going to cause a whole lot of seemingly completely unrelated errors. Manage Inventory is now going hog-wild, throwing errors, adding hundreds of extraneous tokens to inventories, refusing to give sims memories, and who knows what else. I can feel it, this is the answer
562 notes
·
View notes
Text
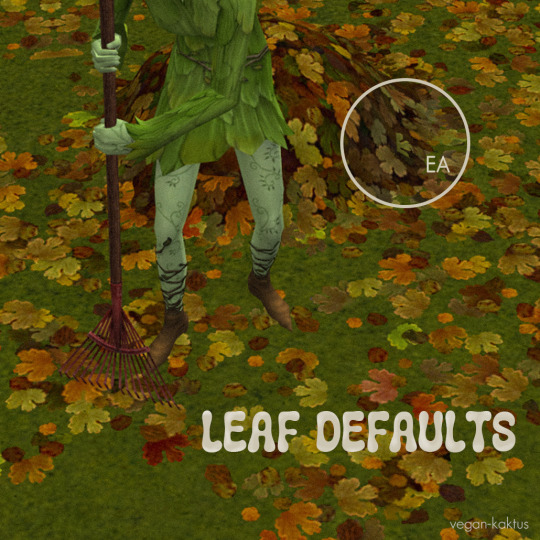

EA's leaves are kind of dull, and I personally think TNW's are too bright, so here's my spin on a leaf default + a new mod :-D
Leaf variety mod
There are 4 different leaf textures in the game files but only one is used. I talked with @shastakiss some years(?) ago and she mentioned an unfinished mod Neder started working on to make the leaf use different textures. Unfortunately, Neder couldn't get it to work. Shasta kindly sent me said mod and I handed it over to @lamare-sims last year who of course managed to fix it (thank you so much once again, you're a legend!!)
Note #1: worth mentioning, this mod will only affect leaves that spawn after you've installed the mod! the same goes for my mesh fix included in the default below. Note #2: if you already have this mod in you dl-folder, delete that file and use the one from this download if you're planning on using my default (otherwise my uv-map and texture edit will not work).
Defaults
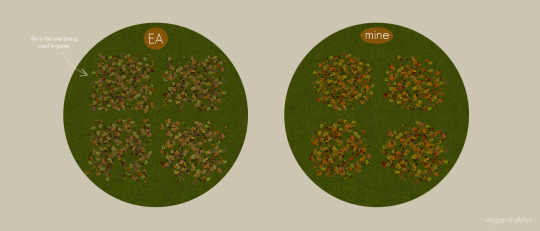
Replaces all 4 leaf-textures with new, more colorful and less blocky textures. I also edited the "effect"-textures of single leaves (the ones falling from the trees). This default can be used without the mod mentioned above, but then only the "original" texture will be used - see second image.
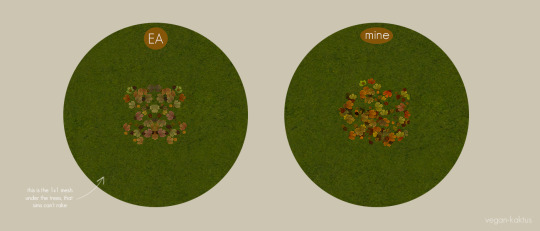
The leaves that spawns under the tree (the one sims can't rake), it was impossible to make it look good with any of the four textures, so I re-mapped it and gave it it's own texture (256x256px). There's also an optional default for the rake included, I edited a tiny error in the mesh and gave it a texture makeover. I made a separate LOD90-default for the leafpile (meaning: the mesh in neighborhood view) and instead of replacing the textures I repo'd them, meaning that the LOD90 default works with any leaf texture default you might use (it will only be showing one texture in neighborhood view).
Texture sizes are all the same as EA's:
Leaves: 512x512px x4 (my default +1: 256x256px)
Rake: 128x256px
Leaf effects: 32x32px x3
Edited leaf-related cc
I edited Sophie-David's leaf pile pet bed (the mesh) and repo'd it to leafpile_txtr, meaning the mesh will now pick up my default (or any other default you might have for leafpile_txtr, and if none - EA's original texture). The mesh now needs seasons + pets, since it's repo'd. Their recolors are not included, so be sure to download them from the link above if you want them and replace their mesh with mine!
I also edited Shakeshaft's leaf cover mesh (warning T$R) , I repo'd it to one of the leaf textures and made recolors - also repo'd - to the rest of the textures. This mesh and recs now need seasons, this also means that the mesh and recolors* can be used without my default.
*with the exception of rc4, which is repo'd to my custom leaf texture, found in my leaf default.
Recommended mod
I recommend simler90's Gardening Rake Leaf Pile Mod or jfade's leaf pile fix (I have no idea what the difference between those two mods are, they edit the same thing so choose one of them).
Nothing in this download is dependent on each other* so feel free to pick and choose what you want :-) remember you can only have one default for the leaves, meaning that if you have any other default (1, 2, 3, 4) or Shakeshaft's/Sophie-David's original meshes, make sure you remove them before installing my files. Everything has been compressed to reduce file size, as usual. Do let me know if I messed up anywhere!
*with the exception of rc4, see above.
DOWNLOAD: SFS | MTS
Credits: Neder, @lamare-sims (many many thanks!!), @shastakiss, Sophie-David, Shakeshaft and lasty EA.
#ts2cc#sims 2 custom content#sims 2 default replacement#dl: default replacement#dl: object default#dl: mod#dl: object recolor#dl: mesh fixes#omg I ramble so much im so sorry#the funny thing is im really quiet irl and so afraid to be a bother#but on my download posts? i TALK#i just have to explain everything and in great detail#my brain just says i have to do it#it's hard to explain#everytime i make a post here on tumblr i always think back to that one anon - saying they miss my posts#that's literally my most treasured ask hahaha you anon are the reason i dare to post#i swear to god even in the tags i ramble
768 notes
·
View notes
Text
DUE TO COPYRIGHT ISSUES, THIS GUIDE IS CURRENTLY OBSOLETE.
hi, i just want to let everyone know, if any of you are frustrated with the state of TS4, i've compiled several different tutorials and made an all-in-one guide for playing TS2 on modern computers. it has all the fixes necessary to prevent crashes + pink flashing, and tips to make the game look just as nice as TS4, if not better!
please let me know if this guide is useful for you, or if anything needs to be changed/added/removed. i've tested it myself on multiple computers, and, while it works for me, there are many possibilities for error, considering that everyone's computer is different.
thank you for reading! i hope you like it :]
EDIT: i've set up a ko-fi, if anyone wants to show their appreciation for my work!! thank you so much to anyone who donates!!
EDIT 2: if you're going to copy my guide, especially if some parts are word-for-word, please give me credit, just like how i gave credit at the end of the tutorial to all of the creators whose guides i referenced in the creation of this carrd. as far as i'm aware, i came up with this idea of an all-in-one carrd first- having a large platform does not make you better than anyone else or "above" giving credit to others.
EDIT 3:
the web installer has been taken down for a copyright issue. i will have to find an alternative method of downloading. as of right now, this guide is obsolete, and reblogs will be turned off until the issue is fixed.
last updated: february 16th, 2025, update info in the replies.
#evie.txt ♡#evie's ts2 guide#the sims 2#sims 2#TS2#ts2cc#sims 2 cc#ok to reblog!#this all being said#while anyone can use my guide#i can and will block anyone anti-LGBTQ/anti-trans who interacts with this post specifically#i'm literally a nonbinary lesbian what are you doing here
919 notes
·
View notes
Text
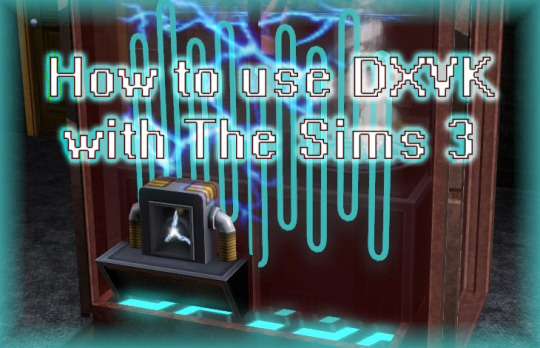
How to use DXVK with The Sims 3
Have you seen this post about using DXVK by Criisolate? But felt intimidated by the sheer mass of facts and information?
@desiree-uk and I compiled a guide and the configuration file to make your life easier. It focuses on players not using the EA App, but it might work for those just the same. It’s definitely worth a try.
Adding this to your game installation will result in a better RAM usage. So your game is less likely to give you Error 12 or crash due to RAM issues. It does NOT give a huge performance boost, but more stability and allows for higher graphics settings in game.
The full guide behind the cut. Let me know if you also would like it as PDF.
Happy simming!
Disclaimer and Credits
Desiree and I are no tech experts and just wrote down how we did this. Our ability to help if you run into trouble is limited. So use at your own risk and back up your files!
We both are on Windows 10 and start the game via TS3W.exe, not the EA App. So your experience may differ.
This guide is based on our own experiments and of course criisolate’s post on tumblr: https://www.tumblr.com/criisolate/749374223346286592/ill-explain-what-i-did-below-before-making-any
This guide is brought to you by Desiree-UK and Norn.
Compatibility
Note: This will conflict with other programs that “inject” functionality into your game so they may stop working. Notably
Reshade
GShade
Nvidia Experience/Nvidia Inspector/Nvidia Shaders
RivaTuner Statistics Server
It does work seamlessly with LazyDuchess’ Smooth Patch.
LazyDuchess’ Launcher: unknown
Alder Lake patch: does conflict. One user got it working by starting the game by launching TS3.exe (also with admin rights) instead of TS3W.exe. This seemed to create the cache file for DXVK. After that, the game could be started from TS3W.exe again. That might not work for everyone though.
A word on FPS and V-Sync
With such an old game it’s crucial to cap framerate (FPS). This is done in the DXVK.conf file. Same with V-Sync.
You need
a text editor (easiest to use is Windows Notepad)
to download DXVK, version 2.3.1 from here: https://github.com/doitsujin/DXVK/releases/tag/v2.3.1 Extract the archive, you are going to need the file d3d9.dll from the x32 folder
the configuration file DXVK.conf from here: https://github.com/doitsujin/DXVK/blob/master/DXVK.conf. Optional: download the edited version with the required changes here.
administrator rights on your PC
to know your game’s installation path (bin folder) and where to find the user folder
a tiny bit of patience :)
First Step: Backup
Backup your original Bin folder in your Sims 3 installation path! The DXVK file may overwrite some files! The path should be something like this (for retail): \Program Files (x86)\Electronic Arts\The Sims 3\Game\Bin (This is the folder where also GraphicsRule.sgr and the TS3W.exe and TS3.exe are located.)
Backup your options.ini in your game’s user folder! Making the game use the DXVK file will count as a change in GPU driver, so the options.ini will reset once you start your game after installation. The path should be something like this: \Documents\Electronic Arts\The Sims 3 (This is the folder where your Mods folder is located).
Preparations
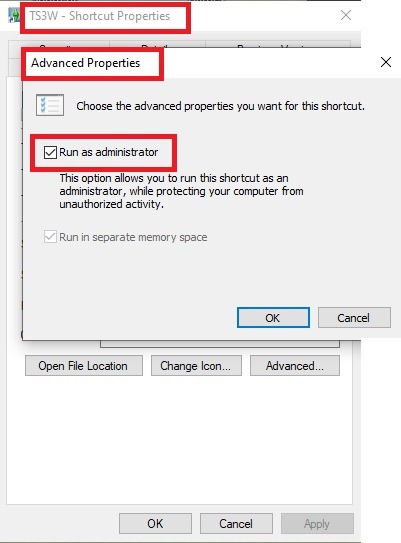
Make sure you run the game as administrator. You can check that by right-clicking on the icon that starts your game. Go to Properties > Advanced and check the box “Run as administrator”. Note: This will result in a prompt each time you start your game, if you want to allow this application to make modifications to your system. Click “Yes” and the game will load.
2. Make sure you have the DEP settings from Windows applied to your game.
Open the Windows Control Panel.
Click System and Security > System > Advanced System Settings.
On the Advanced tab, next to the Performance heading, click Settings.
Click the Data Execution Prevention tab.
Select 'Turn on DEP for all programs and services except these”:
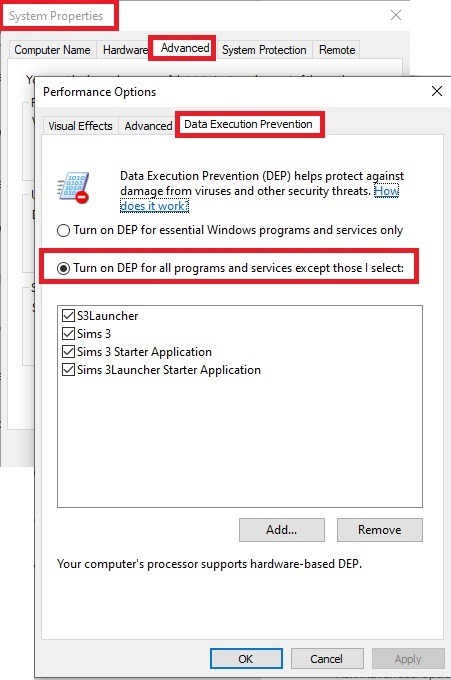
Click the Add button, a window to the file explorer opens. Navigate to your Sims 3 installation folder (the bin folder once again) and add TS3W.exe and TS3.exe.
Click OK. Then you can close all those dialog windows again.
Setting up the DXVK.conf file
Open the file with a text editor and delete everything in it. Then add these values:
d3d9.textureMemory = 1
d3d9.presentInterval = 1
d3d9.maxFrameRate = 60
d3d9.presentInterval enables V-Sync,d3d9.maxFrameRate sets the FrameRate. You can edit those values, but never change the first line (d3d9.textureMemory)!
The original DXVK.conf contains many more options in case you would like to add more settings.

A. no Reshade/GShade
Setting up DXVK
Copy the two files d3d9.dll and DXVK.conf into the Bin folder in your Sims 3 installation path. This is the folder where also GraphicsRule.sgr and the TS3W.exe and TS3.exe are located. If you are prompted to overwrite files, please choose yes (you DID backup your folder, right?)
And that’s basically all that is required to install.
Start your game now and let it run for a short while. Click around, open Buy mode or CAS, move the camera.
Now quit without saving. Once the game is closed fully, open your bin folder again and double check if a file “TS3W.DXVK-cache” was generated. If so – congrats! All done!
Things to note
Heads up, the game options will reset! So it will give you a “vanilla” start screen and options.
Don’t worry if the game seems to be frozen during loading. It may take a few minutes longer to load but it will load eventually.
The TS3W.DXVK-cache file is the actual cache DXVK is using. So don’t delete this! Just ignore it and leave it alone. When someone tells to clear cache files – this is not one of them!
Update Options.ini
Go to your user folder and open the options.ini file with a text editor like Notepad.
Find the line “lastdevice = “. It will have several values, separated by semicolons. Copy the last one, after the last semicolon, the digits only. Close the file.
Now go to your backup version of the Options.ini file, open it and find that line “lastdevice” again. Replace the last value with the one you just copied. Make sure to only replace those digits!
Save and close the file.
Copy this version of the file into your user folder, replacing the one that is there.
Things to note:
If your GPU driver is updated, you might have to do these steps again as it might reset your device ID again. Though it seems that the DXVK ID overrides the GPU ID, so it might not happen.
How do I know it’s working?
Open the task manager and look at RAM usage. Remember the game can only use 4 GB of RAM at maximum and starts crashing when usage goes up to somewhere between 3.2 – 3.8 GB (it’s a bit different for everybody).
So if you see values like 2.1456 for RAM usage in a large world and an ongoing save, it’s working. Generally the lower the value, the better for stability.
Also, DXVK will have generated its cache file called TS3W.DXVK-cache in the bin folder. The file size will grow with time as DXVK is adding stuff to it, e.g. from different worlds or savegames. Initially it might be something like 46 KB or 58 KB, so it’s really small.
Optional: changing MemCacheBudgetValue
MemCacheBudgetValue determines the size of the game's VRAM Cache. You can edit those values but the difference might not be noticeable in game. It also depends on your computer’s hardware how much you can allow here.
The two lines of seti MemCacheBudgetValue correspond to the high RAM level and low RAM level situations. Therefore, theoretically, the first line MemCacheBudgetValue should be set to a larger value, while the second line should be set to a value less than or equal to the first line.
The original values represent 200MB (209715200) and 160MB (167772160) respectively. They are calculated as 200x1024x1024=209175200 and 160x1024x1024=167772160.
Back up your GraphicsRules.sgr file! If you make a mistake here, your game won’t work anymore.
Go to your bin folder and open your GraphicsRules.sgr with a text editor.
Search and find two lines that set the variables for MemCacheBudgetValue.
Modify these two values to larger numbers. Make sure the value in the first line is higher or equals the value in the second line. Examples for values: 1073741824, which means 1GB 2147483648 which means 2 GB. -1 (minus 1) means no limit (but is highly experimental, use at own risk)
Save and close the file. It might prompt you to save the file to a different place and not allow you to save in the Bin folder. Just save it someplace else in this case and copy/paste it to the Bin folder afterwards. If asked to overwrite the existing file, click yes.
Now start your game and see if it makes a difference in smoothness or texture loading. Make sure to check RAM and VRAM usage to see how it works.
You might need to change the values back and forth to find the “sweet spot” for your game. Mine seems to work best with setting the first value to 2147483648 and the second to 1073741824.
Uninstallation
Delete these files from your bin folder (installation path):
d3d9.dll
DXVK.conf
TS3W.DXVK-cache
And if you have it, also TS3W_d3d9.log
if you changed the values in your GraphicsRule.sgr file, too, don’t forget to change them back or to replace the file with your backed up version.
OR
delete the bin folder and add it from your backup again.
B. with Reshade/GShade
Follow the steps from part A. no Reshade/Gshade to set up DXVK.
If you are already using Reshade (RS) or GShade (GS), you will be prompted to overwrite files, so choose YES. RS and GS may stop working, so you will need to reinstall them.
Whatever version you are using, the interface shows similar options of which API you can choose from (these screenshots are from the latest versions of RS and GS).
Please note:
Each time you install and uninstall DXVK, switching the game between Vulkan and d3d9, is essentially changing the graphics card ID again, which results in the settings in your options.ini file being repeatedly reset.
ReShade interface
Choose – Vulcan
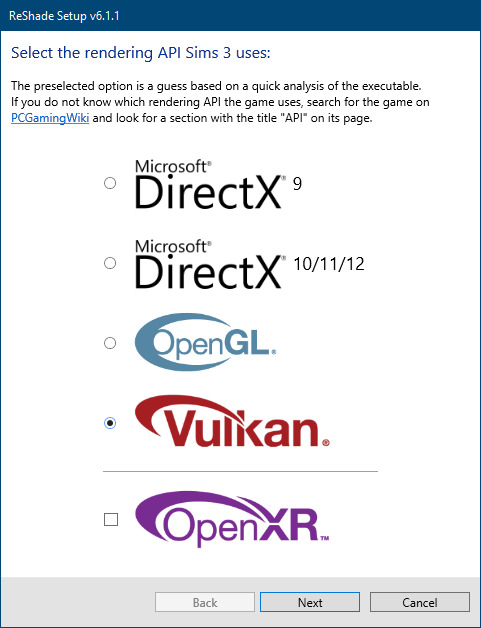
Click next and choose your preferred shaders.
Hopefully this install method works and it won't install its own d3d9.dll file.
If it doesn't work, then choose DirectX9 in RS, but you must make sure to replace the d3d9.dll file with DXVK's d3d9.dll (the one from its 32bit folder, checking its size is 3.86mb.)
GShade interface
Choose –
Executable Architecture: 32bit
Graphics API: DXVK
Hooking: Normal Mode
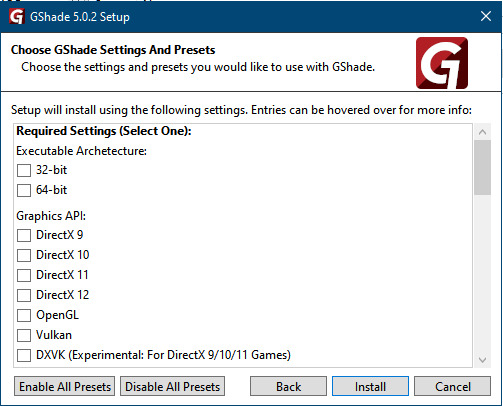
GShade is very problematic, it won't work straight out of the box and the overlay doesn't show up, which defeats the purpose of using it if you can't add or edit the shaders you want to use.
Check the game's bin folder, making sure the d3d9.dll is still there and its size is 3.86mb - that is DXVK's dll file.
If installing using the DXVK method doesn't work, you can choose the DirectX method, but there is no guarantee it works either.
The game will not run with these files in the folder:
d3d10core.dll
d3d11.dll
dxgi.dll
If you delete them, the game will start but you can't access GShade! It might be better to use ReShade.
Some Vulcan and DirectX information, if you’re interested:
Vulcan is for rather high end graphic cards but is backward compatible with some older cards. Try this method with ReShade or GShade first.
DirectX is more stable and works best with older cards and systems. Try this method if Vulcan doesn't work with ReShade/GShade in your game – remember to replace the d3d9.dll with DXVK's d3d9.dll.
For more information on the difference between Vulcan and DirectX, see this article:
https://www.howtogeek.com/884042/vulkan-vs-DirectX-12/
725 notes
·
View notes
Text

Luxury Horse Barn
One of my sims started breeding horses and needed proper facilities. So I built her a barn that ticks all the boxes!


Amenities:
stables for 8 horses
indoor and outdoor riding arena
pasture
living accommodations for the family (2 bedrooms/2 bathrooms)
groom accommodations (1 bedroom/1 bathroom)


There are 3 Versions:
One uses the box stalls that came with the Pets expansion, and the other two use DIY box stalls made with fences and gates. If you don't know how to use the DIY stalls and you're curious, let me know and I'll make a tutorial.
Details:
Lot size: 64 x 64
No store content used
EA Box Stall Version:
cc-free
packs used: Base Game and Pets
uses the box stalls that came with the Pets expansion
furnished Price: § 186.960
unfurnished Price: $137.465
Download EA Box Stall Version (SimFileShare)

DIY Box Stall Version (cc-free):
cc-free
uses fences and gates to create box stalls
packs used: Base Game, Pets and Seasons for the box gates. But if you don't have seasons you can just use any other two-tile gate.
furnished: 188.384
unfurnished: 141.689
Download DIY Box Stall CC-Free Version (SimFileShare)

DIY Box Stall Version with CC-Fence
uses a cc-fence from the Lakeside Saddlery that looks like actual box stalls
cc-fence not included, you need to download both, the fence and the gates from here.
packs used: Base Game and Pets
furnished: 187.156
unfurnished: 140.461
Download DIY Box Stall CC-Fence Version (SimFileShare)

Things to note:
I had @ohrudi's "Pets need less space" mod installed when I was play-testing. I think the lot will still work without it, but I have not play-tested it without the mod, besides: you will find playing with horses way more enjoyable with this mod!
If you direct your sim to jump the course while the sim is already in the outdoor arena, you will get a routing error. The jumping course works best if you position the rider and the horse outside of it (I marked the area in the screenshot below) and then direct your sim from there to jump the course. The sim will then gallop into the arena and start jumping the course.

Credits:
The beautiful realistic horse coats are from Leo's Workshop and can be found here!
I also used the Hanoverian Template and Coat from the same creator, found here.
And the Lusitano Template from Daruma Fields found here.
The exterior was inspired by the lot "Moonlight Stables" by Rocket Jane. I really liked the look of this lot, but I wanted more stables, an indoor riding arena and a bigger pasture. So I had to build my own.
#sims 3#sims3#ts3#thesims3#the sims3#sims 3 house#ts3 house#sims3 lots#ts3 lot#sims 3 build#ts3 build#no cc build#sims 3 horses#ts3 horses#the sims 3 horses#residential lot
139 notes
·
View notes
Text
50 ONE LEVEL CAREERS: Storytelling careers megapack by isy's the snake

Here is yet another career mod pack, but this one has no promotions, you just work and your job level stays at 1. As the title say this mod is best for story telling!
creator's notes-
This mod requires XML Injector by Scumbumbo. You can find it here. Pay attention if you don't already have it for another mod! In that case, you do not need to re-install it. Be sure it is updated for the last patch.
XML Injector is a mod required for some mods to work. So, you install it as any other mod in your Mods folder, no more than one subfolder deep.
This mod has been updated for the version 1.99.305 of the game (second update after Horse Ranch).
It doesn't required any DLC to work. Base game compatible
I've adopted this mod from the amazing ItsKatato who, due to her hiring at EA, couldn't continue to mod. I have made some changes: • I have changes all the pics of the careers — now they all show Sims (please check the credits paragraph at the end to see who was the amazing raccoon who helped me); • I have updated the mod for the Horse Ranch patch; • I have cleared ALL the tuning errors; • Fixed the description of some careers who appeared to be missing.
Now, here we go with the explanation of the mod (originally written by ItsKatato, edited by me):
Katato said: "Have you ever had a story planned out for your sims but you can't find the perfect career for them? Most of the time when I find the career it ends up being a complicated career with a bunch of promotion tasks and extra stuff. Well, I've made a pack of a bunch of single-level careers. All your sim has to do is go to work, that's it. This is perfect for the non-important sims in your life, like the forgotten children of your legacy challenge." In short: those are 50 careers you can use for NPCs Sims or random Sims you do not want to care about. As Amethyst said: "Go to work, make money, leave me alone". Your Sims won't need any task to perform to upgrade and get a promotion, as well as they do not really need an ideal mood to go to work since it won't change their performance. They just go and do their job. And now the list of all careers:
1. Anesthetiologist 2. Cartographer 3. Chiropractor 4. Compliance Officer 5. Data Scientist 6. Dental Hygienist 7. Dentist 8. Diagnostic Medical Sonographer 9. Financial Advisor 10. Financial Manager 11. Genereal Surgeon 12. Genetic Counselor 13. Home Health Aide 14. Information Security Analyst 15. IT Manager 16. Interpreter And Translator 17. Lawyer 18. Marriage And Family Therapist 19. Massage Therapist 20. Mathematician 21. Mechanical Engineer 22. Medical And Health Services Manager 23. Nurse Anesthetist 24. Nurse Practitioner 25. Obstetrician And Gynecologist 26. Occupational Therapist 27. Operations Reasearch Analyst 28. Optometrist 29. Oral And Maxillofacial Surgeon 30. Orthodontist 31. Orthotist And Prosthetist 32. Paralegal 33. Pediatrician 34. Personal Care Aide 35. Phlebotomist 36. Physical Therapist 37. Physical Therapist Assistant 38. Physician 39. Physician Assistant 40. Pilot 41. Podiatrist 42. Prosthodontist 43. Psychiatrist 44. Registered Nurse 45. Respiratory Therapist 46. Software Developer 47. Speech-Language Pathologist 48. Statician 49. Substance Abuse And Behavioral Disorder Counselor 50. Veterinarian 51. Web Developer 52. Wind Turbine Technician
lets give some of our love and support to isy!
download
#sims 4 cc#sims 4 download#sims 4#sims 4 gameplay#the sims 4#sims 4 custom content#sims 4 mods#the sims 4 mods#the sims 4 custom content#ts4#sims 4 careers#sims 4 career#ts4 careers#ts4 career#s4 career#s4 cc#s4 download#s4cc#s4ccfinds#s4 custom content#sims 4 storytelling#sims 4 story#the sims 4 download#ts4 mods#the sims 4 cc#ts4 custom content#thesims4#sims4
301 notes
·
View notes
Text

THE SIMS 3 TUTORIAL
HOW TO CREATE DEFAULT REPLACEMENT MOD USING CUSTOM MESH & TEXTURE FOR SIMPLE OBJECT
⚠️ Tumblr has 30 pictures limit, so I cannot include too many pictures. If you want to zoom in the pictures, click the pictures to enlarge, or save the pictures into your PC, zoom the pictures on picture viewer or zoom in the pictures on your mobile phone. ⚠️
----------------------------------------------------
I create this tutorial to make easier to follow because there are older tutorials available before but scattered on internet and usually only say "Export to replace s3asc" without explaining how to export the edited object properly.
My method is using TSR Workshop instead of exporting the object using Sims 3 Object Export/Import plug in because exporting to replace the s3asc using that plug in always giving error notification "ERR: Model has 1 groups; original had 0" and cannot be exported.
For beginners who are very new using s3pe and haven't created default replacement mod before, better start from simple object first.
Simple objects I mean in-game object that has single MODL and single texture with no morphs, no GeoStates, no presets, no CAS colour channels, and easily cloned from OBJD on catalogue. Usually as utensils that Sims holding in their hand, not buy/build objects. For example: Pencil, pan, fork, spoon.
----------------------------------------------------
Tools to prepare:
s3oc
s3pe
Milkshape 3D for bone assignment (Version I use 1.8.5 beta, discontinued by its developer, therefore feel free to download the full version with its license key provided).
Sims 3 Object Export/Import 1.01 by Wesley Howe (Milkshape plug-in. Download msS3ObjPluginsV101.rar )
TSR Workshop (Older version for TS3 only version 2.0.88)
TSR Workshop plug-ins for export.import TSRW Object.
3D Program (Blender/Maya/3dsMax)
Editing images software (Photoshop, make sure you have to install .dds plugin by Nvidia. For free software alternative, you can use GIMP with its .dds plugin)
This tutorial will not teach you how to:
Meshing object ❌
Create alpha texture ❌
Change thumbnails in-game ❌
Install programs and plug-ins ❌
This is how I created Chinese chopsticks replacement mod using custom mesh and texture.
In summary, this tutorial has 10 steps:
Step 1. Clone the Object using s3oc
Step 2. Open S3PE to Copy the Original Resource Code and Export the Files
Step 3. Export the Original Mesh as Base Mesh to .obj format
Step 4. Create Your Custom Mesh
Step 5. Bone Assignment & Create Group
Step 6. Create custom Texture
Step 7. Import the .wso of Edited Mesh on TSR Workshop & Export the package
Step 8. Export MODL file from Package saved from TSR Workshop
Step 9. Finalizing in s3pe & Replacing the Original file with Edited File & Correcting the Code As Same As Default Code
Step 10. Test the CC in your game.
-----------------------------------
✳️ Step 1. Clone the Object using s3oc
Before cloning the object, check the Game Folder for in-game object file location. Settings > Game Folders...
Take a look if the Base Game or Expansion Pack for object file you want to clone is in the right folder. For example, my The Sims 3 game are all bought from Steam, so the location is D:\SteamLibrary\steamapps\common\The Sims 3
If you want to clone object from Expansion Pack, make sure input the folder location. For example, the location for World Adventures EP is D:\SteamLibrary\steamapps\common\The Sims 3\EP1

If you are done, close the pop-up box. You can continue click Cloning then choose Normal Object...
Wait until you get the whole catalogue. Click Search...

For example, I clone object from World Adventures Expansion Pack. You can clone object from Base Game or other Expansion Packs as long it is considered as "utensil" that Sim holding on hand. For example: "Pencil" or "Pan"
Search for text: chopsticks
or if you want to clone object from Base Game, search: utensil
Tick check marks for Resource Name, Object Name, Object Desc then click "Search button"
Search result gives you results with name "chopsticks". Here is the object we are looking for: UtensilChopsticks
We need the OBJD file to clone. OBJD = Object Data.

Click "Clone or Fix" at the right bottom. Then you see the next page to determine if you want to clone with renumber or not. If you want to make default replacement, then do not check the Renumber box. Keep it blank.
Tick check box means the s3oc will generate new resource code for new item. Not tick the check means the s3oc will overwrite the same resource code, it is to replace object you cloned in-game.
I am personally a detailed person, so I usually tick as many as I want: tick "Deep clone" "Missing String Tables" and "Include Thumbnail" to include more details. Then click "Start" to proceed.

It will give you file name [CreatorName]_ObjectName_Number
Then save your package file in "DBPF Package" format in your project folder. Always make folder for any file to make everything organized.
✳️ Step 2. Open S3PE to Copy the Original Resource Code and Export the Files
Open S3pe, locate your package file you cloned from s3oc. Find the MODL of Utensil Chopsticks, Right-Click, "Details..."

On Resource Details, click "Copy TGI" to copy the Resource Code. Type, Group, and Instance will automatically be copied on clipboard. Then open Notepad, Right-Click to "Paste".
Click GRID on bottom of the s3pe (I mark it red on picture), it will give you pop-up box with Data Grid. Click "Resources", it will be highlight blue and there's 3 dots button appeared on the right side. Click the 3 dots button. It will give you TGI Block List Editor.
Inside MODL's TGI Block List Editor only has IMG. You may wondering why, but that's how the game coded. Type, Group, Instance of _IMG inside TGI Block List Editor should be the same as _IMG on the package.
Copy the TGI, Group, Instance to your Notepad.

After you copied code of MODL, do the same for the texture image (_IMG), but only copy the code from Resource Details. You cannot edit TGI Block List Editor for _IMG as the Grid button for _IMG is greyed out.
The main task is the code of your edited mesh and texture should be the same as the code you copied now from original package you cloned with s3oc.
Keep the code on notepad. You will need this code later.
Export the MODL file. Right-Click, "Export to s3asc". The file appears in long string such with name for example: S3_01661233_08000001_B619DB2238C3430B%%+MODL_filebase
Do not rename the file. Save.

Export the texture file. Right-Click "Export > To File..." The file will be saved in .dds format. Do not rename the file. Save.

✳️ Step 3. Export the Original Mesh as Base Mesh to .obj format
Open Milkshape. Import the s3asc file you saved before.
More steps click spoiler tag "Read More / Keep Reading" below
File > Import > Sims 3 Object Import v 1.01 by Wesley Howe

Locate the s3asc file, then the original chopsticks mesh appears.
Click the "Joints" tab. It has 4 codes. Check box "Draw vertices with bone colors" It will show Bone Assignment colors on the original mesh. Yellow on top chopstick and light blue on bottom chopstick. The colours are to make the object has rig and movement following the Sim's interaction.

Take a look at the 4 codes on Joints Tab. You can play around to see which colour of the code will appear, after that copy paste the code to Notepad to make it easier to comprehend.
Click Select from Tools menu, Select Options: Face. On "Right/Left/Top/Bottom 2D View", Left-click make selection of one part of chopsticks. While the part of object being selected (Red), click Joints then Choose "Assign".
0x96239247 --> Yellow 0xFEAE6981 --> Purple 0xCD68F001 --> Light Blue 0xD0DECA8E --> Red
Your edited mesh must have the exact same Bone Assignment colour later. Check again if the code and colour are correct.

You can save object mesh as .obj to other 3D software such as Blender or any other 3D software.
✳️ Step 4. Create Your Custom Mesh
Use the original .obj as base model. While you can create longer mesh or any edited version as you wish.
Make sure the scale and position of the edited mesh is same as base original mesh, because the edited mesh will be used on Sim's hand.

If you are done editing the mesh, export the UVmap.
You can export the uvmap in higher resolution, as long as it is Power of 2. 64x64, 128x128, 256x256, 512x512, 1024x1024, 2048x2048, 4096x4096. I export in 1024x1024 pixels to make the size of texture larger and have more details.
Then export the mesh object in .obj format.
✳️ Step 5. Bone Assignment & Create Group
Open Milkshape. Import the original mesh.
Check the Groups Tab. Original mesh has 1 group, "group 00". Group 00 means it is the main mesh. There is no shadow beneath the object.

Import the edited mesh as .obj file.

My edited mesh has one single name "default" name on the Group Tab. While edited mesh may have a lot of file name scattered on Group Tab. Regroup the file name to simplify your edited mesh into one single name. Select > Regroup.
The main task is replacing the EA's original mesh with your edited mesh.
Before you delete anything, you must do Bone Assignment first to the edited mesh you created.
Your edited mesh does not have Bone Assignment, so it appears white.
Remember the 4 codes you copied earlier in Notepad.

Copy Bone Assignment from original mesh to your edited mesh.
This case, your want to Bone Assign Yellow colour.
Select > Face to select one part of chopsticks of your edited mesh. On Joints Tab, double click the appropriate code 0x96239247 in blue highlight then the code box on the right side of "Rename" will appear 0x96239247. Make sure the code is correct. Then you can click "Assign".

Your edited mesh will appear in Yellow colour. Then do the same for another part of chopsticks.
Select another part of chopsticks of your edited mesh. On Joints Tab, double click the appropriate code 0xCD68F001 in blue highlight then the code box on the right side of "Rename" will appear 0xCD68F001. Click "Assign".

Your edited mesh will appear in Light Blue colour.
Then what's the other code for? With colour purple and red?
Leave them. Let the codes have the same exact codes as appear in original mesh and let the colours only assigned Yellow and Light Blue. The colours are to determine rig for interaction in-game, which only use Yellow as upper part of chopstick and Light Blue as bottom part of chopstick.
You can safely delete the original mesh with name group00 until it remains your only your edited mesh.

Rename your edited mesh to group00. Type group00 on the box then click "Rename" on the left side.

Export to TSRW Object in .wso format. .wso is format with bone assignment on object attached.

Save your .wso in your project folder.
✳️ Step 6. Create custom Texture
Import original texture you exported from s3pe to your editing image software.
Look at the original texture made by EA. 32x64 pixels. It is very low resolution, blurry and stretched, because the texture should be compressed as low as possible by game designer. As player you want it has higher detail to look realistic as possible and your PC of course can handle high resolution content, sure you can make the resolution much higher than EA's.

Import the UVMap you saved from 3D software. For example, UVmap I imported has 1024x1024 resolution. Add your custom texture. Then save it to .dds format in the same name as original texture. Save in separate folder, name it "Edited Texture" to keep it separated from original texture.
✳️ Step 7. Import the .wso of Edited Mesh on TSR Workshop & Export the package
Open your TSR Workshop.
Create New Project > New Import >Next...

Then Browse original mesh by EA in package format in your project folder.
On Open file box, you cannot see .package file because the filter is .wrk (TSR Workshop Project). Choose the .package dropdown.

Then you can see .package file.
Open the .package. After the file is located, then Next. On Project Details I usually skip without giving name of Project Name and Title. Next.
You must have seen green land with white blank sky.
Where's the mesh? It is actually there... just being zoomed in too close. You need to zoom out by scrolling down mouse.
You can see the original chopsticks mesh by EA. You can save the project file in .wrk format. After you save the file, import the .wso of your edited mesh. Mesh tab > High Level detail. Click green arrow folder icon to import. Then your edited mesh will appear replacing the original EA mesh.

As you see, the texture is messed up because the texture is still using original EA's texture. But then you check Textures tab and it has blank dropdown...
I cannot change the texture on this TSR Workshop!
Don't worry, we can replace the texture on s3pe later.
No need to change anything other than importing mesh. Click Edit > Project Contents to save as package.
You will see pop up box with number or files DDS, FTPT, LITE, MODL, OBJD, OBJK, etc. Export > To. package. Give name such as "EditedChopsticks_TSRW"

✳️ Step 8. Export MODL file from Package saved from TSR Workshop
Open S3PE, File > Open package "EditedChopticks_TSRW" that you saved from TSR Workshop.
Export MODL. Right-Click, export. It gives you file name with [StringOfNumber] .model .
Save it on project folder. Keep it organized and separated from original MODL. Name the folder "Edited MODL". Do not rename the file.
✳️ Step 9. Finalizing in s3pe & Replacing the Original file with Edited File & Correcting the Code As Same As Default Code
Open s3pe, File > Open original package that you cloned from s3oc. [CreatorName]_ObjectName_Number
Find the MODL. Right-Click > Replace...
Locate to your edited MODL with filename .model .
Then click Open.
The original MODL of the package should be replaced with your edited mesh.
Do the same for the texture.
Locate to your edited texture with filename .dds
Then click Open.
The original texture of the package should be replaced with your edited texture.
Take a look at MODL's Type, Group, Instance. It has the same code as original MODL in the original package cloned with s3oc (because it has been replaced)
Don't forget to see the code inside TGI Block List Editor.
Repeat step 2 how to check the code. Right-Click on MODL/IMG > Details... and click GRID > Resources > TGI Block List Editor.
The Type, Group, Instance of the _IMG are different compared from IMG from original package clone, which means that is the evidence of edited mesh replaced the original.
Rename the Instance with default/original Instance you copied on notepad from Step 2. Type, Group, Instance should be the same as default/original Type, Group, Instance.

Open notepad with resource code you copied from Step 2. Make sure the Type, Group, and Instance are all the same.
If the codes are the same, then your edited mesh and texture will overwrite the default mesh and texture with the same code in the game. Save, Commit, Save the package.
Check again if the texture is replaced properly. Right-Click on _IMG > ViewDDS.
ALTERNATIVES!
Yes, you can delete unwanted files in your edited package, to keep the package clean. Simply Right-Click>Deleted.
The only files needed in package are: MODL, _IMG, _KEY
They are the only files with your edited mesh/texture including codes to overwrite the default codes.
You can Start new fresh blank s3pe. Right-Click>Import from file...
Locate your edited MODL and _IMG (texture) file.
On Resource Details box, tick mark "Use resource name" > OK.
Make sure all the Type, Group, and Instance of MODL and _IMG including in the TGI Block List Editor are all the same as the code in original package.

Save the package.
✳️ Step 10. Test the CC in your game.
Put the package to your CC folder in your The Sims 3 document folder to see if the CC is working or not.
If the CC is working as your intended, with your custom mesh and texture, then test the animation. Are the chopsticks animation working as the same as original EA's? If the animation are working well too, then congratulations!

Your default replacement are working. Give applause to yourself. 👏
-------------------------------------
QUESTIONS!
Q:
Can I use this tutorial for making default replacement for buy/build object?
A: This tutorial covers basic method of using TSR Workshop and replacing the default codes (Type, Group, Instance), so you will understand the basic principle of doing default replacement mod.
Keep in mind that different object has different case. Buy / build object has MLOD (not just MODL) more than one, texture images more than one, has presets, and CAStable colour channels.
The TGI Block List Editor for buy/build object has a lot of codes, so have to spend a lot of time to do trial-and-error to make the default replacement working properly, because a lot of times the texture doesn't work (still using default EA's texture), or when the object appears right with your edited mesh and texture, after you choose the presets, the object reverts back to your edited mesh with default EA's texture.
Q:
Help! The texture is black! / still using same EA's texture when tested in the game!
A: The texture codes must be not the same. Check the Type, Group, Instance of _IMG. Do the codes are the same like codes in original package? Check the TGI Block List Editor for MODL, is the _IMG inside has the same Type, Group, Instance as in original package.
Q:
Help! The object disappears when tested in the game!
A: You must be replacing OBJD in your package. Do not replace OBJD. Just MODL and texture only.
#tutorial#the sims 3#the sims 3 tutorial#thebleedingwoodland#the sims 3 default replacement mod#modding#s3pe#s30c#TSR Workshop
119 notes
·
View notes
Text

Fix: Pets need less Space
TL;DR
with this mod, your pets (cats, dogs, horses) need half of the space for all interactions
this mod improves routing for your pets, escpecially for those clunky horses
compatible with “Interaction on sloped terrain enabler” by nikel23
the pets expansions is required for this mod to do anything
Installation: just put all the files in your packages-folder, the usual way, nothing special required, merging is no problem
Conflicts: highly unlikely, see below for detail
compatible with simler90's Gameplay Core Mod (Update 198 and above, since 28th Apr 2024)
Patch: v1.67/v1.69 (probably works with lower patches as well)
Here's my other big routing fix for Sims
Download
ModTheSims | Simblr | SimFileShare
Hey Simmers, Rudi has a big mod-achievement for you today: it's time for my ninth mod
Just recently I play tested my new awesome house, that's cramped up with clutter and plants all the way up to the roof. I tested the house with my pets and had to realize, that they aren't able to use many of the things I placed for them, cause the spaces are just too tight. Also whenever my familiy tried to interact with their pets, they had to walk through the entire house, cause they had no suitable space left. But no more! With this mod, those issues will forever be a sorrow of the past.
Explanation - how the mod works This mod reduces the space that pets (horses, dogs and cats) need for doing things, similar to my other mods. It does this by overwriting the jig size for each pet interaction. A jig is an invisible object that’s auto placed on the ground, while e.g. two sims are talking to each other. Other sims will walk around the other sims talking, cause the jig (placed under the sims talking) obstructs the routing-way for other sims. By default all jigs are quite big, in most cases even way bigger than they need to be. But if you reduce the jig size by a mod, than those interactions are possible even in tiny over-cluttered rooms. Here an example: Playing guitar has originally a jig, that’s 2x2 boxes/meters big, which meant sims often walk outside the house, cause nowhere is enough free space for this very big jig to place down. I solved this issue with my other mod, by reducing the size of the jig for playing guitar.
Recommended Mods, that further improve routing
Sims need less Space by OhRudi
Guitar needs less Space for playing by OhRudi
Bass needs less Space for playing by OhRudi
Interaction on sloped terrain enabler by nikel23
NRaas GoHere by Twallan
Route Fix v9 by Twoftmama (Login required)
How to install
Installation: just put all the files in your packages-folder, the usual way, nothing special required, you can merge them as well
the pets expansions is required for this mod to do anything
Technical Details
Patch: v1.67/v1.69 (probably works with lower patches as well)
this mod can’t affect animations
this mod can’t affect scripting-errors, that are caught by NRaas-Error-Trap
this mod edits the all jigs that came with the Pets expansion pack
Conflicts: only if you have a mod installed who's editing exactly this resource as well, but I assume that's highly unlikely
use delphys dashboard to check for conflicts
I dearly hope your pets enjoy their new freedom. <3
Additional Credits: A BIG THANK YOU to my lovely Beta-Testers: @SimsC, @CardinalSims and @Nemiga Sims 3 Sound Tool S3PE S3OC @you-will-never-find-me-anymore for letting me use her Bonehilda for my awesome profile picture
AND to this awesome and still alive community of simmers
Happy Simming ^^
made by @OhRudi
#ts3#ts3cc#ts3 mod#ts3 cc#mod#the sims 3#sims 3#the sims 3 mod#sims 3 mod#sims 3 cc#the sims 3 cc#cc#custom content
178 notes
·
View notes
Text
Prevent Loss in Case of Save Corruption »
Corrupted saves are getting more and more common in this community. My save corrupted just the other day when I tried solving bugs related to For Rent. Thankfully, I had been warned and therefore I lost very little.
So to keep spreading awareness, and possible solutions, here is what I did that helped me save my savefile.
1. Backup Everything!
Make sure you keep backups of your savefiles outside of the game—on your desktop, an external drive, or the cloud. If you want to be extra safe, keep it in multiple places and keep multiple versions with notes on what's what. Do NOT rely on the in-game "Recover Save" feature, because if your save is corrupted, chances are the recovered version is too.
2. Don't Ignore Last Exception Errors
Make sure to have MC Command Center and Better Exceptions installed. These mods will give you more information about in-game errors.
If you get an error, look it up! This is what saved me. The error might be game-breaking, or it might not. There are multiple tools you can use for this. Personally, I asked for help in Deaderpools Discord server. Another option is to use The Sims 4 lastException Assistant.
3. Try to Recreate the Last Exception Error
If checking the Last Exception error hints at possible corruption or you're not sure what it means—basically if you can’t tell it’s TOTALLY safe—try recreating it.
Step 1: Check if the Last Exception error is mod-related
Remove all mods except MC Command Center and Better Exceptions. Take your latest backup from before the error appeared and place it in your save folder.
Load your backup save and see if the Last Exception error appears. If the error doesn’t show up, this suggests either:
The error is likely mod-related.
Or the original save (not the backup) is corrupted.
If the error does show up on the backup, try using an earlier backup or see if you can trigger the Last Exception error in a new save.
Step 2: Check if the original save (the one with the error) triggers the error without mods
Load the save with the error (not the backup) and try triggering the Last Exception error without mods.
If the error doesn’t show up without mods, it’s likely mod-related.
If the error still appears without mods and doesn’t show up in your backup, assume the original save is corrupted. Stop using that save and switch to your backup to avoid playing in a potentially corrupted save.
Final Thoughts
This is a pretty extreme approach, but it can help if you’re worried about save file corruption and want to avoid losing progress. Keeping multiple backups and regularly watching for exceptions is likely a good way to catch problems early.
Here’s the Last Exception that likely corrupted my game and would have made it unplayable if I’d kept using the save (it slowed my game down drastically):
[manus] business_service failed to handle zone load due to exception (AttributeError: 'NoneType' object has no attribute 'lot_template_id'), CategoryID: persistence_service:685
Tips to Avoid Save File Corruption
Let's end this monologue with a few general tips to avoid corruption altogether—because ideally, we wouldn’t need to use the process I described earlier.
Check Manage Households and delete unneeded NPCs. The game constantly generates new townies, and over time, they clog up your save.
Delete random objects left lying around in the neighborhood. I use the Destroy Object Cheat for this.
Sims’ in-game photographs take up a surprising amount of space. Don't hoard photos! Only keep a few per household.
Large homes with tons of clutter and objects can bog down your game. Delete lots you don't use, or keep them simplistic.
Residential rental lots have a lot of issues. Avoid using them altogether for now, or be very careful and keep a lot of backups.
Use "Save As", instead of "Save", regularly to create a fresh save. Overwriting the same file multiple times can bloat the file and slow down your game.
I hope this helps! If you’ve got any other tips that worked for you, feel free to share!
33 notes
·
View notes
Text

the day has finally arrived... my sims 3 to sims 4 save file is finally out!
i have a (probably unhealthy) attachment to the sims 3, but my computer hates it.. so I thought I would turn the sims 4 into my favorite version of the game. over the last year I have gathered and created 155 unique households, all from the sims 3. each sims 4 neighborhood is transformed into a sims 3 world (see more under the cut). I will admit - I am not a builder, so all of the lots are from the gallery and the houses are not always accurate to their sims 3 houses (I'm working on it). I really put everything into this save file, and I hope others are able to enjoy it as much as I have!
download and more information under the cut
each world was transformed into a sims 3 world (kinda - mt komorebi was difficult but I'll discuss later)
there are a few exceptions to this chart. some eco friendly households that didn't make their specific world were placed in evergreen harbor and mt komorebi has some non-sims 3 townies. you can find the full list of all the households included in my save file here!
ok.. so if you're a total sims 3 stan like me.. you might want this cas background and these sound replacements (1 , 2 , 3)
if you want to restrict spawning so each household stays in their home world, i recommend this mod!
--
phew that was a lot.. but i'm done.. for now. the announcement of the new pack means another world to makeover AND the ability to go back and adjust some of the "apartments" I had in other worlds. more apartments means more sims 3 townies!! i have a lot of work ahead of me :) I truly appreciate everyone who took the time to read and follow my journey creating this save file (even if I went silent for months... it was rough). please tag me if you play in the save file, I would love to see what everyone does with it! if you have any suggestions, comments, or error reports do not hesitate to reach out!
you can download my sims 3 to sims 4 save file here!!!!
(simfileshare) (patreon)
instructions for installing a sims 4 save file can be found here
@mmfinds @sssvitlanz @maxismatchccworld @bubblysccfinds @themodsbabe @alwaysfreecc @public-ccfinds
345 notes
·
View notes
Text


The belly in pregnancy depends on the number of babies
If you thought that sims takes into account the number of babies during pregnancy, I hasten to disappoint you: the belly is affected only by the constitution. There's good news too - I've written a mod that fixes this!
Now at each trimester of pregnancy, when it becomes visible (including in labor stage), the pregnant belly adjusts to the number of babies.
This is a steady state, meaning you can go to another area with your sim, send her somewhere, go into CAS - the belly won't change.
A couple exceptions: if you do a sim reset, it will reset. If you change the number of babies (for example, through the MCCC), the belly will not automatically update. For such cases, I added a cheat code that will put everything back in place:

Basically, if suddenly something reset, then calmly use this cheat.
Keep in mind that when you switch to a new trimester, the belly is updated within a few seconds (usually 2-3). This is to make sure the sims don't overwrite the belly size after working off this mod.
Plus, I made several versions so you can choose a more appropriate size for your needs. I wrote more about the modifications below in the installation section.
Compatible with 105-108 Base Game.
REQUIRED lot51 Core Library version at least 1.19! TRANSLATION Russian translation is built in
CONFLICTS I spent most of my time writing this mod without conflicts. So this mod really doesn't cause any error when working with other mods including Command Center, Relationships and Pregnancy Overhaul and Realistic Childbirth.
However! If you are using the Relationships and Realistic Pregnancy mod, you need the additional file SonozakiSisters_Belly_Size_Injector_Lumpinou_RPO
Also! This mod does not conflict with LittleMsSam's Pregnancy Overhaul Belly Part mod in the sense that it does not cause an error. But it will overwrite the values of the mod from LittleMsSam.
Because of this, I wrote the same four belly versions as LittleMsSam, taking her values as the basis for a one-child pregnancy. That is, for a one-child pregnancy, the same values as LittleMsSam will be used. If you need those values, use one of the versions below. In addition to her four versions, there is my basic one (I recommend using it) and one based on EA values.
INSTALLATION Place the files SonozakiSisters_Belly_Size_Based_On_Babies_Count_Version, SonozakiSisters_Belly_Size_Injector_EA, SonozakiSisters_pregnant_progress_script and SonozakiSisters_Belly_Size_Injector_Lumpinou_RPO (when using the "Relationships and Pregnancy Overhaul" mod) together and no deeper than one subfolder in Mods! You can only have ONE version of the SonozakiSisters_Belly_Size_Based_On_Babies_Count_Version file
HOW TO CHOOSE BELLY SIZE VERSION
80 notes
·
View notes
Text
Okay so, I installed The Sims 3 on my new PC, but I get this error when I start it...?

So I googled it, and apparently, I'm missing some old service packs, so I installed one I found on EA Help ( 2013 I think ), and it didn't help, so I tried installing an older version ( 2010 the security one or whatever ) but it won't install ???

So I uninstalled the 2013 ones, but one refuses to uninstall, and says it's technically not even on my computer?

I've also tried cancelling any kinda updater, and even restarted Windows Installer, and no luck. I'm stuck in an installation loop, idk, any help would be appreciated.
25 notes
·
View notes
Text
A Sims 4 Players Guide To The Sims 3 By Simmearly
I am putting this together based on my own gameplay experiences and expectations, so some of this is purely my opinion.
I recently decided that with my new PC I would re-install The Sims 3, and All EPs, to see how it ran and play around with the features I miss in TS4,
I followed this guide on steam to set the game up to run smoothly.
To paraphrase just a little, this includes a TON of information, but basically, it shows you how to replace the launcher, and run the game on modern machines without issues.
Gameplay would not be possible for longer than an in-game week or so without the fantastic NRAAS & Lazy Duchess Mods.
I Use, Nraas Overwatch, Master Controller, Register, Error Trap & Traveller, which is my personal favorite, as it allows you to travel to more worlds for vacations, and own vacation homes in them etc. It also allows for you to move to a new town and retain relationships from the other town(s) you've lived in.
I recommend good default skin and eye replacements, as well as default replacements for Eyebrows and Beards, I Recommend Checking out @brntwaffles on Tumblr, as they have these as well as lighting mods to brighten up the in-game lighting and water!
Gameplay Mods,
I really enjoy TS3 Vanilla gameplay, so this list is short (For Now) however I do want to expand upon it, the Growing Pains Mod - adds a lot to the child stage and I feel like it integrates so well with Vanilla that it could have been in the game from the start.
Smaller Quality of Life mods,
Nectar Glass Replacements
Sim Drinks - Adds Buffs For Bar Drinks
Shop For Clothes at Clothing Rack, TS2 Style
That's it For Now, I will probably update this post as my Legacy continues, I am currently on Gen 4, and am having a BLAST!
Also - I do own quite a bit of the Store content and I have found myself using it more than expected, I bought a lot of it years ago, and I failed to realize then just how much gameplay is involved,
The Steam it up sauna is currently my favorite object due to its regenerative properties, but the Business-as-Usual industrial Oven, placed on your home lot allows for you to basically have a private chef! (Don't pay full price for any store content, wait for a sale or find it on other avenues) ;)
Thank you to all the amazing creators mentioned, none of this would be possible without YOU!
Edit - TIP! Reset your town using Nraas every few sim weeks to keep things running smoothly
#the sims#the sims 4#the sims screenshots#the sims legacy#the sims 4 cc#the sims 3#ts3#sims 3 screenshots#sims 3#ts3 simblr#sims 3 story#the sims 3 legacy#the sims 3 gameplay#the sims 3 university life#the sims 3 showtime#the sims 3 supernatural#the sims 3 generations#the sims 3 challenge#the sims 3 witch#the sims 3 ambitions#the sims 3 island paradise#the sims 3 late night#the sims 3 into the future#the sims 3 vanilla#the sims 3 world adventures
56 notes
·
View notes
Text
Clearing cache from The Sims 3 folder.
Cache files within The Sims 3 folder are temporary files created by the game. They help the game load faster. Over the time, a pile-up of these files can create slower game-starting times, to even lag. In this post, we will go through each folder and show you which files are safe to remove. If you want to learn what your The Sims 3 folder contains, please refer to our guide [here].
As an advice to lessen the lag and prevent corruption, we recommend clearing these files after each gameplay. They're regenerated every time the Launcher is running, so deleting them is safe, and them reappearing is also normal.

DCBackup - This folder contains the much necessary CCMerged file. After installing new content to your game, you'll often find files with long names full of numbers within that folder. It is safe to remove all of those files except CCMerged file.
DCCache - This folder contains all of your custom content divided into several .dbc files. You should only clear missingdeps.idx file, and any file ending in .tmp.
Downloads - Downloads will contain all Sims3Packs you installed. We advise copying these packs in another folder or an external device, should you want to re-install them again later. After that, it is fully safe to remove all files in it. Files named nav.bin and FSIViewCountTracking will regenerate the next time game is opened.
FeaturedItems - This is a folder generating photos and thumbnails of store content. It is fine to delete the entire folder, and files within it.
RecordedVideos + Screenshots - Both folders contain media captured by the player. Personal advice is copying the files from both of the folders into another folder or external drive. And then removing the contents from these folders.
WorldCache - FOR WINDOWS USERS ONLY - It is safe to remove this entire folder. Mac users SHOULD NOT be touching this file. Explanation why.
After folders, it is safe to delete the following files:
CasPartCache.package - CAS parts that appear in Create-A-Sim.
compositorCache.package - New objects that appear in Buy/Build mode.
scriptCache.package - Mods or Hacks.
simCompositorCache.package -New Sims, default skins.
socialCache.package.package - Information about the social aspects.
+ scriptError(your username) - Files generated by NRAAS mods (ErrorTrap) during errors. Delete if you don't wish to post it to NRAAS Industries.
Guides used:
SimsWiki - Game Help: Sims 3 Delete Cache Files
Carl's Sims 3 Guide - Technical Help - Clearing Cache To Fix Slow Game
Crinrict - Delete Cache Files
134 notes
·
View notes
Note
hi! i wanted to ask something about reshade. yesterday i thought of installing g-shade on my sims so i downloaded it and installed it into the sims, but i didn't think to uninstall reshade first. when i loaded into my game no intro message appeared at the top and nothing happened when i pressed any of the shortcut keys to open reshade nor gshade, i thought then that i should have uninstalled reshade first. so i decided to start over, i started by uninstalling gshade manually, then i uninstalled reshade both manually and through the uninstaller and then reinstalled it again and here's the thing, nothing happens now.
i've tried everything, i put the game to repair, i've deleted everything i can find that has anything to do with reshade and gshade and installed reshade again, i tried the newest version and an older one before it, and yet when i open the sims with reshade installed nothing happens, no message at the top and no way to open it, no error message or anything either, it's just as if it wasn't installed.
i've been installing it as always, which used to work fine, but now it doesn't matter what i do and i don't know what to do to fix it. the only thing i haven't tried is uninstalling and reinstalling the sims, i didn't want to do something wrong there too and make things even worse. i know for certain that i did something somewhere that's making this happen because as close as yesterday morning reshade was working on my sims perfectly. so i wanted to ask if you know what i could do? should i try uninstalling the game? or is there something else i can do? (ps: i love your blog <3)
Hi anon, don't uninstall the game! We can fix this!
No message at the top means ReShade isn't installed correctly, for one reason or another.
Since TS4 changed to dx11 (by default, with the option to change back to dx9 manually) you have to check a couple of things when installing now.
First, make sure you know which version of TS4 you're using. When you open the game, it should tell you if it's dx11 or dx9 in very tiny letters on the bottom-right of the main menu screen.
If you're running the game as dx11, when installing ReShade you need to choose ts4_x64.exe, and choose directx 11 when it asks.
If you're running the game as dx9, when installing ReShade you need to choose ts4_dx9_x64.exe, and choose directx 9 when it asks.
If you've chosen the wrong exe by accident ReShade won't initialise and you won't see that banner at the top.
Now, all this assumes you uninstalled everything correctly first. I'm not familiar with gshade's file structure, so I'm not sure if there are other places besides the Bin folder you need to check for leftover files. But for ReShade, these are the files you need to remove to completely uninstall all aspects of it:
reshade-shaders folder and everything in it
either d3d9.dll or dxgi.dll (which of these you have is dependent on whether you're running it for dx9 or dx11)
reshade.ini
reshade2.ini (if present)
reshadepreset.ini (if present)
any .addon64 files
You can keep your other preset ini files, they won't do anything without ReShade installed. You can also leave in any .log files, they get written to whenever you start ReShade and don't do anything on their own, but you can remove them if you just want to make a tidy Bin folder.
As for gshade files, I expect some of them are similar to those above, but I'm not certain. They might be put in different sub-folders, might be named slightly differently, I'm not sure. You might be able to find out that information from gshade's site.
If you are uncertain, you can take a screenshot of your Bin folder and I'd be happy to have a look and see if I can spot anything that I think you need to remove.
Once you're sure you've removed everything, try reinstalling ReShade following the correct dx9/dx11 instructions above. Hopefully everything should fall into place.
23 notes
·
View notes