#sims 3 meshing tutorial
Explore tagged Tumblr posts
Visit Tumblr Blog
Explore Tumblr blogs with no restrictions, modern design and the best experience.
Last Seen Tumblr Blogs


Fun Fact
Celebrities use Tumblr as well.
Text
Tiptorial: manually reducing the poly from hair (if you're crazy enough and have a lot of free time)
First of all, get rid of the undersides and remap the whole mesh to the proper ts3 hair texture size;
Select one strand, revert the selection with ctrl+i and hide it all with H, to isolate the strand we want to work (do not separate it into another object, if you do that you'll mess with the strands order and will have transparency issues!);
We need to convert the tris into quads, for this, press alt+J. This strand had almost no issues converting it, but some might present it, then you'll have to select each square manually and dissolve the faces to turn it into a quad. It's easier to do that in the UV map with sync selection by selecting it like a checkerboard, then dissolve everything, then select one tri and press shift+g and select polygon sides, this will select everything that was not converted and then you can dissolve it.
After everything is in quads, alt+click on a edge to select the whole edge loop, then dissolve the edge. You can also press G twice to slide the edge along the mesh to better adjust it.
When the strand is like you want it, you can select it and assign to a vertex group so you can easily select all the dissolved strands to better work with the whole mesh (remember, do not separate any strand!)
And now you'll repeat the process with all the other strands 🫠
139 notes
·
View notes
Note
Hi hey gurl! I've been trying to understand something... when it comes to performance, is it vertices or polycount that really matters? I’m trying to get a clearer picture of how they affect gameplay. Hope this isn’t too random tho 😂
Hey nonny, thanks for the great question! I'm not sure if you are looking for a non-creator answer or if you maybe have some experience with meshing, but I try to cover some technical aspects that hopefully will make you understand vertices and polygons better! It's a bit of a longer journey, so grab some snacks and settle in!
Disclaimer: This is my opinion and the definitions are how I came to understand them. I believe what I say to be correct, but I am also human and may have misunderstood something, and making mistakes can happen. Thanks for understanding! TL;DR There will be calculations made on every vertex and every face present in a mesh. So the more you have of either, the worse it is for performance, but if the vertex count is much higher than the poly count, the mesh is especially unoptimized and may impact performance more than it would in an optimized state. Vertex and polygons are actually connected, literally. To understand, we need to start with the basics.
Vertices are points in a 3d space that provide the foundations of a grid-like 3d structure, known as a mesh. Connected through lines known as edges, they form a 3d shape. Three edges form a triangle, or tri for short, also known as a face or polygon. These terms can be used interchangeably, but a tri always has three vertices, whereas faces and polygons can have more than three vertices.
A polygon with 4 vertices (known as a quad) is very commonly used in 3D-modelling, because it can be used to create very neat and well-structured meshes (it is easy to make grids using rectangular shapes). A mesh that is made in a grid-like way may have the same overall shape as one made out of triangles, but the flow of the edges is different, and this plays a role during animation. Having these grid-like lines is usually better for moving and animating characters and avoiding shading issues.

Most meshes for games are thus initially made with 4-sided polygons. These quads are usually further broken down into tris if they aren't already, and three is the least amount of vertices needed to form a coplanar surface.
When the quads of the left sphere are turned into triangles, the grid structure will remain intact:

We can further break down the elements of a polygon. Let's take a simple cube. It has 6 sides, or faces, and each face has 4 vertices that make up the corners. But if we count all the vertices, we will notice that each face shares vertices with other faces. So on a simple cube, we have 6 faces and 8 vertices.

Depending on how a mesh is made though, it may have a lot of edges. You can think of those like cuts in the mesh. If we wanted to cut up the cube, we would separate each face from each other. Now we still have the same number of faces (6), but the vertices are suddenly much higher, because now, every face has its own set of 4 vertices, meaning that we have a total of 24 vertices.

In video games, polygons are usually rendered as triangles. So for our cube, that would mean that every face would be diagonally cut in half, giving us a total number of 12 faces/polygons/tris.

If we take it to the next level and separate all of these triangles from each other, the vertex count would be 36! To recount, on a mesh that is not split, it's only 8. Having these cuts (or split edges, as they are commonly called) in strategic places in the mesh where vertices are split can be important for the final look of the mesh in the Sims games.
You may have already encountered some meshes that have dark spots or shading in some parts, often at the hems. That can happen if the mesh is not split correctly in these areas. It has to do with how the normals work (they are important to how light gets reflected off the mesh).
To not go too off-topic, I won't get into detail about that here.
Ideally, a mesh is only split where it needs to be so it will look right. If there are unnecessary cuts, then the vertex count (and with it, the polygon count) goes up when it doesn't really have to be. If a mesh has a lot of these areas where a lot of faces have their own vertices, then the vertex count is much higher than on a mesh with fewer split edges. This can be a sign that a mesh is not well-optimized. So if you see a mesh that has much more vertices than polys, you may want to question it in regards to performance. CC converters will probably know that Sims 4 meshes come with a lot of these cuts that are needed for Sims 4 because of the way the CC is made (for example, pants have such a split edge cut to allow boots to look tucked-in), but those are superfluous for TS3. So I encourage every Sims 3 CC creator to remove those to save on both vertices and polygons when they are converting! The thing is, in the game, the mesh will be processed and there will be calculations made on every vertex and every face present. Each vertex is indexed, and triangles need to be drawn from the information. Other processes will need to also use the vertices for their calculations. There is more going on during rendering than simply drawing the polygons. The shaders have to calculate their effects, the textures need to be rendered and applied accordingly, filtering such as anti-aliasing will be applied, etc. So the more geometry you have in a mesh, the worse it gets in terms of performance. More geometry means that the polygons are smaller and more numerous, which will in turn affect the vertex count too.
As CC creators, we cannot address all the factors that impact performance, as we can only influence a small part, but we can try to adhere to the game's standards to minimize the performance impact as best as we can. If we wish our meshes to be more detailed than what the game's standards are, then we impact the performance more.
Instead of just cranking up detail like crazy, it is good to see if we really need it. And ask questions such as how often will the player view the item closely? If the player is usually far away from the item or it is a very small item, making it super detailed will not really do much, since the item looks the same as a low-poly item from a certain distance. We can also make compromises and maybe make an item 50% more detailed instead of 200% more detailed, providing a more detailed item while minimizing the performance impact.
This is a bit off-topic, but since I'm here already, we may refrain from using a bigger texture for a very plain piece without any notable intricate detail (like a basic T-shirt, for example), since it already looks fine with a smaller texture, but it may pay off for a highly detailed texture which looks visibly better with a bigger texture, warranting the performance impact (like a lace blouse with an intricate pattern, stitching, and small buttons).
On that note, using the texture space efficiently can also do wonders to increase detail. Use all the real estate you have on that UV map (that is a 2d representation of your 3d mesh and used to apply the texture to the mesh). Have you tried upscaling the texture yet? Okay okay, I'll stop now and get...
Back on topic: The number of polygons also matters, not just the vertex count. When a mesh has lots of smaller polygons, a lot of them are necessary to form the entire mesh. Bigger polys will not provide as much fine details, but will have less impact on hardware because fewer calculations to be made. A good mesh uses only as much detail as needed while using as few polygons as possible to still maintain functionality.
Sims clothing meshes need to animate and move well, so they need to be able to flex at the joints, and the shape must also be able to change to accommodate body sizes, thus the mesh needs the minimum amount of geometry to achieve this and still look decent, which is a sweet spot the developers have to find to craft meshes that perform well while looking reasonably good.
A good habit for creators looking to make meshes for the Sims games is to look at similar meshes in the game and study them (so for TS3, check the original TS3 game meshes, for TS4, check the original TS4 game meshes). Check how many polys they use and how good the topology (structure) of the mesh is.
For example, how many rows of edges do they usually have, and what sizes are the polys usually? How many vertices are in one round of edge loops, for example for the arms? How are the different mesh parts connected to each other, where are split edges used? Then imitate that.
The professionals who made these original meshes knew what they were doing, and they optimized them to be gameplay-friendly, so if in doubt, copy what they do.
Game meshes are usually especially optimized and it is very much game-dependent how they are structured, so a mesh from a different game can look totally different. CC Creators looking to optimize performance in their meshes should try to match the original game's mesh in terms of structure and polycounts. This will also ensure they animate well!
If you made it this far: well done, thanks for bearing with me! I hope you feel more knowledgeable and ready to apply what you've learned to your own meshes or when selecting CC for your favorite Sims game.
#sims 3#reply#sims 4#sims meshing resource#ts3 meshing#sims polycounts#Sims CC creation#meshing theory#tutorial#ts3 tutorial#ts4 tutorial#my best tutorials are always based on asks#why do I always forget which tags I use for tutorials
35 notes
·
View notes
Text
Editing occlusion shadows on objects
This is a tutorial aimed at creators and converters who want to understand, at least a little, how to improve the appearance of their objects in the game. Yes, it’s a bit exhausting, just like creating an object from scratch, mapping it and texturing it, but the result is worth it. The shadow dynamics of TS3 are different from TS4. In TS4, the game itself creates these shadows when the object approaches a wall. In TS3 it is necessary for these shadows to be created using “lights” in TSRW. Of course, the occlusion is not perfect, but it gives the game a more realistic aspect by creating this idea of depth.
The icing on the cake: keep these shadows if they are large objects, like cabinets, sofas, beds, tables, chairs… Small decorative objects, like clutter, you can just delete these shadows. But if you are crazy about perfection and details, and really want even an ant to create its shadow when approaching a wall, my tip is that you clone using a small object as a base as this will make editing the shadows easier.
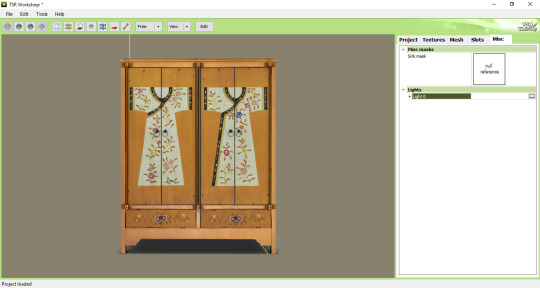
I will use as an example this armoire that I edited a while ago. The shadows have been edited and look like this when you open them in TSRW:
In the game, this is how the shadows appear when we position the object close to a wall:

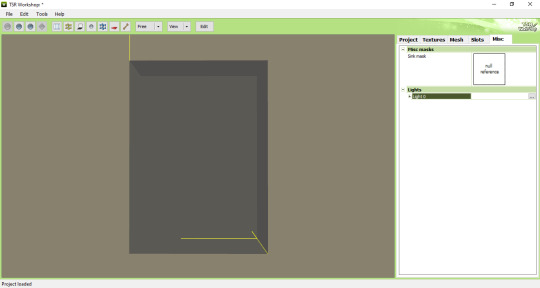
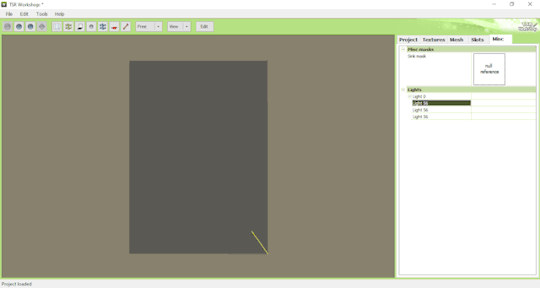
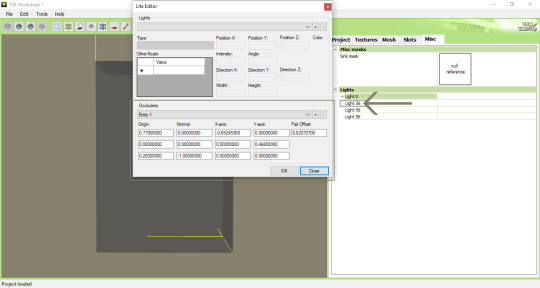
To edit the shadows, you must click on the "MISC" tab in TSRW. These shadows are right below, where "LIGHTS" is written. Note that there is a + sign next to it and when you click it, a drop-down list appears with all the shadows separated. In this example there are 3 of these shadows. The names are the same, but let's say we have shadow 1 (front), shadow 2 (top) and shadow 3 (side). Edits must be made in the order they appear.
Click on the three dots to the right of lights. A window as shown in the image below will appear:
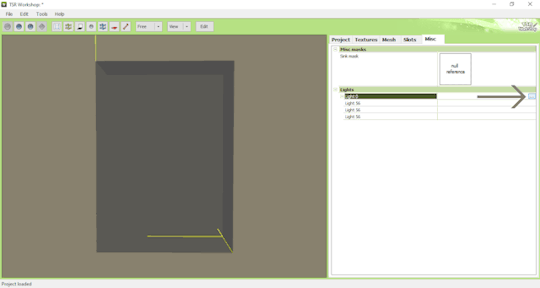
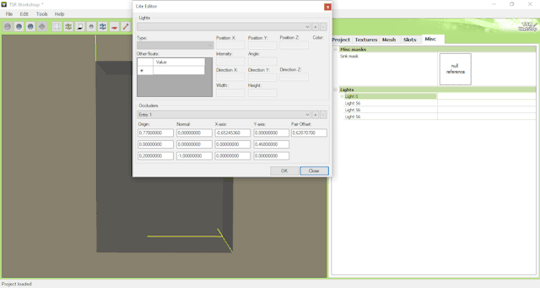
The lights that must be edited are found in the part where it says "OCCLUDERS". In this case, "Entry 1" corresponds to our "SHADOW 1" (front)...
For the front shadow, we will start by changing these two parameters that correspond to the width and position of the shadow. My tip is that you copy the original value, change this value to 1 and then click on "OK" to see what happens (that is, to see what changes when changing the value, so you will know if you need to change it to a higher value or smaller...). If it's not what you need, just paste the original value copied previously into the corresponding field and change it little by little until you reach the correct size of the object.
Front shadow height:

For the distance the shadow is from the object, this field must be edited - remembering that we are still editing the front shadow (which corresponds to the shadow that will replicate the width of the object on the wall):

For the other shadows, you must follow the same path: changing the values until it is proportional to the size of the object.
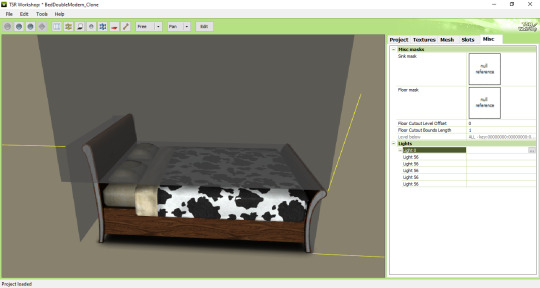
Bonus tip: Open various base game objects in TSRW and see how shadows are created. For example, select a chair and study each shade individually. With practice, you will realize that all you have to do is create a shadow on all sides of the object. For example: on a bed, you should have a shade for the headboard, another for the footboard, another for the side and another for the top, which would be the mattress. Therefore, it is important to study each type of object separately.
Now you might be asking yourself: Oh, yes, thank you very much... But where do I start? How will I know how to create a shadow from scratch? OMG! Help me!
Don't worry, it's very simple: when cloning an object, like a bed for example, it's obvious that you will use a bed from the game as a clone... So just edit the original shadows that correspond to the clone, so that they are the size of the bed you are creating for the game. Only that.
I say again: each object is a specific case. This tutorial is just a simple way to show you the way to understand how these shadows work and how they are generated for the game.
Yes, creating a beautiful object is hard work and requires dedication, time and effort. Therefore, value the creators who strive to deliver you a quality object ♥.
If you feel like helping me, here is a link for donations. Thank you very much ♥.
Tutorial inspired by: @bioniczombie and @sideshowsnob
#tutorial/ usefull#sims 3 tutorial#ts3 tutorial#ts3 creation tutorial#sims 3 creation tutorial#sims 3 meshing#sims 3 object tutorial#sims 3 occlusion shadows#sims 3 occluders#ts3 meshing tutorial#sims 3 TSRW
47 notes
·
View notes
Text

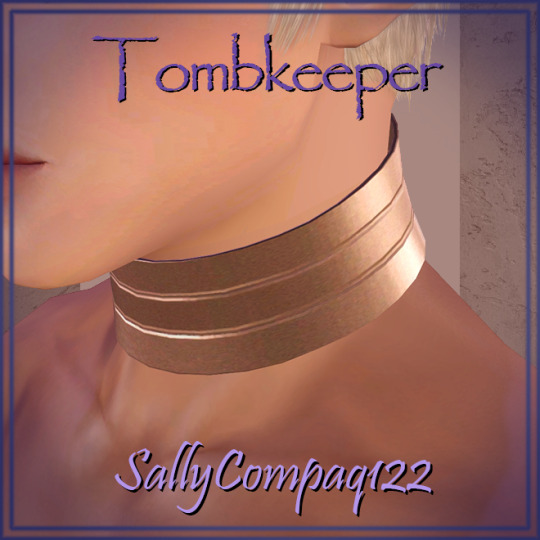
Morph Madness!
Fixing Exploding Morphs
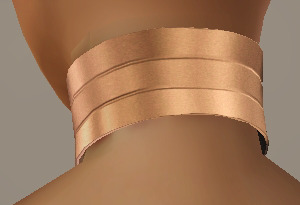
Marik's Egyptian Choker is currently in production. It is the first accessory I've made that involves assignment to more than one bone and morphs for fat, fit and thin states. So there is a learning curve, and it is during that learning curve that interesting and unexpected things can happen.
As with my other content, I'm making the choker fit sims of all ages and genders--that's 8 different bodies.
Adding fat, fit and thin morphs multiples this number to 27 different bodies.
I'm also making 3 levels of detail for each of these. The number comes to 81 different bodies, 81 different bodies for which I need to tightly fit a cylinder around the neck and avoid clipping.
That's a lot of work. I can see why most custom content creators stick with one age, gender and detail level. At least, they did in the past. Our tools are getting better day by day, and that may partly be because of creative, ambitious and somewhat obsessive people like me.
There are usually multiple ways to solve the same problem. Some ways are faster than others. This I've learned from working in Blender3D. You can navigate to a button with your mouse or hit the keyboard shortcut. You can use proportional editing to fiddle around with a mesh or you can use a combination of modifiers.
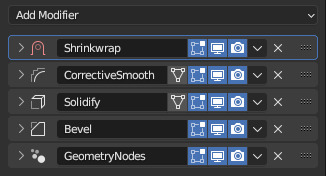
If I am going to be creating 81 chokers, I don't want to be fiddling around on each one of them for an hour. I need something automated, repeatable and non-destructive so I can make adjustments later without having to start over from the beginning. I need to work smart rather than just work hard.
This is where modifiers and geometry nodes come in. After you develop a stack to work with one body, the same process pretty much works for the others as well. That is how it became easier for me to model each of the 81 chokers from scratch rather than to use proportional editing to fit a copy from one body to the next.
But I was about to confront an explosive problem…
Anyone who has worked with morphs before probably knows where this story is headed. There is a good reason to copy the base mesh and then use proportional editing to refit it to the fat, fit and thin bodies. That reason has to do with vertex index numbers.

You see, every vertex in your mesh has a number assigned to it so that the computer can keep track of it. Normally, the order of these numbers doesn't really matter much. I had never even thought about them before I loaded my base mesh and morphs into TSRW, touched those sliders to drag between morph states, and watched my mesh disintegrate into a mess of jagged, black fangs.
A morph is made up of directions for each vertex in a mesh on where to go if the sim is fat or thin or fit. The vertex index number determines which vertex gets which set of directions. If the vertices of your base mesh are numbered differently than the vertices of your morph, the wrong directions are sent to the vertices, and they end up going everywhere but the right places.
It is morph madness!
When a base mesh is copied and then the vertices are just nudged around with proportional editing, the numbering remains the same. When you make each morph from scratch, the numbering varies widely.
How, then, could I get each one of those 81 meshes to be numbered in exactly the same way?
Their structures and UV maps were the same, but their size and proportions varied a lot from body to body. Furthermore, I'd used the Edge Split modifier to sharpen edges, which results in disconnected geometry and double vertices.
Sorting the elements with native functions did not yield uniform results because of the varying proportions.
The Blender Add-On by bartoszstyperek called Copy Verts Ids presented a possible solution, but it was bewildered by the disconnected geometry and gave unpredictable results.
Fix your SHAPE KEYS! - Blender 2.8 tutorial by Danny Mac 3D
I had an idea of how I wanted the vertices to be numbered, ascending along one edge ring at a time, but short of selecting one vertex at a time and sending it to the end of the stack with the native Sort Elements > Selected function, there was no way to do this.
Of course, selecting 27,216 vertices one-at-a-time was even more unacceptable to me than the idea of fiddling with 81 meshes in proportional editing mode.
So… I decided to learn how to script an Add-On for Blender and create the tool I needed myself.
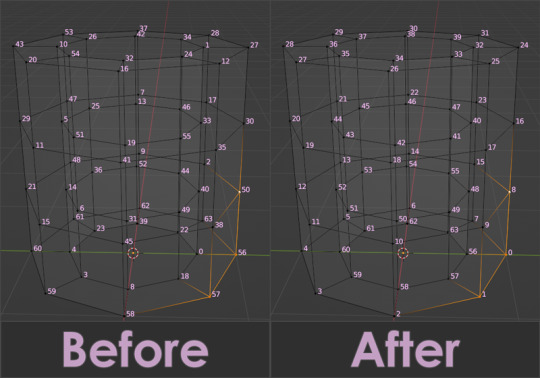
A week and 447 polished lines of code later, I had this satisfying button to press that would fix my problem.

Here are the index numbers before and after pressing that wonderful button.
My morphs are not exploding anymore, and I am so happy I didn't give up on this project or give myself carpal tunnel syndrome with hours of fiddling.
Marik's Egyptian Choker is coming along nicely now. I haven't avoided fiddling entirely, but now it only involves resizing to fix clipping issues during animation.
Unfortunately, I'll have to push the release date to next month, but now, I have developed my first Blender Add-On and maybe, after a bit more testing, it could be as useful to other creators in the community as its been to me.
Looking for more info about morphing problems? See this post.
See more of my work: Check out my archive.
Join me on my journey: Follow me on tumblr.
Support my creative life: Buy me a coffee on KoFi.
#exploding#morph#mesh#sims 3#cc#custom content#tutorial#C:O#SallyCompaq122#mod the sims#cc creator#art process#blender#3d#add on#shape keys#sort#vertex#index#blendercommunity
86 notes
·
View notes
Text
youtube
This is a super awesome YouTube video that helped me to make my very first frankenmesh today!! Its for blender 3 point something and I have 4.2 but if you just google the term the person in the video says a more current tut will appear. Sims 4 studio forums are also really helpful if you have a problem. Just Google like "mesh dissappeared?? Sims 4" and a someone on an s4s forum will have asked the same thing in 2017 and someone else will have told them how to fix it!
I want y’all to jump into learning blender next year too. No more paying for frankenmeshes. I promise you can do it yourself fr. Don’t let blender intimidate you. It can sense your fear lol. And no more paying for recolors. That shit is so egregious. Unless it’s like a recolor of something and it includes art or patterns they drew. Other than that nawwwww. Don’t let nobody repackage content you paid for already and sell it back to you.
#!!!#i officially created my first frankenmesh today!!#and it works!!!#and im so proud!!#blender really can sense ur fear guys simply do not be afraid and watch the tutorial and live ur best life!!!#my very first mesh <3#ive been trying on and off for like a year so today was a really great day 4 me#sims 4#sims 4 cc#Youtube
134 notes
·
View notes
Text
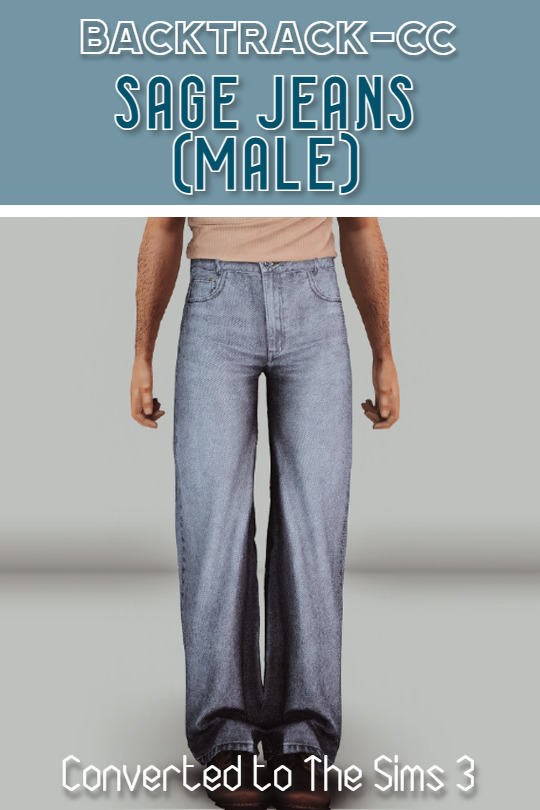
@backtrack-cc - Sage Jeans (males) converted for The Sims 3
DOWNLOAD:
SFS / Mediafire
hii!! I hope everyone enjoys this conversion - clips with some shirts but most seem fine to me!
- Comes in 1 Recolourable Swatch & 4 Presets (2048x2048)
- 5000 Polycount - All LODs
- Correct Bones assignment & body morphs
- Blank Specular & Normal Map
- Categorised for YA Male & Adult Male - Everyday (Disabled for random)
let me know if anyone has converted this before or if theres any issues! if someone else has a conversion, i will delete this one <3
CREDITS @backtrack-cc for the original mesh & textures as well as letting me convert!! <3 The original for sims 4 can be found HERE @sofayya for inspiration from converting streams
@nightospheresims for their sims 3 cc converting tutorials! 💗

#ts3cc#4t3 conversion#ts3 download#ts3#ts3 clothing#s3cc#the sims 3#sims3#sims 3 cc#thesims3#ts3 male clothes#ts3 male clothing#mycc
478 notes
·
View notes
Text
TUTORIAL
How to FIX CUSTOM EYELASHES after update 1.108.349.1020 The Sims 4
YOU NEED:
Sims 4 Studio @sims4studioofficial
Blender (I use Blender 2.79)
Instruction manual:
Opening the eyelashes that need to be repaired in Sims 4 Studio

2. Go to the "Categories" section - Item "Outfit Type" - "Eyelashes"

3. Click "Apply to All Swatches" - Click "Yes"

4. Now we need to assign the correct color to the Vertex in Blender. Go to the "Mesh" category and export the eyelash mesh

5. Open the Mesh in Blender and switch to the "Vertex Paint" mode

6. Select the display mode "Wireframe" or press the "Z" key

7. If the eyelashes are broken, they will have the wrong color. Now we need to assign the correct color

8. Click on the palette icon

9. Go to the HEX item and enter the color code. Color Number: 007F3F

10. After you entered the color code. Click "Paint" - "Set Vertex Color"

11. After that, the color of the eyelashes will change. Save the file and close the Blender

12. Go back to SIms 4 Studio and import the mesh

13. Saving the package file

14. Checking the result in the game
714 notes
·
View notes
Text


Shop Sign Wall Lights
I put together a few sets of shop sign wall lights. But there are instructions. I kept some swatches as a default white color so that you could pick which color you want the light to be while in live mode. This saved on the file size of the package file because the more textures a file has, the more bloated the file size is.
I had some fun with some shop names although I mainly included generic titles in both English and Simlish.
DOWNLOAD for FREE: SFS
OR at Patreon*
*You must be over 18 to access my Patreon page.
INSTRUCTIONS ON CHANGING LIGHT COLORS
Once you place the light in build mode, then go to live mode. Click on the light and you will get the following pie menu.

Select SET COLOR AND INTENSITY and then choose THIS LIGHT. The color options will then appear so you can select which color you want.

If you use the name signs along with the Awning Lights, make sure to place the name on top of the awning so when you select the color picker, the correct sign changes colors. The other option is to place the name separate from the awning, go to live mode and change the color, then go back to build mode and add the awning light you want.
Enable the bb.moveobjects on cheat and then you can make adjustments to location and size of objects. You can adjust the position of the light on the wall by depressing the Alt key while placing the sign (on PC). You can adjust the size of the item by depressing the Shift key and either [ (for smaller) or ] (for bigger) (on PC).
CREDITS
Awning Shop Lights - 19 swatches of various awning wall lights. 18 are pre-colored and one is white so you can change the color yourself in game.
Candy Shop Lights - 20 swatches
Pottery Shop Lights - 25 swatches
Tattoo Shop Lights - 21 swatches
Enjoy!
Creations by SexyIrish7
These cc objects are new 3d meshes created using Blender and Sims 4 Studio.
Polygon Count: 6
All CC have:
*Ability to search catalog using search terms: sexyirish7 and si7
*Customized thumbnail
*******
CREDITS:
Software credits:
Sims 4 Studio v. 3.2.4.1 (Star): https://sims4studio.com
Blender 4.0: https://www.blender.org/download/
GIMP v. 2.10.34: https://www.gimp.org/
Inkscape v. 1.2: https://inkscape.org/
Thank you to the creators and moderators producing tutorials and answering questions!
*******
Model and Image credits:
Mesh created by me.
Simlish font credit to Franzilla: https://modthesims.info/
Image credits:
Awning Lights Image credits: Modified image from Adobe Stock
Candy Shop Image credits:
Swatches 1-3: Image by pch.vector on Freepik https://www.freepik.com/free-vector/christmas-candies-symbols-set-neon-style_11241813.htm#fromView=search&page=1&position=26&uuid=8b541325-0e62-4e37-9468-6bacd30f8963&query=neon+lollipop+candy
Swatches 4-8: Image by gstudioimagen on Freepik https://www.freepik.com/free-vector/sweet-candy-neon-seamless-pattern_5595774.htm#fromView=search&page=2&position=30&uuid=e2259de5-014d-4d04-af87-1198ee0f35e2&query=%40gstudioimagen+neon
https://www.freepik.com/free-vector/sweet-candy-neon-seamless-pattern_5595775.htm#fromView=search&page=1&position=27&uuid=e2259de5-014d-4d04-af87-1198ee0f35e2&query=%40gstudioimagen+neon
Swatches 9-10: Image by openclipart.org https://all-free-download.com/free-vector/download/peppermint_candy_clip_art_13182.html
https://all-free-download.com/free-vector/download/round_candy_with_stick_card_on_pink_background_6823183.html
Swatch 11: Image by All-free-download.com https://all-free-download.com/free-vector/download/round_candy_with_stick_card_on_pink_background_6823183.html
Swatches 12: Image by katemangostar on Freepik https://www.freepik.com/free-vector/ice-cream-cart-neon-sign_3238564.htm#fromView=search&page=8&position=42&uuid=2f82b4d1-5ca8-449c-ae22-4573861ebcb0&query=neon+sign+retail
Pottery Shop Image credits:
Swatch 1: Crafting icons created by andinur - Flaticon https://www.flaticon.com/free-icon/pottery_17392031
Swatch 2: Image by katemangostar via Freepik https://www.freepik.com/free-vector/aquarius-neon-sign_5561944.htm#fromView=search&page=2&position=5&uuid=c55e5e21-0550-46f0-b9be-cfa85ff38796&query=Ceramic+Neon
Swatch 3-4: Pottery icons created by Smashicons - Flaticon https://www.flaticon.com/free-icon/vase_3760867
https://www.flaticon.com/free-icon/vase_3760970
Swatch 5: Icon by istar_design_bureau via Freepik https://www.freepik.com/icon/pottery_1958438#fromView=search&page=2&position=20&uuid=096084ae-13fe-429c-a419-e6e13ccd37b9
Swatch 6:Icons by Eucalyp - Flaticon https://www.flaticon.com/free-icon/pottery_6552610
Swatch 7: Icon by berkahicon via Freepik https://www.freepik.com/icon/spin_13785816#fromView=search&page=2&position=0&uuid=096084ae-13fe-429c-a419-e6e13ccd37b9
Swatches 8-11: Icons by Freepik https://www.freepik.com/icon/pottery_8540816#fromView=search&page=3&position=43&uuid=096084ae-13fe-429c-a419-e6e13ccd37b9
https://www.flaticon.com/free-icon/machine_9200546
https://www.flaticon.com/free-icon/vase_8838322
https://www.flaticon.com/free-icon/pottery_3305262
Tattoo Shop Image credits:
Swatch 1: Modified Image by katemangostar on Freepik https://www.freepik.com/free-vector/tattoo-salon-neon-text-with-tattoo-machine-neon-sign-night-bright-advertisement_2438198.htm?log-in=email
Swatch 2: Image by Nippy Custom https://www.nippycustom.com/products/tattoo-neon-sign
Swatches 3-5: Image by bohlam via Vecteezy https://www.vecteezy.com/vector-art/2185717-tattoo-studio-neon-signs-style-text-vector
https://www.vecteezy.com/vector-art/34210463-neon-sign-tattoo-studio-with-brick-wall-background-vector
*******
TOU:
Do not re-upload and claim as your own
Do not re-upload and hide behind a paywall
#the sims 4 cc#ts4cc#sims 4 cc#the sims 4#wall decor#sims 4#ts4#lights#wall lights#signs#shop signs#retail#pottery#ceramics#tattoo#ink#candy#lollipop#sweets#sugar#light tutorial#sexyirish7
268 notes
·
View notes
Text
Some resources to understand DXT compression:
DXT Compression Explained
Why games use DDS
S3 Texture Compression Depending on the DirectX version, different DDS formats are supported. For DirectX 9, which Sims 3 uses, only the compressed formats ranging from DXT 1-5 are available. For Sims 3, mostly DXT1 (BC1), and DXT5 (BC3) are used, sometimes also DXT3 (BC2) if you do not need many transitional grey colors in the alpha. With DirectX 10 and 11, new and improved formats (BC4 to BC7) have been added that offer much better quality, but TS3 sadly cannot make use of them due to being a DirectX 9 game.
You can use different texture sizes in one project!
You can mix and match texture sizes, I tried that for clothing CC. For example, if you want to have a specular to create a shiny button or something like that, you can often get away with making it half the size of your multiplier. This is especially good if your multiplier is 2048px which is a lot (and should be avoided when possible), and to have smaller specular and mask files will help a lot to reduce the load on the memory. You can always try it out on a case-by-case basis if it works well or not. I usually have the normal map in the same size as the multiplier just because they often need that extra detail (this is for when you actually have detail in the normal map), but you can also experiment with making those smaller as well if you want.
Edit your UV maps!
IMO, one of the best skills a converter can learn is to edit UV maps. Look, we are playing The Sims 3 for a reason. If we want Sims 4 clothes that work like Sims 4 clothes, we could just play Sims 4. Sims 3 has this awesome pattern system, so let's try to properly support it because that is a huge strength of the game and such a wasted opportunity to not at least try to make the CC work with it as best as it can. This also means paying attention to potential UV stretching and disruptions of the pattern that can be fixed by rotating and stitching some UV pieces together.
To avoid having to use 2048px textures for those tiny squished Sims 4 UV maps, you can scale them up and then scale the textures up too. if they are just a little bigger there is usually not much quality loss, but you can also use an image upscaler like Gigapixel AI that will enhance the quality while making the texture bigger. I usually upscale the textures 2x or 4x and then reduce the size to what I need. This makes the textures appear nice and crisp.
Create original CC
Back when TS4 was not yet released, most people who wanted to make CC actually learned how to make meshes using different Sims 3 meshes and editing them and creating mashups known as frankenmeshes, then eventually meshed portions of it themselves or used Marvelous Designer to create the clothes. Blender has come a long way since then and it is packed full of super helpful features. And there are loads of tutorials for Blender now (15 years ago, you were lucky to find anything decent). Also, we can now use Sims 4's meshes along with Sims 3's meshes to create new mashup, and use Blender to customize everything from the base mesh itself to bones and morphs. The possibilities are endless. I really wish we had more original creators in our community. It is such a great feeling to make something that you dreamed up yourself. Maybe just try it?
Ask for help/share what you are struggling with
I've been known to help out whenever I can if you have specific questions about a project. If you feel like you cannot find the resources you need to learn or feel stuck, let the community know! Maybe someone knows a tutorial, or someone with knowledge can write one knowing there is a gap there. Since more experienced creators have not been in your shoes for a while, we may not know of all current beginner tutorials or if there is a lack of them. But if we know what areas need work, we may be able to help! And we can also help with specific issues. I recommend joining the TS3 Creator's Cave Discord to find resources, help, and advice.
Keep up with Software
Also, software changes and tutorials have to change too. It is still possible to mesh using the old ways, but a lot of tasks are easier with newer strategies. It is a good idea to keep yourself informed about tool updates and to go with the updates if possible to keep up with the newest developments. Especially Blender has added tons of new features these last few years and it is vastly different than a few years ago. A lot of changes are more convenient than sticking to the old ways in the long run!
tips for 4t3 converters/CAS clothing creators
3 main things:
non-recolorable presets
DDS. settings
Adult to Teen conversions
disclaimer: i'm not a CC expert, but these are things i've noticed and learned these last couple months converting cc. special thanks to thornowl and the other converters in the TS3 Creators Cave discord.
Non-recolorable presets:
we obviously know that ts4 lacks a CASt tool, so ts4 creators rely on recolors. In my conversions, I do include a couple of the item's recolors. these usually are patterns that CASt does not have.
one thing I've noticed more and more converters doing is putting such item recolors in the 'Overlay' tab in TSRW.
let me show you what that looks like for a non-recolorable preset:
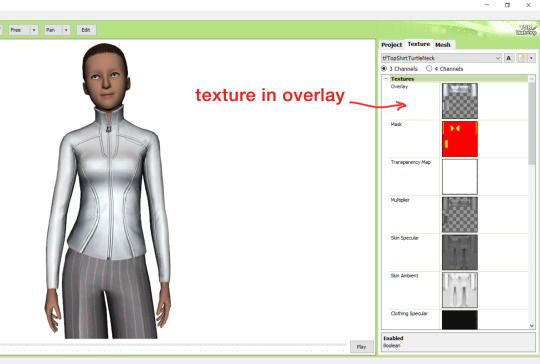
it looks over-saturated, and almost crunchy. but there's another place you can import the recolor into: stencils.
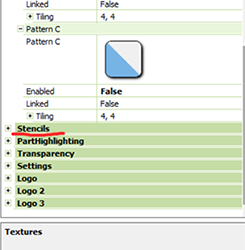
stencils will be found at the bottom, under patterns. hit the plus sign next to stencils to open it.
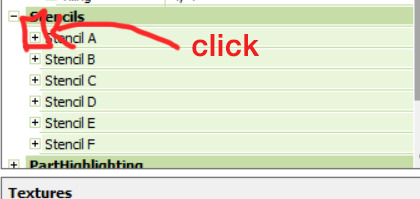
opening it will show you this:
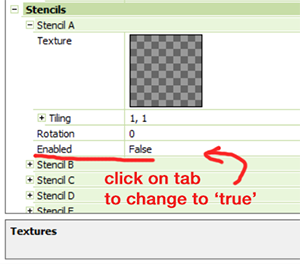
by default, it will be enabled as false. import your recolor into the texture tab as you would do for any other texture tab. make sure you tick the 'false' to 'true.' stencils override overlays, so if you want to use an overlay, enable stencils back to 'false.'
here's what the recolor imported into stencils looks like:

here's the two side by side:
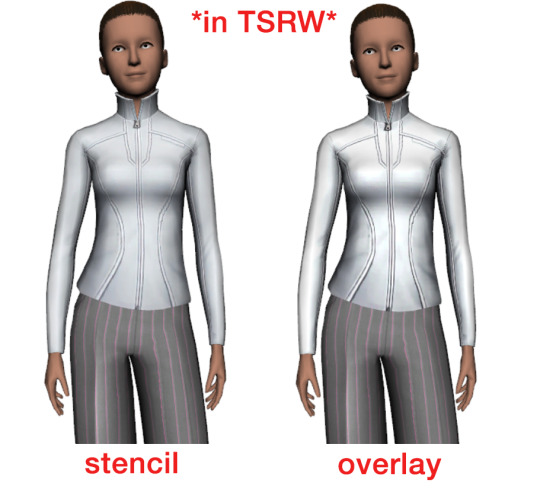
see how different they are? let's see how they are in game:
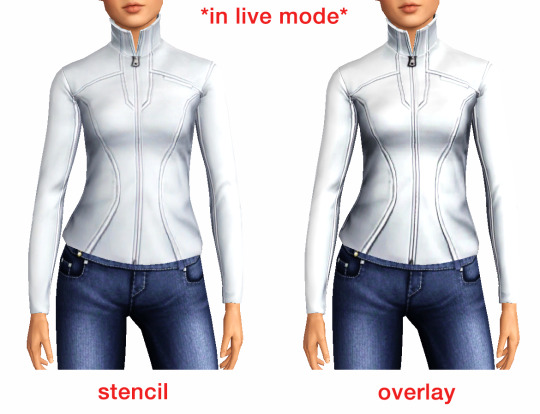
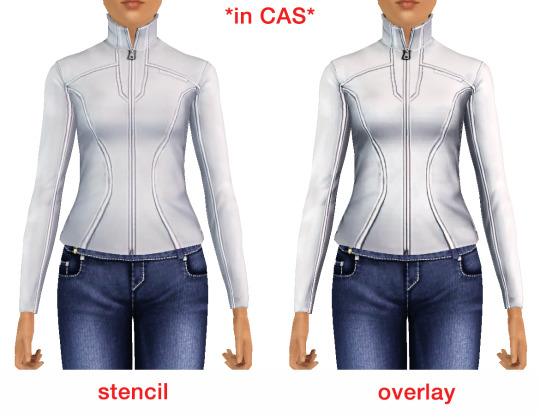
click on the pictures to really see the difference in quality. since TS3 uses DDS. format, it compresses the texture, which results in the crunchy texture. importing the recolor into the overlay tab makes the DDS. compression more noticeable. it ultimately is up to you and whichever one you prefer, but do keep it in mind.
the overlay tab is good for small details that you want to maintain on all recolorable presets, like zippers, buttons, tags, etc. just look at EA clothes for reference, especially their shoes and male clothes.
another thing you can see from the images are the bumps on the mesh. doing normal maps can help you keep those same details on the recolorable presets without importing the recolors.
-----------------
DDS. settings:
something I also see and used to do myself is bloat package files with large file sizes, specifically normal and specular maps, as well as masks. the Sims 3 Tutorial Hub provides a link to plain maps, but the file sizes are unnecessarily big.
let's look at some of EA's maps in TSRW:
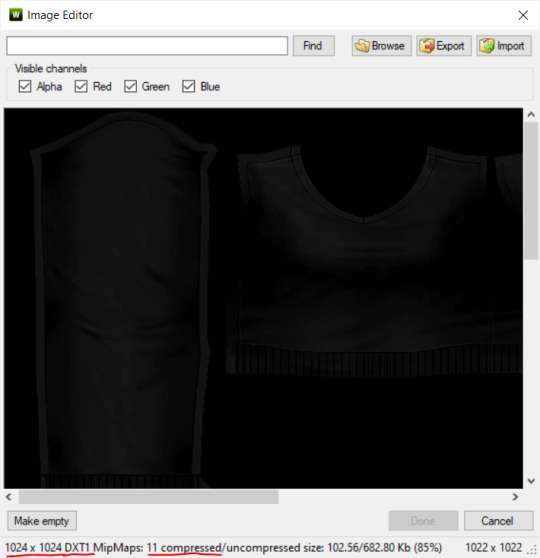
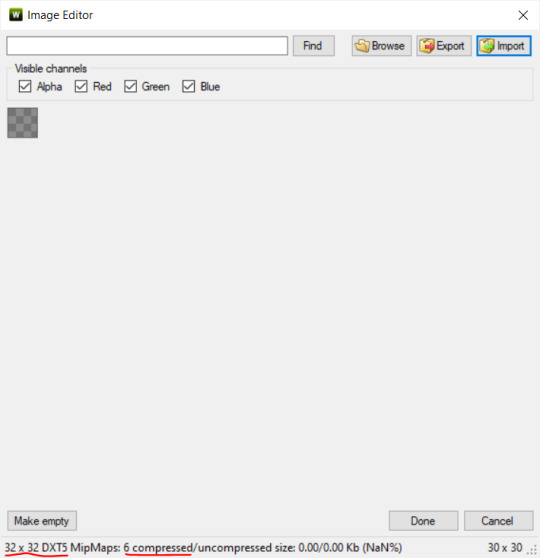
here's the specular from one of the basegame sweaters. notice the image size, DXT format, and compression size.
a lot of converters don't want the shine on regular clothes, so we use a plain, black specular map. but ask yourself, why do you need a 1024 x 1024 purely black specular map with no details?
let's try sizing it down:
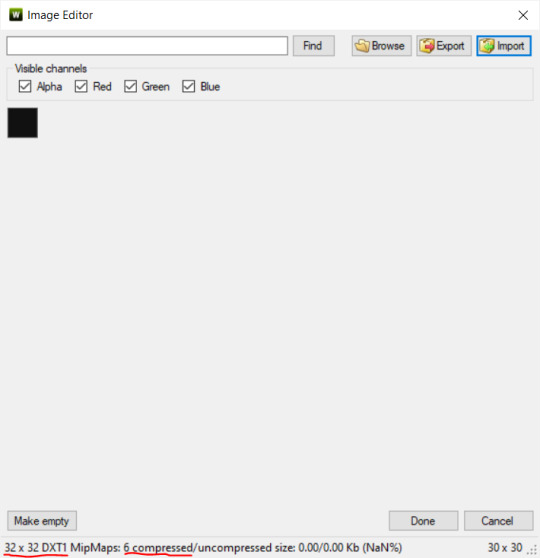
notice the difference between the image and compression size. instead of bloating the package file, we can keep it down by using a 32x32 plain black specular map instead, since there aren't details we want from the specular map.
same goes for normal maps:
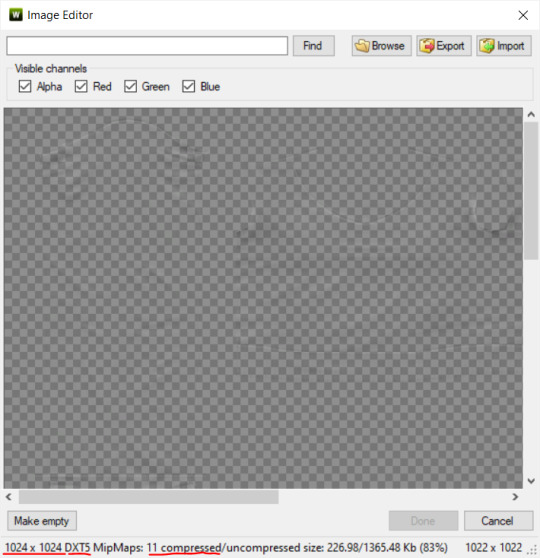
and masks (meant for 1 channel only):

now, notice how I underlined the info about DXT MipMaps. see how the normal map has a different number there compared to the specular map and mask.
the reason these textures use different DXT is because of the colors and alpha channel.
here's how my DDS. settings appear when saving:
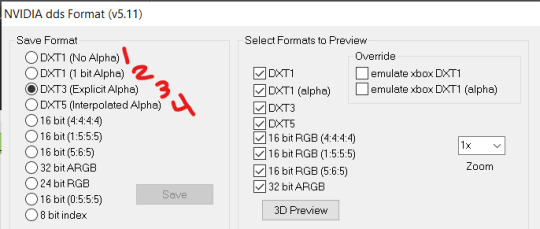
DXT1 (no alpha): this keeps only the 3 color channels and has the strongest compression. it results in half the file size as DXT3/5. 3 channel masks should be saved with this, as they don't need an alpha channel.
DXT1 (1 bit alpha): this includes an alpha, but only black or white. it also results in half the file size as DXT3/5.
DXT3: this one is rarely used for TS3 textures. it really is only used for overlays. it compresses the same as DXT5, but may not be the best for images with smooth-blended alpha regions (Neely).
DXT5: multipliers and normal (bump) maps should only EVER be saved with this. it's best for colors but has a larger file size. this is why it's important to reduce the multiplier and normal map image size, especially if you don't make a normal map.
if you DO decide to do a specular and normal map, they should be regular image size, 1024x1024, and saved in the right format.
here is more information on which textures should use which compression.
-----------------
Adult to Teen Conversions:
the default for converters is obviously AF and AM. a lot of people want the items for teens too. I've seen several converters just enable it in TSRW:
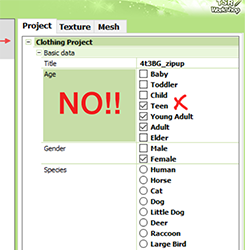
please don't do this. it's honestly the lazy route. you can hardly ever get away this, specifically because of the body differences between adult and teen.
some major issues with this include gaps, seams, and unnatural body characteristics:
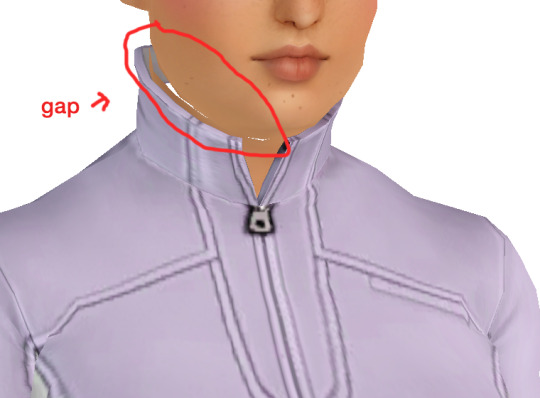
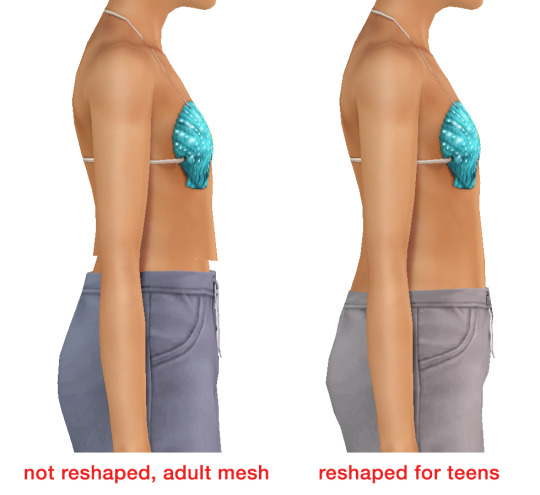
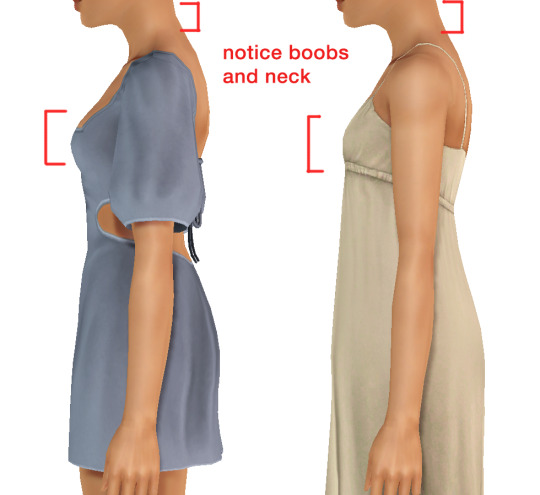
so please, either skip the teen mesh entirely or spend the time reshaping the mesh. @/sweetdevil-sims has a great tutorial on converting meshes from AF to TF here. the inevitable seams on TF meshes are also now fixed, thanks to @/thornowl with their new version of mesh toolkit.
@pis3update
---------------
here are reduced file sizes and corrected settings of the plain mask, specular, and normal:
download
Sources:
Neely, G. ‘Buckaroo’. Working with DDS/DXT Files. Available at: https://www.buckarooshangar.com/flightgear/tut_dds.html (Accessed: 28 May 2024).
#ts3#tutorial#cc tutorial#ts3 meshing knowledge#TS3 CC tips#learn how to create CC#ts3 resource#sims 3 modding#sims 3 CC creation
180 notes
·
View notes
Text
So you wanna make cc?
Here's some helpful tutorials. BUT its highly suggested you start off with the donut tutorial or something similar otherwise nothing in blender will make any sense and you will be lost.
Now go make weird shit 💜 (but try to keep it low poly, sims is old 😅)
more links under the cut
youtube
youtube
youtube
youtube
353 notes
·
View notes
Text


Monica Entertainment Center
Details:
100% My Mesh
8 New Meshes
Search [TBZ For Easy Find
Collection:
TV (tabletop & wall): 1 Swatch
TV Stand: 16 Swatches
Doughnut Vase (small & large): 10 Swatches
Incense/ Incense Vase (separated to change colors for each): 10 Swatches
Cable Box: 1 Swatch
Tv Remote (deco & override): 1 Swatch
Picture Frame (2 versions, digital package requires Moschino Stuff Pack): 9 Swatches
Tutorial For Photo Frame
Credits:
Instagram
Pinterest
Substance
Blender 4.2
Sims 4 Studio

Download

Do Not Share My Content (Always Free After 2-3 Weeks)
Recolors Allowed Do Not Include My Mesh
Do Not Use/Altar My Mesh To Make Your Own Content
DO NOT CONVERT TO ANY OTHER GAMES
Do NOT Share IN Discords, Facebook Groups or Give Away In CC Folders.
STOP PUTTING MY CONTENT IN FOLDERS AND PUTTING THEM BEHIND A PAYPALL
IF THERE ARE ANY ISSUES PLEASE BE SURE TO LET ME KNOW VIA MY IG DMS!!!!
IF YOU USE ANY OF MY CC PLEASE TAG ME ON IG I WOULD LOVE TO SEE IT
163 notes
·
View notes
Text
youtube
I was struggling to smooth the normals at some clothing seams in blender, then found this video and it helped me a lot.
I went through the same process: duplicated the mesh, merged the problematic verts and smoothed the normals in the duplicate, and then aplied these changes on the OG mesh with the data transfer modifier. Selecting the Topology option in the Mapping dropbox helps to avoid the modifier messing with the other normals that are already fine.
I thought this could be useful to somebody else 😊
16 notes
·
View notes
Text
SimPe tutorial: How to fix the height setting of CC chandeliers (The Sims 2)
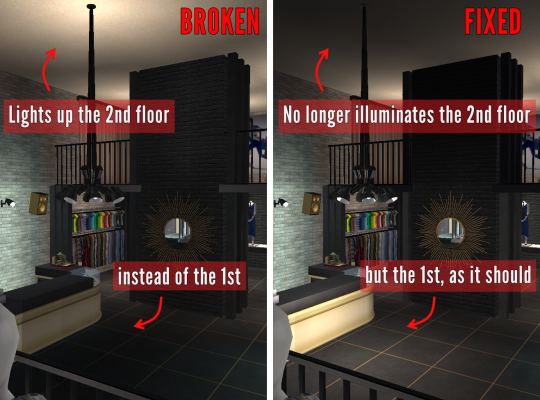
A few years ago, @hugelunatic released a fix for the chandelier added to the game with M&G. Originally, the light cast by the chandelier illuminated the floor level above the lamps, not below them. That mod, however, does not affect custom 2-story lights, which need to be adjusted individually. This is a quick, easy tutorial to do just that.

1. Open the mesh .package file in SimPe;
2. Select "Resource Node (CRES)" in the Resource Tree menu and open the item shown under Resource List;
3. Make sure "Plugin View" is enabled (bottom menu of SimPe);
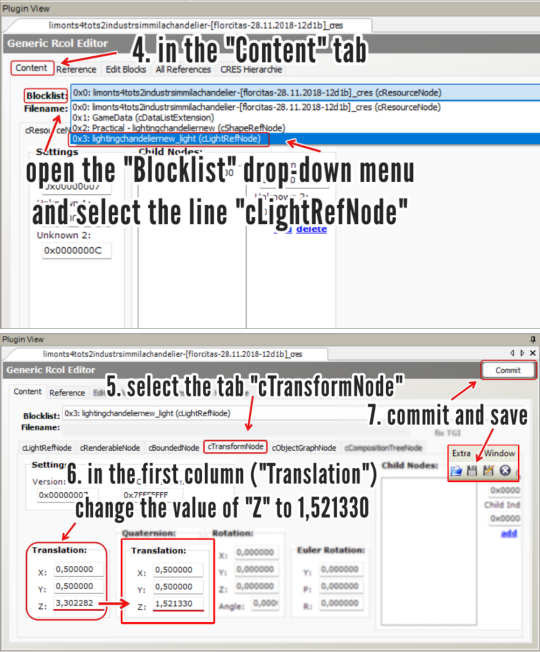
4. In the "Content" tab, open the "Blocklist" drop-down menu and select the line "cLightRefNode";
5. Select the tab "cTransformNode";
6. In the panel displayed, on the first column (named "Translation"), change the value of "Z" to a number that matches the height of the lamp mesh you're editing.
NOTE: For 2-story lights that sit on the same height as Maxis' chandelier, the value that I used was 1,521330 (taken from HugeLunatic's mod). For CC lights of a different height, you might want to try different values, according to your personal preference.
7. Click "Commit" and save.
_______________________________
For my own game, I edited two custom lights using the same height value ("Z") that HugeLunatic did for the M&G chandelier (1,521330) . I'm not sharing them here because both creators are still active, but I'm tagging them in case they wish to update their files. They are:
@lordcrumps' "Slightly Off Track Lighting", from his 4t2 Industrial Loft Kit; and
@limonaire's conversion of Industrisim's 2-story industrial chandelier.
Not needed, but RECOMMENDED: HugeLunatic's fix of Maxis' chandelier.
202 notes
·
View notes
Text

SimCare Medical Clinic

Sim File Share (currently slow due to traffic/site errors. I will keep trying to upload so check my Downloads page for updates.) Dropbox

Our SimCare team is dedicated to nurturing your health through proactive care and patient-centered treatment - whether you're seeking routine check-ups or specialized care. We’re here to support your journey toward a healthier life and ensure that you receive the best support for your health, every step of the way.

Price: 184, 065 Lot Size: 30x20 Lot Type: No Visitors Allowed Store Content: Click here CC Used: Click here File Type: Package Min. Required Game Version: 1.42 Packs Needed: The Sims 3, Pets (buydebug object), LN (elevator, floor, wallpaper), Ambitions, Generations, Seasons Simlish Clinic Signs (Add-on CC): Price: 1500 Environment: 7 HLOD: 122 Features: Shiftable, Frame is CASTable Category: Buy > Decor > Wall Decor Room: Living, Dining, Bedroom, Study EA Mesh Used: Painting Ranch 2x1 from The Sims 3 File Type: Package Min. Required Game Version: 1.42 Packs Needed: The Sims 3, Late Night
Hello and welcome back to my blog!
It’s been a minute, hasn’t it? Life got in the way and honestly, I’ve been taking my sweet time with this new build. It also didn’t help that the Sim File Share site kept giving me errors whenever I tried to upload it and I was supposed to post this last month.
Even now, I’m still dealing with errors on the site and after some frustration, I’ve decided to look into alternative sites for uploading content in the future. But after all the setbacks, it’s finally ready!
Thanks for sticking around and I really appreciate all the likes/reblogs, you all are the best! 💜
Click on the ’Keep Reading’ below for more information and pictures on this lot.


📣 Right-click on a picture and select ’Open image in new tab’ for a clearer view.

This clinic is designed to give a real-life feeling of visiting a healthcare facility. Inside, you’ll find a: reception area, consultation/exam rooms, pharmacy, laboratory, x-ray/radiology, restroom, locker room, staff break room, doctors office and a large empty room for the rabbit hole rug/door. Now, a couple of things to keep in mind - the layout is designed with a small staff in mind but you can use the extra space in the second floor, where the rabbit hole rug/door is placed, if you want to add more offices or any other services. Just make sure that there is enough space for the rabbit hole rug/door to avoid routing issues. I had to get creative with the signs for this build as I couldn’t find anything that felt right or any CCs that matches the layout of the clinic so I made my own directory signs. It is included in the download file and I’ve posted the details along with this post as it is an add-on for the clinic. I’m using a font called Simlish Deja Vu by gazifu@MTS for the signs and I’ve also included translations in the picture above. It’s not perfect but you know what? It does the job! I have also placed a big sign shown on the clinic that translates to 'Pharmacy' and I know it might seem a bit out of place but honestly, it’s the only large sign I liked that fit the building aesthetic I was going for. 📣 Please note that the CC included in the lot are not included on the download file. I’ve compiled a list for those interested in downloading them separately (please click the links above or go to WCIF Navigation page) but those are not required and will be automatically replaced in the game. Any expansion packs with build items listed in the Details section above may be required for this lot to show up in your game. This clinic has been such a fun build to put together and I hope you all enjoy the build. This lot has been play-tested and let me know if you experience any problems on your end!

TSR Tutorial - Create Custom Paintings Sims Wiki - Poly Counts for Creators TSR Workshop Simlish Deja Vu font by gazifu Pixabay
#petalruesimblr#community lot#the sims 3#the sims 3 hospital#the sims 3 clinic#decorative obj#lots#ts3#sims 3#sims 3 lots#ts3 simblr#ts3 simmer#ts3 download#ts3 screenshots#ts3 community#sims 3 download#sims 3 screenshots#ts3 hospital#ts3 clinic#ts3cc#the sims 3 custom paintings#ts3 custom paintings#s3ccfinds#s3cc download#the sims 3 wall decor#ts3 wall decor
157 notes
·
View notes
Text
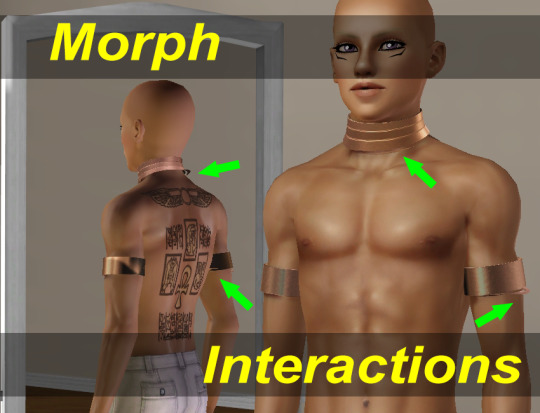
Morph Madness Pt2!
Fixing Morph Interactions
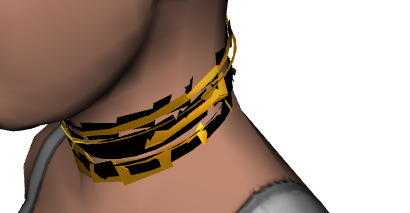
The second version of Marik's Egyptian Choker is currently in production. Despite fixing the exploding morph issue I described before, it seems that my morphing problems were not yet at an end. Creating Marik's Egyptian Armbands and seeing these two accessories worn together revealed another issue.
When several accessories with morphs are worn together, there is a possibility of their morphs interacting inappropriately if their vertex IDs conflict.
The conflicting vertices then veer off into space when the accessories are worn together like in the image above. It may not be obvious, but the bottom of the choker and the bottom of the left armband are ramping off like party ribbons, not the effect I was going for.
So what are these vertex IDs I am talking about and what do they have to do with morphs?
I gave a pretty good description in my previous post about exploding morphs, but I will recap here for you.
Every vertex in your mesh has a number assigned to it so that the computer can keep track of it. A morph is made up of directions for each vertex in a mesh on where to go if the sim is fat or thin or fit. In TSRW, the sliders can be used to drag between these morph states and view them.
The vertex index number determines which vertex gets which set of directions. If the vertices of your base mesh are numbered differently than the vertices of your morph, the wrong directions are sent to the vertices, and they end up going everywhere but the right places.
What happens when the same vertex gets two different sets of directions?
You are seeing the answer in the image. It takes some sort of average and ends up in the wrong place for both items.
How do we fix this unwanted interaction?
We know that the game allows us to wear combinations of clothing and accessory items together. To keep the morphs of these items from interacting like we see above, the game reserves a range of vertex IDs for each category of item. Stay within the range for your category, and you're gold. Exceed that range, and you'll start seeing problems.
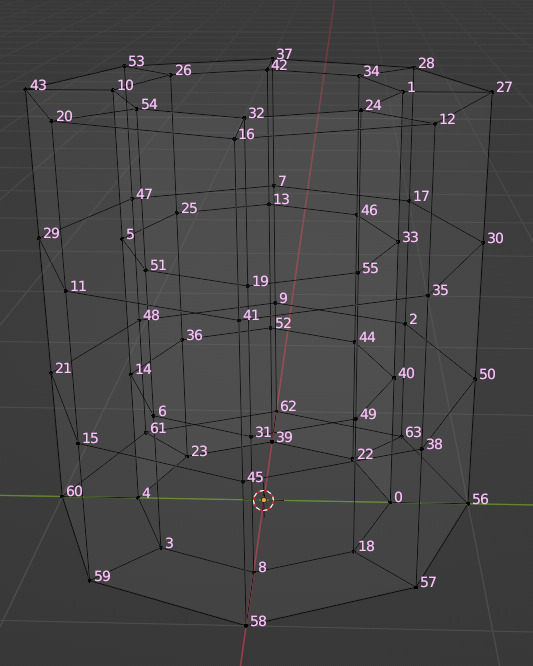
When you import a mesh into TSRW, the vertex IDs to be used in the game are automatically assigned based on the category of item you've cloned. For the choker, I cloned a necklace, so the vertex IDs were numbered to start at 31850.
Starting Vertex ID of Range Category for Sims 3 Accessories:
Earrings: have no morphs
Necklaces: 31850
Armbands: 32300
Bracelets: have no morphs
There is a suggestion online which I will now debunk because it has lost me time and ultimately created problems rather than solving them. The suggestion is to renumber the vertex IDs to have necklaces start at 4000 and armbands start at 8000.
The first problem with this suggestion is that TSRW automatically renumbers to the ranges I gave above. Manually renumbering in TSRW is possible within the Vertices Editor, but it is a hassle. So, I wrote a Python data entry script to automate this process. I succeeded in renumbering the IDs to the 4000s, but there was a second problem: the game is not coded to recognize morphs in this range.
Imagine me being so proud that I'd figured out how to do this code and have it work for me. Imagine me opening up the game and testing the renumbered package. Imagine the item not responding to any of the sliders as if it had no morphs at all. Such a bummer!
If you want your morphs to work, you have to following the guidelines of the game. I've learned this the hard way.
So what are these guidelines?
For a necklace with morphs, vertex IDs start numbering at 31850 and you have 450 available vertex IDs. Ideally, you would fit all your LODs into this range, so that their combined total came in under this number, but there is some wiggle room. You only really need LOD1 to fit within this range to avoid interaction.
For an armband with morphs, vertex IDs start numbering at 32300. I have not tested enough to determine the limit to this range or what category may come afterward to interact with it.
Realize that splitting your hard edges will increase your vertex load in TSRW. A good rule for reducing geometry is if the camera cannot see a detail, it doesn't need to exist.
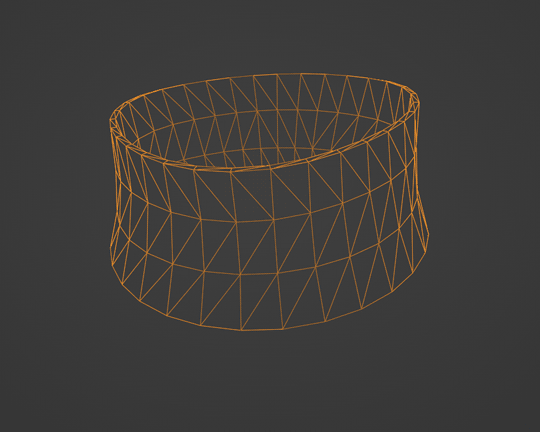
I've been recreating Marik's Egyptian Choker from scratch to reduce the load to within this vertex ID range while preserving quality by adding a normal map.
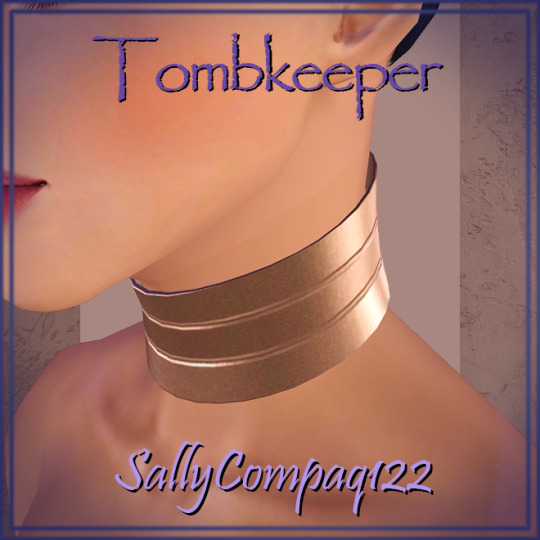
Here is a sneak peek of the custom thumbnails.
I'll also add a normal map to the armbands, so you can look for that update too.
In the meantime, I hope this information is helpful to other creators and users mystified by why their custom content is not working as they'd like.
See more of my work: Check out my archive.
Join me on my journey: Follow me on tumblr.
Support my creative life: Buy me a coffee on KoFi.
#exploding#morph#interaction#accessories#mesh#sims 3#cc#custom content#tutorial#C:O#SallyCompaq122#mod the sims#cc creator#art process#blender#3d#shape keys#sort#vertex#index
7 notes
·
View notes
Text
Cantina Collection

Straight from Oga's Cantina comes this cobbled together industrial set.
A bit later than planned but finally here. All items are very low poly as they are all frankenmeshed from the original bar back counters.
The textures are all composites and rearrangements of the originals, as a result they are not seamless - but we'll say it just adds to the look that they've just been made from whatever scrap metal was around!
Also as the cabinet doors all have the same rust pattern, it looks odd/repetitive on very big kitchens but works fine for small spaces.
There is only one swatch for all items except the seating, which comes in the same colours as the originals.
All items are base game compatible, except the resized bar backs which require Journey to Batuu.
See below for further details, pictures and download links.
Comfort (5 items):


Industrial Bar Stools x 2 - Low Back & No Back
Industrial Dining Chairs x 2 - Low Back & No Back (shown with original JtB high back chair)
Metal Dining Chair (shown with original JtB bar stool)
Surfaces (16 items):


Kitchen Counters & Islands


Bar Table
Dining Tables x 2


Coffee & End Tables
Console Tables x 3


Smaller Replicas of the original Cantina Barbacks x 5 - resized to match the height of regular counters NOTE: You'll need to use bb.moveobjects on to align these properly. JOURNEY TO BATUU PACK IS REQUIRED.
Industrial Shelf
Decor (2 items):
Metal Splashbacks x 2
Activities & Skills (3 items):


Oga's Bars x 2
Sabacc Game Table NOTE: BGC but JOURNEY TO BATUU is required in order to change the game type to Sabacc. Without this it will function as any other base game card table.
Download All (Downloads ZIP file from Google Drive)
Pick and Choose (Opens Google Drive folder)
If there's any problems with any of these items or you have any constructive feedback, suggestions or questions, please just get in touch, I'm still learning every day!
My TOU
Credits
All textures and meshes are edited or frankenmeshed from in-game EA assets.
@myshunosun - for their gorgeous sona dining chair which I cloned in order to have an object with the necessary transparency for the chair and bar stool - can be downloaded here.
Lizbot3000 - for their base game bar tables, which I cloned for my bar table and can be found here.
@ravasheencc - for her Crop It Like It's Hot Backdrops which I used to take some preview photos and can be downloaded here.
CC created using Blender, Sims 4 Studio & GIMP. Preview images using Canva Pro.
Everyone on the S4S forums and the Creator Musings discord group for all the tutorials and advice/help.
#always free cc#alwaysfreecc#custom content#download#journey to batuu#maxis match#my cc#sims 4#sims 4 buy mode#sims 4 cc#sims 4 custom content#sims 4 futuristic cc#sims 4 industrial#sims 4 industrial cc#sims 4 futuristic#sims 4 journey to batuu#sims 4 maxis match#sims 4 star wars#sims 4 star wars cc#star wars cc#star wars sims#star wars sims 4#the sims 4#ts4 cc#ts4#ts4 bb#ts4 buy cc#ts4 custom content#ts4 download#ts4 futuristic cc
207 notes
·
View notes