#tag em do html5
Explore tagged Tumblr posts
Visit Tumblr Blog
Explore Tumblr blogs with no restrictions, modern design and the best experience.
Last Seen Tumblr Blogs


Fun Fact
Mobile Tumblr US users spend an average of 4.04 minutes per session on the app.
Text
Learn Responsive Web Design – TCCI Coaching

Introduction
In the current world of digitalization, websites must be accessible and adaptable to different devices and screen sizes. Learn Responsive Web Design at TCCI Coaching to master the skills needed for seamless performance across desktops, tablets, and smartphones. At TCCI-Tririd Computer Coaching Institute, our expert trainers provide hands-on mentorship to help you develop modern, flexible websites.
What is Responsive Web Design?
It is a method of making a website able to automatically fit and perform well on different screen sizes. Unlike static designs offering fixed pixels, responsive websites include flexible site layouts, media queries, and scalable images combined to provide a seamless-user experience on any device.
Key Principles of Responsive Design
1. Fluid Grids
Fluid grids do not provide fixed pixel-based layouts but relative units such as percentages for ensuring adaptability.
2. Flexible Images
The scaling of images is in accordance to the screen size to avoid any distortion and also the enhancement in load times.
3. Media Queries
Media queries in CSS allow the application of different styles based upon the various screen widths of devices.
4. Mobile-First Approach
Designing in favor of mobile devices first assures the light weight and optimization of a website before going on into larger scales.
Why Responsive Web Design is Important?
Increasing Mobile Users: Most of the users access the web using mobile devices.
SEO Benefits: Google prioritizes the websites in search rankings which are mobile-friendly.
Improved User Experience: It guarantees that navigation is unobstructed and much readable in every type of device.
Technologies Which Are Essential to Responsive Web Design
HTML5: Structuring web pages
CSS3: Styling and Layout
JavaScript: Add interactivity to the site
Bootstrap: A well-known framework for responding design
How to Start with Responsive Web Design?
Learning the basics of HTML & CSS
Knowing the view port meta tags
Experimenting with media queries
Testing in various devices
Best Practices in Responsive Web Design
Using relative units such as %, em, rem
Optimizing images for better performance
Implement Flexbox and CSS Grid
Avoid fixed-width layouts
Popular Frameworks For Responsive Web Design
Bootstrap: Pre-designed components and grid system
Foundation: Advanced responsive design features
Tailwind CSS: Utility-first framework for flexibility
Tools for Testing Responsiveness
Google Mobile-Friendly Test
Chrome Developer Tools
BrowserStack
Common Mistake in Responsive Web Design
Ignoring the Touchscreen Users: Make sure all buttons and links are very easy to tap.
Too Much Breakpoint Overload: Only keep the few most important.
Not Testing on Actual Devices: Emulator is helpful but not always accurate.
Why Train Instead of Other Providers?
TCCI basically provides you with:
Expert Faculty having Industry experience
Live Projects for Practical Hands-on Learning
Flexible Learning Modes (Online & Offline)
Cost effective Fees along with quality Learning
Career Future After Learning Responsive Web Design
Web Developer
Frontend Developer
UI/UX Designer
Freelancing & Entrepreneurship
Conclusion
In the present digital age, it is a compulsion to master the art of responsive web designing. At TCCI-Tririd Computer Coaching Institute, we have provided skilled training from experts to create modern, flexible websites. Start learning today and begin your journey to becoming a successful web developer!
Location: Bopal & Iskon-Ambli Ahmedabad, Gujarat
Call now on +91 9825618292
Get information from: https://tccicomputercoaching.wordpress.com/
0 notes
Text
What?
I would far rather it stripped the decorative elements out and committed to styling being a separate, modular thing that is device-aware.
HTML did do this. That's why HTML5 was a breaking change.
HTML5 split the semantic and presentation layers.
(The only non-semantic elements left are <div> and <span>. If you wanted to get rid of those, you'd need to add a whole fourth language to webdev, which is obviously absurd.)
Everything else has an actual meaning. Even <p> has a meaning, "this is a paragraph of text", which is a concept that is important in most human languages. <b> has legacy bold styles for backwards compatibility, but also because generally speaking that's how you bring attention to text, and that's a different meaning from <strong>. When I'm hand-writing HTML, I use <em> and <i> both, because <i> is correct for book titles and <em> is appropriate for emphasis. <u> is different from <mark> and <ins>, and <strike> is different from <del>. And so on. <table> isn't a presentational element; it defines a data structure that can be styled however you want.
Device-awareness is all up to CSS3 (as most recently revised), and its media queries and container queries. You can turn a <table> from something with two scrolling dimensions into something with one scrolling dimension, using CSS.
It is very not hard to write:
<p class="poem">This is a poem. <br/> it is centered. </p>
<style> .poem {text-align: center;} </style> and then when you want to make al poems on the page use a fancy font, instead of adding twelve bajillion <font> elements, you just change the style tag:
<style> .poem {text-align: center; font-family: cursive;} </style>
Exactly!
To phrase it wrong but also kind of right: If I can do it in naive Microsoft Word,* - if all I want to do mark up my hypertext - I should be able to do it in pure HTML. I don't want to "style" my home page with "cascading sheets," I'm writing text here. Text that I want underlined and centered.
*(I'm aware Word Skill is a deep and subtle river)
37 notes
·
View notes
Text
Doctype HTML - o que é e porquê usar

Ele é o início de tudo quando se trata de programação em HTML. O Doctype HTML é o companheiro de todos que um dia já salvaram ao menos um arquivo *.html.
O Doctype HTML não é uma tag, afinal ele não está dentro da tag <html>, ele não faz parte do documento em si, mas sim, anuncia o que está por vir. O Doctype HTML é uma declaração DTD (Document Type Declaration) ao navegador acerca da linguagem que está sendo usada no documento. Mas... como assim? Se você está familiarizado com HTML sabe que existem várias versões da linguagem. Atualmente a mais usada é a HTML5, porém existem outras versões como HTML 4.01 Strict e XHTML.
Com o surgimento do HTML5, o uso do Doctype HTML foi simplificado, e deixou de ser obrigatório. A declaração se resume atualmente a <!doctype HTML>.
Porém, a presença do Doctype HTML garante que o navegador interprete o arquivo corretamente e é uma boa prática de programação em HTML. Além disso, há uma questão ainda mais relevante do que ter um código bonito, a declaração do Doctype HTML ajuda a prevenir ataques RPO (Relative Path Overwrite), onde o hacker altera ou adiciona folhas CSS ao site.
A W3C também aconselha o uso da declaração, mesmo esta não sendo obrigatório. É fundamental entender que, ela não é obrigatória para funcionamento, mas é obrigatória para o pleno funcionamento. Então, use.
3 notes
·
View notes
Text
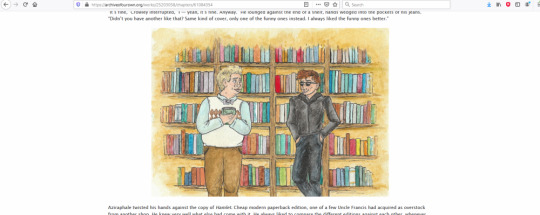
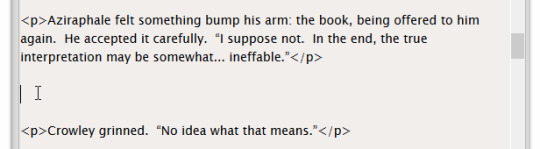
How to center and nice-size an image in an AO3 fic using a work skin
Maybe someone can use this? In my fic for the DIWS Good Omens Mini Bang, I embedded some images from my wonderful illustrator. The centered images will never be wider than the text, no matter the screen size, but they also are never stretched larger than their native size (I resized ‘em to 800px wide in my trusty paint program for faster downloading). Here’s how one looks on my giant monitor and on my phone screen:

If you have never done AO3 skins before then I promise they are not actually scary! You have the option of doing relatively complicated things with them, but this thing is simple.
Anyway this is how I center my images.
Step one: make a skin.
In your AO3 dashboard, click “Skins” in the menu (left or top of page, depending on if you’re on a big or small screen). This takes you to the Site Skins page, which are for if you want to make all of AO3 look different to just you. You want a Work Skin, though, which makes your fic look different to everyone, so click My Work Skins.

Click Create Work Skin in the top right and you’ll get an editor that’s similar to when you’re posting a fic! You only need to set two things.�� One, give it a title that makes sense to you (the title won’t be visible to people reading your fic). Two, paste some stuff into the big “CSS” box.
This is the stuff to paste:
.centered { margin-left: auto; margin-right: auto; text-align: center; }
.centered img { max-width: 100% !important; }
That was the stuff to paste! Just toss both of those two blobs in the big editor and click Submit. Now you have a skin!
Step two: use the skin in your work.
Open up the work you want to do this in. Find the Select Work Skin box (just under the Choose A Language box) and select the skin you just made. Yay! Sorry, the Homestuck and Undertale ones are just there for everyone and that’s how it is. (Nothing against Homestuck or Undertale. I just don’t like unneeded entries in lists.)
Step three: center your image.
This is the most complicated bit, only because I can’t give you an exact thing to copy-paste. But I can give you a basic template! Don’t try to paste this into Word or a similar word processing program. The quote marks could get turned into “smart quotes” (like the ones I typed there, just now -- see how the opening and closing quotes are different from each other?). If you need to save it off for later, Notepad or another very simple plain-text editor will be perfect, because it will keep the quotes as not smart quotes.
Find the spot in your AO3 work where you want the centered image to be. It would be between two blocks of text which are wrapped with <p> tags, so something like this...
Into that space, you’re gonna hit Enter a couple of times (which I’ve already done in the screenshot) and then paste this block:
<p class="centered"> <img src="BANANA" alt="ORANGE" /> </p>
That was the block to paste. Before you’re done, you need to change two things!
BANANA goes away. Inside the quote marks where BANANA used to be, you need to put the URL of your image. This URL must start with http or https (preferably https), or else it won’t work. I can’t give specific instructions on how to get this, because it depends on where the image is hosted! If it’s only on your computer, or attached to an email, it can’t be embedded. It has to have been put somewhere on the web, like Flickr, Photobucket, or Google Drive. It will work to embed from Tumblr, but I don’t trust Tumblr not to change everything up and bork all the old image URLs, thus breaking your embedded images on an arbitrary date in the future. (Any image host could theoretically do this, but -- well. We’re all familiar with Tumblr, right?)
ORANGE also goes away. Inside the quote marks where ORANGE used to be, you optionally can (I recommend you do!) put a brief (200 characters or fewer) description of the image. This is text which is invisible when viewing your fic in a normal browser -- it’s there for screen reader technologies, used by people who are blind or otherwise have trouble seeing a screen. Their screen reader software will literally read out to them, so that they can hear it with their human ears, the description you put here. Don’t start it with “image of” or “picture of”, because the screen reader tells the human that it’s an image already. Here is a pretty user-friendly guide on how to write alt text! If you’re more technically-inclined, the W3C has more involved docs. Remember, the screen reader is going to say out loud whatever you put here, so don’t make it super long, or else you’ll force people who are using screen readers to wait through the long description for your story to continue.
A finished version of the banana/orange block might look like this:
<p class="centered"> <img src="https://www.my-nifty-example-website.com/prettypicture.jpg" alt="Two dogs having a tea party wearing fancy hats" /> </p>
Step four: do it again if needed.
If you have more images to center in the same work, just repeat step 3 for each! Step 2 has to be done once per work. Step 1 might be done once ever (and then you just keep pulling that same skin into many works), or you might do it multiple times (if you want other changes in the skin that are special to only this one work). I do a different skin every time I have a fic that needs a skin, but that’s because I do extra fancy things that are different for each fic.
You never have to do either step 1 or step 2 more than once per work, even if it’s multi-chapter. In future chapters of the same fic, just do step 3 again.
Step five: preview and/or temporary draft is your friend
I am an IT professional with a (technically expired but work with me here) Microsoft certification in HTML5/CSS and seven years of writing this stuff for pay under my belt. Even I don’t post without previewing. Preview and saving as a draft without publishing are both your friends.
Some fun(?) notes
What you are doing here is using cascading style sheets. The AO3 skin is a very simple stylesheet, which is a series of rules that your readers’ browsers will use to apply to text in your story. There are standards that all your normal sort of browsers (Firefox, Chrome, Safari, Edge, Opera...) are supposed to follow when they see these rules, so that no matter which browser someone uses, a webpage will look as similar as possible.
A skin created from the above steps defines a class named “centered” and tells the browser how “centered” should look. Then, in your fic, if you apply the class named “centered” to something in the big editor -- like, say, the <p>aragraph tag that wraps around your image -- then the style from your skin will be applied.
The magic of cascading style sheets is that you can define your class exactly once and then use it many times. If you decide you want to change all the places you used it -- maybe you want every centered image in your 87-chapters-long heavily-illustrated fic to have a green border? -- you have to change exactly one place: your skin. The change will bubble down to every single place you used it.
Skins do not allow all the features of true CSS (no media queries; I am sad), and you can’t put comments in your skin (the editor strips them out). Browser-specific overrides also do not work (if you don’t know what this means, that’s okay, you have to go to extra work to try to use them in the first place). But they’re still pretty cool.
A lot of people will just put <center> tags around their thing, and use width=“100%” or some other number, but that is technically not standard HTML, hasn’t been for a very long time, and sooner or later Chrome is going to get clever and stop respecting it. (Google’s developers like to make Chrome very clever and change how it does things just because they feel like it. It makes my day job rather more difficult. Ask me about SameSite cookies!! Actually, don’t. Never ask me about that thing.)
For portrait-oriented illustrations -- taller than they are wide -- I like to float the image to the right of the text and have it take up no more than 50% of the width of the screen (as seen near the end of this chapter). But that is a more complicated thing than this one, and I am keeping it simple today. Maybe I’ll show how to do the nice floaty at some point.
For any-oriented illustrations, you could have a small resized version which links out to a larger version as a click-to-zoom thing. That is also a little more complicated, so it isn’t in this post.
Questions and clarifications welcome.
That is how to center and nice-size an image in an AO3 fic using a work skin! I hope you are having a good day.
#ineffablefool original post#man idk how i would even tag this thing#i'll worry about that later#not good omens#look you don't understand i love html and css this is fun for me#i don't get to do it very often at my job since they promoted me so i hafta get my kicks where i can
42 notes
·
View notes
Photo
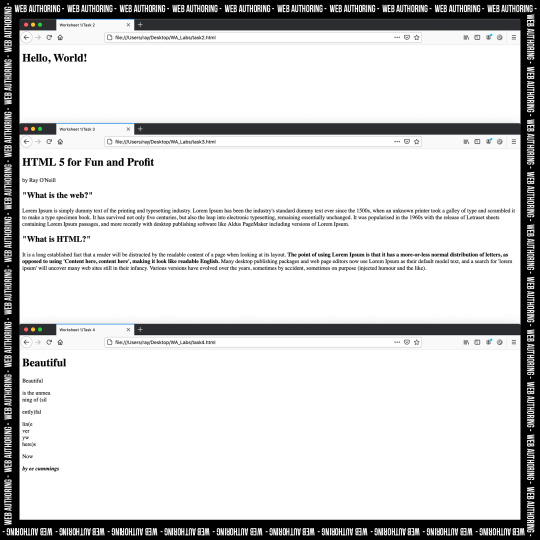
Lecture 2
So, today’s lecture was all about HTML, a build on to the video Gemma linked to us over the week after Week 1′s lecture. We had our lecture for the first hour where we went over the basics again, which were covered in the video, and we built on that knowledge. We looked at Block level elements vs In-Line elements, and we concentrated on block level elements for this week. They take up the full width of screens (unless you change that with CSS - but we haven’t gotten that far just yet) and they expand naturally, and so the next element drops below naturally. We also had a look into some more rules, like how there are 6 levels for headings and what they represent. Then looked at line breaks (<br>), which is used when you want to start a new line. Unlike the paragraph tag which automatically creates a bit of space after you close the tag. These <br> tags can be used during paragraphs, and these tags are an example of void tags, as they do not need a closing tag. We also learned about the Semantic web, and includes semantic elements which add meaning. Examples of these are: <strong>, <b>, <i> and <em> all of which help to emphasise certain things differently! And this all helps to go towards the accessibility of your site, all of which is good practice, the right thing to do and helps toward SEO. We also had a look at HTML lists, which are used to group related pieces of information together in a certain way, either as: Unordered Lists; Ordered Lists or Description Lists (which we will rarely use).
So, using all of this week’s lecture information about HTML, and the video recorded lecture we were asked to watch, we went about tackling our first HTML worksheet, which I really enjoyed. We were first separated into break rooms in Zoom, and I was teamed up with Daniel, Aidan and Ana, and it was my first time meeting anyone properly from the course, which was great! We had 5 different tasks to complete during our time. I already had Atom downloaded as I had already done a Python coding course during the lockdown. So, we used this same software to write our HTML.
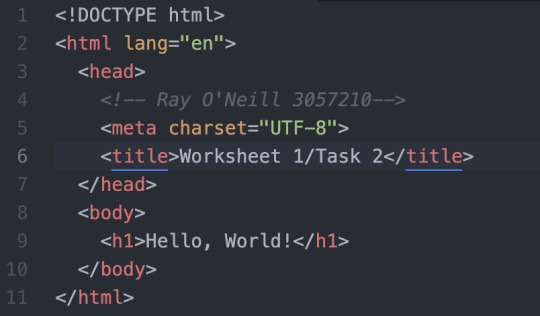
Task 1 was to create the folder structure: WA_Labs, with subfolders: css folder, images folder, and scripts folder. And we were told to save our html files inside the root directory/folder (WA_Labs) and not in any of the subfolders! This is also where the index.html file should be saved as well.
Task 2 was to create a html file to make a standard html5 web document with the heading element saying “Hello, World!” and the result can be seen above in the photo I posted on this post. The code can be seen here:
Task 3 was to create another html5 web document where we added content, subheadings and paragraphs. And we used paragraphs from lipsum.com. The result can be seen in the post above also, and the code below:

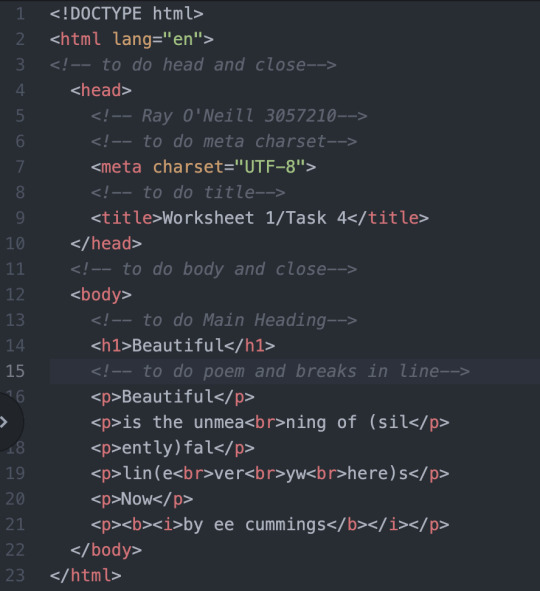
Task 4 was to use different HTML elements to recreate a poem which was divided up and on different lines. It’s a good sign when I found reading the actual poem more difficult than writing the code itself!! We also were to add comments among the code to help us get used to writing them. The resulting web result can be seen in the post above, and again, the code seen below:
Finally, we used the HTML Validator on the Firefox browser, to check our website results and the code we used to create them, and luckily for me, I came away with no warnings or errors, but Gemma did explain that sometimes the Validator doesn’t always detect these errors or warnings as the browsers are always behind current HTML specs. But I hadn’t any major trouble with the code, and nothing time couldn’t fix. And it helped that we were split up into break rooms and got the chance to help each other out and ask questions in a smaller group, which I really enjoyed! Looking forward to next week’s class when we continue with HTML. In the meantime, back to free code camp to help improve my skills.
1 note
·
View note
Text
O que é HTML5?
HTML5 (Hypertext Markup Language, versão 5) é uma linguagem para estruturação e apresentação de conteúdo para a World Wide Web e é uma tecnologia chave da Internet originalmente proposto por Opera Software.É a quinta versão da linguagem HTML. Esta nova versão traz consigo importantes mudanças quanto ao papel do HTML no mundo da Web, através de novas funcionalidades como semântica e acessibilidade. Possibilita o uso de novos recursos antes possíveis apenas com a aplicação de outras tecnologias. Sua essência tem sido melhorar a linguagem com o suporte para as mais recentes multimídias, enquanto a mantém facilmente legível por seres humanos e consistentemente compreendida por computadores e outros dispositivos (navegadores, parsers etc). O HTML5 será o novo padrão para HTML, XHTML, e HTML DOM. Atualmente, está em fase de esboço, porém diversos navegadores já implementam algumas de suas funcionalidades.
Após seus predecessores imediatos HTML 4.01 e XHTML 1.1, HTML5 é uma resposta à observação de que o HTML e o XHTML, de uso comum na World Wide Web, é uma mistura de características introduzidas por várias especificações, juntamente com aquelas introduzidas por software, tais como os navegadores, aqueles estabelecidos pela prática comum, e os muitos erros de sintaxe em documentos existentes na web. É, também, uma tentativa de definir uma única linguagem simples de marcação que possa ser escrita em HTML ou em sintaxe XHTML. Isso inclui modelos de processamento detalhados para incentivar implementações mais interoperáveis; isso estende, melhora e racionaliza a marcação disponível para documentos, e introduz marcações e interfaces de programação de aplicativos (APIs) para aplicações web complexas. Pelas mesmas razões, HTML5 também é um candidato em potencial aplicações multi-plataforma móveis. Muitos recursos do HTML5 tem sido construídos com a consideração de ser capaz de executar em dispositivos de baixa potência como smartphones e tablets.
Em particular, HTML5 adiciona várias novas funções sintáticas. Elas incluem as tags de<video>,<audio>,<header> e elementos<canvas>, assim como a integração de conteúdos SVG que substituem o uso de tags<object> genéricas. Estas funções são projetadas para tornar mais fácil a inclusão e a manipulação de conteúdo gráfico e multimídia na web sem ter de recorrer a plugins proprietários e APIs. Outros novos elementos, como <section>,<article>,<header> e<nav>, são projetados para enriquecer o conteúdo semântico dos documentos. Novos atributos têm sido introduzidos com o mesmo propósito, enquanto alguns elementos e atributos têm sido removidos. Alguns elementos, como<a>, e<menu> têm sido mudados, redefinidos ou padronizados. As APIs e os modelos de objetos de documentos (DOM) não são mais pensamentos retrógrados, mas são partes fundamentais da especificação do HTML5.HTML5 também define com algum detalhe o processamento necessário para que erros de sintaxe de documentos inválidos sejam tratados uniformemente por todos os browsers e outros agentes de usuários em conformidade com o HTML5.
11 notes
·
View notes
Text
HTML5 (Hypertext Markup Language, versão 5) é uma linguagem para estruturação e apresentação de conteúdo para a World Wide Web e é uma tecnologia chave da Internet originalmente proposto por Opera Software.É a quinta versão da linguagem HTML. Esta nova versão traz consigo importantes mudanças quanto ao papel do HTML no mundo da Web, através de novas funcionalidades como semântica e acessibilidade. Possibilita o uso de novos recursos antes possíveis apenas com a aplicação de outras tecnologias. Sua essência tem sido melhorar a linguagem com o suporte para as mais recentes multimídias, enquanto a mantém facilmente legível por seres humanos e consistentemente compreendida por computadores e outros dispositivos (navegadores, parsers etc). O HTML5 será o novo padrão para HTML, XHTML, e HTML DOM. Atualmente, está em fase de esboço, porém diversos navegadores já implementam algumas de suas funcionalidades.
Após seus predecessores imediatos HTML 4.01 e XHTML 1.1, HTML5 é uma resposta à observação de que o HTML e o XHTML, de uso comum na World Wide Web, é uma mistura de características introduzidas por várias especificações, juntamente com aquelas introduzidas por software, tais como os navegadores, aqueles estabelecidos pela prática comum, e os muitos erros de sintaxe em documentos existentes na web. É, também, uma tentativa de definir uma única linguagem simples de marcação que possa ser escrita em HTML ou em sintaxe XHTML. Isso inclui modelos de processamento detalhados para incentivar implementações mais interoperáveis; isso estende, melhora e racionaliza a marcação disponível para documentos, e introduz marcações e interfaces de programação de aplicativos (APIs) para aplicações web complexas. Pelas mesmas razões, HTML5 também é um candidato em potencial aplicações multi-plataforma móveis. Muitos recursos do HTML5 tem sido construídos com a consideração de ser capaz de executar em dispositivos de baixa potência como smartphones e tablets.
Em particular, HTML5 adiciona várias novas funções sintáticas. Elas incluem as tags de<video>,<audio>,<header> e elementos<canvas>, assim como a integração de conteúdos SVG que substituem o uso de tags<object> genéricas. Estas funções são projetadas para tornar mais fácil a inclusão e a manipulação de conteúdo gráfico e multimídia na web sem ter de recorrer a plugins proprietários e APIs. Outros novos elementos, como <section>,<article>,<header> e<nav>, são projetados para enriquecer o conteúdo semântico dos documentos. Novos atributos têm sido introduzidos com o mesmo propósito, enquanto alguns elementos e atributos têm sido removidos. Alguns elementos, como<a>, e<menu> têm sido mudados, redefinidos ou padronizados. As APIs e os modelos de objetos de documentos (DOM) não são mais pensamentos retrógrados, mas são partes fundamentais da especificação do HTML5.HTML5 também define com algum detalhe o processamento necessário para que erros de sintaxe de documentos inválidos sejam tratados uniformemente por todos os browsers e outros agentes de usuários em conformidade com o HTML5.
12 notes
·
View notes
Photo


Building a Landing Page
a freeCodeCamp Challenge
Warming the Engine
As I round the last corner of my third FCC challenge, a few initial assessments should be punctuated. This, overall, has been the most education of the three. Throughout this endeavor, I have made use of some skills (learned previously) and been able to execute them with more ease. Also, I have found myself adhering to new concepts a bit more effectively.
Over the following summary, I will lightly detail a list of features I utilized in the creation of my landing page (for a silly, hypothetical business called ‘Choose Your CHOOCHOO ’.) Here goes…
Figma and Components
I press on with Figma this time and make a point to learn the functionality of components. These are simply set by defining an element as such. After doing so, forging spawns (called instances) is straight-forward and allows for distinctions between the parent (component) and the spawns (instances) themselves.
Taking advantage of this tool makes it much quicker when building cards, buttons and so on. As my prototypes get larger, I will really be able to experience the full capabilities of this option.
Using Cloudinary to Host Images
With my first two FCC challenges, I assumed it was okay to leave my images unaccessible. It never crossed my mind — that they could be made available online via an image hosting site (either cloud or server-based.)
By using cloudinary.com, this could not be a more rudimentary task. After uploading my image from its local location, all that was left to do is rename and readjust quality for sake of image size and (website) loading performance. Both of these tasks are actionable via Cloudinary’s free service. Now, each of my projects include the appropriate images, from favicon, logos and multiple other graphic insertions.
Figma and Element Alignment
Inspect is a crucial device in Figma’s toolbelt. By using ‘inspect’, the red lines for spacing will appear and applying correct distances for each item across my canvas was very streamlined. In addition to the red line features, Inspect will show the font characteristics, colors and even code for finished products. More on this later…
Figma and Multiple Viewports
My first thought when designing mobile, tablet and desktop viewports with Figma was that I would have to manually draw up each screen. This was the wrong idea.
The right idea was in opening a new (blank) resolution and selecting the entire element (or highest parent element of my project,) then duplicating it and maneuvering it onto the next resolution screen.
After the new resolution was gifted a clone of the previous version, the last step was in slightly resizing everything to match. This was a much less pain-free process than my initial plan.
Anchor Jumping Within the Page
Here’s another one which I wasn’t entirely sure of how to pull off — though I had a general idea.
I knew if I wanted to use an (on-page) anchor to navigate somewhere else on that same (existing) page, I would have to reference the element somehow. The answer lied in setting my ‘href’ equal to the desired ‘id’ and that’s it. Now every click on those links directs the user to my intended location on the page — all (ids, of course) preceded by a lone hashtag.
Embedding a Youtube Video with HTML5
My primary attempt in placing a Youtube video in my landing page was to pop the address into a ‘video’ tag. I assumed all would work seamlessly. I was also very wrong.
In order to insert a Youtube video with HTML, a ‘video’ tag just won’t cut it — an ‘iframe’ tag is actually necessary.
That said, there is yet anther step before gaining complete functionality. Once the ‘iframe’ tag is set (and before pasting the Youtube address,) the watch portion of the address must be swapped for embed instead.
By using an ‘iframe’ and recalibrating the address to embed the video, everything should go swimmingly.
PX, EM, REM, CH, EX, %, VW and VH
I could spend some time here and fully articulate each property of these sizes, but I will leave that for another time. What’s most important about this notion (in this setting,) is that I have found it useful to understand how my relative units measure in terms of pixels. So, I have been using a calculator to better estimate how each unit will behave before assigning them to their respective text. This method has saved me a bunch of time in guessing what will fit where and why.
Instantiating H (tags), Articles and Sections
Much like my previous comment on delving deep — I could spend plenty of time going on about the semantics of these tags. In the future, I may do so. But here, I mean to make a more concise observation.
As I built this page, the importance of ‘sections’ (for grouping large portions of content) and ‘articles’ (for grouping the more succinct) makes plenty more sense.
In contrast, ‘h’ tags provide a type of semantic skeleton running down the page, for heading each bit of information.
Uppercase Fonts and Text Transform
I used ‘Playfair Display SC’ as one of my fonts on this project. This is a fully uppercase font. For purposes of browsers or instances where this font is not available, I wanted to ensure my casing was kept.
My solution was in using ‘text-transform’ to make all respective text uppercase (regardless) then setting the back-up font to ‘sans-serif’.
This was a fix to my issue; though, there may (of course) be a better answer to the problem.
Sticky!
A(n (numbered)) objective for this FCC challenge was to keep the navigation bar/header at the top of the page.
The first thing I reached for was a ‘fixed’ ‘position’ on my ‘header’ element. Though, after learning about ’position: sticky;’ I understand it to be a much better way of dealing with this demand.
By using ‘sticky’, no margins or extra code is vital to keep the header in place and from causing problems. This was one of the most clear cut, clean finds of the entire project.
Background vs Background-Color
I was not aware of the ‘background’ property until now. I was steadily using ‘background-color’, then stumbled into the ‘background’ property while researching another objective.
The ‘background-color’ property does just as promised — it sets the background to a specific color via CSS.
However, the ‘background’ property allows for several more values: color, image, repeat, attachment and position.
Box Sizing
I was faced with using many box element of different make-up and sizes. Upon putting together a few, I saw that some of them bled into places across the page for which I did not intend.
Then came ‘box-sizing’. Using this property merges the ‘padding’ and ‘border’ with the overall ‘width’ and ‘height’ of the element in question. After inserting these useful bits, everything squared up very nicely.
Hamburger
In my mobile resolution, I wrote code for a hamburger menu. That said, I won’t be going into detail here. I will (instead) write a full account on my approach to building this feature.
User Select
I learned with this challenge how to keep my elements from being (undesirably) selected. By placing the ‘user-select’ property, this is very achievable.
What’s more is -webkit is for Chrome and Safari functionality, -ms (for Microsoft) and -moz (for Mozilla Firefox).
In Conclusion
I have taken a little more time in constructing this project, but have learned that much more. This is the most well-crafted challenge I have completed (thus far.)
All things considered, I am pleased with the outcome, but am very ready to move onto the next for more information and creation. See you on the other side!
0 notes
Note
Thirding CotD, with the caveat that I know nothing of the Rich Text box as I started out handcoding all my AO3 fic before moving on to using Google Docs script.
Firstly, I'll say that the bug bionerd2point0 mentions about space added between italics and punctuation is not repeated if you use the Google Docs script and then paste the story into HTML mode on AO3. This is something that only happens when going from Google Docs to Rich Text (which I don't do because whenever I've tried that I've lost all my italics and had to redo them anyway—but I'm also on Apple devices and it could be the bold/italic formatting only transfers when using the Google Docs + Rich Text combo on a PC computer).
However, if you do use the Google Docs script, there is a bug is that sometimes what looks like double returns in Google Docs isn't interpreted by the script as such, so rather than replacing the two returns with the </p><p> (paragraph break) tags like it should, the script sticks in a </br> (line break/single break with no space between paragraphs) tag—or even no tag at all. I see this most often with things I initially typed up on/in another platform or app (like myWriteClub, Discord, Notes, Tumblr, etc.) and then pasted into Google Docs. I highly recommend going through the doc and checking that all the tags are where they're supposed to be before copying, using the Preview feature on AO3 before posting to make sure you have all your returns where you want them, or at least checking for returns after posting but before wandering off to do other things.
Finally, while the script will automatically translate most formatting to the correct HTML tags (italics to <em></em>, bold to <strong></strong>, etc.), it does not use the currently preferred/best practices strikethrough tag, still using the more archaic <strike></strike> (not supported in HTML5) instead of <s></s> or <del></del> (which is supported in HTML5). It's a minor thing and something that most people probably wouldn't care about (<strike></strike> still displays fine on AO3 in all browsers/OS I've tried it with), but it's a good idea to use the "correct" tags whenever possible for both forwards compatibility and to make sure that screen readers correctly interpret text.
Hello! I totally adore your blog, it's led me to look into many quirks, identify with issues that other authors have, and read how people deal with them.
Anyway. I've been reading fanfiction for more than a decade, but the last time I published something was back on ff.net about more than a decade ago. I'm writing again upon joining a small fandom and I want to contribute much, but is there a way to properly upload fics on ao3? (With ao3, it's a totally a different platform than I am used to.) I've seen posts of bugs and formatting issues, and I am very much baffled. I've tried googling but there's just so many stuff I think? If you can lead me to any helpful tips that would be very much appreciated.
Unlike FFN, with AO3 you don’t upload a file. You can either import a work that’s already online somewhere by using the url of the page where it’s hosted, or you can copy/paste or draft the work into the Work Text box.
The formatting issues you’ve heard about are probably related to italics. I forget what the exact issue is, but if you make sure your punctuation isn’t italicized, then I think that fixes it? Or, if you write your fics in google docs, you can use a script to do all of the formatting for you. Instructions and a link to the script are here.
I tend to write directly into the Work Text box because I’m a madwoman who doesn’t use a beta and doesn’t have the foresight to write ahead. I just write the thing and post it directly. You can save your work as a draft, but the draft will be automatically deleted if you don’t post it within 30 days. That might be the bug you’re seeing?
Also, to give yourself an easier time of it, I recommend using Rich Text mode instead of HTML. I’m a big fan of keyboard shortcuts, and when I use Rich Text, I can use ctrl+i and ctrl+b just like I would in any other software like Word or Docs (or even tumblr).
If you’d like to watch a video that covers the basics, I posted one over here on youtube a month or so ago. That might help?
Blog, feel free to share any additional resources you think will help anon out. And if you know of any other bug fixes (or can better explain the one I referenced), feel free to share those as well.
#fanfic meta#AO3#fic posting#HTML#my HTML best practices knowledge is about a decade out of date but I do occasionally refresh small bits and the <s> tag is one of those bits
470 notes
·
View notes
Text
Why it’s a shame that XHTML died.
I've been doing a fair bit of web development over the years, and the more of it I do, the more I hate HTML. Why? Simple. It's fucking inconsistent.
HTML5 tags come in three flavours: <a></a>, <b/>, and <c>. The last one in particular is the one that makes me hate HTML5.
The thing about HTML5 is that it's never obvious when it's appropriate to use which tag. For example: <br> is correct, but <br/> is not, <img> is correct and <img/> is not. And the kicker: <script></script> is right, and <script/> is wrong.
Learning XML I was always taught that an opening tag needed a closing tag, and that an opening tag always without exception was followed by a closing tag, meaning that writing <foo> would always be wrong, and <foo></foo> would always be right, and that <foo/> was always just stand-in for a set of opening and closing tags.
So why is this a problem? Because it makes it impossible to write a HTML parser that knows how to deal with the tags properly; that is, unless you include special cases for all the tags that don't have closing tags... In XML/XHTML this isn't a problem at all because all the tags are completely uniform in their construction.
Example
Here's an example body of HTML code
<body> <h1>Hello, reader!</h1> <p>This is a simple example<br> of a broken up paragraph</p> <img src="my-image.png" alt="holiday photo"> <script src="my-script.js"></script> </body>
And now the same code in XHTML
<body> <h1>Hello, reader!</h1> <p>This is a simple example<br/> of a broken up paragraph</p> <img src="my-image.png" alt="holiday photo"/> <script src="my-script.js"/> </body>
Sure it all might just seem minor, after all the differences between the two examples aren't huge; but (to me) they're significant. All the tags are properly closed, it all looks neat and tidy, and look! The script line is actually shorter!
To me XHTML isn't more verbose, it's less confusing.
I mean sure, XHTML requires you to use this dreadful doctype and namespace:
<!DOCTYPE html PUBLIC "-//W3C//DTD XHTML 1.0 Transitional//EN" "http://www.w3.org/TR/xhtml1/DTD/xhtml1-transitional.dtd"> <html xmlns="http://www.w3.org/1999/xhtml">
Which is much less nice than the simple <!DOCTYPE Html> found in HTML5. But I'd argue the payoff is worth it in the long run.
Or it would be if any modern frameworks and tools actually supported XHTML.
Oh how I wish XHTML would be resurrected...
24 notes
·
View notes
Text
Quoting in HTML: Quotations, Citations, and Blockquotes
It’s all too common to see the incorrect HTML used for quotes in markup. In this article, let’s dig into all this, looking at different situations and different HTML tags to handle those situations.
There are three major HTML elements involved in quotations:
<blockquote>
<q>
<cite>
Let’s take a look.
Blockquotes
Blockquote tags are used for distinguishing quoted text from the rest of the content. My tenth grade English teacher drilled it into my head that any quote of four lines or longer should be set apart this way. The HTML spec has no such requirement, but as long as the text is a quote and you want it to be set apart from the surrounding text and tags, a blockquote is the semantic choice.
By default, browsers indent blockquotes by adding margin on each side.
See the Pen The Blockquote Tag by Undead Institute (@undeadinstitute) on CodePen.
As a flow element (i.e. “block level” element), blockquote can contain other elements inside it. For example, we can drop paragraphs in there with no problem:
<blockquote> <p></p> <p></p> </blockquote>
But it could be other elements, too, like a heading or an unordered list:
<blockquote> <h2></h2> <ul> <li></li> <li></li> </ul> </blockquote>
It’s important to note that blockquotes should only be used for quotations rather than as a decorative element in a design. This also aids accessibility as screen reader users can jump between blockquotes. Thus a blockquote element used solely for aesthetics could really confuse those users. If you need something more decorative that falls outside the bounds of extended quotations, then perhaps a div with a class is the way to go.
blockquote, .callout-block { /* These could share styling */ }
Quoting with Q
Q tags (<q>) are for inline quotes, or what my tenth grade teacher would say are those under four lines. Many modern browsers will automatically add quotation marks to the quote as pseudo elements but you may need a backup solution for older browsers.
See the Pen The Q Tag by CSS-Tricks (@css-tricks) on CodePen.
Typical quotation marks are just as valid for inline quotes as the <q> element. The benefits of using <q>, however, are that it includes a cite attribute, automatic handling of quotation marks, and automatic handling of quote levels. <q> elements should not used for sarcasm (e.g. “you would use a <q> tag for sarcasm, wouldn’t you?”), or signifying a word with air quotes (e.g. “awesome” is an “accurate” description of the author). But if you can figure out how to mark up air quotes, please let me know. Because that would be “awesome.”
The citation attribute
Both <q> and blockquotes can use a citation (cite) attribute. This attribute holds a URL that provides context and/or a reference for the quoted material. The spec makes a point of saying that the URL can be surrounded by spaces. (I’m not sure why that’s pointed out, but if you want to anger the semantic code deities, you’ll have to do more than throw spaces around.)
<p>The officer left a note saying <q cite="https://johnrhea.com/summons">You have been summoned to appear on the 4th day of January on charges of attempted reader bribery.</q></p>
That cite attribute isn’t visible to the user by default. You could add it in with a sprinkle of CSS magic like the following demo. You could even fiddle with it further to make the citation appear on hover.
See the Pen Attributable citations by CSS-Tricks (@css-tricks) on CodePen.
Neither of those options are particularly great. If you need to cite a source such that users can see it and go to it, you should do it in HTML and probably with the <cite> element, which we’ll cover next.
The citation element
The <cite> tag should be used for referencing creative work rather than the person who said or wrote the quote. In other words, it’s not for quotes. Here are the examples from the spec:
<p>My favorite book is <cite>The Reality Dysfunction</cite> by Peter F. Hamilton. My favorite comic is <cite>Pearls Before Swine</cite> by Stephan Pastis. My favorite track is <cite>Jive Samba</cite> by the Cannonball Adderley Sextet.</p>
Here’s another example:
See the Pen Cite This! by CSS-Tricks (@css-tricks) on CodePen.
If the author of this article told you he’d give you a cupcake, and you <cite> him by name, that would be semantically incorrect. Thus no cupcakes would change hands. If you cited the article in which he offered you a cupcake, that would be semantically correct, but since the author wouldn’t do that, you still wouldn’t get a cupcake. Sorry.
By default, browsers italicize cite tags and there’s no requirement that a <q> or <blockquote> be present to use the cite element. If you want to cite a book or other creative work, then slap it in the cite element. The semantic deities will smile on you for not using either <i> or <em> elements.
But where to put the cite element? Inside? Outside? The upside down? If we put it inside the <blockquote> or the <q>, we’re making it part of the quote. That's forbidden by the spec for just that reason.
<!-- This is apparently wrong --> <blockquote> Quote about cupcake distribution from an article <cite>The Article</cite> </blockquote>
Putting it outside just feels wrong and also requires you to have an enclosing element like a <div> if you wanted to style them together.
<div class="need-to-style-together"> <blockquote> Quote about cupcake distribution from an article </blockquote> <cite>The Article</cite> </div>
N.B. If you google this issue you may come across an HTML5 Doctor article from 2013 that contradicts much of what's laid out here. That said, every time it links to the docs for support, the docs agree with the article you're currently reading rather than the HTML5 Doctor article. Most likely the docs have changed since that article was written.
Hey, what about the figure element?
One way to mark up a quotation — and in a way that pleases the semantic code deities — is to put the blockquote within a figure element. Then, put the cite element and any other author or citation information in a figcaption.
<figure class="quote"> <blockquote> But web browsers aren’t like web servers. If your back-end code is getting so big that it’s starting to run noticably slowly, you can throw more computing power at it by scaling up your server. That’s not an option on the front-end where you don’t really have one run-time environment—your end users have their own run-time environment with its own constraints around computing power and network connectivity. </blockquote> <figcaption> — Jeremy Keith, <cite>Mental models</cite> </figcaption> </figure>
While this doubles the number of elements needed, there are several benefits:
It’s semantically correct for all four elements.
It allows you to both include and encapsulate author information beyond citing the name of the work.
It gives you an easy way to style the quote without resorting to divs, spans or wretchedness.
See the Pen It Figures You'd Say That by CSS-Tricks (@css-tricks) on CodePen.
None of this is for dialogue
Not <dialog>! Those are for attention-grabbing modals. Dialogue, as in, conversational exchanges between people speaking or typing to each other.
Neither <blockquote> nor <q> nor <cite> are to be used for dialogue and similar exchanges between speakers. If you’re marking up dialogue, you can use whatever makes the most sense to you. There’s no semantic way to do it. That said, the spec suggests <p> tags and punctuation with <span> or <b> tags to designate the speaker and <i> tags to mark stage directions.
Accessibility of quotes
From the research I’ve done, screen readers should not have any issue with understanding semantic-deity-approved <q>, <blockquote>, or <cite> tags.
[VIDEO]
More “ways” to “quote”
You can add quotation marks to a <blockquote> using CSS pseudo elements. The <q> element comes with quotation marks baked in so they need not be added, however adding them as pseudo-elements can be a workaround for older browsers that don’t automatically add them. Since this is how modern browsers add the quotation marks there's no danger of adding duplicate quotes. New browsers will overwrite the default pseudo elements, and older browsers that support pseudo elements will add the quotes.

But you can’t, like I did, assume that the above will always give you smart opening and closing quotes. Even if the font supports smart quotes, sometimes straight quotes will be displayed. To be safe, it’s better to use the quotes CSS property to up the intelligence on those quotation marks.
blockquote { quotes: "“" "”" "‘" "’"; }
See the Pen "Quot-a-tizing" the blockquote by CSS-Tricks (@css-tricks) on CodePen.
Multi-level quoting
Now let’s look at quote levels. The <q> tag will automatically adjust quote levels.
Let’s say you’re in an area that uses the British convention of using single quotes. You could use the CSS quotes rule to put the opening and closing single quotes first in the list. Here’s an example of both ways:
See the Pen Quote Within a Quote by CSS-Tricks (@css-tricks) on CodePen.
There is no limit to nesting. Those nested <q> elements could even be within a blockquote that’s within a blockquote.
If you add quotation marks to a blockquote, know that the blockquote does not change the quote level the way a <q> tag does. If you expect to have quotes within a blockquote, you may want to add a descendant selector rule to start <q> elements within a blockquote at the single quote level (or double quotes if you follow British conventions).
blockquote q { quotes: "‘" "’" "“" "”"; }
The last quote level you put in will continue through subsequent levels of quotation. To use the double, single, double, single… convention, add more levels to the CSS quotes property.
q { quotes: "“" "”" "‘" "’" "“" "”" "‘" "’" "“" "”"; }
Hanging punctuation
Many typography experts will tell you that hanging the quotation marks on blockquotes looks better (and they’re right). Hanging punctuation is, in this case, quotation marks that are pushed out from the text so that the characters of the text line up vertically.
One possibility in CSS is using a slightly negative value on the text-indent property. The exact negative indentation will vary by font, so be sure to double check the spacing with the font you end up using.
blockquote { text-indent: -0.45em; }
There is a nicer way to handle this by using the hanging-punctuation CSS property. It’s only supported in Safari at the time of this writing, so we’ll have to progressively enhance:
/* Fallback */ blockquote { text-indent: -0.45em; } /* If there's support, erase the indent and use the property instead */ @supports ( hanging-punctuation: first) { blockquote { text-indent: 0; hanging-punctuation: first; } }
Using hanging-punctuation is better because it’s less fiddly. It’ll just work when it can.
See the Pen Hanging Your Punctuation by CSS-Tricks (@css-tricks) on CodePen.
Can we animate quotation marks?
Of course we can.
See the Pen Dancing Quotes by CSS-Tricks (@css-tricks) on CodePen.
Why you’d need to do this, I’m not totally sure, but the quotation marks in a <q> tag are added are pseudo elements in the UA stylesheet, so we’re able to select and style them — including animation — if we need to.
Wait, maybe we just solved the air quotes thing after all.
The post Quoting in HTML: Quotations, Citations, and Blockquotes appeared first on CSS-Tricks.
Quoting in HTML: Quotations, Citations, and Blockquotes published first on https://deskbysnafu.tumblr.com/
0 notes
Text
The best code snippets Wordpress for your website

Before publishing this post, we already know how to add PHP functions in Wordpress via using tools. However, I want to share with you some useful functions that either you or any web developers need to know for customising website. Furthermore, these functions can make your website more responsive, more security and more cool. In addition, these function can save your money (without using paid plugin), save much time for coding and test. Therefore, I create a list of 20 cool customised functions that can support you to select the most essential FUNCTIONS that you really need for your website. These functions are compatible with most popular themes and most of Wordpress versions. Besides, I will update more functions in this post for easy reviewing. In addition, the table of content on the right sidebar will support you to navigate easily. Before implementing the process, you need to concentrate on some important steps. READ THIS CAREFULLY BEFORE YOU GO Backup you website Separate each function below for testing before officially activating. You can use plugin snippets or other plugins or separated it in function.php. During testing, if it conflicts, incompatible or make errors on your theme, you can remove it, safely. You just copy and paste PHP code to snippet plugin and activate it. It begins with " " I already tested all codes below, It works like a charm. So if you have question or error code that need for support. You can leave your comment below. I will give you feedback asap. It could be including "How to use" and "CSS" parts. " " shows you how to display the function's result in html markup or insert it directly into posts. Therefore, you do not need to copy it into function.php or code snippet. Besides, " " supports you to decorate Html code block. Code snippets compatibility: Wordpress version > 4.6 PHP ~ 7.xx
Snippets index
Enqueue Google Fonts This function will add more style for your google font function google_fonts() { wp_register_style('OpenSans', 'https://fonts.googleapis.com/css?family=Open+Sans:400,400i,600i,700,700i,800'); wp_enqueue_style( 'OpenSans'); } add_action( 'wp_print_styles', 'google_fonts' ); ?> Make jQuery load from Google Library The function support to load google library in front pages. function replace_jquery() { if (!is_admin()) { wp_deregister_script('jquery'); wp_register_script('jquery', 'http://ajax.googleapis.com/ajax/libs/jquery/1.11.0/jquery.min.js', false, '1.11.0'); wp_enqueue_script('jquery'); } } add_action('init', 'replace_jquery'); ?> Customize excerpt length and read more characters Sometimes you need a special length of the excerpt for a specific template. The following function can be used to set this length as desired. The good thing is that the excerpt length is not set globally, but each template can have its own length. function ahlbtech_excerpt_length( $length ) { return 50; } add_filter( 'excerpt_length', 'ahlbtech_excerpt_length', 999 ); //Custom Read More Excerpt function ahlbtech_excerpt_more( $more ) { return '...'; } add_filter('excerpt_more', 'ahlbtech_excerpt_more'); ?> // Deleting the original tag: // Exchange with this tag, and enter any length (in brackets): Enable Pagination Links The function enable pagination links in front page. You want the old »Older posts | Newer posts «Replace links with a cool number list? No problem, since the WordPress version 4.1 you need for the well-known plugin WP-PageNavi no longer. Now that's easy with on-board resources. if ( ! function_exists( 'ahlbtech_pagination' ) ) : function ahlbtech_pagination() { global $wp_query; $big = 999999999; // need an unlikely integer echo paginate_links( array( 'base' => str_replace( $big, '%#%', esc_url( get_pagenum_link( $big ) ) ), 'format' => '?paged=%#%', 'current' => max( 1, get_query_var('paged') ), 'total' => $wp_query->max_num_pages, 'prev_text' => 'Newer Posts', 'next_text' => 'Older Posts' ) ); } endif; ?> /*---For the list to get a design, it still needs some CSS. Here are the styles that I use now and then. You still need to adjust it to your blog colors--*/ nav.pagination{position:relative;display:block;margin-top:20px} .page-numbers{margin:0;padding:0} .page-numbers li{list-style:none;margin:0 6px 0 0;padding:0;display:inline-block} .page-numbers li span.current{padding:10px 15px;background:#9FC65D;border:1px solid #9FC65D;display:block;line-height:1;color:#fff} .page-numbers li a{padding:10px 15px;background:#eee;color:#555;text-decoration:none;border:1px solid #eee;display:block;line-height:1} .page-numbers li a:hover{background:#9FC65D;border-color:#9FC65D;color:#fff} .screen-reader-text { clip: rect(1px,1px,1px,1px); position: absolute!important; height: 1px; width: 1px; overflow: hidden; } Replace WP login logo with custom If you feel so boring with old logo login style, you can replace it with your new logo as you want. Furthermore, if you are really proud of your WordPress website and have invested a lot of work in the design? Then go a step further and adjust the logo on the login page. It looks really good together with a background color of its own. function ahlbtech_login_logo() { ?> #login h1 a, .login h1 a { background-image: url(/images/LOGO.png); background-size: 260px 110px; width: 260px; height: 110px; } add_action( 'login_enqueue_scripts', 'ahlbtech_login_logo' ); ?> Displays a custom Dashboard Widget This function supports to customised widget in dashboard. function ahlbtech_custom_dashboard_widgets() { global $wp_meta_boxes; wp_add_dashboard_widget('custom_help_widget', 'Theme Support', 'ahlbtech_custom_dashboard_help'); } function ahlbtech_custom_dashboard_help() { echo ' Custom dashboard widget via functions.php '; } add_action('wp_dashboard_setup', 'ahlbtech_custom_dashboard_widgets'); ?> Allow different file formats in Media Library As you know WP supports some kinds of type format when uploading and downloading process is executed. Moreover, this function will help your website to increase supportive WP function in upload and download activities. In addition, you want to upload special file formats to your WordPress library and get an error message? Then use this code and your problem is solved. The code allows the upload of the file formats ZIP , MOBI , PDF and EPUB . If you need more formats, you will find here the complete list of MIME types . /** * Add further Mime types for the download of the products */ function add_custom_mime_types($mimes){ $new_file_types = array ( 'zip' => 'application/zip', 'mobi' => 'application/x-mobipocket-ebook', 'pdf' => 'application/pdf', 'epub' => 'application/epub+zip' ); return array_merge($mimes,$new_file_types); } add_filter('upload_mimes','add_custom_mime_types'); ?> Turn Off your self-referring Pingbacks Pingbacks and trackbacks are not bad features, tell them whether your articles have been referenced or linked to other websites. Unfortunately, WordPress has the bad ability to inform you about links to your articles on your own website. So you turn off these annoying news. Ping-backs affect negatively your SEO and also speed of loading your website. If you can disable it, you can enhance your speed loading of your website. function ahlbtech_no_self_ping( &$links ) { $home = get_option( 'home' ); foreach ( $links as $l => $link ) if ( 0 === strpos( $link, $home ) ) unset($links); } add_action( 'pre_ping', 'ahlbtech_no_self_ping' ); ?> Inject Post Images Into the RSS Feed By default, WordPress does not include post pictures in the RSS feed. That's the way you can add post images into RSS Feed. /** * Add Post Images to the RSS Feed */ function ahlbtech_featuredtoRSS($content) { global $post; if ( has_post_thumbnail( $post->ID ) ){ $content = ' ' . get_the_post_thumbnail( $post->ID, 'large', array( 'style' => 'margin-bottom: 15px;' ) ) . ' ' . $content; } return $content; } add_filter('the_excerpt_rss', 'ahlbtech_featuredtoRSS'); add_filter('the_content_feed', 'ahlbtech_featuredtoRSS'); ?> Responsive Videos – YouTube and Vimeo If your theme does not support responsive videos, then you can quickly set support for it yourself. A PHP function ensures an automatic embedding in a Div, the CSS specifications ensure the optimal scaling at every resolution. function ahlbtech_wrap_oembed( $html ){ $html = preg_replace( '/(width|height)="\d*"\s/', "", $html ); // Strip width and height #1 return' '.$html.' '; // Wrap in div element and return #3 and #4 } add_filter( 'embed_oembed_html','ahlbtech_wrap_oembed',10,1); ?> .embed-responsive.embed-responsive-16by9 { position: relative; padding-bottom: 56.25%; /* 16:9 */ padding-top: 25px; height: 0; } .embed-responsive.embed-responsive-16by9 iframe { position: absolute; top: 0; left: 0; width: 100%; height: 100%; } /* This indication makes HTML5 videos responsive */ video { width: 100% !important; height: auto !important; } Custom Sidebars This function supports you to customised sidebars area. function custom_sidebar_widgets_init() { //copy from HERE register_sidebar( array( 'name' => esc_html__( 'Sidebar', 'humescores' ), 'id' => 'sidebar-1', 'description' => esc_html__( 'Add widgets here.', 'humescores' ), 'before_widget' => '', 'after_widget' => '', 'before_title' => '
', 'after_title' => '
', ) ); //to HERE } add_action( 'widgets_init', 'custom_sidebar_widgets_init' ); ?> Modifies tag cloud widget arguments to have all tags in the widget same font size function blog_widget_tag_cloud_args( $args ) { $args = 1; $args = 1; $args = 'em'; return $args; } add_filter( 'widget_tag_cloud_args', 'blog_widget_tag_cloud_args' ); ?> Expanding Your User Profile With Further Social Media Accounts The biographical details in your WordPress profile are quite meager. You do not have many options to link to all your social networks. With this code, you can add any of your social media accounts and quickly view them in the theme. /** * Managing contact fields for author bio */ $ahlbtech_pro_Contactfields = new ahlbtech_pro_Contactfields( // Missing accounts can easily be added array ( 'Feed', 'Twitter', 'Facebook', 'GooglePlus', 'Flickr', 'Xing', 'Github', 'Instagram', 'LinkedIn', 'Pinterest', 'Vimeo', 'Youtube' ) ); class ahlbtech_pro_Contactfields { public $new_fields , $active_fields , $replace ; /** * @param array $fields New fields: array ('Twitter', 'Facebook') * @param bool $replace Replace default fields? */ public function __construct($fields, $replace = TRUE) { foreach ( $fields as $field ) { $this->new_fields = $field; } $this->replace = (bool) $replace; add_filter('user_contactmethods', array( $this, 'add_fields' ) ); } /** * Changing contact fields * @param $original_fields Original WP fields * @return array */ public function add_fields($original_fields) { if ( $this->replace ) { $this->active_fields = $this->new_fields; return $this->new_fields; } $this->active_fields = array_merge($original_fields, $this->new_fields); return $this->active_fields; } /** * Helper function * @return array The currently active fields. */ public function get_active_fields() { return $this->active_fields; } } ?> $twitter = get_the_author_meta( 'twitter', $post->post_author ); $facebook = get_the_author_meta( 'facebook', $post->post_author ); echo 'Twitter | Facebook'; ?> Make Post Images Mandatory add_action('save_post', 'evolution_check_thumbnail'); add_action('admin_notices', 'evolution_thumbnail_error'); function evolution_check_thumbnail($post_id) { // change to any custom post type if(get_post_type($post_id) != 'post') return; if ( !has_post_thumbnail( $post_id ) ) { // set a transient to show the users an admin message set_transient( "has_post_thumbnail", "no" ); // unhook this function so it doesn't loop infinitely remove_action('save_post', 'evolution_check_thumbnail'); // update the post set it to draft wp_update_post(array('ID' => $post_id, 'post_status' => 'draft')); add_action('save_post', 'evolution_check_thumbnail'); } else { delete_transient( "has_post_thumbnail" ); } } function evolution_thumbnail_error() { // check if the transient is set, and display the error message if ( get_transient( "has_post_thumbnail" ) == "no" ) { echo " You have to assign a post image. Without a post image, the article can't be published. "; delete_transient( "has_post_thumbnail" ); } } ?> Change the Look of the First Paragraph /** * Auto-Highlighting - Automatic highlighting of a post's first paragraph * @author Andreas Hecht */ function tb_first_paragraph_highlight( $content ) { return preg_replace( '//', '', $content, 1 ); } add_filter( 'the_content', 'tb_first_paragraph_highlight' ); ?> /*----If you want only change in a single post----*/ .single p.opener { color: #165a72; font-weight: 400; font-size: 21px; line-height: 1.5; } /*-----------If you want only change in a single post & pages----------*/ .single p.opener, .page p.opener { color: #165a72; font-weight: 400; font-size: 21px; line-height: 1.5; } Load the Entire JavaScript in the Footer /** * @uses wp_head() and wp_enqueue_scripts() * */ if ( !function_exists( 'evolution_footer_scripts' ) ) { function evolution_footer_scripts() { remove_action('wp_head', 'wp_print_scripts'); remove_action('wp_head', 'wp_print_head_scripts', 9); remove_action('wp_head', 'wp_enqueue_scripts', 1); } } add_action( 'wp_enqueue_scripts', 'evolution_footer_scripts' ); ?> Create a Breadcrumb Navigation Without a Plugin // Copy from here function ah_the_breadcrumb() { echo ' '; if (!is_home()) { echo ' '; echo 'Home'; echo " "; if (is_category() || is_single()) { echo ' '; the_category(' '); if (is_single()) { echo " "; the_title(); echo ' '; } } elseif (is_page()) { echo ' '; echo the_title(); echo ' '; } } elseif (is_tag()) {single_tag_title();} elseif (is_day()) {echo" Archive for "; the_time('F jS, Y'); echo' ';} elseif (is_month()) {echo" Archive for "; the_time('F, Y'); echo' ';} elseif (is_year()) {echo" Archive for "; the_time('Y'); echo' ';} elseif (is_author()) {echo" Author Archive"; echo' ';} elseif (isset($_GET) && !empty($_GET)) {echo " Blog Archives"; echo' ';} elseif (is_search()) {echo" Search Results"; echo' ';} echo ' '; } ?> Related posts filtered by Category, Use in Single.php if ( ! function_exists( 'evolution_related_posts' ) ) : function evolution_related_posts() { global $post; if($post) { $post_id = get_the_ID(); } else { $post_id = null; } $orig_post = $post; $categories = get_the_category($post->ID); if ($categories) { $category_ids = array(); foreach($categories as $individual_category) $category_ids = $individual_category->term_id; $args=array( 'category__in' => $category_ids, 'post__not_in' => array($post->ID), 'posts_per_page'=> 3, // Number of related posts that will be shown. 'ignore_sticky_posts'=>1 ); $my_query = new wp_query( $args ); if( $my_query->have_posts() ) { echo ' '; echo ' '; _e('Related Posts','evolution'); echo ' '; echo ' '; $c = 0; while( $my_query->have_posts() ) { $my_query->the_post(); $c++; if( $c == 3) { $style = 'third'; $c = 0; } else $style=''; ?> echo ' ' . esc_html( $categories->name ) . ''; } ?> } echo ' '; echo ''; } } $post = $orig_post; wp_reset_postdata(); } endif; ?> /*----------ADD CSS-----------*/ .related-posts { display: flex; } .related-posts .entry-title { font-size: 1rem; } .related-posts .cat { color: #ba9e30; font-size: 0.85rem; } .related-posts .entry-item { width: 31%; margin-right: 3.5%; position: relative; float: left; } .related-posts .entry-item.third { margin-right: 0; } .related-posts a img:hover { opacity: .85; } .entry-related { padding-bottom: 10px; border-bottom: 1px solid #ddd; margin-bottom: 20px } .related-wrap { margin-bottom: 70px; } Hide Plugin from dashboard. Place in functions.php, replace path from edit plugins pathname. function hide_plugin_ahlbtech() { global $wp_list_table; $hidearr = array('really-simple-ssl/rlrsssl-really-simple-ssl.php'); $myplugins = $wp_list_table->items; foreach ($myplugins as $key => $val) { if (in_array($key,$hidearr)) { unset($wp_list_table->items); } } } add_action('pre_current_active_plugins', 'hide_plugin_ahlbtech'); ?> 'really-simple-ssl/rlrsssl-really-simple-ssl.php' is an example of 1 plugin. You can add more plugins that you want to hide when visitors use "view source from browsers like Chrome or FF. The first part before "/" is the plugin folder and after "/" is the core file of your plugin .php. Ex: " array('really-simple-ssl/rlrsssl-really-simple-ssl.php' , "socialshare/socialshare.php" , ....); " Hide Username & Administrator count. Place in functions.php function hide_user_count(){ ?> table.wp-list-table tr#user-9, .subsubsub li.administrator span.count{display: none;} } Remove Inline Styles of WordPress Tag Cloud The WordPress Tag Cloud is the popular widget for our website. Therefore, using this widget, your visitors can find what they are looking for faster. However, WordPress displays tags in different sizes, which is not always a desired property of this widget. Thus, using this snippet, you can remove the inline styles or you can use CSS to hide its style. function drweb_remove_tagcloud_inline_style($input){ return preg_replace('/ style=("|\')(.*?)("|\')/','',$input); } add_filter('wp_generate_tag_cloud', 'drweb_remove_tagcloud_inline_style',10,1); ?> Turn off WordPress emojis The colourful emojis are not for everyone. In contrast, If you do not want to use emojis in your posts, you can disable this feature completely. The performance of your blog will be better. /** * Disable the emoji's */ function disable_emojis() { remove_action( 'wp_head', 'print_emoji_detection_script', 7 ); remove_action( 'admin_print_scripts', 'print_emoji_detection_script' ); remove_action( 'wp_print_styles', 'print_emoji_styles' ); remove_action( 'admin_print_styles', 'print_emoji_styles' ); remove_filter( 'the_content_feed', 'wp_staticize_emoji' ); remove_filter( 'comment_text_rss', 'wp_staticize_emoji' ); remove_filter( 'wp_mail', 'wp_staticize_emoji_for_email' ); add_filter( 'tiny_mce_plugins', 'disable_emojis_tinymce' ); add_filter( 'wp_resource_hints', 'disable_emojis_remove_dns_prefetch', 10, 2 ); } add_action( 'init', 'disable_emojis' ); /** * Filter function used to remove the tinymce emoji plugin. * * @param array $plugins * @return array Difference betwen the two arrays */ function disable_emojis_tinymce( $plugins ) { if ( is_array( $plugins ) ) { return array_diff( $plugins, array( 'wpemoji' ) ); } else { return array(); } } /** * Remove emoji CDN hostname from DNS prefetching hints. * * @param array $urls URLs to print for resource hints. * @param string $relation_type The relation type the URLs are printed for. * @return array Difference betwen the two arrays. */ function disable_emojis_remove_dns_prefetch( $urls, $relation_type ) { if ( 'dns-prefetch' == $relation_type ) { /** This filter is documented in wp-includes/formatting.php */ $emoji_svg_url = apply_filters( 'emoji_svg_url', 'https://s.w.org/images/core/emoji/2/svg/' ); $urls = array_diff( $urls, array( $emoji_svg_url ) ); } return $urls; } ?> Turn off the jQuery Migrate Script jQuery Migrate is a script intended to provide backward compatibility with older jQuery applications. However, the "old" and new jQuery version no longer supports all old applications. Furthermore, this case will certainly not affect more than 5% of all WordPress sites, and yet the not-so-small script will be set default to WordPress. Therefore, this is how you switch it off: /** * jQuery Migrate Script in WordPress. */ if ( ! function_exists( 'evolution_remove_jquery_migrate' ) ) : function evolution_remove_jquery_migrate( &$scripts) { if(!is_admin()) { $scripts->remove( 'jquery'); $scripts->add( 'jquery', false, array( 'jquery-core' ), '1.12.4' ); } } add_filter( 'wp_default_scripts', 'evolution_remove_jquery_migrate' ); endif; ?> Turn off WordPress oEmbed function The WordPress version 4.4 brought the new feature "oEmbed" with it, which is primarily intended to be able to embed external articles or pages using a simple link in posts. So, If you do not need this feature or if you are just uncomfortable with your articles being displayed in external articles at any time, simply disable this feature. /** * Disable embeds on init. * * - Removes the needed query vars. * - Disables oEmbed discovery. * - Completely removes the related JavaScript. * * @since 1.0.0 */ function evolution_disable_embeds_init() { /* @var WP $wp */ global $wp; // Remove the embed query var. $wp->public_query_vars = array_diff( $wp->public_query_vars, array( 'embed', ) ); // Remove the REST API endpoint. remove_action( 'rest_api_init', 'wp_oembed_register_route' ); // Turn off oEmbed auto discovery. add_filter( 'embed_oembed_discover', '__return_false' ); // Don't filter oEmbed results. remove_filter( 'oembed_dataparse', 'wp_filter_oembed_result', 10 ); // Remove oEmbed discovery links. remove_action( 'wp_head', 'wp_oembed_add_discovery_links' ); // Remove oEmbed-specific JavaScript from the front-end and back-end. remove_action( 'wp_head', 'wp_oembed_add_host_js' ); add_filter( 'tiny_mce_plugins', 'evolution_disable_embeds_tiny_mce_plugin' ); // Remove all embeds rewrite rules. add_filter( 'rewrite_rules_array', 'disable_embeds_rewrites' ); // Remove filter of the oEmbed result before any HTTP requests are made. remove_filter( 'pre_oembed_result', 'wp_filter_pre_oembed_result', 10 ); } add_action( 'init', 'evolution_disable_embeds_init', 9999 ); /** * Removes the 'wpembed' TinyMCE plugin. * * @since 1.0.0 * * @param array $plugins List of TinyMCE plugins. * @return array The modified list. */ function evolution_disable_embeds_tiny_mce_plugin( $plugins ) { return array_diff( $plugins, array( 'wpembed' ) ); } /** * Remove all rewrite rules related to embeds. * * @since 1.0.0 * * @param array $rules WordPress rewrite rules. * @return array Rewrite rules without embeds rules. */ function evolution_disable_embeds_rewrites( $rules ) { foreach ( $rules as $rule => $rewrite ) { if ( false !== strpos( $rewrite, 'embed=true' ) ) { unset( $rules ); } } return $rules; } /** * Remove embeds rewrite rules on plugin activation. * * @since 1.0.0 */ function evolution_disable_embeds_remove_rewrite_rules() { add_filter( 'rewrite_rules_array', 'disable_embeds_rewrites' ); flush_rewrite_rules( false ); } register_activation_hook( __FILE__, 'evolution_disable_embeds_remove_rewrite_rules' ); /** * Flush rewrite rules on plugin deactivation. * * @since 1.0.0 */ function evolution_disable_embeds_flush_rewrite_rules() { remove_filter( 'rewrite_rules_array', 'disable_embeds_rewrites' ); flush_rewrite_rules( false ); } register_deactivation_hook( __FILE__, 'evolution_disable_embeds_flush_rewrite_rules' ); ?> Remove unnecessary entries from the WordPress header WordPress loads a lot of stuff via the wp_head() hook into the header of WordPress themes. Some of them are very useful, others less. Some things just inflate the website unnecessarily. Here comes a little snippet that clears up a lot. The code below will remove the following from being output through the wp_head hook. Really Simple Discovery (RSD) linkWindows Live Writer linkWordPress generator noticePost relational linksFeed LinksShortlinks /** * AHLBTech add more file formats */ function add_custom_mime_types($mimes){ $new_file_types = array ( 'zip' => 'application/zip', 'mobi' => 'application/x-mobipocket-ebook', 'pdf' => 'application/pdf', 'epub' => 'application/epub+zip' ); return array_merge($mimes,$new_file_types); } add_filter('upload_mimes','add_custom_mime_types'); ?> User login only with e-mail and password Since WordPress Version 4.5, a user login is also possible with an e-mail address and the password. In addition, to annoy hackers and make WordPress a bit safer, you can only sign up with this code using email and password. // AHLBTech //WordPress Authentication remove_filter('authenticate', 'wp_authenticate_username_password', 20); // Authentication with E-Mail und Passwort add_filter('authenticate', function($user, $email, $password){ //Check for empty fields if(empty($email) || empty ($password)){ //create new error object and add errors to it. $error = new WP_Error(); if(empty($email)){ //No email $error->add('empty_username', __('ERROR: Email field is empty.')); } else if(!filter_var($email, FILTER_VALIDATE_EMAIL)){ //Invalid Email $error->add('invalid_username', __('ERROR: Email is invalid.')); } if(empty($password)){ //No password $error->add('empty_password', __('ERROR: Password field is empty.')); } return $error; } //Check if user exists in WordPress database $user = get_user_by('email', $email); //bad email if(!$user){ $error = new WP_Error(); $error->add('invalid', __('ERROR: Either the email or password you entered is invalid.')); return $error; } else{ //check password if(!wp_check_password($password, $user->user_pass, $user->ID)){ //bad password $error = new WP_Error(); $error->add('invalid', __('ERROR: Either the email or password you entered is invalid.')); return $error; }else{ return $user; //passed } } }, 20, 3); Stop users from changing their passwords The administration section of WordPress is the heart and the lungs of your website. You always ensure that the passwords given are very strong, so that attacks have no chance. Users, however, like to change the passwords given in very easy to remember and thus cracking variants. You can prevent this successfully! /** * * Stop Users changing password * */ class Password_Reset_Removed { function __construct() { add_filter( 'show_password_fields', array( $this, 'disable' ) ); add_filter( 'allow_password_reset', array( $this, 'disable' ) ); } function disable() { if ( is_admin() ) { $userdata = wp_get_current_user(); $user = new WP_User($userdata->ID); if ( !empty( $user->roles ) && is_array( $user->roles ) && $user->roles == 'administrator' ) return true; } return false; } } $pass_reset_removed = new Password_Reset_Removed(); Show ads after the xx paragraph If you want to earn money with your blog, then you can not avoid the use of advertising. You can use the popular Google Adsense for example. This snippet will display your ad units according to the paragraph you specify. /** * Show ads after the xx paragraph * */ add_filter( 'the_content', 'tb_insert_post_ads' ); function tb_insert_post_ads( $content ) { $ad_code = 'Here comes the promotional code. Either static advertising or Google Adsense.'; if ( is_single() && ! is_admin() ) { // The number before content determines where the code appears. Here after the second paragraph of an article. return tb_insert_after_paragraph( $ad_code, 2, $content ); } return $content; } // Parent Function that makes the magic happen function tb_insert_after_paragraph( $insertion, $paragraph_id, $content ) { $closing_p = ''; $paragraphs = explode( $closing_p, $content ); foreach ($paragraphs as $index => $paragraph) { if ( trim( $paragraph ) ) { $paragraphs .= $closing_p; } if ( $paragraph_id == $index + 1 ) { $paragraphs .= $insertion; } } return implode( '', $paragraphs ); } ?> View category list with RSS feeds Sometimes it can be handy to see all categories with the associated RSS feed addresses. It gets even better if you can use a WordPress shortcode to display the list everywhere - even in the text widgets. function tb_categories_with_feed() { $args = array( 'orderby' => 'name', 'feed' => 'RSS', 'echo' => false, 'title_li' => '', ); $string .= ' '; $string .= wp_list_categories($args); $string .= ' '; return $string; } // add shortcode add_shortcode('categories-feed', 'tb_categories_with_feed'); // Add filter to execute shortcodes in text widgets add_filter('widget_text', 'do_shortcode'); //------How to add ShortCode +The shortcode: lets you show the list where you want it. It also works within widgets. +In your theme, you can also use the shortcode:
Conclusion
I hope you have discovered some useful snippets of code for you and your WordPress. These functions have been used for our website. Therefore, I can ensure the codes are work like a charm without errors. If you need question, you can add to comments section below for our support. Read the full article
0 notes
Text
Declaração DOCTYPE no documento (X)HTML
O documento HTML é composto por declarações de marcação, conhecidas como tag. Entretanto, a declaração DOCTYPE não é uma tag, pois, na verdade, é uma instrução importante para o navegador web e deve ser a primeira informação contida no arquivo, seja HTML ou XHTML. Esta visa definir qual é a versão de codificação do documento que será interpretado, devendo, para o HTML5, ser escrita como <!DOCTYPE html>, tanto em maiúsculo, em minúsculo ou variação de ambos. Portanto, informar ao navegador a versão do documento permite uma interpretação mais rápida e, também, mais adequada por não ser realizar em “quirks mode”.
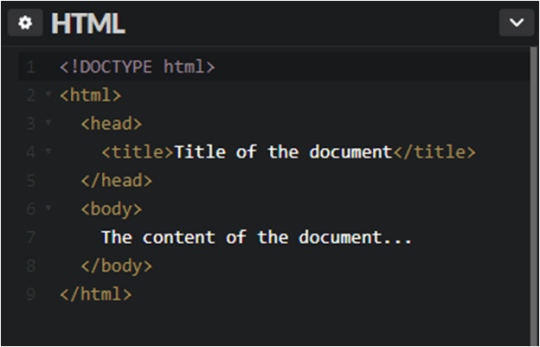
https://www.w3schools.com/Tags/tag_doctype.asp
https://www.maujor.com/w3ctuto/qatips/doctype.html
http://html.com/tags/doctype/
2 notes
·
View notes
Text
freeCodeCamp Survey Form Project
In this post, I talked about going through the freeCodeCamp learning curriculum. I’ve done parts of it before, but I never got to finish it. Now that there’s a new curriculum, I resolved to go through it again from the beginning. Hopefully, this time I’ll be able to finish it.
Anyway, I’ve now gotten to the part where we have to make responsive web design projects. The first project is the Tribute Page. I made one for J.K. Rowling and another for the Harry Potter series. I wrote a post about it as well. You can find it here.
The second project is to build a Survey Form. Just like with the Tribute Page project, I’d like to make this without using frameworks like Bootstrap. I want to focus on using just plain HTML and CSS.
However, I do want to use this opportunity to practice and learn more about SASS (means Syntactically Awesome Style Sheets), a CSS preprocessor. So I’ve decided to use SCSS (means Sassy CSS). This is a newer version of SASS. The old one is .sass, and this doesn’t use brackets and semi-colons while .scss does.
Aside from that, I also want to be able to incorporate all the curriculum lessons that we’ve learned so far. Or, at the very least, include as much of the lessons as possible.
For this project, I’ve decided to make a Harry Potter Series Survey Form.
You can find the instructions for the Survey Form project here: https://learn.freecodecamp.org/responsive-web-design/responsive-web-design-projects/build-a-survey-form.
Here are some more screenshots from the Harry Potter series Survey Form project:
freeCodeCamp Curriculum Lessons Used in the Survey Form Project
Say Hello to HTML Elements
Inform with the Paragraph Element
Link to External Pages with Anchor Elements
Nest an Anchor Element within a Paragraph
Make Dead Links Using the Hash Symbol
Introduction to HTML5 Elements
Uncomment HTML
Comment out HTML
Define the Head and Body of an HTML Document
Link to Internal Sections of a Page with Anchor Elements
Change the Color of Text
Nest Many Elements within a Single div Element
Use a CSS Class to Style an Element
Use CSS Selectors to Style Elements
Style Multiple Elements with a CSS Class
Change the Font Size of an Element
Set the Font Family of an Element
Import a Google Font
Specify How Fonts Should Degrade
Add Rounded Corners with border-radius
Give a Background Color to a div Element
Set the id of an Element
Use an id Attribute to Style an Element
Adjust the Padding of an Element
Adjust the Margin of an Element
Add a Negative Margin to an Element
Add Different Padding to Each Side of an Element
Add Different Margins to Each Side of an Element
Use Clockwise Notation to Specify the Padding of an Element
Use Clockwise Notation to Specify the Margin of an Element
Style the HTML Body Element
Inherit Styles from the Body Element
Create Visual Balance Using the text-align Property
Adjust the Width of an Element Using the width Property
Use the strong Tag to Make Text Bold
Adjust the Hover State of an Anchor Tag
Use the em Tag to Italicize Text
Decrease the Opacity of an Element
Learn about Complementary Colors
Learn about Tertiary Colors
Adjust the Color of Various Elements to Complementary Colors
Use display: flex to Position Two Boxes
Override Class Declarations by Styling ID Attributes
Use Hex Code for Specific Colors
Use Hex Code to Mix Colors
Use Abbreviated Hex Code
Use RGB values to Color Elements
Use RGB to Mix Colors
Adjust the background-color Property of Text
Adjust the Size of a Header Versus a Paragraph Tag
Use the text-transform Property to Make Text Uppercase
Set the font-size of Paragraph Text
Center an Element Horizontally Using the margin Property
Create a Gradual CSS Linear Gradient
Use Headings to Show Hierarchical Relationships of Content
Jump Straight to the Content Using the main Element
Make Screen Reader Navigation Easier with the header Landmark
Make Screen Reader Navigation Easier with the nav Landmark
Give Links Meaning by Using Descriptive Link Text
Create a Media Query
Add Flex Superpowers to the Tweet Embed
Use the flex-direction Property to Make a Row
Apply the flex-direction Property to Create Rows in the Tweet Embed
Align Elements Using the justify-content Property
Use the justify-content Property in the Tweet Embed
Align Elements Using the align-items Property
Use the align-items Property in the Tweet Embed
Use the flex-wrap Property to Wrap a Row or Column
Delete HTML Elements
Use the order Property to Rearrange Items
Add Images to Your Website
Set the font-size for Multiple Heading Elements
Set the font-weight for Multiple Heading Elements
Add a Text Alternative to Images for Visually Impaired Accessibility
Make an Image Responsive
Size Your Images
Turn an Image into a Link
Understand Absolute versus Relative Units
Prioritize One Style Over Another
Override Styles in Subsequent CSS
Adjust the Height of an Element Using the height Property
Use the u Tag to Underline Text
Learn How the CSS @keyframes and animation Properties Work
Headline with the h2 Element
Use the flex-direction Property to Make a Column
Apply the flex-direction Property to Create a Column in the Tweet Embed
Create a Horizontal Line Using the hr Element
Create an Ordered List
Add a box-shadow to a Card-like Element
Use the CSS Transform Property skewX to Skew an Element Along the X-Axis
Use the CSS Transform Property skewY to Skew an Element Along the Y-Axis
Use CSS Variables to change several elements at once
Create a custom CSS Variable
Use a custom CSS Variable
Attach a Fallback value to a CSS Variable
Cascading CSS variables
Modify Fill Mode of an Animation
Change Animation Timing with Keywords
Learn How Bezier Curves Work
Use a Bezier Curve to Move a Graphic
Make Motion More Natural Using a Bezier Curve
Improve Readability with High Contrast Text
Avoid Colorblindness Issues by Using Sufficient Contrast
Avoid Colorblindness Issues by Carefully Choosing Colors that Convey Information
Know When Alt Text Should be Left Blank
Use the CSS Transform scale Property to Scale an Element on Hover
Use the CSS Transform scale Property to Change the Size of an Element
Add an Accessible Date Picker
Add Borders Around Your Elements
Make Circular Images with a border-radius
Fill in the Blank with Placeholder Text
Create a Text Field
Add Placeholder Text to a Text Field
Create a Form Element
Use HTML5 to Require a Field
Improve Form Field Accessibility with the label Element
Create a Set of Radio Buttons
Create a Set of Checkboxes
Wrap Radio Buttons in a fieldset Element for Better Accessibility
Check Radio Buttons and Checkboxes by Default
Override All Other Styles by using Important
Make Typography Responsive
Change a variable for a specific area
Add a Submit Button to a Form
Adjust the Hue of a Color
Adjust the Tone of a Color
Use CSS Animation to Change the Hover State of a Button
Use a CSS Linear Gradient to Create a Striped Element
Create Movement Using CSS Animation
Change an Element's Relative Position
Move a Relatively Positioned Element with CSS Offsets
Create Visual Direction by Fading an Element from Left to Right
Animate Elements Continually Using an Infinite Animation Count
Set the line-height of Paragraphs
Override Class Declarations with Inline Styles
Create a Bulleted Unordered List
Use a media query to change a variable
Make Screen Reader Navigation Easier with the footer Landmark
Create Texture by Adding a Subtle Pattern as a Background Image
Wrap Content in the article Element
Make Links Navigatable with HTML Access Keys
Use tabindex to Add Keyboard Focus to an Element
Use tabindex to Specify the Order of Keyboard Focus for Several Elements
freeCodeCamp Curriculum Lessons NOT Used in the Survey Form Project
The following are the freeCodeCamp curriculum lessons that I wasn’t able to use in the Survey Form project. I really wanted to use all of the lessons for this project. But, unfortunately, it just wasn’t possible. For the next projects, I hope I’ll be able to use these lessons.
All the CSS Grid lessons - just like with the Tribute Page, I decided to use the Flexbox layout for the Survey Form. I’ll focus on the CSS Grid layout in the next project
Improve Accessibility of Audio Content with the audio Element - the Survey Form doesn’t have any audio
Declare the Doctype of an HTML Document - I’m using CodePen to make the Survey Form, so the Doctype has already automatically been declared
Improve Chart Accessibility with the figure Element - the Survey Form doesn’t have a chart
Use Attribute Selectors to Style Elements
Use the s Tag to Strikethrough Text
Lock an Element to its Parent with Absolute Positioning
Lock an Element to the Browser Window with Fixed Positioning
Push Elements Left or Right with the float Property - I used the flexbox layout, so I didn’t have to float anything
Change the Position of Overlapping Elements with the z-index Property
Create a More Complex Shape Using CSS and HTML
Standardize Times with the HTML5 datetime Attribute
Make a CSS Heartbeat using an Infinite Animation Count
Use a Retina Image for Higher Resolution Displays
Use the flex-shrink Property to Shrink Items
Use the flex-grow Property to Expand Items
Use the flex-basis Property to Set the Initial Size of an Item
Use the flex Shorthand Property
Use the align-self Property
Make Elements Only Visible to a Screen Reader by Using Custom CSS
Create a Graphic Using CSS
Animate Elements at Variable Rates - I did animate elements using animations and keyframes, but not at variable rates
Animate Multiple Elements at Variable Rates - I did animate multiple elements using animations and keyframes, but not at variable rates
#freecodecamp#harry potter#web design#web development#sass#css preprocessor#responsive web design project#web design project#coding#responive web design#scss#css#survey form#html#flexbox#harry potter series#jk rowling
0 notes
Text
Whack 'em All - HTML5 Skill Game (Games)
Whack ‘em all is a HTML5 Skill Game. Hit as many moles as possible before time runs out. Get the Super Hammer Power-up to double your points! The game is usable both in Portrait and Landscape Mode, try it now! ! This game has been developed in HTML5/js and third-party library CreateJs – http://createjs.com/ (not Construct2 or other framework). The ZIP package contains the game with 1920×1920 resolution that scales to fit the whole screen both in portrait and landscape mode. Please note that for very wide screens, the game may not be perfectly full screen. The game is fully compatible with all most common mobile device browsers. WARNING:
Sounds are enabled for mobile but we can’t ensure full audio compatibility on all mobile devices due to some well-known issue between some mobile-browser and HTML5. So if you want to avoid sound loading, please read the documentation
Sounds can’t be enabled for Windows Phone as this kind of device have unsolvable issues with <audio> and <video> tag.
If you are planning to make an app out of this game, we suggest you to reskin or at least rebrand it.
We can’t be held responsible and offer support for eventual issues met during the use of the game in third party software (i.e. PhoneGap, Cordova, Iudei)
This game is fully compatible with CTL Arcade
A WordPress Plugin that allows you to create a real arcade on your website.
Easy to Install
With CTL Arcade you can:
Monetize with your games adding Ads Banners
Promote your website with Social Share Buttons
Improve our games with Leaderboard, and Rating Feature
=== Even if we do our best to minimize any inconvenience, we can’t ensure the full compatibility of all our games on every device and every operating system update. Thank you for the understanding. ===
YOU MIGHT ALSO BE INTERESTED IN:
from CodeCanyon new items https://ift.tt/2HmNCne via IFTTT https://goo.gl/zxKHwc
0 notes
Text
Keeping a'Float'
Over the weekend, the idea was to work on the to-do app and go through codeschool courses.
I started, and then stopped, with the to-do app thinking it would be better to focus on the courses as they were free just over the weekend. 2.5 courses done over 3 days. I think that was good progress, cleared a lot of knowledge gaps regarding how things work. It's funny how the explanation in the first two courses was absolutely great and I was considering to get a month's subscription but the third course was a turn off if I may so I think I changed my mind.
Learning Highlights
Setting a body background before background image as fallback
Changing inline tag display to block and using margin: auto for centering horizontally.
Floats and clears and how floats break when screen size decreases and in what order
Reseting browser CSS so it doesn't interfere with ours
Different Positions and how the allow for top and bottom attributes
HTML Document Outline (This was such an 'aha' moment.) and the four HTML5 tags that have their own self-contained outlines (nav,aside,article,section)
To Review Further : Positions, Floats and Clears.
Things to learn next: Relative units and responsive design using them
Plan Ahead
I would want to go back to the to-do app and get it done by Friday (idea is to spend Thursday and Friday on it and do it in a couple of different ways - Grid, Flexbox etc.). I think I really need to take today and tomorrow off coding - or at least today - so I can be fresher and do things that are relaxing.
I would also want to get started with research for Habit tracker and maybe do some designs for interface and logo etc.
0 notes