#tutorial sims 4
Explore tagged Tumblr posts
Visit Tumblr Blog
Explore Tumblr blogs with no restrictions, modern design and the best experience.
Last Seen Tumblr Blogs


Fun Fact
Premium Tumblr themes are available from anywhere between $9 to $49.
Text
Hiii everyone ❣️
As I've received many questions on how I created this shelf with just the base game and no CC, I thought I'd I'd create a short and simple tutorial on how I made it :)
You can find it on youtube (https://www.youtube.com/shorts/2DGMn_xiIic) or on instagram (https://www.instagram.com/reel/DFaYsiCtntd/) ❣️hope it's useful and insightful!
youtube
#tutorial#sims 4#sims 4 tutorial#tutorial sims 4#the sims 4#ts4#the sims#maxis match#youtube#thesims4#mm#no cc#ts4 mm#nocc#youtube tutorial#base game#basegame#basegameonly#ts4 base game#Youtube
16 notes
·
View notes
Text
Since the new eyelash update is here, I'm gonna teach you how to convert old eyelash cc into the new eyelash option!
First of all, we will need the Sims 4 Studio. The download link can be found here: https://sims4studio.com/board/6/download-sims-studio-open-version
Now, head into the app and click the "My Projects" button on the main menu.

Open the eyelash file (.package file) you want to convert. I'll just pick a random one for reference. Once you picked the one you want, hit open.
You will be directed into the studio, which will look like this:

Now on the right side of the screen, find the CATEGORIES button and click on it.

Once there, change the OUTFIT TYPE to MASK DETAIL EYELASHES and APPLY TO ALL SWATCHES. Save the file, and the .package file will be updated in your game. Also, make sure to double check in-game before continuing with your other custom content.

As you can see in my game, It worked! Hopefully it works for all of you, too.

And that's about it. Thanks for reading all the way.
And by the way, If you're going to distribute these publicly without the original creators consent, just don't do it. This is meant for private use only or for content creators who want to convert their eyelashes into the new eyelash section.
EDIT: As trillyke has said, This does not work with eyelashes in the glasses section as they will collide with rings and most of the accessories
#sims-4-custom-content#ts4#thesims4#customcontent#ts4cc#the sims 4 cc#the sims 4 custom content#tutorial#the sims 4#the sims community#the sims cc#sims#sims 4#simblr
4K notes
·
View notes
Text

IF YOU CAN'T ENABLE CC 🌸
Sul sul ^^
After today updates, I wasn't able to enable CC again. It doesn't matter how many times I closed and launched the game.
So I remembered that this had already happened to me before.
If you're going through the same problem, this is how you can fix it:
🌸🌸🌸🌸🌸🌸🌸🌸
HOW TO ENABLE CC AGAIN:
1- On the game home page, in the bottom right corner of the screen, you can see what the current game version is. After today's update, mine was: 1.108.318.1020. Launch the game and check the number that appears for you.
2- In your game folder (Documents>Electronic Arts> The Sims 4) you'll find a file called "GameVersion". There will be a number.
The number in that file has to match the current game version number.
When I opened mine, it was "1.107.151.1020". So I just updated it to "1.108.318.1020" and saved. Then when I launched the game I could enable CC again.
Note 1: There's a "space" before the number in "GameVersion" (as if it were a paragraph). Keep that space. Change the numbers exactly where they are.
Note 2: If you prefer, before changing the number, make a backup copy of "GameVersion" just in case. It won't harm your game, but it's better, just to prevent and make it safer.
💎 If you want a tutorial video, I made one about it some time ago. You can watch it here :)
🌸🌸🌸🌸🌸🌸🌸🌸
ALSO IMPORTANT AFTER UPDATES:
Remember to delete "localthumbcache". You can find the tutorial here.
🌸🌸🌸🌸🌸🌸🌸🌸
I'm currently checking my CC to see if they're still working.
If anything, I'll let you know :)
I hope it helps you if you're having any problems :)
Happy Simming ^^
3K notes
·
View notes
Text
Patio pre diseñado. Esto quiere decir que se guardan los archivos en la carpeta Tray (Documentos/ Electronic Arts/ Los Sims 4/ Tray). Encontrareís otro enlace a la carpeta MODS con todas las decoraciones que habreís de colocar en la carpeta del juego MODS para qué, cuando instaleis el patio en vuestro juego se vea completo. Os adjunto la traducción:
Patio del amanecer
¡La próxima "habitación" al aire libre en mi serie de patios!
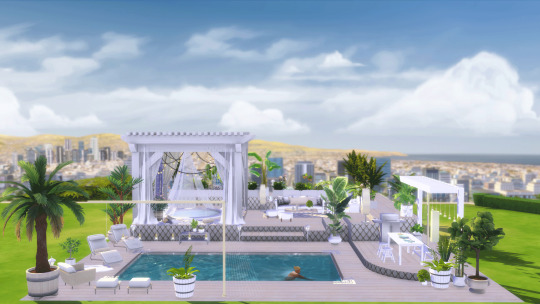
¡Bienvenido a su propio pequeño patio celestial! ¡El Dawn Patio es un paraíso de jardín y área de entretenimiento al aire libre de varios niveles! La amplia terraza incluye una relajante sala de estar, un jacuzzi cubierto con un cenador, un área de barbacoa/comedor y una piscina en el nivel inferior, todo rodeado de exuberantes jardines.
---------- Este patio se guarda como una "habitación" y debe colocarse en su lote ANTES de comenzar a construir. Como se guarda como una habitación, la piscina en sí no está en la construcción (gracias EA por ser ridículo), pero la ubicación de la piscina está claramente marcada en la plataforma de la piscina. Creo todas mis construcciones usando bb.moveobjects
Ya disponible para descargar gratis desde MOD Collective AQUÍ
Dawn Patio
The next outdoor "room" in my patio series!
Welcome to your own little piece of Heaven Patio!!! The Dawn Patio is a multi-level garden and outdoor entertainment area paradise! The expansive deck includes a relaxing sitting area, gazebo-covered hot tub, BBQ/dining area, and lower level swimming pool, all surrounded by lush gardens.
---------- This patio is saved as a “room” and should be placed on your lot BEFORE you begin building. As it’s saved as a room the pool itself is not in the build (thank you EA for being ridiculous), but the placement of the pool is clearly marked on the pool deck. I create all my builds using bb.moveobjects
Now available to download for free from MOD Collective HERE


17 notes
·
View notes
Text

hey guy's i made a quick and easy tutorial on youtube about how you can frame your sims screenshots with any cc frame you want, you don't need photoshop or any other of these overwhelmimg programs and you also don't need any kind of photo editing skills! you can find the video here. i hope it's helping some of you. love, jodie ♡
#tuts*#sims 4 mods#sims 4 cc#sims 4 simblr#sims 4 custom content#the sims 4#the sims#the sims community#sims 4 tutorial#the sims 4 custom content#sims 4 maxis match#sims custom content#sims 4#ts4 simblr#sims community#ts4
444 notes
·
View notes
Text
downloading a bunch of files from sfs folder a bit more comfortably (on PC)
you know this feeling when you see a sfs folder with many separate files and no full set archive, so you just sigh, click on a file, download it, go back, repeat with the next one, go back, try to recall which one you already downloaded and which you didn't... so i've come up with a little workaround that'll make it faster and a bit more comfortable! it's pretty 101, but my friend found my explanation useful, so maybe someone else needs it too.
there's this thing about SFS, that if you open the same page again in a certain period of time, i think it's a day or maybe a few hours, it won't open the page again, but instead it'll just automatically download its file. that's exactly the thing we'll be utilizing here. when you left click on a link with pressed ctrl, this link will be open in another (inactive) tab. so to "automatically" download files from this folder, just hold ctlr and click on each file you need twice.

on the first click, it'll open the inactive tab with it, on the second click, it'll just straight up download the file without you having to go away from the page you're on. when you're done downloading everything you need, just close all tabs it opened. not ideal, yes, but much faster and less annoying than having to manually open each page and click on the button. happy simming!
1K notes
·
View notes
Text
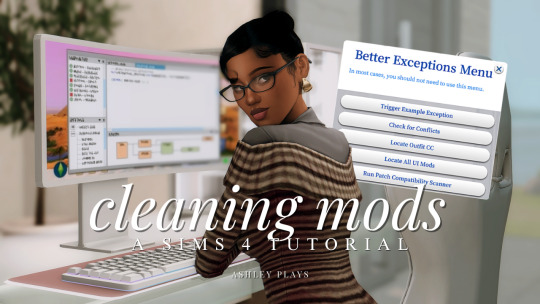
how to clean & organize your mods folder + update broken/outdated mods by ashley plays
this video goes over the following:
how to organize your mods folder
how to update your mods folder after a patch update
how to find broken/outdated mods
how to clean out custom content & find duplicate files
↓ mods, programs & helpful websites mentioned below
mods:
better exceptions
mc command center
programs:
sims 4 tray importer
sims 4 mod manager
helpful websites:
sims 4 news & updates
scarlet's realm: the mod list
bienchen's mods
littlemssam's mods
kiarasims4mods's spreadsheet
mizoreyukii's spreadsheet
2K notes
·
View notes
Text

Quick Guide: Stay Safe While Downloading Sims 4 CC & Mods
I just published a quick guide to help you download Sims 4 CC & mods safely. ⚠️ From trusted sources to spotting red flags. Keep your game clean and secure! 😊
Read it now
#avoid malware in sims 4 mods#how to avoid malware sims 4 mods#how to download mods safely sims 4#patreon sims 4 cc download#safe sims 4 cc creators#safe sims 4 download sites#sims 4 cc best practices#sims 4 cc community guide#sims 4 cc download checklist#sims 4 cc education#sims 4 cc folder structure#sims 4 cc mod manager#sims 4 cc mod security tips#sims 4 cc mods support guide#sims 4 cc protection#sims 4 cc safe download#sims 4 cc safe hosting platforms#sims 4 cc safety guide#sims 4 cc safety tutorial#sims 4 cc virus warning#sims 4 cc zip file tips#sims 4 custom content security#sims 4 custom content tips#sims 4 mod folder organization#sims 4 mod malware prevention#sims 4 mod safety#sims 4 mod safety checklist#sims 4 modding guide#sims 4 mods antivirus#sims 4 script mod warning
281 notes
·
View notes
Text
TUTORIAL
How to FIX CUSTOM EYELASHES after update 1.108.349.1020 The Sims 4
YOU NEED:
Sims 4 Studio @sims4studioofficial
Blender (I use Blender 2.79)
Instruction manual:
Opening the eyelashes that need to be repaired in Sims 4 Studio

2. Go to the "Categories" section - Item "Outfit Type" - "Eyelashes"

3. Click "Apply to All Swatches" - Click "Yes"

4. Now we need to assign the correct color to the Vertex in Blender. Go to the "Mesh" category and export the eyelash mesh

5. Open the Mesh in Blender and switch to the "Vertex Paint" mode

6. Select the display mode "Wireframe" or press the "Z" key

7. If the eyelashes are broken, they will have the wrong color. Now we need to assign the correct color

8. Click on the palette icon

9. Go to the HEX item and enter the color code. Color Number: 007F3F

10. After you entered the color code. Click "Paint" - "Set Vertex Color"

11. After that, the color of the eyelashes will change. Save the file and close the Blender

12. Go back to SIms 4 Studio and import the mesh

13. Saving the package file

14. Checking the result in the game
718 notes
·
View notes
Text


Shop Sign Wall Lights - UPDATED 15 May 2025
I put together a few sets of shop sign wall lights. But there are instructions. I kept some swatches as a default white color so that you could pick which color you want the light to be while in live mode. This saved on the file size of the package file because the more textures a file has, the more bloated the file size is.
I had some fun with some shop names although I mainly included generic titles in both English and Simlish.
DOWNLOAD for FREE: SFS
OR at Patreon*
*You must be over 18 to access my Patreon page.
INSTRUCTIONS ON CHANGING LIGHT COLORS
Once you place the light in build mode, then go to live mode. Click on the light and you will get the following pie menu.

Select SET COLOR AND INTENSITY and then choose THIS LIGHT. The color options will then appear so you can select which color you want.

If you use the name signs along with the Awning Lights, make sure to place the name on top of the awning so when you select the color picker, the correct sign changes colors. The other option is to place the name separate from the awning, go to live mode and change the color, then go back to build mode and add the awning light you want.
Enable the bb.moveobjects on cheat and then you can make adjustments to location and size of objects. You can adjust the position of the light on the wall by depressing the Alt key while placing the sign (on PC). You can adjust the size of the item by depressing the Shift key and either [ (for smaller) or ] (for bigger) (on PC).
CREDITS
Awning Shop Lights - 19 swatches of various awning wall lights. 18 are pre-colored and one is white so you can change the color yourself in game.
Candy Shop Lights - 20 swatches
Pottery Shop Lights - 25 swatches
Tattoo Shop Lights - 21 swatches
Enjoy!
Creations by SexyIrish7
These cc objects are new 3d meshes created using Blender and Sims 4 Studio.
Polygon Count: 6
All CC have:
*Ability to search catalog using search terms: sexyirish7 and si7
*Customized thumbnail
*******
CREDITS:
Software credits:
Sims 4 Studio v. 3.2.4.1 (Star): https://sims4studio.com
Blender 4.0: https://www.blender.org/download/
GIMP v. 2.10.34: https://www.gimp.org/
Inkscape v. 1.2: https://inkscape.org/
Thank you to the creators and moderators producing tutorials and answering questions!
*******
Model and Image credits:
Mesh created by me.
Simlish font credit to Franzilla: https://modthesims.info/
Image credits:
Awning Lights Image credits: Modified image from Adobe Stock
Candy Shop Image credits:
Swatches 1-3: Image by pch.vector on Freepik https://www.freepik.com/free-vector/christmas-candies-symbols-set-neon-style_11241813.htm#fromView=search&page=1&position=26&uuid=8b541325-0e62-4e37-9468-6bacd30f8963&query=neon+lollipop+candy
Swatches 4-8: Image by gstudioimagen on Freepik https://www.freepik.com/free-vector/sweet-candy-neon-seamless-pattern_5595774.htm#fromView=search&page=2&position=30&uuid=e2259de5-014d-4d04-af87-1198ee0f35e2&query=%40gstudioimagen+neon
https://www.freepik.com/free-vector/sweet-candy-neon-seamless-pattern_5595775.htm#fromView=search&page=1&position=27&uuid=e2259de5-014d-4d04-af87-1198ee0f35e2&query=%40gstudioimagen+neon
Swatches 9-10: Image by openclipart.org https://all-free-download.com/free-vector/download/peppermint_candy_clip_art_13182.html
https://all-free-download.com/free-vector/download/round_candy_with_stick_card_on_pink_background_6823183.html
Swatch 11: Image by All-free-download.com https://all-free-download.com/free-vector/download/round_candy_with_stick_card_on_pink_background_6823183.html
Swatches 12: Image by katemangostar on Freepik https://www.freepik.com/free-vector/ice-cream-cart-neon-sign_3238564.htm#fromView=search&page=8&position=42&uuid=2f82b4d1-5ca8-449c-ae22-4573861ebcb0&query=neon+sign+retail
Pottery Shop Image credits:
Swatch 1: Crafting icons created by andinur - Flaticon https://www.flaticon.com/free-icon/pottery_17392031
Swatch 2: Image by katemangostar via Freepik https://www.freepik.com/free-vector/aquarius-neon-sign_5561944.htm#fromView=search&page=2&position=5&uuid=c55e5e21-0550-46f0-b9be-cfa85ff38796&query=Ceramic+Neon
Swatch 3-4: Pottery icons created by Smashicons - Flaticon https://www.flaticon.com/free-icon/vase_3760867
https://www.flaticon.com/free-icon/vase_3760970
Swatch 5: Icon by istar_design_bureau via Freepik https://www.freepik.com/icon/pottery_1958438#fromView=search&page=2&position=20&uuid=096084ae-13fe-429c-a419-e6e13ccd37b9
Swatch 6:Icons by Eucalyp - Flaticon https://www.flaticon.com/free-icon/pottery_6552610
Swatch 7: Icon by berkahicon via Freepik https://www.freepik.com/icon/spin_13785816#fromView=search&page=2&position=0&uuid=096084ae-13fe-429c-a419-e6e13ccd37b9
Swatches 8-11: Icons by Freepik https://www.freepik.com/icon/pottery_8540816#fromView=search&page=3&position=43&uuid=096084ae-13fe-429c-a419-e6e13ccd37b9
https://www.flaticon.com/free-icon/machine_9200546
https://www.flaticon.com/free-icon/vase_8838322
https://www.flaticon.com/free-icon/pottery_3305262
Tattoo Shop Image credits:
Swatch 1: Modified Image by katemangostar on Freepik https://www.freepik.com/free-vector/tattoo-salon-neon-text-with-tattoo-machine-neon-sign-night-bright-advertisement_2438198.htm?log-in=email
Swatch 2: Image by Nippy Custom https://www.nippycustom.com/products/tattoo-neon-sign
Swatches 3-5: Image by bohlam via Vecteezy https://www.vecteezy.com/vector-art/2185717-tattoo-studio-neon-signs-style-text-vector
https://www.vecteezy.com/vector-art/34210463-neon-sign-tattoo-studio-with-brick-wall-background-vector
*******
TOU:
Do not re-upload and claim as your own
Do not re-upload and hide behind a paywall
*******
Changelog:
15.05.2025
*Updated swatches for compatibility with slotted signs.
*Added wall deco slot so that signs can be stacked on slotted signs for Awning Signs
*Added swatches with inverted images for Candy, Pottery, and Tattoo Shop Signs.
#the sims 4 cc#ts4cc#sims 4 cc#the sims 4#wall decor#sims 4#ts4#lights#wall lights#signs#shop signs#retail#pottery#ceramics#tattoo#ink#candy#lollipop#sweets#sugar#light tutorial#sexyirish7#updated cc#featured
304 notes
·
View notes
Text

As storytellers, realism and continuity are important to us, and they're sometimes hard to achieve within the confines of the game. I’m personally a big fan of posing Sims in open doorways, and unless you want to be limited to the CC options that exist, you’re stuck having to make some poor Sim walk in and out and pausing at just the right moment for the desired effect. But it’s actually very easy to edit a door in Blender to make your own open version!
I initially learned about "posing" objects from surelysims' Wicked Whims posing tutorial, which I highly recommend as a whole. However, it might be a little overwhelming to learn a whole new posing system for the sake of a screenshot or two, which is where this tutorial is meant to come in. Some of my explanations might seem overly simplistic, but I wanted it to be approachable even for beginners. I am far from an authority on using Blender or making CC, and I'm sure there are flaws in this process or easier ways to achieve certain things, but it works well enough for my purposes and I hope it will work for yours too. 💗
Now, onto the tutorial...
Figure out what door or gate you want to create an open version of. If it’s from the vanilla game, all you need to do is make note of its name. If it’s CC, find the package in your mods folder, make a copy, and paste it into My Documents > Sims 4 Studio > Mods. This will allow you to find it in S4S in the next step!
Open S4S. On the main screen, make sure “Standalone Recolor” is checked under the “Object” button, then click the button.

A new window should pop up (if it’s your first time doing this, it may take a while to load). At first, it will show every single object in the game. If you know the name of the object you’re looking for, you can use the search bar to find it. You can also use the filtering options to narrow the selection down by category, game pack, and whether it’s vanilla or custom content. Here, I’ve filtered the search to only base game doors. Once I find the door I want to adjust, I click on it and hit “Next.”

This will pop up a window prompting you to save a new file. Place it somewhere you know you’ll be able to find it easily later and name it accordingly. This file will ultimately contain your mesh edit, so you don’t want to lose it! I suggest placing it in a dedicated folder, on your desktop, or in your Mods folder directly.

On the next screen, you’ll be looking at the contents of the package itself. For this tutorial, you don’t need to worry about grabbing anything but the mesh. Click on the “Meshes” tab and then “Export Mesh.” You’ll again be prompted to save.

Open the mesh file you just saved in Blender. (If the view is funky to start, I recommend hitting 1 on your keyboard’s number pad to get a forward-facing view.) [It should also be noted I’m using Blender 3.6, so my screenshots and the location of certain settings may be different than in earlier or newer versions.]
You’ll see that there are actually multiple meshes involved (and the number can vary from object to object). Right now, we’re only concerned with the “rig.” If you’re familiar with posing, you’ll know that all Sims have a rig that is used to move different parts of their bodies around. Objects also have a rig, and objects that can open will have “bones” that control their moving parts. So click on “rig” and then change “Object Mode” in the bottom corner to “Pose Mode.”


Now, if you hit A on the keyboard, it will select all bones and you can see where they’re located. As far as I can tell, all doors have two bones that control their swinging movement. They both do essentially the same thing. I tend to stick with the top bone, which is called something like “bind_doorSwing.”

Pro-tip: If you’re having trouble seeing or selecting the rig's bones, you can change the view on the right side of the screen to “dope sheet.” Then when you save the position of the bones, just like when posing a Sim, by selecting all with A then clicking I and selecting “Location & Rotation,” the list of available bones will pop up there.


Rotate the door open using this bone or bones, if it’s a double door. On double doors, I recommend rotating each side individually rather than trying to rotate them together, as you may get unexpected results. You can use the R+Z combo on the keyboard to limit the direction of movement. (You can also use this in combo with numbers to swing them more precisely. For example, if you want a 45 degree swing, you can press R+Z+45.) Specifying the Z axis allows you to only swing the doors open and closed while restricting their movement in other directions.

Once you’ve got the doors swung open to where you want them, hit A to select all bones, then hit I and select “Location & Rotation” to save the position. (If you’re a poser, this maneuver is already familiar to you - and you know how important it is! If you skip it, the new position won’t save and the doors will revert back to closed.)

That’s it! You don’t have to do anything else to the mesh. Save your file in Blender. If you want to keep it separate from the original door mesh, save as instead and name it something different. (This is why you may want a dedicated folder, since the number of files does add up!)
Reopen the package you made earlier in S4S (or simply return to it if you’ve kept it open). From the same place you exported the mesh, you will now import the edited mesh. Hit “Import Mesh,” navigate to your edited Blender file, and you should now see your edited door replace the original. Since it’s the same mesh, all the swatches will still work perfectly with it.

You’ll notice that you’ve only replaced the “LOD 0 (High)” version of the mesh. When you click the drop-down menu, you’ll see that there are also medium and low detail versions, as well as shadow meshes at all levels of detail. If you’re only making an object for personal use, you don’t have to worry too much about LODs. You can probably just import the same mesh into LOD 1 and LOD 2 and be fine (so long as your computer isn't a potato). And if this is just for you, I honestly wouldn't even touch the shadow LODs.
The only other thing you might do is go back to the “Catalog” tab and alter the object name so you can find it easily in the game catalog. You can also edit the description, price, etc. if you so desire. Hit “Save.”

Test in game! If the package isn’t already in your Mods folder, move it there. As long as you didn’t mess with any of the tags, it should still be in the door section of build mode and work perfectly as a functional door. The door swinging animation will look different, and you could probably get rid of it if you wanted, but that’s above my current skill level and I don’t think it’s really necessary for our purposes. If all you need is an open version of a very specific door for storytelling purposes, it gets the job done.


(First screenshot: doors swung open as intended, second screenshot: doors swinging in the opposite direction as they’re walked through)
These steps can also potentially be used to create open versions of other in-game objects like gates, books, chests/boxes, etc. I’m only just beginning to experiment with minor mesh edits, but once you get the hang of it they can often be faster and easier than trying to line up the best circumstances to get the perfect shot in-game. I might make more tutorials for small edits like this that help with storytelling realism and continuity in the future!
#ts4#sims 4#ts4 storytelling#ts4 tutorial#sims 4 storytelling#sims 4 tutorial#this is the first tutorial i've written so do let me know if anything's confusing!!!#*tbw
277 notes
·
View notes
Text
Edit this screenie with me!


This is an unused screenie of Penny Pizzazz and Marcus Flex. Feel free to save the screenshot (Dropbox link below) and follow along with the instructions, or play around with it and do your own thing! I’m going to keep the instructions as simple as possible; hopefully they make sense.
Note: My process is kinda involved, but it’s a relaxing hobby for me. You do not need to do all of these steps! If the process doesn’t bring you joy, don’t bother!
I’m using procreate, but I’m also a photoshop user. You can use any software that has layers and blend modes :)
Instructions and downloads under the cut!
Dropbox link to the screenshot, and overlays!
1. Let’s start with shadows. The first step is to create a new layer. Put the blend mode to “multiply” (this darkens anything you draw on the layer). Then select a soft brush. We’ll start with Penny’s face. Use the eyedropper tool to choose a shadowy color of her skin (hold your finger on the color you want).

2. Decide where the light will be coming from (we’ll be placing it behind them on the top left). Deepen the shadows already made by the game, and add some shadows opposite to where the light will be. Choose a darker color to match each area you’re drawing on (Penny’s hair, her shirt, Marcus’ skin, his sweater).
When you’re finished drawing the shadows, go into your layer and lower the opacity. Less is more!

3. Choose the eraser (set it to soft brush). With a light hand, soften any shaded areas that are too harsh. Basically you want to blend the shadow with the skin using the eraser. You can also use Gaussian blur!

4. Let’s add some background lighting. This will also be our guide as we add bolder highlights in the next steps. Make a new layer and set the blend mode to “add.” Take your soft brush and a yellowy-orange color, and draw some glowy light coming from the top left.
Lower the opacity and take the eraser and erase much of the light on the right side of Marcus, and erase a bit of the light on their skin/ hair/ etc (like we did with the shadows). You can use Gaussian blur here too!
Note about lighting and highlights: experiment with the color of light, because some will look better depending on the environment and the sims skin tones. Because Penny and Marcus have dark skin, a bolder or darker yellow/orange will look much better than a pale yellow.

5. Let’s start adding more highlights! Make another new layer and change the blend mode to “add.” Choose a yellow-orange and paint some highlights on Penny’s hair, her left shoulder, her chest, cheekbone, and the left side of Marcus’ face. I made the image on the left a different color so you can see where I put the highlights.
Lower the opacity, and use the eraser or Gaussian blur to blend.

6. More highlights! Make a new layer and set the blend mode to “overlay.” Overlay lightens while adding color. I use “light pen” for any outlined highlights (the outer left of Penny’s hair, Penny’s shoulder, the left side of Marcus’ face), and I use a soft brush for the rest. Lower with the opacity, and use the eraser to blend.
This is a great time to play around with other highlight colors! I’m sticking with yellows, so I chose a peach color. Note: the red is to show what I drew.

7. We’re going to import a light leak overlay, and set the layer to “screen.” Then take your eraser, and erase any areas where you don’t want there to be too much light (red areas).

Finally, I’ll merge the layers together and bump up the highlights by going to adjustments > curves. Then I’ll add noise, and a vintage dust overlay. Sometimes I do more than this, sometimes less. I also like to draw hair strands and stuff, but that’s a whole second tutorial.
259 notes
·
View notes
Text

Since folks are trying to paywall written guides, here's all of my written guides, free. (The links aren't all broken this time, yay)
Making a Pose: From Start to Finish
How to make your Pose Packs Easy to Use
How to Make a Deco Sim
Reducing CC File Size
Tips for Posing Expressions
How to make a Toy / Action Figure of your Sim
How I made the Deco Gryphons from 'Gryphon Rider' Pose Pack
How to make a Fun Wall Light using Vector Images
How to Edit Poses to fit Fat Sims
How to make a UI Emotions Pose Override
Non-CC-related
Sims Story / Challenge Planning Document
Sims Story Character Questions
Guide on How to Start and Plan a Sims Story
Guide to GShade
Custom Content Editing: Terms of Use
Side note for those of you learning posing... A lot of posemakers don't allow reuploads with edits, but I do - my Pose Terms of Use ALLOW EDITING AND RE-UPLOADING under the following conditions:
Poses based on mine MUST credit me in the pose pack's in-game description and on the post you share it on, and you must link back to the original pose pack you used as a base.
No paywalls, AdFly, SimsFinds/Simsdom or CurseForge.
210 notes
·
View notes
Text
How to take screenshots and edit (when it's just not your thing)

Alright-y!
So, I have over the years learned how to use reshade and to edit my pictures. I am really not a natural on these things, so this is very much to help others who are as aesthetically challenged as I am. I have to have certain "rules" to follow, because I can rarely just see if a picture will turn out well or not.
We all need to realize where I started. We're talking using FRAPS to take screenshots and then running holy colours batman! to get some sort of effect.
Now, I'm not one to buy fancy stuff and to pirate certain programs isn't really my thing either. So we mend and make do!
Also, I am by far very good at taking screenshots and edit, but I have learned things and hope that it might be useful for someone!
A word on light
One thing I've learned is to work with is light. Where the light is is where the focus will go. This doesn't mean that a person has to be in the spotlight, but if they aren't - try to make that a more conscious choice. I am no pro at this, but I have to say that some of my favorite screenshots are where the light is just good. It focuses the eye or it just give a vibe.


(and yes, for some reason all of my faves are of Agnes, which is a bit annoying since Amanda is my fav-character, lol)
This is also where reLight comes in handy. Yes, it's behind a paywall but there are ways that you will have to figure out yourself.
Great tutorial here on reLight by @pictureamoebae! (if you want to really understand reshade, do check out their tumblr. So many helpful tips and tricks!)


Posing
Posing is fun! I don't fully story-tell with my sims, most of it is gameplay. But I do like to pose for family pictures or to enhance something that is going on.
What you need is Andrew's Pose Player and Teleport Any Sim or Wicked Whims.
Now, I haven't figured out how to use WW for children and younger to pose, so I use both. And I like @ts4-poses to find poses. Eventually, you'll find your favorite creators and can follow them directly.


Angles and vibes
Here's a trick. Work with angles. I am a master of pictures with zero vibe, just a face. Those can be ok, and sometimes that's what you have - but try to angle your shot a little.
Or add clutter, focus on that and let something out of focus happen in the background.
Or just go higher, take the screenshot from above.
Or don't focus on your sim at all, focus on something else that adds to the story/post.


Take the screenshot
The light is good, the angle great, the poses are in place and now, we need to take the actual screenshots.
I am a huge fan of reshade, I use version 4.9.1 because that works for me and the presets I use. No need to update reshade unless it becomes too old.
It can be really difficult to to find a preset that you like. I mostly use birdie by @monasims, tawhay by @windslar and paperbacks by @literalite. But I have tried many.
I like this youtube-tutorial on how to make your own preset, which also helps if you wish to modify one that you've downloaded. I do always recommend learning how to use ADOF and CinematicDOF to help focus the image on what you want to capture. I also strongly recommend @pictureamoebae's Foundation.
To take pictures, use the tab-key to leave the UI behind and use Q and E to go down/up in your game and then the mouse to angle. I use print-screen to take my screenshot, but that's something you set up when installing reshade so that's different for everyone.
And now you have your screenshot and it's time to open an editing program. Cheap as I am, I open GIMP.
Let's edit!
I don't use many steps. Since I can't use fancy photoshop actions I have to make all the steps by myself and well - I am human and therefor lazy.
Resize and start to think of a post
First things first. I cut my pictures to work for the tumblr ratio. I actually don't resize them smaller anymore - because when I change layout on my tumblr I just feel as if it messes it up. Now, I don't have a huge screen and my screenshots aren't massive, so it's not necessary either.
My images will be 1017x1017, 1525 x 1017 or 678 x 1017.
Once this is done, I also try to look at how they will go together. If I want a post of just squares I need to have an even number of images. Sometimes I want a landscape image as a sort of heading, or one in the middle with squares around it. It depends on what I want to convey.
This is by no means something that comes natural to me - I am aesthetically challenged after all. Sometimes, I just have 5 images and have to make do.

Resized
Topaz Clean
Yup, it's awesome. No, it doesn't come with GIMP. Yes, there are ways to work around this. You will have to find those ways on your own.
But I have to say, it does makes wonder for the images. I have completely stolen @sojutrait 's settings because I really like her style and therefor - I copy. I have added a bit more sharpening, but otherwise it's completely hers.

Topaz Clean:ed
Curves
Curves my beloved! I use curves for two things! Take out the yellow (aka increase the blue) and to brighten/darken the image!
I do sometimes matte the image too and here's a good tutorial for GIMP users on how to use curves in GIMP (for a matte look)

Less yellow/more blue

Brighten the brights (but I did not brighten the darker parts)
Layers, curves and increase the light where needed
Now, remember that we need light? Sometimes, a screenshot just doesn't have the right light. So I duplicate the layer, use the free marking tool around what I wish was brighter and put that on a new layer.
Then I use curves to lighten the layer with what I want to brighten and to make darker the layer with what I want to put less focus on (here's an ok youtube video on the subject).
Below, you can see the effect on my images.


Sharpen
Pretty basic. I subtly sharpen the image again. Even if I use the sharpening in topaz clean I do like to add an extra touch before it's time to save and move on.

So sharp!
PSD and UI
I do like to use psd's now and then. I mainly use @windslar's psd-collections and @deathbypufferfish's Build-a-Sim Icon Pack.
It's mostly to help give some info about the post or when my sims age up and I want to show their traits.
I do use the UI-info sometimes. If I do, I go into Game Options in the game > Accessibility > UI-scale and just drag that up a bit. Then I copy/paste that part onto the image I'm using.


Done!
That's pretty much it. Thing is, to post good edits you have to actually take good screenshots. As annoying as it is, it's like cooking: it all comes down to the ingredients. I hate cooking Yes, editing does help but I think my main journey has been to learn to take better screenshots from the start.
The picture below is from resized to done.
Hope this might help someone! I will probably learn more and more as I continue to post, but this is where I am so far in my journey!
151 notes
·
View notes
Text
Sims 4 Render Lighting Tutorial

"Environmental Lighting" won my most recent poll, so let's get right into it!
A few notes before we begin:
I render exclusively in cycles!
This tutorial assumes some basic knowledge of blender
Though this tutorial covers the basics, HDRIs can be used in conjunction with any scene/your built scenes
I decided to focus on environmental and other lighting in this tutorial, since they all kind of go hand in hand.
For this tutorial, I'll be using my recent Cupid Sim. Here's a render of her with no additional lighting:

1. Base lighting
In any full body, single sim render (like lookbooks, for example), I really like to use a glowing base. It grounds the sim a bit and casts some interesting lighting on them.
To do this, I add a circle under their feet by pressing shift+A and selecting circle.

An empty circle will appear, but we need it to be a solid disk, so go into Edit mode (by pressing tab while the circle is selected) then hitting F on the keyboard to fill it.


After that, you can go into the Materials tab and add in color and glow.
Mine is adjusted like this:

And gives this rendered result:

2. HDRIs
HDRIs (High Dynamic Range images) are extremely useful when it comes to environmental lighting, I always use them now to add better/more dynamic lighting to my renders.
HDRIs are 3D/panoramic, which makes them extremely useful.
You can find/download HDRIs online in a few diff places: PolyHaven, AmbientCO, and Blender Market.
There are also several available for FREE using BlenderKit (my preferred method).
So how do you use an HDRI?
We can add HDRIs to our render by navigating to the world tab and changing the color to "environment texture".


I chose this vaporware HDRI from BlenderKit, & here it is with no adjustments, but it's looking a little rough so let's adjust it.

By adding vector nodes, we can adjust how the HDRI behaves. Here I mostly use the Z rotation and the background strength:


Here's the same render with the Z-rotation set to 50, 150, 200, & 250.


You can put in any value for the Z-rotation, this is just an example of how the HDRI turns. This is maybe not the best example of the rotation, but putting her in a forest just didn't feel right lmfaooo, hopefully you can see how the light changes on her depending on the rotation.
You can also adjust the strength of the HDRI. Here's the HDRI (rotated to 150) set at .5 and 1.5 strength:


For this tutorial, my favorite lighting is the HDRI set to 150, and the strength set to .5, like this (this is a rendered image):

3. Transparent HDRIs + Point Lights
But I'm not fully happy with the lighting. I don't love how the HDRI is a bit blurry, so I'm going to set it to be transparent.
To do this, go to the Render Tab, scroll down to the Film option, and check Transparent:


The lighting effect from the HDRI will stay the same, but the background will be transparent.
From here, you can add a background (when I do this, I like adding a plane, & moving/shading it until I'm happy (kinda like this):


NOTE that you have to put the plane far enough behind your sim so it doesn't affect the HDRI lighting too much.
SECOND NOTE You can use this same method to use HDRIs in conjunction with scenes. They can provide the perfect backdrop!
This is still really dark, so I'm going to add three point lights: -Two on either side of her head/shoulders that will be smaller (in radius) and brighter -One in front of her to add actual light (so details aren't lost)

Here's how I set up my lights.


The pink light settings are for the two point lights on the sides The white light setting is for the light in front of her
For a basic render, this is almost good enough for me, but I really like the glowing effect I get in my renders.
To achieve this, we have to go to the compositing tab:
4. Compositing
Full disclosure, my compositing tab is set to glow by default (that's how much I love it), so all of the renders in this tutorial have it turned on.
I use the glare node and set it to fog glow.
Here's my preferred setting:

I prefer the fog glow effect, but bloom, ghost, streaks and star are also options.
Here's a guide to the glare node!
Tbh, I never use any of the other settings, so I'll leave this tutorial here for today.
Here's the final result (with no additional editing):

If you have any questions, please don't hesitate to send an ask, message or join my discord (no minors pls) for help! <3
#ts4 render tutorial#ts4 blender tutorial#sims 4 render tutorial#sims 4 blender tutorial#sims render tutorial#sims blender tutorial#salemsims tutorial#render school tutorial#blender
209 notes
·
View notes
Text

~hide build/buy lot outlines with reshade~
do I need to explain more? 😁
⚠️ this is not a mod to put inside your mods folder ⚠️
Instead, this utilizes a Reshade/Gshade add-on to remove the lot outlines and being able to do so whenever you want with just a shortcut. Requires Reshade/Gshade and the Shader Toggler add-on. Works on both DX9 and DX11.

Download the latest update on the main tumblr post below:
Patreon post here
#sims 4#ts4 resources#ts4 reshade#t: shader toggler#t: reshade add-ons#hide cas ui#vyx.resources#reshade tutorial#1 hour later... in a true me fashion 😂#just had to double triple check everything works fine
435 notes
·
View notes