#video editing software for mac
Explore tagged Tumblr posts
Visit Tumblr Blog
Explore Tumblr blogs with no restrictions, modern design and the best experience.
Last Seen Tumblr Blogs


Fun Fact
US Tumblr user growth rate is estimated to slow down to 4.1%.
Text
#Video editing software#free video editing software#Video editing software for mac#Video editing software for windows#Video editing software for beginners#Video Animation Software
0 notes
Text
#video editing software#video editing software free#free video editing software#best video editing software#free animation software for mac
3 notes
·
View notes
Text
got the craziest vision of a spock oh no marina amv once that felt like so clear it was like a message from another universe where i watched it i really do need to get into amv making i have so many ideas but all the editing software ive tried sucks so bad
6 notes
·
View notes
Text
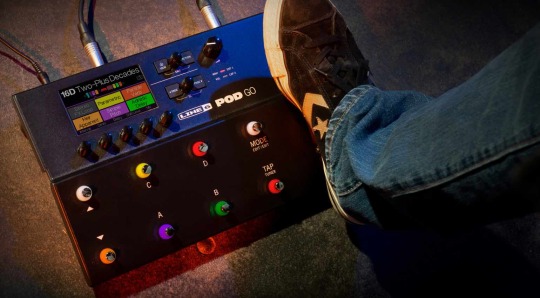
Line 6 POD Go 2.0 firmware update released
Line 6 POD Go 2.0 has just dropped and is an update for the POD Go and POD Go Wireless. It is the fourth significant upgrade since the product’s launch. Line 6 POD Go 2.0 Both the POD Go and POD Go Wireless boast Line 6’s state-of-the-art HX Modeling technology. This technology guarantees top-notch sound and rapid response, setting a new standard in the industry. Expanded Amps, Speakers, and…
View On WordPress
#amps#audio#cabinets#DAW#effects#firmware#Helix#HX Modeling#Impulse Response#Instagram#IRs#Line 6#MAc#OSX#PC#POD Edit 2.0#Pod Go#POD Go 2.0 firmware#Pod Go Wireless#software#Update#video#Windows#YouTube
1 note
·
View note
Text
Ok so I talked about this in tags of a post earlier but I need to talk about it properly
So a couple weeks ago I finally pulled the trigger, I dual booted Linux Mint on my laptop
It has less of my vital files on it then my pc, but I use it more for videos and general Internet stuff, so I would know if I liked it
Installing was scary but after a bit of trouble shooting with disabling bit locker it was easy, and let me be clear, that's a windows thing, because Microsoft really really doesn't want you to have freedom over your machine.
So I booted in
And like
I literally love it so much
I knew people talked about how much better Linux is and how it speeds up literally anything it's put on over windows, but like WOW
It doesn't take 2 minutes to boot up or shut down, my CPU doesn't idle at 25% for no reason, the search for files feature doesn't take 40 minutes only to show me Internet results instead of files, its wonderful.
The default theme is (in my opinion) pretty ugly, sorry whoever made it, it's just not for me.
But that's the great thing, you can literally customize this almost however you would like.
Maybe you shouldn't trust my opinion on what looks nice because I instantly installed a theme that replicated Windows 7
But I got bored of the default colors so I literally found the files where the home bar is saved and changed them to be more "minty"
That along with some CSS color editing gave me this:

You just can't do anything like this in Windows 10/11. You can change the color on windows but if I wanted, in Mint, I could completely change everything, centered icons on the taskbar, icons left justified on the taskbar, no taskbar, make it look like windows 95, it's all yours to do with whatever you want.
There are issues, I won't lie, the biggest one that will probably haunt Linux forever is compatibility.
Simply put most developers don't make native Linux versions of their software, you are lucky if there is a Mac version.
Lots and lots of Windows software CAN work on Linux through compatibility layers like Wine and Steam's Proton, but it's not 100%
My biggest problem is FL Studio and Clip Studio, neither of these I could get working with Wine or Proton so far. I'm hoping in the future I will find a way to make this work, or transition to their free and open source alternatives, but for now I'm stuck with a win 10 pc.
The other issue I've faced is that Linux seems to have a hard time recognizing and remembering my wired headphones. Like sometimes it just works, but most of the time it fails to do so.
My solution to this until I have time to troubleshoot more is to use my stupid headphone jack to USB C dongle that I bought for my stupid phone with no headphone jack.
Luckily it works fine and the type C port on my laptop literally doesn't get used otherwise.
All in all, I'm like excited to use a computer again. I used to only be excited for the programs it allowed me to use, but for the first time in a long time, the "magic" of the PC has returned for me.
Once I save up the money, my next PC will be Linux, Windows doesn't cut it anymore for me.
Ok now I'm going to kinda just talk about Linux for a bit, unrelated to my experience because my brain has been buzzing about this topic lately.
I get why guys who run Linux are so annoying about it now, because it's me now, I love this stupid OS and everyone has to hear about it.
And chances are, you've used Linux before already!
Linux is used in a ridiculous number of places because of its open source nature.
Most servers and other cloud computing systems are running Linux, many public terminals and screens run Linux, every supercomputer in the world runs Linux, if you were in the education system for the past 13~ years you might have used ChromeOS, which is built on Linux, if you have ever used an Android device you have used Linux.
It's never going to take over Windows as the go to operating system in the home, most people don't even know they could switch, and if they don't know that there's no way they are willing to put up with some of the headaches Linux brings.
Although I've spent way more time troubleshooting Windows issues then I have Linux ones so far, so maybe Microsoft stuffing so much bloated spyware into their system is starting to cause windows to rip at the seams, idk.
When I try to explain Linux to people who literally don't understand any of this I use a car metaphor
Windows is like a hatchback SUV, you buy it from a dealer and it mostly works for everyone good enough that they don't complain.
Linux is like a project vehicle in a lot of ways, the mechanic can tune it up exactly to the specifications they want, tear a bit out and put a diffrent one in, it requires some work under the engine but once that mechanic gets it the way they want it, it's incredible.
It's not a perfect metaphor but I think it gets the idea across.
Uh IDK how to finish this post, please try Linux if you can, changed my life.
#Long post about Linux ahead don't click read more if you don't want that#Linux#Linux mint#open source#Mantis thoughts
26 notes
·
View notes
Note
Do you have any tips/useful information for people who want to start making audio rps?
(Also love ur content sm!!! Mitch is the most lovable little guy)
Aw thank you so much! Love him too!
This is a great question, had to think about it for a bit;
If you want to dabble with making audios, feel free to start off with public scripts! I think there's subreddits like ASMR script haven (IIRC?) that has public scripts that can be filled by anyone. Just be sure to read the author's conditions carefully i.e. credit, terms of use, what can be changed etc. Right at the start I recorded a public script to try and get started, it's a great way to just jump right into making something to learn the ropes of it without also first having to write an entire script for it too. Filling public scripts is a fantastic way to start off, however I reckon writing your own stories is a major part of the fun!
You don't need an expensive mic, but audio quality is a very important factor. Do some test recordings and listen back to them (with headphones!) and see how it sounds. This is especially important for whispered scenes (DO NOT get too close to the mic or breathe on it!) or loud scenes (DO NOT peak the mic!). If your mic has a gain / input dial, play with that before recording! Just start with mono to begin with, play with stereo if your mic supports it after you become familiar with it. Aim for your recording to be no louder than -6db at the highest, if you can keep your voice roughly between like -20 and -6 that tends to sound reasonably natural.
Do your best to eliminate external sounds! If you have AC or anything like that on, turn it off. I have to shut down my main PC and record with only my editing Mac on because the PC fans are much louder and my mic is very sensitive! There'll pretty much always be background fuzz, some mics will just have some, but try to make your room as quiet as you can. Your software may have some background noise removal tools, I use filters for that (expensive so I can't recommend them), but DO NOT use the noise removal tool in Audacity! It's terrible!
Speaking of, Audacity is decent to get started with. It's good basic recording software, plus multiplatform. For a while I preferred recording on Windows with Audiodope, also very simple, plus I liked that it asks me whether I wanted to record in mono or stereo first in case I forget to switch, I currently record on Mac with ocenaudio which does the same, while Audacity won't ask, you have to go into settings. Anyway Audacity is okay to start with for editing, it's free, but from what I understand it's a "destructive" editing software in that after you make a change like adding a filter, you can't then go back in and change it other than just undoing, which I really don't like, plus changing the timing of things looks fiddly. I don't know what to recommend to move up from, I've heard good stuff about Reaper but it looks very complicated. Avoid Adobe unless you have a free subscription from somewhere else. I edit entirely in Final Cut Pro so I can't recommend that unless you're on Mac, plus it's my old work software and expensive! If you need sound effects, I use freesound.org, there are other great free resources as well, but make sure you check each individual sound effect's license before use.
Once you've edited the audio and want to turn it into a video, I've heard good stuff about Da Vinci Resolve and Kden Live, both are free! Make a video canvas of 1920 x 1080, FPS doesn't especially matter if you only have a still thumbnail, 25 or 30 is fine, and render it out as a h264 mp4 if you're not sure what to select! Good compression for internet video, good for streaming. Try to record and export your audio as wav if you have enough space, wav is uncompressed audio so it maintains full quality but they can get large.
I also make my thumbnails in-edit but you may want to use external software like Gimp to make them. Avoid getting random stuff of google especially anime boys / girls, and definitely don't ever use an artist's stuff without asking for permission + giving proper credit. Using pre-built generators like Picrew is totally fine, just be sure to credit where you got it from, but 100% avoid AI generators, obviously. Be careful with Adobe stock images, apparently there's AI slop in there too. You don't need art for audios though, they're a nice to have bonus, but many of my most viewed videos have no art at all. If you need background images, I like unsplash.com because it has a free license! Read over it yourself but basically you're able to use pretty much any image they have in your videos!
Just jump in and try making something small, never start with your magnum opus! I started with the introverted incubus character because I'm a very shy person myself, it was an easier role to get started with! If you want to start writing your own scripts too there's a lot we could talk about there as well, just try to picture the scene from the perspective of the listener, what they may be thinking or feeling at any given moment, not just the perspective of the character you're going to be playing!
This was a lot and I don't think I covered much, I hope some of it helps though!!
49 notes
·
View notes
Text

First successful attempt at animation!!!
I feel like a GOD right now
It moves!?!?
I had to fight a bit with my software/mac to get it to work but it WORKS
oh it is over for all of you bitches
I am so so so happy right now. I've tried animation before but this is the first time I've tried using actual animating software and rendering.
I was very pleased to learn that Krita (the drawing software I already use) had animation capabilities! I also downloaded davinci resolve, but video editing stuff seems will work much better with animatics rather than frame by frame animation.
The character you see here is one of my friend's vessel oc's <3
#animation#gif#krita#made with krita#hollowknight#if you're reading this friend crave is a baby and i love them#thank you for letting me animate your feral child#vessel oc#thepencilscratches
17 notes
·
View notes
Note
Since you don't see many edits here, and i am a dumbass in editing, could you make a tutorial on it? Like: what apps should we use, what should or shouldn't do, devices, etc. Since i personally worship your editing prowess, i couldn't help myself but ask for your guidance sensei. 🙇♀️
I don't use a "special device" to make my edits, just a computer which can run a videoediting software and Wallpaper Engine correctly (in my case it's an Apple Mac Pro 4,1 from 2009 with upgraded RAM and GPU, and also with Windows 10 installed on it, but that's not important). My server pc build out of my spare parts, and it's serves as a network bridge, and a file storge (like a NAS, or something) to store my personal files, like the assets for the edits on HPP. The way I make my edits, is a different story. I like to put the charaters in different scenarios to make the edit more enjoyable. I usually chose one image from my pre-granarated ones, or I use (if i see a, as i call an edit "suspicious" image here on Tumblr or X) an image from my "Likes", or if I can't find any which is good for the scanario in my head I generate one using PixAI's Ebora Pony XL AI model. Than if I have an image, I put together a static version of the edit in Paint.NET (PaintdotNET). Here I cut down the unnecessary and the broken (weirdly generated hands, .etc) parts of the image, and I remove the background if I'd like to use a different one. Than I chose a stethoscope png what are suitable for the edit, but I recently using the hand with stethoscope one which you can see in my recent edits. I also make some barely visble changes to the main image and the stething image. If it's done, and looks good I save them (the base image, the background, and the steting png separately) in a folder. After that it's time to "animate" the edit, which is just using the Wallpaper Engine's built in Shake effect, if that part is done, I record the animated soundless edit using OBS, which is usually a 5-6 minutes raw mp4 file. Than I put the raw recording into the video editor which is my case is the Wondershare Filmora X. I chose one of the heartbeat and bearthing audios from my server (if it's needed I modify it a bit in Audacity), and speed them up to mach with the animation. I make the breathing way quieter to have the heartbeat in focus, also i duplicate the hb sound to make a stereo effect, which means the I make the left side a bit louder and add more bass to it than the right side, which make a really good heart pulse effect (ROLL CREDITS). Also in here I add some video effects, cut down the unnecessary parts, I cut down the video to 2 minutes to become uploadable for X, than it's time to export it. After I exported the final edit, i check it for mistakes and I fix them if i find any, and the fixed version gonna be uploaded to Tumblr and X. This whole process is 2+ hours usually, but it's could be more for longer and more complex edits. But you doesn't need to follow my way to make edits, if you ever used a photo editor and a video editor before, and you know how put a transparent png on an image, and a greenscreen video on another one, you good to go. There is a lot of ways you can make an edit, so you can chose one which are suitable for you. If you still need help, you can join the Cardio Editor's Hub, there are lot of other people who gladly gives you some tips and tricks. Good luck, have fun! :D
11 notes
·
View notes
Text
“Switch to Linux” is literally the least helpful advice you can give anyone who doesn’t have a degree in computer science.
I say this as someone who daily drove Linux for the better part of a decade, it is not easy to use, it is unstable without a lot of extra work, and “similar” and “equivalent” programs are never similar enough.
You can’t expect someone who uses a windows-exclusive graphic design software, or recording software, or video editing software, or anything else to just switch to a new product that works differently.
That level of customization you guys love going on about with Linux? All my audio programs on windows and Mac have the same level of it. It is an enormous pain in the ass to set it all back up again, even when you’re going from a saved configuration.
And tons of task-specific programs depend on other task-specific programs that also don’t work on Linux.
I am so fucking tired of “learn to code” being everyone’s go-to solution for any problem with job tools. How about you learn to do my job? You wanna drive a big fucking truck around all day? No? Then shut the fuck up.
96 notes
·
View notes
Text
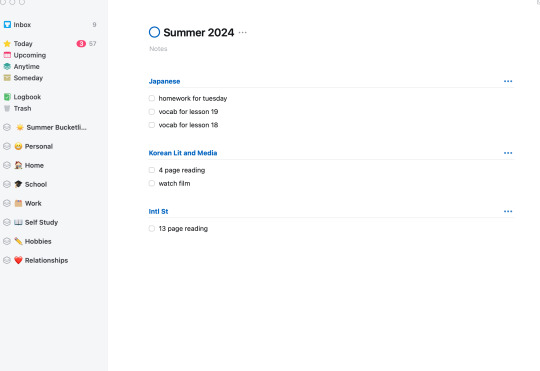
building my organization and productivity system part 1: school
hello interweb
this is a big project so we'll do this in parts.
first: school
I am finishing the last couple classes I need for my degree over the summer, therefore school is still an important part of my life.
Apps:
notion:
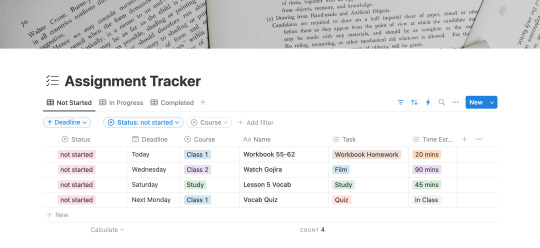
I am not a notion girlie, but I can't find an app that lets me build databases the way notion does. at least not one I like. I am a productivity app enthusiast so i've tried just about all of them and notion just works the best. Here is the template I use to keep track of my assignments. It is a mix of StudyWithAra's template and Notion's Assignment Tracker. The image above is the template I've made available for all of you! There are automations set up (the lightening icon), but I think everything is pretty self explanatory? if you have any questions don't hesitate to reach out.
edit: I have added a new section called "treats" to the database, to help motivate me to finish more of my work. I should add that this system is what I have developed while struggling to manage my chronic illnesses.
obsidian:
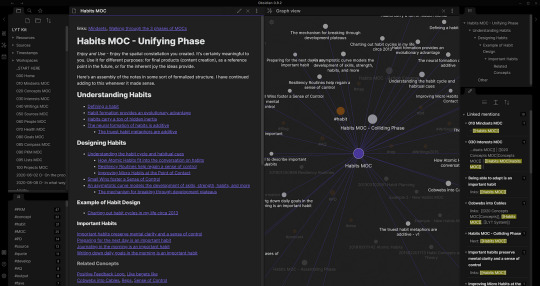
my one true love. i can wax poetic about why this is just a superior notetaking app, but that will be for a later post. for now, think of obsidian as a wikipedia database for all your notes. it allows for tags and backlinks and search and callouts... its amazing. love it there. uhm. a bit of a learning curve, but again a whole post on obsidian upcoming. here is a bit of an intro video for obsidian for students that I often return to. will reveal my obsidian notes in that post I'm working on.
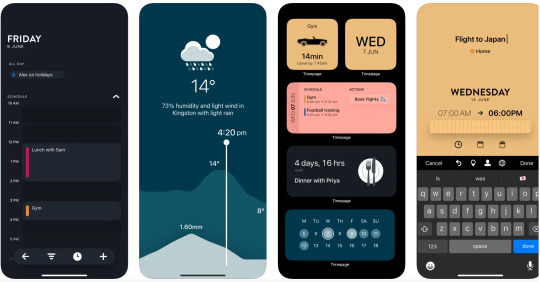
timepage:
if you love stationery you might be familiar with Moleskine. they've built this wonder suite of productivity tools and timepage is the calendar app. I use this on my phone! its everything a calendar app should be and more. its super cute and functional and customizable. I use google calendar to create different calendars that i've color coded to correspond to different areas of my life. i use a couple different calendar apps but timepage is my school calendar. it tells me when to leave for class, how to get there, and how long i have to rest/study/eat between my classes. it shows the weather, alerts you of rain, and did i mention its cute?
things:
the adhd/depression/anxiety struggle is real. I have 101 different apps to tell me what to do and when. things is another one of those apps. one of my lovely friends purchased the mac app for me and it has been a game changer. i use things to organize my entire life, but in the screenshot above you'll see my school list. when notion is too overwhelming or i need to break down things a bit more, i use things.

youtube:
here are some youtube channels I recommend for motivation, for aesthetics, for background noise 1, 2, 3, for body doubling...
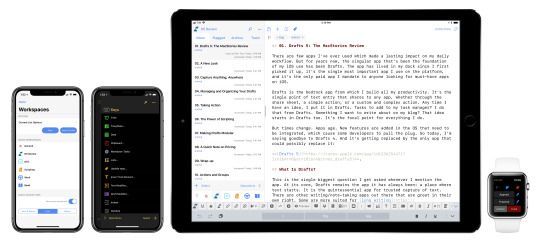
drafts:
cute little app. great for quick notes and also uses markdown so easy to copy and paste between drafts and obsidian. opens and closes quickly and syncs between your mac and phone for free! I write my speeches in here and also those last minute things your professor says after you've already put away your notebook.
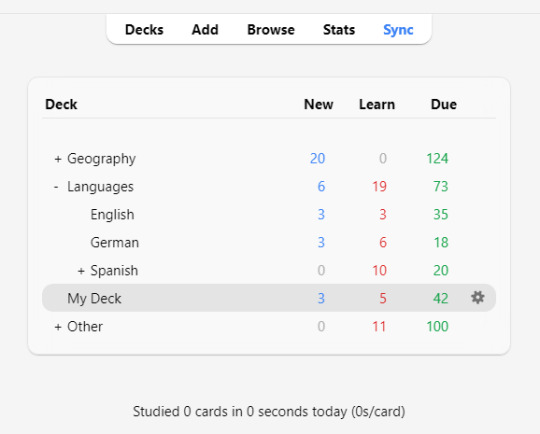
anki:
just started using this because i am in desperate need for spaced repetition. i bought and set up a small remote using this video to help move through the flashcards faster. i am also terribly lazy so we definitely downloaded premade cards instead of making our own. still need to do a bit more research to be able to use this software properly, but it is good enough for now. I am supplementing this app with the flashcard app below.
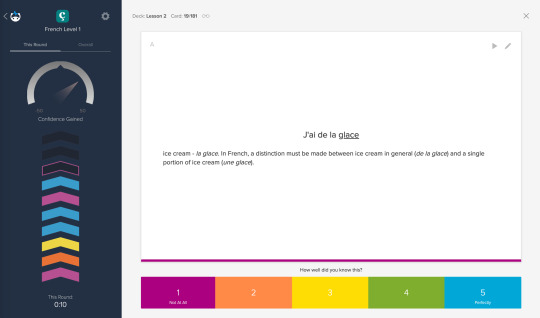
brainscape:
i use this to learn whatever I am studying. recently it has been vocab and kanji, but I imagine I might add in grammar cards at some point too. if you are familiar with anki, brainscape has a similar system for "learning", meaning you rank the card after seeing the answer, deciding for yourself how well you know the material. I can also download the decks I make to use during my commute so that is super helpful. And it's free (with a subscription upgrade available)!
Supplies:
as for material supplies, you'll find some of my favorites below:
kokuyo campus semi B5 - 5 mm graph
kokuyo campus semi B5 - dotted 6 mm rule
zebra sarasa gel pen .07/.05
pentel energel .07/.05
pilot g2 .07/.05
zebra mildliners
bic mechanical pencils in .07
twsbi fountain pen medium/extra fine
platinum carbon black ink
hobonichi cousin
System:
okay so i'm not quite sure how to explain this in a way that makes sense, but i shall attempt it. the system as it stands has a few steps.
move weekly assignments and such from the syllabi to Notion
add due dates and deadlines into Calendars
move tasks to Things
plot study schedule onto Calendars
write essays using notes i wrote in Obsidian during class
study for Japanese using Brainscape and Anki for memorization
practice Kanji and writing in kokuyo campus notebooks
write scripts, quick notes, etc., using Drafts
migrate things from Drafts to Docs, Obsidian, Calendars, or Notion
commence studying using YouTube as background noise
---
that's all for now. I'm still working on the next few posts in this series, but I hope this is helpful or at the very least somewhat entertaining.
wishing y'all the best,
Neith
#studyblr#writing#productivity#studying#studyspo#study motivation#apps#neithliveshere#that girl#organization#organizing#notion#university#self study#disability
16 notes
·
View notes
Text
#free animation software for mac#free animation software for windows#best video editing software#free animation software for android#animation software free#animation software
0 notes
Note
hello animatedjen!! I hope your day has been beautiful 🧡 I've recently moved into an apartment and have decided to get a gaming monitor for my PS5, so I can game at my desk and save some space while still enjoying photo mode sessions. if I remember correctly you play Jedi on PC, so maybe my question for you isn't relevant, but is there a monitor you use & like or would recommend for this purpose? I know these things are expensive and you seemed like a good person to ask about getting my investment right the first time around! especially since I would also use it for professional photo & video editing on occasion, and I know that's relevant to your career field as well. any advice you have on making a flexible set up would be so appreciated! thank you in advance!! I hope this question isn't too bothersome! P.S. I want you to know that you're a micro celebrity amongst my coworker friends because they see your photo mode shots rotate as my desktop wallpapers all day every day haha 😅
Congrats on the apartment!! And I'm very honored to be your work desktop wallpaper 💛 Respawn should be giving you a referral bonus!
Right now I'm using a Gigabyte QHD 34" ultrawide gaming monitor I got secondhand. Good specs for the price, but it's not super color accurate when compared to my Macbook retina screen - it could be calibrated more via software or a physical tool, but for now I use the monitor for gaming, general life stuff, and pre-color editing. I have a DP cable for the PC and HDMI for the Macbook or PS5, so it's easy to switch between devices.
The ultrawide aspect ratio also means I crop my photomode shots to 16:9 to post on socials, since 21:9 photos are very skinny (see above) and people often scroll Tumblr on their small, vertically-oriented phone screens. On the plus side, it's great for video editing since I can see more of the timeline at once. And no black bars during Jedi Survivor cutscenes!

You'll have to decide your budget and what specs are most important to you for photo/video work - I'd recommend a screen somewhere between 24" and 34", with QHD (2K) or UHD (4K) resolution. A higher refresh rate (at least 60hz, if not 120/144/240hz) helps for gaming and video with higher framerates. Color accuracy is tricky, but if you're not creating high-end photo prints or color grading for Netflix, something good (but not perfect) will be just fine. Some monitors will be better for gaming, and some better for photo/video editing, so decide which one to prioritize.
I've seen ASUS ProArt, Dell UltraSharp, and BenQ monitors recommended when I've shopped around before, but I skew towards non-gamer, Mac-friendly tech since more of my client work is on that system and the Jedi stuff is (sadly) not my paid job (yet). But if any other gamer/creative professionals want to drop recs in the comments, y'all probably know more than I do! 🙌
Thanks for the ask and sorry I can't be more helpful. Look forward to seeing the photomode shots from your new monitor :)
#i'm not super confident in this space so always hesitant to give recommendations#at the very least; find something you can return and then test it out for a bit?#asks#photomode asks#kind of?#jedi survivor#jen does irl stuff
12 notes
·
View notes
Note
I've rewatch your Narinder animatic "I don't work here" SO. MANY. TIMES. I love it.
Also, what do you use for animating?
shitty screenshot of some art as an offering

hi!! im so glad you like it!! angry nari is so cute <3
i use a free video editing software called CapCut to put together my animations. it's not actually an animating software; rather, it lets you insert images or videos on a timeline, then move them around and stretch or shorten their length. it's also what i use to edit my let's plays and speedpaints! So, i download the audio from a lyric video, put that in the timeline, line up the lyrics, then make the lyric video invisible and line up all my frames to match the timing that i want. i find this much more intuitive and easy to understand than using actual animation software (of which I have tried many), even though its probably a technically more difficult way to do it.
CapCut is available on Windows and mobile (it puts a watermark at the end of videos made on the mobile app, but you can crop that out on your phone or tablet's photo app). I don't remember if theres a Mac version. as for art, I use Clip Studio Paint, but you could use any art program that lets you export images!
i totally recommend trying to animate yourself!!!!!! it takes a long time but its so much fun and i think capcut makes it really easy
#asks#other art#cult of the lamb#if youd like i could record myself editing one of my wip animations in capcut to give an idea of how it works?#i made the cotl animatic on my PC but my persona 5 animatic was made on my ipad using Procreate and CapCut!
19 notes
·
View notes
Text
Top 5 Best YouTube Video Editors for Creators in 2025 | Beginner to Pro Tools
Top 5 Best YouTube Video Editors for Creators in 2025 | Beginner to Pro Tools:
Looking for the best YouTube video editors to take your content to the next level in 2025?
Whether you're a beginner or a professional, finding the right video editor is essential to producing high-quality, engaging videos. Here are the top 5 YouTube video editors that are trending right now:
1. Adobe Premiere Pro – Industry-standard editing software with powerful tools for color correction, audio editing, and visual effects. Perfect for pro YouTubers looking for versatility.

2. Final Cut Pro X – A fast and intuitive editor for Mac users, offering features like multicam editing and seamless rendering. Great for advanced creators.
3. DaVinci Resolve – Known for its top-notch color grading and post-production tools, it’s an excellent choice for those seeking a free, professional-grade editor.
4. Filmora – Best for beginners and intermediates, Filmora offers a drag-and-drop interface, green screen effects, and more, making it an easy-to-use yet powerful tool.
5. iMovie – A beginner-friendly, free option for Mac users. Simple yet effective, iMovie is perfect for creators just starting out on YouTube.Each of these editors has specific strengths depending on your video editing needs and experience level. Ready to elevate your YouTube videos?
Click here to explore these editors and start editing with the best tools today!
#video editing#video editing course#video editing services#video editing agency#video editor#video editing tips#edit
3 notes
·
View notes
Text
Video Editing Course in Chandigarh: A Complete Guide for Aspiring Creators
In today’s digital era, where content is king and visuals dominate every platform, video editing has emerged as one of the most sought-after skills. From YouTube vlogs and Instagram reels to documentaries and feature films, editing plays a pivotal role in crafting a compelling visual story. Chandigarh, being a hub of education and innovation in North India, offers numerous opportunities for individuals aspiring to learn video editing. This article explores everything you need to know about enrolling in a video editing course in Chandigarh—including course content, career scope, top institutes, eligibility, and more.
Why Choose Video Editing as a Career?
Video editing is no longer confined to film studios. With the explosive growth of digital content on social media, OTT platforms, and e-learning, skilled video editors are in high demand across industries. Here are some reasons why a career in video editing is both exciting and rewarding:
Creative Expression: Editing is an art that lets you shape stories, evoke emotions, and deliver impactful messages.
High Demand: From marketing agencies to content creators, every industry needs talented editors.
Freelancing Opportunities: With the right skills, you can work as a freelancer for global clients.
Attractive Salaries: Experienced editors often earn competitive salaries and perks.
Work Flexibility: Many editors work remotely, giving you the freedom to work from anywhere.
Scope of Video Editing in Chandigarh
Chandigarh, with its emerging media landscape, offers numerous job opportunities in video production, advertising, media houses, and digital marketing firms. The city is also home to various regional entertainment channels and film production units, increasing the need for skilled editors.
Moreover, the growing trend of content creation among YouTubers, influencers, and startups in the Tricity (Chandigarh, Mohali, Panchkula) region has further boosted the demand for professional video editors.
What Does a Video Editing Course Include?
A comprehensive video editing course in Chandigarh typically covers both the technical and artistic aspects of editing. While the curriculum may vary between institutes, the following modules are commonly included:
1. Introduction to Video Editing
Basics of video production
Role of a video editor
Overview of the editing process
2. Editing Software Training
Adobe Premiere Pro
Final Cut Pro (Mac)
DaVinci Resolve
Adobe After Effects (for motion graphics)
3. Technical Skills
Importing and organizing footage
Timeline editing
Trimming, cutting, and splicing clips
Adding transitions and effects
Audio editing and sound design
4. Color Grading & Correction
Adjusting exposure, contrast, and saturation
Using LUTs and color wheels
Matching color tones across shots
5. Motion Graphics & Visual Effects
Intro to keyframing and animation
Creating titles, lower thirds, and credits
Visual effects and green screen editing
6. Exporting & Project Delivery
Understanding codecs and file formats
Rendering for different platforms (YouTube, Instagram, etc.)
Backup and archiving best practices
7. Live Projects & Portfolio Development
Working on short films, music videos, or commercials
Creating a showreel for job or freelance applications
Top Video Editing Institutes in Chandigarh
Several institutes in Chandigarh offer professional training in video editing. Here are some of the best:
1. Morph Academy
Courses: Video Editing, Film Editing, VFX, Multimedia
Software: Adobe Premiere Pro, After Effects, Final Cut Pro
Duration: 3 to 6 months
Certification: Yes
Placement Assistance: Yes
2. BigBoxx Academy
Offers short-term and diploma-level courses
Hands-on training with real projects
Strong industry network for internships and placements
3. Chandigarh Institute of Film and Television (CIFT)
Focuses on film editing and post-production techniques
Experienced faculty from the film industry
4. MAAC Chandigarh
Known for animation and multimedia courses
Includes VFX and advanced motion graphics training
5. ThinkNEXT Technologies
Offers certified training in Adobe software
Affordable courses with practical lab sessions
Eligibility Criteria
Most video editing courses in Chandigarh have minimal eligibility requirements:
Minimum Qualification: 10+2 (any stream). Graduates are also eligible.
Technical Skills: Basic computer knowledge is recommended.
Creative Interest: A passion for films, storytelling, or visual media is a plus.
No prior editing experience is necessary, as most institutes start from the basics.
Duration and Fees
Duration:
Short-term Courses: 1 to 3 months (basic to intermediate level)
Advanced/Diploma Courses: 6 to 12 months (includes motion graphics and VFX)
Fee Structure:
Basic Courses: ₹15,000 to ₹25,000
Diploma Courses: ₹30,000 to ₹80,000
Fees vary depending on the course duration, software taught, and institute reputation.
Career Opportunities After Course Completion
After completing a video editing course, students can explore various career paths, such as:
Video Editor
Motion Graphics Artist
YouTube Content Editor
Post-Production Assistant
Film/TV Editor
Freelance Video Editor
Social Media Content Creator
With experience, editors can also move into roles like Creative Director, Colorist, or Visual Effects Supervisor.
Freelancing vs. Job – Which is Better?
Both options have their merits, depending on your goals and lifestyle.
Freelancing:
Flexible hours and location
Ability to work with international clients
Higher earning potential (once established)
Full-Time Job:
Stable income and benefits
Learning from seniors and working in teams
Opportunities for career growth and promotions
Many students start with a job to gain experience and then transition into freelancing.
Tips to Excel as a Video Editor
Practice Regularly: Edit different types of videos to build versatility.
Watch Tutorials: Platforms like YouTube, Skillshare, and Udemy offer advanced tips.
Stay Updated: Editing trends and software features change frequently.
Build a Portfolio: A strong showreel is essential to attract clients or employers.
Network: Attend workshops, film festivals, or online forums to connect with other creators.
Final Thoughts
A video editing course in Chandigarh can be a stepping stone to a dynamic and fulfilling career in the creative industry. Whether you’re a student, professional, or aspiring content creator, learning how to edit videos professionally opens up countless opportunities in today’s visual-centric world. With the right training, dedication, and creativity, you can build a successful career and bring powerful stories to life through the art of editing.
If you're based in Chandigarh or the surrounding areas, now is the perfect time to sharpen your editing skills and make your mark in the digital content revolution.
2 notes
·
View notes
Note
Hi Jream, I love your LPs so much! Your storytelling is so good and I'm so invested into your stories! I think one aspect what makes me enjoy your videos so much is your style of editing/filming. It's so cinematic and unique. It creates such a cool vibe to your videos! How did you learn video editing and which program do you use? And one last question: What inspires you to create the stories? 🥰
Hiii! Thank you so muchh <33 I really appreciate it!!
To answer your first question: Ever since 8th-9th grade, I would create machinima clips for my sims on imovie just for funsies because I've always loved turning my sims lives into stories (I've only ever played the sims on a mac until recently). But editing is one of those things that I was always passionate about because of my dad and his love for technology/editing family videos. I can even recollect moments in 5th grade taking videos of my dog, friends, & family & would editing them down in imovie like I was some film director LOL. Overall, you honestly grow with time - I've realized each time I release a new episode or video, I am always learning something new on my editing software that I may have not known before and there are still many things I have yet to learn! - I currently use Capcut to edit and OBS to record my videos! -
To answer the last question: I would honestly say my inspiration came from a huge imagination (I dream all the time - no pun intended lol -), playing otome games & watching anime/tv-shows ever since I was a little bean. When I was in middle school, I began writing stories for fun as it was an outlet for me during that time. But speaking on tv-shows and anime, I just love the way directors, producers, and more are able to capture a story through film. I took a class in college that focused on these things and you'll even see camera angles & shots change depending on the genre or story they are trying to tell. Camera angles, music, symbolism & script-writing (& more): they are all used to capture a person's attention and to tell their story and it's something that completely inspires me time and time again.
[ Sorry definitely geeked out at this question because I just love storytelling so much <3 If you ever need help with anything, my dms are always open! ]
8 notes
·
View notes