#Video editing software for beginners
Explore tagged Tumblr posts
Visit Tumblr Blog
Explore Tumblr blogs with no restrictions, modern design and the best experience.
Last Seen Tumblr Blogs


Fun Fact
In Q3 of 2020, 31% of US users access the Tumblr app daily.
Text
#Video editing software#free video editing software#Video editing software for mac#Video editing software for windows#Video editing software for beginners#Video Animation Software
0 notes
Text
I will never learn to cut my losses with an animation because I would simply rather spend two hours re-learning blender just to get a 5 second shot
#I say ‘re-learning’ but I’m pretty sure it’s physically impossible to be ‘done learning’ blender#it’s by far the LEAST beginner-friendly software I’ve ever used#but like it can do pretty much anything lmao#high key feels like it’s made less for artists and more for programmers#like the thing I was doing wasn’t even that difficult it’s just that everything I needed was buried in like 20 layers of UI#I needed like 6 different tutorial videos#if you wanna learn blender really you just think of a project and then off to YouTube you go#i use it for video editing and the kind of videos I make has an upper limit on the shit you need to know how to do lol
8 notes
·
View notes
Text
i know i'm still just a beginner at making edits but can you guys believe i only started video editing this year? i made a short shitty ass edit around? i think february? and then a gmv. and then i had a break but got into making edits in october. and the first ones were ROUGH, but my latest ones? actually pretty decent!!
#started this year as in. started as a hobby. not just as in a one off thing i do once maybe twice a year#bc i have touched video editing software prior and there is evidence of it on my youtube but it's not the kind of stuff i'm doing now#the stuff being silly little edits#which is so fun! i can just grab a song and a character and mash them together and some people will even enjoy looking at them#which! i still dont get what their point is. its just a guy and some music. theres not even any story unlike in amvs/gmvs#they're fun to make and i like watching them but why do ppl like watching them#i think they're to video social media what gifsets are to tumblr#which. i also started making gifs like a few months ago and they still look rough but i'm having FUN#and there are still so many things i can learn before i'll stop being a beginner. and even then! an endless amount of stuff!#i recently got into using keyframes for a slight zoom. i still have no idea how masking works but i'll get there#leevi talks
6 notes
·
View notes
Text
youtube
#Digital Nomad Institute#free video editing software for pc without watermark#best video editing app#ai video creator#video editing#best video editor#ai video editing#free editing software#clipchamp#free video editing software#ai tools#video editing for beginners#ai video editor#best video editing software for pc#best free video editor#best free video editing software for pc#how to edit youtube videos#video editing tutorial#free vidnami alternatives#Youtube
1 note
·
View note
Text
youtube
Elevate Your Podcast with Riverside's Game-Changing Features!
Discover how Riverside can transform our podcasting journey with its top 10 game-changing features. From studio-quality recording that ensures uncompressed audio and video to local recording capabilities, we’ll explore how this platform keeps our content professional even during shaky internet connections. Riverside also offers separate track recording for ultimate editing control, live streaming options to engage audiences in real-time, and easy remote guest invitations. With automatic transcriptions, integrated editing tools, secure cloud storage, and custom branding options, Riverside is perfect for both beginners and seasoned pros looking to elevate their podcasts.

#Podcasting #Riverside
#Youtube#Riverside platform#Neturbiz#podcasting tools#podcast recording#studio quality audio#high resolution video#local#remote#recording#separate track recording#live streaming podcasts#screen sharing#remote guest invitations#automatic transcriptions#integrated tools#cloud storage#custom branding#podcast production#improve podcast quality#podcasting#for beginners#software#strategies#tips#features#video podcasting#audio podcasting#podcast#editing
1 note
·
View note
Text
video editing

ChatGPT
Video editing is the process of manipulating and rearranging video footage to create a cohesive and engaging visual narrative. It involves combining video clips, adding special effects, transitions, audio, and other elements to produce a final video product. Here's a detailed description of video editing:
Video Editing Process:
Importing Footage: The first step in video editing is importing raw video footage into editing software. This footage may come from various sources, such as digital cameras, smartphones, or professional video cameras.
Organizing Footage: Once imported, video clips are organized into a logical structure within the editing software. This may involve creating folders, bins, or timelines to categorize and arrange the footage based on scenes, takes, or other criteria.
Editing Timeline: The editing timeline is where the magic happens. Editors assemble video clips on the timeline, trimming, cutting, and rearranging them to tell a cohesive story. They may also add transitions between clips to smooth out cuts and create visual interest.
Adding Audio: Sound plays a crucial role in video editing. Editors can add background music, sound effects, narration, and dialogue to enhance the viewing experience. Audio levels are adjusted to ensure a balanced mix between music, dialogue, and ambient sounds.
0 notes
Text
Free or Cheap German Learning Resources for all your Hochdeutsch Needs
I will update this list as I learn of any more useful ones. If you want general language learning resources check out this other post. This list is German specific. Find lists for other specific languages here.
For the purposes of this list "free" means something that is either totally free or has a useful free tier. "Cheap" is a subscription under $10USD a month, a software license or lifetime membership purchase under $100USD, or a book under $30USD. If you want to suggest something to add to this list, include things in this price range that are of good quality and not AI generated.
WEBSITES
DW - A public broadcasting service from Germany that also has a German learning section. They have videos, tv series, and lessons from beginner to advanced. The website is free to use with an account.
Gothe Institut - An organization affiliated with the German government that administers language level tests and promotes German culture abroad. They have a lot of free exercises and test questions. If you're willing to pay they may also have classes available in your region.
thegermanproject.com - A free website with explanations of beginner German concepts and stories to read for people at the beginner level.
germancorrector.com - A free website that will correct your spelling and grammar. You can also set the dialect to Switzerland or Austria.
Your Daily German - A blog in English by a native German speaker named Emanuel who makes posts about grammar, vocabulary, tips, and suggestions for reading.
YOUTUBE CHANNELS
Comprehensible Germani - A comprehensible input channel with German lessons in German using visual aids. Has content from beginner through upper intermediate.
Learn German - A channel that explains certain concepts and provides listening practice. The channel uses a mix of German and English.
Chill German - A channel that makes vlogs in slow German. They have videos from beginner to lower advanced levels.
Natürlich German - A comprehensible input channel that talks about different aspects of German culture and other topics as well. Has videos for complete beginner to lower advanced. This channel hasn't updated in a while but there's a large archive to watch through.
Easy German - A channel that has a combination of videos about basic German phrases for beginners and videos with interviews on the street in German speaking regions. The channel has dual language German/English subtitles on screen. The hosts of this channel also have a podcast for intermediate to advanced learners.
Expertly German - A channel about learning German with discussion of grammar, vocab, and business German. The channel is entirely in German.
Deutsch Mit Lari - A channel with a mix of German Lessons and vlogs in slow German. Content ranges from beginner to intermediate. All content and explanations are in German.
Learn German With Anja - A channel with a mix of lessons and videos on culture and living in Germany. Videos are in a mix of both English and German and often have dual language subtitles on screen.
READING PRACTICE
German graded readers by Olly Richards Short Stories in German, Intermediate Short Stories in German, Conversations in Simple German, Western Philosophy in Simple German, World War 2 in Simple German. Books tend to range from $4-$20 depending if you buy the digital or print versions. The books can also generally be found easily at used book stores or used on Amazon for cheaper.
Dino Lernt Deutsch - A series of short stories for beginners about a man named Dino lost in various German speaking countries. The full series new in print costs about $25 but it can be bought used or as a digital edition. Each individual story can also be bought separately
Nachrichtenleight - A website with news articles in simple German. The website is entirely in German.
AlumniPortal - Website with articles about business, academics, and other related topics organized by difficulty level. Has articles from upper beginner to upper intermediate. The website is entirely in German.
Grimm Stories - A website with an archive of the original Grimm's fairy tales. Language may be a bit archaic. The website is available in multiple languages.
PODCASTS
Slow German Podcast - Advertises itself as being for beginner to lower intermediate. The host talks about everyday topics such as seasonal weather and describing your apartment.
Easy German Podcast - The hosts from the Easy German Youtube channel talk about different topics, news, and answer questions from listeners in clear and understandable German.
News in Slow German - It is a podcast with news in slow German, including international news and culture news. Only a small section of the program is available for free.
Top-Thema Mit Vokalbeln - A podcast from DW for lower intermediate learners that discusses news topics in simple German and provides vocabulary lists related to the episode topic.
German Stories - A podcast for beginners in a mix of English and German that gives lessons through dialogues and short stories.
Speaking of Berlin - A podcast by Babbel of Berliners telling personal stories in slow German.
SELF STUDY TEXTBOOKS AND DICTIONARIES
Complete German All-in-One from McGraw Hill - a textbook that also doubles as a workbook. It’s more expensive at about $30. It’s difficult to find intact used copies of this book because it’s also a workbook and people tend to write all over it and tear it up. However the sentence builder and grammar sections are sold separately for much cheaper if you just want one or the other.
German Made Easy - Individual books in this series tend to be about $10-$20. From what I’ve read it’s just fine but it’s cheap and has all the beginner concepts you need and used copies are fairly easy to find online.
Easy German Step By Step - This is McGraw Hill’s budget option at $12-$16 new. Though as this one isn’t a workbook, it’s easier to find used copies. It focuses hard on only the most frequently used vocabulary and grammar concepts to get someone started as quickly as possible. It’s also available in audiobook form.
German Grammar Complete - This book is a full comprehensive guide to all levels of grammar from absolute beginner to college level. However it’s on the more expensive side at $30 and the workbook is sold separately.
DK German to English illustrated dictionary - This dictionary is sorted by topic and includes pictures and English translations. This is a new edition and is slightly harder to find used as I’m writing this. The base price is about $20 but there are older editions of this dictionary that might be easier to find used.
Merriam-Webster’s German to English Dictionary - The OG. The legend. The menace. The classic bilingual dictionary. Simple. Many words. Decent explainations. Only $8 new. Easy to find used older editions.
SERIES FOR LEARNERS AND KIDS TV
Hallo Aus Berlin - A series infamous among German students everywhere. Made in the early 2000s for use in classrooms, it has ten episodes of kids talking about certain topics like numbers and going out to a restaurant. It also has a number of songs. It’s cringey but in a fun way in my opinion.
Löwenzahn - a kids tv series aimed at very young audiences that’s been on for several decades. Every episode discusses one topic like bridges or factories so you’ll hear certain words repeated a lot. Theres only been a couple of different hosts so the presentation style remains consistent and unlike some other shows for kindergarteners it’s not obnoxiously loud and can be enjoyable for adults.
Sesamstraße - Sesame Street in German and localized for the German market with different themes and characters. In their YouTube channel you can find clips from as far back as the 1970s.
180 notes
·
View notes
Text
youtube
NEW VIDEO TUTORIAL 🩷
After almost two years it's time for a new and improved version of my "How to make CAS CC" video. This time I will explain how to create a frankenmesh out of a jumpsuit and a dress for adult Sims! It's VERY beginner friendly so if you weren't successful yet with starting to make CC, maybe this one will give you the help you need!
All the topics I cover in this video below the cut:
00:00 Intro
01:00 Software
01:36 Downloading & Installing Sims 4 Studio
01:56 Downloading & Installing Blender 4.2
02:10 Downloading & Installing GIMP
02:20 Introducing Sims 4 Studio
03:03 S4S | Gathering assets to work with
04:09 S4S | Textures
05:12 Project Folder
05:34 S4S | Gathering assets to work with
07:10 Introducing Blender
10:17 Blender | Edit mode (Select, Delete, Wireframe)
12:38 Blender | Append second mesh (Proportional Editing, UV overlapping)
18:23 Blender | Join two meshes (Material, Merge)
20:03 Blender | Cleaning up the mesh (UV editing, Merge, Rip)
22:14 Blender | Cut number
22:43 GIMP | Making a texture (Select, Delete, Healing, Smudge)
24:52 Photoshop | Making a texture (but make it easy)
25:15 GIMP & Blender | Preview of the texture
25:43 GIMP | Making color swatches (Layers, Lighting, Fill tool)
28:33 S4S | Introducing the CAS area
29:15 S4S | Creating a package file
30:25 S4S | Importing all our assets
31:17 GIMP | Creating a shadow texture
32:24 S4S | The specular map
32:39 GIMP & Browser | Creating a normal map
35:58 S4S | Vertices & Polygons, LODs
37:02 Blender | Creating LODs
38:20 S4S | Categories (Tags, Allow for random, Gender restrictions)
39:36 S4S | Tuning tab (not covered)
39:47 Sims 4 | Results & Outro
434 notes
·
View notes
Text
Murderbot 3D Print Part 3 - FILES!!!
It's what many of you have been waiting for! THE 3D FILES!
The price??? It's free!
That's a lie, the price is actually that you send me pictures of the results so I can have the joy of seeing what you all make. (I mean it, this is a threat)
Based on comments so far, it seems like this will be the first dive into 3D printing and figure painting for some people so I'll go through some of my approach to give you an idea of how I got to this result.
This is actually my first time sculpting, printing and then painting something to completion, so I am not experienced and you can totally do it too. As you may see from my blog I am primarily a digital artist and I occasionally do gouache and ink work, I have literally never painted or sculpted a figure before. (This counts as foreshadowing if you run into any problems with my files lmao)
Sculpting:
I sculpted the model in Nomad Sculpt on my Ipad and tidied things up in blender. I am still a massive beginner with sculpting so I incorporated pieces from some other freely available models to assist me (these are credited in the listing with the model). You don't have to worry about this part!
Printing:
I printed this on my MARS ELEGOO 2 printer. The settings I used for my print are included on the model listing; with these settings the model took about 7.5 hours to print.
The Files
I have uploaded 3 different file formats, a .stl, a .chitubox and a .ctb. An stl is the basic 3D model on its own, it can be opened in most 3D software if you are looking to edit it and it can be imported into any slicing software (slicing is the process of cutting any model into layers for the printer). If you use this file you will have to add the supports to the model yourself (supports are very important in preventing catastrophic print failure).
The .chitubox and .ctb files are specifically from the slicing program I use which is chitubox. The .chitubox program is for the model with the supports for printing attached and the .ctb file is the sliced file that is ready for the printer. VERY IMPORTANT TO NOTE is that these two files are sized and prepared based on my 3D printer dimensions. If you want to use these files, I recommend checking either files in chitubox (and have it set up for the model printer you will be using) and checking the size before going ahead with printing. If the size is too big for your printer you will have to resize the model and add the supports again but you can use the files I have supplied as reference.
I specifically used Chitubox 64 for this as Chitubox basic hates me and won't slice the model so it is solid inside. Printing something solid is easier to print than printing it hollow and trying to cure the resin trapped inside/drain the model (uncured resin is nasty nasty and will also generate gas that builds up pressure and will crack your print).
I recommend using either the basic stl for printing or starting with the .chitubox file and setting up the slicing settings by yourself. The ctb is a good reference for how things should look but probably not the best starting point to guarantee a successful print. If you add supports yourself, I recommend looking up some youtube videos on how to properly support a model, and what parts of a model need the most support and avoiding visible marks on your models from supports.
Post-Printing
Its important to clean and cure your print properly after its done, but if you are getting it done at the library or somewhere else you may not have to worry about this.
To remove the supports I used a heat gun to warm and soften the resin supports and little clippers my friends use for gundam to cut them as flush to the model as possible.
The next thing you want to do is sanding, sand down the marks from the supports, any lines or imperfections from the printing. Resin is relatively soft so this is not hard. I personally bought some cheap sandpaper that went from 400-1000 grit, glued it to icecream sticks, disposable knives and some flat toothpick things and used that to get into small crevices. Sand with wet paper to prevent resin dust going everywhere.
Painting
After sanding I sprayed the model with a primer, I specifically used Mr. Finishing Surfacer 1500 in white. This was my choice simply because its what my local gundam store had and I chose white because I didn't want to use a darker base coat that I had to lighten for the armor (simply put most of the model is white and white is a pain in the ass to paint opaquely)
After this I went in with my standard run-of-the-mill acrylic paints. The key to getting a smooth finish with no brush marks and lumps is to thin/smooth out the paint a little with water and build up the colour in layers.
I painted my base colours (white for the armor, black for the shoes and visor and a dark grey for the suit underneath the armor). To get a cool beaten-up effect I laid some light blue into areas on the armor where shadows would fall, after that I dabbed panel line accent colour which gets into the crevices and lines of the print and accents them (you can also just use really watered down black paint for this, I was lucky to borrow supplies from a warhammer 40k friend). I also covered parts of the armor with it and rubbed it off for a grimy effect and then dabbed some brown paint in for extra colour variation. I then came in and dry-brushed some lighter colours on the dark areas and fixed up the white where I wanted it brighter.
Then finally I coated the whole thing in a matte varnish to protect it and it was done!! My own Murderbot completed!!
Hopefully if you haven't done something like this before, this helps you get started There are dozens and dozens of great tutorials out there for more info or if you want to take your design in a different direction to mine.
Most importantly?? Have fun!!
If you have any issues or questions feel free to message me and we can work on it together!
222 notes
·
View notes
Text

Fully Underwater Lot Tutorial
@creida-sims @kitkat99
UPDATE January 2025
There is now a much, much easier way to do this. This version of SimPE now includes a tool to change terrain geometry. To edit the terrain in SimPE, go to Tools/Neighborhood/Neighborhood Browser and load your neighborhood. In the Resource Tree, select Neighborhood Terrain Geometry (NHTG) and select the only resource in the Resource List. In Plugin View, click Terrain Editor. It's very intuitive, but basically, you can edit the terrain under a lot to make it be underwater. You can also delete the road with the Road Editor.
I'll keep the old tutorial for archival purposes, but unless you can't or don't want to install this version of SimPE, it is pretty much obsolete.


Some warnings and disclaimers
1. This is not a beginner tutorial. I have tried to explain with as much detail as I can, but still, if you just started playing The Sims 2 I recommend trying out other building tutorials first.
2. I have tested it but there's always a possibility that some new problems will come up. Follow at your own risk. Backup your neighborhoods before trying this. Test it first in a new empty neighborhood.
3. These lots are roadless, so they require specific gameplay conditions to avoid breaking immersion (pun intended).
4. They will behave like normal lots in the sense that sims can walk around and do anything as if they were on land. There's one big problem to consider: when sims go fully underwater, their hair and some parts of their clothing might disappear visually.
So this is more useful for structures that sit above the water, shallow water that doesn't reach a sim's head or, with some modifications, small islands surrounded by water. So unless you want bald mermaids, I don't recommend this for sims that live underwater.
5. If you use Voeille's hood water mod, reflections will look glitchy in lot view, because this is technically not a beach lot. The only solution I found is enabling "Lot view ocean reflections" in RPC Launcher. Otherwise you'll have to deal with glitchy reflections.
6. Before following this tutorial, make sure you know the basics of creating, editing, importing and exporting SimCity 4 terrains. Written tutorial by SimEchoes here, video tutorial by loonaplum here.
Software and mods used
The Sims 2 FreeTime expansion pack (required for the modifyNeighborhoodTerrain cheat)
SimCity 4 (required) Hood Replace by Mootilda (required)
Lot Adjuster by Mootilda (required)
Portal revealer by Inge Jones (required)
Voeille's pond and sea water overhaul and RPC Launcher (optional, see disclaimers)
The Sims 2 Apartment Life and Bon Voyage expansion packs (optional, for "walk to lot/work/school" options)
Cheat codes used
moveObjects on/off
modifyNeighborhoodTerrain on/off
1. Creating/editing a terrain in SimCity 4
1.1. You can edit an already existing terrain or create your own from scratch. In both cases, you need to keep two things in mind: If you want the usable area of the lot to be underwater, such as making houses for mermaids or a coral reef, make sure the water is shallow. No more than a few short clicks with the terraforming tools in SimCity 4. This is because The Sims 2 live mode camera won't go underwater, so making the water too deep might make it uncomfortable to build or play the lot.
If you goal is to build a structure mostly above water, like a ship or an oil rig, you can get away with making the water a bit deeper, but not too much. I've noticed that sometimes the lot terrain tools stop working correctly if there a hill that's too steep.
1.2. Once you've created the terrain, you will need to add a small island on the area where your lot will be. I know it seems contradictory, but trust me, it will make sense. Create and name your city. Use the terraforming tools in city mode to make a tiny island of about 6x2 squares.

1.3. On the island, use the road tool to place a straight road that takes up 4 squares. Then, using the street tool (the last option), place two short streets at each end of the road.
Streets will disappear in TS2, only roads translate to roads in ts2, so why do we place them? Well, placing a street at the end of a road will get rid of the rounded end bit in TS2, which can't be used to place lots. This will be important for the placement of the lot and to make sure the edges of the lot are underwater. If this doesn't make sense yet, don't worry, it might make sense later.
1.4. Save the terrain. Don't exit SimCity 4. Copy your new/edited sc4 terrain from your SimCity 4 folder to your SC4Terrains folder in your Sims 2 documents directory. It is usually
"C:\Users\YOURUSERNAME\Documents\EA Games\The Sims 2 Ultimate Collection\SC4Terrains"

1.5. Back in SimCity 4, we're going to make a second version of this terrain. Remove the roads and streets you made before, with the bulldozer tool. With the level terrain tool in Mayor mode, carefully remove the island, so it's on the same level as the bottom of the ocean/lake. Don't change anything else. Save, exit and copy this second terrain to your Sims 2 SC4Terrains folder. Make sure you rename the file to something different from the first one, like adding "no roads" to the filename. You should have two terrains by the end of this step. One with the small island and one without it.
2. Editing the terrain in The Sims 2
2.1. Open The Sims 2 and create a new neighborhood using your new terrain. Something to keep in mind: if you want the terrain to be a subhood of another neighborhood, make it a subhood from the start. You will not be able to move the lot once it's finished, since it will be roadless. I don't recommend decorating the neighborhood for now. Leave it empty until the end of this tutorial.

2.2. Place the smallest empty lot (3x1) on the island.
2.3. In neighborhood view, open the cheat console by pressing Control + Shift + C, and type
modifyNeighborhoodTerrain on
To quote The Sims Wiki:
"This allows you to alter the neighborhood terrain by raising or lowering it. To use this cheat, be in the neighborhood view, then enter the cheat "modifyNeighborhoodTerrain on" (without the quotation marks), and click over the area you would like to change. To select a larger area, click and drag the cursor to highlight the desired area. Press [ or ] to raise or lower the terrain by one click, press \ to level the terrain, and press P to flatten terrain. When you're finished, type “modifyNeighborhoodTerrain off” in the cheat box (again, without the quotations)."
If you use an English keyboard, these instructions will probably be enough for you. If you don't, I recommend first testing the cheat, because the keys for using this cheat are different in other languages. For example, in my spanish keyboard, the question marks are used to raise and lower the terrain and the º/ª key flattens it.
Another aside: When you select an area using this cheat, a green overlay is supposed to show up. Some lighting mods make this green overlay invisible, like the one I use. If that's your case, you kind of have to eyeball it. Remember that one neighborhood grid square in TS2 is equivalent to 10 lot tiles, or the width of a road. I recommend getting a mod that allows you to tilt the neighborhood camera on the Y axis, which will allow you to have a bird eye's view of the terrain.

2.4. Flatten the terrain around the lot so it's at water level. This cheat won't allow you to edit the terrain inside the lot, so you have to edit the terrain around the lot. Make sure there is plenty of flat underwater space around the island. You should end up with something like the picture above. The water will have some holes, but don't worry, those get filled with water the next time you load the neighborhood.
2.5. Enter the lot and place any object on it. Save the lot and exit the game. This is so LotAdjuster recognizes the lot in the next step.
3. Expanding the lot with Lot Adjuster
3.1. Open Lot Adjuster and select your neighborhood and lot.

3.2. Click "Advanced…". Check "Over the road (only enlarge front yard)". Use the arrows to add 20 tiles to the front yard. Click "Finish" and "Restart".

3.3. Select the same lot again. This time, check "Add and remove roads". Uncheck the road checkbox for the front yard. Add 20 Tiles to the back yard, 20 tiles to the left side and 10 tiles to the right side. Check "Place portals manually". You should end up with a 60x60 lot, which is the biggest size. You might want a smaller lot, but unless you know what you are doing, I recommend starting with this size. You can shrink it later. The goal of making the lot this big is making sure the edges of the lot are underwater. Click "Finish" and exit.
4. Moving portals and flattening the lot

4.1. Make sure you have the portal revealer by Inge installed in your Downloads folder before the next step. Open your game and load your neighborhood. The lot should look something like the picture above.

4.2. Load the lot. Delete the object you placed before. Place the portal revealer on the lot near the mailbox/phone booth and trashcan. It looks like a yellow flamingo and you can find it in Build Mode/Doors and Windows/Multi-Story Windows catalogue. You will notice that when you select the object from the catalogue, some yellow cubes appear on the lot, and when you place the object, the cubes disappear. After placing the portal revealer, pick it up and place it again. This will make the yellow boxes visible again.
So what are those yellow boxes? They are portals. They determine where sims and cars arrive and leave the lot. The ones on both ends of the sidewalk are called pedestrian portals, and in the street, one lane has portals for service vehicles (maids, gardeners, etc.) and the opposite is for owned cars and carpools. You can see the portal's names if you pick them up. Make sure not to delete any of them.
Now, since this is going to be a roadless lot, ideally there won't be vehicles in it. This means that the lot would ideally be accessed through walking only. In community lots, this would not be an issue if you have the Bon Voyage expansion pack, which allows sims to walk to lots.
In residential lots, you might run into some problems. Service NPCs always arrive on vehicles, and unless your sim owns a vehicle, the carpool and school bus will always come to pick sims up for work/school. It might break your immersion to have a vehicle show up underwater or on a ship. There are many options to avoid this: having sims work on an owned business instead of a regular job, not having kids on the lot, making the kids homeschooled, avoiding calling service NPCs… it depends on how you want to play the lot. For example, my icebreaker is a residential lot, only adults live there, some sims live in it temporarily and none of them have a regular job.

All of this is relevant because we're going to move the portals. Where you move the portals depends on you. Think about how you're going to use the lot. In my icebreaker, I placed the car portals (which won't be used) underwater, on a corner of the lot. I placed the pedestrian portals on the ship, to pretend that the walkbys are part of the crew or passengers. But for now, just move the portals, mailbox/phone booth and trashcan to a corner of the lot. To be able to pick up the mailbox/phone booth and trashcan, use the cheat moveObjects on. Delete the street and sidewalk tiles using the floor tool (Control + click and hold left mouse button + drag).


4.3. Flatten the island with the level terrain tool. Save the lot. Almost done! Don't mind the hole in the water, this will be fixed. You will notice that in neighborhood view, the island is still there. This is because the neighborhood terrain under the lot hasn't updated. I don't know why this happens, but it does. Normally, moving the lot would fix it, but we can't move this lot using the game's tools. Instead, we are going to fix the terrain with Hood Replace. Don't exit the game yet.
5. Updating the terrain with Hood Replace
5.1. Create a new neighborhood using the new roadless terrain. Make sure it has the same type of terrain (lush, desert, etc.) as the first one. Again, name it "NO ROADS" or something similar. Exit the game.

5.2. Open HoodReplace. On the left column you will select your "NO ROADS" neighborhood. In the right column, select the neighborhood that has the underwater lot. Check these settings: Replace terrain, replace road, and versioned backups. Leave everything else unchecked. Click Copy.

5.3. Open The Sims 2 and load the neighborhood to check if the changes worked. That concludes the tutorial. At this point you can shrink the lot if you don't want it to be so big. Remember to move the portals to their final placement when you're done building the lot. Also keep in mind pedestrians (walkbys) always walk by the mailbox, so keep the mailbox accessible for sims.
If you're going to have multiple underwater lots, I recommend making them first, and decorating the neighborhood after. Doing this in an already existing neighborhood might be more difficult, mainly because, if you made any changes to the terrain using the modifyNeighborhoodTerrain cheat in the past, they might get reset when using Hood Replace.
154 notes
·
View notes
Text
✷ Tonk's Art Resources ✷
Hi! No one asked but I wanted to make a big list of art resources I use because I like to try and help people be creative! Not everything I list is free (mostly the books & some PDFs), but I’ll try my best to keep a big portion of it unpaid.
I've also made a carrd with the same links and a set of software links + prices but I'll be updating this with more things I find that I think would be helpful. :)
Drawing
GES DRAW PARTY - Timed model videos
Drawing Tutorials Online - Figure drawing tutorials (& fun SVA student sketchbook videos)
Line of Action - Timed model Photos
3 tips to improve your PEOPLE SKETCHING (fast urban sketching techniques), Sketching Scottie
Creating Backgrounds, Tim Mcburnie
Drawabox
Reference Angle
Kaycem
Colour Theory
Why Color Studies Are So Powerful, Light Ponderings
Marco Bucci
Colour Tips and Tricks, Iniro (PDF)
This post
Animation
The Animator’s Survival Kit, Richard E. Williams (book) - I think this one is a pretty obvious must-have
How to Animate Night In The Woods [Scribble Kibble #103], Crowne Prince - Helped me get a grip on After Effects
Little Miss Hellraiser Toon Boom Harmony Rig, Edu Bruks - Free Toon Boom Harmony rig
Alex Grigg // Animation for Anyone
BaM Animation
Storyboarding
Exploring Storyboarding, Wendy Tumminello (book)
Storyboarding Essentials: SCAD Creative Essentials, David Harland Rousseau & Benjamin Reid Phillips (book)
Storyboard Pro Crash Course/Tips for beginners, OhJeeToriG
A Guide To Storyboards, MagicBunnyArt (PDF)
Character Design
Character Design Crash Course - A huge free course document with assignments you can work through
Delicious in Dungeon - Fundamentals of Character Design, lines in motion
Writing
Writing for Animation, Comics, and Games, Christy Marx (book)
Screenplay: The Foundations of Screenwriting, Syd Field (book) - I have the 1987 edition
Reedsy
How to Plot a Comic From Start to Finish!, McKay & Gray
Portfolio Tips
How to make a Character Design Portfolio, Jackie Droujko
Top Tips on How to Kickstart Your Storyboard Portfolio, Brown Bag Films
25 Tips to Create an Animation Demo Reel, Sir Wade Neistadt
Extras
PuccaNoodles’ Animation/Art Resource Sheet
My Study References Pinterest board
Motivation Station - Playlist of sketchbook videos and some speedpaints that I use to motivate & inspire me
The Illustrated Freelancer’s Guide, Heather Parry & Maria Stoian (PDF) - Really useful for freelancers in the UK
Software substitution chart
Adobe Suite substitute chart
Remember to check out the carrd, it might have a more updated list!
620 notes
·
View notes
Text
Moffy's Photoshop Tutorial #1: Importing Gifs/Videos + Intro to the Animation Panel
(This tutorial assumes you know general PS things such as layers and blend modes -- but if you have questions, don't be afraid to ask)
---Importing Files---
Okay, so you want to make gifs/animations in photoshop!
First you need to know how to import your files. If you're just working with image files and then exporting as gif, you can start as normal and when ready to animate you can click window > timeline
If you want to import a gif, it's the same as any other image file.
Right Click > Open With > Photoshop (Or just choose File > Open in PS itself, and then click on the file)
(Note! If you don't see PS as an option, you may have to click "chose a default program" and then it will give a menu of programs and you can choose Photoshop from there)
If you want to import a video, from inside Photoshop click
File > Import > Video Frames to Layers
When you do this, you will be greeted with a new window

This is where you choose the section of the video to gif. Be warned, longer videos will be harder to "crop" because this window is quite small and the bar to trim your video is insufficient for longer media. If you can, use small clips that are ten minutes or less.
(Most common video files are able to be opened in PS)
Photoshop has a limit on how many frames it can import at a time, and I have found that limit is 500. At least, with my computer. (who wants to work with this many anyway??) PS may also tell you that it will take time to open the file, so be patient if you have an older computer
I also HEAVILY suggest clicking "limit to every two frames", sometimes I would go as far as every three or four frames, but this may make your final product choppy. Tumblr's size limit for gifs is a lot better than it used to be (10mb) so normally, stick to every two frames for a decent final file size. The longer the selection, the bigger the gif.
You can select whether to import into a timeline or frame animation, for beginners I always suggest frame timeline. This panel is a lot easier to learn and more forgiving. However, if you are experienced in video editing, you may prefer the video timeline.
After imported, you can change the size! 540px is the width of tumblr posts! Height usually isn't an issue for me
---The Animation Panel(s)---
Frame Timeline:

This timeline is beginner friendly, you can work very precisely, very easily. The only downside is that you need to make some edits frame by frame
At the bottom of the frame thumbnail is your delay. I recommend always using 0.08 -- this seems to be the right speed for animation and movie gifs
Make sure "Forever" is selected, of the animation will only play the selected amount of times. (meaning the gif plays once or twice then stops. This is often used in memes though, if you ever wondered)
Use the trash can to delete one frame at a time or select multiple and delete. You can move frames around in this panel, add frames or tweens. (the icons are: add tween, add frame, delete)
The four lines to the right can be used for other options such as changing to a video timeline or reversing the frames. Play around with these! (you can also switch between timelines by clicking the bottom left icon)
Things to know: ALWAYS, ALWAYS, have the first frame selected when making your layer edits IF you want the edit to effect all frames (Such as changing blend modes) Failure to do this means you have to change the blend mode for EVERY frame. and this can take forever.
Certain things will always effect every layer, such as transforming an object. Other will effect the selected frame only, like opacity! So be mindful!
Video Timeline:

This is a timeline I recommend to skilled users, so I won't go too deeply into it (the truth is I rarely use it, so I don't know all the ins and outs)
It works like a video editing software, so if you've used anything similar this will be easy for you.
Layers work just like the layers panel, You can also precisely set the crop of the animation/gif with the blue arrow.
Folders are super useful for this timeline btw!
---EXPORTING---
To export the gift, you need to click ctrl + shift + alt + s at the same time. Just more work than ctrl + s
then you will be greeted with this window, save for web

Here you can experiment with color range, gif modes, and dither. (that's what makes gifs look grainy) I normally use Selective and Diffusion. With dither set as high as possible. (the higher it is, the smoother color gradients looks) I don't have a good way to describing the different modes, so experiment and see what looks best to you!
Need a small gif size? Lower dither, but only a little at a time or the quality will go way down. You can also choose to use less colors. Less colors is great for cel shaded animation, but you'll want the most colors possible for anything realistic.
Click save and your gif is ready to uploaded!
34 notes
·
View notes
Note
hi! i was wondering if you have any advice/certain programs or anything you use for making gifs, because there’s something i really want to make but i have zero experience 💔💔
hello hello!
ah, yes, I have a TON, let's hope this ADHD girlie can give a somewhat concise description lmao. I will answer this publicly, in case it's useful for anyone else.
Software I use:
To make the screenshots: - for single scenes: KMPlayer 12.22.30 (the newer versions are trash) - for shorter videos, or something you want to get all the screenshots out of Free Video to JPG converter is awesome.
To make the gifs: - Adobe Photoshop 2021 (I don't recommend much later versions, because of the Cloud connection they have)
General gif-maker wisdom: "we spend more time on making sure that something looks serviceable, not pixelated, and good quality, than to get it moving and shit" - Confucius, probably
Useful stuff to make your life easy:
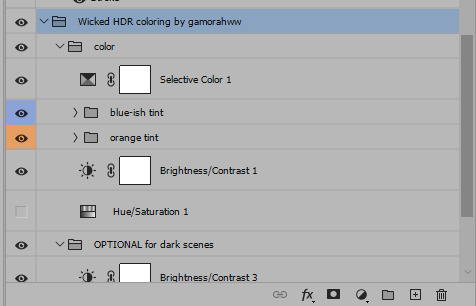
- Squishmoon's action pack for sharpening your screenshots. You can also find their detailed use explained here. - If you are planning to gif Wicked, some scenes are a bit tricky, ngl. But I have two PSDs that you can use, while you're perecting your own craft, and you can edit and update them to make them more "you".
A neutral PSD for mostly indoors and lighter scenes | download

A blue-enhancing PSD for darker scenes | download
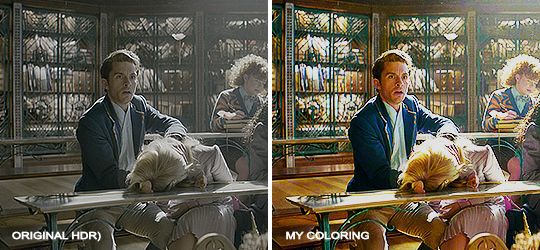
Some info on videos to use: - always, always (ALWAYS) use at least HD videos. Otherwise your gif will look like shit. This should be ideally at least 720p in resolution, but go with 1080p for the best results. Coloring gifs in 1080p is easy, but... - if you want to go pro *rolls eyes*, you could go for HDR (2160p) quality. However HDR is a mf to color properly and I would not recommend it for a beginner. When you extract frames from an HDR video, the image colors will end up being washed out and muddy so you will always have to balance those colors out for it to look decent, however, the quality and number of pixels will be larger. If you ar okay with making small/medium sized images, then stick with 1080p. (Storytime, I spent a lot of time making HDR screenshots, only for me to realize that I really hate working with them, so I'm actually considering going back to 1080p, despite that not being "industry standard" on Tumblr lmao. I'm not sure yet But they take up so much space, and if you have a laptop that is on the slower side, you will suffer.)
See the below example of the image differences, without any effects. You will probably notice, that HDR has some more juicy detail and is a LOT sharper, but well... the color is just a lot different and that's something you will have to calculate in and correct for.

The ✨Process✨
Screencaptures
I like to have all screenshots/frames ready for use. So as step one, you need to get the movie file from somewhere. This should definitely be a legal source, and nothing else (jk).
Once I have the movie. I spend a lot of time making and sorting screencaps. Since I mostly work in the Wicked fandom only atm, that means I will only need to make the frames once, and thats awesome, cause this is the most boring part.
For this, I let the Video to JPG Converter run the whole movie while I was aleep, and by morning, it created gorgeous screenshots for me and my laptop almost went up in flames.
You need to make sure you capture every single frame, so my settings looked like this:
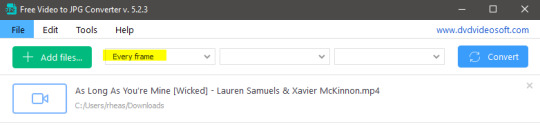
Screenshots do take up a lot of space, so unless your computer has a huge brain, I suggest storing the images in an external drive. For Wicked, the entire movie was I think around 200k frames total. I reduced that to about 120k that I will actually use.
And then I spend some time looking through them, deleting the scenes I know I won't do ever (goodbye Boq, I will never gif you, I'm so sorry :((( ) and also, I like to put them into folders by scene. My Wicked folder looks like this:

If you don't want this struggle and you only need a few specific scenes, there is this great tutorial on how to make frames from KMPlayer. Note that some of the info in this tutorial on gif quality requirements and Tumblr's max allowance of size and # of frames are outdated. You are allowed to post a gif that is a maximum of 10 Mb and 120 frames (maybe it can be even more, idk, said the expert) on Tumblr. But the process of screencapturing is accurate. Also ignore the gifmaking process in this tutorial, we have a lot easier process now as well!
Prepping the images
I have a folder called "captures", where I put all of the specific screenshots for a set I want to use. Inside this folder I paste all the shots/scenes I want to work on for my current gifset, and then I create subfolders. I name them 1, 2, 3, etc, I make one folder for each gif file I want to make. Its important that only the frames you want to be in the gif are in the folder. I usually limit the number of images to 100, I don't really like to go above it, and usually aim to go lower, 50-70 frames, but sometimes you just need the 100.
Sidetrack, but: Keep in mind that Tumblr gifs also need to be a specific width, so that they don't get resized, and blurry. (Source) Height is not that important, but witdth is VERY. But since there is a limit on Mb as well, for full width (540px) gifs you will want to go with less frames, than for smaller ones.
Once you have the frames in folders, you will open Photoshop, and go to: File > Scripts > Load files into stack.
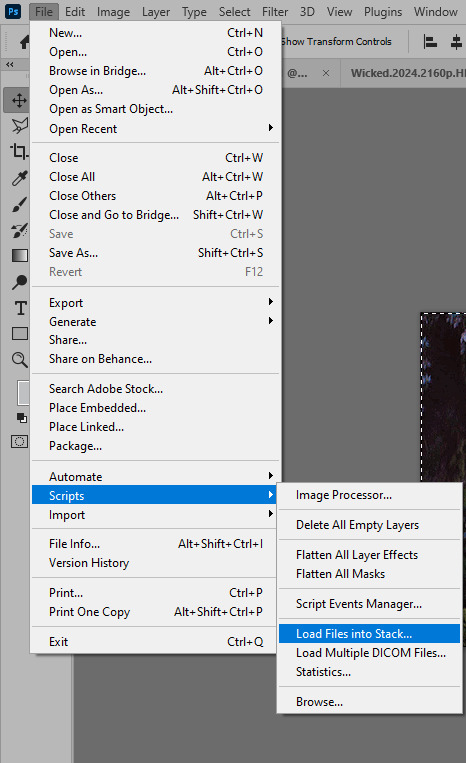
Here you select Folder from the dropdown menu, and then navigate to the folder where you put the frames for your first gif. It will take a moment to load the frames into the window you have open, but it will look like this:

You click "OK" and then it will take anther few moments for Photoshop to load all the frames into a file.
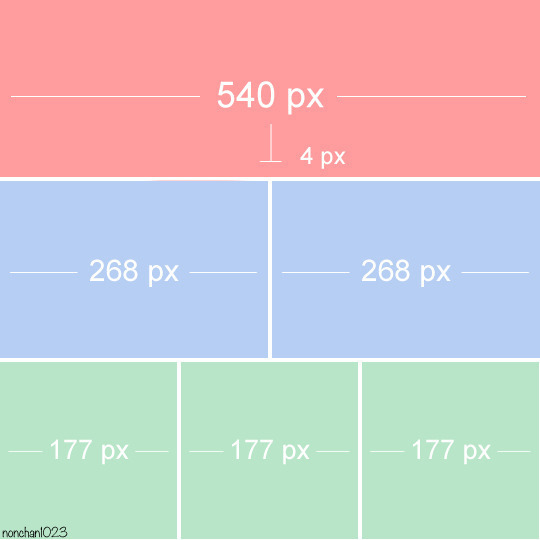
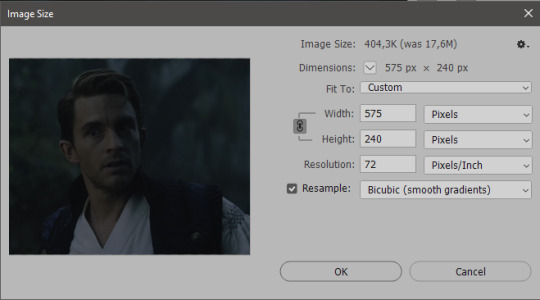
But once that's done, and you have the frames, you next have to resize the image. Go to Image > Image size... When you resize in Photoshop, and save as gif, sometimes you do end up with a light transparent border on the edge that looks bad, so, when you resize, you have to calculate in that you will be cutting off a few pixels at the end. In this example, I want to make a 268px width gif. I usually look at heights first, so lets say I want it to be a close-up, and I will cut off the sides, and it will be more square-ish. So I set height to 240px. Always double check that your width doesn1t run over your desired px numbers, but since 575 is larger than 268 (can you tell I'm awesome at math?), I should be good. I click OK.
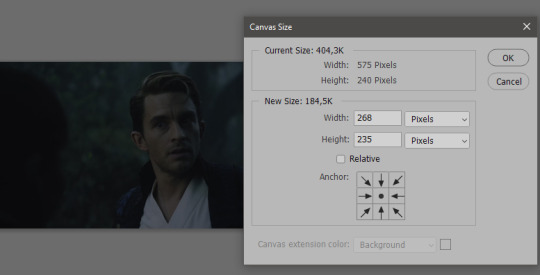
Next, you have to crop the image. Go to Image > Canvas size... At this point we can get rid of those extra pixels we wanted to drop from the bottom as well, so we will make it drop from the height and the width as well. I set the width to 268px, and the height to 235px, because I have OCD, and numbers need to end with 0 or 5, okay?
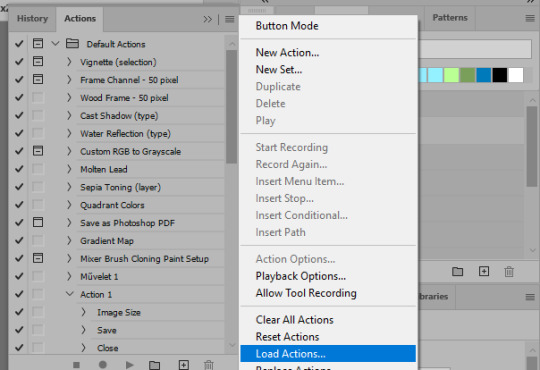
And now, the magic happens! First, go to Window > Actions to have the actions window show up. While you're at it, in the Window menu also select Timeline (this will be your animation timeline at the button) and also Layers. Once you have the Actions window showing up, on the menu in the upper right corner click the three lines menu button, and from the list select "Load Actions". I hope you downloaded the Squishmoon action pack from the start of this post, if not, do it now! So you save that file, and then after you clicked Load, you... well, load it. It will show up in your list like so:
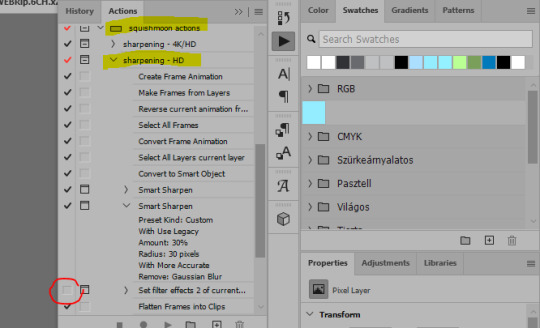
You will want to use the sharpening - HD one, BUT I personally like to go, and remove the tick from the spot I circled above, so leave that empty. This will result in the image having more contrast, which is very much needed for these darker scenes.
When you have that, you select the action itself like so, and click the play button at the bottom. The action will do everything for you, sharpen, increase contrast and also, create the gif and set the frame speed. You won't need to edit anything, just whatever window pops up, click "OK"

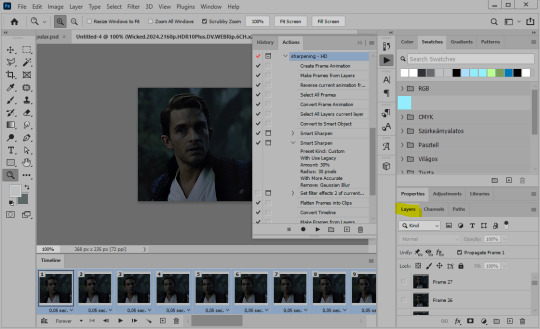
Now it should all look like something like this:
In the Layers window on the side, scroll all the way up to the top. The frame on the top is your last frame. Every effect you want to add to the gif should go to here, otherwise it won't apply to all frames. So at this point I open my PSD for darker scenes, and pull the window of it down, above the gif I'm working on like so:

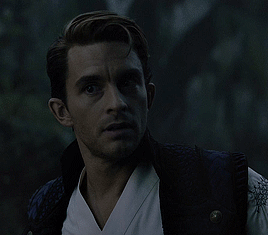
And then I grab the folder I marked with yellow, left click, hold the click down, and drag that folder over to my current gif. And bamm, it will have the nice effect I wanted! You can click the little play button at the button to see a preview.

Once you have it sorted, now its time to extract it, but first, here's our before and after view:

Now, if you are happy with this, you can just save and close.
If you want to add subtitles, you can do that as well either manually with the text tool (remember, to add as the TOP layer as we did with the coloring) or you can use a pre-set PSD for that as well, here's mine.
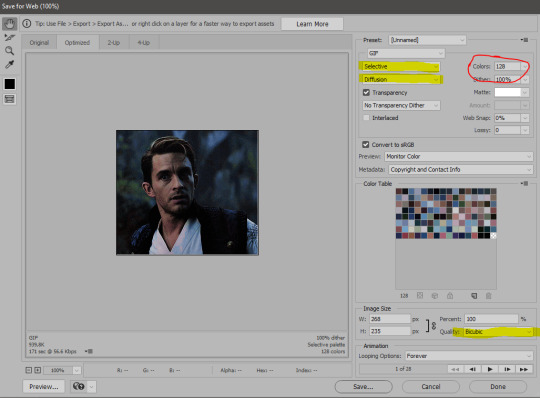
Now, we just need to export it. Go to File > Export > Save for Web (Legacy) and copy my settings here. Others may use other settings, but these are mine, so! I hope you are happy with them :3
In this case, for colors, I picked 128 colors, because on dark sscenes you can get away with using less colors, and the larger that number is, the bigger the filesize. If you use lighter images, you will need to bump that shit up to 256, but that will make your file larger. You can see at the bottom of the screen, how large your file will end up being. So long as you are under 9 Mb, you should be good :3
Conclusion
Look, Gif making and Photoshop in general is a bit scary at first. There are a lot of settings you can mess around on your own, a lot to play with, and also a lot can go wrong. This is a very basic tutorial, and also my current process and preferred coloring. However if you look at "gif psd" or "gif tutorial" or similar tags on Tumblr, you can find a LOT of great resources and steps, for many-many things. Usually people are not too antsy about sharing their methods either. You make 4-5 gifs, and you will have the steps locked down, and then it's all about experimenting.
After you have some muscle memory, your next step should be to explore what is inside a PSD coloring folder that you use. Open them up, try clicking around, click the little eye, to see what happens if they are turned off, and double click them, and play around with the sliders, to see what each does. Most people on Tumblr don't really know what each one does, we all just pressed a few buttons and got really lucky with the results, lol.
If anything is unclear, don't hesitate to ask, I'll gladly help!
Good luck <3
45 notes
·
View notes
Note
I have a question and you might’ve been asked before, but animation, do you have any tips for beginners? Love your content btw 🥰
Even tho my degree is in animation I must be honest…😬 nowadays I very often don’t have the patience for anything more complicated than animatics. So I’m trying to stick to tried and true advice lol…
Probably the biggest tip would be that, yes the beginner exercises may be boring, and not look very cool, but they are essential to getting those skills you need down. The flour sack exercise, the wave principle—doing squash and stretch, and timing studies to really nail the way that movements should “flow” properly. These are absolutely necessary skills to master if you want to make fluid animations.
Planning is also another important, but sometimes overlooked aspect of animation. Some ppl (read:me) wanna just jump straight to animating. But planning in those first simplest stages really helps save you headaches in the later stages, when things are getting more complicated and all over the place. Storyboarding helps you plot your timing, choosing where key shots will go, camera angles, pacing ect.
And speaking of camera angles. STUDY STUDY STUDY cinematography! Something doesn’t have to be animated for it to be applied to animation. Perspective is a massive beast to tackle once you start storyboarding and unless you want boring shots and stagnant compositional framing, you need to learn all the ways you can frame a scene and your characters! Idk if you’re up for watching some horror movies, but those are a great source to pull from, as they tend to always frame, pace and even light their shots in really interesting and dynamic ways!
It’s also great to practice with free programs before you spend money on things like a subscription for photoshop or any other fancy software. Most interfaces are similar enough, that beginning with something free like Rough Animator or Blender can give you some good practice before you commit!
That’s all I can think of right now! And sorry if that wasn’t exactly what you were looking for…if you want me to try to give more specific advice on something just drop me another ask—I’m willing to keep rambling on!
Lastly, just few good videos I have saved!
Good traditional habits for digital animators <- basically Toniko Pantoja’s whole channel is a goldmine of knowledge!
Drawing figures in perspective
Every Frame A Painting is also a great channel for breaking down film/composition/writing—there’s a video for virtually every aspect of cinema
-Chuck Jones -the evolution of an artist
-Akira Kurosawa- composing movement
-Satoshi Kon- editing space and time
187 notes
·
View notes
Note
Do you have a (PC) program you do text/editing on for PMVs?? I love the Viktor/Elsa one you did ToT
TYSM! I edit and composite all of my videos in Adobe After Effects and I did the text in there as well. It's not the most affordable or beginner friendly software imo but it's the only one I've ever used to so I don't have other recommendations haha
25 notes
·
View notes
Text
How to compose like Toby Fox
I analyzed Toby's music... here's the backbones to his songs, and various Toby techniques! I included ways to get started with recording your music! Read more to see 👀
Battle themes
For the music Toby uses in his battle themes, he starts with a 1-2 measure long riff. He gradually adds in more instruments, looping the original track from the intro. A simple tune you can hum to. After adding in several instruments, he adds the bridge of the song. He removes the beginning melody and lets the background music continue for a measure. Then he slows down the song and keeps one instrument. After that he adds a buildup and changes the octave, or adds harmony to the final chorus. At the very end, he adds a finale that ties the beginning to the end of the song.
Background music
For the background music during exploring, he makes the songs easily "loopable" so the beginning fades into the end. He uses orchestra sound fonts and ambient noise. During emotional short cut scenes he uses faint opera vocals as well. Don't forget the random wind whooshing sounds.
Instruments used
Undertale mostly focused on chiptune synthesizers and 8 bit sounds. Toby branched out to orchestra instruments in chapter 1 of Deltarune, and emphasized his piano skills. In chapter 2, he fell in love with the harpsichord that he'd romanced many years ago in his homestuck side gig. Thank goodness he left the weird overused synth pitch bending in his past. Good grief, that was... creative. Toby's been experimenting with brass instruments, which makes sense. Toby played trumpet in jazz band during high school. After his work on Pokémon, Toby's music has become diverse, and each song has a unique twist. Working with other artists was definitely a great step for him! Don't be afraid to reach out to other beginner musicians and collaborate!
Making music like Toby
To make music like Toby... experiment! Create a long-term relationship with the harpsichord and mash notes together until you find yourself playing them over and over, nodding your head in satisfaction. You gotta quickly record the track and tweak it later so you remember what it sounds like.
Simple ways to record music
Music professionals will K1LL me for this one. Here's some ways to begin recording music without buying that 1999$ springo bingo synth board with the doodoofart pro vst producing sound bit 2000.
Using these tips, you can record and change sound fonts! Once you record your track, you can mess around with the sound on your recording device! That's how Toby has so many instruments 👀
Look up videos on YouTube about converting music into wav and mp3 files. Toby didn't know what a wav file was when he began music production! Don't be scared of all these fancy weird words. You'll catch on! There's no shame in going on the web for help. Music production can get very complicated with random errors and shit. (I have cried over my piano before) That's what reddit is for! Frustration is inevitable. Just take a deep breath and STAY DETERMINED. Even if you can't play piano? Watch tutorials and practice! Toby is self taught and doesn't write sheet music!
If you have an electric piano keyboard, you can hook it up to a computer with a cable that's easily found on Amazon. You can also use an iPad pro, hook THAT up and record it in a program like garage band. I recommend investing in studio one 5 on your computer! If you've got studio one... get a vocaloid software bundle and mess around with piapro studio 👀 add vocals!!! There's some cheap vocaloids out there! Toby's worked with some vocaloid producers in the past! Mess around and have fun!
Get creative!
The keyboard is your playground. Toby says that simplicity is important. He mentioned this in the annotations included on the sheet music that came with the undertale collectors edition. You don't need to go overboard with advanced shit to sound professional. Some of the best songs are simple and catchy!
Toby would want you to be kind to yourself and your hands. Be patient. Music takes time! Make your own songs and follow your own path. Create your own style so when people hear your music they know it's you!
Good luck!
#toby fox#toby fox facts#indiedev#undertale#gamedev#video games#gaming#toby fox my beloved#tobyfox#tobyfoxfacts#musicindustry#music#musician#song#music tips#deltarune
128 notes
·
View notes