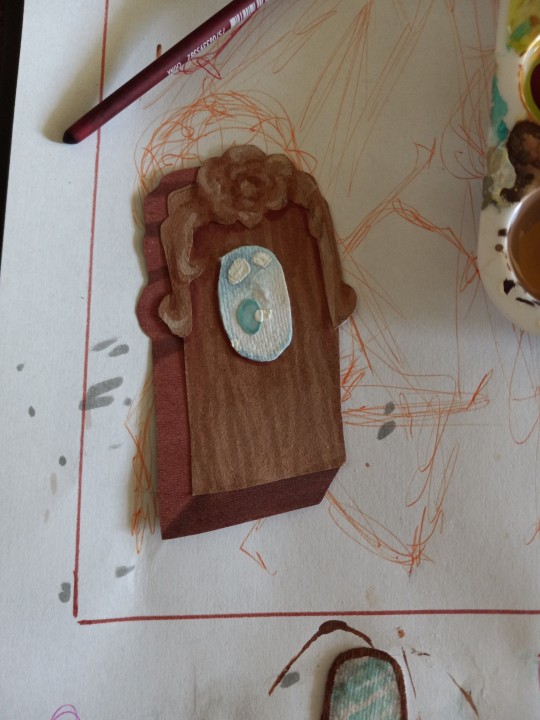
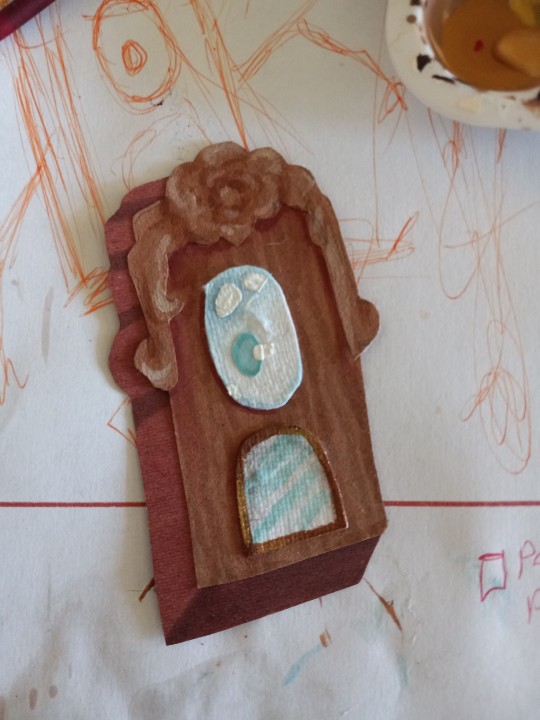
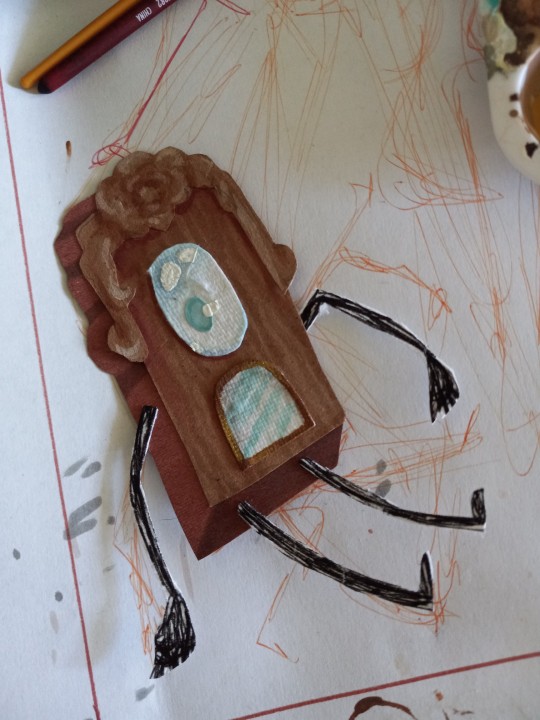
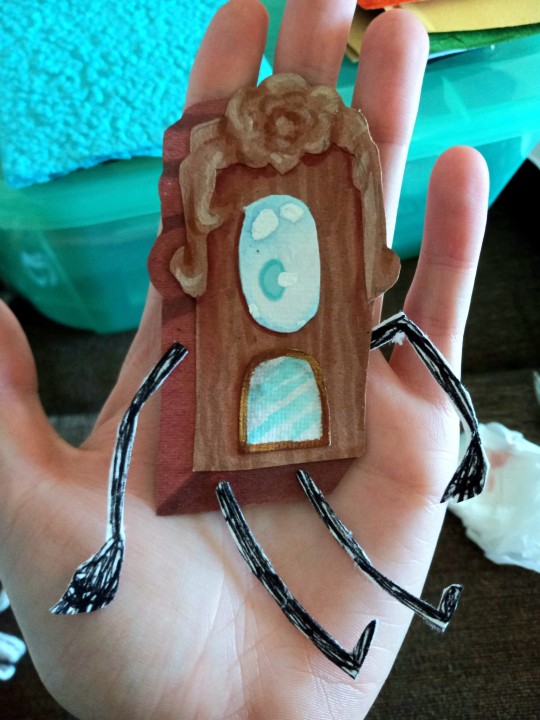
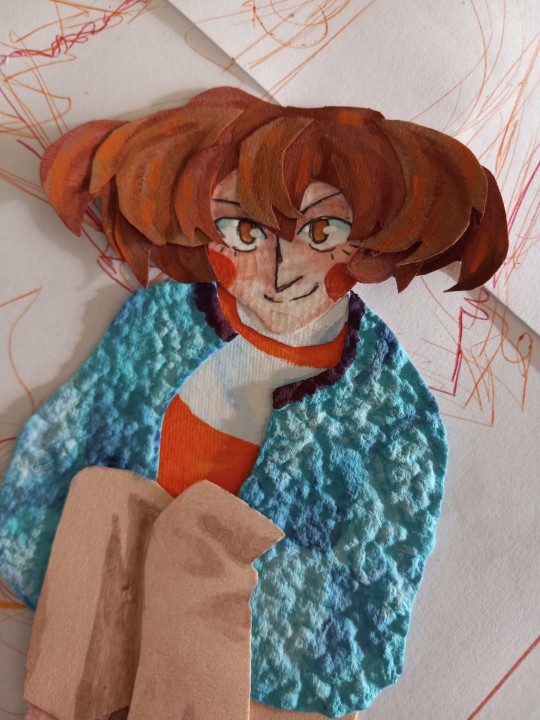
#watercolor paper cut out
Text
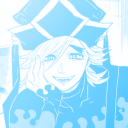
Bad Sansuary Day 22 Sunset
#bad sansuary#badsansuary#nightmare sans#dreamtale#sunset#traditional art#i used this as an excuse to make a mess#watercolor#markers#watercolor paper cut out#probably late but ehhhhhhh#i dont like it that much idk
79 notes
·
View notes
Photo
you will remember her :)
#ember mclain#danny phantom#dp#phandom#watercolor#dp fanart#phart#sketchbook stuff#mint draws#my art#artists on tumblr#illustration#it gets cut off cause i ran out of paper :/#also this is kinda old#oh well#doodles#doodle#sketchbook
145 notes
·
View notes
Note
do you ever sell your traditional art? like as originals, not as art prints
sometimes!! I used to do it a lot in my early etsy days, I'd make tiny paintings/sketches on flash cards and sell those.
Right now, I have a few watercolor paintings sitting around, and yeah I've thought abt seeing if they would sell! but the stuff in my sketchbooks usually stays there
#but like I am nothing if not easily persuaded#but no in general I feel better parting with pieces I did on A Piece of watercolor paper#or a notecard#if it's inside a notebook... something about tearing the page out or cutting it out#i dunno it don't seem quite right#it was born there...#sergle answers
34 notes
·
View notes
Text
🦇🍬Candybats🍬🦇
(Implied)
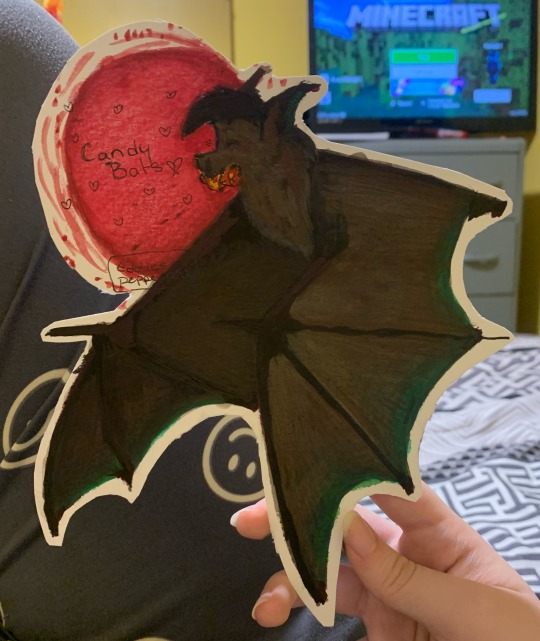
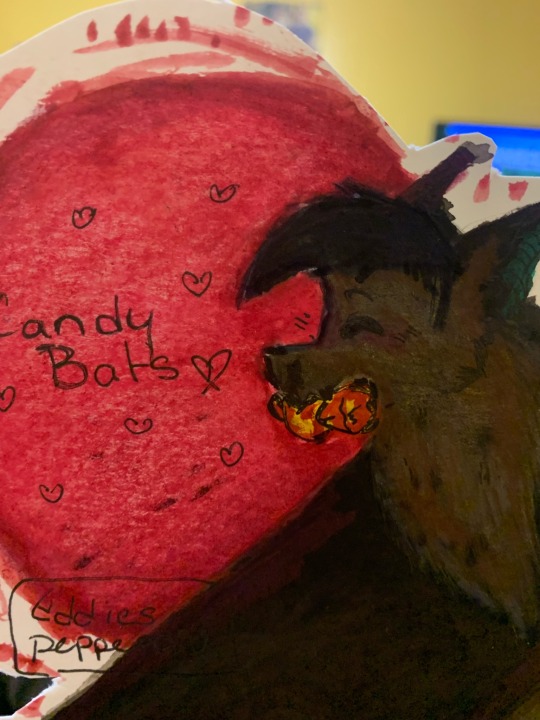
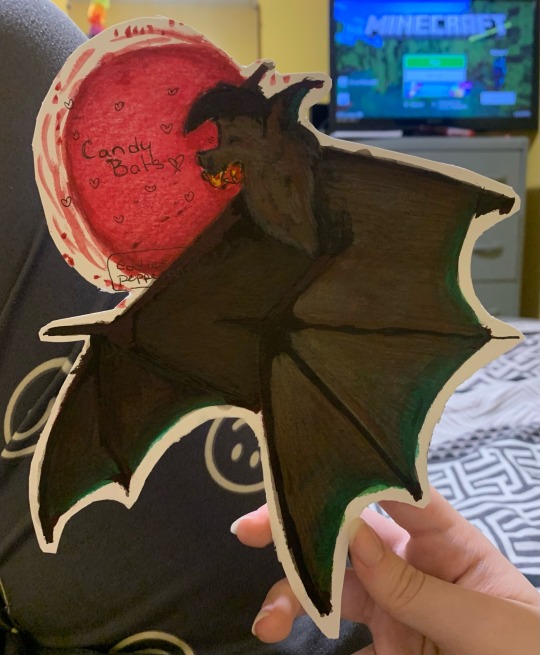
Bat Streber bat Streber bat Streber bat Streber
(I apologize if the quality is ass,, idk why people preach about iPhone cameras being good cause I got an xr and it is absolute shite)
#artists on tumblr#fanart#spooky month#spooky month streber#spooky month fanart#spooky month kevin#not really#he’s supposed to have a piece of candy in his mouth#I had to cut him out cause where I’m left handed I smudged the rest of the paper up#watercolor#watercolor gauche#coloured pencils#streber fanart#bat streber#kevin x streber#streber x kevin
53 notes
·
View notes
Text
ok i love how my prints turned out and i tried it on watercolor paper as well and it adds a nice texture if i want it
#i mostly have watercolor paper it's the only thichk paper i have#but the smoother side ks good for printing#i do have one huge sheet of paper for print making specifically#but i have no way to cut it well....#can you tell i don't think things through ahdjlj#using a sponge was pretty good for the ink application but it is much quicker to use a roll so i'll invest in one#my mom had some picture frames lying around so i can jse the glass of one to spread out the int with the roller i think#if it isn't fragile glass.....#it shouldn't be lol#anyways. making postcards will be soo much fun#and i'll get linoleum sheets bc that ks much cleaner to work with than these rubber blocks#they create soo much dust it's rly annoying#and the edges of the cuts aren't clean either#anyways. thos is really fun!#and i like that i can make one stamp and then get a picture whenever i want skhkdlj
2 notes
·
View notes
Text
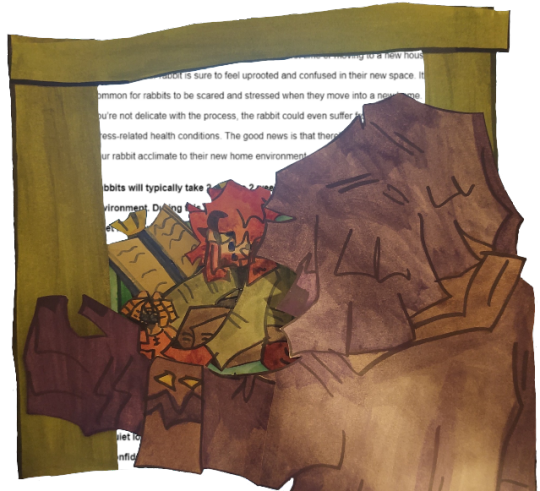
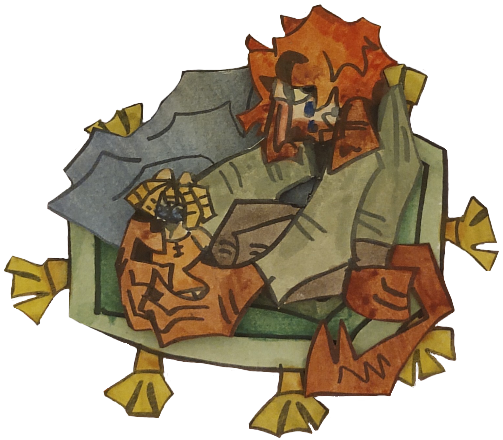
on the care and keeping of a niece
#scribbles#tangible#cassius oc#jane oc#<-- did not realize how little ive drawn him. NEED to change that#trying 2 get better at watercolors. apologies for the influx of stuff w it recently#rabbit care tips in the first image was going to be actual cut out paper but apparently our printer is fucked so lol
9 notes
·
View notes
Text
So a couple years ago I was interested in getting into bookbinding and my mom got me a book and a set of tools but I never wound up doing it but today I was overtaken by the spirit of crafts (and staying up all night) and cracked all of it open to bind a short story in a pamphlet style
#Could I have just stapled it?#Yeah I could've#But I used a bonefolder and a needle and special thread so I feel Professional#It was the simplest project in the book but I did it!#I didn't actually design the cover before doing it first tho#So I may eventually take it apart and redo it#The cover paper is watercolor paper cuz that's the only large paper I have on hand#But it worked pretty good and painting it could be cool#I have two more stories printed out#So now that I know the size to cut the paper#I could cut them and paint them before folding them up#Mypersonalthings
5 notes
·
View notes
Text

Trying out paper art idk what it's called but it's been fun trying new mediums☺
#myart#watercolor#wip#work in progress#paper art#cut outs#idk#traditionalart#oc#sophieoc#clockmanoc#still needs some work tho
2 notes
·
View notes
Text
briar valley doesn’t know what to do.
the capable, dark fae are proud creatures. they pride themselves in being ‘superior.’ able to adapt to anything anyone could throw at them…
and yet;
it’s sunny out
for the first time in thousands of years, it’s sunny out.
the citizens of briar valley didn’t know what to do with this event. was it a bad omen for the impending future? was another war going to break out? did those fae come to attack?
all wrong and pessimistic.
it was because, for the first time in thousands of years, a draconia was happy. smiling, besides himself with joy as he stared into your crinkled eyes.
eyes which he found himself searching and scanning for any signs of deceit, any signs of ill intent or mistrust.
to give him a reason to shut you out and crackle his way back into his palace. but there was none. because as the sun peeked its head from the clouds like water being dropped onto watercolor, the more your eyes seemed to shine like those very colors.
as the light touched your face your eyes seemed to glow, to sparkle, to swell with so much love and adoration he could tell that the tears sliding down your face weren’t sad ones. but happy ones.
he’s only heard of humans crying from joy. believing it to be another one of lilia’s tall tales. and yet, there you are once again smashing his expectations.
his lips felt chapped.
yet yours, looked delicious. like a freshly baked cream puff young clover would used to give you. he himself didn’t care for the lightness of the pastry, yet he’d always remember the way you lit up once you chewed the treat.
he could almost chuckle at how you ravaged it. it’s remains spilling from your lips as you chewed happily. he remembers commenting about how ‘ruthless you humans were to cute things.’ you had laughed at the comment, cutting malleus off before he could finish. yet he decided to save that second part for much later, as having you laugh was enough for him.
the cream puff felt like sand paper on his fingers compared to your lips. they almost felt like jelly when he swiped his thumb across the bottom of your lip. your eyes slowly widening as you tensed up. your eyes followed his as he sat back down on his chair.
his eyes trained on yours as he swiped his thumb across his tongue before he commented about its flavor.
yet compared to now? your lips were softer than the pillow the princess of dreams slept on. they were smoother than the finest silk, and lusher than the rose queens prized possessions.
he had to tear his eyes away from your grinning face as he stared at you as a whole. you were jumping up and down, hands intertwined with one another as he stared up at you.
there was a pit in his stomach, an ache to his limbs, especially his tail. but most notably he felt a a burning in his chest that got hotter with each new ray of sun.
———
might delete in a few hours tbh
enjoy this quick malleus scenario i wrote as i typed. NOT‼️ edited‼️ i lost my train of thought and gave up.
trying to warm up the creative juices i suppose 🤓🤷🏻🤷🏻
#i was bored#not edited#twisted wonderland#twst#twisted wonderland x reader#twst x reader#malleus draconia#twisted wonderland malleus#twst malleus#malleus x reader#malleus draconia x reader#thanks sativa
2K notes
·
View notes
Text
I painted a Doberman named Wicked in watercolors!
Want a pet portrait done? My commissions are open!
I figured out a new technique with my watercolor brushes to make more realistic short/fine hairs. I am absolutely in love with this painting, I think it may be my best so far.
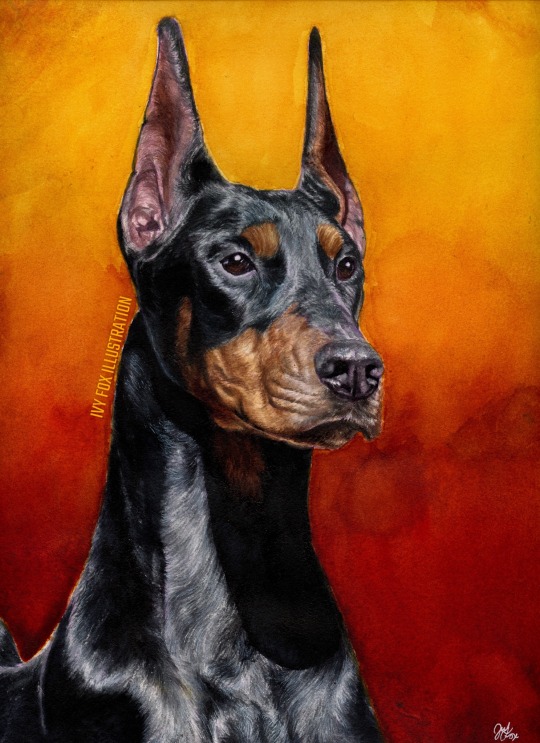
About my process:
So usually I’d use a cut up acrylic brush to get an uneven/jagged texture that creates strokes resembling when used to paint. This is great with long haired animals if they have flowing hair. With short haired dogs it doesn’t work as well because of the hundreds (thousands?) of tiny little strokes required to get the texture right. This time I used an actual watercolor brush (a smaller round brush) and would flick any excess water off so it was mostly dry (but with pigment) and splayed out kind of wildly (more or less depending on how sparse or heavy/dark I needed the hair to be in each area) I primarily used a Windsor & Newton Series-7 size 3 (finest sable). The paper is 9x12. Adjust your brush sizing accordingly. I used a white gel pen for corrections. Often it’s too bright for a particular area on a darker dog so I’ll often rub it in with my fingers to soften the contrast!
#doberman#art#dogs#pet portrait#watercolor#artists on tumblr#petblr#painting#show dog#dog show#dogsports#well bred dogs#Dobermann#art commisions#ivyfox-illustration#commissions open#animals#art tips#watercolor tips#fine art#traditional art
2K notes
·
View notes
Text
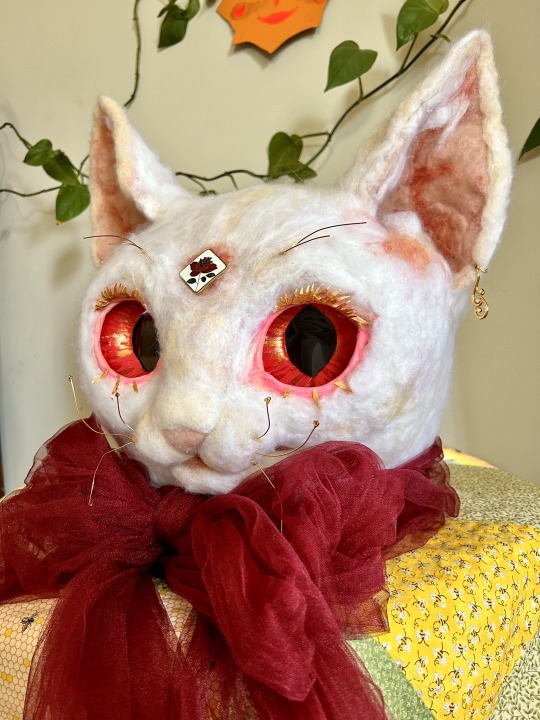
Hello! this will be a quick process post so that you can see how I needlefelted a fursuit head!

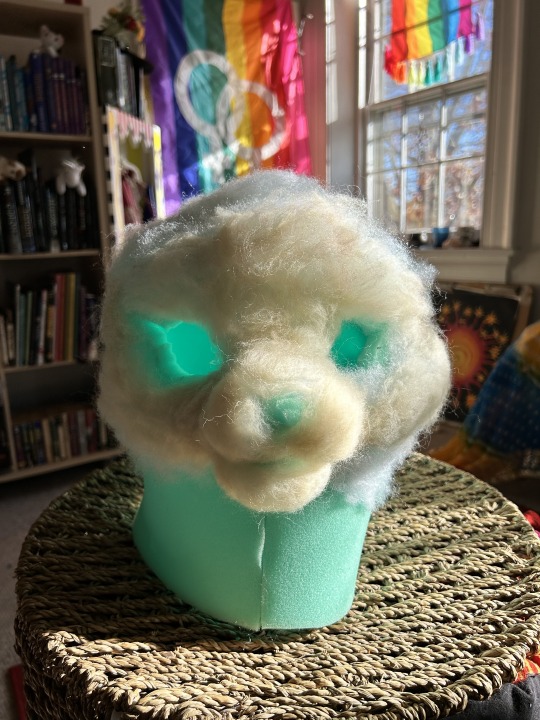
I began by following the "bucket head" tutorial by Matrices, then added a layer of polyfill so that I wouldn't use as much of my merino wool. This is how I typically make a doll head, my "core wool" is often polyfill because it really likes to clump together and fuse.
Overall, this project took about two months of my spare time. This is the first fursuit head I have made, but not my first needlefelt project.
I would really like to encourage other people to try making masks this way! You can do any kind of subtle color with wool and the wool fiber is very cheap. If you wanted to make a fursuit head with the entirety of starry night flowing over it, or a head with tons and tons of complex colors, I think wool might be the best material. I also did not need to know how to pattern or sew in order to make this-- it was sculpture rather than sewing, which I am bad at.
The rest under the cut!

Another angle where you can see that I am building up the structure of the head.
I then made the ears, which are translucent because they're felted, just like real ears!
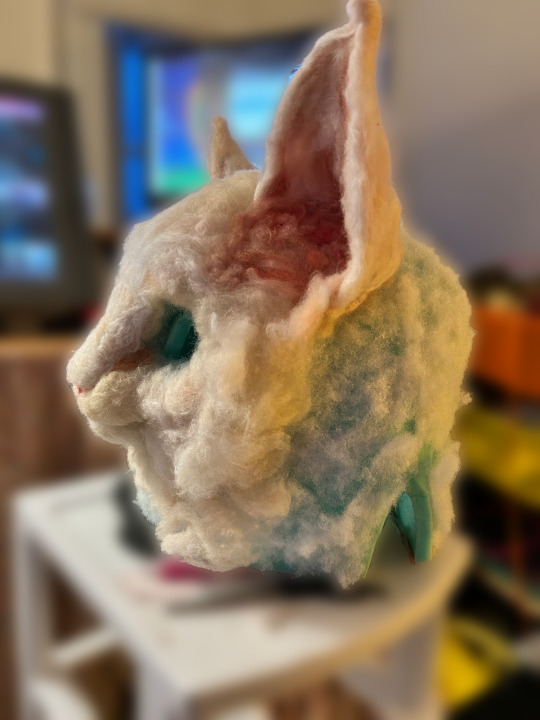

I wasn't happy yet with the proportions at this point, so I spent a lot of time figuring that out and deciding where and how I'd be placing the eyes.
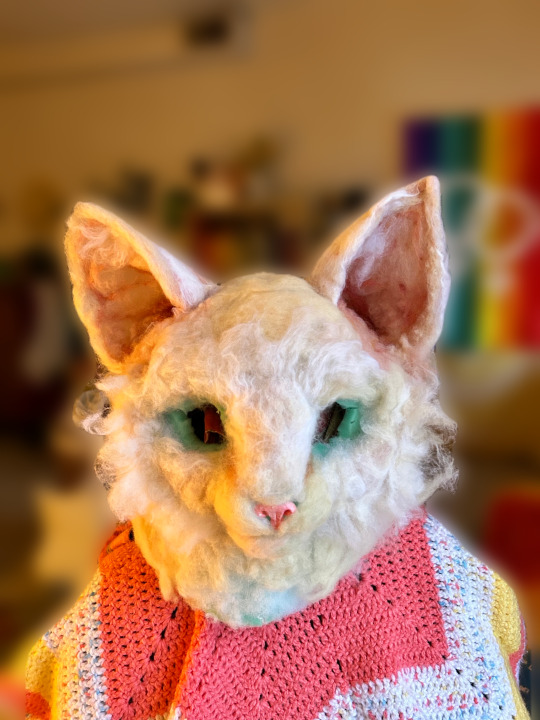
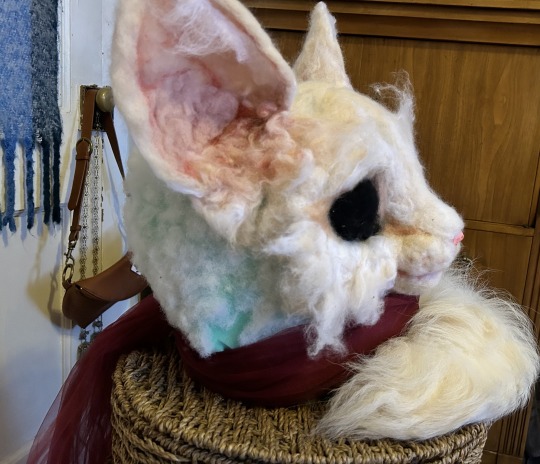
I made a pair of sculpey follow-me eyes by using a little soy sauce dish as a concave circular mold and tried a foam clay nose and teeth. The sculpey eyes could be more successful, they took a lot of shaving and adjusting to get right and they eventually cracked from the strain I'd put them through while making them more shallow. For a while, I intended to make wefts of white wool to use on the sides of the head, but I ended up preferring a domestic shorthair head shape because it reads the most clearly as a cat vs any other animal.
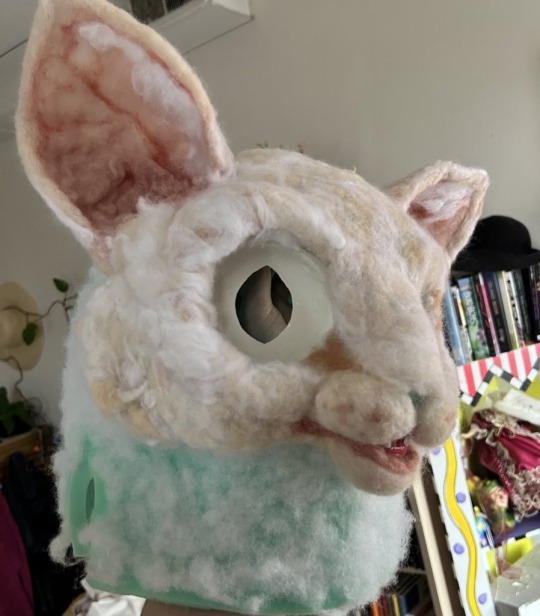
I originally intended to have the eyes behind clear plastic domes and used "shaker domes" that people use to make greeting cards to cover the eye, but in the end they made the eyes too dull. I made foam clay housing for the eyes and painted it pink with acrylic paint. I used stick-on car window tint to create the pupils. My visibility inside the head is really good!
Finally, after fiddling, one of the eyes was deeper than the other and I had to re-set both to account for it. I added spot glitter on top of the acrylic paint on the eye using some gold watercolor paint I had, which was silly because I'll need to wash the head at some point. I will probably seal the eyes before washing and hope for the best. I intend to spot clean the head until it absolutely needs to be washed, at which point I'll remove some pieces or find a way to protect them while soaking the head in a cool dr. bronner's bath.
I glued down a layer of felt fiber on top of the foam clay "tear ducts" and then felted new fiber over the tear duct skin and cheeks to blend them into the face. I also removed the teeth and closed her mouth because I didn't have time to adjust the teeth as much as I wanted before the con that my friends and I attended. I would like to modify this head so that she can open and close her mouth.
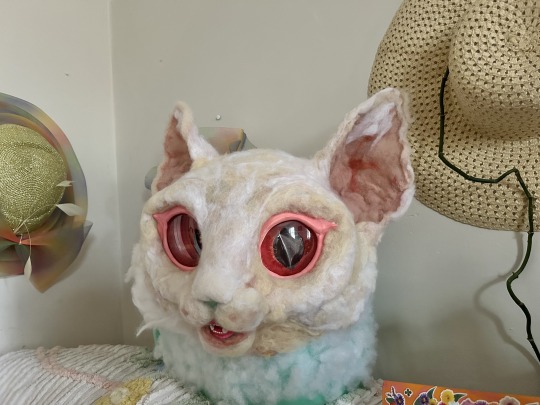
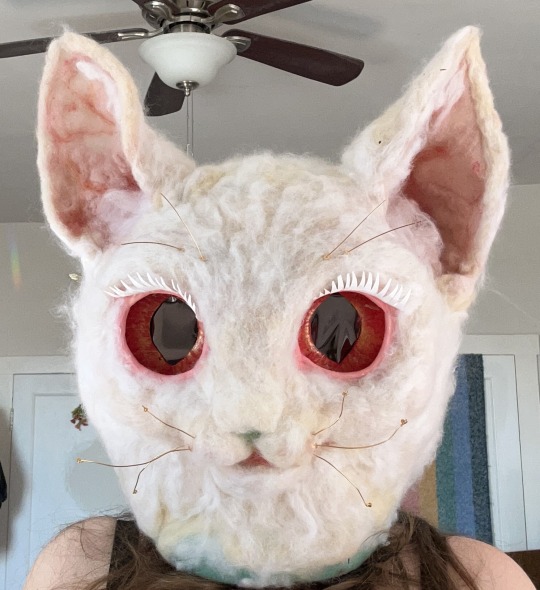
Lastly, I added wire whiskers with little glass beads looped onto the ends and paper eyelashes that I also watercolored and sealed, like the insides of the eyes. Like I said before, it's gonna be a problematic wash, but I'm confident I'll figure it out, and I can always repair her or replace her lashes if something goes wrong.
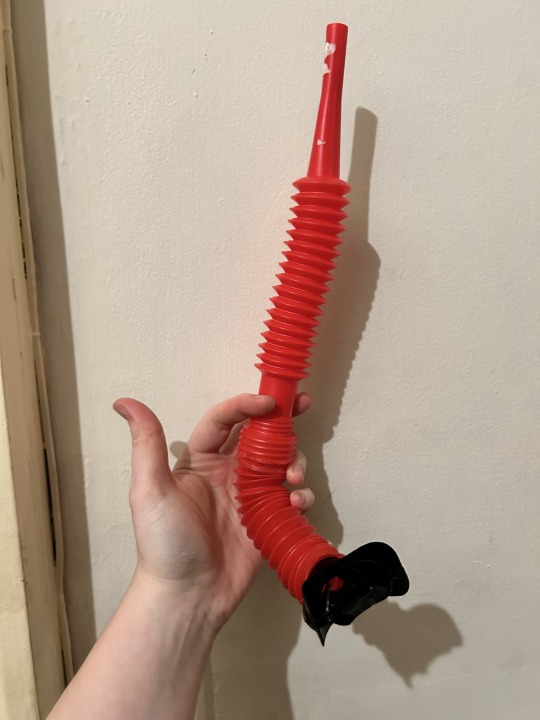
Last thing, to keep the inside of the head nice and cool and prevent fogging since in the end I closed the mouth and had sealed eyes, I made a snorkel out of a snorkel mouthpiece fitted into two collapsible auto funnels.
I would say that realistically this entire project cost me less than $150. I had some materials lying around, like the wire and the beads and the sculpey.
I added two ear vents on either side of the head so that I had options on where to feed the snorkel out. If you look at the other pictures on the blog of me wearing the head, you mostly can't even see the snorkel mouth. However, it was a little problematic to let go of the snorkel to talk. it would be perfect for a silent suiter, but I'm lucky that so many people wanted to talk to me. I'd like to try and replace the snorkel mouth with something I can talk in, but I'm not sure what to use. It should be something that can create a seal to keep my breath out of the head. it's possible that I will be able to make something with a painter's mask.
I hid the "seam" between the head and my body with two yards of tulle tied into a big bow and sewn down onto the neck so that it wouldn't move around.
I hope that if you try making something similar you'll show it to me!
317 notes
·
View notes
Text
Some horrordust, look at the lovelies leaning on each other :)
#undertale#horrordust#dust x horror#utmv#horror sans#dust sans#traditional art#that really thin paper that you can't get wet#the only colored pencils I could find#watercolor paper cut out
113 notes
·
View notes
Text
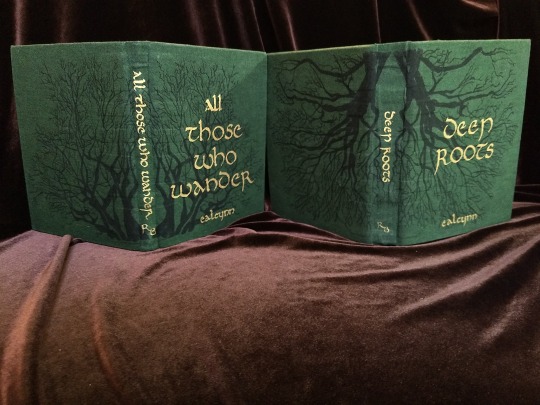


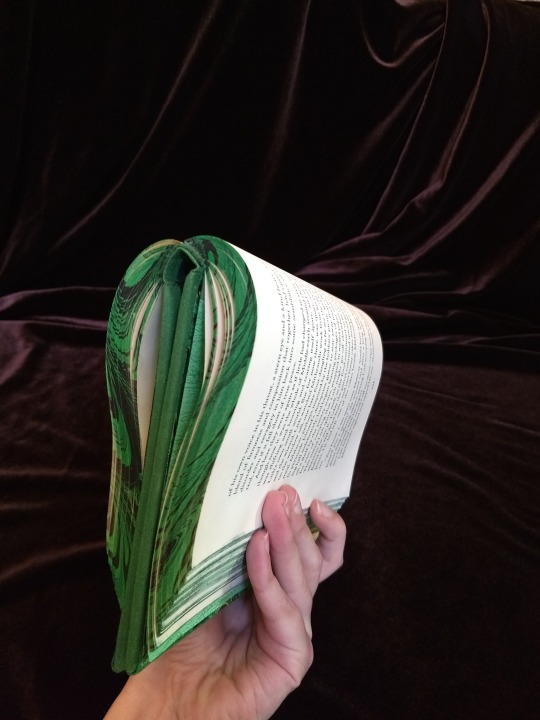
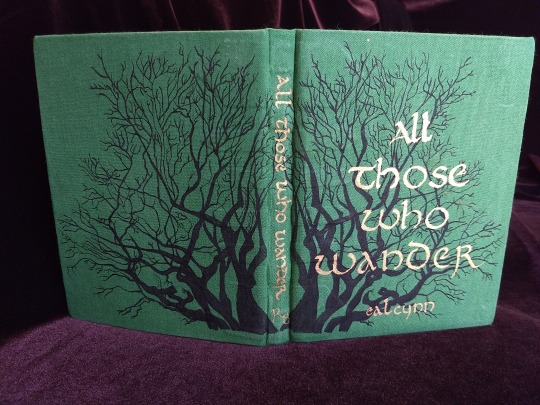
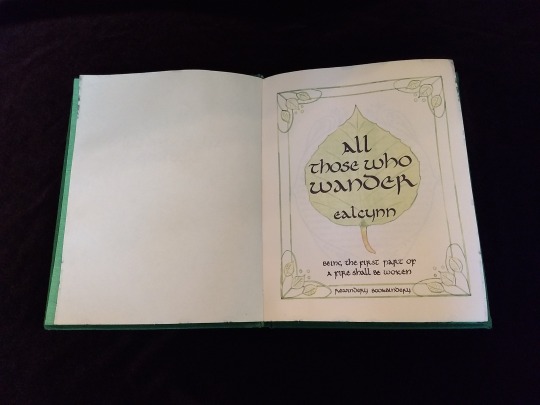
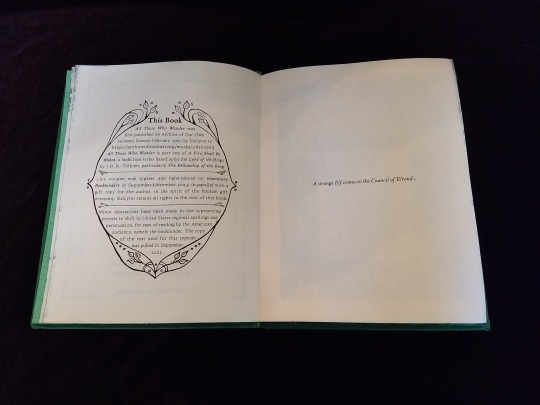

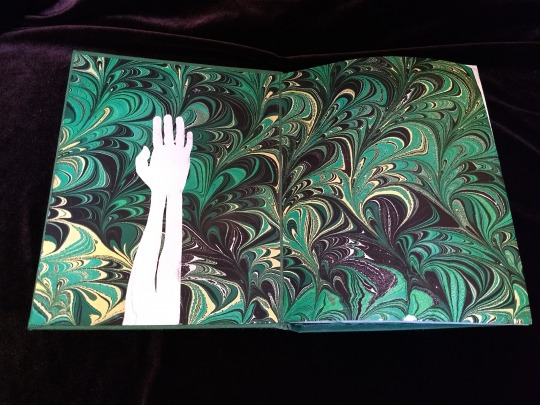
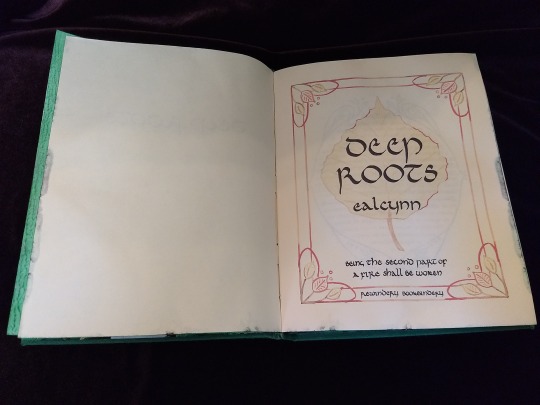
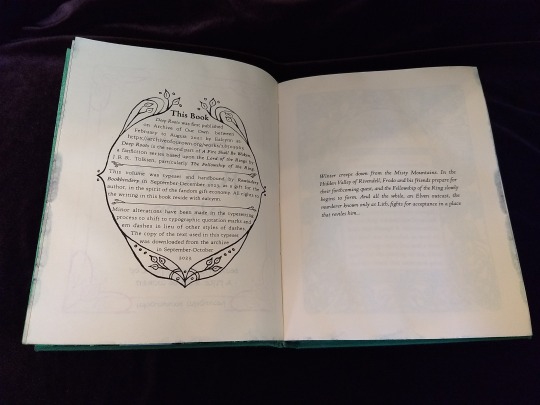


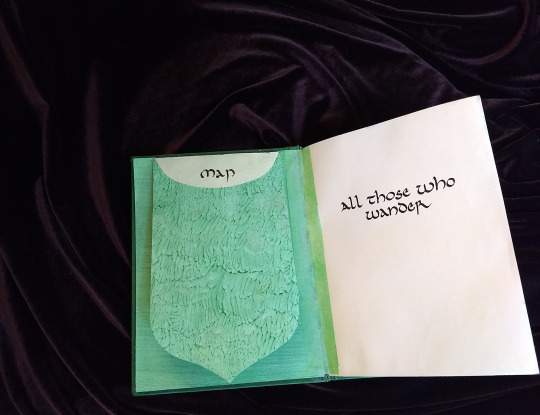

A Fire Shall Be Woken, by Ealcynn. A pair of bindings using the K118 structure, one as a gift for the author and one to keep.
Chapter page illustrations are by Alphonse Mucha, all other illustrations are hand-drawn.
I hope to make a long post later explaining the process in more depth & another to document all my mistakes, but here's the basics.
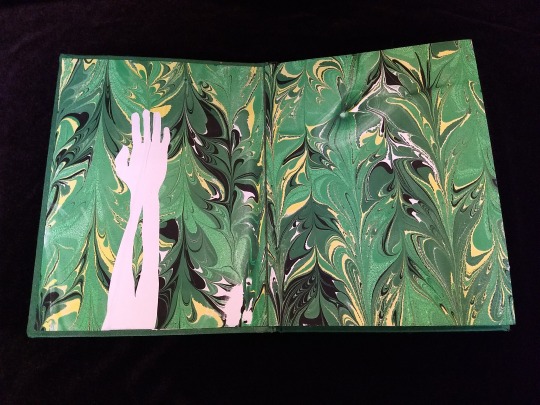
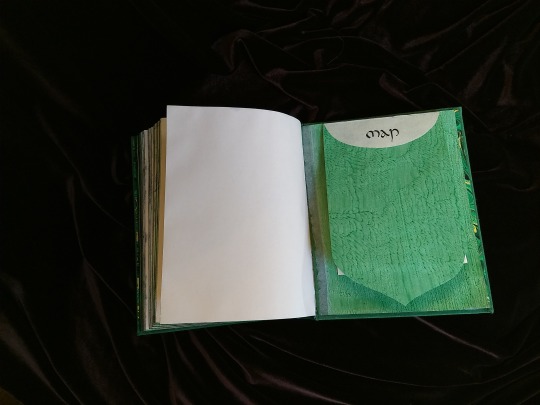
New techniques learned: Paper marbling, edge marbling, uncial calligraphy, making paste papers, drawing on bookcloth, making paste-filled cloth, fold-out maps
I began work on this project in early September and am completing the finishing touches this week.
Structures:
Binding: K118 tightback
Endpapers: Simple cloth-joined endpapers
Map fold: Turkish map fold
Materials:
Sewing supports: linen tapes
Thread: 30/3 linen thread
Spine lining: Medium weight kozo tissue bonded to linen fabric
Interior paper: Hammermill Ivory, 11x17, hand-cut to 8.5x11
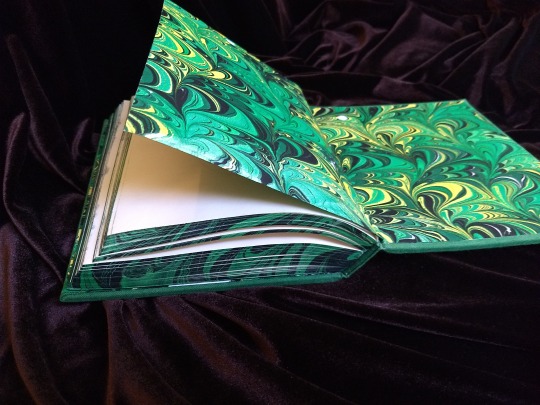
Endpapers: Blick sulphite paper hand-marbled, with masked stenciled silhouettes created with freezer paper
Adhesives: Jade PVA, wheat starch paste, wheat flour paste
Covers: Davey board, laminated full thickness to half thickness
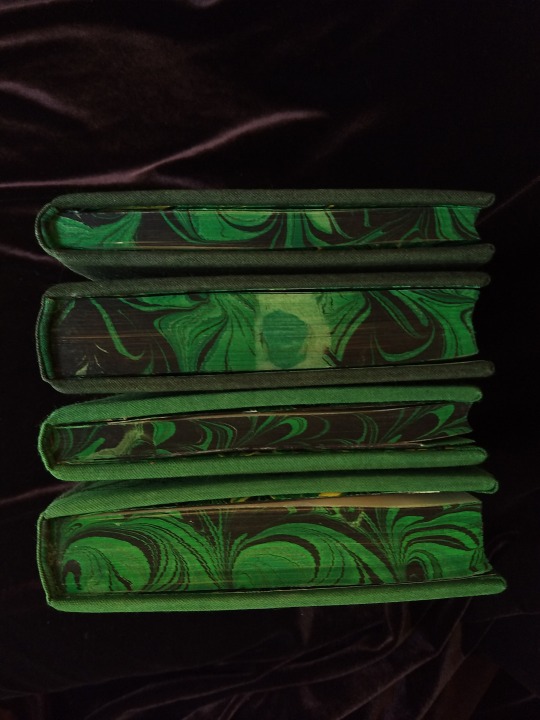
Cover fabric: Studio E shot cottons in Jungle and Emerald; filled with wheat starch paste
Cover decorations: Speedball india ink and Dr. Ph. Martin's calligraphy ink in Copperplate Gold
Inks for maps and illustrations: Speedball black india ink and a selection of watercolors thickened with gum arabic
Dip pens used for calligraphy: Combination of Brause calligraphy nibs and Leonardt tape nibs
Dip pens used for illustration: Nikko G pointed pen nib
Typesetting:
Typesetting program: Scribus 1.5.5
Body font: Coelacanth in 10 pt caption weight
Headings, titles, chapter titles, drop caps: Hand lettered uncial calligraphy, scanned
Illustrations and References:
Frames on colophon, copyright, author's notes and title page: Hand drawn, with inspiration taken from the vellucent bindings of Cedric Chivers
Frames that illustrate each chapter start: Alphonse Mucha from Cloches de Noël et de Pâques
Cover illustrations: Referenced from a photograph of an European beech tree found on iNaturalist.org
Maps of Imladris: Hand drafted with inspiration from the maps of Barbara Strachey, and Daniel Reeve
Map of Eriador: Traced from a map by Karen Wynn Fonstad, with edits made to coordinate with the geography of the fic
Frames on maps: Referenced from a drawing by Alphonse Mucha that @zhalfirin found for me
Special Thank Yous:
To the tightback council of problem-solvers in the Renegade server: Zhalfirin, Eka, @spockandawe who helped figure out many issues with the structure and technique
To the marbling experts in the Renegade server: Marissa, Aether, AGlance, Jenny, Catz, Badgertide, Rhi, and everyone else who helped me figure out beginnner marbling
To Spock for finding the K118 structure and introducing it to the server!
And to Bruce Levy, who discovered the method and shared his discoveries freely with the bookbinding and conservation world.
#bookbinding#Fanbinding#mine#bookbinding adventures#thank you to everyone i consider this a group effort#it has been 10000 years and I have loved every step#except for sanding. nasty nasty sanding. ew.#fic recs
226 notes
·
View notes
Text
How to transfer sketches to watercolor paper
Ever created a drawing you really love, then decided that you wanted to paint it in watercolor (or transfer it to another type of paper)? Or maybe you just want to avoid smudges on your good paper? Or transfer a digital sketch onto paper?
This tutorial will help!
Start with a sketch on plain cheap copy or sketch paper (print if you need to, or photocopy your original sketch if you don't want to ruin it).

Next, flip the paper over (so you're looking at the blank side) and put it on a lightbox. Don't have one? No worries! Hold it up to a window, or put it on your iPad screen at max brightness.
Now, take an (ideally HB non-mechanical) graphite pencil and scribble all over the lines shining through, until it looks like a messy copy of your original sketch.
(First image is of just the graphite back, second is of the corner flipped so you can see the original sketch too)

Now, attach it to your nice paper graphite side down. Use tape on two corners (so it stays in place, but you can peel up the other corners to check it).
Tips for easily released tape: Cut the tape to your desired length and put it on fabric, like your pants, and pull it off. Repeat a few times. The oils from your fingers plus the fibers will make it less sticky!

Now, trace the original side of your sketch with a ball point pen! You need a very sharp tip and to be able to see where you’ve drawn, so definitely use a ball point pen for this. Use firm pressure!! (Your hand will probably be sore if you do this all at once). Make sure you’re on a hard surface, too.
Tip: start in a corner you can flip to check, and make sure it's transferring properly. If not, add more/a softer graphite to the back and/or press harder.
When you're done, you'll have a light but visible pencil guide to paint right over!

Want other tips? Send in an ask or check out my tutorial tag!
#watercolor#watercolor tutorial#art tutorial#painting tutorial#traditional art#illustration#artists on tumblr#paper transfer#tutorial#art tips
343 notes
·
View notes
Text
So this project has been coming together nicely. See below the cut to see how the whole printmaking process went and hear me yak about it!
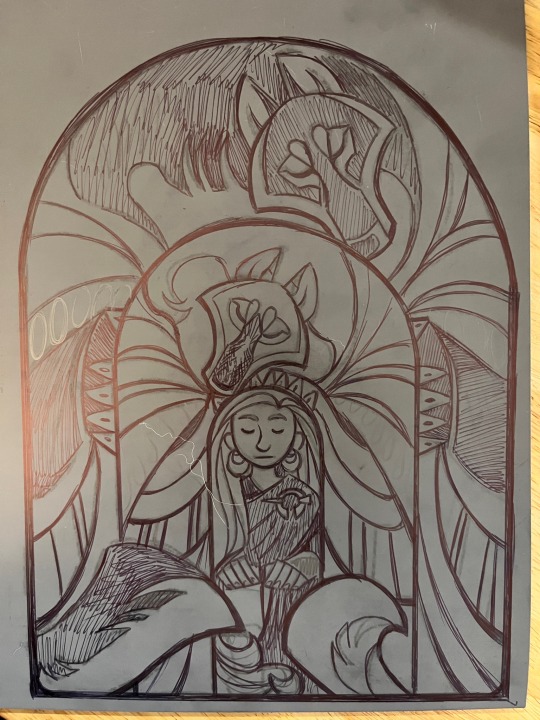


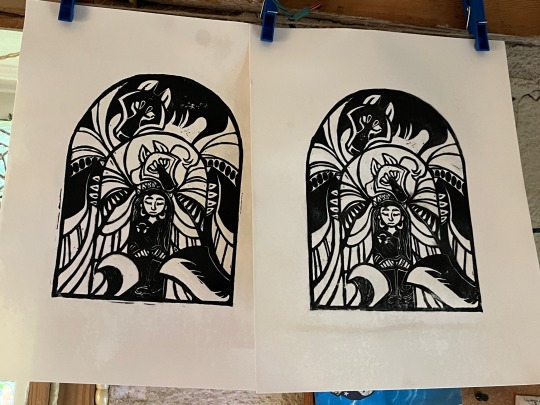
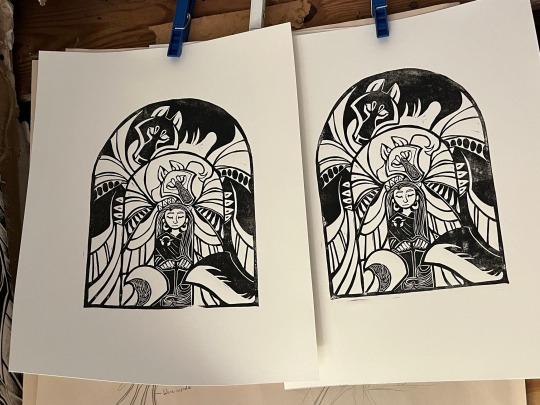
What started as a sketchbook idea was traced over, refined, flipped, transferred to some easy cut lino, carved, and then today we did some test printing! The first two are the proofs that came out first on dry paper. The second pair of proofs are on dipped paper. The third pair are on misted paper.
I used some Bristol smooth because it's what I had lying around. I've also got some sheet watercolor (Either Arches or Winsor+Newton) but I haven't tried it yet. I used Speedball fabric oil-based ink. I feel like I need to go pick a printmaker's brain because it's been a decade since I did this and I don't remember what papers we used among other things. I now also need to figure out if my blotchiness is technique, if it's paper, and whether or not I would benefit from a small lever press. These were burnished with a combination of spoon and thunder egg brayer. Yes I said thunder egg I am just that unintentionally metal. It's like a sliced open geode except it's smooth agate instead of crystals so it's shaped very perfectly for what I needed today.
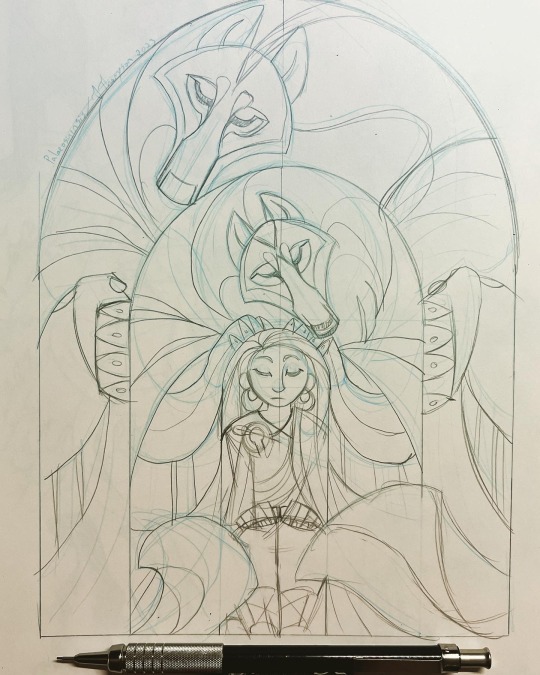
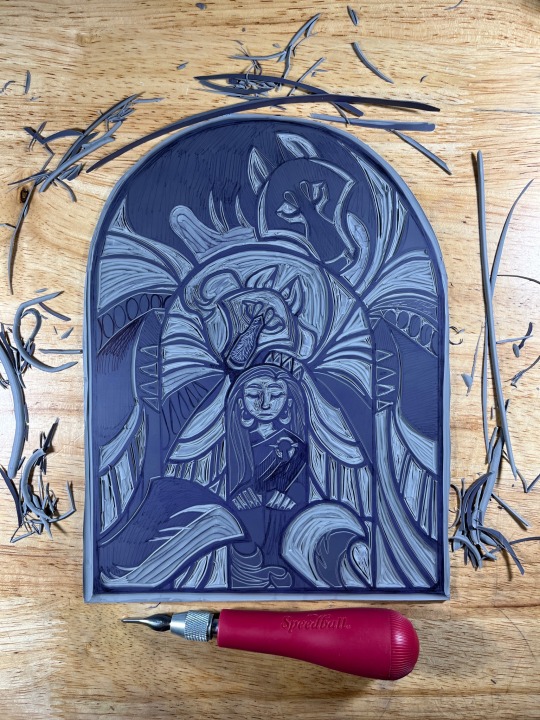
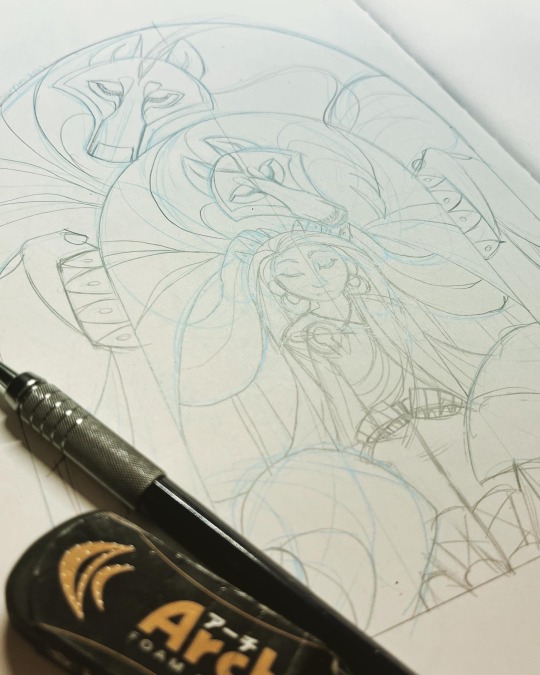
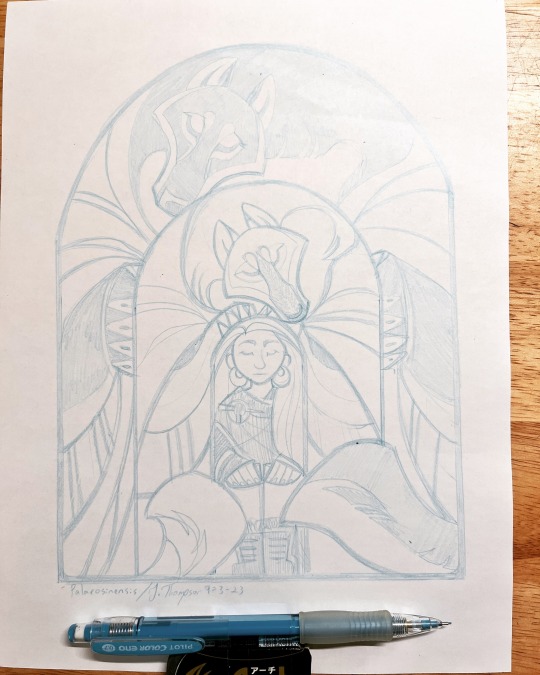
#art#drawing#pencil#sketch#linocut#lino#printmaking#print#printing#wolf#wolves#wolfwalkers#secret of kells#illustration#paleo panthera#palaeosinensis#palaeo#block printing#raised by wolves
438 notes
·
View notes
Text
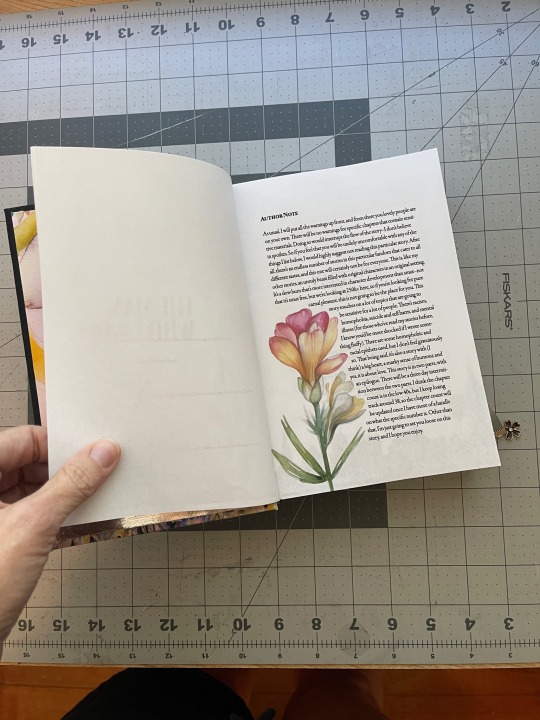
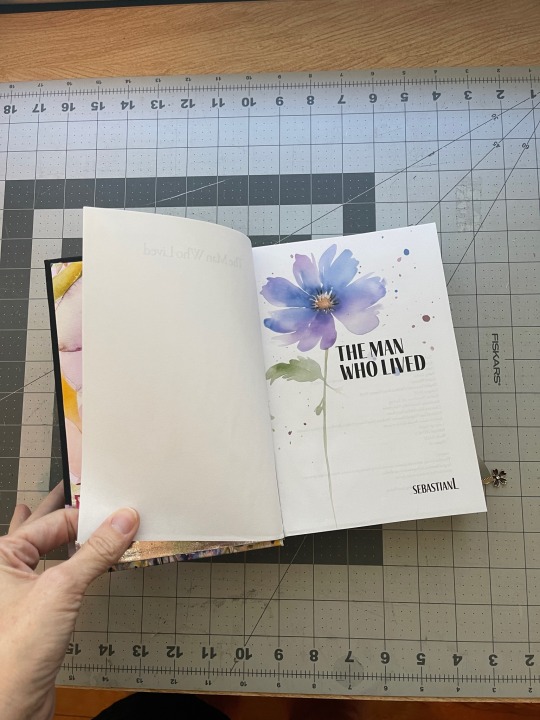
Bound: The Man Who Lived by sebastianL

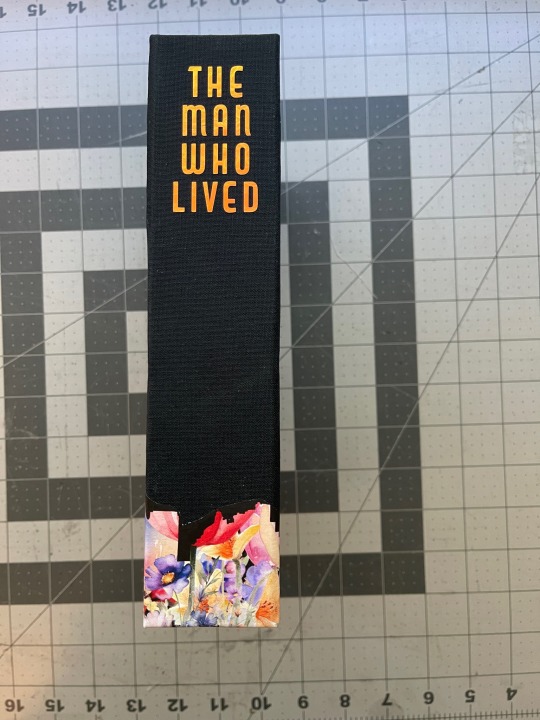
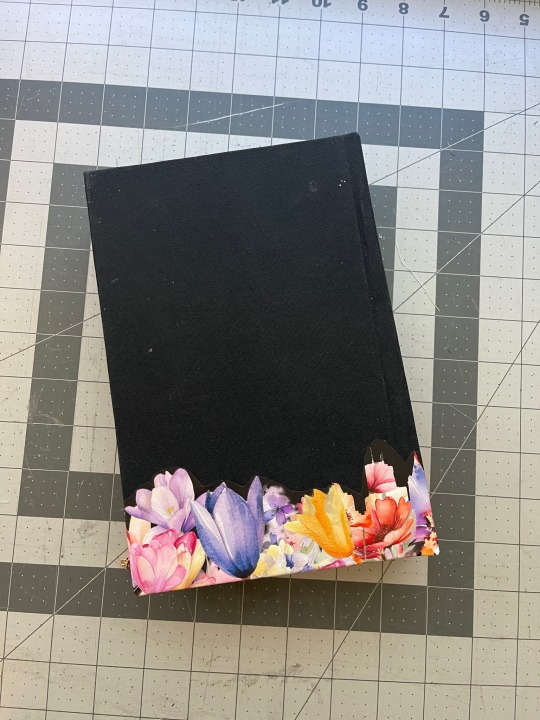

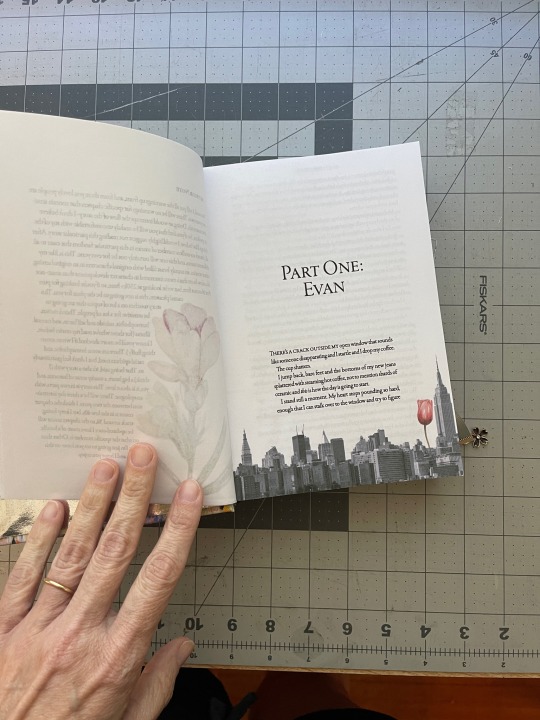


Well, this was a labor of love!
I have so much to say about this bind.
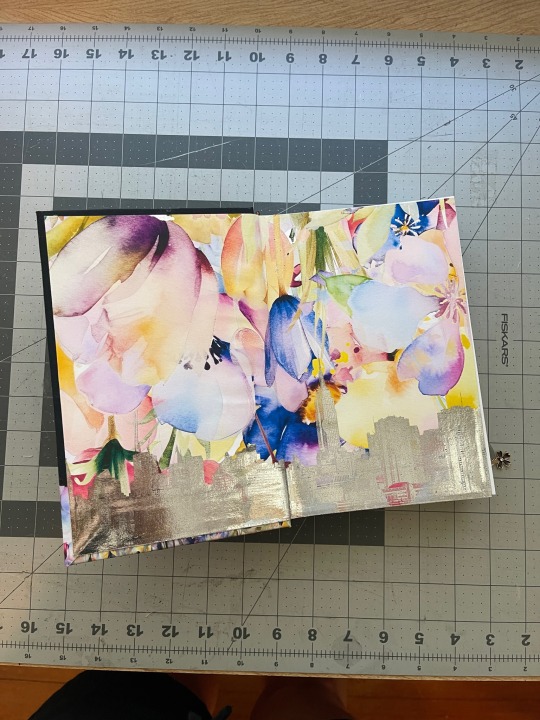
I had the idea to incorporate two themes visually in this bind - watercolor flowers (for Draco's tattoos) and New York (where he lives). I bought a set of graphics off etsy (much like I did for Grounds for Divorce and lemons) and went to town with them.
There are 42 chapters in this fic, and each chapter page has one more flower, so by the last chapter, well, there are a lot of flowers.
I wanted these pages to be more vibrant, but when I printed them, the color was bleeding through to the other side, so I had to lower the opacity on them. If this had been a shorter fic, I would have just used 26lb paper instead of 20lb, but at 685 pages, that was not an option. 😅
As it was, it baaaaarely fit under the blade of my guillotine. I definitely won't be able to trim text blocks longer than this.
The skyline was also used a lot, even though it's the Manhattan skyline and technically Draco lives in Brooklyn but let's just call it artistic license.
The end papers are a collage of the flowers, which I then printed the skyline over with my laser printer, then foiled that.
(And let me say that my insistence on printing color pages on my inkjet and b/w pages on my laser printer meant this took forever to print and resulted in many messed up pages. I should just print the whole dang thing in inkjet. But it would take 10,000 years.)
I had a really hard time coming up with a concept for the cover. Or, rather, figuring out how to execute the concept I had in mind. Finally I remembered I had some iron on printable paper, so I printed the flower design, then cut the skyline out of it. But the paper wasn't wide enough to cover the whole front and back of the book, so on the back I had it transition into just the flowers.
Overall, I'm very very happy with how this bind came out. I love it.
Body Font: Garamond Premier
Inside title page: Fino
Cover: Capitol Capitals
P.S. Draco and I have similar tattoos (watercolor flowers) so that might be why I went in this direction. Who can say?
P.S.S. Honestly, as much as I love this bind, the best way to experience this fic is via the incredible podfic (25 hours!) by @thirdeye1234.
150 notes
·
View notes
Last Seen Blogs

madridistasites
Real Madrid

fafidanab
Untitled
ffaa
afasaja

vogonsofficial
umpihangesta kasvaa vittumainen kusipää