#website setup tutorial
Explore tagged Tumblr posts
Visit Tumblr Blog
Explore Tumblr blogs with no restrictions, modern design and the best experience.
Last Seen Tumblr Blogs


Fun Fact
Tumblr has been providing a Korean-language service since 2013.
Text
How to Install WordPress for Beginners | Step-by-Step Guide
Creating a website might seem challenging, but with WordPress, it’s easier than you think. Whether you’re starting a blog, launching a business site, or setting up an online store, WordPress is the best platform to get started. This guide will show you how to install WordPress step-by-step, even if you’re a complete beginner. Why Choose WordPress? WordPress is the most popular content management…
#beginner-friendly guide#create a website#how to install WordPress#website design basics#website setup tutorial#WordPress for Beginners#WordPress installation guide#WordPress tutorial
0 notes
Text
Google Site Kit: Complete Guide to WordPress Plugin by Google
Learn everything about Google Site Kit — the official WordPress plugin by Google. Discover its features, installation steps, integrations (Analytics, Search Console, AdSense), benefits, and expert tips. Google Site Kit: The Ultimate Guide to Google’s WordPress Plugin In the fast-paced world of digital marketing and website management, data-driven decisions are key to success. To make informed…
#AdSense WordPress plugin#all-in-one WordPress plugin#free Google plugin#Google Analytics WordPress#Google metrics for WordPress#Google Optimize WordPress#Google Search Console integration#Google Site Kit#Google tools for WordPress#install Google Site Kit#PageSpeed Insights plugin#Site Kit dashboard#Site Kit setup guide#Site Kit tutorial#Tag Manager WordPress plugin#website performance tools#WordPress analytics plugin#WordPress plugin by Google#WordPress SEO tools#WordPress site speed insights
0 notes
Text
वर्डप्रेस पर वेबसाइट कैसे बनाएं: एक आसान स्टेप-बाय-स्टेप गाइड
How to Create a Website: आज के डिजिटल युग में अपनी वेबसाइट होना एक जरूरत बन गया है, चाहे आप ब्लॉग शुरू करना चाहते हों, बिजनेस को ऑनलाइन ले जाना चाहते हों या अपना पोर्टफोलियो प्रदर्शित करना चाहते हों। वर्डप्रेस एक ऐसा प्लेटफॉर्म है जो बिना कोडिंग ज्ञान के भी आपको एक शानदार वेबसाइट बनाने की सुविधा देता है। इस लेख में हम आपको बताएंगे कि वर्डप्रेस पर वेबसाइट कैसे बनाएं, वो भी आसान और व्यवस्थित तरीके…
#build a WordPress website#create WordPress website step by step#design a website on WordPress#How to create a website on WordPress#how to start a WordPress website#install WordPress website#make a website with WordPress#WordPress for beginners#WordPress site setup guide#WordPress website tutorial
0 notes
Text
⭐ So you want to learn pixel art? ⭐
🔹 Part 1 of ??? - The Basics!
Edit: Now available in Google Doc format if you don't have a Tumblr account 🥰
Hello, my name is Tofu and I'm a professional pixel artist. I have been supporting myself with freelance pixel art since 2020, when I was let go from my job during the pandemic.


My progress, from 2017 to 2024. IMO the only thing that really matters is time and effort, not some kind of natural talent for art.
This guide will not be comprehensive, as nobody should be expected to read allat. Instead I will lean heavily on my own experience, and share what worked for me, so take everything with a grain of salt. This is a guide, not a tutorial. Cheers!
🔹 Do I need money?
NO!!! Pixel art is one of the most accessible mediums out there.
I still use a mouse because I prefer it to a tablet! You won't be at any disadvantage here if you can't afford the best hardware or software.
Because our canvases are typically very small, you don't need a good PC to run a good brush engine or anything like that.
✨Did you know? One of the most skilled and beloved pixel artists uses MS PAINT! Wow!!
🔹 What software should I use?
Here are some of the most popular programs I see my friends and peers using. Stars show how much I recommend the software for beginners! ⭐
💰 Paid options:
⭐⭐⭐ Aseprite (for PC) - $19.99
This is what I and many other pixel artists use. You may find when applying to jobs that they require some knowledge of Aseprite. Since it has become so popular, companies like that you can swap raw files between artists.
Aseprite is amazingly customizable, with custom skins, scripts and extensions on Itch.io, both free and paid.
If you have ever used any art software before, it has most of the same features and should feel fairly familiar to use. It features a robust animation suite and a tilemap feature, which have saved me thousands of hours of labour in my work. The software is also being updated all the time, and the developers listen to the users. I really recommend Aseprite!
⭐ Photoshop (for PC) - Monthly $$
A decent option for those who already are used to the PS interface. Requires some setup to get it ready for pixel-perfect art, but there are plenty of tutorials for doing so.
Animation is also much more tedious on PS which you may want to consider before investing time!
⭐⭐ ProMotion NG (for PC) - $19.00
An advanced and powerful software which has many features Aseprite does not, including Colour Cycling and animated tiles.
⭐⭐⭐ Pixquare (for iOS) - $7.99 - $19.99 (30% off with code 'tofu'!!)
Probably the best app available for iPad users, in active development, with new features added all the time.

Look! My buddy Jon recommends it highly, and uses it often.
One cool thing about Pixquare is that it takes Aseprite raw files! Many of my friends use it to work on the same project, both in their office and on the go.
⭐ Procreate (for iOS) - $12.99
If you have access to Procreate already, it's a decent option to get used to doing pixel art. It does however require some setup. Artist Pixebo is famously using Procreate, and they have tutorials of their own if you want to learn.
⭐⭐ ReSprite iOS and Android. (free trial, but:) $19.99 premium or $$ monthly
ReSprite is VERY similar in terms of UI to Aseprite, so I can recommend it. They just launched their Android release!
🆓 Free options:
⭐⭐⭐ Libresprite (for PC)
Libresprite is an alternative to Aseprite. It is very, very similar, to the point where documentation for Aseprite will be helpful to Libresprite users.
⭐⭐ Pixilart (for PC and mobile)
A free in-browser app, and also a mobile app! It is tied to the website Pixilart, where artists upload and share their work. A good option for those also looking to get involved in a community.
⭐⭐ Dotpict (for mobile)
Dotpict is similar to Pixilart, with a mobile app tied to a website, but it's a Japanese service. Did you know that in Japanese, pixel art is called 'Dot Art'? Dotpict can be a great way to connect with a different community of pixel artists! They also have prompts and challenges often.
🔹 So I got my software, now what?
◽Nice! Now it's time for the basics of pixel art.
❗ WAIT ❗ Before this section, I want to add a little disclaimer. All of these rules/guidelines can be broken at will, and some 'no-nos' can look amazing when done intentionally.
The pixel-art fundamentals can be exceedingly helpful to new artists, who may feel lost or overwhelmed by choice. But if you feel they restrict you too harshly, don't force yourself! At the end of the day it's your art, and you shouldn't try to contort yourself into what people think a pixel artist 'should be'. What matters is your own artistic expression. 💕👍
◽Phew! With that out of the way...
🔸"The Rules"
There are few hard 'rules' of pixel art, mostly about scaling and exporting. Some of these things will frequently trip up newbies if they aren't aware, and are easy to overlook.
🔹Scaling method
There are a couple ways of scaling your art. The default in most art programs, and the entire internet, is Bi-linear scaling, which usually works out fine for most purposes. But as pixel artists, we need a different method.


Both are scaled up x10. See the difference?
On the left is scaled using Bilinear, and on the right is using Nearest-Neighbor. We love seeing those pixels stay crisp and clean, so we use nearest-neighbor.
(Most pixel-art programs have nearest-neighbor enabled by default! So this may not apply to you, but it's important to know.)
🔹Mixels
Mixels are when there are different (mixed) pixel sizes in the same image.

Here I have scaled up my art- the left is 200%, and the right is 150%. Yuck!
As we can see, the "pixel" sizes end up different. We generally try to scale our work by multiples of 100 - 200%, 300% etc. rather than 150%. At larger scales however, the minute differences in pixel sizes are hardly noticeable!
Mixels are also sometimes seen when an artist scales up their work, then continues drawing on it with a 1 pixel brush.

Many would say that this is not great looking! This type of pixels can be indicative of a beginner artist. But there are plenty of creative pixel artists out there who mixels intentionally, making something modern and cool.
🔹Saving Your Files
We usually save our still images as .PNGs as they don’t create any JPEG artifacts or loss of quality. It's a little hard to see here, but there are some artifacts, and it looks a little blurry. It also makes the art very hard to work with if we are importing a JPEG.

For animations .GIF is good, but be careful of the 256 colour limit. Try to avoid using too many blending mode layers or gradients when working with animations. If you aren’t careful, your animation could flash afterwards, as the .GIF tries to reduce colours wherever it can. It doesn’t look great!

Here's an old piece from 2021 where I experienced .GIF lossiness, because I used gradients and transparency, resulting in way too many colours.
🔹Pixel Art Fundamentals - Techniques and Jargon
❗❗Confused about Jaggies? Anti-Aliasing? Banding? Dithering? THIS THREAD is for you❗❗ << it's a link, click it!!
As far as I'm concerned, this is THE tutorial of all time for understanding pixel art. These are techniques created and named by the community of people who actually put the list together, some of the best pixel artists alive currently. Please read it!!
🔸How To Learn
Okay, so you have your software, and you're all ready to start. But maybe you need some more guidance? Try these tutorials and resources! It can be helpful to work along with a tutorial until you build your confidence up.
⭐⭐ Pixel Logic (A Digital Book) - $10 A very comprehensive visual guide book by a very skilled and established artist in the industry. I own a copy myself.
⭐⭐⭐ StudioMiniBoss - free A collection of visual tutorials, by the artist that worked on Celeste! When starting out, if I got stuck, I would go and scour his tutorials and see how he did it.
⭐ Lospec Tutorials - free A very large collection of various tutorials from all over the internet. There is a lot to sift through here if you have the time.
⭐⭐⭐ Cyangmou's Tutorials - free (tipping optional) Cyangmou is one of the most respected and accomplished modern pixel artists, and he has amassed a HUGE collection of free and incredibly well-educated visual tutorials. He also hosts an educational stream every week on Twitch called 'pixelart for beginners'.
⭐⭐⭐ Youtube Tutorials - free There are hundreds, if not thousands of tutorials on YouTube, but it can be tricky to find the good ones. My personal recommendations are MortMort, Brandon, and AdamCYounis- these guys really know what they're talking about!
🔸 How to choose a canvas size
When looking at pixel art turorials, we may see people suggest things like 16x16, 32x32 and 64x64. These are standard sizes for pixel art games with tiles. However, if you're just making a drawing, you don't necessarily need to use a standard canvas size like that.
What I like to think about when choosing a canvas size for my illustrations is 'what features do I think it is important to represent?' And make my canvas as small as possible, while still leaving room for my most important elements.
Imagine I have characters in a scene like this:

I made my canvas as small as possible (232 x 314), but just big enough to represent the features and have them be recognizable (it's Good Omens fanart 😤)!! If I had made it any bigger, I would be working on it for ever, due to how much more foliage I would have to render.
If you want to do an illustration and you're not sure, just start at somewhere around 100x100 - 200x200 and go from there.
It's perfectly okay to crop your canvas, or scale it up, or crunch your art down at any point if you think you need a different size. I do it all the time! It only takes a bit of cleanup to get you back to where you were.
🔸Where To Post
Outside of just regular socials, Twitter, Tumblr, Deviantart, Instagram etc, there are a few places that lean more towards pixel art that you might not have heard of.
⭐ Lospec Lospec is a low-res focused art website. Some pieces get given a 'monthly masterpiece' award. Not incredibly active, but I believe there are more features being added often.
⭐⭐ Pixilart Pixilart is a very popular pixel art community, with an app tied to it. The community tends to lean on the young side, so this is a low-pressure place to post with an relaxed vibe.
⭐⭐ Pixeljoint Pixeljoint is one of the big, old-school pixel art websites. You can only upload your art unscaled (1x) because there is a built-in zoom viewer. It has a bit of a reputation for being elitist (back in the 00s it was), but in my experience it's not like that any more. This is a fine place for a pixel artist to post if they are really interested in learning, and the history. The Hall of Fame has some of the most famous / impressive pixel art pieces that paved the way for the work we are doing today.
⭐⭐⭐ Cafe Dot Cafe Dot is my art server so I'm a little biased here. 🍵 It was created during the recent social media turbulence. We wanted a place to post art with no algorithms, and no NFT or AI chuds. We have a heavy no-self-promotion rule, and are more interested in community than skill or exclusivity. The other thing is that we have some kind of verification system- you must apply to be a Creator before you can post in the Art feed, or use voice. This helps combat the people who just want to self-promo and dip, or cause trouble, as well as weed out AI/NFT people. Until then, you are still welcome to post in any of the threads or channels. There is a lot to do in Cafe Dot. I host events weekly, so check the threads!
⭐⭐/r/pixelart The pixel art subreddit is pretty active! I've also heard some of my friends found work through posting here, so it's worth a try if you're looking. However, it is still Reddit- so if you're sensitive to rude people, or criticism you didn't ask for, you may want to avoid this one. Lol
🔸 Where To Find Work
You need money? I got you! As someone who mostly gets scouted on social media, I can share a few tips with you:
Put your email / portfolio in your bio Recruiters don't have all that much time to find artists, make it as easy as possible for someone to find your important information!
Clean up your profile If your profile feed is all full of memes, most people will just tab out rather than sift through. Doesn't apply as much to Tumblr if you have an art tag people can look at.
Post regularly, and repost Activity beats everything in the social media game. It's like rolling the dice, and the more you post the more chances you have. You have to have no shame, it's all business baby
Outside of just posting regularly and hoping people reach out to you, it can be hard to know where to look. Here are a few places you can sign up to and post around on.
/r/INAT INAT (I Need A Team) is a subreddit for finding a team to work with. You can post your portfolio here, or browse for people who need artists.
/r/GameDevClassifieds Same as above, but specifically for game-related projects.
Remote Game Jobs / Work With Indies Like Indeed but for game jobs. Browse them often, or get email notifications.
VGen VGen is a website specifically for commissions. You need a code from another verified artist before you can upgrade your account and sell, so ask around on social media or ask your friends. Once your account is upgraded, you can make a 'menu' of services people can purchase, and they send you an offer which you are able to accept, decline, or counter.
The evil websites of doom: Fiverr and Upwork I don't recommend them!! They take a big cut of your profit, and the sites are teeming with NFT and AI people hoping to make a quick buck. The site is also extremely oversaturated and competitive, resulting in a race to the bottom (the cheapest, the fastest, doing the most for the least). Imagine the kind of clients who go to these websites, looking for the cheapest option. But if you're really desperate...
🔸 Community
I do really recommend getting involved in a community. Finding like-minded friends can help you stay motivated to keep drawing. One day, those friends you met when you were just starting out may become your peers in the industry. Making friends is a game changer!
Discord servers Nowadays, the forums of old are mostly abandoned, and people split off into many different servers. Cafe Dot, Pixel Art Discord (PAD), and if you can stomach scrolling past all the AI slop, you can browse Discord servers here.
Twitch Streams Twitch has kind of a bad reputation for being home to some of the more edgy gamers online, but the pixel art community is extremely welcoming and inclusive. Some of the people I met on Twitch are my friends to this day, and we've even worked together on different projects! Browse pixel art streams here, or follow some I recommend: NickWoz, JDZombi, CupOhJoe, GrayLure, LumpyTouch, FrankiePixelShow, MortMort, Sodor, NateyCakes, NyuraKim, ShinySeabass, I could go on for ever really... There are a lot of good eggs on Pixel Art Twitch.
🔸 Other Helpful Websites
Palettes Lospec has a huge collection of user-made palettes, for any artist who has trouble choosing their colours, or just wants to try something fun. Rejected Palettes is full of palettes that didn't quite make it onto Lospec, ran by people who believe there are no bad colours.
The Spriters Resource TSR is an incredible website where users can upload spritesheets and tilesets from games. You can browse for your favourite childhood game, and see how they made it! This website has helped me so much in understanding how game assets come together in a scene.
VGMaps Similar to the above, except there are entire maps laid out how they would be played. This is incredible if you have to do level design, or for mocking up a scene for fun.
Game UI Database Not pixel-art specific, but UI is a very challenging part of graphics, so this site can be a game-changer for finding good references!
Retronator A digital newspaper for pixel-art lovers! New game releases, tutorials, and artworks!
Itch.io A website where people can upload, games, assets, tools... An amazing hub for game devs and game fans alike. A few of my favourite tools: Tiled, PICO-8, Pixel Composer, Juice FX, Magic Pencil for Aseprite
🔸 The End?
This is just part 1 for now, so please drop me a follow to see any more guides I release in the future. I plan on doing some writeups on how I choose colours, how to practise, and more!
I'm not an expert by any means, but everything I did to get to where I am is outlined in this guide. Pixel art is my passion, my job and my hobby! I want pixel art to be recognized everywhere as an art-form, a medium of its own outside of game-art or computer graphics!

This guide took me a long time, and took a lot of research and experience. Consider following me or supporting me if you are feeling generous.
And good luck to all the fledgling pixel artists, I hope you'll continue and have fun. I hope my guide helped you, and don't hesitate to send me an ask if you have any questions! 💕
My other tutorials (so far): How to draw Simple Grass for a game Hue Shifting
28K notes
·
View notes
Text
How to configure SSL for WAMP server
The WAMP server (Windows, Apache, MySQL, PHP/Python/Perl) is a software stack designed to create a local development environment on Windows. It bundles “Apache”, a web server to host websites and applications, “MySQL”: A”, a relational database management system for managing data, and “PHP/Python/Perl”, a programming languages for server-side scripting. In this short article, we shall discuss how…
#configure HTTPS for development server#configure SSL for WAMP server#enable HTTPS on WAMP server#enable SSL localhost#install SSL certificate WAMP#Microsoft Windows#secure WAMP server website#secure WAMP server with SSL#SSL#SSL 3.0#ssl certificate#SSL certificate installation WAMP server#SSL configuration tutorial WAMP#SSL Encoding Format and Extensions#SSL setup for localhost WAMP#WAMP HTTPS configuration guide#WAMP server HTTPS localhost#WAMP server secure connection#WAMP server SSL setup#Windows#Windows 10#Windows 11#Windows Server#Windows Server 2012#Windows Server 2016#Windows Server 2019#Windows Server 2022
0 notes
Text
How to Install WordPress: A Step-by-Step Tutorial for New Users

WordPress powers over 43% of all websites and is the world’s most popular content management system (CMS). But if you’re new to it, installing WordPress can feel overwhelming.
Even though WordPress is known for being user-friendly, terms like “database configuration” and “file uploads” can be confusing. This often leaves new users frustrated and unsure of where to start.
Don’t worry! In this beginner’s guide, we’ll show you exactly how to install WordPress step-by-step, using both easy auto-installers and the manual method. By the end, you’ll have your website running smoothly.......Continue
#How to Install WordPress#Install WordPress#Website Setup#WordPress for Beginners#WordPress Installation#WordPress Setup#WordPress Tutorial
1 note
·
View note
Text
youtube
Hosting Multiple Websites in GoDaddy: Addon Domain Setup and Upload Tutorial - #godaddyaddondomains by TutorialsFor #GoDaddyTutorial #AddonDomainSetup #MultipleWebsiteHosting #WebsiteUpload #GoDaddyHosting #DomainManagement #WebHostingTutorial #AddonDomainGuide #GoDaddyForBeginners #WebsiteSetup #HostingMultipleSites #GoDaddyTipsAndTricks #DomainNameSetup #WebDevelopmentTutorial #GoDaddyAddonDomain #GoDaddyAddonDomainSetupForBeginners #HostingMultipleWebsitesOnGoDaddy #GoDaddyDomainManagementTutorial #AddonDomainUploadAndSetupGuide Hosting Multiple Websites in GoDaddy: A Step-by-Step Guide Are you tired of managing multiple web hosting accounts for your various websites? Look no further! GoDaddy's addon domain feature in cPanel allows you to host multiple websites under a single account, making management a breeze. In this tutorial, we'll walk you through the process of setting up an addon domain and uploading your website in GoDaddy. The tutorial is designed for beginners and intermediate users, providing a comprehensive guide to managing multiple websites in a single GoDaddy account Step 1: Log in to Your GoDaddy Account First, log in to your GoDaddy account using your credentials. If you don't have an account, create one and purchase a hosting plan that suits your needs. Step 2: Access Your Control Panel Once logged in, access your control panel (cPanel) by clicking on the "Web Hosting" tab and then selecting "Control Panel" from the dropdown menu. Step 3: Create an Addon Domain In your cPanel, scroll down to the "Domains" section and click on "Addon Domains." Enter the domain name you want to add, select the subdomain (if desired), and set the document root (public_html/yourdomain.com). Click "Add Domain" to create the addon domain. Step 4: Upload Your Website Next, upload your website files to the document root you specified in Step 3. You can use File Manager, FTP, or SFTP to upload your files. Step 5: Set Up Domain Name Servers (DNS) Update your domain's DNS settings to point to GoDaddy's nameservers. This step varies depending on your domain registrar. Contact their support if needed. Step 6: Verify Your Addon Domain Return to your cPanel and click on "Addon Domains" again. You'll see your newly created addon domain listed. Click on the "Verify Domain" button to ensure everything is set up correctly. Conclusion Hosting multiple websites in GoDaddy using addon domains is a straightforward process. By following these steps, you can easily manage multiple websites under a single account. Take advantage of GoDaddy's addon domain feature today and streamline your web hosting management! Additional Tips - Make sure your hosting plan supports addon domains. - Use a unique document root for each addon domain. - Update your website's configuration files to reflect the new domain name. By following this tutorial, you'll be able to host multiple websites in GoDaddy with ease. If you have any questions or need further assistance, feel free to ask in the comment section! https://www.youtube.com/watch?v=aoOCO5KsBd8
#Hosting Multiple Websites in GoDaddy: Addon Domain Setup and Upload Tutorial - godaddyaddondomains#Youtube
0 notes
Text
A Beginner's Guide: How to Publish Your Website on GoDaddy in Simple Steps
Embarking on the journey to publish your website is an exciting step toward establishing your online presence. In this guide, we’ll walk you through the straightforward steps to publish your website using the popular web hosting platform, GoDaddy. Whether you’re a business owner, blogger, or an aspiring online entrepreneur, this step-by-step tutorial will demystify the process. Step 1: Choose…

View On WordPress
#Content Creation#GoDaddy Hosting#GoDaddy Tutorial#Web development#Web Hosting#Website Publishing#Website Setup#WordPress on GoDaddy
0 notes
Text
youtube
#shopify tutorial#shopify custom app development#shopify app development node js#shopify app#shopify ecommerce website#shopify store setup#shopify custom theme development#Youtube
0 notes
Text
Google News Publisher आपकी Website को बार-बार कर रहा reject? तो इस तरह पाएं 100% approval
Google News Publisher Center विश्वसनीय खबरों को प्राप्त करने के लिए दुनिया का सबसे बड़ा श्रोत है। गूगल न्यूज़ पर खबर पढ़ने के लिए पाठकों की संख्या दूसरे श्रोतों से कहीं ज़्यादा है। यही वजह है कि सभी प्रकाशक अपनी Website को Google News पर रजिस्टर करना चाहते हैं। लेकिन दुर्भाग्यवश 100 में से केवल 2 प्रकाशक को ही सफलता मिल पाती है। 100 में से करीब 98 वेबसाइट गूगल न्यूज़ प्लेटफॉर्म पर रजिस्टर या पब्लिश के…

View On WordPress
#Google News Approval Tips#Google News Approval Tips Hindi#Google News Approval Tutorial#Google News Hindi#Google News Publisher Settings#Google News Publisher Setup#Google News website approval
0 notes
Text
Luo Binghe Shimeji (Extended Version!)


a couple years ago, riladoo created an adorable binghe shime! he could be picked up and tossed around your computer screens, climb around on all your windows, multiply, and all the other cute things that come in the standard base shimeji set.
more recently, i reached out to riladoo with a commission request - more action sets for binghe! over the past couple months, riladoo has worked hard to make some adorable binghe art, and i've updated all the source code and config files to accommodate the new actions! 🎉
the extended action set includes: - a 'sit and eat' idle action - two 'head patting' actions when the mouse hovers over him - a 'fall and cry' action for when he falls from tall heights - a 'land nicely' action for when you place him down gently
the original binghe shime listing on riladoo's gumroad has been updated to have all these new actions, so go grab him now!! he's free / pay what you want! 🥰
i've put more details about the new action sets + general shimeji setup tips below the cut, but otherwise -- LET THE BINGHE COMPUTER INFECTION COMMENCE !!
**these extended actions only work on windows, not mac. sorry ;w; the original shime set has a mac version, though!
Extended Action Set Details
when you download the files from riladoo, you're looking for the .zip file labeled "Updated Shime code" !

sit and eat this is an idle action that will trigger randomly the same as any other idle action. if you want to trigger it manually, you can right click the shime -> 'set behavior' -> 'sit and eat'
head pats these are 'stay' actions that will trigger automatically when you hover your mouse over the shime. i recommend hovering your mouse over his head for maximum head-pat-effectiveness! unfortunately, this action won't play if the shime is actively climbing a wall/ceiling - maybe in the future this can be extended further, but for now there are only head patting actions for sitting and standing poses :>
falling variations (crying / default / land nicely) there are now a total of 3 'falling' actions. to see the 'fall and cry' action, allow binghe to fall from the top half of your monitor. to see the standard/original 'fall and trip' action, allow binghe to fall from the low-mid range portion of your monitor. to see the 'land nicely' action, gently place binghe down at the bottom of your monitor. this means you're rewarded for catching binghe when he falls off a window - if you catch him and set him down, he lands nicely, but if you let him fall normally, he'll start crying!! 🥰
Shimeji Installation Tips
if you've never had a shimeji before - don't worry, they're super easy to install! i recommend following this video tutorial created by the person who originally created the source code for shimeji. you can skip the parts about downloading the shimeji itself - you'll get that from riladoo's website :>
if you install everything but opening the shimeji executable does nothing, download jarfix to resolve this issue.
if you follow the tutorial and update the 'interactive windows' but the shime still doesn't stand/climb on the specified windows, restart your computer to resolve this issue. alternatively, make sure you don't have any 'unexpected' monitors plugged in - a friend of mine had their shime constantly falling down through their monitor onto their screen drawpad, which was confusing until it got figured out!
if you are on mac instead of windows.... i am so sorry i actually have no idea how to help 🙇♂️ the original/default binghe shimeji set DOES have a mac os folder in with the downloads, but i've never tested it (don't use mac), and even if it works, it won't include the extended actions (i didn't build an executable for mac with the new code).
More Questions???
feel free to hit me up! in the replies of this post / through DMs / send an ask - whatever is best for you. i'll tag any asks i get about the shime with #binghe shime chronicles so they get archived nicely. i got very familiar with all the source code / config files to get this lil guy set up with his extended actions, so hopefully i can answer any questions you have! 💪😤
that's all!! i am so happy w how the new actions turned out - the art riladoo did for them is SO cute! - and i hope y'all will be, too!
531 notes
·
View notes
Text
Not-a-tutorial - Lighting (Advanced)
Previous parts:
Not-a-Tutorial - Lighting (Basics)
Not-a-Tutorial - Lighting (Basics - Indoor)
Intention:
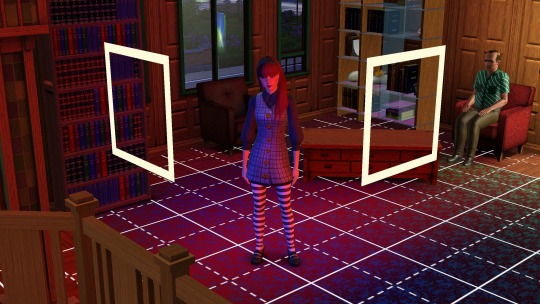
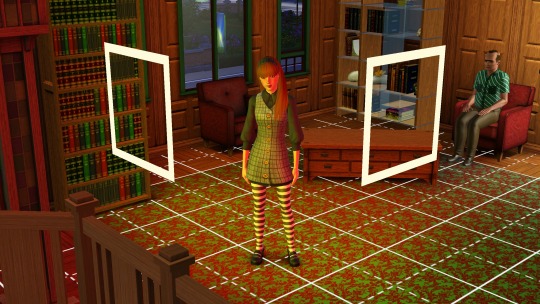
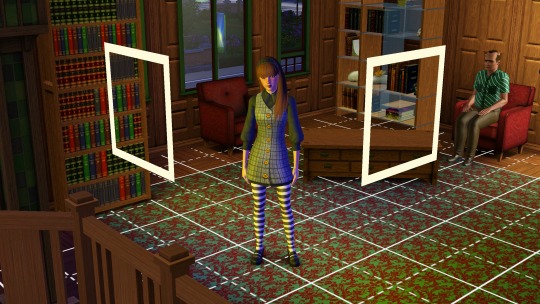
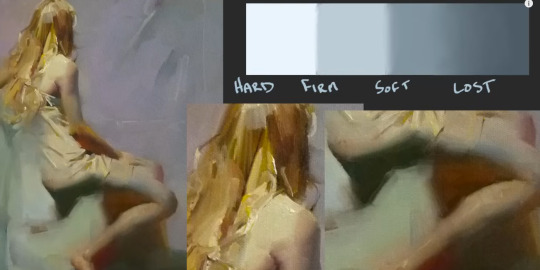
While dialogues and body language can say a whole lot on what you're trying to tell to the reader, lights can as well! Here's a great example:
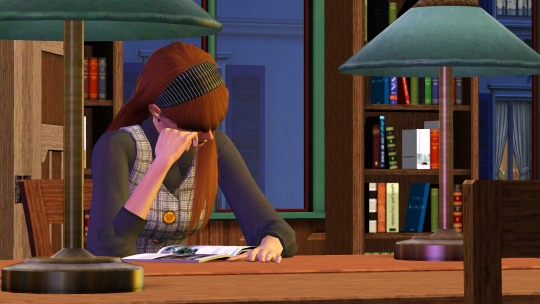
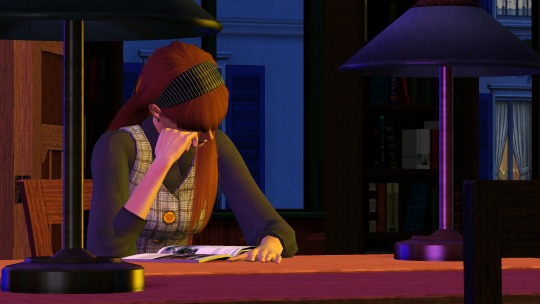
(Left is with the lights on, right is with the lights off).
As you can see, the left one feels much more like it's... let's say, a winter-y 6pm, and she's studying in the library...
Whereas on the right, it feels much more like she's skipping on sleep, and it's 3am, studying.
Moods:
You can also use lighting for more tenser scenes! Here are a few examples from my story:
Here the setup was the same, but I added softer rose/red pastel-y colours... (Though this scene did have like 6 lights :p)

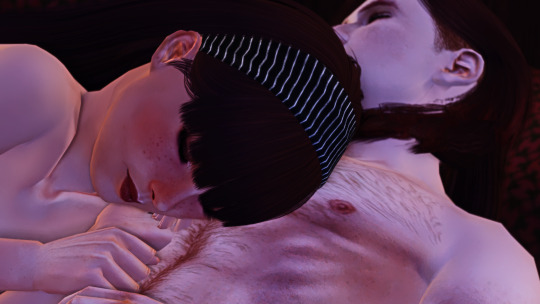
Here I not only used a blue backlight for giving it a “night” feeling, but I also added an orange and white front-light to represent a sense of hope and that our poor Ethan isn't alone.
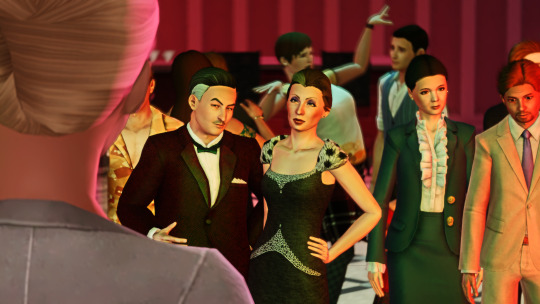
Here I gave Vita and Nick Alto a yellow, green and red lighting setup, to represent more jealous and angry colours for Nancy. As Nancy is staring at them.
However, the pink represents not only the stage light, but also a sense of Innocence given her background of not understanding the entrepreneur game.
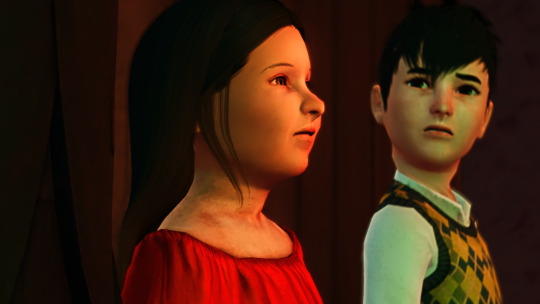
Here I gave little Bella a red background and light foreground, keeping the left part of her face dark, as the speech is about the future of the town. And with the light, she represents a bright but unclear future.
Note: all of these images do use Reshade, so trying to get these results without it may look a bit different!
Seasons:
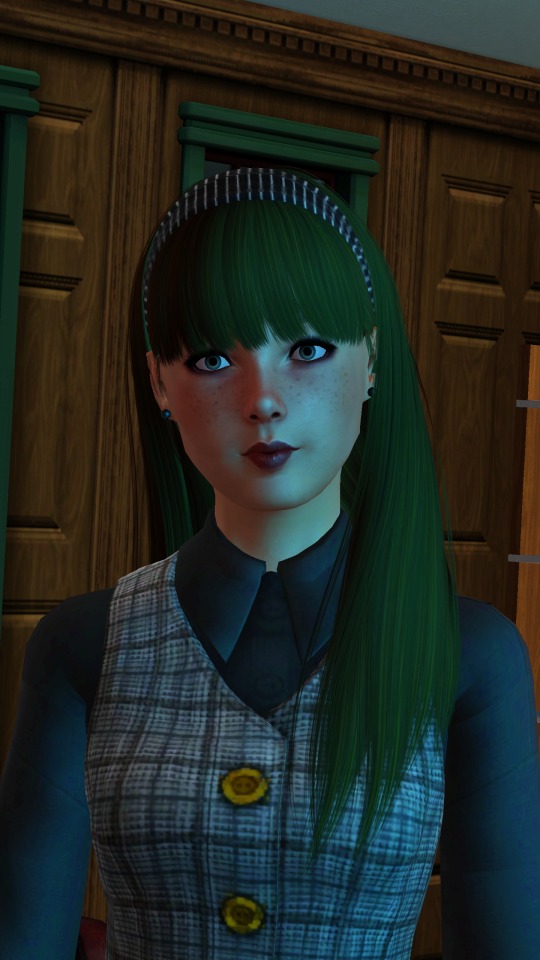
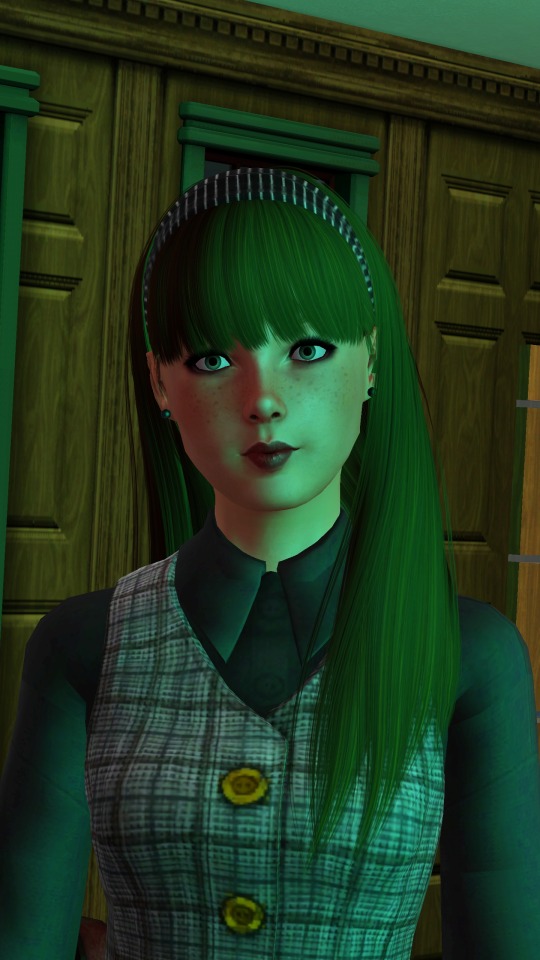
Representing the colours associated with the seasons can give a scene a really cool feeling!
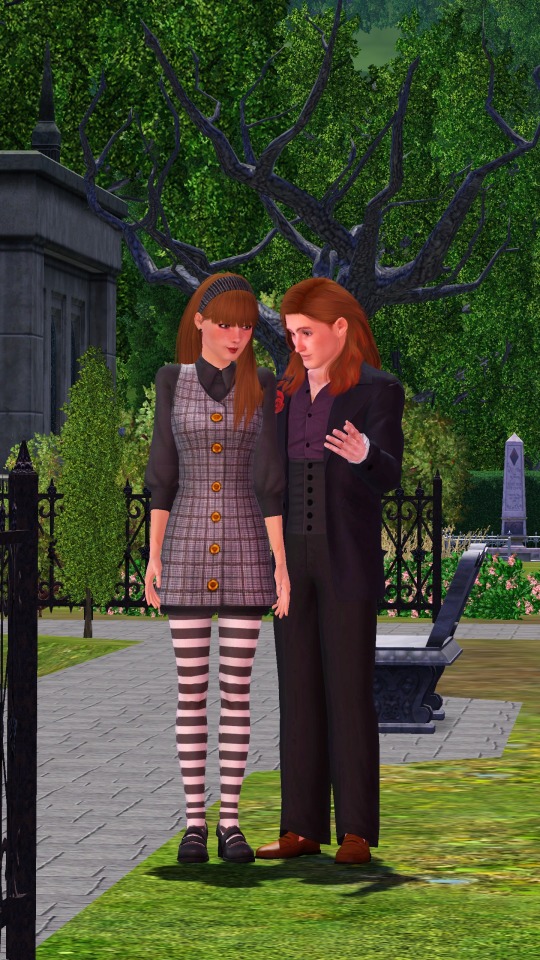
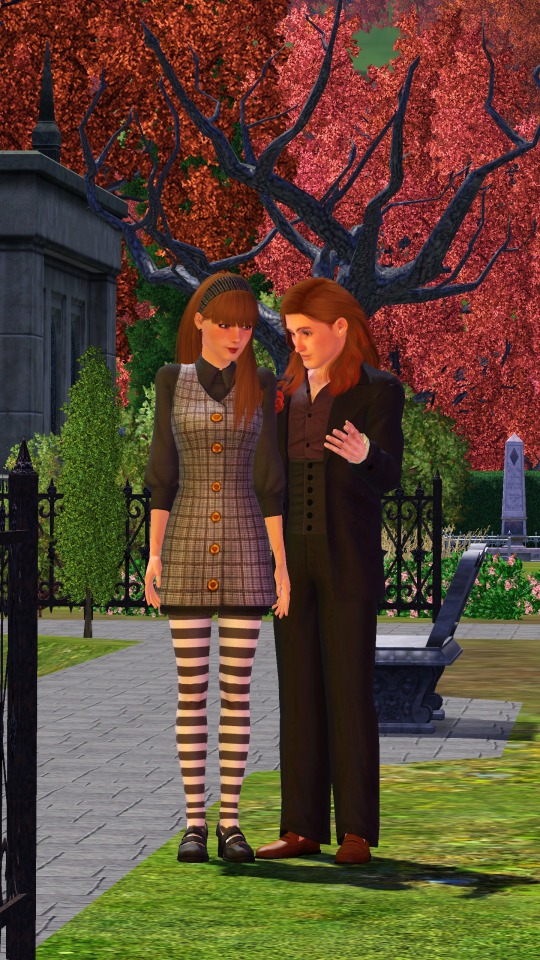
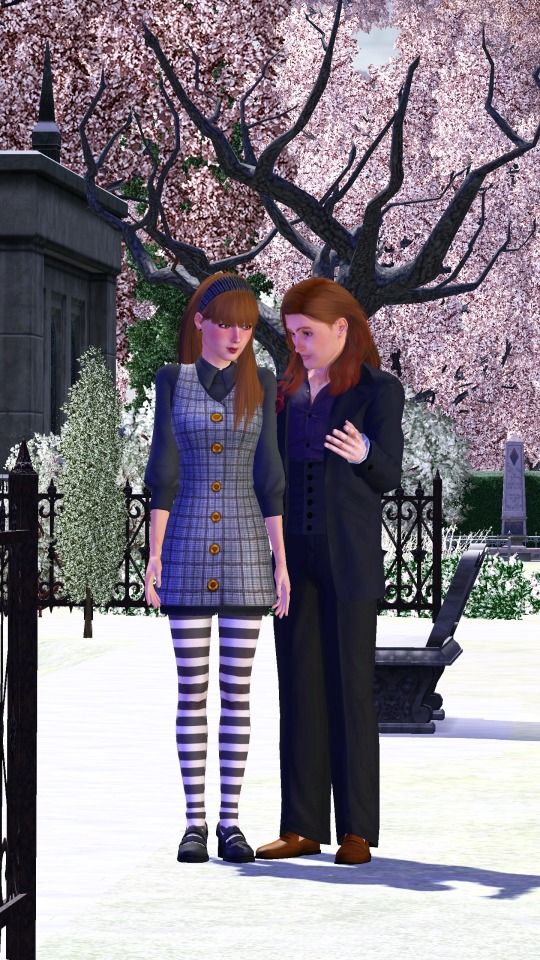
Summer, Spring, Autumn, Winter.
Color mixing:
One thing I thought was pretty cool with TS3's Lighting engine, is how colors in certain highlights will mix just like paint!
Red + Blue looks a bit purple-ish.
Red + Yellow will look a bit orange-y.
Blue and Yellow will turn green-ish at parts.
Custom Coloured Lights
Sometimes, some of EA's colours aren't... quite there. Or really what you need. Here is a short list of colours I've made and used:
0, 150, 255 - Replacement of Cyan (More of a light blue):
0, 163, 108 - Jade
255, 195, 0 (better Yellow)

What's the easiest way to find new colours?
It's pretty easy! If you google for "Colour generator" then there you go! Do make sure to get the RGB values from those websites!
But, for the ones who don't want to google, here are a few suggestions:
Give them a try and see which ones are great! Do go for colours that are quite strong in contrast. Pastel will just end up being white, and darker colours will just turn... well it will look like there is no light on :p
That was it! Hopefully it was insightful, and obviously feel free to add your own discoveries to it! :)
#the sims 3#ts3#sims 3#the sims#sims#sims 3 story#sims 3 screenshots#sims 3 gameplay#thesims3#ts3 simblr#ts3 gameplay#ts3 screenshots#sims 3 blog#sims 3 simblr#sims3
143 notes
·
View notes
Text
Art Resources!
I've been actively involved in a few different art critique communities for the past 4 years, and I've noticed that most people seem to struggle with a lot of the same things. Here are the resources I suggest to people the most. Feel free to add onto this!
Guides
This composition guide by genicecream here on Tumblr, which was the first thing to make composition really click for me:

This absolutely excellent guide by SpongeBob storyboard director Sherm Cohen, which goes into a lot of different things, but mainly storytelling and posing. It is critical for anyone working with storytelling in art, even if it's not as stylized as SpongeBob!:

This guide to edges by Marco Bucci on YouTube:
This video series about design theory by Sinix that is absolutely essential for character design, composition, and pretty much doing any work with visual art at all.
The Schweizer guide to spotting tangents explains itself. Everyone should read this. There is also an updated version here with even more information!

Tools
Pick a head angle using a 3D model and be given a matching human or animal reference photo (credit to @selfish-ghost for initially posting these to Tumblr).
Line of Action is a well-known reference photo website that provides randomized references set to a timer. They currently offer full figures, animals (including bugs), hands and feet, faces, basic shapes, and environment scenes. They have a really awesome tutorial for figure drawing here that only takes 15 minutes!
Adorkastock has both a huge backlog of reference photos with a TON of different action poses (of models with varying body types) and another timed reference photo tool!
Quickposes and Sketchdaily also offer timed reference photo tools.
Earthsworld is a wonderful collection of high quality candid reference photos of people spanning all the way back to 2003. This is an excellent resource if you're looking to break out of sameface syndrome.
This virtual lighting studio by zvork allows you to make custom lighting setups on 4 different 3D models (including 1 darker skinned model).
William Nguyen on Artstation has male and female Asaro-inspired 3D head models that are rotatable with customizable lighting, intended to show the planes of the face.
25 notes
·
View notes
Note
I've been using a mix of Krita and Paint tool SAI. I'd appreciate resources for Krita specifically too. Thank you for answering by the way. ♥️
Of course!
So! Here's my guide to making comics with Krita, down to the details such as layer setup, borders, speech bubbles, and SFX.
preface: it took me at least a year to figure this process out; but once when you've figured out the system & a template, it's smooth sailing. let's use this finished spread from the selfship comic last year to go through the process:

i'm going to assume a certian level of digital program proficiency (knowing what layers are, having a general idea of what vector vs raster graphics are, etc) since otherwise this post would be a book lol.
(if the read more does not work: the static permanent link for the full tutorial is on my website here: https://kradeelav.com/diary/tegalog.cgi?postid=312&1740096282
rest of the post under the cut; this one's going to be a long one as is.
let's start with talking about the layers for a single page of the above comic image.

(ignore the "orbs" and "titania bubble" layers - those were oddities for this specific spread.) Going from the top downwards:
SFX - sound effects. this is an optional layer to have if you don't have a lot of sound effects. you can use either render the sound effects by drawing them out (raster) or vector SFX; whatever you're most comfortable with. more on that below.
frame - this is the comic page borders.
speech bubbles - self explanatory. contains both the text inside the bubble and the bubbles themselves.
ink - main lineart & drawing layer; self explanatory.
tone - the shading layer.
(deleted) ruff/sketch - this is the sketchy thumbnail layer that is imported when i first start working on each spread, and naturally gets deleted when the lineart starts looking good on its own.
so!
there's two types of digital rendering krita can do: raster (most similar to drawing with a pencil or tablet) and vector (computer draws mathematical lines and shapes and text that you can manipulate). a lot of programs fully specialize in one or the other but the killer feature of krita is it can do both on a single page; you just need separate layers depending on the rendering..
that's what this "fx" symbol stands for by the way - these are the vector layers....

... and the symbols circled in purple clue you in that they're raster layers (ink, tone, sketch) where you do the actual drawing. with me so far?
speaking of those:
borders/frame
here's what the borders layer looks like + (the print layout layer above everything in black/yellow). the print layout layer is really only useful if you're physically printing this comic (it's basically bleed/trim if you've heard of those terms, ignore this otherwise).

i really struggled with doing borders in krita until finding this tutorial:
youtube
- since the thing is i make a lot of last minute changes. i need to be able to move and edit borders around easily if a panel's not working for me. so the method above makes it incredibly flexible to just ... up and move one, or to make a gutter wider.
i also really need to be able to see what's behind the borders while i'm drawing it to check anatomy sometimes -- the beautiful thing is you can simply turn the layer style to "multiply" and it's effectively transparent with one click.

like this, voila!
lettering
here's the lettering layer(s) with one bubble's text selected.

fair warning: krita is absolute ass with the text tool. it's the biggest failing but in newer versions i do believe they're slowly working on improvements. thankfully this program can do just enough to letter bubbles.
essentially, i use the same trick as the frames shown in the video above. if you slap a "layer style > stroke" on the whole "bubbles" layer, that's where that 2px black border comes from, and that layer-style-as-a-border "follows" every bubble so it's consistent.
(rule of thumb aesthetics-wise is speech bubble borders should be slightly thinner than frame borders, and on average about as wide as your lineart.)
SFX (sound effects)
technically you can hand-ink all of your SFX if vector art scares you or if you don't intend on doing much, but the vast majority of pros use vector work for efficiency. hentai/erotic work also has a lot of SFX versus other (non-NSFW) genres for the immersion factor with bodily functions.
the spread above didn't need a lot, though.

as you can see it's mostly the inorganic orb clinks and then the big SHING. (i put my for-the-web-kradeelav.com signature on the same layer for laziness).
here's part of my current sfx library below just to show you what i start with for erotic strips; usually i start with some base fonts and start moving the letters around individually.

(a lot of these are redone for every project; there's some in here that are already "outdated" in my eyes.)
miscellaneous
my favorite inking brushes are from this free resource pack. my favorite halftone (shading) brushes are from this (also free). thanks for reading!
26 notes
·
View notes
Text
Tumblr and other blog spaces
Seeing a few people on my dashboard worried about Tumblr's future. I'm thinking about making a small Blogger tutorial on how to use it at a later time. Till then, here's a tidbit of what I know from using Blogger since 2010.
Blogger is free, requires a Google account, but it is old as fuck.
My Blogger page: Sketching with Reckless Abandon
Blogger is very archaic, like there is no easy way to find other blogs except through some random search engine. Formatting on Blogger's post editor is not great. Images sometimes break or glitch and sometimes delete paragraphs. Also, labels on Blogger are not the same as tags on Tumblr: they are only for your blog's organization. Sometimes search engines can use your labels for their results but I'm not sure how well that works in today's internet.
Blogger's dev blog was last updated in 2020, so I'm not even sure if there's any support for future updates. Blogger still works, lol.
Blogger's dashboard is the Reading List and is out of the way of your main page of Blogger, which usually shows your entire history of your blog posts. The Reading List shows a list of blogs you follow, their posts shortened for compact display. To follow other blogs based on Blogger: first you need to find a blog (either .blogspot or .blogger), then paste the home url in your Reader List > Manage > Mangage Blogs I'm Following page. Use this page to unfollow blogs.
Old as fuck website aside, Blogger is good for Artists (if you use a blog template that favors your images) and Writers (Blogger is a long form blogging website like Tumblr, though in theory I don't think Blogger has a post cap). It is possible to use Blogger as an archive, provided you keep things organized and up to date. Like with some templates on Tumblr, you can use some templates on Blogger to make your blog into a webpage or portfolio site. Setup is a little finicky, though.
Use labels to organize your blog, don't use labels as tags or talk in tags - this will mess up your blog's organization and will be hell to clean up. I suggest not to use it as a micro-blogging platform. Small posts within a short amount of time will flood Reader Lists.
You do not have to worry (somewhat) about awkward censorship there, but still follow Blogger's TOS. 18+ art and content must have Adult Content enabled in settings. If you are an 18+ creator, I suggest reading the Community Guidelines before making a blog on Blogger.
Moderation on these blogs are extremely basic. Like, you just have some basic moderation on your comments. You can hide comments on individual posts.
Also, it's possible Blogger might break a few posts. It's rare, but it would explain why my earliest posts from 2010-2013 don't have me as the author. I can still edit them, but can't change author. It might be because I had a Google+ account back then before Google deprecated it. Anyway, today Blogger uses my main Google account as the author of my recent posts.
There is no way to share posts easily, except copying other posts and linking them in your blog post (talk about it, so it's not just a link). To interact with others, just comment (if available) under blog posts. Make sure your comment is set to public (either your google acc or name with url). If you want to comment anonymously, you can do that as well.
Blogger's biggest pro is its Stats page. It shows you how many views you got for your blog and your posts, and it also shows detailed information on what keywords/labels that helped bring views to your blog. Might want to get used to using SEO techniques.
You can monetize the blog with Google Adsense, but you might need to find an updated way to get it started - I never set mine up and I'm not sure if that still works for this site.
That's it for right now.
#my posts#blogger#blogspot#tumblr#tumblr layoff#blogging sites#blog sites#alternatives to tumblr#blogger is held together with hopes and dreams#like there's blogs still here since 2000s
8 notes
·
View notes
Text
Reposting to my blog: Needle Lace Resources
Disclaimer: if you are a beginner, you can absolutely use a piece of paper, any threads you have on hand, and a stitch guide and end up with a good result. However if you want to have more control over your work (especially tension) or make larger pieces (or, god forbid, matching ones), you will quickly outgrow this setup. Most of the resources I recommend are specifically geared for beginners who want to become intermediates, and not absolute beginners. To address that, I spend a lot of time (in all my posts) explaining why the obvious shortcuts are more cut than short. So when you see links to my page, expect that in advance.
If I strike you as overly pedantic, just think of it as me desperately trying to project information back to my past self.
Book Resources and Reviews
https://www.tumblr.com/lacewise/731564386254258176/heres-a-list-of-all-the-needle-lace-books-i-have (book list)
https://www.tumblr.com/lacewise/731585929588948992/the-lace-guild-books-review (book reviews, still in print)
https://www.tumblr.com/lacewise/732288716382552065/alright-pat-earnshaws-book-needlelace-this-is (book review, out of print)
https://www.tumblr.com/lacewise/731216166444531712/i-know-that-a-lot-of-people-do-not-like-reading (explanation on why I recommend needle lace books—they have lots of diagrams and often better explanations of lace traditions if you’re looking to recreate something specific)
Resource Guides
https://www.tumblr.com/learning-needle-lace/681193878741729280/intro (comprehensive, uses the same materials I use when planning and practicing projects—unfortunately requires level of comfort with internet archive)
https://www.tumblr.com/learning-needle-lace/690860721418944512/hey-wondering-if-youve-ever-come-across-some (reticella specific)
https://www2.cs.arizona.edu/patterns/weaving/topic_lace.html (I also like messing around with this archive but wouldn’t recommend it to beginners because it’s a mess) (the entire weaving archive: https://www2.cs.arizona.edu/patterns/weaving/weavedocs.html )
Video Tutorials
https://youtu.be/bNxdoB9dpkI?si=gbkeu9ciHoZjjJWd (THE video tutorial series for learning needle lace, I have a meme recommending this—it’s perfect)
https://www.tumblr.com/pseuddamntired/768441288185069568/needle-lace-resources (great list of needle lace video tutorials, I’ve never seen several of these or many of the websites before)
https://www.sewhistorically.com/how-to-make-venetian-needle-lace/ (cites information from the Victorian era, which means some of the background is inaccurate, but does give a better idea of how the lace itself is worked)
https://pysankigirl.wixsite.com/graceslace/copy-of-videos (reticella specific, I love these tutorials because the voiceover helped me with many, many things—but the pixel count is basically 11)
Tumblr Tutorials (We Are Not Experts)
https://www.tumblr.com/learning-needle-lace/691216149779808256/close-ups-of-the-other-3-tear-drops (stitches adapted to aemilia ars)
Note: my tutorials are more “why you don’t do this” then “how to do this” because there are so, so many reasons to use stiffener behind your work (which is why pre-poking holes to guide your needle through the outline is recommended)
https://www.tumblr.com/lacewise/732026951071596544/part-1-completing-your-setup-aemilia-ars (my tutorials part one—I don’t know how helpful they will be, this focuses on getting started in aemilia ars and why things are done—aemilia ars is uniquely fiddly and the structure itself is what’s keeping it together… good luck) (also note that I don’t use diagrams or enough pictures of work in progress—I need to fix that)
https://www.tumblr.com/lacewise/732035947737333760/part-2-tacking-threads (I use “tacking down stitches” and “couching” interchangeably here but technically tacking is for aemilia ars for “this is extremely fiddly” reasons—since ground laces usually have more filling stitches, they need more support—anyway this recommendations on tacking/couching threads themselves—also don’t use synthetic threads for couching stitch. I haven’t tried it myself but I bet I can predict the results)
https://www.tumblr.com/lacewise/732103763408617472/part-3-ground-lace-setup (ground lace tutorial part 1—I realize my numbering system was weird but I worked from geometric lace onwards deliberately because some of the logic of working ground laces comes from their differences to punto in aria)
https://www.tumblr.com/lacewise/732192250737590272/through-the-horror-of-seeing-people-put-a-target (tacking down ground lace specifically—if you watch the videos on reticella you will find out that there are two ways to work reticella and I barely understand one—I make the outline as I go, but you can also put the outline down first)
https://www.tumblr.com/lacewise/732274532925194240/wait-i-do-have-something-to-say-about-the (this is really only applicable for crochet thread sizes 10-50ish but it’s a good starting guide for beginners and explains why the couching threads need to be a regular distance away)
Let me know if I’ve missed anything or there’s something I need to clarify. A lot of stuff just doesn’t make sense until you do it yourself so I *heavily* recommend the Michael Dennis video tutorials.
I do love alternative resources but oh my god is that the quickest way to run into problems you don’t understand. Which is why I recommend research via books. (I would like to document that stuff via blog posts and videos myself but unfortunately that takes time and understanding I don’t yet have.)
#needle lace#needle lace discussion#needle lace resources#I know there are some repeats but just assume that means the information is more important or accessible#genuinely do let me know if I need to fix anything
17 notes
·
View notes