#3d Animation Software for Beginners
Explore tagged Tumblr posts
Visit Tumblr Blog
Explore Tumblr blogs with no restrictions, modern design and the best experience.
Last Seen Tumblr Blogs


Fun Fact
The Tumblr app for Google Glass was released on May 16, 2013.
Text
#3d animation software for beginners#3d animation software for kids#free 3d animation software#3d animation software for mac#Free 3d animation software#3d Animation Software for beginners#free animation software#animation software for kids#Animation Software for Kids#Animation Software for Mac
0 notes
Text
#free 3d animation software#3d animation software#3d animation software free#3d animation#best 3d animation software#best 3d animation software for beginners
3 notes
·
View notes
Note
Ozz! I'm trying to get into drawing, but I'm absolutely horrid at it and have no idea where to begin. Do you have any tips for beginners? Also, what program do you use? I've heard Krita is good, have you heard of it?
Also, also, remember to hydrate properly and get a good amount of sleep and do lots of self-care! <33 we love you and your content; you make the world a brighter place ^^
~ 🐇
If you want to start from the very bottom, there's a website where the first lesson is drawing a line, quite literally. It builds your confidence with basic shapes, then moves on to more complex topics like textures, shapes in space, construction of real life objects and so on.
I've had it in my bookmarks for...gosh, years now. I should definitely pick it up again, haha.
I also follow Alphonso Dunn on YouTube, he has hundreds of art tutorials and exercises.
As for software, I briefly used Krita years ago and it was nice! It had a very easy interface and the brushes worked well if you wanted to reproduce traditional art. The only reason I didn't stick to it was because I already had PaintTool SAI and Photoshop at the time. When I got my first graphic tablet, I started with Paint.NET, though it was very simplistic.
The general consensus online seems to be Krita for painting or MediBang if you're into drawing anime. In terms of paid software, I think Clip Studio Paint is very popular and has a lot of resources, from brushes to 3D models. Photoshop is classic, but it can be overwhelming if you're new to digital art.
I personally use Procreate because it came with my iPad and it has a very simple menu. Some professional illustrators say it lacks the advanced options you'd find in other programs, and I do agree it may not be enough if you want to go beyond merely drawing. To add text and make small edits, I'll put the doodle through Photoshop, for example.
Free software: Krita, MediBang, Gimp, KRESKA.art (no installation required)
Paid software: PaintTool SAI, Adobe Photoshop, Procreate, Clip Studio Paint
If anyone has more suggestions or tips, feel free to drop them in the comments!
88 notes
·
View notes
Note
Hi i love your art!! I really like how you integrate 3d in illustrations, which tips would you tonnato someone who wants to learn 3d art / how do you approach it?
thanks in advance!
i never took a proper class for it, but youtube tutorials do a pretty dang good job for this! and messing around by yourself!
first things first, is to choose the software to use i use blender, it's free and very powerful for 3d and animation
starting out, follow some tutorials for basic functionality perhaps a stick figure-esque rigged model
after that, you can experiment yourself with what you want to make and look up specific things as you go along
Here are some links, it's been awhile since I've started so idk how helpful they are but hope they help!
Beginner Tutorial Playlist
Rigged Character Playlist
UV Transparency
Shape Keys
69 notes
·
View notes
Note
Do you have any animation software recommendations? I'm a beginner animator and i want to start learning.
There are a lot of options out there. I chatted with some of the crew to try to narrow down recommendations. There was something of a consensus that Clip Studio Paint is actually quite good as a beginner animation tool. If you work with digital drawing programs, it's overall UX will probably feel pretty familiar from the start. It's not overcomplicated, but it's still sophisticated enough to produce production quality work if you want to push it that far.
You can hone your animation chops in so many different ways, though, from TV Paint to a sticky note flipbook. I'd suggest a little experimenting to find what feels right to you. You can animate in Adobe Photoshop. The tools provided are fairly rudimentary, but there's nothing wrong with starting out plain and simple. You can animate in 2D with Blender's Grease Pencil tool too. And it's free. And maybe you can pick up some 3D skills in the process. If it's within your budget, Toon Boom is a very solid choice. It's what we use for Lackadaisy, and we know many, many other animated productions rely on it too. If you happen to like working with Procreate and you're comfortable with touch screen controls, give the new Procreate Dreams a shot. Prioritize your comfort and enjoyment in selecting a tool first. Once you have developed your drawing skills and understand the principles of animation, you get to take that knowledge with you to any other animation tool you decide to pick up next.
572 notes
·
View notes
Note
Hi, when you say your thesis is a new pipeline for a 3D short, does that mean the actual thesis, the thing that gets you graduated, is a paper with a hypothesis and a conclusion, and making the film is just the means to test your proposals???
We started working on the film in January and it's 75% done ! This month we also wrote a 53-page project report detailing the process of our animation pipeline, as well as some usability testing for 3D modelling. The paper largely explored which modelling software is best for beginners (Blender, VR, etc) Together with an exam in mid-June all three things (project report, oral exam and finished animation) form the basis for our final grade 👍 so basically the film came first and the paper is a delineation of our process making it
32 notes
·
View notes
Note
Hi!
I know you use Xara 3D Maker to make your posts, but do you know if there are any similar tools a complete beginner could use? Do you know of any apps or websites? Any tips for anyone starting out?
This site is what I use to make glitter text gifs. The only other animation software I can think of is Blender, which I tried but it is actually very hard to learn. There is also cooltext.com where you can make simple animated text, like flaming letters. And there is Make Word Art where you can make still images of text in different fonts and styles.
Honestly, Xara 3D Maker 7 seems intimidating to learn, but it's relatively easy once you know the buttons. There are some tutorials out there, and I will at some point make one for a simple animation and show the basics. I have no experience with animation outside of Xara 3D Maker, it's simple enough that you don't need to know how to work Blender or GIMP or anything super complicated.
As for tips for starting out with Xara 3D Maker, read and watch the tutorials. Those were my lifelines when I first started out. And if you like a particular animation/color combination or you have some text you want to use as a template, click File -> Save As... and save it. Then when you want to go back to it, click File -> Open... and select your saved text.
A major thing that would have saved me so much time spent manually cropping animations is to export the animation with the size selected as 'current window size,' the 'crop' box checked, and the 'transparent' box checked. I spent literal years manually cropping text with ezgif.com and GIMP before I decided to mess with the export options and it changed my life, lol.
Again, I'll make my own tutorial sometime. Xara 3D Maker 7 is honestly a lot of fun, and I don't regret paying for it. It was well worth the money to make these animations and some stuff for myself. You could watch the tutorials first and see if it's something you feel comfortable spending money on to try for yourself.
23 notes
·
View notes
Note
hello! i really love your art & animations! i'm not sure if someone has asked this already but: what do you use to animate? & how long have you been animating for? do u know of any tutorials/classes? (i'm a beginner learning on my own atm!)
hi ! thanks a lot :D
Software wise it depends, procreate for the little sketchy animations, toon boom story board and harmony for bigger projects, sometimes blender even ^^ and unity for work, but its special for video games, i even animated a lot on photoshop when i started !!! never again !!!
i composite in after effect or premiere, depending on what needs to be done, sometimes both for big stuff, but if youre learning animation, focus on the basics before the aesthetics (you can fumble your way into compositing way more easily than anim)
ive been animating on and off for 5 years, 3 of wich were in animation school (during which we surprisingly did not animate much lmao) i got this film out of it tho lol
as for tutos....
i cannot recomend enough The Animator's survival guide, you ccan find the free pdf on the internet, and a bunch of people explaining and showcasing it on yt, its basically the bible for 2d animation
this vid is also very good to get a feel of animation, and the basics, the guy also has v good classes on his channel
but basically the best way to learn is to animate ! a lot ! and look at animations you like, download them and look at them frame by frame : how does the timing work, how doess that character moves, etc
ACT IT OUT ! FILM YOURSELF IN YOUR ROOM DOING STUPID SHIT ! ANIMATE IT ! (believe me, im as sad as you that this is the answer to good anim... but it is...)
and what kind of anim do you like to make ! fights ? chara acting ? sfx ? theres a LOT in which you can specialize (if making a living out of it is your goal) so play around in a cheap/free/cracked software and see what you like and what works for you !
animation is a very complete field : you gotta know perspective, anatomy, acting, composition, exercising any of these skills ultimately makes your animations better !
3d anim is a whole other can of worm, but (IMO) still requires 2d basics,
TO CONCLUDE :
just go ham on doing weird shit and consume, consume,consume animation : short gobelin/carlarts films, all of richard williams filmography, obscure russian animated movies from the 70's, youll ALWAYS learn something, thats how you learn best
Happy creating !! animation is AMAZING the way i felt the first time i made something that MOVES ? unparralleled
#THE PURE JOY EVERY TIME I HIT PLAY FOR THE FIRST TIME ON AN ANIM ???#animation#2d animation#art#artists on tumblr#digital art#watch a lot of youtube animators also#they ave a lot of little tricks timing/economical wise
50 notes
·
View notes
Note
what software do you use to make the 3d models for your dolls? I've been trying to make dolls and it hasn't been working out very well.
blender. my hottest beginner tip, as somebody who has been doing this for maybe a year so i do fall into the beginner category myself, is to ignore all advice on how to 3d model Properly.
what i mean is that 3d printing is very forgiving. there are no poly count budgets or topology requirements like games or animation have, and a lot of the advice online is geared towards those things. i have no idea how to do low-poly modeling, or anything deeply technical. mostly i just add some balls of clay in object mode, and then go directly to sculpting. the sculpt mode is pretty quick to figure out; if you can do it with clay, you can do it in blender after playing around with the tools for a bit. there's no need to learn everything immediately; you can get pretty far with dolls by just sculpting and figuring out how to use the boolean modifier for joints & other miscellaneous holes.
44 notes
·
View notes
Note
Haii, Sosaaa! Okay, so i wanna get into animation BUT I'm really new. Lucky for me I know someone who's awesome at animating (that's you btw) so I need your expertise. What program do you use, and also do you have any tips for a newbie?
Aww Jay, you flatter me~✨but before answering I must put the disclaimer that I'm just a hobbyst animator with no formal training, that during quarintine thought "Oh woah, these Multiple Animation Projects that people do in YT are so cool! I want to join them!" and started learning by herself. Take everything I say with a grain of salt.
First things first: I mainly use TV Paint. However I'm not letting you spent money on paid stuff you don't even know you'll like, so here are some free alternatives that I've used as well:
Krita is mostly a drawing program, but it also has a animation interface. The red and black parts of the Helena AMV were made with this.
Flipaclip is kinda neat phone/tablet app for when you want to animate on the go, but it can also feel more limiting since various features have to be unlocked by watching ads or getting the premuim version (in typical app fashion, I guess...)
Blender, while mainly meant for 3D animation, also has been developing Grease Pencil, that allows 2d animation in both 2D or 3D spaces. And the lines are vectors, so you can edit them after drawing them and such.
You can even use normal drawing programs. I've animated with Paint Tool Sai and Medibang by drawing all the frames, saving each frame as a image in sequence (001, 002, 003...) and putting them together in some editing program or gif maker. It's possible, but it's more work.
There's also OpenToonz, which is an open source version of the software used by Studio Ghibli in some movies?? I haven't used this one, but I'll leave it here in case you want to give it a try.
For editing (In the rare scenarios where I do fancy editing) I use After Effects. I can't personally recommend any free substitute, but as far as I've read, DaVinci Resolve seems like a good replacement.
Now, regarding actual animation advise, I won't explain the principles or terminology because:
It's very overwhelming since it's A LOT of information, specially for a beginner
I work mostly by vibes, so there are concepts I don't undertand well enough to explain to others
Instead I'll foward you this whole book that goes in detail about all that technical stuff.
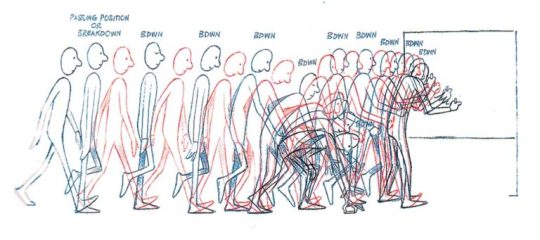
That being said, at the end of the day, hand-drawn animation is drawing main poses (aka key poses) and then drawing a bunch of more drawings in between until the drawings together look like they move.
So yeah, it's a lot of work,
....but it doesn't have to be tedious work~ 👀✨
As a hobbyst I live for the philosophy of vibing during the process instead of chasing perfect results, and I'm assuming that you just want to try for funsies and not that you're trying to become a pro industry animator anyways. Here are my personal tips to make the animation process more bearable:
1- Pick something you love! Seriously, any long task becomes more bearable when it's about a theme or character you enjoy. There's a reason why most of my animations have been about HnK or Signalis,
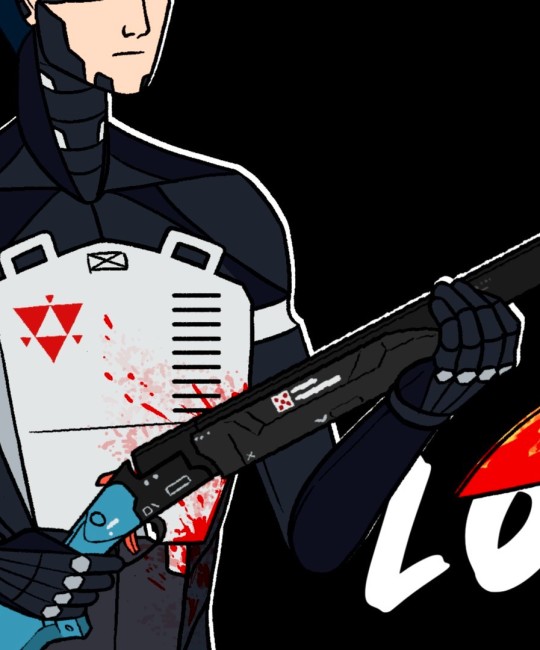
2- SIMPLIFY THAT DESIGN! Before you even pick the pencil, I want you to really look at the design of whatever you're going to animate and ask yourself "Are all the details in this design really necessary?" Every extra detail really starts to add when you have to draw the same thing multiple times for a single second of animation. You don't need to add all the robotic details on replika bodies, or draw every single stripe a tiger has, to put an example.
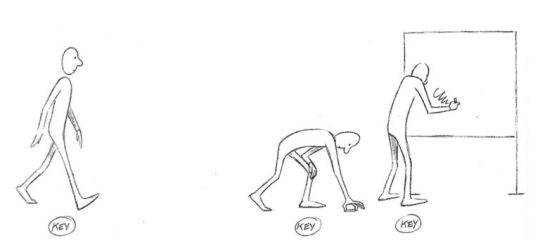
3- Keep it simple! At some point you might have a cool idea of an anime style epic battle with looks of cool explosions, camera angles, awesome fighting choreograpies and whatnot; but you first have to start small or else you'll get overwhelmed and not finish anything (been there, done that). Start with something simple like a bouncing ball, or if you're feeling brave, a walk cycle or a character turning their head. In that same sense, remember the book I linked? Don't try to learn all of it at once, go one step at a time.
4-Use references! On google images there are multiples breakdowns of things like run, flight or walk cycles, for example, and you can even use youtube videos! (tip: pause the video and use "," and "." to move back and forth between frames). In case you need help with a very specific pose or movement, you can use yourself or a friend recreating the pose irl (yes, the process is very embarrasing, and yes, the results are worth it)
4- You don't have to animate/redraw everything everytime. We aren't going for Oscar winning levels of animation here anyways. It's ok to copy and paste across different frames, only animate certain parts of the body and leave the rest static, panning the camera to simulate movement... Listen, if actual standars profesionals cut corners, why can't we? We aren't even getting paid for this!
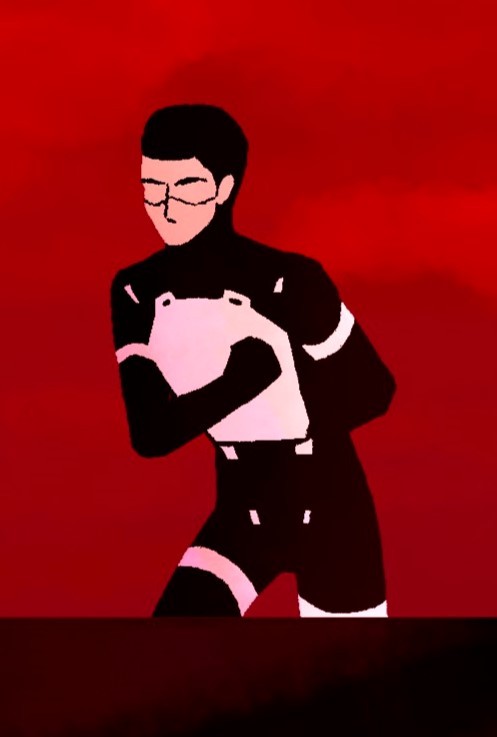
6- It's ok to suck at first. My first animation was this kitty back in 2016,

and here's this Elster from last year doing similar movements.

It's not perfect by any means, but I feel like both art and animation-wise there has been some improvement. And I guess that right now I could remake it and make it even better, but that's because I got more experience and a better eye at finding mistakes and how to solve them, and you get that with practice.
...So yeah, there's that, have fun in your animation endeavors 👍✨
#OH MY GOD THIS IS A TESTAMENT#I'm so sorry Jay for making you read all of this#I know less that you think#but the little I know I try to share to the best of my habilities#animation#ask#the yappening
13 notes
·
View notes
Text
#3d animation software#2d vs 3d animation software#3d animation software free#3d animation app for android#free 3d animation software#3d animation software for uk#3d animation app for iphone#3d Animation Software for Beginners#3d Animation Software fre#3d Animation Software for Kids#3d Animation Software for Mac#3d Animation Software for pc
0 notes
Text
#best 3d animation software for beginners#3d animation software free#best 3d animation software#free 3d animation software#3d animation#3D Animation app
0 notes
Note
hello! i'm not sure if you remember me, a while ago i asked about digital art and if it's possible to do on an ipad or something similar. i was really grateful for your response and i got an ipad over christmas! i didn't realize how expensive the pencils were though and was only able to get one recently. now that i have all of that, i download the first art program i saw (ibispaint x, i don't know how good that is) and feel super overwhelmed by everything, all the tools and brushes and i have no idea where to begin. i know this is a super broad topic, but i don't know if you have any advice for a beginner hoping to become a digital artist? or know of any resources? thank you so much in advance and no worries if this topic is too broad to really get into properly!
Oh hey!! Congrats on getting an iPad! And yeah, shopping for the pens is a big pain in the butt, but I'm glad you finally got it all setup!
So most of the advice I'm gonna give you is very basic, starter advice that can apply to virtually any digital art software, as the vast majority of them are built with the exact same base tools, they just vary in their intended purposes which means they may differ in more advanced settings and what they offer beyond the basics (ex. Photoshop has more colors than Clip Studio because it's built for editing high quality photos whereas Clip Studio is meant to emulate comic art, but Clip Studio offers more in the way of comic-creating tools such as specialized rulers, 3D material support, built-in screentoning, etc. and all of the software available will tend to have different brush engines, meaning it doesn't always 'feel' the same to draw in one software as it does in another).
Your bestest friends:
Layers! This is the biggest pro to going digital, because now you can work with layers! So anything you draw on each layer is preserved and can't touch or affect whatever's on the other ones :3 You can find the layers tab in Ibis Paint X in the bottom right, don't be afraid to make a bunch of them and mess around with what you can do. Play around with the different blending mode settings (in Ibis Paint it's the menu that's labelled 'Normal' in the layers popup) especially Multiply, Color Dodge, and Overlay, as those three are the most commonly used to make coloring more efficient and give your art some extra pop.
Lasso/marquee/magic wand tools! These are basic selection tools that allow you to select an area within the layer you're working on, so that whatever you paint won't travel outside of that area. The Lasso is a free draw tool, the marquee tool is typically 4 sides by default (so squares/rectangles) and the magic wand detects and selects a closed area with one click! (just note that by default it's only on the layer you're on, so if you use it on a layer that has nothing, it will typically select the entire canvas).
Alpha locking! This is a simple button setting you can click to 'lock' the layer you're working on, which basically means that whatever you've drawn on that layer, anything you add can't travel outside of that drawing. So if you want to quickly shade something without going outside the lines, alpha locking is your solution!
Clipping groups/layers! This is a bit more advanced but is basically an even better version of alpha locking that you can use in conjunction with it. Clipping layers are basically additional layers that , when you click the 'clipping group' button, 'attaches' that new layer to the layer that's below it. It performs the same function as the alpha lock by preventing whatever you draw on that layer from travelling outside of it, HOWEVER it comes with the added benefit that it's on an entirely different layer, meaning you can erase and mess with whatever's on that new layer as much as you like and it won't hurt the base layer. It kinda follows the same logic as animation cels !
Masking! Y'know when you're doing a traditional painting, and you put down tape to cover the area so you can paint over it and later remove the tape and everything underneath is untouched? That's basically what masking is! Once you put down a layer mask, using the erase tool on it will 'erase' whatever the mask is applied to, and using the brush will make it magically return! This may sound silly at first, but I find masking is especially helpful if you want to erase something on the layer you're working on without it disappearing forever! It's also really helpful for comic work because you can mask whatever's outside of the panels and voila, nothing you draw will travel outside of those panels!
Stabilization! I don't know how extensive Ibis Paint X is with offering stabilization tools, but many digital art software comes with it and it's a LIFE SAVER for new digital artists adjusting to the feel of digital art. It essentially 'slows down' the output of the ink on the canvas which helps a lot with getting cleaner lines in fewer tries. It's not quite as big of a deal when drawing on iPads because obviously you have more control by default by drawing directly on the screen, but it can still be really helpful when you need to pace your hand ahead of the actual drawing tool to pull cleaner lines!
That's pretty much all I can think of for now! But here are some other commonly asked questions:
1.) There are so many brushes to choose from, which one do I use?
The round brush is small but mighty. Virtually anything can be painted with it, it's simple, but malleable, especially when you start messing around with the hardness and opacity settings. Don't get too lost in the sauce with the brushes that are available to you, it can be very easy to get overwhelmed by all the options and variety. Some artists still work purely with just round brushes, some artists have custom brushes they like to use to speed up their drawing process or achieve certain textures. Play around with them, but don't get too stressed about which one you use because there's no wrong answer, the right brush to use is the one that gets the job done ! <3
2.) What canvas size should I use?
It depends on a variety of factors such as whether or not you're planning to print, where you're going to be posting it, etc. By default I like to work on 8.5 x 11 inch canvases (standard printer paper size) at 350 dpi, which if you want to make that canvas in Ibis Paint X, means you just have to make a canvas with a pixel ratio of 2975 x 3850 pixels! Just note that the lower you go in either pixel count or dpi, the lower the resolution, so it's typically encouraged you work at a minimum of 300 dpi (but you usually don't have to go any higher than 600) to ensure you don't wind up with any blurry low res JPG's/PNG's.
3.) Should I export my final drawing as JPG or PNG?
This is usually just up to personal preference, but like the canvas size, it depends on what you're using the image for. You can always export as both, the biggest difference between them is that PNG is lossless meaning you won't experience image compression like you will with JPG, BUT you're also going to have much larger image sizes. JPG is often fine for any standard posting, PNG is typically recommended if you want to have a drawing with a transparent background for printing (as JPG can't do transparent backgrounds) or if you just want to have a really high res image file for sharing outside of social media sites (as social media sites like FB/IG/etc. will typically compress the hell out of your images anyways)
Here are some other super helpful resources as well if you need some visual and/or audio guides:
Sinix Design - How to Learn Digital Painting (Beginners)
Marc Brunet - The Beginner's Guide to Digital Art
Skynix Art - 50 Digital Art Tips in 5 Minutes
One thing I also like to do is watch speedpaints of digital artists as it can really help pull back the curtain on what they're doing (or at least, it can help you see what they start with which can help you better picture the process of turning a blank canvas into a finished work of art!) And though I don't do it as often, if there's an artist whose work I REALLY like, I'll try and find their actual work files (many bigger artists sell them on their crowdfunding sites/Gumroad/etc.) so that I can actually break the drawings apart layer by layer for the purpose of analysis. Of course, all that is something that you'll grasp better over time as you learn the tools and learn to recognize what artists are doing in their own workflow, so don't worry if you don't glean a whole lot of info from the "big guys" right away, you should always be referencing artists who are higher along the skill ceiling from you but not too high that they're using techniques and tools that are outside of your realm of understanding.
Other than that, just try to have fun, don't stress too much about it, and save often!!! Part of creating art is learning to be at peace with the process, so don't stress too much if it takes you a while to get adjusted to the layouts and tools - at the end of the day, digital art is another medium entirely, so it's not uncommon at all for traditional artists to need a lot of practice to 'switch' to digital, because they both utilize different tools and techniques. Be patient with yourself, always be on the hunt for new resources and guides and references, and don't be afraid to experiment and make mistakes (the best part about digital art? Mistakes don't cost you any paint or materials!)
Good luck!! And congrats again! 🥰
60 notes
·
View notes
Text
¿Qué Distribución de Linux Deberías Usar Según tus Intereses? / Which Linux Distribution Should You Use Based on Your Interests?
Introducción / Introduction
Español: Linux ofrece una vasta gama de distribuciones, cada una diseñada para diferentes intereses y necesidades. Ya sea que te enfoques en el desarrollo de software, la administración de sistemas, la creación de contenido multimedia, o simplemente busques una alternativa a Windows o macOS, hay una distribución de Linux que se adapta a ti. Además, Linux proporciona ventajas significativas sobre otros sistemas operativos en muchos de estos escenarios. En este blog, exploraremos cuál distribución es ideal según tus intereses y las razones por las que Linux puede ser una mejor opción en comparación con Windows o macOS. Presentaremos esta información de manera accesible para tanto hispanohablantes como angloparlantes.
English: Linux offers a wide range of distributions, each designed for different interests and needs. Whether you focus on software development, system administration, multimedia creation, or simply seek an alternative to Windows or macOS, there’s a Linux distribution that suits you. Additionally, Linux offers significant advantages over other operating systems in many of these scenarios. In this blog, we’ll explore which distribution is ideal based on your interests and why Linux might be a better choice compared to Windows or macOS. This information will be presented in a way that is accessible to both Spanish and English speakers.
1. Ubuntu: Ideal para Principiantes, Desarrollo y Diseño Gráfico / Ubuntu: Ideal for Beginners, Development, and Graphic Design
Español: Ubuntu es la elección perfecta para quienes son nuevos en Linux o buscan una distribución estable y fácil de usar para el desarrollo de software. Su amplia compatibilidad con aplicaciones como GIMP, Inkscape y Blender también la convierte en una excelente opción para diseñadores gráficos e ilustradores. Además, Ubuntu ofrece soporte para una variedad de herramientas de desarrollo, lo que la hace ideal para programadores.
English: Ubuntu is the perfect choice for those new to Linux or looking for a stable and user-friendly distribution for software development. Its broad compatibility with applications like GIMP, Inkscape, and Blender also makes it an excellent choice for graphic designers and illustrators. Additionally, Ubuntu offers support for a variety of development tools, making it ideal for programmers.
2. Fedora: Para Desarrolladores, Seguridad y Creación de Contenido Multimedia / Fedora: For Developers, Security, and Multimedia Creation
Español: Fedora se destaca por estar a la vanguardia en términos de tecnología y seguridad. Es una distribución ideal para desarrolladores y aquellos interesados en seguridad informática. Además, Fedora es compatible con una amplia gama de software para edición de video, audio y animación, como Kdenlive, Audacity y Blender, lo que la convierte en una opción sólida para creadores de contenido multimedia.
English: Fedora stands out for being at the forefront of technology and security. It’s an ideal distribution for developers and those interested in cybersecurity. Additionally, Fedora supports a wide range of software for video editing, audio production, and animation, such as Kdenlive, Audacity, and Blender, making it a solid choice for multimedia content creators.
3. Debian: Para Administradores de Sistemas, Usuarios Avanzados y Diseño 3D / Debian: For System Administrators, Advanced Users, and 3D Design
Español: Debian es conocida por su estabilidad, lo que la hace ideal para administradores de sistemas y usuarios avanzados. Su entorno sólido también es adecuado para diseñadores 3D que buscan un sistema confiable para trabajar con software como Blender o FreeCAD. Debian proporciona un entorno de trabajo predecible y seguro, ideal para manejar proyectos de gran escala y complejidad.
English: Debian is known for its stability, making it ideal for system administrators and advanced users. Its solid environment is also suitable for 3D designers looking for a reliable system to work with software like Blender or FreeCAD. Debian provides a predictable and secure work environment, ideal for handling large-scale and complex projects.
4. Arch Linux: Para Usuarios Avanzados, Personalización Extrema y Jugadores / Arch Linux: For Advanced Users, Extreme Customization, and Gamers
Español: Arch Linux es la distribución preferida por aquellos que desean un control total sobre su sistema. Es ideal para usuarios avanzados que buscan personalización extrema y desean optimizar su sistema para el rendimiento en juegos. Arch te permite configurar tu entorno de juego con precisión, optimizando el rendimiento con herramientas como Steam y Proton para jugar títulos de Windows en Linux.
English: Arch Linux is the preferred distribution for those who want full control over their system. It’s ideal for advanced users seeking extreme customization and who want to optimize their system for gaming performance. Arch allows you to finely tune your gaming environment, optimizing performance with tools like Steam and Proton for playing Windows titles on Linux.
5. Linux Mint: Alternativa a Windows para Escritorio y Creadores de Contenido / Linux Mint: Windows Alternative for Desktop Users and Content Creators
Español: Linux Mint ofrece una experiencia de usuario familiar para aquellos que buscan una alternativa a Windows, siendo particularmente amigable para el uso en escritorios. También es una excelente opción para creadores de contenido que necesitan una distribución simple y efectiva para trabajar con herramientas como OBS Studio, GIMP y Audacity. Mint combina facilidad de uso con estabilidad, facilitando la transición desde Windows.
English: Linux Mint offers a familiar user experience for those seeking an alternative to Windows, being particularly user-friendly for desktop use. It’s also an excellent choice for content creators who need a simple and effective distribution for working with tools like OBS Studio, GIMP, and Audacity. Mint combines ease of use with stability, making the transition from Windows smooth.
6. Pop!_OS: Para Desarrolladores, Gamers y Diseño 3D / Pop!_OS: For Developers, Gamers, and 3D Design
Español: Pop!_OS es una distribución basada en Ubuntu, optimizada para desarrolladores y jugadores. Incluye soporte nativo para GPUs, lo que la hace ideal para jugar y trabajar en proyectos de diseño 3D con software como Blender. Además, su enfoque en la productividad y el flujo de trabajo eficiente la convierte en una excelente opción para desarrolladores que buscan un entorno de trabajo optimizado.
English: Pop!_OS is a Ubuntu-based distribution optimized for developers and gamers. It includes native GPU support, making it ideal for gaming and working on 3D design projects with software like Blender. Additionally, its focus on productivity and efficient workflow makes it an excellent choice for developers looking for an optimized work environment.
Ventajas de Linux Sobre Windows y macOS / Advantages of Linux Over Windows and macOS
Español: Linux ofrece diversas ventajas sobre Windows y macOS, incluyendo:
Costo: La mayoría de las distribuciones de Linux son gratuitas, lo que reduce significativamente el costo en comparación con las licencias de Windows o macOS.
Seguridad: Linux es conocido por su robusta seguridad, con menos vulnerabilidades a malware debido a su arquitectura y modelo de permisos.
Rendimiento: Linux es más eficiente en el uso de recursos, ofreciendo mejor rendimiento, especialmente en hardware más antiguo o limitado.
Personalización: Con Linux, tienes un control total sobre tu sistema, permitiendo ajustar cada aspecto según tus necesidades, lo que es ideal para usuarios avanzados y creadores de contenido.
English: Linux offers several advantages over Windows and macOS, including:
Cost: Most Linux distributions are free, significantly reducing costs compared to Windows or macOS licenses.
Security: Linux is known for its robust security, with fewer vulnerabilities to malware due to its architecture and permission model.
Performance: Linux is more resource-efficient, offering better performance, especially on older or limited hardware.
Customization: With Linux, you have full control over your system, allowing you to tweak every aspect to fit your needs, ideal for advanced users and content creators.
Conclusión / Conclusion
Español: Elegir la distribución de Linux adecuada puede mejorar significativamente tu experiencia, dependiendo de tus intereses y necesidades. Desde Ubuntu y Fedora para principiantes y desarrolladores, hasta Arch Linux para usuarios avanzados y jugadores, y Pop!_OS para creadores de contenido y diseño 3D, hay una distribución que se adapta a cada perfil. Linux ofrece notables ventajas sobre Windows y macOS, convirtiéndose en una opción atractiva para una amplia variedad de usuarios.
English: Choosing the right Linux distribution can significantly enhance your experience, depending on your interests and needs. From Ubuntu and Fedora for beginners and developers, to Arch Linux for advanced users and gamers, and Pop!_OS for content creators and 3D design, there’s a distribution that fits every profile. Linux offers notable advantages over Windows and macOS, making it an attractive option for a wide range of users.
#Linux#DistribucionesLinux#Ubuntu#Fedora#Debian#ArchLinux#LinuxMint#PopOS#AlternativaWindows#SistemaOperativo#PersonalizaciónLinux#VentajasLinux#LinuxVsWindows#LinuxVsMac#DesarrolloSoftware#AdministraciónSistemas#SeguridadLinux#RendimientoLinux#DiseñoGráfico#Videojuegos#Animación#Diseño3D#CreaciónDeContenido#Ilustración#Multimedia
30 notes
·
View notes
Note
i dont understand the whole "unity" thing. what is happening? all the game devs on my tl are talking about it
Alright so starting from 0:
To make a game, you need to do a lot of things: display objects, animate them, physics, collisions, etc. This, is a lot of work, so while you can do them from scratch, and some people do, most people will use a game engine.
A game engine is a software that does many of the reccuring things in a video game. For example, it handles the displaying of 3D objects. But it doesn't do the whole game, even with an engine, there's still a lot of work to do.
What most devs will do when making a game, is that they'll use an engine as a basis, and then build above it.
Now, we have several options to choose from, when it comes to game engines. One of these options is called "Unity". Unity is one of the largest game engine, with a reputation of being great to learn for beginners.
And many people, me included, spent of fucking lot of time learning Unity, and developing tools for Unity and all was good.
But everything changed when capitalism attacked.
A few days ago, Unity announced they would change how they would bill developers for each time their game would be downloaded, above a certain threshold. Which made a lot of devs angry.
First because it counted once for each device the same user would download the game on, then once for each time he reinstall the game, then once for each pirated version etc. Also it was retroactive so there are games that will be withdrawed from Steam, like cult of the lamb and such.
So of course we got angry and they backtracked on a few things. I'm still gonna change engine because fuck them.
But swapping engine isn't an easy task. If you're working on a game, you'll have to redo most of the code. If you made tools, all these will be useless. So some people are stuck with Unity and their unfair practices.
134 notes
·
View notes
Text
Masterpieces in Pixels: The Best of Digital Photo Artwork
When Technology Meets Imagination
Once, the masterpiece was born of brush and canvas. Today, some of the world's most breathtaking compositions begin with a stylus and screen. Welcome to the world of digital art painting, where creativity knows that there is no limit and pixels do not become poetry.
This article is a celebration of the digital renaissance - showing iconic digital photo artifacts, spotting impressive artists, and revealing how the technique is changing the visual stories.
The Rise of Digital Art: A New Chapter in Art History
The development of art has always been powered by equipment—stone, charcoal, oil, and acrylic. The digital era brought a new set of devices: graphic tablets, photo-editing software, and 3D rendering engines.

Why Digital Art Painting Deserves the Spotlight
Critics once rejected digital art as "less real," but the world of art has moved. Today, digital photo artwork is displayed in major galleries, collected as NFTs, and used in gaming, film, fashion, and advertising.
Here’s what makes it stand out:
Versatility: From photorealism to essence, digital equipment suits every style.
Efficiency: Premous, again, and layers use the experiment risk-free.
Exception: Artists worldwide can cooperate, share, and sell their work.
Digital Masterpieces That Inspire
Let's dive into some standout examples that show the emotional and technical depth of digital art painting.
1. “Portrait of the Future” by Artgerm
A hyper-detailed science-fiction portrait that mixes Eastern aesthetics with the Western comic book effect. The signature of the artgerm is possible with the work of the complex layer in Photoshop.
2. “City of Light” by Beeple
One of the most famous digital artists of our time creates a dystopian world with quality like Bipal cinema. Their daily rendering leads the boundaries of digital storytelling.
3. “Dreams in Bloom” by Ross Tran
This colorful, chaotic, and joyful piece shows how digital equipment can reflect an artist's personality. Ross's bold brushstrokes and unique character design make their work immediately recognizable.
Behind the Scenes: How Digital Art Paintings Are Created
Creating a digital work includes more than just software. It is a process filled with vision, technology, and story.
Step-by-step Process:
Sketching the concept —just like traditional art.
Blocking in shapes and color —using layers for flexibility.
Adding depth and lighting—digital brushes simulate texture and light.
Refining details—highlights, shadows, effects, and final polish.

Meet the Masters: Influential Digital Artists
Loish (Lois van Baarle)
Known for its dreamy characters and expressive brushwork, depiction and animation of bridges in a vibrant digital style.
Feng Zhu
Concept artist for games like Star Wars and Transformers, Feng brings cinematic flair to every digital stroke.
Magdalena Pagowska
Their fantasy-themed digital photo artifacts featured a mixture of realism and imagination, often accompanied by ethereal light and flowing texture.
How to Appreciate Digital Art
It is not certain how to read digital paintings. Here are things to see:
Brush technique: Is it painterly, smooth, or textured?
Lighting: Does it evoke a mood?
Composition: How are the elements balanced?
Emotion: What story is it telling?
Digital does not mean. In fact, with repetition and the ability to use it, digital art often captures deep emotional nuances.
Getting Started: Become a Digital Creator Yourself
Inspired? You can try your hand at digital art painting even as a beginner. Here’s how:
Beginner Tools: Try free apps like Krita or use an iPad with Procreate.
Learn the Basics: Study traditional drawing—digital is just a new medium.
Take Courses: Platforms like Skillshare, Udemy, and YouTube are goldmines.
Join the Community: Reddit, ArtStation, and Discord groups provide support and feedback.
The best way to improve? Just keep creating. Even the best artists started with stick figures.
The Digital Canvas: What's Next?
Technology leads the limits of creativity.
AI-assisted painting tools are helping artists generate ideas faster.
Augmented and virtual reality art is becoming more interactive.
NFTs and blockchain have created new art markets and collector experiences.

Celebrating Creativity in the Digital Age
Digital art painting is proof that artistry is not limited by medium. Whether it is painted on a canvas or prepared on a tablet, what matters is the story that tells it, and it is a feeling.
In Pixel, these works reflect the same passion, technology, and surprise that are hanging any oil painting in a museum. So next time you see a digital artwork, look closely - you can gaze into the future of art.
4 notes
·
View notes