#3d modeling software for buildings
Explore tagged Tumblr posts
Visit Tumblr Blog
Explore Tumblr blogs with no restrictions, modern design and the best experience.
Last Seen Tumblr Blogs


Fun Fact
Tumblr.com rank in the US is 25.
Text
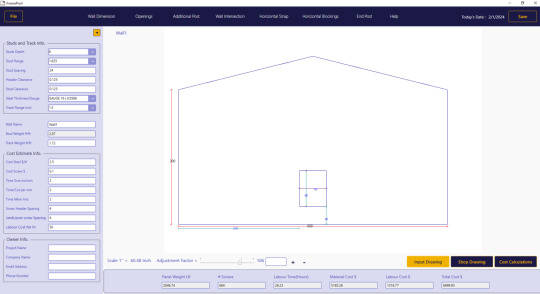
Make Use Of Light Gauge Steel Design Software Without Having 3D Modeling Skills
Did you know? Now you no longer need to have a thorough understanding of CAD design or acquire specialized 3D modeling abilities. With your basic knowledge of evaluating architectural dimensions and structural standards, you can easily enter your data into our light gauge steel design software program. After that, FrameProX instantly generates detailed shop drawings along with comprehensive cost calculation, for constructing the particular wall.
#light gauge steel design software#light gauge steel framing#3d modeling software construction#3d modeling software for buildings#3d steel detailing software#architecture 3d modeling software#building construction software#best steel detailing software#building structural analysis software
1 note
·
View note
Text
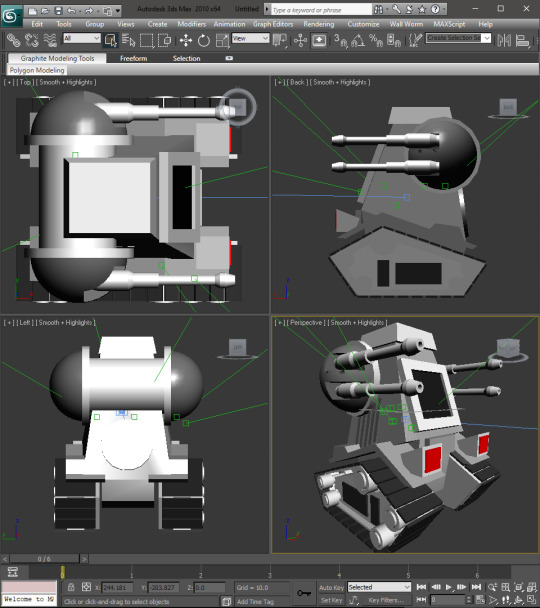
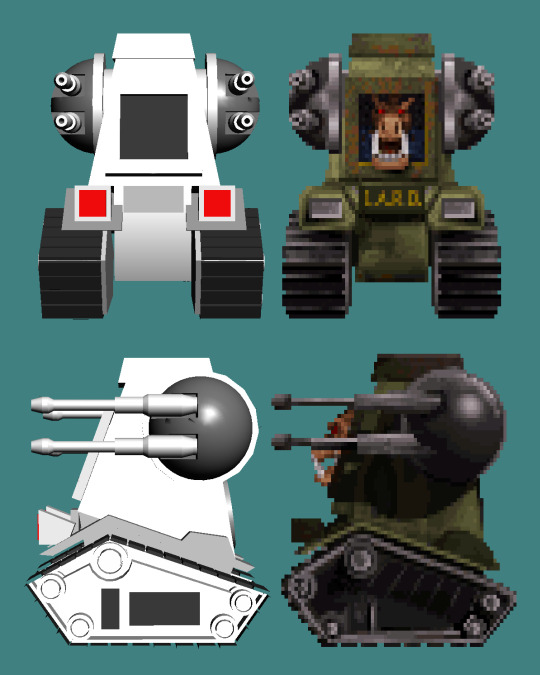
"The RIOTTANK.3DS model found in the recent 3D Realms discs in the late Stephen Hornback's data archive sure looks like it could be 'the' original model used for the Pig Cop Tank sprites in Duke Nukem 3D."
#duke nukem 3d#duke nukem#build engine#3d realms#apogee software#trivia#3d model#vehicle#pig cop#pig cop tank
4 notes
·
View notes
Text
Best BIM Tools in 2025 and Selecting the Right BIM Software

BIM is a comprehensive approach in the AEC realm, and its applications and tools hold a significant position. It is vital to choose the right BIM software for project requirements, coordination, and efficiency. Here’s a detailed, curated list of the best BIM software and key factors for selecting it.
#bim modeling services#3d bim services#mep shop drawings#building information modeling#interior visualization#clash detection#revit families creation#3d cad drawings#shop drawing services#bim company#top bim software#best bim tools
2 notes
·
View notes
Text
The Role of CAD Drafting in Structural Engineering
Discover how CAD drafting tools revolutionize structural engineering by improving accuracy, streamlining design, enhancing collaboration, and ensuring regulatory compliance. Learn about the vital role of CAD software in creating precise, efficient, and sustainable structural designs.
#CAD drafting#drafting tools#structural engineering CAD#AutoCAD drafting#structural design software#CAD in structural engineering#3D modeling CAD#drafting software#structural analysis CAD#engineering drafting tools#digital drafting#building design CAD
0 notes
Text
BIM Software Solutions for Modern HVAC Applications
As the HVAC industry continues to evolve in 2025, Building Information Modeling (BIM) has become an indispensable tool for professionals seeking to optimize design, installation, and maintenance processes. For HVAC engineers, contractors, and technicians, selecting the right BIM software can significantly impact project efficiency and outcomes. Let’s explore the most effective BIM solutions for…
#3D modeling#augmented reality#Autodesk Revit#automation#Bentley AECOsim#BIM#BIM workflows#building information modeling#Building performance#building systems#clash detection#cloud collaboration#cooling loads#decision matrix#digital twin#duct design#energy analysis#Energy efficiency#fabrication documentation#Graphisoft ArchiCAD#heating loads#hvac#HVAC design software#HVAC engineering#interoperability#mechanical engineering#mechanical systems#MEP#MEP coordination#mixed reality
0 notes
Text
Speed build of an MOC of the Chicken Jockey from Minecraft
1 note
·
View note
Text
God. Getting the sims 3 to work in 2024....
#ive done it. i did it. but oh god#modding the sims 3 in 2024. even worse.#also done it. accomplished. but oh god#why you ask? fun i answer. its a more fun game than ts4 for me to just. play#sims 4 is like a really limited 3d modelling software. to me. i make my pretty sims i close the game. make my cool building i close the game#sims 3? sims 3 i actually play. as a life simulator game. funny that#i still tell my ilttle stories with my blorbos dont get me wrong. but i actually. do that. instead of just thinking abt it
0 notes
Text
Professional 3D BIM Modelling Services in Washington DC
Our 3D BIM Modelling Services DC offer cutting-edge solutions for all your construction and architectural needs. We specialize in creating precise, detailed Building Information Models that enhance project efficiency, reduce errors, and streamline collaboration. Serving the Washington DC area, our expert team ensures your projects are executed flawlessly from concept to completion. Whether you’re an architect, contractor, or developer, our BIM services provide the accuracy and innovation necessary for successful project delivery.
#3D BIM Modelling Services DC#3D Reality Capture For Building Construction#Reality Capture 3D#Reality Capture Services#Reality Capture Software#Top Bim Service Companies#3D BIM Modeling Services#3D BIM Modeling#3D BIM Modeling Services New York
0 notes
Text
The Bridge to Innovation: Why Revit Needs an OBJ Exporter
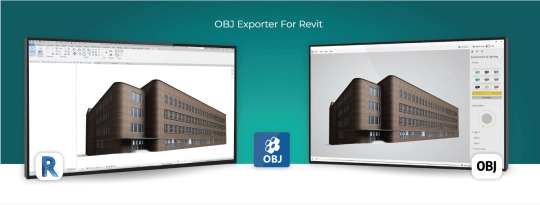
Introduction
Autodesk Revit is a powerful BIM (Building Information Modeling) software used extensively in the architecture, engineering, and construction industries. It enables professionals to design, model, and document complex building structures with precision and efficiency. However, there are situations where you may need to export your Revit models to other software applications for various purposes, such as visualization, simulation, or 3D printing. This is where an OBJ (Wavefront Object) exporter for Revit becomes invaluable. In this blog post, we'll explore the reasons why you need an OBJ exporter for Revit and the benefits it brings to your workflow.
1. Compatibility with a Wide Range of 3D Software
One of the primary reasons for using an OBJ exporter for Revit is compatibility. OBJ is a widely recognized 3D file format supported by an extensive list of 3D software applications. When you export your Revit models as OBJ files, you can easily share your designs with collaborators or transfer them to other specialized software for tasks such as rendering, animation, or simulation. Some popular software packages that support OBJ include Blender, 3ds Max, Maya, Unity, and many more.
2. High-Quality Mesh Export
Revit models consist of BIM elements like walls, floors, roofs, and families. These elements are typically represented as parametric objects with detailed information. When exporting to OBJ, Revit converts these parametric objects into polygonal meshes, allowing for a more efficient transfer of geometry. OBJ files maintain the visual fidelity and structural integrity of your design, ensuring that complex architectural details and textures are preserved accurately.
3. Streamlined Visualization
Visualization is a critical aspect of architectural and construction projects. An OBJ exporter for Revit simplifies the process of rendering and visualizing your models in other 3D software. You can import your OBJ files into rendering software like Blender or 3ds Max to create stunning, photorealistic renderings, which are essential for client presentations, project approvals, and marketing materials. OBJ files can also be used in virtual reality (VR) and augmented reality (AR) applications, enhancing your ability to communicate design concepts effectively.
4. Simulation and Analysis
In certain scenarios, you may need to analyze your Revit models for structural integrity, energy efficiency, or other factors. Many simulation and analysis tools, such as finite element analysis (FEA) or computational fluid dynamics (CFD) software, require 3D models in a compatible format. By exporting your Revit models to OBJ, you can seamlessly integrate them into these specialized software packages for in-depth analysis and optimization.
5. 3D Printing
The field of 3D printing has seen rapid growth in recent years, and architects and engineers often use it to create physical prototypes, scale models, or custom building components. OBJ files are widely accepted by 3D printing software and services, making it easy to translate your Revit designs into tangible objects. Whether you're working on an architectural model or a structural component, exporting your Revit model as an OBJ file ensures that it can be easily converted into a 3D-printable format.
6. Cross-Platform Collaboration
Collaboration is key in the AEC (Architecture, Engineering, and Construction) industry. Teams often consist of professionals using various software tools, and seamless data exchange is crucial for project success. An OBJ exporter for Revit facilitates cross-platform collaboration by providing a standardized format that can be imported into different software environments. This compatibility reduces the risk of data loss and ensures that all team members can work with the same model.
Conclusion
In conclusion, an OBJ exporter for Revit is a valuable tool that enhances the versatility and compatibility of your BIM workflow. It enables you to share, visualize, analyze, and produce physical models from your Revit designs with ease. By using OBJ as an intermediary format, you can tap into the full potential of your Revit models, allowing you to collaborate more effectively with colleagues and unlock new possibilities in architecture and construction projects. Whether you're creating stunning visualizations, conducting simulations, or 3D printing prototypes, an OBJ exporter for Revit is a valuable addition to your toolkit.
Get FREE Trial
#OBJ exporter for Revit#Autodesk Revit#3D Software#CAD Plugins#CAD Expoters#CAD Importers#CAD Extensions#CAD Software#3D printing#visualization#BIM (Building Information Modeling) software
0 notes
Text


Shop Sign Wall Lights - UPDATED 15 May 2025
I put together a few sets of shop sign wall lights. But there are instructions. I kept some swatches as a default white color so that you could pick which color you want the light to be while in live mode. This saved on the file size of the package file because the more textures a file has, the more bloated the file size is.
I had some fun with some shop names although I mainly included generic titles in both English and Simlish.
DOWNLOAD for FREE: SFS
OR at Patreon*
*You must be over 18 to access my Patreon page.
INSTRUCTIONS ON CHANGING LIGHT COLORS
Once you place the light in build mode, then go to live mode. Click on the light and you will get the following pie menu.

Select SET COLOR AND INTENSITY and then choose THIS LIGHT. The color options will then appear so you can select which color you want.

If you use the name signs along with the Awning Lights, make sure to place the name on top of the awning so when you select the color picker, the correct sign changes colors. The other option is to place the name separate from the awning, go to live mode and change the color, then go back to build mode and add the awning light you want.
Enable the bb.moveobjects on cheat and then you can make adjustments to location and size of objects. You can adjust the position of the light on the wall by depressing the Alt key while placing the sign (on PC). You can adjust the size of the item by depressing the Shift key and either [ (for smaller) or ] (for bigger) (on PC).
CREDITS
Awning Shop Lights - 19 swatches of various awning wall lights. 18 are pre-colored and one is white so you can change the color yourself in game.
Candy Shop Lights - 20 swatches
Pottery Shop Lights - 25 swatches
Tattoo Shop Lights - 21 swatches
Enjoy!
Creations by SexyIrish7
These cc objects are new 3d meshes created using Blender and Sims 4 Studio.
Polygon Count: 6
All CC have:
*Ability to search catalog using search terms: sexyirish7 and si7
*Customized thumbnail
*******
CREDITS:
Software credits:
Sims 4 Studio v. 3.2.4.1 (Star): https://sims4studio.com
Blender 4.0: https://www.blender.org/download/
GIMP v. 2.10.34: https://www.gimp.org/
Inkscape v. 1.2: https://inkscape.org/
Thank you to the creators and moderators producing tutorials and answering questions!
*******
Model and Image credits:
Mesh created by me.
Simlish font credit to Franzilla: https://modthesims.info/
Image credits:
Awning Lights Image credits: Modified image from Adobe Stock
Candy Shop Image credits:
Swatches 1-3: Image by pch.vector on Freepik https://www.freepik.com/free-vector/christmas-candies-symbols-set-neon-style_11241813.htm#fromView=search&page=1&position=26&uuid=8b541325-0e62-4e37-9468-6bacd30f8963&query=neon+lollipop+candy
Swatches 4-8: Image by gstudioimagen on Freepik https://www.freepik.com/free-vector/sweet-candy-neon-seamless-pattern_5595774.htm#fromView=search&page=2&position=30&uuid=e2259de5-014d-4d04-af87-1198ee0f35e2&query=%40gstudioimagen+neon
https://www.freepik.com/free-vector/sweet-candy-neon-seamless-pattern_5595775.htm#fromView=search&page=1&position=27&uuid=e2259de5-014d-4d04-af87-1198ee0f35e2&query=%40gstudioimagen+neon
Swatches 9-10: Image by openclipart.org https://all-free-download.com/free-vector/download/peppermint_candy_clip_art_13182.html
https://all-free-download.com/free-vector/download/round_candy_with_stick_card_on_pink_background_6823183.html
Swatch 11: Image by All-free-download.com https://all-free-download.com/free-vector/download/round_candy_with_stick_card_on_pink_background_6823183.html
Swatches 12: Image by katemangostar on Freepik https://www.freepik.com/free-vector/ice-cream-cart-neon-sign_3238564.htm#fromView=search&page=8&position=42&uuid=2f82b4d1-5ca8-449c-ae22-4573861ebcb0&query=neon+sign+retail
Pottery Shop Image credits:
Swatch 1: Crafting icons created by andinur - Flaticon https://www.flaticon.com/free-icon/pottery_17392031
Swatch 2: Image by katemangostar via Freepik https://www.freepik.com/free-vector/aquarius-neon-sign_5561944.htm#fromView=search&page=2&position=5&uuid=c55e5e21-0550-46f0-b9be-cfa85ff38796&query=Ceramic+Neon
Swatch 3-4: Pottery icons created by Smashicons - Flaticon https://www.flaticon.com/free-icon/vase_3760867
https://www.flaticon.com/free-icon/vase_3760970
Swatch 5: Icon by istar_design_bureau via Freepik https://www.freepik.com/icon/pottery_1958438#fromView=search&page=2&position=20&uuid=096084ae-13fe-429c-a419-e6e13ccd37b9
Swatch 6:Icons by Eucalyp - Flaticon https://www.flaticon.com/free-icon/pottery_6552610
Swatch 7: Icon by berkahicon via Freepik https://www.freepik.com/icon/spin_13785816#fromView=search&page=2&position=0&uuid=096084ae-13fe-429c-a419-e6e13ccd37b9
Swatches 8-11: Icons by Freepik https://www.freepik.com/icon/pottery_8540816#fromView=search&page=3&position=43&uuid=096084ae-13fe-429c-a419-e6e13ccd37b9
https://www.flaticon.com/free-icon/machine_9200546
https://www.flaticon.com/free-icon/vase_8838322
https://www.flaticon.com/free-icon/pottery_3305262
Tattoo Shop Image credits:
Swatch 1: Modified Image by katemangostar on Freepik https://www.freepik.com/free-vector/tattoo-salon-neon-text-with-tattoo-machine-neon-sign-night-bright-advertisement_2438198.htm?log-in=email
Swatch 2: Image by Nippy Custom https://www.nippycustom.com/products/tattoo-neon-sign
Swatches 3-5: Image by bohlam via Vecteezy https://www.vecteezy.com/vector-art/2185717-tattoo-studio-neon-signs-style-text-vector
https://www.vecteezy.com/vector-art/34210463-neon-sign-tattoo-studio-with-brick-wall-background-vector
*******
TOU:
Do not re-upload and claim as your own
Do not re-upload and hide behind a paywall
*******
Changelog:
15.05.2025
*Updated swatches for compatibility with slotted signs.
*Added wall deco slot so that signs can be stacked on slotted signs for Awning Signs
*Added swatches with inverted images for Candy, Pottery, and Tattoo Shop Signs.
#the sims 4 cc#ts4cc#sims 4 cc#the sims 4#wall decor#sims 4#ts4#lights#wall lights#signs#shop signs#retail#pottery#ceramics#tattoo#ink#candy#lollipop#sweets#sugar#light tutorial#sexyirish7#updated cc#featured
305 notes
·
View notes
Text
Murderbot 3D Print Part 3 - FILES!!!
It's what many of you have been waiting for! THE 3D FILES!
The price??? It's free!
That's a lie, the price is actually that you send me pictures of the results so I can have the joy of seeing what you all make. (I mean it, this is a threat)
Based on comments so far, it seems like this will be the first dive into 3D printing and figure painting for some people so I'll go through some of my approach to give you an idea of how I got to this result.
This is actually my first time sculpting, printing and then painting something to completion, so I am not experienced and you can totally do it too. As you may see from my blog I am primarily a digital artist and I occasionally do gouache and ink work, I have literally never painted or sculpted a figure before. (This counts as foreshadowing if you run into any problems with my files lmao)
Sculpting:
I sculpted the model in Nomad Sculpt on my Ipad and tidied things up in blender. I am still a massive beginner with sculpting so I incorporated pieces from some other freely available models to assist me (these are credited in the listing with the model). You don't have to worry about this part!
Printing:
I printed this on my MARS ELEGOO 2 printer. The settings I used for my print are included on the model listing; with these settings the model took about 7.5 hours to print.
The Files
I have uploaded 3 different file formats, a .stl, a .chitubox and a .ctb. An stl is the basic 3D model on its own, it can be opened in most 3D software if you are looking to edit it and it can be imported into any slicing software (slicing is the process of cutting any model into layers for the printer). If you use this file you will have to add the supports to the model yourself (supports are very important in preventing catastrophic print failure).
The .chitubox and .ctb files are specifically from the slicing program I use which is chitubox. The .chitubox program is for the model with the supports for printing attached and the .ctb file is the sliced file that is ready for the printer. VERY IMPORTANT TO NOTE is that these two files are sized and prepared based on my 3D printer dimensions. If you want to use these files, I recommend checking either files in chitubox (and have it set up for the model printer you will be using) and checking the size before going ahead with printing. If the size is too big for your printer you will have to resize the model and add the supports again but you can use the files I have supplied as reference.
I specifically used Chitubox 64 for this as Chitubox basic hates me and won't slice the model so it is solid inside. Printing something solid is easier to print than printing it hollow and trying to cure the resin trapped inside/drain the model (uncured resin is nasty nasty and will also generate gas that builds up pressure and will crack your print).
I recommend using either the basic stl for printing or starting with the .chitubox file and setting up the slicing settings by yourself. The ctb is a good reference for how things should look but probably not the best starting point to guarantee a successful print. If you add supports yourself, I recommend looking up some youtube videos on how to properly support a model, and what parts of a model need the most support and avoiding visible marks on your models from supports.
Post-Printing
Its important to clean and cure your print properly after its done, but if you are getting it done at the library or somewhere else you may not have to worry about this.
To remove the supports I used a heat gun to warm and soften the resin supports and little clippers my friends use for gundam to cut them as flush to the model as possible.
The next thing you want to do is sanding, sand down the marks from the supports, any lines or imperfections from the printing. Resin is relatively soft so this is not hard. I personally bought some cheap sandpaper that went from 400-1000 grit, glued it to icecream sticks, disposable knives and some flat toothpick things and used that to get into small crevices. Sand with wet paper to prevent resin dust going everywhere.
Painting
After sanding I sprayed the model with a primer, I specifically used Mr. Finishing Surfacer 1500 in white. This was my choice simply because its what my local gundam store had and I chose white because I didn't want to use a darker base coat that I had to lighten for the armor (simply put most of the model is white and white is a pain in the ass to paint opaquely)
After this I went in with my standard run-of-the-mill acrylic paints. The key to getting a smooth finish with no brush marks and lumps is to thin/smooth out the paint a little with water and build up the colour in layers.
I painted my base colours (white for the armor, black for the shoes and visor and a dark grey for the suit underneath the armor). To get a cool beaten-up effect I laid some light blue into areas on the armor where shadows would fall, after that I dabbed panel line accent colour which gets into the crevices and lines of the print and accents them (you can also just use really watered down black paint for this, I was lucky to borrow supplies from a warhammer 40k friend). I also covered parts of the armor with it and rubbed it off for a grimy effect and then dabbed some brown paint in for extra colour variation. I then came in and dry-brushed some lighter colours on the dark areas and fixed up the white where I wanted it brighter.
Then finally I coated the whole thing in a matte varnish to protect it and it was done!! My own Murderbot completed!!
Hopefully if you haven't done something like this before, this helps you get started There are dozens and dozens of great tutorials out there for more info or if you want to take your design in a different direction to mine.
Most importantly?? Have fun!!
If you have any issues or questions feel free to message me and we can work on it together!
222 notes
·
View notes
Text
My list of open source for art reference
Blender 3D - with the sketchfab addon for free 3D downloadable models. Large library, pretty much anything you need, versatile export formats. i use this the most out of all.
DAZ3D Studio for detailed figure posing/anatomy studies. free model bases included.
Internet Archive for books on various art studies such as anatomy, clothing and more, to read for free.
VUE by e-onsoftware for environmental world building. Something to fiddle around with to create some powerful, in depth background scenery. (very high CPU usage)
Style3D Atelier, a clothing simulation software with posable models to see how clothing folds form and interact with the body. Free trial exists, how much of the Programm is usable after free trial expires is still unclear to me. Will update later if it stays a viable source (for the real time cloth simulation, this requires a good CPU, too.)
MOSH (lite), for effects such as VHS filters, glitches, distortion etc. 27 effects for free. Both in static form and as .gif if i recall correctly.
Sketchuptextureclub, for seamless textures. Free to download for a limited amount each day.
On my Saved for later list:
Stocksnap.io
Pixivision.net
Cosmos.so
Unsplash.com
Pixabay.com
i've definitely hit slumps before. but i'm always on the search for bettering myself, finding new and or different ways to expand my art and experiment. i hope this will help.
105 notes
·
View notes
Text
👽questions for sim 2 players👽
‼️THIS IS NOT A SURVEY OR QUESTIONNAIRE‼️ you can answer whichever questions you'd like in whichever way you'd like, and feel free to add on to your answers in any way you'd like - share as much or as little about your sims 2-ing as you want, i am keen to hear it all! 👂👀👂
📻audio📻
do you listen to music/streams/podcasts/tv/etc. while playing? if so, is it stuff you would also be listening to if you were doing something else, or do you listen to specific things while playing sims 2?
conversely, do you listen to the sims 2 soundtrack when you're not playing the sims 2?
📺visual📺
if you have little or no cc or other visual changes to your game, are there particular reasons? e.g. disk space/performance, nostalgia/just prefer the vanilla vibe, etc.
if you use a lot of 4t2 and/or 3t2 cc are there any particular reasons? e.g. you play the other game and also want the same stuff in the sims 2, you don't have the other game but want the other game's stuff that you've seen, you prefer the aesthetic of the other game but prefer the gameplay of the sims 2, you feel like eaxis content from the other games is part of the same "set" as the sims 2, you just prefer clay hair, etc.
if you use the vibrant, colourful, and lower contrast? aesthetic that's often called "maxis match", does it actually "match" the sims 2 in your view/experience of the game or do you consider it "maxis match" in the sense of the whole sims series? alternatively, do you not consider it "maxis match" and just prefer the colour and brightness? if so are there any particular reasons? e.g. it reminds you of a game or other media that you like, it gives you a feeling/vibe that you like, etc.
if you use cc that isn't the "maxis match" style mentioned above, but that you consider "maxis match", are there any particular traits that qualify/disqualify "maxis match" cc for you?
if you use "realistic" or "alpha" cc, would you consider your "aim" to be to make the sims 2 game more like real life, or to make a version of real life in the sims 2? alternatively, do you just like the aesthetic, are you used to using "alpha" cc in other sims games, or is "alpha" cc something that is nostalgic for you?
📖experience📖
do your real life experiences influence the way you alter and/or play the sims 2? e.g. adding or replacing stuff with cc that is more familiar to your location and/or culture, making sims, families, builds, or stories that are familiar to you, etc. alternatively, do you have a game that is removed from from your real life experiences? e.g. fantasy, non-human, historical, etc.
do you use the skills you use for sims 2 gameplay/content creation for work/school/other hobbies? e.g. image/video editing, 3D modelling, coding, making/using spreadsheets, writing, internet research, etc. if so, does that influence the way you use your skills? e.g. software, habits/best practices, decreased/increased motivation, etc.
📠mentions📠
@heyoniina, @ennysimmer, @trofysisters, @mocuna-sims, @itschaniesims, @phoebe-twiddle, @squeezleprime, @withlovefromsimtown, @funderberkersims, @kindreddarling
i have just tagged the people that interacted with my posts asking if people would be interested in answering questions, but ‼️if anyone sees these questions and would like to answer them, please do‼️ ‼️especially if we are mutuals‼️ ‼️also please @maisims2 with your answers so i can read them‼️
thank you for your time 🥰
#sims 2#ts2#the sims 2#ts2 simblr#ts2 tumblr#sims 2 gameplay#ts2 gameplay#the sims 2 tumblr#sims 2 tumblr#sims 2 simblr#the sims 2 simblr#the sims 2 audio visual experience
97 notes
·
View notes
Note
Ozz! I'm trying to get into drawing, but I'm absolutely horrid at it and have no idea where to begin. Do you have any tips for beginners? Also, what program do you use? I've heard Krita is good, have you heard of it?
Also, also, remember to hydrate properly and get a good amount of sleep and do lots of self-care! <33 we love you and your content; you make the world a brighter place ^^
~ 🐇
If you want to start from the very bottom, there's a website where the first lesson is drawing a line, quite literally. It builds your confidence with basic shapes, then moves on to more complex topics like textures, shapes in space, construction of real life objects and so on.
I've had it in my bookmarks for...gosh, years now. I should definitely pick it up again, haha.
I also follow Alphonso Dunn on YouTube, he has hundreds of art tutorials and exercises.
As for software, I briefly used Krita years ago and it was nice! It had a very easy interface and the brushes worked well if you wanted to reproduce traditional art. The only reason I didn't stick to it was because I already had PaintTool SAI and Photoshop at the time. When I got my first graphic tablet, I started with Paint.NET, though it was very simplistic.
The general consensus online seems to be Krita for painting or MediBang if you're into drawing anime. In terms of paid software, I think Clip Studio Paint is very popular and has a lot of resources, from brushes to 3D models. Photoshop is classic, but it can be overwhelming if you're new to digital art.
I personally use Procreate because it came with my iPad and it has a very simple menu. Some professional illustrators say it lacks the advanced options you'd find in other programs, and I do agree it may not be enough if you want to go beyond merely drawing. To add text and make small edits, I'll put the doodle through Photoshop, for example.
Free software: Krita, MediBang, Gimp, KRESKA.art (no installation required)
Paid software: PaintTool SAI, Adobe Photoshop, Procreate, Clip Studio Paint
If anyone has more suggestions or tips, feel free to drop them in the comments!
88 notes
·
View notes
Text

THE SIMS 3 TUTORIAL
HOW TO CREATE DEFAULT REPLACEMENT MOD USING CUSTOM MESH & TEXTURE FOR SIMPLE OBJECT
⚠️ Tumblr has 30 pictures limit, so I cannot include too many pictures. If you want to zoom in the pictures, click the pictures to enlarge, or save the pictures into your PC, zoom the pictures on picture viewer or zoom in the pictures on your mobile phone. ⚠️
----------------------------------------------------
I create this tutorial to make easier to follow because there are older tutorials available before but scattered on internet and usually only say "Export to replace s3asc" without explaining how to export the edited object properly.
My method is using TSR Workshop instead of exporting the object using Sims 3 Object Export/Import plug in because exporting to replace the s3asc using that plug in always giving error notification "ERR: Model has 1 groups; original had 0" and cannot be exported.
For beginners who are very new using s3pe and haven't created default replacement mod before, better start from simple object first.
Simple objects I mean in-game object that has single MODL and single texture with no morphs, no GeoStates, no presets, no CAS colour channels, and easily cloned from OBJD on catalogue. Usually as utensils that Sims holding in their hand, not buy/build objects. For example: Pencil, pan, fork, spoon.
----------------------------------------------------
Tools to prepare:
s3oc
s3pe
Milkshape 3D for bone assignment (Version I use 1.8.5 beta, discontinued by its developer, therefore feel free to download the full version with its license key provided).
Sims 3 Object Export/Import 1.01 by Wesley Howe (Milkshape plug-in. Download msS3ObjPluginsV101.rar )
TSR Workshop (Older version for TS3 only version 2.0.88)
TSR Workshop plug-ins for export.import TSRW Object.
3D Program (Blender/Maya/3dsMax)
Editing images software (Photoshop, make sure you have to install .dds plugin by Nvidia. For free software alternative, you can use GIMP with its .dds plugin)
This tutorial will not teach you how to:
Meshing object ❌
Create alpha texture ❌
Change thumbnails in-game ❌
Install programs and plug-ins ❌
This is how I created Chinese chopsticks replacement mod using custom mesh and texture.
In summary, this tutorial has 10 steps:
Step 1. Clone the Object using s3oc
Step 2. Open S3PE to Copy the Original Resource Code and Export the Files
Step 3. Export the Original Mesh as Base Mesh to .obj format
Step 4. Create Your Custom Mesh
Step 5. Bone Assignment & Create Group
Step 6. Create custom Texture
Step 7. Import the .wso of Edited Mesh on TSR Workshop & Export the package
Step 8. Export MODL file from Package saved from TSR Workshop
Step 9. Finalizing in s3pe & Replacing the Original file with Edited File & Correcting the Code As Same As Default Code
Step 10. Test the CC in your game.
-----------------------------------
✳️ Step 1. Clone the Object using s3oc
Before cloning the object, check the Game Folder for in-game object file location. Settings > Game Folders...
Take a look if the Base Game or Expansion Pack for object file you want to clone is in the right folder. For example, my The Sims 3 game are all bought from Steam, so the location is D:\SteamLibrary\steamapps\common\The Sims 3
If you want to clone object from Expansion Pack, make sure input the folder location. For example, the location for World Adventures EP is D:\SteamLibrary\steamapps\common\The Sims 3\EP1

If you are done, close the pop-up box. You can continue click Cloning then choose Normal Object...
Wait until you get the whole catalogue. Click Search...

For example, I clone object from World Adventures Expansion Pack. You can clone object from Base Game or other Expansion Packs as long it is considered as "utensil" that Sim holding on hand. For example: "Pencil" or "Pan"
Search for text: chopsticks
or if you want to clone object from Base Game, search: utensil
Tick check marks for Resource Name, Object Name, Object Desc then click "Search button"
Search result gives you results with name "chopsticks". Here is the object we are looking for: UtensilChopsticks
We need the OBJD file to clone. OBJD = Object Data.

Click "Clone or Fix" at the right bottom. Then you see the next page to determine if you want to clone with renumber or not. If you want to make default replacement, then do not check the Renumber box. Keep it blank.
Tick check box means the s3oc will generate new resource code for new item. Not tick the check means the s3oc will overwrite the same resource code, it is to replace object you cloned in-game.
I am personally a detailed person, so I usually tick as many as I want: tick "Deep clone" "Missing String Tables" and "Include Thumbnail" to include more details. Then click "Start" to proceed.

It will give you file name [CreatorName]_ObjectName_Number
Then save your package file in "DBPF Package" format in your project folder. Always make folder for any file to make everything organized.
✳️ Step 2. Open S3PE to Copy the Original Resource Code and Export the Files
Open S3pe, locate your package file you cloned from s3oc. Find the MODL of Utensil Chopsticks, Right-Click, "Details..."

On Resource Details, click "Copy TGI" to copy the Resource Code. Type, Group, and Instance will automatically be copied on clipboard. Then open Notepad, Right-Click to "Paste".
Click GRID on bottom of the s3pe (I mark it red on picture), it will give you pop-up box with Data Grid. Click "Resources", it will be highlight blue and there's 3 dots button appeared on the right side. Click the 3 dots button. It will give you TGI Block List Editor.
Inside MODL's TGI Block List Editor only has IMG. You may wondering why, but that's how the game coded. Type, Group, Instance of _IMG inside TGI Block List Editor should be the same as _IMG on the package.
Copy the TGI, Group, Instance to your Notepad.

After you copied code of MODL, do the same for the texture image (_IMG), but only copy the code from Resource Details. You cannot edit TGI Block List Editor for _IMG as the Grid button for _IMG is greyed out.
The main task is the code of your edited mesh and texture should be the same as the code you copied now from original package you cloned with s3oc.
Keep the code on notepad. You will need this code later.
Export the MODL file. Right-Click, "Export to s3asc". The file appears in long string such with name for example: S3_01661233_08000001_B619DB2238C3430B%%+MODL_filebase
Do not rename the file. Save.

Export the texture file. Right-Click "Export > To File..." The file will be saved in .dds format. Do not rename the file. Save.

✳️ Step 3. Export the Original Mesh as Base Mesh to .obj format
Open Milkshape. Import the s3asc file you saved before.
More steps click spoiler tag "Read More / Keep Reading" below
File > Import > Sims 3 Object Import v 1.01 by Wesley Howe

Locate the s3asc file, then the original chopsticks mesh appears.
Click the "Joints" tab. It has 4 codes. Check box "Draw vertices with bone colors" It will show Bone Assignment colors on the original mesh. Yellow on top chopstick and light blue on bottom chopstick. The colours are to make the object has rig and movement following the Sim's interaction.

Take a look at the 4 codes on Joints Tab. You can play around to see which colour of the code will appear, after that copy paste the code to Notepad to make it easier to comprehend.
Click Select from Tools menu, Select Options: Face. On "Right/Left/Top/Bottom 2D View", Left-click make selection of one part of chopsticks. While the part of object being selected (Red), click Joints then Choose "Assign".
0x96239247 --> Yellow 0xFEAE6981 --> Purple 0xCD68F001 --> Light Blue 0xD0DECA8E --> Red
Your edited mesh must have the exact same Bone Assignment colour later. Check again if the code and colour are correct.

You can save object mesh as .obj to other 3D software such as Blender or any other 3D software.
✳️ Step 4. Create Your Custom Mesh
Use the original .obj as base model. While you can create longer mesh or any edited version as you wish.
Make sure the scale and position of the edited mesh is same as base original mesh, because the edited mesh will be used on Sim's hand.

If you are done editing the mesh, export the UVmap.
You can export the uvmap in higher resolution, as long as it is Power of 2. 64x64, 128x128, 256x256, 512x512, 1024x1024, 2048x2048, 4096x4096. I export in 1024x1024 pixels to make the size of texture larger and have more details.
Then export the mesh object in .obj format.
✳️ Step 5. Bone Assignment & Create Group
Open Milkshape. Import the original mesh.
Check the Groups Tab. Original mesh has 1 group, "group 00". Group 00 means it is the main mesh. There is no shadow beneath the object.

Import the edited mesh as .obj file.

My edited mesh has one single name "default" name on the Group Tab. While edited mesh may have a lot of file name scattered on Group Tab. Regroup the file name to simplify your edited mesh into one single name. Select > Regroup.
The main task is replacing the EA's original mesh with your edited mesh.
Before you delete anything, you must do Bone Assignment first to the edited mesh you created.
Your edited mesh does not have Bone Assignment, so it appears white.
Remember the 4 codes you copied earlier in Notepad.

Copy Bone Assignment from original mesh to your edited mesh.
This case, your want to Bone Assign Yellow colour.
Select > Face to select one part of chopsticks of your edited mesh. On Joints Tab, double click the appropriate code 0x96239247 in blue highlight then the code box on the right side of "Rename" will appear 0x96239247. Make sure the code is correct. Then you can click "Assign".

Your edited mesh will appear in Yellow colour. Then do the same for another part of chopsticks.
Select another part of chopsticks of your edited mesh. On Joints Tab, double click the appropriate code 0xCD68F001 in blue highlight then the code box on the right side of "Rename" will appear 0xCD68F001. Click "Assign".

Your edited mesh will appear in Light Blue colour.
Then what's the other code for? With colour purple and red?
Leave them. Let the codes have the same exact codes as appear in original mesh and let the colours only assigned Yellow and Light Blue. The colours are to determine rig for interaction in-game, which only use Yellow as upper part of chopstick and Light Blue as bottom part of chopstick.
You can safely delete the original mesh with name group00 until it remains your only your edited mesh.

Rename your edited mesh to group00. Type group00 on the box then click "Rename" on the left side.

Export to TSRW Object in .wso format. .wso is format with bone assignment on object attached.

Save your .wso in your project folder.
✳️ Step 6. Create custom Texture
Import original texture you exported from s3pe to your editing image software.
Look at the original texture made by EA. 32x64 pixels. It is very low resolution, blurry and stretched, because the texture should be compressed as low as possible by game designer. As player you want it has higher detail to look realistic as possible and your PC of course can handle high resolution content, sure you can make the resolution much higher than EA's.

Import the UVMap you saved from 3D software. For example, UVmap I imported has 1024x1024 resolution. Add your custom texture. Then save it to .dds format in the same name as original texture. Save in separate folder, name it "Edited Texture" to keep it separated from original texture.
✳️ Step 7. Import the .wso of Edited Mesh on TSR Workshop & Export the package
Open your TSR Workshop.
Create New Project > New Import >Next...

Then Browse original mesh by EA in package format in your project folder.
On Open file box, you cannot see .package file because the filter is .wrk (TSR Workshop Project). Choose the .package dropdown.

Then you can see .package file.
Open the .package. After the file is located, then Next. On Project Details I usually skip without giving name of Project Name and Title. Next.
You must have seen green land with white blank sky.
Where's the mesh? It is actually there... just being zoomed in too close. You need to zoom out by scrolling down mouse.
You can see the original chopsticks mesh by EA. You can save the project file in .wrk format. After you save the file, import the .wso of your edited mesh. Mesh tab > High Level detail. Click green arrow folder icon to import. Then your edited mesh will appear replacing the original EA mesh.

As you see, the texture is messed up because the texture is still using original EA's texture. But then you check Textures tab and it has blank dropdown...
I cannot change the texture on this TSR Workshop!
Don't worry, we can replace the texture on s3pe later.
No need to change anything other than importing mesh. Click Edit > Project Contents to save as package.
You will see pop up box with number or files DDS, FTPT, LITE, MODL, OBJD, OBJK, etc. Export > To. package. Give name such as "EditedChopsticks_TSRW"

✳️ Step 8. Export MODL file from Package saved from TSR Workshop
Open S3PE, File > Open package "EditedChopticks_TSRW" that you saved from TSR Workshop.
Export MODL. Right-Click, export. It gives you file name with [StringOfNumber] .model .
Save it on project folder. Keep it organized and separated from original MODL. Name the folder "Edited MODL". Do not rename the file.
✳️ Step 9. Finalizing in s3pe & Replacing the Original file with Edited File & Correcting the Code As Same As Default Code
Open s3pe, File > Open original package that you cloned from s3oc. [CreatorName]_ObjectName_Number
Find the MODL. Right-Click > Replace...
Locate to your edited MODL with filename .model .
Then click Open.
The original MODL of the package should be replaced with your edited mesh.
Do the same for the texture.
Locate to your edited texture with filename .dds
Then click Open.
The original texture of the package should be replaced with your edited texture.
Take a look at MODL's Type, Group, Instance. It has the same code as original MODL in the original package cloned with s3oc (because it has been replaced)
Don't forget to see the code inside TGI Block List Editor.
Repeat step 2 how to check the code. Right-Click on MODL/IMG > Details... and click GRID > Resources > TGI Block List Editor.
The Type, Group, Instance of the _IMG are different compared from IMG from original package clone, which means that is the evidence of edited mesh replaced the original.
Rename the Instance with default/original Instance you copied on notepad from Step 2. Type, Group, Instance should be the same as default/original Type, Group, Instance.

Open notepad with resource code you copied from Step 2. Make sure the Type, Group, and Instance are all the same.
If the codes are the same, then your edited mesh and texture will overwrite the default mesh and texture with the same code in the game. Save, Commit, Save the package.
Check again if the texture is replaced properly. Right-Click on _IMG > ViewDDS.
ALTERNATIVES!
Yes, you can delete unwanted files in your edited package, to keep the package clean. Simply Right-Click>Deleted.
The only files needed in package are: MODL, _IMG, _KEY
They are the only files with your edited mesh/texture including codes to overwrite the default codes.
You can Start new fresh blank s3pe. Right-Click>Import from file...
Locate your edited MODL and _IMG (texture) file.
On Resource Details box, tick mark "Use resource name" > OK.
Make sure all the Type, Group, and Instance of MODL and _IMG including in the TGI Block List Editor are all the same as the code in original package.

Save the package.
✳️ Step 10. Test the CC in your game.
Put the package to your CC folder in your The Sims 3 document folder to see if the CC is working or not.
If the CC is working as your intended, with your custom mesh and texture, then test the animation. Are the chopsticks animation working as the same as original EA's? If the animation are working well too, then congratulations!

Your default replacement are working. Give applause to yourself. 👏
-------------------------------------
QUESTIONS!
Q:
Can I use this tutorial for making default replacement for buy/build object?
A: This tutorial covers basic method of using TSR Workshop and replacing the default codes (Type, Group, Instance), so you will understand the basic principle of doing default replacement mod.
Keep in mind that different object has different case. Buy / build object has MLOD (not just MODL) more than one, texture images more than one, has presets, and CAStable colour channels.
The TGI Block List Editor for buy/build object has a lot of codes, so have to spend a lot of time to do trial-and-error to make the default replacement working properly, because a lot of times the texture doesn't work (still using default EA's texture), or when the object appears right with your edited mesh and texture, after you choose the presets, the object reverts back to your edited mesh with default EA's texture.
Q:
Help! The texture is black! / still using same EA's texture when tested in the game!
A: The texture codes must be not the same. Check the Type, Group, Instance of _IMG. Do the codes are the same like codes in original package? Check the TGI Block List Editor for MODL, is the _IMG inside has the same Type, Group, Instance as in original package.
Q:
Help! The object disappears when tested in the game!
A: You must be replacing OBJD in your package. Do not replace OBJD. Just MODL and texture only.
#tutorial#the sims 3#the sims 3 tutorial#thebleedingwoodland#the sims 3 default replacement mod#modding#s3pe#s30c#TSR Workshop
120 notes
·
View notes
Text
putting aside the ethics of 'A.I' videos in their creation/usage/waste/economics, just on a purely technical level one thing i find interesting is no matter if the result looks photorealistic or like 3d CGI- it's all technically 2d image generation.
unless specifically used as an add on in a software for 3d rendering, of course, pretty much every ai video you see online is 2d art. the space rendered is a single plane, think of it like doing a digital painting on a single layer. the depth/perspective is an illusion that is frame by frame being rendered to the best ability of prediction based on data it has been fed.
obviously videos of 3d models in animation are a 2d file. like a pixar movie. but in video games you do have a fully rendered 3d character in a 3d rendered space, that's why glitches that clip through environments are so funny. it's efficient to have stock animations and interaction conditions programmed onto rigged dolls and sets.
by contrast if you were to use a generative ai in a similar context it would be real time animating a series of illustrations. of sounds and scenarios. the complexity required for narrative consistency and the human desire to fuck up restrictions hits up against a much more randomised set of programming. how would it deal with continuity of setting and personality? obviously chatbots already exist but as the fortnight darth vader debacle recently shows there are limits to slapping a skin on a stock chatbot rather than building one custom.
i just think that there's so many problems that come from trying to make an everything generator that don't exist in the mediums it is trying to usurp because those mediums have a built in problem solving process that is inherent to the tools and techniques that make them up.
but also also, very funny to see algorithmic 2D pixel generation being slapped with every label "this photo, this video, this 3d render" like it is at best description cgi, let's call it what it is.
but i could of course be wrong in my understanding of this technology, so feel free to correct me if you have better info, but my basic understanding of this tech is: binary code organised by -> human programming code to create -> computer software code that -> intakes information from data sets to output -> pixels and audio waveforms
9 notes
·
View notes