#Android studio tutorial
Explore tagged Tumblr posts
Visit Tumblr Blog
Explore Tumblr blogs with no restrictions, modern design and the best experience.
Last Seen Tumblr Blogs


Fun Fact
BuzzFeed published a report claiming that Tumblr was utilized as a distribution channel for Russian agents to influence American voting habits during the 2016 presidential election in Feb 2018.
Text
Become a Certified Android Developer: Enroll at Code with TLS Today
Are you ready to embark on an exciting career in mobile technology? With the rapid growth of mobile app usage, learning Android App Development is an invaluable skill that opens doors to endless opportunities. At Code with TLS, we offer a comprehensive and beginner-friendly Android App Development course designed to help you become a certified Android developer. Whether you’re a student, a professional looking to upskill, or someone wanting to break into the tech industry, our course is the perfect launchpad for your journey.
Why Choose Code with TLS for Android App Development?
At Code with TLS, we understand the importance of a hands-on learning approach. Our Android App Development course is tailored for beginners and covers everything you need to know about building robust and efficient Android applications. You’ll learn essential concepts, such as:
Java and Kotlin programming languages for Android
Android Studio and its user-friendly tools for app development
Understanding the Android SDK (Software Development Kit)
Creating dynamic UIs with XML
Best practices for debugging and optimizing Android apps
Integrating third-party libraries and APIs into your projects
Publishing your app to the Google Play Store for a wider audience
Our course is not just theory-based; you’ll work on practical, real-world projects that give you the skills and experience employers are looking for.
Benefits of Becoming a Certified Android Developer
When you complete the Android App Development course at Code with TLS, you’ll receive a Certificate of Completion that showcases your newly acquired skills. This certification will not only boost your resume but also provide you with the confidence to take on real-world Android development projects.
Additionally, learning Android development opens up various career paths, such as:
Mobile App Developer
Android UI/UX Designer
Android Software Engineer
Freelance Android Developer
Tech Start-up Founder
Enroll Today and Start Your Development Journey
Code with TLS offers flexible learning schedules, expert mentors, and access to a wide range of resources to support your learning process. Our course is designed to ensure you can keep up with the rapidly evolving world of Android App Development, preparing you for a future in tech that’s both lucrative and fulfilling.
Don’t miss out on the opportunity to become a Certified Android Developer. Enroll at Code with TLS today and take your first step toward mastering Android App Development. The future of mobile technology is waiting for you!
#Android App Development#Android Development Course#Learn Android App Development#Certified Android Developer#Android Development Certification#Mobile App Development Course#Code with TLS Android Course#Tech Course Provider#Android Developer Training#Kotlin and Java for Android#Android Studio Tutorial#App Development for Beginners#Android Development Career#Google Play Store Publishing#Android Developer Certificate
0 notes
Text
#Technology Magazine#Free Online Tool#Interactive Tools and Collection#Internet Tools#SEO Tools#Learn Search Engine Optimization#Computer Tips#Freelancer#Android#Android Studio#BlogSpot and Blogging#Learn WordPress#Learn Joomla#Learn Drupal#Learn HTML#CSS Code#Free JavaScript Code#Photo and Image Editing Training#Make Money Online#Online Learning#Product Review#Web Development Tutorial#Windows OS Tips#Digital Marketing#Online Converter#Encoder and Decoder#Code Beautifier#Code Generator#Code Library#Software
0 notes
Text
youtube
How to Develop Apps | Introduction to Android Studio
Quick Startapps is extremely experienced in building a wide array of social apps, productivity apps, games, and e-commerce apps for brands around the world.
BUY SOURCE CODE & AIA FILES
https://quickstartappss.com/store/
WE DEVELOP ANDROID & IOS APPS, WEBS APPS AND GAMES
Do you want to build your dream project? Contact us
Whats App: https://wa.me/923325592620
Mobile: +923325592620
Facebook: / quickstartapps
Email: [email protected] Website: https://quickstartappss.com/
Office Located at: Office # 09, Lower Ground Akbri Plaza, MPCHS E-11/1, Islamabad Pakistan
Pin Location: https://goo.gl/maps/Y6NMVugbi6exdjh98
#mobile app developer#app developers#quick startapps#mobile app developer course#android studio#android app development tutorial for beginners bangla#android development#android studio tutorial for beginners#ios app development#software company#web development#software development#mobile game development#custom mobile app development services#Youtube
1 note
·
View note
Text
In light of the recent Nintendo boycotts, I come bearing a gift
I'll copy/paste a message I've been sharing in discord servers
If you like Nintendo games but hate the company, today's your lucky day
This is totally illegal and you absolutely shouldn't do it because its wrong, so I'm gonna tell you exactly what to do so that you guys know not to do it!
You guys absolutely should not download Azahar Nintendo 3DS emulator and then go onto Citra-emulator.com to find old Nintendo DS and Nintendo 3DS games and then open the games through Azahar for to play free, including Tomodachi life, ACNH, The Sims 3, Nintendogs + Cats and Flipnote Studio.
You really shouldn't do this stuff its its illegal but if you did it, it would totally work and no one could stop you. Also I work in tech and virus scanned random files and they all came up clean so its safe but its still illegal don't do it................. (But you totally could and no one would stop you)
The Citra emulator doesn't work because the dev got hit with a lawsuit. He went on to work on Azahar. They say not to do this for legal protection, but it fully works.
As far as I know, these games do not have piracy barriers EXCEPT Tomodachi Life (A large red cross over the character faces). I have a debug file that fixes this. If you guys come across another game that has a barrier let me know and I'll search for a debug
Tutorial
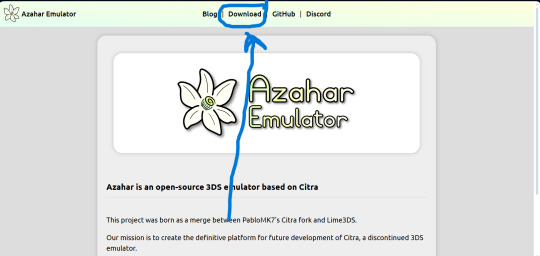
Use this link to download the emulator
https://azahar-emu.org/ scroll all the way up to "Download". Download the version that corresponds with your system (Windows, Mac, Linux, Android)
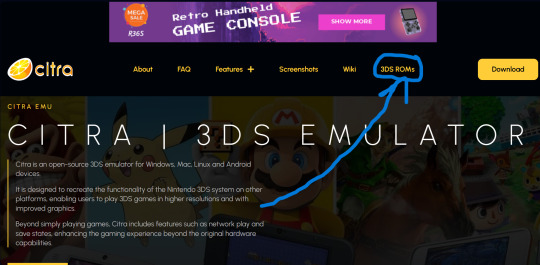
And this link to download the game files
https://citra-emulator.com/ Scroll all the way up to "3DS ROMS". There is an incomplete but still extensive collection of games, both Japanese and English titles as well as Pokemon ROM hacks
On Windows, place the game files on your desktop and open them. It will ask you what app you want to open the file with. Choose "Select app on PC", search for Azahar and select it then press "okay"
(I'm not 100% on the process for Linux and Mac but I'm sure they're similar. On Android I know for certain they are)
You'll know if it works because the game icons will switch from a paper file to the Azahar flower
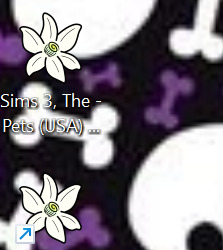
Once you see these flowers, you are all set and ready to play!
And here is the error fix for Tomodachi life. Download this file and open it like normal. It will ask you what app you wish to open it with. Open it with Azahar.
Don't panic! A lowkey scary looking dialogue box will pop up for a moment and text will very quickly load onto it. This is Azahar reading the file and saving the commands. It will very quickly close itself. Once that window closes itself, you're all set to open Tomodachi Life and play like normal!
https://drive.google.com/file/d/1_BQfoGycmpaaOvBEm29LU1FKqy7cgG6j/view?usp=drive_link
(This is an upload from my own personal google drive account. I pinkie promise there's no virus on this. and if there is you have full permission to yell at me and put me on blast)
and that's everything I got! Feel free to reblog with other sites or tips you have! <3 Have fun lovelies!
#toby rambles#stardew valley#creepypasta#mouthwashing#hatsune miku#thats not my neighbor#animal crossing#The sims#simblr#tamagotchi#emulation#game emulator#activism#boycott nintendo#vocaloid#epic the musical#epic telemachus#epic odysseus#epic penelope#Stardew valley#stardew#sdv elliott#sdv sebastian#sdv haley
85 notes
·
View notes
Note
Got any tips in shading stuff in black and white digitally?
Hi Anon!
You're in luck! I'm currently wrapping up a book which is shaded digitally, so I've been thinking a lot about this recently.
How I do this is by no means the only way, so take from these tips as much or little as you want! When I add grays and shadows to a line art drawing, I try to think about these things:
Preparing the image
I like to work with a file that has a white background and a layer with only line art on top of it. Between these two layers I add new layers where I use the pen tool and bucket to fill areas with black, then I lower the opacity for that layer to get a value that I want.


This method works well for me, and for simpler pieces I don't need more than 3 layers with different values - light, medium and dark grays.
I work in Clip Studio. Here's a picture of the layers of a recent drawing. Each layer is actually completely black but you can see the opacity percentages by each layer. Lower percentage -> brighter value. This makes it super duper easy to change the value of a layer, no need to repaint it, just change the opacity!

Value composition
For the best result, do a couple of value sketches with a limited set of values and find something that works well for the image. Getting the values right is what will improve the image the most! Here's a quick tutorial on muddycolors. Muddy Colors is a very nice art blog to check out. Looking at grayscale storyboard drawings or value sketches are great ways to pick up on this too.
I try to group values when working with grays. Take this image for example:

The character in the foreground has mainly dark grays, which separates her from the background, which has mostly light grays. Then the windows are white and the roof black.
Value composition is a huge and complex area and I recommend anyone wanting to learn to be more conscious about their values and to do value sketches. Analysing art you think has good values is great too.
Shadows
Not every piece needs shadows, but they can add a lot to an image! I use three kinds of shadows when I work in grayscale.
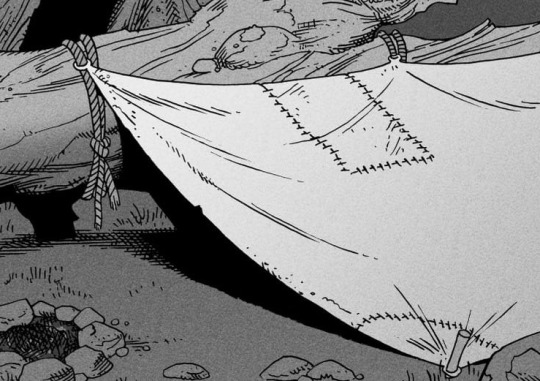
Inked shadows - these shadows are added during the inking stage and usually show areas where light would have almost no way of getting there, such as under this tent.
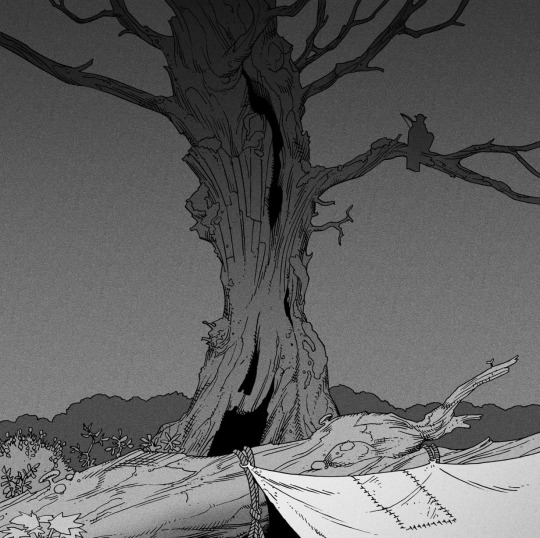
Gradient shadows - these shadows usually represent something getting further and further away from a light source or an area that would bounce light. This tree receives a tiny bit of light from a campfire on the ground and moonlight that bounces on the ground and up, fading as we get higher up in the tree. But mainly I add these gradients in ways that look cool and will help the overall composition.
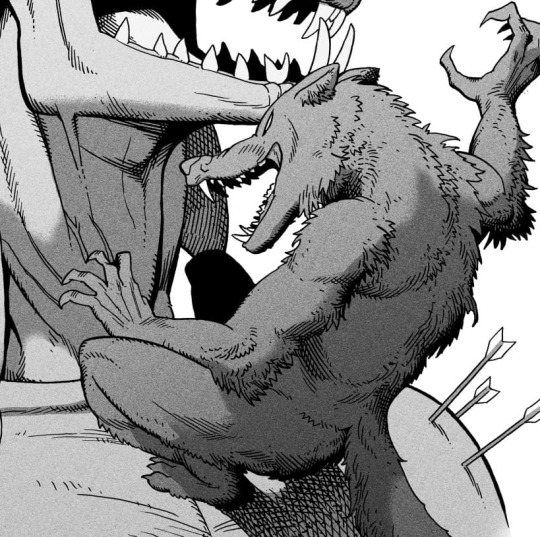
Hard shadows - these shadows appear when a strong light casts shadows and can be used on a shape or to cover something. Here's a werewolf with shadows on its back, which gives it a better sense of mass and is interesting visually!
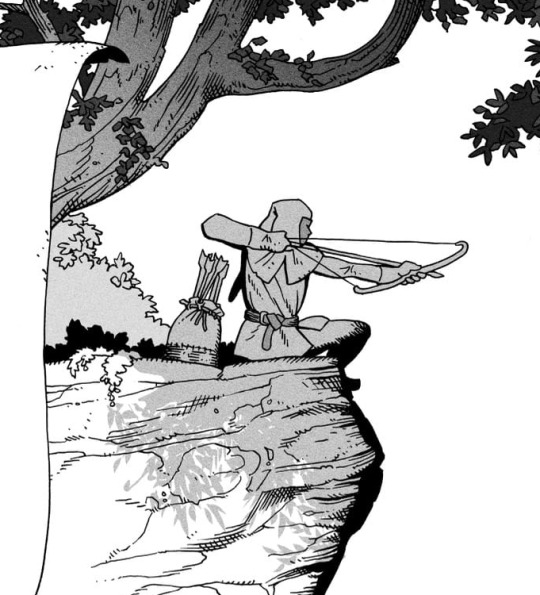
You can also cover an area in shadow like this, where the tree casts a shadow down on the archer and the cliff.
Texture
I like to add a layer of noise as a finishing touch. In Clip Studio you can create a noise layer with Filter->Render->Perlin noise... Find a balance of scale and amplitude that works for the image, then change the layer mode to "Vivid Light" and lower the opacity of the layer to around 30%. I like how this looks, it's not super visible usually but helps make the drawing feel less artificial and digital.

I hope that helps! Here are some nice links too:
Muddy Colors
Android Arts
Gurney Journey - Read his books!
Happy drawing!
351 notes
·
View notes
Text
★ How to: Tumblr Dividers ★
personally i had a really hard time trying to make dividers so i'm making this to hopefully help others who may be having the same problems as me.

1. Programs
i like to use clip studio paint since that is what i have but there are other free options too like: Photopea (free, browser), Canva (free, browser),IBIS Paint (free, ios/android), ect...
2. Canvas Sizes
this is where i struggled the most since it can be hard to judge how something will look in a post vs how it looks when you're making it. i put together some "guideline" dividers so its easier to see how things will look:

^ small divider 2000 x 40px ( good for pixel art )

^ medium divider 2000 x 100px (good for small doodles)

^ large/ medium divider 2000 x 140px (small text and drawings)

^ large divider 3000 x 225px ( good for titles )
obviously you don't have to follow these exactly but they are a good reference for what looks good at different sizes
3. Saving
the way that you save your drawings will affect how they look if you want parts to be "clear/ see through" make sure to save in .png these files may be a little bit bigger but they will keep any transparent parts of your divider / drawing.
^ a good example of this is my star divider
if you're ok with having no transparent parts/ a solid colour, pattern divider you can save in .jpg these files are smaller than .png so are good if you don't have a lot of space on your device. All of the above "size example" dividers are .jpg so they don't have any transparent parts. [Side note: if you have transparent parts in your drawing but save it in .jpg they will become white]
i hope that this was a helpful little tutorial, i didn't go through everything but i tried to give some good starting points!
#tutorial by: kayo-ko#How to: Dividers#divider tutorial#dividers#dividers by kayo#how to#art tutorial#tutorials#digital art
406 notes
·
View notes
Text
BatB Week podfic instructions and tips

Thanks to everyone who signed up for the podfic exchange! If you signed up as a reader, you should have gotten a message with info on who you matched with. Send a DM if you missed the message.
(If you didn’t sign up, there is still time! We still need one more podficcer! The form to sign up is here.)
I don’t personally do voice/audio work, but I’ve pulled together some quick tips and instructions for recording, editing, and posting podfics below the cut. If someone else has better/more suggestions, please add on!
Recording and editing
Need audio recording/editing software? You don't need anything fancy; you can record it on whatever voice recording software comes installed on your phone (I have Samsung Voice Recorder, for instance), or use one of these free, beginner-friendly audio editors: Lexis Audio Editor (Android, iOS, Windows), Audacity (Windows, Mac, Linux), GarageBand (Mac), Audiotool (online).
Nastasia Marquez has a great tutorial on how to record and edit voiceovers for beginners in Audacity. It's very easy to follow along and gets straight to the point.
When recording, watch out for plosives and sibilances (e.g. your "pps," "sss," and "shh") as they can easily hinder the quality of your recording by being aggressive to the ear. It’s hard to give tips since everyone will be working with different devices, but my suggestion would be to put some space between your mouth and the microphone, or have your device inside a sock. You can learn more on them and how to deal with them here.
A good way to get clean audio is to record under a blanket. It’s silly, but it’s as close to a padded studio as you can get for free. It reduces echo and makes the audio sound much better no matter the mic you use.
Don't be afraid to record in short batches! There’s no need to do it in long unbroken takes. Piece it together later.
Posting the audio file
Once you have your finished audio file, you have to upload it somewhere, because AO3 can host the link to it, but not the audio file itself. It seems like Internet Archive is popular for hosting podfic audio files. You can also host it on Google Drive, YouTube, Mediafire, or Spotify.
Posting the podfic to AO3
Go to ‘Post > New work’ just like you would for posting any fic to AO3.
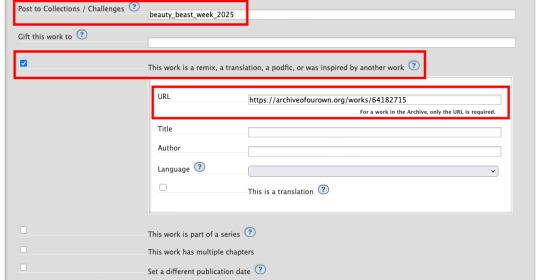
In the ‘Post to Collections / Challenges’ field, enter “beauty_beast_week_2025” (see first screenshot below).
Check the box that reads ‘This work is a remix, a translation, a podfic, or was inspired by another work’ and include the URL to the original fic (see first screenshot below). This not only gives credit to and notifies the author, but it adds a link to your podfic from their fic (when they approve it) so that your podfic gets more hits and kudos.
In the body of the post, insert the HTML to embed the audio file (see second screenshot below). It’s easy: AO3 has a simple guide to copy and paste from here.
If you’d like, you can add more content to the body of the post, like the event banner or some text, but it’s not necessary.
Here are some examples of BatB podfics so you can see how they’ve set things up: The Great Wide Somewhere, Mutual Care, and The Beast Within
Posting to the event
Important: tag the @beauty-beast-week account within the body of your Tumblr post itself by typing the @ symbol, typing beauty-beast-week, and then selecting that account name from the autocomplete menu that appears. This is the only way to be sure we see your post so we can reblog it from this account and include it in our master list posts.
Other than that, make sure you post to Tumblr on the day of the prompt you're using and include in your post:
Tag the @beauty-beast-week account within the body of the post (yes, I’m repeating myself)
Which fic your podfic is for, and link to it
Which day/prompt your podfic is for, in the body or tags
The event hashtag #batbweek and/or #batbweek 2025
Any other appropriate hashtags (characters, ship, NSFW and content warnings)
Optional: The event banner (save from the top of this post) or the day's banner (in the full event instructions that will come later)
Heads up authors! Check your AO3 email during the event!
If your work was adapted into a podfic for the exchange, check your email and follow the link to approve linking back the podfic to your original work so more people can discover the podfic version!

Send an ask or DM if you have any problems or questions!
7 notes
·
View notes
Note
Hello there!
I'd like to know your advice on drawing tablets?
As in, what do you use for your digital art? Is there any you suggest?
I'm planning on getting one, but there are so many options, and I'd like to know your opinion and preference.
Thank you ^^
hi anon! thanks for the question!
i draw with a samsung galaxy tab s7!
BUT if this is your first time drawing digitally, then it's a good idea to test out if you like it with cheaper options first (so you don't drop a whole lot of money on a hobby/medium of art you don't enjoy)
some suggestions:
if you have a smart phone, try drawing with your finger using free to use drawing apps like ibispaint X or HiPaint (i recommend HiPaint cuz the UI is a lot simpler and less overwhelming, but both have a good selection of tools. i wanna say ibispaint has better text tools tho and there's A LOT more tutorials and resources online) drawing digitally with your finger is different from drawing digitally with a pen AND drawing traditionally, but this is a good way to familiarize yourself with digital art tools. a very simple entry point if you already have a smart phone.
if you don't want to draw with your finger (understandable, i personally couldn't stand it) you can try simple drawing tablets, which are the tablets that you plug into your computer/laptop, come with a pen, but they don't have a screen you draw directly on. they're actually a lot more affordable nowadays (i saw some for under $50 CAD, which is WILD), so that’s a good starting option if you want to draw with a pen. with a pen, you have more control with line weights than you do with your finger, but it takes practice to get used to. it also takes some getting use to drawing on a tablet and looking at your monitor, but this is where i started haha. i still have my old bamboo wacom create drawing tablet. but nowadays, other brands like xp-pen and huion are very comparable to wacom, so definitely consider getting a cheaper one to try out first. of course, if you go with a drawing tablet, you'll need an art program on your computer. i've used photoshop and clip studio paint and they're very good, but probably overwhelming for people who are new to digital art (they are loaded with tools and you have to really familiarize yourself with the menus and everything). there are probably simpler options available... but i'm not as familiar with them. oh wait, i think there are some drawing tablets that can also connect with your smart phone too nowadays. man, that's so cool. that's probably a better option instead of purchasing photoshop or clip studio paint right off the bat.
if you REALLY want a screen display experience, try a cheaper general tablet. iPads are a popular option if you're comfortable with the Apple ecosystem (i'm not 😅) but they can be pricey PLUS you have to buy the Apple pen separately. for Android, I'm pretty sure even the Samsung Galaxy Tab S6 is a solid choice and it comes with a pen unlike an iPad. the SPen is built with Wacom tech, so you know it's quality. and while iPad has Procreate, HiPaint is available for Android and it's basically a Procreate clone (i explain more about HiPaint here) otherwise, ibisPaint X is also good and infinite painter is probably the most sophisticated free to use drawing app i've encountered (sophisticated as in it does a pretty good job at imitating traditional media in their brushes. it's cool, but the free version is very limited).
also if you like watching videos, Brad Colbow and Teoh on Tech on YouTube are great resources. they specifically review tech from an artist's perspective.
why i suggest testing it out is because if you're used to drawing traditionally, then switching to digital is a different experience. some artists can't get used to drawing digitally, and that's fine. that's why it's a good idea to test it out with a cheaper option first to see if you like it and to give yourself time to familiarize yourself with drawing apps/programs. i actually kinda hated drawing digitally at first. i didn't have the same level of control that i was used to with drawing traditionally. and overtime i made a lot of bad habits with my digital art that i had to unlearn by switching back to traditional art for a couple years (some bad habits like: relying on the Undo button to make "perfect" lines; trying to draw really fast because the pen glides over the screen unlike a pencil has friction against paper) so... give it a try and just let yourself have fun. don't worry about making anything perfect, just have fun!
#ask the crab#i hope you have fun!#i first got my bamboo wacom tablet in 2011#and it's still very good#i use my samsung tablet now because i really like the screen display experience#and the fact i can bring it with me on the go without my laptop#i like digital art#but i'll still occasionally switch to traditional art#that's how i deal with art block#i switch something up and just experiment with a different medium for a little while#that gets me out of the perfectionist mindset too#i can't spam the undo button if there's no undo button with pen and paper#the reason why i switched to digital art recently was because i was struggling with sketching with traditional art a little while back#i was designing a new DCA OC with a body type i am not familiar with drawing#and it was just getting frustrating trying to get the body shape right#so i took a break and switched to drawing chibis in digital art so i could give myself a refresh#i eventually was able to design that character#but i did it digitally#i'll share him soon#i haven't really decided on an outfit for him yet
23 notes
·
View notes
Text
Heard a little rumor about Adobe. Now's as good a time as any to share with everyone the apps I draw/paint in. 😉
Infinite Painter (Android) - This is my default. I did exclusively traditional mediums for a long, long time, and this app feels the most like using the "real thing". It has vectors, filters, and a robust editing menu. It autosaves. New files open with a menu of commonly used dimensions/dpis so you don't have to memorize them. It has an extensive online manual that teaches you how to use everything. It can export to just about anything - it'll even save all your layers as transparent PNGs if you don't see the filetype you need. (Cons: the larger your canvas, the more likely it is to glitch, and the fewer layers it can comfortably support.) It's cheap, and a one-time purchase.
Medibang Paint Pro (Android/Mac/PC) - This is where I make comics. It has built in tools for manga: frames, fonts, screentones. It autosaves temporary backups. It has online storage so you can bounce back and forth between editing on your tablet or your computer, and group access for multi-person projects. It has a basic online tutorial, regular user-written tutorial articles, an active online community, and sponsored contests with cash prizes. (Cons: It doesn't have a basic rotate tool, or many editing/filter options.) It's cheap, and while I did a one-time purchase, I think they've either switched to or offer an optional subscription model.
That's... about it, really. For me everything else is pencil and paper. Or epoxy putty and model paint... Once or twice a year I break out the watercolors. I dabbled in Clip Studio Paint, but the menus are way too tiny on my small tablet. I recently downloaded IbisPaint (Android/Apple), but I haven't tried it out yet.
39 notes
·
View notes
Text
Resource - Digital Tool Assets
Okay, so I've jumped around with several programs to try out based on the needs I had at any given time. These are program specific assets and resources that I've come across while using testing out the various programs.
Sketchbook
I still use this program, though strictly while on-the-go (I use an Android tablet). I personally use it more for quick sketches and then carry them back onto my PC to render, but I know @kreature1827 uses the app and has done some incredible work within the app. The link provides free brush and texture assets.
The program does work across multiple platforms, however I am unsure if there are any sync features present.
Clip Studio Paint
I purchased this program some years ago and tried it out for a bit, and don't get me wrong: it's a really good program. The issue I personally have is that when I moved over to Linux, CSP has no functionality within the system (that, and the pricing model past V1 was not something I personally liked to get involved with). The CSP Asset store is accessible through the program, and includes a lot of brush, pattern, model, and stamp assets.
Since CSP moved into a subscription model, they've added the option to have the program sync with multiple devices.
Krita
This is my current program of choice, and it's also one of the programs I started out using when I looked into illustration work. I did drop it a couple of times, though the reasons were always surrounding the need for on-the-go use and resource management (before Krita 4, it demanded so much out of my laptop that I couldn't use it effectively). The link provided provides a ton of brushes, plugins, and tutorials.
Krita does have an Android app available for beta testing, however my reason from moving away from the mobile app was due to the odd interactions within the app (i.e. some of the tools, like Transform, don't behave properly and require multiple specific alterations to only get a half-decent result).
Medibang Paint
This is what I used whenever I got a tablet before I coming across Autodesk Sketchbook. It's a very robust program, but it does have a specific use for manga art work. You can make some custom brushes, however the program didn't particularly click with me or how I approach my art pieces (i.e. I didn't stick with it at all). The link provided gives program-specific tutorials on getting specific results, such as halftone screens and tool usage.
Medibang is excellent with the cross platform use (it's even better than CSP in that it's free with a simple account), and can be synced with almost any device or operating system. The program does feature ads, which I personally detest. But the ads aren't intrusive and they're mainly out of the way.
3 notes
·
View notes
Text

Name: My Time At Portia
Genre: Post-Apocalyptic, Crafting Sim, Action RPG
Platform: PC, PS4, Xbox One, Android, iOS, macOS, Nintendo Switch
Release: 2019
Audience: General
Protagonist Type: Optional, Customizable
Romance type: Optional, BxG, GxG
Official Synopsis:
Start a new life in the enchanting town of Portia! Restore your Pa's neglected workshop to its former glory by fulfilling commissions, growing crops, raising animals, and befriending the quirky inhabitants of this charming post-apocalyptic land!
Armed with your Pa's old handbook and workbench, you must gather, mine and craft your way to being crowned the number one workshop in Portia. Help the locals rebuild the town and uncover the secrets locked deep away beneath it. Be prepared though…it won't be easy!
The town of Portia is full of friendly new faces for you to meet. Make friends, complete requests, exchange gifts, go on dates and let romance blossom!
Inspired by the magic of Studio Ghibli, My Time at Portia whisks you away to a world of wonder that you won't forget. How will you spend your time at Portia?
Content warnings: Family Abandonment
Notes:
There are eighteen men and ten women available for the female player to romance. Many romance options have exclusive quests and content if you pursue them, but not all romance options have these.
Players can go on dates, give gifts, get married, and eventually have children with their spouses. However, the children never age out of the baby stage and just lie in the crib like objects that you need to feed every so often.
The player is able to divorce their spouse and marry someone else, however some characters will marry other NPCs if both are unromanced, and these characters cannot be romanced at that point.
One male character, Aadit, will abandon the player character at a certain point in the story if he is married, even if they have children together. Another male character, the ladykiller wannabe Albert, will continue flirting with other women even if married. One male character, Antoine, has a romantic crush on the character Dr. Xu, which will not subside even if either are married.
A female character, Ginger, has a terminal illness and will eventually die after a certain number of years have passed in game, but the player can prolong her life indefinitely by collecting materials to treat her illness.
In addition to the romancable cast, one female character named Merlin can be taken on a date as a tutorial for the romance mechanics, but at the end of the date she determines she is asexual and is unavailable from that point on.
The female player character has a small amount of reactivity, but not much outside of being referred to with female pronouns.
#my time at portia#my time series#genre: post apocalyptic#genre: crafting sim#genre: action rpg#romance type: optional#romance type: bxg#romance type: gxg#protagonist type: optional#protagonist type: customizable
3 notes
·
View notes
Text
Learn Android App Development from Scratch: Hands-on Projects with Code with TLS
If you're looking to kickstart your career in mobile app development, learning Android App Development is one of the most rewarding paths. With millions of Android users worldwide, the demand for skilled Android developers is higher than ever. At Code with TLS, we provide a comprehensive, hands-on approach to help you learn Android App Development from scratch, giving you the tools and skills you need to build your own mobile applications.
Why Choose Code with TLS for Android App Development?
At Code with TLS, we believe that the best way to learn Android development is through practical experience. Our Android App Development course is designed with beginners in mind, taking you from the basics all the way to building fully functional apps. By focusing on hands-on projects, you will not only understand the theory but also gain practical experience in the field, ensuring that you’re ready to take on real-world challenges.
What Will You Learn?
Our Android development course covers everything you need to know to create Android applications, including:
Java and Kotlin Programming Languages: We teach you the essential programming languages used for Android development, including Java and Kotlin. These languages are the backbone of Android apps and are crucial for building efficient and powerful applications.
UI/UX Design: Learn how to design intuitive and attractive user interfaces that engage users, an essential skill for any app developer.
Android Studio: Master Android Studio, the official Integrated Development Environment (IDE) for Android development, to create, test, and debug your apps.
Building Real-World Apps: Throughout the course, you will create hands-on projects, such as building a weather app, a task manager, or even a social media app, ensuring you have practical knowledge and a portfolio to showcase.
Why Hands-on Projects Matter
Theory is important, but hands-on projects are what truly prepare you for a career in Android app development. When you work on real projects, you learn how to solve actual problems that developers face in the industry. By the end of the course, you'll have a working portfolio of apps that you can share with potential employers or clients.
Get Started with Code with TLS
At Code with TLS, we are not just a tech course provider; we are your partner in building a successful Android development career. Our expert mentors, interactive learning modules, and community support will ensure you stay on track and achieve your goals. Whether you’re aiming to build your own apps or land a job in Android development, our course will give you the skills and confidence to succeed.
Enroll today and start learning Android App Development from scratch with Code with TLS—the best choice for aspiring Android developers.
#Android App Development#Learn Android Development#Android Development Course#Tech Course Provider#Code with TLS#Learn to Build Android Apps#Android Programming for Beginners#Hands-on Android Projects#Java and Kotlin for Android#Mobile App Development Training#Build Your First Android App#Best Android Development Course#Android Studio Tutorial#Android Developer Bootcamp#Learn Kotlin for Android#Android App Development Course 2025
0 notes
Note
heyyy I'm new to digital art, would you mind sharing some tips regarding programs and tutorials and etc? also on how to turn a real life piece into a beautiful and clean digital piece... really love your art
oh good luck with your art journey! my experience with digital art is pretty dated (as in a decade + levels dated) and i might be too out of touch to give beginner tips but regardless, allow me to attempt
Programs: it would help to know which hardware you have for digital but ill put down some i have experience in 1. Clip Studio Paint Pro - PC/Android/ipad/everywhere i think? unfortunately they betrayed humankind and its now a subscription everywhere but on PC. i bought a one-time license years years years ago on sale and its probably the best available on my end. I also got it on subscription on android so i can sync works between my PC and tablet. its very flexible in a way that you can draw with it in the most basic way single layer sketches or whatever but they have so many features and keep adding more.
2. procreate - ipad only never been an apple user but my friend is, and he's been a procreate user forever. he recently tried CSP on ipad though and he still claims he likes procreate better for ease of use and compatibility with tablet ergonomics and apple pen
3. medibang paint - pc/android/ipad
free forever. and out of all the free programs i recommended my other digital art newbie friend this is what he liked best.
4. adobe photoshop - dont even look at this the only reason i have one is im leeching off company license. its still unfortunately the industry standard tho but CSP is much cheaper and has the same controls and most of the basic functions 5. Paint Tool SAI - my first art program but i haven't tried it again. honestly still think this has the best brush flexibility and pen pressure control ----- As for tutorials, i find digital art has such a steep and high skill ceiling and its a challenge im still tackling and probably will forever tackle haha. I'm trying to osmosis painting techniques from splash art painters from League of Legends who most of them post complete timelapses (my favorite being Bo Chen) where you can study not just their techniques but like, art directions that make their pieces striking. Anyway, I also promised a friend I would make a simple coloring tutorial so maybe after inktober hustle, I would look for a piece there I'd use for the guide.
---- Traditional to digital is never a satisfactory process to me but if you can, invest on a scanner. I use an epson v39, had it for years.
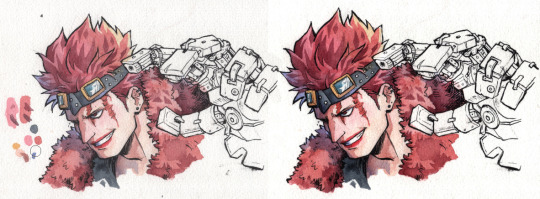
scanned vs edited. the goal is to at least get the white of the paper as white as possible and the blacks the blackest, without whitewashing/burning the rest of the colors. Level correction function is your best friend here and most art programs have that.
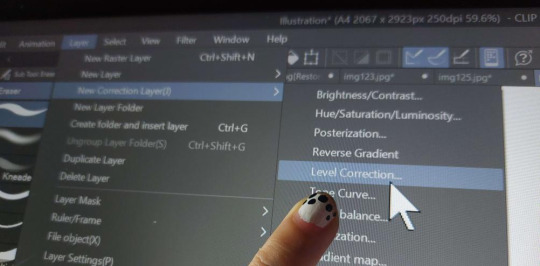
Then i just clean dust and errors and slide the contrasts around until it looks as close to the original piece
If you have a decent phone camera, you can get away just posting instagram aesthetic pics with materials framing it or smth and just edit as usual. natural light tends to be a lot more forgiving than the harsh light of scanners anyway.

Anyway I hope this helps and have fun learning!
#granpa voice: back in my day we didnt have phones or tablets capable of drawing#we had to use dodge and burn on pirated photoshop apps using a mouse on the family computer#i think i also started digitals a bit late in life so unlike younger millenials and gen Zs its not easy as second nature to me#compared to traditional mediums at least
33 notes
·
View notes
Text
Understanding Java: A Comprehensive Guide for Beginners and Pros
In the ever-expanding landscape of programming languages, Java stands as a stalwart, renowned for its versatility, reliability, and scalability. Whether you're an aspiring coder taking your first steps into the world of programming or a seasoned developer looking to broaden your skill set, Java presents a vast and captivating journey of discovery. This comprehensive guide aims to provide you with a roadmap for mastering Java effectively, offering insights, strategies, and resources to empower your learning process.

Java's prominence in the tech industry cannot be overstated. Its cross-platform compatibility, robustness, and extensive libraries make it a top choice for a wide range of applications, from web development to mobile app creation and enterprise-grade software solutions. With Java as your programming language of choice, you're embarking on a learning journey that can open doors to diverse and rewarding opportunities in the software development field.
Whether you're just beginning your Java journey or seeking to enhance your existing skills, this guide is your compass, pointing you toward the resources and strategies that will enable you to thrive in the world of Java development. So, let's embark on this adventure together, as we unlock the power of Java and take your coding skills to new heights.
The Fundamentals: Starting with the Basics
At the heart of mastering Java lies a strong grasp of its fundamentals. To begin your Java journey, you must dive into the basics. Start by understanding variables, data types, operators, and control structures, including loops and conditionals. These are the building blocks of Java programming and serve as your foundation. Fortunately, there's a wealth of online tutorials, textbooks, and courses available to help you comprehend these essential concepts.
The Power of Object-Oriented Programming (OOP)
Java is often celebrated for its object-oriented programming (OOP) paradigm. Delve into the world of OOP, where concepts like encapsulation, inheritance, polymorphism, and abstraction are fundamental. These principles are crucial for writing clean, maintainable, and scalable Java code. A strong grasp of OOP sets you on the path to becoming a proficient Java developer.
Practice Makes Perfect: The Art of Coding
Programming is a skill that thrives with practice. To truly master Java, you must write code regularly. Start with small projects and gradually work your way up to more complex challenges. Experiment with different aspects of Java, refine your coding style, and embrace the iterative process of development. Platforms such as LeetCode, HackerRank, and Codecademy offer a plethora of coding challenges that can sharpen your skills and boost your confidence.
Harnessing the Java Ecosystem: APIs and Libraries
Java boasts a vast standard library, replete with pre-built classes and methods. Familiarize yourself with these libraries as they can significantly streamline your development process. By leveraging these resources, you can save time and effort when building applications. Whether you're developing desktop applications with JavaFX, web solutions with Spring Boot, or mobile apps using Android Studio, understanding the Java ecosystem is indispensable.
Memory Management: The Key to Efficiency
Java employs automatic memory management through garbage collection. To optimize performance and prevent memory leaks, it's essential to grasp how memory is allocated and deallocated in Java. Understanding the intricacies of memory management is a hallmark of a proficient Java developer.
Building Real-World Projects
Theory alone won't make you a Java expert. Building practical applications is one of the most effective ways to learn Java. Start with modest projects and gradually increase their complexity. This hands-on approach not only reinforces your understanding but also equips you with real-world experience. Develop desktop applications with JavaFX for intuitive user interfaces, craft robust web applications using Spring Boot, or dive into the world of mobile app development with Android Studio. The projects you undertake will serve as a testament to your Java prowess.
The Power of Java Books: In-Depth Knowledge
Consider supplementing your practical experience with authoritative Java books. "Effective Java" by Joshua Bloch and "Java: The Complete Reference" by Herbert Schildt are highly recommended. These books provide in-depth knowledge, best practices, and insights from seasoned Java experts. They are invaluable resources for expanding your understanding of Java.
Enriching Your Learning Journey: Online Courses and Tutorials
Online courses from reputable platforms like Coursera, Udemy, edX, and ACTE Technologies can accelerate your Java learning journey. These courses offer a structured approach, with video lectures, assignments, and quizzes to reinforce your knowledge. ACTE Technologies, in particular, stands out for its expert instructors and comprehensive curriculum, providing you with valuable insights into the world of Java development.
Engaging with the Community: Online Forums and Communities
Joining Java forums and communities is an excellent way to complement your learning. Platforms like Stack Overflow, Reddit's r/java, and Java-specific LinkedIn groups provide a space to ask questions, seek guidance, and share your knowledge. Engaging with the Java community not only helps you find answers to your queries but also keeps you updated on the latest industry trends and best practices.
Staying Current: Java's Evolution
Java is a dynamic language that evolves over time. To remain at the forefront of Java development, it's essential to stay updated with the latest Java versions and features. Follow industry-related blogs, newsletters, and social media accounts. Keeping abreast of these changes ensures that your Java skills remain relevant and in demand.

In conclusion, embarking on the journey to master Java is an exciting and rewarding endeavor that demands dedication and continuous learning. The world of Java programming offers a multitude of opportunities, from web development to mobile app creation and enterprise solutions. By following the comprehensive roadmap outlined in this blog, you can pave the way to becoming a proficient Java developer.
Remember, learning from reputable sources such as ACTE Technologies can provide you with the knowledge and expertise needed to excel in Java programming. ACTE Technologies' exemplary Java courses, led by expert instructors and featuring a comprehensive curriculum, can help you establish a strong foundation and advance your Java skills. As you embark on your Java learning journey, may your passion for coding and commitment to excellence lead you to success. Good luck!
8 notes
·
View notes
Text
Details for Content Sizes when Importing and Exporting Content Online (Codes) (Tutorials)
Tutorial by @warrenwoodhouse
Importing and Exporting Details for different types of content that you can import and export to social media websites, apps and services.
Google YouTube
Add
Google YouTube Shorts
Aspect Ratio: 1080 x 1920
Video Length: 1 second (minimum); 60 seconds (maximum)
Video recording device: any suitable video recording device
Resolution: 8K maximum permitted (lowest resolution: 420p)
Encoding: HEIC H.264
Exporting: Adobe Premiere Pro, Adobe Premiere Express, YouTube Shorts (via YouTube app, iPhone and Android), HandBrake (encoding software), VideoLAN VLC Media Player (encoding software)
Google Blogger
Add
TikTok
Add
Snapchat
Add
Meta Facebook
Add
Meta Facebook Watch
Add
Meta Instagram
Add
Meta Instagram Boomerang
Add
Meta GIPHY GIF
Add
Meta GIPHY CAM GIF
Add
X Twitter
Add
X Twitter Vine
Add
X Twitter Periscope
Add
SONY PlayStation SHAREfactory
Details for when you’re importing and exporting content from the PlayStation 4.
Add
SONY PlayStation Share Factory Studio
Details for when you’re importing and exporting content from the PlayStation 5.
Videos - SONY PlayStation Share Factory Studio
File Formats: .mp4, .m4v, .mov, .webm
Resolutions: 64x64 to 1920x1080 mp4, m4v, mov; 3840x2160 webm
Encoding: H.264, VP9
Bit Rate: H.264 in 62.5 mbps
Scan: Progressive Scan only
Duration: 1 second to 60 minutes
Colour Space - H.264: BT.709
Colour Space - VP9: BT.709, BT.2020 (referred to as HDR)
Pixel Format: YUV4:2:0 (H.264, VP9)
Aspect Ratio: 1:1
Import From: USB:\\SHAREFACTORY\VIDEOS\
Optional 1: USB:\\SHAREFACTORY\VIDEOS\folder1\video1.mp4
Optional 2: USB:\\SHAREFACTORY\VIDEOS\folder2\video2.mp4
Music - SONY PlayStation Share Factory Studio
File Formats: .mp3, .mp4, .m4a, .aac, .ogg, .amr, .3gp, .3gp2
Bit Rate: 64 to 320 kbps with consistent bit rate
Import From: USB:\\SHAREFACTORY\MUSIC\
Optional 1: USB:\\SHAREFACTORY\MUSIC\folder1\music1.mp3
Optional 2: USB:\\SHAREFACTORY\MUSIC\folder2\music2.mp3
Images - SONY PlayStation Share Factory Studio
File Formats: .jpg, .png
Resolutions: 64x64 to 3840x2160
PNGs support transparency
Bit Colour: 8 to 32
Import From: USB:\\SHAREFACTORY\IMAGES\
Optional 1: USB:\\SHAREFACTORY\IMAGES\folder1\image1.jpg
Optional 2: USB:\\SHAREFACTORY\IMAGES\folder2\image2.jpg
Sound Effects - SONY PlayStation Share Factory Studio
File Formats: .wav
Duration: 0.5 seconds to 15 seconds
Import From: USB:\\SHAREFACTORY\SOUNDS\
Optional 1: USB:\\SHAREFACTORY\SOUNDS\folder1\soundeffect1.wav
Optional 2: USB:\\SHAREFACTORY\SOUNDS\folder2\soundeffect2.wav
Changelog
2nd April 2024 at 7:20 am: Added the sections titled “SONY PlayStation SHAREfactory”, “SONY PlayStation Share Factory Studio”, “Videos - SONY PlayStation Share Factory Studio”, “Music - SONY PlayStation Share Factory Studio”, “Images - SONY PlayStation Share Factory Studio” and “Sound Effects - SONY PlayStation Share Factory Studio”
28th February 2024 at 9:13 am: Created post
2 notes
·
View notes
Text
Kotlin Tutorial for Beginners: Learn Kotlin Language with Easy Android Examples
Are you ready to dive into the world of Android development with Kotlin? At RRTutors, we bring you a complete kotlin tutorial for beginners that simplifies your learning journey with practical examples, real-world use cases, and hands-on coding exercises.
Why Learn Kotlin?
Kotlin is a modern, expressive, and powerful programming language officially supported by Google for Android development. Whether you are a beginner or transitioning from Java, our kotlin language tutorial will help you build a strong foundation in both syntax and practical applications.
What You’ll Learn in This Kotlin Tutorial
Our kotlin tutorial is designed to cover everything you need, step-by-step:
Introduction to Kotlin Programming
Variables, Data Types, and Operators
Control Flow: If, When, Loops
Functions and Lambda Expressions
Object-Oriented Programming in Kotlin
Null Safety and Smart Casts
Collections and Functional Programming
Exception Handling
Android Basics using Kotlin
Kotlin Tutorial for Beginners
This Kotlin tutorial for beginners is perfect if you're just starting out. With clear explanations and beginner-friendly code snippets, you’ll understand the core concepts and gradually move into more advanced topics.
Each tutorial comes with:
Simple code examples
Practice tasks
Visual guides and explanations
Android Kotlin Tutorial
If your goal is to build Android apps, our android kotlin tutorial section will walk you through everything from setting up Android Studio to creating your first app. You’ll learn how to:
Build user interfaces with XML and Kotlin
Handle user input and navigation
Use Kotlin with Jetpack libraries
Connect to APIs and use data locally
Start Your Kotlin Journey with RRTutors
With RRTutors' easy-to-follow kotlin tutorials, you’ll gain the skills and confidence to develop real Android applications. Whether you're a student, hobbyist, or aspiring Android developer, our Kotlin language tutorial resources will guide you every step of the way.
Start learning today at RRTutors.com – Your trusted source for Android and Kotlin programming tutorials.
0 notes