#Creating Motion with Keyframes
Explore tagged Tumblr posts
Visit Tumblr Blog
Explore Tumblr blogs with no restrictions, modern design and the best experience.
Last Seen Tumblr Blogs


Fun Fact
Tumblr Inc. is using 66 technologies for its website.
Text
youtube
Unleash Animation Magic: Creating Flipbook Style Animations in Green Screen by DoInk
Embark on a journey into the world of animation with Green Screen by DoInk! In this blog post, we're diving deep into the art of flipbook-style animations, showcasing how you can bring your drawings to life with captivating motion. Whether you're an aspiring animator or a teacher looking to engage your students in a dynamic lesson, this tutorial will equip you with the skills to craft simple flipbook animations using the powerful features of Green Screen by DoInk.
What you will learn:
Introduction to flipbook-style animations in Green Screen by DoInk
Step-by-step guide on creating flipbook animations from scratch
Utilizing the app's drawing tools and timeline for seamless animation
Real-world examples showcasing the versatility of flipbook animations
Elevating your storytelling with dynamic and engaging visuals
With Green Screen by DoInk, the world of animation is at your fingertips. Whether you're crafting whimsical characters or illustrating educational concepts, flipbook-style animations offer a captivating way to bring your ideas to life and engage your audience like never before.
#Green Screen by DoInk#Flipbook Animation Tutorial#Animation Principles#Drawing Tools in Green Screen#DoInk Tutorial for Animators and Educators#Dynamic Storytelling with Flipbook Animations#Creating Motion with Keyframes#Enhance Engagement with Animated Content#DoInk#Do Ink#How to animate#How to animate with Students#Animation App#simple animation#animate simply#Youtube
0 notes
Text
one thing that irks me about tech bros is that they fundamentally misunderstand how artists seek out tools to help their process
the thing about creating innovations and tools is figuring out how to streamline an annoying part of the process so you can get to the fun part of the process.
If I don't have to worry about drawing every strand of hair on a cat, that makes it easier for me to draw a cat: and so people in the community have made so so so many hair texture brushes with all these different and shapes to help me create that cat
in motion graphics animation, it'd be a massive time sink to manipulate a model Frame By Frame without keyframe interpolation. Keyframe interpolation is where you tell the computer to move an object from point A to C and the computer fills in what point B is. Its a feature and a tool that reduces the workload of a project and allows you to focus on what you really want to do instead!
which is why anytime I read and hear about a tech bro going off about the wOndERs oF Ai I wonder if they actually have any knowledge of the field they're trying to solve problems for, or if they're just moonlighting as Explorers of the New World granting Savages new technologies that they're too dumb to understand
859 notes
·
View notes
Text
Unknown Circumstances of a Creation
June 2006
I have acquired a new animation software application, even though I have no prior experience in animation creation and my current lack of artistic skills. As of now, I am still in the process of learning. My recent focus has shifted since assuming my current affiliate position and past events. I found myself preoccupied and haven’t been drawing as much lately. The past events are still hard for me to comprehend, despite the many years that have passed. My memories have been jumbled and I’m still trying to sort through it.
Initiating Adobe Flash to start and reading all available instructions on how to utilize the application. I try all the tools, timeline, keyframes, and other features available. I begin by making lines and shapes using the tools, then making them move frame by frame and with motion tween. I also experimented with drawing, albeit, nothing too detailed or complicated. Just to see how it turns out in this animation application.
Perhaps, it’s time to start animating something different besides lines and shapes.
A stick figure serves as a good start, I remember it being the first thing I drew since my lack of artistic ability. I employ my mouse to draw a basic black stick figure, which I subsequently convert into a symbol.
Name… I stop and ponder, should I even name it something with significant thought…
‘victim’
It’s moving… the stick figure is moving. After I have given it a name, it starts to move on its own.
I didn’t need to animate it and it exhibited movement as if it came to life. Is this one of the animation application features? It wasn’t written anywhere and shouldn’t be possible. Advanced technologies are primarily to be utilized for military or research purposes. Outside of that field, not many technologies weren’t close to the level of advance.
Perhaps it’s because I’m using his computer in particular… but does it extend to the drawing created inside the application?
Turning my attention back to the stick figure. It seems to try breaking out of the transformation box. Rotating the supposed box around and seeing the stick figure inside it got tousled around due to the rotation. I try something different, drawing an anvil, it suddenly falls as if the concept of gravity exists. It was going to impale the stick figure, but it managed to move itself and the transformation box just enough so it wouldn’t get squished. The Anvil still destroys the transformation box, freeing the stick figure inside.
It retrieved the fragmented transformation box, hurling it towards the cursor as it sprinted and leaped to grab the cursor. The stick figure remains holding on, as I move the cursor to try breaking its grip. It remains holding on despite that, shifting the cursor towards the tools and timeline, it finally let go of the cursor.
Paying it no mind, my intent to try the application tools was intervened by the stick figure as it grabbed the icons and threw them at the cursor. Picking the lasso tool, I proceed to try using it like a real-life lasso by wrapping it around the stick figure, the stick figure swinging in mid-air as I move it around with the lasso.
The stick figure manages to grab the magnifying glass and throw it toward the cursor, freeing it from the lasso. Trying an alternative method, I attempted to draw a ray gun, attempting to recall its appearance from the numerous video games I once played. The gun works as it fires a ray leaving behind burn marks.
The stick figure evaded the blast and then utilized the application tool to sabotage the firearm, causing it to detonate and damage the animation timeline, resulting in the keyframes falling from their place.
Employing a similar approach, a gun turret is drawn, with keyframes serving as bullets. With the gun turret's trajectory adjusted to target the stick figure, the turret fired a shot. The stick figure, utilizing the eraser tool, successfully deflected the projectile. Subsequently, the stick figure utilized the pen tool to construct a defensive barrier. The barrier is used like a projectile, with the eraser tool as the arrow, shooting the eraser toward the turret, striking the turret, and erasing portions of it, rendering it unusable.
Creating more weapons to use against the stick figure and then binding it against the scroll bar. Moving the cursor as to delete the symbol of the stick figure, it crosses out the delete option and hits the cursor away. It then manages to copy itself to get an advantage by utilizing all available things on the application and proceed to launch attacks on the cursor as unisons.
With a simple click on the “X” button, everything stops as a notification window appears, requesting confirmation for the saving of the current work. With not much thought, I clicked the “No” option.
Perhaps further testing is required, but this time other than a stick figure. I draw a simple bird and nothing happened. I draw various inanimate objects and some have worked as if it isn’t merely a drawing. I draw a horse and nothing happens. There's no clear consistent pattern on what can become alive, although most that have shown to work so far are inanimate objects.
These unpredictable events reduce my motivation to use the application due to the lack of clarity regarding potential outcomes.
Perhaps I should continue this a couple of days later...
Initiating Adobe Flash again, I try to recreate what I have done a couple of days ago. Creating the same stick figure with the same symbol name I watch as it begins to move. Letting it move around for a bit before grabbing it with the cursor. It attempts to free itself but I simply let go and the stick figure falls from the great height. It slowly rises from the falling it takes but before it can do anything I click the option “Cut” and the stick figure is gone.
The creation of the stick figure exhibits the same as the initial result. I find these events hard to comprehend on what could lead to this outcome. But my schedule is going to be busy for the upcoming months and trying to make sense of this isn’t my top priority.
I’ll resume when I have nothing to do, to see why these drawings begun to move on their own. To determine if something is alive, one should know whether it can die.
For the time being, perhaps I should just draw on paper…
September 2006
Creating the same stick figure many months ago and creating a miniature circle. The circle, when drawn, exhibits a weight-bearing, ball-like behavior. Proceeding to launch it at the stick figure with each one I increase its size from its initial miniature from. The last one large enough that it completely crushes the stick figure, yet the stick figure continues to demonstrate movement as it emerges from beneath the imposing sphere.
Drawing a stair while the stick figure moves from beneath the sphere. Finishing the stairs, I placed the stick figure on top of the stairs. I observe as when it is drops at the top of the stairs it wobbles before stumbling and descending the stairs. When it falls at the bottom It appears stationary but then exhibits signs of movement trying to get up.
Is it simulating the experience of physical injury?
November 2006
I was simply trying to animate a fish in an aquarium, but it still isn’t fluid in its movement. All the drawings so far don’t display independent movement or move on their own, unlike the stick figure. Getting an idea, I draw the stick figure with the same procedure for it to become ‘alive’.
Seeing the stick figure move on its own the fish that I have drawn also move lively around the supposed aquarium. It swims around despite no indication of water, using the bucket to color the aquarium, only to have my attention on the stick figure wildly moving and floating as a drawing of bubbles generated from its supposed head.
Grabbing the stick figure to drop it outside the tank, it moves with a deliberate, cyclical pattern reminiscent of inhalation and exhalation.
Paying no mind I simply delete the stick figure as I continue to observe the still-moving fish swimming in the tank.
December 2006
Creating a weapon to be used like the first time, I drew a set of fireworks and witnessed it launched in various directions some towards the stick figure that is moving away. Trying another item, I draw a bomb watch it ignited, and descend down, exploding as it reaches near the stick figure. Upon detonation, the stick figure is launched away from the explosive force.
From this current test, I notice that the things that I have drawn seem to manifest to life after the stick figure is created.
March 2007
The stick figure seems to survey its surroundings, finally noticing the cursor as it pauses its motion. I employed the eraser tool and directed the cursor toward the stick figure it responded by moving away upon noticing the cursor drew closer. It seems to have memory data on what has been happening throughout. The stick figure starts to sprint in an attempt to make distance with the cursor, but by simply shifting the mouse to the side as do the cursor moves with quick speed towards the moving stick figure. The stick figure's legs were erased as the cursor came in contact, yet still moved away using its hands in replace of its legs. The remaining portion of the stick figure leaving only its hand as the final outstretched limb, but nevertheless, all were erased.
Pressing the undo keys, the stick figure reverts back to its full body. In perfect condition and capable of movement. The stick figure quickly sits up and touches its own body as if inspecting its own form. Using the shape tool, I constructed a box to confine the stick figure, ensuring its stillness.
It merely needs to be redrawn with the same procedure for it to be active. How about when the application is closed? Is it like rebooting every time the application is initiated and the stick figure is created with the same procedure? Does it just stop the same way when an application is closed?
Perhaps I should check the program that could be one of the causes for this. I never managed to see the actual programming he did. He never states that it could make drawing on the computer become animated. I think he once said that the things that become ‘alive’ with his programming are-
CRASH
“Max...?”
“MAX!!!”
I shout and hurriedly run towards the source of the crash, leaving behind the computer unattended.
I spent the remainder of the day digging a grave…
And sat beside them as I lost in thought becoming oblivious to the world around me.
When the day has darkened, I return inside. Upon recalling the unattended computer, I returned to check on it only to discover the animation application in ruins.
The stick figure nowhere in sight.
______________________________________________________________
My first time writing in this form. Trying to write in Alan POV is a little difficult. Due to how he behave and his mannerism in this AU. Try to sprinkle some worldbuilding and lore. Of course being an AU, not everything is going to be fully the same as the original. And also due to the fact most of the stories are written before AVA 11.
Still tho, hopefully you all enjoy!
Get to know AVA Remembrance AU
#ava remembrance au#animator vs animation#ava#ava au#ava victim#animator vs animation victim#writing#fanfic
22 notes
·
View notes
Text

ANIMATED TEXT TUTORIAL: ★★✩✩✩ Difficulty: Beginner/Intermediate
This is a step by step tutorial on how I did the text for my Pink Venom swinging text.
We are going to be making this text:
Before I start, you WILL need Adobe After Effects, but I will show you step by step how to achieve this.
Tutorial below the cut!
✔ Step One: Composition Open After Effects and create a new project, then a new composition making sure the composition matches your gif settings. (ex: 540 x 540, 2 seconds, 30 fps)


✔ Step Two: Creating Our Text Add a new text layer. It should be the same as Photoshop, you can just select the text tool and write what you want. Customize the text to say what you want and change the font and size to your liking.


We should have something like this:

✔ Step Three: Adding Our Animation There should be a box that says "Effects & Presets", in that box you can search for effects. Search for "Explosion". It will be under Text > Miscellaneous.

Select the first one and you can either drag it on top of your text layer or just double click it with your text layer selected. Sliding the time, we should have something that looks like this:

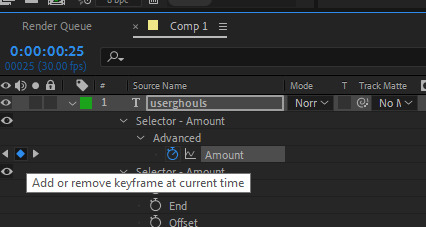
✔ Step Four: Adjusting the Animation With your text layer still selected, press "U" on your keyboard. This will open our key frames for the animation.

It's a lot to look at but don't worry, we will only be focused on Amount and Opacity, and I will make this as easy as possible for you. On the Opacity setting, click on the little time clock. This will remove the keyframes. Make sure your opacity is set to 100%.

Next we are going to adjust the amount so that it explodes INWARD instead of OUTWARD. Find a good spot where the letters are out and add a new keyframe the same way you would on Photoshop.
Now swap the two keyframes so the explosion animation is reversed. Next we are going to remove the scale keyframes. Click on the second stop watch for the second amount parameter, and make sure that one is set to zero.

We should be left with only ONE thing that is keyframed. And the keyframes should look like an hourglass.

You can stop now and leave it or we can make it a little smoother and more fun looking.
✔ Step Five: Editing the Graph & Adding Motion Blur To add a motion blur to our text, we just need to select the three little circle stack on our text layer. Also double check that the same symbol is highlighted blue up top.

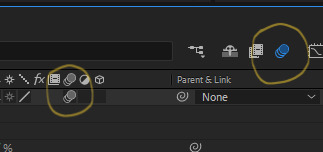
Now we have motion blur. Next we are going to adjust the graph. To open the graph select the little graph icon and then select our keyframed buy clicking on the amount parameter.


Now our graph should look like this:
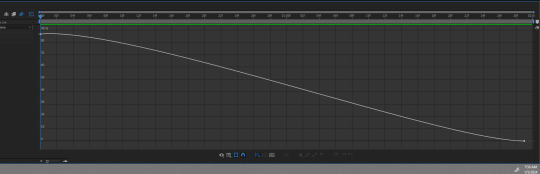
Select one of the dots and two little arms should pop up and we can drag those around to adjust the graph (the speed of our animation). Adjust to your liking, but to make it look like the text in the tutorial, my graph looks like this:
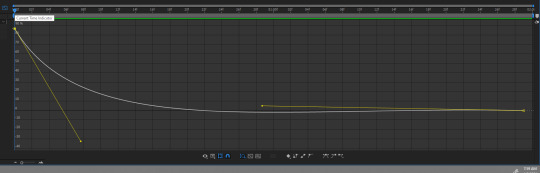
With my graph, the animation looks like this:

Now all the hard work is done!
✔ Step Six: Exporting Now to export our video so it can be turned into a gif: Go to File > Export > Add to Render Queue

We should be at a menu like this:
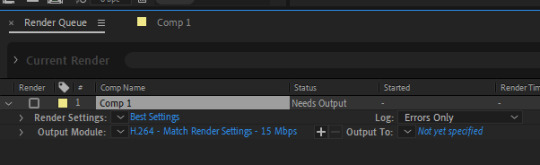
Click on the part that is blue next to "Output Module" and another box should pop up. For format: change to "Quicktime" For Video Output > Channels: select "RBG + Alpha" (this will ensure our background is transparent)
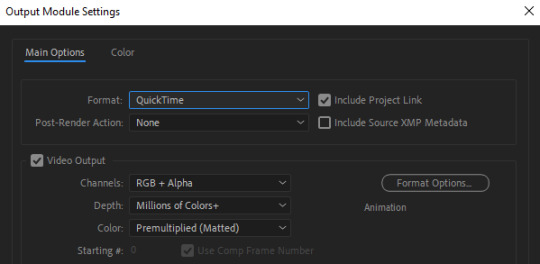
Select "OK" and then under "Output to" select where you want the video to save.
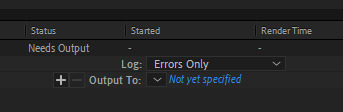
Now all you have to do is Render.
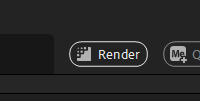
Once that finishes, YOU'RE ALL DONE!
Import video to frames as you usually would in Photoshop, just don't change the frame delay.
Treat it like a normal text layer/smart object.
As usual, you can play around with all the animation settings to get the look you want, this is just the basics for the main animation.
It looks like a lot but the difficulty is minor once you get the hang of the steps.
Any questions you have during the process just DM me! ★
159 notes
·
View notes
Text
youtube
Urasawa MEP intro
Thanks @marshmallowgoop for all your hard work in hosting this MEP! It was so fun seeing the final video put together, everyone should be proud of their work c:
Here's a little breakdown of my part below-


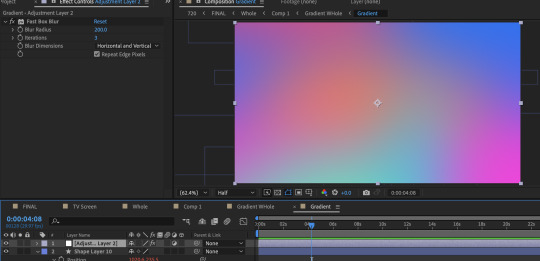
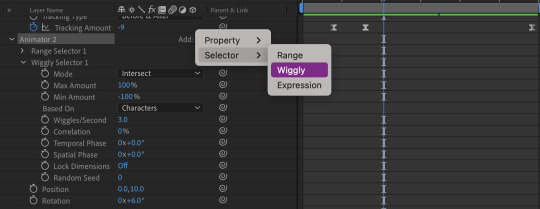
The base of the gradient consists of ten circles all moving in wacky ways thanks to wiggle expressions. Putting the wiggle expressions to extreme values means the circles will occasionally disappear entirely from view or massively take over the screen, leaving the gradient with a lot of evolving variety.
To add expressions: Alt click the stop watch and type wiggle( , ) The first number is how many times per second it will move and the second is the extreme to which it will move. (Frequency, Amplitude)
To quickly view your written expressions: click the layer and double click E on your keyboard
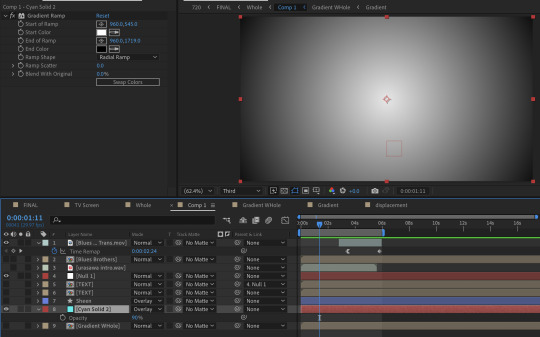
1st gradient comp: Masked into a circle. Double click the shape for it to be centered and fill the whole comp. Animate the scale so it disappears and covers the whole comp. And because I don't want to copy paste the keyframes a million times: Alt click the stop watch, click the arrow, scroll to properties, and click the loopOut cycle expression. The animation will repeat immediately from the beginning.
Duplicate gradient comp: Scaled up to the max size of the last keyframe in the masked gradient layer
Adjustment layer: A displacement map
Okay, so what's informing the displacement map?
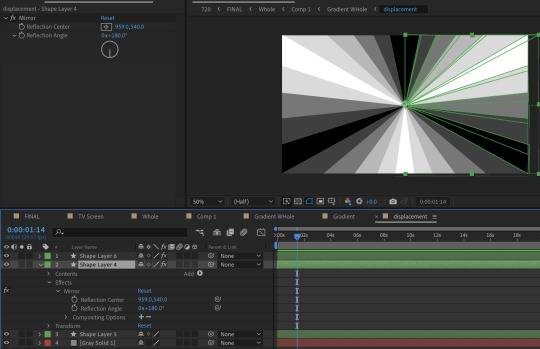
It's another comp layer that's the same ray pattern made out of shape layers. (Quick tip, use the mirror effect so it's less work). Displacement maps work by using areas of black and white to inform how an image is moved. Middle gray is neutral, black pushes in one direction, white pulls in the opposite.


The displacement is pushed to such an extreme that clicking 'stretch map to fit' isn't resolving the areas of black. I couldn't figure out why, so I resorted to scaling up the comp to hide it. It's also doing a fun thing were the circles fall to the center first before expanding outwards. I didn't intend for that to happen, but it's a very nice flow of motion.
Okay, but how do you keep the pattern precise when making the rays?
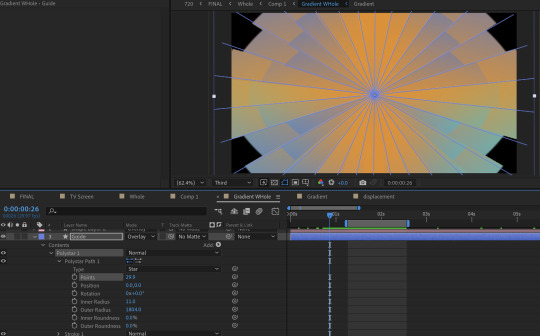
I played with the polystar shape to make a guide.
But this still looks pretty flat, right?
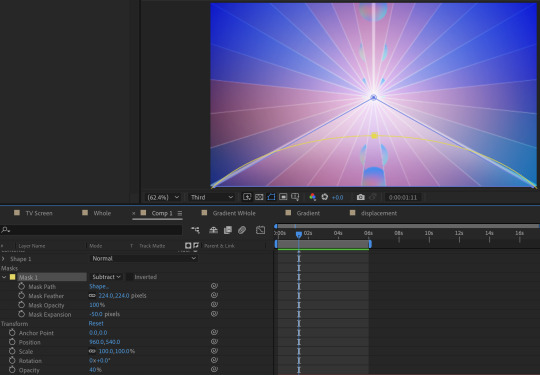
Some additional adjustments:
A white shape layer (blue) to fit the bottom triangle with a feathered mask (yellow) to form a luster across the shape. This is on an overlay blend mode and the opacity is turned down.
And a radial gradient ramp that is also on an overlay blend mode with the opacity turned down.
What about the reflections?

They're the same comps but duplicated, flipped vertically, with some added blurs (including vertical only) and the opacity turned down.
You may notice that the car's reflection doesn't move in a way a flipped layer should.
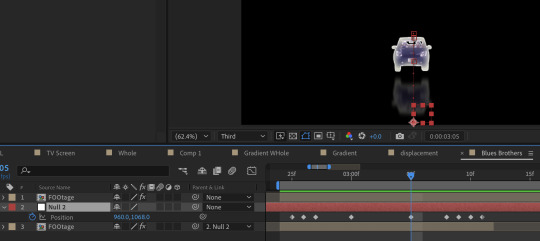
That's because I have it following a null where I animated the position to match how I think a reflection going down a road works. (Additionally I exported this whole comp with a transparent background because I wanted to make some time adjustments without screwing up the mask animation)
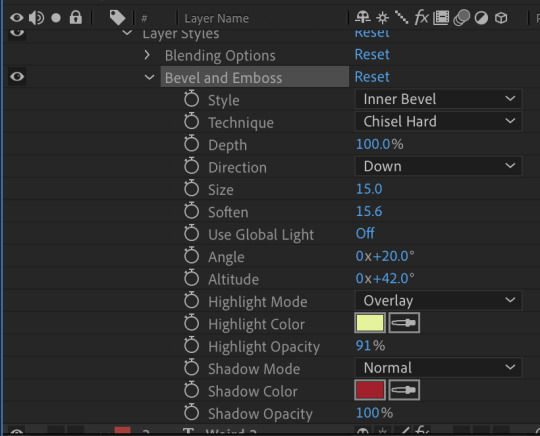
About the text:
The title is using a bevel and emboss layer style, that's why the text appears to melt together when I squish the tracking inward. (Side note about tracking, add a line anchor and type 50% if it stubbornly refuses to be centered by default) Text animators also have a wiggly setting! A little bit hidden, but fun. I only added this for the main title.
I also added posterize time to change the fps to 12, which gives it a little bit of a choppy animated look.
The "TV opening" look consists of an animated white shape layer with some blurs, grain and noise across the whole comp. And since it's already black and white I can use it as a track matte for the final, whole comp of the title opening. I use the offset effect to create the 'rolling footage' of the title with scale wipe to create that bit of warping.
I like making sure there's always an easy to follow direction of motion, so after a lot of downward fast movement, everything is timed to burst outward, from the title to the gradient.
#dcmk#my animation#motion graphics#my video#curse tumblr for not letting me upload more than one video#I had the itch to write some type of breakdown but I really don't know how thorough I should be#I don't expect most people to do more than glance at it so I went on until I lost steam#but if anyone really does have questions I'm happy to answer!
7 notes
·
View notes
Text
Blog Post #04- Storytelling Through Stray
In this blog post, I will explore how Stray, a third-person cat adventure game evokes deep emotions within players through its unique storytelling, innovative design, and non-human protagonist. Stray demonstrates just how deeply immersive video game narratives can be. Further I will examine the visual style of the game, its apocalyptic setting, and minimalist storytelling techniques.

Developed by BlueTwelve Studio, Stray is a 2022 video game where a stray cat explores a post-apocalyptic cyberpunk city. Drawing inspiration from the stray cats of Montpellier, France, the developers tried to capture the feline experience authentically.
The game’s standout feature is its realistic portrayal of cat behaviour. Rather than using motion capture, the team relied entirely on traditional keyframe animation techniques. Animator Miko observed real cats, studying their movements to replicate them in the game. This method gave the team the freedom to imagine how a cat might behave in specific scenarios, even extrapolating from real-world knowledge when faced with situations no cat would naturally encounter. Thus, it resulted in a deeply immersive experience making it feel lifelike and believable, and more emotionally connected to the players.
I find it fascinating as an environment artist how visual storytelling can portray complex emotions. Stray caught my attention because it tells a relatable story with a non-human protagonist. Through this game, I was able to look into how immersive worlds can be created in which the environment and visuals say much more than words. Stray pushes me to go out of the box in my projects and explore unconventional ways to connect with players
------------------------------------------------------------------------------
The Look, Feel, and Style of the Game


Stray is visually stunning, with its cyberpunk city blending vibrant neon lights and decaying architecture. The atmosphere evokes a sense of nostalgia and loss, as remnants of human life—graffiti, posters, and abandoned technology—tell silent stories of a vanished civilization. The vertical design of the city reflects societal hierarchies, with affluent areas closer to the sky and impoverished robots living below. The game’s art style balances realism and stylization. The cat’s animations are lifelike, while the robot characters have a charming, human-like quality. Lighting plays a crucial role, with warm, flickering hues contrasting against cold blues to create a hauntingly beautiful world. This combination of design elements draws players into the narrative, making the world feel alive despite its desolation.
------------------------------------------------------------------------------
Environmental Storytelling in a Cyberpunk Dystopia
The environment in Stray is more than just a backdrop; it's an active storyteller. The game takes place in a post-apocalyptic world where humans have vanished, and left behind is a society of robots. Every little detail, from books lying abandoned to graffiti made by robots, adds layer upon layer to the narrative. The city's design encourages exploration, with every corner offering clues about the world's history. The companion robot, B-12, acts as a guide and translator, giving just enough exposition to keep the story coherent without spelling out much for the player. The minimalist approach of the game, allow players to piece together the story through observation, and making it feel deeply personal.


At its core, Stray is a tale of survival, affection, and hope. Playing as a stray cat creates a feeling of vulnerability and resilience. Companionship seems to play a role in a world full of loneliness between the protagonist and B-12, adding to that depth. The lack of traditional dialogue places greater emphasis on the visual and audio storytelling. Subtle animations, detailed environments, and a haunting score combine to evoke powerful emotions. This game is one example of how to tell a powerful story without words, making Stray a leader in narrative design.
------------------------------------------------------------------------------
Stray is widely praised for its emotional depth and its ability to whisk gamers away into its world. For many players, the game really had something new to say about storytelling, mainly using a cat as the protagonist. The thinking here is that such a non-human perspective creates a very fresh, vulnerable way for the player to go through a narrative and makes emotional connections with the character and its world even more resonant. Critics, in their reviews have highlighted the game’s seamless blend of gameplay and narrative.
It is a brilliant example of how far video games can push the limits of narrative. It delivers a unique experience through its realistic animations, rich environments, and emotional depth, leaving a lasting impact that will linger long after the game is over. To game artists and designers, Stray stands as a testament to visual storytelling and an inspiration toward the discovery of new ways to engage players.
Sources:
The Verbal Thing, 2022. Stray Game Thoughts. Available at: https://theverbalthing.com/news/stray-game-thoughts [Accessed 15 Dec. 2024].
Blogging with Dragons, 2022. You Need to Play Stray. Available at: https://bloggingwithdragons.com/you-need-to-play-stray/ [Accessed 15 Dec. 2024].
Abby’s Blog, 2022. Stray. Available at: https://abbysblog.net/blog/stray [Accessed 15 Dec. 2024].
Yellow Brick Road, 2022. How Stray Became a Masterpiece in Storytelling. YouTube. Available at: https://youtu.be/YnjZy4l4xR4?si=i96BzrLu8nMJ2Kov [Accessed 15 Dec. 2024].
Game Makers’ Insights, 2022. Creating the World of Stray. YouTube. Available at: https://youtu.be/nujjCmABO7Y?si=EKVeaLzaqiU9YRaO [Accessed 15 Dec. 2024].
7 notes
·
View notes
Text
Video Editing Course in Chandigarh: A Complete Guide for Aspiring Creators
In today’s digital era, where content is king and visuals dominate every platform, video editing has emerged as one of the most sought-after skills. From YouTube vlogs and Instagram reels to documentaries and feature films, editing plays a pivotal role in crafting a compelling visual story. Chandigarh, being a hub of education and innovation in North India, offers numerous opportunities for individuals aspiring to learn video editing. This article explores everything you need to know about enrolling in a video editing course in Chandigarh—including course content, career scope, top institutes, eligibility, and more.
Why Choose Video Editing as a Career?
Video editing is no longer confined to film studios. With the explosive growth of digital content on social media, OTT platforms, and e-learning, skilled video editors are in high demand across industries. Here are some reasons why a career in video editing is both exciting and rewarding:
Creative Expression: Editing is an art that lets you shape stories, evoke emotions, and deliver impactful messages.
High Demand: From marketing agencies to content creators, every industry needs talented editors.
Freelancing Opportunities: With the right skills, you can work as a freelancer for global clients.
Attractive Salaries: Experienced editors often earn competitive salaries and perks.
Work Flexibility: Many editors work remotely, giving you the freedom to work from anywhere.
Scope of Video Editing in Chandigarh
Chandigarh, with its emerging media landscape, offers numerous job opportunities in video production, advertising, media houses, and digital marketing firms. The city is also home to various regional entertainment channels and film production units, increasing the need for skilled editors.
Moreover, the growing trend of content creation among YouTubers, influencers, and startups in the Tricity (Chandigarh, Mohali, Panchkula) region has further boosted the demand for professional video editors.
What Does a Video Editing Course Include?
A comprehensive video editing course in Chandigarh typically covers both the technical and artistic aspects of editing. While the curriculum may vary between institutes, the following modules are commonly included:
1. Introduction to Video Editing
Basics of video production
Role of a video editor
Overview of the editing process
2. Editing Software Training
Adobe Premiere Pro
Final Cut Pro (Mac)
DaVinci Resolve
Adobe After Effects (for motion graphics)
3. Technical Skills
Importing and organizing footage
Timeline editing
Trimming, cutting, and splicing clips
Adding transitions and effects
Audio editing and sound design
4. Color Grading & Correction
Adjusting exposure, contrast, and saturation
Using LUTs and color wheels
Matching color tones across shots
5. Motion Graphics & Visual Effects
Intro to keyframing and animation
Creating titles, lower thirds, and credits
Visual effects and green screen editing
6. Exporting & Project Delivery
Understanding codecs and file formats
Rendering for different platforms (YouTube, Instagram, etc.)
Backup and archiving best practices
7. Live Projects & Portfolio Development
Working on short films, music videos, or commercials
Creating a showreel for job or freelance applications
Top Video Editing Institutes in Chandigarh
Several institutes in Chandigarh offer professional training in video editing. Here are some of the best:
1. Morph Academy
Courses: Video Editing, Film Editing, VFX, Multimedia
Software: Adobe Premiere Pro, After Effects, Final Cut Pro
Duration: 3 to 6 months
Certification: Yes
Placement Assistance: Yes
2. BigBoxx Academy
Offers short-term and diploma-level courses
Hands-on training with real projects
Strong industry network for internships and placements
3. Chandigarh Institute of Film and Television (CIFT)
Focuses on film editing and post-production techniques
Experienced faculty from the film industry
4. MAAC Chandigarh
Known for animation and multimedia courses
Includes VFX and advanced motion graphics training
5. ThinkNEXT Technologies
Offers certified training in Adobe software
Affordable courses with practical lab sessions
Eligibility Criteria
Most video editing courses in Chandigarh have minimal eligibility requirements:
Minimum Qualification: 10+2 (any stream). Graduates are also eligible.
Technical Skills: Basic computer knowledge is recommended.
Creative Interest: A passion for films, storytelling, or visual media is a plus.
No prior editing experience is necessary, as most institutes start from the basics.
Duration and Fees
Duration:
Short-term Courses: 1 to 3 months (basic to intermediate level)
Advanced/Diploma Courses: 6 to 12 months (includes motion graphics and VFX)
Fee Structure:
Basic Courses: ₹15,000 to ₹25,000
Diploma Courses: ₹30,000 to ₹80,000
Fees vary depending on the course duration, software taught, and institute reputation.
Career Opportunities After Course Completion
After completing a video editing course, students can explore various career paths, such as:
Video Editor
Motion Graphics Artist
YouTube Content Editor
Post-Production Assistant
Film/TV Editor
Freelance Video Editor
Social Media Content Creator
With experience, editors can also move into roles like Creative Director, Colorist, or Visual Effects Supervisor.
Freelancing vs. Job – Which is Better?
Both options have their merits, depending on your goals and lifestyle.
Freelancing:
Flexible hours and location
Ability to work with international clients
Higher earning potential (once established)
Full-Time Job:
Stable income and benefits
Learning from seniors and working in teams
Opportunities for career growth and promotions
Many students start with a job to gain experience and then transition into freelancing.
Tips to Excel as a Video Editor
Practice Regularly: Edit different types of videos to build versatility.
Watch Tutorials: Platforms like YouTube, Skillshare, and Udemy offer advanced tips.
Stay Updated: Editing trends and software features change frequently.
Build a Portfolio: A strong showreel is essential to attract clients or employers.
Network: Attend workshops, film festivals, or online forums to connect with other creators.
Final Thoughts
A video editing course in Chandigarh can be a stepping stone to a dynamic and fulfilling career in the creative industry. Whether you’re a student, professional, or aspiring content creator, learning how to edit videos professionally opens up countless opportunities in today’s visual-centric world. With the right training, dedication, and creativity, you can build a successful career and bring powerful stories to life through the art of editing.
If you're based in Chandigarh or the surrounding areas, now is the perfect time to sharpen your editing skills and make your mark in the digital content revolution.
2 notes
·
View notes
Note
OK it’s infodump time. just a heads up i may hit character limit and end up taking up multiple asks. one of the first things you’re taught about in animation are the 12 principles of animation! they might vary a bit in how they’re described but most people follow the principles as they’re described in the book Disney Animation: The Illusion of Life, written by two of the people that got disney to be the big studio it is today. the illusion of life is basically the animator’s bible. it is The Book.
in order to keep myself straight when it comes to remembering the principles, i’m following this youtube video that my teacher showed us in class ^_^ it was made by the same guy who does those stickman animation vs animator videos, if you’re familiar! and he explains things well. i’d highly recommend watching it so you can see the visual of each principle being exercised as it’s being explained. also, a lot of principles overlap with each other somewhat, so expect some redundancy. OK let’s get started >:D
Principle 1- Squash and Stretch
you’ve heard of this i’m sure! animation looks more appealing to the eye if things squash and stretch with their motion. it’s how you get “bouncy” looking animations, and it keeps things from looking stiff. something moving fast or dramatically will stretch, and something suddenly stopping or compressing will squash. the most important thing to keep in mind with squash and stretch is maintaining the same volume— otherwise, whatever object is being animated seems to grow or shrink in size, which isn’t an effect we’re usually looking for. (rubberhosing in old cartoons breaks this rule a bit, but if you look you will see that squash and stretch absolutely still applies!)
Principle 2- Anticipation
an important thing in animation is creating something that your audience can intuitively follow along with. a lot of animated movements happen quickly, so you need to cue your audience in on what your characters are about to do. this is what anticipation is for! plus, in real life, a person doesn’t just start running from a standstill or lift up and throw a ball like a robot— they wind up before they move. anticipation can be just about anything— you can oftentimes anticipate a rotation of the head by having the eyes move first. it can be subtle or dramatic— looney tunes showcases a lot of anticipation! this principle is also sometimes called “wind-up” or “lead-in.”
Principle 3- Staging
this principle is incredibly important for coherency and clarity in your animation. since you’re an artist already, you’ll actually be a bit ahead in learning this! staging is all about composition and leading the eye where you want it to be at the right time. think rule of thirds type stuff. a lot of staging is intuitive, and you’ll pick up on it as you practice. trust yourself! any human can tell what looks good vs what doesn’t. studying other animations is also very useful for learning this one. i highly recommend studying other animations in general, tbh :3 a LOTTT of animating uses reference so get comfy with that idea.
Principle 4- Straight Ahead and Pose-to-Pose
this is less an idea to keep in mind, but rather two methods of frame-by-frame animating that you can choose between depending on what you’re trying to animate. straight ahead animation is exactly what it sounds like— drawing one frame of an animation, then the next, and then the next one after that. straight ahead is very good for animating things that move somewhat unpredictably, like fire or steam, but it’s easy to lose track of your timing or motion in more structured actions. pose-to-pose works a bit differently— instead of drawing one frame after the next, you start with the most important frames in the animation, or the “key frames.” in a basic bouncing ball animation, this would be the first frame, the first impact with the ground, the peak into the air, the second impact, and the last frame. then, you go and draw the frames between those keyframes. this is called “in-betweening!” the word “tween” comes from this, because all a tween is is having a computer do your in-betweening for you (do not equate this with being easier, though! computers are finicky and it takes a lot of work to get tweens feeling natural as a result.) pose-to-pose is usually best for character animation or big/complicated motions. you have more control over your movement and timing this way, but if you need to animate something with movement that’s a bit more random, you may struggle a bit trying to use pose-to-pose. use each method whenever the situation calls for it!
Principle 5- Follow Through and Overlapping Action
this is one of my favorite principles! to me, it’s what takes a lot of animations from feeling stiff and basic to alive, like the things i’m seeing are actually moving and interacting with each other. things that are attached to a body with room to flow (hair, accessories, clothing, tails, what have you) will move somewhat independently from the body and continue to move while the body reaches a rest state. if a superhero with a cape lands in the ground fast, the cape will stay in the air for a while before falling to rest behind them. if a character with long, flowing hair is suddenly yanked backwards, they’ll start moving before their hair does, causing it to seem to float up into their face. basically, keep things like inertia and gravity in mind. this is also a really good way to make animation feel flowy and smooth :)
Principle 6- Slow In and Slow Out
another example of inertia! generally speaking, if you want a movement to feel natural and organic, you need to follow this principle. things in motion are slowest at the beginning and end of their actions, and fastest in the middle. that means you’re going to be drawing more frames at the beginning and end of your motions, and less frames in the middle. each frame is a fraction of a second (usually 1/24th in the industry, or a 1/12th if you’re animating on twos (aka most of the time)), so the more frames you spend on an action, the slower it will be in the final product. this principle is also often referred to as “ease in and ease out” or just “easing,” which is what i usually call it. easing is the main thing that you need to keep in mind when animating with tweens, as well! it’s what brings a motion from mechanical to natural.
Principle 7- Arcs
to put it simply, almost all motions follow an arc. when a person moves their arm, their elbow swings on an arc from their shoulder, their wrist swings on an arc from their elbow, their hand swings on an arc from their wrist, and so on and so forth. the best way to learn this principle is to just watch things move. look close and you’ll start to notice the arcs that objects and people follow! this is another huge part of making tweens feel natural instead of mechanical. oftentimes, animators will create what’s called a motion path, which guides the computer to tween things in a certain way instead of going straight from point A to point B. most motion paths follow arcs, but some don’t- it depends on what’s being animated and how it’s moving.
Principle 8- Secondary Action
secondary action refers to actions that support the main action of something in motion. in character animation this is usually anything that can be used to express an emotion— if you want to animate a cat being startled, the primary action will be the cat jumping back and maybe running off, and the secondary actions will be the cat’s tail fluffing up, ears pinning back, spine arching, and face curling back in a hiss. secondary action is often confused with overlapping action, but they’re not the same. one supports realism, while the other supports communication.
Principle 9- Timing
this is one of the most important principles out there, imo. timing is exactly what it sounds like— it’s the pacing of your animation, how many frames you let each action take, how long any pauses are. timing is another thing that you kind of have to feel out as you practice, but studying other animations will be your best friend here. remember, frames are a unit of time! the more frames something takes up, the longer it will be. this also plays a part in deciding your framerate in the first place. most professional studios do what’s called animating on twos in 24fps. all animating on twos is is having each new drawing in an animation last at least two frames. this has you effectively animating at 12fps most of the time, which is perfectly functional for most scenes without really sacrificing looks. when animators want their scene to look REALLY smooth, they’ll switch from animating on twos to animating on ones, which simply means that each drawing only takes up one frame. this lets animators increase the smoothness of the final product without disrupting the timing— you can fit in more frames because you were intentionally leaving them free before. animations can happen at basically whatever fps you want depending on what you’re going for. i know that popular animator crumb/cuptoast animates at 6fps, for example! if you’ve seen their animations, you know it’s still possible to get a really nice final product with that few frames. if you’re animating frame-by-frame, i’d suggest not going over 32fps. at that point, the increase in quality is so minimal in comparison to the amount of work you’re doing that it isn’t really worth it.
Principle 10- Exaggeration
another of my faves! exaggeration is exactly what it says on the tin. take that pose. now push it. more. just a little bit more. don’t be afraid to break physics— this is art, not real life. almost all art forms contain exaggeration, and in animation it’s especially important. for example, squash and stretch are often used as a form of exaggeration! think smear frames or tom and jerry. also, the more exaggerated something is, the easier it is for an audience to tell what’s going on. if you want a character to look visibly angry, but all you do is make them frown, the audience has a hard time intuiting what that frown means. are they sad? bored? upset? but if you make them frown hard, maybe even growl or grit their teeth, furrow their brow, throw their hands up in the air, have their face turn red, make steam blow out of their ears, etc… well, then it’s pretty clear that they’re mad. in cases where you want an animation to feel more realistic, the exaggeration will be more subtle, but it should still be there to some degree. remember what you’re trying to convey— generally, treat things less like a documentary and more like theatre. i keep this in mind basically every time i draw (especially very animated characters like marzi), and i’m pretty sure it’s why the thing i get compliments on the most in my art is expressiveness. never be afraid to push just a little bit more.
Principle 11- Solid Drawing
this is, to me, the hardest principle. solid drawing is all about realism. you want your characters to feel like they exist in a real, living world, so they need to follow the rules. think of characters in 3D forms instead of 2D shapes (this is the main reason why animation reference sheets ALWAYS have a turnaround or two). remember that they have weight. keep proportions consistent (unless exaggerating). this rule can be broken on purpose if you don’t need something to feel particularly “real” (think 1930s era cartoons), but 90% of the time you will need to keep it in mind, so it’s best to learn the rule before you break it. solid drawing is not easy, and it takes a lot of practice. to me it’s the animation equivalent of dynamic posing in illustration. one of the hardest things to animate in 2d is the camera rotating around a character, and that’s because the character needs to maintain an extremely consistent appearance or else the whole thing breaks and looks uncanny. This One Is Hard But Important basically
Principle 12- Appeal
appeal!!! i love appeal. because appeal pertains to design! when designing anything for animation (we’ll say a character for simplicity’s sake right now), you need the design to be appealing to the audience. THIS DOES NOT MEAN YOUR DESIGN HAS TO BE PRETTY. they can be ugly and appealing. cartoons like invader zim or ren and stimpy are good examples of Ugly With Appeal. this is where things like shape language, silhouette, and expressiveness come into play. sometimes you can break other rules to increase a character’s appeal— for example, mickey mouse’s ears never overlap with each other or the rest of his head, regardless of the angle his head is at. this breaks solid drawing rules, but maintains the distinctive silhouette, so someone will be able to look at him from any angle and INSTANTLY recognize that it’s mickey mouse. i actually follow this rule with marzi’s ears to a degree, though i’ve also been trying to balance it with more solid drawing as well! it keeps the silhouette distinct and prevents from creating business that could distract.
OKAY that’s that for the 12 principles!!!! i’m impressed i fit it all in one ask. hopefully. if tumblr sends this properly. if you have any questions or there’s anything else about animation you wanna know about (history, software, industry, etc…) feel free to ask i LOVEEEE talking abt animation so much. okay that’s all i got for ya yaaay yippee hooray
Holy crap. ⊙▽⊙ Everyone give it up for Mars for this one. You really wrote out all of this for me.... omg.... thank you!!! I will definitely have to watch that video you linked. And I'm actually surprised that I recognized a few of these principles. yippee!!!! I'm gonna have to get into animation now, I don't have a choice. you've forced my hand... I'll be coming back to this later for sure. hehe ^__^
4 notes
·
View notes
Note
Hi can I ask? What app or software do you use to draw? Most specifically to animate and make GIFs? :D
Hiya! First off: Of course you can ask! I am always open to share my knowledge~ So if there's anything else you wanna know in future don't hesitate to reach out~ :3
The program I use?

I use Clip Studio Paint Ver. 4 (latest version) for the iPad.
My iPad is a rather old one (6th generation, 10 Inch). I got it second-hand in 2019 but it holds up well!
Payment? Plans or One-Time?
Keep in mind, that CSP for iPad is a subscription-system! You can choose between the Pro-Version ( 4,39 € / Month ) or the EX-Version ( 8,59 € / Month ). I use the Pro-Version, but it limits your animation to 24 panels / 2 seconds, so you can't do much with it, while EX-Version gives you limitless frames.
If you use your PC to draw, you can purchase CSP with a One-Time Payment, so you won't have the subscribtion payments. There will be occasional updates, that you'll have to pay extra for but I honestly feel like CSP is worth it, since they're listening to their userbase and the updates are starting to give Adobe a run for their money.
All in all for Animation, I recommend working at the PC because a horizontally wide Screen is SUCH a blessing for working on timelines - I just can't afford a new screentablet for my PC so I am stuck with the iPad for now xD the iPad screen feels very cramped when I work on my animations.
They also have a 3-Month trial-version so you can test it out first!
What does animating look like in there?
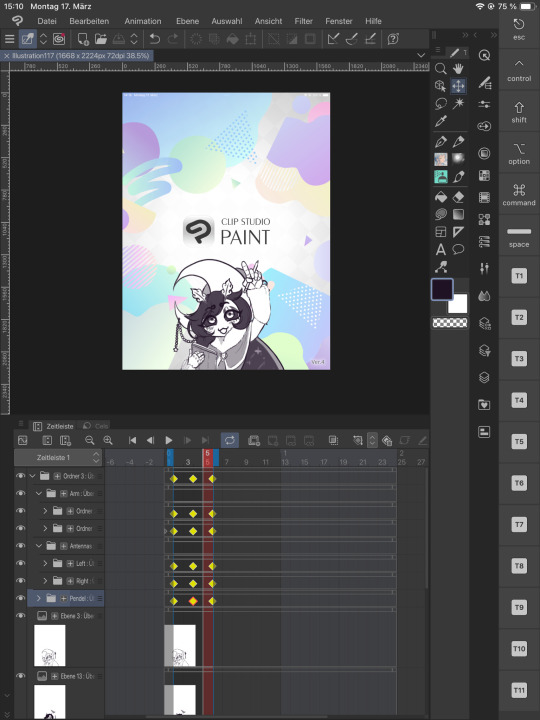
You can animate with Keyframes, meaning you can animate the rotation, expansion, position and opacity. Depending on the curves of the animation, you can make more cut animations or smooth ones.
(FYI you can customise your layout within the program, like I had to make a custom layout for being a left-handed one, so my hand won't rest on any controls xD )
Here are two examples in which I animated using keyframes in CSP.


You can see that the keyframes for the first picture are rounded, while the keyframes for the second one has hard edges. There's still so much more I can tell about keyframes, but I guess this would go too deep right now haha~
Then for frame by frame animation like the one below you can work draw each panel by yourself and CSP's got the functionality to lightboard the panels before and after your current so you can have a good idea of what you're doing. You can also combine these two techniques if needed.
Like for Vascos head I used Keyframes to move it up and down.

What about my more Complex animations?
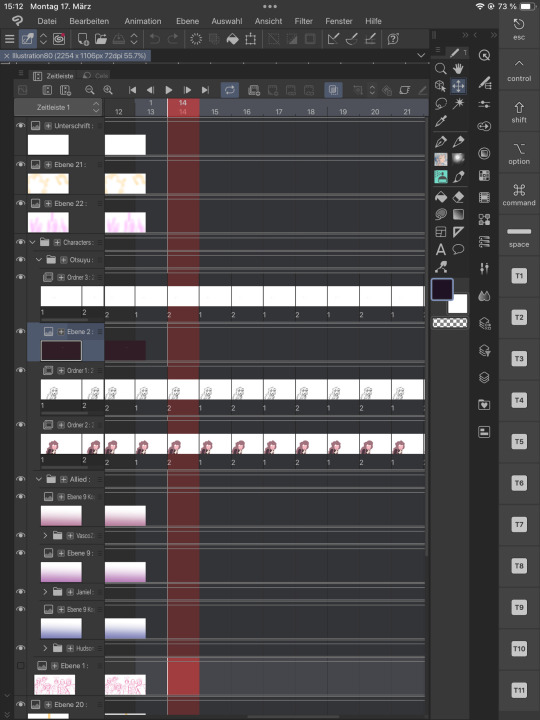
Like those? Or my latest Otsuyu-Vtuber-Project?


Well, for these "motion graphics" I prepare the entire pictures with CSP but I drag them into another program:

Which is the "industry-standard" for creating Vtuber haha~ but the Pro-Version also requires a yearly subscribtion, because the free version of it just doesn't cut it. The limitations are too heavy to really make use of it.
Everythings so expensive! Isn't there any alternative?
Yes, but I can't speak of experience when I recommend: Procreate, which is a one time and fairly cheap ( 6,99 € ) purchase. It is such a strong program and I've seen different artist pull out so much of it, but I honestly did not get to try it out, because the layout is vastly different to the one I am used to from CSP (which I am using for over a decade) I've even seen people animate with FlipaClip, but again I can't talk about my own recommendation about that.
And while I always LOVED "Adobe After Effects" because of my career-choice and studies, I can't recommend Adobe these days, since they're the MOST expensive option ( ~80 € / Month, if not even more) out there, while still being held as industry standard AND they're monitoring your work, so they can feed them into their AI programs. One - like many others - you can't really opt out of.
In that regards, I want to give you guys: Animating as become super accessible these days. There WILL be a program and even a free class / tutorial for you out there, so you can get into it!
Everyone starts small! Here's some examples from when I was barely a teen and I reaaaally wanted to animate:


I remember that I exported each image as PNG to then use another program and make a gif outta it. I wasn't really able to onion-skin most of this so things looked off xD
#veilody#veilodys thoughts#not me just infodumping on y'all#I hope I don't overwhelm you guys with that xD#and I hope this helps y'all!#more questions are encouraged#if ya want me to keep myself short then please add that in your ask#I won't take offense xD#program recommendation#art programs#clip studio paint#fuck adobe#anon ask#yeeee another ask got in ✨
3 notes
·
View notes
Text
Learn Animation | Even If You Can’t Draw

Buy now - click here
Want to Animate but Can’t Draw?This beginner-friendly course teaches you animation step by step—no drawing skills required!What You’ll Learn:• Create your first animation from scratch• Animate blinks, expressions, and smooth motion• Master 3D head rotation and lip-syncing• Plan scenes and keyframe like a pro• Add color, effects, and polish your workWhy Join?• No drawing skills needed—just your creativity• Step-by-step lessons with hands-on projects• Learn industry techniques used by professionalsStart animating today and bring your ideas to life!
#you#liketime#believe#it#beyourself#do#mind#learn#see#neverforget#growyourown#think#never#but#still#will#give#if#take#learningthroughplay#they#thing#because#even#did#thoughtsbecomethings#makeme#howiseedatworld#ichoosehappiness#thoughtfortoday
2 notes
·
View notes
Text
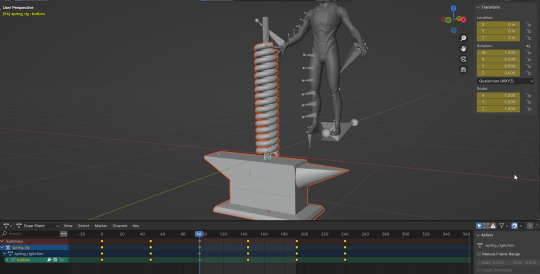
One Wiggly Thing
After much bullshit fighting and Googling I have achieved... 1 (one) wiggly thing in Unreal. It's a simple keyframed animation of a mass on a spring that I whipped up in Blender and exported to Unreal. But what have I done to achieve such a masterful piece of art?

First thing first, I used the dope sheet to set a small handful of keyframes at the extremes (Tap 'i' to create keyframes). I set the handle type to give it sinusoidal motion.
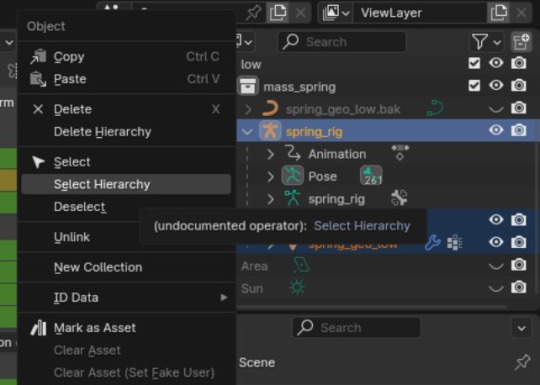
The bigger issue was exporting it to UE5. Turns out, you need to select the whole hierarchy before exporting, then select "selected objects" when exporting. My issue is that I was selecting the top most "spring_rig" and expecting that to be fine
Once they're in Unreal, there is a "Skeletal Mesh", "Animation Sequence", and a "Physics Asset". Pop down the Skeletal Mesh, select the object, head on over to the "Animation" tab, set "Animation Mode" to "Use Animation Asset", and select your animation sequence. DONE
Not a clue what the physics asset is for and you might also have a "Skeleton", but I haven't a clue what those are for yet
(Yes that was the actual frame rate while trying to screen capture while running UE5 (I pinky promise tho it run smooth while not trying to screen capture))
8 notes
·
View notes
Text
Mastering Trim Paths in After Effects: A Guide to Dynamic Shape Animations
Learn to create dynamic animations with After Effects' Trim Paths feature, perfect for smooth shape reveals and versatile motion graphics.


Animating Trim Paths in After Effects is a powerful technique used to create dynamic and visually appealing animations, especially with vector-based shapes and paths. Trim Paths essentially allows you to animate the start and end points of a shape's path, giving you control over how it reveals or hides over time.
Here's why it's amazing to use:
Controlled Reveals and Hides: Trim Paths enables you to animate the drawing of shapes, making it perfect for creating effects like drawing outlines, revealing text or logos, or creating intricate animations where shapes appear or disappear dynamically.
Versatility: You can use Trim Paths with a wide range of shapes, including basic shapes like circles and rectangles, as well as custom vector shapes created with tools like the Pen Tool. This versatility allows for endless creative possibilities.
Smooth Animations: It provides smooth and precise control over the animation of paths, allowing you to create fluid and seamless transitions between different shapes or states.
Layered Animations: You can apply Trim Paths to individual shape layers or masks within a layer, allowing for complex animations with multiple layers interacting and revealing each other.
Combining Effects: Trim Paths can be combined with other After Effects effects and techniques, such as keyframe animation, expressions, masks, and effects like Stroke and Gradient Ramp, to create even more intricate and unique animations.
With Trim Paths, you can:
Animate Stroke End: This controls the endpoint of the path, allowing you to animate the drawing of a shape from beginning to end or vice versa.
Animate Stroke Start: Similar to End, this controls the starting point of the path, useful for animating shapes to disappear or shrink.
Offset Path Animation: You can animate the offset of the path, creating effects where shapes follow a path or move along a trajectory over time.
Complex Shape Reveals: By combining multiple Trim Paths animations, you can create complex reveals or animations where shapes morph or transform gradually.
Overall, Trim Paths in After Effects is a fundamental tool for animators and motion graphics artists, offering precise control and endless creative possibilities for animating shapes and paths.
Follow me for more exiting tips and animation insights @motionpandey
Thanks for reading ♥
#motion graphics#2d animation#after effects#learn animation#motion design#art#animation tips#artists on tumblr#tumblog#trim path
8 notes
·
View notes
Text
Adobe Premiere Pro Crack Latest Version Download Free
Adobe Premiere Pro Crack is a professional non-linear video editing software that allows you to edit video files of any format. With Adobe Premiere Pro you can create stunning videos for social media, television and movies.
Download Adobe Premiere Pro Cracked Version
Adobe Premiere Pro crack is a pirated version of professional software that has undergone different modifications. The software cracking is aimed at removing the software protection so a larger number of people can use it without purchasing the activation key.
The standard hacking process involves removing the original file, namely the program’s executable, and replacing it with a fake one that fools the program pretending this is a licensed version. In such a way, the software doesn’t ask for the activation code.
Features:
Responsive Design
The convenience of the entire workflow largely depends on the program’s interface. That’s why, Adobe team is continuously improving their products in order to make the UI super-responsive and efficient. The latest enhancement is related to the integrity of keyframes in motion graphics.
Immersive VR Support
With the growing popularity of VR, many video editors look for programs that offer handy tools for this type of work. Adobe Premiere Pro is a nice representative of this category, as it boasts impressive complex VR editing features.
Simultaneous Editing
Thanks to this feature, you can smoothly jump from one scene to another and add clips to several projects effortlessly. Of course, such an approach is very helpful if you want to spend your working time more productively.
Multiple Formats
The frequent problem with video conversion is the loss of frames and slight corruptions. For users not to deal with video conversion, Adobe Premiere Pro allows uploading numerous native formats, thus preserving the original quality of the footage. In other words, you can record the video and then instantly add it to the program without prior converting.
Adobe Premiere Pro Free Download for Windows
Just like any other software that has tons of features, it takes quite a lot of time to learn Adobe Premiere Pro. The good news is that the software, despite the heavy price tag, is a hugely popular one so it is easy to find tutorials on how to use it.
Before you look elsewhere, however, you should follow through the interactive tutorials that are presented by the Learning mode in Adobe Premiere Pro. Also, read the Adobe help page for more in-depth guide about the software.
Learning Resources
For those looking to enhance their skills in Premiere Pro, there are plenty of learning resources available.
Tutorials
Adobe offers a wealth of tutorials and training materials to help users master Premiere Pro's features and capabilities.
Common Issues
While Premiere Pro is a robust and reliable software, users may encounter occasional issues during their editing process.
Troubleshooting Tips
From crashes to playback issues, we'll explore some common problems users may encounter in Premiere Pro and how to troubleshoot them effectively.
To get you started, you can click the link below to download Adobe Premiere Pro for Windows:
Download Link
#Adobe Premiere Pro Crack#Adobe Premiere Pro Download#Download Adobe Premiere Pro With Crack#Adobe Premiere Pro Cracked Version#Adobe Premiere Pro free
7 notes
·
View notes
Text
Week 1: Secondary Research & my Idea.
These are some of the different artists I was looking at during the week.
This is Stuart Blackton, the first person to use pixilation and the creator of the "the enchanted mirror". He would "interact" with the drawing, even "removing" parts of the drawing and making them "reappear" as real objects, and would make the face "react". He would stop the recording, make his changes, and continue as before.
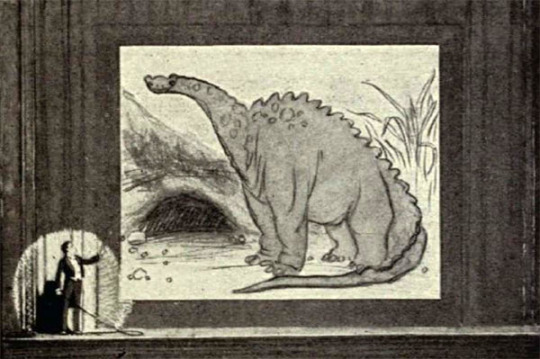
This here is Windsor McCay, american cartoonist who created "Gertie the dinosaur", the earliest cartoon to ever feature a dinosaur. This was also the first film to ever use Keyframes, Registration marks, Tracing paper, Animation loops, and Mutoscope action viewer. He would similarly interact with the animation, "throwing" an apple onto the screen and pocketing it when no one looked while an "apple" would appear on the screen, or he would walk behind the stage and "reappear" on screen and ride Gertie.
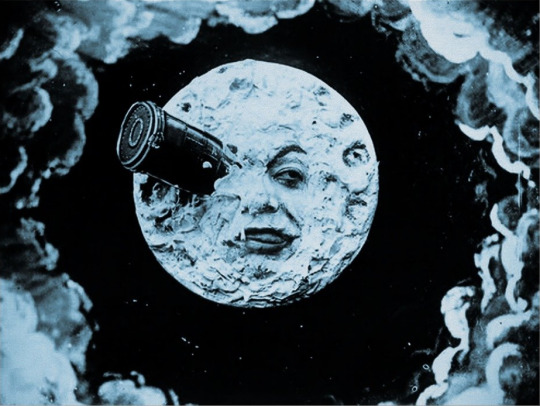
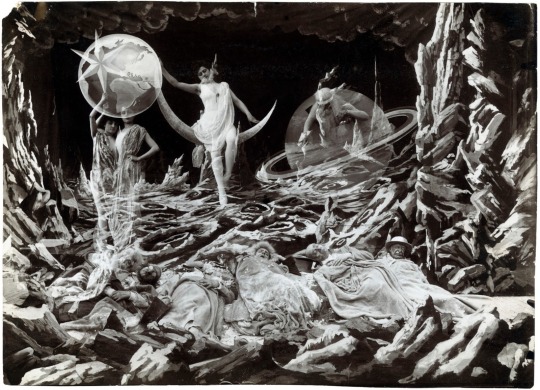
Georges meileis "trip to the moon (1902)", the first film to use Double exposure, Stop motion, and Slow motion. He was a illusionist film maker and a magician. The film took 3 months to make and was filmed in a greenhouse like building to get as much light as possible.
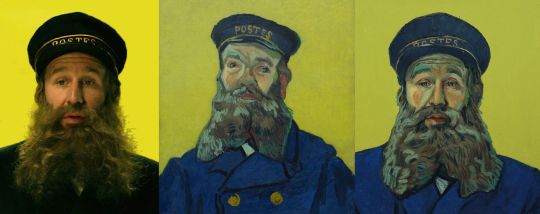
"Loving Vincent" directed by Dorota Kobiela and Hugh Welchman, the worlds first fully painted film with over 65,000 frames. The they would record the actors dressed as their characters , and would use a projector to project the frames from the video onto the canvases and the animators would paint each frame in Van Gogh's art style.
I briefly looked at Jan Svankmajers "Darkness light Darkness", its a very peculiar piece of media, and it is a 7 minute clay stop motion animation. Its just a body reconstructing itself in a miniature house and figuring out where everything goes.
How does this relate to my project?
Well my idea is to create a mixed media short film based in a haunted art gallery/museum ( some place with a lot of artwork) with a security guard monitoring the building and the strange occurrences within its walls. The main focus will be the different security cameras, which will be changing perspectives a lot, and even the p.o.v of the guard. The centerpiece will be an an animation of a portrait crawling out of the frame, but the first part of the animation will be painted like in "Loving Vincent", but as the creature begins to leave the frame it transforms into stop motion animation with clay. I was thinking that since the creature is made of paint it would make a wet sound when it moves, which is where I want to incorporate foley sound, and leave traces of itself around the building. In the background I want to create other spooky visuals like other paintings distorting or objects from paintings disapearing and showing up in the wrong places like in "The enchanted mirror". I want to experiment with different Camera trick to create different visuals and create suspense like the dutch tilt. I want to slowly unnerve the viewer, using different visual affects and changes in each camera.
There's a lot of work to be done and I'm looking forward to see how I'll incorporate the different workshops into it too
7 notes
·
View notes
Text
Interview of Death Parade Staff - Key Animators
The Appeal of Key Animation and the Joy of Animation Supervision Animator Roundtable Discussion
Shōsuke Ishibashi / 石橋 翔祐 [Key Animator] Takashi Kojima / 小島 崇史 [Key Animator] Ryōta Azuma / 東 亮太 [Animation Director / Key Animator] Izumi Murakami / 村上 泉 [Prop Design / Key Animator] — Please tell us about a memorable scene from "Death Parade" that you participated in
Azuma: I have mainly worked on PD Takuya's works, which is how I got involved in Death Parade. I was given the opportunity to be the animation director for episode six, which was a very unique episode. To be honest, I didn't have much experience as an animation director, so key cuts were handled by Kojima-san, Ishibashi-san, Murakami-san, and other skilled animators and artists, who made the important scenes more appealing. Especially Ishibashi-san. His cuts were the first to get delivered, and they had an enormous number of keyframes where Mayu was moving ecstatically with very detailed acting. It was completely different from the keyframes I usually draw, so I was shocked to see how he handled it. It had a positive influence on me. Murakami: I think Ishibashi-san created Mayu's character. Ishibashi: No, that's not it. Since I participated in episode six first, Mayu was the first character I animated. I was like, "Huh? Decim hasn’t shown up yet," (laughs). I worked on episode 4 afterwards. Murakami: When I joined, Ishibashi-san's rough animation was already complete, so I watched the footage and thought, "Mayu is a girl who moves like this," and I understood what to do. Also, Episode Director Shishido was the type to entrust a lot to the animators. Kojima: Yes, Shishido [Jun]-san's storyboards are very easy to visualize in motion. Speaking of memorable things, in Death Parade, there were many scenes where the space was constructed in 3D, right? Ishibashi: Yeah, that's right. The first scene I worked on was in front of the bar counter in Viginti in episode six. It was challenging because it was not originally constructed in 3D. But then when I started working on other episodes, I realized that this [3D layout] was easy. Kojima: Working with 3D layouts means you don't have to draw backgrounds [laughs], which is convenient, but I also worried that neglecting to draw them might make my skills in that area rusty, so I had some doubts about whether it was the right approach. Ishibashi: I understand that. But drawing so many kokeshi dolls was tough... Murakami: Oh, I'm sorry. It's my fault that there were so many kokeshi dolls. When I was asked by Tachikawa-san (series composer and director) to design a Japanese-style bar, I thought it would be nice to have lots of kokeshi dolls lined up like bottles of alcohol, so I drew the image board with that in mind...
— PD Takuya and Kurita-san mentioned that Kojima-san broadened the range of character acting in Death Parade.
Kojima: Is that so? That's great to hear. In the first episode we worked on around 55 cuts, and during the meeting, either Director Tachikawa or Director Shishido-san requested that I present the acting with all the intensity of someone emotionally breaking down in tears at a press conference. So, I watched some videos for reference and drew accordingly. When it came to the ninth episode, I was initially consulted about the air hockey scen, but wanting to try something new, I asked to work on the scene where Shimada's sister is assaulted instead. Ishibashi: I thought you were definitely going to choose hockey, so I was like, "Oh, this is it?” (laughs). The cut with the light glinting on the knife, the acting was so skillful there that we left it untouched and just let it run as it was. Kojima: (laughs) Well, I can't help but feel like I've been doing nothing but pitiful scenes most of the time. Also, the skating scene in episode eleven was very difficult. Ishibashi: That scene was mainly handled by Murakami-san, right? I also participated a bit, like drawing the childhood skating scenes. Kojima: I was allowed to draw the start of the skating scene. I did about 4 cuts in that area. Murakami: As for me…I am filled with a feeling of wanting to fix it… Ishibashi: No, you did really well. You had quite a number of cuts, right? Murakami: The number of cuts was around twelve. With everyone's help, we managed to complete it somehow. We had assistance from the 2nd key animation team as well.
— It seems that episode eleven had one of the stricter schedules among all the episodes. Ishibashi: Indeed, I was worried about whether we could really broadcast the episode or not, but the atmosphere in the studio wasn’t tense at all, and I felt very good. It was more like, "Can we do it?" rather than "Oh no, oh no!" (laughs). In the end, we managed to complete it (laughs). Murakami: While drawing, I kept thinking, "I can't believe this is going to air in a week," "unbelievable." Ishibashi: I think it was because Kurita-san, PD Takuya, and production manager Nakatani were people who had such a reassuring presence. When I heard laughter coming from their corner, I thought, "As long as Tachikawa-san is laughing, it will still be OK.” — Who was the easiest character to draw? Azuma: The dark-haired woman was relatively easy to draw, but Decim was quite challenging to get right. Kurita-san's designs are characterized by having their mouths positioned lower on their jaws, but when I started drawing, I unconsciously kept placing the mouth too high… Kojima: All the main characters were difficult. Decim especially was a total struggle for me. Personally, I might not be good with characters who lack expressions. I found it enjoyable to draw characters with expressive faces or those in despair. Ishibashi: I found the dark-haired woman somewhat difficult to draw, but Decim was relatively easier for me. With guest characters, there was some flexibility in altering their faces, which might have been influenced by Kojima-kun's work in episode 1, where he broadened the scope of the acting. Murakami: I had already given up on trying to make them look on-model (laughs). Kurita-san's characters, when drawn by him, are very beautiful, but if you don't draw them well, the balance gets messed up. It's beyond me... (laughs). Also, in episode six, drawing Memine the cat was challenging. Azuma: But you were the one who could draw the cat the best. It was really helpful while working as an animation director. Murakami: Really? I didn't know what to do, so I started with a lot of cat sketches. Ishibashi: In episode six, Murakami-san drew great facial expressions in the live scene in the C part. Especially when everyone was like, "Yay!" (laughs). Speaking of what left an impression on me, in episode nine where I was the animation director, Hiromi Ishigami-san, Ryoma Ebata-san, Tetsuya Masuda-san, and Akitsugu Hisagi-san participated as key animators, and it was really enjoyable. Ishigami-san is my senior, but it had been about 7 years since I last saw her original drawings, and I was again impressed by how good she is. Ebata-san's presentation of Tatsumi smoking a cigarette and putting it out with his foot had a very good sense of perspective. Ebata-san was also in charge of the part during the ending theme, where the emotions were conveyed amazingly even without any dialogue. And Masuda-san also did a lot of keyframes. I personally like Masuda-san's drawings, so I got excited whenever I received his keyframes... But even though I'm talking so familiarly, I don't actually know Masuda-san at all (laughs).
— So you've only seen his keyframes.
Ishibashi: That's right. So when I came to the studio for the animation meetings, I wanted to meet him... I was saying "Masuda-san, Masuda-san" so much that they thought we were old acquaintances, but no one told me "Masuda-san is here" (laughs). I was shocked (laughs). Azuma: As an animation director, it makes me happy when I receive wonderful keyframe drawings. This time, there were a lot of good people of a similar age as me who participated, and I was glad that I was able to get a lot of inspiration from them. Kojima: As for what left an impression... Well, due to certain circumstances, I didn't work inside the building, so I feel like there's a bit of a difference in atmosphere here (laughs). But if I had been working inside, it would have been a bit more enjoyable, so it's a bit disappointing (laughs). Ishibashi: Kojima-kun and I have worked together at a different company before so I was looking forward to working together again, but when I heard that you wouldn't be joining the company, I was a little disappointed. Kojima: Since I didn't have many opportunities to meet people this time, I'll try my best to work in the studio next time (laughs). Ishibashi: (laughs) Speaking of disappointments... Personally, I wish I could have seen more of Kurita-san's keyframes. Like in the first episode, the scene where Decim pulls out the thread. Or in part C of episode three, when Chiyuki does that flourish at the end. Every time I thought, "Who did this!?", it turned out to be mostly Kurita-san (laughs). Kurita-san always talks as if he hasn't done anything, but I thought that was unfair. Murakami: He did mention he wanted to do keyframes. Ishibashi: When someone is that skilled, of course they would want to do keyframes. As an animation supervisor, you're in a supportive role, helping with the difficult parts and making sure the characters are on-model, so the keyframes are more exciting. Kojima: But as a Chief Animation Supervisor, Mr. Kurita, was able to make corrections in a way that preserved the good points of the person in charge of the original drawings, and I think this is one of the reasons why I enjoyed working on this project.
— Murakami-san, is there any particular scene that left an impression on you?
Murakami: Working on the figure skating scenes was really fun, but bowling was also really enjoyable. My previous project [Ace of Diamond] also had sports-related elements. Sports movements are different from everyday actions; they're very straightforward. For example, if you're "throwing a ball," you're solely focused on the act of throwing. That aspect makes your work very focused and exciting. During the bowling scenes, I consciously tried to convey the weight of the ball. However, the fun part is from drawing to the rough animation. When you’re in it, you think, "This might work," but when it comes together as a finished visual, you end up reflecting, "It's not as good as I hoped," right? Ishibashi, isn't that how all animators feel? [Ishibashi laughs]. The linetest is probably the most intense emotionally (laughs). There's no color or anything decided, so your imagination can run wild.
— It seems like the animators had quite a bit of freedom in their drawings, from what I've heard.
Ishibashi: When we were asked to "do this part," there were many areas where we had a lot of freedom. It might have been a bit challenging, but it allowed animators to expand their creativity. Kojima: It was easy for me too. I really enjoyed the work. Azuma: Especially with guest characters, since they only appear in that particular episode, I think they were given a lot of freedom to draw. Mayu in episode six, for example, was a character where we were told we could go all out with the comedic, exaggerated expressions, so there was a lot of freedom. Ishibashi: Mayu's face when she's hit with wind from below was really something (laughs). Murakami: Yes, there were many cuts where we could do whatever we wanted with the acting. Ishibashi: When we were asked to "do this part," there were many areas where we had a lot of freedom. It might have been a bit challenging, but it allowed animators to expand their creativity. Kojima: It was easy for me too. I really enjoyed the work. Azuma: Especially with guest characters, since they only appear in that particular episode, I think they were given a lot of freedom to draw. Mayu in episode six, for example, was a character where we were told we could go all out with the comedic, exaggerated expressions, so there was a lot of freedom. Ishibashi: Mayu's face when she's hit with wind from below was really something (laughs). Murakami: Yes, there were many cuts where we could do whatever we wanted with the acting.
— Looking back on the series, were there any episodes that left a deep impression on you?
Kojima: I like episodes eight and nine. They're a bit gut-wrenching, but there's something about the feeling of hopelessness that I appreciate. You don't see stories like that often. Ishibashi: I'm quite sensitive, so watching sad stories makes me sad too. I prefer more gentle endings, like in episode three. Also, the farewell between Chiyuki and Decim in episode twelve, that scene made me cry a lot (laughs). Murakami: When I saw episode twelve, I thought, "I was doing a ‘good story’ anime" (laughs). This series had different vibes for each episode, which was interesting, but episode six had a really good balance... The story was wild, and so was the animation. It was a lot of fun to watch. However, just before it aired, I started worrying, "Did we go too far?" "Is it going to be okay?" Even Shishido-san, who storyboarded it, was worried. Azuma: Is that so? I thought episode six was interesting from the moment I started working on it (laughs). So, I wasn't worried at all. I was like, "It's definitely going to be fun! Watch it!" Ishibashi: Actually, what made me wonder if it would be okay was the opening. When I first saw the storyboard, I thought, "Huh? Is this really for Death Parade?" (laughs). Azuma: Yes, that's right. When I heard the song, I was so excited that I thought, "Oh! (laughs). [Murakami laughs] Overall, this project was challenging, but it was also enjoyable.
━┅━┅━┅━┅━┅━┅━┅━┅━┅━
NOTE: I am not fluent in Japanese! I translated this with the help of a language partner. However, as neither of us are fluent in one another's native tongue, there may be errors in the translation. I typically don't share things I translate in my free time, but since no one has tackled these interviews in nearly 10 years, I figured it was nice to put these out there for folks who may be interested.
#death parade#anime#translation#interview#anime interview#takashi kojima#yuzuru tachikawa#mayu arita#ginti#decim#chiyuki#cloudytranslates
5 notes
·
View notes
Text
Hello you gregarious gorillas!
Paul showed us how to assemble our pieces onto Adobe Animate and how to easily lip synch our work. It was a lot of steps but I typed them down so bear with me.
The first step was bringing our photographed pieces onto Photoshop and cutting them out of their backgrounds, and saving them in a PSD file. We then imported them into Animate onto our library. After that we dragged our face onto the stage along with the neutral mouth shape.
This is where we began the lip synching progress.
find your end time and create frame, and name your layer head
bring in your audio file and name the layer audio
bring in neutral mouth and name the layer mouth
convert mouth into symbol and type as graphic
click on mouth properties and go to Looping. Click on play single frame.
double click on mouth symbol and add blank keyframes.
Do a blank keyframe for each mouth shape type and frame by frame add them in to each frame.
Click on mouth properties and Frame. In Label name the frames for each mouth shape with the sound they say for ease.
Go back and click lip synching. You then need to substitute each letter with the corresponding mouth shape and put lip synching to audio layer.
the lip sync should be done then and when you're exporting it put the audio layer to the second frame because apparently you won't hear it for some reason.
Also export it as vimeo 1080p
When I did this I realized pretty late that the audio I used had most of my takes on the one file so the bit I lip synched was only the bit where I said my name at the beginning. I tried fixing this by slicing up the audio but I ran out of time so I'll try and do this when I get back after Easter.
In the meantime this was what I managed to get done. I also added the background pieces and motion tweened them rather quickly to get the basic effect I wanted. I would've like to have moved my mini me as well but that required moving the lips and potentially messing with the lip synching and I didn't want to risk that at the time.
youtube
3 notes
·
View notes