#DIY Decorations and Crafts
Text
How to Throw the Ultimate Kid's Party: 10 Epic Ideas That Will Leave Guests Speechless
Discover creative and unforgettable party ideas that will make your child's celebration a memorable and speechless-worthy event. #KidsPartyIdeas #EpicCelebrations #ParentingFun #PartyPlanning
Introduction: The Art of Crafting Unforgettable Childhood Memories
Every parent knows the magic that lies within the world of children’s parties. It’s a realm where imagination knows no bounds, where laughter echoes like music, and where every moment becomes a cherished memory. But when it comes to throwing the ultimate kid’s party, how can you ensure that it stands out from the rest? How can…

View On WordPress
#Adventure Quests or Treasure Hunts#Character or Costume Parties#Creating Unforgettable Celebrations#Creative Invitations and Favors#DIY Decorations and Crafts#Enchanting Fairy Tale Parties#Epic Party Ideas for Kids#Hands-On Science or Art Parties#Innovative Party Planning#Interactive Games and Challenges#Kid-Friendly Food and Treats#Magical Outdoor Adventures#Movie or Outdoor Movie Nights#Out-of-the-Box Party Activities#Sports or Game Tournaments#Talent Show or Performance Parties#Themed Party Entertainment#Throwing the Ultimate Kid&039;s Party#Unique and Memorable Party Ideas for Children#Unique Children&039;s Party Concepts#Virtual or Online Party Experiences#Wow Factor Party Themes
0 notes
Text

Made myself a swanky little headset stand for my Radio Demon themed gaming space. I love that it’s both functional and beautifully creepy when not in use
#hazbin hotel#hazbin hotel alastor#alastor#diy#I make things besides illustrations sometimes haha#my personal aesthetic is quickly becoming southern gothic deer beast charm and I’m not mad#crafts#desk decor#gaming setup
1K notes
·
View notes
Text

Purkin! I’ve never made any kind of crocheted pumpkin before, but this was reeeaaaally fun!
Pattern by Moon Leaf Creates on Etsy!
#amigurumi#crochet#yarn#cute#diy#crafts#handmade#kawaii#craft#halloween#cat#pumpkin#pumpkin cat#fall season#autumn#halloween decorations
963 notes
·
View notes
Text

<3
273 notes
·
View notes
Text


Mothman's on a new self care journey.
Follow along on Instagram: @MothmanOddities
196 notes
·
View notes
Text
#halloween#halloween diy#halloween decorations#howls moving castle#ghibli aesthetic#stardew valley#studio ghibli#diy craft
492 notes
·
View notes
Text
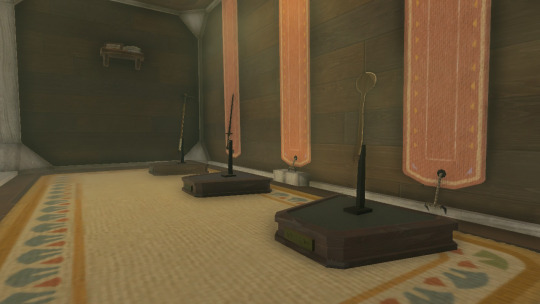
i made these sword wall mounts from Link’s house in BotW! i made three in total to match the three in Link’s Hateno house. the TotK ones are slightly different, featuring a rod to stand the weapon upright, rather that against the wall.*
i’m gonna be overly descriptive here for my own reference, as well as anyone else who would like to make something similar!


here’s the specs:
mount:
h - 44 in // w(top) - 16 in // w(bottom) - 14 in
plaque:
h - 2.5 in // w - 8.5 in
- made from plywood and cut wooden sticks
- bindings used screws, wood glue, and a nail gun
- base colour using spray paint
- border colour using primer paint
- fastened with velcro temporarily
- backside is hung on wall with a wire line
i plan to add Hylian text to the plaques. probably something general rather than a specific weapon name (so i can swap swords between mounts).
also planning to replace the velcro strip with a leather strap and buckle. something adjustable for different sizes. i’ll either use rivets or simply cut two slots in the sides for the leather strap to go through.
all my swords i plan on hanging here are high-density foam/PVC pipe. so far, i have the royal claymore, great flameblade, and master sword. although the first two are larger in game, they are roughly the same size as the master sword seen in the photos. this allows me to make a one-size-fits-most build!

inspired by u/ on reddit and twitter for the inspiration!


*here’s the different versions between games:

#legend of zelda#botw#the legend of zelda: breath of the wild#zelda botw#botw link#loz botw#tarrey town#hateno house#hateno village#breath of the wild#sword#zelda diy#zelda decor#botw diy#botw decor#diy projects#diy craft#diydecor#woodworking#medieval#ren faire#fantasy#cottagecore#botw cosplay#cosplay props
87 notes
·
View notes
Text

Crepe Paper Streamers: https://pin.it/3vyJxy6fK

DIY Leaf Ghosts and Leaf Bats: https://pin.it/11NdMxMMu

Halloween Treat Cones: https://pin.it/3WYynzfWf

Spooky Elizabethan Crows: https://pin.it/6XapRzFh6

DIY: Vintage-Inspired Halloween Candy Buckets: https://pin.it/1vyYseZbt

Chenille Pumpkin Man: https://pin.it/4q7OdJtBO
Some Vintage Inspired Halloween Crafts to get you in the spirit ✨👻🎃✨
#fall#autumn#fall blog#halloween#spooky#autumn blog#cozy#autumn aesthetic#leaves#fall aesthetic#source: pinterest#fall crafts#Halloween crafts#vintage#vintage inspired#vintage halloween decor#vintage halloween#vintage inspired Halloween crafts#diy#Halloween blog#pumpkin#crow#black cat#bat
141 notes
·
View notes
Text


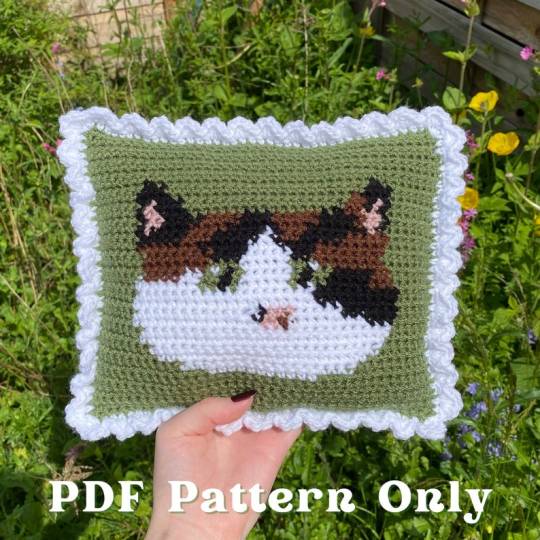
Crochet Downloadable Patterns by crochemily
#crochemily#crochet download pattern#pdf download#pdf pattern#crochet pdf#crochet pattern#diy crochet#diy#cat#handbag#bag#cute#craft day#pillow#pillow case#dorm decor#gift idea#animal crossing#lord of the rings#cosy
142 notes
·
View notes
Text
64 notes
·
View notes
Text
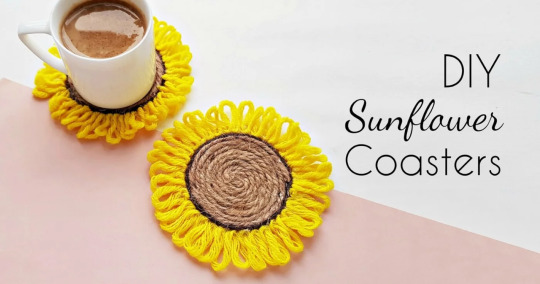

DIY Twine Sunflower Coasters
✖✖✖✖✖✖✖✖
sew-much-to-do: a visual collection of sewing tutorials/patterns, knitting, diy, crafts, recipes, etc.
#DIY#twine#yarn#coaster#home#house#decor#gift#table#kitchen#floral#flower#sunflower#tutorial#craft#fun#summer
59 notes
·
View notes
Text
Another multi-parter for both thighs across the main seam of a pair of jeans! This is a VERY common canvas for sashiko 'round this household, seeing as both Razz and I have pretty thorough thighs. Luckily, having learned my lesson (somewhat) from the giant patches in the same area I did previously, I split this into two designs, even if the patch fabric itself was one piece. Both designs are from wrenbirdart's stick and stitch collections, barring that little section on the first one I pencilled myself, as the main pattern was slightly too small.


First up we've got this genuinely delightful set of little asterisks, formed out of vertical, horizontal, and two diagonal sets of stitches. The first set of stitches immediately make clear that I really should be more careful about my math when I'm trying to duplicate the wrenbirdarts patterns onto my own dissolvable backing. Sure, that set all the way on the right is off by increasing increments of a quarter inch with each set, but I actually don't mind that look too badly in the end. The general look of all the eight-pointed overlapping crosses works super well, and I may take some inspiration from the mildly-fumbled pattern on that hand-pencilled section to make an alternating pattern of standard crosses and the asterisks, in the future.


Secondly, there's this pine forest design! I really had a love hate relationship with this one, as the pattern itself is SUPER pretty, I mean, look at that final picture! It's so beautiful! The major downside, though, is that it doesn't lend a lot of opportunities to load up straight stitches in a row. As you can kinda see in the progress shots, you do that central "coordinate grid" of a given pine top, then go quarter by quarter, filling in the other stitches, one by one, individually. Which, to me, is SUPER boring, I much prefer to load up a bunch of straight stitches in a row, then pull them all through, smoothing the fabric afterwards. So, partially because I wanted to get it done and over with as fast as possible, and partially because my jean shorts were in DIRE need of fast repairs before I could wear them in the (then incoming) summer heat, I somewhat sped my way through the pattern, in hopes that I can later come back to this pattern, and develop a more-loadable version that still keeps the pine-like beauty of the finished piece here.
#Solarpunk#Visible Mending#Clothing Repair#Mending#Hand Sewing#Fiber Arts#Fabric Arts#Crafts#Diy craft#Ecopunk#Sustainable Fashion#Slow Fashion#Sashiko#DIY#Fix your Clothes#Decorative Art#Functional Art#Solarpunk Fashion#textile art#queue.queue#a thousand words#nesterian lifestylings
45 notes
·
View notes
Text
~Picture-Perfect Crochet Earring Holder~
I am very excited to present this as the fruits of my first foray into pattern publishing!

This pattern includes a gauge and guide on sizing and will work for any rectangular picture frame.


Feel free to check out more yarn-y things from me on my Ravelry or LoveCrafts profiles!
#crochet#pattern#free pattern#crochet pattern#earring holder#earring#crocheting#diy#diy projects#yarn crafts#aesthetic#dorm room#apartment#dorm room decor#dorm room ideas
313 notes
·
View notes
Text


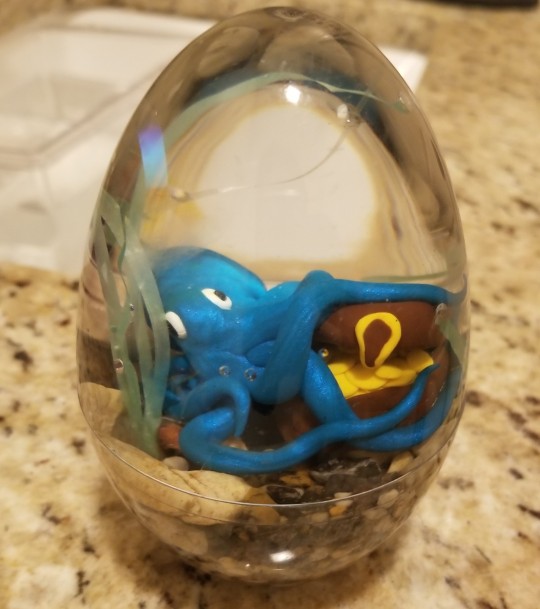
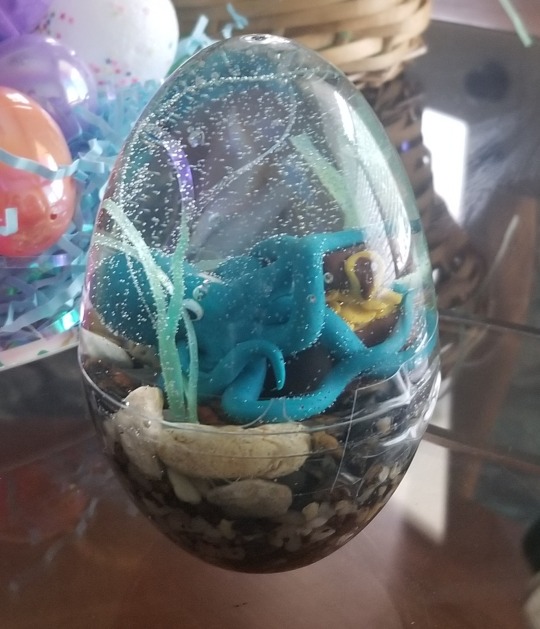
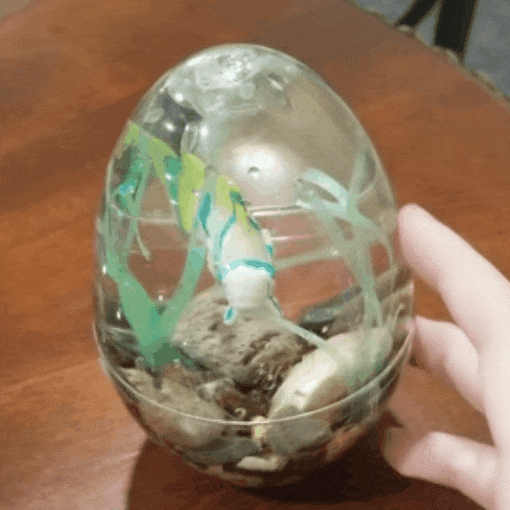
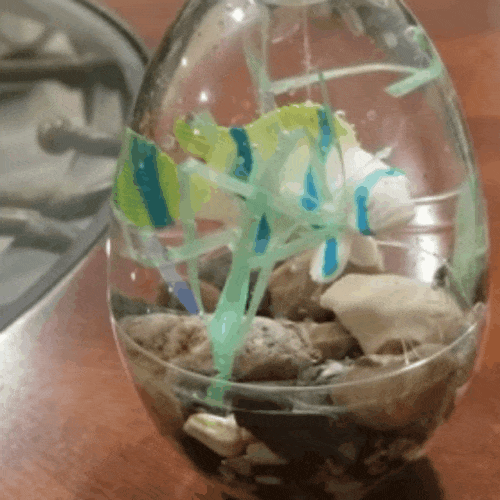
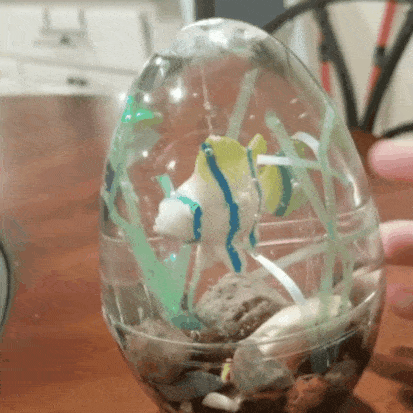

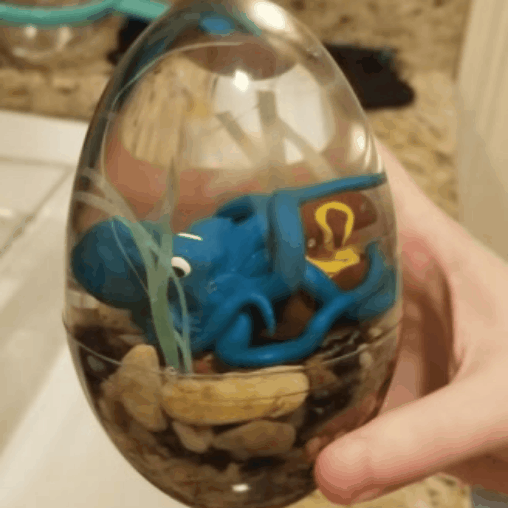

Made little aquariums out of clear plastic eggs that once had goodies in them!
The fish came from slime I bought some year or so ago, and I made the octopus out of polymer clay. I also used green easter basket grass for the water plants and used thread to keep the fish up and alive-looking!
#stim#crafts#clear egg crafts#diy#diy aquarium#octopus#fish#water#rocks#aesthetic#decoration#underwater#sea life#gifs#tw hands#blue#white
413 notes
·
View notes
Text

🔥Home Sweet Hell Home🔥
Crossstitch designed and Stitched by me 😘
Squooshy's Stitch Bits
#shameless self promotion#cross stitch#counted cross stitch#cross stitch patterns#xstitch#diy#fiber art#crafts#handcrafted#homemade#pattern#handstitched#hellhole#needleart#needlecraft#i made a thing#hell#subversive#goth decor#home decor
244 notes
·
View notes
Text
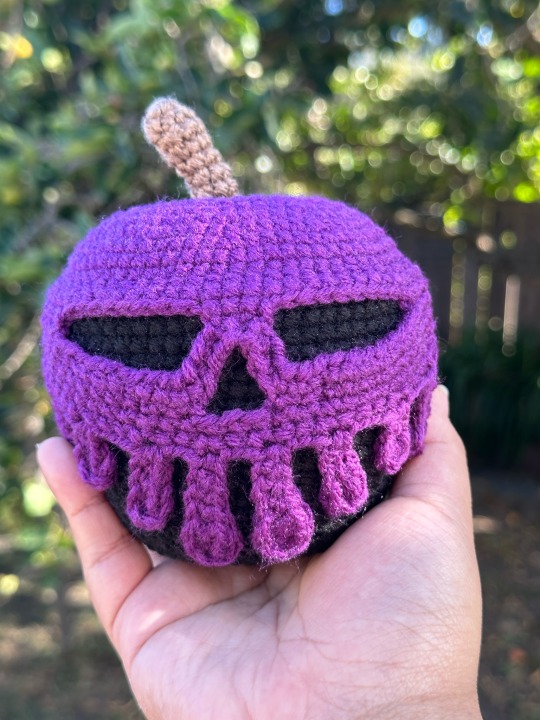
I was an evil queen once upon a time…
(In a musical hehehehe)
Pattern by fayni_toys
#amigurumi#crochet#yarn#cute#diy#crafts#handmade#kawaii#craft#halloween decorations#halloween#halloween decor hunting#spooky#fall season#snow white#evil queen#poison apple
178 notes
·
View notes
Last Seen Blogs

highoffyouonly
HighOffYou

himboatheart
hello lgbt community

fredericvidal
Frédéric, musicien et cinéaste (BRAMSTOCKER).

hikariseyo
hikari

hide09-03
ログ