#Drawing Tutorial
Explore tagged Tumblr posts
Visit Tumblr Blog
Explore Tumblr blogs with no restrictions, modern design and the best experience.
Last Seen Tumblr Blogs


Fun Fact
Tumblr was the first site to host the blog for President Barack Obama in 2011.
Text
legs tutorial
a female-centric tutorial for legs <3

we start with bones.
as you can see, the femur juts out, and there's a gap between it and the iliac crest-- this forms what ppl know as "hip dips". some women don't have them.
here's some legs with different fat and muscle contents for comparison

but why are they *shaped* like that? (I hear u ask). well, muscles. muscles can Bulge or Wrap. Think of it as a garter on a thigh-- the thigh bulges, the garter wraps. the thigh then bulges gloriously around it.

here are some simplified representations of the important muscle groups in the leg.
the gracilis/abductor magnus is the "inner thigh". it bulges.
the rectus femoris is a part of the massive bulges we see on muscular legs. it's the middle one
the vastus medialis and vastus lateralis are muscles on the lower inside and outside of your thigh, and are the other bulges you see on muscular legs
the sartorius originates at the hip and wraps around the rectus femoris to terminate at the medial femur (inner knee-ish). it's the garter in this example-- it causes those bulging muscles to squish in the inner thigh.
the anterior tibialis and some other muscles wrap around the shin area.
the gastrocnemius is what we know as the calf. it's the meat of your lower leg, the bulging muscle we all think of when we think "calf"


#maeellen#digital art#art#maetheellen#anatomy#anatomy tutorial#art guide#art tutorial#drawing tutorial#art tips#art help#art resources#art advice
3K notes
·
View notes
Note
I just wanna say I really admire your art. I was curious if you had any art tips on getting good dynamic poses and such.
Hiya dear Potato-san! Thank you for the kind words <3
I think I can ramble a bit about dynamism. Hopefully it'll be understandable.
When it's for research purpose or fast comics, the simplest way to get good dynamic poses is basically just to let your hand go wild. Take a sharpie bigger than what you're used to work with, and sketch fast poses. The sharpie won't let you erase, so the art as a whole will feel more instinctual compared to big illustrations. It's a very good first base to prepare comics.

If you freeze before even starting (because drawing something that can't be erased can do that), draw the vaguest bit of directory lines first. That will be the main dynamic of your pose. The two big base shapes are usually straight and pointy (triangle), or soft curves (circles). If you want something dynamic, the first shapes will be needed. If you want something cozy, make sure your main dynamic line is a smooth curve.

The best practices to get used to drawing dynamic poses are either to draw people dancing, or to draw Spiderman poses (I'm not kidding).
You will naturally have a dynamic here. Your first step will be to find the main line, as stated earlier. Then you put your shapes following the main line you found.

If you have a particularly dynamic artstyle, or like exaggeration, you can increase the shapes you see. A lot of art is exaggeration. It goes for the main line (see below, I accentuated the bow of her back), or the body shapes (legs and arms are very easily malleable to convey sharp dynamics).

The main point when you draw something really dynamic (like fights or dancing) is to ignore the usual, realistic shapes of the limbs to instead focus on the feeling of direction you want the reader to follow. When you do semi-realistic (like me for my COD art) it can be a bit hard to find the right balance between realistic proportions/shapes and the dynamic you want, but then that's just trial and error until you get what you want.


Well, there you go. Sorry if it's messy ^^'
TLDR: Have a really strong and easily identifiable direction line. And exaggerate. Always exaggerate.
#hey look at that :D Arts of two of my big projects are in this post#someday I'll finish them...#mello's drawings#art tips#tutorial#tuto#drawing tutorial#ask me anything#my art#i spent far too long wording and rewording this TwT
38 notes
·
View notes
Note
Question! How do you draw ur characters 👀 like tips tricks
hihi i hope i didn't misunderstand you meant this like, in generally and not specifically about each of my chara's!! sorry this is so messy LOL n please take everything i say with a grain of salt ive never learnt art professionally_(´ཀ`」 ∠)_


2K notes
·
View notes
Text


Tutorial for drawing characters with Down syndrome!
DISCLAIMER... Please keep in mind that this is an introductory drawing tutorial and has some generalizations in it, so not every “X is Z” statement will be true for Actual People. It's more of an overview of features that are common in people with Down syndrome, not meaning to imply that every person with DS has all of them 👍 thanks.
If you draw any characters using this feel free to tag me!
Consider supporting me on ko-fi if you find this to be helpful.
#my art#disabled artist#artists on tumblr#digital art#id in alt text#art#personal art#drawing#drawing tutorial#drawing tips#ccartshare
35K notes
·
View notes
Text
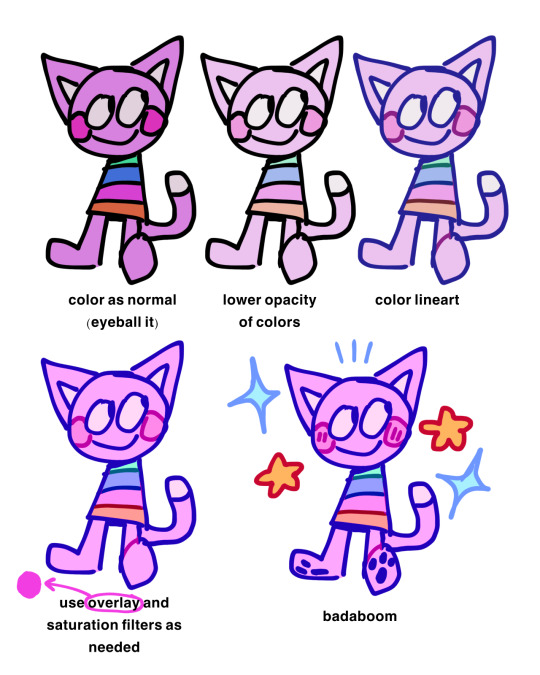
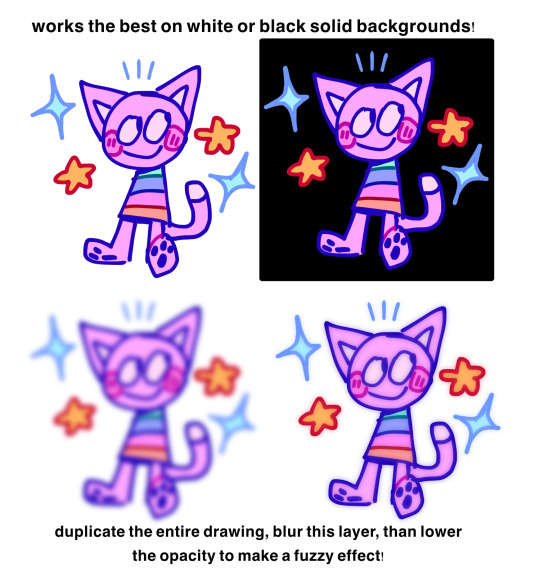
little visual for how i use pastel colors!!
2K notes
·
View notes
Text
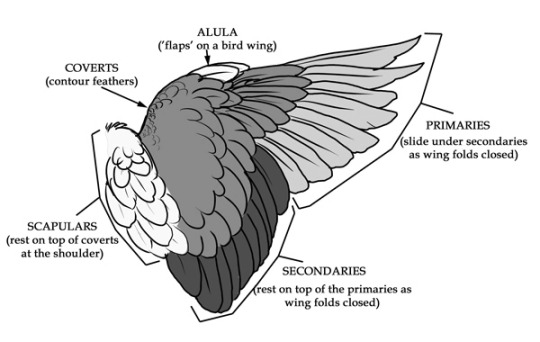
Wing tutorial~
Since it has been asked, I made a little breakdown on how to draw wings.
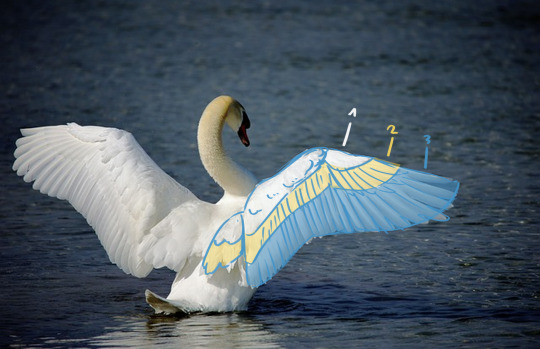
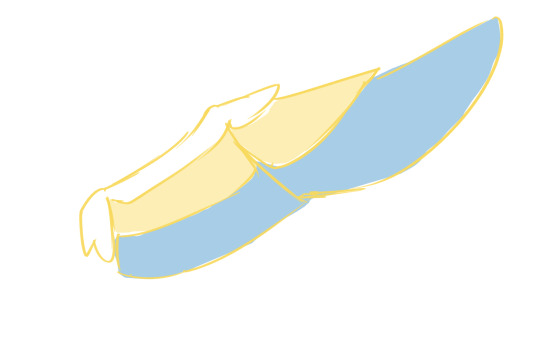
So, first thing to understand is wing anatomy. I used a swan wing as reference for my artwork. Divide the wing into blocks of feathers. There's sort of three layers to the feathers outlined in the second picture, and these divided along the top joint of the wing where it folds. See the second image. Make sure you bring in these nice, flowy shapes here!
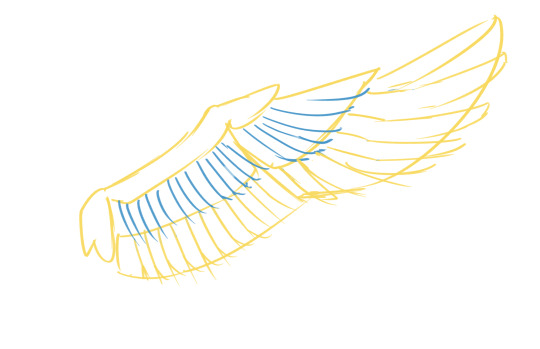
Now that you have these big shapes, you can cut into them and make the individual shapes of the primary and secondary feathers (layer 3.) also make sure they overlap correctly depending on if you are drawing the wing from the front or the back. make sure you stick with a nice rythm and have the feathers get gradually bigger as you get closer to the tip. Like this:

when you go ahead and draw that layer 2 of coverts, make sure that every feather you drew for the bottom layer has (approximately) a feather overlapping it (so you have pretty much the same number of feathers in each layer) and that they line up nicely. But you can also make them a bit more ruffled. Like this:
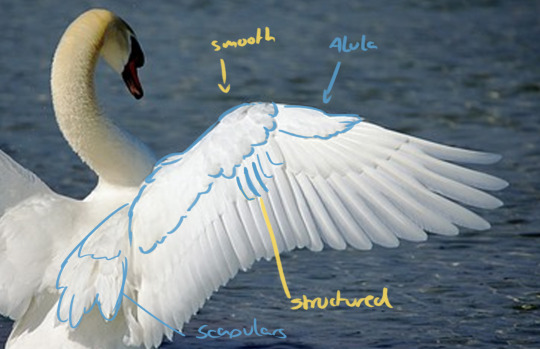
Other than the flight feathers, the very top part of the wing is very smooth, with shorter, more rounded feathers (almost half-circles!). They can lie very flat or also look a lot more fluffy. think of them almost like overlapping scales. There is also the Alula at the top of the wing, a sort of extra feathery bit that sticks out over the primaries. also don't forget the scapulars which cover over the shoulder blade and are on top when the wing is folded. The Scapulars also have two layers of feathers. (see first graphic).
From there, it's only a matter of lineart and shading or however you want to finish your artwork. Hope this helps with the structure! Drawing wings folded together is a whole other story that I'm not going to get into here... lol.
TL:DR: understand the structure of wings and use references to get it right, work from big shapes to small shapes.
Edit: I demand to be tagged in the results, I desperately need to see more wing art. ÒwÓ
#art tutorial#art tips#art resources#art help#drawing tutorial#wings#wing tutorial#good omens#how to draw#angel wings
2K notes
·
View notes
Text
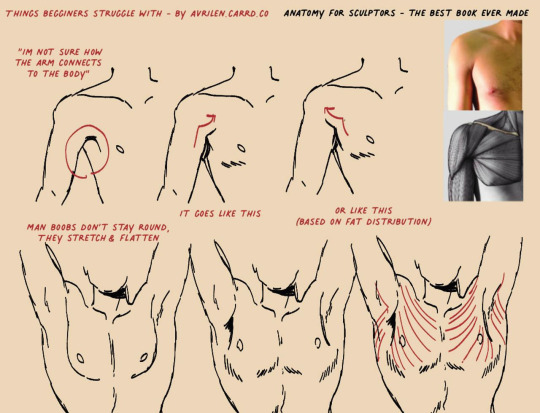
A small guide for people who struggle with this area
26K notes
·
View notes
Text


#thinking in shapes literally changed everything it’s like art sharingan#art tutorial#how to draw arms#beestuts#anatomy tips#drawing tutorial#how to draw#anatomy#how to study anatomy
168 notes
·
View notes
Text
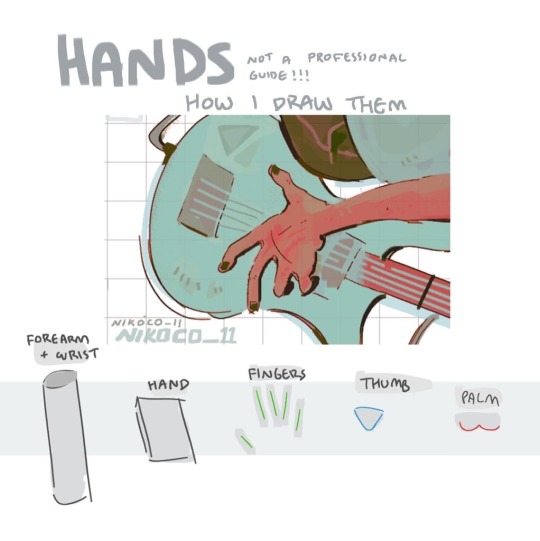


my recipe for drawing hands!
(small note that this is a shortcut that is more abt style and ease than anatomical accuracy. it helps to take time to really properly study hands, makes it easier to bend the rules a bit like this and have it still look good!!)
(learn rules b4 u break them or whatevah)
#qna#tutorial#guide#drawing tutorial#digital art#illustration#drawing#artists on tumblr#my art#clip studio paint
60K notes
·
View notes
Text
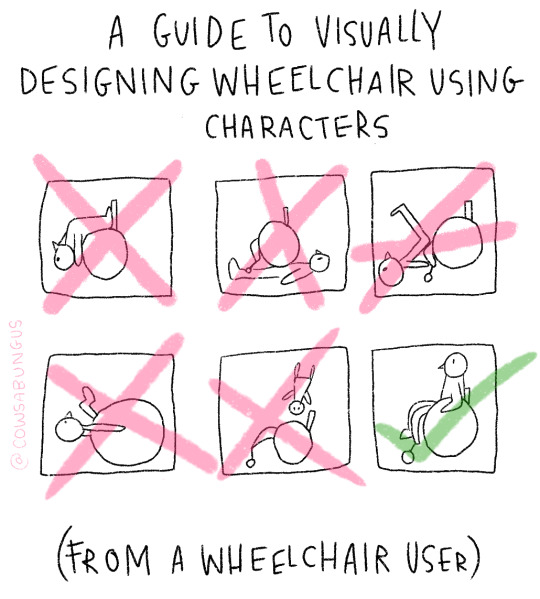
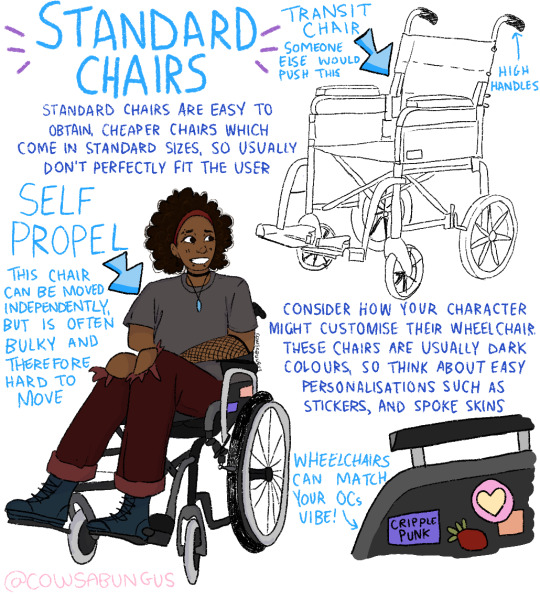
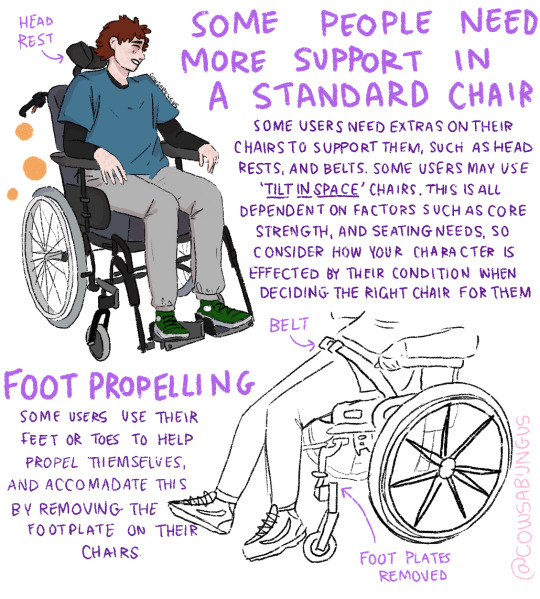

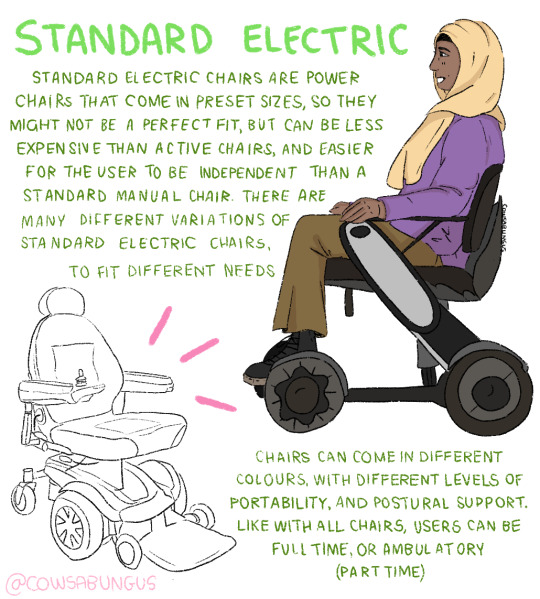

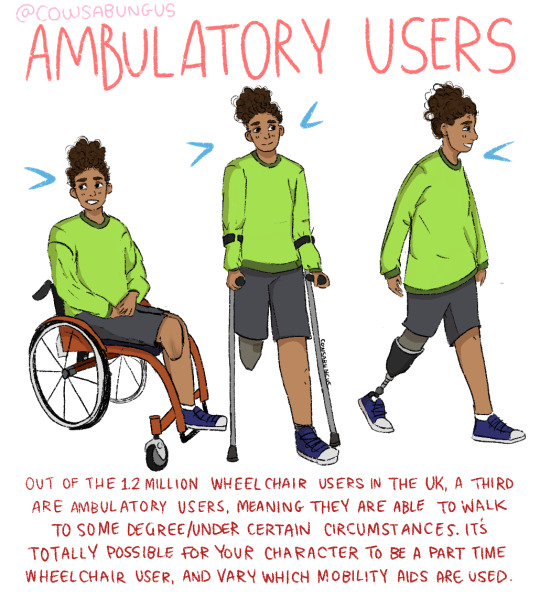
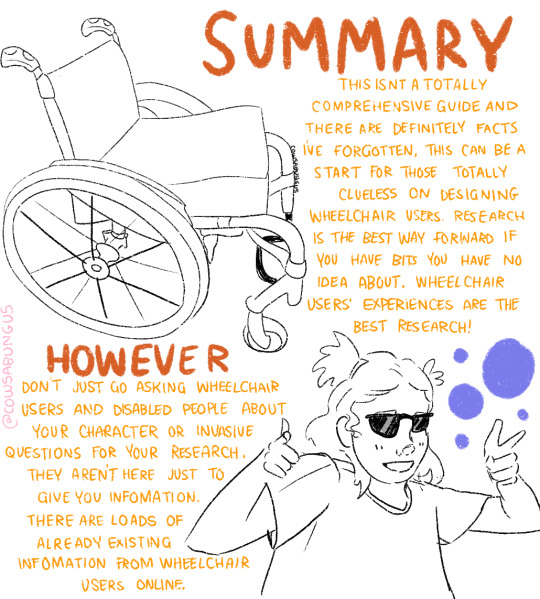
A guide to designing wheelchair using characters!
I hope this helps anyone who's trying to design their oc using a wheelchair, it's not a complete guide but I tried my best! deffo do more research if you're writing them as a character
#art#original art#artist#oc art#original character#queer#disabled#disabled rights#disability#disability pride month#tutorial#art tutorial#disabled character#design tutorial#drawing tutorial#Tumblr tutorial#character design#character illustration#concept art
114K notes
·
View notes
Note
Hello! Would you mind reposting your tutorial on drawing brown features from a year ago over here? I saved it awhile back on twt but since that site is super unreliable it'd be nice to have a copy of it over here too. Sorry if you don't want to lol
here ya go


317 notes
·
View notes
Text
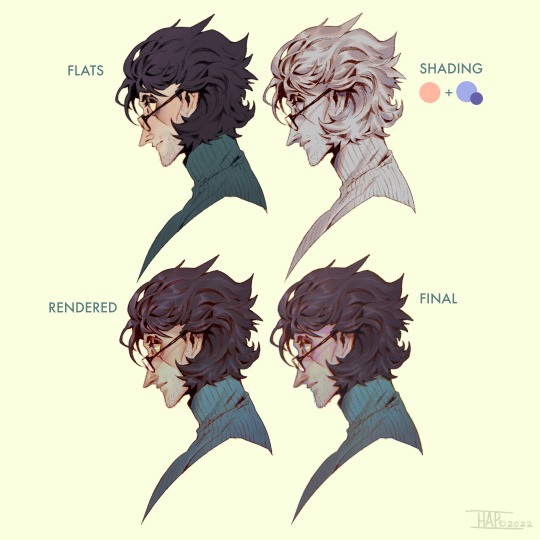
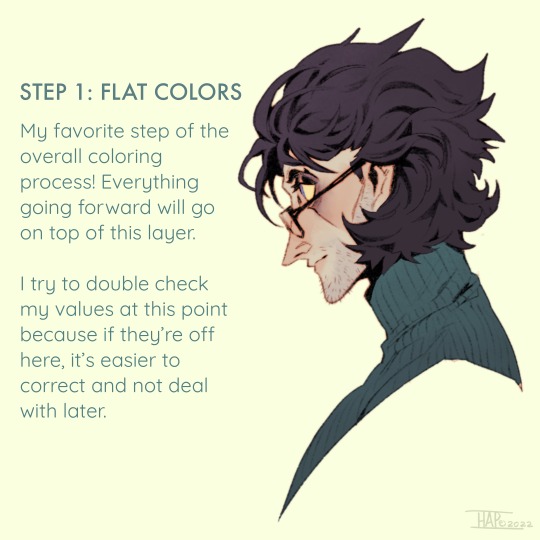
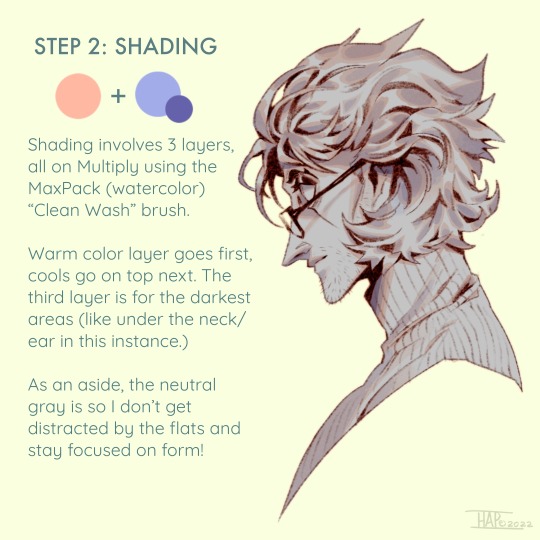
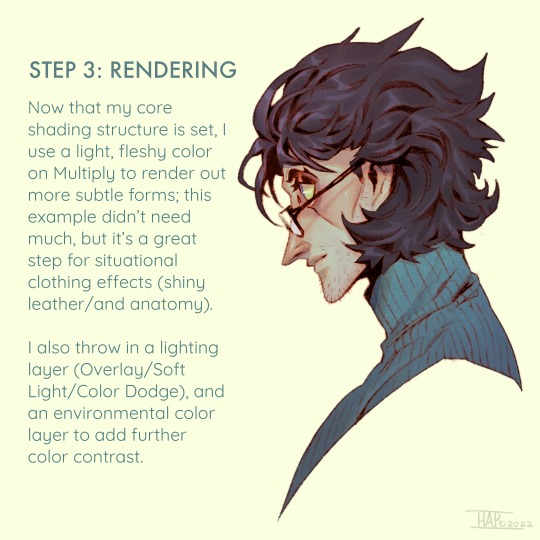
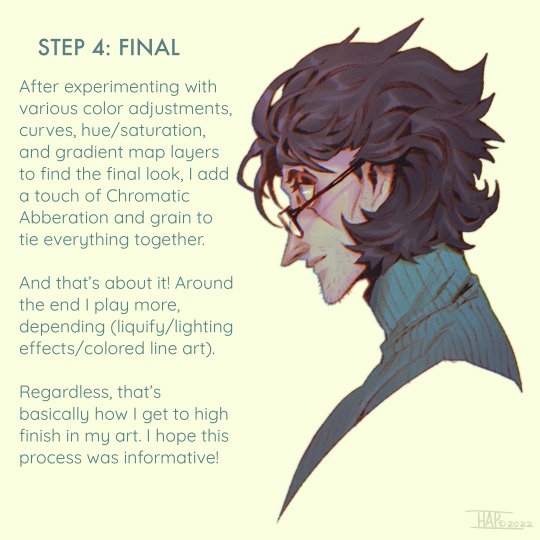
Rendering step-by-step (2022)
#kodasea#own art#2022 art#digital artwork#procreate art#art#artists on tumblr#art tutorial#step by step#shading tutorial#rendering tutorial#drawing tutorial#cold case crew#own character#cold case detective#lawrence#Still follow this basically! Although recently I've been playing with inching back the realism in the light logic/shadows a bit
4K notes
·
View notes
Text
A lot of people on twitter wanted me to explain how I draw expressions, so here you go
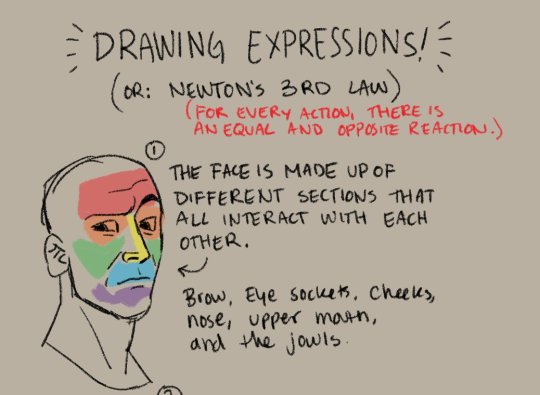

Unless you're drawing explicit realism, in my opinion, expressions should be exaggerated to some degree. If you aren't doing a 1:1 recreation, the point is to get the FEELING across. Try making the expression you want to draw and feeling how your face pinches and stretches.
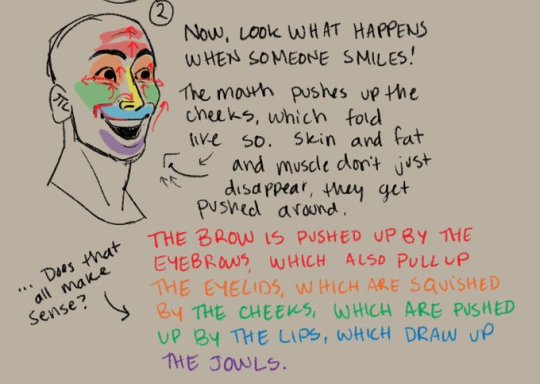
Skin doesn't just "disappear" when your face moves it around --- that's where wrinkles come from! Pay attention to where your skin creases when you emote, and use it to your benefit. It's a fine line between overdoing it and underdoing it -- find your own balance.
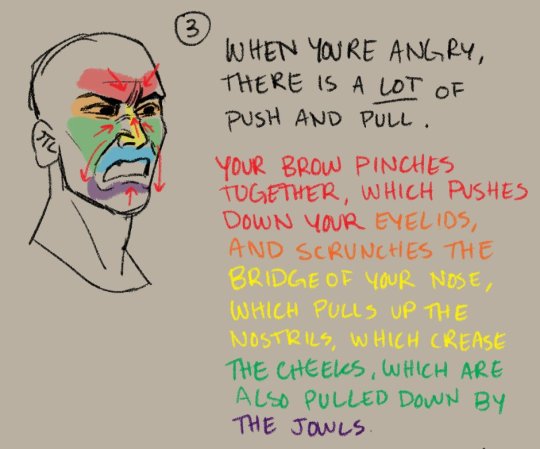
Ultimately, every expression has a little bit of push and pull, unless your face is completely neutral (and even then, there are still some wrinkles...). Learning to think of expressions as actions and reactions is VERY helpful in learning to draw them without needing a reference, and in learning how to stylize and push expressions based on references as well!
I think a lot of people end up with stiff or unexpressive emotions in their art because they're just trying to recreate a picture instead of understanding WHY and HOW the face is moving --- and it's a tough thing that takes a while to really pick up and learn. Hopefully is helpful in showing a way of thinking about it that can influence your process and approach to emotions!!!
Also, bonus: even without the lines, the planes alone still show a LOT of emotion.

4K notes
·
View notes
Text
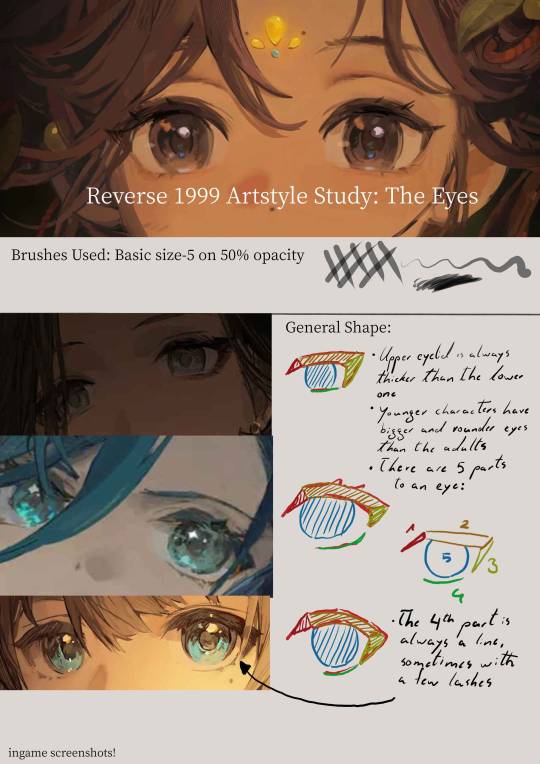
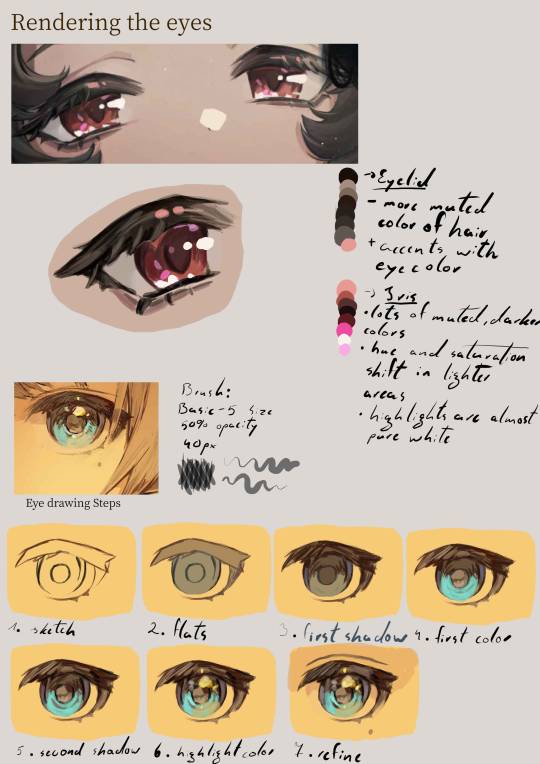
Disclaimer: I do not actually know how they paint the eyes,this is just me guessing their process purely from observations
Transcript:
General Shape:
- Upper eyelid is always thicker than the lower one
- younger characters tend to have bigger and rounder eyes than the adults
- there are five parts to an eye: 1. the upper eyelid corner(towards the nose) ; 2. the upper eyelid main part ; 3. the upper eyelid corner at the back ; 4. the lower eyelid ; 5. the iris
Eyelid:
- more muted color of the hair + accents with saturated eye color
Iris:
- lots of muted darker colors
- hue and saturation shift in lighter areas
- highlights are almost pure white
Eye drawing Steps:
sketch
flats
first shadow
first color
second shadow
highlight color
refine
#art style#art study#eye#eyes#anime eyes#godofart#r1999#r1999 fanart#reverse 1999#drawing guide#guide#art guide#art tutorial#drawing tutorial#fanart#art#digital art#illustration
2K notes
·
View notes
Text


Tutorial for drawing characters with cleft lip! Sorry that it's mostly unilateral-centric but it makes up the vast majority of resources and photos. Still tried to get tips for drawing bilateral clefts in though.
Keep in mind that this is an introductory drawing tutorial and has some generalizations in it, so not every “X is Z” statement will be true for Actual People 👍
If you draw any characters using this feel free to tag me!
Consider supporting me on ko-fi if you find this to be helpful.
#my art#disabled artist#artists on tumblr#digital art#id in alt text#art#personal art#queer artist#drawing tutorial#drawing tips#ccartshare#drawing disabled characters#disabled representation
37K notes
·
View notes