#FAQs Help and Tutorials
Explore tagged Tumblr posts
Visit Tumblr Blog
Explore Tumblr blogs with no restrictions, modern design and the best experience.
Last Seen Tumblr Blogs


Fun Fact
In February 2021, Tumblr had 518.6 million blog accounts.
Text
Jeff Jarvis: Blogging
“The first step in blogging is not writing them but reading them.” —Jeff Jarvis.
View On WordPress
#Arts#education#FAQs Help and Tutorials#Jeff Jarvis#Reading#Search Engine Strategies#United States#Writers Resources
0 notes
Text
How to Trend on Twitter
**Mastering the Art of Trending on Twitter: A Comprehensive Guide** In the fast-paced world of social media, Twitter stands out as a powerhouse platform for real-time news, conversations, and trends. With millions of active users engaging in discussions on a wide range of topics, trending on Twitter can significantly amplify your message, increase visibility, and connect you with a global…
View On WordPress
0 notes
Text
TS4, DirectX 11, and ReShade
Patch notes today say that finally (finally!) The Sims 4 is moving over to use the DirectX 11 rendering api. Until now TS4 has used DirectX 9, which has given us some limitations when using ReShade.
They're bringing the official rollout sometime in the future, but for now you can opt in to switching to DirectX 11 on a voluntary basis.
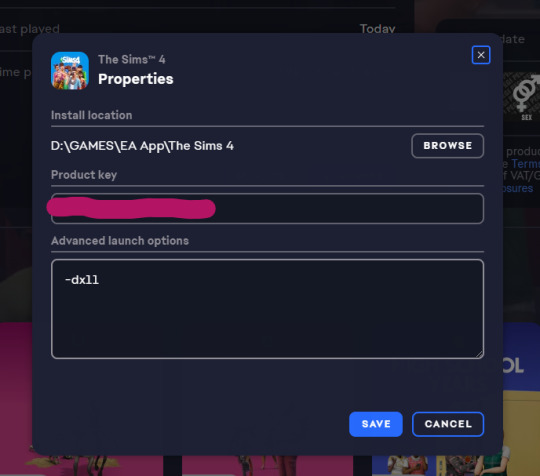
You don't need to uninstall your game or install a new version. To switch to using DirectX 11, update your game with today's patch, and then click on Manage > View Properties from the The Sims 4 game page on EA App and enter -dx11 in the advanced launch options box. You can remove this at any time to go back to using DirectX 9.
Note: the game developers have warned in the patch notes that some mods may have visual glitches until they are updated to accommodate dx11, so it may be advisable to wait until your mod authors have confirmed everything works okay
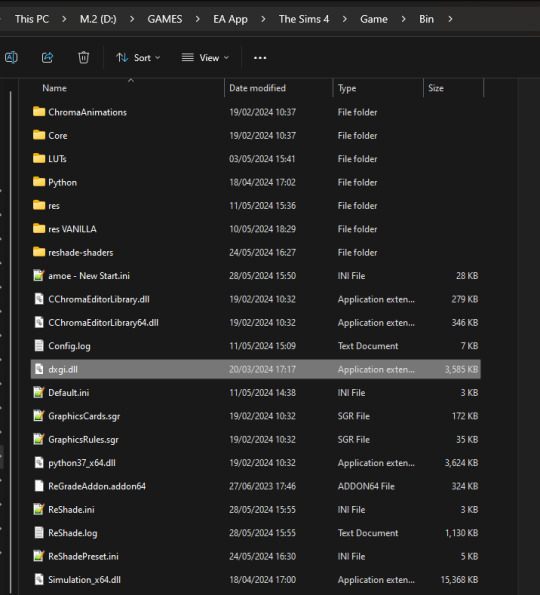
If you have ReShade installed currently for DirectX 9 you can make it start using DirectX 11 instead by finding the d3d9.dll inside your Bin folder and changing its name to dxgi.dll. No need to uninstall and reinstall ReShade, that's all you need to do. If you want to go back to using dx9, just revert the name back to d3d9.dll.

The main benefit of using ReShade under DirectX 11 is that you'll have access to more shaders than usual. You've probably noticed a lot of red errors (also known as compiling errors) -- those are more often than not these days caused by DirectX 9 limitations.
#reshade faq#reshade for ts4#ts4 reshade#reshade tutorial#reshade installation#reshade help#reshade tips
1K notes
·
View notes
Note
Hey pxl! Loving your recent builds ❤️ Can I ask what your general bokeh settings are in reshade? I’ve been struggling :/
Hello nonny, thank you =)
Here is a quick guide I put together, along with my default DOF settings for qUINT_DOF:

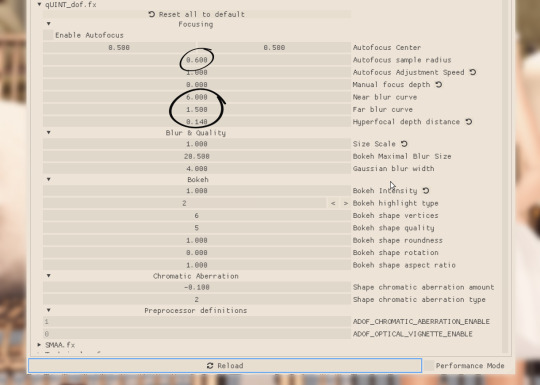
Autofocus Sample Radius adjusts the immediacy with which your depth of field blur settings begin to take effect. 0 = intense immediately after focus subject, 1 = gradual intensity after focus subject.
Near Blur Curve adjusts the blur from the closest perspective, i.e., from your focus subject. 0 = intense blur, higher values lower the blur, 6.000 = no blur.
Far Blur Curve adjusts blur from the mid-point of your depth of field to the farthest point from your focus subject, 0 = intense, 2 = no additional effect.
Hyperfocal Depth Distance adjusts blur farthest from your focus subject 0 = no additional effect, 1 = intense.
Hope this helps!
342 notes
·
View notes
Note
hi! i love reading your fics but i specifically love the social media shenanigans in dearly beloathed. i was wondering how you would feel if i took some inspiration from that for a fic of mine because i would love to write something that's very similarly formatted but i wanted to make sure you were fine with that (cause i'm assuming it took some time and effort to come up with) before i did. anyways your writing is awesome and i love reading it
Yes sure of course! I took inspiration from ao3 fics (F1 fandom in particular is stunning at formatting, I have so much respect for their dedication), such as this one (I basically took the formatting from this) and this Twitch streamer AU. If you're posting on ao3, there's the option of playing with HTML/CSS for a more "realistic" socmed interface, for example this one for Twitter which is magic to me. This one is an extremely impressive Discord mockup. An Unauthorised Fandom Treatise is a nice look into mid 2010s Superwholock era fandom whereas F1 rpf and indeed mcyt / streamer stuff is more "modern". Anyways yeah there's a lot of potential in this genre of fics and loads of stuff to check out on ao3 if you wish :) I love scrolling through the Unconventional Format tag because people are just so creative. Good luck with your writing!
#im serious about the f1 thing. go into the f1 tag and search for social media or unconventional format and boom#theres also more simple css with different coloured text which can mimic socmed better than black and white#still the basic italics bold underlines is usually enough to sculpt the look of socmed#text symbols and emojis are also fun. the document is your sandbox yipppee#ao3 has a faq section about their built in html which is very helpful. lots of css tutorials on ao3 too#sorry if this is a lot i get excited about formatting <3#ask box#answered#writing#dearly beloathed#hrm posting on stuff like neocities gives even more customisation... but yeah it takes effort and time#theres also sth i like about simple mockups with no css and minimal html (it's easy to copy and paste / edit)
12 notes
·
View notes
Note
Would you ever consider explaining your process on how you make gifs so quickly? Not a full blown tutorial but mainly sharing the programs you use?
sure!! i'll try to break it down but tbh im not good at explaining the method used to make gifs so i recommend checking out some tutorials for something more in-depth.
i use two programs to make gifs: adobe premiere rush & adobe photoshop cc
putting this under the cut because i included some pictures to help explain
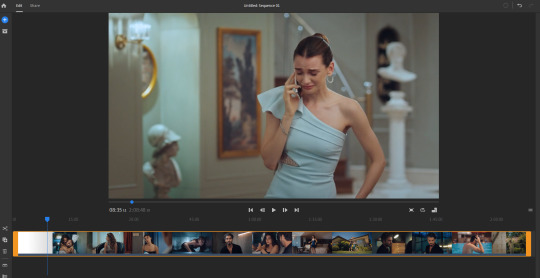
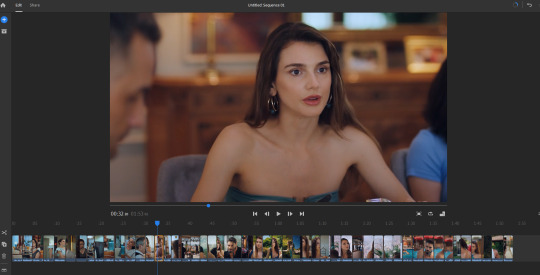
step one: clipping (premiere rush)
so here i usually import my video into premiere rush and clip out the scenes i would like to gif. to keep it somewhat consistent, i like to make my clip sizes 2-3 seconds if possible, and this usually takes me anywhere from 10 to 30 minutes depending on how big the video im trimming is and how much screentime the person im giffing has
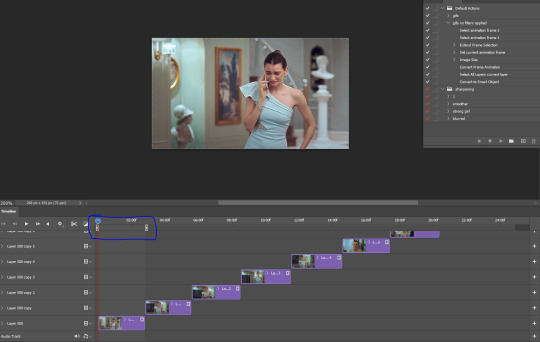
step two: importing (photoshop cc)
so i use videos to layers to make my gifs, which i would recommend if you have storage space to spare on your computer because it can eat up a lot of your space during the process. but essentially, i import my trimmed video into photoshop and add the sharpening i'll use, then split each gif that'll be made into it's own layer. i repeat this with the rest of the video and save each file as it's own part. the longer your trimmed video is, the longer it'll take to do this step, but this specific example took me 15 minutes to do.


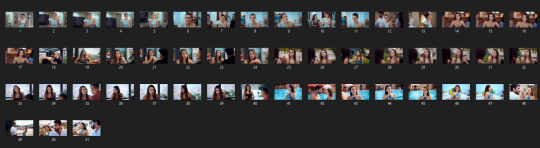
step three: coloring (photoshop cc)
this is probably the fastest part of it, but it's basically going back to each part you made and coloring the gifs. you'll use the marker to trim it down for each gif and save it for web. if the video you're trying to gif is easy to color, it will go pretty fast, and it took me about 10 minutes to make 50 gifs.

note: the entire process of making these specific gifs took me a little over half an hour (10 minutes to clip, 15 minutes to import, 10 minutes to gif = 50 gifs), but obviously the time varies depending on each project and it's difficulty. i will say my method probably goes faster because it's a lot of repeated actions all at once so once you get the hang of it you can go pretty quickly. i also tend to clip stuff in advance to gif later just because it's my least favorite part and probably will require the most focus.


#anonymous#answered#faq#gif tutorial#hope this helps!#didnt intend on starting asli gifs but i wanted to start a new project to explain
17 notes
·
View notes
Text
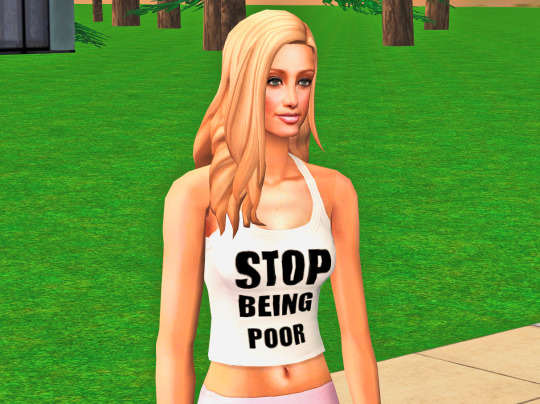
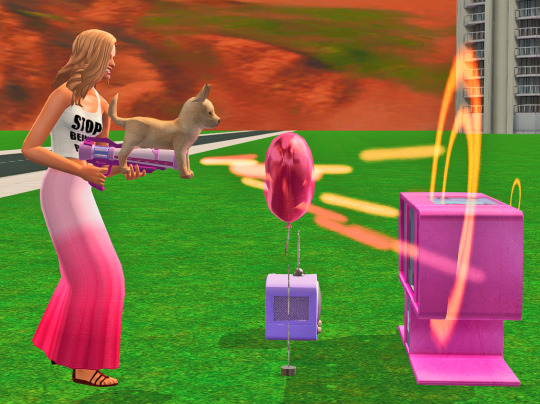
Paris Hilton Repo-man Default Replacement


By popular demand, I am releasing this default. But be warned, the installation process requires SimPE!
You can download SimPE here if you don't have it.
Instructions
Download the files below and put them in your downloads. Use clean installer to install the Paris Hilton sim.
Go into your neighborhood and create Paris Hilton in CAS via the downloaded sim
Close the game
Open SimPE and click Ctrl + Shift + N
Choose your neighborhood, click Open, wait for it to load, then go to Tools > Neighborhood > Sim Surgery
Make sure the Service Sims box at the top of the window is checked and scroll down to find a sim named "Repo Man"
Click on the Repo Man sim and then click Use within the Patient Sim box on the right
Then, scroll up to find your Paris Hilton sim. Click on Paris Hilton and click Use within the Archetype Sim box on the right
Click Surgery
You will have to do steps 6-9 for each repo-man in your neighborhood if you don't have antiredundancy.
You will have to do steps 2-9 for each neighborhood you want a Paris Hilton repo-man in.
DOWNLOAD
FAQ and credits below the cut
FAQ
Is this safe? > idk, probably
What happens if I just download the files and don't do steps 2-9? > you'll have the car and gun defaults but Paris won't be the repo-man
Did you know that Paris Hilton never actually wore a shirt that said "Stop Being Poor"? > yep
Simpe is confusing me > see this tutorial with pictures that shows how to use sim surgery, should help!
Credits
Purplepower for the sims 4 deco chihuahua I used to make the gun
Stefan for the Paris Hilton sim I used as a base
Paris Hilton for being iconic
#sims#sims 2#the sims 2#ts2#the sims#sims2#s2#s2cc#ts2cc#ts2 download#the sims 2 cc#sims 2 download#sims 2 custom content#sims 2 cc
767 notes
·
View notes
Text

TofuPixel Links + FAQ - Commissions Open!
🌟 Building a game: @wishlings 🌠
🎨 My Portfolio
Support me: 💜 Tip Me 💜 Digital Store 💜 Print Store 💜 Game Assets 💜 Stickers + Merch
Socials: Bluesky | Cara | GameJolt | TikTok
Yes you can use / cross-stitch my work for personal use! <3
🎨 Pixel Art Beginner Guide
Hello, I'm Tofu, a pixel artist based in England. I work full-time doing pixel illustrations or game-art. I started learning in my early 20s, so no it's not too late for you!
I run a 7k+ member Discord server called Cafe Dot, where we host events like gesture drawing and portrait club.
I currently have Good Omens brainrot so expect some fanart on this blog. I also occasionally do/reblog horror art so be mindful of that!
Due to so much AI nonsense on every platform, all my public work will be filtered/edited with anti-AI scraping techniques. Supporters on my Ko-Fi can see unfiltered work and also download it.
🌸 Want to learn how to do pixel art? Check my tutorial tag!
Other tags:
tutorial (not pixel specific)
my art
follow (artists i recommend)
🌟Free Stuff!!!
❔FAQ
What app do you use? I use Aseprite on PC and occasionally Pixquare on iOS (use code tofu for 30% off Pixquare!! <3) Free alternative: Libresprite on PC
Why does your art look so crunchy / compressed? Glaze
How did you learn pixel art? I first started out watching MortMort and making tiny sprites. Then once I started getting interested in landscapes/environment art, I did many, many Studio Ghibli studies.
How can I also protect my art? You can use Glaze and Nightshade- Glaze protects against Img2Img style copying, and Nightshade poisons the data so the AI thinks it's the opposite of what it actually is. There is a lot of misinformation going around (likely from pro-AI groups) so do your own research too! If you're a pixel artist you can also tilt or blur your art after upscaling, which will make it near useless to AI models (or regular thieves) once downscaled again.
Feel free to send me an ask if there's anything you want to know! I am always happy to help beginners :--3
1K notes
·
View notes
Text
pinned post/FAQ
TRANS RIGHTS!! TERFS GET THE FUCK OFF MY BLOG!!!!!!!

we have a source of income again, but if you like my work, donations are always appreciated!
who are you?
i'm just a guy who likes spore [2008]
why do this?
i just really like spore and making creatures in spore. it helps me practice my creature creation abilities.
can you make my oc in spore?
as of right now i do not take requests. i generally find characters and creatures i want to make by them appearing on my dashboard. refer to the Request Beast.

what is in your icon?
captain thunderhide, my main spore space stage captain.

what is peeling?
peeling is when i remove all detail parts from a creature and show the bare sculpt underneath - anything that is not eyes, mouth, hands, feet, or limbs will be removed. it is a tradition around these parts
what are "original spores"?
original spores are spore creations that aren't based on existing media - ocs, copyrighted characters, or otherwise. usually, they're just making things to make them in spore, or are based on simple prompts such as "a plate of spaghetti" or "a penis".
do you use mods?
i exclusively play this game with mods.
can i download the creatures you make?
only if the original creator of the design is okay with it and requests a png. please note that in order to successfully download the creatures, you will need to download every mod used to create them.
i will not always be able to say what mods i use to make something, so it's a gamble if you don't have all of the ones i use.
how do i mod spore/do advanced creature creation like you?
darkedgetv's FAQ is a very good resource to begin. i started there, and it's where i recommend you to start if you're interested in spore modding. it also contains many other mods i have not listed under the cut.
as much as i disagree with the process of using a discord server to contain vital information and resources, the davoonline spore modding community discord is also a good source of resources and mods that even i do not use.
have you heard of [in-development indie sporelike]?
yes. i have heard of all of them.
i hold no interest in any of the currently in development indie "sporelikes". i believe they are trying to reinvent the wheel and overall they do not interest me.
are there any other blogs like yours?
there's a few and ever growing! i refer to this as the ecosystem or the making-you ecosystem.
i have a masterpost of all known individuals in this ecosystem here.
what editor mods do you use?
a lot, so they'll be under the cut.
not mods, but highly recommended for enhanced playing experience
4GB patch - Tutorial - patches spore [and other 32bit programs] to be able to use 4gb of RAM. recommended if playing a highly modded copy, and makes the game more stable.
Reshade & ReSpore - post-processing injector & shader that alters the appearance of spore, giving it more detailed shading and vibrant colors. i use this for gameplay and screenshots. runs on GPU power, so excellent if you have a strong graphics card
HD graphics fix - this doesn't actually seem to work for my copy, but it alters the textures of base spore to be more high-quality.
mods that are absolute must-haves
these mods are ones that i use in almost every creation, and add a lot of QoL to the editors. if i forget a mod in a creature png i post, it will be one of these.
Dark injection - THE spore mod. it's likely a lot of other mods you'll download will mesh well with dark injection. you can turn off whatever you don't want to use through the installer.
Universal Property Enhancer - a library mod that many other mods require
The Smoother - a useful tool for building muscles and smoothing out your creatures' bodies
Enhanced Color Picker - a requirement for super detailed creations, enables hexcode color picking and color wheel selection beyond normal limits of spore
[UPE] Infinite Part Scaling - allows scaling of parts near-infinitely, beyond the limits of the original game
Project Skyncraft - adds new creature skinpaints
Unshackled - adds nodes and limbs for creating custom wings, heads, hands, etc. a little bit unstable, i mostly use this for wings.
Spore Stacker - allows stacking of any part
Subtle Rotations - reduces part rotation snapping
Advanced CE - adds building editor manipulators to the creature editor
Every Part Costs Nothing - self explanatory
Rotate Anything - lets you rotate anything, including feet and hands
Advanced Creature Paint - allows for individual coloring of parts on a creature, like in the building and vehicle editors
Ambient Occlusion Disabler - removes baked-on shadows for creatures
Delta Paints - adds new skinpaints
Valla's Skinpaint Switcheroo - adds duplicates of all vanilla, C&C, and GA creature coat and detail skinpaints into their opposite category
Valla's Vanilla Style Parts - adds several parts which mimic the vanilla style
Delimbiter - increases the amount you can scale limb parts, and allows for more crazy movements of certain limb parts
test drive related mods
these mods are not required to download the creatures i post, but are recommended for the test drive.
No More Creature Editor Animations - turns off the animations that play when you add eyes, mouth, feet/hands, etc
Sevan's TF2 editor animations - adds multiple animations from tf2 into the creature test drive.
Mx3's Dance Animations - adds a multitude of dance animations into the creature test drive.
Tenebris's Creature Test Drive Animations - adds many animations from within the game to the creature test drive.
EditorBG - adds extra editor backgrounds
Ramone Kemono's MMD Drag Ball - high-effort dance mod complete with special effects and a reverse engineered camera system
part mods
these mods add parts to the editors.
DroneParts 2017 - adds many mechanical and polygonal parts useful for machine creatures, i like to use it for building clothes and markings.
New Drone Parts - a sequel to droneparts 2017, compatible with the old version. install both at the same time if you want to be able to use creatures from the old droneparts mod.
Himeric Engine - adds horror-themed parts to the creature editor.
Spore Resurrection Next Steps - adds a few parts to the creature editor and several new textures to the building and vehicle editors.
Dinosaur Parts - adds parts based on dinosaurs and other animals. mostly heads.
Strange And Beautiful - a now-discontinued, reuploaded mod that adds unusual and unique parts to the creature editor
Bionicle parts - adds a few bionicle pieces to the creature editor
Little Box Of Horrors - adds many parts with an overall horror theme. some are animated.
Pandora's Toolbox [1.0] - adds a multitude of basic shapes and polygons to build with
Replicant - adds non-textured animating parts and non-animating parts in a separate tab. good for if you want to use hands, limbs, etc without them animating or adding stats
Armoured And Dangerous - adds a few high detail mechanical looking parts.
Wordsmith 2.1 - adds letters to the creature, building, and vehicle editors
Kaiju parts - adds several parts based on popular kaiju
Organic Help - adds many membrane pieces to the creature editor, for creating wing webbing among other things
Project: Mad Mannequins - adds many human body based parts. and a horse for some reason
A Mouth For All Seasons - adds alternate versions of all vanilla mouths [and all unused cell mouths] with alternate diets
Valla's Captain Badges - adds all space badge models into the captain outfitter and creature editor
Rock On! - adds rock props from spore into the building and creature editors
Anime Parts - adds a couple anime human heads and anime hairs
2K notes
·
View notes
Text
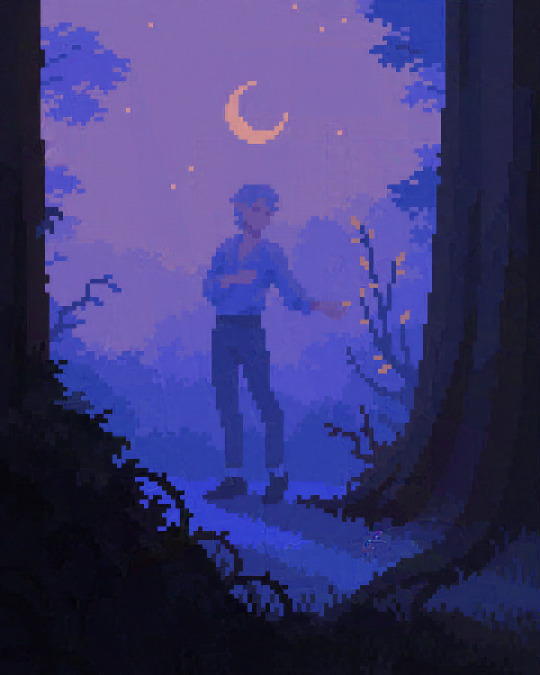
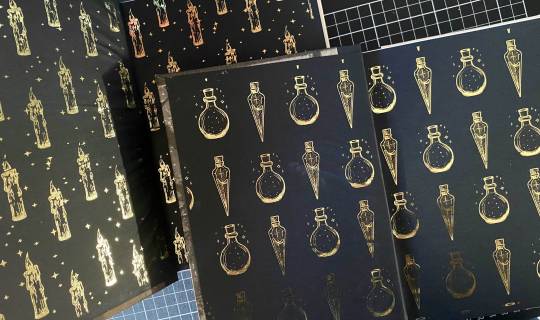
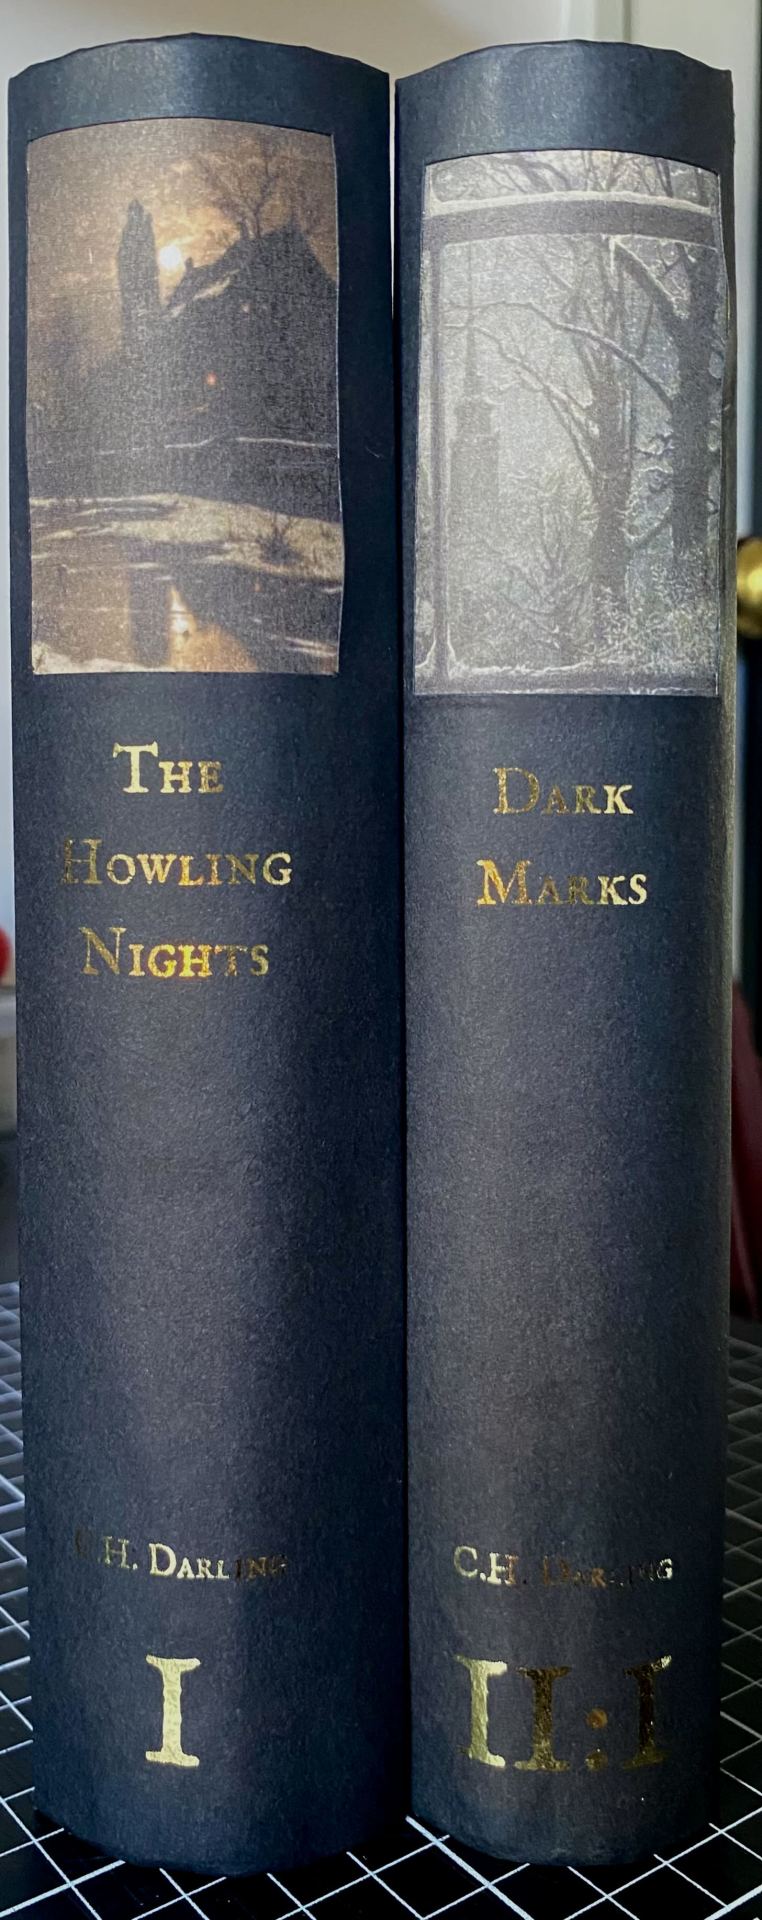
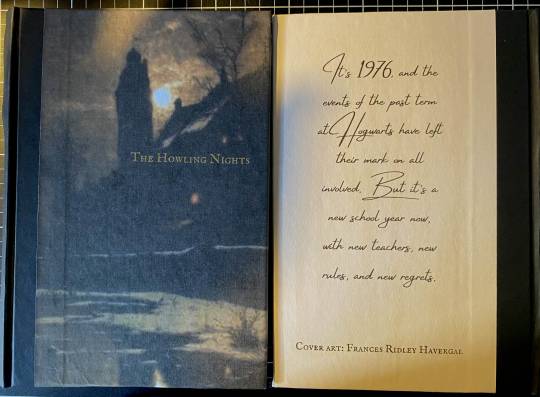
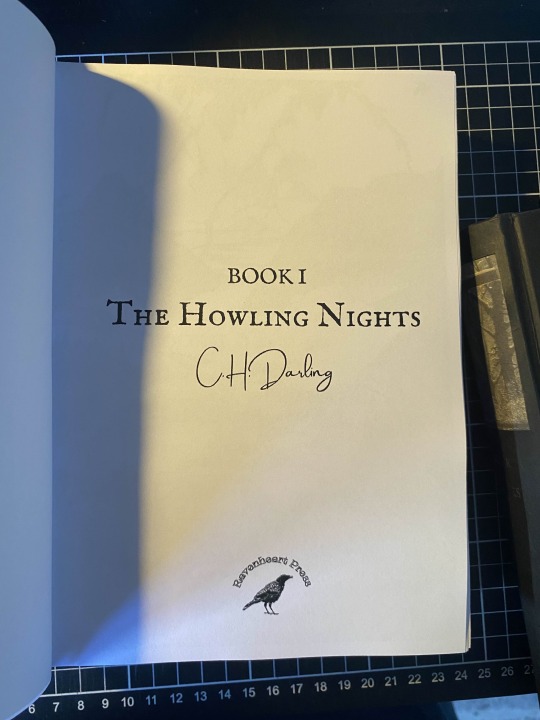
🕯️ Fanfic binding of @chdarling 's The Last Enemy Series.🕯️
I was originally not going to post this, but I thought - why the heck not. All my love goes out to C.H. Darling. This Marauders fic has brought so much comfort and whimsy into my life, and it’s been a privilege to have this sitting on my shelf, waiting to be re-read again and again.
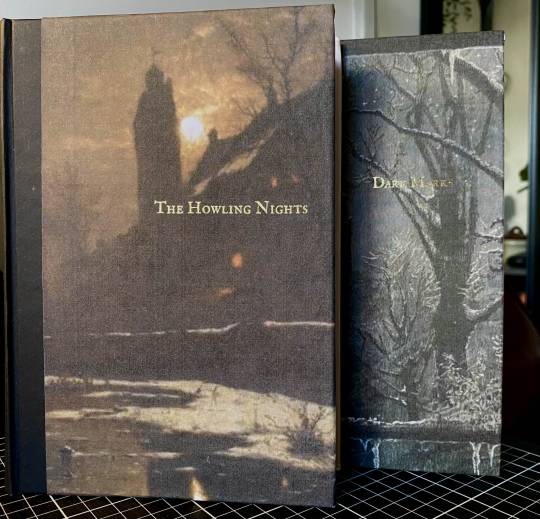
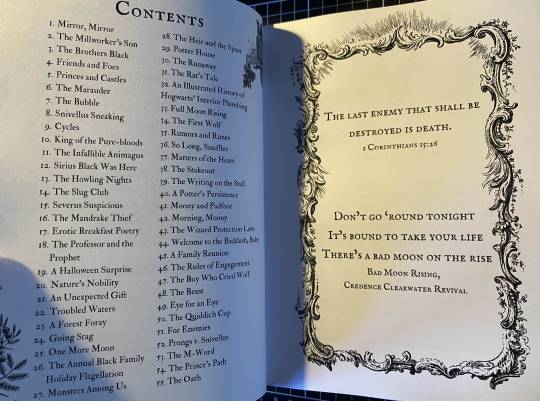
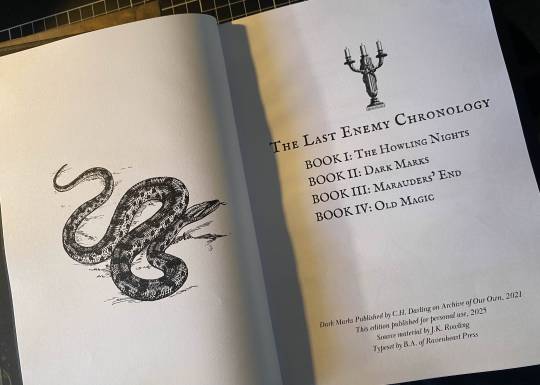
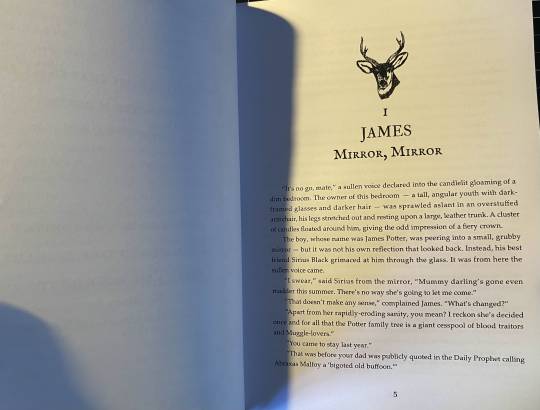
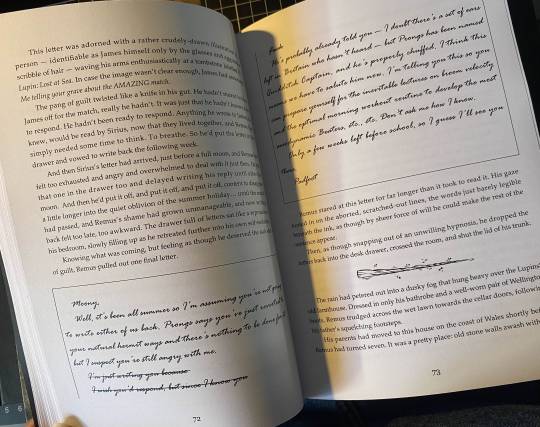

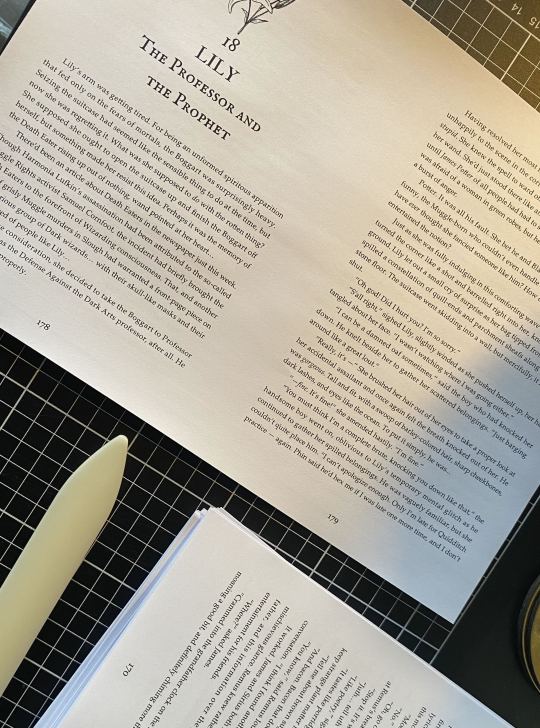
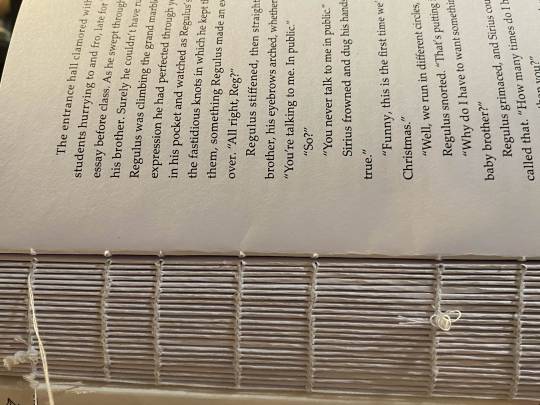
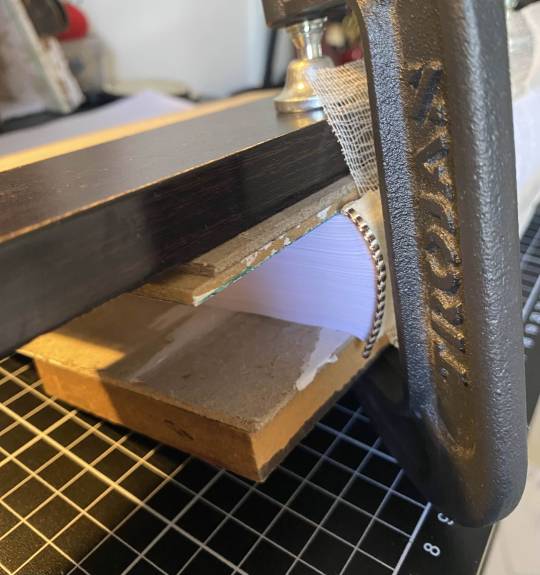
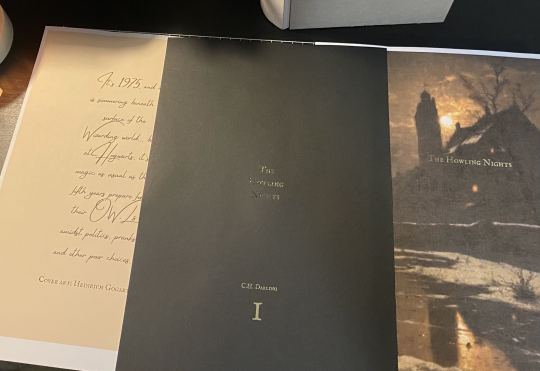
Honestly, this long-term project has helped me through a really stressful period of my life. Putting this together has brought just as much comfort as reading TLE, no regrets!! For personal use only. Never resell fanfic. Please ask permission or check an author's FAQ before binding fanfic. You don't need fancy supplies to bind, and there are a lot of tutorials, budget friendly options, and ways to achieve binding your own copy. Details:
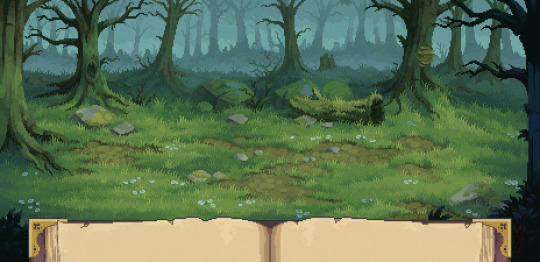
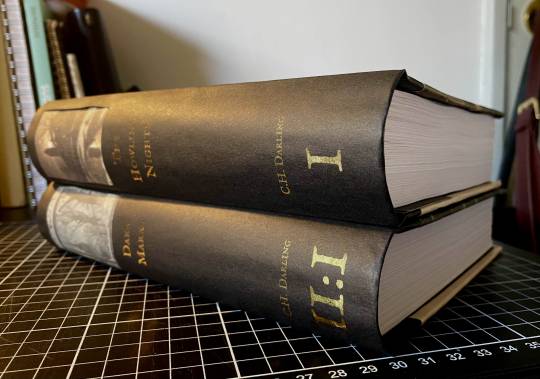
• Typeset created in Word. Graphics from Canva. • Text block using 80gsm copy paper. Coptic stitch. Rounding and backing. Oxford hollow.
• Book cover using recycled book board, paper shopping bags, and 120gsm paper. Cover art by Heinrich Gogarten and Frances Ridley Havergal. Printed with Inkjet.
• Endpapers designed in Canva. Printed using Laserjet. Foiling done using toner-reactive foil & a laminator.
#its not a perfect bind but aaahhh i just love this fic so so much!!!#never stop creating CH <3 youve inspired so many#i will make book 2 part 2 someday... just need to find the time#bookbinding#jily#marauders#fanfic#ao3#fanfiction#foiled#bookbinder#wolfstar#ch darling#TLE#the last enemy#fanbinding#bea binds
170 notes
·
View notes
Text
Masterpost | Ask | Rules | Dreamwidth | Discord
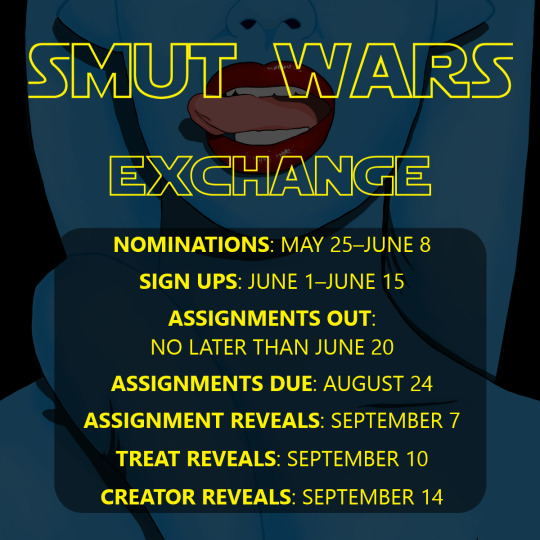
Smut Wars is back for 2025!
We're a fanwork exchange focused on smut, showcasing art, fic, podfic, and vid rated M or E.
Are you new to AO3 exchanges? We’ve compiled a step-by-step tutorial for newcomers, from nominations all the way to posting to the collection: click here 🔗.
Rules are available here 🔗; rules and FAQ for the previous rounds are outdated once nominations for the 2025 round open.
Please help us spread the word!
Tagging @swfandomevents, @faneventshub, @eventfeed, @femslashfandomevents and @thebigbangblogproject ♡
#smut wars#smutwars2025#fandom exchange#star wars#andor#the bad batch#ahsoka series#sw prequels#sw ot#sw sequels#the mandalorian#*announcement#*2025
124 notes
·
View notes
Text

Hey! I'm Amanda | Not WCIF | 18+ (Sometimes NSFW)
Find me on YouTube: Here Main series on YouTube: The Aspiring Artist | Rotational Gameplay All posts related to The Aspiring Artist can be found here. Casual gameplay posts on my blog are separate from the storyline on YouTube. All of my Sims 4 posts | All of my reblogs | Other nsfw posts CAS Mods Cas background | Cas lighting (Studio flat) | Controlled Position Mod | More Cas Columns (6 columns) Game Lighting Mods In-Game Lighting (Dark) | Sunblind Gshade/Reshade I make my own Gshade presets. They are not available for download. However, here are some that I would recommend if you are looking for a preset: Boho dreams (Neecxle) | Birdie (Sforzinda) | Lithium (Gunthermunch) | Luminescent (HazelMine) | Raices (Folkbreeze) | Almond (Glimersims) | Kaleidoscope (Okruee) | White Willow (Tianaberrie) | Serenity (Misslollypopsims) | Neapolitan (Midsummermoon) Photo Resources I use SRWE for a lot of my screenshots. I take some of them on a higher resolution monitor without hotsampling. I use Krita for photo editing and sometimes Canva. I usually crop my photos and resize them for faster uploading. Check out this tutorial if you're new to hotsampling. Check out this FAQ for help with understanding reshade. Video Resources I use OBS to record my videos and Filmora to edit. I also recommend Davinci for a free editing alternative. I use this mic for narrated episodes. Essential Gameplay Mods These are the mods that I consider essential for my game: Basemental Drugs (21+) | Wicked Whims (18+) | MCCC Other Mods The other mods I have installed: UI Cheats Extension | RPO (I only use modules 1, 7, and 14) | Somnik and Severinka Custom Foods | Control Any Sim | No Zzz | No Music Notes | Hidden Highlight | Tool | No Romantic Satisfaction Decay | Seasons Tuner | Kiss and Grind | Chalk'd UI Defaults/Overrides My current default skin can be found here , default eyes here, default feet here, and default teeth here. I mostly use these skintones. Default phone | Toothbrush | Headphones | Male animation replacer (18+) Some Commonly Used CC I use a lot of eyes from these creators found here and here. I typically use skins, skin details, and other genetics from these creators found here, here, and here.
153 notes
·
View notes
Text
Hey folks!
It has been a while! Well, we wanted to announce some big things coming your way!
WWC Askbox: Soft Re-Opening
Wednesday, Nov 1, 2023 to Thursday, Nov 30, 2023
In light of the recent attention WWC has received by the writeblr community, and the reception to our Guide to Academic Research—the mods have decided that we will temporarily reopen to your questions and test some important changes to the site! As you may have noticed, we've taken a much-needed break to catch up on our personal lives and restore our inspiration to answer the hundreds of Q&A that we receive.
Once the submission window is up on Nov 30, we will evaluate how our new system is going, tinker some more, and reopen once again once the construction dust clears.
New Rules and FAQ!
We are pleased to announce our new and improved Masterpost, which we hope will be a more centralized, more informative resource for those new and returning to WWC.
Brand-new FAQs, with new answers and content for further reading
Code of Conduct and other etiquette rules
The Ask Tutorial—a guide to writing a good ask that we’ll answer!
Moving forward, all followers are required to go through the masterpost to submit a question so they are aware of the new rules, terms & conditions.
Read the masterpost here and ask your question!
New Process
We're piloting out our own personal askbox via Google Forms. This will help us streamline the process and keep track of everyone’s questions.
We are also introducing the Deletion Log, a public, anonymous ledger that lets you know if your question (identified by a number code) has been deleted due to a rule violation, and what you can do to resubmit. Check out the Deletion Log here.
Want to submit an ask?
The below are topics of asks that we will get to right away, based on the mods who are currently active.
Black
Chinese
Colonialism
Iranian/Persian
Japanese (INCLUDING: Anime fanfic questions! Only Mod Rina will be answering anime questions, and only if she feels that the ask would make for an educational post.)
Jewish
Mixed race
South Asian: Hindu, Indian, Punjabi, Sikh (please remember that when asking about South Asia you must indicate region & time period)
Taiwanese
Writing/Publishing industry
Coming Soon: Writingwithcolor.org
We've made tremendous progress on writingwithcolor.org and are almost ready to show off the more permanent residence of WritingWithColor! However, it'll take a lot of time to fully transfer posts and links. To get the new look and all its benefits to you faster, we plan for a soft launch of the content. This will include back and forth linking between WritingWithColor.org and our home on Tumblr. We'll try to keep things seamless and your viewing experience on Tumblr shouldn't be too interrupted. Launch date is coming soon!
New Mod Applications
We still have some applications from our last call of mods and folks to respond to. So if you haven’t heard back, sorry for the delay, but no worries—we will get back to you as we start shaking the dust off our bones and getting back into Q&A. Once we are ready to invite more mods again, we'll continue our outreach.
A Special Thanks To You All
We want to thank you for your continued support, whether it’s been viewership, spreading the word about us, or sending us a tip that supports our domain and future projects for you all. The whole team really appreciates it. We will keep bringing you our best advice and guides on all things good writing with inclusivity.
Be well and keep writing!
~WWC
724 notes
·
View notes
Text
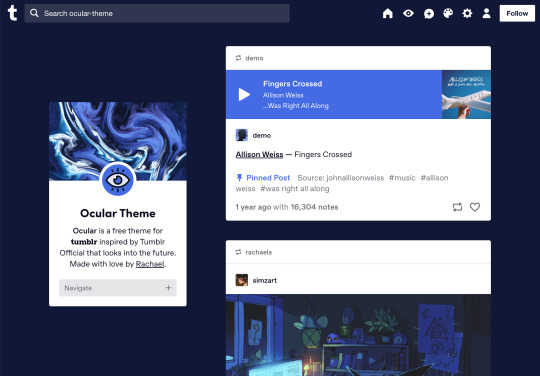


Ocular — Version 3
Preview // User Guide // More Info & Install
your favorite sidebar theme just got an upgrade, babeyyy
I went to update Ocular to make it NPF post-compliant and then my hand slipped and I redesigned the whole thing lmao. here's a brief update about Ocular 3; if you're looking for a full list of changes between versions 2 and 3, click the "Read More" below)
Ocular comes with the following features:
Colors: easily change the color scheme of your sidebar and posts using any colors you want
Post sizes: 400px, 500px, 540px, 600px, 700px
Sidebar: can be on the left, right, or above the posts. pick from a list of sidebar sizes, header image heights, and avatar shapes
Fonts: 20 different fonts, sizes 13px to 18px
Background: solid, gradient, full-size image or repeating image
Links: choose either regular navigation or drop-down navigation. unlimited custom links (visit the help desk FAQ for a tutorial) and ability to rename home, ask, submit, and archive links
Endless scroll, custom ask box text, Tumblr's full-width controls and search bar, optional header, avatar, and favicon images
if you already have Ocular installed, version 3 should be coming at you as soon as the update passes the theme garden. if you installed this theme with GitHub, you'll have to re-install manually.
now let's get to the fun stuff. what's new in version 3?
wow, do I have some updates for you!
1. goodbye color schemes, hello post background and text colors
you can now directly control the color of the posts rather than relying on color schemes to do it. want your posts to be a very specific shade of navy? all yours, buddy. go wild (make sure it's readable tho)
2. hello, color schemes! wait I thought we got rid of that guy
a lot of the color schemes I made became redundant now that the new post background/text color options exist. if you were married to the old color schemes, all of them can be recreated using those options. so the new color scheme options are as follows:
"My colors" — uses the colors you picked for post background/text
"Light preset" and "dark preset" — sets the posts to white with black text, or off-black with white text
"Translucent" — uses the colors you choose for post background/text, but makes the post backgrounds semi-transparent. there are NINE different translucent color schemes, ranging from 90% (only slightly see-through) to 10% (VERY see through)
3. navigation dropdown option
you can either use the sidebar links like they were before, or you can turn them into a cute little dropdown (helpful if you have lots of links or links with long titles!) you can enable this using the "use dropdown navigation" setting. you can also customize the label for the dropdown using the "dropdown menu label" setting. for instance, the dropdown on my blog currently says "oooh you wanna click me"
4. RIP google fonts I always hated your load times
decided to stop using Google Fonts and instead I'm providing the font files directly in the code. this will help speed up load times drastically when using custom fonts, plus I don't have to use Google. win-win! there's quite a bit of coverage overlap with the old fonts, but some of them that were too similar to each other got the ax. I also added all of the system fonts as options (hit classics like Arial, Georgia, and Comic Sans MS are now available TO YOU!)
5. more layout, sizing, and spacing options
the sidebar used to be either on the center-left, center-right, or above the posts; now it can go in the top-left or top-right! you can now control the border radius on the posts and sidebar. the header height, sidebar width, and post spacing all have additional options.
6. some options have been renamed for additional clarity
"background color 1" -> "background color"
"background color 2" -> "gradient background color"
"background" -> "background style"
"font override" -> "use body font everywhere"
"title" -> "sidebar title"
"description" -> "sidebar description"
"ask box text" -> "custom HTML above ask box"
7. removed some options
you win some, you lose some. I removed the uppercase sidebar links, theme credit, and inline media spacing options, mostly for redundancy reasons or because they produced unclear results.
8. as previously stated, now NPF-compliant
Ocular was ALMOST compliant with Tumblr's new post format, but had a few tweaks that needed to be ironed out. they're now ironed.
9: now user-friendly right out of the box
I updated the default color and content options, so new users installing this theme will have a much easier time using and customizing it immediately. no more ugly ass green background!
10. and finally, new JS
I had to rewrite some of the javascript for this theme, which turned into me rewriting ALL of the javascript. doing so meant that I could eliminate dependencies on third-party JS libraries and run the whole thing on plain JS. that should improve load times!!
bonus: custom CSS can do some nifty stuff now
want to change the size of your avatar? you can do that now! just do this to your Advanced > Add custom CSS section
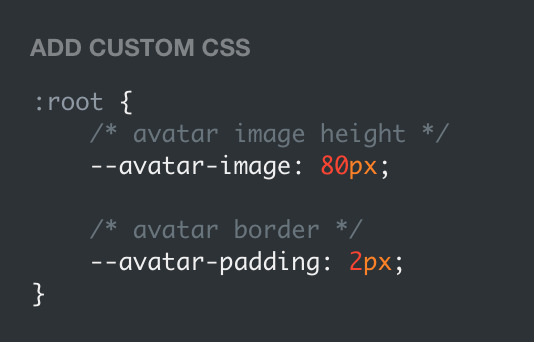

super helpful if you're using the Avatar shape: Uncropped setting and you need your image to be a specific size (like a pixelated GIF)
for more info, check out the Ocular user guide. thanks for reading my updates!! hope you all have a fantastic start to your 2024 ❤️
#tumblr theme#tumblr themes#themes by rachael#codingcabin#ocular#blog#you should've seen me writing the JS for the audio posts lmfao I was on my hands and knees begging it to work
594 notes
·
View notes
Note
Hi there! 😄 Tysfm for compiling the LO brushes, being able to use them (non-commercially of course lol) makes me so friggin happy. 🙇♀️ I have a few questions to ask about them though:
Which brush did RS use for laying down color before shading/effects? In the Rekindled tutorial, you use the Lineart Brush for laying down flats, but I'm not sure if what I said in the previous sentence is the same thing as flats (I've been drawing my whole life, but I didn't start taking digital seriously until very recently lol 🤦♀️).
When the Splatter Versa brush was used in S1, there are varying oval shapes as well as several other non-ovular shapes that I don't see when I use the brush. Were there other similar brushes used with different shapes? Or am I just doing something wrong with the brush settings? The other shapes look more wilted than the other petal shapes.
Which brush was used for the usual thick, varying lineart? (It's most noticeable with the lines in hair in mid-S1 esp.) This brush isn't really textured, so I'm a bit confused which one in particular it is.
Sorry for being annoying, I'm just not tech-savvy and very intimidated by all the technical aspects of digital drawing lol ("Wtf are 'blending modes'?" /hj). 🙇♀️
Hey there, no problem!! I'm glad people are getting use out of them!
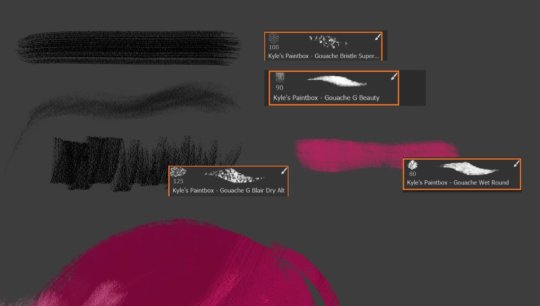
Though I'm not entirely sure as it clearly changed often throughout the course of the first season, the Gouache a Go Go brush and Hard Pastel both have those "crunchier" textures that you can see in some panels. There are also watercolor brushes that she used to blend the edges in some bigger panels.
Could you send me an example of a panel? Just so then I can actually see it and mess around with some things and give you a better answer haha That said, if I had to take a guess, either she messed with the brush control / tilt settings in Photoshop, or she may have used the Warp / Liquify tools to warp them intentionally to achieve that "petal" look. But again, send me a pic of the panels in question if you can and I can take a closer look :>
As mentioned previously, an example would help a lot here, but I do know what you're saying that some panels had very thick, varied lineart. Rachel has gone on record on two separate occasions that she used the Gouache Wet Pencil / Wet Round brush from the Kyle Webster Pack. Though the Hard Square Pastel brush can also achieve similar effects. Note that the Wet Round brush is a dual-sizing brush - if you adjust the brush size, you have to also adjust the particle size in tandem, otherwise you'll get a bigger brush size with more scattered/diluted particles. Though this effect IS very helpful for shading!
As mentioned, Rachel has mentioned some of the brushes she's used, and though it's not necessarily relevant to what you're looking for specifically, she's also mentioned these brushes in old FAQ's, specifically the Wet Round brush for lineart.


Here are some examples I whipped up real quick based on some of the panels that specifically depict thick lineart and textured coloring:

Mind you, these are all my best guesses, based on what Rachel has provided and what I've both dug up and been provided by other contributors who have pointed me in the right direction.
Unfortunately, while LO's art style is unique, it also makes it very difficult to reverse-engineer because throughout the comic (esp in S1 when she was still experimenting) while she did clearly have some "favorites" out of the bunch, she also just kind of went off "vibes" a lot of the time, treating every panel as an individual painting. And while that did lend to some of LO's most beautiful panels throughout S1, it also created a lot of whiplash between stylization because after doing one panel with thick lineart and bold texturing, she'd do another with watercolors and softer edges.
That's also not taking into account the software she was using - many of these brushes were designed exclusively with the Photoshop brush engine in mind, not Clip Studio, so they may not work entirely as intended if you use them in Clip Studio or some other non-Photoshop software. We also have to consider other factors like canvas resolution, texture effects added afterwards (such as that canvas overlay), and other adjustable settings within the brushes themselves that Rachel may have tweaked, including the pressure sensitivity, particle size/density, thickness, etc. All of which we can't really truly know, so we can only settle for our closest guess.
This is half the challenge - and fun - of trying to emulate her art style, because even she clearly didn't follow any strict rules 😅 Unfortunately it leaned more towards worse as time went on as it was clear the assistants themselves were given very little guidance or consistency (or at least, didn't have the time to settle on a happy medium) resulting in panels that are even more distinctly out of place as they were being swapped between different artists with different backgrounds and styles.
All that aside, I hope that helps! I do admittedly have to update that brush pack again, I feel like there are a handful of brushes I've found since then that could also be added, but I'd also like to update the included instructions to better reflect what I've learned since then regarding each brush and how they could be used. Ultimately though, they're yours to experiment with! Mess around, adjust the sizes and density and pressure settings, all of these things can contribute to the overall look.
Good luck! <3
82 notes
·
View notes
Text
KotLC Recursive Exchange
Schedule (in CDT)
May 31: Discord server opens. Work nominations open.
June 14: Sign-ups open.
June 25: Work nominations close.
June 28: Sign-ups close.
July 1: Assignments are out.
July 31: Assignments are due.
August 7: Works are revealed, with all creators anonymous.
August 14: Creators are revealed.
August 17: Discord server closes.
What is this event?
This is an exchange where you make fanworks based off of fanworks! Like when someone draws fanart based on their favorite fanfiction. During work nominations, people will nominate the works they want involved in the exchange. You'll then be able to sign up to make fanfiction, fanart, poetry, and/or podfic based on these works.
This one will be a bit trickier to sign up for than our last exchange, but there will be tutorials and people happy to help! And please feel free to join the Discord even if you're not sure you want to participate. There are more resources, like a glossary of terms, there.
Gift Minimums:
Fic: 1000 words, with an ending
Art: A drawing completed to the standard you would normally post as "finished"
Poetry: 150 words OR a sonnet, villanelle, cascade, ghazal, pantoum, rondeau, or sestina
Podfic: Audio of either 1000 words or the complete work, whichever is shorter
Basic Rules for Participating:
You must be 13 or older.
You must join the Discord server and follow all the rules listed there.
You must have an AO3 account, sign up through AO3, and post your gift on AO3.
You must do your best to make a gift that meets the minimum requirements, and that you think your recipient will like, within the time of the event.
You must contact a moderator as soon as possible if you think you will not finish your gift in time.
You must keep your gift and recipient anonymous until creator reveals.
Links:
Discord server invite (accept the rules to see the full server!)
Request an AO3 account
FAQ
How will this event work?
You will sign up by offering and requesting gifts based on specific fanworks. These fanworks will be nominated during the work nominations period, and they will all have to have permission statements from their creators to be eligible.
For example, maybe I really want a story based on bookwyrminspiration's Shattered Upside Down, but about a specific side character. Quil has a permission statement on their AO3 profile saying fanworks are okay (with credit, and without AI). So I could nominate Shattered Upside Down and then request that story!
I can't find a permission statement from a creator. What do I do?
Ask nicely! You could try something like "Hi, I love your [stories/art/etc]! I'm going to be participating in an event where people make fic, art, and other fanworks inspired by KotLC fanworks. Would you be okay with people making fanworks based on your [stories/art/etc]?"
How many fanworks do I need to sign up?
You'll need to request at least three different works, and you'll need to offer at least four different works. At least two requests and three offers can't be based on works made by you.
What if I don't match with anyone?
If no one requests what you offer: We'll give you an opportunity to offer more things. If you do not want to, you will unfortunately not be able to participate in the exchange.
If no one offers what you request: You can still participate. We'll put you up as a pinch hit, meaning people can offer to make a gift for you without being assigned to.
What if no one knows about the work that I want to nominate?
There will be a channel to promote it in the Discord! Tell people all about why they should love it.
What if I don't get a gift?
We won't reveal the works until everyone has a gift. If no one picks up a pinch hit, the exchange will remain closed until someone does. Everyone who participates will receive a gift.
What isn't allowed in the exchange?
For the comfort of the most number of participants: noncon, incest, bestiality, romantic relationships between characters who are canonically adults (over 18) and characters who are canonically minors (under 18), and NSFW are not permitted. AI is also not allowed.
Considering the series, graphic violence and major character death are allowed, but only if the recipient says they're okay with receiving them.
My recipient requested ten things! How many do I have to make?
Only one! You can choose any of your recipient's requests to make, even ones you didn't originally offer.
Can I make more than one gift?
If you have more than one AO3 account, you may sign up multiple times. But please only do this if you're sure you can finish both gifts in time!
You can also be a pinch hitter, filling in for people who drop out, or make "treats"—extra gifts just for fun. But you won't receive extra gifts for either of these things.
51 notes
·
View notes