#HTML tags for input fields
Text
Learn HTML Tags with WebTutor.dev: Your Ultimate Resource for Web Development Tutorials
HTML (Hypertext Markup Language) is the backbone of the web. It is the standard markup language used to create web pages. HTML consists of a series of tags that define the structure and content of a web page. In this blog post, we will dive deeper into HTML tags, what they are, and how they work.

HTML tags are the building blocks of a web page. They are used to define the structure and content of a web page. HTML tags are surrounded by angle brackets (<>) and are written in lowercase. There are two types of HTML tags: opening tags and closing tags. An opening tag is used to start a tag, and a closing tag is used to end it. For example, the opening tag for a paragraph is <p>, and the closing tag is </p>.
HTML tags can also have attributes, which provide additional information about the tag. Attributes are included in the opening tag and are written as name-value pairs. For example, the <img> tag is used to embed an image on a web page. The src attribute is used to specify the URL of the image. The alt attribute is used to provide a description of the image for users who cannot see it.
HTML tags can be used to define headings, paragraphs, links, images, lists, tables, forms, and more. Here are some examples of commonly used HTML tags:
<html>: Defines the document as an HTML document
<head>: Defines the head section of the document, which contains metadata such as the page title and links to external files
<title>: Defines the title of the document, which appears in the browser's title bar
<body>: Defines the body section of the document, which contains the content of the page
<h1> to <h6>: Defines HTML headings of different sizes, with <h1> being the largest and <h6> being the smallest
<p>: Defines a paragraph
<a>: Defines a hyperlink to another web page or a specific location on the same page
<img>: Defines an image to be displayed on the page
<ul> and <ol>: Defines unordered and ordered lists, respectively
<table>: Defines a table
<form>: Defines a form for user input
<br>: Inserts a line break
<hr>: Inserts a horizontal rule
<strong>: Defines text as important or emphasized
<em>: Defines text as emphasized
<blockquote>: Defines a block of quoted text
<cite>: Defines the title of a work, such as a book or movie
<code>: Defines a piece of code
<pre>: Defines preformatted text, which preserves spaces and line breaks
<sup> and <sub>: Defines superscript and subscript text, respectively
<div>: Defines a section of the page for grouping content
<span>: Defines a small section of text within a larger block of text for styling purposes
Learning HTML can seem daunting, but with the right resources, it can be easy and enjoyable. One such resource is WebTutor.dev, an online platform that provides tutorials on web development, including HTML. The tutorials are easy to follow and provide a hands-on learning experience. The platform also offers quizzes to test your knowledge and a community forum to connect with other learners and ask questions.
In conclusion, HTML tags are the building blocks of a web page. They define the structure and content of a web page and can be used to create headings, paragraphs, links, images, lists, tables, forms, and more. If you are interested in learning HTML, check out WebTutor.dev for easy-to-follow tutorials and a supportive community of learners.
#learn code#learn code for free#school of coding#introduction to coding#learn html#learn CSS#learn JavaScript#programming training courses#how to learn coding for free#best way to learn coding#how long does it take to learn coding#HTML tags for headings#HTML tags for paragraphs#HTML tags for images#HTML tags for links#HTML tags for lists#HTML tags for tables#HTML tags for forms#HTML tags for input fields#HTML tags for buttons#HTML tags for divs#HTML tags for spans#HTML tags for anchors#HTML tags for meta data#HTML tags for stylesheets#HTML tags for scripts#HTML tags for iframes#HTML tags for audio#HTML tags for video#HTML tags for semantic markup
2 notes
·
View notes
Text
Let's understand HTML

Cover these topics to complete your HTML journey.
HTML (HyperText Markup Language) is the standard language used to create web pages. Here's a comprehensive list of key topics in HTML:
1. Basics of HTML
Introduction to HTML
HTML Document Structure
HTML Tags and Elements
HTML Attributes
HTML Comments
HTML Doctype
2. HTML Text Formatting
Headings (<h1> to <h6>)
Paragraphs (<p>)
Line Breaks (<br>)
Horizontal Lines (<hr>)
Bold Text (<b>, <strong>)
Italic Text (<i>, <em>)
Underlined Text (<u>)
Superscript (<sup>) and Subscript (<sub>)
3. HTML Links
Hyperlinks (<a>)
Target Attribute
Creating Email Links
4. HTML Lists
Ordered Lists (<ol>)
Unordered Lists (<ul>)
Description Lists (<dl>)
Nesting Lists
5. HTML Tables
Table (<table>)
Table Rows (<tr>)
Table Data (<td>)
Table Headings (<th>)
Table Caption (<caption>)
Merging Cells (rowspan, colspan)
Table Borders and Styling
6. HTML Forms
Form (<form>)
Input Types (<input>)
Text Fields (<input type="text">)
Password Fields (<input type="password">)
Radio Buttons (<input type="radio">)
Checkboxes (<input type="checkbox">)
Drop-down Lists (<select>)
Textarea (<textarea>)
Buttons (<button>, <input type="submit">)
Labels (<label>)
Form Action and Method Attributes
7. HTML Media
Images (<img>)
Image Maps
Audio (<audio>)
Video (<video>)
Embedding Media (<embed>)
Object Element (<object>)
Iframes (<iframe>)
8. HTML Semantic Elements
Header (<header>)
Footer (<footer>)
Article (<article>)
Section (<section>)
Aside (<aside>)
Nav (<nav>)
Main (<main>)
Figure (<figure>), Figcaption (<figcaption>)
9. HTML5 New Elements
Canvas (<canvas>)
SVG (<svg>)
Data Attributes
Output Element (<output>)
Progress (<progress>)
Meter (<meter>)
Details (<details>)
Summary (<summary>)
10. HTML Graphics
Scalable Vector Graphics (SVG)
Canvas
Inline SVG
Path Element
11. HTML APIs
Geolocation API
Drag and Drop API
Web Storage API (localStorage and sessionStorage)
Web Workers
History API
12. HTML Entities
Character Entities
Symbol Entities
13. HTML Meta Information
Meta Tags (<meta>)
Setting Character Set (<meta charset="UTF-8">)
Responsive Web Design Meta Tag
SEO-related Meta Tags
14. HTML Best Practices
Accessibility (ARIA roles and attributes)
Semantic HTML
SEO (Search Engine Optimization) Basics
Mobile-Friendly HTML
15. HTML Integration with CSS and JavaScript
Linking CSS (<link>, <style>)
Adding JavaScript (<script>)
Inline CSS and JavaScript
External CSS and JavaScript Files
16. Advanced HTML Concepts
HTML Templates (<template>)
Custom Data Attributes (data-*)
HTML Imports (Deprecated in favor of JavaScript modules)
Web Components
These topics cover the breadth of HTML and will give you a strong foundation for web development.
Full course link for free: https://shorturl.at/igVyr
2 notes
·
View notes
Text
XSS?
I know Im going to cry my ass off over this as someone who is experienced in cybersecurity field, but XSS attack which FR lately experienced is not something which would breach a database (unless the website is vulnerable to SQL injection) or take the server down.
You may wonder what XSS is? I may explain a few basics before this.
So your browser is capable of executing scripts (javascript) which is behind the webpage effects things like showing the alarm box when you tap or click on the bell, the coliseum rendering and etc, it is sandboxed which means the script cannot access the data outside the same website (like the script in FR webpage cannot access contents like cookies of your Google account).
However since javascript on FR webpage can access your FR cookies (which store your login session), inputs like profile bio, dragon bio, forum posts and titles (whatever that a user can put inputs in) must be sanitized in order to prevent unexpected code from being executed on your browser.
However the developers could miss this sanitizer system on the inputs for any reason (like the code being too old and vulnerable to XSS but devs havent noticed it) which means a suspicious user (lets just say hacker) could craft a javascript code and save it in a FR webpage which doesnt sanitize html tags and therefore if a user visits it, the code will be executed and the cookies will be sent to the hacker.
What could XSS attack access?
If the attack is successful and the hacker has logged into your account, they could access anything that you can normally access when you are logged into your account, the hacker could access your messages on FR, find your email which you use for FR and even impersonate as you. They cannot access or change your FR password because it is not accessible on the browser, they cannot breach a database because XSS does not execute on server side.
Worst scenario? If your browser (and its sandbox) is vulnerable to memory issues then XSS could even execute unexpected codes on your own computer or mobile, which is very rare but still possible.
Why would someone want to hack kids on the haha funny pet site?
Because KIDS (and let's be honest, most of the adult audience) are stupid, they are vulnerable to being manipulated to do or visit something on internet, your data is valuable even if it is on a funny pet site, they target these sites because the audience is mostly kids (in this context, under 18) and most importantly they abuse the belief that pet sites arent a target for hackers.
Cheers and stay safe on internet.
20 notes
·
View notes
Text
Difference Between Web Designer And Web Developer | Types Of Web Designers | Web Designer And Developers Roles
Web Designer: A web designer is the person who makes the website look good. They mostly refer to the website's splendor as well as its usability. Web Designers' primary responsibility is to focus on the style and overall feel of the website using various software such as Photoshop, Corel Draw, and so on to make the website more appealing.
Check Out - Best Website Design And Development Company
There Are Different Types Of Web Designers As Per Their Role:
User Experience (UX) Designer: The term "UX" stands for "User Experience." How a user feels and how his or her needs are met after using the software, automobile, or any other device designed. Simply put, "is the user able to use the product efficiently, as the developer intended?"
User interface (UI) designer: The creation of graphics, illustrations, and the use of photographic artwork and typography to enhance the display and layout of a digital product within its various device views is referred to as user interface (UI) design. Input controls (buttons, drop-down menus, data fields), navigational components (search fields, sliders, icons, tags), and informational components comprise interface elements (progress bars, notifications, message boxes).
Visual Designer: The visual designer's role is to ensure that the finished product looks appealing. They are a cross between user interface designers and graphic designers. Do not mix up a graphic designer and a visual designer.
Web Developer: Web developers are commonly referred to as programmers. They take the web designer's design and turn it into a fully functional website. They use various software and tools such as Javascript, jQuery, Node.js, PHP, ASP.NET Python, and so on. Their primary goal is to create a well-functioning website. Web developers are in charge of working with UX designers, UI designers, and visual designers to create web pages based on the designer's design.

Web Developers Are Classified Into Three Types Based On Their Roles:
Front-End Developer: The part of a website with which the user directly interacts is known as the front end. It is also referred to as the application's 'client-side.' It includes all of the elements that users directly interact with: text colours and styles, images, graphs and tables, buttons, colours, and a navigation menu. Front End development is done with HTML, CSS, and JavaScript. Front End developers are responsible for the structure, design, behaviour, and content of everything seen on the browser screen when websites, web applications, or mobile apps are opened. The Front-End has two main goals: responsiveness and performance. The site's responsiveness must be ensured by the developer.i.e. it appears correctly on devices of all sizes no part of the website should behave abnormally irrespective of the size of the screen.
Back-End Developer: The server-side of the website is referred to as the backend. It stores and organizes data while also ensuring that everything on the client side of the website functions properly. It is the section of the website that you cannot see or interact with. It is the part of the software that does not have direct contact with the users. Users gain indirect access to the parts and characteristics developed by backend designers via a front-end application. The backend also includes activities such as API development, library development, and working with system components without user interfaces or even scientific programming systems.
Full Stack Developer: Full-stack web developers can create complete web applications and websites. They work on the frontend, backend, database, and debugging of web applications or websites.
Know More >>>
#Website Designing & Development Company In Delhi#Website Designing & Development Company#Website Designing & Development Company In India#Website Designing & Development Company In Tilak Nagar#Website Designing Company In Delhi#Website Designing Company#Website Designing Company In India#Website Designing Company In Tilak Nagar#HTML#CSS#Java Script#front end Developers#back end developer#Full Stack developers
4 notes
·
View notes
Text

HTML
HTML Course Content
HTML, or *HyperText Markup Language*, is the standard language used for creating and structuring content on the web. It defines the structure of web pages through the use of elements and tags, which dictate how text, images, links, and other multimedia are displayed in a web browser. HTML provides the foundation for web documents, allowing developers to format content, organize sections, and create interactive features. It consists of a series of elements enclosed in angle brackets, such as <p> for paragraphs, <a> for links, and <img> for images, which together build the content and layout of a webpage.
HTML Contents
HTML (HyperText Markup Language) is the foundation of web pages and web applications. It structures content on the web, defining elements like headings, paragraphs, links, images, and other multimedia. Here’s a breakdown of key HTML contents:
1. *Basic Structure*:
*<!DOCTYPE html>*: Declares the document type and version of HTML.
*<html>*: The root element that encompasses the entire HTML document.
*<head>*: Contains meta-information about the document, such as title, character set, and links to CSS or JavaScript files.
*<body>*: Contains the content that is visible on the web page, including text, images, and interactive elements.
2. *Text Elements*:
*<h1> to <h6>*: Heading tags, with <h1> being the most important.
*<p>*: Paragraph tag for regular text.
*<a>*: Anchor tag for creating hyperlinks.
*<span>* and *<div>*: Generic containers for grouping inline and block content, respectively.
3. *Lists*:
*<ul>*: Unordered list.
*<ol>*: Ordered list.
*<li>*: List item, used within <ul> or <ol>.
4. *Images and Media*:
*<img>*: Embeds images.
*<video>* and *<audio>*: Embeds video and audio files.
*<figure>* and *<figcaption>*: For adding images or media with captions.
5. *Forms*:
*<form>*: Contains form elements for user input.
*<input>*: Various input fields (text, password, checkbox, radio, etc.).
*<textarea>*: For multi-line text input.
*<button>* and *<select>*: Buttons and dropdown menus.
6. *Tables*:
*<table>*: Defines a table.
*<tr>*: Table row.
*<th>*: Table header cell.
*<td>*: Table data cell.
7.*Semantic Elements*:
*<header>, *<footer>**: Defines the header and footer sections.
*<nav>*: Navigation section.
*<article>*: Independent content item.
*<section>*: Thematic grouping of content.
*<aside>*: Sidebar or additional content.
*<main>*: Main content of the document.
8. *Metadata and Links*:
*<meta>*: Provides metadata such as descriptions, keywords, and viewport settings.
*<link>*: Links external resources like CSS files.
*<script>*: Embeds or links JavaScript files.
Importance of HTML
HTML is critically important for several reasons:
1. *Foundation of Web Pages*:
HTML is the core language that structures content on the web. Without HTML, web pages wouldn’t exist as we know them. It organizes text, images, links, and other media into a cohesive and navigable format.
2. *Accessibility*:
Proper use of HTML ensures that web content is accessible to all users, including those with disabilities. Semantic HTML elements provide context to assistive technologies, making it easier for screen readers to interpret the content.
3. *SEO (Search Engine Optimization)*:
Search engines rely on HTML to understand the content of web pages. Properly structured HTML with relevant tags and attributes improves a website’s visibility in search engine results, driving more traffic to the site.
4. *Interoperability*:
HTML is universally supported by all web browsers, ensuring that content can be displayed consistently across different devices and platforms. This cross-compatibility makes HTML the most reliable way to share content on the web.
5. *Foundation for CSS and JavaScript*:
HTML is the backbone that supports styling and interactivity through CSS and JavaScript. It provides the structure that CSS styles and JavaScript enhances, creating dynamic, interactive, and visually appealing web experiences.
6. *Web Standards Compliance*:
HTML is maintained by the World Wide Web Consortium (W3C), which sets standards to ensure the web remains open, accessible, and usable. Following these standards helps developers create web content that is robust and future-proof.
7. *Ease of Learning and Use*:
HTML is relatively simple to learn, making it accessible to beginners and non-programmers. Its simplicity also allows for rapid development and prototyping of web pages.
In summary, HTML is essential because it structures and defines web content, ensuring it is accessible, searchable, and interoperable across various platforms. It is the foundation upon which modern web design and development are built.
0 notes
Text

How To Create A Fully Functional Registration Form Using HTML, CSS And Laravel - Sohojware
In today’s digital age, having a functional and user-friendly registration form is crucial for any website or application. It allows users to create accounts, subscribe to services, or register for events. A well-designed registration form not only enhances the user experience but also helps you gather valuable data.
This comprehensive guide by Sohojware, a leading web development company in Bangladesh, will walk you through the process of creating a fully functional registration form using HTML, CSS, and Laravel. Laravel, a popular PHP framework, provides a robust foundation for building secure and scalable web applications.
What you’ll learn in this guide:
Understanding the components of a registration form
Building the HTML structure for the registration form
Styling the registration form with CSS
Integrating form functionality with Laravel
Components of a Registration Form:
Before diving into the code, let’s understand the common components of a well-designed registration form:
Input fields: These are where users enter their information, such as name, email address, username, and password. There are different types of input fields like text boxes, dropdown menus, and checkboxes, depending on the information you want to collect.
Labels: Labels identify each input field, making the registration form intuitive for users.
Validation: This ensures users enter data in the correct format. For example, email addresses must follow a specific format, and passwords must meet certain length and complexity requirements.
Submit button: This button triggers the form submission process.
Confirmation message: A clear message appears after successful registration, informing users their account has been created.
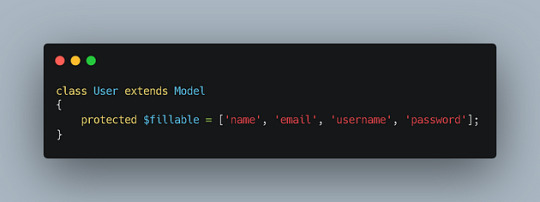
Building the HTML Structure:
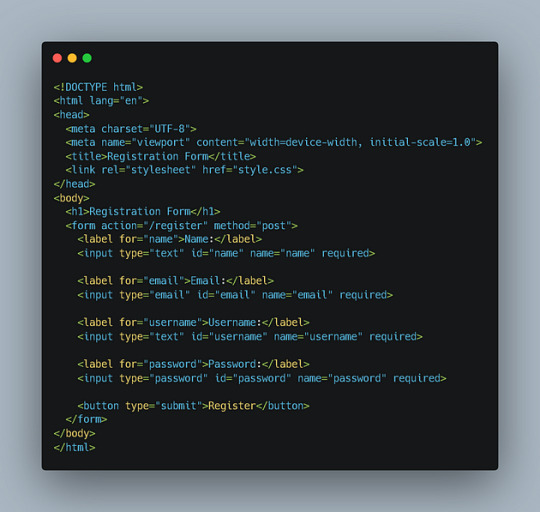
This code defines a basic registration form with input fields for name, email, username, and password. It also includes a submit button. Note that the action attribute in the <form> tag specifies the URL where the form data will be submitted, and the method attribute defines the HTTP method (POST in this case).
Styling the Registration Form with CSS:
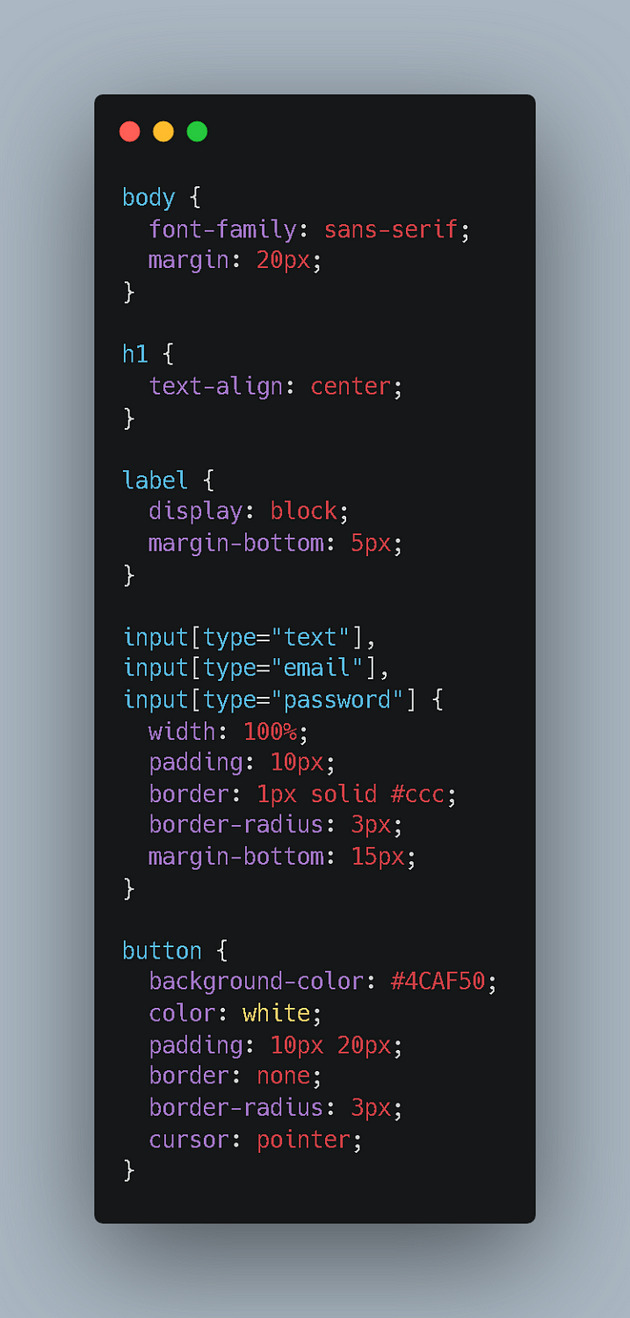
This code styles the form elements, making it visually appealing and user-friendly. You can further customize the styles to match your website’s design.
Integrating Form Functionality with Laravel
To make your registration form functional, you’ll need to integrate it with Laravel’s routing, validation, and database functionalities. Here’s how:
Create a Laravel Route: In your routes/web.php file, define a route to handle the form submission:
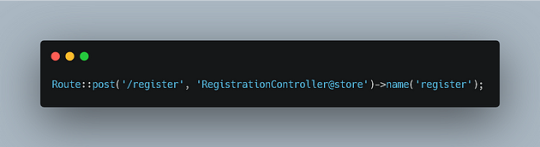
This route specifies that when a POST request is made to the /register URL, the store method in the RegistrationController class will be called.
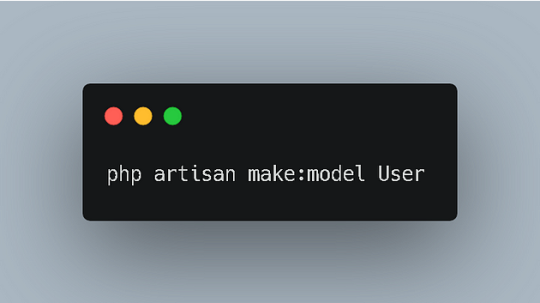
Create a Controller: Generate a new controller using the Artisan CLI command:

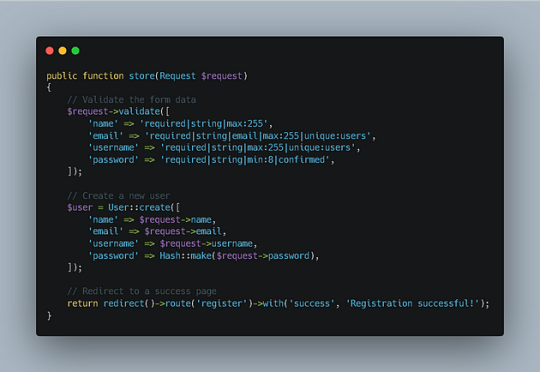
This code first validates the form data using Laravel’s validation rules. If the validation passes, it creates a new user record in your database using the User model. Finally, it redirects the user to a success page with a confirmation message.
Configure Database: Make sure your database connection is configured in your .env file.
Additional Considerations:
Security: Implement proper security measures to protect user data, such as hashing passwords and using secure encryption techniques.
Error Handling: Provide informative error messages to users if their form data is invalid.
Email Verification: Consider sending a verification email to users after registration to confirm their account.
Customization: Customize the registration form to match your website’s design and branding.
By following these steps, you can create a fully functional registration form using HTML, CSS, and Laravel, providing a seamless user experience for your website or application.
1 note
·
View note
Text
HTML Forms

HTML forms are used to collect user input and send it to a server for processing. Forms are essential in web development for tasks like user registration, login, surveys, and more. Here’s a guide to understanding and creating HTML forms.
1. Basic Structure of an HTML Form
An HTML form is created using the <form> element, which contains various input elements like text fields, checkboxes, radio buttons, and submit buttons.<form action="/submit-form" method="post">
<!-- Form elements go here -->
</form>
action: Specifies the URL where the form data will be sent.
method: Defines how the form data will be sent. Common values are GET (data sent in the URL) and POST (data sent in the request body).
2. Text Input Fields
Text input fields allow users to enter text. They are created using the <input> tag with type="text".<form action="/submit-form" method="post">
<label for="name">Name:</label>
<input type="text" id="name" name="name">
<label for="email">Email:</label>
<input type="email" id="email" name="email">
<input type="submit" value="Submit">
</form>
<label>: Associates a text label with a form control, improving accessibility.
type="text": Creates a single-line text input field.
type="email": Creates a text input field that expects an email address.
3. Password Field
A password field masks the input with dots or asterisks for security.<label for="password">Password:</label>
<input type="password" id="password" name="password">
4. Radio Buttons
Radio buttons allow users to select one option from a set.<p>Gender:</p>
<label for="male">Male</label>
<input type="radio" id="male" name="gender" value="male">
<label for="female">Female</label>
<input type="radio" id="female" name="gender" value="female">
type="radio": Creates a radio button. All radio buttons with the same name attribute are grouped together.
5. Checkboxes
Checkboxes allow users to select one or more options.<p>Hobbies:</p>
<label for="reading">Reading</label>
<input type="checkbox" id="reading" name="hobbies" value="reading">
<label for="traveling">Traveling</label>
<input type="checkbox" id="traveling" name="hobbies" value="traveling">
type="checkbox": Creates a checkbox.
6. Dropdown Lists
Dropdown lists (select boxes) allow users to select one option from a dropdown menu.<label for="country">Country:</label>
<select id="country" name="country">
<option value="bd">Bangladesh</option>
<option value="us">United States</option>
<option value="uk">United Kingdom</option>
</select>
<select>: Creates a dropdown list.
<option>: Defines the options within the dropdown list.
7. Text Area
A text area allows users to enter multi-line text.<label for="message">Message:</label>
<textarea id="message" name="message" rows="4" cols="50"></textarea>
<textarea>: Creates a multi-line text input field. The rows and cols attributes define the visible size.
8. Submit Button
A submit button sends the form data to the server.<input type="submit" value="Submit">
type="submit": Creates a submit button that sends the form data to the server specified in the action attribute of the form.
9. Reset Button
A reset button clears all the form inputs, resetting them to their default values.<input type="reset" value="Reset">
type="reset": Creates a button that resets the form fields to their initial values.
10. Hidden Fields
Hidden fields store data that users cannot see or modify. They are often used to pass additional information when the form is submitted.<input type="hidden" name="userID" value="12345">
11. File Upload
File upload fields allow users to select a file from their computer to be uploaded to the server.<label for="file">Upload a file:</label>
<input type="file" id="file" name="file">
type="file": Creates a file upload input.
12. Form Validation
HTML5 introduces several form validation features, like the required attribute, which forces users to fill out a field before submitting the form.<label for="username">Username:</label>
<input type="text" id="username" name="username" required>
required: Ensures the field must be filled out before the form can be submitted.
13. Grouping Form Elements
Fieldsets and legends can be used to group related form elements together.<fieldset>
<legend>Personal Information</legend>
<label for="fname">First Name:</label>
<input type="text" id="fname" name="fname">
<label for="lname">Last Name:</label>
<input type="text" id="lname" name="lname">
</fieldset>
<fieldset>: Groups related elements together.
<legend>: Provides a caption for the group of elements.
14. Form Action and Method
action: Specifies the URL where the form data should be sent.
method: Specifies how the data is sent. Common methods are GET and POST.
<form action="/submit" method="post">
<!-- Form elements here -->
</form>
Key Takeaways
Forms are a crucial part of web development for gathering user input.
HTML provides a wide range of input types and elements to create various kinds of forms.
Properly labeling and grouping form elements enhances accessibility and usability.
Form validation helps ensure that the data submitted by users meets certain criteria before being sent to the server.
With these basics, you can start building functional forms for collecting data on your website!
Read More…
0 notes
Text
Mastering Web Testing: Unlocking the Potential of Selenium WebElement
In the world of web automation, web elements are the building blocks of every web page. They are the buttons we click, the fields we fill, and the text we read. Mastering the art of interacting with these elements is the key to unlocking the power of automation and conquering repetitive web tasks. So, get ready to dive deep into the exciting world of web elements and their methods! For those eager to excel in Selenium, exploring a Selenium course in Pune could be invaluable. Enrolling in such a program presents a unique chance to gain comprehensive knowledge and hands-on skills crucial for mastering Selenium.

What Is a WebElement?
A WebElement in Selenium is anything that is present on the web page, such as a text box, button, or link. It represents an HTML element and is used by Selenium WebDriver to interact with the web page.
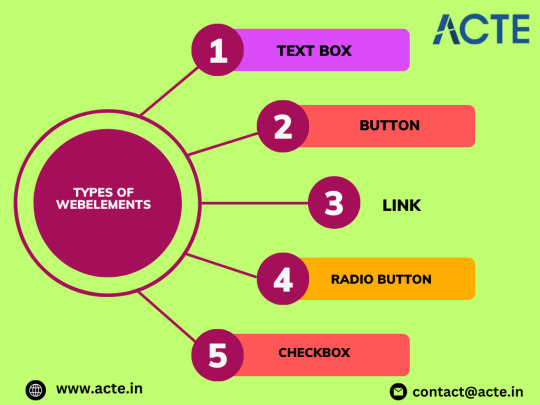
Types of WebElements
WebElements in Selenium can be divided into different types, namely:
1. Text Box: An input field where you can enter text.
2. Button: A clickable element that performs an action.
3. Link: A clickable element that navigates to another page.
4. Radio Button: A type of button that can be selected or deselected.
5. Checkbox: A type of button that can be selected or deselected.
Operations Performed on Web Element
These are the operations that are performed on the WebElement:
1. sendKeys(): Allows the user to type content automatically into an editable field.
2. click(): Used to click on the web element present on the web page.
3. isDisplayed(): Verifies if an element is present and displayed.
4. isEnabled(): Verifies if an element is enabled.
5. isSelected(): Verifies if an element is selected.
6. getLocation(): Returns the location of the element.
7. getSize(): Returns the size of the element.
8. clear(): Clears the value of an editable field. Enrolling in a top-rated Selenium Online Training can unleash the full power of Selenium, offering individuals a deeper understanding of its intricacies.
Locating Web Element
In order to identify WebElements accurately and precisely, Selenium makes use of different types of locators, namely:
1. ID: Uses the unique ID of the element.
2. Name: Uses the name of the element.
3. Class: Uses the class name of the element.
4. XPath: Uses the XPath expression to locate the element.
5. Tag Name: Uses the tag name of the element.
6. Link Text: Uses the text of the link to locate the element.
7. CSS Selectors: Uses CSS selectors to locate the element.
Conclusion
In this blog, we have covered the basics of WebElements in Selenium, including their types, operations, and locators. By mastering the art of interacting with these elements, you can create robust automation scripts that contribute to delivering high-quality software products.
0 notes
Text
web development,
web development,
In today's digitally-driven world, having a strong online presence is crucial for businesses, organizations, and individuals alike. And at the heart of any successful online venture lies web development. Whether you're looking to create a personal blog, launch an e-commerce store, or develop a corporate website, understanding the fundamentals of web development is essential.
What is Web Development?
Web development refers to the process of building, creating, and maintaining websites and web applications. It encompasses a variety of tasks, including web design, content creation, server-side scripting, client-side scripting, and network security configuration.
Key Components of Web Development:
Frontend Development: Frontend development involves creating the visible parts of a website or web application that users interact with directly. This includes designing the layout, implementing navigation menus, and ensuring responsive design for various devices.
Backend Development: Backend development focuses on the server-side logic of a website or web application. It involves managing databases, processing user input, and handling requests from the frontend.
Full-Stack Development: Full-stack developers are proficient in both frontend and backend development. They have the skills to handle all aspects of web development, from designing user interfaces to managing server infrastructure.
Technologies and Tools:
HTML (Hypertext Markup Language): HTML is the standard markup language used to create the structure of web pages.
CSS (Cascading Style Sheets): CSS is used to style the appearance of HTML elements, including layout, colors, and fonts.
JavaScript: JavaScript is a programming language used to add interactivity and dynamic behavior to web pages.
Backend Frameworks: Popular backend frameworks include Node.js, Django, Ruby on Rails, and Laravel, which streamline the process of building server-side logic.
Databases: Databases such as MySQL, PostgreSQL, MongoDB, and SQLite are used to store and manage data for web applications.
Version Control Systems: Version control systems like Git enable developers to track changes to their codebase, collaborate with team members, and revert to previous versions if needed.
Best Practices in Web Development:
Responsive Design: Ensure that your website is accessible and user-friendly across various devices, including desktops, laptops, tablets, and smartphones.
Optimized Performance: Optimize your website's performance by minimizing file sizes, leveraging caching techniques, and optimizing images and multimedia content.
Security: Implement security best practices to protect your website from common threats such as SQL injection, cross-site scripting (XSS), and cross-site request forgery (CSRF).
SEO (Search Engine Optimization): Optimize your website for search engines by using relevant keywords, creating high-quality content, and optimizing meta tags and descriptions.
Accessibility: Ensure that your website is accessible to users with disabilities by following web accessibility standards such as the Web Content Accessibility Guidelines (WCAG).
Conclusion:
Web development is a multifaceted discipline that encompasses various technologies, tools, and best practices. By understanding the fundamentals of web development and following best practices, you can build robust, user-friendly websites and web applications that effectively meet the needs of your audience. Whether you're a beginner or an experienced developer, continuous learning and staying updated with the latest trends and technologies are essential for success in the dynamic field of web development.
0 notes
Text
HTML 101: The Ultimate Beginner's Guide to Writing, Learning & Using HTML

HTML serves as the backbone of every web page, allowing us to structure content with paragraphs, headings, images, links, forms, and more. If you're eager to delve into web development or explore the world of coding, mastering HTML is a fantastic starting point.
Join us on webtutor.dev as we unveil the ultimate guide to HTML for beginners. In this comprehensive tutorial, we'll demystify HTML, explore its diverse applications, and equip you with the skills to write your own HTML code. From essential elements to crucial attributes, we'll cover it all.
Get ready to embark on your HTML journey with webtutor.dev – your go-to resource for empowering web development education. Let us dive in and unlock the potential of HTML together.
Join us now on webtutor.dev!
What is HTML?
First published by Tim Berners-Lee in 1989, HTML is now used by 94% of all websites, and probably all the ones you visit. But what is it, exactly?
HTML, short for HyperText Markup Language, is the backbone of the web. It is a markup language that structures the content of web pages. HTML utilizes tags to define the elements and their attributes, such as headings, paragraphs, images, links, lists, forms, and more. These tags instruct web browsers on how to display and render the content to users. With HTML, developers can create interactive and visually appealing web pages. It plays a vital role in creating a seamless browsing experience by allowing users to navigate through hyperlinks and access information across different websites. HTML is the foundation upon which websites are built, providing the structure and organization for displaying text, multimedia, and interactive elements. By learning HTML, individuals can gain the skills to create and customize web pages, making their mark in the digital landscape.
Is HTML a programming language?
No, HTML (Hypertext Markup Language) is not considered a programming language. It is a markup language used for structuring the content and presenting information on web pages. HTML provides a set of tags that define the structure and semantics of the content, such as headings, paragraphs, links, images, and more.
While HTML is essential for web development, it primarily focuses on the presentation and organization of data rather than the logic and functionality found in programming languages. To add interactivity and dynamic behavior to web pages, programming languages like JavaScript are commonly used in conjunction with HTML.
What is HTML Used for?
HTML (Hypertext Markup Language) is used for creating and structuring the content of web pages. It provides a set of tags that define the elements and their layout within a web page. Here are some of the key uses of HTML:
Web page structure: HTML is used to define the structure of a web page, including headings, paragraphs, lists, tables, forms, and other elements. It allows you to organize and present content in a hierarchical manner.
Text formatting: HTML provides tags for formatting text, such as bold, italic, underline, headings of different levels, and more. These tags help in emphasizing and styling specific parts of the content.
HTML Hyperlinks: HTML enables the creation of hyperlinks, allowing you to connect different web pages together or link to external resources. Links are defined using the <a> tag and provide navigation within a website or to other websites.
Images and media: HTML allows you to embed images, videos, audio files, and other media elements into web pages. It provides tags like <img>, <video>, and <audio> for adding visual and multimedia content.
Forms and user input: HTML provides form elements, such as text fields, checkboxes, radio buttons, dropdown menus, and buttons, allowing users to enter and submit data. Form data can be processed using server-side technologies.
Semantic markup: HTML includes semantic elements that provide meaning and structure to the content. Examples of semantic elements are <header>, <nav>, <article>, <section>, <footer>, which help define the purpose and role of specific parts of a web page.
Accessibility: HTML supports accessibility features, such as providing alternative text for images, using proper heading structure, using semantic elements, and other attributes that make web content more accessible to users with disabilities.
Overall, HTML serves as the foundation of web development, providing the structure and presentation of content on the World Wide Web. It is often complemented by other technologies like CSS (Cascading Style Sheets) for styling and JavaScript for interactivity and dynamic behavior.
How to Write HTML?
<!DOCTYPE html><html><head><title>My Page</title></head><body><h1>Hello, World!</h1></body></html>
Explanation:
<!DOCTYPE html>: Specifies the HTML version.
<html>: Opening tag for the HTML document.
<head>: Contains metadata about the page.
<title>: Sets the title of the page displayed in the browser's title bar or tab.
<body>: Contains the visible content of the page.
<h1>: Defines a heading level 1.
Hello, World!: The actual content to be displayed.
Please note that this example is a very basic HTML structure, and for more complex pages, additional tags and attributes would be required.
How to Create an HTML File
To create an HTML file, you can follow these steps:
Open a text editor: Open a text editor of your choice, such as Notepad (Windows), TextEdit (Mac), Sublime Text, Visual Studio Code, or any other editor that allows you to create plain text files.
Start with the HTML doctype: At the beginning of your file, add the HTML doctype declaration, which tells the browser that the file is an HTML document. Use the following line:
<!DOCTYPE html>
Create the HTML structure: After the doctype declaration, add the opening and closing <html> tags to enclose the entire HTML document.
Add the head section: Inside the <html> tags, include the <head> section. This is where you define metadata and include any external resources like stylesheets or scripts. For now, let's add a <title> element to set the title of your page:
<head>
<title>My First HTML Page</title>
</head>
Create the body: Within the <html> tags, include the <body> section. This is where you place the visible content of your web page. You can add various HTML tags here to structure and format your content. For example, let's add a heading and a paragraph:
<body>
<h1>Welcome to My Page</h1>
<p>This is my first HTML file.</p>
</body>
Save the file: Save the file with an .html extension, such as myfile.html. Choose a suitable location on your computer to save the file.
Open the HTML file in a browser: Double-click on the HTML file you just saved. It will open in your default web browser, and you will see the content displayed according to the HTML tags you added.
Congratulations! You have created an HTML file. You can now edit the file in your text editor, add more HTML elements, styles, scripts, and save the changes to see them reflected in the browser.
Common HTML Attributes
<input type="text" name="username" placeholder="Enter your username" required>
<img src="image.jpg" alt="Image description">
<a href="https://example.com" target="_blank">Link to Example</a>
<div id="container" class="box">
<button onclick="myFunction()">Click me</button>
<table border="1">
<form action="submit.php" method="POST">
<select name="color">
<option value="red">Red</option>
<option value="blue">Blue</option>
</select>
Explanation:
<input>: Attributes like type define the input type (text, checkbox, etc.), name sets the input's name for form submission, placeholder provides a hint to the user, and required specifies that the input is mandatory.
<img>: src specifies the image source URL, and alt provides alternative text for the image (useful for accessibility).
<a>: href sets the hyperlink URL, and target="_blank" opens the link in a new tab or window.
<div>: id assigns an identifier to the element, and class adds a CSS class for styling or JavaScript targeting.
<button>: onclick triggers a JavaScript function when the button is clicked.
<table>: border adds a border to the table.
<form>: action specifies the form submission URL, and method sets the HTTP method (GET or POST).
<select>: name assigns the name for the selection input, and <option> defines the selectable options within the dropdown menu.
These are just a few examples, and there are many more HTML attributes available for different elements, each serving specific purposes.
#learn to code for free#coding course online#Online Web Tutorial#learn coding for free#online tutorial#learn code#learn code for free#introduction to coding#learn html#programming training courses#best way to learn coding#how long does it take to learn coding#learn coding for beginners#best online platform for learning coding#best place to learn to code online
4 notes
·
View notes
Text


THEME 10: Washi (3)
Inspired by a washi tape-decorated journal spread created by a friend.
Static previews: index page, permalink | Code
Features:
Decorate 4 tapes using solid colors or images! Choose where and how the images are displayed—tiled across the theme, or as singular accents
Header image and "sticker" images, plus an extra subtitle and customizable text labels
Appearance options: Customizable post width, multiple font display options, and a variety of color options, including an (optional) color palette toggle
Tag filtering plugin by glenthemes—edit directly from the Customize menu, no HTML required (see below the cut for usage notes)
Unlimited custom links
Responsive
Supports new post types/pinned posts
And more!
For help, check my theme guide, or feel free to send me an ask. Theme credits and tag filtering guide are under the cut.
Tag filtering
In the Customize menu, scroll down until you find the text input field labelled "Filtered tags". By default, this is set to "spoiler, spoilers" (without the quotation marks). In this list, you can enter whatever tags you want to filter exactly as you'd write them in the Tumblr post editor, without the hashtag. Separate each new tag with a comma and a space.
For example, if I wanted to filter the tag #politics, i would simply write "politics". If I also wanted to filter #red and #green, I would now write "politics, red, green". Note that the last tag does not have a comma after it, and that spaces must be included!
Credits
Layout inspired by stuffandsundry, with permission
Style My Tooltips by malihu
Phosphor Icons
Custom like buttons by Demirev
NPF photosets plugin by codematurgy
Palette toggle by eggdesign
Custom audio posts by annasthms
Tag filtering by glenthemes
Scroll to top script by Fabian Lins
Images used in the preview:
Dark mode: Avatar, header, sticker, red (tape 1), orange (tape 2), pink (tape 3), magenta (accent tape)
Light mode: Avatar, sticker, green (tape 1), turquoise (tape 2), teal (tape 3), blue (accent tape)
#code#theme#theme 10#series: washi#coding cabin#theme hunter#free#custom width#sidebar#nav text#pagination#unlimited links#header img#custom font size#tfont#gfont#unnested#responsive#npf#color mode#search#rblk buttons#timestamps#tags
81 notes
·
View notes
Text
The Web Content Accessibility Guidelines (WCAG) outline several key principles and criteria to ensure that web content is accessible to people with disabilities. Some common accessibility issues addressed by WCAG include: 1. **Non-Text Content**: Images, videos, and other non-text content should have alternative text (alt text) to describe their content or function. This helps people who use screen readers or those who have images disabled. 2. **Keyboard Accessibility**: All functionality should be operable through a keyboard interface alone, without requiring specific timings for individual keystrokes. 3. **Color Contrast**: Ensure that text and images of text have sufficient contrast against their background to be readable by people with low vision or color vision deficiencies. 4. **Headings and Structure**: Use proper HTML heading tags (h1, h2, h3, etc.) to create a logical structure for your content. Screen readers and other assistive technologies use these to navigate content. 5. **Forms and Input Fields**: Ensure that all form elements have associated labels or instructions. Provide clear error messages and suggestions for correction. 6. **Navigation and Links**: Make sure that navigation menus and links are easily identifiable and usable. Avoid using ambiguous link text like "click here" and ensure link text describes the target of the link. 7. **Audio and Video**: Provide captions and transcripts for multimedia content to make it accessible to people who are deaf or hard of hearing. 8. **Resize Text**: Ensure that users can resize text without it becoming obscured or causing layout issues. 9. **Page Titles and Language**: Use descriptive page titles and indicate the language of the content to assist users and assistive technologies in understanding the content. 10. **Focus Indication**: Ensure that there is a visible indication of keyboard focus for interactive elements, such as links and form fields, to assist users who navigate with keyboards. These are just a few examples of the many guidelines outlined in the WCAG. Adhering to these standards helps ensure that websites are accessible to a wider range of users, including those with disabilities.
0 notes
Text
HTML Interview Questions

Are you gearing up for an HTML interview and seeking valuable insights? Look no further! This article provides a concise yet comprehensive overview of essential HTML concepts, offering guidance to help you ace your upcoming interview.
Understanding HTML Basics: The Foundation of Web Development
HTML, or HyperText Markup Language, serves as the cornerstone of web development. It is utilized to craft web pages and applications, forming the backbone of the internet. As you prepare for your interview, familiarize yourself with the fundamental structure of an HTML document, comprising the document head and body. The head holds crucial information such as title, meta tags, and scripts, while the body encapsulates visible content like text and images.
HTML documents consist of elements identified by tags, encompassing opening and closing tags or self-closing tags. Tags, along with attributes, define the appearance and behavior of elements. Nesting elements within one another allows for the creation of intricate structures effortlessly.
Key HTML Concepts: Dive Deeper for Interview Success
Attributes and Usage: Attributes provide additional details about HTML elements, such as size or color. Understanding how to use attributes is crucial, especially in elements like links () where the "href" attribute determines the destination URL.
Comments in HTML: HTML comments offer developers a means to provide insights without displaying information on the webpage. Employing encapsulates comments, aiding in code comprehension and error reduction.
Common Lists in Web Design: Various lists play pivotal roles in web design, including navigation menu lists, header lists, footer lists, form fields lists, article lists, images and media lists, and typical content area lists. Mastery of these ensures organized and user-friendly webpages.
Text Section Separation Tags: HTML tags such as , -, , , , and aid in segmenting text sections. Utilizing attributes like id or class further refines text formatting, while CSS and JavaScript enhance customization.
Alternative Text for Images: Alt-text in HTML provides concise image descriptions, enhancing accessibility for visually impaired users and aiding search engines in proper indexing. It serves as a textual alternative in case images cannot be displayed.
URL Encoding in HTML: Encoding URLs in HTML ensures correct display, prevents cross-site scripting attacks, and aids search engine interpretation. It contributes to improved website visibility and security.
Collapsing White Space: Collapsing white space in HTML streamlines code, fostering concise and efficient development. It eliminates unnecessary spaces, enhances readability, and contributes to faster webpage loading.
Border and Rule Attributes: Both border and rule attributes define borders around HTML elements, with 'border' serving as shorthand for various properties. Understanding their interplay is essential for crafting visually appealing elements.
List Element Organization: Employing CSS styling, HTML tags ( and ), and style classes aids in keeping list elements organized within an HTML file. This ensures a structured and visually pleasing document.
Creating Hyperlinks: Crafting hyperlinks involves utilizing the tag with the "href" attribute to specify the linked page's destination. Optional attributes like "target" can control how the link opens.
Text Field Size Limits: Text field size limits in HTML depend on the programming language and framework. HTML5-compatible browsers typically support a vast character limit, but reasonable constraints are advisable for user-friendly interactions.
HTML5 Form Elements: HTML5 introduces new form elements, including , , , , , range input, color picker control, and date/time inputs. Familiarity with these enhances form functionality and user experience.
CSS Integration in HTML: HTML supports three types of CSS integration: internal, external, and inline. Each method offers distinct advantages, allowing developers to tailor styling to specific needs while maintaining code organization.
JavaScript Application in HTML: Integrating JavaScript into HTML involves using the tag to add scripts, either inline or through external files. JavaScript enhances webpage interactivity, form validation, and dynamic content.
Navigating HTML Challenges: Overcoming Common Hurdles
As you delve into HTML, anticipate challenges like invalid syntax, poor layout, and cross-browser compatibility issues. Validating syntax, ensuring an appealing layout, and testing across browsers are crucial steps in delivering a seamless web experience.
Conclusion: Elevate Your HTML Interview Preparedness
Preparing for an HTML interview requires a multifaceted approach. Delve into coding, design, problem-solving, and industry-specific questions. Recognize the nuances between frontend and backend roles and understand the demands of junior, midlevel, and senior positions. Stay informed about relevant technologies and coding languages, and practice mock interviews to enhance your confidence and response time.
Remember, meticulous research and preparation significantly increase your chances of success in an HTML interview. Engage with experienced individuals, both as interviewees and interviewers, to gain valuable insights. Your commitment to due diligence will establish credibility throughout the interview process. Best of luck!
If you want to know more Scaler Academy Reviews or courses then do visit - analyticsjobs
#analytics jobs#HTML Interview Questions#html#career opportunities#html css#php#programming#data science
0 notes
Text
A Fun Guide to Three.js 3D Web Magic

Ever imagined bringing a splash of 3D wonder to your web pages? Well, you’re about to embark on an exciting journey into the realm of Three.js! In this guide, we’re not just going to explore the magic it holds, but we’re going to have some hands-on fun with its most dazzling features. And rest assured, we’re going to keep it as interactive and enjoyable as a carnival ride!
So, are you ready to kickstart this adventure into the vibrant world of Three.js?
What is Three.js?
Three.js is a JavaScript library that makes it easy to create 3D graphics on the web. Whether you’re building games, visualizations, or interactive experiences, Three.js is your ticket to the third dimension. Let’s embark on this journey!
Cool Features of Three.js
1. Cross-Platform Compatibility
One of the standout features of Three.js is its seamless compatibility with various web browsers. Whether your audience is using Chrome, Firefox, Safari, or Edge, Three.js ensures a consistent and captivating 3D experience across platforms.
2. Abundance of Geometry and Materials
With Three.js, you have access to a rich library of predefined geometries (like cubes, spheres, and planes) and materials (including basic, Lambert, Phong, and more). This makes it easy to create intricate 3D scenes with minimal effort.
3. Lighting and Shadows
Creating realistic lighting and shadows is a breeze with Three.js. To add depth and realism to your scenes, you can experiment with various light sources like ambient, directional, point, and spotlights.
4. Animation and Interactivity
Three.js empowers you to bring your creations to life with animations and interactivity. You can animate objects, control camera movements, and respond to user input to craft dynamic and engaging experiences.
5. Post-Processing Effects
Elevate your visuals with post-processing effects like bloom, depth of field, and vignette. These effects add a layer of polish and professionalism to your 3D scenes.
Getting Started with Three.js
Now, let’s walk through a basic tutorial by making a spinning 3D moon to kickstart your journey with Three.js.
Before starting you can view the live demo here!
Step 1: Setting Up Your Environment
Section Breakdown:
Document Type Declaration:
<!DOCTYPE html> declares the document type and version (HTML5 in this case).
2. HTML Root Element:
<html> tags define the root of the HTML document.
3. Head Section:
<head> contains meta-information about the document and external resources like stylesheets and scripts.
4. Character Encoding and Viewport:
<meta charset="UTF-8"> sets the character encoding to UTF-8 for proper text display.
<meta name="viewport" content="width=device-width, initial-scale=1.0"> ensures proper scaling on different devices.
5. Page Title:
<title> sets the title displayed in the browser tab.
6. Internal CSS:
<style> contains CSS rules. In this case, it removes any default margin from the body.
Step 2: JavaScript Section
Section Breakdown:
Loading Three.js Library:
<script src="https://threejs.org/build/three.min.js"></script> loads the Three.js library from an external source.
Script Tags:
<script> tags are used to embed JavaScript code within the HTML document.
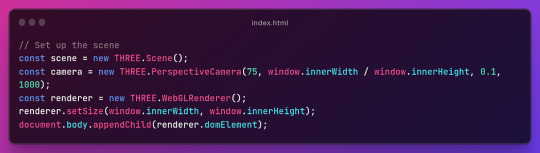
Step 3: Setting up the Scene and Camera
Section Breakdown:
1.Creating a Scene:
const scene = new THREE.Scene(); creates a new 3D scene.
2. Setting up the Camera:
const camera = new THREE.PerspectiveCamera(75, window.innerWidth / window.innerHeight, 0.1, 1000); sets up a perspective camera with specified parameters (field of view, aspect ratio, near and far clipping planes).
3. Initializing the Renderer:
const renderer = new THREE.WebGLRenderer(); creates a WebGL renderer.
4. Setting Renderer Size and Appending to DOM:
renderer.setSize(window.innerWidth, window.innerHeight); sets the size of the renderer to match the window.
document.body.appendChild(renderer.domElement); appends the renderer’s canvas element to the document body.
Step 4: Creating a Sphere and Adding Moon Texture
Section Breakdown:
1.Creating a Sphere:
const geometry = new THREE.SphereGeometry(5, 32, 32); creates a sphere geometry with specified radius and segments.
2.Loading a Texture:
const textureLoader = new THREE.TextureLoader(); creates a texture loader.
const texture = textureLoader.load('path_to_your_image.jpg'); loads an image texture.
3.Applying Texture to the Sphere:
const material = new THREE.MeshBasicMaterial({ map: texture }); creates a material using the loaded texture.
const sphere = new THREE.Mesh(geometry, material); creates a mesh using the sphere geometry and applied material.
scene.add(sphere); adds the sphere to the scene.
Step 5:Animating the Moon
Section Breakdown:
1. Animation Loop:
function animate() { ... } defines an animation loop using a recursive requestAnimationFrame call.
2.Sphere Rotation:
sphere.rotation.y += 0.01; incrementally rotates the sphere around the y-axis. Adjust the value for different rotation speeds.
3.Rendering the Scene:
renderer.render(scene, camera); renders the scene using the defined camera.
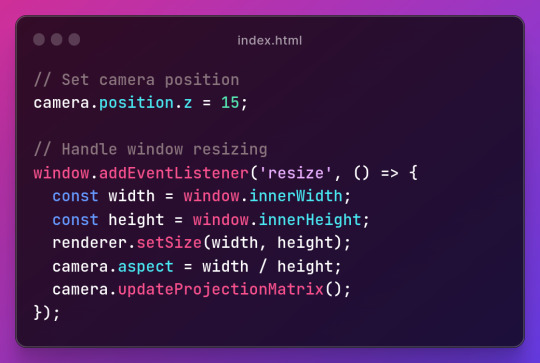
Step 6: Setting Camera Position and Handling Window Resizing
Section Breakdown:
1.Setting Camera Position:
camera.position.z = 15; sets the camera’s position along the z-axis.
2.Handling Window Resizing:
window.addEventListener('resize', () => { ... }); adds an event listener for window resizing.
3.Inside the event handler:
const width = window.innerWidth; and const height = window.innerHeight; retrieve the new window dimensions.
renderer.setSize(width, height); updates the renderer’s size.
camera.aspect = width / height; adjusts the camera’s aspect ratio.
camera.updateProjectionMatrix(); updates the camera’s projection matrix.
Conclusion
And there you have it! You’ve just created a basic 3D scene using Three.js. Customize it further by tweaking textures and rotations. Integrate it into your projects for added charm. Access the full source code here.
In the next part, we will learn to add key, mouse, and touch controls. Happy coding!😃

0 notes
Text
How much to value in HTML in your knowledge?
HTML
1. Define Your Audience
Determine whether your course is for beginners, intermediate learners, or advanced developers.
Tailor the content and teaching style to the knowledge level of your audience.
2. Outline the Course Structure
Introduction to HTML
What is HTML and why it's important?
Basic structure of an HTML document.
HTML Elements and Tags
Headings, paragraphs, links, images, lists.
Attributes and Formatting
Common attributes (id, class, style, etc.).
Text formatting (bold, italic, underline).
Creating Forms
Input types, labels, buttons, form handling.
Tables and Semantic HTML
How to create and style tables.
Importance of semantic HTML tags (header, footer, article, etc.).
Multimedia Integration
Embedding videos, audio, and using the canvas tag.
Responsive Web Design Basics
Introduction to media queries and responsive layouts.
3. Hands-On Projects
Include practical assignments, like creating a basic webpage, a portfolio site, or a simple form.
Encourage students to apply what they’ve learned by building their own projects.
4. Supplemental Materials
Provide downloadable resources like cheat sheets, example code, and template files.
Share links to further reading or tools like HTML validators and editors.
5. Interactive Elements
Use quizzes, interactive coding exercises, and peer reviews to engage learners.
Consider incorporating videos or live coding sessions to explain concepts visually.
6. Assessment and Feedback
Design assessments at the end of each module to test comprehension.
Offer feedback on projects and assignments, or create a peer-review system.
7. Regular Updates
HTML and web standards evolve, so regularly update your course content to reflect best practices.
Stay informed about changes in the field and incorporate new trends or tools.
8. Community and Support
Create a forum or group where students can ask questions, share projects, and collaborate.
Offer support through Q&A sessions, live chats, or a dedicated helpdesk.
9. Certification
Provide a certificate of completion or a badge to encourage students to complete the course.
10. Promotion and Feedback
Promote your course through relevant channels, such as social media, blogs, or coding communities.
Gather feedback from students to continually improve the course.
By following these steps, you'll be able to create a comprehensive and valuable HTML course that helps learners build solid foundational skills in web development.
1 note
·
View note
Text
HTML Full Course: A Comprehensive Tutorial to Build Your Website

Introduction
Welcome to our HTML Full Course, where we will take you on an exciting journey to master the fundamentals of HTML (Hypertext Markup Language) and build your own website from scratch. Whether you are a complete beginner or someone looking to refresh their HTML skills, this course is designed to provide you with a solid foundation in web development. Let's dive in and learn HTML from the ground up!
Why Learn HTML?
HTML is the backbone of every website on the internet. It is the standard markup language used to create web pages and provide structure to the content they display. By learning HTML, you gain the ability to create and design web pages, understand how web content is organized, and set the groundwork for learning other web development technologies.
Prerequisites
No prior programming knowledge is required to embark on this HTML Full Course. All you need is a computer, a text editor, and the willingness to learn and experiment with HTML.
Course Outline
1. Getting Started with HTML
Understanding the basics of HTML and its role in web development.
Setting up your development environment with a text editor and web browser.
Creating your first HTML document and understanding the structure of an HTML page.
2. HTML Elements and Tags
Learning about HTML elements and tags, such as headings, paragraphs, lists, and links.
Mastering the use of attributes to add additional information to HTML elements.
3. Working with Images and Multimedia
Adding images to your web pages and setting appropriate attributes.
Embedding videos and audio for a rich multimedia experience.
4. Creating Forms
Building interactive web forms to gather user input.
Understanding form elements like text fields, checkboxes, radio buttons, and dropdown menus.
5. Structuring Web Content
Organizing your web page using semantic HTML elements like headers, sections, articles, and footers.
Improving accessibility by using proper HTML structures.
6. HTML5 and Beyond
Exploring the new features and elements introduced in HTML5.
Understanding the importance of backward compatibility for older browsers.
7. HTML and CSS Integration
Linking CSS (Cascading Style Sheets) to HTML to add styling and improve the visual appearance of your web pages.
Conclusion
Congratulations! You've completed our HTML Full Course, and now you have a strong understanding of HTML and how to build a website from the ground up. HTML is a vital skill for anyone interested in web development, and with practice, you can create stunning and interactive web pages.
Remember, learning web development is an ongoing journey, and there's always more to explore, such as CSS, JavaScript, and other web technologies. Continuously practicing and building projects will help you solidify your skills and stay up-to-date with the latest trends in web development.
Now go ahead and put your knowledge to the test by creating your own web projects. Happy coding and best of luck on your web development journey!
#internship#virtualinternship#career#education#internshipgate#build your resume#free internship#internship in india#professional resume#online internship
0 notes
Last Seen Blogs

givesupp
Writer. Obsessor.

aisy-shopstore
Aisy shopstore

medievalmead
Medieval Mead

ask-ocean-o-r
Ask Ocean O'Connell Rosenberg!

armudcomtr
Armud ✅