#How To: Make Indents in AO3 HTML Editor
Explore tagged Tumblr posts
Visit Tumblr Blog
Explore Tumblr blogs with no restrictions, modern design and the best experience.
Last Seen Tumblr Blogs


Fun Fact
After the announcement of the deal with Yahoo!, there were 170K signatures of unhappy Tumblr users petitioning to prevent the sale in 2013.
Note
Hi, sorry to interrupt, but I was looking at your fics, which are really good, and I came across something that I see in a lot of other fanfics and I don't know how to do it. How did you manage to set it indented?
hello! thank you for reading my fics, it means a lot!
I need to know what you mean by "indented." do you mean something like this summary?
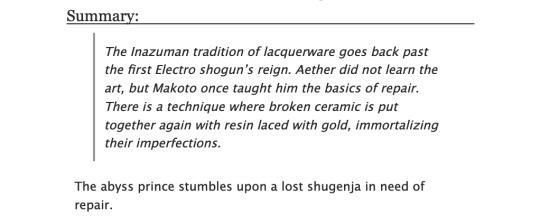
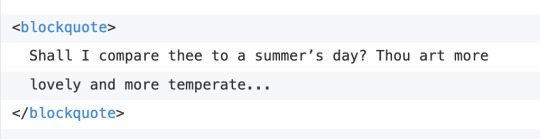
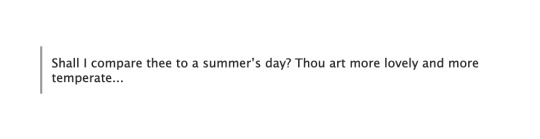
tumblr editor calls this "indented" for some reason, but what it's really called are "blockquotes." you don't need fancy css for this since it's available with just html. you can code it using the blockquote tag.
on the other hand, maybe you mean indenting as in adding spacing like in this chat?
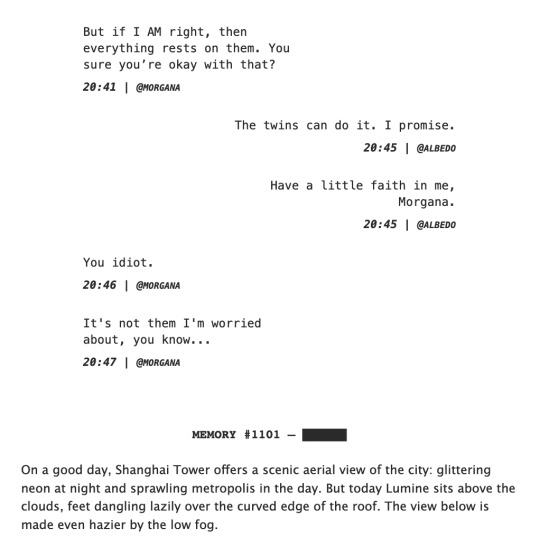
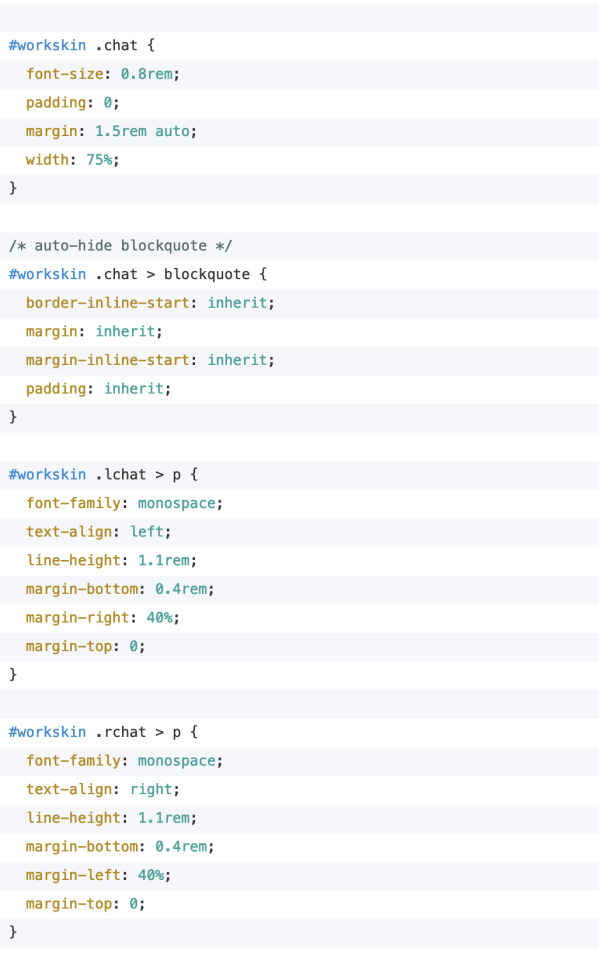
in this case, then yes you do need to add css to your workskin. here are the relevant parts of the code.
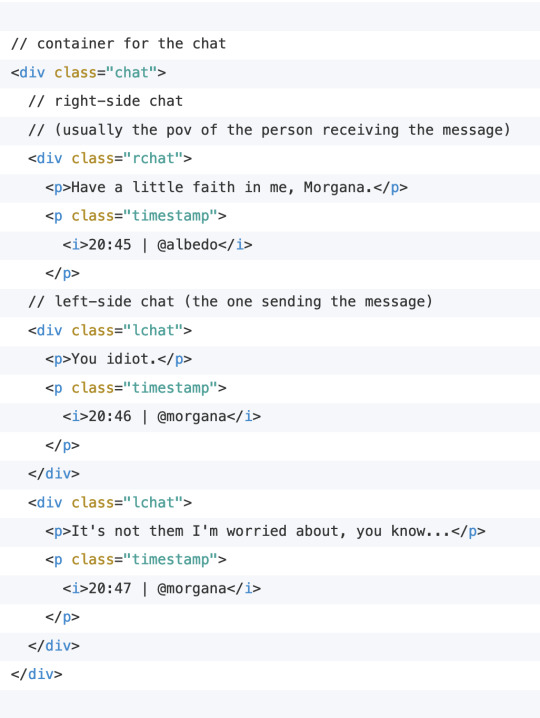
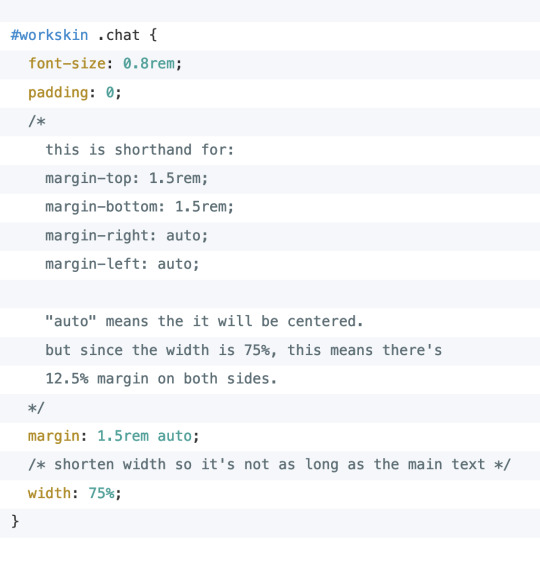
so the important things here are:
put your elements inside a container with the .chat class (or any other class name of your choosing)
make sure .chat has margin set to auto and width set to less than 100%.
I hope I was able to answer your question! I'm not sure if there are other examples of indenting that I used in fics; if you meant something else, just let me know so I can answer the question properly! 🙇🏻
the rest of my workskin code is always available to use as a reference (copy paste if you want): AO3 demo, html code, css code.
something extra under the cut:
bonus:
the above is a modified version of what I'm doing. I actually combined both methods in one, but that gets a little bit more complicated and it's probably more than what you need. I'll add the full code here under the cut if anyone's interested.

to note:
notice that I replaced the div containers with blockquote in the html. however, with workskins turned on, you won't see it! that's because I'm hiding it specifically when workskin is turned on.
but if someone reads my fic with workskins turned off (the "hide creator's style" button AO3 provides at the top of the fic), then none of my styling will show up. I still want to make the grouping of the chat text and timestamp clear though, so I put them in blockquotes for this purpose.
here's how it looks like with and without workskins. I want to make sure that my fics are readable even if someone turns off workskins, or if they download my fic as an epub/pdf (which IIRC removes all the css styling as well).
14 notes
·
View notes
Text
Posting Fic - How to prep your writing to display correctly on AO3 (via LibreOffice)
So I've seen guides online about how to convert your fanfic for AO3 after writing it in Google Docs, because a lot of people use GDocs to do their writing (which is a decent option, since it saves it in the cloud and all that). I'm not planning on repeating that here.
But I don't do my writing in GDocs, I do my writing in LibreOffice Writer, because it emulates an older version of Word (which is what I grew up on and am most used to), and because I can have more robust spellchecking than on GDocs. And when I was first considering finally posting my work to AO3, I'd heard lots of commentary about how often pasting into the rich text editor sometimes loses formatting, or what hoops people had to jump through to make sure everything looked good.
So I'm here with the actually-pretty-darn-simple method I use to post to AO3 for anyone who needs this, because I want to be helpful.
Please note: this is largely for the basic formatting one might use on AO3. I haven't tested it with fancier things (not even smallcaps yet, though I'm hoping that won't prove too difficult when I finally get around to a chapter that needs that functionality). Also, these instructions are for Windows, which is what I use.
The first step is, obviously, to write up your story in LibreOffice Writer. I have some formatting standards I prefer because it makes my works look like they're publication-ready, which helps me stay in the "I'm actually writing fiction here" groove.

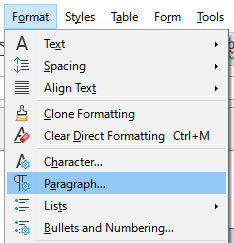
Once you're done writing, you need to make sure the file is ready to save for AO3. With how I write, the only thing I change is that I remove that first-line indent across the whole document. This is easy enough. Select everything, and then go to Format > Paragraph.
Once in that dialog, change the first line indent to 0. If you don't see a number there at all, just enter the number in there.
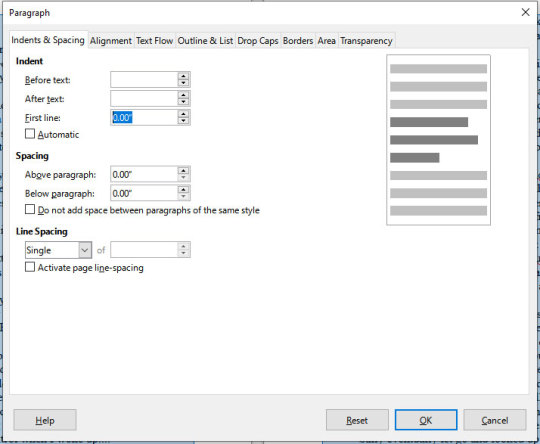
Then press "OK." This will realign all the paragraphs, including their first lines, to the left margin.
Note that I haven't changed the spacing between paragraphs at all. It's still single-spaced, and that's fine, because the next step can handle that.

DON'T SAVE OVER THE ORIGINAL.
What you want to do at this point is select "Save As" and make sure to save it as an html file, not whatever file format you normally use. LibreOffice will probably ask if you want to do that or use its native format, and you can just tell it "use html format."
You should now have an html file wherever you saved it. If you double-click it, it will open in your default browser, and you can check that the formatting carried over properly if you want. It should look ready for posting, complete with the internet-standard single empty line between paragraphs. LibreOffice knows to wrap each paragraph in html paragraph tags, which is what AO3 likes, and AO3 (and generally the rest of the internet) reads that as the extra empty space between paragraphs, just like you should see here on Tumblr.
Now you need to navigate to where you have the file on your computer via your file manager of choice (I'm on Windows, so I use File Explorer, which I can reach just by right-clicking on the Start button, but I also have a shortcut to it on my taskbar). Right-click on the file, and "open with" Notepad. You can also just open Notepad and open the file from within the program.
You should see the html code for the file.
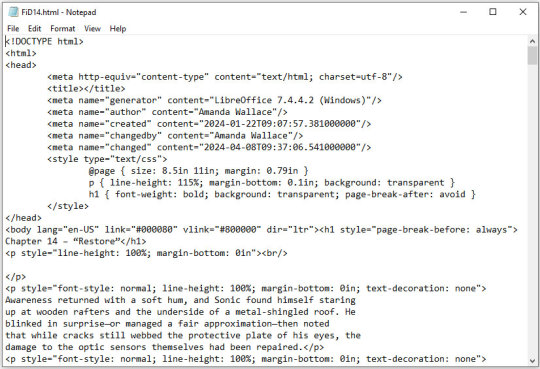
This is all set and ready to go. Copy everything between the "body" tags in the file (I also skip the lines that are for the chapter title, because I can enter that in a different spot on AO3).
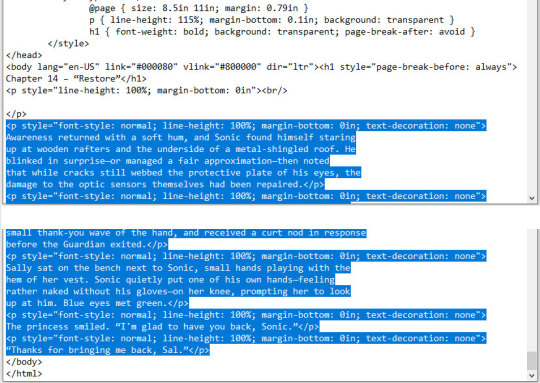
Copy the selected code and paste it into the HTML editor on AO3. If you want AO3 to do a bit of cleanup for you, you can click over to the Rich Text editor, then back to HTML, and it will clean up extra carriage returns and such, but this isn't necessary. Double-check that everything looks good by clicking "Preview," and if you're happy, click "Post."
This even preserves smart quotes, which I don't bother to change to straight quotes, though I suppose you could do so if you wanted.
But honestly, that's how easy it is. Save the file as html, copy the html over to AO3, and done. No scripts, no file converters, no worrying if your formatting is going to survive being pasted into the Rich Text editor. Just LibreOffice and Notepad.
0 notes
Text
How to Customize Your AO3 Writing HTML Format & More!
Okay! So you want to know how to customize your AO3 HTML writing format/how to navigate AO3 in general—well you’ve come to the right place!
Here I’ll be addressing common errors that happen when navigating AO3 as both a reader and primarily as a writer. I’ll also be giving out some great tips and tricks on navigating AO3—especially when it comes to customizing your AO3 writing. I’m mainly making this because when I was trying to simply publish my stories on AO3 with indentation on my writing format; it was such a HASSLE. Especially going through countless blogs that were really freakin’ old and youtube videos that weren’t at all helpful and/or very confusing. Hopefully today I’ll be able to help you try and alleviate that confusion.
I’m also going to make a youtube video on this in the near future as well as my tumblr guide( if you want to learn how to customize your Tumblr blog(theme, linking things on your bio, navigating certain functions) go ahead click here.
Alright! So let’s say you already have your chapter ready and prepped to be pasted onto the HTML writing format. Here are a few things you need to know before pasting that long written chapter onto the HTML format.
If you have a bunch of indentation on your chapter and go ahead and paste that onto AO3 HTML format—it’d immediately remove all that indentation.
Indentation:
No Indentation:
This is going to happen no matter how much spacing you put in that text on HTML. It’s primarily because HTML is meant to be a bunch of code in between text. There is no code suggesting to create indentations on your text. So you might be asking yourself, well how do I create indentions Seph? Here is how:
^ here is my secret weapon hehe~
Now, before I came across this holy grail of a website(after going through long hours of searching through youtube videos and articles etc) I was manually typing out all of my code onto my stories. It was literal hell(especially because I write very LONG chapters(20k-60k) so I had to physically scroll through my own writing to put code in between text that sometimes didn’t even work when I finally published my story/chapter. The website I’m going to link to you—it’s a website where you paste your work onto the google doc and it’d put the code in FOR YOU. So you don’t have to sit there for hours implementing your own code for indentations, bold text, etc. Here’s how to use the website:
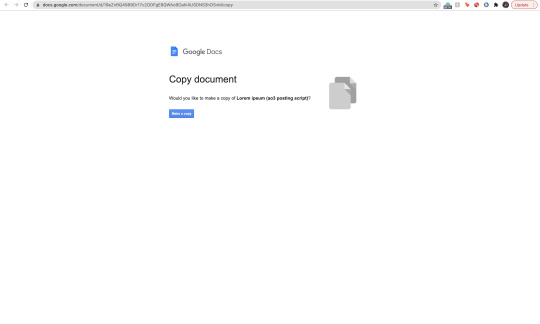
Website link: https://docs.google.com/document/d/19eZnBQ4989Dr17v2ODFgE8QWAo9Oahi4USDNS3hOSvM/copy (as far as I know this website doesn’t have a name but imma just call it the HTML holy grail lolll)
* You’re going to click, “make copy.”
Make sure before you’re clicking, “make copy,” that the gmail you’re signed into is the same one your browser is signed into. So when you go through the process of selecting a google account to sign into—you don’t select a different gmail. If you don’t write your stuff on google docs and for example—use Word—just copy your writing from your Word document and paste it into the website’s google doc. You’d just have to sign into an email anyway lol.
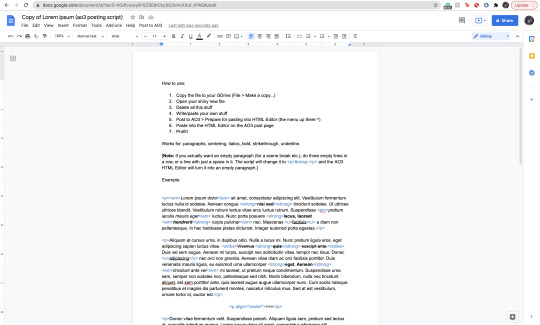
Now when you click, “Make copy,” it’d open to this page. This page has a bunch of instruction you don’t need to read. What you’re going to do is delete all of this text and paste your writing on it. To select all the text:
SHIFT+CMD+A (MAC)
SHIFT+ALT+A (Windows)
Then hit:
Delete (Mac)
Backspace (Windows)
Now that it’s empty, you’re going to go ahead and copy your story:
SHIFT+CMD+A & then CMD + C (MAC)
SHIFT+ALT+A & then ALT + C (Windows)
and paste it to this document.

Now it’s going to look very similar to your own google docs page where you copied your writing from. What you’re going to do next, is click/look for the text that says, “Post to AO3″ which can be found on taskbar above the writing functions next to, “Help.”

When you click this, it’d ask you two things:
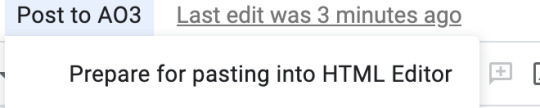
and:

Obviously, we want to select, “Prepare for pasting into HTML Editor.” Click that and it’d immediately start running. It will ask you to sign into a google account as well:
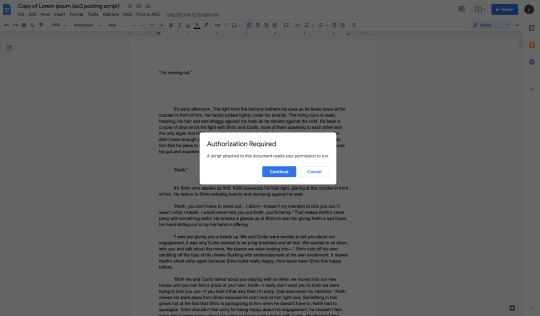
Click continue (this is where it’d ask you to sign into a google account):

Here choose your gmail account (for obvious reasons I won’t be showing my email lol):

It’d ask for permission, select— “Allow” below.
It’d immediately run the script and it should look like this:

Everything highlighted in blue is your code. This coding will make your indentations for you as well as make the coding for bold text, italic text, so on and so forth.
Now, you’re going to copy all of this text:
SHIFT+CMD+A :then: CMD + C (MAC)
SHIFT+ALT+A :then: ALT + C (Windows)
and paste it into your HTML editor on AO3 (ofc, delete all the text already on your ao3 editor):

Now all of your writing should look like this—all code and text.
Keep in mind, when you click, “Preview” your indentations/italics/bold text won’t appear. Idk why it doesn’t (ao3 is just wack like that) but when you publish your indentations/bold text/italics, text WILL appear. I guarantee it.
Alright so adding tags/editing your work is very simple:
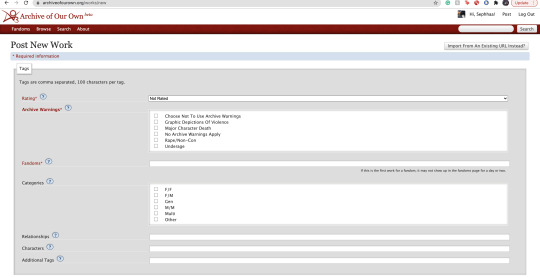
Here is where you’re going to tag all of your work. As you can see, you have a lot of options:

Here is where you start rating your fic. It runs from Not Rated to Explicit. This is primarily to let readers know what type of fic they’re reading before actually clicking on it. It lets younger audiences know not to click it if it’s too mature or too explicit. This also makes it easier for readers to search up stories under whichever rating you choose.

Now the Archive warnings are just extra EXTRA warnings that are more specific. So if your story falls under any of these specific warning tags go ahead and put them—you can also choose not to use the warnings.

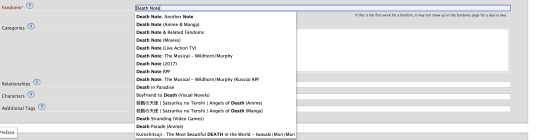
The fandom tag is pretty self-explanatory. If you’re confused then you clearly don’t know what AO3 is LOLL. Ao3 is commonly known as a fanfiction site where people will upload fanfics in relation to the fandom they’re writing for. So let’s say I made a fanfic for the anime Death Note, I would type, “Death Note” onto the fandom tag:
Now the categories tag is very self-explanatory as well, choose the tag pertaining to the relationship of your main characters. For example:
I’m going to use Death Note as my example: both of my main characters and/or ship is L/Light Yagami depending on how both characters identify their genders, in this case both characters identify as male in my fanfic. I would choose the “M/M,” tag. Another example:
If I wrote a BTS fanfic and it’s a x-reader X Park Jimin fic, the x-reader for my fic identifies as female, while Park Jimin identifies as a male in my fanfic so I would choose the “F/M” tag.
If the fanfic you wrote has characters that are nonbinary for example, you can choose the “other” tag.
The trend here is knowing what your characters identify as in your fanfic and applying that tag here.

The relationships tag is where you’d put the main ship tag. So again:
If I wrote a Death Note fanfic, and my main romantic pairing or sexual pairing was L/Light Yagami I’ll type that pairing onto the bar and depending on how popular that ship is, it’d pop up for you.
The characters tag is where you’d put all of your characters by name onto the bar. So going back to the Death Note example, I would put L, Light Yagami, and Misa Aname as my characters. You also have the option to add OC characters as a tag (OC—Original characters.)
Additional tags is just that—additional tags. Here is where you’d list specific tags/concepts pertaining to your fanfic. So my tag list will look something like this:
*Gore
*Violence
*Explicit Sexual Content
*Fluff
etc.
Here is where authors commonly put a bunch of random thoughts/writing. You have to keep in mind—if you want to write your thoughts, for example, “L totally rims Light cuz we all know Light is king of the bottoms” you can’t make your thoughts EXTREMELY long. If your thoughts end up being very long—ao3 won’t let you publish your fanfic unless you fix the tags.
Onwards!
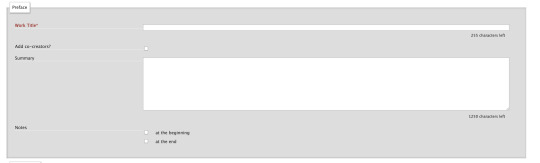
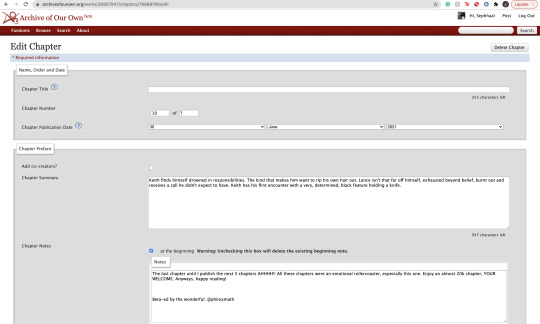
Now, here is where you’re going to put your story title, summary, add any co-creators, beginning notes and end notes. All very self-explanatory. Though, I will come back to beginning notes/endnotes later.
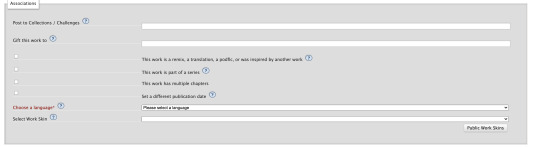
Here is all the extra stuff that I don’t really find a lot of authors using. The only one that has a lot of relevance is the “Language” tag which is very important for obvious reasons. Though the small list of tags/buttons to click on—hold some value. If you have a fanfic that is a series, as an example, you can select this box. If you have a fanfic that has multiple chapters, you’d check off the mark that says “this work has multiple chapters.” When you click this, it’d ask you how many chapters. If you don’t know how long your fic will be, you can simply put a question mark. If you selected the option where your fanfic is part of a series, it’d ask you from what series in your works and/or let you make a new series (if your first work is the first book to said series.) The last option, “Set a different publication date,” is an interesting feature on ao3. This feature lets you prep your works in advance and if you know what exact date you plan on publishing your fanfic, you can put an exact date on that fic for when you want to publish it.
Now work skins, or, “Skins,” is a feature I don’t find a whole lot of people using. I had ended up using it because again—I wanted to create indentations to my work on a HTML format and upon some research I found that someone recommended to use skins and apply them to your work to create those indentations.
You may be asking yourself, “What is a skin/work skin?”
A work skin/skin is a body of code you can customize in a separate window. I don’t know the exact details on how to successfully make this code since I forgot how to properly do it (also I mainly don’t want to go into extreme detail how to make a work skin lol) this work skin can be applied to your writing and modify it in a way where you don’t have to manually add certain features. For example:
I wanted to make indentations for my fanfic on the HTML format. At first I used a work skin with code to do the indentation for me:
Here’s a link where you could learn how to do that: work skin indentation
The issue I found when creating this work skin and applying it to my writing, it made it look really wonky. Now I’m sure you can go ahead and change the settings to the work skin in terms of sizing/spacing etc. But to be honest, that sounds like a lot of work I don’t wanna be doing. If you find yourself successfully using work skins (and you know your way around advance coding) by all means, use work skins to your advantage. As far as I know, work skins also have different functions but I do not know those exact functions. I have the holy grail google docs to make indentations/coding for me lol. Moving on!

Last but not least, we have the privacy section where you’d obviously make your selections based on your preferences. Registered users are users who have actual ao3 accounts. Guests are users who don’t have ao3 accounts. Pretty self-explanatory. You can choose where you want a specific audience to read your fics, register users or guests. Or choose both. Or none at all.

START NOTES/ENDNOTES:
Remember how I mentioned that I would be coming back to beginning notes/endnotes? Here’s why:
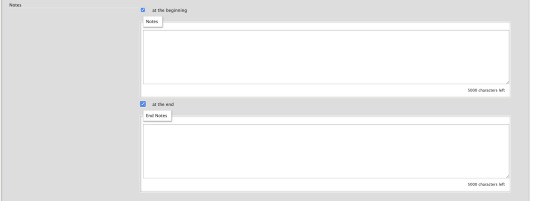
Let’s say you successfully publish your fanfic and it’s a multi chapter fic. A common problem I found myself having and A LOT of other people, when you have multiple chapters and you add endnotes to a specific chapter, your first chapter endnotes appear on that latest chapter you’ve created different endnotes for.
Let me make this clearer:
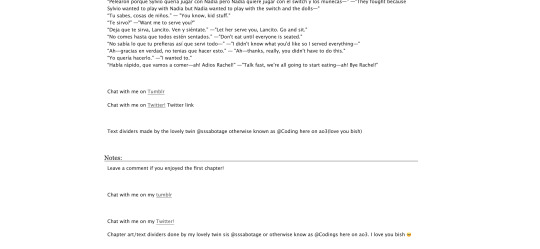
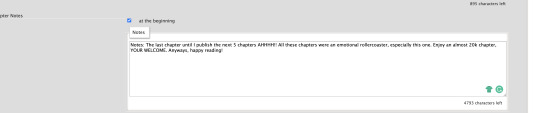
Let’s say my fic is 10 chapters. In the very first chapter, I added specific endnotes that look like this:

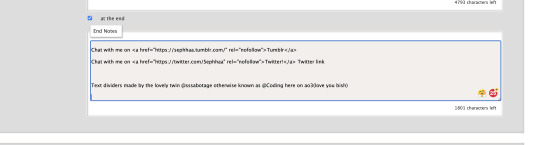
The text: “Leave a comment if you enjoyed the first chapter! Chat with me on my <a href="https://sephhaa.tumblr.com/" rel="nofollow">tumblr</a> Chat with me on my <a href="https://twitter.com/Sephhaa" rel="nofollow">Twitter!</a>” <— this is my endnotes I put for my first chapter.
Now if I go ahead to check my chapters outside of the editor page and then check my latest chapter (in this case is chapter 10):
Both my endnotes for that chapter (chapter 10) and my endnotes for the very first chapter appear on my 10th chapter when only my endnotes for, specifically, chapter 10—should be the only one that readers SHOULD see. My readers should only be seeing chapter 10 endnotes. NOT chapter 10 endnotes AND chapter 1′s notes.
Now you may be asking yourself, “Well, how do I get rid of my first chapter notes on my chapter 10 endnotes? When I go to the editor page, to chapter 10, my endnotes look fine and I don’t see my first chapter endnotes there?” Here is how you get rid of them:

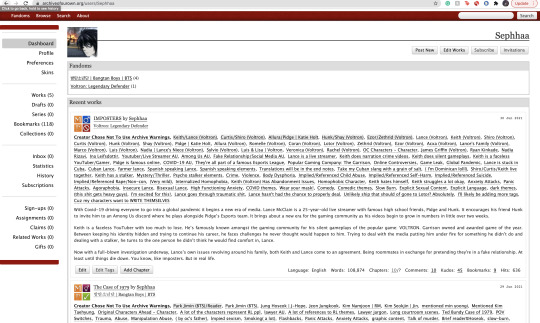
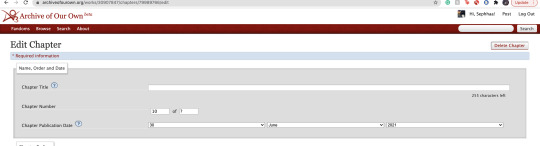
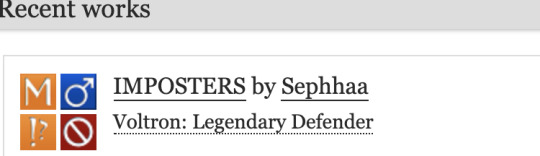
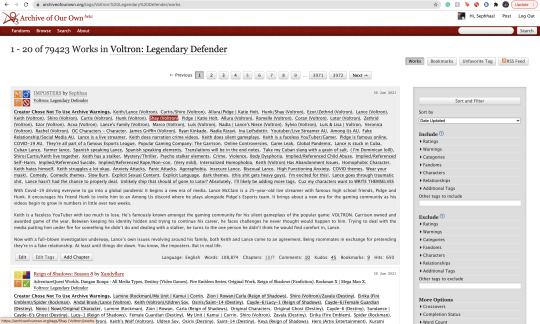
Now, I want you to pay attention to this screenshot. This is a screenshot of my ao3 editor page for my latest fic, “IMPOSTERS.” The reason why I want you to pay attention to this screenshot because I want you to notice a very alarming detail we all gloss over.
We are in the, “Edit Work” page. We are NOT on chapter 1.
Let me break this down:
You know how your first chapter’s endnotes keep appearing on your latest chapters? Yeah, that’s because they’re appearing on every other chapter because you’ve pasted your first chapter’s endnotes on the, “Edit Work” editor page instead of putting your endnotes to chapter 1 and ONLY chapter one.
What you’re going to do is scroll down to your endnotes
*Copy them if you want
*DELETE! the endnotes on the, “Edit Work” page by selecting this little window:
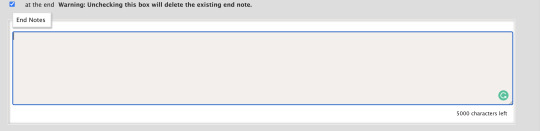

*Make sure to un-click the little blue check mark so it deletes the endnotes.
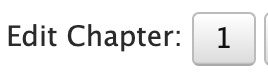
Go over to your first chapter by selecting the chapter number on the above taskbar:

*Scroll down to your endnotes
*Paste those endnotes you copied in the endnotes box (now these notes will only appear on chapter 1)
And BOOM! No more first chapter endnotes to your latest chapter endnotes:

Keep in mind: what commonly happens is if you see your first chapter endnotes and then you go and publish chapter 6, just know that if you had written notes in the editor page instead of the chapter, will now naturally move on to the next chapter until another update —it’s because your first chapter endnotes will move onto the latest chapter you post. Those first chapter endnotes won’t be applied to every single chapter of yours.
HITS/KUDOS/COMMENTS:
Now, Hits, Kudos and especially comments are very self-explanatory but here are some things I really do love about each feature:

HITS:
Hits are something I really do enjoy about ao3. Main reason being it’s so different compared to every other writing platform for example—Wattpad.
Now I’ve been, up until recently, on Wattpad for 8 years, I started as an original novel writer and then transferred into fic writing (which is hilarious cuz a lot of writers start as the very opposite.)
In saying that, Wattpad is famously known for clicking and rising the amount of views/reads on a story based on the amount of clicks you give that story. What I didn’t like, even as the writer to my own work, if I click my own stories—Wattpad would count those clicks and mark them as reads. So whenever I edit or check my own work, my reads would go up simply by me—as the author— clicking my own story/chapters. It would be extremely hard to know who was actually reading my story and how many of those reads were actually me just clicking my story.
AO3 doesn’t do this. Since you are the author of that fanfic, it doesn’t count you as a reader when clicking your own story.
This is super great and it just gives me an idea of how many people actually went to give my fic a hit.

KUDOS:
Kudos is a great function and I like it a lot because ao3 doesn’t have the option where people can dislike a fic. Ao3 and many writing sites don’t have a “liking” system like Instagram and Facebook. And that’s mainly because ao3 is NOT a social platform. You cannot make social posts on ao3 and while it’d be nice to notify my readers about x, y and z you can just link your social platforms in your end notes. Which is something I’ll get into in a second.
COMMENTS:
Comments are just that, comments. A good feature on ao3 tho is, you as the author can filter comments. I see authors, unfortunately get a lot of hate for x and y ship and/or concept. It happens a lot and it’s complete BS—especially when authors end up orphaning said story so they can get a little peace of mind.
Ao3 has a pretty good filtering system where you can choose to allow certain comments underneath the story/chapters. The only downside to this, you as the author have to manually read through all these comments (which are commonly hate comments) and it can put a mental toll on you. Ao3 has yet to figure out a way where we can block certain users so they won’t be able to comment/read your fic. So if you are someone who has recently came out with a fic and you are receiving some kind of hate—maybe get a friend or close family member to log into your account and filter your comments for you. Otherwise, you’d have to grow a backbone and can take the hate and filter through your own comments.
In saying that, please please be aware to not take every comment personally and surround yourself with good people. What people say doesn’t matter as long as you were happy writing that chapter/pairing/concept. If it means you’d need a minute away from the internet or not check your inbox at all—both options are available to you and you as the writer don’t have an obligation to respond to hate if you don’t want to.
LINKING YOUR SOCIAL MEDIA IN NOTES:
If you had came from my tumblr guide (which I highly recommend if you’re trying to navigate your tumblr) the coding used for adding links to your tumblr bio in that guide is extremely similar to the coding we will be using today in the AO3 beginning notes/endnotes:
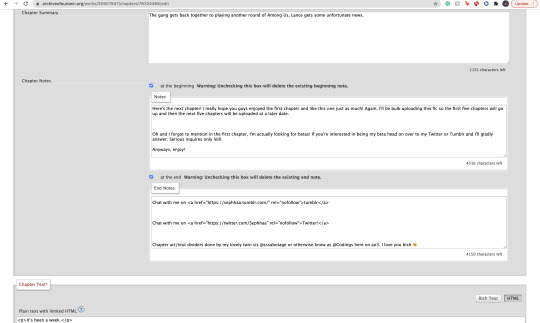
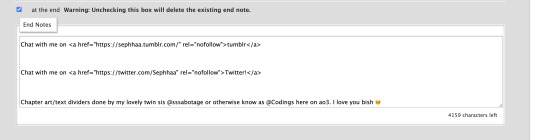
Now here is my social media links in my endnotes. You can add social media links to both beginning notes and endnotes (I find they’re placed more commonly in the endnotes) the coding we will be focusing on is:
<a href=“
that is:
<a SPACE href= QUOTATION MARK ( “ )
(really familiar yeah? lollll shoutout to y’all who came from my tumblr guide)
Now, you’re going to want to type this out in your notes window, and then go grab a social link (I’ll just go ahead and use my Twitter social link) simply copy whichever social platform link you want to copy and paste it right after the quotation mark. It’d look a little something like this:
<a href=“https://twitter.com/Sephhaa”
and end it with a quotation mark( “ ) again.
Right after that we need to write more coding and that coding is:
ref=“no follow”
that is:
SPACE ref=QUOTATION MARK( “ ) no SPACE follow QUOTATION( “ )
So your link will now look a little something like this:
<a href=“https://twitter.com/Sephhaa” ref=“no follow”
Now more coding, but this time, we need some type of text so it just doesn’t look like some long ass link in your notes. Here is the code we’re going to use:
> - beginning
</a> - end
that is:
(start) > TEXT </a> (end)
(my text in this case is going to be “>Twitter!</a>”)
(together ofc, for the sake of the example I’m spacing it) Your link should look something like this:
<a href=“https://twitter.com/Sephhaa” ref=“no follow”>Twitter!</a>
Now you can do this with every social media you have to convert it into a link inside your notes/endnotes.

You can tell whether it worked or not if it’s underlined and highlighted.
ADDING IMAGES TO YOUR HTML FORMAT:
Alright! Adding images to your fic is great! Especially if you want to feature some fanart and you want everyone to see it etc. I personally use this feature to add text dividers. Text dividers is what separates my text, for example, if I’m going from one POV to another—I can add a text divider. I’m going to teach you how to add images to your HTML format since it’s a bit complex and takes a little trial and error—especially when it comes to sizing.

Alright so the coding you’re going to use here is this:
<img src="
that is:
<img SPACE src= QUOTATION MARK ( “ )
After that we’re going to use a website that can convert our images into a link:

Postimages.org!: Website Link.
Here is where you can choose an image, the website will convert it and then you can copy the link of your image and paste it to your code:

After converting your image of choice—you’re going to copy the direct link.

Now, once you have copied the direct link you will go back to your coding and paste it after the quotation mark. It should look like this:
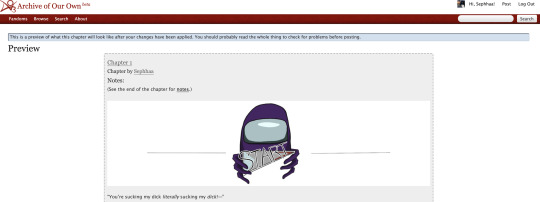
<img src=“https://i.postimg.cc/kGfmV3hQ/C6-CF33-E3-8-D9-E-4-E92-B63-F-1-EE2-B5-FA00-AF.jpg" alt="
and make sure you end it with another quotation mark.
Here is the next set of coding:
alt=“
that is:
alt= QUOTATION MARK ( “ )
Then:
width=“100%” (or whatever number you want to put, here I will just put 100)
that is:
width= QUOTATION ( “ ) 100% QUOTATION MARK ( “ )
height=“50%” (or whatever number you want to put, here I will just put 50%)
that is:
height= QUOTATION MARK ( “ ) 50% QUOTATION MARK ( “ )
Your code should now look like this:
<img src=“https://i.postimg.cc/kGfmV3hQ/C6-CF33-E3-8-D9-E-4-E92-B63-F-1-EE2-B5-FA00-AF.jpg"alt=“”width=“100%”height=“50%”
Now you’re going to end the code like this:
/> </p>
that is:
/> SPACE </p>
Now your official image link should look like this:
<img src=“https://i.postimg.cc/kGfmV3hQ/C6-CF33-E3-8-D9-E-4-E92-B63-F-1-EE2-B5-FA00-AF.jpg"alt=“width=“100%”height=“50%”/> </p>
If you select “Preview,” in your HTML editor you can see your image in that window and you can adjust the sizing of the image as much as you like. My image looks something like this when I go to preview:

This sizing is pretty great for fanart sizes. You can use this to also make text dividers but in smaller sizes. Like this:
(I have to fix the spacing but you know what I’m trying to get at lollll)
my text dividers look like that and I use a sizing of 30% for both my width and height. You’d simply use the same steps as the first image. Just change the sizings on width and height and adjust it to a much smaller image so it can appear as a text divider. These images are also set to “center” immediately. I don’t know the the coding to make images not centered(if you want your image on the right/left sides) but if I find them all add them to this guide.
Now I don’t really have a whole lot of tips and tricks but some tips I can give you if you are someone trying to gain some attention to your story.
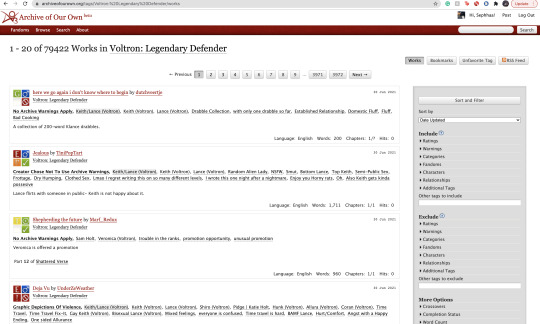
1). Within your fandom pay attention to which fanfic gets the most hits and look at their concepts/tags. Now I pride myself on originality and you should too but sometimes just seeing what tags/concepts ppl use can give you an idea of what readers are trying to read.
I find that in the VLD fandom, the top grossing ship is Klance therefore if I make a fic with them as my main ship, I know I can except some hits. Ships alone can make readers click on your stories. If you write an uncommon ship, it’s likely you won’t really get a lot of hits but honestly you should write for your own enjoyment and not for the hits. This is coming from a person who makes fanfics that I MYSELF want to read and anyone else reading it is reading my own indulgence lmaoooo.
2). Look at concepts.
Think of yourself as a reader and not a writer when looking at concepts. What are concepts YOU seek out. This could be anything from smut to explicit content. To enemies to lovers, to murder and violence. Fantasy AUs and Touch of Life AUs. Me personally—I always seek out stories that have explicit content, primarily smut cuz I know if the story has smut sometimes the story is written to my unhealthy standards of mature content/explicit content. I also look for uncommon concepts, violence, and my favorite concept is anything with crime.
Those are my preferences as a reader and if you are a writer and writing content that you yourself would like to see in a fanfic, there’s a chance other people like those same concepts too. If you don’t know what concepts you’d like to write or what concepts are out there—look at your favorite fic writers and what concepts they write as a reference. You can also just sit yourself down, in front of a google doc, and think about a fanfic you would like to scroll by and think, “OOO That’s def something I wanna read/add to my bookmarks.”
3). Now, I don’t use this tip/trick that often (cuz again, I don’t really care THAT much about hits/kudos etc.) but it is daunting when you put so much time in a fic and it’s not getting as much hits/kudos as you thought it would. If you think it’s a fic worthy of some attention and you’d like to get your name out there more than use this tip/trick:
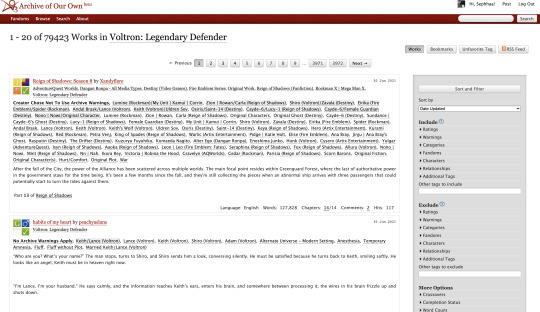
AO3 functions in a way where if you publish a fanfic to your designated fandom, it’d appear on the front page of that fandom tag. This is where readers will scroll through and find fanfics they want to read. Since there is so many people who publish their fics daily everywhere in the world—your fic won’t stay on the front page for a long time. Unless it’s a fic with A LOT of hits (I only really see this in the BTS fandom tag, all stories with thousands of hits are on that front page lol) So here is a little secret way to keep your fic on the front page for a much longer time:
Go to your latest chapter on any of your stories or any story in general.
In order to get your story on the front page again, you’d need to copy everything in this chapter. I’m talking about summary, notes, and the entire written chapter. I suggest separating your chapter summary/notes in one google doc and the chapter text in the work section in a different google doc. Mainly cuz it’s easier to use the
SHIFT+CMD+A (MAC)
SHIFT+ALT+A (Windows)
keys. So go ahead and copy everything, paste them to their separate google docs and delete that entire chapter.
Yes. You heard me. Delete the chapter.
It physically hurts me to do this, especially if something goes wrong. Good thing I keep a copy of all my work—AND YOU SHOULD TOO WTH.
Anyway, go ahead and delete the chapter and then go ahead to your story Edit Work and add a new chapter where you’d be re-publishing that specific chapter.
Step 1: Saving Chap Summary/Notes

Step Two: Saving Chapter 10:
Step 3: Deleting Chapter/Latest Chapter on AO3:

(As you can see above, I only have 9 chapters when originally I had 10)
Step 4: Re-Publication:


Step 5: Publication/Post:

You can also take your time and preview it to see if everything looks good.

As you can see my chapter is posted and it looks good! Now if you click on your fandom tag underneath your fic title—it’d take you to the front page of the list of fics posted. You should be able to see your fic on the front page.
As you can see, my fic is the very first one on the list of fics and on the front page of my fandom fic tag.
Some things to keep in mind:
1). While this is extremely helpful in getting people to click on your fic since your fic is on the front page, the downside of using this tip/trick is the fact that the original date you published this chapter will change. So let’s say you published your fic in the summer of 2020 and have long since finished the story and decide to use this trick and republish your work again in order to get on the front page—the date will instead be 2021 on whatever season or month you decide to republish. It feels kind of weird to republish a chapter and/or story when you’ve finished it a long time ago and it will give an impression to readers that you have only JUST finished the book. Now, if the readers decide to follow your social media and know that you had actually finished the series a long ass time ago—then it’d be written off as you editing/revamping the chapter.
In a lot of cases, it’s just you editing/revamping a chapter in the case that the chapter didn’t upload right etc.
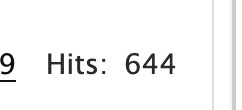
2). Depending on your fandom: this tip/trick might not entirely work. While I’m in the VLD fandom and it’s fairly easy to appear on the front page again—I’m also in the BTS fandom and I find that the process is extremely different. While re-publishing my story in the VLD fandom tag I can easily get my story back on the front page—I cannot say the same for my BTS fandom tag primarily because BTS fics are not sought after by how recent fics have been published but by the amount of hits your fic has. The larger amount of hits you have on your BTS fics—the greater your chances are staying on the front page of the BTS fandom tag list. Since my BTS fic has a good amount of hits (499-500) I appeared on the front page but for a very short period of time. Sometimes that’s enough to garner the attention of 1 or 2 readers. And that’s enough for me.
3). Again, I don’t use this tip/trick often (mostly a trick honestly lol it kinda feels like cheating the system a bit) and you should use this sparingly. Not so much to NOT give your fics the attention you want them to have but on your mental health. Numbers are numbers at the end of the day and it matters more to actually like the stories you write and reach out to a few people instead of thousands upon thousands who probably don’t even interact with you as an author. Start small and build your way up. It’s more genuine that way and you can learn how to maneuver things smoothly when you start off small. That and you have more room to make mistakes and get the chance to learn from them instead of receiving hate for them early on.
Welp! That is all for my AO3 guide. I’m sure I’ll come across another tip or trick or SOMETHING and add it here lolll. I’m still fairly new on ao3 (in terms of publishing my own work) and I’m bound to run into errors etc. But I hope this was helpful for you. I really wish there was a guide like this one (updated to at least 2019 or something cuz LORD all the articles/blogs I came across were old as shit and I didn’t even know if their tips/information were still relevant to the new ao3 format etc) So at least I did a service to younger Seph a year or two ago trying to navigate ao3.
If you found this helpful, I also have a tumblr guide on how to customize/navigate tumblr and all things tumblr (in terms of adding links to your bio, how to make a masterlist etc) so if you’d like to see/read that, head on over here. I’ll also be making youtube videos on both these guides in the near future, just for the peeps that need that extra visual and who don’t want to read through this VERY long guide.
If you like this or me, check out some of my work! I am a fanfic writer—I write both anime and BTS content ( primarily VLD(Voltron) fics but I do plan on writing something for Death Note & Inuyasha (cuz there isn’t enough SangoXMiroku content and that’s a crime in of itself) I also plan to write for the MHA fandom soon too! If that’s something you’re interested in head on over to my Masterlist.
Until my next guide!
#How to Customize Your AO3 HTML Writing Format/Navigate AO3#AO3 guide#How to: AO3#AO3 tutorial#How to: Add A Link To My AO3 Notes#How to: Get Rid of First Chapter Endnotes To My Latest Chapter#How To: Make Indents in AO3 HTML Editor#AO3 Tips#AO3 Tricks#Newbie AO3 Friendly#Fic Writer Friendly#How to: Add Images to Your HTML AO3 Format
32 notes
·
View notes
Text
New AO3 Script / Screenplay Tutorial
Some time back I posted a tutorial for how to format CSS and HTML for a screenplay on AO3, but since then I have improved upon it and I wish to now share with you all the (hopefully somewhat better) new version.
I previously had a significant problem with the spacing of certain elements, which would end up breaking the formatting. So recently I spent two days studying and trying code after code until I got it right.
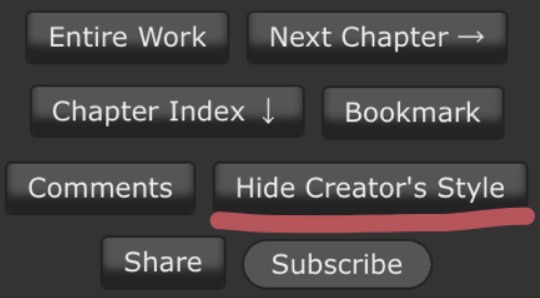
Note that though this formatting makes the screenplay look authentic enough on a computer monitor or on mobile in landscape mode, it does not (in my experience) tend to show up well in portrait mode. This version is at least readable in portrait mode, however, whereas the old version was not. Still, you might like to make an author’s note mentioning that readers in portrait mode may need to use the “hide creator’s style” button, which will take away the formatting:
Okay, let's get to work! First you are going to have to create a new AO3 work skin. Name it whatever you like, then insert this code:
#workskin p { font-family: "Courier Prime", Courier, monospace; text-align: justify; text-justify: inter-word; }
#workskin p { margin-left: 5%; }
#workskin p { margin-right: 15%; }
#workskin .indented { padding-left: 15%; padding-right: 25%; text-align: justify; text-justify: inter-word; }
#workskin .par { display: block; padding-left: 15%; padding-right: 25%; }
#workskin .character { display: block; padding-left: 25%; }
You can adjust things like the margin and padding percentages to fit your own style, of course!
Now comes the fun part. After you have written your script, make a new draft using your screenplay skin. Then get onto the HTML editor.
The SHOT, SCENE HEADING, and ACTION elements will be left alone. The only tagging necessary for them is < p > (close up the < and >, of course... Tumblr is giving me a hard time about showing it as it really should be) for paragraph transitions. But do be sure to use the < p > tag, or it will break the formatting.
Next are the CHARACTER, PARENTHETICAL, and DIALOGUE elements... which are a bit more involved.
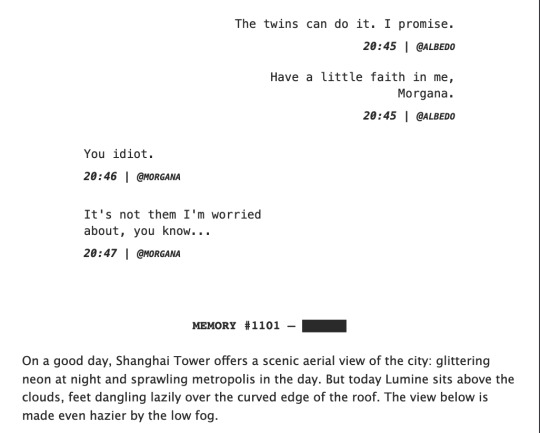
Before blocks of character/parenthetical/dialogue, you need to put the following tag (with closed up < & >): < div class="indented" align="left" > . Note that if there is more than one Character involved with no action breaks in between (in other words, if there is a conversation going on), you do not need to put the tag between each character, just before the first one. Like so:
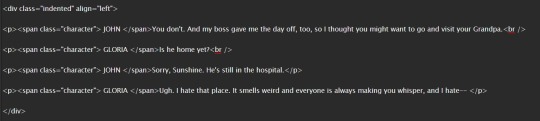
And be sure to close it back up after the blocks of conversation with < /div >
Next up is CHARACTER, which, as you can see above, is tagged: < p >< span class="character" > CHARACTER NAME< /span >
Notice that there are no line breaks between the < /span > and the dialogue. Due to the nature of < span > if you try to put a line break in there it will turn it into a paragraph break, which doesn't work well for the screenwriting thing. I am sure there is a workaround, but that's what I got for the time being!
Now we come to PARENTHETICALS, which are the bits of action within dialogue:
To tag those, once again do not make a line break, but simply insert this: < span class="par" > then close it after inserting the parenthetical with < /span >
It might be easier to simply visualize, but note that as a personal preference I tend to italicize my parenthetical elements with < em >... you don't have to, that's just my style:

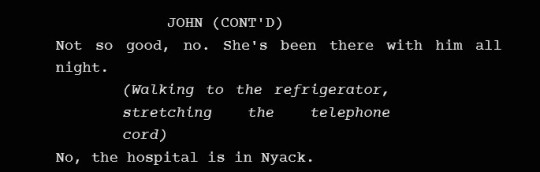
And that is basically it! If you would rather just look at the code than to try and figure out what I was trying to explain (I am not sure I did a good job of that!), here is a basic visual:
This:

Should get you this:

Or something similar, anyway. It may vary on your screen. If you would like to see a live example of how it will look on your monitor or with your device, you can click below to get to a small fic I have formatted this way (it isn't the story sampled above, however, since that is a WIP I have not posted anywhere yet!)
If I have made any mistakes or anything is in need of clarification, let me know! I will do my best to fix it!
#ao3#fanfic#ao3 tutorial#tutorial#writing#writeblr#screenplays#screenplay format#screenplay tutorial
37 notes
·
View notes
Note
Quick writing question: how do you get indents on AO3? I posted a fic but the indents are gone and it semi ruins the story????
So when you’re uploading your chapter, before you paste your text, what you’re going to do is click this box.

When you do you’ll be given a lot of the same options that you would in Word or Google Docs,like to italicize or put in lines or breaks or insert and format images ect. The rich text option takes you away from direct html formatting and editing and does the coding for you.

What I personally do is have everything formatted to how I want it in my Word document,including my em-dashes and my spacing and line drops and ittalicizing so when I copy and paste it under the rich text it keeps all that formatting,including spacing and indents. The only thing I’ve noticed it won’t keep is a line page break which I manually insert after pasting but under the rich text options it’s a matter of pushing a button.
I use Microsoft Word and so I can’t vouch to how this transition does with Google Docs or some other writing editor but I can’t imagine ao3 wouldn’t make the formatting translaation compatible to something as big as Google Docs. I also highly recommend you have your formatting and edits done before you paste to the ao3 text box. I know some people type directly into it but I have come across the formatting getting screwed up if you play around in the text too much afterwards,though it’s been far less glitchy the last couple years. Hope that helps!
40 notes
·
View notes
Text
[images: AO3's HTML editor, without formatting buttons, and rich text editor, with formatting buttons. the buttons to switch editors are circled.]
.
so you know how sometimes fics on AO3 have extra blank space between paragraphs? you know how that seems to be a glitch that affects some authors always and others never?
I'm like 95% confident that's an artifact of pasting rich text from a word processor directly into AO3's rich text editor. because AO3's parser, I'm certain, understands the thing that happens when one presses Enter in Word or LibreOffice or etc to be a paragraph break; this is the parser's cue to insert </p> there and <p> to begin the next line. but people who compose in Word or LibreOffice or etc for posting on the internet will sometimes hit Enter twice in order to start a new paragraph, because that's the intuitively obvious way to make a blank line between paragraphs. and because this is for the internet, not a book where paragraphs are indicated by indenting the first line, that's the intuitively obvious way to format the document.
except AO3's parser doesn't have any way to know that two consecutive paragraph breaks is supposed, these times, to be the ordinary amount of white space between paragraphs. nor should AO3's parser be changed to know that, probably, because often enough people want two paragraphs separated by twice the ordinary amount of white space plus an additional one-text-line-high amount of white space. like, that's not an uncommon scene break format, right there, and those authors would be understandably cranky if putting in a blank paragraph on purpose stopped working for them.
which means the people who hit Enter twice as a single paragraph break and then copy-paste from their word processor directly into AO3's rich text editor, without using a tool such as is linked up top, have twice as many paragraphs as they want to have, and every second paragraph is blank.
(btw AO3 is a pain about blockquotes when one's composing in HTML, too.)
it just occurred to me that some people may not have this so do yourself a favor and bookmark it:
ao3 posting script google doc
it runs a script that automatically formats all your stuff in HTML so you can paste it directly into the HTML editor of AO3 and don't have to worry about going through to manually add italics and stuff. lifesaver
1K notes
·
View notes
Note
hi! so i just made an archive of our own account and i don't know what to post first. do you have any tips or advice for posting on ao3? do you have any tips for ao3 in general? thank you!
Hi there anon! Thank you for your question!
First things first: I think to a certain extent, what to post first is going to be entirely up to you. Whatever you feel like writing, whatever format it’s in, you should write it up and post it! Or, depending on how long you’ve been using the site as a guest, you can look through other people’s content to pay attention to tagging, author’s notes, formatting – that kind of thing. AO3 is user-friendly in most ways, and you’ll grasp it pretty quickly.
But, I do have a couple tips to help you out on your first run-through (and actually some helpful tricks I think some more familiar users may not know, as well)!
BTW since we’re on the topic, if you use the subscribe function on AO3!!! Did you know about the different ways to subscribe to an author, a series, or an individual work?
You can only subscribe to an author from their dashboard or their profile page! If you are in the middle of reading a particular fic, and you hit the subscribe button at the top of the page, you will only subscribe to updates for that fic. Same deal if you want to subscribe to a series, you must be on the series page. Subscribing to a fic within that series will only subscribe you to that specific fic – you will get updates if that story is updated/chapters are added, but not if a new work is added to the series.
I suspect some people are unaware of this, due to the frequent amount of subscriptions I get on one-shots! (But, idk… maybe there’s just some really hopeful people out there laijefliajelsjf)
Anyway, now, onto the rest of this textbook (it got long)!
NEW WORK vs DRAFTINGWhen you go to post your very first work on AO3, you’ll go to Post > New Work at the very top to open up AO3′s drafting tool. From here, you can go through and copy over a work from Word or Google docs or whatever writing program you use, or just write up your fic in the post box itself!
Either way you choose, you can then decide to post your work right then and there (Post Without Preview), or if you are still editing it, you can choose the Preview option. This will take you to the work as it will appear once posted; from there you can go back to the editing page, which will now have a Save Without Posting option. Use this if you would just like to save your work and come back to it later. Note: drafts are saved for one month only.
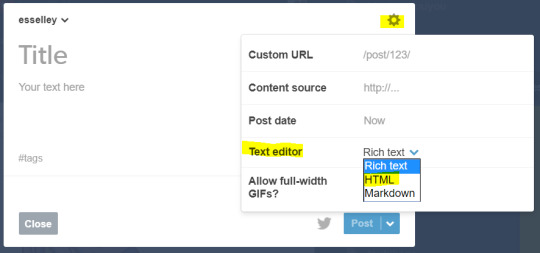
HTML vs RICH TEXTWhen you open your drafts/start a new work, the main field for your text has two options: HTML or Rich Text. HTML just shows you all HTML codes in your work. Rich Text is probably what you want to work in while editing, because you’ll only see this bar in that format:

However, sometimes you will want to use the HTML section in order to copy over text from another source that allows HTML format; for instance, Tumblr! I always copy the HTML from my tumblr fics over to AO3 when posting, because it is the easiest/fastest way to ensure the formatting stays intact. Here’s where to find that:
AVOID BACKDATED DRAFTSThis is a pitfall I encountered with my first fic I ever posted. When you create a draft, the date of posting defaults to the date you first saved the draft. So if you are like me and you draft fics way in advance of posting, you need to make sure to update the post date before you actually hit post, or it will backdate your fic – this happened with This Place in the Sky, and it was several hours before I realized it had backdated by a week, and no one was seeing it T.T Learn from my mistakes, younglings

(And if you want to backdate a draft, then you would go in here to alter the date.)
ITALICS ISSUESome people have noticed an issue with AO3 that causes fics to have odd spaces after punctuation (periods, quotation marks, dashes). This is a glitch related to italicizing when you transfer over fics from another source. To avoid having to search your entire fic for those spaces, always italicize the punctuation that precedes/follows your italicized words. For instance:
“No!” – quotations/exclamation not italicized, glitch makes it show up as:

“No!” – all punctuation italicized, now shows up as:

:D It’s just less of a headache to have to comb through and find all the random spaces, I find, when you just italicize beforehand! A preemptive strike.
PARAGRAPH SPACINGLet’s look at the variations of line spacing in a posted fic:
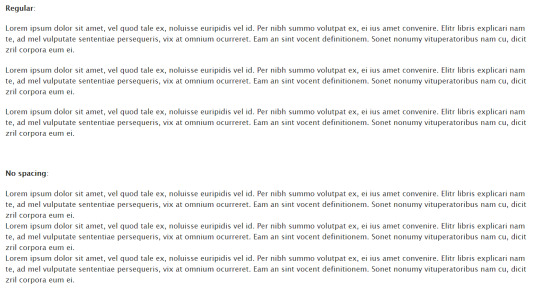
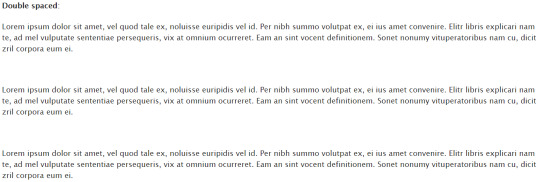
And here’s what this looks like in AO3′s Rich Text editor:

Sorry that is so tiny, but notice the clear difference in spaces between paragraphs while editing! There’s no actual correct way to do this, but! The “regular” option of spacing is the most common on AO3, and also the easiest to read. Avoid the no spacing option at all costs! It can be a huge headache to read, unless you are indenting paragraphs (less common on AO3, but acceptable). I tend to dislike the double spacing option as well because I feel like it breaks up the flow of wording, but that’s just personal preference.
HOW TO AVOID DOUBLE SPACING BETWEEN PARAGRAPHS
Frequent posters may also have noticed a thing AO3 does where it will insert double spaces at random intervals, often for large sections of the fic at a time, for no discernible reason. This happens often when you copy your work over from another source. But there’s an easy fix!
On MS Word and Google docs, find the “Add space after paragraph” option, and enable it for every fic you write. When you hit Enter (ONCE) to go to a new paragraph, it will autospace for you (meaning, you should not need to double tap the Enter key).
Now when you copy this over to AO3, it will read ONE SPACE reliably, giving you that regular spacing option up above. Cool news: if you copy your HTML from Tumblr to HTML on AO3, you don’t even need to worry about this. HTML be chill like that
QUICK HTML CODESAnother thing I see people asking is how to add hyperlinks! But also, did you know you can add links, bolded, and italicized text to your summary/notes as well? You just have to put them in HTML, and this:
ItalicsBoldHyperlink
will show up as:

You can easily bold/italicize/add links in the Rich Text editor, but summary/notes are HTML only and you will have to use the above. These are the most useful/common options you’ll need, I think. Try to preview before posting to make sure you got it right (and haven’t bolded your entire summary and the world with it on accident).
LINK BACK TO TUMBLRThere’s an easy way to link your stories to Tumblr (or Twitter) that automatically includes your title, tags, summary, and all other relevant information right in the post! Just hit this button at the top of your fic, once it’s posted – it’ll take you to the Tumblr log-in screen, so log-in and from there you can edit the post. This is what I use to make all my AO3 fic posts on Tumblr \o/

TAGS/SYNOPSISFinally, more of a stylistic note! Be thoughtful when tagging your fic/writing a synopsis. In general, try to be clear and concise, so people can see what they’re getting into at a glance. Tag what’s important to the theme and tone of your fic. This really varies from person to person… maybe you want to tag every single thing your fic encompasses! I find really long tags to be overwhelming when browsing AO3, and prefer simple ones. I tend to overtag more for smut-heavy/PWP than I do for longer, plot driven fics.
Your summary should also be clear and to the point, and describe the content of the fic. You can put any other thoughts in your beginning and end notes; if you are leaning towards saying anything like “sorry this sucks this is my first fic/I am bad at summaries/etc” just leave that out! If you don’t like summaries, use a quote from the fic. You don’t have to apologize for posting, even if you don’t think it’s a Shakespearean masterpiece. You still wrote a fic, and that’s awesome!
This is everything I could think of for the time being…I hope it’s helpful!!
#ao3#archive of our own#writing advice#anonymous#esselle replies#long post#i'm so sorry...#i thought this would be short#posting on ao3: a guide by esselle#1st edition#writing advice: social media
376 notes
·
View notes