#How to Learn Software Testing
Explore tagged Tumblr posts
Visit Tumblr Blog
Explore Tumblr blogs with no restrictions, modern design and the best experience.
Last Seen Tumblr Blogs


Fun Fact
Tumblr’s website traffic is steadily declining.
Text
i'm a grown ass man child
#here take this (jenson button edit in the year of our lord 2025)#he’s my favorite guinea pig though because legit any edit i wanna try I try it with him. either great or awful!#in other words: I do the hard work in the trenches so you don’t have to! (watching every cringe sell out video on his instagram)#7000 individual text layers later and here she is#maybe there's an easier way to do it but idk! as most know whenever i post a video it's like me testing the waters with a new thing#like for example! i've never put text over a video but by god i was determined this time#there have been other videos where i learned how to isolate audio (poorly but it somewhat worked [see the a moment apart lewis video])#but like. yeah. i tried text for the first time and i don't pay for any editing software because who has that kind of money#and i definitely don't use tiktok so like. away we went.#anyway. hope you all enjoy. jb fan club this one is for you <3#also lmao i was supposed to be writing tonight and instead i spent 6 hours on this.#jenson button#my stuff#my video
40 notes
·
View notes
Text
Flash Was Killed Because It Was Objectively Dangerous
I get it, I get the Flash nostalgia and the fondness for old Flash games. I was big on Neopets before they decided to ruin the art and make all the pets samey paper dolls to play dressup with (completely ruining the point of the far more expensive "redraw" colors like Mutant and Faerie and Desert). I have fond memories of Newgrounds games and I even managed to take a class for a semester in high school where I could learn flash.
But I also remember how terrible it was. And you should too.
Leaving aside all of the issues involving performance and inaccessibility (such as being easily broken by bog-standard browser actions like the back button, and its ability to modify web code AND OS code in real time likely broke a lot of accessibility tech too), Flash was legitimately one of the most dangerous web technologies for the end user. An end-user is you, or more specifically back then, child-you.
According to Wikipedia and its sources, Flash Player has over a thousand vulnerabilities known and listed and over 800 of these lead to arbitrary code execution.
What is arbitrary code execution? That's when someone can just run any commands they want on a machine or program that didn't intend it. A fun way to see this is in this infamous Pokemon tool-assisted speedrun where they manage to get an SNES to show the host's twitch chat in real time. It's not so fun though when it's someone stealing all the files on your computer, grabbing your credentials so they could clean out your Neopets account (yes, really, it was a pretty common concern at the time), and other nefarious works. Also, there was a time where it allowed people to spy on you with your webcam and microphone.
Oh and on top of all of this, Flash had its own "flash cookies", which could not be cleared by ordinary means and thus could be used to track users indefinitely, at least until Adobe slapped a bandaid over it by introducing yet another screen an ordinary person wouldn't know to use. (I assume this is how the infamous neopets "cookie grabbers" worked, so they could get into your account. This is mainly what I remember about using Flash back in the early 2000s lol) So it not only was a "stranger taking over your machine" concern, but a bog-standard privacy concern too, arguably a precursor to our current panopticon internet landscape, where greedy websites would track you because they could and maybe get some money out of it, facilitated by this technology.
When Apple decided to block it, it wasn't out of greed; Steve Jobs cited its abysmal performance and security record, among other issues such as an inherent lack of touchscreen support, and Apple cited specific vulnerability use-cases when blocking specific versions before they nuked it entirely. When Mozilla, who makes Firefox, decided to block it, it's not like they would've gotten money out of doing so, or by offering an alternative; they did so because it is fucking dangerous.
Your ire and nostalgia is misplaced. Flash was not killed by our current shitty web practices that ruin unique spaces and fun games. Flash was killed because both Macromedia (its original developers) and Adobe were incapable of making it safe, if that was even possible, and it was killed after third-parties, in an unprecedented gesture, collectively threw their hands up and said enough.
Well, that and HTML5 being developed and becoming more widespread, being able to do everything Flash can do without being a pox on technology. One could argue that you should bemoan the lack of Flash-to-HTML5 conversion efforts, but that requires asking a lot of effort of people who would have to do that shit for free...and if they have to run Flash to do so, opening themselves up to some of the nastiest exploits on the internet.
Nostalgia is a fucking liar. The games themselves I think are worth having nostalgia over (look, I still find myself pining for that one bullet hell Neopets made and Hannah and the Pirate Caves), but Flash itself deserves none of that, and absolutely deserved to be put in the fucking ground. You're blaming the wrong causes. It was terrible.
(specifics and sources found via its wikipedia page, which has a lot more than is mentioned here. and also my own opinions and experiences back then. lol)
#flash#nostalgia really is a liar#don't trust it#technology#yet another instance of my unfettered autism#adobe flash#macromedia flash#the old web#I was there gandalf three thousand years ago lmao#personal context: I am now a software QA that tests web apps#and when I was a child I was absolutely a neopets addict and am on Subeta TO THIS DAY#I learned HTML and CSS when I was 12#largely to spruce up my Neopets profile#I have been on the internet A While now#(I understand how ironic it is given that my tumblr layout is kind of shit; I will fix it soon)
20 notes
·
View notes
Text
get me ouuuttt of hereeeee [horse race tests world]
#HIGH KEY. MIGHT MAKE A PMV#is this the thing that makes me learn editing software. not isat. not puyo. not my ocs. horse race test.#ITS DIIIIREEEEEE HOW DID I GET HERE LET ME OUUTTTTT/SILLY#this is my roman empire or whatever the fuck /pos#chimera rambles
1 note
·
View note
Text
.
#lol thank god i decided to hold off on adding the identifiers until later#this framework is really advanced for UI automation and it's a big stretch for me!!#like this is real software engineering and not just scripting#which is NOT EASY TO FIND#my coworker/lead who introduced this framework on our project is literally so fucking valuable...#does he even KNOW? does he even UNDERSTAND#how hard it is to find actual talented engineers who are willing to work on automation??????#if people say I'm a unicorn then what about this guy????#i'm so grateful to have him leading our team because i am learning SO MUCH#and building shit that i never ever in a million years would have built on my own#like the job i just left? i could have coasted there just writing the simplest POMs and test scripts#but this job is like. i am doing Real and Cool Engineer things#and yet it's still 'just automation' so the pressure from leadership just isnt there lmao9o#the devs are in crunch and we're not even MANUAL TESTING right now#they have the poor product folks testing for the imminent release jdkkskksksjsjsjs#clearly that is bad for the team and the product etc. i do not approve#and yet.#it has been nice to be able to focus solely on automation <_<
1 note
·
View note
Text
Free or Cheap Mandarin Chinese Learning Resources Because You Can't Let John Cena One Up You Again
I will update this list as I learn of any more useful ones. If you want general language learning resources check out this other post. This list is Mandarin specific. Find lists for other specific languages here.
For the purposes of this list "free" means something that is either totally free or has a useful free tier. "Cheap" is a subscription under $10USD a month, a software license or lifetime membership purchase under $100USD, or a book under $30USD. If you want to suggest a resource for this list please suggest ones in that price range that are of decent quality and not AI generated.
WEBSITES
Dong Chinese - A website with lessons, a pinyin guide, a dictionary, and various videos and practice tests. With a free account you're only allowed to do one lesson every 12 hours. To do as many lessons as quickly as you want it costs $10 a month or $80 a year.
Domino Chinese - A paid website with video based lessons from absolute beginner to college level. They claim they can get you ready to get a job in China. They offer a free trial and after that it's $5 a month or pay what you can if you want to support their company.
Chinese Education Center - This is an organization that gives information to students interested in studying abroad in China. They have free text based lessons for beginners on vocab, grammar, and handwriting.
Pleco Dictionary App - This is a very popular dictionary app on both iOS and Android. It has a basic dictionary available for free but other features can be purchased individually or in bundles. A full bundle that has what most people would want is about $30 but there are more expensive options with more features.
MIT OpenCourseWare Chinese 1 2 3 4 5 6 - These are actual archived online courses from MIT available for free. You will likely need to download them onto your computer.
Learn Chinese Web Application From Cambridge University - This is a free downloadable file with Mandarin lessons in a PC application. There's a different program for beginner and intermediate.
Learn Chinese Everyday - A free word a day website. Every day the website posts a different word with pronunciation, stroke order, and example sentences. There's also an archive of free downloadable worksheets related to previous words featured on the website.
Chinese Boost - A free website and blog with beginner lessons and articles about tips and various resources to try.
Chinese Forums - An old fashioned forum website for people learning Chinese to share resources and ask questions. It's still active as of when I'm making this list.
Du Chinese - A free website and an app with lessons and reading and listening practice with dual transcripts in both Chinese characters and pinyin. They also have an English language blog with tips, lessons, and information on Chinese culture.
YOUTUBE CHANNELS
Chinese For Us - A channel that provides free video lessons for beginners. The channel is mostly in English.
Herbin Mandarin - A channel with a variety of lessons for beginners. The channel hasn't uploaded in a while but there's a fairly large archive of lessons to watch. The channel is mainly in English.
Mandarin Blueprint - This channel is by a couple of guys who also run a paid website. However on their YouTube channel there's a lot of free videos with tips about how to go about learning Chinese, pronunciation and writing tips, and things of that nature. The channel is mainly in English.
Blabla Chinese - A comprehensible input channel with content about a variety of topics for beginner to intermediate. The video descriptions are in English but the videos themselves are all in Mandarin.
Lazy Chinese - A channel aimed at intermediate learners with videos on general topics, grammar, and culture. They also have a podcast. The channel has English descriptions but the videos are all in Mandarin.
Easy Mandarin - A channel associated with the easy languages network that interviews people on the street in Taiwan about everyday topics. The channel has on screen subtitles in traditional characters, pinyin, and English.
StickynoteChinese - A relatively new channel but it already has a decent amount of videos. Jun makes videos about culture and personal vlogs in Mandarin. The channel is aimed at learners from beginner to upper intermediate.
Story Learning Chinese With Annie - A comprehensible input channel almost entirely in Mandarin. The host teaches through stories and also makes videos about useful vocabulary words and cultural topics. It appears to be aimed at beginner to intermediate learners.
LinguaFlow Chinese - Another relatively new channel but they seem to be making new videos regularly. The channel is aimed at beginner to intermediate learners and teaches and provides listening practice with video games. The channel is mostly in Mandarin.
Lala Chinese - A channel with tips on grammar and pronunciation with the occasional vlog for listening practice, aimed at upper beginner to upper intermediate learners. Some videos are all in Mandarin while others use a mix of English and Mandarin. Most videos have dual language subtitles onscreen.
Grace Mandarin Chinese - A channel with general information on the nitty gritty of grammar, pronunciation, common mistakes, slang, and useful phrases for different levels of learners. Most videos are in English but some videos are fully in Mandarin.
READING PRACTICE
HSK Reading - A free website with articles sorted into beginner, intermediate, and advanced. Every article has comprehension questions. You can also mouse over individual characters and see the pinyin and possible translations. The website is in a mix of English and Mandarin.
chinesegradedreader.com - A free website with free short readings up to HSK level 3 or upper intermediate. Each article has an explaination at the beginning of key vocabulary words in English and you can mouse over individual characters to get translations.
Mandarin Companion - This company sells books that are translated and simplified versions of classic novels as well as a few originals for absolute beginners. They are available in both traditional and simplified Chinese. Their levels don't appear to be aligned with any HSK curriculum but even their most advanced books don't have more than 500 individual characters according to them so they're likely mostly for beginners to advanced beginners. New paperbacks seem to usually be $14 but cheaper used copies, digital copies, and audiobooks are also available. The website is in English.
Graded Chinese Readers - Not to be confused with chinese graded reader, this is a website with information on different graded readers by different authors and different companies. The website tells you what the book is about, what level it's for, whether or not it uses traditional or simplified characters, and gives you a link to where you can buy it on amazon. They seem to have links to books all the way from HSK 1 or beginner to HSK 6 or college level. A lot of the books seem to be under $10 but as they're all from different companies your mileage and availability may vary. The website is in English.
Mandarin Bean - A website with free articles about Chinese culture and different short stories. Articles are sorted by HSK level from 1 to 6. The website also lets you switch between traditional or simplified characters and turn the pinyin on or off. It also lets you mouse over characters to get a translation. They have a relatively expensive paid tier that gives you access to video lessons and HSK practice tests and lesson notes but all articles and basic features on the site are available on the free tier without an account. The website is in a mix of Mandarin and English.
Mandarin Daily News - This is a daily newspaper from Taiwan made for children so the articles are simpler, have illustrations and pictures, and use easier characters. As it's for native speaker kids in Taiwan, the site is completely in traditional Chinese.
New Tong Wen Tang for Chrome or Firefox - This is a free browser extension that can convert traditional characters to simplified characters or vice versa without a need to copy and paste things into a separate website.
PODCASTS
Melnyks Chinese - A podcast for more traditional audio Mandarin Chinese lessons for English speakers. The link I gave is to their website but they're also available on most podcatcher apps.
Chinese Track - Another podcast aimed at learning Mandarin but this one goes a bit higher into lower intermediate levels.
Dimsum Mandarin - An older podcast archive of 30 episodes of dialogues aimed at beginner to upper beginner learners.
Dashu Mandarin - A podcast run by three Chinese teachers aimed at intermediate learners that discusses culture topics and gives tips for Mandarin learners. There are also male teachers on the podcast which I'm told is relatively rare for Mandarin material aimed at learners and could help if you're struggling to understand more masculine speaking patterns.
Learning Chinese Through Stories - A storytelling podcast mostly aimed at intermediate learners but they do have some episodes aimed at beginner or advanced learners. They have various paid tiers for extra episodes and learning material on their patreon but there's still a large amount of episodes available for free.
Haike Mandarin - A conversational podcast in Taiwanese Mandarin for intermediate learners. Every episode discusses a different everyday topic. The episode descriptions and titles are entirely in traditional Chinese characters. The hosts provide free transcripts and other materials related to the episodes on their blog.
Learn Chinese With Ju - A vocabulary building podcast aimed at intermediate learners. The podcast episodes are short at around 4-6 minutes and the host speaks about a variety of topics in a mix of English and Mandarin.
xiaoyuzhou fm - An iOS app for native speakers to listen to podcasts. I’m told it has a number of interactive features. If you have an android device you’ll likely have to do some finagling with third party apps to get this one working. As this app is for native speakers, the app is entirely in simplified Chinese.
Apple Podcast directories for Taiwan and China - Podcast pages directed towards users in those countries/regions.
SELF STUDY TEXTBOOKS AND DICTIONARIES
Learning Chinese Characters - This series is sorted by HSK levels and each volume in the series is around $11. Used and digital copies can also be found for cheaper.
HSK Standard Course Textbooks - These are textbooks designed around official Chinese government affiliated HSK tests including all of the simplified characters, grammar, vocab, and cultural knowledge necessary to pass each test. There are six books in total and the books prices range wildly depending on the level and the seller, going for as cheap as $14 to as expensive as $60 though as these are pretty common textbooks, used copies and cheaper online shops can be found with a little digging. The one I have linked to here is the HSK 1 textbook. Some textbook sellers will also bundle them with a workbook, some will not.
Chinese Made Easy for Kids - Although this series is aimed at children, I'm told that it's also very useful for adult beginners. There's a large number of textbooks and workbooks at various levels. The site I linked to is aimed at people placing orders in Hong Kong but the individual pages also have links to various other websites you can buy them from in other countries. The books range from $20-$35 but I include them because some of them are cheaper and they seem really easy to find used copies of.
Reading and Writing Chinese - This book contains guides on all 2300 characters in the HSK texts as of 2013. Although it is slightly outdated, it's still useful for self study and is usually less than $20 new. Used copies are also easy to find.
Basic Chinese by Mcgraw Hill - This book also fuctions as a workbook so good quality used copies can be difficult to find. The book is usually $20 but it also often goes on sale on Amazon and they also sell a cheaper digital copy.
Chinese Grammar: A beginner's guide to basic structures - This book goes over beginner level grammar concepts and can usually be found for less than $20 in print or as low as $2 for a digital copy.
Collins Mandarin Chinese Visual Dictionary - A bilingual English/Mandarin visual dictionary that comes with a link to online audio files. A new copy goes for about $14 but used and digital versions are available.
Merriam-Webster's Chinese to English Dictionary - In general Merriam Websters usually has the cheapest decent quality multilingual dictionaries out there, including for Mandarin Chinese. New editions usually go for around $8 each while older editions are usually even cheaper.
(at the end of the list here I will say I had a difficult time finding tv series specifically made for learners of Mandarin Chinese so if you know of any that are made for teenage or adult learners or are kids shows that would be interesting to adults and are free to watch without a subscription please let me know and I will add them to the list. There's a lot of Mandarin language TV that's easy to find but what I'm specifically interested in for these lists are free to watch series made for learners and/or easy to understand kids shows originally made in the target language that are free and easy to access worldwide)
457 notes
·
View notes
Text
Athletes Go for the Gold with NASA Spinoffs
NASA technology tends to find its way into the sporting world more often than you’d expect. Fitness is important to the space program because astronauts must undergo the extreme g-forces of getting into space and endure the long-term effects of weightlessness on the human body. The agency’s engineering expertise also means that items like shoes and swimsuits can be improved with NASA know-how.
As the 2024 Olympics are in full swing in Paris, here are some of the many NASA-derived technologies that have helped competitive athletes train for the games and made sure they’re properly equipped to win.

The LZR Racer reduces skin friction drag by covering more skin than traditional swimsuits. Multiple pieces of the water-resistant and extremely lightweight LZR Pulse fabric connect at ultrasonically welded seams and incorporate extremely low-profile zippers to keep viscous drag to a minimum.
Swimsuits That Don’t Drag
When the swimsuit manufacturer Speedo wanted its LZR Racer suit to have as little drag as possible, the company turned to the experts at Langley Research Center to test its materials and design. The end result was that the new suit reduced drag by 24 percent compared to the prior generation of Speedo racing suit and broke 13 world records in 2008. While the original LZR Racer is no longer used in competition due to the advantage it gave wearers, its legacy lives on in derivatives still produced to this day.
Trilion Quality Systems worked with NASA’s Glenn Research Center to adapt existing stereo photogrammetry software to work with high-speed cameras. Now the company sells the package widely, and it is used to analyze stress and strain in everything from knee implants to running shoes and more.
High-Speed Cameras for High-Speed Shoes
After space shuttle Columbia, investigators needed to see how materials reacted during recreation tests with high-speed cameras, which involved working with industry to create a system that could analyze footage filmed at 30,000 frames per second. Engineers at Adidas used this system to analyze the behavior of Olympic marathoners' feet as they hit the ground and adjusted the design of the company’s high-performance footwear based on these observations.

Martial artist Barry French holds an Impax Body Shield while former European middle-weight kickboxing champion Daryl Tyler delivers an explosive jump side kick; the force of the impact is registered precisely and shown on the display panel of the electronic box French is wearing on his belt.
One-Thousandth-of-an-Inch Punch
In the 1980s, Olympic martial artists needed a way to measure the impact of their strikes to improve training for competition. Impulse Technology reached out to Glenn Research Center to create the Impax sensor, an ultra-thin film sensor which creates a small amount of voltage when struck. The more force applied, the more voltage it generates, enabling a computerized display to show how powerful a punch or kick was.
Astronaut Sunita Williams poses while using the Interim Resistive Exercise Device on the ISS. The cylinders at the base of each side house the SpiraFlex FlexPacks that inventor Paul Francis honed under NASA contracts. They would go on to power the Bowflex Revolution and other commercial exercise equipment.
Weight Training Without the Weight
Astronauts spending long periods of time in space needed a way to maintain muscle mass without the effect of gravity, but lifting free weights doesn’t work when you’re practically weightless. An exercise machine that uses elastic resistance to provide the same benefits as weightlifting went to the space station in the year 2000. That resistance technology was commercialized into the Bowflex Revolution home exercise equipment shortly afterwards.
Want to learn more about technologies made for space and used on Earth? Check out NASA Spinoff to find products and services that wouldn’t exist without space exploration.
Make sure to follow us on Tumblr for your regular dose of space!
2K notes
·
View notes
Text
A summary of the Chinese AI situation, for the uninitiated.

These are scores on different tests that are designed to see how accurate a Large Language Model is in different areas of knowledge. As you know, OpenAI is partners with Microsoft, so these are the scores for ChatGPT and Copilot. DeepSeek is the Chinese model that got released a week ago. The rest are open source models, which means everyone is free to use them as they please, including the average Tumblr user. You can run them from the servers of the companies that made them for a subscription, or you can download them to install locally on your own computer. However, the computer requirements so far are so high that only a few people currently have the machines at home required to run it.
Yes, this is why AI uses so much electricity. As with any technology, the early models are highly inefficient. Think how a Ford T needed a long chimney to get rid of a ton of black smoke, which was unused petrol. Over the next hundred years combustion engines have become much more efficient, but they still waste a lot of energy, which is why we need to move towards renewable electricity and sustainable battery technology. But that's a topic for another day.
As you can see from the scores, are around the same accuracy. These tests are in constant evolution as well: as soon as they start becoming obsolete, new ones are released to adjust for a more complicated benchmark. The new models are trained using different machine learning techniques, and in theory, the goal is to make them faster and more efficient so they can operate with less power, much like modern cars use way less energy and produce far less pollution than the Ford T.
However, computing power requirements kept scaling up, so you're either tied to the subscription or forced to pay for a latest gen PC, which is why NVIDIA, AMD, Intel and all the other chip companies were investing hard on much more powerful GPUs and NPUs. For now all we need to know about those is that they're expensive, use a lot of electricity, and are required to operate the bots at superhuman speed (literally, all those clickbait posts about how AI was secretly 150 Indian men in a trenchcoat were nonsense).
Because the chip companies have been working hard on making big, bulky, powerful chips with massive fans that are up to the task, their stock value was skyrocketing, and because of that, everyone started to use AI as a marketing trend. See, marketing people are not smart, and they don't understand computers. Furthermore, marketing people think you're stupid, and because of their biased frame of reference, they think you're two snores short of brain-dead. The entire point of their existence is to turn tall tales into capital. So they don't know or care about what AI is or what it's useful for. They just saw Number Go Up for the AI companies and decided "AI is a magic cow we can milk forever". Sometimes it's not even AI, they just use old software and rebrand it, much like convection ovens became air fryers.
Well, now we're up to date. So what did DepSeek release that did a 9/11 on NVIDIA stock prices and popped the AI bubble?
Oh, I would not want to be an OpenAI investor right now either. A token is basically one Unicode character (it's more complicated than that but you can google that on your own time). That cost means you could input the entire works of Stephen King for under a dollar. Yes, including electricity costs. DeepSeek has jumped from a Ford T to a Subaru in terms of pollution and water use.
The issue here is not only input cost, though; all that data needs to be available live, in the RAM; this is why you need powerful, expensive chips in order to-
Holy shit.
I'm not going to detail all the numbers but I'm going to focus on the chip required: an RTX 3090. This is a gaming GPU that came out as the top of the line, the stuff South Korean LoL players buy…
Or they did, in September 2020. We're currently two generations ahead, on the RTX 5090.
What this is telling all those people who just sold their high-end gaming rig to be able to afford a machine that can run the latest ChatGPT locally, is that the person who bought it from them can run something basically just as powerful on their old one.
Which means that all those GPUs and NPUs that are being made, and all those deals Microsoft signed to have control of the AI market, have just lost a lot of their pulling power.
Well, I mean, the ChatGPT subscription is 20 bucks a month, surely the Chinese are charging a fortune for-
Oh. So it's free for everyone and you can use it or modify it however you want, no subscription, no unpayable electric bill, no handing Microsoft all of your private data, you can just run it on a relatively inexpensive PC. You could probably even run it on a phone in a couple years.
Oh, if only China had massive phone manufacturers that have a foot in the market everywhere except the US because the president had a tantrum eight years ago.
So… yeah, China just destabilised the global economy with a torrent file.
#valid ai criticism#ai#llms#DeepSeek#ai bubble#ChatGPT#google gemini#claude ai#this is gonna be the dotcom bubble again#hope you don't have stock on anything tech related#computer literacy#tech literacy
433 notes
·
View notes
Text
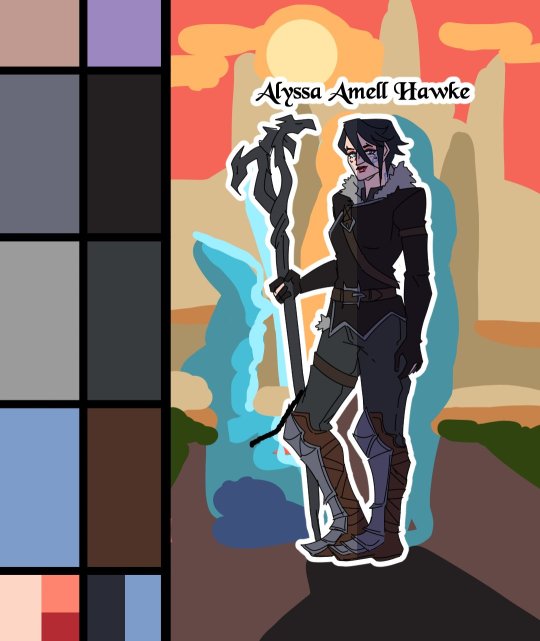
Heroes of the Dragon Age
An animation I've made for Dragon Age Day 2023, featuring my main Warden (Alyssa Cousland-Theirin), Hawke (Eleena Amell Hawke) and Inquisitor (Sulevin Lavellan)!
It's to this day one of my best artwork and I thought I should share it here too! 90+ hours between the original sketch, outfit design, the rough animation, rotoscope, inking, flat-colours, background shading and even the audio :')
Interested in the process? I detailed it below since it was my first time doing something like that:
I would like to start by saying I'm not a professional animator!Everything you've seen here is the result of experimentation and a lot of practice to learn and understand how 2D animation works.

My first idea started in May 2023. I just finished rewatching DA Absolution for the X time, and wanted to analyse why I loved the intro so much. (Even after countless rewatch, I never skipped it once.) I was inspired to study it with my main three protagonists!


Then came the first test with Alyssa Cousland-Theirin, my Hero of Ferelden! I tried to understand which part to separate for the animation. Mainly the hair and cape because it flows a lot more than the rest! If I recall, my first idea here was to make her counter flame attacks (?). Then, as the camera turns around her, I tried to add a grid to know how the camera would work around it.
I ended up making the clip longer, so she could position herself to the further left and leave space to the two other protagonists.

Now it was time to try to animate Sulevin Lavellan, my Inquisitor. I really kept that quick doodling style just to capture the vibe without putting too much time/effort into it! The background would be static to contrast with Alyssa's. I also loved the idea of a rogue sneaking!

Instead of working on Eleena Amell Hawke, my Champion of Kirkwall, I went back to Alyssa and started working with Clip Studio Paint 3D models (this entire animation has been done on the EX version of the software!) It helped for rotoscope animation and maintaining likeness! That's when I got the idea to make the background swirl around the character to let the eyes be guided by the rest of the screen!

After a couple more hours, I planned the entire animatic with 3D models and quick doodles! I finally found a cool pose for Eleena Hawke, which was honestly the hardest of the three to imagine for some reason? I tried many other poses but ended up picking an animation from the game!


This whole time, I was studying a bunch of background ideas and how studio Red Dog Culture House (who made Absolution) work! Thankfully, they have a YouTube Channel where they shared some BTS content so I could analyse it!


Then, I simplified my character and their original designs in the style of the studio! These outfits are how I imagine them after Trespasser. Alyssa as the Queen of Ferelden, looking for a cure to the Calling, Hawke following Fenris to Tevinter & Sully as a Red Jenny Inquisitor!


The idea for Sulevin's animation actually came from a piece I doodled on a live stream, when I was drawing pose studies and turning them into finished artworks haha As for Alyssa, I wanted to draw the fight that got her facial scars!

Once their designs were ready and the background ideas too, I made the rough version of the animation! Basically a sketch done on top of the 3D models to add the details, staying pretty rough just to capture the idea and movements.


Then it was time to start the lines! I decided make a folder per frame, so I could separate all he main elements and draw them one by one. It helps keeping the likeness of a character in the different frames without having big "jumps" between frames! In fact, every parts were coloured differently to recognize them, and then I used vector erasers and masks (Ah yes, the entire lineart is done in vectors of course! It's easier to adjust and save time when working on similar frames!)


At first of course, everything overlaps! But I find it easier to draw too much and erase after, just to make sure everything is coherent in each frames! The cool thing about CSP is how you can change the colour of the layers in one click! So all the coloured lines turned into black in one second, and I could reverse it just as quickly to double check!

Then I started working on Sulevin! I made a blue line to mark where her feet were, as the sketch in the background wasn't perfectly straight! (Like Sulevin's sexuality 🤭😂) The silhouettes were very quick to do, but I had fun adding more & more details as she came closer to the foreground!

I really wanted to add that little dagger trick, but I remember it required me to change the pacing of Eleena's apparition, as it was recovering her arm too quickly! I had to change the pace of multiple frames quite a lot during the project, to make sure the flow was right! For Eleena, most of her animation remained around her arms and the staff itself, as magic would be the most difficult part! That way each character has their own focus: Alyssa has a very animated background, Sulevin got the grappling hook and Eleena the ice!

Then it was time to start adding colours! Just like for the lineart, I separated every colour on it's own layer, so I could easily adjust the colours later if needed. I added one colour at the time, going through all the frames, and then another colour!
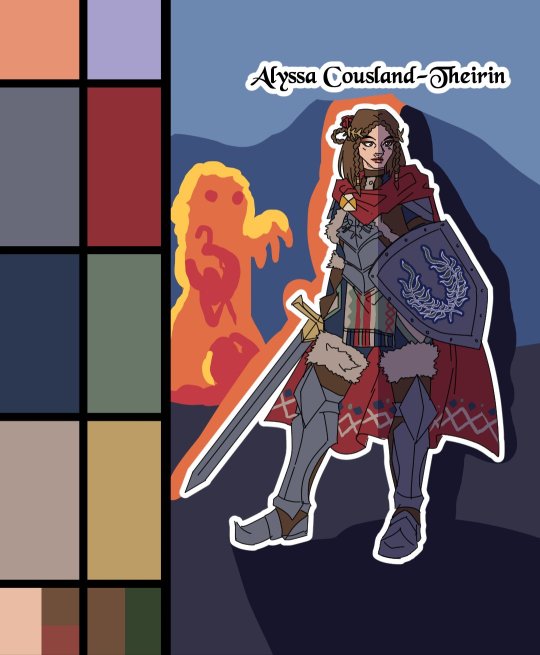
I made full palette tests with the colours I would use for their background at this point, checking if the details remained readable! Alyssa was the most challenging in terms of clothes, because I made her a very detailled armour! I had to simplify the Theirin heraldry, vectorize/redraw the Cousland, and make a brush for her cape's pattern!

Once I was done adding the flatcolours, I started the background, and oh boy it was a wild ride. For the cave, I painted multiple tests. I imagine was to use CSP panorama tools, which transform a texture into a 3D sphere, so each corners must match to look good. Sadly, it made the background very blurry, so after hours of testing, I changed ideas. Instead of the random fire balls (?) I originally imagined for Alyssa, I made three simple frames of a Rage Demon to attack her.


I ended up using the cave as a repeated pattern to make it turn 360° around the character. For Eleena, I mixed inspiration from the comics, Dreadwolf & Absolution, using warm colours matching Hawke's signature red. Just like I made the cave very grey/blue to match Grey Wardens. For Val Royeaux, it was more complex because I wanted to make it green, matching the Inquisitor's signature green. But bright green couldn't work, and the original colour during day time was blue/white/gold. So I added more leaves, played around the design a bit! After adding the rage demon, I made the shading! It was surprisingly easy and quick to do now!

I clipped a white layer on the flatcolours to not be distracted by the colours, and made thin lines to separate the light/shadows, then simply filled everything with the bucket tool! Then you set the layer to multiply and remove the white layer, and you have celshading shadows! Now the character looks out of the picture, so I added layers of blue in color burn, saturation and substract blending modes to make her look like she's in the right setting! Of course, I did the same with the other two, giving Hawke a red overlay and Sulevin green shadows!

Then I added the details, it went from white irises, to sword/staff smears to earrings and smaller finition that goes on top of these layers. To add the lights, I simply selected the shadows and reversed the selection! Using warm and cold tones to create contrast with the purple/bluish shadows! I also added more ambient light layers for Alyssa to reflect the Rage Demon fire. Now it was time to add ice magic! My first attempt had too many frames, making it look weird! Sometimes it's better to lower the frame rate to make things less bumpy!

Then I downloaded some cool ice brushes on CSP assets that made it look less like blue magical flames! But when I covered the screen in ice, I realized "Oh wait, I could make a cool transition from the ice, to blue lyrium turning red?"Red Lyrium truly links these three games and The Veilguard somehow! I spent the next hour painting over the idol and putting it in a black background, with lyrium and then the golden Dragon Age title text.
For the SFX, I used free youtube libraries sounds & "Darkspawn!" comes from the violent human female voice set (iconic for ""Can I get you a ladder? So you can get off my back!"😂🤭) After editing all that, the animation was finally done!

Here's the final math:
About 15 hours for the sketching/rough/animatic phase, 30h for the lineart, 25h for colours, 10h for backgrounds, 5h for details & 5h for music & SFX, for a total of 90 hours. Aka the same amount of time it took me to finish Baldur's Gate 3 the first time lol
If you have any question regarding the animation or the softwares etc. do not hesitate to ask, I'll do my best to answer!
#dragon age#dragon age origins#dao#dragon age 2#da2#dragon age inquisition#dai#da4#dragon age dreadwolf#dragon age the veilguard#animation 2d#original character#tutorial#warden#grey warden#warden cousland#alistair x cousland#alistair x warden#ferelden#hero of ferelden#queen of ferelden#hawke#fem hawke#eleena amell hawke#mage#warrior#rogue#lavellan#inquisitor lavellan#solavellan
320 notes
·
View notes
Text
i learn something new about software development every day because it turns out explicitly marking a feature as not implemented:

is in practice not enough to let people know that the feature is, in fact, not in the game yet, and that this is why it is not doing anything for them at the moment and there is therefore no need to ask how they can unlock it to make it do things. the lesson is: even in an alpha test version, don't implement a new thing halfway, just hide it completely from player view until you finish making it
1K notes
·
View notes
Text
Installing Linux (Mint) as a Non-Techy Person
I've wanted Linux for various reasons since college. I tried it once when I no longer had to worry about having specific programs for school, but it did not go well. It was a dedicated PC that was, I believe, poorly made. Anyway.
In the process of deGoogling and deWindows365'ing, I started to think about Linux again. Here is my experience.
Pre-Work: Take Stock
List out the programs you use regularly and those you need. Look up whether or not they work on Linux. For those that don't, look up alternatives.
If the alternative works on Windows/Mac, try it out first.
Make sure you have your files backed up somewhere.
Also, pick up a 5GB minimum USB drive.
Oh and make a system restore point (look it up in your Start menu) and back-up your files.
Step One: Choose a Distro
Dear god do Linux people like to talk about distros. Basically, from what all I've read, if you don't want to fuss a lot with your OS, you've got two options: Ubuntu and Linux Mint. Ubuntu is better known and run by a company called Canonical. Linux Mint is run by a small team and paid for via donations.
I chose Linux Mint. Some of the stuff I read about Ubuntu reminded me too much of my reasons for wanting to leave Windows, basically. Did I second-guess this a half-dozen times? Yes, yes I did.
The rest of this is true for Linux Mint Cinnamon only.
Step Two: Make your Flash Drive
Linux Mint has great instructions. For the most part they work.
Start here:
The trickiest part of creating the flash drive is verifying and authenticating it.
On the same page that you download the Linux .iso file there are two links. Right click+save as both of those files to your computer. I saved them and the .iso file all to my Downloads folder.
Then, once you get to the 'Verify your ISO image' page in their guide and you're on Windows like me, skip down to this link about verifying on Windows.
Once it is verified, you can go back to the Linux Mint guide. They'll direct you to download Etchr and use that to create your flash drive.
If this step is too tricky, then please reconsider Linux. Subsequent steps are both easier and trickier.
Step Three: Restart from your Flash Drive
This is the step where I nearly gave up. The guide is still great, except it doesn't mention certain security features that make installing Linux Mint impossible without extra steps.
(1) Look up your Bitlocker recovery key and have it handy.
I don't know if you'll need it like I did (I did not turn off Bitlocker at first), but better to be safe.
(2) Turn off Bitlocker.
(3) Restart. When on the title screen, press your Bios key. There might be more than one. On a Lenovo, pressing F1 several times gets you to the relevant menu. This is not the menu you'll need to install, though. Turn off "Secure Boot."
(4) Restart. This time press F12 (on a Lenovo). The HDD option, iirc, is your USB. Look it up on your phone to be sure.
Now you can return to the Linux Mint instructions.
Figuring this out via trial-and-error was not fun.
Step Four: Install Mint
Just follow the prompts. I chose to do the dual boot.
You will have to click through some scary messages about irrevocable changes. This is your last chance to change your mind.
I chose the dual boot because I may not have anticipated everything I'll need from Windows. My goal is to work primarily in Linux. Then, in a few months, if it is working, I'll look up the steps for making my machine Linux only.
Some Notes on Linux Mint
Some of the minor things I looked up ahead of time and other miscellany:
(1) HP Printers supposedly play nice with Linux. I have not tested this yet.
(2) Linux Mint can easily access your Windows files. I've read that this does not go both ways. I've not tested it yet.
(3) You can move the taskbar (panel in LM) to the left side of your screen.
(4) You are going to have to download your key programs again.
(5) The LM software manager has most programs, but not all. Some you'll have to download from websites. Follow instructions. If a file leads to a scary wall of strange text, close it and just do the Terminal instructions instead.
(6) The software manager also has fonts. I was able to get Fanwood (my favorite serif) and JetBrains (my favorite mono) easily.
In the end, be prepared for something to go wrong. Just trust that you are not the first person to ever experience the issue and look it up. If that doesn't help, you can always ask. The forums and reddit community both look active.
178 notes
·
View notes
Text
Here’s an short unsuccessful test I did today; attempting to create an animation in a program I quite literally have ZERO experience with using ahaha :’)
Storytime/long ramble (unimportant):
I wanted to be like the “cool kids” and shift out of my comfort zone—no more relying solely on FlipaClip! Gotta branch out to a more effective program (ideally one that has an interface resembling animation software used directly in industry work)! I’ve seen people make good use of AlightMotion and figured it’s worth a shot!….that goal quickly fell apart <<
There’s definitely a wide variety of tools and especially emphasis on built-in editing features. I was intimidated by the sheer amount of mechanics going on at first, but gradually you get used to navigating stuff (even if some stuff I’m still trying to figure out the purpose of lmao). The only issue is that (to me at least) AlightMotion seems to handle tweening better then frame-by-frame animation. Which immediately lands me in a predicament of sorts since uh…can’t say I’m good at tweening. That would require me to actually finish coloring characters/have the ability to polish things using clean linework :P
Tweening (from my perspective) is about making something visually appealing by rigging separated assets of characters (like you would for puppets) rather then the whole. Or alternatively, some people tween by slightly moving the same drawn lines around on a singular drawing…so TLDR the exact opposite of frame-by-frame. I’m not an illustrator, I’m a storyteller. I can only manage rough line work with uncolored motions. Usually the smooth flow of frame-by saves me, else it would all look rather unfinished. I know where my strengths and my weaknesses lie; I’ve given AlightMotion a shot, but unfortunately it’s not gonna be solving the FlipaClip replacement problem 🥲
Was still beneficial challenging myself to play around with an unfamiliar environment! It’s a step in the right direction to encourage myself to try different things/figure out what works or doesn’t. If my patience didn’t wear thin, I’m sure I could’ve attempted authentic tweening instead of trying to push the program to work with frame-by-frame (it kept crashing, lagging, and pixelating while I tried to force it to comply with my methods. Think it’s safe to assume it doesn’t like me fighting against tweening lol). Who knows! Might return to AlightMotion in the future or might not. Depends on how adventurous or up for a challenge I’m feeling :3


Also goes without saying that online video tutorials would have probably helped—I’m just stubborn & prefer taking hands on approach sometimes. Learning any new program is gonna be overwhelming and scary at first, it is normal! I don’t think anything bad about AlightMotion. Just not for me at the moment. Was fun to play with while it lasted
#hplonesome art#mr puzzles and leggy animation#mr. puzzles and leggy#leggy and mr. puzzles#smg4 leggy#smg4 mr. puzzles#mr puzzles smg4#smg4 mr puzzles#leggy smg4#update#(not feeling up for other tags since I kinda deviated too much in my rambling :P)
78 notes
·
View notes
Text
not to be such a boomer, but I think chatgpt is fucking this generation over, at least in terms of critical thinking and creative skills.
I get that it's easy to use and I probably would've used it if I was in school when it came out.
but damn.
y'all can't just write a fucking email?
also people using it to write essays ... i mean what is the point then?
are you gaming the educational system in pursuit of survival, or are you just unwilling to engage critically with anyone or anything?
is this why media literacy is so fucking ass right now?
learning how to write is learning how to express yourself and communicate with others.
you might not be great at it, but writing can help you rearrange the ideas in your brain. the more you try to articulate yourself, the more you understand yourself. all skills can be honed with time, and the value is not in the product. it's in the process.
it's in humans expressing their thoughts to others, in an attempt to improve how we do things, by building upon foundations and evolving old ideas into innovation.
scraping together a mush of ideas from a software that pulls specific, generic phrases from data made by actual humans... what is that going to teach you or anyone else?
it's just old ideas being recycled by a new generation.
a generation I am seriously concerned about, because digital tests have made it very easy to cheat, which means people aren't just throwing away their critical thinking and problem solving abilities, but foundational knowledge too.
like what the hell is anyone going to know in the future? you don't want to make art, you don't want to understand how the world works, you don't want to know about the history of us?
is it because we all know it's ending soon anyway, or is it just because it's difficult, and we don't want to bother with difficult?
maybe it's both.
but. you know what? on that note, maybe it's whatever.
fuck it, right, let's just have an AI generate "therefore" "in conclusion" and "in addition" statements followed by simplistic ideas copy pasted from a kid who actually wrote a paper thirty years ago.
if climate change is killing us all anyway, maybe generative ai is a good thing.
maybe it'll be a digital archive of who we used to be, a shambling corpse that remains long after the consequences of our decisions catch up with us.
maybe it'll be smart enough to talk to itself when there's no one left to talk to.
it'll talk to itself in phrases we once valued, it'll make art derived from people who used to be alive and breathing and feeling, it'll regurgitate our best ideas in an earnest but hollow approximation of our species.
and it'll be the best thing we ever made. the last thing too.
I don't really believe in fate or destiny, I think all of this was a spectacular bit of luck, but that's a poetic end for us.
chatgpt does poetry.
187 notes
·
View notes
Note
do you have, among your many guides, anything for How To Do Taxes without paying some shithead company $200?
I do not because taxes are a nightmare; i looked into trying to create a guide and realized I could cause people for-realsies problems because the system is set up to change regularly and trip you up.
I do know that as of 2024 if you make under $79k a year there is a free file option with the IRS: https://www.irs.gov/filing/free-file-do-your-federal-taxes-for-free
I want to be clear: doing taxes is a fucking nightmare and I hate it, filling out the forms is confusing and upsetting and seems to be worded in the hardest to understand way possible. But I also just sit down and fill out the forms and do the math with no other software; I do not generally pay people to do my taxes because I sit down and do the paperwork myself (or ask Large Bastard to do it because he's better at reading numbers correctly; emotionally I'm more likely to cry and he's more likely to rage-quit so it's a wash on that end).
The IRS website has a step-by-step guide: https://www.irs.gov/how-to-file-your-taxes-step-by-step
The way that I do ANYTHING that I don't know how to do is:
Look up a step by step set of instructions
Search anything that I don't understand in those instructions and research until I've got a handle on it then rewrite that information in a way that I understand it
Read through the instructions from beginning to end, double-checking that I know what each term means
Make sure that I've got everything that the instructions call for in front of me
Follow the instructions step by step; if I get stopped or have a problem I will search the problem using combinations of key terms until I figure out an approach and will try various approaches until that works and I get to the next step
IF I CAN'T GET PAST THAT STEP I call for help from someone who knows this better than I do.
Continue following steps miserably until I am done and can wash my hands of the mess and/or test results.
This is how I learn to cook things and fix cars and thread sewing machines and put trim line in weed whackers and do taxes. Find instructions, make sure I understand instructions, make sure I have everything required for the project, follow instructions, make sure I've got a phone-a-friend handy, and check my work after.
It's not very specific advice for taxes, but it's how I do new stuff (or stuff that isn't new but that I find confusing every time, like taxes).
646 notes
·
View notes
Text


Neural Filters Tutorial for Gifmakers by @antoniosvivaldi
Hi everyone! In light of my blog’s 10th birthday, I’m delighted to reveal my highly anticipated gifmaking tutorial using Neural Filters - a very powerful collection of filters that really broadened my scope in gifmaking over the past 12 months.
Before I get into this tutorial, I want to thank @laurabenanti, @maines , @cobbbvanth, and @cal-kestis for their unconditional support over the course of my journey of investigating the Neural Filters & their valuable inputs on the rendering performance!
In this tutorial, I will outline what the Photoshop Neural Filters do and how I use them in my workflow - multiple examples will be provided for better clarity. Finally, I will talk about some known performance issues with the filters & some feasible workarounds.
Tutorial Structure:
Meet the Neural Filters: What they are and what they do
Why I use Neural Filters? How I use Neural Filters in my giffing workflow
Getting started: The giffing workflow in a nutshell and installing the Neural Filters
Applying Neural Filters onto your gif: Making use of the Neural Filters settings; with multiple examples
Testing your system: recommended if you’re using Neural Filters for the first time
Rendering performance: Common Neural Filters performance issues & workarounds
For quick reference, here are the examples that I will show in this tutorial:
Example 1: Image Enhancement | improving the image quality of gifs prepared from highly compressed video files
Example 2: Facial Enhancement | enhancing an individual's facial features
Example 3: Colour Manipulation | colourising B&W gifs for a colourful gifset
Example 4: Artistic effects | transforming landscapes & adding artistic effects onto your gifs
Example 5: Putting it all together | my usual giffing workflow using Neural Filters
What you need & need to know:
Software: Photoshop 2021 or later (recommended: 2023 or later)*
Hardware: 8GB of RAM; having a supported GPU is highly recommended*
Difficulty: Advanced (requires a lot of patience); knowledge in gifmaking and using video timeline assumed
Key concepts: Smart Layer / Smart Filters
Benchmarking your system: Neural Filters test files**
Supplementary materials: Tutorial Resources / Detailed findings on rendering gifs with Neural Filters + known issues***
*I primarily gif on an M2 Max MacBook Pro that's running Photoshop 2024, but I also have experiences gifmaking on few other Mac models from 2012 ~ 2023.
**Using Neural Filters can be resource intensive, so it’s helpful to run the test files yourself. I’ll outline some known performance issues with Neural Filters and workarounds later in the tutorial.
***This supplementary page contains additional Neural Filters benchmark tests and instructions, as well as more information on the rendering performance (for Apple Silicon-based devices) when subject to heavy Neural Filters gifmaking workflows
Tutorial under the cut. Like / Reblog this post if you find this tutorial helpful. Linking this post as an inspo link will also be greatly appreciated!
1. Meet the Neural Filters!
Neural Filters are powered by Adobe's machine learning engine known as Adobe Sensei. It is a non-destructive method to help streamline workflows that would've been difficult and/or tedious to do manually.
Here are the Neural Filters available in Photoshop 2024:


Skin Smoothing: Removes blemishes on the skin
Smart Portrait: This a cloud-based filter that allows you to change the mood, facial age, hair, etc using the sliders+
Makeup Transfer: Applies the makeup (from a reference image) to the eyes & mouth area of your image
Landscape Mixer: Transforms the landscape of your image (e.g. seasons & time of the day, etc), based on the landscape features of a reference image
Style Transfer: Applies artistic styles e.g. texturings (from a reference image) onto your image
Harmonisation: Applies the colour balance of your image based on the lighting of the background image+
Colour Transfer: Applies the colour scheme (of a reference image) onto your image
Colourise: Adds colours onto a B&W image
Super Zoom: Zoom / crop an image without losing resolution+
Depth Blur: Blurs the background of the image
JPEG Artefacts Removal: Removes artefacts caused by JPEG compression
Photo Restoration: Enhances image quality & facial details
+These three filters aren't used in my giffing workflow. The cloud-based nature of Smart Portrait leads to disjointed looking frames. For Harmonisation, applying this on a gif causes Neural Filter timeout error. Finally, Super Zoom does not currently support output as a Smart Filter
If you're running Photoshop 2021 or earlier version of Photoshop 2022, you will see a smaller selection of Neural Filters:


Things to be aware of:
You can apply up to six Neural Filters at the same time
Filters where you can use your own reference images: Makeup Transfer (portraits only), Landscape Mixer, Style Transfer (not available in Photoshop 2021), and Colour Transfer
Later iterations of Photoshop 2023 & newer: The first three default presets for Landscape Mixer and Colour Transfer are currently broken.
2. Why I use Neural Filters?
Here are my four main Neural Filters use cases in my gifmaking process. In each use case I'll list out the filters that I use:

Enhancing Image Quality:
Common wisdom is to find the highest quality video to gif from for a media release & avoid YouTube whenever possible. However for smaller / niche media (e.g. new & upcoming musical artists), prepping gifs from highly compressed YouTube videos is inevitable.
So how do I get around with this? I have found Neural Filters pretty handy when it comes to both correcting issues from video compression & enhancing details in gifs prepared from these highly compressed video files.
Filters used: JPEG Artefacts Removal / Photo Restoration
Facial Enhancement:
When I prepare gifs from highly compressed videos, something I like to do is to enhance the facial features. This is again useful when I make gifsets from compressed videos & want to fill up my final panel with a close-up shot.
Filters used: Skin Smoothing / Makeup Transfer / Photo Restoration (Facial Enhancement slider)
Colour Manipulation:
Neural Filters is a powerful way to do advanced colour manipulation - whether I want to quickly transform the colour scheme of a gif or transform a B&W clip into something colourful.
Filters used: Colourise / Colour Transfer
Artistic Effects:
This is one of my favourite things to do with Neural Filters! I enjoy using the filters to create artistic effects by feeding textures that I've downloaded as reference images. I also enjoy using these filters to transform the overall the atmosphere of my composite gifs. The gifsets where I've leveraged Neural Filters for artistic effects could be found under this tag on usergif.
Filters used: Landscape Mixer / Style Transfer / Depth Blur
How I use Neural Filters over different stages of my gifmaking workflow:
I want to outline how I use different Neural Filters throughout my gifmaking process. This can be roughly divided into two stages:
Stage I: Enhancement and/or Colourising | Takes place early in my gifmaking process. I process a large amount of component gifs by applying Neural Filters for enhancement purposes and adding some base colourings.++
Stage II: Artistic Effects & more Colour Manipulation | Takes place when I'm assembling my component gifs in the big PSD / PSB composition file that will be my final gif panel.
I will walk through this in more detail later in the tutorial.
++I personally like to keep the size of the component gifs in their original resolution (a mixture of 1080p & 4K), to get best possible results from the Neural Filters and have more flexibility later on in my workflow. I resize & sharpen these gifs after they're placed into my final PSD composition files in Tumblr dimensions.
3. Getting started
The essence is to output Neural Filters as a Smart Filter on the smart object when working with the Video Timeline interface. Your workflow will contain the following steps:
Prepare your gif
In the frame animation interface, set the frame delay to 0.03s and convert your gif to the Video Timeline
In the Video Timeline interface, go to Filter > Neural Filters and output to a Smart Filter
Flatten or render your gif (either approach is fine). To flatten your gif, play the "flatten" action from the gif prep action pack. To render your gif as a .mov file, go to File > Export > Render Video & use the following settings.

Setting up:
o.) To get started, prepare your gifs the usual way - whether you screencap or clip videos. You should see your prepared gif in the frame animation interface as follows:

Note: As mentioned earlier, I keep the gifs in their original resolution right now because working with a larger dimension document allows more flexibility later on in my workflow. I have also found that I get higher quality results working with more pixels. I eventually do my final sharpening & resizing when I fit all of my component gifs to a main PSD composition file (that's of Tumblr dimension).
i.) To use Smart Filters, convert your gif to a Smart Video Layer.
As an aside, I like to work with everything in 0.03s until I finish everything (then correct the frame delay to 0.05s when I upload my panels onto Tumblr).
For convenience, I use my own action pack to first set the frame delay to 0.03s (highlighted in yellow) and then convert to timeline (highlighted in red) to access the Video Timeline interface. To play an action, press the play button highlighted in green.

Once you've converted this gif to a Smart Video Layer, you'll see the Video Timeline interface as follows:

ii.) Select your gif (now as a Smart Layer) and go to Filter > Neural Filters

Installing Neural Filters:
Install the individual Neural Filters that you want to use. If the filter isn't installed, it will show a cloud symbol (highlighted in yellow). If the filter is already installed, it will show a toggle button (highlighted in green)

When you toggle this button, the Neural Filters preview window will look like this (where the toggle button next to the filter that you use turns blue)

4. Using Neural Filters
Once you have installed the Neural Filters that you want to use in your gif, you can toggle on a filter and play around with the sliders until you're satisfied. Here I'll walkthrough multiple concrete examples of how I use Neural Filters in my giffing process.
Example 1: Image enhancement | sample gifset
This is my typical Stage I Neural Filters gifmaking workflow. When giffing older or more niche media releases, my main concern is the video compression that leads to a lot of artefacts in the screencapped / video clipped gifs.
To fix the artefacts from compression, I go to Filter > Neural Filters, and toggle JPEG Artefacts Removal filter. Then I choose the strength of the filter (boxed in green), output this as a Smart Filter (boxed in yellow), and press OK (boxed in red).
Note: The filter has to be fully processed before you could press the OK button!

After applying the Neural Filters, you'll see "Neural Filters" under the Smart Filters property of the smart layer

Flatten / render your gif
Example 2: Facial enhancement | sample gifset
This is my routine use case during my Stage I Neural Filters gifmaking workflow. For musical artists (e.g. Maisie Peters), YouTube is often the only place where I'm able to find some videos to prepare gifs from. However even the highest resolution video available on YouTube is highly compressed.
Go to Filter > Neural Filters and toggle on Photo Restoration. If Photoshop recognises faces in the image, there will be a "Facial Enhancement" slider under the filter settings.

Play around with the Photo Enhancement & Facial Enhancement sliders. You can also expand the "Adjustment" menu make additional adjustments e.g. remove noises and reducing different types of artefacts.

Once you're happy with the results, press OK and then flatten / render your gif.
Example 3: Colour Manipulation | sample gifset
Want to make a colourful gifset but the source video is in B&W? This is where Colourise from Neural Filters comes in handy! This same colourising approach is also very helpful for colouring poor-lit scenes as detailed in this tutorial.
Here's a B&W gif that we want to colourise:

Highly recommended: add some adjustment layers onto the B&W gif to improve the contrast & depth. This will give you higher quality results when you colourise your gif.
Go to Filter > Neural Filters and toggle on Colourise.

Make sure "Auto colour image" is enabled.
Play around with further adjustments e.g. colour balance, until you're satisfied then press OK.
Important: When you colourise a gif, you need to double check that the resulting skin tone is accurate to real life. I personally go to Google Images and search up photoshoots of the individual / character that I'm giffing for quick reference.
Add additional adjustment layers until you're happy with the colouring of the skin tone.

Once you're happy with the additional adjustments, flatten / render your gif. And voila!

Note: For Colour Manipulation, I use Colourise in my Stage I workflow and Colour Transfer in my Stage II workflow to do other types of colour manipulations (e.g. transforming the colour scheme of the component gifs)
Example 4: Artistic Effects | sample gifset
This is where I use Neural Filters for the bulk of my Stage II workflow: the most enjoyable stage in my editing process!
Normally I would be working with my big composition files with multiple component gifs inside it. To begin the fun, drag a component gif (in PSD file) to the main PSD composition file.
Resize this gif in the composition file until you're happy with the placement

Duplicate this gif. Sharpen the bottom layer (highlighted in yellow), and then select the top layer (highlighted in green) & go to Filter > Neural Filters

I like to use Style Transfer and Landscape Mixer to create artistic effects from Neural Filters. In this particular example, I've chosen Landscape Mixer
Select a preset or feed a custom image to the filter (here I chose a texture that I've on my computer)

Play around with the different sliders e.g. time of the day / seasons
Important: uncheck "Harmonise Subject" & "Preserve Subject" - these two settings are known to cause performance issues when you render a multiframe smart object (e.g. for a gif)

Once you're happy with the artistic effect, press OK
To ensure you preserve the actual subject you want to gif (bc Preserve Subject is unchecked), add a layer mask onto the top layer (with Neural Filters) and mask out the facial region. You might need to play around with the Layer Mask Position keyframes or Rotoscope your subject in the process.
After you're happy with the masking, flatten / render this composition file and voila!

Example 5: Putting it all together | sample gifset
Let's recap on the Neural Filters gifmaking workflow and where Stage I and Stage II fit in my gifmaking process:
i. Preparing & enhancing the component gifs
Prepare all component gifs and convert them to smart layers
Stage I: Add base colourings & apply Photo Restoration / JPEG Artefacts Removal to enhance the gif's image quality
Flatten all of these component gifs and convert them back to Smart Video Layers (this process can take a lot of time)
Some of these enhanced gifs will be Rotoscoped so this is done before adding the gifs to the big PSD composition file
ii. Setting up the big PSD composition file
Make a separate PSD composition file (Ctrl / Cmmd + N) that's of Tumblr dimension (e.g. 540px in width)
Drag all of the component gifs used into this PSD composition file
Enable Video Timeline and trim the work area
In the composition file, resize / move the component gifs until you're happy with the placement & sharpen these gifs if you haven't already done so
Duplicate the layers that you want to use Neural Filters on
iii. Working with Neural Filters in the PSD composition file
Stage II: Neural Filters to create artistic effects / more colour manipulations!
Mask the smart layers with Neural Filters to both preserve the subject and avoid colouring issues from the filters
Flatten / render the PSD composition file: the more component gifs in your composition file, the longer the exporting will take. (I prefer to render the composition file into a .mov clip to prevent overriding a file that I've spent effort putting together.)
Note: In some of my layout gifsets (where I've heavily used Neural Filters in Stage II), the rendering time for the panel took more than 20 minutes. This is one of the rare instances where I was maxing out my computer's memory.
Useful things to take note of:
Important: If you're using Neural Filters for Colour Manipulation or Artistic Effects, you need to take a lot of care ensuring that the skin tone of nonwhite characters / individuals is accurately coloured
Use the Facial Enhancement slider from Photo Restoration in moderation, if you max out the slider value you risk oversharpening your gif later on in your gifmaking workflow
You will get higher quality results from Neural Filters by working with larger image dimensions: This gives Neural Filters more pixels to work with. You also get better quality results by feeding higher resolution reference images to the Neural Filters.
Makeup Transfer is more stable when the person / character has minimal motion in your gif
You might get unexpected results from Landscape Mixer if you feed a reference image that don't feature a distinctive landscape. This is not always a bad thing: for instance, I have used this texture as a reference image for Landscape Mixer, to create the shimmery effects as seen in this gifset
5. Testing your system
If this is the first time you're applying Neural Filters directly onto a gif, it will be helpful to test out your system yourself. This will help:
Gauge the expected rendering time that you'll need to wait for your gif to export, given specific Neural Filters that you've used
Identify potential performance issues when you render the gif: this is important and will determine whether you will need to fully playback your gif before flattening / rendering the file.
Understand how your system's resources are being utilised: Inputs from Windows PC users & Mac users alike are welcome!
About the Neural Filters test files:
Contains six distinct files, each using different Neural Filters
Two sizes of test files: one copy in full HD (1080p) and another copy downsized to 540px
One folder containing the flattened / rendered test files
How to use the Neural Filters test files:
What you need:
Photoshop 2022 or newer (recommended: 2023 or later)
Install the following Neural Filters: Landscape Mixer / Style Transfer / Colour Transfer / Colourise / Photo Restoration / Depth Blur
Recommended for some Apple Silicon-based MacBook Pro models: Enable High Power Mode
How to use the test files:
For optimal performance, close all background apps
Open a test file
Flatten the test file into frames (load this action pack & play the “flatten” action)
Take note of the time it takes until you’re directed to the frame animation interface
Compare the rendered frames to the expected results in this folder: check that all of the frames look the same. If they don't, you will need to fully playback the test file in full before flattening the file.†
Re-run the test file without the Neural Filters and take note of how long it takes before you're directed to the frame animation interface
Recommended: Take note of how your system is utilised during the rendering process (more info here for MacOS users)
†This is a performance issue known as flickering that I will discuss in the next section. If you come across this, you'll have to playback a gif where you've used Neural Filters (on the video timeline) in full, prior to flattening / rendering it.
Factors that could affect the rendering performance / time (more info):
The number of frames, dimension, and colour bit depth of your gif
If you use Neural Filters with facial recognition features, the rendering time will be affected by the number of characters / individuals in your gif
Most resource intensive filters (powered by largest machine learning models): Landscape Mixer / Photo Restoration (with Facial Enhancement) / and JPEG Artefacts Removal
Least resource intensive filters (smallest machine learning models): Colour Transfer / Colourise
The number of Neural Filters that you apply at once / The number of component gifs with Neural Filters in your PSD file
Your system: system memory, the GPU, and the architecture of the system's CPU+++
+++ Rendering a gif with Neural Filters demands a lot of system memory & GPU horsepower. Rendering will be faster & more reliable on newer computers, as these systems have CPU & GPU with more modern instruction sets that are geared towards machine learning-based tasks.
Additionally, the unified memory architecture of Apple Silicon M-series chips are found to be quite efficient at processing Neural Filters.
6. Performance issues & workarounds
Common Performance issues:
I will discuss several common issues related to rendering or exporting a multi-frame smart object (e.g. your composite gif) that uses Neural Filters below. This is commonly caused by insufficient system memory and/or the GPU.
Flickering frames: in the flattened / rendered file, Neural Filters aren't applied to some of the frames+-+
Scrambled frames: the frames in the flattened / rendered file isn't in order
Neural Filters exceeded the timeout limit error: this is normally a software related issue
Long export / rendering time: long rendering time is expected in heavy workflows
Laggy Photoshop / system interface: having to wait quite a long time to preview the next frame on the timeline
Issues with Landscape Mixer: Using the filter gives ill-defined defined results (Common in older systems)--
Workarounds:
Workarounds that could reduce unreliable rendering performance & long rendering time:
Close other apps running in the background
Work with smaller colour bit depth (i.e. 8-bit rather than 16-bit)
Downsize your gif before converting to the video timeline-+-
Try to keep the number of frames as low as possible
Avoid stacking multiple Neural Filters at once. Try applying & rendering the filters that you want one by one
Specific workarounds for specific issues:
How to resolve flickering frames: If you come across flickering, you will need to playback your gif on the video timeline in full to find the frames where the filter isn't applied. You will need to select all of the frames to allow Photoshop to reprocess these, before you render your gif.+-+
What to do if you come across Neural Filters timeout error? This is caused by several incompatible Neural Filters e.g. Harmonisation (both the filter itself and as a setting in Landscape Mixer), Scratch Reduction in Photo Restoration, and trying to stack multiple Neural Filters with facial recognition features.
If the timeout error is caused by stacking multiple filters, a feasible workaround is to apply the Neural Filters that you want to use one by one over multiple rendering sessions, rather all of them in one go.
+-+This is a very common issue for Apple Silicon-based Macs. Flickering happens when a gif with Neural Filters is rendered without being previously played back in the timeline.
This issue is likely related to the memory bandwidth & the GPU cores of the chips, because not all Apple Silicon-based Macs exhibit this behaviour (i.e. devices equipped with Max / Ultra M-series chips are mostly unaffected).
-- As mentioned in the supplementary page, Landscape Mixer requires a lot of GPU horsepower to be fully rendered. For older systems (pre-2017 builds), there are no workarounds other than to avoid using this filter.
-+- For smaller dimensions, the size of the machine learning models powering the filters play an outsized role in the rendering time (i.e. marginal reduction in rendering time when downsizing 1080p file to Tumblr dimensions). If you use filters powered by larger models e.g. Landscape Mixer and Photo Restoration, you will need to be very patient when exporting your gif.
7. More useful resources on using Neural Filters
Creating animations with Neural Filters effects | Max Novak
Using Neural Filters to colour correct by @edteachs
I hope this is helpful! If you have any questions or need any help related to the tutorial, feel free to send me an ask 💖
#photoshop tutorial#gif tutorial#dearindies#usernik#useryoshi#usershreyu#userisaiah#userroza#userrobin#userraffa#usercats#userriel#useralien#userjoeys#usertj#alielook#swearphil#*#my resources#my tutorials
538 notes
·
View notes
Note
I adore your art! I especially love how you do faces and capture the small details in expression/clothing! Do you have any tips about how to go about getting anatomy and facial structures correct? I do drawing as a hobby but I always find it so frustrating. Thanks for sharing your art with us on here :)
Thank you so much! Trust me I totally understand and I don't fully get anatomy myself.
The way I draw faces kinda kicks off from the Loomis method by drawing the circle first and then working around that. I think that's a good place to start, it's really good for face proportions and knowing where to put everything. After you do it so many times you don't need to lay everything out and you'll just know by hand. I can churn out so many faces now just drawing the circle part. I went ahead and looked online and I found a free PDF of one of his books you can take a look at :)
I still struggle with anatomy but whenever I try to figure it out I usually block in what I want on a canvas with a big dark pen and shave it down. I turn down the opacity and then try to sketch over.

I will say, use any resources you have available to you - they are there for you to use. I always use references and If I'm still struggling to get my idea out, I'll pull up a 3d model and sketch over. It saved me a lot of tears and frustration in the end and a lot of options out there are completely free or one-time purchases.
CSP has built-in software for modeling and lots of downloadable poses, Magicposer you can use for free but some stuff is locked behind membership subscriptions. DAZ studio software is free but that one has a bit more of a learning curve to operate. Handy I think is a one-time purchase and there are many options for hand and lighting reference. These are just ones I've tried for anatomy that worked for me but I definitely encourage looking around and doing some testing with other software if you're interested!
Best of luck lovely!
52 notes
·
View notes
Text
this is not a post that is a life lesson exactly, but it is like. an update on my life and how glad i am to have had options in this situation, and it can also be a metaphor if that metaphor is helpful to you
anyway, in mid february my boss was like 'hey do you have time for a catch up in at 11.30', and i had to do my regular self talk down of 'you're not getting fired lol clam down' except
(okay i didn't get fired, but i did get laid off.)
(read more because i've never told a short story in my life)
which. positive news, i got laid off in aotearoa nz and not america, but it is still the worst job market my case worker at the ministry of social development has seen in 20 years, so i wasn't feeling like. hype. about this situation.
the specifics of my career are that it's not really a career so much as it is a place i started working at when i was 17, and then didn't leave. it had nothing to do with my degree and wasn't doing anything i was especially interested in, but it was a job, and i was comfortable there, and it paid for half a surgery i needed and dealt with a solid decade of my unmedicated panic attacks, so like. solid work. a job that did essentially what i needed it to when i needed it.
that being said this left me in the position of: not having done a job search, ever! not having a CV! not having comprehensive knowledge of my own skillset because i learnt half a programming language on the job and only knew how to use it with my company's bespoke software! i was not feeling confident!
the huge caveat to this is that i DID receive 38 weeks severance. and when i say huge, i mean that was the safety net/prize that allowed me to do literally anything after the point of being laid off. like. had i not had that financial cushion, i had enough of a governmental safety net to fall back on if necessary, but it would have been high tension misery and panic the whole way through. at no point would i have dealt with any of it with grace (and frankly, no one should have to).
but because i did have that safety net, i had options, and i also just had the ability to...start dealing? my main concern was like, okay, given that this is happening, am i going to be able to continue living pretty normally for the next few months? yes? okay then, the only thing to do is to start doing.
(there are many things to do in this situation, but it did help me to picture having one path, and that path was Forward).
so idk i used my ten years of reading ask a manager on breaks and started writing cover letters and applying for jobs and now i have one. this is a simplification of a process that was at times miserable, and always deeply fucking boring, but i also think that the nature of just getting a rolling application process started helps with the overall brain-work of not taking rejections personally. like, if you're applying to everything that your skillset vaguely fits, your feelings can't be too hurt if a company comes back with 'skillset too vague bitch, nice try'.
anyway the job i ended up landing - and it was One Job, but You Only Need One - has ended up being something in the public sector that in the process of learning it existed, i became weirdly enthusiastic about. it also has a week more holiday than my last job, pays 10k more, and is in the same suburb i live in. it has more opportunity for career growth, and apparently i can also get free eye tests? that sounds nice. and i landed it quickly enough that i still have a stack of that severance money left for savings and also purchasing a celebratory build your own wooden pinball machine set.
all this to say, getting laid off was weirdly the best thing to happen to me this year. perhaps in many years.
which. that's LUCK, so much of this is luck, and location, and random happenstance. but also, you know, some of it was mindset and work also. some of it was due to decisions i made about my job and my mental health over a decade ago. i am a person who was able to deal with this situation pretty okay today because of decisions i made as a much less stable and unmedicated young adult.
this is what i mean about this being a useful metaphor if you want it to be. on account of the luck and the happenstance etc, i would never want to say 'this bad thing that happened to you is secretly a chance for a good thing to come!' because: i genuinely don't believe that.
but i know i have been a person in the past who fucked up in ways i had to trust my future self would be able to deal with and built on. i have had difficult and bad situations in my life that had very little to do with any power i had over those situations, and i had to pick a direction and start walking, because the other option was to lie down and not move.
and that process has been habit forming. allowing myself to take breaks when i could afford to, even if it meant not keeping up, meant that i could built up my tolerance to risk and disaster at my own speed, befitting my own capacity.
i am haunted by the version of myself that i believe could exist if i wasn't weighed down by everything that i am. a hannah who is less tired, more focused, less mentally ill, more supported by generational wealth and opportunity. she sits just out of reach, and occasionally she looks back and says, a little concerned, 'aren't you worried you're just making excuses, though? don't you think if you were a little more disciplined, you could be me? are you going to be so kind to yourself that you forget you even wanted to be me in the first place?'
i am: always worried about these things. but i am the person who is here, and i am moving forward at the pace i am able. for the most part, it's working out.
35 notes
·
View notes