#How to see multiple desktops on mac
Explore tagged Tumblr posts
Visit Tumblr Blog
Explore Tumblr blogs with no restrictions, modern design and the best experience.
Last Seen Tumblr Blogs


Fun Fact
If you dial 1-866-584-6757, you can leave an audio post for your followers.
Text
on the topic of writing software
I want to ramble at you about some writing software options. 98% of the time I'm perfectly content with LibreOffice Writer (and previously I used Word, back when Microsoft products were less shitty). But every now and then when I have a new project (like now - more on that later) I start looking for something shiny and new to try. And I fell down into another research rabbit hole lol
I usually don't talk a lot about this bc my needs are very simple, and not sure how useful my opinion is to others, but I enjoy the topic. It's an intersection of creative writing and tech nerdiness and I like both of those things. Also what writing software you prefer really depends on the type of writer that you are, and everyone has a slightly different writing process and I find that fascinating.
Now, as I said, I'm coming at it from a slightly tech-nerd angle. I don't care if the installation is clunky, I'm happy to see the words open-source, and the need to create an account will already mildly piss me off (:
Don't worry, I'm not as intense as the guy writing his novel in Vim. Though fucking respect. And I can't say I'm not tempted to try it even with the steep learning curve lmao (Seriously, if you don't know Vim is notorious among software developers.)
Anyway, things I've tried so far:
Manuskript: this was listed as an open-source Scrivener alternative (though I haven't tried Scrivener. so.). I gave it a go when I was writing heart worth the trouble and it was pretty nice. It helped me when I had to move scenes and chapters around. But overall I think it was made with plotters in mind bc it wants you to enter a lot of information upfront. I'm not a planner/architect type of writer so this type of software is a bit overwhelming for me. Still, the fact that it's open source and works on Linux gets kudos from me.
Wavemaker: I recently played around with this, and I actually surprisingly like the features it has. You can put multiple books in a project, which is very nice if you like to work on different things, like fanfic, novels, etc. The mindmap is a feature I liked, though it's a bit clunky bc it collapses the text fields when you exit, and once I added an image field by accident that I could never remove lol I do like a bit of a snowflake method, so that feature is cool, and the cards are pretty straightforward too. Usually, my problem with these apps is that I don't even want to touch half of the features so they are pointless to me, but the features of Wavemaker were kind of nice. It's a web app that you can download and use offline but it's still working from your browser if that makes sense. That was what I didn't really appreciate. Also, it doesn't give you a lot of options to back it up. You either save the wavemaker file, export it into a document (which is fine, but it adds an extra step to the backup process) or you sync with Google Drive *shudders*
Things I want to try out:
Calmly Writer: now this is just purely a text editor that focuses on being very zen, streamlined, distraction-free, etc. It's pretty and it has typewriter sounds. (Yeah, I'm not immune to a pretty UI and harmless fun features alright? I can contain multitudes :P) It has an online version, but you can also download it, and works on Windows, Mac, and Linux. On paper, the desktop app requires a license, but the way they put it is that you can evaluate it for free and the evaluation doesn't have an enforced time limit... So. As good as free. (Though if I really like it, I would totally consider buying a license for 20usd that I can use on 3 computers, that seems fair. I appreciate a license over a subscription model for sure.) Honestly, I think this is the one I'm going to try next bc it just integrates perfectly into my writing process. That being: a multitude of messy, hand-written notes and notebooks + a document editor + backups on hard drive and GitHub (yes, really) ^^"
Shaxpir: This is on the opposite end of the spectrum basically, but out of the "fancy" ones, I kind of like the look of this the most. I like the statistics part in particular. But honestly, I probably won't try it bc it doesn't have a Linux version which would be a pain in the ass for me, and is cloud-based. I kind of don't really trust them, which is my biggest issue with these companies. (Although the creator's heart seems to be in the right place when it comes to AI. Basically, some of their features are based on machine learning and language models. For example, it will recognize passive voice, if it's an adverb with "-ly" or the emotion of a word. Which I think is all cool and fine and shouldn't be lumped in with generative AI. But he also had a website that did this analysis for already published works, and when people pointed out that it was sketchy, he took that down and I can respect that. I'm not sure how much it influenced the actual features of the app, maybe I'll just take a peek out of curiosity. The whole thing does make me have trust issues though lmao) If anyone has experience with it though, I'm interested to hear about it.
Obsidian: not a dedicated writing software, but rather an elaborate note-taking app. I heard good things about it from smart people lol If I really wanted to access my writing on my phone, I would probably use this bc it works on every platform and has end-to-end encrypted sync with version control. I heard you can also integrate it with GitHub which is always music to my ears lol But the setup probably takes a bit of time and I'm not particularly motivated to do that right now.
So yeah, those are the options that appeal to me right now. If anyone used these and has opinions, I'm all ears :D
137 notes
·
View notes
Note
So Warframe added a "Pom-2" Alternate 1999 computer (that's needed for weird void magic future science wizardry). Thoughts?
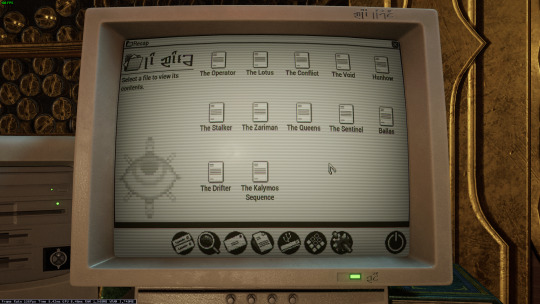


Only thing I have that's a sort of question mark is that I don't know of many setups that would have needed a 5 1/4" floppy in 99 (or why it has both the tower and the under monitor unit)
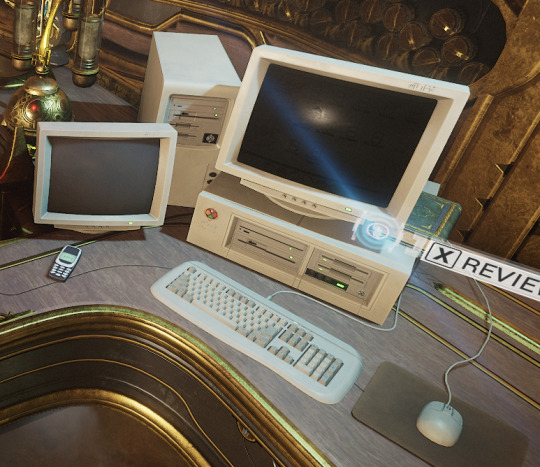
ugh. OKAY, so... the tower and desktop combination is just weird. I have, on one occasion, run a "server" that was two towers, and the original PC supported a DUAL-DESKTOP mode, but both types together? nonsense.
dual monitor was rare but possible in 1999 (win98 added native support), so I think the best interpretation here is that this is actually two computers. maybe the one on the left is missing the keyboard and mouse because it's being used as some kind of server for the other computer? I used a little case like that to run my first linux server, which was also acting as a router for my internal network.
The OS is weird. The icons above the menu-bar look like win98, the dialog box is windows 3.x, the menu-bar icons on the bottom are pure os X (although they remind me of like a web-TV kinda system, like hotkeys for email/internet/etc), but the greyscale is very classic mac system. Actually it kinda reminds me of C64's GEOS, but GEOS was very classic-mac.

Like most CRT-filters, they turned the scanlines up WAY TOO HIGH. No CRT I've ever seen looked that fucking terrible. The monitor buttons are a bit odd: You didn't get monitors with buttons on the front until long after they were all color... but maybe it's a color monitor that's showing a monochrome OS?
as for the floppies: yeah. There are multiple mistakes here.
5.25" in 1999 is just silly. If you still had 5.25" disk drives in 1999, you were intentionally doing some retrocomputing stuff. For reference, around 2001 my PC repair job would specifically ask me to copy data off 5.25" disks, because they didn't have any 5.25" drives anymore, and I was their only tech who did.
The other mistake is that they have THREE floppy drives. so the PC doesn't really support that, natively? You can do some tricks and make it work (The youtuber Tech Tangents did a video on how it could be done), but realistically two was the normal max.
The final mistake is that all the drive activity lights are on. Those are only supposed to be on while the drive is reading or writing... and I don't see any disks in those drives! Let alone a situation that would involve turning all three on at once (I don't think that's even possible on most floppy controllers!)
In fact, the main time you'd end up with the drive lights stuck on like that is when you've installed the drive cable upside down. That ends up with them getting stuck on and non-functional. So this computer looks, to me, like it was put together incorrectly and no one noticed.
I don't believe that font would be on a black & white retro computer. Nope. Too smooth and too big.
There's also a USB icon on that OS: I don't think there's ever been a monochrome OS that supported OS, and looking at that computer case I don't believe that it has USB. Maybe the tower would, but the desktop? no.
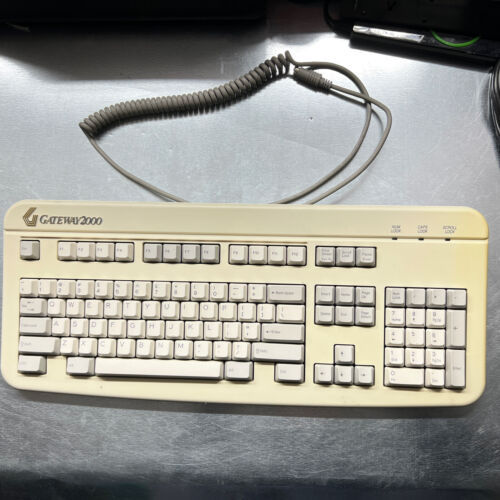
That keyboard is off a Gateway 2000 computer. Something like this:
162 notes
·
View notes
Note
I saw that you use a tablet, a desktop, and paper notes. How do you conciliate those notes?
Is there a mechanism of making primary notes on one resource and then passing those notes to other while reviewing them?


hi! thanks so much for asking! here are my favorite methods for sharing notes between devices :). i personally have apple devices so i can fairly easily airdrop and sync things between devices, but i also frequently work at the library desktop computers where i can't do that! so here's my tips and tricks for sharing notes between devices
for context: i've been mostly doing digital notetaking recently, but i also like to scan my paper notes as well!
i'm going to be dividing this post into 2 methods! (there will be some overlap). syncing already written notes and syncing notes (in progress) between devices
for already written notes:
the first step i would take is export your notes as a pdf or any other file type. if they're handwritten try going into your notes app (for ios) or downloading a pdf scanner app for your phone! if your notes are digital check the sharing options in your app to see if there's anything about "exporting".
personally, i like to use either discord or notion. i have created a discord server with only myself that i use just for sharing links/files/anything between devices! i like discord because there's apps for pc, mac, tablets, and phones; and even a web app! discord is really nice and fast, and you can make different channels (as pictured below) for organization. as long as your file size isn't too big, you should be fine.

my second app i like to use is notion! notion is such a beast in itself, but i like to use it to upload files and images and links! below are two ways i have used it: to upload pdfs/files, and to upload goodnotes (my notetaking app) links to the pages i'm writing on! similar to discord, notion has apps for all devices, but it also works great just by itself on the website (no app required)! it's really great to access it from all my devices.


another way you could share your notes on different devices is through the cloud! (yes, discord and notion are both through the cloud). google drive, microsoft onedrive, icloud storage, etc. are great tools that you can use to upload files and see on multiple devices. i personally like discord and notion more, just because they're already apps i frequently use, but if you can't get either one cloud-based storage platforms are also a great idea! they definitely have more security than discord or notion, because your files may be at risk of being deleted!
for the purposes of sharing notes to reference on another device when writing an essay, or something of similar vain, i really love discord and/or notion and they both work great!
for syncing notes in real time:
pretty similar to the last one, i would say notion or google docs (or microsoft word on the web i believe has similar functionality, or onenote, anything similar!)
if you want to be writing notes on one device and have them sync up quickly on another - i think any word processing software is the best bet for you.
both notion and google docs you can access them on any device, and/or on their websites too!
google docs is a lot more straightforward, but since notion is so powerful it provides a lot of flexibility for your notes! here's an (old) example of notes i've taken on notion. (i personally really like how easy it is to make columns!)
i hope this helped a little bit! please let me know if you have any more questions :)
also! notetaking is very much an individual thing, if something works for me and doesn't work for you - that's okay! we're all learning and just have to figure out what's best for ourselves.
#to: ilyastudies#from: silverfroot#thanks for the ask!#studying tips#studying#studying aesthetic#studyblr#study motivation#university#studyspo#study blog#study inspo#academia#chaotic academia#study aesthetic#study tips#advice#study advice#study methods#study resources#resource#text post#*
31 notes
·
View notes
Text
Reminders for the upcoming TS4 update!
Simmers, the new expansion pack For Rent comes out on December 7th and as we all know, big updates can mess with your game especially if you use mods. I've learned my lesson from the last few updates and I'd like to give some suggestions to help!
Note: I use the EA App for Sims 4, on a Windows computer. The methods I describe here will probably not apply to MAC users. I also don't know if these work for pirated games so just be careful!
-BACK UP YOUR SAVES. Just in case your save gets corrupted or the update somehow manages to lose your saves (this has happened to me- after the update, my saves were gone). Here's what I do:
Navigate to your "Sims 4" folder. In my case it's Documents>Electronic Arts>Sims 4.
Find your "saves" folder and right-click to copy it.
Paste your copy of your saves folder to your desktop (some people paste to their external hard drive as well, but I'm not sure how to do this)
Right click on your copy to rename it. It's a good idea to write the date on which you copied your folder. Here's my current backup:

Your saves are now backed up! If you lose your files in the game or they become corrupted, open up your backup folder, then select and copy all the files in the folder and then paste them into your actual saves folder. Your saves will then be restored! You should do this every so often just in case. I try and back up my saves once a month.
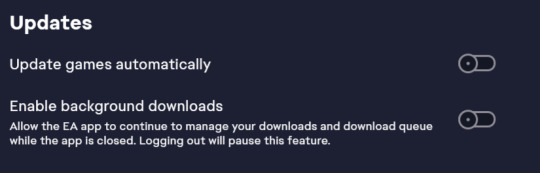
-Turn off automatic updates. This way you can choose when to update your game. I personally wait until mod creators start updating their mods and then update the game.
Open the EA App and head to your settings, then the "downloads" tab.
Turn off the "update games automatically" option.
When you're ready, update the game and enjoy!
-Follow mod creators on social media. If you use mods, it's a good idea to keep up with updates and what the creators are up to. When there's a huge Sims update, many mods (especially script mods) tend to break and need to be updated by the creators. Keeping up with them allows you to see what their plans are for updating the mods. Creators use many different platforms, but from what I've seen most tend to use Tumblr, Patreon, and Twitter/X to post updates. If I find a mod I really like, I always follow the creator. They also deserve tons of support for their amazing work!
-Know which mods are broken and updated. In addition to following mod creators, there are multiple threads that log all mods with each update. They tell us which mods are broken, which are updated, and which were unaffected by the update. If you're experiencing a glitch with a mod, you can report it on these threads. Here are examples of threads from previous updates:
Always check these before writing to an official Sims/EA forum about a glitch. If you use script mods, the bugs you're experiencing will most likely be from these mods. Also, if you use UI mods like UI Cheats, don't freak out if your UI looks like this:
Your game isn't corrupted, the mod is just outdated. UI Cheats almost always breaks after a big update. The creator of UI Cheats updates frequently, so make sure to check up on their Patreon page.
-Check in with the community if you have a bug. The Sims Forums, r/Sims4 on Reddit, and Simblr are good places to go if you have a question about a bug you're having. r/Sims4 was a lifesaver for everyone who had the dreaded tooth glitch in Growing Together. If you're having a non-mod related bug, chances are others are having it too, so don't feel afraid to ask!
I hope this helps some of my fellow simmers. Good luck with the new update and pack, I can't wait to see how my favorite Simblrs use it in their stories and gameplays!💖
#sims 4#ts4#sims 4 info#sims 4 update#sims 4 for rent#sims 4 expansion pack#important#the sims#sims#sims 4 mods#simblr#the sims community
13 notes
·
View notes
Text
idk if i have the vocabulary to explain this gripe so i apologize for the wordiness ahead but i hate how apple UI in particular has started requiring more clicks/taps on virtually everything? like for example to add a photo to an imessage you now have to tap at least three times to get to your camera roll. on maps you need to tap multiple times WHILE DRIVING to end a route and get the navigation to stop, and sometimes maps will suggest a new "faster" route and switch it to the new option if you don't tap "dismiss" fast enough instead of letting you stay on the road you wanted... forcing you to stop paying attention and take your eyes off the road to touch your screen if you want to base your route on other factors than temporary traffic backup. i just tried to put a spotify playlist on shuffle on mac desktop, and realized after a few minutes it still wasn't shuffling. when i went back to the app, i realized they have added a dumbfuck new "smart shuffle" and you need to go to a second popup to select which shuffle you WANT or it just stays unshuffled? like. i did not ask for smart shuffle. why are you adding so many things nobody wants and making it harder to use the features your users are used to, instead making us opt into one or the other instead of defaulting to the basic setting? idk man. i don't even see the point of these menus except i guess forcing users to test their new features. does anyone in tech know why apple and developers in general do this or is it just non-intuitive late-capitalist design??
8 notes
·
View notes
Text

1/8/93
Hi, I am the Editor, Producer, and Main writer for Fashion Fag Magazine® I do not want to be the only contributor to this magazine. I want and love your input and support to make this magazine, that you can rely on for good articles, poetry, reviews, fashion tips etc. Use this magazine as an outlet for your feelings and emotions. I will try to have in depth interviews with prominent gay figures and the ordinary fag. Unlike other magazine this magazine will not be, Gay white male oriented.
This magazine will be inclusive of everyone, lesbians, bi-sexuals and supporters. People of all races, colors and socio-economical backgrounds will be represented within these pages. If you see us falling short on any of these promises let us know because we are here to serve your needs. With all of this said enjoy your first issue of Fashion Fag Magazine®
Peace, Love + Hair Grease
Miss Trevor
Nineteen Ninety-Three, thirty-one years ago, three decades, a quarter of a century, seriously a lifetime ago, but one thing is consistent I have used the written word to express my feelings, values, failures and loves for a long damned time. Mind you, this was the furthest thing from a magazine, the first issue basically being double-sided text on colored office paper, it was all about the aspiration!
I would love to say my starting this zine/newsletter was an original idea but that would a fine piece of creative retelling of history. My college friend Matthew Carlin had a newsletter called TMCM, The Matt Carlin Mirror where he talked about his life, love, school and anything else that came to mind. It was his post-college way of keeping in touch with the friends made back in Ithaca, and like him I thought I could do the same and grow the fan-base I thought I had, in my head.

Desktop publishing was a new idea in the early nineties, albeit Quark Xpress was started in 1981, it didn't become more widely used until the early nineties on Macintosh and Windows dominating the market share of the time. I wouldn't start using it myself until '95 somehow coping a bootleg version for my Mac SE. Previously I was using AppleWorks which later became ClarisWorks, this was basically just a word processing application, and I remember to create just one page I would have to create a text box in different positions and put them together when I printed it.
Below is one of the template pages from issue #2, there are three parts of this page, the find-a-word with its description below, Miss Moody Herself and the bits below it, and the three columns on the lower half. I didn't know how to make ClarisWork split up a page into different areas. I could easily make columns, but having something on the upper half of the page that was different than the content on the lower page had to be done by passing the document through the printer multiple times my Apple StyleWriter II.

So in my digital files for one page I would sometimes have three or four ClarisWord docs. It made for a slightly confusing organizing of an issue because one four page issue could easily have twelve to sixteen files. Quark Xpress which I taught myself, would get rid of the need for multiple documents and multiple passes through the printer. It had become the standard for desktop publishing and it was appropriate that I should utilize the industry standard for my own mass-read publication.
Sorry, I went off into a technical rabbit hole, but I think part of understanding who I am is to understand my technical proficiency throughout my adult life, and even now, its one of the things that I seriously think gave me the edge when I went to work in the corporate world, the fact that I had dabbled in so many applications and technology made me hit the ground running faster than a lot of my contemporaries.
I wish I still had that old SE, I gave it back to the friend who I purchased it from as a payment for his ripping out the old red carpet in my new apartment, the same one I am living in today. The reason I would love to have it, is I know there was a special app I used to create the type for Fashion Fag Magazine, my initial logo, which would change by my third issue.
Looking back at this production this was truly the first manifestation of my artistic voice as an adult. As I am learning of my childhood where I attempted to draw, sing, perform and write a little bit, but here I was now taking writing to the forefront as a means of expression. Albeit untrained I was designing a newsletter about my life and my experiences, I was seeking to give a voice to my identities and the struggles faced there within.

For all the wonderful things I learned at college, in this post-college queer world I was attempting to be seen for all the many aspects of my personhood, not just a body part, skin color or general aesthetic appeal. One of the backlashes of attending a primarily white educational institution, no matter had well-intentioned folks were, I was repeatedly othered. Sometimes by the people who looked like like me and had similar social-economic backgrounds, and others who loved the way I did with varying economic backgrounds but also failed to see the entire me.
Just a brief moment about the title, I have alway had a thing for fashion albeit my vision for myself and what was actually executed in the real-world wouldn't align until much later. I still felt I had the potential for a personal style that would surpass that of my peers.
Albeit the whyte queers weren't necessarily always the most fashion-forward of folks, particularly the ones I knew, I envisioned personal style being able to push the envelope and announce something more nuanced about my personality other than just being Black and queer. This voice would come to full fruition later, but Fashion Fag Magazine was precognition of what I knew would come in time.

Through my observations about my world I wanted folks to see the world in the way that I did. And through my nine issues published from nineteen ninety-three through nineteen ninety-six I attempted just that, sometimes successful other-times failing miserable, but still trying to make myself seen and heard in a world that wasn't really checking it for people like me, dark-skinned, femme, gender non-conforming, queer, well-spoken, nerdy, comic book reading, dance the house down folk.
I am going to try to translate this classic text for a new audience, who am I fooling with my twelve followers here, but I look at this mini-blog as a digital obituary for my life, and its important to include all the bits and pieces of a life, so you're are not just broken down to legal document or a one-hundred and fifty word summary. For as long as Tumblr is around which may be less than the span of my life, I at least want to make an attempt to record my thoughts and feelings about the breadth of the experiences of Trevor A. Brown.
[Photos by Brown Estate]
#QuarkExpress#desktop publishing#ClarisWorks#Apple SE#StyleWriter II#zine#newsletter#the matt carlin mirror#tmcm#fashion fag magazine#matthew carlin#queer#black#early 90s#AppleWorks#being seen#being heard#femme#gender nonconforming#obituary#dark skinned#in my own words#identity#sexuality#who I love#who I am
3 notes
·
View notes
Text
Virtual Try On for E-Commerce: The Tech That’s Turning Browsers Into Buyers

In a world where over 70% of shopping journeys start online, how do you sell products that need to be “felt” before they’re bought?
From lipstick shades and sunglasses to jewelry and apparel, e-commerce brands have long faced the challenge of bridging the “try-before-you-buy” gap. But now, there's a game-changing solution: Virtual Try On (VTO) technology.
Virtual Try On for E-Commerce is not just a feature - it’s fast becoming a conversion engine.
Powered by augmented reality (AR) and AI, VTO lets users see themselves in products digitally before making a purchase decision. The result? Higher confidence, higher cart values, and fewer returns.
What is Virtual Try On for E-Commerce?
Virtual Try On is an interactive technology that allows customers to digitally “try” products in real time - using their phone or desktop camera. Whether it’s:
Trying on lipstick shades that match your undertone,
Wearing earrings and necklaces virtually,
Or testing different sunglasses on your face shape,
VTO gives users the confidence they need to convert.
With a smartphone camera and a tap, consumers are able to visualize exactly how products will look on them, not just on a model.
Why Virtual Try On Matters Now More Than Ever
The e-commerce boom is crowded - and attention spans are shrinking. Here's why Virtual Try On is becoming non-negotiable:
Improves Product Confidence Shoppers are 3x more likely to convert when they can visualize products on themselves.
Reduces Return Rates By aligning expectations and reality, VTO significantly cuts returns - especially in beauty, eyewear, and fashion.
Boosts Average Order Value (AOV) Customers tend to buy more when they can experiment visually - trying multiple shades, styles, or combos.
Enhances Brand Experience VTO isn't just utility - it's engagement. It creates a "wow" factor that keeps users on your site longer.
Mobile-First Friendly Most VTO platforms are optimized for mobile, where the bulk of online shopping happens.
How It Works: The Tech Behind VTO
Virtual Try On for E-Commerce uses a combination of:
Real-time facial mapping and tracking Advanced computer vision algorithms recognize facial landmarks or body shapes to superimpose products accurately.
Augmented Reality (AR) AR overlays the product on the user's live image feed, adjusting with movement and lighting.
AI-Powered Skin Tone & Fit Matching AI can detect your skin tone or face shape and automatically recommend compatible shades or styles.
WebAR or App-Based Platforms VTO experiences can be embedded directly on websites or offered via branded apps.
Industries Seeing Massive Impact
Beauty & Cosmetics: Try on lipsticks, eyeliners, foundation shades in real time.
Eyewear: See how different frames suit your face, side profile, and eye spacing.
Jewelry: Experiment with nose rings, necklaces, earrings - all virtually.
Apparel & Footwear (in select categories): From AR-powered sneakers to smart mirrors in trial rooms, the virtual wardrobe is expanding.
Fashion Accessories: Hats, hairbands, glasses, even tattoos - customers can try before they buy.
The Business Case: Why Brands Are Investing in VTO
A study by Shopify found that VTO-enabled products see a 94% higher conversion rate compared to those without. That’s not a typo.
Other stats making the case stronger:
61% of online shoppers prefer to buy from sites that offer VTO.
VTO can reduce product return rates by up to 30%.
Shoppers engage 2x longer on product pages with try-on capabilities.
In a competitive market, these aren’t incremental gains. They’re transformational.
Virtual Try On in Action: Brand Success Stories
Lenskart uses real-time 3D VTO to help users try on frames - contributing to a major boost in online sales.
MAC Cosmetics offers live try-ons for over 800 shades, increasing product trial rates exponentially.
Nykaa and Sephora have built entire try-on ecosystems within their apps, leading to higher session times and loyalty.
Implementation Considerations for E-Commerce Brands
If you’re looking to integrate Virtual Try On for E-Commerce, here’s what to keep in mind:
Choose the Right Tech Partner Look for solutions that offer face/body tracking, shade match accuracy, and mobile-first optimization.
Seamless UX Integration The best VTOs are frictionless - no extra downloads, just click and try.
Leverage Data Smartly Use VTO engagement data to personalize future recommendations, retargeting, and upsells.
Optimize for Speed If the try-on experience lags or glitches, users bounce. Prioritize load speed and AR stability.
Test & Iterate A/B test VTO placements, product ranges, and engagement formats to see what drives conversions.
VTO Is the New Product Page
In the future, static images won’t sell products. Experiences will.
Virtual Try On for E-Commerce is not a “nice-to-have” anymore - it’s becoming table stakes. Brands that adopt it early will not only see immediate ROI, but also establish themselves as digital-first, customer-centric leaders in their space.
Because in a world of endless scrolls and impulse carts, seeing really is believing.
0 notes
Text
How to Connect Cricut With Bluetooth (Easy Steps)
Do you know how to connect Cricut with Bluetooth? You must know about the setup process if you want to set up your own Cricut machine. Any Cricut machine that you want to use needs to be connected to a device that will help you use the machine. Design Space is downloaded on the device, and the app helps you use the machine on the device. However, it is not necessary to connect the machine and your device using Bluetooth only. You can use an alternative option, such as a USB cable. But if you use a USB cable for the connection, keep in mind that it is a wired connection and will not offer as much flexibility as Bluetooth. Here, we will see how you can connect a machine to multiple devices.
How to Connect Cricut With Bluetooth to Windows?
As I said, a crafting machine can be connected to many devices, and one of these devices can be either a phone or a computer. A computer can be a great choice when it comes to using it with your machine. If you have a Windows or Mac computer, you can use it with a machine. To add your machine to a device, follow the steps below:
How to Connect Cricut With Bluetooth to Mac?
Similarly, a MacBook is a great device to use with a machine. To use the machine, you have to connect it to your computer. The connection process is pretty similar, but I am writing the process in any way to avoid any kind of confusion. Here is how you can connect a machine to a Mac.
How to Connect Cricut via Bluetooth to Android?
To connect a machine to a device, you don’t necessarily need a computer. You can do the same with an Android or an iPhone as well. Here is how you can connect an Android phone to a machine via Bluetooth:
How to Connect Cricut Machine via Bluetooth to iOS?
To connect an iPhone to a machine, you need to follow the steps that I am writing below:
Conclusion
This was the blog for learning how to connect Cricut with Bluetooth. I hope this post helped you learn, and I believe you can easily connect your machine to any device. Here, I have only talked about Bluetooth connection, as it is more convenient for users. It is a wireless connection that gives the freedom to move while making DIY projects. Now, you can easily connect your machine to any of these devices.
FAQs
What Is My Cricut Connection Bluetooth PIN?
Sometimes, when you try to connect your machine to your phone or computer, you are asked to enter a PIN. This mostly happens when you try to connect the machine to any device for the first time. If you are facing a similar problem and do not know the PIN code, you do not have to worry. You just have to enter 0000, and your device will be paired to the machine.
Is It Necessary to Connect Cricut to Bluetooth?
Yes, it is! If you want to use and work on any Cricut machine, you will have to connect it to your device. With the help of the connection, you can cut any design on the machine using the Design Space app on a device. However, it is unnecessary to connect the machine and your device using Bluetooth. You can also choose to use a USB cable to connect them.
How to Reset Cricut Bluetooth Connection?
If you are having a problem with your Bluetooth connection but don’t know how to fix it, you can reset Bluetooth. It will help you fix the connection error. The first way to reset the connection is by turning off the machine and Bluetooth on your desktop. When you turn them back on again and connect them, the Bluetooth will be reset. You can also use the other method. You first have to unpair the Bluetooth connection and then connect it back.
Visit: cricut.com/setup www.cricut.com/setup login
Source: https://cricricutdesigncut.wordpress.com/2025/01/23/how-to-connect-cricut-with-bluetooth-easy-steps/
#design space setup#digital design#cricut.com/setup#www.cricut.com/setup login#www.cricut.com/setup#cricut design space#cricut design space setup#cricut.com#cricut#cricut design#design.cricut.com#design.cricut.com/setup#cricut setup#cricut.com setup mac
0 notes
Text
ScrapeStorm Vs. ParseHub: Which Web Scraper is Better?
Web scraping is no longer an act meant only for programmers. Even non-coders can now scrape any data from any website without writing a single line of code — thanks to the existence of visual web scrapers such as ScrapeStorm and ParseHub. With visual web scrapers, anybody with the skill of using the mouse can extract data from web pages.
Allow us to compare some of the 2 most popular options in the market.
ScrapeStorm and ParseHub are both very powerful and useful web scraping tools. Today, we will put both tools head-to-head to determine which is the best for your scraping project.
ParseHub Introduction ParseHub is a full-fledged web scraper. It comes as a free desktop app with premium features. Hundreds of users and businesses around the world use ParseHub daily for their web scraping needs.
ParseHub was built to be an incredibly versatile web scraper with useful features such as a user-friendly UI, page navigation, IP rotations and more.
ScrapeStorm Introduction
ScrapeStorm is an AI-Powered visual web scraping tool,which can be used to extract data from almost any websites without writing any code. It is powerful and very easy to use. You only need to enter the URLs, it can intelligently identify the content and next page button, no complicated configuration, one-click scraping. ScrapeStorm is a desktop app available for Windows, Mac, and Linux users. You can download the results in various formats including Excel, HTML, Txt and CSV. Moreover, you can export data to databases and websites.
Cost ComparisonBrandScrapeStormParseHubProfessionalPremiumBusinessStandardProfessionalMonthly plan ($)49.9999.99199.99189599
Both services offer a free plan that grants multiple projects and hundreds or more pages.We recommend you try out the free plans for both tools first before making a decision on paid plans. Visit our download page to start web scraping for free with ScrapeStorm now.
Feature ComparisonFeatureParseHubScrapeStormAuthoring environmentDesktop app (Mac, Windows and Linux)Desktop app (Mac, Windows and Linux)Scraper logicVariables, loops, conditionals, function calls (via templates)Variables, loops, conditionals, function calls (via templates)Pop-ups, infinite scroll, hover contentYes YesDebuggingVisual debuggerVisual debuggerCodingNone requiredNone requiredData SelectorPoint-and-click, CSS selectors, XPathPoint-and-click, XPathHostingHosted on cloud of hundreds of ParseHub serversHosted on your local machine or your own servers.IP RotationIncluded in paid plansMust pay external serviceSupportFree professional supportFree professional support, tutorials, online supportData exportCSV, JSON, APIExcel, CSV, TXT, HTML, Database, Google SheetImage DownloadSupportedSupported
Data Extraction Methods How is data being extracted in a web scraper determines whether you will find it easy to use a web scraper or not.

ParseHub support for a point and click interface. It also has support for XPATH — and that is not all. ParseHub has got support for CSS selectors which makes it easier for those with a background in web development. It also has support for regular expression, making it possible to scrape data hidden deep within texts. However, the way of clicking on ParseHub is a bit complicated, and it takes some learning to master it.

ScrapeStorm also does support a point-and-click interface. It also supports XPATH, regular expressions and more. The data selection method of ScrapeStorm is very simple and clear, and related operations can also be performed through the buttons on the interface. Even if you don’t know the software at all, you can start extracting data at the first time.
Conclusion
Looking at the above, you would see that there are no much differences between ScrapeStorm and ParseHub. In fact, they are more similar than they are different from each other. This means that for the most part, the one you use does not really matter as they should both be useful for most visual web scraping projects.
However, from experience, ScrapeStorm is a little bit simpler and easier to use than ParseHub because of the lesser features it comes with — it is also cheaper.
0 notes
Text
Check-in #5
It has been a second since the last update, how is everyone doing? Good good! I have been in the coding trenches trying my best to figure out how I am going to make the mechanics of this game actually work. It seem very easy to code, very straight forward at least but I am having a difficult time. I have no idea why, but Unity doesn't seem to like my desktop, a Mac, or my laptop, a windows, and tries to make both of them explode any time I try to code ANYTHING.
So far I have the movements coded in, left, right, jump, but that where it ends. Right as I was trying to start the coding process, Unity updates for Mac and now most of the tutorials I try to follow try to get me to use mechanics that no longer exist in the Unity library so I get left with error codes. When the player jumps, they float down like a feather unaffected by gravity when every other movement reacts perfectly as intended. I've tried multiple different tutorials on how to fix this, but nothing seems to work. I even went as far as asking Ai, scandalous I know, to try and explain what I did wrong in my code. Seeing as the update was so recent, theres not many tutorials on how to use if or much trouble shooting that I can find online. I will simply just have to grit my teeth and try my best to work through it.
Other than that, I have been working on having the camera follow the player as they move through the level. The next part I will be working on is the priorities the player will be tasked with collecting. I have a simple idea on how the Ui, user interface, is going to look for this feature, but it is a matter of coding it into the game that I am a little worried about. I have a couple of ways to have the priorities the player collect to disappear and show up in the Ui but until I code it in, I don't know which I am going to choose.
On the social media portion of this project, I am having a harder time getting my game out there than I thought I would. I think it is a mixture of when I am posting and how often, seeing as many others will post multiple times a day, and I just don't have time to do that. Currently, I don't have any donations on my kofi, but I expected that because my account doesn't get that many views.
below are the finished backgrounds>

1 note
·
View note
Text
How to Share Screen on Zoom: A Complete Guide for Mac & PC Users
One of Zoom’s most valuable features is screen sharing, whether you’re presenting, demonstrating a task, or guiding a team through a complex process. Mastering how to share screen on Zoom can significantly improve the quality of your virtual meetings by making them more engaging and interactive. In this guide, we’ll show you how to share screen on Zoom on both Mac and PC, introduce different types of screen sharing, and provide tips to maximize this feature.

Steps to Prepare Before Sharing Your Screen on Zoom
Before diving into how to share screen on Zoom, it’s essential to make sure everything is set up for a smooth experience. Zoom works on a variety of platforms, including Windows, macOS, iOS, and Android. Here's what to do before sharing your screen:
Install Zoom: Make sure you’ve downloaded and installed the Zoom app on your device.
Update Zoom: Keep your Zoom app up to date to access the latest features.
Prepare Your Files: Open all documents, apps, or websites you’ll be sharing ahead of time.
Join or Start a Meeting: Sign in to Zoom, click the meeting link, or enter the meeting ID to get into the meeting interface where you can begin screen sharing.
Different Types of Screen Sharing Options
Zoom provides several screen-sharing options to suit different purposes. Here’s a look at the main types of screen sharing available:
Full Screen Sharing: This option lets you share your entire desktop, perfect for when you need to navigate between multiple applications.
Single Application Sharing: Focus on a single app window, like a PowerPoint or web browser, without showing your whole desktop.
Whiteboard Sharing: Collaborate in real-time with Zoom’s whiteboard feature, ideal for brainstorming sessions.
Multimedia Sharing: Share videos, music, or other media with sound to keep your presentations dynamic.
How to Share Screen on Zoom on Mac & PC?
Sharing your screen on Zoom is easy once you know the steps. Here’s how to share screen on Zoom on both Mac and PC:
Start or Join a Zoom Meeting: Launch the Zoom app on your device and either start a new meeting or join an existing one.
Click the "Share Screen" Button: In the Zoom window, find and click the “Share Screen” button.
Choose What to Share: Select whether you want to share your entire screen, a specific window, or the whiteboard. If you’re sharing a video, be sure to select “Share Sound.”
Adjust Settings: Use advanced options like “Optimize for video clip” to improve the quality of videos you’re sharing.
Begin Sharing: Once everything is set, click "Share" to start screen sharing. Everyone in the meeting will now be able to see your screen.
Advanced Features for Screen Sharing on Zoom
Once you know how to share screen on Zoom, you can explore more advanced features to enhance your presentations:
Allowing Others to Share: As the host, you can control who can share their screen. You can allow multiple people to share simultaneously or limit it to one person at a time.
Optimizing for Video: Enable the “Optimize for video clip” setting to ensure smooth video playback during screen sharing.
Sharing Computer Sound: When sharing multimedia, make sure to select “Share Sound” so participants can hear your videos or music.
Annotation Tools: Use Zoom’s annotation tools to draw, highlight, or add text to your shared screen, perfect for interactive meetings.
Remote Control Feature: Participants can request to control your screen when you’re sharing, allowing for greater collaboration.
Troubleshooting Common Screen Sharing Issues
Even after learning how to share screen on Zoom, you may run into some common issues. Here’s how to fix them:
Slow Connection: A weak internet connection can cause delays or disconnections. Make sure you have a stable internet connection.
Audio Issues: If participants can’t hear your shared media, double-check that you’ve enabled “Share Sound.”
Restart Zoom: Restarting the Zoom app can often resolve minor glitches.
Tips for Successful Screen Sharing
To improve your screen-sharing experience, here are some pro tips:
Reliable Internet: Ensure you have a strong internet connection for seamless sharing.
Minimize Distractions: Close any unnecessary apps or notifications to avoid interruptions during your presentation.
Engage with Zoom Tools: Use tools like chat, annotations, and the whiteboard to keep your audience engaged.
Be Mindful of What’s Visible: Ensure you don’t accidentally share sensitive or private information.
Conclusion
Learning how to share screen on Zoom is a vital skill for effective virtual meetings. Whether you’re using a Mac or PC, knowing how to use this feature will ensure your presentations are smooth and professional. With the right preparation and a few pro tips, you’ll be a Zoom screen-sharing pro in no time. Take full advantage of this feature to enhance your meetings and keep your audience engaged. Read More
0 notes
Text
Top 5 Application Virtualization Software Of 2024

Picture this: it’s Thursday evening, you’re finally home from a busy day at the office. You kick off your shoes and grab your phone to catch up on Instagram, only to find it’s not loading. Even after several tries, Instagram won’t refresh, so you switch to Facebook—no luck there either. What’s going on?
After dealing with the initial confusion, you head over to Twitter (or X if you prefer) and—there it is! One of those unexpected moments when a big platform like Meta is experiencing an outage. It’s always interesting to see the creativity that brands and users unleash during these times.
While social media erupts with memes, we can’t help but imagine the frantic atmosphere at Meta’s offices—a coder rushing to get the system back online. And what if the expert needed to fix the issue is relaxing on a Hawaiian beach with no internet connection?
But thanks to Application Virtualization Software, tech companies are often prepared for scenarios like this! Want to know how this software works and which ones are the best? Keep reading for our top 5 Application Virtualization Software picks for 2024!
Application Virtualization Software lets users access and use software on different devices from the one it was originally installed on. IT teams can install the software remotely, making it accessible from anywhere without compromising functionality.
Here’s our updated list for 2024’s top choices. Let’s explore!
Top 5 Application Virtualization Software of 2024:
These tools simplify management, improve compatibility, and enhance efficiency. Here are our top 5 picks:
Azure Virtual Desktop Developed by Microsoft, Azure Virtual Desktop is a cloud-based solution that supports app deployment across various platforms. With more than 100 services, it’s a consistent leader in hybrid cloud solutions.
Parallels RAS Parallels RAS enables Windows applications to run on any device, even Macs or Chromebooks. It’s known for its flexibility, delivering apps from cloud environments and winning multiple awards for its virtualization solutions.
Citrix DaaS Citrix DaaS offers app and desktop virtualization with seamless access from any device. It integrates well with public and private clouds, giving businesses a flexible hybrid approach for managing their workloads.
VMware Horizon VMware Horizon optimizes resource use by running apps in isolated environments, making it efficient and cost-effective. It’s a long-standing leader in the virtualization space, trusted by businesses worldwide.
Nutanix AHV Nutanix AHV is an enterprise-ready hypervisor that comes without additional costs. Its built-in backup features and data protection tools make it an excellent option for companies aiming to enhance their virtual infrastructure.
Conclusion:
Application Virtualization Software is increasingly vital for businesses. It helps them efficiently manage resources while enabling remote access to essential tools. As always, the right choice depends on your company’s specific needs and goals!
0 notes
Text
If you want a safe way to try it, try using a virtual machine running linux mint to start with.
As for why you're getting propaganda, read below
Linux has recently started to become much more mainstream with non technical youtubers switching over to it and have been talking about their experiences in doing so. Among these are:
- PewDiePie
- Atomic Shrimp
- James Lee
There's a lot of reasons for it, but the short one is that this october, microsoft will cease mainstream Security patches for windows 10. As a note, this is the shortest support cycle they've ever offered (windows 7 was supported until 2020), and these security patches are installed silently in the background without prompting you, even for a restart, in windows 10. This leaves users with three options:
1. Stick with windows 10, despite the lack of security. - this is a terrible idea, as developers usually stop caring for backwards compatibility with recent updates, and these security patches are often the only thing stopping you from being hacked without any interaction on your end. You'd be surprised by the amount of compromising info you actually have on your computer, and how many times one of those silent security patches saved you from being screwed over.
2. Upgrade to windows 11 - this is a fairly unappealing option for a lot of people largely because windows 11 is... pretty annoying. The new features that are exciting and worth using are extremely buggy and broken. Several existing features have been removed, and the majority of new features are things like AI, crypto and advertising which are constantly pushed on you. Using windows 11 requires you to re-learn a lot of fundamental ideas within previous versions, at which point... many realise that option 3 is more appealing.
3. Switching OS - okay. I am an OG mac hater... but these days, even I can see that OSX is more appealing than using windows is now, because it's just, you know, an operating system. That said, some of windows 11's new features like virtual desktops and tiling are worth using...
If only there were an OS that had them already and had already patched out all the bugs many moons ago? Hmmmm.
Linux' biggest selling point is its customizability. The idea that your system can include as many cool features as you want, and as few annoying unfinished features as you want. Naturally it's also both been getting easier to use, and more capable.
Now that's not to say it's quite as easy to work with as other systems. Switching to linux is a bit like switching to mac, but with none of the guard rails, and if every major mac release was still recieving updates that spiralled off in their own directions. It can be pretty confusing to start with for sure. But it is certainly getting better.
Linux mint continues to be one of the best starting points for newcomers, and for gaming, linux has gotten really easy to work with. But. For other usecases, it can be a bit of a pain still. Specifically, photo editing is probably one of its weakspots, either requiring you to install a beta version of GIMP with multiple plugins, or to run through the grand riddle of figuring out how to install either photoshop or affinity using wine. It can also be tricky to work with more uncommon hardware (though there is a great app called input-remapper that has saved my ass so many times)
And of course sometimes you just encounter something that you need to fix or install and trying to fix it becomes a living nightmare because it feels like you're the first person in the history of the universe to encounter this issue. Tbh, that happens with every system, but especially when you're new to linux, it feels like the esoteric bug gods are targetting you specifically.
So. That's limnix. If you want recommendations lmk, otherwise, an easy way to try it out would be to install virtual box or vmware player, then install linux mint onto it.
Bro why is my dash filled with Linux propaganda I'm gonna get Ideas above my skill level and fuck up my pc trying to follow them.
316 notes
·
View notes
Text
How Do I Install Cricut Design Space: All Devices Covered!
How do I install Cricut Design Space - this is a question that all Cricut users face when setting up their crafting machines. If you are facing the same, there is no need to worry. As a long-time Cricut user, I am going to guide you through the process of installing the software on your device. By reading this blog, you can easily download and install the Cricut Design app hassle-free.
Design Space is a versatile and flexible app available for both computers and phones. However, your device needs to meet certain specifications to download and use the software. This works with Android and Apple devices, as well as Windows and Mac computers.
How Do I Install Cricut Design Space on Windows?
If you want to download the app on your computer, then a Windows computer is a great option. Just make sure that you are using Windows 10 or one of any later versions. Here is the process for downloading the software on your computer:
How Do I Install Cricut Design Space on Mac?
If you want to use the Design Space on a Mac system, it is equally good for the app. It has all the features that you have to download and log in with it. But, just like a Windows computer, you have to remember that you are using either a macOS 11 or a newer version. This is the process for downloading the software:
How to Install Cricut Design Space on Android?
A computer is not necessarily needed to use the app on your computer. Even if you do not have a desktop, you can use the app on an Android and Apple phone. Here is how you can install the software on your Android phone:
How Do I Install Cricut Design Space on iOS?
An iPhone is equally good for downloading the application. Here is the complete process for downloading the software:
Conclusion
So, if you have worries about how do I install Cricut Design Space, I am sure that after reading this blog, your problem is solved. Whichever of the above-mentioned devices you have, you can download the software on your device by following the steps written in this post. However, you should keep one thing in mind: after you download it, you will have to log in with your Cricut account. In the case of a first-time user, creating an account will be necessary for you.
FAQs
What do I need Cricut software for?
Design Space is the app that you need to run a Cricut machine. This is a free app by Cricut itself. You can get this app on your operating system and use it to create your own projects. Also, it helps you use the crafting machine on your computer and mobile device. In the app, you can create designs for your projects, or you can upload any design from your device as well. It simply means that the software is the backbone of Cricut.
Can I use my own image on Cricut Design Space?
Yes, Design Space gives you multiple options when it comes to creating or choosing a design for your projects. The first thing you can do is pick any design from the app. The software has over 100,000 ready-made free designs, templates, and texts on the app. You can pick any of them and use them. You can also create your own design by going to the New Project section. If you want, you can choose any design from outside the app and upload it to the app.
How can I upload a file on Cricut app?
To upload a design to the Design Space app, you have to open it and choose the Upload option. Then, you should click on “Browse” and choose the file you want to upload on the app. Once you select it, you will see a preview of the design. If you are happy with the design, you can simply press “Continue,” and the file will be uploaded to the software.
Visit: install cricut design space app cricut.com setup mac www.cricut.com setup login
Source: https://cricutcraftcreate.wordpress.com/2024/08/20/how-do-i-install-cricut-design-space-all-devices-covered/
#How Do I Install Cricut Design Space#cricut create connect to computer#cricut setup#cricut design space app#cricut venture#cricut new machine setup#cricut design space#install cricut design space app#cricut.com setup mac#www.cricut.com setup login#www.cricut.com/setup login#www.cricut.com/setup
0 notes
Text
How Do I Connect My Cricut to Bluetooth: Beginner’s Guide
Hey, Cricut enthusiasts! Are you looking for a guide that answers your query: How do I connect my Cricut to Bluetooth? No worries! I have got you covered! In this guide, I will talk about how to connect your Cricut machine to your computer and mobile devices. I remember the day I started setting up my Cricut product for the first time. It was not as easy as I thought it would be.
Later, when I started setting up my multiple Cricut machines, I got used to it, and today, I am capable of setting up multiple Cricut in no time. In this blog, I will connect my Cricut via Bluetooth device. These devices are Windows, MacBook, Android, and iOS. All these devices are compatible and can be connected to the Cricut machine hassle-free. Now, let’s get started without any further ado.
How Do I Connect My Cricut to Bluetooth (Desktop)?
In order to learn how to connect Cricut to Bluetooth on a Windows or Mac computer, follow the described steps below:
On Windows
Make sure you have placed your PC and machine closer together on a flat surface, not exceeding 15 feet.
After that, turn on your machine and PC.
Once you are on your Windows desktop, you have to type Windows + I. It will take you to the Settings tab.
On the Settings screen, you have to select the Devices option.
Under the Devices option, you will notice a Bluetooth option. See whether the Bluetooth toggle switch is on. If it is disabled, then turn it on.
Once Bluetooth is on, you must add your machine to your PC’s Bluetooth. To do this, click on Add Bluetooth or other device. A pop-up screen will appear when you hit this option.
On the pop-up screen, you need to select a Bluetooth option and then wait for a while.
If you have turned on your machine properly, it will show up in the Add a Device screen.
Once it is visible on the pop-up screen, you need to select it to pair.
Finally, your Cricut machine will be paired now.
On MacBook
Repeat the first and second steps that I have explained for the Windows PC.
After that, you will need to head to the Apple menu.
When you click on the Apple icon, a dialogue box with various options will appear. Choose System Preferences and proceed.
Then, you will move to a System Preferences screen, where you will notice a plethora of applications. One of them is Bluetooth. Click on it to launch it.
Once you launch the Bluetooth app, you will move to a screen where you have to enable your Bluetooth if it is disabled.
When Bluetooth is on, select the machine that appears in the available list.
After the machine selection, Mac will start connecting to your machine and will be paired soon.
By now, I have answered your one query: How to connect Cricut to Bluetooth on a Mac and Windows computer? Now, if you also want to connect your machine to your mobile device, head to the below section.
How Do I Connect My Cricut to Bluetooth (Mobile Phone)?
Now, connect the Cricut machine to a mobile device using Bluetooth. Follow the steps below to connect the machine to your smartphone of your choice:
On Android
Turn on your Android smartphone.
On the home screen, you have to look for the Settings app.
After that, you have to look for the Bluetooth option.
Navigate to the Bluetooth option and turn it on.
Ensure your machine is already on, and then wait for your mobile to detect your machine.
Once it appears on your phone, click on the machine that appears on your phone and complete the pairing.
On iOS
Turn on your iPhone or iPad and go to the Settings app.
Under Settings, you need to find the Bluetooth option and enable it.
After enabling the Bluetooth, you need to wait and let your iOS device detect your nearby machine.
When it detects, you can select it and finish the pairing.
Finally, you might have gotten the answer to your query: How do I connect my Cricut to Bluetoothon different platforms, including Windows, macOS, Android, and iOS? Now, you can start your Cricut setup hassle-free.
FAQs
Question 1: What is Bluetooth code for my Cricut machine?
Answer: You will need to enter the Bluetooth code while connecting your Cricut to your compatible device. When connecting your device, Whale may ask you to enter four digits of code. This four-digit code is 0000. Enter this code when it prompts you to do so while connecting your machine to your compatible device.
Question 2: Why is my Cricut not connecting to my Mac?
Answer: Below are some reasons why your machine is not connecting to your MacBook:
Bluetooth is off
The distance between Cricut and Mac exceeds 15 feet.
Device is incompatible
Misconfigured settings
Outdated or damaged Bluetooth driver
Outdated operating system installed on the device
A damaged USB can lead to connection failure
Question 3: How to connect my Cricut to device?
Answer: In order to connect your machine to your device, ensure you do the following:
Turn on the machine.
Then, enable your Bluetooth from the device’s settings.
After that, add the device.
Next, select the Cricut model.
Afterward, enter the PIN code.
Finally, pair your Cricut to your device.
Wrap Up
I have finally tried to answer the most frequently asked question – how do I connect my Cricut to Bluetooth? Cricut machines are compatible with several devices, such as Windows, MacBook, Android, and iOS. I have explained the steps for each device separately so that users don’t get confused. However, you should always make sure about the distance between your Cricut and the compatible device.
Source :- https://crricut.wordpress.com/2024/08/03/how-do-i-connect-my-cricut-to-bluetooth-beginners-guide/
design.cricut.com/setup
cricut maker 3 accessories
cricut explore air 2 accessories
0 notes