#I’m so used to using color and blend modes and my pencil brushes
Text
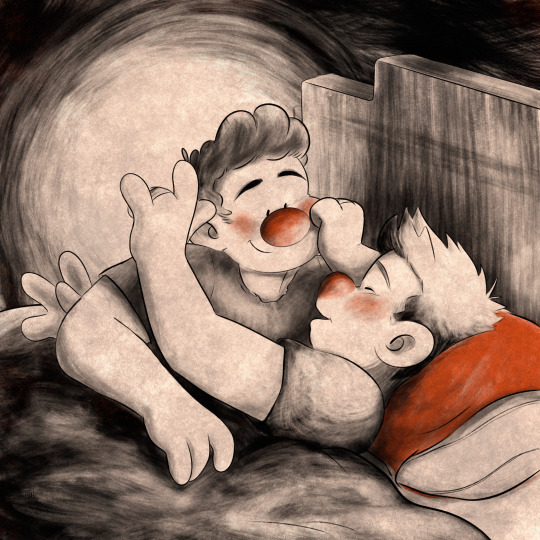
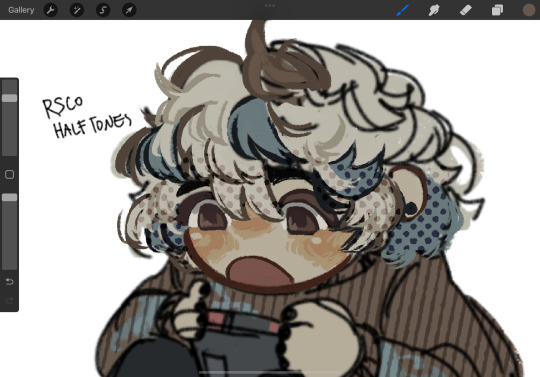
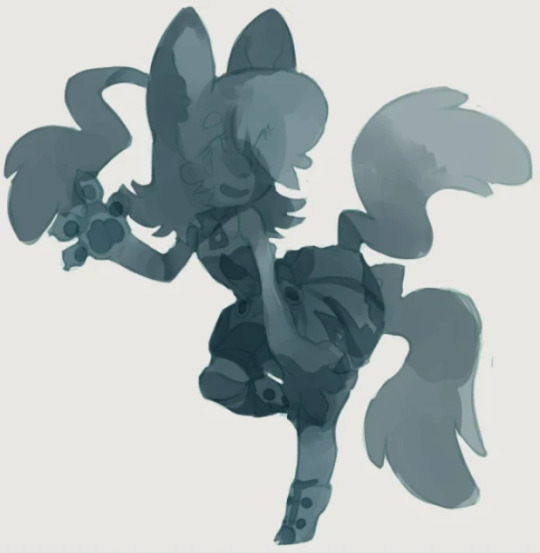
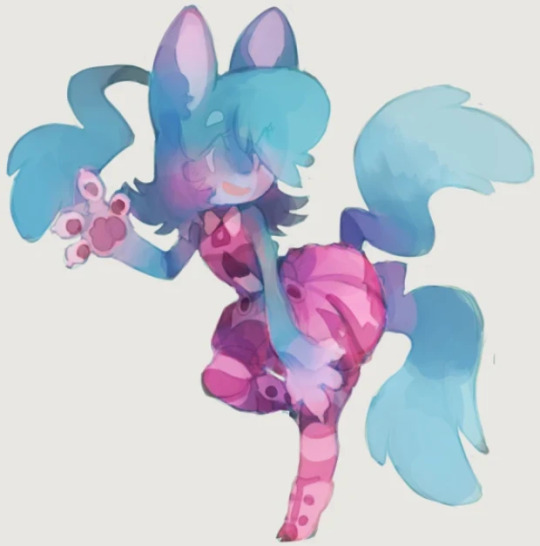
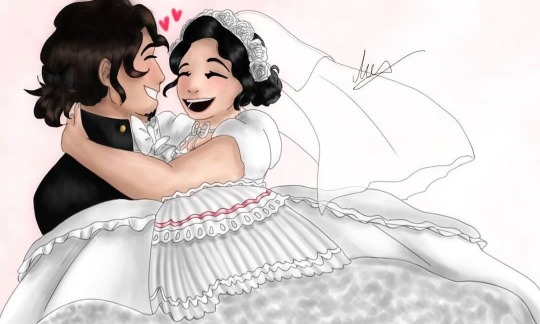
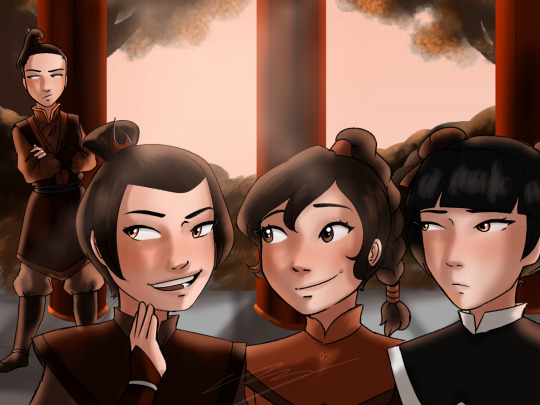
Suptober - Day 2;
Pillow Talk
#suptober22#suptober#destiel#spnfanart#spn fanart#destiel fanart#wiggleart#YALL IT TOOK WAY TOO LONG TO FIGURE OUT A SIDE PR OFILE#I’ve been struggling with it since I started with this style but I feel like I finally figured it out#including me doing a small character turn around model while drawing this#lmao#also doing lighting when you just have ink brushes is haaaaard how do people do this#I’m so used to using color and blend modes and my pencil brushes#so this is a good exercise#inktober#inktober22
303 notes
·
View notes
Note
Hiya! Hope this message finds u well :3 I absolutely love your art; found you from insta! Quick question also; I’m not sure if you’ve answered this before, but which brushes do you use for ur digital art? I love the textures they’re so crunchy (endearing)!! Have a lovely day!! :D
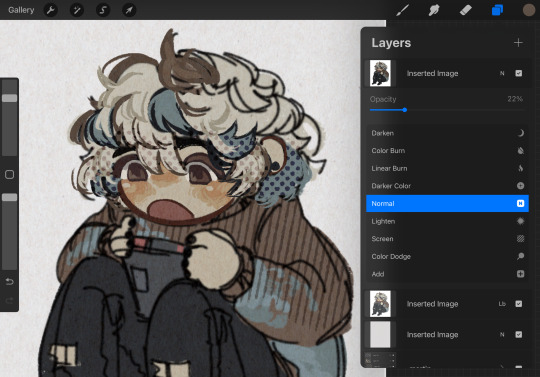
hello!! here's a little brush tour ft. this half rendered martin.
also, a great app for ipad artists who really want to dig into texture is art set 4. i swear by it and i've been using it for about two years. none of my more recent art uses it, but that's just because i'm experimenting with my process rn

so here's a list of my most used brushes lately, and there will be links to all of them at the bottom of this post.
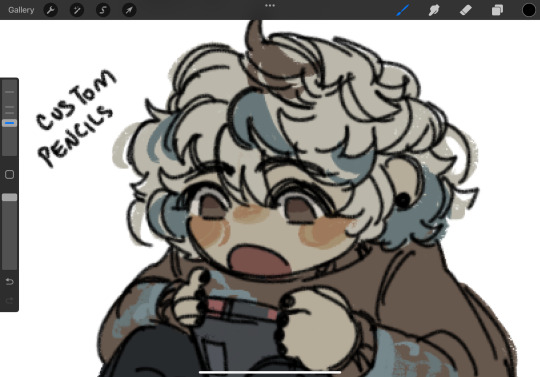
the two labeled "custom pencil" are both my own personal modified pencils (both sourced from the 6b pencil) but the narinder pencil and the vanilla 6b pencil are both very similar to them. i use these two for sketching and flat color specifically, and if you do specifically want these two brushes then i'd be happy to upload them somewhere for you to download, but they're not really necessary for texture
i also use G&B halftone brushes sometimes! but i greatly prefer the RSCO sample pack, and i cannot find the link to the G&B brushes no matter how hard i google, and pretty much any halftone brush set will do the same job
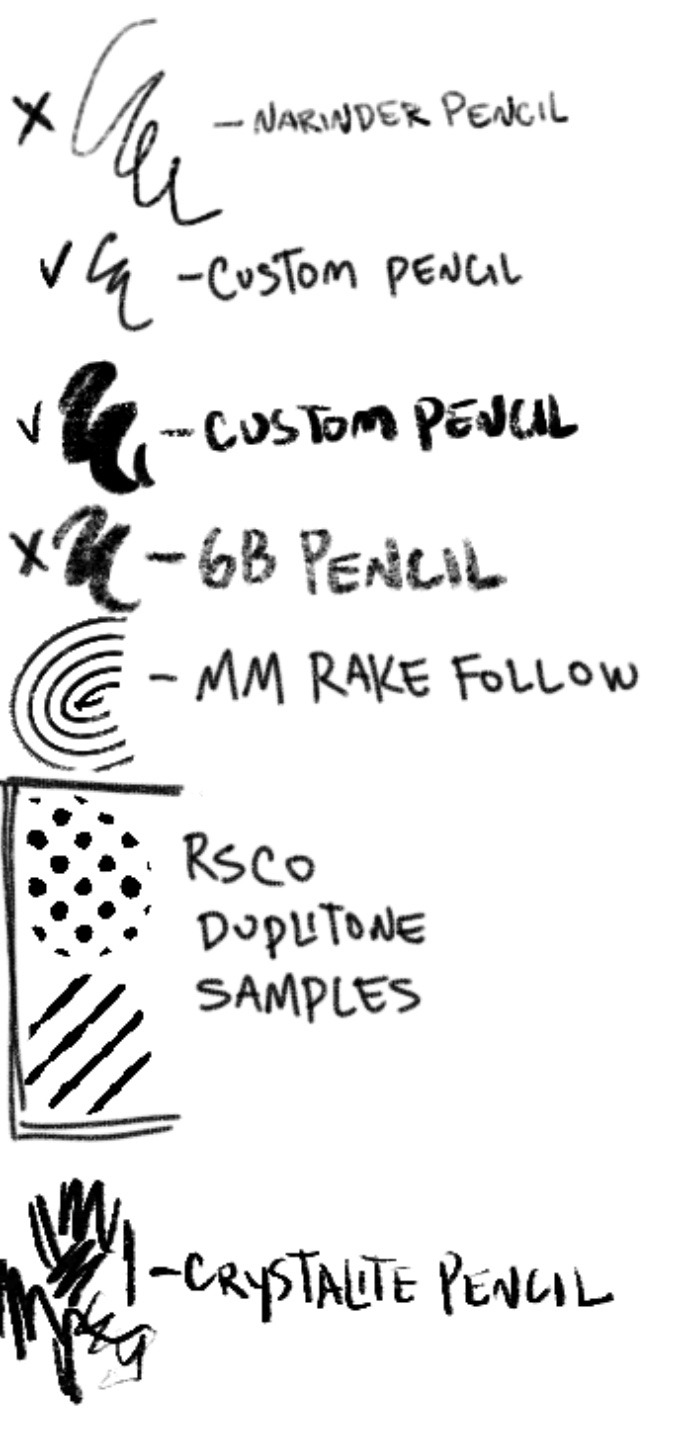
and here's what they look like in practice!
(i like to set these halftones to color burn. color burn is my most used blending mode, even for shading)
and then i hit "copy all," paste, and duplicate it. so you should have two layers of just your entire canvas. then import a paper texture
i'm partial to the set i'll link down below, my favorite is #5. you should absolutely check out the rest of the free texture packs on their website if you're wanting to diversify your texture process btw, all of their stuff is fantastic.
to use that texture, your layers should look like this!
on the layer set to the linear burn, i also like to go into the adjustments menu and bump up the brightness until all of the colors are at similar values to what they were before. and the normal layer on top is just to control the intensity/opacity of the paper texture!
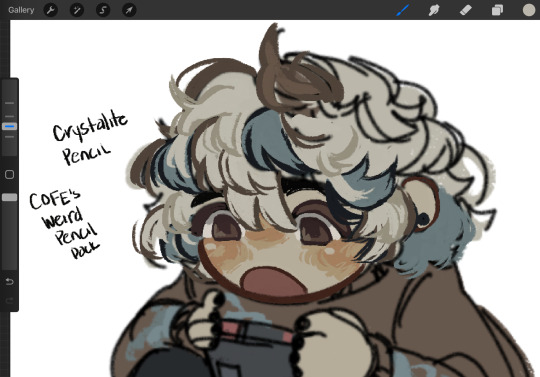
after all of that, sometimes i'll go in with brushes like MM rake follow, or more from COFE's weird pencils, on top of all of those layers for finishing touches.
definitely play around with it, try new free brushes all of the time (i heavily recommended subscribing to Manero. they have a lot of free stuff and it's all fantastic) and see what works for you <3
here are the links to the brushes in this post, as well as some extras! some of them are paid and some of them are completely free. + it wasn't mentioned here, but i use the tatyworks linen fabric brush for blending! for any of the paid brushes, i'll try to link some free alternatives
paid brushes:
alternatives to paid brushes:
free brushes:
extra goodies:
#procreate art#procreate brushes#art tutorial#artists on tumblr#digital art#digital artist#art recommendations#art resources
63 notes
·
View notes
Note
heyyy idk if you remember but I once asked u about your inspiration/how you learned anatomy/draw etc. and I wanted to ask if you have answered that already. ofc you don't have to (you don't have to answer this one either, if you don't I'll just assume you didn't) ig you posted stg about not having time etc to reply and again: i love your art
Hey! I distinctly remember something like that although I don’t think I answered. And I can’t find it in my inbox either. Either I responded it and it got lost in the void or I might have deleted the ask when I was cleaning the box from all the porn bots. Either way I’m sorry for losing your ask 🥲
I will answer it now
I started drawing digitally when I was 15 on an old wacom tablet. I didn’t stop doing traditional stuff until I bought an ipad and got lazy with the endless options it offered me. I still use the ipad with procreate and CSP interchangeably. In my experience Procreate has a better coloring tools be it the colors itself or the brushes, the editing tools. Blending modes are, in my opinion, slightly better than CSP. and CSP inspires me to do more sketches and comic style stuff. I recommend them both.
What I will say now will stay between you and me. Alright? I learned doing anatomy from drawing filthy, filthy pornography. I wasn’t any good at it in the beginning, but honestly it is the best way to learn it, in my experience. I developed so fast when I was doing nsfw art. A lot faster than if I had only been drawing normal stuff. Many of those drawings will never see the face of day, but they’re there. And they helped me a lot.
Other than that I also recommend studying real life. Try to understand where body parts start and where they end. Try to study the “line of action”. Try to remind yourself a body is a 3d form. Foreshortening helps, although I’m not the biggest fan of it. Trace photographs- and I’m not saying like go over like by like. Study photographs. There are many reference pictures online. I often find mine on pinterest.
Redrawing one pose over and over again until you can do it with close eyes, helps, and will drive you up a wall. You will want to break your pencil. But it will help. Compare what you draw with the reference picture. Remember to flip the canvas often. Our eyes get used to our art, good parts and the mistakes.
Sleep on a pose if you can’t get it just right. Your eyes will be kinder to you in the next day.
Yeah using references and being very mindful of them will help you a lot. There are some youtube tutorials. This streamer has been my favorite lately.
About finding inspiration… I’m sorry I can’t help you much with this one. You see, I’ve lost mine and I have been looking for it for a year now. Idk. Get unnaturally obsessed with a media? Get into a moderately large fandom? Have some people around you to keep your interest alive? Idk I haven’t been active in any fandom in years. But when I was, I saw that social interaction of it helped me to stay motivated to create.
Keep your mind sharp: read, study, interact with anything out of your comfort zone. In my personal experience, keeping in my walls never really gives me that rush, that eureka of inspiration. I often get this desire to create when my mind is active. I don’t know if it will be the same for you though.
Thank you for this ask! And thank you for being incredibly patient. I’m sorry again for losing your ask before. I hope I could help even a little 🖤 stay creative, friend.
6 notes
·
View notes
Note
Hey mutual... I really like your art... can... can I know which brushes you use and how long you've been drawing for... .3
Definitely not to steal
ok so i’m gonna be so honest. i have the worst habit of getting bored and downloading as many free brush sets as i can find. and i change the brushes i use a lot bc i get bored 😭 right now i mainly use (all for procreate btw):

all from different brush sets… the gw inkamigo sketch brush is from the gw sketch + draw pack, the marker smooth lineart brush and medium airbrush are from azzy’s brush pack, the hb soft sketch brush is from alicjanai’s sketchy set, the ms paint pencil tapered is from corro’s ms paint pack, and the two rendering brushes are from the theariyaki free pack.
generally speaking though, for sketching i prefer to use rougher brushes that are pressure sensitive for size and opacity. for lineart it really just depends on the mood, but recently i’ve been enjoying that smooth, almost wet? feeling that the smooth marker brush has. for coloring, i NEED that brush to not be soft at all, because it means there will be a million pixels not filled in with how i color (outlining the area w that brush then filling). and honestly how i shade just depends on the mood… i use the medium airbrush for simpler shading (like the jevil & undyne drawings i posted lately), while i use those rendering brushes for like. rendered pieces (like that noelle drawing i most recently posted). i actually recently downloaded the marmo shale brush pack and i’m super excited to try that out :)
OH ALSO WITH THE LINEAR BURN BLENDING MODE FOR MY CLEAN SKETCH/LINEART BRUSHES… started doing that fairly recently and i LOVE it. i don’t enjoy coloring much but i like making the colors look nice and that’s a godsend for that. picked that up from @skunkes actually!
as for how long i’ve been drawing.. basically since i can remember LOL i have always been the “art kid”. started drawing digitally around 8 i think? was a finger and phone artist for a while til i got my ipad a few years ago :) but yeah i hope this helps 🫡
3 notes
·
View notes
Note
hey! i am consistently in awe of your work, i genuinely adore it (I’d love to get prints of some of your pieces if that’s available anywhere 👀) but im writing to ask abt your technique and brushes! Im new to digital art, and i wanna create the sort of effect you make and i cannot for the life of me figure out how to do it! you have these strokes that look sort of like charcoal but also paint? also refracted light???? idk what program u use or anything and im just a noob still learning how to get the most out of the brushes that come w procreate, but even if you’re using a different program and stuff, I’d love to see if there’s anyway i can translate that effect somehow to the tools I’m using. It’s really cool stuff!! im sorry if you’ve already answered this somewhere 😅
hey! ok first off take anything i say with a grain of salt because 1. i'm self taught 2. there are many many ways to do art, there's no One Right Way. experiment and settle on what works best for you!
atm I basically only use procreate on ipad with an apple pencil.
I've compiled the brushes I use most into this post click here, I'd say download some sets and try them out! this seems to be a bit of an unpopular opinion because I regularly see advice to stick to the basic brushes however if you were making traditional art you wouldn't unnecessarily limit yourself to the cheapest brushes/paints either (assuming you could afford everything), so. go ham.
the main technique I use is a pretty common one where I use a big textured brush and then use a base color layer + clipping masks (you can google how to use these) or selection tool to get sharp edges. so I'll make a selection of the shape I want to paint and then paint within that selection. i often do this with light strokes and/or the brush on lower opacity so i'll keep texture. if you look at concept artists on instagram you'll see this technique used a lot too :) 'edge control' is a term to google to find more about hard/soft edges and how they'll improve your art!
for the light, even for digital art I would very very much recommend james gurney's book 'color and light' because it teaches you almost all you need to know about, well, color and light, and you can apply these principles to digital art too. it's well worth the price but if you can't afford it then there are perhaps some copies to be found online ;) for the actual method in procreate, I like to use layers on the add and screen blending modes, sparingly, and NOT with white highlights but with the actual color of the light e.g. yellow, blue-ish, etc. for stuff like wings, it's usually multiple layers stacked on top of each other!
(i am not organized)
as a final note i will add that i painted traditionally for years before starting digital art, so i do think that'll have influenced my approach in a couple ways because i basically took all that knowledge and methods into digital rather than starting from scratch.
#hope this is comprehensible and sorry for lack of more pics I just know it’d have taken even longer otherwise#feel free to dm me if you have more questions#if anyone is wondering about a specific painting let me know and i'll happily explain howeverrrr#am terrible with answering asks tho so pls be patient & just in case too many ppl ask i may not get around to all of it#not art#mjulmjul answertime#LONG post
26 notes
·
View notes
Note
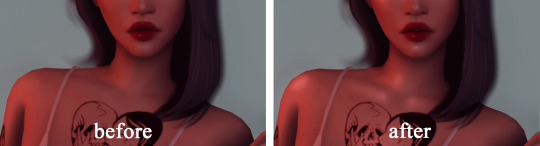
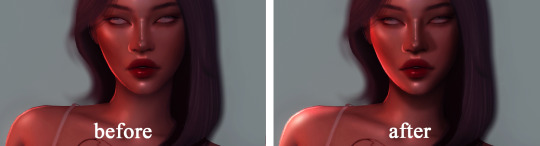
I'm very curious how do you shade? And with what brush? I struggle with getting my stuff to look satisfying but your style looks so soft and homely. 🥺
AHH thank you!! 💕 i usually shade with a bluish or purpleish colors with a multiply blending mode on. i often use round render brush by jingsketch to do it, and afterwards i go over and render the whole drawing with hb pencil on a separate layer to add details and stuff :^)


this is before and after i’ve rendered the drawing! i basically add the base colors, lighting and shading and color the lines before starting to go over the drawing :) it’s my favourite part of drawing! i hope this helped?? i’m not rlly sure if i’m being clear :,D
125 notes
·
View notes
Text
User ofer135 asked me about my art process, so I put this together for them! After receiving it, they reccomended me to post it publically, so here it goes! 0v0 Be free to ask questions!
Program: Paint Tool SAI 2 (Will also work for SAI 1 for the most part)
That's a little long, but basically... First, I sketch the pic out... obvs
The lines are in a 'Multiply' mode layer!
Then, in more 'Multiply' layers, I add tones! I prefer to always keep it unsaturated, since the next step include lots of saturated modes
I add lights and colors with 'Overlay' and 'Screen' layers! In this step sometimes I add different colors, but most of the time I maintain the hue. It's good to start with a single hue!
Once I'm more or less satisfied, I add more colors! I add these with a mix of overlays, screens or even 'Color' mode layers.
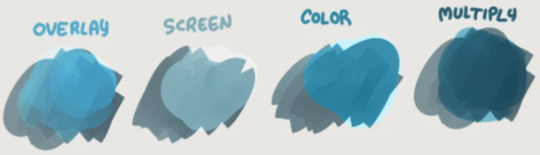
Generally, Overlay is for saturation and color. Screen is for unsaturated lights and contrast, and color is for neutral tintying. If it starts to look too saturated, I can reduce the saturation in any of the layers to compensate. Lowering the luminosity is another valid option.
With the picture more developed, I also might add more Multiply or color layers in order to adjust contrast. I let my intuition guide me
Since the picture has gotten a little messy, sometimes I add a layer where I paint over what I already have using the marker and pickying colors from the image itself
See it's a little more defined? I also add contrast and mix colors as needed.
After that, I use a mix of layers as needed to make adjustments so the picture's colors are ready to work! Using filters like upping contrast or depth is also fine!
Picture is ready for rendering!
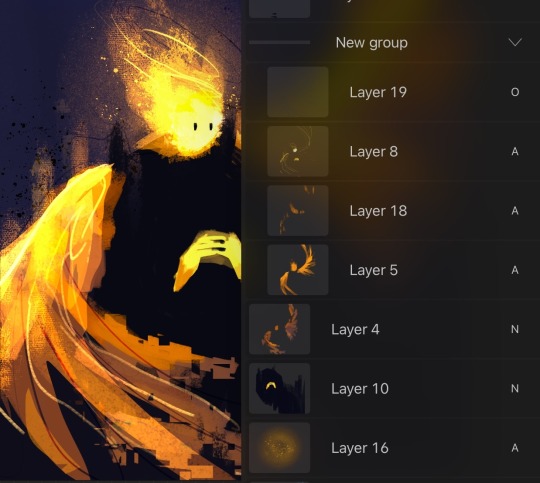
Then, I merge all the layers together! Usually I put them in a folder and duplicate that folder, so I can keep the original layers. It's a big loss of information otherwise ;v;
On the merged image, I use a blending brush and start dragging colors, defining shapes and the like. Sometimes (in this picture it's very obvious) I still use extra layers to add more color and contrast where needed~!
My blending brush is a modified version of the 'Watercolor' default brush in Paint Tool SAI. It's set so it never adds color on its own, but only drags colors that are already on the layer. The dragging becomes more transparent if the pressure is low, allowing me to do gradients here and there. Think of it like when you use your finger to drag pencil on paper, but not messy and you being able to hold the pressure for as long as you want! (Btw do not use your finger to drag colors, it's greasy and will ruin your art)
179 notes
·
View notes
Note
Sorry if you've had to answer this before.. but what brushes are your favorite on procreate??
I have not had to answer this, so no worries!! Unfortunately, my favorite brush that I use for sketching/lineart was one that I downloaded, and I for the life of me cannot remember what it is called or where I got it from :( My other fave brush for lineart/sketching however, is just the 6B Pencil or whatever it’s called in the sketching tab.
The brushes I use for coloring differ depending on what kind of art I’m doin! Recently, I’ve been using the marker brush (I think it’s in the drawing tab?) but I’ve gone into the settings and changed the blend mode from multiply to normal. In bigger paintings and whatnot (such as my Dawn of the fourth art) I use the square paintbrush :)
I hope this helps!
4 notes
·
View notes
Note
any digital art tips???
I'll try... hopefully this might be helpful! <3
Experiment!
Experiment not only with art styles, colors and brushes but also with different drawing programs! There's quite a lot accessible art programs that are free and do not require any payment like Photoshop, Procreate or ClipStudio Paint do, which is not to say that you can not use them. If you can, do that! (Although Adobe seems to be a prick atm with the prizes so think about whether or not you want to have that stress)
Free programs you can check out are:
-ibisPaintX
-Krita
-FireAlpaca
-MediBang Paint
-Autodesk Sketchbook
Just to name a few! There's a lot more drawing softwares than the ones I named but those are the ones I used at one point (except for Krita). Currently I'm very happy with MediBang Paint. What software suits you best is up to you of course, which is why I'd recommend you try out some and stick to your fave!
Also note that the software you use barely has an impact on how well you draw. People can even create amazing artworks with Microsoft Paint! It's not the program or software that makes the art, it's the artist and their skills.
Still, you should feel comfortable with your drawing software!
Equipment
You should also be comfortable with your equipment. Do you want to draw on a drawing pad connected to your laptop or PC? A tablet (with a pen) like an iPad (note that there's many other brands that produce tablets in good quality you do not necessarily require an iPad and Apple pen)? Or are you alright with your phone and fingers?
Artist equipment, no matter digital or traditional, is very expensive (I know that-) which is why you shouldn't be upset when someone draws with "better"/"more professional" equipment than you. Not everybody has the money to afford those expensive pads and tablets and not everybody has the room for a whole PC. This is totally fine. Because here too: of course equipment can be helpful in making it easier for you to draw and maybe even help improve your art but in the end the artist and their skills make the art. Not the equipment or software.
You can create amazing works with only your phone and fingers. No necessity for a whole tablet for example! Do not let anybody pull yourself down because of the equipment you use/have!
When I started digital art I also only had my (compared to my phone today) tiny Samsung, ibisPaintX or Autodesk Sketchbook and my fingers. Here's some examples if what that looked like:

Then someday I switched to a drawing pad and stayed with that equipment for years before getting a tablet for Christmas last year.
Drawing pad - beginning


Drawing pad - middle

Drawing pad - end

And everything post Christmas last year is made with my tablet. (Not trying to say my art was amazing then or is it now hhhhh)
Blending modes
Digital art gives artists the opportunity to use options their traditional counterparts don't have: blending modes aka. "multiply", "add", "overlay", "darken", "screen", "soft light", hard light", "color", "hue", "brightness" etc.
It's those options that can make your artwork go from
To

I recommend you experiment with those too! They should be found under "blending mode".
[P.S. you can use multiple blending mode layers over each other]
Use references! Use your features!
Finding references for all kinds of things is something every artist would recommend. It is done with a quickly with a Google (or any search machine of your choice) search or some scrolling through pinterest. Digital devices allow you to download or screenshot the pictures and insert them onto your canvas! With the invisible layer feature you can easily make the reference disappear and appear again as you like.
You can also sketch your motif on paper with pencil all traditional, take a photo of it and insert it onto your canvas/ make it your sketch. That way you even include both traditional and digital art! Quite some artists do that. Of course, it is up to you whether or not you want to follow this process.
What I'm trying to say with this section is: use the features and advantages you have with digital art!
Just have fun.
Art is a constant learning process. You develop and improve your skills over the time. And maybe now you're still insecure and unsure but one day you'll just know what to do and how. You'll get the hang of it! You're doing art for YOU and for YOURSELF most of the time (gifts or commissions for someone else not included). Have fun! Don't pressure yourself!
-Meg <3
34 notes
·
View notes
Note
What brush do you use? :0
Hi! I USE,, QUITE A FEW BRUSHES so this might get long,, I mostly use the "Charcoal Stick - Sargent - Dark" brush (sometimes with a lighter color and the Rendering blend mode set to ‘multiply’) from this REALLY GOOD brush pack for Procreate here! It's got a lot of super nice crunchy and smooth textured brushes, but I'd recommend making use of the apple pencil's tilt to get the most of them. MaxU's free "Sketchy Sarmento" pencil brush is a super good similar one that I used for a while too!
I'd recommend playing with the pressure settings in the apple pencil section of the brush studio to get the pressure you want though (especially for lining or sketching brushes). I get easily exhausted pressing my pencil down really hard to make darker marks, so it's important to tailor your tools to how you work. <:’]
I also like the gouache flow brushes (especially the "Gouache Flow Rough") from MaxPacks! Procreate's default Gouache and Watercolor brushes in the Painting section are also really good alternatives too.
I'M ALSO HUGE FAN of True Grit Texture Supply's tools, especially their Debaser Kit, Beat Tones Halftone Brushes, and Fast Grit Stamps to crunch the heck out of your artwork with paper and halftone textures. Purposefully putting "imperfections" in my artwork kinda helps me curb my perfectionism when it comes to drawing, so they might also be helpful to some folks! They also have a bunch of cool brushes in their free Sampler Pack here!
If anyone has any questions about the specific brushes/settings/techniques I used in a particular piece though, I'd be more than happy to try my best to answer! I’m not sure if the brush creators allow direct download links for their paid brushes, though. (´;ω;`) A lot of my process honestly just involves throwing textures at the wall and then blasting the heck out of it with overlay layers haha
8 notes
·
View notes
Text
✨really dumb editing tutorial✨
after some anons asking me how i do specific things during my editing process/how i edit as a whole, i decided to finally make a more in-depth tutorial on how i edit! keep in mind, i do now use a tablet, but you can 100% do all of this with just a keyboard and mouse, i promise!!!
________________________________________________________
mxao + dof
the first thing i do, before anything, is take a screenshot with mxao + dof on and a screenshot with those two toggled off.
since mxao makes the outline of a sim’s head visible through alpha hair, i do these steps to erase those awkward bits
stack the screenshot with mxao + dof toggled on on-top of the other screenshot
i take a soft round brush and erase any weird bits of mxao that stand out to me + erase hard outline of mxao in the hair

________________________________________________________
highlighting
now that i’ve gotten that out of the way, i go onto doing some of the highlighting! for this step, these are my brush settings + the brush i use. (i use an opacity of ~10% because i like being able to build up the highlight to what i like!), and i set the blend mode of this layer to overlay. i only use the color white for highlighting

i don’t have good advice for where to place highlight, because for me it’s just what my brain says makes sense. however, if you have trouble knowing where to place highlight, keep in mind where your light source is and how light hits certain parts of the body!
after this, i make a new layer at overlay and use these brush settings, usually i’ll keep the size at around 5pt or lower

i like using this for very small highlighting details, which includes
rim lighting
browbone
cupids bow
tip + bridge + crease of the nose

________________________________________________________
shading
for shading, i use the exact same brush settings as the first highlighting step, but...
instead of using white, i use black
i set the layer to soft light
as i said in the highlighting section, i contour/shade in the spots that make most sense to me, and i try to keep in mind where the light source is coming from

for the next step of shading, i’ll make a new layer (still with the soft light blend mode, but i set the opacity of the whole layer to 50%) and use the hard round pressure size brush with 100% opacity to do other details such as
nose shadow
neck/jaw shadow
under the upper eyelid
side of the face (completely dependent on the light source, if the light source is head-on, i don’t do this)
etc
just so that the new shading isn’t too harsh, i’ll take the blending tool and lightly run that over the edges of the new shading. to clean up spots where i don’t want the shading, i’ll simply just take a soft round eraser and erase whatever i don’t want.
i’ll do this same thing for highlighting, but obviously do it the opposite way that i’d do it with shading
small tip, but after i create a shadow on the eyeball underneath the upper eyelid, i’ll create a new layer, take a small white brush, and highlight the space where the shadow and the rest of the eye meets. for this edit i’m not doing that, however.
________________________________________________________
hair
for this step in my editing process, i’ll...
create a new layer, blend mode normal
use the KYLE ultimate pencil hard. i like the crunch of this brush
set the smoothing to roughly 20-40%
for creating just hair strands, i’ll kind of go ham and select either a medium shade in the hair or one of the lightest shades in the hair
keep in mind the flow of the hair
if there are already hair strands in the hair you’re using, you can use that as a sort of blueprint
if my light source is coming from just one side, i’ll take the same brush with the color white and create just a few strands for some highlight
at this point, if i want to enhance any of the rim lighting, i’ll just go over some of it with the current brush and color i have. for this edit, i’ll do this for just the rim lighting on the side of the sim’s face and place the white color in the center of the rim lighting (hopefully that makes sense!)
if i want to highlight the hair more, i’ll make a new layer with the blend mode overlay and use the hair’s current highlights and enhance what’s there

________________________________________________________
finishing up
that’s just about all i do for edits, but not all my edits are the same. obviously this is a still imagine and not a gif, but i have a small tutorial for that here. all i do to finish up the edit is...
create white bars on each side of the edit and “cut out” the sim (if that makes any sense)
merge the layers and use “smart sharpen” to sharpen up the image, you can play with the settings to get what you’d like
tips for people with only a keyboard and mouse
utilize the eraser with the soft round brush as much as you can!
this can help you mimic the pressure recognition that tablets have
use that eraser to kind of feather/thin out the ends of lines, such as hair strands
290 notes
·
View notes
Note
i saw ur tags on that last post and i am a beginner digital artist and i would love to hear ur tips ^-^ tysm!
hello anon! sorry it took me a hot sec to respond to this, i hope you see this aha
here are some tips i have for beginner digital artists! please keep in mind that i am not a professional, and that what is best for me might not be best for you! also i primarily use paint tool SAI and photoshop, for reference. i just have been doing this for a while so i have figured some shit out:
play with brush settings!! having different brushes with different settings to serve different purposes can make your life so much easier. my suggestion would be to have at least 5 different brushes in your wheelhouse set to your own preferences: custom all-purpose brush, eraser brush, pencil brush, airbrush tool, brush for blending (i have a custom paint brush to use for this but a standard water brush also works pretty well for this). turning whatever brush you are using into eraser mode will also be very helpful. for paint tool SAI users, i can share some of the brushes i use + what i use em for
map your undo keys (ctrl + z) to somewhere convenient, and set up your desk/devices to optimize your comfort. i work on my laptop, which i put on a raised surface on my desk so that i can sit straight and look straight ahead at the screen instead of hunching over my desk to work. i’m getting older and my back is so messed up so this important for me LOL. my drawing tablet has buttons, so i map my ctrl + z keys to the buttons so i can use the undo button quickly. this is a really simple thing to do and it helps to streamline your process by a LOT
the magic wand tool is so helpful for filling in outlined spaces and streamlining your coloring process a little. it won’t be perfect but often i think it’s easiest to magic wand things spaces and then go in and fill in the gaps
for ALL stages of your art (lining, coloring, painting, etc) using transparent eraser functions are actually really useful. this one is hard to articulate fully, but instead of just repeatedly drawing a line and undoing it because it looks bad, it’s often a lot easier to get a little sketchy and loose with your lines and then go in and touch them up with an eraser. i use basically all my different brushes on the eraser mode to make things look more natural. if you are curious about this one i can try to explain further with visuals in a separate post
you can window your files so that you can work with your references right next to your art, which i personally find very convenient.
layers can be SO USEFUL!! they are something that really sets digital art apart from traditional art. you can compartmentalize different parts of your drawing into different layers, adjust each layer differently, move and transform layers independently, add different filters/effects to each layer, etc. i can’t really dictate to you how exactly to use your layers, because some people like to use a ton of layers and some people prefer to use very few to only one layer, but it is worth playing around with different methods of using layers to see what works best for you. personally, i am someone who uses like 30+ layers in a piece. if you use a lot of layers, PLEASE keep them organized and label them in a way that makes sense to you
transform tool (ctrl + t ) is your friend! i use this tool so much, it is excellent for resizing things, tweaking shapes, fixing perspectives, and more.
play with the hue/saturation and brightness/contrast sliders. those are really good for adjusting colors, shadows, highlights, etc etc
save often, and save multiple sets of your files in multiple forms. this shouldn’t happen too often, but sometimes your files can just arbitrarily get corrupted beyond repair and you just lose all your work. i’ve gotten into the habit of saving my works at various stages into .sai files, .psd files, and .png files. SAI files are especially vulnerable, i’ve noticed.
these are just some things i could come up with off the top of my head, it’s hard to be comprehensive in one post, but feel free to shoot me some questions! i can try to make some more helpful tutorials if any of you are curious about my process.
52 notes
·
View notes
Text
My art process: start to finish
For @sisterdragonwithfeathers and anyone else who wants some art tips :)

Step 1: sketch your art. Don’t need to be too fussy, just get it all down. I do traditional sketches and upload them to Krita but for digital sketching I like to use the airbrush in a bright color.
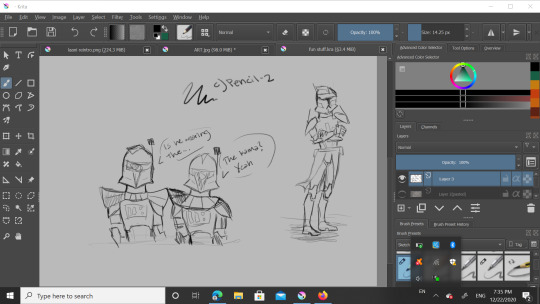
Step 2: Yes, another sketch but this time it’s digital. I lowered the opacity on the OG and used “c) Pencil-2″ but you can see it highlighted in blue in the 1st pic. Here I adjust proportions a bit if needed, maybe clean it up a ~tiny~ bit, but I’m going for a sketchy look for this piece.

Here i used “b) Basic-5-size” but I customized it a bit to fit my style. It’s highlighted but my thumbnail is just scribbles so it should look like the paintbrush to the left of it. Also I basically just unchecked “flow” and checked “softness” in brush settings to customize. The soft brush lineart over the digital sketch layer gives it a nice look. Next step!
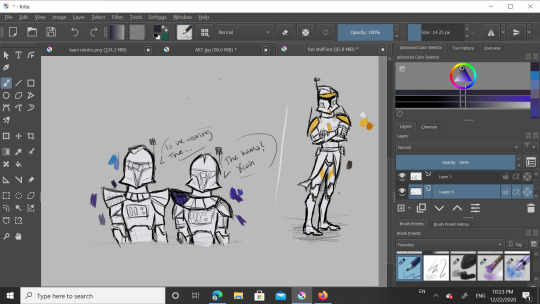
Add a new layer under both the lineart and sketch layers and use that same basic brush for the base color (here it’s white) and then either use that or the pencil to block in some flat colors. I have color pallets there but I didn’t use them that much. You’ll see in a sec, but understand that I mainly only colored Cody here because blue in the next few steps gets a little funky.
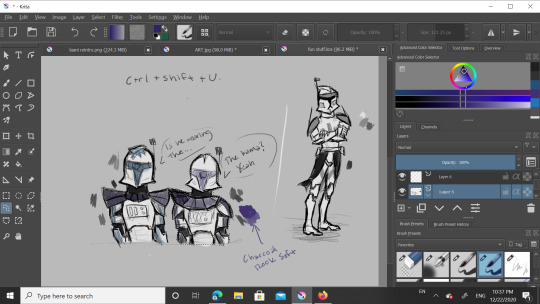
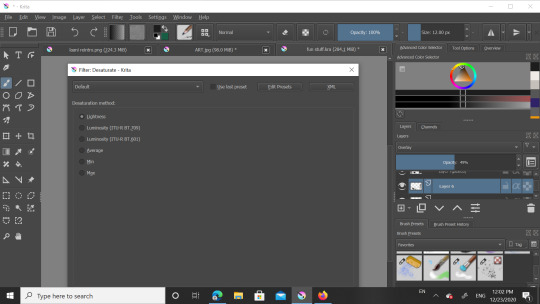
Be not afraid, I say confidently, as this is my third time doing this. Anyway to get grayscale like this just smash Control+Shift+U and a menu will shove its way onto your screen. I used “lightness” which should be the first option. Ignore the blueish markings, I was just playing around with a layer above to see what shade of blue to use later.
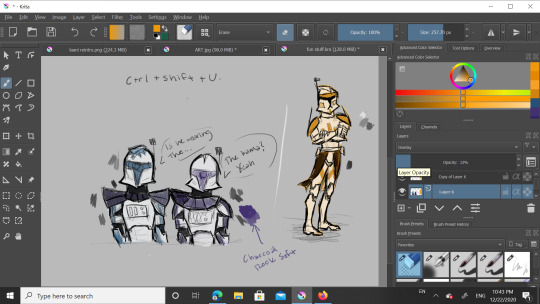
Ok, new layer. I recommend not being a di’kut like me and actually naming your layers. There’s alot. See the leftmost column on the toolbar? Good, now look at the magnifying glass at the bottom and go 2 up to the squiggly shape. It’s a lasso so you can outline what you want to color- I had to do each clone seperately for this one- and when you color it in it won’t go outside your selection. For 501st bois I tend to use a dark blue but for 212th I use a bright orange. Now that you have clone shaped blobs of color, change blend mode from Normal to Overlay. Lower the opacity until you like it, I do around 40%

You did it! You got through the hard part. Smooth sailing from here, just add details, speech bubbles, WHATEVER, just go crazy! In my last piece I had a white glow around Rex and Ahsoka. For that I made a new layer below all the others, used “grainy chalk” in very light grey on Add blending mode. Also, for the armor texture I use the soft charcoal in white on Add mode and lower the opacity. That’s it, you’re done.
Feel free to follow these steps, adjust them to your style, or do something completely different. If anyone wants to draw this particular piece as practice, go ahead but please don’t post it without crediting me.
That’s all for now, have a great day/night y’all!
15 notes
·
View notes
Note
how did you colour 42’s skin? it looks pretty!
thanks Anon! ^w^
it was mostly through trial & error, and it took a chunk of my time to find out how to color his skin. i did find some brushes & textures that are suited for this, and now i have my own way on how to color a night sky! (or just spacey shit)
(just to clarify, i’m using Paint Tool SAI for my digital drawings, so the following tutorial is for those who have that program)
first off, i made my own brush using the Star Brush Textures from MissMillia in DeviantArt and a Pencil base. then i just scribbled at maximum size (500) to make up the night sky.

it doesn’t look like it’s got stars, but when you take a closer look…

…there are very, very small white specks. these make up the stars in the brush. if that bothers you, we’ll get back to it later, ‘cause we’re making the nebula clouds!
i first used the AirBrush to make up the base cloud, like so:

(oh yeah, i also selected the sky so that the cloud doesn’t go out of bounds)
then i blur the whole thing using the Blur tool!

in here, the color looks as good as it is, but for 42’s skin, i wanted to change the blending mode of the layer i was in. for me, the most suitable blending mode for the nebula cloud(?) was Lumi & Shade.
here’s how it looks like when i changed the blending mode:

now here’s when another new brush comes in. for the cloud borders (and maybe a bit at the center?), i made & used a Nebula brush using these settings. (you can also see the settings for the brush in the photos when it’s selected)

now, while i used it all over the cloud, i didn’t like how it look, so i used the Blur tool again.

there! much better.
you can add more of the Nebula brush at different colors for as much as you like! or if you’re done, get a new layer and use your trusty Pen tool (or any brush that you normally use for drawing) to put white dots around your night sky to add more stars that are a bit more emphasized than the others.

annnnnd we’re done! it’s kinda mediocre now that i think about it, but at least it works!


#jam does art tutorials??#(yep that’s the tag)#(hold up i better tag that other speedpaint from last year that too—)#stars#galaxy#night sky#that was stupid#idk anymore#art#doodle#drawing#digital drawing#digital art#artist#artists on tumblr#inquiries of a fennec#a really nice anon
2 notes
·
View notes
Note
Hi! I see u use procreate! What brushes did u use for ur mando & baby gogurt lookin like a potted plant piece 😭 it’s so cute and I love ur coloring! Do u have tips for blending and shading by any chance?
Hiya!! And thank you! For the lines, I used the HB pencil brush that I tweaked just a bit (tightened up spacing on the stroke path!) and for colors, I used a brush I found here, link below. Its a gouache brush, and I made no changes in settings :D
For blending on the color layer, I use a mix of using the smudge tool to soften edges of shadows, not all shadows, but ones that are on rounder objects like the tops of helmets and clothes. Then, to add some dimensionality, I use the color picker tool and pick a color that is in between the colors I want to blend, lower the opacity of the brush I am using, and gently blend in the colors, or you can use thick paint strokes, depending on what you want.
For shading, I *usually* don't use a color mode, like multiply. Shading depends on the temperature of the drawing, and I usually use warm pallets, so I stick with cooler shadows, and then throw a warm colored overlay layer on top. I usually color pick the individual item I want to color, and move the color selector down, making it darker, but *shifting* it to a more saturated color at the same time. Also, I move the hue slider ever so slightly in one direction just to change up the colors a bit. Thats just a rule of thumb, feel free to experiment!
For larger pieces, I use a multiply layer just so I can lay down shadows quickly, and then I manually go in and clean them up/add more detail/make them darker. Be sure to use another layer on top when changing up the shadows, or procreate won't register any changes! I use this same technique for lighting, only in the opposite direction, moving up instead of down, keeping it saturated! Not always, but when you lower saturation too much, it can start to look muddy, in my experience. My art is uber-saturated though, so it may be fine for you!! I think(?) I may have used a color mode layer set to "Add" for the shiny details on the helmet? But Im not sure. As I said, experiment and play around for a bit.
Finally, throwing a color layer on top set to "soft light" "hard light" or "overlay" can really make the colors more cohesive! If I'm going to make something rendered, I make a layer on top and blend, color picking the color in between. Also, you can color the lines by using alpha lock on the line layer, switching it to multiply, and going in and adding colors to the lines (darker green for baby goku, blueish for Mando's armor, reddish brown for his clothes.)
So yea! Sorry about the wall of text. I hope this was helpful!
10 notes
·
View notes
Text
Inspiration is Motivation - Prologue

Fanfiction | Artist!Taehyung x SingleMom!Reader
Genres: Fluff, Romance, Humor, Smut
Rating: G (for this chapter)
Word Count: 2.385 words
Chapter Warnings: none

Your brows furrow at the earlier statement of your best friend, Hanna.
"Believe me, it'll help you to relax for a few hours and I'll take good care of Ty."
You have no doubt about the latter. Hanna might be that stereotype single woman who likes to go out for a couple drinks every so often, but she is a reliable caretaker and one ridiculously good cook. Based on this, she was an absolute blessing the last two times she watched over your son. However, you still feel a little uneasy about her suggestion.
"I don't know... Tyler is kind of stubborn and moody lately, how could I leave you both alone for nearly four full hours? Not to mention that I can paint at home if I want to, I don't need to go to some weird art course..." you try to defy yourself. The idea of entrusting Hanna with your five year old son for so long worries you. Just the thought of it causes a bad feeling to spread throughout your body. Hanna just rolls her eyes, however. "Listen. I already signed you up for that course this Saturday. It's supposed to start at eleven, won't go past three in the afternoon and you can calmly come back home to Tyler and me having a great time without setting your apartment on fire."
You can't fight down the amused giggle at her statement before you sigh. "Hanna, I really don't-..." you begin, only to be interrupted mid-sentence. "Yes, you do want to try it. I'll be here at 10 this Saturday and you can either go to that course or stay here with us and bathe in my judgment."

And here you are, two days later and sat on a chair in front of an empty canvas and an A3 sized sketchpad, surrounded by strangers who, just like you, are waiting for the course to begin.
You take this time to inspect the equipment provided to you. Brushes and pencils of rather good quality, however accompanied by a cheap, fizzy eraser. The watercolor paint seems decent enough. But the big bottles of acrylics and oils on the desk in the middle of the room, accessible for everyone in it, clearly are not top-notch quality. That of course does not mean it is bad per se, you just might have expected something fancier in the art department of the local Community College.
Your train of thoughts comes to an abrupt stop when you hear someone opening the big wooden door and entering the room, a deep but smooth voice wishing you and your fellow course participants a good morning. The slender figure who just stepped into the room makes your eyes grow wide the second you lay your eyes on him. He is tall, with model like features, facial as well as bodywise. His fashion sense clearly is a little extravagant, for he wears a way too oversized dress shirt with a pair of what almost seemed to be pajama pants of some sort, and a matching beige colored beret topping his head. The big round glasses topping his nose make you curious. Does he need them to see? Or were they simply added to this retro outfit because they fit the vibe?
"I'm glad you all made it here on time, unlike myself" he then speaks while rummaging in the bag he has just placed on top of the desk in the front of the room. You hear quiet giggles erupting from two slightly older women in the back. His lips curve into a handsome smile, not even needing to show the whites of his teeth to make you doubt the existence of a man with such impressive visuals. Yet, you feel kind of stupid for the way you swoon over his looks like a teenager, despite being a grown woman with a child waiting for her to return home.
The young man claps his hands together as if to catch everyone's attention, even though he already possesses the full concentration of everyone in this room. "Now, I'd like to start by introducing myself, if that's alright by you."
He swiftly turns to the chalkboard behind himself and writes down what you assume to be his name.
"My name is Kim Taehyung and I teach traditional art at the local University. But as you can tell, I'm also hosting art courses like this one once a week, while also working as a hobby freelance artist. So I guess you could say that art is my passion."
There it is again. That charming smile of his as he tends to the attentive group of people in front of him. "But enough of me, I think we're all here to improve our skills, so how about we start with some easy warm ups to get creative first?" You notice everyone responding by nodding or already flipping over the cover of the massive sketchpad in front of them to reveal a blank page. Imitating your 'classmates', you flip open your sketchpad and face Mr. Kim again.
He begins by instructing everyone to warm up their wrists by drawing circular shapes of several sizes and shading them to your heart's content to make yourself familiar with the medium you're using. Another hint of his is to try the different art materials provided to each one of the participants and see which one you'd preferably work with today.
A couple minutes later, you can tell Mr. Kim valued his participants' individuality. Only giving a rough theme for the artwork you are supposed to create, he left everything else to you. "Warm Autumn" was the theme he came up with and your mind immediately drifts off into what you would like to call your ‘creative mode’. Images of brown leaves, soft breezes of air and fluffy fabrics of knitwear come to your mind. Thus, you begin by settling on a color palette in warm brown, red and yellow tones and soon start by sketching an idea.
Mr. Kim does no longer talk to the whole course. Instead, he begins to slowly walk around the classroom and take a look at everyone's approaches on the topic. Usually, you'd get so engulfed in your works that you would blend out most of your surroundings. However, Mr. Kim's presence makes it hard for you to fully concentrate on the sketch before you like you usually would. You don't even need to look up to know where Mr. Kim currently stood at, while he gradually comes closer to where you are seated at.
The sound of his steps approaching you slowly sends shivers down your spine, just like the feeling of him standing right beside you, wordlessly examining your sketch. You can't keep from glancing up at his face as his gaze remains locked on the paper before you, an approving look surfacing on his face. He then glances at your face, his eyes meeting yours immediately as he leans down a bit to speak to you with a quieter, low voice. "Nice choice of motives. Do you have an idea for the final composition already?"
You feel your cheeks heating up as you mumble out a shy "Um, kind of", unsure of how to feel about the genuine interest Mr. Kim shows. It's been a while since someone other than your son Tyler had commented on one of your works. The young artist next to you smiles. "You're a fast one, huh? I like that. But let me know if you need anything, alright?" His voice is just as unique as his appearance. And the more you get to hear of it, the more you come to like the sound of it. Nodding your head with a smile, you thank him before he smiles back and moves on to the next participant of his course.
By the end of the course, you have created a piece you are rather proud of - the motives assembled in a harmonic way, adding to the calm and welcoming atmosphere of your painting. Throughout the creation process of it, Mr. Kim came around every once in a while to praise you for your ideas or help you improve parts of your piece in ways you wouldn't have been able to think of yourself. You have actually truly enjoyed today. At the end of the course, Mr. Kim gives his final speech in which he thanks everyone for participating and gives some last advice before sending everyone home with their final artworks. You had just put the materials you had used back to where you got them from, ready to pack your things to leave, when Mr. Kim approaches you with a gentle smile. "(Y/N), am I right?" He addresses you, your heart seemingly skipping a beat at the way your name sounds when spoken with his smooth voice. "Yes, that would be me" you say, turning to him with faked confidence. In reality, something about this Kim Taehyung makes you feel like a shy teenager again. He smiles apologetically as he asks "Do you perhaps have a minute or two to talk? If you're not in a hurry to be somewhere, that is."
To be honest, you want to apologize and leave right now. Tyler is waiting for you at home, after all. And so is Hanna. But your head nods on it’s own accord before your mind could stop it from doing so. What are a few minutes anyway, right?
"Great! Actually, I was curious to see how your piece turned out. To be honest, I didn't really get to look at it yet," he then says as he regards your artwork which is still on the easel at your seat. Examining it interestedly, he chuckles. "You're really talented, you know? This can't have been the first time you’ve painted something like this."
Your lips curve upwards in a bashful smile. "Ah, well actually... It's kind of my hobby. It's just that I haven't had much time to pursue it recently..." you answer. A soft humming noise resonates in his throat before he faces you again. "Are you interested in modern art too?" He suddenly asks, catching you a little off guard. "Modern art?" You repeat, to which he nods. "There's an art exhibition at the City Hall next friday. The main focus of it lays on contemporary artists and most works shown there are paintings and sculptures, rather than installations or anything like that. But I have a feeling that you might like it." You aren't sure where he was aiming at with this information, but you appreciate it. Mirroring his friendly smile, you say "It does sound interesting, yes. But I'm really busy lately, I'm not sure if I'll be able to go."
Mr. Kim seems understanding as he nods. "Well, if you do make it, maybe we'll meet there." He responds, making you nod slowly as you mumble a barely audible "That'd be nice." You want to ask him if there'd also be works of his exhibited there, remembering that he introduced himself as a freelance artist earlier, but the sound of your phone vibrating in your pocket interrupts you. "Ah, sorry" you then say, quickly looking at your phone to see messages of Hanna coming in. It’s nothing serious, just questions about whether Tyler still takes naps after lunch or not, since he apparently got a little energy boost after having eaten well. But it is urgent enough for you to decide that it is time to go home now. "I better get going now. Today was really nice, thank you. And thank you for telling me about the art exhibition, too. As you said, maybe we'll meet there." You speak as you collect your belongings and art piece, Mr. Kim nodding calmly and smiling as he wishes you a nice day before you leave.
On your way home, you keep thinking about today's events. About the fun you have had while painting for the first time in months and the useful help Mr. Kim had offered. The giddy feeling you got whenever he would lean in to talk to you quietly with that soothing deep voice of his. You have really had a great day, even if you still feel a little awkward for being so affected by the male's looks and kind words. But who could blame you, if said artist looks like a piece of art himself?
Arriving at home, the first thing you notice right after opening the front door is the welcoming scent of warm pancakes coming from your kitchen. Peeking past the doorframe, you smile at the sight of your best friend and son pouring dough into a frying pan together, your little son giggling in excitement.
"Hello you two" you greet the diligently working duo and laugh when your son immediately comes running to you to hug your legs and welcome you back excitedly. Crouching down to meet his eyes, you then give him a kiss on his cheek and smile at him. "Did you have a nice time with Hanna?" You ask, your smile widening when Tyler nods eagerly. "Yes! Hanna knows so many fun games for two! We played hide and seek too!” You give Hanna a glance, relieved to see her smiling just as happily as your little son. For some reason you’re always worried that he might be a little too challenging for her sometimes, but seeing her reaction to his happy storytelling, you have no doubt that she adores your son almost as much as you do.
Getting up to greet your friend properly with a short hug, you then look at the pile of pancakes on the kitchen counter. "Someone seems to be hungry, huh" you comment, Hanna rolling her eyes as she speaks, avoiding the topic. "How was the art course?"
You can feel Tyler leaning against your legs, silently requesting your attention. Picking him up to hold him close, you then begin to tell Hanna about the building, the people there, the fun you had when painting something from start to finish for the first time in ages, and in the end you thank her for having made this possible. Yet, a very specific detail you keep to yourself for now - Kim Taehyung.
Thank you for reading the Prologue to my new series “Inspiration is Motivation”!
If you can’t wait to read the next chapter, check out my Series Masterlist and follow @pluto-fics to be notified of new updates.
Stay safe and see you soon! 💜
- Pluto 🌑
#kpop#bts reader insert#bts taehyung#bts fanfic#bts#fanfiction#bts smut#taehyung#kim taehyung#v#bts v#taehyung smut#v smut#fluff#taehyung fluff#v fluff#romance#boyfriend#bangtan sonyeondan#bangtan#bangtan boys#fanfic#reader#reader input#oc#reader interactive#reader insert#k-pop#btswriterscollective#single mother
55 notes
·
View notes
Last Seen Blogs

glayxier
Untitled

sydamestluule
hääl mu sees

gkbyrkdhull-blog
Untitled
glitter-in-the-grillcheese
hold on i didn't order that-
williamblaq
WIlliam Blaq