#Library Automation Software
Explore tagged Tumblr posts
Visit Tumblr Blog
Explore Tumblr blogs with no restrictions, modern design and the best experience.
Last Seen Tumblr Blogs


Fun Fact
Tumblr was named as a finalist in Lead411’s New York City Hot 125 in Aug 2010.
Text
How can libraries ensure the security of their data and protect patron privacy when using a library management system?
In today's digital age, libraries rely heavily on technology to manage their collections, provide access to resources, and serve their patrons. However, with the use of technology comes the risk of data breaches and privacy violations. As libraries increasingly adopt library management systems, it is important to consider how these systems can be secured to protect patron privacy and ensure the integrity of library data.
At Metaguard, we understand the importance of data security and privacy in the library setting. Our team of experts works with libraries to implement security measures and provide training and support to ensure that library management systems are secure and compliant with privacy regulations.
One of the first steps libraries can take to ensure data security and privacy is to implement access controls. Access controls limit who has access to sensitive data and ensure that only authorized personnel can view and modify data. Libraries can also implement multi-factor authentication to further enhance security and prevent unauthorized access.
Another important step is to ensure that all data is encrypted when it is transmitted or stored. Encryption ensures that data is protected from hackers and other unauthorized users. Libraries should also regularly update their software and systems to ensure that they are protected from known security vulnerabilities.
In addition to securing the library management system, libraries must also protect patron privacy. This includes implementing policies and procedures for handling and storing patron data, as well as obtaining consent before collecting any personal information. Libraries should also provide clear and transparent privacy policies to patrons and ensure that they are informed about how their data is being used and protected.
At Metaguard, we work with libraries to implement privacy and security best practices, including regular audits and assessments to identify and address potential vulnerabilities. We also provide training and support to library staff to ensure that they have the knowledge and skills to maintain a secure and privacy-compliant library management system.
In conclusion, library management systems are an essential tool for modern libraries, but they also come with security and privacy risks. By implementing access controls, encryption, and other security measures, libraries can protect their data and ensure the integrity of their systems. At Metaguard, we are committed to helping libraries achieve these goals and providing the necessary support and training to ensure that data security and privacy remain a top priority.
0 notes
Text
"Code is read much more often than it is written." - Guido van Rossum
#poetry#programming#code#developers#art#aesthetic#books & libraries#comics#gaming#music#writing#video games#software#automation#apps#development#softwaredevelopment
2 notes
·
View notes
Text
Lazy Loading Page Speed Optimization: Efficient Practices & Tips

Key Takeaways
Lazy loading can significantly improve page speed by loading only necessary content initially, reducing initial load times.
Implementing lazy loading can save bandwidth, which is crucial for users on limited data plans.
This technique enhances user experience by ensuring faster interactions and smoother scrolling.
SEO can benefit from lazy loading as search engines prefer faster websites, potentially improving rankings.
To effectively implement lazy loading, use browser-native features and ensure compatibility across different devices.
Enhancing Web Performance with Lazy Loading
In today's fast-paced digital world, web performance is more critical than ever. Slow websites can drive users away, impacting engagement and conversions. One powerful technique to boost performance is lazy loading. By understanding and implementing lazy loading, you can optimize your website's speed and efficiency, keeping your visitors engaged and satisfied.
Understanding the Need for Speed
Users expect websites to load quickly and efficiently.
Slow loading times can lead to higher bounce rates.
Improved speed enhances user satisfaction and retention.
Most importantly, speed is not just a luxury; it's a necessity. Users are increasingly impatient, and a delay of even a few seconds can cause them to abandon your site. Therefore, ensuring that your site loads swiftly is crucial for maintaining user interest and engagement.
Lazy loading offers a solution by optimizing the loading process. Instead of loading every element of a page at once, lazy loading prioritizes essential content and defers non-essential elements. This approach can make a dramatic difference in how quickly your site feels to users.
Lazy Loading: A Game Changer for Web Efficiency
Lazy loading is more than just a buzzword; it's a transformative technique for web optimization. By deferring the loading of non-essential elements, such as images and videos, until they are needed, lazy loading reduces the initial load time of a webpage.
Images and videos load only when they enter the viewport.
Reduces server requests, enhancing page speed.
Particularly beneficial for mobile users with limited bandwidth.
Besides that, lazy loading helps in conserving resources, which is particularly beneficial for mobile users who might be on limited data plans. By only loading what's necessary, users experience faster interactions and smoother scrolling, which can significantly improve their overall experience.
Eager Loading: When Immediate Isn't Ideal
Eager loading, the opposite of lazy loading, involves loading all page elements at once. While this approach might seem straightforward, it can lead to longer initial load times, especially on content-heavy pages. Therefore, eager loading is not always the best choice, particularly when dealing with large images or videos.
Lazy loading, on the other hand, ensures that your website delivers essential content swiftly, making it an ideal choice for optimizing page speed and improving user experience.
Benefits of Lazy Loading
Lazy loading isn't just about speed; it's about creating a seamless and efficient user experience. Let's delve into the various benefits it offers.
Faster Initial Load Times
By loading only the necessary elements initially, lazy loading significantly reduces the time it takes for a page to become interactive. Users can start engaging with the content almost immediately, without waiting for all elements to load.
This immediate engagement is crucial in retaining user interest. For instance, if your homepage loads quickly, users are more likely to explore further, increasing the chances of conversion.
Additionally, faster load times can have a positive impact on your website's bounce rate. Users are less likely to leave if they don't have to wait for content to load, which can improve your site's overall performance metrics.
Loading Images Efficiently
Images often account for the majority of a webpage's load time. By implementing lazy loading for images, you can significantly improve your page speed. This involves loading images only when they are about to enter the viewport. As a result, users won't have to wait for all images to load before they can interact with your content.
To do this effectively, you can use the loading="lazy" attribute in your image tags. This attribute tells the browser to defer loading the image until it is close to being visible. Additionally, consider using responsive image techniques to serve different image sizes based on the user's device, further optimizing load times.
Handling Videos and Media Content
Videos and other media content can be resource-intensive, causing significant delays in load times if not managed properly. Lazy loading can also be applied to these elements. By embedding videos with lazy loading techniques, you ensure they only load when a user scrolls to them.
For example, instead of directly embedding a video, use a thumbnail image with a play button overlay. When the user clicks the play button, the video loads and plays. This not only saves bandwidth but also improves the initial loading speed of the page.
JavaScript and CSS Deferred Loading
JavaScript and CSS files are essential for modern web applications, but they can also be a bottleneck if not handled correctly. Lazy loading these resources involves deferring their loading until they are needed. This can be achieved using the defer and async attributes for JavaScript files.
The defer attribute ensures that the script is executed after the HTML document has been parsed, while the async attribute allows the script to be executed as soon as it's available. For CSS, consider using media queries to load stylesheets conditionally based on the user's device or viewport size.
Tips for Optimizing Lazy Loading
Implementing lazy loading is just the beginning. To truly optimize your website's performance, follow these additional tips and best practices.
Use Browser Native Features
Modern browsers offer native support for lazy loading, making it easier than ever to implement this technique. By using native features, you can ensure compatibility and reduce the need for third-party libraries, which can add unnecessary overhead.
To take advantage of these features, simply add the loading="lazy" attribute to your image and iframe tags. This simple addition can have a significant impact on your page speed, especially for image-heavy sites.
Besides, using native features ensures that your site remains future-proof, as browsers continue to enhance their support for lazy loading and other performance optimizations.
Minimize Default Image Size
Before applying lazy loading, it's crucial to optimize your images for size. Large images can still slow down load times, even with lazy loading. Use image compression tools to reduce file sizes without sacrificing quality.
Optimize Animations
Animations can enhance user experience, but they can also impact performance if not optimized. Use CSS animations instead of JavaScript whenever possible, as they are more efficient and can be hardware-accelerated by the browser.
Ensure that animations are smooth and don't cause layout shifts, which can negatively affect user experience. Test your animations on different devices to ensure they perform well across the board.
Remember, the goal is to create a seamless experience for your users. By optimizing animations, you can enhance the visual appeal of your site without compromising performance.
Test Across Multiple Devices
It's essential to test your website on a variety of devices and screen sizes. What works well on a desktop might not perform the same on a mobile device. Use tools like Google PageSpeed Insights to analyze your site's performance and identify areas for improvement.
Regular testing ensures that your lazy loading implementation works as intended across different platforms, providing a consistent experience for all users.
Overcoming Common Lazy Loading Challenges
While lazy loading offers numerous benefits, it's not without its challenges. Addressing these issues ensures that your implementation is successful and doesn't negatively impact your site.
Dealing with SEO Concerns
Lazy loading can sometimes interfere with search engine indexing if not implemented correctly. To ensure your content is indexed, use server-side rendering or provide fallbacks for search engines that may not execute JavaScript. For more insights, check out how lazy loading decreases load time and increases engagement.
Ensure all critical content is available without JavaScript.
Use structured data to help search engines understand your content.
Regularly monitor your site's indexing status in Google Search Console.
These strategies help maintain your site's visibility in search engine results, ensuring that lazy loading doesn't negatively impact your SEO efforts.
Addressing Browser Compatibility Issues
While most modern browsers support lazy loading, some older versions may not. To ensure compatibility, consider using a polyfill or fallback solutions for browsers that don't support lazy loading natively.
By addressing these compatibility issues, you can provide a consistent experience for all users, regardless of their browser choice. Regularly updating your site and testing on different browsers can help you identify and resolve any issues that arise.
Troubleshooting Loading Delays
Even with lazy loading implemented, you might encounter loading delays. This often happens when elements are not optimized or when there are too many third-party scripts running on your site. To troubleshoot these issues, start by identifying the elements that are causing delays. Use tools like Google Chrome's Developer Tools to pinpoint these elements and analyze their loading times.
Once you've identified the culprits, consider compressing images, deferring non-essential scripts, and minimizing the use of third-party plugins. By doing so, you can significantly reduce loading times and improve the overall performance of your website.
The Future of Lazy Loading in Web Development
Lazy loading is set to become an integral part of web development as websites continue to grow in complexity and size. With the increasing demand for faster and more efficient websites, lazy loading offers a practical solution to enhance user experience without compromising on content richness.
"Lazy loading is not just a trend; it's a necessity for modern web development. As websites evolve, so do the techniques we use to optimize them."
As more developers recognize the benefits of lazy loading, we can expect to see advancements in browser support and new tools that make implementation even easier. This evolution will ensure that lazy loading remains a vital component of web optimization strategies.
Emerging Technologies that Support Lazy Loading
Several emerging technologies are poised to enhance lazy loading capabilities. For instance, progressive web apps (PWAs) and server-side rendering (SSR) can work alongside lazy loading to deliver content more efficiently. PWAs offer offline capabilities and faster load times, while SSR ensures that content is rendered on the server, reducing the load on the client's device.
Additionally, advances in artificial intelligence and machine learning could further optimize lazy loading by predicting user behavior and preloading content accordingly. These technologies have the potential to revolutionize how we approach web performance optimization.
The Growing Importance of Mobile Optimization
As mobile usage continues to rise, optimizing websites for mobile devices has become more critical than ever. Lazy loading plays a crucial role in this optimization by reducing data usage and improving load times on mobile networks.
By implementing lazy loading, you can ensure that your mobile users have a seamless experience, regardless of their network conditions. This is particularly important for users in regions with slower internet speeds, where every byte counts.
Frequently Asked Questions
Lazy loading is a powerful tool, but it can also raise questions for those unfamiliar with its implementation. Here are some common questions and answers to help you better understand lazy loading and its impact on your website.
These insights will help you make informed decisions about implementing lazy loading on your site and address any concerns you may have.
"Lazy loading can seem daunting at first, but with the right guidance, it becomes an invaluable asset for web optimization."
What is lazy loading and how does it work?
Lazy loading is a technique that defers the loading of non-essential elements, such as images and videos, until they are needed. This reduces the initial load time of a webpage, allowing users to interact with the content more quickly. By only loading elements when they enter the viewport, lazy loading conserves resources and improves performance.
How does lazy loading affect page speed and SEO?
Lazy loading can significantly enhance page speed by reducing the number of elements that need to be loaded initially. This not only improves user experience but also positively impacts SEO. Search engines favor faster websites, which can lead to improved rankings.
However, it's essential to ensure that lazy loading is implemented correctly to avoid any negative impact on SEO. This includes providing fallbacks for search engines that may not execute JavaScript and ensuring that all critical content is accessible without JavaScript. For more insights, check out this beginner's guide to lazy loading.
By addressing these considerations, you can harness the benefits of lazy loading without compromising your site's visibility in search engine results.
"Faster websites are favored by both users and search engines, making lazy loading a win-win for performance and SEO."
Therefore, lazy loading is an effective strategy for enhancing both user experience and search engine rankings.
What types of content should be lazy loaded?
Lazy loading is particularly beneficial for large images, videos, and other media content that can slow down a webpage. By deferring these elements, you can ensure that users only load what they need, when they need it.
Additionally, lazy loading can be applied to JavaScript and CSS files, further optimizing load times. By prioritizing essential content and deferring non-essential elements, you can create a more efficient and user-friendly website.
Are there any drawbacks to implementing lazy loading?
While lazy loading offers numerous benefits, it does have some potential drawbacks. If not implemented correctly, it can interfere with search engine indexing and result in missing or delayed content. To mitigate these risks, ensure that your lazy loading implementation is compatible with search engines and provides fallbacks for non-JavaScript environments. For more insights, check out Boost Your Website Speed With Lazy Loading.
How do I verify if lazy loading is working on my site?
To verify that lazy loading is working, use browser developer tools to inspect the network activity. Check if images and other media elements are loading only when they enter the viewport. Additionally, tools like Google PageSpeed Insights can help you analyze your site's performance and confirm that lazy loading is functioning as intended.
By regularly monitoring your site's performance and addressing any issues that arise, you can ensure that lazy loading continues to enhance your website's speed and user experience.
#A/B testing strategies#abstract design#Adobe Sensei automation#affordable AI tools#AI capability experimentation#AI-driven design suggestions#AI-driven innovation#alternate reality game#API integration#Appointment booking#appointment cancellation policy#ARG#authentic partnership#automated resizing#background removal#behind-the-scenes content#Blue color scheme#budget-friendly design software#Canva free version#Canva Pro features#Client data protection#client feedback tools#Client testimonials#Cloud Libraries#community building#community engagement#community engagement platforms#content automation#Conversion tracking#cost-effective strategies
0 notes
Text
oh my god i don't speak to my dad anymore cuz hes nutty but i know what he does for a living
and musk is currently pulling a "the software govs use is 50 years old which means there can be no advances"
and that's..... that's what my dad does for a living, he gets paid 500-1k an hour to make software that specifically communicates with old legacy software cause he's a 90s dev who knows the old languages still and it's more efficient to hire a freak who knows how to make something to bridge between the old and new programs than to fully trash the old system
like there's literally consultants that get hired for that specific purpose and as a software guy musk KNOWS this
#personal#im losing a LOT of money and decent work connections cause its less stressful than dealing with the crazy man#who literally called my professors at their personal art studios =_=#but ummm???? um??? hes like a low level linkedin influencer lmfao ._.#for software and THIS specific subject matter#the thing ive been getting raises on at work is making scripts to communicate between adobe software with the spreadsheets our#PLM system at work spits out....to automate a bunch of artwork thru libraries.........????#the way my boss gets me to not leave is by giving me /coolmathgames.com/ as a treat basically#and more money for being able to solve /coolmathgames.com/#i work in corporate and one of our order management systems specifically gets routed thru a windows vista virtual machine#cause they dont feel the need to fix....cuz if its not broke#just make the new things that bridge between the two systems?????#instead of having to transfer over decades of a database it makes 0 sense#idk man im rlly frustrated online cuz one of my dads patents is for a legacy speech to text software#(and the other is for a logistics/shipment thing)#like he wasnt the lead on either project but the speech to text specifically is irritating cuz theres#things ppl call 'AI' and im like....thats a buzzword this is litcherally 90s/00s tech and ive been in the office it was made lol
1 note
·
View note
Text

#G2M’s EZY-Auto prep is an automated #NGS library preparation workstation equipped with user-friendly #software, compatible hardware, and a professional support team, enabling quick #sample processing for an excellent library #preparation experience. It accommodates various sample types and quantities to meet diverse needs. Additionally, it features heating and cooling, magnetic plate lifting, #PCR thermal cycling, UV sterilization, and efficient #purification to ensure accurate and contamination-free library construction.
Contact us at [email protected] or +91-8800821778 if you need any further assistance!
Visit our website for more information: https://www.genes2me.com/automated-ngs-library-sample-preparation
#automated #library #workstation #analysis #rtpcr #solutions #instrument #magnetic #hardware
#g2m#genes2me#automated#library#workstation#software#analysis#rt pcr#pcr#ive#ngs#next generation sequencing#instrument#magnetic#hardware
0 notes
Text

Level Up Your Library with a Modern Library Management System
Organise books, streamline workflows, and empower users—all in one go! Discover an innovative approach to library organisation and patron satisfaction with our advanced library management system. Partner with us to unlock the full potential of your library!
0 notes
Text
How I ditched streaming services and learned to love Linux: A step-by-step guide to building your very own personal media streaming server (V2.0: REVISED AND EXPANDED EDITION)
This is a revised, corrected and expanded version of my tutorial on setting up a personal media server that previously appeared on my old blog (donjuan-auxenfers). I expect that that post is still making the rounds (hopefully with my addendum on modifying group share permissions in Ubuntu to circumvent 0x8007003B "Unexpected Network Error" messages in Windows 10/11 when transferring files) but I have no way of checking. Anyway this new revised version of the tutorial corrects one or two small errors I discovered when rereading what I wrote, adds links to all products mentioned and is just more polished generally. I also expanded it a bit, pointing more adventurous users toward programs such as Sonarr/Radarr/Lidarr and Overseerr which can be used for automating user requests and media collection.
So then, what is this tutorial? This is a tutorial on how to build and set up your own personal media server using Ubuntu as an operating system and Plex (or Jellyfin) to not only manage your media, but to also stream that media to your devices both at home and abroad anywhere in the world where you have an internet connection. Its intent is to show you how building a personal media server and stuffing it full of films, TV, and music that you acquired through indiscriminate and voracious media piracy various legal methods will free you to completely ditch paid streaming services. No more will you have to pay for Disney+, Netflix, HBOMAX, Hulu, Amazon Prime, Peacock, CBS All Access, Paramount+, Crave or any other streaming service that is not named Criterion Channel. Instead whenever you want to watch your favourite films and television shows, you’ll have your own personal service that only features things that you want to see, with files that you have control over. And for music fans out there, both Jellyfin and Plex support music streaming, meaning you can even ditch music streaming services. Goodbye Spotify, Youtube Music, Tidal and Apple Music, welcome back unreasonably large MP3 (or FLAC) collections.
On the hardware front, I’m going to offer a few options catered towards different budgets and media library sizes. The cost of getting a media server up and running using this guide will cost you anywhere from $450 CAD/$325 USD at the low end to $1500 CAD/$1100 USD at the high end (it could go higher). My server was priced closer to the higher figure, but I went and got a lot more storage than most people need. If that seems like a little much, consider for a moment, do you have a roommate, a close friend, or a family member who would be willing to chip in a few bucks towards your little project provided they get access? Well that's how I funded my server. It might also be worth thinking about the cost over time, i.e. how much you spend yearly on subscriptions vs. a one time cost of setting up a server. Additionally there's just the joy of being able to scream "fuck you" at all those show cancelling, library deleting, hedge fund vampire CEOs who run the studios through denying them your money. Drive a stake through David Zaslav's heart.
On the software side I will walk you step-by-step through installing Ubuntu as your server's operating system, configuring your storage as a RAIDz array with ZFS, sharing your zpool to Windows with Samba, running a remote connection between your server and your Windows PC, and then a little about started with Plex/Jellyfin. Every terminal command you will need to input will be provided, and I even share a custom #bash script that will make used vs. available drive space on your server display correctly in Windows.
If you have a different preferred flavour of Linux (Arch, Manjaro, Redhat, Fedora, Mint, OpenSUSE, CentOS, Slackware etc. et. al.) and are aching to tell me off for being basic and using Ubuntu, this tutorial is not for you. The sort of person with a preferred Linux distro is the sort of person who can do this sort of thing in their sleep. Also I don't care. This tutorial is intended for the average home computer user. This is also why we’re not using a more exotic home server solution like running everything through Docker Containers and managing it through a dashboard like Homarr or Heimdall. While such solutions are fantastic and can be very easy to maintain once you have it all set up, wrapping your brain around Docker is a whole thing in and of itself. If you do follow this tutorial and had fun putting everything together, then I would encourage you to return in a year’s time, do your research and set up everything with Docker Containers.
Lastly, this is a tutorial aimed at Windows users. Although I was a daily user of OS X for many years (roughly 2008-2023) and I've dabbled quite a bit with various Linux distributions (mostly Ubuntu and Manjaro), my primary OS these days is Windows 11. Many things in this tutorial will still be applicable to Mac users, but others (e.g. setting up shares) you will have to look up for yourself. I doubt it would be difficult to do so.
Nothing in this tutorial will require feats of computing expertise. All you will need is a basic computer literacy (i.e. an understanding of what a filesystem and directory are, and a degree of comfort in the settings menu) and a willingness to learn a thing or two. While this guide may look overwhelming at first glance, it is only because I want to be as thorough as possible. I want you to understand exactly what it is you're doing, I don't want you to just blindly follow steps. If you half-way know what you’re doing, you will be much better prepared if you ever need to troubleshoot.
Honestly, once you have all the hardware ready it shouldn't take more than an afternoon or two to get everything up and running.
(This tutorial is just shy of seven thousand words long so the rest is under the cut.)
Step One: Choosing Your Hardware
Linux is a light weight operating system, depending on the distribution there's close to no bloat. There are recent distributions available at this very moment that will run perfectly fine on a fourteen year old i3 with 4GB of RAM. Moreover, running Plex or Jellyfin isn’t resource intensive in 90% of use cases. All this is to say, we don’t require an expensive or powerful computer. This means that there are several options available: 1) use an old computer you already have sitting around but aren't using 2) buy a used workstation from eBay, or what I believe to be the best option, 3) order an N100 Mini-PC from AliExpress or Amazon.
Note: If you already have an old PC sitting around that you’ve decided to use, fantastic, move on to the next step.
When weighing your options, keep a few things in mind: the number of people you expect to be streaming simultaneously at any one time, the resolution and bitrate of your media library (4k video takes a lot more processing power than 1080p) and most importantly, how many of those clients are going to be transcoding at any one time. Transcoding is what happens when the playback device does not natively support direct playback of the source file. This can happen for a number of reasons, such as the playback device's native resolution being lower than the file's internal resolution, or because the source file was encoded in a video codec unsupported by the playback device.
Ideally we want any transcoding to be performed by hardware. This means we should be looking for a computer with an Intel processor with Quick Sync. Quick Sync is a dedicated core on the CPU die designed specifically for video encoding and decoding. This specialized hardware makes for highly efficient transcoding both in terms of processing overhead and power draw. Without these Quick Sync cores, transcoding must be brute forced through software. This takes up much more of a CPU’s processing power and requires much more energy. But not all Quick Sync cores are created equal and you need to keep this in mind if you've decided either to use an old computer or to shop for a used workstation on eBay
Any Intel processor from second generation Core (Sandy Bridge circa 2011) onward has Quick Sync cores. It's not until 6th gen (Skylake), however, that the cores support the H.265 HEVC codec. Intel’s 10th gen (Comet Lake) processors introduce support for 10bit HEVC and HDR tone mapping. And the recent 12th gen (Alder Lake) processors brought with them hardware AV1 decoding. As an example, while an 8th gen (Kaby Lake) i5-8500 will be able to hardware transcode a H.265 encoded file, it will fall back to software transcoding if given a 10bit H.265 file. If you’ve decided to use that old PC or to look on eBay for an old Dell Optiplex keep this in mind.
Note 1: The price of old workstations varies wildly and fluctuates frequently. If you get lucky and go shopping shortly after a workplace has liquidated a large number of their workstations you can find deals for as low as $100 on a barebones system, but generally an i5-8500 workstation with 16gb RAM will cost you somewhere in the area of $260 CAD/$200 USD.
Note 2: The AMD equivalent to Quick Sync is called Video Core Next, and while it's fine, it's not as efficient and not as mature a technology. It was only introduced with the first generation Ryzen CPUs and it only got decent with their newest CPUs, we want something cheap.
Alternatively you could forgo having to keep track of what generation of CPU is equipped with Quick Sync cores that feature support for which codecs, and just buy an N100 mini-PC. For around the same price or less of a used workstation you can pick up a mini-PC with an Intel N100 processor. The N100 is a four-core processor based on the 12th gen Alder Lake architecture and comes equipped with the latest revision of the Quick Sync cores. These little processors offer astounding hardware transcoding capabilities for their size and power draw. Otherwise they perform equivalent to an i5-6500, which isn't a terrible CPU. A friend of mine uses an N100 machine as a dedicated retro emulation gaming system and it does everything up to 6th generation consoles just fine. The N100 is also a remarkably efficient chip, it sips power. In fact, the difference between running one of these and an old workstation could work out to hundreds of dollars a year in energy bills depending on where you live.
You can find these Mini-PCs all over Amazon or for a little cheaper on AliExpress. They range in price from $170 CAD/$125 USD for a no name N100 with 8GB RAM to $280 CAD/$200 USD for a Beelink S12 Pro with 16GB RAM. The brand doesn't really matter, they're all coming from the same three factories in Shenzen, go for whichever one fits your budget or has features you want. 8GB RAM should be enough, Linux is lightweight and Plex only calls for 2GB RAM. 16GB RAM might result in a slightly snappier experience, especially with ZFS. A 256GB SSD is more than enough for what we need as a boot drive, but going for a bigger drive might allow you to get away with things like creating preview thumbnails for Plex, but it’s up to you and your budget.
The Mini-PC I wound up buying was a Firebat AK2 Plus with 8GB RAM and a 256GB SSD. It looks like this:

Note: Be forewarned that if you decide to order a Mini-PC from AliExpress, note the type of power adapter it ships with. The mini-PC I bought came with an EU power adapter and I had to supply my own North American power supply. Thankfully this is a minor issue as barrel plug 30W/12V/2.5A power adapters are easy to find and can be had for $10.
Step Two: Choosing Your Storage
Storage is the most important part of our build. It is also the most expensive. Thankfully it’s also the most easily upgrade-able down the line.
For people with a smaller media collection (4TB to 8TB), a more limited budget, or who will only ever have two simultaneous streams running, I would say that the most economical course of action would be to buy a USB 3.0 8TB external HDD. Something like this one from Western Digital or this one from Seagate. One of these external drives will cost you in the area of $200 CAD/$140 USD. Down the line you could add a second external drive or replace it with a multi-drive RAIDz set up such as detailed below.
If a single external drive the path for you, move on to step three.
For people with larger media libraries (12TB+), who prefer media in 4k, or care who about data redundancy, the answer is a RAID array featuring multiple HDDs in an enclosure.
Note: If you are using an old PC or used workstatiom as your server and have the room for at least three 3.5" drives, and as many open SATA ports on your mother board you won't need an enclosure, just install the drives into the case. If your old computer is a laptop or doesn’t have room for more internal drives, then I would suggest an enclosure.
The minimum number of drives needed to run a RAIDz array is three, and seeing as RAIDz is what we will be using, you should be looking for an enclosure with three to five bays. I think that four disks makes for a good compromise for a home server. Regardless of whether you go for a three, four, or five bay enclosure, do be aware that in a RAIDz array the space equivalent of one of the drives will be dedicated to parity at a ratio expressed by the equation 1 − 1/n i.e. in a four bay enclosure equipped with four 12TB drives, if we configured our drives in a RAIDz1 array we would be left with a total of 36TB of usable space (48TB raw size). The reason for why we might sacrifice storage space in such a manner will be explained in the next section.
A four bay enclosure will cost somewhere in the area of $200 CDN/$140 USD. You don't need anything fancy, we don't need anything with hardware RAID controls (RAIDz is done entirely in software) or even USB-C. An enclosure with USB 3.0 will perform perfectly fine. Don’t worry too much about USB speed bottlenecks. A mechanical HDD will be limited by the speed of its mechanism long before before it will be limited by the speed of a USB connection. I've seen decent looking enclosures from TerraMaster, Yottamaster, Mediasonic and Sabrent.
When it comes to selecting the drives, as of this writing, the best value (dollar per gigabyte) are those in the range of 12TB to 20TB. I settled on 12TB drives myself. If 12TB to 20TB drives are out of your budget, go with what you can afford, or look into refurbished drives. I'm not sold on the idea of refurbished drives but many people swear by them.
When shopping for harddrives, search for drives designed specifically for NAS use. Drives designed for NAS use typically have better vibration dampening and are designed to be active 24/7. They will also often make use of CMR (conventional magnetic recording) as opposed to SMR (shingled magnetic recording). This nets them a sizable read/write performance bump over typical desktop drives. Seagate Ironwolf and Toshiba NAS are both well regarded brands when it comes to NAS drives. I would avoid Western Digital Red drives at this time. WD Reds were a go to recommendation up until earlier this year when it was revealed that they feature firmware that will throw up false SMART warnings telling you to replace the drive at the three year mark quite often when there is nothing at all wrong with that drive. It will likely even be good for another six, seven, or more years.

Step Three: Installing Linux
For this step you will need a USB thumbdrive of at least 6GB in capacity, an .ISO of Ubuntu, and a way to make that thumbdrive bootable media.
First download a copy of Ubuntu desktop (for best performance we could download the Server release, but for new Linux users I would recommend against the server release. The server release is strictly command line interface only, and having a GUI is very helpful for most people. Not many people are wholly comfortable doing everything through the command line, I'm certainly not one of them, and I grew up with DOS 6.0. 22.04.3 Jammy Jellyfish is the current Long Term Service release, this is the one to get.
Download the .ISO and then download and install balenaEtcher on your Windows PC. BalenaEtcher is an easy to use program for creating bootable media, you simply insert your thumbdrive, select the .ISO you just downloaded, and it will create a bootable installation media for you.
Once you've made a bootable media and you've got your Mini-PC (or you old PC/used workstation) in front of you, hook it directly into your router with an ethernet cable, and then plug in the HDD enclosure, a monitor, a mouse and a keyboard. Now turn that sucker on and hit whatever key gets you into the BIOS (typically ESC, DEL or F2). If you’re using a Mini-PC check to make sure that the P1 and P2 power limits are set correctly, my N100's P1 limit was set at 10W, a full 20W under the chip's power limit. Also make sure that the RAM is running at the advertised speed. My Mini-PC’s RAM was set at 2333Mhz out of the box when it should have been 3200Mhz. Once you’ve done that, key over to the boot order and place the USB drive first in the boot order. Then save the BIOS settings and restart.
After you restart you’ll be greeted by Ubuntu's installation screen. Installing Ubuntu is really straight forward, select the "minimal" installation option, as we won't need anything on this computer except for a browser (Ubuntu comes preinstalled with Firefox) and Plex Media Server/Jellyfin Media Server. Also remember to delete and reformat that Windows partition! We don't need it.
Step Four: Installing ZFS and Setting Up the RAIDz Array
Note: If you opted for just a single external HDD skip this step and move onto setting up a Samba share.
Once Ubuntu is installed it's time to configure our storage by installing ZFS to build our RAIDz array. ZFS is a "next-gen" file system that is both massively flexible and massively complex. It's capable of snapshot backup, self healing error correction, ZFS pools can be configured with drives operating in a supplemental manner alongside the storage vdev (e.g. fast cache, dedicated secondary intent log, hot swap spares etc.). It's also a file system very amenable to fine tuning. Block and sector size are adjustable to use case and you're afforded the option of different methods of inline compression. If you'd like a very detailed overview and explanation of its various features and tips on tuning a ZFS array check out these articles from Ars Technica. For now we're going to ignore all these features and keep it simple, we're going to pull our drives together into a single vdev running in RAIDz which will be the entirety of our zpool, no fancy cache drive or SLOG.
Open up the terminal and type the following commands:
sudo apt update
then
sudo apt install zfsutils-linux
This will install the ZFS utility. Verify that it's installed with the following command:
zfs --version
Now, it's time to check that the HDDs we have in the enclosure are healthy, running, and recognized. We also want to find out their device IDs and take note of them:
sudo fdisk -1
Note: You might be wondering why some of these commands require "sudo" in front of them while others don't. "Sudo" is short for "super user do”. When and where "sudo" is used has to do with the way permissions are set up in Linux. Only the "root" user has the access level to perform certain tasks in Linux. As a matter of security and safety regular user accounts are kept separate from the "root" user. It's not advised (or even possible) to boot into Linux as "root" with most modern distributions. Instead by using "sudo" our regular user account is temporarily given the power to do otherwise forbidden things. Don't worry about it too much at this stage, but if you want to know more check out this introduction.
If everything is working you should get a list of the various drives detected along with their device IDs which will look like this: /dev/sdc. You can also check the device IDs of the drives by opening the disk utility app. Jot these IDs down as we'll need them for our next step, creating our RAIDz array.
RAIDz is similar to RAID-5 in that instead of striping your data over multiple disks, exchanging redundancy for speed and available space (RAID-0), or mirroring your data writing by two copies of every piece (RAID-1), it instead writes parity blocks across the disks in addition to striping, this provides a balance of speed, redundancy and available space. If a single drive fails, the parity blocks on the working drives can be used to reconstruct the entire array as soon as a replacement drive is added.
Additionally, RAIDz improves over some of the common RAID-5 flaws. It's more resilient and capable of self healing, as it is capable of automatically checking for errors against a checksum. It's more forgiving in this way, and it's likely that you'll be able to detect when a drive is dying well before it fails. A RAIDz array can survive the loss of any one drive.
Note: While RAIDz is indeed resilient, if a second drive fails during the rebuild, you're fucked. Always keep backups of things you can't afford to lose. This tutorial, however, is not about proper data safety.
To create the pool, use the following command:
sudo zpool create "zpoolnamehere" raidz "device IDs of drives we're putting in the pool"
For example, let's creatively name our zpool "mypool". This poil will consist of four drives which have the device IDs: sdb, sdc, sdd, and sde. The resulting command will look like this:
sudo zpool create mypool raidz /dev/sdb /dev/sdc /dev/sdd /dev/sde
If as an example you bought five HDDs and decided you wanted more redundancy dedicating two drive to this purpose, we would modify the command to "raidz2" and the command would look something like the following:
sudo zpool create mypool raidz2 /dev/sdb /dev/sdc /dev/sdd /dev/sde /dev/sdf
An array configured like this is known as RAIDz2 and is able to survive two disk failures.
Once the zpool has been created, we can check its status with the command:
zpool status
Or more concisely with:
zpool list
The nice thing about ZFS as a file system is that a pool is ready to go immediately after creation. If we were to set up a traditional RAID-5 array using mbam, we'd have to sit through a potentially hours long process of reformatting and partitioning the drives. Instead we're ready to go right out the gates.
The zpool should be automatically mounted to the filesystem after creation, check on that with the following:
df -hT | grep zfs
Note: If your computer ever loses power suddenly, say in event of a power outage, you may have to re-import your pool. In most cases, ZFS will automatically import and mount your pool, but if it doesn’t and you can't see your array, simply open the terminal and type sudo zpool import -a.
By default a zpool is mounted at /"zpoolname". The pool should be under our ownership but let's make sure with the following command:
sudo chown -R "yourlinuxusername" /"zpoolname"
Note: Changing file and folder ownership with "chown" and file and folder permissions with "chmod" are essential commands for much of the admin work in Linux, but we won't be dealing with them extensively in this guide. If you'd like a deeper tutorial and explanation you can check out these two guides: chown and chmod.

You can access the zpool file system through the GUI by opening the file manager (the Ubuntu default file manager is called Nautilus) and clicking on "Other Locations" on the sidebar, then entering the Ubuntu file system and looking for a folder with your pool's name. Bookmark the folder on the sidebar for easy access.

Your storage pool is now ready to go. Assuming that we already have some files on our Windows PC we want to copy to over, we're going to need to install and configure Samba to make the pool accessible in Windows.
Step Five: Setting Up Samba/Sharing
Samba is what's going to let us share the zpool with Windows and allow us to write to it from our Windows machine. First let's install Samba with the following commands:
sudo apt-get update
then
sudo apt-get install samba
Next create a password for Samba.
sudo smbpswd -a "yourlinuxusername"
It will then prompt you to create a password. Just reuse your Ubuntu user password for simplicity's sake.
Note: if you're using just a single external drive replace the zpool location in the following commands with wherever it is your external drive is mounted, for more information see this guide on mounting an external drive in Ubuntu.
After you've created a password we're going to create a shareable folder in our pool with this command
mkdir /"zpoolname"/"foldername"
Now we're going to open the smb.conf file and make that folder shareable. Enter the following command.
sudo nano /etc/samba/smb.conf
This will open the .conf file in nano, the terminal text editor program. Now at the end of smb.conf add the following entry:
["foldername"]
path = /"zpoolname"/"foldername"
available = yes
valid users = "yourlinuxusername"
read only = no
writable = yes
browseable = yes
guest ok = no
Ensure that there are no line breaks between the lines and that there's a space on both sides of the equals sign. Our next step is to allow Samba traffic through the firewall:
sudo ufw allow samba
Finally restart the Samba service:
sudo systemctl restart smbd
At this point we'll be able to access to the pool, browse its contents, and read and write to it from Windows. But there's one more thing left to do, Windows doesn't natively support the ZFS file systems and will read the used/available/total space in the pool incorrectly. Windows will read available space as total drive space, and all used space as null. This leads to Windows only displaying a dwindling amount of "available" space as the drives are filled. We can fix this! Functionally this doesn't actually matter, we can still write and read to and from the disk, it just makes it difficult to tell at a glance the proportion of used/available space, so this is an optional step but one I recommend (this step is also unnecessary if you're just using a single external drive). What we're going to do is write a little shell script in #bash. Open nano with the terminal with the command:
nano
Now insert the following code:
#!/bin/bash CUR_PATH=`pwd` ZFS_CHECK_OUTPUT=$(zfs get type $CUR_PATH 2>&1 > /dev/null) > /dev/null if [[ $ZFS_CHECK_OUTPUT == *not\ a\ ZFS* ]] then IS_ZFS=false else IS_ZFS=true fi if [[ $IS_ZFS = false ]] then df $CUR_PATH | tail -1 | awk '{print $2" "$4}' else USED=$((`zfs get -o value -Hp used $CUR_PATH` / 1024)) > /dev/null AVAIL=$((`zfs get -o value -Hp available $CUR_PATH` / 1024)) > /dev/null TOTAL=$(($USED+$AVAIL)) > /dev/null echo $TOTAL $AVAIL fi
Save the script as "dfree.sh" to /home/"yourlinuxusername" then change the ownership of the file to make it executable with this command:
sudo chmod 774 dfree.sh
Now open smb.conf with sudo again:
sudo nano /etc/samba/smb.conf
Now add this entry to the top of the configuration file to direct Samba to use the results of our script when Windows asks for a reading on the pool's used/available/total drive space:
[global]
dfree command = /home/"yourlinuxusername"/dfree.sh
Save the changes to smb.conf and then restart Samba again with the terminal:
sudo systemctl restart smbd
Now there’s one more thing we need to do to fully set up the Samba share, and that’s to modify a hidden group permission. In the terminal window type the following command:
usermod -a -G sambashare “yourlinuxusername”
Then restart samba again:
sudo systemctl restart smbd
If we don’t do this last step, everything will appear to work fine, and you will even be able to see and map the drive from Windows and even begin transferring files, but you'd soon run into a lot of frustration. As every ten minutes or so a file would fail to transfer and you would get a window announcing “0x8007003B Unexpected Network Error”. This window would require your manual input to continue the transfer with the file next in the queue. And at the end it would reattempt to transfer whichever files failed the first time around. 99% of the time they’ll go through that second try, but this is still all a major pain in the ass. Especially if you’ve got a lot of data to transfer or you want to step away from the computer for a while.
It turns out samba can act a little weirdly with the higher read/write speeds of RAIDz arrays and transfers from Windows, and will intermittently crash and restart itself if this group option isn’t changed. Inputting the above command will prevent you from ever seeing that window.
The last thing we're going to do before switching over to our Windows PC is grab the IP address of our Linux machine. Enter the following command:
hostname -I
This will spit out this computer's IP address on the local network (it will look something like 192.168.0.x), write it down. It might be a good idea once you're done here to go into your router settings and reserving that IP for your Linux system in the DHCP settings. Check the manual for your specific model router on how to access its settings, typically it can be accessed by opening a browser and typing http:\\192.168.0.1 in the address bar, but your router may be different.
Okay we’re done with our Linux computer for now. Get on over to your Windows PC, open File Explorer, right click on Network and click "Map network drive". Select Z: as the drive letter (you don't want to map the network drive to a letter you could conceivably be using for other purposes) and enter the IP of your Linux machine and location of the share like so: \\"LINUXCOMPUTERLOCALIPADDRESSGOESHERE"\"zpoolnamegoeshere"\. Windows will then ask you for your username and password, enter the ones you set earlier in Samba and you're good. If you've done everything right it should look something like this:

You can now start moving media over from Windows to the share folder. It's a good idea to have a hard line running to all machines. Moving files over Wi-Fi is going to be tortuously slow, the only thing that’s going to make the transfer time tolerable (hours instead of days) is a solid wired connection between both machines and your router.
Step Six: Setting Up Remote Desktop Access to Your Server
After the server is up and going, you’ll want to be able to access it remotely from Windows. Barring serious maintenance/updates, this is how you'll access it most of the time. On your Linux system open the terminal and enter:
sudo apt install xrdp
Then:
sudo systemctl enable xrdp
Once it's finished installing, open “Settings” on the sidebar and turn off "automatic login" in the User category. Then log out of your account. Attempting to remotely connect to your Linux computer while you’re logged in will result in a black screen!
Now get back on your Windows PC, open search and look for "RDP". A program called "Remote Desktop Connection" should pop up, open this program as an administrator by right-clicking and selecting “run as an administrator”. You’ll be greeted with a window. In the field marked “Computer” type in the IP address of your Linux computer. Press connect and you'll be greeted with a new window and prompt asking for your username and password. Enter your Ubuntu username and password here.

If everything went right, you’ll be logged into your Linux computer. If the performance is sluggish, adjust the display options. Lowering the resolution and colour depth do a lot to make the interface feel snappier.

Remote access is how we're going to be using our Linux system from now, barring edge cases like needing to get into the BIOS or upgrading to a new version of Ubuntu. Everything else from performing maintenance like a monthly zpool scrub to checking zpool status and updating software can all be done remotely.

This is how my server lives its life now, happily humming and chirping away on the floor next to the couch in a corner of the living room.
Step Seven: Plex Media Server/Jellyfin
Okay we’ve got all the ground work finished and our server is almost up and running. We’ve got Ubuntu up and running, our storage array is primed, we’ve set up remote connections and sharing, and maybe we’ve moved over some of favourite movies and TV shows.
Now we need to decide on the media server software to use which will stream our media to us and organize our library. For most people I’d recommend Plex. It just works 99% of the time. That said, Jellyfin has a lot to recommend it by too, even if it is rougher around the edges. Some people run both simultaneously, it’s not that big of an extra strain. I do recommend doing a little bit of your own research into the features each platform offers, but as a quick run down, consider some of the following points:
Plex is closed source and is funded through PlexPass purchases while Jellyfin is open source and entirely user driven. This means a number of things: for one, Plex requires you to purchase a “PlexPass” (purchased as a one time lifetime fee $159.99 CDN/$120 USD or paid for on a monthly or yearly subscription basis) in order to access to certain features, like hardware transcoding (and we want hardware transcoding) or automated intro/credits detection and skipping, Jellyfin offers some of these features for free through plugins. Plex supports a lot more devices than Jellyfin and updates more frequently. That said, Jellyfin's Android and iOS apps are completely free, while the Plex Android and iOS apps must be activated for a one time cost of $6 CDN/$5 USD. But that $6 fee gets you a mobile app that is much more functional and features a unified UI across platforms, the Plex mobile apps are simply a more polished experience. The Jellyfin apps are a bit of a mess and the iOS and Android versions are very different from each other.
Jellyfin’s actual media player is more fully featured than Plex's, but on the other hand Jellyfin's UI, library customization and automatic media tagging really pale in comparison to Plex. Streaming your music library is free through both Jellyfin and Plex, but Plex offers the PlexAmp app for dedicated music streaming which boasts a number of fantastic features, unfortunately some of those fantastic features require a PlexPass. If your internet is down, Jellyfin can still do local streaming, while Plex can fail to play files unless you've got it set up a certain way. Jellyfin has a slew of neat niche features like support for Comic Book libraries with the .cbz/.cbt file types, but then Plex offers some free ad-supported TV and films, they even have a free channel that plays nothing but Classic Doctor Who.
Ultimately it's up to you, I settled on Plex because although some features are pay-walled, it just works. It's more reliable and easier to use, and a one-time fee is much easier to swallow than a subscription. I had a pretty easy time getting my boomer parents and tech illiterate brother introduced to and using Plex and I don't know if I would've had as easy a time doing that with Jellyfin. I do also need to mention that Jellyfin does take a little extra bit of tinkering to get going in Ubuntu, you’ll have to set up process permissions, so if you're more tolerant to tinkering, Jellyfin might be up your alley and I’ll trust that you can follow their installation and configuration guide. For everyone else, I recommend Plex.
So pick your poison: Plex or Jellyfin.
Note: The easiest way to download and install either of these packages in Ubuntu is through Snap Store.
After you've installed one (or both), opening either app will launch a browser window into the browser version of the app allowing you to set all the options server side.
The process of adding creating media libraries is essentially the same in both Plex and Jellyfin. You create a separate libraries for Television, Movies, and Music and add the folders which contain the respective types of media to their respective libraries. The only difficult or time consuming aspect is ensuring that your files and folders follow the appropriate naming conventions:
Plex naming guide for Movies
Plex naming guide for Television
Jellyfin follows the same naming rules but I find their media scanner to be a lot less accurate and forgiving than Plex. Once you've selected the folders to be scanned the service will scan your files, tagging everything and adding metadata. Although I find do find Plex more accurate, it can still erroneously tag some things and you might have to manually clean up some tags in a large library. (When I initially created my library it tagged the 1963-1989 Doctor Who as some Korean soap opera and I needed to manually select the correct match after which everything was tagged normally.) It can also be a bit testy with anime (especially OVAs) be sure to check TVDB to ensure that you have your files and folders structured and named correctly. If something is not showing up at all, double check the name.
Once that's done, organizing and customizing your library is easy. You can set up collections, grouping items together to fit a theme or collect together all the entries in a franchise. You can make playlists, and add custom artwork to entries. It's fun setting up collections with posters to match, there are even several websites dedicated to help you do this like PosterDB. As an example, below are two collections in my library, one collecting all the entries in a franchise, the other follows a theme.

My Star Trek collection, featuring all eleven television series, and thirteen films.

My Best of the Worst collection, featuring sixty-nine films previously showcased on RedLetterMedia’s Best of the Worst. They’re all absolutely terrible and I love them.
As for settings, ensure you've got Remote Access going, it should work automatically and be sure to set your upload speed after running a speed test. In the library settings set the database cache to 2000MB to ensure a snappier and more responsive browsing experience, and then check that playback quality is set to original/maximum. If you’re severely bandwidth limited on your upload and have remote users, you might want to limit the remote stream bitrate to something more reasonable, just as a note of comparison Netflix’s 1080p bitrate is approximately 5Mbps, although almost anyone watching through a chromium based browser is streaming at 720p and 3mbps. Other than that you should be good to go. For actually playing your files, there's a Plex app for just about every platform imaginable. I mostly watch television and films on my laptop using the Windows Plex app, but I also use the Android app which can broadcast to the chromecast connected to the TV in the office and the Android TV app for our smart TV. Both are fully functional and easy to navigate, and I can also attest to the OS X version being equally functional.
Part Eight: Finding Media
Now, this is not really a piracy tutorial, there are plenty of those out there. But if you’re unaware, BitTorrent is free and pretty easy to use, just pick a client (qBittorrent is the best) and go find some public trackers to peruse. Just know now that all the best trackers are private and invite only, and that they can be exceptionally difficult to get into. I’m already on a few, and even then, some of the best ones are wholly out of my reach.
If you decide to take the left hand path and turn to Usenet you’ll have to pay. First you’ll need to sign up with a provider like Newshosting or EasyNews for access to Usenet itself, and then to actually find anything you’re going to need to sign up with an indexer like NZBGeek or NZBFinder. There are dozens of indexers, and many people cross post between them, but for more obscure media it’s worth checking multiple. You’ll also need a binary downloader like SABnzbd. That caveat aside, Usenet is faster, bigger, older, less traceable than BitTorrent, and altogether slicker. I honestly prefer it, and I'm kicking myself for taking this long to start using it because I was scared off by the price. I’ve found so many things on Usenet that I had sought in vain elsewhere for years, like a 2010 Italian film about a massacre perpetrated by the SS that played the festival circuit but never received a home media release; some absolute hero uploaded a rip of a festival screener DVD to Usenet. Anyway, figure out the rest of this shit on your own and remember to use protection, get yourself behind a VPN, use a SOCKS5 proxy with your BitTorrent client, etc.
On the legal side of things, if you’re around my age, you (or your family) probably have a big pile of DVDs and Blu-Rays sitting around unwatched and half forgotten. Why not do a bit of amateur media preservation, rip them and upload them to your server for easier access? (Your tools for this are going to be Handbrake to do the ripping and AnyDVD to break any encryption.) I went to the trouble of ripping all my SCTV DVDs (five box sets worth) because none of it is on streaming nor could it be found on any pirate source I tried. I’m glad I did, forty years on it’s still one of the funniest shows to ever be on TV.
Part Nine/Epilogue: Sonarr/Radarr/Lidarr and Overseerr
There are a lot of ways to automate your server for better functionality or to add features you and other users might find useful. Sonarr, Radarr, and Lidarr are a part of a suite of “Servarr” services (there’s also Readarr for books and Whisparr for adult content) that allow you to automate the collection of new episodes of TV shows (Sonarr), new movie releases (Radarr) and music releases (Lidarr). They hook in to your BitTorrent client or Usenet binary newsgroup downloader and crawl your preferred Torrent trackers and Usenet indexers, alerting you to new releases and automatically grabbing them. You can also use these services to manually search for new media, and even replace/upgrade your existing media with better quality uploads. They’re really a little tricky to set up on a bare metal Ubuntu install (ideally you should be running them in Docker Containers), and I won’t be providing a step by step on installing and running them, I’m simply making you aware of their existence.
The other bit of kit I want to make you aware of is Overseerr which is a program that scans your Plex media library and will serve recommendations based on what you like. It also allows you and your users to request specific media. It can even be integrated with Sonarr/Radarr/Lidarr so that fulfilling those requests is fully automated.
And you're done. It really wasn't all that hard. Enjoy your media. Enjoy the control you have over that media. And be safe in the knowledge that no hedgefund CEO motherfucker who hates the movies but who is somehow in control of a major studio will be able to disappear anything in your library as a tax write-off.
1K notes
·
View notes
Text
Humans are not perfectly vigilant

I'm on tour with my new, nationally bestselling novel The Bezzle! Catch me in BOSTON with Randall "XKCD" Munroe (Apr 11), then PROVIDENCE (Apr 12), and beyond!

Here's a fun AI story: a security researcher noticed that large companies' AI-authored source-code repeatedly referenced a nonexistent library (an AI "hallucination"), so he created a (defanged) malicious library with that name and uploaded it, and thousands of developers automatically downloaded and incorporated it as they compiled the code:
https://www.theregister.com/2024/03/28/ai_bots_hallucinate_software_packages/
These "hallucinations" are a stubbornly persistent feature of large language models, because these models only give the illusion of understanding; in reality, they are just sophisticated forms of autocomplete, drawing on huge databases to make shrewd (but reliably fallible) guesses about which word comes next:
https://dl.acm.org/doi/10.1145/3442188.3445922
Guessing the next word without understanding the meaning of the resulting sentence makes unsupervised LLMs unsuitable for high-stakes tasks. The whole AI bubble is based on convincing investors that one or more of the following is true:
There are low-stakes, high-value tasks that will recoup the massive costs of AI training and operation;
There are high-stakes, high-value tasks that can be made cheaper by adding an AI to a human operator;
Adding more training data to an AI will make it stop hallucinating, so that it can take over high-stakes, high-value tasks without a "human in the loop."
These are dubious propositions. There's a universe of low-stakes, low-value tasks – political disinformation, spam, fraud, academic cheating, nonconsensual porn, dialog for video-game NPCs – but none of them seem likely to generate enough revenue for AI companies to justify the billions spent on models, nor the trillions in valuation attributed to AI companies:
https://locusmag.com/2023/12/commentary-cory-doctorow-what-kind-of-bubble-is-ai/
The proposition that increasing training data will decrease hallucinations is hotly contested among AI practitioners. I confess that I don't know enough about AI to evaluate opposing sides' claims, but even if you stipulate that adding lots of human-generated training data will make the software a better guesser, there's a serious problem. All those low-value, low-stakes applications are flooding the internet with botshit. After all, the one thing AI is unarguably very good at is producing bullshit at scale. As the web becomes an anaerobic lagoon for botshit, the quantum of human-generated "content" in any internet core sample is dwindling to homeopathic levels:
https://pluralistic.net/2024/03/14/inhuman-centipede/#enshittibottification
This means that adding another order of magnitude more training data to AI won't just add massive computational expense – the data will be many orders of magnitude more expensive to acquire, even without factoring in the additional liability arising from new legal theories about scraping:
https://pluralistic.net/2023/09/17/how-to-think-about-scraping/
That leaves us with "humans in the loop" – the idea that an AI's business model is selling software to businesses that will pair it with human operators who will closely scrutinize the code's guesses. There's a version of this that sounds plausible – the one in which the human operator is in charge, and the AI acts as an eternally vigilant "sanity check" on the human's activities.
For example, my car has a system that notices when I activate my blinker while there's another car in my blind-spot. I'm pretty consistent about checking my blind spot, but I'm also a fallible human and there've been a couple times where the alert saved me from making a potentially dangerous maneuver. As disciplined as I am, I'm also sometimes forgetful about turning off lights, or waking up in time for work, or remembering someone's phone number (or birthday). I like having an automated system that does the robotically perfect trick of never forgetting something important.
There's a name for this in automation circles: a "centaur." I'm the human head, and I've fused with a powerful robot body that supports me, doing things that humans are innately bad at.
That's the good kind of automation, and we all benefit from it. But it only takes a small twist to turn this good automation into a nightmare. I'm speaking here of the reverse-centaur: automation in which the computer is in charge, bossing a human around so it can get its job done. Think of Amazon warehouse workers, who wear haptic bracelets and are continuously observed by AI cameras as autonomous shelves shuttle in front of them and demand that they pick and pack items at a pace that destroys their bodies and drives them mad:
https://pluralistic.net/2022/04/17/revenge-of-the-chickenized-reverse-centaurs/
Automation centaurs are great: they relieve humans of drudgework and let them focus on the creative and satisfying parts of their jobs. That's how AI-assisted coding is pitched: rather than looking up tricky syntax and other tedious programming tasks, an AI "co-pilot" is billed as freeing up its human "pilot" to focus on the creative puzzle-solving that makes coding so satisfying.
But an hallucinating AI is a terrible co-pilot. It's just good enough to get the job done much of the time, but it also sneakily inserts booby-traps that are statistically guaranteed to look as plausible as the good code (that's what a next-word-guessing program does: guesses the statistically most likely word).
This turns AI-"assisted" coders into reverse centaurs. The AI can churn out code at superhuman speed, and you, the human in the loop, must maintain perfect vigilance and attention as you review that code, spotting the cleverly disguised hooks for malicious code that the AI can't be prevented from inserting into its code. As "Lena" writes, "code review [is] difficult relative to writing new code":
https://twitter.com/qntm/status/1773779967521780169
Why is that? "Passively reading someone else's code just doesn't engage my brain in the same way. It's harder to do properly":
https://twitter.com/qntm/status/1773780355708764665
There's a name for this phenomenon: "automation blindness." Humans are just not equipped for eternal vigilance. We get good at spotting patterns that occur frequently – so good that we miss the anomalies. That's why TSA agents are so good at spotting harmless shampoo bottles on X-rays, even as they miss nearly every gun and bomb that a red team smuggles through their checkpoints:
https://pluralistic.net/2023/08/23/automation-blindness/#humans-in-the-loop
"Lena"'s thread points out that this is as true for AI-assisted driving as it is for AI-assisted coding: "self-driving cars replace the experience of driving with the experience of being a driving instructor":
https://twitter.com/qntm/status/1773841546753831283
In other words, they turn you into a reverse-centaur. Whereas my blind-spot double-checking robot allows me to make maneuvers at human speed and points out the things I've missed, a "supervised" self-driving car makes maneuvers at a computer's frantic pace, and demands that its human supervisor tirelessly and perfectly assesses each of those maneuvers. No wonder Cruise's murderous "self-driving" taxis replaced each low-waged driver with 1.5 high-waged technical robot supervisors:
https://pluralistic.net/2024/01/11/robots-stole-my-jerb/#computer-says-no
AI radiology programs are said to be able to spot cancerous masses that human radiologists miss. A centaur-based AI-assisted radiology program would keep the same number of radiologists in the field, but they would get less done: every time they assessed an X-ray, the AI would give them a second opinion. If the human and the AI disagreed, the human would go back and re-assess the X-ray. We'd get better radiology, at a higher price (the price of the AI software, plus the additional hours the radiologist would work).
But back to making the AI bubble pay off: for AI to pay off, the human in the loop has to reduce the costs of the business buying an AI. No one who invests in an AI company believes that their returns will come from business customers to agree to increase their costs. The AI can't do your job, but the AI salesman can convince your boss to fire you and replace you with an AI anyway – that pitch is the most successful form of AI disinformation in the world.
An AI that "hallucinates" bad advice to fliers can't replace human customer service reps, but airlines are firing reps and replacing them with chatbots:
https://www.bbc.com/travel/article/20240222-air-canada-chatbot-misinformation-what-travellers-should-know
An AI that "hallucinates" bad legal advice to New Yorkers can't replace city services, but Mayor Adams still tells New Yorkers to get their legal advice from his chatbots:
https://arstechnica.com/ai/2024/03/nycs-government-chatbot-is-lying-about-city-laws-and-regulations/
The only reason bosses want to buy robots is to fire humans and lower their costs. That's why "AI art" is such a pisser. There are plenty of harmless ways to automate art production with software – everything from a "healing brush" in Photoshop to deepfake tools that let a video-editor alter the eye-lines of all the extras in a scene to shift the focus. A graphic novelist who models a room in The Sims and then moves the camera around to get traceable geometry for different angles is a centaur – they are genuinely offloading some finicky drudgework onto a robot that is perfectly attentive and vigilant.
But the pitch from "AI art" companies is "fire your graphic artists and replace them with botshit." They're pitching a world where the robots get to do all the creative stuff (badly) and humans have to work at robotic pace, with robotic vigilance, in order to catch the mistakes that the robots make at superhuman speed.
Reverse centaurism is brutal. That's not news: Charlie Chaplin documented the problems of reverse centaurs nearly 100 years ago:
https://en.wikipedia.org/wiki/Modern_Times_(film)
As ever, the problem with a gadget isn't what it does: it's who it does it for and who it does it to. There are plenty of benefits from being a centaur – lots of ways that automation can help workers. But the only path to AI profitability lies in reverse centaurs, automation that turns the human in the loop into the crumple-zone for a robot:
https://estsjournal.org/index.php/ests/article/view/260

If you'd like an essay-formatted version of this post to read or share, here's a link to it on pluralistic.net, my surveillance-free, ad-free, tracker-free blog:
https://pluralistic.net/2024/04/01/human-in-the-loop/#monkey-in-the-middle
Image: Cryteria (modified) https://commons.wikimedia.org/wiki/File:HAL9000.svg
CC BY 3.0 https://creativecommons.org/licenses/by/3.0/deed.en
--
Jorge Royan (modified) https://commons.wikimedia.org/wiki/File:Munich_-_Two_boys_playing_in_a_park_-_7328.jpg
CC BY-SA 3.0 https://creativecommons.org/licenses/by-sa/3.0/deed.en
--
Noah Wulf (modified) https://commons.m.wikimedia.org/wiki/File:Thunderbirds_at_Attention_Next_to_Thunderbird_1_-_Aviation_Nation_2019.jpg
CC BY-SA 4.0 https://creativecommons.org/licenses/by-sa/4.0/deed.en
#pluralistic#ai#supervised ai#humans in the loop#coding assistance#ai art#fully automated luxury communism#labor
379 notes
·
View notes
Text


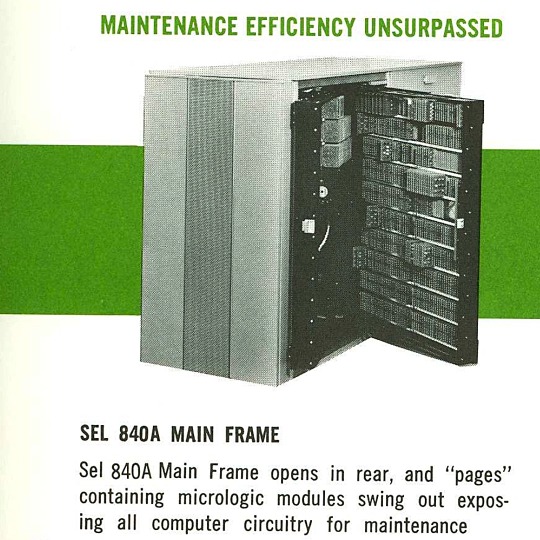
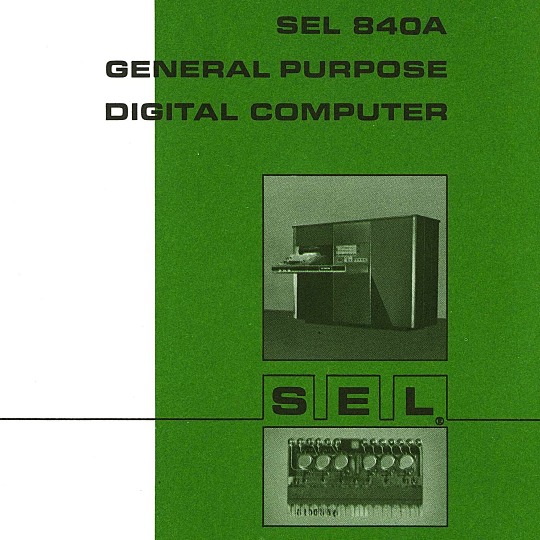


🎄💾🗓️ Day 11: Retrocomputing Advent Calendar - The SEL 840A🎄💾🗓️
Systems Engineering Laboratories (SEL) introduced the SEL 840A in 1965. This is a deep cut folks, buckle in. It was designed as a high-performance, 24-bit general-purpose digital computer, particularly well-suited for scientific and industrial real-time applications.
Notable for using silicon monolithic integrated circuits and a modular architecture. Supported advanced computation with features like concurrent floating-point arithmetic via an optional Extended Arithmetic Unit (EAU), which allowed independent arithmetic processing in single or double precision. With a core memory cycle time of 1.75 microseconds and a capacity of up to 32,768 directly addressable words, the SEL 840A had impressive computational speed and versatility for its time.
Its instruction set covered arithmetic operations, branching, and program control. The computer had fairly robust I/O capabilities, supporting up to 128 input/output units and optional block transfer control for high-speed data movement. SEL 840A had real-time applications, such as data acquisition, industrial automation, and control systems, with features like multi-level priority interrupts and a real-time clock with millisecond resolution.
Software support included a FORTRAN IV compiler, mnemonic assembler, and a library of scientific subroutines, making it accessible for scientific and engineering use. The operator’s console provided immediate access to registers, control functions, and user interaction! Designed to be maintained, its modular design had serviceability you do often not see today, with swing-out circuit pages and accessible test points.
And here's a personal… personal computer history from Adafruit team member, Dan…
== The first computer I used was an SEL-840A, PDF:
I learned Fortran on it in eight grade, in 1970. It was at Oak Ridge National Laboratory, where my parents worked, and was used to take data from cyclotron experiments and perform calculations. I later patched the Fortran compiler on it to take single-quoted strings, like 'HELLO', in Fortran FORMAT statements, instead of having to use Hollerith counts, like 5HHELLO.
In 1971-1972, in high school, I used a PDP-10 (model KA10) timesharing system, run by BOCES LIRICS on Long Island, NY, while we were there for one year on an exchange.
This is the front panel of the actual computer I used. I worked at the computer center in the summer. I know the fellow in the picture: he was an older high school student at the time.
The first "personal" computers I used were Xerox Alto, Xerox Dorado, Xerox Dandelion (Xerox Star 8010), Apple Lisa, and Apple Mac, and an original IBM PC. Later I used DEC VAXstations.
Dan kinda wins the first computer contest if there was one… Have first computer memories? Post’em up in the comments, or post yours on socialz’ and tag them #firstcomputer #retrocomputing – See you back here tomorrow!
#retrocomputing#firstcomputer#electronics#sel840a#1960scomputers#fortran#computinghistory#vintagecomputing#realtimecomputing#industrialautomation#siliconcircuits#modulararchitecture#floatingpointarithmetic#computerscience#fortrancode#corememory#oakridgenationallab#cyclotron#pdp10#xeroxalto#computermuseum#historyofcomputing#classiccomputing#nostalgictech#selcomputers#scientificcomputing#digitalhistory#engineeringmarvel#techthroughdecades#console
31 notes
·
View notes
Text
About Me
thought i would make this post because why not
My online pseudonym is Cerulity32K, casually Cerulity. Though, my preferred name is Kali, and my alternate username is Kali the Catgirl.
Though my mental conditions are mild, I do have ADHD (inattentive) and am seeking an autism evaluation. I am also trans (she/they).
But let's get to the good stuff. I excel in computing, especially low-level stuff and graphics (webdev scares me) and math, advanced functions, calculus and linear algebra being the most useful to me. I like to intersect math and computing, and it leads to some pretty fun results, especially when dealing with graphics. My main languages are Rust, C, C++, CUDA, C#, and Python, though I am trying to understand Assembly for a few systems (my laptop [x86_64], NES [6502], and the Atari 2600 [6507]). The main libraries I go to are Raylib and Macroquad for 2D games, and for 3D I go for wgpu, Vulkan, or OpenGL, though wgpu may be the main one I use from now on.
I also do music. My favourite types of music are either loud, distorted songs (FREE.99), literally noise (Portal 2 OST), or electronic-jazz fusion (Creo). I also sometimes make music. It's usually remixes or covers, as I suck at melody crafting, but I have made a couple original songs. I specialize in industrial chiptune and what I like to call "rustcore". My two music environments are LMMS and Furnace, though the latter is the main one I use nowadays.
My favourite game genres are automation, puzzle, and platformer. Factorio, Exapunks, and Celeste are my favourites in those genres respectively.
Other than that, I like to do procedural or subdiv modelling in Blender.
All in all, I'm just a software catgirl :3
#about myself#programming#rust#coding#software engineering#c#c++#software#math#music#chiptune#factorio#exapunks#celeste#lgbtq#lgbt#lgbtqia#queer#trans#nonbinary#assembly#6502#x86_64#nes#atari 2600#furnace tracker#furnace#lmms#industrial music#6507
45 notes
·
View notes
Text

Tools of the Trade for Learning Cybersecurity
I created this post for the Studyblr Masterpost Jam, check out the tag for more cool masterposts from folks in the studyblr community!
Cybersecurity professionals use a lot of different tools to get the job done. There are plenty of fancy and expensive tools that enterprise security teams use, but luckily there are also lots of brilliant people writing free and open-source software. In this post, I'm going to list some popular free tools that you can download right now to practice and learn with.
In my opinion, one of the most important tools you can learn how to use is a virtual machine. If you're not already familiar with Linux, this is a great way to learn. VMs are helpful for separating all your security tools from your everyday OS, isolating potentially malicious files, and just generally experimenting. You'll need to use something like VirtualBox or VMWare Workstation (Workstation Pro is now free for personal use, but they make you jump through hoops to download it).
Below is a list of some popular cybersecurity-focused Linux distributions that come with lots of tools pre-installed:
Kali is a popular distro that comes loaded with tools for penetration testing
REMnux is a distro built for malware analysis
honorable mention for FLARE-VM, which is not a VM on its own, but a set of scripts for setting up a malware analysis workstation & installing tools on a Windows VM.
SANS maintains several different distros that are used in their courses. You'll need to create an account to download them, but they're all free:
Slingshot is built for penetration testing
SIFT Workstation is a distro that comes with lots of tools for digital forensics
These distros can be kind of overwhelming if you don't know how to use most of the pre-installed software yet, so just starting with a regular Linux distribution and installing tools as you want to learn them is another good choice for learning.
Free Software
Wireshark: sniff packets and explore network protocols
Ghidra and the free version of IDA Pro are the top picks for reverse engineering
for digital forensics, check out Eric Zimmerman's tools - there are many different ones for exploring & analyzing different forensic artifacts
pwntools is a super useful Python library for solving binary exploitation CTF challenges
CyberChef is a tool that makes it easy to manipulate data - encryption & decryption, encoding & decoding, formatting, conversions… CyberChef gives you a lot to work with (and there's a web version - no installation required!).
Burp Suite is a handy tool for web security testing that has a free community edition
Metasploit is a popular penetration testing framework, check out Metasploitable if you want a target to practice with
SANS also has a list of free tools that's worth checking out.
Programming Languages
Knowing how to write code isn't a hard requirement for learning cybersecurity, but it's incredibly useful. Any programming language will do, especially since learning one will make it easy to pick up others, but these are some common ones that security folks use:
Python is quick to write, easy to learn, and since it's so popular, there are lots of helpful libraries out there.
PowerShell is useful for automating things in the Windows world. It's built on .NET, so you can practically dip into writing C# if you need a bit more power.
Go is a relatively new language, but it's popular and there are some security tools written in it.
Rust is another new-ish language that's designed for memory safety and it has a wonderful community. There's a bit of a steep learning curve, but learning Rust makes you understand how memory bugs work and I think that's neat.
If you want to get into reverse engineering or malware analysis, you'll want to have a good grasp of C and C++.
Other Tools for Cybersecurity
There are lots of things you'll need that aren't specific to cybersecurity, like:
a good system for taking notes, whether that's pen & paper or software-based. I recommend using something that lets you work in plain text or close to it.
general command line familiarity + basic knowledge of CLI text editors (nano is great, but what if you have to work with a system that only has vi?)
familiarity with git and docker will be helpful
There are countless scripts and programs out there, but the most important thing is understanding what your tools do and how they work. There is no magic "hack this system" or "solve this forensics case" button. Tools are great for speeding up the process, but you have to know what the process is. Definitely take some time to learn how to use them, but don't base your entire understanding of security on code that someone else wrote. That's how you end up as a "script kiddie", and your skills and knowledge will be limited.
Feel free to send me an ask if you have questions about any specific tool or something you found that I haven't listed. I have approximate knowledge of many things, and if I don't have an answer I can at least help point you in the right direction.
#studyblrmasterpostjam#studyblr#masterpost#cybersecurity#late post bc I was busy yesterday oops lol#also this post is nearly a thousand words#apparently I am incapable of being succinct lmao
22 notes
·
View notes
Text
Looking for some advice for shifting my music collection away from Spotify?
I have, over the last decade and a half or so, been building up my big music library on Spotify. I am now wanting to leave Spotify behind thanks to it's slowly encroaching enshittification and other problems.
Unfortunately, due to how long I’ve been there, my main playlist alone is at just shy of 1900 tracks, and that's before i get onto other playlists. This makes the moving quite a mammoth undertaking, and spotify seems designed to make escaping as hard as possible.
So I’m looking for suggestions on software that can get me going on this.
Main things I'm looking for
Being able to automate recreating my main playlist with local files Bonus points if it can do placeholders for missing tracks. (I have my song list in csv form, so hopefully that'd help.)
Being able to automatically sync the playlist and song files to my android phone. (Over LAN probably?)
Any help would be super appreciated.
6 notes
·
View notes
Text
Unlock creative insights with AI instantly
What if the next big business idea wasn’t something you “thought of”… but something you unlocked with the right prompt? Introducing Deep Prompt Generator Pro — the tool designed to help creators, solopreneurs, and future founders discover high-impact business ideas with the help of AI.
💡 The business idea behind this very video? Generated using the app. If you’re serious about building something real with ChatGPT or Claude, this is the tool you need to stop wasting time and start creating real results.
📥 Download the App: ✅ Lite Version (Free) → https://bit.ly/DeepPromptGeneratorLite 🔓 Pro Version (Full Access) → https://www.paypal.com/ncp/payment/DH9Z9LENSPPDS
🧠 What Is It? Deep Prompt Generator Pro is a lightweight desktop app built to generate structured, strategic prompts that help you:
✅ Discover profitable niches ✅ Brainstorm startup & side hustle ideas ✅ Find monetization models for content or products ✅ Develop brand hooks, angles, and offers ✅ Unlock creative insights with AI instantly
Whether you’re building a business, launching a new product, or looking for your first real side hustle — this app gives your AI the clarity to deliver brilliant results.
🔐 Features: Works completely offline No API or browser extensions needed Clean UI with categorized prompts One-click copy to paste into ChatGPT or Claude System-locked premium access for security
🧰 Who It’s For: Founders & solopreneurs Content creators Side hustlers AI power users Business coaches & marketers Anyone who’s tired of “mid” AI output
📘 PDF Guide Included – Every download includes a user-friendly PDF guide to walk you through features, categories, and how to get the best results from your prompts.
📂 Pro Version includes exclusive prompt packs + priority access to new releases.
🔥 Watch This If You’re Searching For: how to use ChatGPT for business ideas best prompts for startup founders AI tools for entrepreneurs side hustle generators GPT business prompt generator AI idea generator desktop app ChatGPT for content creators
📣 Final Call to Action: If this tool gave me a business idea worth filming a whole video about, imagine what it could help you discover. Stop guessing — start prompting smarter.
🔔 Subscribe to The App Vault for weekly tools, apps, and automation hacks that deliver real results — fast.🔓 Unlock Your PC's Full Potential with The App Vault Tiny Tools, Massive Results for Productivity Warriors, Creators & Power Users
Welcome to The App Vault – your ultimate source for lightweight desktop applications that deliver enterprise-grade results without bloatware or subscriptions. We specialize in uncovering hidden gem software that transforms how creators, freelancers, students, and tech enthusiasts work. Discover nano-sized utilities with macro impact that optimize workflows, turbocharge productivity, and unlock creative potential.
🚀 Why Our Community Grows Daily: ✅ Zero Fluff, Pure Value: 100% practical tutorials with actionable takeaways ✅ Exclusive Tools: Get first access to our custom-built apps like Deep Prompt Generator Pro ✅ Underground Gems: Software you won't find on mainstream tech channels ✅ Performance-First: Every tool tested for system efficiency and stability ✅ Free Resources: Download links + config files in every description
🧰 CORE CONTENT LIBRARY: ⚙️ PC Optimization Arsenal Windows optimization secrets for buttery-smooth performance System cleanup utilities that actually remove 100% of junk files Memory/RAM optimizers for resource-heavy workflows Startup managers to slash boot times by up to 70% Driver update automation tools no more manual hunting Real-time performance monitoring dashboards
🤖 AI Power Tools Local AI utilities that work offline for sensitive data Prompt engineering masterclass series Custom AI workflow automations Desktop ChatGPT implementations Niche AI tools for creators: image upscalers, script generators, audio enhancers AI-powered file organization systems
⏱️ Productivity Boosters Single-click task automators Focus enhancers with distraction-killing modes Micro-utilities for batch file processing Smart clipboard managers with OCR capabilities Automated backup solutions with versioning Time-tracking dashboards with productivity analytics
🎨 Creative Workflow Unlockers Content creation accelerators for YouTubers Automated thumbnail generators Lightweight video/audio editors 50MB Resource-efficient design tools Cross-platform project synchronizers Metadata batch editors for digital assets
🔍 Niche Tool Categories Open-source alternatives to expensive software Security tools for privacy-conscious users Hardware diagnostic toolkits Custom scripting utilities for power users Legacy system revival tools
youtube
#DeepPromptGenerator#BusinessIdeas#ChatGPTPrompts#SideHustleIdeas#StartupIdeas#TheAppVault#PromptEngineering#AIProductivity#SolopreneurTools#TinyToolsBigImpact#DesktopApp#ChatGPTTools#FiverrApps#Youtube
2 notes
·
View notes
Text
Why Sabaragamuwa University is a Great Choice.
Sabaragamuwa University of Sri Lanka (SUSL) is increasingly recognized for its technological advancement and innovation-driven environment, making it one of the leading universities in Sri Lanka in terms of technology. Here are the key reasons why SUSL stands out technologically.

Here’s why SUSL stands out as a technological powerhouse among Sri Lankan universities:
🔧1. Faculty of Technology
SUSL established a dedicated Faculty of Technology to meet the demand for tech-skilled graduates. It offers degree programs such as:
BTech in Information and Communication Technology
BTech in Engineering Technology
These programs combine practical experience in labs, workshops and real-world projects with a strong theoretical foundation.
🖥️2. Advanced IT Infrastructure
SUSL has modern computer labs, smart classrooms, and high-speed internet access across campus.
A robust Learning Management System (LMS) supports online learning and hybrid education models.
Students and lecturers use tools like Moodle, Zoom, and Google Classroom effectively.
🤖 3. Innovation & AI Research Support
SUSL promotes AI, Machine Learning, IoT, and Data Science in student research and final-year projects.
Competitions like Hackathons and Innovative Research Symposia encourage tech-driven solutions.
Students develop apps, smart systems, and automation tools (e.g., Ceylon Power Tracker project).
🌐 4. Industry Collaboration and Internships
SUSL connects students with the tech industry through:
Internships at leading tech firms
Workshops led by industry experts
Collaborative R&D projects with government and private sector entities
These connections help students gain hands-on experience in areas such as software engineering, networking, and data analytics that make them highly employable after graduation.
💡 5. Smart Campus Initiatives
SUSL is evolving into a Smart University, introducing systems that streamline academic life:
Digital student portals
Online registration and results systems
E-library and remote resource access
Campus Wi-Fi for academic use
These initiatives improve the student experience and create an efficient, technology-enabled environment.
🎓 6. Research in Emerging Technologies
The university is involved in pioneering research across emerging technological fields, including:
Agricultural tech (AgriTech)
Environmental monitoring using sensors
Renewable energy systems
Students and faculty publish research in international journals and participate in global tech events.
🏆 7. Recognition in National Competitions
SUSL students often reach fina rounds or win national competitions in coding, robotics, AI, and IoT innovation.
Faculty members are invited as tech advisors and conference speakers, reinforcing the university's expertise.
Sabaragamuwa University is actively shaping the future not only with technology, but by integrating technology into education, research and operations. This makes it a technological leader among Sri Lankan Universities. Visit the official university site here: Home | SUSL
2 notes
·
View notes
Text
Why Python Will Thrive: Future Trends and Applications
Python has already made a significant impact in the tech world, and its trajectory for the future is even more promising. From its simplicity and versatility to its widespread use in cutting-edge technologies, Python is expected to continue thriving in the coming years. Considering the kind support of Python Course in Chennai Whatever your level of experience or reason for switching from another programming language, learning Python gets much more fun.

Let's explore why Python will remain at the forefront of software development and what trends and applications will contribute to its ongoing dominance.
1. Artificial Intelligence and Machine Learning
Python is already the go-to language for AI and machine learning, and its role in these fields is set to expand further. With powerful libraries such as TensorFlow, PyTorch, and Scikit-learn, Python simplifies the development of machine learning models and artificial intelligence applications. As more industries integrate AI for automation, personalization, and predictive analytics, Python will remain a core language for developing intelligent systems.
2. Data Science and Big Data
Data science is one of the most significant areas where Python has excelled. Libraries like Pandas, NumPy, and Matplotlib make data manipulation and visualization simple and efficient. As companies and organizations continue to generate and analyze vast amounts of data, Python’s ability to process, clean, and visualize big data will only become more critical. Additionally, Python’s compatibility with big data platforms like Hadoop and Apache Spark ensures that it will remain a major player in data-driven decision-making.
3. Web Development
Python’s role in web development is growing thanks to frameworks like Django and Flask, which provide robust, scalable, and secure solutions for building web applications. With the increasing demand for interactive websites and APIs, Python is well-positioned to continue serving as a top language for backend development. Its integration with cloud computing platforms will also fuel its growth in building modern web applications that scale efficiently.
4. Automation and Scripting
Automation is another area where Python excels. Developers use Python to automate tasks ranging from system administration to testing and deployment. With the rise of DevOps practices and the growing demand for workflow automation, Python’s role in streamlining repetitive processes will continue to grow. Businesses across industries will rely on Python to boost productivity, reduce errors, and optimize performance. With the aid of Best Online Training & Placement Programs, which offer comprehensive training and job placement support to anyone looking to develop their talents, it’s easier to learn this tool and advance your career.

5. Cybersecurity and Ethical Hacking
With cyber threats becoming increasingly sophisticated, cybersecurity is a critical concern for businesses worldwide. Python is widely used for penetration testing, vulnerability scanning, and threat detection due to its simplicity and effectiveness. Libraries like Scapy and PyCrypto make Python an excellent choice for ethical hacking and security professionals. As the need for robust cybersecurity measures increases, Python’s role in safeguarding digital assets will continue to thrive.
6. Internet of Things (IoT)
Python’s compatibility with microcontrollers and embedded systems makes it a strong contender in the growing field of IoT. Frameworks like MicroPython and CircuitPython enable developers to build IoT applications efficiently, whether for home automation, smart cities, or industrial systems. As the number of connected devices continues to rise, Python will remain a dominant language for creating scalable and reliable IoT solutions.
7. Cloud Computing and Serverless Architectures
The rise of cloud computing and serverless architectures has created new opportunities for Python. Cloud platforms like AWS, Google Cloud, and Microsoft Azure all support Python, allowing developers to build scalable and cost-efficient applications. With its flexibility and integration capabilities, Python is perfectly suited for developing cloud-based applications, serverless functions, and microservices.
8. Gaming and Virtual Reality
Python has long been used in game development, with libraries such as Pygame offering simple tools to create 2D games. However, as gaming and virtual reality (VR) technologies evolve, Python’s role in developing immersive experiences will grow. The language’s ease of use and integration with game engines will make it a popular choice for building gaming platforms, VR applications, and simulations.
9. Expanding Job Market
As Python’s applications continue to grow, so does the demand for Python developers. From startups to tech giants like Google, Facebook, and Amazon, companies across industries are seeking professionals who are proficient in Python. The increasing adoption of Python in various fields, including data science, AI, cybersecurity, and cloud computing, ensures a thriving job market for Python developers in the future.
10. Constant Evolution and Community Support
Python’s open-source nature means that it’s constantly evolving with new libraries, frameworks, and features. Its vibrant community of developers contributes to its growth and ensures that Python stays relevant to emerging trends and technologies. Whether it’s a new tool for AI or a breakthrough in web development, Python’s community is always working to improve the language and make it more efficient for developers.
Conclusion
Python’s future is bright, with its presence continuing to grow in AI, data science, automation, web development, and beyond. As industries become increasingly data-driven, automated, and connected, Python’s simplicity, versatility, and strong community support make it an ideal choice for developers. Whether you are a beginner looking to start your coding journey or a seasoned professional exploring new career opportunities, learning Python offers long-term benefits in a rapidly evolving tech landscape.
#python course#python training#python#technology#tech#python programming#python online training#python online course#python online classes#python certification
2 notes
·
View notes
Text
Image-Line FL Studio Producer Edition v21.2.3 Build [4004]

Image-Line FL Studio is a complete music production software environment or digital audio workstation (DAW). With more than 20 years of innovative developments, it combines everything you need for composing, arranging, recording, editing, mixing, and producing professional quality music.
Feature of FL Studio 21.2.3:
Record multiple tracks, stretch time, and bend notes with ease during editing.
Industry-leading piano roll lets you craft intricate melodies and control MIDI patterns like a maestro.
Multi-track mixer, automation control, and VST plugin support – mix and polish your tracks to perfection.
Create complex productions with ease. Effect chains, audio sends, sidechain control, advanced automation – it’s all here.
Experience the smoothest piano roll in the game. Edit notes, work with scores, and unleash your creative potential.
No DAW does playlist-ing like FL Studio. Sequence notes, audio, and automation freely, creating unique sonic tapestries.
Explore a massive library of native instruments and effects. Still not enough? Dive into the vast world of VST plugins.
Resize, rearrange, personalize – the user interface adapts to your workflow, not the other way around.
Record and edit automation in real-time, breathing life into your music.
Use FL Studio as a VST plugin or connect with ReWire for seamless integration.
FL Studio is designed for touch control, letting you express your creativity in a whole new way.
Powerful clip-triggering and intuitive controls unleash your inner DJ.
Context-sensitive guidance is always available with a simple press of F1.
Bind your MIDI controllers with ease, taking command of your sounds.
Render mesmerizing 4K videos directly from your FL Studio projects.
More Info
Version: v21.2.3 Build [4004]
Developer: Image-Line
Format: STANDALONE, VST
Bit depth: 64bit
Interface language: English, German, Spanish, French, Chinese.
System requirements: WIN 10+
Size: 1.23 GB
Installation:
Install FL.Studio.v21.2.3 [4004].exe
Install
Edison Declipper Windows.exe
FL Cloud mastering Windows.exe
Stem extractor Windows.exe
Download Setup
14 notes
·
View notes