#Windows API
Explore tagged Tumblr posts
Visit Tumblr Blog
Explore Tumblr blogs with no restrictions, modern design and the best experience.
Last Seen Tumblr Blogs


Fun Fact
Tumblr has 411 employees.
Text
#Api#Microsoft API#Application Development#Development#Azure Api#Cognitive Services API#Dynamics 365 APIs#Windows API
0 notes
Text
I want to make this piece of software. I want this piece of software to be a good piece of software. As part of making it a good piece of software, i want it to be fast. As part of making it fast, i want to be able to paralellize what i can. As part of that paralellization, i want to use compute shaders. To use compute shaders, i need some interface to graphics processors. After determining that Vulkan is not an API that is meant to be used by anybody, i decided to use OpenGL instead. In order for using OpenGL to be useful, i need some way to show the results to the user and get input from the user. I can do this by means of the Wayland API. In order to bridge the gap between Wayland and OpenGL, i need to be able to create an OpenGL context where the default framebuffer is the same as the Wayland surface that i've set to be a window. I can do this by means of EGL. In order to use EGL to create an OpenGL context, i need to select a config for the context.
Unfortunately, it just so happens that on my Linux partition, the implementation of EGL does not support the config that i would need for this piece of software.
Therefore, i am going to write this piece of software for 9front instead, using my 9front partition.
#Update#Programming#Technology#Wayland#OpenGL#Computers#Operating systems#EGL (API)#Windowing systems#3D graphics#Wayland (protocol)#Computer standards#Code#Computer graphics#Standards#Graphics#Computing standards#3D computer graphics#OpenGL API#EGL#Computer programming#Computation#Coding#OpenGL graphics API#Wayland protocol#Implementation of standards#Computational technology#Computing#OpenGL (API)#Process of implementation of standards
9 notes
·
View notes
Text


3 notes
·
View notes
Text
WinAmp 5 – rusty color and what is required

So, at my summertime retro computer Asus F3S., I have installed program for audio – WinAmp version 5.666 from 2013. So, this computer is going with Windows Xp. So, it is perfect for this. Good program. As I remember I used WinAmp 2 something. In age of my Pentium 2. It was a long time ago. So, I do not remember, already.

So, I with a great pleasure install some more new WinAmp. It looks beautiful, and lots of functions. And it reminds me some CD Player. I am talking about a big squares from 80s-90s.As a part of music center. So, a soft style Winamp 5 is looks like part of a music center. So, it is such a music player with lots of buttons.

Nothing tricky. There is playlist, library. And windows with what is playing now. And mainly it has lots of settings. And there is change in visual theme. I select rust. So yellow brown color. Part of indications you can hide. And opposite - to show more info. So, player can look compact, as at full screen.
So, it is such a nice music memory.

Dima Link is making retro videogames, apps, a little of music, write stories, and some retro more.
WEBSITE: http://www.dimalink.tv-games.ru/home_eng.html ITCHIO: https://dimalink.itch.io/ GAMEJOLT: https://gamejolt.com/@DimaLink/games
BLOGGER: https://dimalinkeng.blogspot.com/ DISCORD: https://discord.com/invite/F24Kw7TaH4 TUMBLR: https://dimalink.tumblr.com/
#retro#windows xp#winamp#winamp 5#xp soft#retro soft#player#music player#cd player#mp3 player#retro api#playlist#library#music library
6 notes
·
View notes
Photo
Chrome on mobile doesn't allow add ons. If something didn't change, Kiwi is the only chrome-based browser with add on support. Firefox on mobile allows add ons (it's a small collectionbto chose from but the most important add ons are supported)
And what is possibly the most important in this day and age: Firefox implememts the security and safety features from Tor browser.
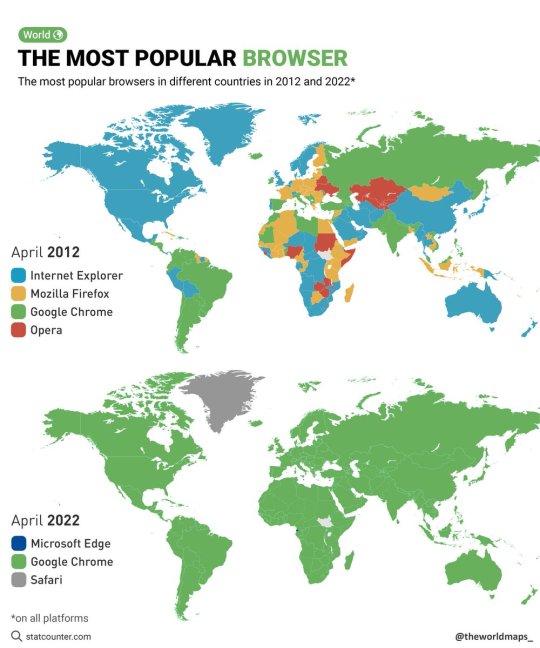
The most popular browsers in different countries in 2012 and 2022.
by @theworldmaps_
#firefox#i always have old hardware#and chome was crashing or getting stuck with a handfull of open tabs#meanwhile firefox handled dozens and hundreds of open tabs and even several windows less issues#I am really unhappy with many of firefox's design choices starting with locking out session managers fromthe needed apis#or not working with add on developpers pre deprecating of old add on ecosystem#or taking away user choices#or the awesomebar. oh my god. and the way the switches for the search and adress bars work#and turning into a chrome clone re the user interface amd experience#(the code is a bit of a mess by now too apparently.)#but I still have so many more choices than with chrome
163K notes
·
View notes
Text
Who’s Spying on You the Most? Microsoft, Google, Nvidia, or Steam? Let’s Find Out!
Hey everyone! Let’s talk about something we all know but don’t always think about: tech companies spying on us. Yeah, it’s no secret that our devices and apps are constantly collecting data, but have you ever wondered who’s doing it the most? Is it Microsoft? Google? Nvidia? Steam? Or maybe even EA? I decided to run a little experiment to find out, and the results were… eye-opening. The…
#background connections#Copilot tracking#cybersecurity#data collection#data protection#data security#digital privacy#Discord connections#EA app#firewall settings#Google APIs#Linux telemetry#Microsoft Edge#Microsoft Rewards#Microsoft telemetry#modern software design#Nvidia data tracking#Nvidia GeForce Experience#online privacy#online security#online tracking#privacy tips#Steam privacy#tech companies spying#tech experiments#ThreatLocker#Windows activity tracking#Windows Defender#Windows privacy#zero-trust security
0 notes
Text
youtube
Simple beginners guide how to build create WebHID API Electron JS Desktop App for windows 10 & windows 11. Electron webhid api Desktop App html js Script: https://bit.ly/4egIyAw or https://drive.google.com/file/d/1euT1JxtpOgdZwVpA5C1nXOZRZ7bnbsoa/ Electron JS Desktop App Project Tutorial for Beginners: WebHID API Example w/ Source Code
#tutorials#how to#programming#arduino#esp32-s2#esp32#WebHID API#Desktop App#Electron#Electron JS#Source Code#Project Tutorial for Beginners#windows 10#windows 11#Youtube
0 notes
Text
🚀 Аренда VPS&VDS серверов по низким ценам от VPSDEDIC 🌐
Вам нужно надежное и доступное решение для хостинга? VPSDEDIC предлагает аренду VPS&VDS серверов с отличным соотношением цена-качество! Мы знаем, что наши клиенты ценят стабильность и гибкость, поэтому предлагаем мощные возможности для вашего бизнеса или проектов.
Почему выбирают VPSDEDIC? 🔥 Низкие цены — мы предлагаем одни из самых доступных тарифов на рынке, позволяя вам экономить на аренде серверов без ущерба для качества! 💡 Поддержка 24/7 — у вас возникли вопросы или сложности? Наша техподдержка доступна круглосуточно, чтобы помочь вам в любой ситуации, и это абсолютно бесплатно! ⚙ Установка любой ОС или iso-образа — вы можете выбрать любую операционную систему: будь то Windows или Linux, а также установить свои iso-образы для полного контроля над сервером. 🔒 Высокая безопасность — мы гарантируем защиту данных, используя современные технологии шифрования и безопасные каналы передачи данных. ⚡ Мощность и производительность — наши сервера оснащены SSD-накопителями для высокой скорости работы, а также поддерживают SSH-доступ для удобства управления.
Что вы получите с VPSDEDIC? Полный root-доступ для максимального контроля над сервером 🛠 Возможность настройки под любой проект: от небольших сайтов до крупных корпоративных систем 🌍 Широкий выбор конфигураций с гибкими настройками под ваши задачи 💻 Современные технологии: WireGuard, API для интеграции и удобного управления 🤖 Поддержка FTP, bash и других необходимых инструментов для вашего бизнеса 🧰 Не теряйте времени — переходите по ссылке https://vpsdedic.ru и узнайте больше о наших предложениях! 🌐

0 notes
Text
How to Configure and Run Performance Tests in Postman
APIs is the backbone of many businesses today and the quality and reliability of these APIs can have a great impact on how customers feel about a product. If you want to get great feedback from your customers then your APIs must meet the expected functionality and can handle the expected load through the traffic hitting the endpoints. That is the reason every business or organization carries out…

View On WordPress
#API instance#Api intergration#Api management#Api management gateway#APIs#automated testing#Performance#performance monitor#performance testing#postman#Testing#Windows
0 notes
Text
Microsoft與Meta合作推出Windows Volumetric Apps API:開啟3D空間互動新時代
微軟宣布推出一項名為Windows Volumetric Apps的新API,這是一種“將 Windows 應用程式擴展到 3D 空間”的方法。 微軟與Meta的合作進入新階段,雙方致力於使Windows在Quest裝置上提供一流的體驗。利用Quest的獨特功能,Windows應用將能夠延伸至3D空間,為用戶創造出更加沉浸與互動的使用環境。 這一新API將作為Windows應用的擴展存在,當應用透過即將推出的微軟專為Quest設計的Windows應用進行流式傳輸時,用戶可以在Meta Quest頭戴顯示器的虛擬顯示器上,訪問��於本地網絡的實體PC或Windows 365 Cloud PC。 開發人員今天可以註冊開發人員預覽版,以獲得對「volumetric API」的存取權。 在Meta Connect…

View On WordPress
#虛擬實境#虛擬實境遊戲#虛擬實境資訊#虛擬實境新聞#META#Microsoft#Quest 3#vr#vr news#vr news today#Windows 365 Cloud PC#Windows Volumetric Apps#Windows Volumetric Apps API
0 notes
Text
DeepL Pro Türkiye'ye Geldi!
Popüler çeviri aracı DeepL’ın gelişmiş sürümü artık Türkiye’de kullanılabilecek. Önceden yalnızca ücretsiz versiyonu erişilebilirken, DeepL Pro artık Türkçe dil desteğiyle ülkemizde resmi olarak hizmet veriyor. Yapay zekâ destekli bu gelişmiş çeviri ve yazım denetim aracı, işletmelere küresel ölçekte büyümeleri için ileri düzeyde çeviri seçenekleri sunmayı hedefliyor. Aralık ayında başlaması…

View On WordPress
#Android#API#API entegrasyonu#belge çevirisi#çeviri#çeviri aracı#DeepL Pro#dil#iOS#işletme#özelleştirme#Türkiye#uygulama#veri güvenliği#web sitesi#Windows#yapay zekâ#yazım denetim
0 notes
Text
OpenAL is a cross-platform audio API used for realistic 3D positional audio in applications, especially games. It models sound sources in 3D space for an immersive experience. Developed in 2000, it resembles OpenGL conventions. No need to remove it unless you encounter issues; some older games rely on it. 🎧🎮
0 notes
Text
Nintendo is removing twitter integration next week, here's what to do to share screenshots instead
So in case you missed it, Nintendo announced last month that they're removing the Switch's twitter integration on Jun 10/11 (depending on your time zone) as a result of twitter jacking up their API fees to absolutely ridiculous degrees. This will not affect making posts in the plaza (at least in Splatoon 3) but it does mean you will not be able to upload screenshots and videos to twitter for easy access.
If you're like me and do this a lot, then you've got two alternatives.
One of these methods is significantly easier than the others, but requires a computer that runs Windows and a USB cable. With your Switch in portable mode, go into your System Settings and find the Data Management section:

Click it and scroll down to the "Copy to PC via USB Connection" option.

Click it and you'll be prompted to connect your Switch to your PC via USB. When you do, a folder containing all your Switch screenshots and videos will pop up on your PC. From there, you can copy as many videos and screenshots as you'd like to a location of your choosing, at which point you can disconnect your Switch.

And now you're done!
The other option is a bit more finicky (and also I can't take screenshots to show you the process), but can be done with any smart device. Go into your Album and pick a video or screenshot you would like to share. Select Send to smart device, after which you'll be prompted to scan a QR code. Scan it with your smart device and you'll be given a link to connect to a Wifi, which sounds weird but is just how the console and smart device connects. Once they have, you'll be able to send your images and video to your phone.
966 notes
·
View notes
Text
How to run The Sims 3 with DXVK & Reshade (Direct3D 9.0c)

Today I am going to show you guys how to install Reshade and use Direct3D 9.0c (D3D9) instead of Vulkan as rendering API.
This tutorial is based on @nornities and @desiree-uk's awesome guide on "How to use DXVK with The Sims 3", with the goal of increasing compatibility between DXVK and Reshade. For users not interested in using Reshade, you may skip this tutorial.
If you followed nornities and desiree-uk's guide, it is strongly recommended that you start from scratch, meaning you should uninstall DXVK AND Reshade completely. Believe me when I say this: it will save you a lot of time, frustration, and make your life so much easier.
For the purpose of this tutorial, I am on patch 1.69.47 and running EA App on Windows 10, but it should work for version 1.67.2 on Steam and discs, too. This tutorial does not cover GShade.
Before we start
Backup your files, even the entire folder (Program Files\EA Games\The Sims 3\Game\Bin) if you want to be extra safe; you will thank yourself later. If you do not wish to backup the entire folder, at least backup the following:
reshade-presets
reshade-shaders
Reshade.ini
Options.ini (Documents\Electronic Arts\The Sims 3)
Keep them somewhere secure, for your peace of mind (and sanity).

Done? Great stuff, let us begin!
Step 1:
If you installed DXVK following nornite and desiree-uk's guide, go to the bin folder and delete the following files to fully uninstall DXVK, we are starting from scratch:
d3d9.dll
TS3.dxvk-cache
dxvk.conf
TS3_d3d9.log (or TS3W_d3d9.log)
Step 2:
If you already have Reshade on your PC, uninstall it using this: https://reshade.me/downloads/ReShade_Setup_X.X.X.exe (replace X.X.X with version number)
Step 3:
Perform a clean install of Reshade (I am using the latest version - 6.4.1 at the time of writing). Please note that you need a version no older than 4.5.0 or this method will not work. Choose DirectX9, click next.
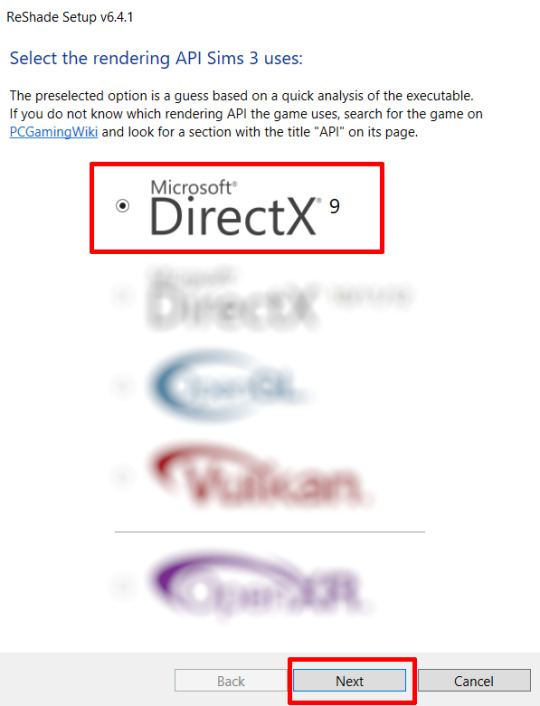
Once the installation is complete, you should see a "d3d9.dll" file inside The Sims 3's bin folder (Program Files\EA Games\The Sims 3\Game\Bin):
It may all seem familiar thus far. Indeed, this is how we installed Reshade in the past before using DXVK, but here comes the tricky part:
Step 4:
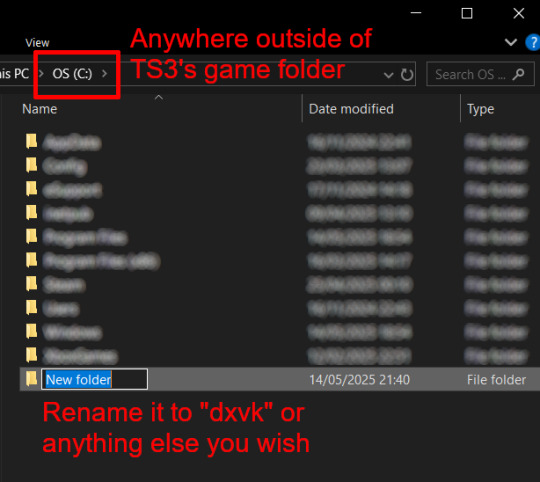
Create a new folder outside of The Sims 3's game folder (I created it on my C drive), name it "dxvk" or whatever else you like. Remember where you saved this folder, we will return to it later.
Step 5:
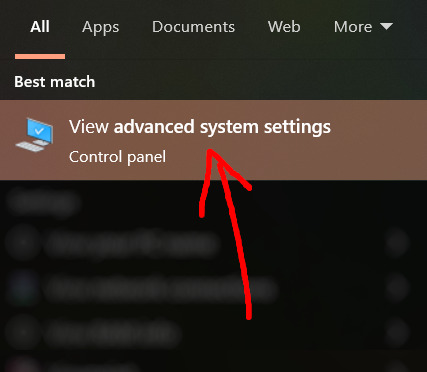
Now we need Reshade to load the next dll in order to chain Reshade with DXVK. Click on the search bar, and type in "View advanced system settings".
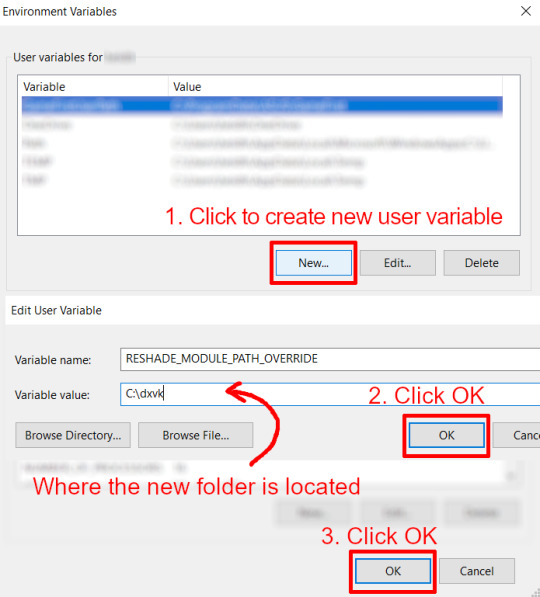
Click on "Environment Variables..."

Under "User variables", click "New..."
In the new pop-up window, find "Variable name:" and type in:
RESHADE_MODULE_PATH_OVERRIDE
for "Variable value:", paste in the directory that leads to the folder we created earlier. Once you are done, hit OK, and then hit OK again to save the changes made.
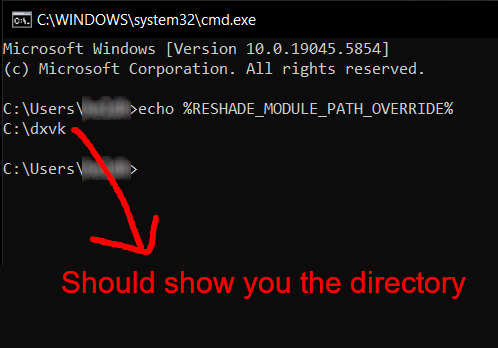
You can use Command Prompt to check if this new environment variable has been registered by entering:
echo %RESHADE_MODULE_PATH_OVERRIDE%
It should return you the folder's location. If not, make sure you have typed in the variable name correctly and confirm the folder's location.
Step 6:
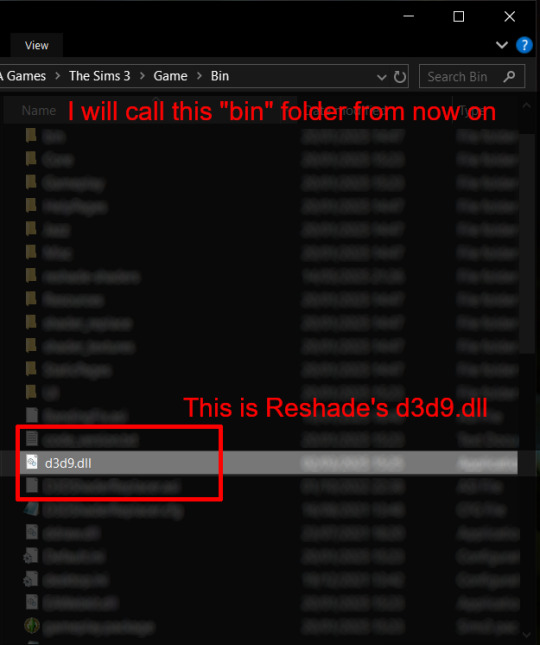
Download DXVK (version 2.3.1) from here: https://github.com/doitsujin/DXVK/releases/tag/v2.3.1 and unzip "dxvk-2.3.1.tar.gz" (I use 7-Zip, but winRAR works, too). Remember to choose x32, and move only "d3d9.dll" to the folder we made earlier.
Now we have two "d3d9.dll" files, one from Reshade (lives in the bin folder), and the other from DXVK (in this new folder, outside of The Sims 3 game folder).

Step 7:
Download "dxvk.conf" here: https://github.com/doitsujin/dxvk/blob/master/dxvk.conf delete everything inside, and enter the following:
d3d9.textureMemory = 1 d3d9.presentInterval = 1 d3d9.maxFrameRate = 60 dxvk.hud = devinfo
Ctrl + S to save the document.
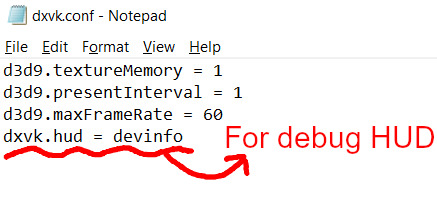
The first 3 lines are taken from @nornities and @desiree-uk's guide.
The last line is only for debugging purposes. Due to the inconvenient location occupied by the HUD (top left corner of your screen), it should be removed once the installation is successful.
Step 8:
Drag "dxvk.conf" into the bin folder, where Reshade's "d3d9.dll", "TS3.exe", and "TS3W.exe" all live.

Step 9:
Now fire up the game and check if both are showing up:

Lastly, check for “TS3.dxvk-cache” in the bin folder:
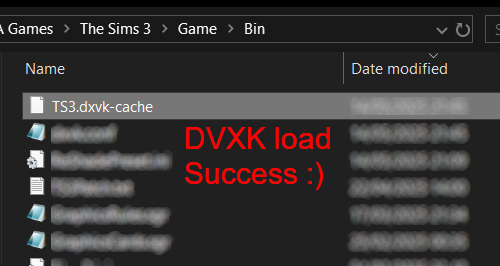
If it is there, congratulations! You have successfully installed DXVK and Reshade utilising D3D9 as API! You can now go to "dxvk.conf" and remove its last line "dxvk.hud = devinfo" and have fun! :)
Hope this tutorial isn't too confusing, the last thing I want is to over-complicate things. If you still need some help, comment down below or send me a DM/ask, I'll try and troubleshoot with you to the best of my ability.
Credits:
@nornities and @desiree-uk for their fantastic guide.
@criisolate for promulgating the usage of DXVK in TS3 community.
reddit user folieadeuxmeharder for helping me troubleshoot and informing me of this workaround.
doitsujin for creating DXVK.
crosire for creating Reshade.
142 notes
·
View notes
Text
How to back up your tumblr blog with Tumblr-Utils FOR MAC USERS
I've seen a few guides floating around on how to use some more complex options for backing up your tumblr blog, but most are extremely PC focused. Here is a guide for fellow (unfortunate) mac users!
Note: I am not a tech savvy person at all. My brother walked me through this, and I'm just sharing what he told me. Unfortunately I won't be able to help much if you need trouble shooting or advice ;; sorry! This is also based off of this guide (link) by @/magz.
- - - - GUIDE - - - -
First, open terminal. You can command+space to search through your applications, and search for "terminal". It should look like this.

You should see something like this within the window:
[COMPUTER NAME]:~ [USER NAME]$ []
First, create a virtual environment for tumblr back up. This will limit any conflicts with other python programs. Type and enter this into terminal:
python3 -m venv .tumblr_backup
Then, Activate the virtual environment by entering this:
source .tumblr_backup/bin/activate
The next line should now show something like this:
(.tumblr_backup) [COMPUTER NAME]:~ [USER NAME]$ []
As a side note, you can exit this virtual environment by typing and entering "deactivate". You can re-enter it through the previous line we used to activate it to begin with.
Next, install the base package with this line:
python3 -m pip install tumblr-backup
The linked guide details various options for tumblr back up packages that you can install. Copied from the guide for convenience:
"tumblr-backup : default tumblr-backup[video] : adds option to download videos tumblr-backup[exif] : adds option to download EXIF information of fotos (photography metadata information) tumblr-backup[notes] : adds option to download notes of posts (huge) tumblr-backup[jq] : adds option to filter which posts to backup tumblr-backup[all] : adds all options (personally doesn't work for us at the moment of writing this)"
I chose the video option, but you can pick which you'd like. Download that specific package with this line. Note that unlike the previous lines Ive shown, the square brackets here are actually part of it and must be used:
python3 -m pip install tumblr-backup[OPTION]
Next, you need to create an app linked to your tumblr account to get an OAuth consumer key (aka API key). Go to this link: [https://www.tumblr.com/oauth/apps] and click the [+Register application] button. Here, you will have to input a bunch of info. What you put doesn't really matter. This is how the original guide filled it out, and I did pretty much the exact same thing:

(The github link for your convenience: https://github.com/Cebtenzzre/tumblr-utils)
For the next step, You'll take the OAuth consumer key (NOT the secret key) and set it as the API key in tumblr-utils to give it the ability to download your blog. Input this line. Note that in this case, the square brackets are NOT to be included- just copy and paste the key:
tumblr-backup --set-api-key [YOUR OAUTH CONSUMER KEY]
This will set you up to start your back up! Type this to see all the different customization options you can pick from for your backup:
tumblr-backup --help
To begin your back up, pick which options you want to choose from and select which of your blogs you want to back up. It should look like this:
tumblr-backup [OPTIONS] [BLOG NAME]
For example, I am currently backing up this blog and I wanted to save videos as well as reversing the post order in the monthly archives. This is what my command looked like:
tumblr-backup -r --save-video bare1ythere
And there you have it! Your backup will be saved into a file titled after your blog. You can search through finder for it from there. There is also an option to specify where you want to save your blog, but I'm not sure how it works. I hope this was useful!!
92 notes
·
View notes