#create tab of ms access
Explore tagged Tumblr posts
Visit Tumblr Blog
Explore Tumblr blogs with no restrictions, modern design and the best experience.
Last Seen Tumblr Blogs


Fun Fact
The Tumblr app for Google Glass was released on May 16, 2013.
Text

The Very Useful Watermark Feature
Whenever I bring up subject matter that involves procedures whereby the location of the feature has moved from one version of the software to another, you should know where it is situated from Version to Version of the software.
The Watermark is a very important feature that should be used to protect against wholesale copying.
Let's take a quick look at the Watermark.
If we choose to implement a watermark in MS Word, we make a decision whether we use a generic watermark such as "Confidential" "Client Copy" etc. or we can use a picture or logo type picture and finally we can use a "Custom Watermark" whereby we type in our own text such as our company name, website etc.
Note: Your Watermark will not print if you do not have the selection “Print Drawings Created In MS Word” checked. You can find this setting under File, Options, Display, Printing Options.
If we print out the file, the watermark will be visible on your hard copy. If we send the file in MS Word to someone and the file is not password protected, then someone can simply remove it. Finally, if we save the file as a PDF, then the watermark will be present in the PDF on its own layer. Again, it can be accessed and removed if you don't password protect the PDF file from editing. In Adobe Professional, this can be done under Tools, Advanced Editing Functions and choose -Touch-Up Object Tool. And one should remember the many programs that break the passwords set on both MS Word and Adobe PDF.
Keep in mind that the watermark can be implemented from the Adobe file since Adobe Professional and Nuance allow one to create a watermark in the newly created PDF.
In MS Word 2010, we find the watermark under the Page Layout Tab.
In MS Word 2013 and above, here is how to get to the watermark feature:
Click the Design tab.
In the Page Background group, click the Watermark button. A menu plops down with a host of predefined watermarks that you can safely place behind the text on your document's pages.
Choose a watermark from the long, long list or customize your own.
Note: To "flatten" the watermark so that it can not be removed! Using Adobe Professional or Nuance, In Nuance, look for the Advanced Processing Tab and select "Flatten".
In Adobe Pro, Click the Layers button, and select "Flatten Layers" from the options menu.
Highly Recommended:
Top-Tier Style Legal and Corporate Training for MS Office. We train Corporate Professionals, Secretaries, WP Operators, Paralegals, Law Students, Attorneys, Business People, Marketing as well as Legal Outsource Personnel
www.AdvanceTo.com
www.Awalkinthecenter.com for Word Processing Center Related Workshops
https://advancetoffice.com/
888-422-0692 Ext. 1 and 2
Teacher Connected Books and Video
Hey Students: AdvanceTo Offers a unique PDF Editing and Procedures Class!
The following topics with will thoroughly be explored:
Dedicated Document Conversion Cleanup Class (Separate Class For WP Operators).
Bookmarks
Cleanup
Fillable Forms
Signatures
Redactions
Security
And Much More!
This class meets for 4.5 hours. This is a thorough live hands on Zoom class not short mini videos as you might see on YouTube. The cost of this class is $175.00. This is the very material that you would need to step in a law firm or Corporate Firm and be able to perform.
If you are a Secretary, Word Processing Operator, Paralegal or a freelance worker, you NEED to know these functions which will go hand in hand with your MS Word knowledge. Take advantage of this great class! When finished, you will have gained a comfort level and knowledge that you can now add to your existing resume. Those who purchase two or more classes (and those additional classes can be from any of our offerings) will receive a discount. All groups receive a discount!
Contact us today!
https://advancetoffice.com/
888-422-0692 Ext. 1 or 2
2 notes
·
View notes
Text
Art has never been more accessible today and will hopefully be even MORE accessible in the future, without the help of "AI" to even begin with. Anyone at any age today does not have to be a prodigy, or pay extreme amounts of money in order to learn to play. Learning from a professional of course can lend you more knowledge and help, but it is no longer necessary.
Today we have the internet and anyone can look up how to animate using Blendr or how to paint flowers with water color or how to storyboard. Someone who is 50 can pick up a guitar and learn using videos and online tabs. Community college classes are also cheaper and extremely helpful. It has been beyond astounding to me that people are saying AI "art" makes art more accessible, when plenty of artists first started with MS Paint and used a mouse to make drawings of dogs.
There are so many ways for us to create art and we have been doing so with anything and everything we have had at hand.
"ai is making it so everyone can make art" Everyone can make art dipshit it came free with your fucking humanity
212K notes
·
View notes
Text
The Importance of Formatting: Enhancing Readability in Microsoft Word Documents
Document Formatting Services: Common Questions Answered
1. Which two are examples of document formats?
Two examples of document formats are PDF (Portable Document Format) and DOCX (Microsoft Word Document). PDF is commonly used for sharing and preserving document formatting, while DOCX is a file format used by Microsoft Word for creating and editing text documents. Both formats serve different purposes in document management and sharing.
2. What type of file is a document?
A document is typically a file that contains text, images, or other content and is used for communication, record-keeping, or information sharing. Common formats for documents include Word (.doc, .docx), PDF (.pdf), and plain text (.txt). These files can be created, edited, and shared using various software applications, making them versatile for personal and professional use.
3. How to format a MS Word document?
To format a Microsoft Word document, use the "Home" tab to adjust font type, size, and color. Use the "Paragraph" section to set alignment, line spacing, and indentation. For margins, go to the "Layout" tab. Insert headers, footers, and page numbers via the "Insert" tab. Finally, save your document using "File" > "Save As."
4. What is the standard document format?
The standard document format commonly used is PDF (Portable Document Format). It preserves formatting across different devices and platforms. Other widely used formats include DOCX (Microsoft Word) and TXT (plain text). The choice of format often depends on the intended use, such as sharing, editing, or printing documents.
5. What is the purpose of the file formatting?
File formatting serves to organize and structure data within a file, making it readable and usable by software applications. Different formats (like .txt, .jpg, .csv) dictate how data is stored, accessed, and interpreted, ensuring compatibility and efficiency in data management and sharing. Proper formatting enhances data integrity, reduces errors, and facilitates easier data manipulation and retrieval.
Visit: VS Website See: VS Portfolio
0 notes
Text

CELEBRATING NATIONAL POETRY MONTH
FLP BOOK OF THE DAY: In the Needle, A Woman by Susan Michele Coronel
On SALE: https://www.finishinglinepress.com/product/in-the-needle-a-woman-by-susan-michele-coronel/
In the Needle, A Woman Susan Michele Coronel deftly weaves together strands of challenging #life experiences, including the complexities of the #mother-daughter bond, divorce, #family #losses, and her #Jewish ancestors’ traumatic past. Through captivating imagery and a lyrical imagination that accompanies us from childhood through adolescence and adulthood, In the Needle, A Woman culminates in the speaker’s life as an independent #woman with her own desires and needs. Through it all, the healing power of #poetry helps her to mend the torn fabric of her #life and to find purpose, creating a durable framework that bridges generations, traditions, and norms. In “Was My Mother the Ocean or a Rainstorm?” the speaker writes: “Pain nourishes me because it contains/seeds of goodness. I put on a blindfold/ & keep still. Now I don’t need/ to choose. I am not afraid.”
Susan Michele Coronel lives in New York City. A two-time Pushcart nominee, she has had poems published in numerous journals including MOM Egg Review, Redivider, One Art, Anti-Heroin Chic, TAB Journal, The Ekphrastic Review, Spillway 29, and Plainsongs. This book, her first full-length collection, was the winner of the 2024 Donna Wolf Palacio Poetry Prize. In 2023, she won the Massachusetts Poetry Festival’s First Poem Award. Versions of this book were named finalists for Harbor Editions’ Laureate Prize (2021), the 42 Miles Press Poetry Award (2023), the C&R Press Poetry Award (2023), and the Louise Bogan Award (2024). In 2021 she received a Parent Poet Fellowship for Martha’s Vineyard Institute for Creative Writing’s summer conference. Ms. Coronel holds an M.S. Ed. in Applied Linguistics from the City University of New York (Queens College) and a B.A. in English from Indiana-University Bloomington.
PRAISE FOR In the Needle, A Woman by Susan Michele Coronel
“The mandible of time opens & closes,” writes Susan Michele Coronel. “I flash forward to erase/ what’s lost.” In her debut full-length collection, In the Needle, a Woman, Coronel stitches together a creature called “time” to examine, not only her own lineage, but the legacy she will pass onto her daughters. Time truly is a creature — hungry and golden — “a copperhead seeking its yellow tail,” and one that is “thirsty for the past.” Retracing her family’s trauma back to the pogroms in Europe, as well as her own childhood of the ‘70s, we are transported to a pre-teen wood paneled “basement, tuning in to radio static that crackled under a dangling bulb . . . coating our tongues bright gold.” Donnie and Marie, Barbies, and Judy Blume’s Are You There, God, It’s Me Margaret? are stitched into this tale with a needle from the heart, and “in the needle, a woman.” The speaker (“this monster”) has withstood the untimely death of her brother, divorce, estrangement from her children, and “listens to Nick Cave and grinds stone with its teeth.” Susan Michele Coronel has written a memoir in verse, a muscular book with “hooves,” a collection that we all need to read.
–Jennifer Martelli, author of Psychic Party Under the Bottle Tree
Compelling and remarkably honest, In the Needle, A Woman investigates both the softer and sharper edges of our unique emotional landscapes in a series of exciting, accessible poems that explore equally the strengths and frailties of the human condition in its varied aspects — personal identity, grief, relationships, family, and slowly mending hearts. Weaving together universal open-hearted narratives into a poignant collection, In the Needle, A Woman is both intellectually stimulating and emotionally engaging, reminding us of the beautiful complexities of being human.
–John Sibley Williams, author of As One Fire Consumes Another
In gorgeous phrasing and rhythm, in the depths of song, and sometimes in the depths of grief, Susan Michele Coronel writes “my mouth opens / a fig of faith in a coppice of eucalyptus & cedar / I am the new eve” and indeed the poems here mark the beginning of what must be lived when the past’s cinders are spread across generations. Here are poems that sift through the grief of lost siblings, strained marriages, and the anxiety and joys of what comes next for the children, to discover what is left of what’s been passed down—the myths and the stories that save us: “Children always refuse, / but it’s still better to ask them to carry something /than to come to the table of the future empty-handed.”
–Julia Lisella, author of Our Lively Kingdom
An exploration of the feminine and all its iterations, In the Needle, a Womanencompasses the beauty and divinity found in the evolution from girlhood to teenager to young adult to adult now caring for the elders, while at the same time bearing witness to the mistakes we all make, the flaws we all have, the wishes and regrets all sewn together into the complexity of being human. An important read that reminds one of how essential our relationships with our feminine relatives, ancestors, and selves are to our sense of being and belonging.
–Anne Marie Wells, author of Survived By
Please share/please repost #flpauthor #preorder #AwesomeCoverArt #poetrybook #read #poems #women #life #family #loss #generations #relationships
1 note
·
View note
Text
25 Excel Shortcut Keys You Should Know in 2025

Overwhelmed by Excel? Let Shortcut Keys Be Your Superpower!
If you���ve ever felt like you’re drowning in data or wasting hours clicking menus in Excel, it’s time to rethink your approach. Working smarter with Excel isn’t just about knowing formulas — it’s about mastering shortcut keys. These simple combinations can transform tedious tasks into quick wins, saving you valuable time and energy.
Microsoft Excel is an essential tool for anyone working with data daily, from professionals in Nairobi’s bustling offices to students tracking projects in Kisumu. Mastering Excel shortcut keys will not only make your work faster but also significantly more efficient. So, why spend hours slogging through rows and columns when you can breeze through them in seconds?
Let’s dive into some of the most powerful Excel shortcut commands you need to know in 2025.
1. Excel Workbook Shortcut Keys: Your First Step to Efficiency
Navigating and managing your Excel workbooks is the foundation of working efficiently. Here are some of the top shortcuts every user should know:
Ctrl + N: Open a new workbook instantly.
Ctrl + S: Save your current workbook.
Ctrl + P: Open the print dialog box to prepare your workbook for printing.
Ctrl + F: Quickly find data in your spreadsheet.
Ctrl + Tab: Switch between open workbooks effortlessly.
Pro Tip: If you’re keen on mastering all workbook-related shortcuts, check out the free Mastering Excel Spreadsheet & Workbook course on UniAthena. It’s a great way to upskill without spending a dime.
2. Formatting Data in Cells: Perfect Presentation Every Time
Whether you’re correcting data or enhancing its visual appeal, these shortcuts can help you format your spreadsheets like a pro:
Ctrl + 1: Open the format cells dialog box for detailed customization.
Ctrl + B: Bold the selected text for emphasis.
Ctrl + U: Underline text to make it stand out.
Ctrl + Shift + $: Apply currency formatting instantly.
Ctrl + Shift + %: Format numbers as percentages.
Did You Know? Properly formatted data is not just visually appealing; it also enhances readability and makes collaboration smoother.
3. Advanced MS Excel Shortcut Commands: Power Up Your Skills
Ready to level up your Excel game? Here are some advanced shortcuts that can save you hours:
Alt + =: Automatically insert the SUM function for quick calculations.
Ctrl + ;: Insert the current date into your worksheet.
Ctrl + Shift + L: Toggle filters on or off to easily manage large datasets.
Ctrl + Space: Select an entire column.
Shift + Space: Select an entire row.
If you’re intrigued by the possibilities of Excel, why stop at shortcuts? Enroll in UniAthena’s free Essentials of MS Excel course and discover advanced formulas and functions to maximize your productivity.
4. Pivot Table Shortcuts: Dominate Data Analysis
Pivot tables are a powerful feature of Excel, and knowing these shortcuts will make you a data analysis guru:
Alt + N + V: Create a new Pivot Table.
Alt + J + T: Access the Analyze tab for Pivot Table tools.
*Ctrl + Shift +: Select the entire Pivot Table range.
Alt + F5: Refresh your Pivot Table to include the latest data.
Ctrl + -: Remove selected rows or columns from your table.
Quick Insight: Pivot tables help you summarize and analyze large datasets in a flash, making them a favorite tool for professionals in Kenya’s growing data-driven industries.
5. Essential Everyday Shortcuts: Small Tricks, Big Impact
Before diving into advanced tools, master these universally useful shortcuts. They’re simple, yet they pack a punch:
Ctrl + C: Copy selected data.
Ctrl + V: Paste copied data.
Ctrl + X: Cut selected data.
Ctrl + Z: Undo your last action.
Ctrl + A: Select all data in the current worksheet.
These shortcuts are consistent across Microsoft Office applications like Word and PowerPoint, so you’ll find them handy beyond Excel.
Conclusion: Empower Your Career with Excel in Kenya
Excel isn’t just a spreadsheet tool; it’s a gateway to efficiency, productivity, and success. By mastering these shortcut keys, you’ll not only work faster but also position yourself as a valuable asset in Kenya’s competitive job market.
Ready to take your skills to the next level? Explore UniAthena’s free diploma in Microsoft Excel and earn a certification that showcases your expertise. Whether you’re in Nairobi, Mombasa, or Eldoret, this is your chance to upskill and stay ahead in the ever-evolving digital landscape.
Bonus Tip: Start with the basics and practice daily. The more you use these shortcuts, the more natural they’ll feel. Soon, you’ll wonder how you ever worked without them!
Make 2025 the year you conquer Excel and unlock new opportunities. Let these shortcuts be your stepping stones to success in Kenya and beyond!
#best online courses#online short course#online courses#online training#uniathena free courses#short course#free online learning#online learning
0 notes
Text
Amazon CloudWatch Application Signals For AWS Lambda

Use CloudWatch Application Signals to monitor serverless application performance created using AWS Lambda.
An AWS built-in application performance monitoring (APM) solution called Amazon CloudWatch Application Signals was introduced in November 2023 to address the challenge of tracking the performance of distributed systems for apps running on Amazon EKS, Amazon ECS, and Amazon EC2. Application Signals expedites troubleshooting and minimizes application downtime by automatically correlating telemetry across metrics, traces, and logs. You may increase your productivity by concentrating on the apps that support your most important business operations using CloudWatch Application Signals‘ integrated experience for performance analysis within your applications.
CloudWatch Application Signals for Lambda
In order to remove the hassles of manual setup and performance concerns associated with evaluating the health of applications for Lambda functions, AWS is announcing today that Application Signals for AWS Lambda is now available. You can now gather application golden metrics (the volume of requests coming in and going out, latency, problems, and errors) with CloudWatch Application Signals for Lambda.
By abstracting away the intricacy of the underlying infrastructure, AWS Lambda frees you from having to worry about server health and lets you concentrate on developing your application. This enables you to concentrate on keeping an eye on the functionality and health of your apps, which is essential to running them at optimal efficiency and accessibility. This necessitates having a thorough understanding of performance insights for your vital business processes and application programming interfaces (APIs), including transaction volume, latency spikes, availability dips, and mistakes.
In the past, determining the underlying cause of anomalies required a significant amount of time spent correlating disparate logs, KPIs, and traces across several tools, which increased mean time to recovery (MTTR) and operational expenses. Moreover, developing your own APM solutions using open source (OSS) libraries or custom code was laborious, complicated, costly to operate, and frequently led to longer cold start times and deployment issues when overseeing sizable fleets of Lambda functions. Without the need for manual instrumentation or code modifications from your application developers, you can now easily monitor and debug serverless application health and performance concerns with CloudWatch Application Signals.
How it works
By delving deeper into performance measurements for crucial business operations and APIs, you may quickly determine the underlying cause of performance abnormalities using CloudWatch Application Signals‘ pre-built, standardized dashboards. This aids in the visualization of the application topology, which displays how the function and its dependencies interact. To keep an eye on particular processes that are most important to you, you may also set Service Level Objectives (SLOs) on your applications. Setting a target that a webpage should render in 2000 ms 99.9 percent of the time over a rolling 28-day period is an example of a SLO.
CloudWatch Application Signals uses improved AWS Distro for OpenTelemetry (ADOT) modules to automatically instrument your Lambda function. You can swiftly monitor your apps with improved performance, including decreased cold start latency, memory usage, and function invocation duration.
Application Signals in the Lambda Console to gather different data on this application using an existing Lambda function called appsignals1.
You can enable the application signals and the Lambda service traces by choosing Monitoring and Operations Tools from the function’s Configuration tab.
This Lambda function is a resource that is attached to myAppSignalsApp, an application. For your application, you have established an SLO to track particular operations that are most important to you. Your objective is for the application to run within 10 ms 99.9 percent of the time within a rolling 1-day period.
After the function is called, it may take five to ten minutes for CloudWatch Application Signals to identify it. You will thus need to reload the Services page in order to view the service.
Now that you are on the Services page, you can see a list of every Lambda function that Application Signals has found for you. This is where any telemetry that is released will be seen.
Then, utilizing the newly gathered metrics of request volume, latency, faults, and failures, you can rapidly identify anomalies across your service’s various processes and dependencies and visualize the entire application topology from the Service Map. You can rapidly determine whether problems affecting end users are specific to a job or deployment by clicking into any point in time for any application metric graph to find connected traces and logs relating to that metric.
Now available
You can begin utilizing Amazon CloudWatch Application Signals for Lambda right now in any AWS Regions where both Lambda and Application Signals are accessible. Lambda functions that use Python and Node.js managed runtimes can now use Application Signals. Support for additional Lambda runtimes will be added soon.
Read more on govindhtech.com
#AmazonCloudWatch#AWSLambda#AmazonEC2#AmazonEKS#Lambdafunctions#applicationprogramminginterfaces#API#news#CloudWatchApplicationSignals#technoligy#technews#govindhtech
0 notes
Video
youtube
Billing / Invoice Automation using Google Sheets
Billing / Invoice Automation using Google Sheets
⭐️⭐️GITHUB
https://github.com/deepaklohia/google-sheets-billing-automation
⭐️GOOGLE SHEET SAMPLE
https://docs.google.com/spreadsheets/d/e/2PACX-1vSxUi1KfkWOINQlqagJX1ZFZy5FMFmMwxItVXuuHHZw8TpyvhFUxNY8KrDnd9yHMJ1r2Zjr-GWP1E8b/pubhtml
➡️ Google Sheets Fully Functional Free Add-ons
⭐️Google Sheets Attendance Tracker
https://workspace.google.com/marketplace/app/attendance_tracker/602607637436
⭐️Google Sheets Time Tracker
https://workspace.google.com/marketplace/app/time_tracker/182790105381
⭐️Google Sheets Combine Sheets
https://workspace.google.com/marketplace/app/combine_sheets/405522851504
⭐️Google Sheets TimeJet
https://workspace.google.com/marketplace/app/timejet/531257058624
➡️OTHER USEFUL VBA AUTOMATIONS
how to extract notepad data in excel | VBA Automation
https://youtu.be/xHr7WXjK4dc
how to get Developer tab in MS Excel
https://youtu.be/DKj2YqcP9cA
How to run any exe file using VBA
https://www.youtube.com/watch?v=WCFLHf0QbE8
Excel macro to convert pdf to excel
https://www.youtube.com/watch?v=jeJR_v6TZOQ
Attendance tracker (custom ribbon)
https://www.youtube.com/watch?v=AU5lbtVVL4M
file inner text / content replacer - find and replace text
https://youtu.be/Cqi4xtJdOso
Excel Macro to convert pdf to Excel
https://youtu.be/jeJR_v6TZOQ
how to merge excel files
https://www.youtube.com/watch?v=AB9dJ_0bwo4
how to track time and motion
https://youtu.be/sBknyAEBPMU
send birthday greeting automatically
https://youtu.be/1jFJ35ZPR_A
connect excel to word / create letters in word automatically
https://youtu.be/ZgZHY4mOOvY
automated sop / workflow designer
https://youtu.be/7aNVmmYneZQ
Send bulk emails in outlook
https://www.youtube.com/watch?v=tDIOenSdN80
extract outlook attachments
https://www.youtube.com/watch?v=Wq83KruKUyk
Outlook email extractor VSTO Plugin
https://youtu.be/jg3EWdvjPS0
how to remove password from MS Access database permanently
https://youtu.be/Zc87eBV3Maw
Similarity finder / Advanced lookup
https://youtu.be/1Mcchh1rBjU
Excel to notepad
https://youtu.be/wlO5TyC1x00
bulk legal letter generator
https://www.youtube.com/watch?v=7-iv3L-lvBY
simple attendance tool
https://youtu.be/AU5lbtVVL4M
Excel randomizer for random records
https://youtu.be/4dLTVfTB3I0
Excel html editor
https://youtu.be/J76SpjwhMtA
email domain name remover
https://youtu.be/hqx5xP1Rc4o
google sheets, billing automation , customized billing, invoice , google app script , how to automate billing , invoice
0 notes
Text
What Is The Best Software To Convert OST to PST for MS Outlook?
The best software to convert OST to PST for MS Outlook often includes features like ease of use, reliability, and comprehensive support for various versions of Outlook. Among the top-rated options are Stellar Converter for OST,
which is known for its intuitive interface and robust performance, and Kernel for OST to PST Converter Tool, praised for its speed and accuracy in handling large files and complex conversions. Another highly recommended tool is SysTools OST to PST Converter,
which offers a straightforward conversion process and additional features like previewing emails before conversion and selective data export. These tools not only ensure a seamless conversion process but also offer additional functionalities to recover and manage your Outlook data efficiently.
How Can I Manually Convert An OST file To A PST file In MS Outlook?
Here are the steps to manually convert an OST file to a PST file in MS Outlook:
Open MS Outlook: Launch Microsoft Outlook on your computer.
Create a New PST File: Go to "File" > "Account Settings" > "Account Settings." In the "Data Files" tab, click "Add" and create a new Outlook Data File (.PST).
Export Data to PST: Go to "File" > "Open & Export" > "Import/Export."
Choose Export Option: Select "Export to a file" and click "Next."
Select PST Format: Choose "Outlook Data File (.PST)" and click "Next."
Choose OST Folder: Select the OST file's folder you want to convert (e.g., Inbox, Sent Items) and check "Include subfolders." Click "Next."
Select Destination: Browse to choose the location where you want to save the new PST file and name it. Click "Finish."
Set Password (Optional): You can set a password for the PST file, or leave it blank and click "OK."
Your OST file data will now be exported to the newly created PST file.
Are There Free Tools Available To Convert OST to PST for MS Outlook?
Yes, there are free tools available to convert OST to PST for MS Outlook, but they often come with limitations. Some popular free tools include OST2PST Kit and Free OST to PST Converter. These tools typically offer basic conversion capabilities but might have restrictions on the size of the files or the number of conversions.
For full features and better reliability, paid versions of these tools or more comprehensive software like Stellar Converter for OST or Kernel for OST to PST Converter are recommended. These paid tools provide more robust and efficient conversion options without limitations.
What Are The Steps To Convert An Ost File To A Pst File In MS Outlook?
Here are the steps to convert an OST file to a PST file in MS Outlook:
Open Outlook: Start Microsoft Outlook on your computer.
Go to Import/Export: Click on "File," then "Open & Export," and select "Import/Export."
Choose Export: Select "Export to a file" and click "Next."
Select PST Format: Choose "Outlook Data File (.PST)" and click "Next."
Select Folders: Pick the folders from the OST file you want to convert, check "Include subfolders," and click "Next."
Choose Save Location: Browse to select where you want to save the new PST file, name it, and click "Finish."
Set Password (Optional): You can set a password for the PST file or leave it blank and click "OK."
Your OST file data will now be converted and saved as a PST file.
Can I Convert An OST File To PST without Outlook Installed?
Yes, you can convert an OST file to PST without Outlook installed by using third-party conversion tools. These specialized software programs, such as Stellar Converter for OST or Kernel for OST to PST Converter, can directly convert OST files to PST format without needing Outlook on your computer.
They are designed to work independently of Outlook, making the conversion process simple and accessible even if you don’t have Outlook installed. This is especially useful if you need to access your emails and data from an OST file on a different system.
How Do I Recover Data From A Corrupt OST File And Convert It To PST?
Here are the steps to recover data from a corrupt OST file and convert it to PST:
Download Software: Download and install a specialized tool like Stellar Repair for Outlook or Kernel for OST to PST Converter.
Open the Tool: Launch the installed software on your computer.
Select OST File: Use the tool to browse and select the corrupt OST file you want to repair.
Scan the File: Start the scanning process to repair the corrupt OST file.
Preview Data: Once the scan is complete, preview the recoverable data displayed by the tool.
Save as PST: Choose the option to save the recovered data and select "PST" as the file format.
Save Location: Choose the location on your computer where you want to save the new PST file.
Finish: Complete the process by clicking "Save" or "Finish," and the tool will create the PST file with your recovered data.
What Is The Difference Between OST and PST files In Ms Outlook?
OST and PST files in MS Outlook serve different purposes. An OST (Offline Storage Table) file allows you to work offline by storing a copy of your mailbox on your computer, which syncs with the Exchange server when you're online again.
This is used with accounts like Exchange, Office 365, and Outlook.com. On the other hand, a PST (Personal Storage Table) file stores emails, contacts, and calendar data on your computer, and is commonly used for email backup or archiving, as well as with POP3 and IMAP accounts. Essentially, OST is for offline use with server synchronization, while PST is for personal data storage and backup.
How Can I Convert An Orphaned Ost File To A Pst File In Ms Outlook?
Converting an orphaned OST file to a PST file in MS Outlook involves these simple steps:
Open MS Outlook: Launch Microsoft Outlook on your computer.
Create a New PST File: Navigate to "File" > "Account Settings" > "Account Settings." In the "Data Files" tab, click "Add" and create a new Outlook Data File (.pst).
Import OST Data: Go to "File" > "Open & Export" > "Import/Export."
Select Import Option: Choose "Import from another program or file" and click "Next."
Choose File Type: Select "Outlook Data File (.pst)" and click "Next."
Browse for OST File: Click "Browse" to locate and select the orphaned OST file you want to convert.
Set Import Options: Choose how you want to handle duplicates and click "Next."
Select Destination: Choose the newly created PST file as the destination for importing the OST data.
Complete Import: Click "Finish" to start the import process.
Access Data: Once the import is complete, you can access the data from the orphaned OST file in the PST file within MS Outlook.
1 note
·
View note
Text
Mentor Message 3.12.24

Announcements
Want informal feedback on your online courses? Fill out a request to have a Distance Learning Committee “coach” give you 3 ideas for improving your online course.
Teams Calling Coming Soon: Mesa and Miramar are underway. Emergency phones will stay the same.
New DB Version: In a Sandbox Shell, check out the new redesign for Canvas Discussion Boards and Announcements (Not yet available in the mobile app). It organizes replies under the original post, allows tagging, and likes. It does require participants to post before they can see others’ postings, which used to be the instructors’ decision.
Using an external tool & a rubric in Canvas Assignments? If the rubric “freezes,” use the TAB key to delete or get to areas where you need to edit.
Grading Tips:
Free access for AFT Members to a paid version of GPT Zero: This allows you to bulk upload MS Word, PDF, or plain TXT file formats. Information about AFT-GPT Zero Partnership.
Sign Up for GPT Zero (Use “San Diego Community College District” for your institution). Include an AI policy in your syllabi or addendum to your syllabi. Sample syllabi AI policies
Create a little library of common feedback comments: Tutorial for Canvas Grading Library (1:39) You can always customize the comment, but it’s nice to never have to recreate that feedback from scratch for the nth time!
Student Tutorial for Checking Grades (3:59):Post a quick tutorial for students so they know how to read feedback on assignments in Canvas. Many thanks to Dave Giberson for this short, thorough tutorial. For a bare bones version: CVC How to Check Grades (1:36)
Safety Reminder: Regularly download a backup of your gradebook (and your courses) for safekeeping throughout the semester “just in case” your courses get deleted or damaged unexpectedly.
Text & Screenshot Tutorial from Instructure
Cara’s Video Tutorial: Export Gradebook & Back Up Your Course (4:52)
Captioning Update:
Canvas Studio: You now have 2 recording options – “Studio Capture” or “Screen-Cast-O-Matic.” For now, use ““Screen-Cast-O-Matic” if you like having your face in the lower corner & want to select a particular part of the screen to record. “Studio Capture” is a Beta version that selects “windows” to capture, BUT it tends to distort your image if you are recording your screen & you in the corner talking.
Editing in Canvas Studio: The 3 “snowman dots” gives you easier editing access to quickly trim & annotate your videos in addition to putting in quiz questions or creating public sharing links.
3C Media Captioning Resource: 3C Media just reopened their captioning services! Faculty can submit items for captioning at the 3C Media Website. Turnaround is usually 2-3 days. This is particularly helpful if you need to have more accurate captions for longer videos such as demonstrations, lectures, etc. How to submit items to 3C Media.
Professional Development
Nvida Conference (Free virtually) 3/17-3/21: https://www.nvidia.com/gtc/
Online Teaching Conference (OTC): June 26-28 in Long Beach. Early bird pricing through May. Apply for AB1725 funding for conference registration & travel
0 notes
Text
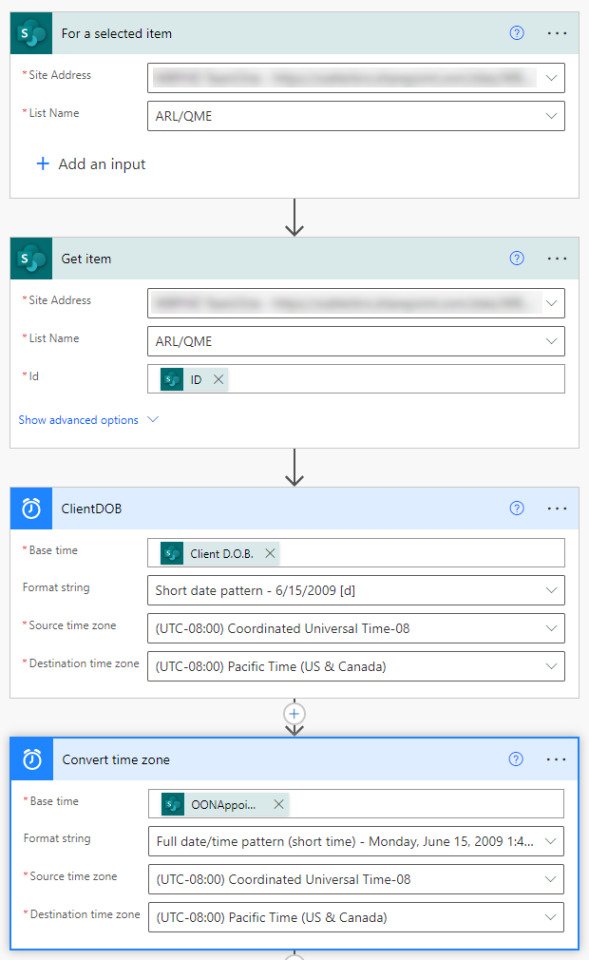
This is the first part of sending 2 Adobe Acrobat sign documents and a welcome letter to a client email address that was triggered from a SharePoint list. The data will be dynamically populated from the list to fields in the Acrobat sign document and the welcome letter.
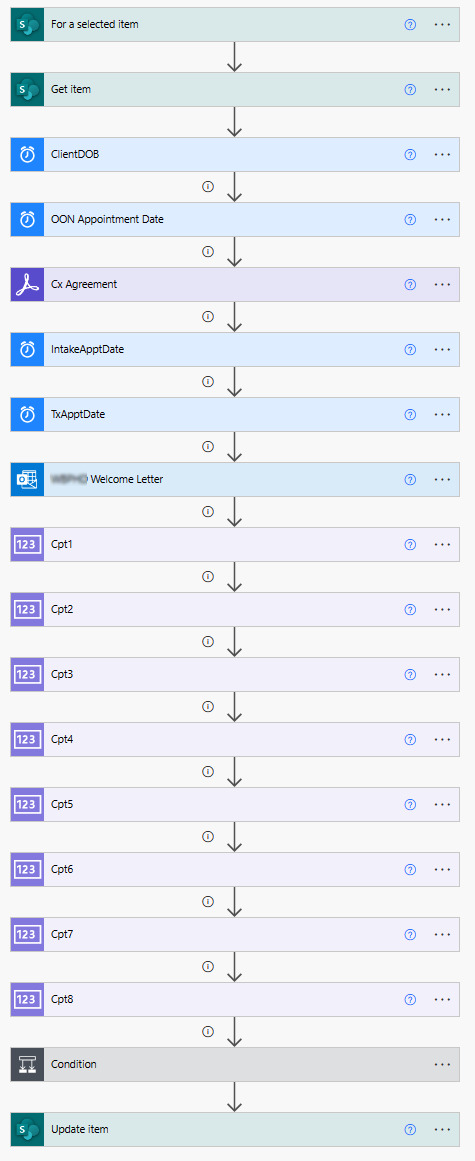
It is not exactly what everybody might need, but has lots of tips to help you with your own Microsoft Automate flow projects and SharePoint. 1) The trigger. SharePoint - For a selected Item. Self explanatory :-) When you have rows in a SharePoint list. You would select the record and then click the automation tab your flow will appear.
2) SharePoint - Get Item. Gives you accesses to the list fields and potential data.
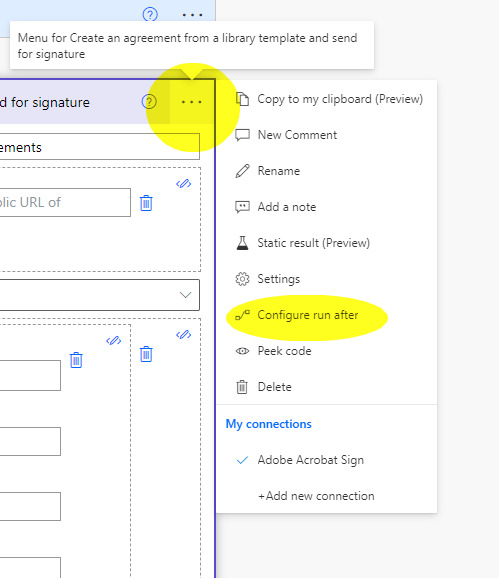
3) A date convertor component. Further on in the agreement, a DOB (date of birth - a date field) is needed. Dates come out in UTC format these components convert the formatting to your area or preference. A little more later on. 4) Another date convert. Name them to make easier for identification Top right - the 3 dots in a component.
5) Select an Adobe connector - "Create an agreement from a library template and send for signature."
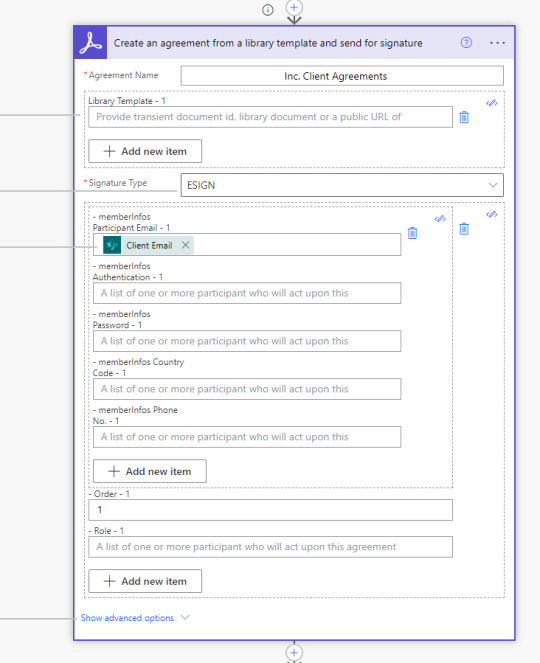
The .pdf part
At this point, you need to create a .pdf file. (the form that the recipient receives). The .pdf file needs to be in your Adobe cloud files as a Template. The libraryDocumentId - (to identify which .pdf/file to send) is a bit tricky to get/determine. I could not find it anywhere (really poorly done on Adobe's part.) How hard could it be?, select the file and see properties or something. Anyway, if you search online the only results were found was to run commands through the API. I did not have access to the API at the time. I got it by logging into the adobe account and opening the .pdf with it open look at its URL of the agreement in the browser's address bar. The ID usually starts with CBJCH.

On creating forms to use as a pdf. You can use excel to design your forms and print to .pdf. I find the Adobe web based designer to be just awful with limited design abilities and frustrating snap to settings that can not be disabled. You can use MS Word or any software that can print to a .pdf printer (built-in on windows 10)
More about the Adobe component/connector
Signature type: ESIGN Means the primary interaction is to have the document signed by the recipient.
Participant Email - 1. Where/whom to send to. Can come from your SharePoint list - an email address field - as to where it would be sent. Select from the dynamic list.
Agreement Name - can be whatever you like.
Show advance options:
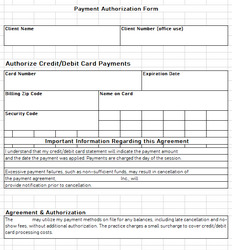
In the web based UI of Adobe you will be configuring your .pdf form. For example, you drag the signature block over on the form to where it should be positioned.
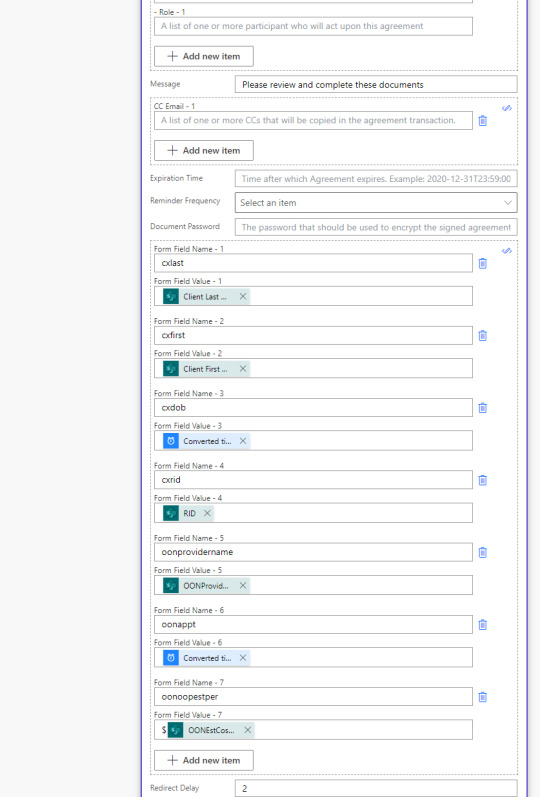
You can further customize your forms with custom and dynamic values from your SharePoint list. In Adobe, you would drag over a text block and position on your form. You will name that text block and make it read only (it will show the value in the text block that you made in Adobe. See the above image Form Field Name - 1
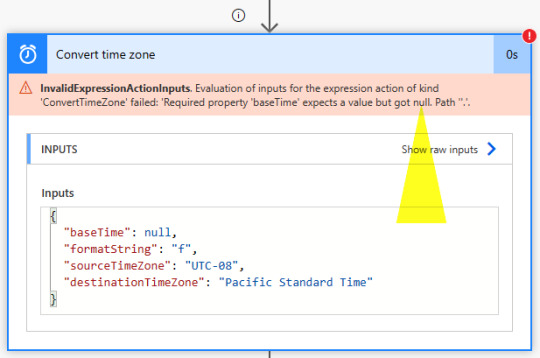
Form field value: choose your field from the Power Automate dynamic list. Redirect delay. After the recipient signs and clicks/taps submit, you can delay and then link to a website/resource. Dates and decimals: Any time you need these data types. You need to convert the output to your proper format. Using expressions or convert components. Furthermore, they don't like NULL values. If any of the date/decimals fields can be (possibly) NULL configure the component(s) run after settings. The setting will allow a NULL value and the flow will just continue - instead the flow would fail.
In the image below a NULL value warning even after the successful run was complete.


The complete flow.
#automation#Flow#Microsoft Power Automate#information technology#design#business technology#robotic automation#logic#computer science#programming#database#data visualization#software#datascience#dataanalytics#dataanalysis#data management#data manipulation
0 notes
Text
Organizing Your Data: Tips for Sorting and Presenting Graphs Effectively in PowerPoint
Data Visualization: Key Queries Explained
1.How to create a graph in PPT?
To create a graph in PowerPoint, open your presentation and select the slide where you want the graph. Click on the "Insert" tab, then choose "Chart." A dialog box will appear select the type of graph you want (e.g., column, line, pie) and click "OK." This will open an Excel-like spreadsheet where you can input your data. After entering your data, close the spreadsheet, and the graph will appear on your slide. You can then resize, move, and format the graph using the Chart Tools that appear in the ribbon.
2. What are the 4 types of charts in MS PowerPoint?
The four types of charts commonly used in MS PowerPoint are:
1. **Column Chart** - Displays data using vertical bars, ideal for comparing values across categories.
2. **Line Chart** - Shows trends over time with a connected line, useful for continuous data.
3. **Pie Chart** - Represents parts of a whole as slices of a circle, effective for showing proportions.
4. **Bar Chart** - Like column charts but uses horizontal bars, suitable for comparing quantities across different categories.
These charts help visualize data effectively in presentations.
3. How do you format a graph in PowerPoint?
To format a graph in PowerPoint, first click on the graph to select it. Use the "Chart Design" tab to change the chart type or style. For specific formatting, right-click on elements like bars or lines to access options for colors, outlines, and effects. Use the "Format" tab to adjust text size, font, and alignment. You can also modify axes and gridlines through the "Format Axis" option. Finally, ensure your graph has a clear title and labels for better understanding. Save your changes to apply the new formatting.
4. How do I import a graph into PowerPoint?
To import a graph into PowerPoint, first create your graph in a program like Excel. Select the graph and copy it (Ctrl+C). Open your PowerPoint presentation and navigate to the desired slide. Paste the graph by pressing Ctrl+V. You can also use the "Insert" tab, select "Object," and choose "Create from File" to insert a graph saved as an image or file. Adjust the size and position as needed. For more customization, use the "Chart" option under the "Insert" tab to create a new graph directly within PowerPoint.
5. How to sort a graph in PPT?
To sort a graph in PowerPoint (PPT), click on the graph to select it. If it's a chart, go to the “Chart Tools Design” tab. Click on “Select Data” and then choose “Edit” for the series you want to sort. You can rearrange the data in the table or adjust the data range to change the order. For bar or column charts, you may also sort data directly in the Excel sheet linked to the chart. Lastly, refresh the chart to apply the new order. Save your changes to update the presentation.

Visit: VS Website See: VS Portfolio
0 notes
Text
Organize Your Finances with MS Excel Invoice Templates
Maintaining organized finances is essential for the success and growth of any business. MS Excel invoice templates offer a powerful solution to streamline your invoicing process and keep your financial records in order. In this article, we will explore how MS Excel invoice templates can help you organize your finances effectively.
Efficient Invoicing: MS Excel invoice templates provide a structured format for creating and managing invoices. With pre-designed templates, you can quickly generate professional invoices, including essential details such as client information, billing items, and payment terms.
Centralized Data Management: Excel’s spreadsheet layout allows you to centralize all your invoicing data in one place. Create separate sheets or tabs for different clients or projects, making it easy to access and track past invoices, payments, and outstanding balances.
Automated Calculations: Excel’s formula functions enable automatic calculations for subtotals, taxes, discounts, and the final invoice total. This reduces manual errors and ensures accurate billing, simplifying your financial record-keeping.
Payment Tracking: With Excel invoice templates, you can easily track payment statuses and due dates. Color-code or use conditional formatting to highlight unpaid invoices or overdue payments, enabling you to prioritize collections effectively.
Financial Analysis: Excel’s data analysis tools empower you to gain valuable insights into your finances. You can create charts, graphs, and pivot tables to visualize revenue trends, monitor cash flow, and identify areas for improvement.
Budgeting and Forecasting: Utilize Excel to create budget spreadsheets and financial forecasts. By integrating invoicing data, you can make informed decisions and allocate resources more effectively.
Integration with Accounting Software: Many accounting software platforms are compatible with Excel. You can seamlessly import data from your invoice templates into your accounting system, ensuring consistency across financial records.
Tax Compliance: Excel invoice templates facilitate easy tax compliance. You can add tax calculations and generate reports to simplify tax filing and meet regulatory requirements.
Year-end Reporting: Excel’s organization and calculations assist in preparing year-end financial reports. These reports are essential for auditing, tax filing, and assessing your business’s financial performance.
Customizable Templates: MS Excel invoice templates are highly customizable. You can tailor them to include your company logo, branding, and other details, creating professional and personalized invoices that reflect your business identity.
In conclusion, MS Excel invoice templates offer a comprehensive and user-friendly approach to organizing your finances. From efficient invoicing and centralized data management to automated calculations and financial analysis, Excel empowers businesses to maintain accurate and well-organized financial records. Embrace the benefits of MS Excel invoice templates and take control of your finances, allowing you to focus on driving your business towards success and growth.
Maintaining organized finances is essential for the success and growth of any business. MS Excel invoice templates offer a powerful solution to streamline your invoicing process and keep your financial records in order. In this article, we will explore how MS Excel invoice templates can help you organize your finances effectively. In conclusion, MS Excel…
1 note
·
View note
Text
How to format a proper ebook for Amazon Kindle in MS Word
Becoming a published author today is just a few clicks away, and the key to unlocking that door lies in the art of formatting your masterpiece for electronic devices, mobile phones and kindle. In this step-by-step tutorial, computer trainer from ESS Institute, one of the best computer institute in Delhi explains how to transform your words into a polished eBook using Microsoft Word. Whether you’re a seasoned wordsmith or a budding storyteller, join us as we navigate the formatting prowess, setting the stage for your literary debut on the Amazon platform and the potential to turn your passion into profit. It’s time to dust off those creative cobwebs and embark on a journey that transcends the boundaries of your imagination—welcome to the realm of self-publishing success!

What is an ebook?
An ebook, known as “electronic book”, is a digital version of a traditional printed book. It is readable on different electronic devices like computers, smartphones, tablets, e-readers etc.
Instead of printing on paper, ebooks are created in digital formats. It contains images, text, and different elements.
Characteristics of an E-Book
Digital Format
They are documents that can be viewed on electronic devices, frequently in formats like EPUB, PDF, AZW, or MOBI.
Accessibility
With features like audio, audio+highlighted text, braille, big font, colors, reading speed, and more, they let students personalize their learning and read in a way that suits them.
Convenience
They can be downloaded or purchased online or both, without taking any physical space. They can be readable from any geographic location across boundaries.
Portable
Since they are digital, you can access a variety of books everywhere you are by carrying a library of them on a single device.
What is Amazon Kindle?
Amazon Kindle is developed by Amazon for reading and accessing digital books, newspapers, and other written content. It is a digitalized platform which gets access with the help of the internet. Amazon Kindle includes Kindle E-Readers, Kindle Apps, Ebooks, Whispersync, Built-in Light, Whispersync, Kindle Unlimited etc.
How to format an ebook in MS Word?
If you are new with ms word, formatting an ebook in the same can be a bit complex. As it may require specific layout and format considerations to ensure compatibility in various ebooks reading devices and platforms. Here are 10 easy steps on how to format an ebook for kindle in ms word.
Step 1: Select the correct version of MS Word
Make sure you are using the right version of Microsoft Word (2010, 2013, 2016, 2019, or Microsoft 365) which are in recent use for the best compatibility feature. Open any of the above mentioned and follow the next steps.
Step 2: Set up page layout and styles accordingly
Ensure your page size and margins are set up properly. Most of the ebooks use a standard page size of 6×9 inches. For the same Go to Page Layout tab, click on “Size”, select “More Paper Sizes” to set the dimensions. Also adjust the margins as well accordingly, keeping them consistent throughout your document. Use word’s built in styles (Heading 1, Heading 2, etc.) for consistent formatting.
Step 3: Remove Headers/Footers and Page Numbers
Most of the ebooks do not include headers/footers and page numbers. Because including page numbers navigates specific thing to specific page which ebooks don’t support. Go to insert tab and select Page
Number or Header/Footer. Choose “Remove Page Numbers” or “Remove Headers & Footers”.
Step 4: Insert and Draft a Table of Contents
Now create a table of contents using Word’s built-in-table of contents feature. Go to the “References” tab at the top of the window. Click on ”Table of Contents” dropdown button . Select any one of the styles according to your choice or can choose “Custom Table of Contents” to customize the formatting. Also set the links to navigate to the corresponding sections of your table of contents.
Step 5: Place Body of the contents
The body of the material you want the e-book to have can be input here. Body provides an overview of the book’s usual core ideas, including its chapters, sections, and text that provides information.
Step 6: Insert Hyperlinks
For inserting a hyperlink to navigate to websites and other sections of a book, highlight the text that you want to turn into a hyperlink, right click on it, and from the context menu, select “Hyperlink”. Dialog box will appear. In the same select which type of link you want. Click on Ok.
Step 7: Remove extra spaces and page breaks
Make sure to remove extra spaces and page breaks in your ebook. As it is essential to ensure a clean and consistent layout. For the same, Click on “Home” tab in the Ribbon at the top of the window. In the “Editing” group, click on the “Replace” button . Now the “Find and Replace” dialog box will appear. In the “Find What” field, type a space followed by another space:” ”.In the “Replace with” field, type a single space:” “.Now click on “Replace All” button.
Step 8: Save in pdf format
Now to create an ebook file that can be easily converted into various formats, save your word document as a PDF for the best compatibility.Go to “File” > ”Save As” > choose PDF as the format. This will provide consistency to your formatting and layout.
Step 9: Convert to ebook format
To have the distribution feature of your ebook, you will typically need to convert the PDF to ebook formats like EPUB, MOBI. You can convert it online with the help of different online converter platforms.
Step 10: Test it Accessibility
Now is the final time to test your ebook on multiple devices. To check its accessibility, compatibility and user friendly features. If you feel some errors or disreputability, immediately work on the same and correct it before final uploading on amazon.
What are the benefits of Using MS Word for Creating an Ebook?
There are many benefits of using Ms Word for Creating an Ebook for those who are very much familiar with the software. Benefits includes:
Easy to Customize
Ms Word has different customizing features and it offers extensive formatting capabilities, allowing you to create the visually appealing ebooks with customized styles, fonts, headings and page layouts.
Can Insert different Images and Graphics
Ms word allows you to insert different images and graphics to enhance your visibility and to make it in an attractive way.It provides tools for resizing, positioning, formatting images etc.
WYSIWYG Editing
Ms Word provides “What You See Is What You Get” interface, which allows you to see your ebook in real time with its immediate results. This interface allows users to create and edit your ebook’s layout and appearance.
Making an Ebook on Ms Word for Amazon Kindle provides authors and different writers the freedom, accuracy, and customizability to offer their readers a convenient and versatile way to access and enjoy written content in the digital format, by sitting at any corner of geographical location.
You can also do it by yourself. But if you are still thinking how to start, ESS Institute is one of the leading Computer Training Institute in Delhi where you can learn Microsoft office with computer operations too in less than 90 days only. Apply Now
#Computer Institute in Delhi#Best Computer Institute in Delhi#Graphic design course in delhi#Graphic design institute#graphic design institute in delhi#Web development institute in delhi
0 notes
Text
Microsoft Access Create Tab के प्रत्येक Ribbon की जानकारी Hindi में
Microsoft Access Create Tab के प्रत्येक Ribbon की जानकारी Hindi में
Microsoft Access Create Tab – Microsoft Access में डेटाबेस बनाने के लिए टेबल, क्वेरी, फॉर्म, रिपोर्ट को क्रिएट करने के Options दिए गए है। तो चलिए जानते है। Microsoft Access के क्रिएट टैब के बारे में । Microsoft Access के क्रिएट टैब पर जाने के लिए माउस से क्लिक या कीबोर्ड से Alt + C प्रेस कर सकते है। Microsoft Access में Create Tab के Options Microsoft Access के क्रिएट टैब में Six Groups होते है।…

View On WordPress
#access#access 2016#access 2019#access form create tab#access forms#access tutorial#create a form in microsoft access#create a table in microsoft access#create form in ms access#create query in ms access#create report in ms access#create tab in access#create tab of ms access#create table in ms access#how to create an access database#how to use access#how to use create tab in ms access#how to use microsoft access#how to use microsoft access tutorial#learn microsoft access#microsoft#microsoft access#microsoft access (software)#microsoft access 2016#microsoft access 2016 tutorial#microsoft access 2019#microsoft access database#microsoft access forms#microsoft access tutorial#ms access
0 notes
Text
How to buy Microsoft Office 2019 Product Key plus
The Microsoft Office 2019 Product Key can be downloaded free from the Microsoft website at the Download Microsoft Office section. Once downloaded, the key can be installed on the appropriate Windows Server to complete the installation process. When the application is installed, it will automatically activate all the applications and then proceed to save all the changes in the file. Microsoft provides a number of templates and user defined themes which can be selected and used to customize the look and feel of the suite.
To be able to use Microsoft Office properly, one needs to Microsoft Office 2019 Product Key plus. This key must be saved in a safe place so that they can be used again if required. This saves the user from having to provide passwords for the various files that need to be accessed. The downloaded file normally becomes the default product key after installation.
After the application has been installed, a new User Account Control page needs to be activated and this allows the user to log into the new Microsoft Office session with the supplied account password. The user should then log out of the application to continue with the rest of the steps. If there are any updates to the program, these will also be available for download from the Microsoft Downloads web site. To update the software, all that is required is a click of the mouse.
If there is any problem with the Microsoft Office or if there are problems with the downloaded application, the user can restore the previously stored key through the Microsoft Office Editor. This can be done by clicking on the Start button and then clicking Run. When prompted, enter the key that was previously stored in the Save tab. The newly added key will appear in the Application Key item and can be used to launch the application.
When downloading software from the Microsoft web site, ensure that the product key is safely stored so that it can be used later on. There are two ways to do this. One way is to use the download manager that is offered when downloading the software or it is possible to create a file containing the key. Once this has been saved, launch the downloaded application and the key will appear.
An alternative method is to create a key with the Microsoft Office Download Manager. To do this, select the Download Manager and then choose Add. The Add file option will allow you to enter the key. There are a number of files that can be uploaded, one of which is the Microsoft Office Key. Once this has been added, it will be stored in the Download Manager and will be ready for use when it is needed.
When using the Download Manager, there is a possibility that a message may appear. This message is a reminder that you are downloading an application and thus making it a trusted download. Once the message appears, click on Continue and then on Trust to make the download secure. By doing this the application will be allowed to proceed with the download.
At this point, the key will be safely stored, and you will be able to log on to the MS Office website and use your newly created product keys. To print a certificate or download a file, all you need to do is follow the user prompts. It is easy to make sure that the key was properly created and is available for use. If you happen to encounter any problems, there is a help option available for the products which allows you to get more information about the process. This should solve any problems that you come across during the installation process.
1 note
·
View note
Text
Best image creator tools online (On web, no need to install programs)
We live in an era when visual contents get more attraction than the normal ones. You can apply your creativity to attract your audience’s attention towards your contents.
It’s very important nowadays to create attractive and well designed images to enrich your written contents. Patent issues and piracy also need to be taken care of, to avoid legalisation issues.
Just like me, most newbie digital marketers start with MS paint and rely on it only for most of their image content needs. But once you come across beautiful tools available online, your life becomes much easier.
You don’t need to hire a designer for making good designs. There are few image creating tools available in the market. Some of them are free, some are partly free and some are paid tools.
Don’t confuse these tools with “Image Editing Tools”. Image editor tools require altogether different features. Please visit our article on “Best image editing tools”.
Remember, these tools will be used online only and you don’t need to download and install applications (programs) to use them. Just to make the designing simpler for newbies, this is the most important.
Let’s look at them one by one.
1. Canva
It’s easy to use drag-and-drop software. Create, mix, match, try whatever you want. Even if you haven’t created any image in your lifetime, just no need to worry. Canva is there for you.
From high-end design to logo to visiting card to letter head; you can create anything very easily. Almost all your design related needs can be fulfilled by Canva.
There are preset sizes for every purpose of images like Facebook Post, Instagram post, etc. Canva’s giant library with lots of images, icons, layouts, text styles and shapes will help you create your ideal images. You can upload your own graphics also.
Their premium plans offer even more of the resources to enable you to create professionals like images.
Price:- Free for 8,000+ templates, 1GB storage, and up to 10 team members; from $9.95/mo per user for Canva for work, which offers unlimited storage, access to 300,000 assets and templates, custom fonts, transparent backgrounds, and more
2. Stencil
Another easy-to-use graphic design tool for you. Stencil provides with you 650+ pre-designed templates, over a million images and few lacs icons and graphic elements to choose from. Free and simple image creating tool for beginners, social media marketers, bloggers and small business. With a free plan you can create upto 10 images per month.
3. Snappa
Snappa is another quick and easy graphic design software similar to Canva. It offers a free plan which includes 40,000+ free photos and upto 5 downloads per month. The free plan contains limited design templates to choose from and integration with 2 social accounts. You can upload your own graphics too in Snappa editor as well as import your custom fonts. Connecting your social media account allows you to share the graphic on the social platform right from the app.
Snappa goes all-in for this design, building its app around making vibrant, polished share images as quickly and easily as possible. While Snappa, like many similar apps, includes a thorough template library, they put more emphasis than other apps on getting the background image just right. With a library of free (and royalty-free) images, choosing the perfect background image is just a few clicks away, whether you’re using one of Snappa’s images or uploading your own. From there, Snappa offers an effects sidebar that helps you create the perfect image effects for your post–whether that means darkening or coloring the background image to make white text pop, or brightening the image to highlight dark text. (It’s important to note, however, that while Snappa has a library of additional graphics and shapes, these features are more limited compared to other apps.)
Snappa is similarly thorough when it comes to text. Easily edit your text from the sidebar, adjusting font, size, alignment, line spacing, opacity, and—my personal favorite–an optional drop shadow effect. It’s not an overload of features, but it’s more than enough to make your text, and therefore your message, really stand out.
Unfortunately, Snappa’s free plan is more limited than similar apps, allowing only 5 shares or downloads per month, which won’t be enough for many brands. You also cannot save designs in Snappa’s free plan. However, the free plan is a good way to test the app and see if it’s right for you.
4. Desynger
One of the easiest application especially for your phone, be it iOS or Android. Desynger can create graphics as smooth as Canva. Starting with a template or from a scratch, create a smooth design. Desygner’s library of free images and design elements will leave you speechless.
Even in its mobile app, Desygner doesn’t skimp on features. Multiple menus allow you to hyper-customize image and text settings, while never becoming cumbersome to use on a small screen. You can even pull up a list of all layers, making it even easier to select, deselect, and rearrange image elements with a few taps.
Desynger’s web app works almost identically, with sidebar menus to help you select the design assets and effects you need. The tool is simpler than Canva and provides fewer templates, images, and assets with its free plan, but combined with the mobile app, Desygner becomes a very versatile tool for quickly creating unique, professional social media images.
Desygner Price: Free; from $6.95 for more templates and assets, as well as features like versioning.
5. Pablo by Buffer
Pablo Created by the social media scheduling tool, Buffer, Pablo is as minimalistic as they come, making it drop-dead easy to add a nice-looking, customized graphic to your social posts.
Pablo has only a few features and really only one workflow. Choose a template or just an image for your blank template—all free and royalty-free, provided by sites like Unsplash and Pixabay. Pablo’s keyword search is fast and precise, so you can pick the perfect image for your post. From there, choose from one of three sizes, each fitted specifically for Pinterest, Instagram, or Facebook/Twitter.
Image customization is limited—choose from a few preset filters, designed to provide the right level of contrast between your image and your text. You can also add up to three text boxes. Pablo displays them as “Header,” “Body,” and “Caption,” but you can adjust size and font to redesign the text as you see fit. Add one adjustable logo or graphic, and you’re good to go!
When you’ve finished your image, you can either download it, put it into your Buffer queue, or share directly to Twitter, Facebook, Pinterest, or Instagram.
Pablo Pricing: Free—Buffer subscription not required (but certainly recommended!)
6. Crello
Crello is an alternative of Canva and offers similar features and functionality. This free online graphic design software allows creation of design using pre-created formats such as social media covers, ads, posters etc. Crello offers over 5000 free designs and collection of over 60 million images.
7. Gravit Designer
Gravit Designer includes many of the classic graphic design functions of tools like Photoshop, Sketch, and GIMP—such as layers, drawing tools, grouping, shapes, text, effects, and more—with a much more simplified, easy-to-learn interface.
As a self-described intermediate (on my best days) designer, Gravit Designer suited me perfectly. All the controls and effects I needed were easily available, so I could really make the design my own without spending a lot of time starting from scratch with Photoshop and its overabundance of tools. A tutorials tab in Gravit Designer’s main view also gives you ready access to all the knowledge you need to get started.
While Gravit Designer is ideal for building your own designs from scratch, it does come with a small library of templates pre-sized for uses like blog posts and social media images. Start with one of these preset canvases, or define your own. The app also offers a small library of shapes, illustrations, and icons. While not comprehensive as the asset libraries included with some other apps, it’s nonetheless a handy addition to a tool that already does so much.
Want to backup your design files or make them easily shareable with your team once you’re done? Gravit Designer is built to sync with the Gravit Cloud, which is also free. Simply create a Gravit account, enable the sync, and you’ll be set!
Gravit Designer Price: Free
Read full article on here
1 note
·
View note