#fantasy tutorial
Explore tagged Tumblr posts
Visit Tumblr Blog
Explore Tumblr blogs with no restrictions, modern design and the best experience.
Last Seen Tumblr Blogs


Fun Fact
The average Tumblr user visits about 67 pages every month.
Text
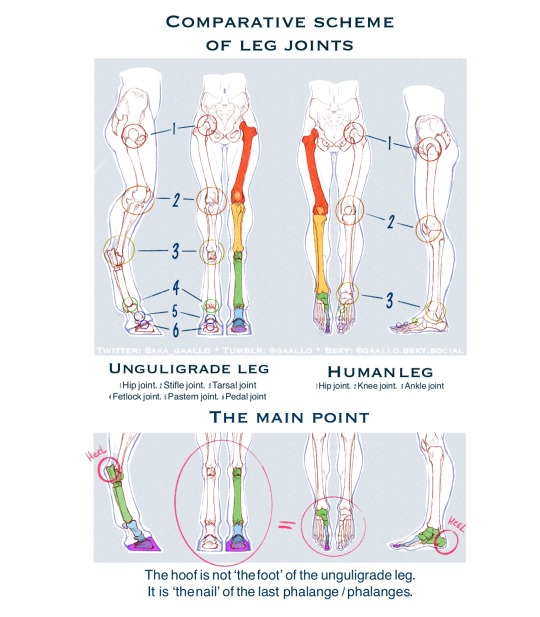

I made my first tutorial about drawing Unguligrade (hooved) legs of fantasy races, in comparison with human legs.
Hope you find it useful! 💚
#art#art tutorial#fantasy character#fantasy#fantasy tutorial#hooves tutorial#anatomy#tutorial#tiefling#draenei
202 notes
·
View notes
Text
Archery: expectations vs reality vs reality again! REJECT THE BORING VERSION OF REALITY AND SUBSTITUTE THE FUN ONE!
You can find the College of Arrows here join us and be an Archery Bard! Or something
#please do ridiculous things responsibly. there's a reason one of the courses on my site is entirely on safety.#archer#archery#nerd#fantasy#history#trick shot#tutorial
5K notes
·
View notes
Text
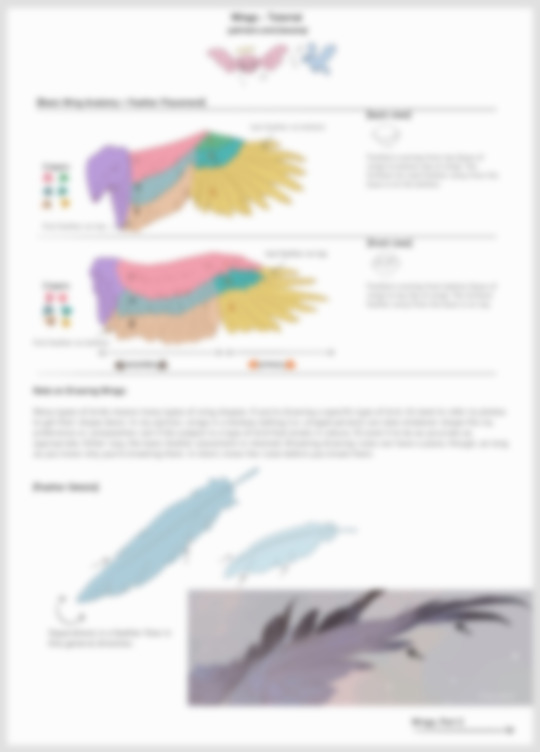
Wing Tutorial is HERE 🦅, now available on my Patreon✨ It includes full speedpaints, a step-by-step of the painting process, drawing tips + more!
2K notes
·
View notes
Text


A knight and friends.
#art#digital art#original character#character design#2d animation#animation#oc#animated gif#cartoon#tutorial#art tutorial#animation tutorial#how to#knight#medieval#steed#horse#bird#pet#quest#adventure#dnd#d&d#fantasy#king arthur#arthurian#derp#derpy#equestrian#armor
603 notes
·
View notes
Text
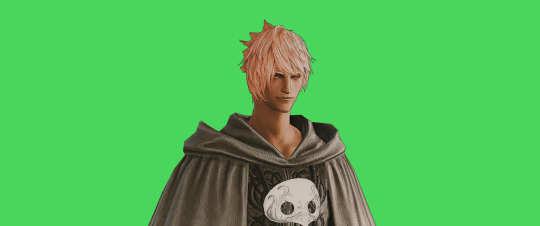
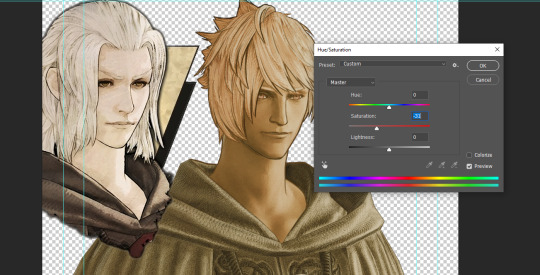
FF14 Battle Portrait Tutorial
For the past few weeks I was trying to find a way to recreate the battle portrait from FF14 as there was a few characters that I want to see in that style but don't officially have one yet. I think I got it down more or less (see image below) so I thought it's a good time to share what I did.

First of all, I made a few files that would help make life a little easier. They can be grabbed here .
Note: I did use Reshade to do a bit of work at the screenshot stage to help speed up the process but the same effect can be recreated in Photoshop with a vanilla screenshot. There are a lot of tutorials on how to do comic/cartoon effect in photoshop and those would make good bases to work off of.
Step 1: Take the screenshot with the PortraitBase Shader on. I usually take two screenshots. One with "Comic" on and one with it turned off. This is so that I have more to work with if needed.

Step 2: Drag all the screenshots into photoshop and remove the background. In photoshop, arrange the layer so that the screenshot with the Comic lines visible is on top of the one with the effect off.
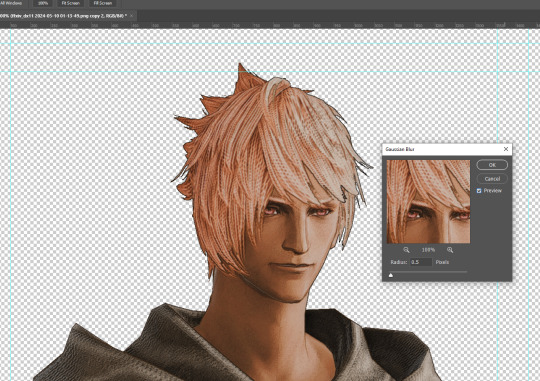
Step 3: Duplicate the the layer with the "comic" effect and apply Blur->Gaussian blur (radius 0.5)
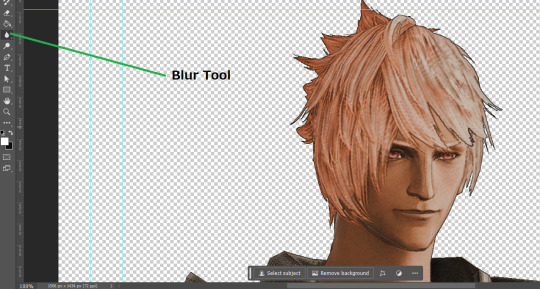
Step 4: Take a look at the hair. In Eric's case, It still doesn't look blur enough to me so I used the blur tool and blurred it a bit more
Step 5: Create a new layer above the layer in the previous step and use the brush tool to start outlining the edges. Where to outline is up to you but the idea is to make edges defined so that it looks more like a drawing.

Step 6: Duplicate the outline layer and then hide that layer. Step 7: Merge everything under the outline layer. Step 8: Drag and drop the "Texture.png" into the project and Clip it to your character layer. Set the blending of the texture to "soft light". Step 9: Drag and drop the "stroke Texture.png" into the project and Clip it to your character layer. Adjust the size till you are happy then set the blending to "overlay". Step 10: Adjust the opacity settings of both texture layers until it looks good to you.
Step 11: Click on your character layer and go to image->Adjustments->Hue/Saturation (note: you will see I dragged in the official Hades portrait as a point of reference to work off of). Adjust the saturation till you are happy.
Step 12: Go to image->Adjustments->Color Balance and adjust the color till you are happy. In this example, since Eric is also wearing the Sophist robe, I tried to match that color to Hades' Sophist robe color.
Step 13: Once you are happy, drag the "Template.png" into the project and scale that to the size you want. Make sure it is completely covering the character. If it's not, you can just use paint more of it with the brush tool to extend it till it covers everything.

Step 14: Hide the "template.png" layer and select your character layer. Use the magic wand tool to select the outside of the character.
Step 15: With the selection still selected, click on the "Template.png" layer and press delete on your keyboard. You should now be left with a blank in the shape of your character.

Step 16: Drag the"Template.png" layer to be below your character layer. Then click on your character layer and clip it.
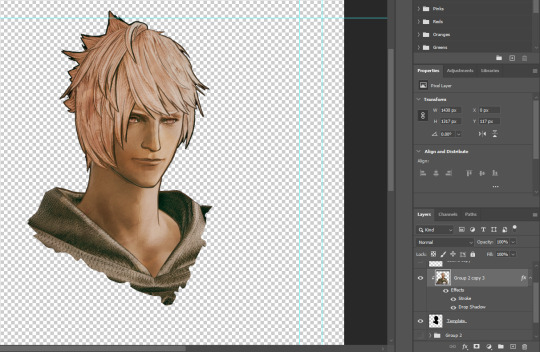
Step 17: Click on the "Template.png" layer and add a 2px stroke and shadow to it.
Step 18: Drag "Back_Deco.png" into the project and place it behind your character. Scale it till you are happy with it.
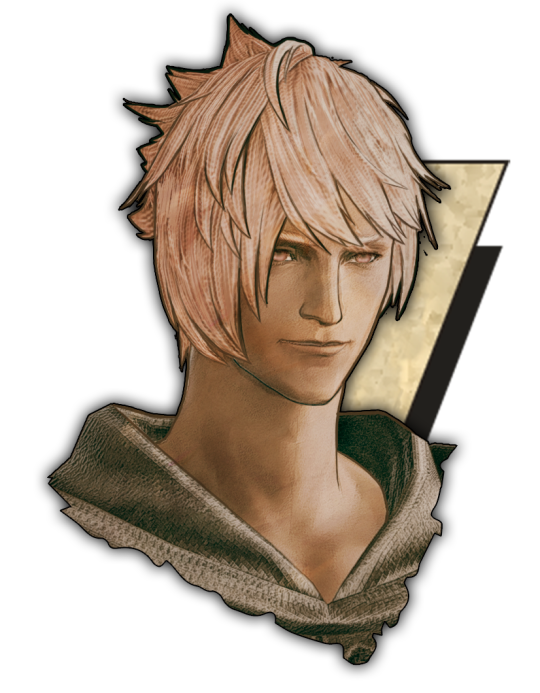
And that's it! Now you can recreate portraits for any NPCs that you want (in theory). A lot of it is also fine tuning to what you want but this should at least give you a decent base to work off of :)
2K notes
·
View notes
Text
One of the better examples of integrating video game conventions of play into the narrative is how the game mechanics tutorials in the opening stages of Final Fantasy VII (the original) flip the customary script and have Cloud, the player character, be the one explaining things to other characters, thereby establishing the unspoken expectation that his narrative function is to be the guy who knows what the fuck is going on and lending greater weight to the eventual revelation that he has no idea what the fuck is going on.
#gaming#video games#game design#final fantasy vii#final fantasy#cloud strife#tutorials#swearing#final fantasy vii spoilers#final fantasy spoilers#spoilers
3K notes
·
View notes
Text
bill dead hallariel gone cathilda gone and hell if we're counting gilear then he's gone too. the closest thing fabian has to a parental figure right now is honestly probably his motorcycle. if we had to pick. and that's his dog
#[hangman voice] Sire. Sire. If you open YouTube you can find a washing machine tutorial. Sire please#dimension 20#fantasy high junior year#fabian aramais seacaster#scal txt
2K notes
·
View notes
Text
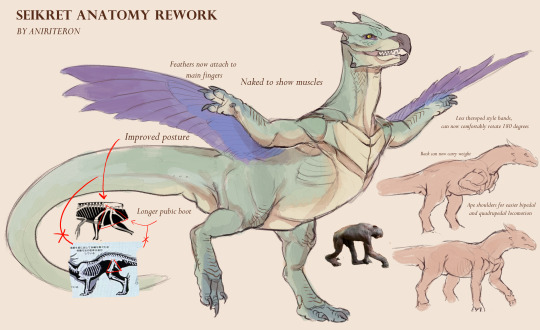
not with the intent to change anything or 1 up capcom. this is my attempt to make sense to the anatomy. free to use, this is really for future notes.
idk how they fly and im not gonna put the special shoulder to wrist wing tendon idk the name of there rn
these types of arm can still provide your seikret with 25mph (40kph) of running speed, while the current estimate to the non modified seikret is 28mph (44Kph), thankfully not a significant loss.
#speculative fantasy#2025#spec evo#speculative anatomy#speculative biology#speculative worldbuilding#spec bio#seikret#theropod#dinosaur#mhwilds#monster hunter wilds#monhun#anatomy#tutorial
163 notes
·
View notes
Text
'From Sketch to Finish'
Last day to grab my artbook before the campaign ends! The book shares the artistic journey from my earliest drawings, to the paintings I make today. The book includes painting tutorials, art tips, advice on art style & an in-depth insight into how I make paintings from sketch, to finish.
Check it out here: The Artbook
#brbchasingdreams
#brbchasingdreams#art process#art tutorial#artist#artwork#artists on tumblr#drawing#painting#illustration#art#watercolor#traditional art#sketch#art on tumblr#my art#fables#dragon#painting process#art style#dragons#fantasy#fantasy art
586 notes
·
View notes
Text


Last year, I had the amazing opportunity to create a character design tutorial for "Inspired by Nature" by @3dtotal. Here are some of the artworks included in it!
The book teaches readers how to use flowers, plants, trees, fungi, and other elements of the natural world as inspiration for character designs. My task was to choose a summer flower and design a character based on its features.
I chose the cornflower and created this little goblin, Periwinkle!
Periwinkle specializes in collecting nectar and pollen to make infusions and medicines for animals and insects in need. His friend and assistant, Bumblebee (also included on the artworks here!), helps him gather the ingredients, with the added benefit of pollinating flowers along the way.
In addition to Periwinkle, the book features 16 other incredible characters to explore and learn from. If you're interested, the book is available in the @3dtotal store!
#digital art#norapotwora#characterdesign#character art#original character#fantasy#character tutorial#design tutorial#cornflower#goblin design#goblin character#goblin#flower character
391 notes
·
View notes
Text

New pack of hooved sketches
#art#artwork#digital art#draenei#tiefling#hooves tutorial#art tutorial#sketch#drafts#fantasy tutorial#drawing practice
71 notes
·
View notes
Text

How to draw the main dragon in my Dragon Diaries comic :))) chapter one redo is on the writing table
#dragon#illustration#art#digital#artists on tumblr#digital art#drawing#illustrators on tumblr#concept art#illustrative art#fantasy#fantasy illustration#tutorial#drawing tutorial
126 notes
·
View notes
Text
How to Collect all the Framer Kits
There are a LOT of framer kits out there now for our adventure plates and dungeon portraits. But where to find them all?
You don't need to go hunting it up on websites; the game will tell you!
Open up your Portrait menu. I'll use a currently unused plate of Aeryn's.
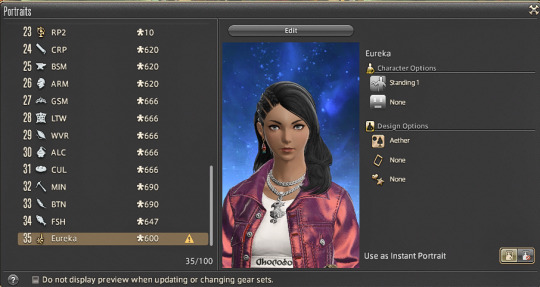
Select "Edit" above the center portrait. On that page, where it lets you select the Presets, Background, Frame, and Accent, there are the usual arrows, but also a page icon, the Background paper button boxed in yellow below to contrast with my dark mode UI.
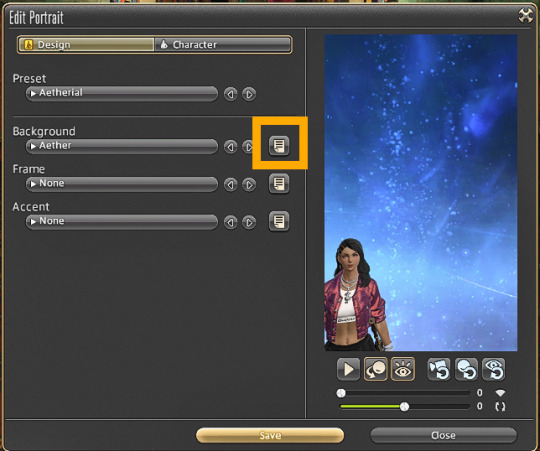
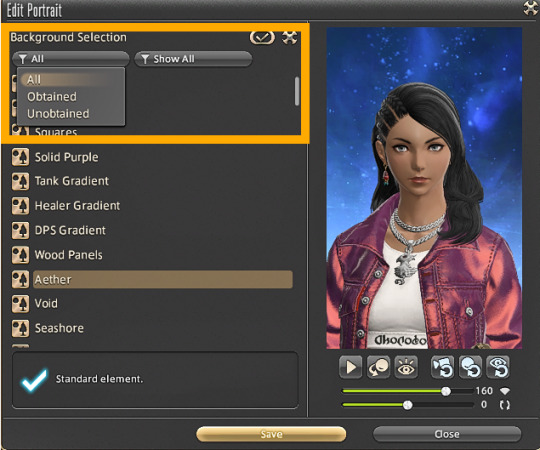
At the top of that submenu are options to show obtained or unobtained, and also how/where you get the various backgrounds.
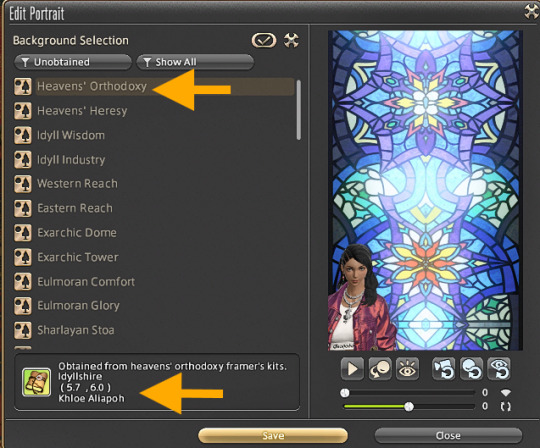
Filtering out the ones I own, I see I can get A "Heaven's Orthodoxy" (among others) and at the bottom of the list, it tells me where I can get it (from Khloe Aliapoh in Idyllshire; never free of that kitten...)
There are plenty out there! Every Allied Society has a framer kit now, talking to old Jonathas in Gridania about your achievements will nab a few, turning in bicolor gems to various vendors will add a few more, PvP for Job frames...the list goes on! The second dropdown in the submenu will give you ideas of all the ways to find kits.
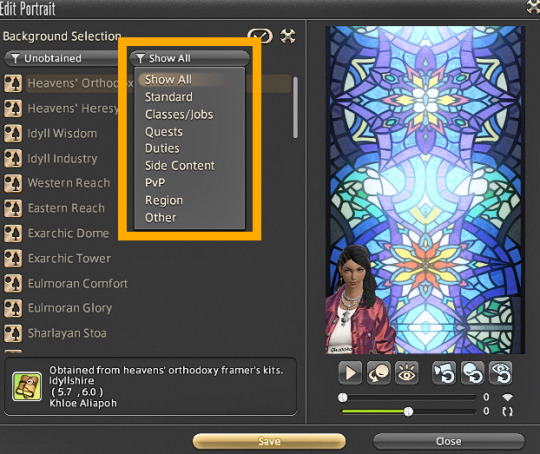
And yes, it works exactly the same way for previewing Adventure Plate options!

Go forth, and make your WoL's ID cards pretty!
#final fantasy xiv#tutorial#how to#reference#resource#adventure plates#framer kits#portraits#I forgot my leveled crafters current ilvls are 666 at this time#tho leveling crafters isn't quite as devilish as it used to be...
215 notes
·
View notes
Text

Made a casual guide for how to design your own horse and horse gear! ✨ 🐴
I can’t speak to every style of tack, so take this guidance loosely! it’s mostly for fun and based on the very important guiding principle of Horse Gear Cool >>> Horse Needs This Gear
126 notes
·
View notes
Text
How to make a mimic Christmas ornament~.

Materials needed
Fimo White for behind the eyes
Fimo White for the body (or pick any colour you want, there are glitter options!)
Fimo Translucent White (for the teeth)
Clear glass Christmas bauble
Glass eyes. Roughly 9 per mimic. Do not use plastic, those need to be able to take the oven baking of roughly 100°.
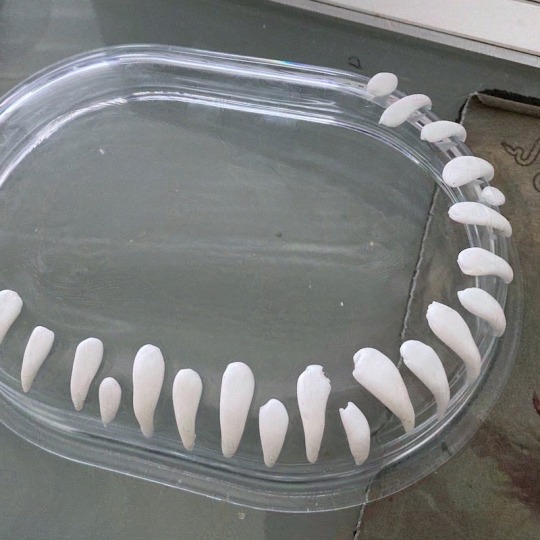
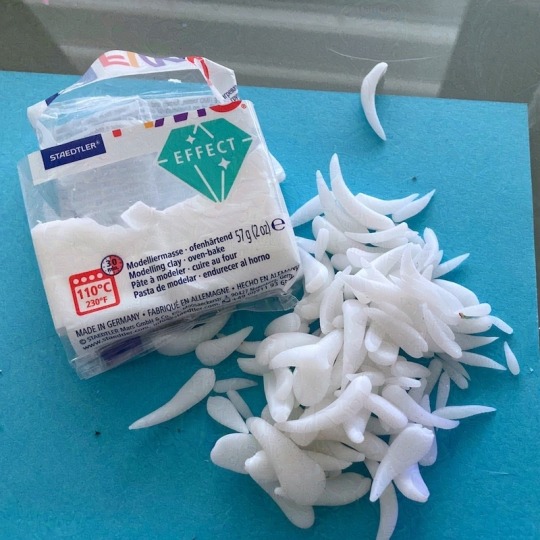
First step: Make a bunch of teeth from the Translucent White Fimo. I use a baking pan, because it has the perfect curved edge to make the teefies curved.
Bake. Repeat till you have a bunch of teefies.
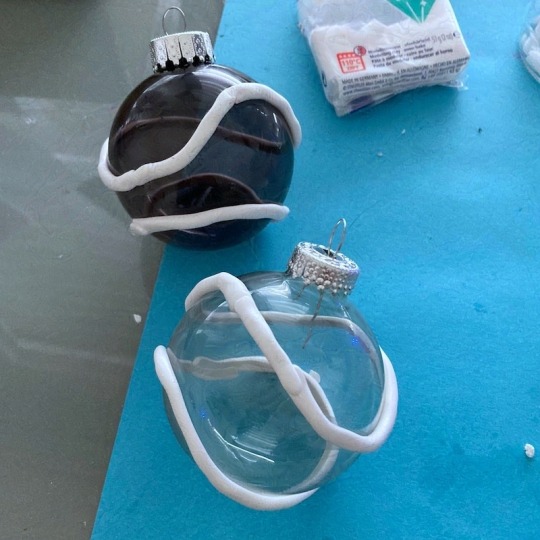
Put a noodle of white fimo on the baubles. This is the general shape of the mouth.
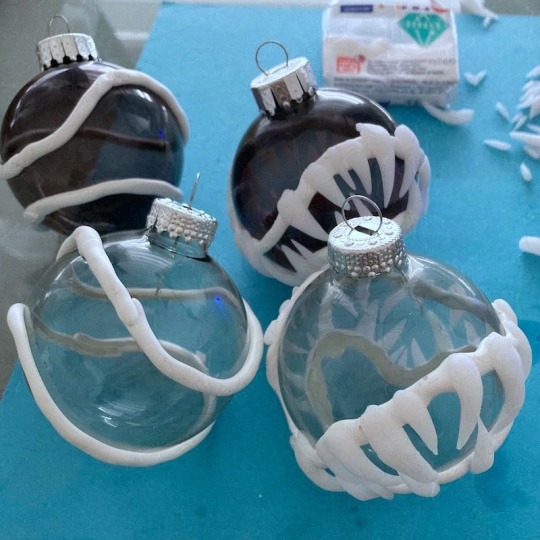
Add the already hardened teefies.
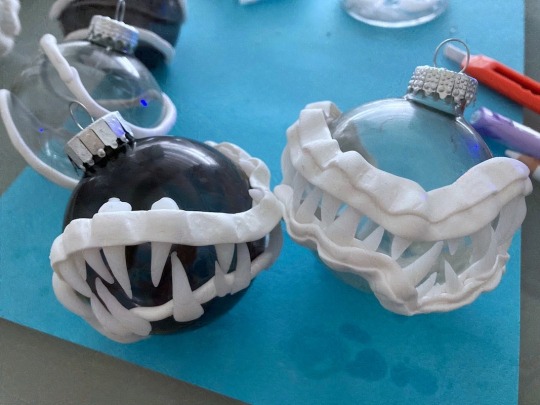
Once you have added enough teeth, add lips with White Fimo. Personally, I flattened a noodle and put two layers of that on. It's a fantasy creature, do whatever you feel is right for you. :D

Bake at 100°.
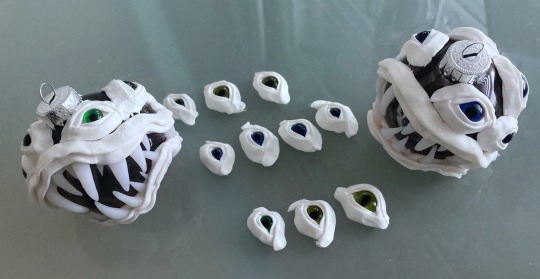
While this is baking the teeth and later the lips, you can prep the glass eyes. If your eyes come with wire hoops, clip those off and embed them in the Fimo.
I use roughly 9 glass eyes of different sizes per mimic.
I placed the eyes on a flattened bit of white fimo. Use white in any case if your eyes are see through: The white fimo here will make them look their colour. Then add lids. Same deal as with the lips, it's a fantasy creature, there is no right or wrong approach. Go wild.
Once the baubles with the lips finished baking and are hardened, place the eyes on the bauble, where you feel they might work for you.
Do that on ONE HALF of the bauble. Not both, will be hard to hold the bauble and not squish what you already sculpted if you do both halfs at the same time.
If you don't feel confident about how to get it right yet, start at the bottom.
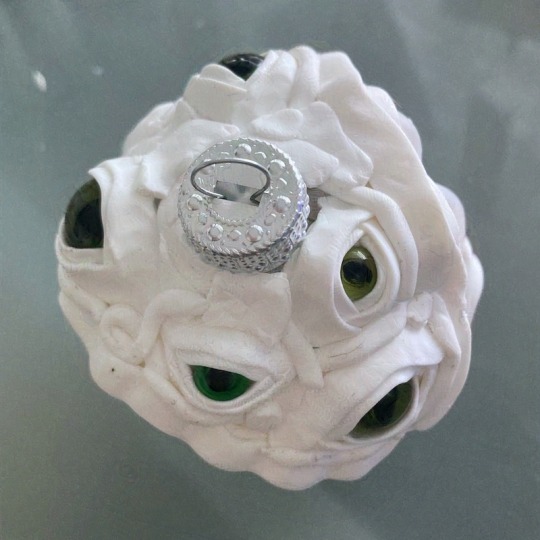
Fill the space between the eyes and lips with white fimo.

Smooth it. I used the back end of a round pencil for that, since I don't have tools for sculpting, I just improvise.

Add whatever texture you feel like. I like swirls.
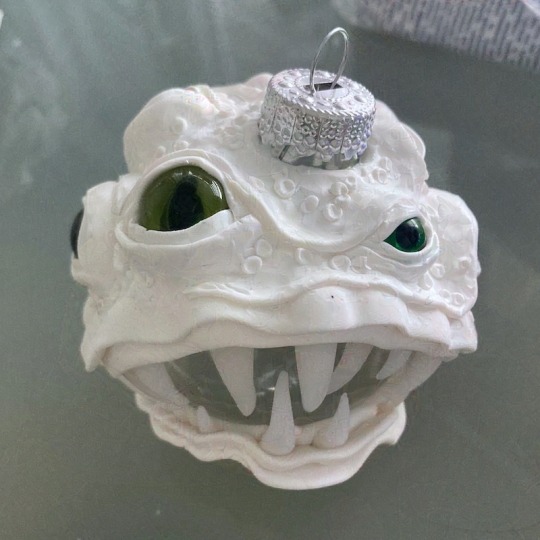
Since I'm not too great at smoothing out rough bits, I put some texture and warts on it.
One side done.
Bake at 100°.
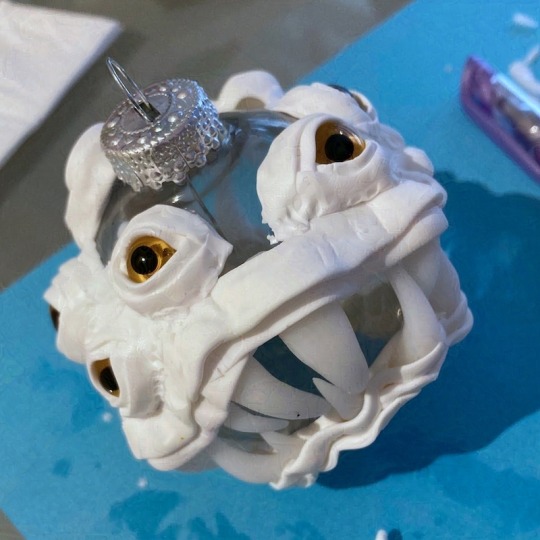
Careful, the glass eyes get hot and stay hot longer than the rest of the sculpt or the bauble.
Repeat the eye-fitting and sculpting on the other side. NEARLY THERE!
Bake at 100° for the last time! :D (yes, this is the same image every time. <3 )
Congrats to your finished mimic!
Personal request: please do share your mimics with me! <3 I would love to see them all~! <3
I only made six though. Dunno where the seventh one came from.
563 notes
·
View notes
Text
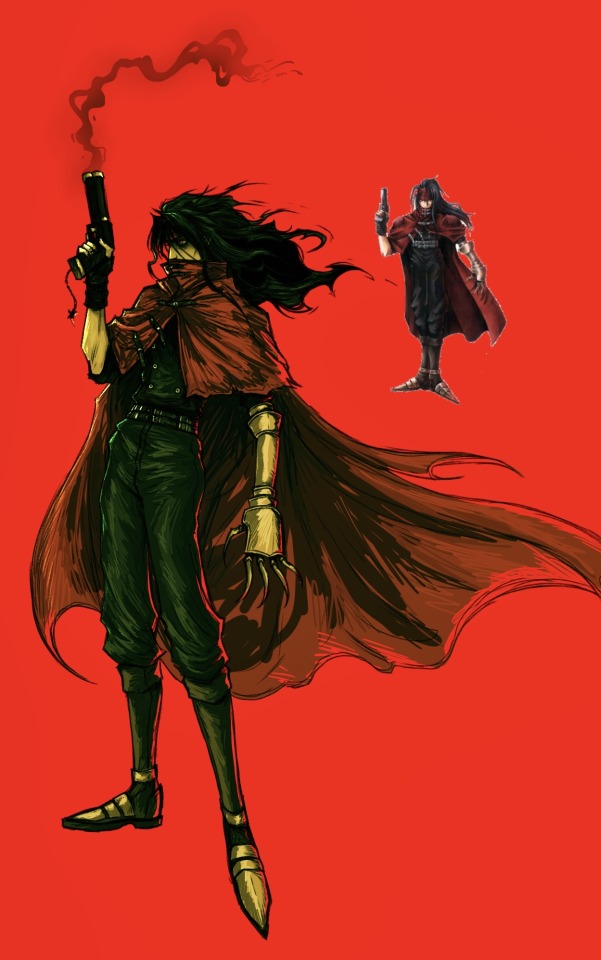
vincent birthday today :0
#happy birthday silly man….#he gives me a horrifying amount of gender envy Google how to become Vincent Valentine TUTORIAL#ff7#timmy draws stuff#fanart#digital art#my art#final fantasy vii#final fantasy 7#vincent valentine#ffvii#they need to show his face in rebirth I am rattling the bars of my enclosure as we speak
782 notes
·
View notes