#hopefully these are helpful <3
Note
hiya! do you have any writing tips to share ? i love your writing and your journey is very inspiring to me as a new writer!
hiii, darling! this is so sweet, and i love hearing about new writers <33 welcome, welcome !!
anyway, as for writing tips, i have a few, and some of them are about just like — prepping — whereas others are more writing or editing-focused. also, a lot of these are contradictory, meaning you really have to exert a case-by-case sense of judgment. a tip that make work in one situation/with one piece, may not work with another.
before we break into that — if you or anybody reading this knows they are best writing off the cuff and/or are a pantser who detests making writing a routine/ritual + works more successfully in what is akin to random spikes of energy, some of these tips won’t be super helpful. what works for me is being very constant and thorough.
also, disclaimer, i have no real certifications (yet).
write everyday, or: as often as you can. seriously, practice helps. not only with the cohesion of your work, but with your writing. playing around and engaging with words in some way every day is my biggest tip. and i don’t care if you sit there and churn out 8,000 words in one day or write a 47-word paragraph and call it a night, just touch it. write! sometimes i write 5k in a day and revisit it & it’s terrible, and sometimes i write 24 words before i decided i was too tired & return to some of the world’s prettiest 24 words. if you have time, always try and write.
planning, outlining, editing, etc. is writing. it absolutely is, and don't let anybody else tell you otherwise. however, if you are only planning, outlining, and editing what you have already written, then you will never finish anything. sometimes, you have to take your hands off the work & give it a week. sometimes, with outlines, you have to say fuck it, we ball, and start typing and see what happens. i am an excessive planner, so this is hard advice i had to learn, but there is almost never a necessity for every single comprehensible detail to make it into the outline as a.) the work will start to mirror that bullet-y feel of an outline b.) many of those little details will get cut anyway. just write. get off pinterest and write.
on that note, if you are an outliner, do try to include as much detail as you can into that outline - namely things you know are important to the overall scene and that you may forget by the time you go and write it. most often, for me, that means writing down lines of dialogue as i first hear them in my head, even if they are ultimately changed by the time i go to type/edit. sometimes simply saying: "then valerie explodes in anger" is enough of a cue, other times, i have to remind myself how, exactly, she explodes in anger. this is often because i plan and make outlines in clusters.
speaking of, planning in advance—while bothersome to the pansters of the world—will save you a lot of work in the long run. it's definitely guaranteed to slash your plot-holes in half. what i specifically do is make the outline for like 4-5 chapters at once, or however many chapters apply to maybe one "plot beat" or arc. this ensures that they're as smooth as possible and all connect well because they were all sort of penned in a continuous motion.
share your work. it's scary, i know!!, but share it. i don't mean post it - unless that moves you, then please do - but share it. ask a friend to read it, source out a mutual, search for beta readers on the internet, etc. depending on what level of criticism you ask for, other people's feedback is invaluable. writers are always too close to their work and their characters so things may seem like they make sense and/or are realistic when they may not be. other people may catch what reads awkwardly but otherwise goes unseen because you've read over the piece too many times. they can pick out typos, confusing moments in plot/characterization, or—positively, funny/cute/sweet/riveting/interesting moments that kept them wanting to read more and therefore might serve as some motivation. writers often love criticism, and they like to know how they can make the work better, but they also love knowing what makes the work good and what people want to see more of. for any invested readers or betas tuning in right now: the more specific you can make your feedback, the better. i don't know a writer that wouldn't appreciate some lines/passages/moments being specifically honed in and celebrated, because sometimes a simple "yeah, it was good" is nice, but...not enough.
give some space between writing and editing. a lot of writers will advise somebody not to edit something until they've finished it in its entirety (not to applicable to people like fic writers who are sometimes writing without a schedule, on a post-write-post-write-rinse-repeat schedule), but i don't personally follow this rule...? i don't feel complete moving on from a chapter that may be teeming with typos. i am, however, somebody who would write a chapter, call it a night, and let myself sleep before looking at it again. with this rewrite specifically, i would also only edit lightly knowing i had a massive overall edit later in the pipeline. but do give space. words start to blur when you've been writing for a while, and what reads smoothly when you're sleep-deprived might be alphabet soup when you're not (or vice versa!) [and if you are working on a real book, do try to save as much of the editing as possible for a finished draft, as i can guarantee you'll have to do some rewriting anyway, so there's no use in killing yourself for the shiniest sentence so early on.]
editing is also done best when it's done by somebody else, but don't be the writer that puts word vomit on somebody's desk and expect them to make sense of it. what you give somebody else to edit should always be in its best stage possible (unless it's like: hey, just read over this rq, which isn't really an editing task). wordy is okay. full of red spaghetti, as i like to call it, is not. spell check is FREE. for self-editing purposes: i recommend some grammar aids like grammarly, prowritingaid, and hemmingwayapp. the latter, even the free version, is really good for pointing out things like overly complex sentences/run-ons, an over-abundance of adverbs, too much passive voice, etc. i don't always listen to that last site when it highlights some of my sentences as too complex, however, as...sometimes they are just big sentences while not being difficult to read. always exercise your best judgment or ask for a second set of human eyes.
also for editing, if possible, printing out your work and doing it by hand is a really good way to visualize the work and to reduce screen-induced distractions. i find it especially helpful for cutting words. i don't know why. sometimes, it looks great on a screen, but then i read it on paper and picture what people would be snuggling up in their beds to flip through and have a new sense of "oh, that's not needed," "that's redundant," "that's gratuitous detail that can be summarized in one sentence instead of four," etc.
for massive rewrites, however, i typically abandon a pen and just open up two side-by-side computer tabs and go at it. i end up cutting words this way too usually!! or adding, depending on...
another editing tip: reading your own work aloud is always good. your ear really does pick up on things that your eye doesn't. but if you're like me and you don't want to sit there and read off thousands of words to your poster of insert favorite celebrity, or if you're in public environment/a home environment with too many overhearing ears, then text-to-speech software is amazing. i swear by it, particularly for determining if the flow of the text is good, and there are a bunch of free ones out there. the most realistic voices (AI) are typically ones you need to pay for, which i don't do (looking into this, however, just because it's so helpful for me), so i will make do with voices that sometimes sound like siri — but it works!!! when writers read, especially their own work, i think they have a tendency to edit and rearrange words in their head like a passage is an endless word scrambler, so turning off your visual cortex (besides like, following along with the audio) and just listening to the words as they are read to you sort of cuts that instinct off at the knees and shows that, no, it doesn't sound as awkward as you think it does. there will never be a reader who scrutinizes your words as deeply as you do, so it's reassuring to know that it sounds nice off the lips of somebody else. even if it's a robot.
lastly, don't neglect snacks, water, entire meals, homework, your social life (to an extent, sometimes i get it fr), your health, sleep, the bathroom, etc. you can't write when you're dead.
lastly, part 2, have fun with it!!!!!!
4 notes
·
View notes
Text
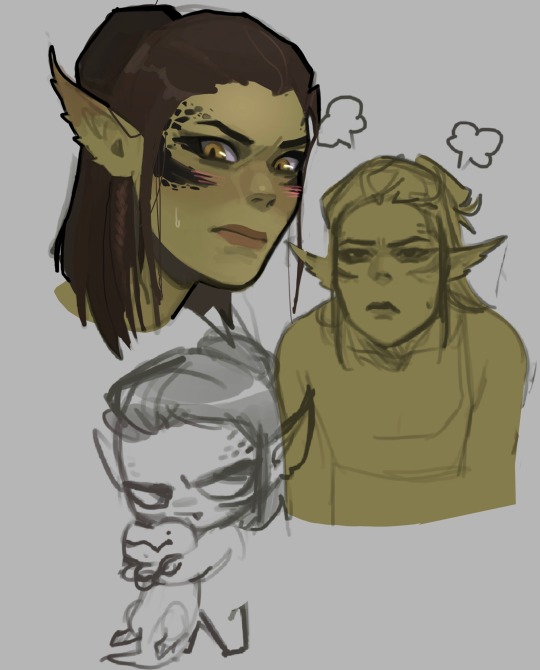
baby girl. baby
#lae’zel#baldurs gate 3#fanart#my art#space wife#this is a wip (hopefully)#im trying to learn how to color better (help me)
2K notes
·
View notes
Text
Sims 3 Gameplay Mods
I was going through MTS looking for mods to improve my gameplay and thought I would share the ones I downloaded!
Livestreaming Mod - Allows your sims to livestream from a PC for tips, blog followers, and celebrity points.
More Pregnancy Interactions - Adds more options for the pregnant sim and more social interactions with all age groups!
Yoga Mod - Allows your sim to do yoga and also lead a yoga class for simoleons.
Laundromat Fix - Actually empties the laundry hamper on your sims home lot when using a washing machine at a laundromat.
Dirty Laundry Mod - Gives your sim a negative moodlet when dirty laundry hasn't been washed in a few days. Gives more incentive to do your sims laundry!
Layoff Mod - Gives your sim a 2% chance at the end of every work day of being laid off. Depending on their work level they may get unemployment benefits.
Nicer Vendors - Overrides the default animations when interacting with vendors, looks more friendly.
Acne Mod - Gives teens-adults a chance of waking up with acne. Adds washing face options and applying acne toner at sink.
Sunscreen - Allows you to buy sunscreen from the store, will protect sims from getting a sunburn with Seasons installed. Works on vampire sims as well.
Restaurant Host Career - Allows your sim to work part time at diners/bistros as a host. Only 1 career level.
TSM > TS3 Facial Expressions - Overrides most s3 facial expressions with the sims medieval ones making them a lot more realistic and natural looking.
One With Nature - Allows your sims to sleep outside on ground, wash themselves in bodies of water, and go to the bathroom outside. Needs Nraas traveler mod to work. (Good for apocalyptic gameplays/adding realism?? haha)
Walk Cycle Edits - Overrides original walk cycles so there's no forced smile, allowing your sims to make facial expressions based on mood/surroundings.
The Randomizer Mod - Triggers more random events that effect your household. Adds more realism and can effects the relationships/friendships your sims have. (Can choose between which random event modules you want in your game based on play style!)
More Negative Moodlets - Negative moodlets cause a greater effect on your sims mood making it a bit more realistic.
#the sims 3#sims 3#ts3#simblr#sims 3 mods#I've seen more and more people playing their game on my dash#thought I'd help spice things up lol#I went through over 30 pages on MTS#hopefully y'all find some mods you wanna add to your game!
933 notes
·
View notes
Text


A character reference based on all four Steps of Our Life! It's only "sort of" a height reference as well since obviously they're not 100% accurate (the devs don't have specific heights for everyone to my knowledge).
I did dig into the code to try and get characters at their "normal" heights but there are other matters at play too (example: Nicolas is obviously "taller" than he should be because he needs to be pushed upwards to be visible enough above the game's text box; likewise with other very short characters).
Still, this should serve as either a nice reference guide for every character or a "height reference" in the sense of getting an idea of which characters are shorter/taller than others.
I'm also going to detail some extra notes below the break, including posts from GB Patch's Tumblr that reference any defined heights (with Cove being the obvious one) or general height things, as well as some more stuff about the MC's height in comparison to the three love interests depending on what you pick.
Cove's height is listed on GB Patch's FAQ as 4' 1" in Step 1 (also stated as "mostly average, perhaps a bit on the short side"), 5' 4" in Step 2 (in-game this is defined as "very tall" on the MC's potential height spectrum, as that is the only option considered on par with Cove's height), 6' 0" in Step 3, and 6' 4" in Step 4. A fun fact is that Cove's final height was originally 6' 3" (191cm) instead.
Derek in Step 2 is under five feet tall (this post also lists Cove as "around 5 and a half feet tall" which you could take as either close enough to 5' 4" as stated above or a potential original height he had that got changed). In-game, he's "short" but not "very short", as having your MC be "very short" will prompt narration telling you that you're shorter than Derek, whereas "short" only has you relate to him in smolness generally.
Step 4 Derek is "mostly average." He wouldn't be considered tall nor would he be considered short. His youngest brother Nicolas will "probably end up as a similar height to him" once he's more grown up.
Step 4 Baxter is "taller than average, but not especially tall."
I've been informed that, on the Our Life Patreon Discord, Step 4 Derek's height is listed as 5' 9" (175cm) whereas Step 4 Baxter's is listed as 5' 11" (180cm), so those are their defined heights. Before that, both of their heights had jumped around somewhat. A post from 2019 said that Derek was 5' 11", but a post from June 2021 said that Baxter was 5' 11" and Derek was 5' 9" (so consistent with the Discord). Then there's also another post from July 2021 (you'll have to scroll down for this one) that listed Baxter at around 5' 10" while Derek was 5' 8"/5' 9". If you're insane enough to try and use the character reference too, then Baxter would actually be around 6'1" at minimum since he's taller than Step 3 Cove (though you could also make the same argument that this means the mom trio of Pamela, Noelani, and Kyra must be decently tall as well since they're so close to Cove on the character reference).
I don't have any experience with GB Patch's other game, XOXO Droplets, so I don't know what ages the characters are in it, but since both Shiloh and Jeremy are characters seen visibly in Our Life, I thought I'd also mention that they're listed as 5' 10" and 5' 5" (or 5' 5 1/2") respectively in XOXO Droplets. Jeremy also apparently grows to 5' 8" in his 20s and he's 22 in the Our Life Cove Wedding DLC (I don't think this is spoken of in the game specifically but he's labeled as 22 in the code).
As for the MC and how their height plays into things, "tall" and "very tall" as well as "short" and "very short" tend to be considered the same for the most part in the game's code. It's not that there isn't a difference at all (I would say it's still notable), it's just that sometimes the game may be more vague about height differences. My post about Errands references this where you don't need more athletic points due to being "very short" instead of "short" to give Cove a piggyback ride.
A guesstimate I'd make is that about 5% of the time, the game will take note of whether you're "very tall" instead of "tall" or "very short" instead of "short." Otherwise, you're either "generally tall," "average," or "generally short." There are also other instances (usually with Cove) where the game might just check if you're either generally tall (around Cove's height) or not generally tall (i.e: definitely shorter than him).
This is actually relevant to the heights because, following all above information, one would assume that Step 4 Derek is average, Step 4 Baxter is tall, and Step 4 Cove is very tall going off the MC's potential "height spectrum" of very short, short, average, tall, and very tall, but it's not entirely the case.
A "tall" MC (generally tall) will look "down" at Step 4 Baxter just as he will look "up" at them or they'll look directly at each other if the MC is "average," same as Step 3 Baxter, but--
when the game has any instance of differentiating between "tall" and "very tall" (they never do this for Step 3 Baxter so the base assumption would have to be that he's just average height), things change.
During Baxter's apology in the wedding of his Step 4, Baxter dips his chin to look at the MC if they're "short"/"very short," levels his chin to look at the MC if they're "average"/"tall," and then lifts his chin to look at the MC if they're "very tall." A generally tall MC still has to lean down to kiss him if they choose to do so though.
Also, during the intimacy scene with Baxter (either in his office or his living room), if the MC is "very short," "short," or "average," it states that Baxter is taller than them. If they're "very tall," then Baxter is shorter than them, but a "tall" MC is "almost the exact same height" as him.
This is all a really long-winded way of saying that GB Patch referring to Step 4 Baxter being "taller than average but not especially tall" might mean that he's some infuriating middle ground between average and tall where he's not quite one but not quite the other either (which honestly is very Baxter of him so I can't even be mad).
#type: helpful#type: cracking the cove#our life#olba#our life: beginnings & always#((If you line up the images yourself then make sure the height of the original images are all the same))#((I don't know if Tumblr squished any.))#((Let me know if I'm missing anyone!))#((I know there's Step 3 Jeremy and someone named Cala in Derek's Step 4 (haven't gotten there yet)))#((but you only see those two on the phone so there is no ''default'' position/size for them.))#((Also I was worried that Tumblr would eat the quality if I uploaded such long images))#((so I separated Steps 2 and 3 and 4 into multiple images.))#((Hopefully that's fine; if you line them up side-by-side it still works out.))#((Me feeling so exposed because now how I design my Coves is here for everyone to see.))#((Feel free to judge my bias towards the color blue.))
657 notes
·
View notes
Text
not if it’s you.
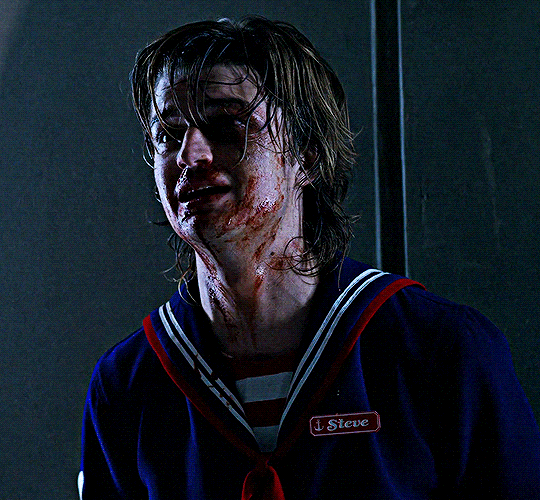
word count: 7k
summary: After the events at Starcourt Mall, you have a hard time convincing Steve that he’s allowed to be not okay. You want to take care of him. And if you harbour some more-than-friends feelings at the same time? Well, that’s nobody’s business but yours. [angst + hurt/comfort + friends to lovers]
You’re bone-deep tired.
The red and blue lights of the ambulance feel branded onto the inside of your eyelids, there even when your tired eyes slide shut. The cool metal on the ambulance door soothes your forehead and for a moment, head tilted against it, you could honestly just sleep even with all the noise.
It’s been a hell of a night.
You blink. You need to keep yourself awake, you’re not home yet. Gazing blankly across the crowded parking lot, reporters and townspeople milling between the yellow police tape, you can feel your brain begin to try to grapple with all the events of the night.
It’s like some warped horror flick of memories, parts of the film blacked out that you can’t quite recall. The elevator, the Russians, and some god-awful melted monster of people — even in your mind the image makes you shudder.
The longer you think about it, the more it feels like the stress is fusing with your bones, attaching itself to every cell in your body. It makes you shake, a forceful twitch of your head to put all the thoughts to rest.
Process it later. Make sure you can stay stitched together physically tonight. You must look a tad loony from the outside, twitching and shaking, but considering your night it’s more than warranted.
The gash on your arm is the worst of your injuries. A jagged stretch of torn skin that was gifted by one of the Russian soldiers who had hoped it would loosen your tongue. And when that didn’t work, the pliers nearly had — you would’ve told them anything when they took them out and lined it up with one of your fingernails.
But Steve then had done something stupid — kicked to get a guard’s attention since his yelling obviously hadn’t made a difference, let one of them lean down real close, and then headbutted him with all his might.
Relief had shocked your system, some broken cry as you slumped over when the pliers moved away. Fingers saved, if only briefly.
It had all turned to dread when they had lugged him out of his chair, preparing for round two of questioning. You had felt it then, a twisted gurgle of emotion lurched up your throat — violent enough it might have made you sick if you had managed to open your mouth. You hadn’t. There was a chance you would’ve said something worse, some jumble of feelings that wouldn’t have helped.
So, you had bit your tongue. Tasted blood and pretended that closing your eyes meant you couldn’t hear Steve pleading in the room over.
He hasn’t said much since the two of you had been sat in the back of the ambulance, gloved hands of the paramedics roaming over skin to find and treat injuries. There’s just one guy left now, still hovering around Steve with a flashlight and treating him with much less care than you’d like.
Steve looks as tired as you feel and when he can’t focus enough to look ahead, the paramedic prods his cheek unkindly. Steve winces.
“Hey,” you snip, cutting into the interaction. “Are you done? Can we go home?”
The paramedic turns the flashlight on you, blinding you for a moment. It confirms your asshole hypothesis of his character and you cringe at the brightness. It’s gone in the next moment, finally clicked off. He observes you both for another moment before an annoyed drawl comes out.
“Yeah, scram. But first you,” He jabs a finger at Steve who blinks but doesn’t react. “Lots of rest. No big brain work, no alcohol, and don’t run any marathons or anything.”
Steve nods, then grimaces at the pain the movement causes. You can’t help the wrinkle in your brow as you watch - you startle a bit when the paramedic turns his pointed finger on you.
“And you. His pupils are still dilated so keep an eye for seizure symptoms. Wake him every couple of hours and get a CT scan tomorrow.”
Some part of you is perturbed that he’s put you in charge of taking care of Steve. Another part gleans and blushes because you’d accepted the task the moment he’d asked, without question.
“Tomorrow?” You ask hotly, at the same time Steve says, “I’ll be fine on my own.”
The paramedic shakes his head, tsking as if you’re bothersome school-children not patients, and steps back with his hands raised. “Figure it out, I don’t care. I’ve got a dozen other people to check over.”
He winds around the door of the ambulance and leaves the both of you alone. A cool wind skirts through the parking lot, ruffling your hair. A sigh wrestles out your chest, a pathetic attempt to alleviate the tightness in your chest.
You don’t think you’ve ever hated the colours blue and red more than right now. The blazing colours atop police cars that flood the parking lot, the colours of Steve’s Scoops uniform, the colour of blood seeping into your pale blue shirt.
If you squint, you can see your own car parked alongside Steve’s in the distance — it feels like a lifetime ago when you had driven in and parked up. Your keys are lost down, down below you, taken in the interrogation. You stand to shake off that train of thought.
You turn back and offer your hand out to Steve. After all the blows he’s taken tonight, you desperately want to offer him kindness. Offer him a touch that doesn’t hurt, doesn’t make him flinch or wince. Steve stares at your hand for a long moment, eyes contemplating — and then puts his in yours.
He lets you pull him to his feet.
One of the police cruisers takes you to Loch Nora, Steve and you tucked away in the backseat. His hand is still in yours, barely holding it in his tiredness; when the car rounds a corner though, you can feel his fingers clench tighter so your hand doesn’t slip away.
They detach eventually when the wheels roll up on the curb outside Steve’s house, late in the night. Like the rest of the sleeping houses, the lights are all off. There are no cars in the driveway. The loneliness of it yawns out down the drive, like visible smoke plumes that escape every window.
Steve somehow looks tenser at seeing it; he still forces himself out of the car, bloody sneakers scraping against the gravel. You follow. It aches to move too much, even just shuffling out of the car feels like moving a mountain. The door clips closed quietly behind you. You hear the engine fade back down the road.
Steve is still stuck in place — you have a feeling he’s not looking at the house at all but stuck in thought, looking through the timber and paint and seeing all the horrors of the night. You step up beside him and gingerly reattach your hands.
It seems to surprise him, jumping ever so slightly at the touch and turning to look at you. “I didn’t...”
I didn’t think you’d stay. The sentence dies in his throat, a little embarrassed by how relieved he is that you’ve stayed with him - so much it shows in the quiver in his voice. Steve doesn’t finish it because then you’ll hear the other part of the sentence, even without him saying it. No one stays.
“C’mon,” you urge him to walk with you, beginning to drift up the driveway.
There’s no rush, you’ll wait as long as he needs to before moving, but it’s colder out tonight. Maybe it just feels that way with all your tiredness, the frostiness nipping at your skin. All your energy is focused on staying on your feet, on helping Steve. There’s none left to keep you warm.
He ambles after you like walking is an afterthought and following you is the priority. His sneakers drag, soft scraping noises with every step. You can feel his gaze burning into the back of your head, his fingers squeezing as if he’s checking you’re really still here with him.
The front door is unlocked and it’s only when it snicks shut behind you, do you wonder if you’ve overstepped. It’s awkward, but only a bit. You’ve been in Steve’s house before — though, who hadn’t with all his parties in sophomore year?
But not quite like this. Not just the two of you, and never holding his hand.
The events that had transpired last fall in Hawkins had thrown Steve into your life, along with a dizzying revelation of new dimensions and an unsettling truth about monsters that came right out of your nightmares.
Though, maybe it made more sense to say you were thrown into Steve’s life. You had always known of him - he couldn’t say the same about you.
Like the hoards, freshmen you had not been immune to the boyishly good looks and charismatic nature of Steve Harrington. Once upon a time, before someone called him King Steve and it stuck, there had been a crush.
But like red wine on white linen, with time — and plenty of distance — it had faded.
Not even the adventure that bound you two together, the tunnels that snaked beneath Hawkins and your shaky hands lugging him into the car, had been enough to reignite old affections. Not his insistence on you leaving the tunnels first, not even the way he clutched you when you all made it out. Not unscathed, but alive.
Pitifully, it had been his shoddy attempts at flirting in his ridiculous sailor uniform to kick-start your heart back up.
You had sighed, chin in hand, and leaned into the foolish feelings — because going crazy over a boy felt the most normal thing you could do. And after demodogs and slithering vines kept creeping from the past into your slumbers, normal was all you wanted.
But Steve needed you as a friend, more so considering his fallout with Tommy H and Carol had become permanent. He flirted with customers, every girl you’d recognised from your year, but never you.
It felt a good enough reason to bite your tongue. Keep him close, but never as close as you’d like.
But now you’ve done it again — been pulled along on another adventure that’s brimming with terrors that will take years to forget.
Everything feels worse this time round, a decay that ebbs away your hope. It’s somehow harder to heal from wounds that come from evil, but not the supernatural. It’s all the heavier when the boy who holds your heart made himself a punching bag so you didn’t get hurt.
The warmth of his hand, squeezing for only a moment, brings you back to the present. To now, still standing in the entryway to Steve’s house. You blink, coming back to yourself, and turn back to him. There’s a crinkle between his brow, and worry washed across his features.
“Are you okay?” He asks it tentatively like he’s afraid to spook you. It sends a rush to your system, a pleasant throb in your chest. You can’t deny you like knowing he worries. That he cares.
“Yeah,” you croak out, nodding as you speak. “Do you— I mean, you don’t mind me staying, do you?”
Suddenly, the potential embarrassment of inviting yourself in, even with the good intentions of taking care of Steve, is overwhelming. The next words tumble out without thought.
“I just, I don’t want to be alone right now.” It’s a bit hurried, tinged with nervousness. You stammer. “And I don’t want you to be alone right now.”
Something like pure affection blooms in Steve’s chest at your words, the heat of it stealing his breath and pain for just a moment. It’s a different sort of ache in between his ribs, something white-hot and pure.
He hadn’t been able to voice his relief when you’d gotten out of the car and stayed with him — and it fails him now at your admittance.
You don’t want to be alone. You don’t want him to be alone.
Steve doesn’t think he’s deserving of your good will, nor the kindness in every touch. He can’t help how he consumes it greedily, drinks in the touches like he knows it’ll be taken from him soon enough. His eyes stay fixed on you.
There’s something so alluring about your silhouette, the golden street light let in through slits in the door. It halos you, soft amber that softens every curve. You’re enchanting, even when bloodied.
Steve’s not sure his heart has felt like this before — so molten hot, valves working overtime, ribbons of affection tied tight across his chest. He’s sure they’ll leave scorch marks, testimonies to his bleeding heart that pulses with each beat for you, for you, for you.
Because you’re still here and something in his trodden on heart perks up before he remembers to crush it. It’s not that Steve has never thought of you as more — god, the mere thought of you as more to him.
More than a friend, more than this, it’s enough to make his head spin. To make his hands shake and return a nervousness to his system he hasn’t felt since sophomore year when he first laid eyes on Nancy Wheeler.
But you’re not Nancy. In the best way, that makes all the difference,
You were some breath of fresh air, bursting into his life in all the middle of his estranged drawn out break-up with Nancy — brash in all the right ways, kind when he needed, and far too soft to be tangled up in any of this mess.
You’re still too soft for it now, and it shows in the jagged cut torn into the fabric of your skin — it doesn’t matter how it happened, Steve still feels like it’s his fault. It’ll scar, red puckered skin that twists down the expanse of your shoulder. A living reminder of the night burned into you to carry forever.
It hurts Steve maybe more than he’s warranted to. You’re both just friends.
But when Steve thinks of how he’s accidentally pulled you too close, put you first in the heart, it aches evermore.
He’s not sure when you went from barely a friend to this — you’re a crush, an Achilles heel, the unattainable from the moment he met you, the moment he knew you. Steve feels like he’s been building himself towards you, pushing his growth to aim for anywhere near enough for you. You’ve been too good for him from the start.
It doesn’t stop him from loving you.
Steve realises after a moment that he hasn’t said anything when your fingers start to slip from his. His grip tightens to keep your hand in his.
“No, I— Stay. I...” It’s a struggle to say it, too many years of suppressing any urge to ask for comfort. “I don’t want to be alone, either. Or for you to be. Stay.”
Your lips, chapped and still with a hint of blood, twitch into somewhat a smile. “Okay.”
This time it’s Steve who drags you along, both slowly moving up the stairs. Each step threatens to reopen the scabs that have only just begun to form. It’s like some micro-dose of torture, Steve thinks, hearing your winces behind him.
The fluorescence of the bathroom lights is bright enough to make your eyes fly shut. Steve’s braver, taking only a moment to pause. He ignores how the lights dance, a sickening comparison to his experience with the drugs that had barely left his system. Though it’s the last thing he wants, Steve drops your hand to begin his search.
When your eyes blink open, prepared to face the lights, you’re a bit perplexed to see Steve hunting through the linen cupboard. He produces a towel, white and fluffy.
You cringe internally at the thought of sullying the pale colour with blood but it’s but a blip in tonight’s problems. Besides, the Harrington’s could certainly afford to replace it.
“Here.” Steve murmurs. You both seem to have agreed to keep softly spoken for the night.
He presses the cotton into your hands as he walks, ready to shoulder out and take care of himself. There was an en-suite in his own room — and sure, it would hurt like hell rinsing his wounds but he’d done it last year. Blasted the heat so he was wincing at the burn atop his skin and not the ache underneath it.
“Steve?” You question, turning and halting his feet. He pauses, confused by the questioning expression on your face. He gestures to the shower, hiding how the movement makes his ribs sting painfully.
“You can shower here and- and the guest room’s all made up.” The words trip a bit on the way out, weakness beginning to weigh on his voice.
Somehow being back home crumbles his walls sooner than he’d like. Tonight has been heavy, a burden that lies thick on his shoulders and creeps down, taking root in his muscles.
But Steve will do what he had done last year; take the punches, burn them off in the heat of the shower — hot enough that he can’t feel any tears — and then deal with it.
“No, s’not that.” You shake your head, a strand of hair coming loose. “I... What about you?”
What about all the blood? The bruises and cuts? You’d seen the scars littered on the skin of his face from Billy, cuts that had healed wrong and left marred skin. Wounds left uncared for, only healed with time.
The question only begs more confusion from Steve. He gestures to somewhere behind him as he says, “There’s another shower, don’t worry.”
He pulls a smile to ease you. It wobbles at the ends of his mouth. Something claws into your heart, a profound heartache at the thought it doesn’t even occur to Steve to take care of himself.
“Steve,” you begin, beginning to get a sense of the wall you’re encountering.
Steve Harrington has some very thick defenses and not without good reason; they’ve got him through some treacherous times. Even now, he uses it like a crutch, a seal to hide away horrid memories. Ignored in favour of temporary strength.
You don’t need his display of strength — you’re not one of the kids that needs to be shielded from the reality that even Steve has a breaking point — certainly not when his state is far worse than your own.
But you have a feeling he doesn’t know how to switch it off. Steve doesn’t seem to understand what you mean when you say you don’t want him to be alone.
“Steve, you’re not okay.”
“I’m- I’ve done this before, alright?” He insists, eyes darting between yours, features turning stonier. You can see his defensiveness begin to curl his shoulders in. “I’m alright, I promise.”
“Are you?” You say, not unkind. “Tonight was— Steve, you were tortured.”
The effect of your words is instantaneous. Steve’s face falters, his icy expression dissolving with a shudder he can’t stop. You watch it warp him painfully, jaw clenching and eyes misty; he blinks furiously to clear them. You continue.
“You can’t just- just bounce back from that. Nobody can.” You shake your head as if it proves your point. “It doesn’t matter if you’ve done this before, this— this is a lot for anyone, even—”
“Well then, why are you still here, huh!” His words interrupt your own, tone angrier than you’re expecting. “If this is so much!”
His chest rises and falls quickly, brows draw together like it hurts to breathe so harshly. The words don’t sting, but his tone does. You reel in your hurt and focus past his anger, focus on what it really is.
A final line of defense. A ploy to make you upset or angry, to make you emotional enough to storm out and leave him to lick his wounds alone. Another way to ignore it, compartmentalize what happened instead of facing it head on.
Maybe it’s cruel of you to make him deal with it so soon. But you care, too much to pretend to ignore his pain.
“Steve.”
“Don’t.” It wobbles, voice weak. His anger has already drained away in a moment.
“You’re not alright,” you insist, voice barely above a whisper. “C’mere.”
You don’t give him a choice, your free hand reaching out to snag his own, which hangs loose at his side.
Steve stumbles forward as you tug him back into the bathroom. Without his anger, he’s pliant and goes without protest. Your gentle fingers on his chest nudge him in the direction of the sink, the cool porcelain pressing through the back of his soiled Scoops top.
“Can you do something for me? Can you...” You bite your already bloody lip, nervousness sketched across your features.
How can you say this without giving too much away? It feels too intimate, like flying too close to the sun, well within the realm of potentially hurting your own feelings. You’ll do it for him gladly.
“Can you just...let me take care of you?”
It hurts like a sucker punch to the gut. Like a breath has been forced out of his chest, because when was the last time someone has asked him that?
Silence stains the air.
“It won’t be pretty.” He croaks finally, still giving you an easy out. Still prepared to spare you the ugliness of his emotions.
“Doesn’t matter to me,” You respond, lips twitching. You bare your heart and half hope he sees it — sees it and knows he’s loved when you say, “Not if it’s you.”
Another beat of quiet.
“Okay.” Steve breathes, so faintly you barely hear it. Then as if you’ll rescind the offer any moment, he nods fervently.
Your smile is genuine, maybe the first in hours and something in you relaxes. He won’t fight you on this. He may have taken the beating earlier for you but, at the very least, you can do your best to patch him back up — let your hidden feelings translate into a gentleness he so very deserves.
It takes only a quick rummage beneath the sink to find a first-aid kit. It feels wildly underprepared; an afterthought purchase once upon a time that was only ever intended for scraped knees. It hasn’t ever been opened. The tear of the zipper is the only noise in the bathroom, bouncing off the tiles.
As expected, there’s not much in it. It contains a box of plasters in multiple sizes, one roll of gauze, a bottle of antiseptic, and a mixture of other pills and eye drops.
Some loose safety pins rattle around in the bottom as you take inventory. It’s not stellar and you’re no doctor, but it’ll do. It has to do.
When you finally look up, wondering where to begin on his injuries, Steve is regarding you with a look you can’t quite name.
If you were sure of yourself, you might call it awe.
You tell yourself it’s because you’re here, helping him, and it can be awfully easy to mix up feelings when you’re getting stitched up. You don’t let your hopes rise, not even for a moment.
Steve’s blood sings, ears rushing with the sound of it when you step closer. You’re so damn close. Steve can’t ignore the scent that carries with you, his brain involuntarily committing each detail of you that he can get to memory - lest he never gets you this close again.
You want to take care of him; Steve thinks this might be a dream.
Nimble fingers work to gather some cotton with antiseptic and then you’re holding it up, posed, and ready to mend.
“Can you sit up on the counter?” You ask, all sweetness. Steve obliges easily, despite the protests from his sore body that cries out as he shifts up. You smile, then warn, “This might sting.”
It’s overwhelming as you step closer, between his legs, and take the cotton to his face with a gentleness Steve hasn’t felt in years. His eyes close instinctively.
It does sting. The wince leaks out through his clenched teeth, soothed instantly by your soft apologies that pour out like honey.
For a moment, it’s easier this way; with his eyes closed, Steve can pretend this is usual. That when he gets roughed around, there’s someone to tend and clean his wounds — instead of just himself and the harsh rinse of the hot shower.
He tries and fails not to think of last year, his poor attempts to patch himself up. Hands too shaky, touch too rough.
The memory bites. The injuries of tonight somehow feel worse. A tinge of bile taints his mouth and Steve swallows it back down, concentrating on you.
You’re not quite humming but soothing noises, low and soft, come from your throat. Steve’s not even sure you know you’re doing it. His hands clench emptily as his side — the split knuckles make them hurt and when you’re this close, the itch to hold you is near unbearable.
It doesn’t take long for the first cotton pad to turn a violent shade of pink. Steve’s face looks a tad clearer than before but uncovering old blood means finding new wounds.
Your stomach burns pitifully as you take them all in. There are too many to count, a thousand different hues — broken blood vessels that run in all directions, little labyrinths under his skin.
Why does it hurt so much? Even with your bound shoulder that still sends out pain with every motion, it all dulls away when you look at Steve. Lashes fluttering, eyes still closed, marred with wounds you’re begging to ease. You know it hurts so much because you care.
Love is pain, you suppose, with only a twinge of bitterness. It’s swallowed instantly, consumed and disintegrated by the fact you get this. The boy you love, between both palms, trusting you to take care of him.
A year ago, you’d met only the steely exterior he’d put up — and thought it had simply been remnants of King Steve. Maybe Steve Harrington was as much of an asshole as half the town said.
He was all bite, glowers, and clipped answers. With time though, he’d softened like snow melting in the sun; all the parts of him trickling into your life until he was cemented by your side.
He hadn’t even let you patch him up after the scrap with Billy that had taken him out. You hadn’t felt you could ask.
But this time...your throat grows a bit thicker at the trust that binds the pair of you. Affection rushes your system and forces a sharp inhale from your lungs. You step back.
The space makes it easier to breathe. Dials down the chances of pressing your lips against his skin — if only to give him a mark born of love. Hands searching through the first-aid kit again, you produce some painkillers and locate an arnica pill.
You give yourself one more moment; inhale and withhold the tidal wave of devotion that begs to spill from within you.
“Take these, please.” You say quietly, uncurling one of his fists to press the pills into. He swallows them dry.
You prep more cotton and begin again with the gentle touches, coaxing off dried blood. This time, Steve’s eyes stay open. He watches you, an unreadable emotion in his eyes.
You work away the blood from a cut above his eyebrow and when it’s clean, your thumb follows. You caress along the broken skin as if you could meld it back together with pure will.
Steve’s chest grows tight. Something about you being here, taking care of him makes the night’s memories all too present. Nausea sways in his gut. It’s impossible to shove them to the back, to press them down, when it feels like each cut is being reopened. Cleansed with a douse of love.
You’re altering the history of each wound but to do so, he has to recall how each of them was carved into his skin. It hurts. Why are you still here?
Steve’s head pulls back unexpectedly, eyes shuttering closed in a scrunched expression. You startle a bit.
“Shit, I’m sorry — too harsh?”
He makes a strained noise, effectively gutting you with it. If you weren’t so close — an inch further and you could press your forehead to his — you wouldn’t hear it. Hear the tiny whisper that scratches out the word, “Why?”
“What?” You whisper. You don’t understand.
“Why...Why are you...?” He’s clearly struggling to find the words he wants. His hand reaches up, fingers brushing the bridge of his nose before he drops it again. His chin quivers. It stops your heart for a moment to realise he’s crying.
“I don’t— I don’t understand.” Steve grinds the words out, voice thick. A tear splatters, seeping into the blue of his uniform. He won’t look at you, eyes trained on the loose thread on his shorts.
“Steve?” you murmur, wary and heavy with concern. This is— you don’t know what this is.
“I don’t understand.” He repeats, shaking his head slightly. He seems to choke on the next words. “You’re still here. Why are you...? Everybody...”
He trails off, some whimper of sorts forcing its way out his throat. You’re stuck, absorbing each of his words and putting together the pattern that Steve can’t seem to voice. I don’t understand. You’re still here. Why are you...? Everybody... Everybody leaves.
Oh.
Rich King Steve who’s got it all. The house, the car, and any girl he fancies, all of them fawning for a look from him at one of his legendary parties.
His lack of parental supervision had been lusted over in high school, furious whispers of envy over the fact he could get away with parties every weekend. That booze went missing and he never seemed to catch any shit for it. It occurs to you now that nobody was around to notice.
The absence in his life is vast and suddenly blindingly obvious — a chasm in his chest that is bleeding all his secrets to you.
Steve Harrington is lonely.
When you surge forward, injuries be damned, and your arms loop around his neck, there’s a moment of stillness. You can feel the tension in his muscles, hear his ragged inhale, and then— he sags into you, finally, finally letting himself lean on someone else.
His arms wind around your middle in a desperate motion, tugging you closer and the fabric of your shirt clenches between his fingers. His face buries in your neck and hot wet tears soak the collar of your shirt. You can hear his raspy noises, soft cries as he clings to you like a lifeline.
“Why did this happen to me?”
It fucking hurts to hear. You don’t know how to tell him there’s no why — that there is no reason that can justify why he’s gone through this much suffering. Just the bitter fact that, sometimes, bad things happen to good people.
“Steve,” you feel like you’re saying his name an awful lot tonight. You say it because you can’t begin to think of how to answer his heartbreaking question. “I—“
“I-I used to think,” The words are muffled into your neck. His grip on you is nearly tight enough to hurt but you don’t dare relent any space. His voice is barely above a whisper, just loud enough to hear. “That- that it was like karma, yanno?”
“Steve, no,” you whisper, horrified. If he hears you, he doesn’t show.
“B-Because that first time,” He’s stuck on some belittling ramble about himself, continuing between his sniffs. “I definitely deserved it. But then I grew and I changed.”
Something twists painfully in your stomach.
“And then last year, it made sense, yeah? Billy, he was— a real piece of work.” He sniffs again, his voice a little harder at the mention of the deceased.
The tension falls away at the next sentence, voice wobbling through the thickness in his throat. “And I used to be like that, so—“
You pull back instantly, hands shifting back from around his neck. It effectively halts him, and whatever he was saying dies in his throat. Your hands move to cradle his jaw and, as lightly as you can with his injuries, you tug him from his hiding place and stare him in the face.
Steve’s eyes look bigger and browner full of tears. His nose is red, just the tip, and runs messily at the onslaught of tears. Pink splotches bloom underneath his cheeks, patchy and warm, his face etched in complete misery.
It wrecks you to see. More so to think he’s been shouldering all this alone since ‘83.
“People don’t deserve suffering, Steve.” You state it strongly enough that he can’t refute the truth, punctuating with your thumbs on either cheek, pressing light touches.
“You don’t deserve suffering. You never did.” Your voice quivers a bit, some shred of your heart shriveling pathetically at the fact you even need to tell him this. Your hands shake ever-so-slightly. A hot tear streaks down your cheek.
Steve crumbles. You don’t resist when he drops his head down, only move back in— offering a place to hide away again. You let him stay hidden away, a sanctuary in your arms, safe when he’s buried in the curve of your neck.
“And- and just ‘cause,” you say, sniffling a bit now. He holds his breath, a sharp inhale that quietens his whimpering crying. “Just ‘cause no one has stayed before doesn’t mean you don’t deserve this, Steve.”
His fingers press harsher into your back and your feet stumble a bit, pulled off balance. Adjusting your arms, you pull him tighter yet, hoping that the closeness will make all your sentiments seep in. Your shoulder aches terribly; you don’t dare move away.
“You know that, right?” You whisper, unable to stop your fingers from grazing the nape of his neck softly. “You deserve to be taken care of.”
A soft kiss to the side of his head, barely noticeable between his shakes, but it eases the strain on your heart. Time wanes and melts beneath the glow of the bathroom lights, an unending amount of tears that you suspect reach back further than just the memories of tonight.
You stay like this, holding him close. You give him all the time he needs, sweet nothings mumbled until he feels strong enough to face you— to face the world.
Eventually, Steve’s breathing slows, crying turning to trembling gasps. When he finally does retreat, you curse internally because of course, only Steve Harrington can still look devastatingly beautiful after crying.
Tears cling to his lashes, sparkling reflections. He wipes his nose on the back of his hand.
Silence ebbs. Steve gathers himself, another sniff, and wipes his nose before he lifts his head. You can see in his face the moment he’s about to apologise; the word sorry is about to come tripping out his mouth. You beat him to it.
“I’m sorry to inspire more tears,” Your voice, still quiet, aims for a comforting jest. “But I’m not quite done cleaning you up.”
You twist the cotton between your fingers to show him. Steve blinks, eyes focusing on your hand, perhaps surprised you’re still taking care of him. He forgets about his needless apologies.
“Though, your tears did a lot of the work.” You say cheekily, a smile teasing at the edges of your lips. It makes him huff a laugh. Steve could nearly cry again; you’re so nice. He thinks about the last time cried, thinks about Tommy’s sneer, his scoffed words that told him toughen up, King Steve.
He lets you wipe them away, clear his face and patch it up as best you can. Any tension from before, the mental barb-wire defenses he had still held up to keep you out, has ebbed away. It’s softer now, easier between you two.
Trust flows from Steve in the form of his allowance, letting you fuss. It flows from you in the form of your touch, which still dances too close for just friends. You let your fingers dot the kisses across his face since you can’t.
“You’re good at this,” Steve murmurs, breaking the silence. He allows himself the privilege of your touch, his fingers burning where they graze your sides.
Patching people up? Injuries from last year made sure you got decent practice on yourself. You’re decent, you’ll admit.
Maybe he means taking care of him. You’re proving to be very good at that.
You want to. Somewhere rooted in feelings that sway closer to love, genuine love, is the urge to be the one who does it. The shoulder to cry on, the one who carries his woes when it gets too much — and you want him to do the same for you. Achingly, you want to take care of him; and him, you.
The thought burns so viciously through your chest, you sink your teeth into your bottom lip a bit meanly. It stings.
You don’t notice it, trying to rein in your drifting heart that sings to be closer to him, but Steve does. His fingers twitch; he wants to rescue it, pull it from your harsh grip with his thumb.
He does.
You stop moving.
His thumb is calloused, a bit rough against the supple plumpness of your bottom lip. The blood beneath it tingles, gloriously hot at the attention. Either all the air in the room has been sucked out or you’ve stopped breathing.
You’d hazard a guess it’s the second, given the stillness your body has taken on. Muscles locked, eyes frozen on his face — the only part of you that moves is your heart, thundering pumps going far too fast.
Steve’s gaze stays on his thumb on your lip. You’re desperate to find out what to call the emotion swimming in his eyes.
“Steve?” you say his name yet again, lips moving against his thumb. He blinks like a frog, one eye after the other, and drags his gaze up to your eyes.
His hand shifts, brushing across your mouth to hold the side of your jaw, cupping it sweetly. The cotton falls from your grip as Steve urges you closer with a gentle tug.
Then his eyes are back on your lips and even though it feels like slicing your own heart open to do it, you speak before he can kiss you.
“Please don’t,” you whisper, eyes crushing closed.
You want to terribly. The want for his kiss warbles from deep within you, a yawning ache. But it might just finish you off if it’s all heat of the moment — a kiss that is just some twisted thank-you because Steve isn’t used to being taken care of.
You clear your throat, swallowing heavily. “Not— not if it’s just for tonight. Not just because I stayed, please.”
There’s a pause. His shaky exhale breezes across your face. It’s possible your ears might be ringing as if straining to hear the sound of Steve’s heart— dying for a clue to what he’s feeling. You’re not brave enough to open your eyes and read it in his face.
His thumb scrapes across your bottom lip again and then— then, he kisses you, impossibly tender.
The tiny gasp that escapes you is consumed instantly, swallowed up by Steve’s kiss. He kisses gentle, touch so soft that it has you searching for more the moment you’ve got a taste of it.
You barely get a moment to lean into it, to kiss him back before Steve breaks it. He hovers close, close enough that you could steal another taste of his lips if you wanted. You want to— the ferocity of your eagerness sends a shiver along your spine. He speaks before you seize the opportunity.
“I want to.” He says, voice a bit raspy and the words inspire enough bravery to look at him, eyes creasing open. “I- I’ve wanted to for a while.”
You nearly sink in your relief, knees trembling for a moment as your hand comes up to enclose the wrist of the hand that holds your face. Thumb sweeping short strokes, you clutch the tan skin and lean into his caress.
“You mean it?” You whisper, far too excited. Your heart may as well be on your sleeve, cards once played close to your chest now splayed on the table. Your tone reveals all, spilling with hope, even as you ask whether it means the same to him as it does to you.
Yes. The word seems stuck in his throat, suddenly too thick to speak. Because it’s only three letters and that can’t possibly cover what Steve means when he says I’ve wanted to for a while.
That you’d somehow snuck into his life and intertwined among all of his heartstrings, like spun gold mixing until the whole organ felt terribly tangled in a way he’d never want to change.
Nancy had given him the thump of his head.
But you? You were the thump on his heart. Not a push for change, nor for growth — but permission to grant himself a second chance in love.
“I mean it.” He says, emotion coating each word. “Yes, god, I really mean it.”
And you let him tell you over and over again with his mouth pressed to yours, searing kisses that make your head dizzy and pulse speed.
Steve knows he’s not alright — not physically or mentally after what he’s faced tonight, not with the vice grip on his chest that had clung tightly and all the ugly parts of him had all slithered out for you to see.
He also knows that he will be alright, sometime in the far future.
When wounds have healed, when scars are beginning to fade, and the nightmares start being every couple of nights, instead of every night, then he’ll be nearly okay. It’ll take time, lots of it.
But when your gentle hands coax him to bed and you slip beneath the covers beside him, leaving a warm quick kiss upon his shoulder — Steve thinks that, maybe, that future isn’t nearly as far away as it seems.
Your hand finds his under the sheets, twisting your fingers together to act like an anchor in the inkiness of the night.
There are no nightmares that night.
—
tags below!
@hawkinsindiana @harringtonbf @spideystevie look technically there’s no tags this is just all da bitches i’m always talking to <3
#if anyone talks to me about tenses i'll come out SWINGING#not even grammarly could help me w that <3#hopefully HOPEFULLY this is considered in character steve#in any case i spent a wee while puzzling interactions & reactions so at least u know i tried !#its hard to pick a relationship dynamic that would work for him being surprised ur here??? while also getting a lil confession in there#i think its cute#maybeeeee lemme know what u think? hehe#anyways steve HONEY u deserve to have someone kiss all the wounds#and let u sob in their arms and yanno i VOLUNTEER#GIVE HIM TO ME AND ILL TREAT HIM RIGHT!!!#babygirl cries in this... heartbreaking but had to happen#ruby writes#ruby writes steve#steve harrington#steve#harrington#steve x reader#steve harrington x reader#steve harrington fic#steve fic#steve harrington imagine#steve imagine#stranger things#stranger things imagine#stranger things fic#wahoo#i cannot help but post fics the moment they are finished#idc if its like thursday for all u fuckers#come get ur hurt/comfort nowwww
4K notes
·
View notes
Text
Another bonus to learning a fiber art is being able to speak to others in a Lovecraftian language that nobody else understands...
...and also being able to read things like THIS:
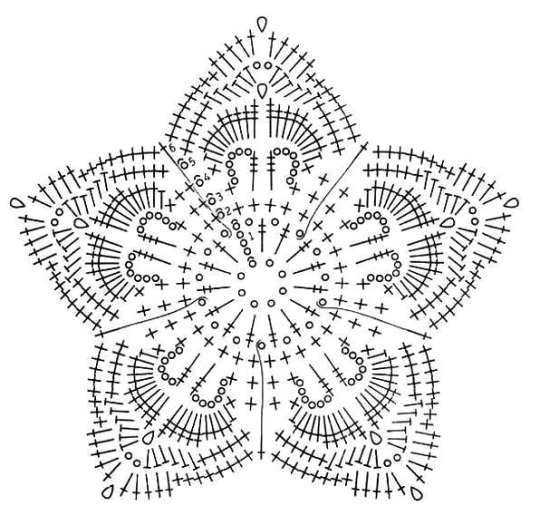
#art#crochet#fiber art#described images#image description in alt#used a crochet pattern for this because it's just INSANE#see i can recognize some of these stitch markings but i haven't done them all yet#i actually kind of prefer the diagram pattern because it actually shows you the shape and the way stitches compliment the piece#with a 'normal' pattern (e.g. 1 dc in fifth ch from hook ch 2 4 dc) i understand it sure but. it isn't the same.#i was reading somebodys recommendations for tapestry yarn and understood all the abbreviations and what they mean#plus i feel like diagrams can be a great way to teach you not only how stitches look but how they contribute to the larger piece#one of my crochet proficiency goals is to be able to look at a piece and know instantly what made it#*cue me at the store analyzing a crochet piece so i can replicate it for 5× the cost*#if you're selling a crocheted piece for like $20 then it's my imperative to replicate it and not buy it 🫡#i think that has the same moral implication as like... 'proplifting'#did crochet as the example because thats what i do as a fiber art. if theres a similar thing for knit/weave/ect then DROP IT BELOW I BEG YO#i want to learn all the lovecraftian languages of the fiber artists <3#i feel like describing the image in exactly what stitch marking indicates what would have been too much so hopefully the explanation as to..#...what the diagram DOES and how it visually indicates a pattern was helpful <3
821 notes
·
View notes
Text
learning to spin on a drop spindle: a beginner’s lengthy yet comprehensive guide
I put this monograph together for a friend, but many other people wanted to read it as well, so here it is !
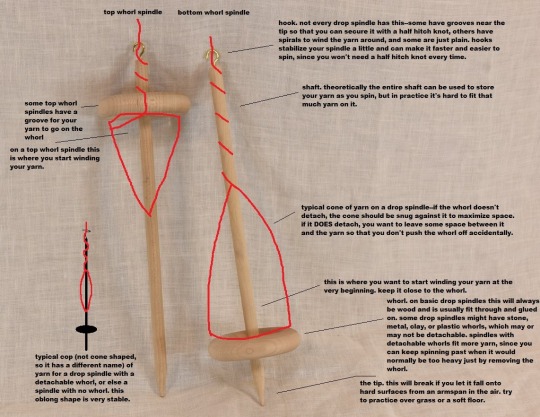
Fig A: Parts of a Drop Spindle. (image source. notes are mine. Click for higher res !). Apologies in advance for the lack of image descriptions--for the most part I use images because I can’t figure out how to describe the thing in words, so describing the images is kinda the whole issue. If anyone wanted to write them for me I’d add them to the original post in a heartbeat !
How to Get Started Drafting and Spinning
So, you have your fiber and your spindle--now what ?


Friendly pre-tutorial reminder that radfems can fuck right off if they think I’m writing any of this for their benefit. I’m not. I hope they all choke on their spindles <3. This is a safe space for trans people first and foremost.
(Check out this post that goes into picking a spindle and your first fiber, if you don’t have one yet)
First, you might wish to practice drafting a little. Drafting is the process of drawing the fibers out from, for example, a strand of roving or a rolag, into a thinner, airy length. To draft, loosely hold your fiber in your dominant hand, and pinch the very tip of the fiber with your thumb and forefinger of your non dominant hand. Then gently pull. If you pull all the way, you should notice that your fiber detaches from the fiber source eventually. For yarn, we want very very long lengths, so we don’t want that to happen. To get a continuous length of drafted fiber, simply change where you’re pulling from as you go. For example, you can draft out 2 centimeters/1 inch of fiber, and then move your fingers 2 cm/1 in back toward your fiber supply, and draft again.
The thinner you draft (or pre-draft*), the thinner that fiber will spin up. Once we start spinning, you’ll see how adding twist immediately compacts the fiber quite a bit, so you need to draft much thicker than you actually want your yarn to be. When pre-drafting specifically, if in doubt--draft thicker. You can always draft it out a little more as you’re spinning.
Figuring out how to draft smoothly can be one of the harder parts of learning to spin, but even before knowing how to do it perfectly you can still create good yarn.
Check out The Joy of Handspinning website to see drafting in action, as well as several different types of drafting.
Also check out this video explaining pre-drafting roving. 1:00-2:30 is especially helpful. If it’s not clicking from this video, search youtube for “pre drafting fiber for spinning” and watch til you have a better understanding.
*pre-drafting just means drafting before spinning--so it’s the same type of thing as drafting while spinning, but without having to wrangle your spindle at the same time. I’d recommend pre-drafting at least a bit of your fiber until you feel comfortable doing it. Then you can spin with your pre-drafted fiber, and it’ll be easier than if you hadn’t pre-drafted.
Tips: If you have a bottom whorl spindle, you may also want to practice spinning the spindle before it has any fiber on it, just to get a feel for how it moves. You could do this with the bottom point in a bowl or on a flat surface like a book or table. Try rolling the top of the shaft between your thumb and index finger. Don’t worry about it toppling over frequently--your spindle will be suspended by the yarn that you’re spinning, so it won’t topple !
If you have a top whorl spindle, you might have a harder time getting it to spin without being suspended, because the center of gravity is so high. Instead, try tying a piece of thread or scrap yarn to the hook (if it has one) or below the whorl (look for figure B below) and secure it with a half hitch knot. Then try spinning it like that, and let it hang freely to unwind itself whenever it has too much twist before you try again.
You can also try spinning a bottom whorl suspended by scrap yarn or thread. The advantage of trying it while it’s suspended is it can allow you to watch twist being added and see what it does without messing with your handspun, as well as letting you get a feel for how it moves while suspended. If you have a bottom whorl, I’d give both a try !
---
Now that you can draft, you’re gonna want to attach your fiber to your spindle. Some people use a leader to do this--it’s a pre-spun loop of yarn that you tie to your spindle. Then you loop some pre-drafted fiber through the loop of the leader, add twist til it holds, and off you go.
Another way to do it is without a leader. I’m much more familiar with this method, and I find it way easier, so I’ll go into more depth on this one:
1. Take the end of your pre-drafted fiber (you will need enough pre-drafted fiber to go from the underside of the whorl to the very top of the spindle, and then back again. If you’ve pre-drafted way more, don’t worry. We’re just working with this short amount for now, but it can stay attached). Make a slip knot at the end. You can roll the fiber between your fingers to add some twist if you’re having trouble making a slip knot with it. (Tip: if you’re having trouble getting the fibers to roll, wet them slightly with water or spit and it will be much easier)
2. Put the slip knot on the bottom point of your spindle, and slide it up so that it’s at the whorl.
3. Gently wind the pre-drafted fiber up the spindle shaft, until you are at the hook or top. Wind it over the hook (or do a half-hitch knot at the top--if there’s a groove near the top your half hitch should sit in there, otherwise it should sit as close to the top as possible while still being secure. You may drop it a few times while learning where the perfect spot is--such is life). Be careful with pre-drafted fiber--depending on staple length and fiber type, it can pull apart quite easily. The trick to keeping that from happening is to keep it a little slack and loose until you have added twist to it.
4. Pinch your pre-drafted fiber between your thumb and forefinger on your dominant hand, about 1 hand’s width from the top of your spindle. Turn the spindle in the direction you intend to spin your yarn (usually this will be clockwise, or to the right). Spin the spindle until you have the desired amount of twist. You should notice that all the fiber above the hook/half-hitch has twist, while the fiber below it has none. You need all of it to have twist, so let’s even it out--pop the half-hitch off with your thumb/unwind the yarn from the hook, unwind the yarn from the shaft so that the entire length you’ve worked with so far is stretched out. This will allow the twist to equalize. Now wind it all back up and put the half-hitch back/wind around the hook again. You may need to repeat this a couple times to get your starting fiber fully twisted (don’t worry though--you only need to do this at the very start. From here on you shouldn’t need to equalize twist like that until the next time you start from an empty spindle).
You’re done attaching the fiber--now you can spin !
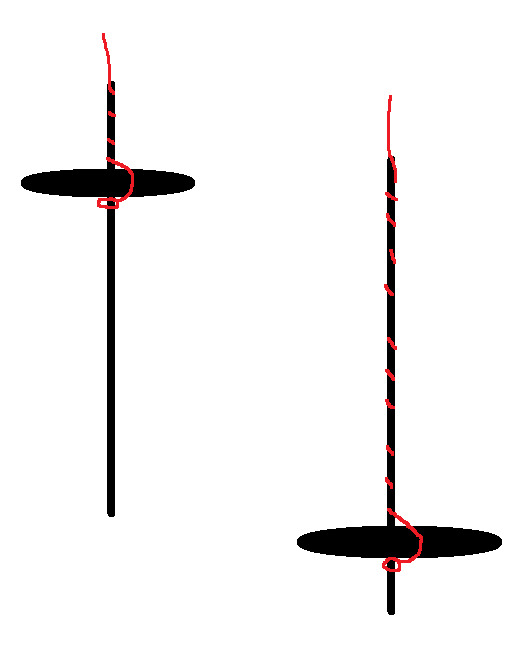
Fig B: How your yarn should sit on a spindle, both top and bottom whorl
If that doesn’t make sense, here’s a video showing how to attach it with and without a leader. If that doesn’t help either, search youtube for “how to attach leader to drop spindle” and keep looking until you have a better understanding.
---
So you know how to draft and your fiber is attached to your spindle--now it’s time to spin ! There are 3 different parts to spinning a singles on a drop spindle.
1. Adding twist. This can be done with just your hands, but the spindle makes it a whole lot faster. This is the purpose of a spindle--to add twist very quickly (and as a bonus, it’s a handy place to store the yarn as you spin it !). All you have to do is spin the spindle, and the only trick is to make sure you always spin in a consistent direction--don’t start a project spinning clockwise and end it spinning counterclockwise ! You’ll have an impossible time plying it then. There are a lot of different ways to spin a spindle--you’ll see a few watching the videos here, and more if you search out videos of drop spindling yourself. Whatever method is comfortable and practical for you is what you should do.
2. Drafting the fiber. You already know how to do this part !
3. Winding the yarn on. When your yarn is long enough that adding more length will make it hard to work with, you’ll want to wind it onto the spindle so that you can get back to spinning. To do this, pop the half hitch knot off the top/unwind from the hook, unwind along the shaft, and wind it near or at the base of the whorl, in the orientation seen in the very first picture. Always wind in the same direction that you’re spinning, to stop your yarn from flying off.
I would highly recommend starting with the method known as “park and draft” while you learn. In this method, you first add a ton of extra twist (usually as much as you can) and then put the spindle down and draft until that extra twist is used up. Then you wind on, and repeat. This isolates the actions of spinning so that you are only doing one at a time, which makes it a lot easier. Most people move on from this technique once they’ve figured it out, but you don’t have to--the drawback is that it’s typically slower, but hey, spinning is a slow craft anyway. There is no wrong way to spin, and everyone’s hands and bodies have different needs and work in different ways.
How to Park And Draft
First, use your dominant hand to pinch your pre-drafted fiber a few inches/6 cm above the top of the spindle.
Now just spin the spindle clockwise, until it won’t really spin any more. (Don’t try to get ~the most twist ever achieved~ or anything like that--your yarn can potentially snap from too much twist. Take your cue from the spindle--when it stops wanting to spin, you’ve got enough twist.) Don’t let the twist advance beyond where you’re pinching it off.
This is important--if the twist gets into your fiber, it becomes much harder to draft it. But don’t worry, you can undo this by pinching just above where the twist has entered your fiber, and with the other hand just below (pinching the actual yarn here). Now (with the hand that’s pinching the yarn) roll in the opposite direction that you’re spinning in. This will move the twist down into the rest of your yarn. Let go of where you’re pinching the fiber, slide your yarn-pinching hand to where it usually is as you’re spinning, and get back to it.
Your leader/yarn should be very kinked up and wiry. Now put the spindle between your thighs (or between your knees, under one knee, or under something heavy that won’t damage your spindle. Thighs are convenient, but if it’s uncomfortable, try putting the spindle somewhere else. It needs to be held firmly in place and not move around). This is the “park” part of “park and draft”.
Now, you want to be pinching the twist off at the same spot, but using your other hand instead. I usually pinch right above where I’m already pinching and let go with the lower hand.
First we’re going to just bring the twist up the pre-drafted fiber by sliding your pinching hand up the fiber, slowly and gently. You should see the twist follow behind your hand as it enters the fiber. If you have lots of pre-drafted fiber, you might wind on, add more twist, wind on again, etc. You could also draft out your pre-drafted fiber (this is what the majority of more experienced spinners who pre-draft do) while you go.
The “draft” part of “park and draft” is just like pre-drafting, but one end is attached to a spindle. This gives you something to lightly pull against, if you want. Draft slowly and with purpose.
At a certain point, you will run out of excess twist. At this point, wind on. If you’ve only done a short length, you can also add more twist, park it again, and go back to drafting.
If you’ve run out of armspan but still have lots of excess twist, unpark your spindle (let it hang free) and allow it to untwist a little, monitoring it closely. If this happens often, try to put less energy into twisting your spindle, or allow it to twist for less time.
The amount of twist that your yarn has matters a lot--it will impact your finished yarn hugely. A yarn without enough twist will be very limp and might even fall apart as you handle it. A yarn with too much twist will be wiry and inelastic. You want to find a middle ground where it’s got just the right amount for what you intend to use it for--a hard, inelastic wool yarn can make a good bag, but not a very good hat.
To see how much twist you’ve added to your singles as you spin, try a plyback test ! This is really quick to do on spindles--just relax the distance between your fiber supply and the top of the spindle. When the yarn is no longer taut, the live twist will cause it to twist back on itself. With too little twist, you may just get a few sad loops (or no loops, if it’s super undertwisted). With too much twist, you may get tons of tight little curls of yarn. With a good amount of twist, you should have a few good curls (just one if it’s a short length of yarn, or several if it’s your armspan) that aren’t too tight. Those curls are what your yarn will look like once 2 plied, so it’s a great litmus test for whether you’re adding the correct amount of twist or not.
Fig C: What different amounts of twist looks like in your singles.
To fix too little twist, just spin the spindle a little extra until it looks right. To fix too much twist, either draft more fiber or else let the spindle untwist a little.
You can and should do this before winding each new length on, at least while you’re still learning the motions.
Check out this video of how to spin with the park and draft method ! 0:00-4:45 is intro and attaching the leader. 4:46-9:00 is the method itself (note to friend: don’t watch past 9 mins). If this video doesn’t work for you, search “drop spindle park and draft” on youtube.
A few interim tips
1. It’s critical to hold your fiber supply loosely. If you find that you have put a lot of force into drafting, then you are either holding your fiber way too tight or your hands are too close together (or potentially both). Drafting should not require force. If it is requiring force, adjust your grip and your hand placement continually until it gets better, and refine from there.
2. Try to put some tension on the yarn as you wind it on. This will make it sit a little neater and flatter, so that you have a more stable cone of yarn and can fit more on it.
3. If you draft out your fiber so much that it runs thin and just sort of disintegrates, just pull off the most wispy parts from your yarn and the fiber supply, then hold the two together again, making sure to overlap by several inches/6-10cm. Gently draft out a little and add twist before putting that join under the weight of your spindle, or it will fail again. You can join from one fiber source to the next one (necessary with rolags, hand combed top, and strips off of batts) in a similar way; make sure to leave a little unspun fiber for a good join, and overlap the end of the first fiber source with the beginning of the second by about an inch/2.5 cm.
4. If your yarn snaps (rather than your fiber running thin as you draft), it’s because it was A) twisted way too much B) spun too fine for the drop spindle you’re using C) both A and B or D) your spindle has become heavy enough that it can no longer spin as fine as you were spinning.
For A, B, and C: remove as much twist as you can from either end of the snapped yarn, then put both ends in your upturned palm, overlapping them over the whole width of your palm. Add enough either water or spit to get them good and wet (not dripping, but they do need to be wet). Now place your other palm down on top, and rub vigorously for about 30 seconds until the ends have joined together. If necessary, you can also just tie the ends in a knot, although it’s not invisible and you can usually feel it in the finished yarn.
For D: is your whorl removable ? If so, remove the whorl and continue spinning. If not (and for the vast majority of beginner’s drop spindles it won’t be), your spindle is full ! Even if there’s still room, it’s too heavy to continue spinning on for that project. You could keep going spinning a thicker yarn, but that means your yarn will randomly get thicker somewhere near the end, which works for very few projects. If this happens to you when there’s still tons and tons of room on your spindle, that means in general you ought to spin thicker yarn on that particular spindle if you want to fill it up all the way.
Okay, I spun yarn, now what ?
So at the moment, you have what we call a singles (some people just say “single”). That can be used as is, or it can be plied--that is, held together with more strands of singles and twisted in the opposite direction. But either way, you need to get it off your spindle !
If you’re going to leave it as a singles, then you’ll be winding it into a skein (we’ll get into that later). If you want to ply it though, you’ve got a lot of options. (I’ll get to how to actually ply later, this is just discussing those options.)
Many Methods of Plying
Plying Straight Off The Spindles
First, if you’ve got multiple spindles capable of spinning the same weight of yarn, you could just set your full spindle aside and spin another one. You’d need at least 3 spindles (the third, ideally, a bigger plying spindle) to get a 2 ply yarn, and 4 spindles to get a 3 ply with this sort of setup. This is what I do with supported spindles, since I have many, and I can attest that it saves a lot of winding time and is terribly convenient.
But it’s also probably not doable for many people, and it’s ridiculous to buy 3 drop spindles when you’re just getting into it !
Wind And Store
Second, you can wind your singles onto something for storage, and then use your now-empty spindle to spin another singles. Two great things to store yarn on are small rocks and empty toilet paper (loo) rolls.
Winding it around a small rock is better than just winding it into a ball for plying, since the rock will weight it and stop it from flying up in the air once you start plying. A big pebble works great. With this setup, you’d want to put all your balls of singles in a bowl or container of some kind, hold the ends of each, attach it to your spindle, and let them roll around as you ply.
They can tangle (mine usually don’t, but it can happen), so the toilet paper rolls might be an upgrade--these can be put on a stick, and the stick can be put on something (or you can poke two holes in a cardboard box, put the stick through one hole, load the rolls onto it, then put it through the other hole as well) to keep it stationary so that the rolls... well, roll. This requires some storage space (usually if you do this often, you don’t wanna make a new one every time, so keeping it is preferable) and is honestly not a huge upgrade... unless you have a ball winder that can wind the yarn onto the TP rolls for you, in which case this is a big time saver. If you don’t have one and don’t have issues with tangling, the rocks will probably work just as well and take up a lot less space.
Fig D: Diagram of a Simple Ply Box
Ply Bracelet
Thirdly, if you want a 2 ply yarn specifically, you could wind it onto your hand and make something called an Andean Plying Bracelet. Here’s a link to a page that goes into it in detail. I highly, highly recommend learning how to do these. They look a little complex, and I couldn’t tell you the motions if my life depended on it, but I can do them with my eyes closed while not paying a whit of attention. They rely entirely on muscle memory, so once you learn them, they’re easy as pie.
The whole point of a plying bracelet is to get 2 strands of yarn out of 1 singles. You could of course wind a singles into a ball, then wind half of it onto another ball, and then ply from there. But a plying bracelet is a lot faster, and will always match up exactly.
One downside of a plying bracelet is that, as the name implies, it goes on your wrist. So if you keep needing to put your spindle down to take care of other things, you’ll need to pull off the plying bracelet as well (or carry the whole thing with you). They can be stored on a cylindrical object that’s smaller than your wrist, or sometimes also draped on hooks or put on the spindle shaft itself. I don’t usually encounter problems when pulling on or off my plying bracelets--it doesn’t seem to tangle them--but if you’re plying while cooking or watching a child or something else that might require you to stop immediately and hurry over to whatever needs tending, then you might want to save the ply bracelet for another day.
Chain Plying
Fourth, you could wind your singles into one ball, and then chain ply it. Chain plying is a way to turn one singles into a 3 plied yarn. It also preserves stripes in your singles (we’ll talk about this in more detail later), so it can be perfect for a very colorful singles.
Chain plying is simple. Do you know how to tie a slip knot ? Of course, because you needed one to start spinning ! (Although here’s the link to how to tie a slip knot again, if you need it.) So that means you basically know how to chain ply as well.
Step one: tie a slip knot at the end of your singles (you want a very short tail, since that’s basically waste). Make the resulting loop nice and big, and lay it over your singles. Pull the singles through the loop--now you have a new loop ! Make it nice and big as well. Lay it over your singles. Pull the singles through. Repeat until you’re at the end of your singles (try to have your last loop be a very small one). To finish, place the end through the loop, and then just pull on it until it tightens the loop. Note that you typically are adding ply twist and winding on as you do this, but you can also just chain ply an entire single and wind it into a ball as you go, then add twist once you’re done. That can be a lot easier to wrangle, if you’re having difficulties.
You might notice that this is basically a really open crochet chain. Yep ! It needs to be open so that the twist can enter the yarn, but you can do very big or somewhat smaller loops--although no matter what, you need to keep the loops large enough to at least hook a couple fingers through them so that you can make the next loop. Note that sometimes, the bump at the start of each loop can be felt and/or seen. Also note that chain plying is best done with smooth singles that can slide against each other. It can be done with a bumpy, lumpy yarn that sticks to itself, but bumps and lumps will catch as you try to chain, and if the yarn sticks to itself then it won’t slide nicely, which can really slow you down.
You may find that you prefer holding the ball of singles as you chain, or you may want it in a container on your lap/on the floor. You could also make a little wrist pouch to hold it, although take friction into account--if you make it out of wool yarn, choose a smooth one.
Ply Ball
Fifth is a sort of hybrid of a few of the others I’ve already mentioned, called a ply ball. To make a ply ball, simply wind two or more singles together into a ball (I’d suggest winding them around a small rock for a ply ball, too). The number of singles you wind in your ply ball will be the number of plies your yarn will have. A chain plied single wound into a ball is also functionally a ply ball.
Ply balls are extremely portable--you only ever need to work with one at a time, so you can just keep it in your pocket without worry of tangling, and it’s not attached to you or a box or another spindle. The downside is that it generally requires you to either have multiple spindles (ex: fill up two spindles, wind both off into one ply ball) or do extra winding (ex: fill up your spindle, wind it off to a rock for storage, fill up your spindle again, now wind from the spindle and the rock to get your ply ball. Add more winding for more plies).
However, you can also wind a ply ball from plying bracelet (yes, that’s more winding--but now it’s portable, and you’ve just turned one singles into a 2 strand ply ball) or even chain a singles, but wind it into a ply ball instead of plying it then and there to get a 3 strand ply ball (this also might let you play around with really long or really short chains without having to think about ergonomics as much, since your spindle isn’t involved).
Ply balls can also be helpful if you’re having issues wrangling your singles while you try to ply, since they’re laid together already--so they’re worth an attempt if you are having trouble keeping your yarn in line while plying.
There’s a short (but full of tips) article on ply balls here.
There’s even more ways to ply--look into "plying from a center pull ball” (similar to a plying bracelet, but requires a ball winder or a nostepinne) and “ply on the fly” (chain plying at the same time as spinning the singles--highly portable instant gratification). There may also be others that I’ve forgotten or not heard of, hopefully mentioned by others in the notes !
So Many Ways to Ply--How to Choose ?
So, every plying method and every number of plies has its own effects on the finished yarn, and you can use those effects to get the yarn you’re after.
By the way, if you’re not familiar with yarn weights such as lace weight and worsted weight, you should read this first !
A singles is great for your soft, fluffy, luxury stuff--cowls, hats, mittens that won't get a lot of wear, or shawls. It also preserves the colors that you spun exactly--so if you spun a beautiful perfect rainbow singles and the most important thing to you is that it stays a rainbow, you could leave it as a singles ! You can knit, crochet, weave, and nalbind with them like normal (I actually really prefer them for nalbinding--they felt easier so the joining is quicker), although because they haven’t been plied, they’re a lot weaker to abrasion and snapping. So they’re not ideal for things that need to be durable, and if you’re spinning short and/or fine fibers, you may find that even with some care they still don’t last very long, so keep in mind that stuff made from singles probably won’t be passed down or anything like that. But still, I’ve knit several small pouches from singles that have held up just fine being tossed around my room. One advantage to note is that you have the most yardage and the least spinning time this way, so it’s a very ‘time cheap’ yarn--you spin 100 yards/90 meters of singles, and you get 100 yards/90 meters of yarn. No time spent plying. However, it is as thin or thick as you spun it, and however consistent or inconsistent your spinning is, that’s your end result ! A lot of spinners (me) balk at this.
2 ply is next. I use 2 ply for almost everything besides socks--it’s quick, it’s fairly durable, and it looks very pretty (and an error correction: is ideal for lace). A 2 ply halves the amount of yarn you end up with--if you spin 100 yards/90 meters and 2 ply it, you’ll end up with 50 yards/45 meters. It also has a distinct ‘handspun’ look--2 ply knits up to a messier fabric. I really love that effect, but if you want a neat, uniform fabric, don’t do a 2 ply ! I’m not sure how it affects crochet or weaving, unfortunately, but do I suspect it’s similar with crochet. It also bulks up your yarn--it’ll be a little bit less than double the thickness of your singles, usually. 2 ply holds up alright to gentle/moderate daily wear, and is great for hats, gloves that don’t need to be hard wearing, scarves, and bags that won’t need to bear a huge amount of weight. It’s a workhorse yarn--you can use it for almost anything, and it’ll probably be okay. The only thing I would never use it for is socks--that’s a 3 or 4 ply project.
Let’s talk 3 ply ! 3 ply can be achieved either through chain plying or else as a traditional 3 ply--meaning 3 separate singles all plied together. You’ll get very different effects from these two methods in terms of both color and even-ness. If your singles had any stripes of color, with chain ply they will remain as stripes (this could be an alternative to your rainbow singles !). With a traditional 3 ply, your stripes will all blur together, and you’ll get a varied and multicolored yarn. You will get 1/3 of the yardage/meterage of your original singles, so a 3 ply yarn takes longer to make than a singles or a 2 ply. But it is also about 3 times thicker than your singles, so if you’re struggling to spin thick singles but want a thick yarn, 3 ply is a great option.
If your singles are very even, you’ll see no real different between chain ply and traditional 3 ply (except for the bumps at the start of each loop--they are usually visible as well). However, if your singles are kind of all over the place, chain plying magnifies this. On the other hand, a traditional 3 ply really evens out any inconsistencies. Even though I’ve got a few years under my belt, I am not a very consistent spinner, simply because I can neither visualize nor remember the weight I ought to be spinning, so it’s always a total guess (damn aphantasia). Beginners are also often inconsistent spinners, just due to lack of muscle memory. Either way, a traditional 3 ply can be really helpful in creating a fairly smooth, even yarn from really wild, inconsistent singles.

Fig E: comparisons of chain ply and traditional 3 ply, in terms of consistency
Lastly, 4 ply. 4 ply will turn your heavy laceweight singles into a light worsted, if it puffs up in blocking enough. I love 4 ply for my supported spindles mostly, since those spin very fine yarn and I don’t have a use for anything finer than sock weight yarn. It’s also very durable, and a laid 4 ply (like a traditional 3 ply--just 4 strands held together) make good socks. A cabled 4 ply (take two 2 ply yarns and ply them again) makes terrible socks, but is still very durable and has an interesting rope like appearance and texture. 4 ply in general is great for socks, bags, blankets, and especially sweaters, as it doesn’t pill much and will stand up to heavy wear. However, you have to spin 4 times the singles to get your finished yarn--a 100 yard/90 meter 4 ply skein requires 400 yards/360 meters of singles, and then more time for plying. So these are rather slow. They’re an awesome option for a fiber that refuses to spin up to anything other than the finest lace, and they will make great objects and garments that will last for a good long while.
Past 4 ply, you kind of just get rope. I haven’t ventured past 4 ply much--give it a shot if you’re curious !
The Why of Ply is a great article on the different aspects of different plies, and touches on some stuff I don’t mention (like stitch definition and cables) if you want to know more ! Highly recommend it.
How to Ply
So... you know at least a few methods of plying now, know how many plies you want your finished yarn to have, and you may have even already wound a ply ball or filled all of your spindles. Which means it’s finally time to ply everything.
To start, you need to attach all your plies to your spindle. For the methods that I’ve discussed (with the exception of chain plying), you’re going to do the following: gather the ends of your plies together, and make one slipknot with all of them. Then put the slipknot on your spindle below the whorl, the same way you would when spinning singles (and when not using a leader).
For chain plying: chain your singles until you’ve got about a foot or a third of a meter. Now you want to attach it to your spindle. Take the very first slip knot loop and slip it onto the spindle, below the whorl.
Now, secure your yarn by wrapping it around the hook or else with a half hitch knot, and spin the spindle counterclockwise (anticlockwise). You should immediately see the plies twisting together to form plied yarn.
From here, you will proceed basically the same way as you did when spinning singles--you’ll add twist to your plies, then wind on. This can be a really great opportunity to practice doing things while the spindle is in motion; you won’t be drafting, but depending on the type of plying you’re doing, you may be chaining, pulling from a ply bracelet, or simply letting the plies slide through your fingers (you do want to tension them and keep the twist from getting past your hand). If that requires too much coordination, feel free to park and ply--that is, spin the spindle to add excess twist, park it and let it into your yarn, then wind on.
If you try to ply your yarn the same direction that you spun it, you’ll notice that it doesn’t really turn into a cohesive yarn, and instead becomes wiry and the plies don’t slot neatly together. If you notice this happening, turn your spindle in the other direction. A yarn that is both spun and plied in the same direction won’t be stable or strong, and will tangle the second you try to work with it.
This is why it’s helpful to be consistent in which direction you choose to spin your singles, by the way--if you always spin wool clockwise, then you can know with certainty that it will be plied counterclockwise.
We refer to yarn as having either Z twist or S twist (this refers to whatever the finished twist is, so a singles that you’re never going to ply, or a 3 ply yarn, for example). This just makes it a little easier to talk about and recognize what we’re doing.
Fig F: S and Z Twist in plied and singles yarn
It’s essentially a mnemonic device that allows you to glance at your yarn and go “Oh! I spun these three singles counterclockwise, so I should ply them all together clockwise.” I often have to draw an S or Z in the air (just like I sometimes have to draw an L in the air to pretend I can reliably tell left from right), but it is pretty foolproof and will prevent you from, for example, trying to ply an S twist singles with a Z twist singles and then wondering what on earth went wrong.
By the way, this page has a really helpful chart on what direction you might want to spin in based on what you intend to do with the finished yarn. For example, crocheting (right handed style) with S twisted yarn will remove the twist as you work, but knitting in continental or English style (or crocheting left handed style) with that same yarn will add twist. Most spinners spin their singles to have Z twist and ply them with S twist--but if you’re a crocheter or knit Eastern style this will unply your yarn as you work, and you are encouraged to try reversing things to have better results with your handspun projects. The more you know !
Now, back to your plying. You may be wondering how you’re supposed to know how much ply twist to add, which is a great question, because plyback tests don’t work when you’re actually plying. Those are for when you’re spinning your singles. Instead, I do what I call a “hanging test”. Just hold out a length of plied yarn between your hands and let it hang (not pulling it taut--the yarn should have a nice downturned curve). A balanced yarn--that is, a yarn that has equal and correct amounts of spin and ply twist--will just hang nicely. An underplied (or underspun) yarn will usually also hang nicely, but you will see gaps inbetween the plies. This is no good at all. Gaps won’t just make your yarn look bad, they'll also make it split when you work with it, and will be less durable and more prone to pilling, felting, and eventual disintegration after much use.
On the other end of the spectrum, an overplied yarn (which may have both too much spin and ply twist, or may be underspun and then overplied in an attempt to fix ones mistake--which won’t work, by the way. You need to go back and add more spin twist to your singles) will twist in the middle instead of hanging. If it only twists a tiny bit, you’re fine. But if it twists a lot, there’s problems. Overtwisted 2 ply yarns tend to be aggressively smooth--this is only relevant for 2 ply, since those have a sort of pearled silhouette. If your 2 ply is smooth, then you’ve most certainly overplied it. 3 and 4 ply are always smooth, however, so a smooth profile for one of those is to be expected.
Fig G: Ply twist in 2 ply yarns. Do these yarns have S or Z twist ?
Don’t worry if your first yarns aren’t perfectly spun or plied (really--they won’t be). Every spinner is striving for something different with their yarn. Some are aiming for total technical perfection, some aim for exquisite fineness, some aim for beautiful colorways and for finding the softest and most lovely breed of sheep. Some just want to spin, some just want usable yarn, some just want a pair of socks that last on their feet and find commercial sock yarn to be about as durable as wet paper (that would be me). You certainly don’t have to know what you want to get out of spinning right away, but the point is that every single spinner has their own standards that they hold themself to, and you don’t need to (and shouldn’t !) try to meet others standards. Especially when still learning, but also just all the time and forever.
I’ve Plied My Yarn, Now What ? OR I Just Want Singles, Now What ?
Now your yarn needs to come off the spindle ! But not the way we’ve been taking singles to ply off the spindle--we need to make what’s called a hank. A hank is basically a loop of yarn that’s been tied so that it’s nice and secure. These loops can be pretty big (mine are all 2 yards/1.8 meters) or as small as the distance around your hand--it all comes down to what you wind your yarn onto.
I have already made a tutorial that goes into quite a bit of depth (and has pictures, even), so I’m gonna speed through this part a little bit.
1. Find something to wind your yarn around. A Niddy noddy is the preferred tool for the job here, and will make it much faster to wind and thoughtlessly simple to calculate the yardage/meterage of your yarn (I’ve seen people use yarn swifts as well, and they certainly look very speedy), but they are by no means required. Substitutes include: a large hardcover book, the back of one or two chairs, your hand (ideal for very small amounts of yarn), your forearm (for smallish amounts of yarn--wrap between the thumb and forefinger and go down to the elbow, then back up), or anything else that won’t deform with pressure and is holding relatively still.
2. Wind your yarn around that thing. You may need to start with a slipknot to attach it to whatever it is you’re winding on, or else a piece of tape. If you’re using your forearm or hand, you can simply pinch the end to hold it in place. Unlike when winding your yarn onto your spindle, when winding your yarn into a hank, you want to use as little tension as possible so that you can get a more accurate measurement of length later on. Also try to keep your winding tidy--in an ideal world, the yarn should be traveling almost the same path every time, not a few inches to the left one time, then wildly skewed to the right the next time.
3. Tie off your hank. Once you’ve finished winding, you need to secure your hank so that it doesn’t tangle. You can use either scrap yarn or else the ends of the yarn you just made (I prefer the latter, since the ends tend not to be very good anyway, so at least they don’t go to waste. In this case, snap off or cut both ends--the length you should cut depends on how thick your hank is). Find where both ends are--you will need to tie knots near the ends so that you can attach the ends to them. Tie an overhand knot a few inches/5cm below the first end, and then hold that end alongside one of your strands of knot-tying yarn, and tie another overhand knot. Repeat this with the other end. Make sure you haven’t overlooked any strands of yarn and left them out of the tie--that’s a very easy way to get tangles.
4. Remove your hank. Gently push your hank off of whatever you wound it on. Put it to the side--now we want to measure. Use soft measuring tape (or a piece of inelastic string or yarn, if you don’t have one--you will then need to measure that against a rigid measuring tape) to span the entire path that your yarn traveled. Write down that number, and now count the number of strands in your hank. Multiply the two numbers together. Now convert your inches or centimeters into yards or meters, and you have your yardage or meterage !
Ex: You wrapped your yarn around your palm, which measures 10 inches. There are 41 strands. 10x41=410. 410 inches is roughly 11 yards. Or: You wrapped your yarn around a small book, which measured 21 cm. There are 50 strands. 21x50=1050. 1050 cm is of course 10.5 meters.
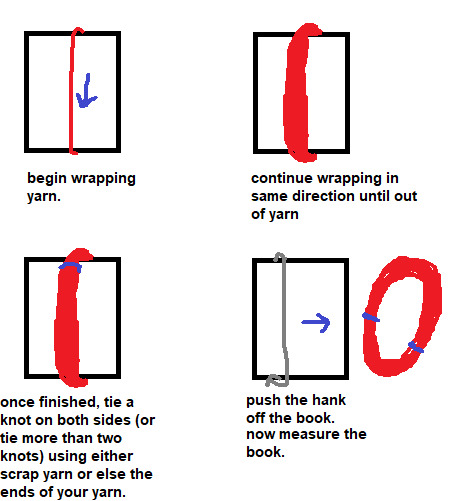
Fig H: Winding a hank on a hardcover book.
It can be very helpful to label your handspun yarn. The yardage/meterage is critical information when it comes to using patterns, less so if you don’t use patterns. But there’s other info that you might still find handy to know later on, such as what the fiber is, where and when you got it, when you spun it, how you plied it, any info on the dye job, what the yarn weight is, what spindle you spun it on, whether it is part of a set, how much it weighs, etc.
Some of my really verbose labels might look like this:
Avocado dye and copper mordant hand dyed in the fleece 2020
Cormo
Bought 2019
Spun for 2020 TDF
2 plied on wheel
210 yards
3.4 oz
light worsted weight
But most of my labels just have the yardage and breed, if I label them at all. I tend to document things online and also remember spinning my yarn better than I remember anything else going on in my life, so I’m a little lazy about labeling. Your labels should include the information that you think you’ll find helpful in the future, or that you know you won’t have another way to recover if you end up forgetting.
Blocking your yarn
Don’t attach that label just yet--we aren’t totally done with our yarn. It has one or two more steps before it’s ready to be used, and that first step is called blocking. There’s a few ways to block yarn--wet blocking, steam blocking, and resting.
Wet blocking: Get your hank of yarn wet, using anything other than very hot water (this could start felting your yarn). You could run it under the tap for a minute or else let it sit in a bowl of water with a little hair conditioner for about half an hour, if you wanted your yarn to be a little softer, then rinse the yarn. Squeeze as much water out as you can, then hang it to dry. You can (and should) also snap or thwack it--but I've gone into detail on that in a link below.
Steam blocking: Get a source of steam going--like a pot of water simmering or a very hot tap running. Using tongs or a long wooden spoon, hold your yarn over the steam and slowly rotate it until the whole skein has been steamed. Don’t let the yarn touch the water.
Resting: If neither option above is possible, you can also just let your yarn sit for at least a week. This lets the twist settle down, so it’ll be a lot easier to work with. However, it doesn’t do anything else that blocking does, so it won’t really show you your “finished” yarn, and may lead to problems down the road.
So--why did we just do that stuff ? Well, we blocked our yarn to reset the fibers, basically. During the spinning, we put the fibers under tension, and they more or less stay in that slightly stretched state. But it’s not really stable--the next time they get wet, they’ll spring back into the natural crimp that the wool wants to have (this changes drastically depending on breed and even individual sheep), and will often puff up. The hank might lose a little length and your yarn’s weight (not as in ounces or grams, but as in lace, dk, or bulky weight) often increases some. So if you’ve made your yarn into something before blocking it, with the perfect gauge and nice drape, the first time you wash it you’ll find that it’s thicker and a little smaller and has less drape. It might not fit anymore, or the seams might be messed up.
This is all entirely avoidable if you just block it before you do anything with it, so I highly recommend that you do.
The other thing that blocking does is set the twist, so your yarn won’t kink up as you work with it--even a perfect, balanced yarn can kink up as you work if the twist is live--which makes it a lot more pleasant. Resting sets the twist as well, as mentioned above.
I’ve gone into blocking in more detail in this post here, if you’d like to know more--I’d especially recommend reading the last section about snapping and thwacking your yarn.
Once it’s fully dry (and remember--wool can hold a lot of water and still feel dry, so give it a little extra drying time just to be sure) it only needs to be wound into a ball before you can use it ! Congratulations on your handspun yarn--that’s a real achievement.
Storing your yarn
If you don’t plan on using it right away, you may want to skein your hanks up to keep them compact and tidy. To do this, put your thumbs on the inside of your hank, and pull it taut. Then, one thumb at a time, twist in the opposite direction that you plied in. Your hank should start to kind of look like rope. Once it has a lot of twist (enough that you’re struggling to add more), find the center point of the hank, and fold it. With 2 yard hanks I tend to fold it over my knee, but a doorknob or something else would work just as well. It should immediately look like an oversized piece of yarn--that’s because we just twisted it one direction, and then folded it in two and let the excess twist twist it in the other direction, which is the same way you ply yarn ! There should be a loop at each end where your thumb was--take your thumbs out and put one loop through the other. Now you can attach your label and you’re good to go !
If it’s a very small hank (one that’s been wound around the palm, especially) you’ll probably just want to wind it into a ball instead. You could do this with any length of yarn--it’s not an ideal way to store wool yarn ultra long term, since staying wound into a ball can stretch out the fibers again, which means you’d need to wind it into a hank and re-block it if you wanted to make an accurate gauge swatch or something. Short term (a year or less) it’s just fine.
If you’re wondering how to wind up a big hank into a ball without tangling, just sit down with your knees up, and put your knees inside the hank, then move your knees apart until the hank is taut. Now you can wind in relative peace, free from tangles. You can also use a yarn swift, if you’ve got one.
I would recommend, by the way, using up some of your first skeins as soon as possible (you might want to keep your very first skein so that later you can see how far you’ve come--I really wish I kept mine). You won’t know how your spinning is until you’ve used it, so to prevent you from getting to skein #40 thinking you’ve been doing great, only to discover that your yarn is actually unusable... use your early yarn ! Evaluate it, make judgements, and learn from it. Does it need more twist ? Is it very lumpy ? Are there lots of spots where it went thin ? Do you like how the colors turned out with the plying method you chose ? These are all good questions to ask yourself as you use your yarn.
Moving On From Park and Draft
Once you’re comfortable with the park and draft method, you might want to try moving on to true suspended spinning. As I said earlier--it may not be for you, and that’s fine, but you won’t know if you don’t try. True suspended is quite a bit faster than park and draft, so if you want to speed up a little, you should give it a shot.
In park and draft, you first add twist, then park the spindle to draft your fibers into yarn. In true suspended spinning, you set the spindle going and draft while the twist is being added. This eliminates the whole ‘standing/sitting there with your arm outstretched, waiting for your yarn to accumulate twist’ section.
The easiest way to get into true suspended spinning is to work your way up to it--try drafting just a little bit while your spindle is building up twist during park and draft. To give yourself more time, set the spindle spinning slower. Then try drafting a bit more. The goal is to draft at the same rate that twist is added, meaning that you can wind on pretty much as soon as the yarn is too long to keep spinning.
The trick here is to adjust the speed at which your spindle spins rather than the speed at which you draft. You can only draft so fast before your technique gets sloppy, and past that you’ll be focused far more on keeping pace with the twist being added than on drafting evenly.
So if I find that I spun my spindle too aggressively, I still it immediately and try again, but slower this time.
I answered an ask about this a while ago where I went into a little bit more depth, if you’re interested.
And if you haven’t seen it, the pinned post on my blog is a lot of stuff like that all collected into one post for easier perusal. Some of them I’ve already linked to earlier in this post, but others I haven’t.
Small Projects, Scrap Projects, and Big Projects: Tips for All
You may be wondering, What the hell am I supposed to do with this yarn ? This isn’t even enough for a pair of fingerless gloves !
Which is a fair concern--endlessly accumulating small skeins of yarn can be frustrating if you don’t know how to use them up.
Drop spindles are limited in how much yarn you can make on them, and while you can make huge skeins by joining smaller skeins together, they may not all be the same weight ! Or they may not match. Or it may just be really boring.
You may also be doing a lot of experimenting, and ending up with 30 yard/meter skeins that you can’t even make something tiny with.
Small Skeins: For single skeins that are too small for gloves, hats, etc, you may still be able to make things like pouches (for yarn, crochet hooks, dice, coins, etc), baby socks or hats, coasters, or other small items. My spinning wheel oil holder is a little basket crocheted out of some handspun, and I have a mini tape measurer on my keys with a cover crocheted over it from handspun as well. You might have to invent things to do with your handspun, but using items that you made enriches your life--I promise.
Scrap Projects: What about tiny skeins ? Or maybe you’ve already made all the coasters and baby socks and spinning oil holders that you could possibly need, and now the small skeins are piling up again. I humbly submit the Scrap Yarn Project--my favorite type of project by far. I’ve been slowly working on a handspun scrap blanket for about 2.5 years, using tiny scraps, small skeins, and leftovers from projects alike. I knit 5x5 inch stockinette squares (some have colorwork, some have different stitch patterns, but mostly I let the yarn be the star) and for the most part just try make squares that are thick enough to stay warm but thin enough to have a little drape. It’s an incredibly satisfying project.
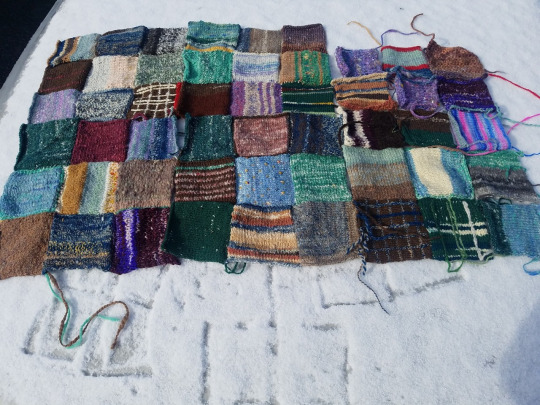
Fig I: An older image of the author’s handspun scrap blanket in progress. The yarns used range from fingering weight to super bulky, and are spun in all sorts of different ways. But it still feels very cohesive.
I like the square approach (and of course if you wanted to crochet granny squares, that would work perfectly too) because it’s modular, so you can decide halfway through that you don’t want a sweater, you want a bag--and then just sew the squares into a bag, instead. But it doesn’t need to be squares by any means--you could also make scrap yarn sweaters, hats, socks, scarves, etc., that are constructed normally.
The only thing to look out for is yarn weight--in some cases, you might want the weights to all be very similar. Socks, for instance, won’t do well if you have parts that are bulky weight and parts that are light fingering weight. You could hold yarns together to get similar weights if necessary, or just only add to the project when you’ve got another scrap skein of worsted weight or whatever. For squares you can use any weight of yarn if you want, but you should change your hook or needle size to get a fabric that’s a similar density, so your stitch count will change from square to square.
Big Projects: These can be difficult even for experienced spinners, because consistency is key to ending up with an even fabric. Not from armspan of yarn to armspan, but from skein to skein--if the weight changes, things can suddenly get much more complicated while you try to correct for the skeins that are too thick or too thin.
One way to try and mitigate that is to not ply anything until you’ve finished spinning all the singles--that is, if you need 10 skeins of 2 ply, spin 20 spindles worth, then go through and pair off your stored singles, thin with thick and average with average. It can definitely be more tedious to do it this way, but if you’re worried about consistency, it might be a good idea.
It also might not be necessary. Try to let your mind stretch back over the whole course of human history--as a species, we’ve been spinning yarns for pretty much all of it, and until very recently, what you spun was what clothed you. If the skeins you spun for your new cloak were all different weights, well... you probably either repurposed those skeins (IF you could, and that’s a pretty sketchy IF) or you shrugged, wore a lumpy cloak, and got on with life. Perfection isn’t everything, my friend. Either way, do what’s going to make you happy. For me, I’d be just fine with a lumpy cloak.
Out Of The Basics: A Few Further Pushes Into The World of Spinning
There’s many, many techniques out there, and an infinite variety of yarns to be spun. Some require tools, some don’t. Some are very advanced, and some quite simple. There are many other tools to spin on besides drop spindles. There’s also processes related to spinning--such as dyeing, fiber prepping, and wool washing--which can greatly enhance your spinning enjoyment and variety. I can’t teach them to you today, but I can certainly tell you about them so that you can look into them yourself !
Changing Up Your Fiber or Techniques to Get Different Effects
We touched on this earlier in the section about the number of plies--a 2 ply yarn will knit up into a bumpy, slightly irregular fabric, and a 3 or 4 ply will be very regular and neat. But that’s not the extent of what you can do to change your yarn up (without buying anything new). I’m going to throw some terms around now--you’ll need to google them, because this is already absurdly long.
For one thing, if you have roving, you can try splitting it lengthwise and fractal plying your yarn for a very beautiful self-striping but marled effect. You can also try spinning it from the fold on multicolored roving, which keeps the colors separate instead of muddied, which can happen otherwise.
With any fiber, you can always mix and match, or add pops of color ! If you’re spinning a bunch of gray rolags, for instance, you can occasionally detach the rolag, spin a tiny bit of blue roving, reattach the rolag, and go back to spinning. Depending on how you ply it, this could produce almost specks of blue or else slips and streaks.
Speaking of plying, the way you make a 2 ply can really change the colorway of the yarn if your fiber is a gradient or multicolored. Say you’ve got roving that’s a gradient from white to purple--if you do a plying bracelet, your yarn will be part barberpole, part gradient: a purple ply with a white ply at one end, and then gradually transition to the midpoint of lavender-pink in the middle, with both plies the same color. But if you plied it the other way, by wrapping your singles onto storage rocks and then plying from those, you’d get a yarn that’s got one pink ply and one white ply at one end, and one pink ply and purple ply at the other.
Chained 3 ply versus traditional 3 ply will make a huge difference as well. If your fiber has stripes, chain plying it will preserve them perfectly (as long as you’re careful to start a loop at the color change--or if you wanted it to fade in a little, you could start partway through a color change), whereas a traditional 3 ply will always marl them, no matter how careful you are about evenly splitting your fiber into 3 sections.
If you like really colorful and bright yarns, you might enjoy cabled 4 ply (where you ply two 2 plied yarns together). If your starting 2 plies are already colorful, you’ll get super colorful yarn with a cabled 4 ply--to me it always looks like dashed lines in different colors.
A laid 4 ply can also make some interesting color combinations, and is perhaps the ideal candidate for mixing random singles together, since it has 3 other plies each singles can hopefully be tempered by. And a yarn that has 3 plies of one color and 1 ply of another color can be interesting indeed !
It’s not just color that you makes an exciting new yarn, though--you can also try making boucle, or thread plying or autowrapping, or spinning beehives, spinning beads into your yarn, spinning thick and thin yarn... the possibilities are almost endless. I’d highly recommend giving “The Spinner’s Book of Yarn Designs” by Sarah Anderson a read if you can--she discusses all of these and many more, and shows how to do them. Other good books that’ll show you how to make lots of different kinds of yarn, or how to tailor your yarn to your needs, are: “Yarnitecture”, by Jillian Moreno, “Spin Art” by Jacey Boggs, and “Yarn Spinning With A Modern Twist”, by Vanessa Kroening. Your library may well have copies, and if not you could likely request they buy it.
You Don’t Have to Drop Your Spindles
...Because there’s other kinds of spindles ! And things that aren’t spindles, but on which you can also spin !
There are Turkish Spindles, which are functionally almost identical to drop spindles (and you can drop them, to be fair), but you wrap your yarn around two detachable interlocked arms that also function as the whorl. When you remove the arms and spindle shaft from the turtle (not cone) of singles, you can then 2 ply with it immediately using both ends. Turkish spindles are great if you love 2 ply and hate winding.
There are Supported Spindles, which come in many forms but are essentially fancy sticks with pointy tips that you spin in bowls. These have more winding than drop spindles because you spin in very short lengths at a time and wind onto a temporary cop that’s just below the tip (it’s much faster than if you wound all the way down to the cop near the bottom). However, you use them while sitting or even (with a bit of wrangling) laying down, and your arms stay in a comfortable, much more relaxed position while spinning. It also spins, as a default, finer yarn than your average drop spindle (I can achieve a very fine and consistent laceweight on any supported spindle, but have only managed that on my tiniest and lightest drop spindle). And they are very fast tools--with proficiency, they can be much faster than drop spindles. Supported spindles are great if you find drop spindles painful, if you have low energy, if you’re mobility impaired, or if you want to spin finer yarn.
There are Spinning Wheels, which come in many shapes and sizes but are the fastest way to make yarn by hand. There are a few objects which could fall under the umbrella of a spinning wheel (namely Walking Wheels, Charkah Wheels, and Electric Wheels) which do not have treadles, but the majority of spinning wheels are powered by foot treadles and can spin faster than you can spin a drop spindle. They also remove winding from your list of duties (for the most part), since the flyer will wrap your newly spun yarn onto the bobbin as you go. New spinning wheels can be prohibitively expensive, but you can also find used ones for ludicrously cheap on craigslist, at estate or garage sales, at antique shops, or other places where old items might be sold. (You can also often find them at affordable but not cheap prices at fiber festivals). Be sure to research the parts of a spinning wheel before you try to buy a used one from a non-spinner--there are many SWSO’s (Spinning Wheel Shaped Objects) out there that will fool you. Spinning wheels are great if you want to make larger amounts of yarn, or want to make yarn faster.
There are Electric Wheels, which are small machines that will add twist and wind the yarn onto the bobbin for you, so all you have to do is draft. New low end models are much cheaper than new spinning wheels, and they take up far less space. They also remove the element of treadling, so if you are intrigued by spinning wheels but have weak legs in any capacity, these can save you a lot of pain. I have a spinning wheel and can’t spin on it much anymore, because my knees and hips dislocate almost immediately. I switched to supported spinning primarily, but an electric wheel would be a good substitute as well. Electric wheels are great if you want to make more yarn faster, but can’t afford a spinning wheel or don’t have the space for them. They are also one of the more accessible tools for those with severe mobility impairments.
And there’s still more, although I can’t do a pitch for all of them xD. There’s Tahkli Spindles for spinning cotton, Navajo Spindles that are long thigh-spinning tools, Medieval Spindles that are easy to whittle replacements for if you break your spindle a lot, and even more beyond that. Many cultures have their own traditional spinning tool, each with their own techniques and strengths, and if drop spindles aren’t doing it for you but you still want to spin, I implore you to check out other kinds of spindles !
From Sheep To Sweater (Washing and Processing A Raw Fleece)
Most people learn to spin from roving (even if it might not be a very good beginner’s preparation), although there’s also rolags, batts, top (both commercial and hand combed), sliver, and cloud. But what if you could start with a raw fleece (unwashed, with vegetable matter and lanolin and who knows what else) and make things out of that ?
There’s some immediate advantages to starting with a raw fleece (even over a washed fleece). For one, raw fleeces tend to sell very cheap. This will depend on where you live, but the vast majority of fiber that I buy these days is raw fleece, and I’ve never spent less on fiber. At a fiber festival, I once paid $10 USD for 2 pounds (slightly under 1 kilo) of raw Shetland fleece. So--they’re cheap. As soon as someone starts putting work into a fleece, like washing it or dyeing it, the price immediately jumps.
Second, if you’re looking for the most bang for your buck, starting from a raw fleece is the way to go. You need to wash it, skirt it (take out the really terrible or gross bits), perhaps sort or grade it if it’s multicolored or there’s clear variation in fiber quality, dye it (if desired--I only dye my white fleeces, as I quite like brown and gray and black), process it into spinnable fiber, spin it, ply it, and then knit/crochet/nalbind/weave/do whatever else your heart desires with it. A single raw fleece can last me a month even if I work on it tirelessly, and I might have paid $20 USD--a little over an hour of wages for me.
It also brings you a lot closer to your work. I can’t say I felt very attached to my fiber when I worked exclusively with roving, but sorting through a pile of hand washed Southdown Babydoll locks while I comb them into top to spin into sock yarn on supported spindles that I whittled myself--I can tell you, I feel pretty damn connected to my work, to the ridiculous little sheep whose wool I have, to my socks, and to the wool itself. It adds a lot of depth, both to the experience, and to my understanding.
It’s also honestly pretty easy. To wash a fleece, you need a dedicated wool pot (as in, don’t cook in it again), a bit of dish soap, and some time. Put the fleece in--don’t crowd it, just work in batches if your pot can’t easily fit all of the fleece--add cold water and a squirt of dish soap, and let it cook on the stove for about 45 minutes, without a lid. Don’t let it boil--ideally it should be steaming but not quite simmering. You can use a dedicated wool spoon/tongs to gently and infrequently stir the wool. The water should get pretty gross. After 45 minutes, start the tap running (you need to rinse the wool in very hot water--if you let temperature shock happen, it could felt), drain the water, and rinse the fleece. Then repeat--filling up the pot with hot water now--until the water stops looking dirty at the end of the 45 minute cooking time. Rinse it one more time, and then let your wool dry, ideally on a clothesline but over a vent/spread out flat on a towel is fine too.
Yes, it really is that easy. If you’re worried about felting or otherwise ruining the entire fleece, you can always start by washing just a handful, so that way if you ruin it there’s not much waste. But I’ve washed at least a couple dozen fleeces that exact way, and I’ve never ruined one.
After washing and drying your fleece, you need to prepare it. I typically prepare enough to spin for a day at a time, but you could also do it all at once if that’s more your style. There’s many ways to prepare wool, and I’ll discuss most of them at least in brief, but we’ll start with teasing. This is where you take a lock in your hands, and tease it open. Let any VM (vegetable matter) fall out or pick it out yourself, and open the lock up to the point that you can no longer see any lock structure. It’s now spinnable, just like that ! This is a pretty slow method, but if you start out your raw fleece journey buying just a few ounces/50ish grams of fleece, it’s perfectly doable to tease it all open by hand.
If you have money to put into the endeavor, a humble pair of hand cards (70 TPI will card most wools), or you can kind of make do with two pet brushes like these (although at that point, spend $10 USD more and you have a pair of hand cards, so idk what the point of that is, unless you already have them) is a very good place to start. Load the fiber onto one card, card it until it’s uniform, roll it into a rolag, and it’s spinnable !
You also have hand combs, which are a lot more expensive than hand cards, but which can process very long fibers and can get out all the vm. Cards don’t remove a lot of vm, so combs is the way to go for super vm-y fleeces. They also produce hand combed top, which spins up into a very compact, strong, and abrasion resistant yarn--great for socks.
Past that are drum carders, which are machines in the way that spinning wheels are machines--manual, but they certainly automate the processing of fiber for you. These can be expensive indeed, but process fiber very quickly and are a great choice if you plan to sell the fiber, if you want to start with raw fleece but haven’t the dexterity to do it by hand (and there are electric drum carders as well--otherwise, you are turning a hand crank), or if you want to process high volumes of fiber because you just go through it that fast.
Honorable mentions include flick carding (both cheaper and slower than hand cards--you work with a couple locks at a time and open them up by flicking them with a tined brush), blending boards (these don’t process raw fiber, but they turn already processed fiber into batts--so you can blend many wools very easily for different textures or colors. These are like painting with wool--so fun !), and willowing (I haven’t tried this one yet, but you lay out your wool and repeatedly hit it with willow branches or other bendy sticks, which opens the fiber and also sends it flying all over the place. It looks very fun, and rather slow, and is also free as long as you can find a willow tree).
This website describes some of those methods (and one I didn’t get to) if you’d like to check it out.
Colors to Dye For
Wool takes dye very readily, and you probably come into contact with several natural dye materials every day--onion skins, avocado pit and peel, daffodils, coffee, black tea, thyme, even grass ! You don’t have to be working with fleece to dye it (although dyeing fleece gives you so much color variation and is very fun)--you can also dye roving very easily. Batts, rolags, and top less easily, although it’s possible with a lot of care.
For most natural dyes, you need to collect quite a lot of it, and then let it cook overnight on low heat. Boiling (sometimes even simmering) can kill the color, so you’ve got to be patient. Crock pots on low or medium are great for this. If you can cook it two days, all the better. Let it sit and cool for at least 12 hours, then strain it. (Tip: you can store natural dyes in jars in cool, dark places for at least a year without any ill effects--so you don’t need to use the dye immediately)
The majority of dyes need something called a mordant (I go into more detail about mordants in this post if you’re interested). There are many mordants, but some easy household ones are alum, baking soda (bicarb), copper (put a few bits of copper pipe in a jug of white wine vinegar, let sit for a few weeks at least before using), or iron (same as copper, but with rusty nails. Use a plastic jug !!! Metal will rust and glass can break). Most people mordant their wool by putting it in their dedicated wool pot with some water, adding the mordant, and letting it cook on low for an hour. Then drain the water and add the dye.
Natural dyes need to cook for a while to set--I usually let them cook overnight at least.
For batts, rolags, and top, you can do something called solar dyeing--carefully mordant your wool as usual, then place it in a jar with the dye, and put the dye outside in the sun. Over time (at least a week--often months, especially if you don’t live somewhere warm and sunny) the heat from the sun will warm the water and dye the wool. You could also try storing the jar somewhere you know will be warm, such as near the stove or fireplace.
You don’t have to use natural dyes either--there are also acid dyes, or food coloring, kool-aid (sugar-free), etc. I’m a lot less familiar with those, so I can’t go on at length. They can be a good choice if you don’t have the time for natural dyes, or if you want to get specific colors and not guess what your wool will turn out as. Look into them if you have any interest !
Dyeing your own wool is immensely satisfying, and can be a very cheap (or free, in the case of many natural dyes if you’ve collected or grown them yourself) way of obtaining more color, if you find that you keep ending up with a lot of white wool.
Endless Breeds of Sheep
There are many breeds of sheep on there (not endless, sorry--although there will always be new breeds being developed, so endless in a way !), and they all have different qualities, both in terms of the sheep themselves, and the wool they produce.
Do you want your wool to be very hard wearing ? Down breeds such as Southdown (one of my absolute favorites), Shropshire, or Dorset can be quite durable, and are resistant to felting. You could also go for stronger, coarser wools such as Jacob or Romney--coarser means stronger with wool, and softer tends to mean weaker.
Do you yearn for a softer wool ? Cormo is fantastically soft, as are Rambouillet, Debouillet, and Merino. Many lambswools (meaning the fleece from a lamb--the older a sheep gets, the coarser its wool tends to be) can be softer than their breed standard, so seeking out lambswools even from breeds like Jacob or Rya (both usually strong wools) can lead to soft fleeces.
Of course, there are more considerations than just soft and hard wearing, but there’s pretty much a breed for everything. If you’re interested, “The Fleece & Fiber Sourcebook” by Carol Ekarius and Deborah Robson is an incredible resource, and covers just about every breed under the sun (with pictures, samples, notes, recommendations, and interesting bits of history), as well as most non-sheep fiber producing animals as well ! Speaking of...
There’s Not Just Wool
There’s also many non-sheep fibers, and plant fibers too !
Animals with easily usable fiber include: alpaca, llama, angora rabbits, goats, camels, musk ox, and more ! Their properties are usually different from wool--all of the fibers from the animals above have little to no crimp in their fiber, meaning that they aren’t elastic like wool is. They’re also varying degrees of warm (cashmere--the undercoat fibers that come from many different breeds of goats--are extremely warm, but still not as warm as musk ox down), and some are unbelievably soft. If you can, I highly recommend getting a little cashmere, a little camel down, or whatever other exotic fiber strikes your fancy. They’re very fun to experiment with, and small amounts can easily be worked into projects to add warmth, drape, or softness.
We can’t forget about silk, either--produced mainly by certain species of silkworms, although most insects undergoing complete metamorphosis produce silk of varying quality as well. Silk is a very interested fiber to spin--but it can also be reeled instead of spun, which is how you can get extremely thin silk pieces without even needing to spin thread-weight yarn.
But in early human history, before we domesticated sheep and bred them to have better wool than they started out with, we spun things like inner tree bark, flax, nettle, and cotton. These all require very different techniques than wool, but most of them can be spun on the same tools (and all but cotton can be hand twisted into cordage instead, if that’s more up your alley). They are also inherently cooling--fabrics made from linen will keep you very cool indeed--so if you live somewhere hot where having wool objects is mostly pointless, don’t despair ! There’s still stuff for you to spin.
Connect With Others !
I’m about done with this monograph, but there’s a few last things I want to share.
First is the existence of Fiber Festivals--you may or may not have some in your area. They’re extremely fun, and you can meet many spinners there. They’re also usually a very cheap source of fiber, as prices are often a lot lower at festivals.
Second is the existence of Spinning Guilds--again, you may or may not have one locally, but if you do, you might want to join ! There are also spinning clubs and groups, which might be a little lower-key and more welcoming to beginners.
Then there’s TDF, or Tour De Fleece. You may have heard of the biking tournament called Tour de France which happens in July--well, every year a lot of us spinners do a tournament ourselves, but it’s generally not competitive (except on Ravelry--there are teams and points and everything). For the most part, participating in TDF just means setting a spinning goal for yourself from July 1st to July 23rd (the end of the race) and then trying to achieve it. For a lot of people, this means spinning every day. Some set goals like “get through this whole fleece I bought 10 years ago” or “spin a sweater’s worth of yarn” or “learn how to spin flax, finally” (that’s what I did last year). Or maybe it is just spinning every day--even if just for 20 minutes. On tumblr you can see other’s work and post your own under the tag #TourDeFleece2023, or #TDF2023 (there’s many variants as well)--we’d love to have you !
Lastly, there’s International Spin In Public Day ! To be honest, nobody can really agree on what day that is--allegedly, it’s the 3rd Saturday of September. (For me, it’s literally every day that I leave my house, but I digress). But I’ve also seen posters for October, for September 10th or earlier, and just generally lots of different dates. I’d say play it safe--if you see someone say it’s International Spin in Public Day, go spin in public just in case :D. The purpose of a day like this is to bring spinning back into public knowledge--let’s face it, most people in the western world have zero clue how yarn is made, and couldn’t differentiate a spindle from a spatula. This sucks ! Spinning is such a great activity--it can be meditative, calming, fun, exciting, or a background motion to other activities that allows you to actually pay attention (if you have ADHD). And I think a lot more people would spin, and would enjoy it, if only they were exposed to the idea. You certainly don’t have to act as Spinning’s public outreach officer, or anything like that... but when people ask what you’re doing, explaining it patiently and encouraging them to look into it does everyone a favor.
In Conclusion
I hope this has been helpful and not too confusing ! It’s really important to note that I’m just one guy--I don’t know everything, and I might not always have the best techniques. Looking for information on spinning from multiple sources is a good way to get a well-rounded understanding, and to correct common misconceptions that you might have already learned. Perhaps more importantly, there’s pretty much an infinite number of ways to do almost every single step I’ve described here, and if the way I showed you--or the video I linked to showed you--isn’t working, don’t despair ! There’s nothing wrong with you, you probably just need to do it a different way. I must have watched 3 dozen videos of people drop spindling before it finally clicked with me.
I hope I’ve opened up the world of spinning to you at least somewhat ! There are many things I didn’t touch on, and lots of stuff I wish I could talk more about, but at the end of the day I mostly wanted to 1) show you how to make yarn and 2) pique your curiosity about the whole rest of it. If you have questions, I’ll try to answer them (Purple, I will of course answer all your questions and also attempt to mind read your questions before you’ve even asked them so that I have a 10 million slide power point done by the time the question is out of your mouth), but check the comments and replies first ! Someone else might have answered it already.
Thanks for reading, and happy spinning !
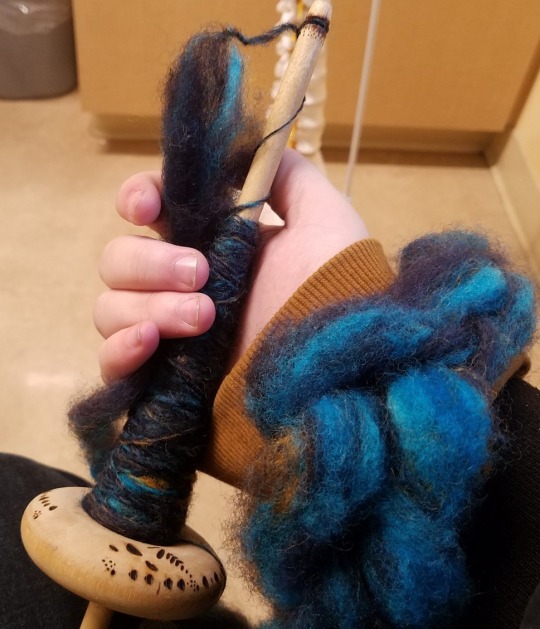
Fig J: The author holding his old drop spindle, spinning at a doctor’s appointment. The spindle now belongs to the friend for which this monstrosity of a tutorial was written ! :D
#spinning#drop spindle#beginner spinning#tutorial#handspinning#handspun yarn#fiber arts#i truly have no idea how to tag this#its over 13k im so sorry#swords i did end up adding tipping to this blog bc of your recommendation thank you !#i cant seem to add tips to posts that i made after tipping was enabled tho. which is very annoying. so its just on all my posts for now#hopefully will fix that later#this did take about a week of writing ! so if anyone#(BESIDES PURPLE FOR SEVERAL OBVIOUS REASONS THIS WAS A GIFT FOR YOU <3)#wants to show some appreciation if it helped you at all#i would be very thankful as i am so goddamn broke lol
2K notes
·
View notes
Note
Can i request something where bucky has a smutty obsession with sundresses? Just the way his doll looks in them and stuff?
I've definitely written Bucky loving sundresses before but now that there's a bit of a chill in the air, I'm imagining the same sundresses but with tights underneath 😏
Having the tights keeps you a little bit warmer but it doesn't give Bucky the access he's used to. The tights are such a tease because he knows how flimsy they are but they're in the way of what he wants and that would never do.
He does love the feeling of them though. The thin material is so smooth under his fingertips, there's an attractive sheen to them and he finds he can't take his eyes off your legs, right at the hem of your dress.
"Sweetheart." Bucky's voice is firm and it makes you smile to yourself. "Come here."
He's sitting by the kitchen table, sipping his coffee and you know that he's been watching you since you came down to make your breakfast.
You peck his lips softly when you reach him, enjoying the way a smile tugs at the corners of his lips. "Everything okay?" You ask, letting him press his knee between your thighs, spreading your legs.
His hands land on your legs out of instinct. The silky smooth feeling does something for him that he didn't quite expect and for a second, touching you over the fabric feels just as intimate as touching your bare skin.
"I like these." Bucky teases, squeezing your ass, making you roll slightly against his thigh.
"I'm glad you like them. You need to be gentle though, you'll rip them."
That wasn't even something he'd considered but now it's all he can think about. Those perfect tights, totally ruined, your panties pushed out of the way so there's nothing between your body and his fingers.
"You've never really liked it when I'm too gentle." He reminds you and you can't help but giggle because he's right and you know it. "What if... I just ripped a hole. Right here. Between your legs." His fingers tap the apex of your thighs, through your tights and underwear and your only option is to grind down on his thigh just a little harder.
"That would ruin them." You rock your hips back and forth, enjoying the friction against his insanely muscular thigh, letting your own need build.
"I don't think so. I think it might make them better. You know I like those pretty dresses you wear. Putting that flimsy fabric in the way is just a tease." Both of his hands meet under your skirt, testing the resistance of the material when he tugs in different directions.
"Rip them." You whisper, half pleading.
He huffs out a quiet laugh, pulling harder and you feel the fabric give the whole way across with little ladders beginning to run down the legs.
"Bend over. Let me see." You do as you're told, standing up, pulling the skirt of your dress up to expose your clothed sex to him.
It's not clothed for long though, he widens the hole just a little, slipping your panties to the side to allow him to sink a finger into your wet, eager, inviting cunt, quickly followed by a second.
"Pretty little hole to fuck you through." He muses, watching you try to resist the urge to fuck yourself on his fingers, getting more and more desperate for his cock.
#asks answered <3#becca writes spice#anon#this is in honour of the fact that my winter wardrobe is really just my summer dresses plus tights 🙃#this week honestly came with enough problems for an entire year#I don't know what happened this week#It felt like it lasted FOREVER#somehow each day got a little bit worse than the day before#I lost my cool completely on Tuesday afternoon#and there was no getting it back last week#so I've taken time off to work in my other job this week and hopefully that helps#need a bit of a break
459 notes
·
View notes
Text

#i love that they used daryl dixon as the bg lmao#anyways! this has been a long time coming. the positives abt social media have been starting to stop outweighing the negatives for me#and rather than offering the connection to others it once did it has begun to feel very disconnecting to me in a way i do not like#i will still pop in occasionally i think if only just to post poetry or answer asks. but i will no longer be opening this app daily or#uploading my queue so when whatever's in there now runs out that's it!#I'll still be active on patreon. slightly less active on substack and medium. and wolfgang and i will still be doing the podcast.#but i need to take my time back tbh and this will help me do that hopefully. hope ur all as well as can be <3#tcp
166 notes
·
View notes
Note
Hey, I started reading Robin son of Batman because of your recommendation (I literally have a print of your post on my phone to not forget lol). Honestly? One of the best things I ever read!!!
Thank you for opening my eyes! Damian has been one of my favorite characters for over a year, but I didn't read/watch much of him because of school, life (and probably an executive dysfunction in the mix).
Maya is incredible. I loved her.
I haven't finished all the issues yet, but do you have any other recommendations?
WAH this makes me so happy, i'm glad you still gave it a shot even with how busy life is!! ;v;
i’d love to give reccs, and i’ll try to go a beginner friendly route! tbh you can pick up whatever here, but since you've read R:SOB i’d immediately follow up with Batman and Robin (2011) #1-8! this first arc is what’s referred to in Maya’s introduction, and it's just. so good.
Main Books
Batman and Robin (2009)
Dick as Batman with Damian as his Robin!
#20-22 Tree of Blood: Dark Knight vs White Knight arc is done by Tomasi and Gleason, the team for the next Batman and Robin series
*Batman and Robin (2011)
Bruce and Damian figuring out their relationship as both Batman & Robin and father & son
imo you can enjoy the ride and read straight through this but i’ll add context to avoid as much confusion as possible since there’s the occasional tie-in or offscreen events, like Damian’s death nbd
Batman Incorporated (2012) #1-10
events leading to Damian's death - affects Batman and Robin (2011) from issue #18
kind of a tough read especially with how Talia's written, but a lot of iconic bits like Batcow, Damian's vegetarian declaration, Alfred the cat, "We Were the Best, Richard."
Robin (2021)
another self-discovery adventure, particularly after Alfred’s death and a fallout with Bruce (and questionable writing choices from his last Teen Titans run)
Batman and Robin (2023)
currently ongoing! after a number of events, Bruce and Damian are back as a duo
Damian Dynamics!
Batman: Streets of Gotham (2009) #7, 10-12
arc where Damian meets one of his first Gotham friends, Colin Wilkes
Batgirl (2009) #5-7, #17
Steph and Damian dynamic! "the bad cop, worse cop" dysfunctional duo
Red Robin (2009) #13-14
early Tim and Damian dynamic that of course includes fighting haha. funny enough, accidentally my first intro to Damian LOL
Teen Titans (2003) #89-92
Dick!Batman has Damian join the Teen Titans. Start of Damian and Rose Wilson dynamic that’s extended in Robin (2021)
Batman: Gates of Gotham (2011)
Damian meets Cass and has a brief team up
Gotham Academy (2015) #7
Damian meets Maps Mizoguchi! they have a few other meetings, but outside of that the series itself is a great read!
Robin War Event (2015)
Robin War (2015) #1, Grayson (2014) #15, Detective Comics (2011) #47, We Are Robin (2015) #7, Robin: Son of Batman (2015) #7, Robin War (2015) #2
Duke and Damian dynamic! not exactly beginner friendly but these are the main issues in order for the event! you can also read the TPB version for everything including Tie-Ins
Nightwing (2016) #16-20, #42, #43
#16-20 Nightwing and Robin arc!
#42 Dick on a mission to save Damian! the one appearance of "Wiggles" the dragon
#43 Dick, Roy, and Damian team-up
New Talent Showcase 2018 "Catwoman: Pedigree"
Selina, Damian, and Alfred the cat
Batman: Prelude to the Wedding - Robin vs. Ra's Al Ghul (2018)
Selina, Damian, and Cheese Viking - Damian's fav game shown in Nightwing: Rebirth (2016)
Monkey Prince (2022) #1-4
Marcus Sun Shugel-Shen's main comic, but Damian features as a fun dynamic here before they're in more serious circumstances in Batman VS Robin (2022)/Lazarus Planet event
Superman (2016) #10 - 11
the beginning of the Super Sons! featuring Maya!
Super Sons (2017)
solitary arcs but there’s a few event tie-in issues later
Adventures of the Super Sons (2018)
literally more Super Sons adventures lol galactic shenanigans yeehaw
Challenge of the Super Sons (2020)
Super Sons time shenanigans feat. the Justice League
Robin 80th Anniversary (2020)
"Boy Wonders" - brief Damian feature as Tim considers his next step in life
"My Best Friend" - Jon's thoughts on Damian and their dynamic
"Bat and Mouse" - refers to Damian's unfortunate Teen Titans (2016) run at the time of release which follows up with Teen Titans Annual #2 where Damian briefly gives up Robin
Extra Comics!
Superman/Batman (2003) #77
Kara and Damian in a Halloween team-up! also the appearance of "Li'l Matches" lol
DCU Halloween Special '09 "Cavity Search"
Damian out on a solo mission for Halloween night. Immediately after is Tim's Red Robin story "Then and Now: Our Father's Sins" which is more somber in contrast but also a good read!
DCU Halloween Special 2010 "Robin the Vampire Slayer"
a Dick!Batman and Robin story featuring the vampire Andrew Bennett
Cursed Comics Cavalcade (2018) "The Devil You Know"
Halloween themed comic with a sweet short story of Damian alongside Solomon Grundy
DC's Terrors Through Time (2022)
"Trick or Treat" a Super Sons Halloween story
"The Haunting of Wayne Manor" Damian and Deadman story - in the end, Boston kinda refers to Nezha's possession of Damian in Batman VS Robin (2022) which was happening at the time of this release
Batman: Li'l Gotham (2013)
lighthearted series that instantly makes me smile with the silliness and Dustin Nguyen’s art i love this dearly
Secret Origins (2014) #4 "A Boy's Life"
a retelling of Damian's origin story
Detective Comics (2016) #1001-1005
Batman and Robin vs the Arkham Knight (unrelated to the game)
Truth & Justice (2021) #6/#16 - 18 Digital First version
cute story of Damian’s birthday! Juni Ba’s art is so fun!!
DC Festival of Heroes: The Asian Superhero Celebration (2021) “Special Delivery”
short story about Damian! and poisoned pizzas. completely forgot the artist Sami Basri drew Rebirth Damian here before catboy Damian lol Cass’s story “Sounds” is also cute! Marcus makes his first appearance in "The Monkey Prince Hates Superheroes"
DC VS Vampires (2021)
Damian makes appearances throughout this elseworlds book, but the one-shot DC VS Vampires: Hunters (2022) is vampire Damian-centric!
Batman: Black and White (2021) #5
“Father & Son Outing” short story written and drawn by Jorge Jimenez!
Batman: Urban Legends (2021) #20-23
#20 “My Son” Talia and Bruce focus
#20 - 23 “The Murder Club” 4 Parts
Tiny Titans (2008) #33, #39, #45, #47
a few appearances but SO CUTE, LOOK AT HIM

*Batman and Robin (2011) reading guide
i'm mostly trying to avoid the "what did i just walk in on?" kinda feeling when i first started reading comics LOL i'll list the comics where events take place, but you don't necessarily have to read them to go through this book since things are usually explained as quickly as possible in the first page or so
#0 Someday Never Comes
Talia and baby Damian before he grows up to meet Bruce
#1-8 Born to Kill
just an incredibly solid arc for Bruce and Damian!
#9 Court of Owls Tie-In Issue
Damian VS a Court of Owls Talon. While Bruce is occupied with a home invasion of Talons, Alfred makes a call for allies to protect targeted Gotham public figures from Talons. During Batman (2011) #1-11
#10-12 Terminus
Damian challenges the previous Robins sans Steph
Batman Incorporated (2012) is occurring at this time where Talia has placed a bounty on Damian and there's small mentions of that
#13-14 Eclipsed/Devoured
mostly solitary arc! end of it leads into the Death of the Family event
#15-16 Death of the Family Tie-In Issues
Damian and Joker face-off... Alfred's been kidnapped by the Joker, and Damian goes looking for him. During Batman (2011) #13-17
#17 Life is but a Dream - Death of the Family Epilogue
a sort of subconscious check-in through the dreams of Damian, Alfred, and Bruce. Nightwing (2011) #17 features Damian encouraging Dick after Death of the Family events
#18 Undone "Requiem"
Bruce dealing with Damian's death from Batman Incorporated #8
other reactions to Damian's death: Dick in Nightwing (2011) #18, Tim in Teen Titans (2011) #18
#19-23 Denial, Rage, The Bargain, Despair, Acceptance
Bruce through the stages of grief with some batfam appearances in each. also introduces Carrie Kelley into continuity as Damian's acting tutor.
Batman (2011) #19-20 also addresses Bruce's loss
#23.1-23.4
these could be skipped - villain stories, also related to Forever Evil event.
#24-28 The Big Burn
optional Batman and Two-Face/Harvey Dent arc, #23.1 is part of this story!
Damian's resurrection and return
#29-32 The Hunt for Robin
Ras took Talia and Damian's bodies from their graves, and Bruce goes after him.
-> Robin Rises: Omega
continues events from #32. if you don't want to jump to this, basically, Glorious Godfrey and a bunch of parademons from Apokolips are here for a chaos shard which Ra's put in Damian's sarcophagus. at some point, Bruce gets a hold of the shard where he sees a vision that leads him to believe Damian can be resurrected. Godfrey ends up taking the shard, along with Damian's body since it was emitting the same energy.
#33-37 Robin Rises
Bruce hellbent on retrieving Damian from Apokolips and reviving him
-> Robin Rises: Alpha
necessary to read and continues events from #37! Damian's back with a bang lol
#38-40 Superpower
Damian adjusting to having superpowers and being alive again
Annual #1 2013 Batman Impossible
sweet (and funny) one-shot of Damian sending Bruce on a meaningful scavenger hunt around the world while Damian gets to be the cutest Batman for a bit
Annual #2 2014 Batman and Robin: Week One
one-shot takes place during Damian's absence. after Bruce and Alfred find a mystery gift left for Dick, Dick recounts a story he had told Damian from his Robin days.
Annual #3 2015 Moonshot
one-shot Batman and Robin adventure on the moon!
...and of course after Batman and Robin (2011), Damian's story continues in his first solo Robin: Son of Batman (2015)!

#damian wayne#ask#sorry for R:SOB promo again but i need this title attached to Damian's name as much as B&R 2009/2011😭#thank you for the ask anon!! really am so happy you were able to find the time to read RSOB and enjoy it!! i genuinely cheered 😭#i hope some of these comics give you many emotions and/or a smile!! <3#if anyone would like to correct something or include some Damian comics please feel free to comment or add to the post!!#sorry if the reading guide is an intimidating wall of text hhh after i finished it i was like...this does not look beginner friendly LOL 😭#Damian's Teen Titans run is beginner friendly but it's so frustrating to read his character being regressed especially after RSOB#ig i would only recc the first 5 issues just for Mara asdsfg#super/bat 77 comic rlly made me wonder how Williamson could've made Damian sound so stiff now compared to his first time writing him?? rip.#also i love how there's so many Halloween stories here lol#maybe?? i'll do a guide for Damian's intro since those were the most confusing for me when i really got into his comics#i think his most recent appearances are a bit easier to figure out on your own but i don't mind doing a guide for that too if needed!#OOF tags got long lol i may be a bit nervous posting this bc i'd like ppl to read more Damian but worried i may have goofed somewhere#but hopefully this is helpful to anyone curious about peeking at his comics!!
249 notes
·
View notes
Photo
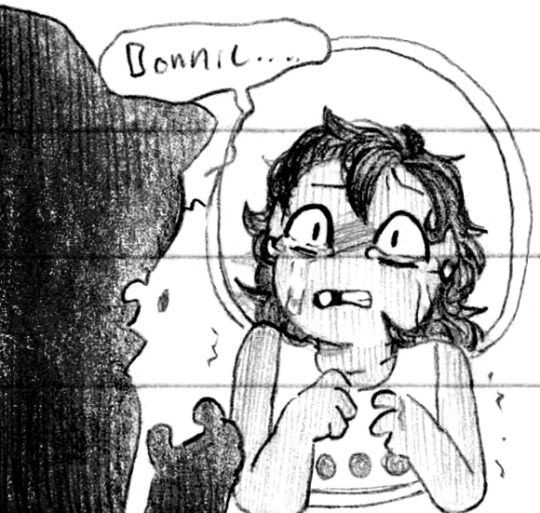

An eye for a life, unquestionably worth it (Patreon)
#Doodles#ISaT#Siffrin#Bonnie#Blood#It's been *checks watch* nine months??? since I last drew an empty eye socket???#Not even ZEX got that treatment how could this be :0 It's such a Look#I guess it's only been a couple months since I posted Diaryfic!Edgar but that was drawn a while ago - Sif is new and fresh blood <3#I'm sure they're stoked about it lol sorry Sif#That really was my entire motivation I just wanted to draw eye horror and blood on him lol poor Sif#But also I got to practice Bonnie :D Again I'm sure they're stoked about the situation#Gosh that'd be such a scary situation for a kid :'0 And feeling guilty about it weh </3#Their name being called and it's scary and sad even tho Sif's just trying to comfort! Weh#If I thought about it in a Bit less of an angst mood (lol) I imagine the other adults would flock to Sif both to protect/help him#But also to keep him out of Bonnie's line of sight - the less time spent looking the less traumatic hopefully :(#There's something Very about Sif getting blood - his own or anyone's really - on his cloak :0#Something he's had for a long long time and Something Happens - it's just Very I dunno of what but Very#Really fun to draw the black and white blood splatter ♪ Shaped character design paired with soft details ah <3#I've been really into that hazy fuzzy eye style lately too it's really fun to ''tone'' the eye rather than ''line'' it#It's not something I think about that much so I don't do it often! But it's quite effective :D
130 notes
·
View notes
Text


excited to announce i've made my first brush pack for procreate!!! i really like all these brushes and i hope you do too :) you can check out all the brushes and even download a free demo on my itch.io!
#procreate#digital art brushes#art resources#brush pack#my art#tried to keep the whole set affordable also !#but yeah. stuff like this helps me out <3 and hopefully these brushes help u!#will make a csp set at some point i promiseeee 😢#i just dont understand the brush engine as well in there
1K notes
·
View notes
Text

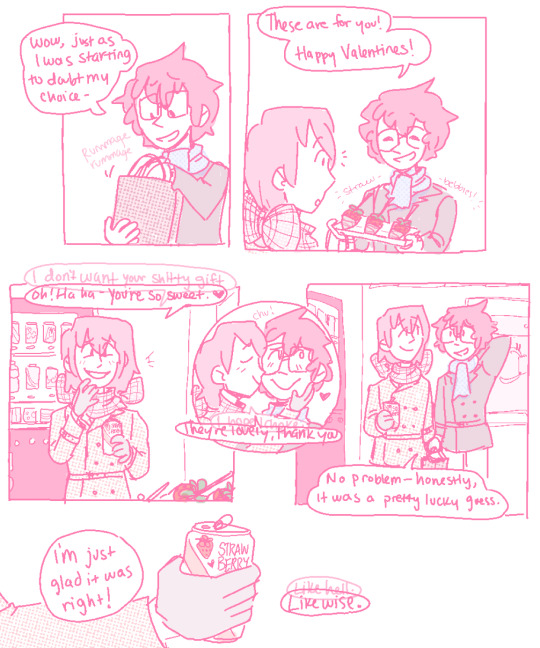

Happy Valentines, Akira.
Happy Valentines, Asshole.
If you can’t read what Akechi’s secondary inner-dialogue says cause I obscured it too much behind his regular dialogue, here’s a transcription in panel order:
Hello, you fucking-
Ah- Hello, Akira!
Fuck off, why should I tell you-
Just a soda- there’s a new flavor.
I don’t want your shitty gift.
Oh- haha! You’re so sweet.
I hope I choke.
They’re lovely, thank you.
Like hell.
Likewise.
There’s no way it’s just a coincidence.
Still though, it’s a funny coincidence.
#p5#akeshu#akechi goro#kurusu akira#wow- me?? posting a valentines comic... actually on?? valentines????? wack. absolutely wack#it's a short one! I purposefully tried to keep it short. it was a challenge and it still ended up being 3 pages. but i blame my canvas size#also in case u can't see what akira is holding out to akechi: theyre chocolate covered strawberries on sticks!#i saw them irl and was like oh god i want those. i am going to project that feeling on my favorite characters so help me god#and now! here we are! but my shitty-ass coloring & line quality make it hard to discern them so. sorry about that lmaooooo#ANYWAY i don't do enough post-maruki stuff so. i made this one a little bittersweet. :)#why did i put akechi's scarf in a bow? honestly i dont know! i think i saw some art a while ago that did that too and i thought it was cute#well. plus i guess there's the symbolism of 'akechi being alive and reciprocating your feelings (however involuntarily) IS a gift' part#hence that hes wrapped up in a bow. like a present. :)#also god. the first panel is supposed to be akechi's reflection in a vending machine window. I could NOT get it to look right#so for reference!!! just so you guys understand!!!!!! thats what that panel is supposed to be!!! he is NOT in fact a ghost. (sigh)#hope you enjoyed and had a lovely valentines!! for my part i have eaten nothing but sweets today and hoo boy will that have been a mistake#ALSO in terms of the audience-participation comic...hopefully coming soon. if i can ever gain the will to draw it.#but at least tumblr has polls now so i can do the audience-choose-y bit without needing to use a separate website! so thats good i guess#anyway anyway anway thanks for listening to me ramble if you made it this far! have a lovely rest of your day and hopefully see u again soon
710 notes
·
View notes
Text
Raphael, Archdevil Supreme
Oil on canvas pad, 8x10"
details and process below
lovely ref by @crimsoncrocuta
This non-canon outfit for Raph is one of my favorites! I love drawing him in it 💜 The frilled collar isn't in the original but I like to paint it in. It feels incomplete without it.
I drew inspiration from Singer-Sargent, one of my major art influences. I'm self-taught and have studied his works for years, but this is the first time I've attempted his technique with oils (I was intimidated 😅). But I'm glad I tried because I learned a lot!
I can only upload one video which is the process, but on my Instagram you can also watch: some tape removal, varnishing, and me adding the highlights for his eyes.

Process
Mr. Wincott has seen the wip of this! very happy and grateful :D

#bg3#baldurs gate 3#bg3 raphael#bg3 fanart#raphael bg3#raphael the cambion#artists on tumblr#oil painting#traditional art#I'm really happy with how this turned out!! <3#got to paint both him and Zev now :D#I wish I could show the texture better but hopefully the closeups help!#ngl when Mr. Wincott liked it i was over the moon but also:#don't mess this up (x10) to myself which is probably how raph's in game painter would be like lol#if he doesn't like it he'll just take your soul no pressure!! ;D
90 notes
·
View notes
Text


While it doesn't specify that Jacobson says she has a prosthetic leg in the message, it also doesn't say that she didn't mention it. I think Mechi would accept anyone who reminds him of Yamka, no matter how temporary their stay might end up being.


Mechi, Jacobson, and Boop VS the Drainers (which are much bigger really, but I thought this was funnier)


Look at her go <3


Just as we sent Jacobson on her way, we got another message from a child in need! Well, we can't turn this one down either, so... Let's see our new brief acquaintance!


Oh no, she's adorable!!


I suppose it would be cruel to make a three-year-old walk that far. Into the transport pod she goes.


Randy, please. The joke is getting old now.


RANDY PLEASE


What secrets is this strange child hiding... What is he running from? I wonder...
First | Next | Previous
#rimworld#gracie plays#A Mechanitor's Message#art#my art#traditional art#rimworld art#unpolished art#slightly more polished art than usual#Today in Rimworld: “Mechi starts a daycare apparently”#nah#the daycare is at Arwell#hopefully the guys there appreciate kids#because they're getting a whole lot of them very quickly#Poor kids#must be a tough life for the little guys out here in the arid shrubland#made that much worse by the fact that their only help comes in the form of a very disgruntled mechanitor who obviously dislikes them#ah well#have a fantastic day everyone!! <3
55 notes
·
View notes
Text
“I need a father. I need a mother.
I need some older, wiser being to cry to.
I talk to God, but the sky is empty.”
― Sylvia Plath
#The Chosen One#anakin#anakin skywalker art#anakin skywalker#anakin skywalker fanart#sw#star wars#star wars art#mayhem art#my thanks to magnusbae for helping me choose the perfect quote to fit with the art <3#also this time I feel like saying a word or two about what I was going for with this one#lately I find myself gravitating toward the ideas of Anakin in religious context#this one was inspired by statues and stained windows of praying saints and it is the beginning of my religion themed sw art#some other wips are in the owen already so hopefully i will finish baking those someday :)#but more about this one#I wanted to capture the immense burden that was put onto Anakin's shoulders by being labeled as the chosen one by the Jedi#he was made into a symbol representing the hope of the prophecy#he stands surrounded by people. people with expectations. people who lay their hopes in his hands. who gaze upon him. who celebrate him#yet he stands isolated. lost.#deified. pushed towards his own downfall#he's searching for his path. he's searching for guidance#for a shoulder to lean on. to cry on. after the loss he has suffered and for the torments that are yet to come#he's exeptionally strong yet so fragile and vulnerable
99 notes
·
View notes
Last Seen Blogs

rosesky-blog
Rose Colored Sky

ghedzo-blog
STOMP HOUSE RECORDS

birthalone
Untitled

saix-unicorn
Saïx

princessroyasblog
Anne And Tim 🩷