#how to use canva tutorial
Explore tagged Tumblr posts
Visit Tumblr Blog
Explore Tumblr blogs with no restrictions, modern design and the best experience.
Last Seen Tumblr Blogs


Fun Fact
Tumblr was created by web developers David Karp and Marco Arment.
Text
Canva Free Everything You Need to Know About Free Version of Canva
If you’ve ever felt intimidated by graphic design or thought you needed a degree in Photoshop to create stunning visuals, let me introduce you to Canva. Whether you’re a small business owner, a student, a social media enthusiast, or just someone who loves creating, Canva Free is a game-changer. In this article, we’ll dive into everything you need to know about Canva Free—its features,…
#canva#canva 2025#canva ai#canva course#canva design#canva design tutorial#canva for beginners#canva free#canva hacks#canva pro#canva pro free#canva text effects#canva tips#canva tips and tricks#canva tricks#canva tutorial#canva tutorial for beginners#design with canva#easy canva tutorial#how to use canva#how to use canva app#how to use canva for beginners#how to use canva tutorial#learn canva#tips for canva#tutorial canva#video canva
0 notes
Text
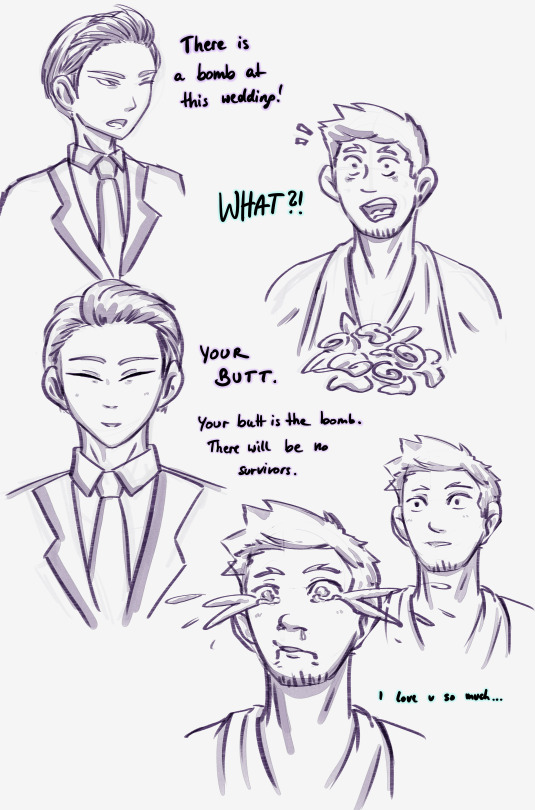
Based on B99 being iconic of course.
And the most beautiful Kafka Bride there is. ♡( ◡‿◡ )
Honestly, if that's not romance to you, we will never work out, sorry..
#kn8#kaiju no 8#kafhoshi#hoshina soshiro#kafka hibino#let's be honest they would have to rescedule the wed cause kafka wouldn't be able to calm himself down again lol#my wimpy boi#i literally scratched through my working hours to finally get home and make this#sorry for always picking up your ideas and add my shit to it ox..#if that bothers you just let me know#also I feel like I wanna learn how to use the comic canvas mode in CSP#feel like it could improve sketches like these a bit..#seems like we're going back at the yt tutorials#icy's art
83 notes
·
View notes
Note
Sorry if this is a bit out of left field since we’re moved on to the deciding the pattern part of the birthday quest, but I was curious if you had any patterns in mind for a messenger bag in the event that it won? I’ve always wanted a nice one, but I never thought of making one myself until I saw it in your poll
Hey! It's not out of left field at all, I love talking about patterns! I don't have a pattern for one yet, but I will be either sharing a link to one or just drafting one myself in the short-to-medium term, because I want to make my nieces some messenger bags for rock collecting. It'll depend on if I find a pattern I like or if I find my old denim messenger bag I drew all over that I think is still in my closet somewhere? I loved that thing, it's my personal default of what I think a messenger bag looks like
#ask away!#I might also either make my own tutorial or share a link for one I find#for converting a normal crossbody purse to one that can also be worn as a backpack#that one has to percolate a little longer before I figure out exactly what I want to do#but it's definitely a thing I want to do#oh hey wait I think I know how to do it#for my specific purse anyway it would just take two little loops#hm. I even have a rainbow canvas that matches the bag pretty well#wait my bag already HAS loops#they aren't for this but I bet I can use them for this#thank you nonny these tags just helped me figure out how to convert my purse into a backpack#with no sewing at all#that is not helpful for your question but I am leaving the tags in lol
6 notes
·
View notes
Video
youtube
Create Frame from any image with this Canva app for FREE
#youtube#canva#canva tips#canva app#canva tutorial#canva design#tutorial#design tutorial#how to use canva#canva for beginners
2 notes
·
View notes
Text

I decided to do something fun for the end of the year and made a chart of all the books I've read in 2023.
Some of the books are polish and don’t have a translation. Also if you’re wondering why the priory of the orange tree is on there twice it’s because in Poland the book was split into two parts ^^
I’ve put my favorites under the cut
☆ A tale for the time being
☆ Bunny
☆ The trial
☆ This is how we lose the time war
☆ Perfume
☆ Fight club
☆ Ring
☆ Hidden Valley Road
☆ The outsiders
#reading wrap up#year in books#2023#also if you’re wondering how I made the chart I used Canva#and based it on a tutorial on making a kpop photocard wishlist haha#also this is in reading order so most recent ones are on the bottom#also fun fact#only 6 of these books I own and the rest is from the library or borrowed from friends or family
2 notes
·
View notes
Text
youtube
#Digital Nomad Institute#how to create mind map on canva#online business tools#productivity tools for digital nomads#how to create canva templates#digital nomad lifestyle#digital nomad productivity#how to mind map#digital nomad tools#digital nomad resources#digital nomad#remote work tools#digital nomad tips#business model canvas#how to sell canva templates#mind mapping software#digital nomad skills#canva tutorial#how to use canva#mind map#business tools#Youtube
0 notes
Text
Can't afford art school?
After seeing post like this 👇

And this gem 👇
As well as countless of others from the AI generator community. Just talking about how "inaccessible art" is, I decided why not show how wrong these guys are while also helping anyone who actually wants to learn.
Here is the first one ART TEACHERS! There are plenty online and in places like youtube.
📺Here is my list:
Proko (Free, mostly teaches anatomy and how to draw people. But does have art talks and teaches the basics.)
Marc Brunet (Free but he does have other classes for a cheap price. Use to work for Blizzard and teaches you everything)
Aaron Rutten (free, tips about art, talks about art programs and the best products for digital art)
BoroCG (free, teaches a verity of art mediums from 3D modeling to digital painting. As well as some tips that can be used across styles)
Jesse J. Jones (free, talks about animating)
Jesus Conde (free, teaches digital painting and has classes in Spanish)
Mohammed Agbadi (free, he gives some advice in some videos and talks about art)
Ross Draws (free, he does have other classes for a good price. Mostly teaching character designs and simple backgrounds.)
SamDoesArts (free, gives good advice and critiques)
Drawfee Show (free, they do give some good advice and great inspiration)
The Art of Aaron Blaise ( useful tips for digital art and animation. Was an animator for Disney. Mostly nature art)
Bobby Chiu ( useful tips and interviews with artist who are in the industry or making a living as artist)
Sinix Design (has some tips on drawing people)
Winged canvas (art school for free on a verity of mediums)
Bob Ross (just a good time, learn how to paint, as well as how too relax when doing art. "there are no mistakes only happy accidents", this channel also provides tips from another artist)
Scott Christian Sava (Inspiration and provides tips and advice)
Pikat (art advice and critiques)
Drawbox (a suggested cheap online art school, made of a community of artist)
Skillshare (A cheap learning site that has art classes ranging from traditional to digital. As well as Animation and tutorials on art programs. All under one price, in the USA it's around $34 a month)
Human anatomy for artist (not a video or teacher but the site is full of awesome refs to practice and get better at anatomy)
Second part BOOKS, I have collected some books that have helped me and might help others.
📚Here is my list:
The "how to draw manga" series produced by Graphic-sha. These are for manga artist but they give great advice and information.
"Creating characters with personality" by Tom Bancroft. A great book that can help not just people who draw cartoons but also realistic ones. As it helps you with facial ques and how to make a character interesting.
"Albinus on anatomy" by Robert Beverly Hale and Terence Coyle. Great book to help someone learn basic anatomy.
"Artistic Anatomy" by Dr. Paul Richer and Robert Beverly Hale. A good book if you want to go further in-depth with anatomy.
"Directing the story" by Francis Glebas. A good book if you want to Story board or make comics.
"Animal Anatomy for Artists" by Eliot Goldfinger. A good book for if you want to draw animals or creatures.
"Constructive Anatomy: with almost 500 illustrations" by George B. Bridgman. A great book to help you block out shadows in your figures and see them in a more 3 diamantine way.
"Dynamic Anatomy: Revised and expand" by Burne Hogarth. A book that shows how to block out shapes and easily understand what you are looking out. When it comes to human subjects.
"An Atlas of animal anatomy for artist" by W. Ellenberger and H. Dittrich and H. Baum. This is another good one for people who want to draw animals or creatures.
Etherington Brothers, they make books and have a free blog with art tips.
📝As for Supplies, I recommend starting out cheap, buying Pencils and art paper at dollar tree or 5 below. If you want to go fancy Michaels is always a good place for traditional supplies. They also get in some good sales and discounts. For digital art, I recommend not starting with a screen art drawing tablet as they are usually more expensive.
For the Best art Tablet I recommend either Xp-pen, Bamboo or Huion. Some can range from about 40$ to the thousands.
💻As for art programs here is a list of Free to pay.
Clip Studio paint ( you can choose to pay once or sub and get updates. Galaxy, Windows, macOS, iPad, iPhone, Android, or Chromebook device. )
Procreate ( pay once for $9.99 usd, IPAD & IPHONE ONLY)
Blender (for 3D modules/sculpting, animation and more. Free)
PaintTool SAI (pay but has a 31 day free trail)
Krita (Free)
mypaint (free)
FireAlpaca (free)
Aseprite ($19.99 usd but has a free trail, for pixel art Windows & macOS)
Drawpile (free and for if you want to draw with others)
IbisPaint (free, phone app ONLY)
Medibang (free, IPAD, Android and PC)
NOTE: Some of these can work on almost any computer like Clip and Sai but others will require a bit stronger computer like Blender. Please check their sites for if your computer is compatible.
So do with this information as you will but as you can tell there are ways to learn how to become an artist, without breaking the bank. The only thing that might be stopping YOU from using any of these things, is YOU.
I have made time to learn to draw and many artist have too. Either in-between working two jobs or taking care of your family and a job or regular school and chores. YOU just have to take the time or use some time management, it really doesn't take long to practice for like an hour or less. YOU also don't have to do it every day, just once or three times a week is fine.
Hope this was helpful and have a great day.
"also apologies for any spelling or grammar errors, I have Dyslexia and it makes my brain go XP when it comes to speech or writing"
104K notes
·
View notes
Text
youtube
Learn how to create GIFs in WhatsApp using Meta AI in 2024! This step-by-step guide will show you the easiest way to make personalized GIFs directly within WhatsApp. Whether you're using an Android or iOS device, this tutorial covers everything you need to know. Perfect for enhancing your chats with fun and unique GIFs.
#WhatsApp GIF kaise banaye#How to Create GIF in WhatsApp Using Meta AI 2024#WhatsApp GIF tutorial#Meta AI GIF creation#WhatsApp tricks 2024#how to create a gif#how to make a gif#how to#how to create gifs#how to make gifs#how to create a gif in canva#how to easily create a gif in canva#create a gif#how to make an animated gif#how to create a gif using canva#easy way to create a gif#how to create animated gifs with canva#how to create a gif using canva for work#how to create animated gif in photoshop#how to create#how to create gif#create gif from video#how to make a gif in canva#Youtube
0 notes
Text
youtube
0 notes
Text
the charcoal portrait of my husband
youtube
View On WordPress
#taniatrioloartista#casa#charcoal portrait#charcoal portrait drawing for beginners#draw#drawing charcoal portraits#drawing portrait in charcoal#easy charcoal portrait drawing#how to charcoal portrait#how to draw a face silvie mahdal#how to draw a face using charcoal pencil#how to fix charcoal drawing on canvas#il mio ritratto disegnato a carboncino#independent artist 85#independentartist85disegni#portrait charcoal drawing#ritratto a carboncino tutorial#taniatrioloartistaindipendente#Youtube
0 notes
Note
I’m obsessed with the Lackadaisy comics way of shading/colouring! Could you please give a tutorial of how you do that and what brushes you use?
Here's a sample I used for the Lackadaisy Essentials art book. About 98% of the time, I'm not using specialized brushes - just basic soft and hard-round brushes, with various opacities.


Digital scan of the establishing shot pencil drawing - I added some some grid lines on top to double check the 1-point perspective. I didn’t include the characters here because I knew I’d be using the art as a background for more than one panel in the comic.
Initial lighting pass - This was done almost entirely by burning shadow directly into the pencil art scan. This way, I preserve a lot of my pencil lines (rather than painting over them) and the grain of the paper remains in play. This helps retain a sort of aged, natural media look despite the largely digital nature of it.
Contrast and brightness adjustments - Here I hand-painted more minute details into the rug, decor and fixtures with small diameter round brushes. I drew a wallpaper pattern on a separate canvas, then applied it as an overlay layer here too. And, of course, the characters arrived as raw pencils on new layers.
Character compositing and color wash - I didn't want to go fully monochrome with the colors, but I also didn't want to treat this like a full color digital painting. Instead, I opted for something resembling a warm-to- cool wash, achieved with a color layer on top of the grayscale base. Young Mordecai and Rose were toned to match the scene with a combination of burning, dodging and painting.
Lighting effects and atmosphere - Overlay layers can be used to push warm values into a much more saturated, vibrant place than a color layer alone can manage, and that's what I did here to create the streaming sunlight. I used a screen layer to include overexposure on bright colored elements as well. Floating dust motes in the light were added for atmosphere, and I polished the characters up with their own color and overlay layers to match the scene.
There's another, older process breakdown here on the Lackadaisy web site too, if you want more information.
1K notes
·
View notes
Text

#free website builder#real estate agent websites#ai website builder#canva website builder#godaddy website builder#godaddy website builder tutorial#groove artificial intelligence review#free website hosting#artificial intelligence review#create a website with canva#create a website using canva#how to create website for free in canva#how to create a website in canva#how to create wordpress website on godaddy#create a website in canva#video creator app review
1 note
·
View note
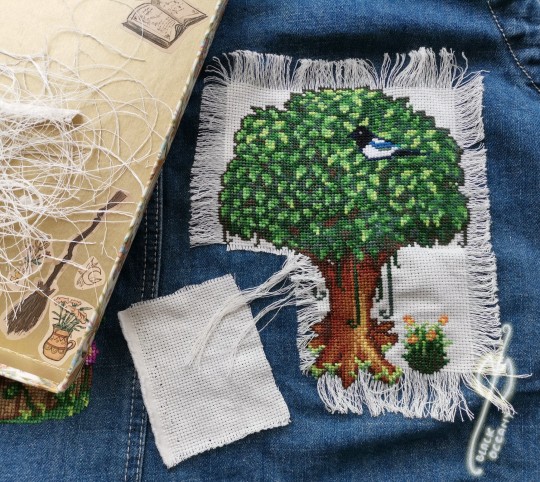
Text
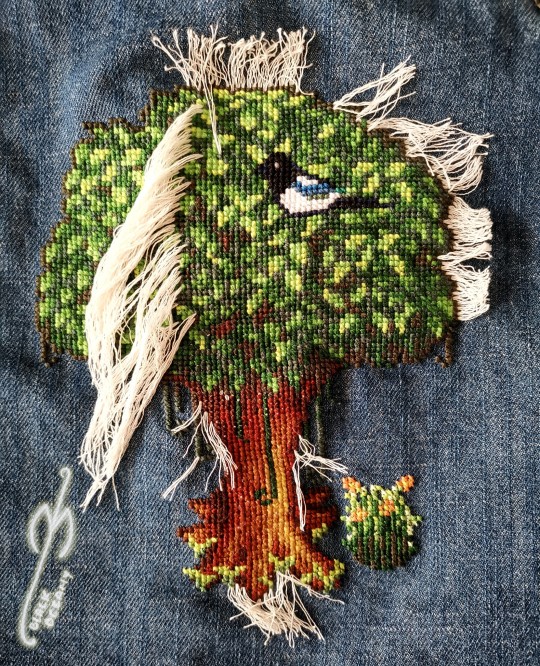
I have recently received another ask about my canvas pulling and since I've been thinking about making a serious tutorial for a while now, I took the opportunity to take some pics and vids while finishing the tree. Do please enjoy :3
1. Why pulling out canvas at all?
Primarily, this is a fantastic technique to apply cross stitch patterns directly to the item you want OR to make patches from old jeans, like this one:
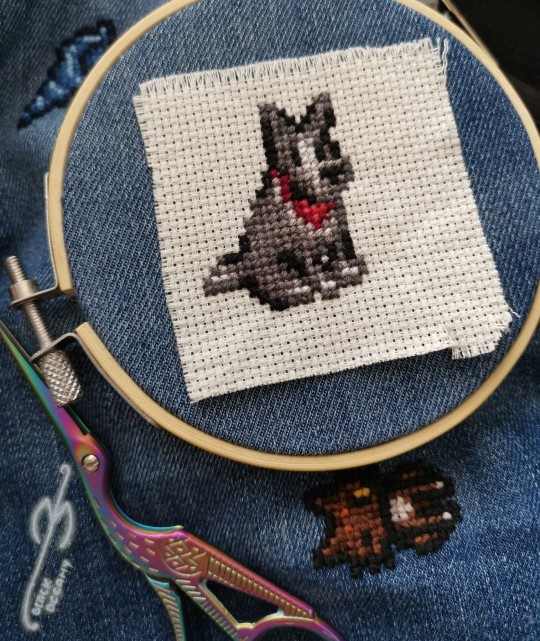
With small patterns I usually don't bother to sew the canvas prior to embroidering, like with the pupper above. In case of the bigger patterns, I usually sew it lightly on the edges just to keep the canvas in one place. The more stretchy the material type is, the more important it's going to be to keep it in place.
2. Why not use a soluble canvas?
I'm sure you can and that they'll be as successful as the regular one 😁 However, as I mentioned in my previous posts here and here, I prefer to err on the side of cheaper, hence the tutorial.
3. Okay. I'm convinced - I even have a pattern embroidered on! What's next?
With small patterns (like the doggo earlier) it's going to be pretty easy. You just pull the threads one by one - preferably starting on the thinnest part of the pattern - and you may not even need the pliers. The fun (?) is with the large pieces, because the canvas has on average quite fragile threads and they like to break. Note - the canvas I'm using and I suppose most of the existing canvas types, will have four threads per one embroidery row. It's usually easier to pull one first and then the other three, bit that may vary when, for example, you managed to pierce the thread during stitching phase earlier 😉
If you were already careful during the stitching, you paid extra attention to embroider EXACTLY between the canvas threads and avoid piercing them at all. There are two benefits to that being extra careful: one, it's easier to pull it out later; two, the stitching gains an extra precision to it (and it looks great!). I recently discover that the round tip needle is making it much easier and if you're interested, there's a separate post about it as well!
On to the process! You can see from the pictures how I started with cutting out a piece of canvas that I can later reuse for something small (recycling is my hobby 🤷🏻♀️). I also pulled loose threads from around the tree:
Next part was to clean up the trunk and the grass on the right:
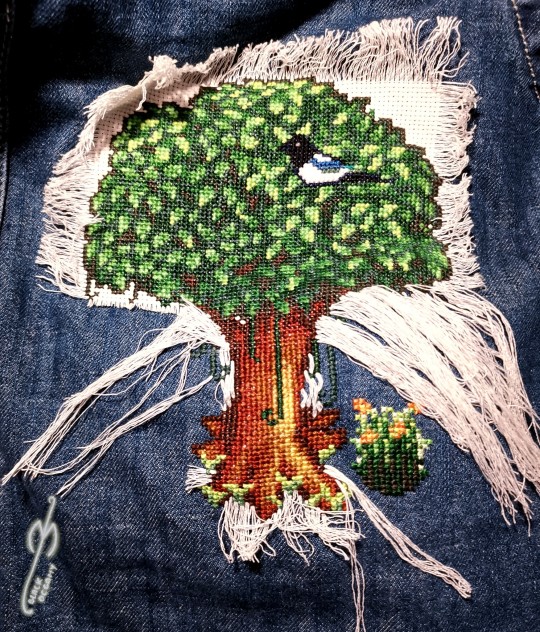
I then cut off the excess to avoid the threads tangling and slowly moved to the sides of the leaves on right and left:
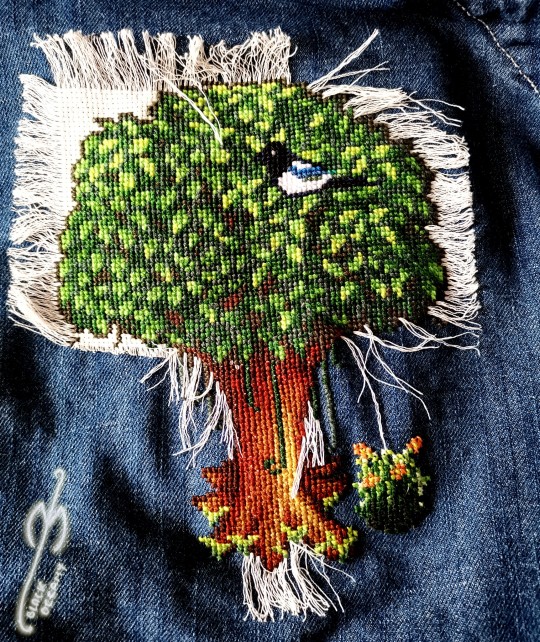
You'll notice that the last photo has the thread pulled halfway through the pattern. That's because on this stage it's usually impossible to simply pull the thread out - even with the pliers it is just going to break off. I use a needle to pluck it from between the embroidery like this:
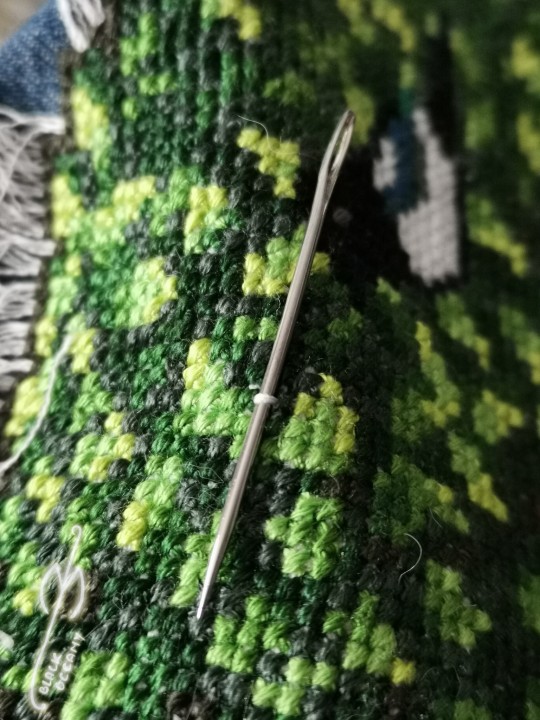
If you're more of the visual learner, I made this vid that I hope explains the process in more detail. You'll notice that I'm using my fingers and not the pliers here, because it's faster than to switch between tools.
And finally, when you're left with single direction threads like these, it's just a matter of pulling them out one by one.
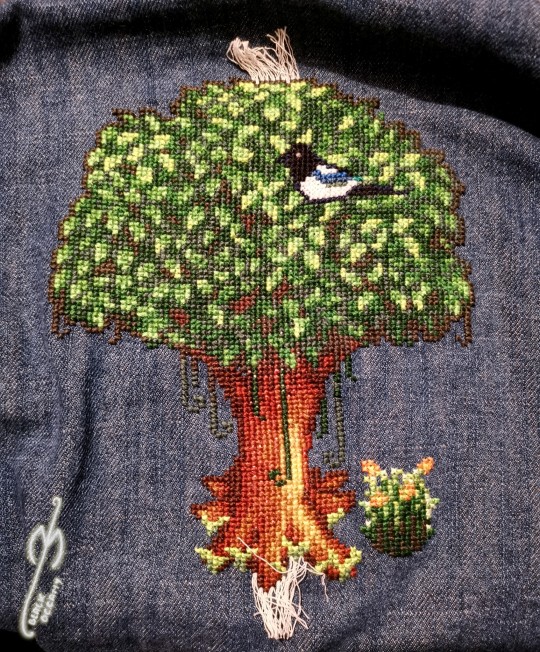
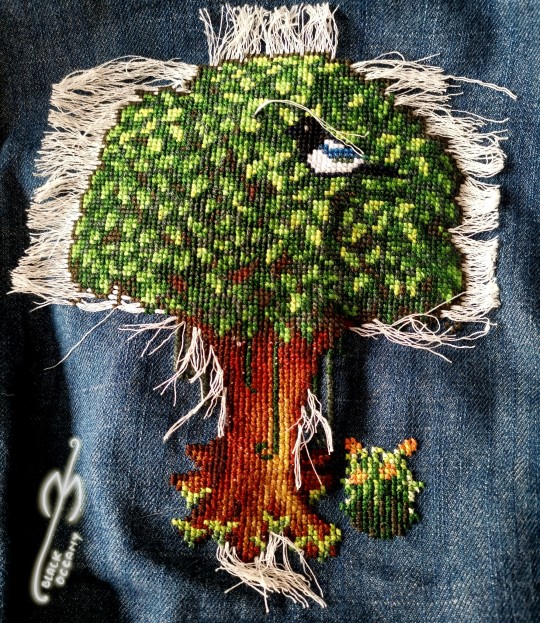
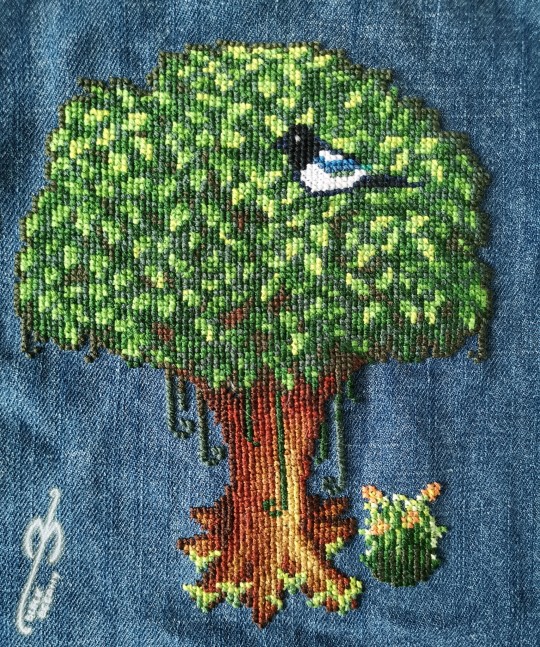
And that's it! The final product looks clean and neat, AND you will notice that without the canvas beneath it's also getting a bit of volume that looks cool (and helps even out small mistakes you may have made along the way).
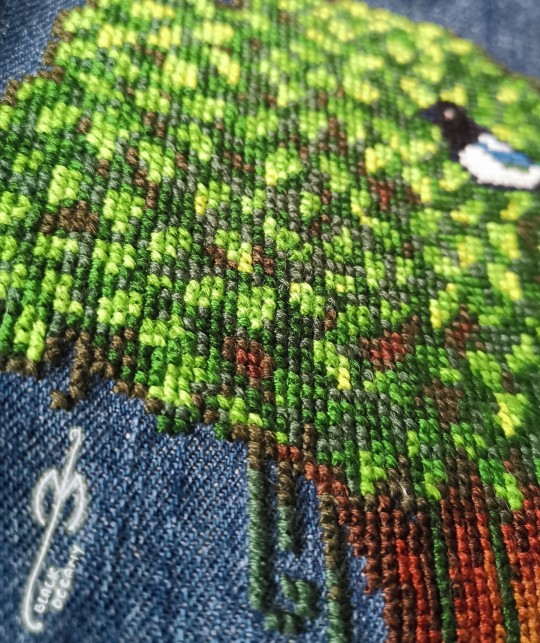
Thanks for reading this far! Let me know if there's something else I forgot to explain 😊
2K notes
·
View notes
Text
-> just a something small
thinking about boyfie!Sukuna with creative gf!reader.
“Don’t move,” you said, brow furrowed as you traced yet another swirl of henna onto Sukuna’s already tattoo-covered arm.
“I’m literally not moving.”
“You breathed. I felt it.”
He stared at you, unimpressed. “That’s usually encouraged.”
You didn’t respond. You were too busy drawing a stick man, very deliberately, right inside one of his thick, black tattoo bands. It looked comically out of place. Like someone had graffitied a caveman onto the ceiling of the Sistine Chapel.
You sat back proudly. “Look at him. Living his best life.”
Sukuna tilted his head to examine the stick figure. “He has no face.”
“He’s minimalistic. Don’t be rude.”
He said nothing, which in Sukuna-language meant “this is ridiculous but I’m letting it happen because I love you or something.”
He didn’t mind being used as a canvas. That much had become clear. You’d started with henna, but the chaos had escalated over time.
One evening, while you were studying on the couch, you realised his hand was resting peacefully on your lap. Completely still. Completely unguarded.You grabbed a pen.“You’re doing something,” he said without looking.
“No I’m not.”
“You’re drawing on me.”
You were. A tiny cat on his thumb, a sunflower on his pinky, a suspicious-looking frog on the side of his hand.
He looked at them after five minutes of silence.“Why is this frog judging me.”
“He knows what you did.”
Later, you sat him down at the kitchen table like you were about to perform a very serious operation. You held up a bottle of pale pink nail polish.He glanced at it. Then at you. Then at his lighter.
“I’m repainting it,” you said. “Your personality is 90% violent and the other 10% is whatever colour your hair is. We’re leaning in.”
He didn’t even argue. Just pushed the lighter across the table like a defeated man handing over a family heirloom. You worked in silence for a bit, tongue between your teeth. “You’re very precise,” he said.
“I trained under the ancient masters of DIY TikTok.”
“I have no idea what that means.”
“Good. That’s how I maintain my mystery.”
You didn’t stop there. Oh no. Next was Labubu. Your slightly terrifying big-eared plush toy. One morning, Sukuna walked into the living room to find you sewing tiny pink thread onto its head.“What’s happening.”
“He’s becoming you.”
Your Labubu now had angry little eyebrows, a tiny scar, and black ink marker tattoos all over his felt arms. You handed it to Sukuna.
“He’s your plush clone. Be gentle. He’s moody.”
Sukuna stared at it. “It looks like it’s planning murder.”
“Just like you.”
He didn’t argue. That meant you were right.
You found a DIY jacket tutorial and decided Sukuna needed a makeover. He was napping. You were in a creative mood. Dangerous combination. You ironed on three patches, one of which said “Menace to Society,” and drew a snake on the sleeve in fabric marker.
When he woke up, you showed him.He blinked at the jacket. Then at you.“I was asleep for twenty minutes.”
“You trusted me. That was your first mistake.”
He was a man of very few words. You were a woman of… too many. Somehow, that balanced. He let you paint his lighter, design his hoodie, and vandalise his body with henna frogs. He let you stitch thread into a plushie’s forehead and call it bonding. He let you use his hands as notebooks when your own were full.
And in return, you kissed his scar without asking, drew hearts on his knuckles, and said stuff like, “You’re the calmest chaos I’ve ever met.”
He didn’t smile often. But sometimes you caught the edge of one when he thought you weren’t looking. Especially when the stick man got a little cape.
“Don’t,” he warned when he saw you giggling.
“He’s a hero, Sukuna.”
“You need supervision.”
“You are my supervision.”
That shut him up. Mostly because it was true.
#ᶻz 𝐂𝐇𝐄𝐑𝐁𝐈𝐈#jjk#anime#jujutsu kaisen#ryomen sukuna#sukuna#sukuna x you#sukuna x y/n#jjk sukuna#sukuna x reader#jjk ryomen#jujutsu kaisen ryomen
583 notes
·
View notes
Video
youtube
How to create a cute Halloween poster in Canva | Easy Canva Tutorial for...
#youtube#Canva#canva design#Canva tutorials#Canva tips#Graphic design#graphic design tutorial#Halloween#Halloween 2024#Halloween poster design#Halloween design#Cute halloween#adorable Halloween#Learn design#design tutorial#How to use canva for beginners#step by step canva tutorial
0 notes
Note
HIIIIIII!!!! sorry if this is like a stupid ask lol, but could you do a stamp tutorial? your stamps are always so high quality oml, how do you resize your gifs and images???


HIIII and no worries, I can totally make a stamp tutorial! (⌒▽⌒)
I’ll be going through on how to make a normal image stamp and then a gif stamp. By following these two tutorials, you’ll be able to make stamps just like these!


PROGRAM USED ★ Ibispaint
STAMP TEMPLATE BY ★ AHMED-ART on Deviantart.
To start off, you must find an image you’d like to make into a stamp. Then, find a stamp template you think would pair well with your image. There are many different types of stamp templates out there and you can find a lot of them on Deviantart.
Make sure to read the terms of use for the template before using though! Here is the template I will be using for this tutorial.

Making stagnant stamps is easy once you got the steps down. You can use any art program and follow a similar process, but I only use Ibispaint to create mine.
First, create a canvas that is the same width and height as your stamp template. This one is 97x57. Most stamp templates have super similar proportions. If you are unsure of your stamps dimensions, you can create a 100x100 canvas then crop it around the stamp template once you have inserted it.
(Brush icon -> Canvas button -> Trim)
To get higher quality on the image inside your stamps: the closer the better! For example:


See how the first stamp’s image is rather far away? This makes the quality appear much lower. However, once you zoom in, it becomes higher! So I recommend finding images to create stamps out of that you are able to zoom in on so the quality can pop.
You’ll need to erase the parts of the image that don’t fit inside the stamp so it remains transparent around the border.
If you want to change the border color of the stamp, fill in the canvas with the color you want. Then, clip it to the stamp border. Lastly, go and set it on multiply. This will change the stamp borders color!

If you want to put a line texture on your stamp, you can utilize the ruler tool in Ibispaint to draw lines over your stamp.

I’ll add these every once and awhile to my stamps for fun. If you set the opacity of the lines to 10%, it’ll end up looking something like this.
And that’s the completed stamp!
Changing the border color and adding the line texture is completely optional, though it’s always fun to customize stamps!

PROGRAMS USED: Ibispaint, Ezgif
GIF stamps are a little trickier, but the process is not too difficult once you got it down!
First, find a gif that you would like to make into a stamp. I’ll be using this one!

if you want to have a different colored or customized stamp border, you must edit it on Ibispaint before like explained above.
You can combine the layers and save them transparently so it’ll end up looking something like this.

I made this one blue and added a gradient to it to match the gif I want to make into a stamp! You can add a gradient to the border by adding a darker color onto the multiply layer then using an airbrush to blend both colors together in the middle on both sides of the template.
Now, open up Ezgif and click the tab called Crop. Then, insert your stamp template there. The way I find the dimensions of the inside of the stamp is by cropping my way around the inside of the template.
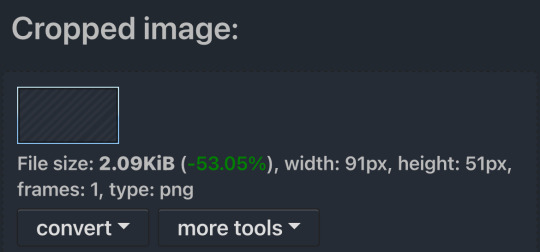
The dimensions inside this template in particular are 91x51. This is what we will resize our gif to! Before we can do that, click the crop tab again at the top of the page to refresh it and then insert your gif. This isn’t required to do, but I like to crop my gifs a bit so they focus more on what is going on inside my stamp. Like I said before, the closer the better, as it will make the quality higher!

Now that we have our cropped gif, click the tab called resize at the bottom of the page. The dimensions of the inside of this stamp are 91x51, so insert those numbers in the width and height boxes to then resize the gif.

Next step is to click the overlay tab at the bottom. You will need to click the button that says “extend canvas size” so we have room to overlay the stamp template on top of the gif. After extending the size, upload the stamp template as an overlay where it says choose file.

On computer, after clicking upload image, you can just drag the stamp template over the gif and situate it. However, you can also figure out the number coordinations to fix the template ontop of the gif by messing around with it a bit. I make my graphics on my phone so I use the numbers instead of dragging.

Left means to move the template left or right depending on the numbers you insert. Top moves the template up or down. The left for this template is 42 and the top is 21. It takes a bit of messing around to find the exact numbers.
Now that the template is ontop of the gif, all that is left to do is to crop the space around it. Click the crop tab again at the bottom of the page and then click where it says “trim transparent pixels around the image.” This will easily crop the extra space around the stamp.

Click download to save your gif and that’s it! Here is the finished product!
The whole process for making gif stamps is always the same, the only things that can vary or change are the dimensions of the gif (so it can fit inside different templates) and the left/right.
I hope you find this tutorial helpful and if anyone needs anything else explained, let me know. These stamps are free to use if anyone would also like to use them.
Happy stamp making everyone! 🩷
Dividers (c) @coco-coquette

#tutorial#web graphics#graphics#webcore#old web#rentry#stamps#web decor#gif stamps#alien stage#alien stage till#strawpage#spacehey#ᯓ ᡣ𐭩🐚asks
682 notes
·
View notes