#i got it working super smooth... i based it off a tutorial but it was super clunky okay?
Text
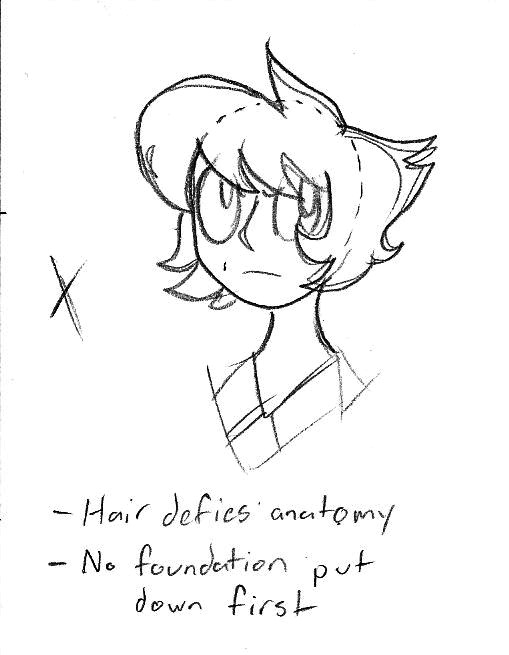
How I Did Shigaraki's Makeup
This is a very half-assed tutorial because I didn't photograph each little step. I have a strong background in theatrical makeup so it didn't even occur to me that there would be many steps in the middle that need extra explanation. I will try my best to explain the process.
Notice the words I use over and over: GENTLY, LIGHTLY, and SLOWLY. Liquid latex is a delicate product and if you want the skin to wrinkle and not peel too much, you need to be gentle in every step of the process. It is also dangerous if you get it in your eyes, so if you think you can't be gentle and careful, DO NOT do this tutorial until you have practiced working around your eyes with a safer product of a similar consistency like liquid foundation. I have been doing SFX makeup on and off as a hobby for like 10 years and even I am extra careful with anything around my eyes. This makeup job is safe if you know what you're doing, but be cautious.
1. The beginning. In this photo, my face is washed and my moisturizer is settling in. Liquid latex sucks the moisture out of your skin and my face is hurting today after doing this makeup for two days, so remember to moisturize and let it sink in. My eyebrows are slicked down with an Elmer's purple glue stick. This is for smoothness but primarily, it is how you'll protect your brows from being ripped out by the latex. For your eyebrows, you can also add a thin layer of orange concealer to cancel out the dark color and set it with powder (if I had orange concealer I would have done so since I think they show even through the latex and foundation).
My red contacts are in because they're prescription and I need to see to be able to do the makeup (plus, I always do contacts first). You can put them in at the end if that's your preference.

2. Sculpting wax (Spirit Halloween) for Tomura's scars. I dabbed on Pros-Aide cream adhesive to help it stuck, then applied and smoothed it out with a metal tool. Honestly, I hate it. I don't know if I just need more practice with scar wax, if it's a bad product for my skin type, or if the product was shit, but the stuff would NOT stay in place or fully set. Next time I'll just paint the scars on and add dimension with makeup.
Before you ask, YES, everything is on the correct side (I just think my face looks better in mirrored images). If this was just a photoshoot look, I'd do it in reverse so it flips correctly. Shigaraki's eye scar and mole are on his right side and his mouth scar is on the left. Reference panel for scar placement and the cosplay's hairstyle.


3. Base layer (liquid latex). Daub it on with a makeup sponge, all over the area you want to cover. I chose to stop mine at my natural cheekbone to give my face lift, but you can go higher or lower, include the nose bridge like I did or don't. I have a prominent nose and while I'm not actually trying to flatten the bridge (because I don't believe in trying to make yourself look like a different race when you're in costume), I was concerned that it would break up the line of the wrinkles in a weird way so the top of the bridge got included in the latex too. I don't like how thick the bottom edge at my cheekbone is (Friday's was better in that aspect), so i would do a thinner edge next time to help it blend into my skin better. I also sealed the edges of the mouth scar with a thin layer of the product. Liquid latex is buildable, so slowly add thin layers until you get to your preferred consistency. Latex also shrinks by 3% as it dries, so the more layers you add, the tighter your skin will feel and the more it will hurt your face. I did many layers for 2 days in a row and need time for my skin to recover.
Be SUPER CAREFUL around your eyes and take that part slowly and gently. Notice that I left almost my entire upper eyelid and a ring around my lower uncovered as a safety precaution.

4. Dimensional liquid latex. Using the tip of your sponge, stamp thicker lines around where you want the wrinkles to be. It helps to do things like scrunch your face and raise your eyebrows so the wrinkles line up with your skin's natural creases. I laid it thick on my brows to both make my browbone a little thicker (to help with the gender illusion) and to cover the color of my brows. Let that firmly set and try to hold your face in the weird positions as it does to help with the texture.

5. Base layer and contour. I used Ben Nye Ultralite cream highlight because it was something I already owned as a highlight foundation, but you can use any foundation you want, I just wanted paler skin. You can brush it on the parts of your exposed skin, but daub it over the latex, making sure to get into all the little cracks (rubbing to blend will pull off the latex, which is why all of the coloring will be done with powders. You CAN do creams to color before setting the makeup, but use a dab blending technique with a clean sponge and don't rub. I frankly did not have the time to dab blend when I did this. If you have time, this is a great place to add cream highlights to the wrinkles.
On my real skin, I contoured my cheeks and jawline with my normal cream foundation (BN Cine Light Beige) and gently blended with a sponge. Then, I set the whole thing with setting powder and brushed off the excess. This was a new addition, I didn't do contour the first day and I looked like an actual moon-faced potato in all of the pics I took with/for people that asked me (terrible con lighting). My face is a little chubby so anything to make it look less so in pics is great.
Also, as a precaution, get anything that goes tightly over your head on or off before foundation so there are no mishaps. Even setting spray is not a miracle worker and the theatre gods will curse you and have your clothing touch the ONE PLACE that isn't set. Mine is the magical tit-disappearing device, not shifted into place just yet.

6. Coloring. This is where it gets complicated, so bear with me. Using a fluffy, big angled brush, I tapped on a reddish/bronze countour powder all over the wrinkled skin. You can use a redder shade if you want but this was what I had. Don't worry about getting it totally even but don't dab too hard in any area as you cannot blend it out if you get too much powder over the latex. Like the latex, build the color slowly.
Next, the part that really adds complexity of color and makes the skin look like his. I brushed Ben Nye Contour Brown cream in the creases of the wrinkles, then patted it in with my finger to LIGHTLY smooth the edges. Then I powdered over the whole thing again with setting powder, then went back over the new lines with a taupe shade of contour powder and lightly softened the edges with a fluffy brush. Every makeup artist will tell you that adding layers of cream and powder together like this will make you look cakey and will cause creases and flaking, but that's the effect we're going for. He has a super forgiving face that easily hides tiny errors in technique.
I used that same taupe shade for my cheek and jaw contour, then blended that out. I didn't really use highlight for this look because I didn't know what to use (my normal highlight shade was my foundation) but having experimented with white eyeshadow as highlight for a different look last night, I think that could be a winner. I'd highlight the chin, cheekbones, jawline, nose tip, and a few wrinkles around the brow.
Lips: covered in foundation. Cracks made with the BN cream contour, highlights added with a water-activated white face paint I have. Barely blended, then powdered over. It makes your real lips dry and flaky as hell, but the stuff will not budge when you eat or drink. I bought the shittiest brown liner that broke immediately or I would've used it for the lip cracks and some of the wrinkle detail. I don't love the lips and am going to experiment with a better technique.
At this stage, I also added contour and highlight to my neck, sternum, and collar bones.

7. Details! I tried to do a trace with a metal tool to create a divot in the sculpting wax, but it just rubbed off 🙄. I ended up removing the scar wax from the upper lip as it kept moving and wouldn't survive me talking. I used the water-activated white paint to do the base of the scars, then set it with a couple of shades of pink eyeshadow and a little white for some highlights. Next time I do this, if the scar wax doesn't work right, I'll also trace the outside with contour brown to add dimension.
The neck scars were a last minute addition and I wasn't that careful with their placement or the technique on them. They're okay, I guess, but I can do better. I can texturize them with a base of latex or just be more careful with the placement so it looks less random
Contour brown was traced around the eyes to make them pop and hide the edge where the latex stopped for eye safety.
The white lashes are the water-activated white paint on a spoolie. Just buy white mascara, I couldn't find it anywhere in town and I was running low on time so I couldn't order it.
Finally, a dot of black liquid eyeliner for the Shimura mole to finish the look!
Everything was set with setting spray.


8. Enjoy your makeup! Excuse the wig, I hadn't finished styling for the day when I snapped the pic.
Final look:

Bonus: Removal.
Be delicate with removal and rub the latex, don't rip (if you can lightly pull your skin taut, it hurts less). You should use a makeup remover or oil cleanser (I prefer Pond's Dry Skin Cream as I have sensitive skin and I know it works for me), emulsify and remove with warm water and a wash cloth, then use a gentle cleanser to get it all out of your pores. Finish with a thick layer of moisturizer and if you really feel like shit, you can slug over that too. My skin is still very red and sensitive today around my eyes and cheekbones (the skin is thin and delicate there), so I'm gonna moisturize again.
I hope this helps anyone who wants to go the SFX route for Shigaraki's makeup and not just cosmetics. I will continue to improve the process and may post a video tutorial a while down the road once I get the scar wax situation figured out.
4 notes
·
View notes
Text
OBS CAMERA TUTORIAL
Wondered how you can go from THIS?

TO THIS?!

with literally two lamps, some trial and error and OBS? I got you!
For the record I am using the Logitech Brio in both photos, I've made adjustments with my lighting set up and while it's still not PERFECT it's a lot nicer to look at (in my opinion)
Now for this you will need:
-A webcam
-two-three light sources (lamp, ringlight, softbox, etc)
-OBS
-Splitcam (optional, but I find it give me better control of my colour correction needs)
-LUTs (once again, optional!)
Onward to the tutorial!!
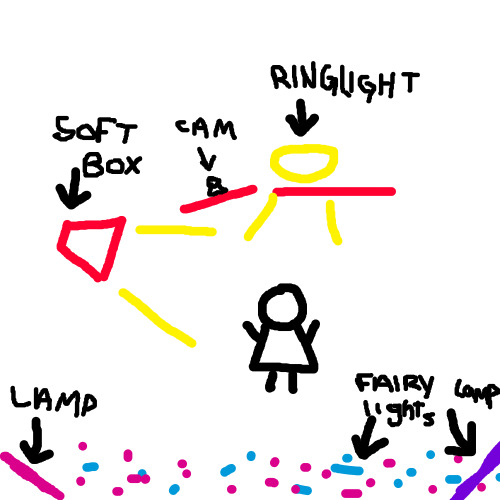
When I say lighting is important, I MEAN IT. I learned a lot from lighting when a friend who was in photography taught me the 3 point lighting system. Basically to avoid "dorito shadows" as I like to call them on your face you need to have at least two light sources pointing on you at once. My set up looks like this:
I know, what on earth am I doing streaming when I should be making ART.
Anyways, I have two main source lights (three would be ideal)
I have a soft box that is placed slightly to my left and pointing DOWN at me and a ringlight that is directly in front of me with my webcam pointed slightly angled at me (does that make sense?!) behind me are my 'mood' lighting, the fancy coloured lights that give my room the neon-spacey-retrowave kinda vibe I like. You can use whatever lights you want depending on your own personal style! I literally use a $10 ringlight, a soft box lamp, some LED colour changing bulbs in random lamps and some fairy lights I got off amazon. NOTHING FANCY!
Option 1. OBS
These are settings that I ALWAYS deselect and play with as leaving it to the webcam software to auto-adjust leads to yellowy, dull or over exposed visuals.
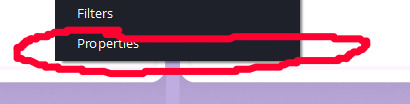
After adding your webcam source select it, right click and select PROPERTIES

then select "Configure Video"

you will get a pop up that looks like this. Now to avoid your camera looking super WARM or COLD or risking a blow out from high exposure DESELECT the following:
- White Balance
- Exposure (found in 'Camera Control' Tab)
- Focus
- Low Light Compensation
Then adjust accordingly to how you'd like your camera to look.
Don't forget to play with brightness, contrast & saturation!
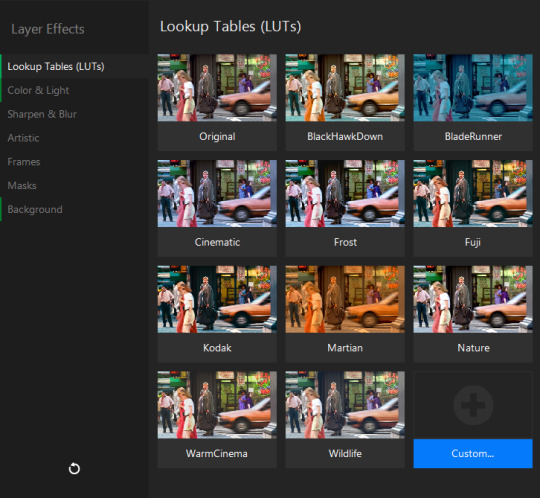
Next up are LUTs
Luts stand for Look Up Tables and are meant for colour correcting photos/video. You can find a lot for FREE however, I make my own based on the specific colour correcting I require.
To use LUTs in OBS right click your camera source and select FILTERS
Here you will see a section for audio/video filters and one for effect filters. We are using effect filters!
Hit the '+' at the bottom and select "Apply Lut"
Now you need to locate your file folder you keep your Luts you've either made or downloaded in, you can also adjust the amount on your lut filter to appear nicer and not so harsh.
For further adjusting hit the '+' again in the effect filter area and select "colour correction" here you can adjust brightness or contrast further as well as Gamma and Hue!
Option 2. Splitcam Video Driver
Download Splitcam! https://splitcam.com/
Splitcam offers dual streaming but with how I run my stream (alerts, graphics, scene switching) I use it as a webcam source.
Splitcam offers a LOT of adjustments that can make your webcam feel more like a DSLR (if your computer is capable of handling it)
Once you've added your webcam via Media Layers +
Click the three dots '...' next to your camera source and select Driver Properties and deselect the same settings I listed in the OBS tutorial
Now Splitcam offers SO MUCH so I will only tell you the settings I mostly use.
Quick adjust, essentially adjusts the colours of your entire "canvas" it also offers a skin smoothing tool (however you need a stronger PC for this to work otherwise it will look all stuttery)

In before a viewer sees this and goes all "OMG FAKE!! U USE FILTERS OMG!!!!111" shut the FUCK UP, no one ASKED YOU, and you are probably the same lame ass who drools over someone who ABUSED the liquify tool in photoshop to the point their background is warped because she looks like a cartoon mom from the 90s. PUH-LEEZE (no offence to those ladies, you do you boo, just poking fun at the people who actually think it's real lmao)
Next up are EFFECTS!
Click the three dots next to your camera source
Here you will see where you can adjust colour and light, LUTs, backgrounds, frames, masks (I DO NOT recommend using any of these, some adjust eye colour/slim your face and look WEIRD AF)
Go around and play with what is there and see what you like!
I personally use LUTs in here as well as the Highlight/Shadow effect to adjust for what looks best for me. As well as in 'Background' I use Blur to give my webcam that depth that DSLRs have!
Now from here I then go into OBS to select my finished colour corrected source and select "Splitcam Video Driver" as a 'Video Capture Device' then add all my cool overlays as I'd like!
I hope this tutorial is alright, and my bad if it's kinda rushed!
1 note
·
View note
Text
on one hand, writing
on the other, i have a job i love even if i'm working from home lately
decisions, decisions... for tomorrow
#phoebe rambles#im a gameplay programmer!#actually i only have bug fixes to do before i move on to level design for this project#pretty sure my boss forgot about intern 2 (me) aside from granting me from home work time..................#or maybe he just trusts that i'm working on my project?#can't say im complaining...#being paid to do a passion project is pretty much anyone's dream#but like i wanna write dangit#urgh i bet im gonna have to do a presentation about this#i may be a good writer but i'm a somewhat confusing speaker#maybe its the autism. talking is like grabbing random pieces of information and mashing them together#i... actually have no idea what level of confidentiality this project has... but i'll stay on the safe side and not share pictures...#the assets are stuff i bought with my personal money anyway#it would be pretty boring. you kinda have to play it#but like it's not even super great fun yet! because i'm not done with it!#;u;#im really proud of my tile-based movement script tho#i got it working super smooth... i based it off a tutorial but it was super clunky okay?#lots of messing around to get something real nice#yall who play games but don't program them probably can't tell but#a lot of effort goes into making simple things nice#i've spent a lot of time on the UI as well#making quality of life improvements is for me too yaknow#what's driving me insane right now is a menu that will close only when i DONT click on the damn button because#the way it's premade it'll close whenever i click outside of it (nice)#but clicking on the button closes it. you see.#and so when i release the button press. it reopens the damn thing#absolutely maddening and i haven't figured out a way to fix it#i tried to set the button to activating when i START to press it instead but it just did nothing at all#by which i mean it did the same thing but faster
17 notes
·
View notes
Text
【7:46pm】
~~~~~~~~~~~~~~~~~~~~~~~~~~~~~~~~~~~~~~~~~
ꕥ Fluffy Puffy ꕥ
Yunho x reader
Warning Too cute to be true (AU)
Descr: You are making up extra credit for your art class, so you decided to take a pottery class. Based on the name that was given to you, you thought that the teacher would be an old man. Your Pottery class turned out to be private lessons with a stunning young man that was around your age. Oh what to do . . where is this lesson going?
~~~~~~~~~~~~~~~~~~~~~~~~~~~~~~~~~~~~~~~~~~

The professor from your art course is making you take lessons to boost your grade. Not that it was bad or anything, you just wanted an A to make your GPA look pretty. Your art teacher was a pain in the ass with her grades, “so stingy”, you would say to yourself. But pottery couldn’t be that bad. Every assignment was equally stressful as it was relaxing anyways. Best of both worlds I guess.
You chose from the list she had, “5 Ceramics/ Pottery lessons with Sir. Jeong” it was a weird last name and sounded old but you went with it. It was only 5 lessons and playing with clay how hard can it be?
-
“Ugh It’s just 4:25 and it’s already so dark”, you said walking into your 4:30 class. Taking off all layers you sat comfortably on the stool. Right next to sign that said 4:30 class. No one was there. You were kinda creeped out. The lights were dim, the sun was already gone and all you heard was a person shuffling in another room. Not even a receptionist! “Oh these are private classes”, . . . “With an old maannnn. . .” You sat there wincing at yourself allowing your brain to wonder through 5 million different scenarios.
Thud! “Okay . . Class time”, you heard a voice say. It didn’t . . sound old. . Nor look 👀. A Tall handsome young man appeared in front of you. Black hair, very pink lips and soft eyes. Perplexed at what laid before you, the young man was . . Actually very very handsome.
“Sir Jeong???? He deserves the name of Mr. At least.”, you thought to yourself as the teacher walked towards you cleaning his hands from clay.
“So you’re my new student. Huh?”, he asked.
“Uhmmm, yes . . I guess”, you replied looking around.
“Haha alright let’s get started then”.
You were now so happy it was a private lesson. He was giving you a tutorial, and your eyes were just wondering his body. He face was full of concentration; body big for the little stool he was in; not lean, strong build; well rounded all around; his hands. . . Seemed strong. . You thought to yourself; his concentrated face gave him a different look than what he had when he walked in, but his cheeks squished your hearts with how soft and plushie they looked; and his black hair seemed so silky and soft; and his voice wasn’t rough or smooth or deep or high, but it was definitely sweet and full of patience and delicacy. “Like . . Honey, or maple sap”
WHIPPED IS WHAT YOU WERE
“Eehhhh, I would say more like dough, because it’s easier to structure than honey. But whatever makes you comfortable”, wide eyed you looked at his face. Blankly he stated back.
“Everything okay? You’re looking at me like I have 3 heads”.
Panicked you responded, “ah no no nothing Mr. Jeong, please continue”.
“Please call me Yunho, it’s weird to have someone around my age to call me that”
“Oh, okay then. . Yunho, please continue”.
After 30 minutes of Yunho talking and demonstrating you how to treat, knead, and play with the clay you were finally able to do it yourself. Excited you rolled up your sleeves. Sitting at the stool, Yunho stood in front of you watching you. He seemed taller and taller the closer he got. A little shy you dived in. You started off better than you expected. With enough confidence you entered the hard part, building your desired pot. Before molding your pit of clay you stood and took a few steps back. Thinking real hard on how you wanted it to come out. Like a light bulb it clicked. You went to work. Super concentrated you were building up your creation.
SNAP!
Just like that went your concentration as from the blink of an eye a ring of your clay was on one hand and the other places spinning on the wheel. You heard giggling from your side. Looking over you saw Yunho giggling. “No go ahead do as I showed you”, “Ehhh. . . Ha. . . “, you liked blankly at your mold not moving. Looking back over to Yunho he wasn’t there. Thud, you heard something behind you. It was a stool that wasn’t there when you first sat down, and it was reallllllllllly close. A rush of black flooded your sight. It was just Yunho sitting behind you.
“Come. look.”, he said wetting his hands. You turned around quickly, as your face flushed red realizing what’s about to happen. His chest bumped onto your back lightly leaning you forwards, his arms stretched forward towards the mold and taking the clay in your hands. Molding it into what it used to be. Extremely flustered you watched his hands.
“See ?”, He said standing up from the stool.
“You remember now ?”
“mhm”
Why are you so hot, you felt like sweating. UGGGHH what was thattt?! He was so warm and delicate with me. He might have sat behind me but he didn’t even touch you much. Is he really that big or am I just small. So many thoughts rushed through your head while you tried building your vase. Every few minutes your clay would flop, break, and bend too far. After thinking for too long you just grew frustrated.
“Ughh come onnn”, you talked badly to your clay. Putting it back and adding more pressure to your art. And SNAP.
The damn clay broke off.
Tensing up you squished the clay in your hand.
“Hey, heyyy don’t take it out on the clay now”, you heard a voice behind you say softly. His big hand brushed against your clenched fist. Feeling another hand on your other shoulder, you saw Yunho’s face pop on your side view.
“Let’s try again, this time let me help you, okay?”, he said slightly smiling.
Feeling something on your hand you looked at your hand. His hand. His though brushing against your hand to ease up. Looking back, how could you not calm down. Releasing the tension, you let the frustration fall off your face.
Yunho let out a cheeky smile, “great okay, now lets go back to putting it on the mold”, his voice was so . . Patient it was so sweet. He held both of your hands to the mold. And you both wet your hands in wet clay. You can feel his chest on your back. His breathe was calm. And his skin was soft. He was very warm too. You oddly felt safe.
“Done”, In an instant your bubble popped. “Huh?” You looked at the vase before you. It wasn’t the one you wanted to make exactly but it still was pretty. Popping up once again at your side you looked over your shoulder. It was a smiling Yunho. You quickly turned around flustered of the pretty boy.
He got up and placed the stool in it’s place. “I think that should be it for our class today, I am going to heat it up so then we can paint next class”, Yunho explained to you. It seemed like everything was moving so fast. You weren’t ready to leave him. He was too dreamy please don’t let the class be over yet.
The moment you laid your eyes on him, it’s as if time stopped. But in reality it went by faster than light you complained to yourself. Sulking you picked up your stuff.
He walked you to the door and you walked out “till next class”, he said
Looking back, you wanted to take a picture of this exact moment. His cute smile and the way he stood at the door. Little did you know this exact moment, was engraved in your brain, you just had to wait more time till you realized this night would be the night you always come back to thinking about him.
“Till next class”
~~~~~~~~~~~~~~~~~~~~~~~~~~~~~~~~~~~~~~~~~~~~
Authors note: I meeaannnn if y’all want more ain’t nobody complaining. Just let me know.
———————————————————————————————————
#ateez#atiny#ateez fanfic#kpop#fanfic#yunho#jeong yunho#yunho fluff#yunho x reader#yunho scenarios#ateez scenarios#ateez fluff#pottery#ceramics#alternate universe#yunho teacher#teacher
65 notes
·
View notes
Note
Hi I haven’t made gifs in almost 2 years and I’m wondering if there’s any tips or gif tutorials you know or steps you take to get your gifs so HD? But ofc if you don’t share stuff like that I understand completely I’m just trying to figure my way back into gif making again ♥️
hi nonnie! this got kinda long lol
my main recommendation is this tutorial by chloezhao; it's super detailed and easy to follow, and will get you through the whole process from acquiring your files to sharpening and coloring your gifs. an additional tutorial i strongly recommend is this one by anya-chalotra (also every other tutorial in her resources tag is fantastic); it goes further into sharpening and, really importantly, save settings—that's a part of giffing that's often overlooked but has a major impact on how your stuff ends up looking. i personally save with adaptive, diffusion (100%), bicubic, but every other gifmaker will have a different take on this, so try it out for yourself and see what you like!
now, those tutorials combined are pretty all-encompassing, so some of the following may be redundant, but here are my personal tips:
unless you have no other option available, NEVER GO FOR FILES BELOW 1080p—i can't stress this enough. also, use screencaps instead of screen-recording, and don't skip frames.
if you gif with the video timeline, always drag your saved gif back into photoshop and fix the frame rate!! the first tutorial goes into this if you don't know what i'm talking about, but yeah, super important. i didn't do this until recently cause i was lazy and didn't think it made that big a difference, but since i've started taking that extra step i look at my previous gifs and think it's SO NOTICEABLE how much "choppier" they are.
sharpening is king. the settings shown on that first tutorial are a great base to start, and the second offers some more options, but i really encourage playing around with the amount/radius settings, as well as with checking legacy & accuracy on and off (which are shown when you click on the little cog icon in smart sharpen), to find a setting that you really love. some ppl like smoother gifs, others like theirs really sharp—it's really a matter of personal taste, so trying out those adjustments for yourself will help you understand how sharpening works and let you find your own preference.
all that being said, sharpening is not one-size-fits-all. depending on how something was filmed and lit, when it came out, how much grain there is on the file, etc, you might have to make little (or big) adjustments to your sharpen settings. this is why it's so important to understand how this tool works instead of just blindly inputting numbers.
the black/white eye droppers within the curves tool are your best friends. the first tutorial goes over how this works.
beware of vibrance and saturation. i personally never use vibrance, and saturation requires a gentle touch. overusing either of these tools can really destroy the quality of a gif—it pays off to build up your coloring by gradually stacking other adjustment layers.
channel mixer my beloved. i never used this adjustment at the start because i had no clue how it worked, but since i've learned by using it over time it's become literally my favorite tool for coloring—it can seriously work miracles.
a little noise can go a long way. sometimes messing around with sharpening still doesn't get your gif looking like you want it, quality-wise, and adding a noise filter can a) make your gif look sharper, b) make your gif look more uniform when the file has some annoying grain you can't get rid of, and c) just give it some personality! but this is totally a personal preference, as some people, like i mentioned, will want their gifs as smooth and noiseless as possible.
that's all i can think of for now! i've never done tutorials myself and i have a tendency to ramble and overexplain, but if you have questions abt specific things you can always ask me and i'll try my best to put something together or redirect you to another tutorial
5 notes
·
View notes
Note
Please please pleeeaseee I love my girl Tyreen I just want to see some nice things about her uwu just.. ah, idk, just tell me if you got any ideas about nice and kind (or maybe something cute? You can't tell me she's not like that sometimes even if its SUPER rare) things that Ty would do when nobody was around. (Let's give her some love too, pls)
The Tyreen that exists in private or with her brother in earlier COV eras, is a very different being to the persona she fronts for others.
Source : Joseffyne Robinson, check out their fantastic art
Within my AU and early/mid COV:
Ty’s natural speaking manner is well enunciated and smooth, without her lilting singsong habit you hear during broadcasts, or her streameresque emphasis on short, punchy words in a sentence.
She and her twin have a touch of their father’s accent that’s generally only audible during emotional moments like when highly amused or very angry, but her default speaking tone is calm and direct with a slight bite to her T’s.
Leda passed on her enunciation and vocabulary through lessons to the twins as she wholeheartedly believed the family would leave Nekrotafeyo at some point, and thought the kids would do well to be understandable anywhere they visited with neutral and clear accents.
Tyreen’s left hand is damaged from a long term injury since her childhood, and the white glove she wears is more to hide what she perceives as a weakness than to protect others from her powers. Cloth does practically nothing to prevent The Leech consuming what she touches, a lesson she learned the hard way in the childhood trauma that lead to her fingers being crushed.
She has regular mobility but the knuckles and back of her hand are noticeably scarred and can get painful in the joints during stormy weather.
The only person aware of this issue is her twin, and she often seeks him out on nights when the pain is bad. His hand is big, strong, and practiced at massaging out the burn of the dull ache in her knuckles.
Sitting together watching bullshit on a massive echofeed in their shared cloister while he squeezes and cracks the joints for her is one of the shared unspoken bonding activities that continue all the way till late COV (though extremely rarely).
Ty is obsessed with shitty romcom movies. It doesn’t matter how low their EchoCritic score is, it doesn’t matter how scathing the reviews, she has watched it and enjoyed it. The worse, the better.
She knows deep down that she’s living vicariously through them, but it’s not something she wants to waste her time thinking about in too much depth.
Has an encyclopedic knowledge of terrible quotes from said movies and enjoys dropping them randomly in streams (much to Troy’s absolute disgust as he gestures violently at the script she’s deviating from while he stands off camera), and then likes to follow up on what viewers are saying online. Who noticed, who watched the crap that one was from, who’s arguing over if she’s doing it ironically or not.
Lives for drama, and it doesn’t have to be the vicious kind. These kind of fun little nods to fans who are paying attention give her a buzz that’s.. nice! It actually feels like being part of something innocent? Normal? It feels like being part of something she’s welcome within as a peer rather than… Well. Rather than being the thing being worshipped.
Ty is very messy and her living quarters are rarely anything but a state. It’s not that she want’s them to be like this, it’s just that no matter how tidy she tries to be, she always seem to somehow end up with more mess. If she spends an hour focusing on cleaning up her bedchamber, she will walk into a living quarter that is somehow worse than before she started, and it eventually overwhelms her to the point of frustration.
(Troy has automated a routine with his ship’s service bots to maintain her personal quarters as well after giving up on her ever breaking out of this cycle, to which she is very thankful for.)
Bites her nails when nervous or worried, and can do so till the point they bleed. She’s never been able to break out of this habit and isn’t proud of it. It’s a remnant of her time with Typhon and a little reminder of him whenever she catches herself gnawing on a nail edge, and she hates that she can’t stop.
Her duties as God Queen take up almost all her spare time. If she’s not live streaming then she’s taking offerings, or doling out punishment to penitent worshippers desperate to be smote by her touch, or sitting in boring ass meetings with corporate sleezebags while Troy works them over. Smirking between fingers as she rests her chin in her hand, watching as her silver tongued twin lets them think they have the upper hand in the dealings, till suddenly they don’t.
In her wind down time she’s either watching movies in comfy indoor clothes, tank tops and shorts, or indulging her actual hobby. Tyreen Calypso spends a lot of time making soap.
The optional luxury of bathing was one of the first things she can remember being shocked by when they landed on Pandora. They had been hygienic on Nekro, as much as possible, but washing there was heating water over the ancient holo stove the family used for cooking, then scouring yourself with that nasty-ass soap Grouse made out of animal fat every few days.
There was nothing enjoyable about it, it was a chore that had to be done, same as cleaning clothes or cookware, so when she had her first bath in a bathroom with three (3) different liquids that smelled great that she could use to clean her hair??? Mind. Blown.
Soon as she had her own ship, she filled the bathroom with soaps, ointments, anything that smelled good and felt good and let her melt in her bath for hours on end. It was only a couple of months later when Troy offhandedly mentioned she “Could just make that stuff yourself, ya know. Loads of echo tutorials on it. Might be fun.” And Ty’s brain popped.
She could do it herself. The herbs, spices, and oils she used were dried or refined, nothing was alive, nothing would wilt at her touch, and it became an enjoyable messy hobby for her to play with when the mood hit.
She flutters her eyelashes at any comments on her scent ever since, because she made it and damn straight it’s delicious. She gifts Troy little bars based on his own tastes often too, it’s a wordless way to make clear she values the work he puts in for their cause.
Tyreen sways towards warm citrus. Sharp grapefruit and black pepper, rose and patchouli, pomelo and juniper. She’s inviting and hot to scent. Troy prefers cleaner, spiced smells. Bergamot and sandalwood, ceder and seasalt, lemongrass and witch-hazel. She takes genuine pride in noting when he’s been using something she made for him over what he’d usually buy.
Her hair is naturally a very deep brown as opposed to black like her twin’s is, she doesn’t enjoy the upkeep for her white bleached style but it’s part of her aesthetic at this point, and her God Queen aesthetic is worth any price.
Asks are Open!
#system-45#borderlands#borderlands 3#bl3#tyreen calypso#troy calypso#calypso twins#asks#my hcs#my writing
87 notes
·
View notes
Text
Cloud’s Chronic Chapter 18
I’m new to tumbrl, so I’ll start with my latest gaming blog. Which I wrote a few days ago and post on a gaming site. I’ll add old chapters here too. Then the new ones going forward. I do most my gaming on PS5 & PS4
Pretty late with this chapter. I spent pretty much a solid month playing and loving Returnal. I got to 97% of the way to platinuming the game and my game crashed. I had to turn console off to get it to do something. Then when it came back on the save file had corrupted. For some reason the cloud save was corrupted too. Maybe it overwrote. This was the most gutting and annoying save corruption I’ve had.
I managed to do a perfect run on my first run after the tutorial run. Biomes 1-3 and then 4-6 in one smooth run and completed the game again. Then it took weeks and weeks of replaying through the 2/3 biomes I needed all collectibles for to get the respective last trophies. I think the last one I needed was in the desert biome and was an ultra rare room that has one chance to spawn per run. I think it took 70 runs to unlock.
Then finally after that massive grind and pretty much earning the platinum twice over I got one of my favourite platinums in my collection. It’s a good job I liked the game so much.
After that I chilled out a bit and then got the beautiful Ratchet and Clank Rift Apart. It’s truly gorgeous and one of my fave platform games I’ve played on PS along with Astros. I’ve played about half way through so far. I need to go back and finish it as I put it on hold to complete a milestone I was close to.
I decided to make FFVII Remake my 100th platinum as it’s a special milestone and FFVII is a special game to me. One I grew up playing as a school kid and the one that got me hooked on RPGs and JRPGs. Also one of the only games to make me emotional.
Firstly though as FFVII intermission has just come out. I decided to enjoy Yuffie’s DLC first. I loved the story and the fact that it was based in the same time frame as the main game. Parallel to the main story. Yuffie was really fun to play as in combat with a great ranged and close range mix. Can’t wait to play as her in Remake part 2. Another great addition was the mini game Fort Condor. A simple yet addictive strategy battle game. With different troops and board set ups. I really hope they bring that mini game to part 2 also.
The other real hard part was the pride and joy fight in the battle sim. Where you take on 4 summons back to back and then the ultimate weapon. The hardest fight is Bahamut who also calls a summon for a hand and hits you with a one hit kill move every few mins. Only reprieve or a mana barrier could save you. Somehow I passed that on my first attempt. Thanks to some luck and a recommended set up. At 40 mins long, I’m glad it didn’t take a lot of try’s. As a reward you get a necklace that lets you start with a limit break. That was super useful in the last few chapters. I popped a few easy plats to get to 99 after that. Then got the platinum and 100 milestone earlier today.
The last few days I started Hades. Omg what an amazing, beautiful hand drawn and addictive game. I can see why it got so many GOTY’s on the switch. I fell in love with it the first day I played it. After 14 attempts I finally made my first successful escape / run on my third day playing it. This will be my chill out game and one I play along with a few others if I can get off it. I really want to get this platinum and spend a lot of time with it. I bought the PS4 version with free PS5 upgrade. So once I have the 5 plat. I’ll go back to it sometime and earn the PS4 plat.
The game is a brilliant Rouge-like. You have 6 weapons you eventually earn. I favoured the bow at first and really enjoyed the range and safety it provided. As you go through the rooms you get given boons by the Greek Gods Zeus, Poseidon etc etc. That Biff your attack, special, cast (spell) and more. Each one is noticeably different and fun. Also you can get Duo boons that combine the power of two gods for very powerful effect. Like lightening on top of a water pushback.
The game is difficult but as you make your runs you get permanent upgrades to work on that make each run a little easier. Like extra health, extra lives etc etc. There is also a god mode. A 20% damage reduction that increases 2% every death to a cap of 80%. Now Ive completed my first run. I might start using god mode to make the grind a bit easier.
As you meet more characters and give them gifts they give you keepsakes. Another powerful bonus to help you along. Which you can level also. The character interacts and the way the game adds story slowly each run is a master stroke in rouge like story telling. This game really is a joy. I look forward to playing more and learning more.
As I’m writing this Ghosts of Tsushima Director’s Cut is minutes from release. I stopped playing it only a few hours in for last years GTTSC. So this is the perfect time to restart and get into one of last years best games in its ultimate form on PS5
Another great few weeks or months of gaming are ahead. Have a good one all.
1 note
·
View note
Text
Tomb Raider Ice Picks - Eva Foam build

Material list:
Eva Foam in different thicknesses. (I highly recommend High density Foam because it´s way more solid and more practical for Props) I used 5mm Foam for the base and 2mm Foam for details
White fabric and some leather straps for the details

A sharp box cutter, scissors and a dremel
Hot air Gun + Hot Glue Gun
Your Primer of choice ( I always prefer Flexbond, wood glue for props because it gives the whole thing extra stability and makes it less wobbly + you can cover all your mistakes hehehe.. ) but Plastidip is fine too :)
Your Paint of choice (I used dark red and silver-metallic spraypaint)

Okay got everything you need? Let´s start..
The First step is to find a good Blueprint. You can find plenty online or you can create your own (like I did) just make sure all the proportions are correct. I always work with alot of reference Pictures

Carefully cut out your Pattern and transfer it to your Eva Foam. My picks consists of 3 parts each (2mm Foam) + the two sepperate pieces for the handle (also 2mm Foam)
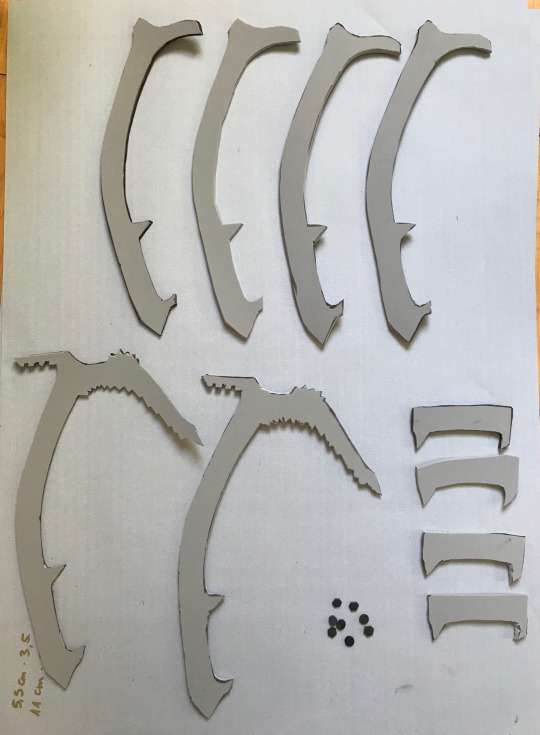
Next step is to glue everything together with contact cement. I added some small additional details with normal super glue.

Wear a mask and dremel the hecc out of it, until everything is smooth and pretty. I added some more details. Battle damage and the tiny hole at the bottom.
Now prime everything with your primer of choice. (Plastidip,Gummidip or normal Wood glue works just fine) I always use Wood Glue for props because it gives your prop the extra stability it needs and you can cover up all the mistakes you made. 4-5 coats until everything is smooth
If you´re happy with the result it´s time for Paint :D
I used Spray paint for the main areas and acrylic paints for the details, but of course you can use whatever is available to you :) I let everything dry over night before I move on.

For weathering I took some black acrylic paint and mixed it with a lot of water, (Oil paints work extremely well, so if you have that definitely use it!) brushed it all over the prop and took most of it off with a dry cloth. This step is super important. It gives your prop realism and depth. I added some additional brown for rusty look to reinforce the general metallic look of the prop :)
Set everything with a shiny setting spray to protect your fine work!
Almost done!
For the last step I took some leftover white fabric, weathered it with some red,brown and black acrylics and added a leather ribbon to the bottom hole we made earlier. You can use some additional details, depending on what your reference pictures show you.
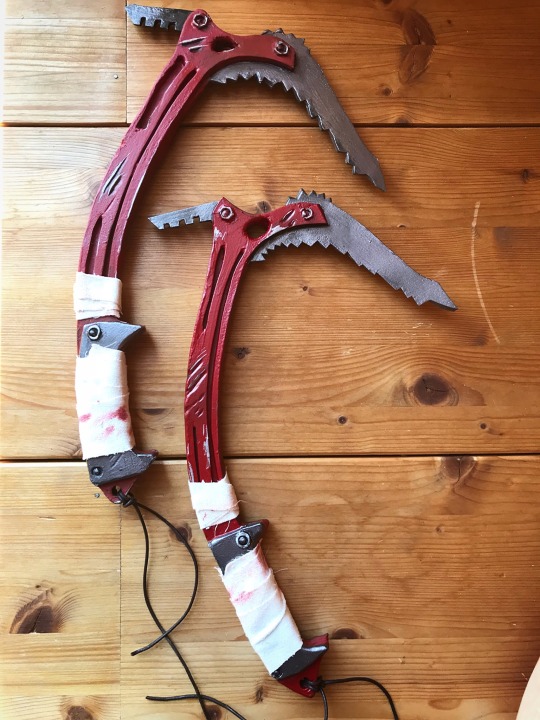
And you´re done! The whole thing took me around 2 days and I only used very affordable materials.
I hope you found this tutorial helpful. Don`t hesitate to ask me if you have any more questions or need tips for your own cosplay projects.
Have fun crafting guys! :)
20 notes
·
View notes
Text
Weight Painting
Note: Please don’t reblog this, I only posted it here because someone requested it and the private link wasn’t working - it’s a WIP and I have like zero time to actually fix it. Thank you. <3
I’ve noticed a lot of people struggle with weight painting, which I empathize with – not understanding weights kept me from making the kind of CC I wanted to make for years! Most CC tutorials don’t really explain much beyond «do a weight transfer», which isn’t always sufficient, so I decided to write up what I do when I weight paint. I’m sure there are ways of doing this that work just as well (and better!), but through copious trial and error, this is what I’ve found works for me.
I’m mostly going to focus on long dresses and gowns (aka 90% of my CC), but a lot of this should be useful for other types of CC as well.
This isn’t going to be a full, detailed guide to weight painting because, honestly, I don’t actually understand Blender that well. I’m also not going to cover meshing, UV maps, basic weight transfers and stuff like that – if you need advice on those things, check out the Sims4Studio forums. :)
I use Blender 2.76 – things might work/look different in other versions!
1. Vertex groups and mesh explosions
Okay, so this was without a doubt my biggest hurdle back in the day. My meshes kept getting all spiky and deformed in game and I couldn’t for the life of me understand why.
Turns out vertex groups are, like, really important. This is probably obvious to a lot of people, but it took me about two years to figure out, so I’m gonna talk about it.
Your mesh needs to have the same vertex groups as the base mesh you’re cloning, and not all EA meshes use the same ones. If you’re doing a weight transfer from the mesh you originally cloned, this shouldn’t be a problem. Most tutorials will tell you to clone an EA package that’s as similar to yours as possible, and this is a huge part of the reason for that.
However, I don’t do that! This is because I don’t want to use too many mesh cuts (for a guide to mesh cuts, look at this Sims4Studio guide) because they confuse me. In fact, I clone 99% of my dresses from the base game chemise so that they’ll be both base game compatible and only use one mesh cut.
Now, the chemise looks nothing like a gown, so if I was going to do a weight transfer from that for a long dress, it... wouldn’t work. That means I have to use something else, and that means paying attention to vertex groups. Let me explain why.
If you export the chemise and open it in Blender, you can see the list of vertex groups on the right. If you try to import a mesh that has additional vertex groups into your package, you’ll get distortions and weird spikes in-game. Most notably when it comes to making long dresses, the chemise does not have Skirt, Foot or Toe bones, but most of EA’s long dresses use one or more of these. So, for instance, if you do a weight transfer from this Holiday Celebration gown:
And import the mesh into a package cloned from the chemise...
Your result will be something like this:
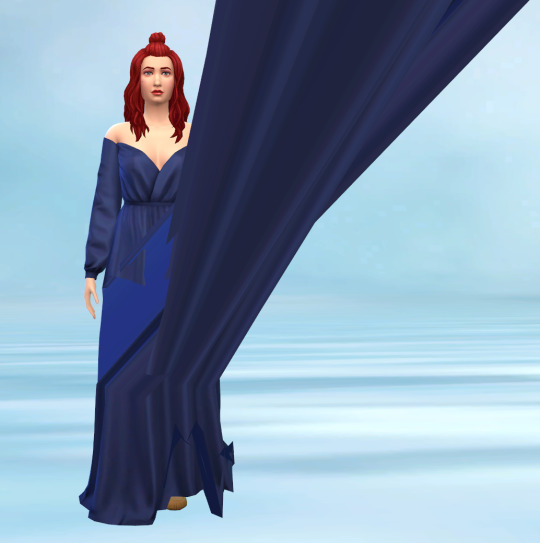
This is because these vertex groups don’t exist in the original cloned mesh:
The easiest way to avoid this is, as I already mentioned, cloning and doing you weight transfer from the same mesh. A lot of the time, that’s going to work just fine. As I also said, though, I don’t do that. So what do I do instead?
2. How to manually fix weights
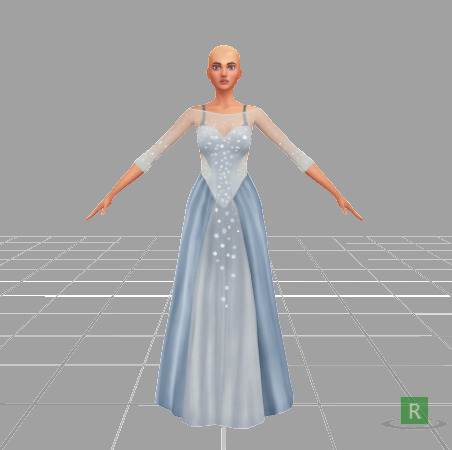
This is the dress I want to weight paint. My .package file is cloned from EA’s chemise. As you can see, they look nothing alike.

Now, I’ve been doing this for a while, so I already have an old piece of CC that I can do a weight transfer from that’s not going to have any vertex group issues (full disclosure: all my skirt weights these days are transferred from my Hannah dress and then adjusted slightly). For the purposes of this guide, however, that’s not how I’m doing it.
The first thing I’ll do is separate the dress from the body so I don’t mess up any weights unnecessarily. Then I’m going to split the mesh one more time so that I can do individual weight transfers for the top and the skirt.
I do this because it’s usually really hard to find a mesh to do a transfer from that’s similar enough to both parts to give a good result, and since I’m aware of what vertex groups I can use, this isn’t going to be a problem. Sidenote: I also recommend splitting meshes like this for UV1 transfers.
Next, I need to find base meshes to do weight transfers from. For the top, I almost always use this base game sweater because, in my experience, it works for almost anything:
Finding a long dress or skirt is harder, though. I don’t want to use the Skirt, Foot or Toe bones, but just about all EA meshes use them. So what I’m going to do is find a mesh that uses them anyway and then manually remove them.
Note: If you’re completely new to weight painting, you’re going to be much better off finding meshes that use the same bones/vertex groups! I’m doing it this way to demonstrate manual weight painting and editing in general, not the most efficient way of weight painting this particular dress.
I’m going to use the long gown from the Holiday Celebration pack because the skirt has a similar-ish shape.
Let’s take a look at the vertex groups in Blender. This has a lot of bones that I don’t want, but okay!
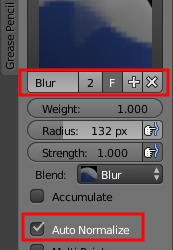
The next step is to do weight transfers as usual, which I’m assuming I don’t need to cover. Merge the mesh back together (if you split it), and let’s talk about the most important, magical, amazing button in all of weight painting. That’s this one:
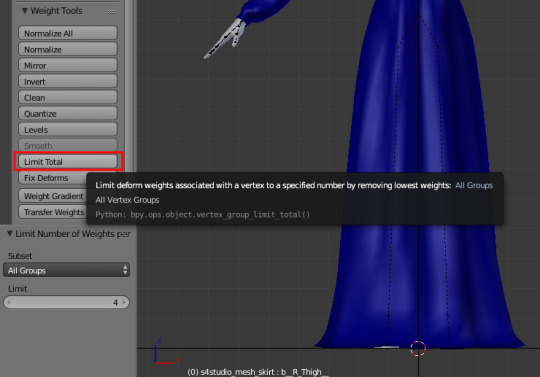
See, The Sims 4 only allows vertices to be attached to 4 bones and automatically limits them if there are too many. This can result in weird deformations and spikyness in-game. However, Blender’s «Limit Total» button will, well, limit the number of bones per vertex for you. You can do this manually as well, of course, but I very, very rarely feel the need to. Generally, using this tool regularly during weight painting will fix SO MANY problems. Click it immediately, and keep clicking it every so often.
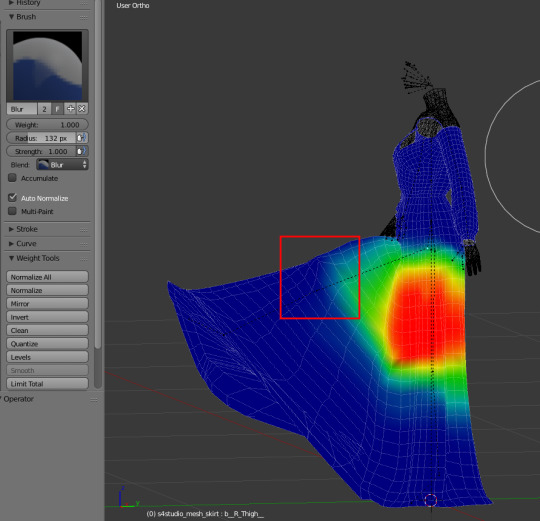
Next, I’ll pose the rig so I can see what the mesh is going to look like when it moves. This looks pretty good right now, but of course, it’s not going to look like this in-game because it has too many bones. It also looks pretty jagged and doesn’t move very smoothly.

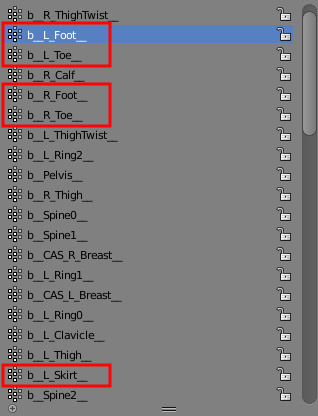
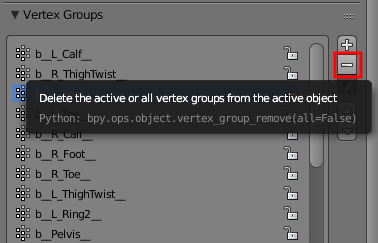
Let’s start with the vertex groups. What I’m going to do next is straight up delete the groups I don’t want. In this case, that would be the Skirt, Foot and Toe bones – compare it to the vertex groups in your cloned mesh if you’re not sure.
Then hit «Normalize All». We just removed a bunch of weights without replacing them with anything, which will result in a whole bunch of weirdness and deformations. Normalizing the weights will automatically make sure all the vertices have the right values to work properly.

Once I’ve got that sorted out, it’s time to do the actual painting. In this case, what I want to do is smooth out some of the jaggedness and fix some spikes that have appeared.
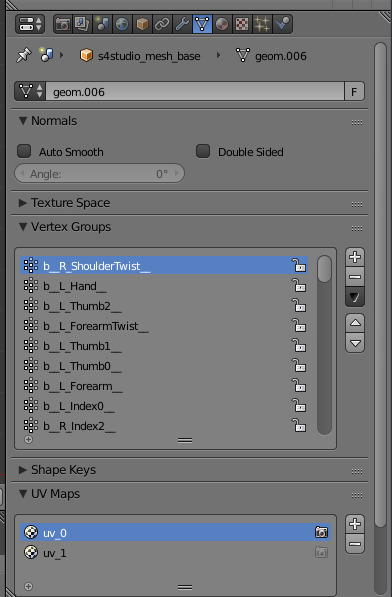
In this case, there appears to be a problem with the left calf. The bone related to this is named, appropriately, enough, b_L_Calf. By clicking this vertex group in Weight Paint mode, we get an view of how the weights are painted on the bone.
Note: All the vertex groups are quite reasonably named. If there’s a problem with the shoulders, for instance, the b_L/R_ShoulderTwist bones are most likely the ones that needs fixing.
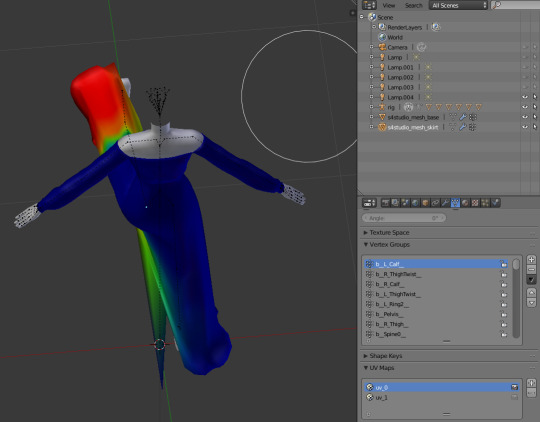
Dark blue means the vertexes aren’t weighted to the bone, red means they’re heavily weighted to it. In the image above, it looks like the weird spike should be moving with the rest of the calf, but it’s hasn’t been painted to do so.
There are a couple of ways to fix this, the easiest of which is probably using the «Add» Weight Painting Tool. The exact settings aren’t super important and fairly intuitive, so go ahead and play around with them. Make sure Auto-Normalize is active, though. Then use the tool on the offending vertex, and the weird spike disappears.

The Blur tool is by far the one I use most, though, and it works great for things like this as well. It gives you less precise control than the Add/Subtract tools, though, so it’s mostly a matter of preference.
My next step is going to be smoothing out some jagged edges with the Blur tool, starting with the upper thigh area, which has some spikyness going on.
Note: The mesh I weight transferred from doesn’t use the Thigh bones at all, so with the Skirt bone gone, the skirt is purely weighted to the ThighTwist and Calf bones. This is how I weight paint long, flowy dresses as well. These types of meshes don’t really require a precise distinction between the Thigh and ThighTwist bones, and it’s easier to weight paint two vertex groups than three. Tighter and shorter dresses generally require using all three, though.
To make sure you don’t accidentally start weight painting the arms or unrelated parts of the mesh, you can select the part of the mesh you want to focus on in Edit mode and activate Face selection masking for painting by clicking the tiny red/white cube at the bottom of the screen in Weight Paint mode.
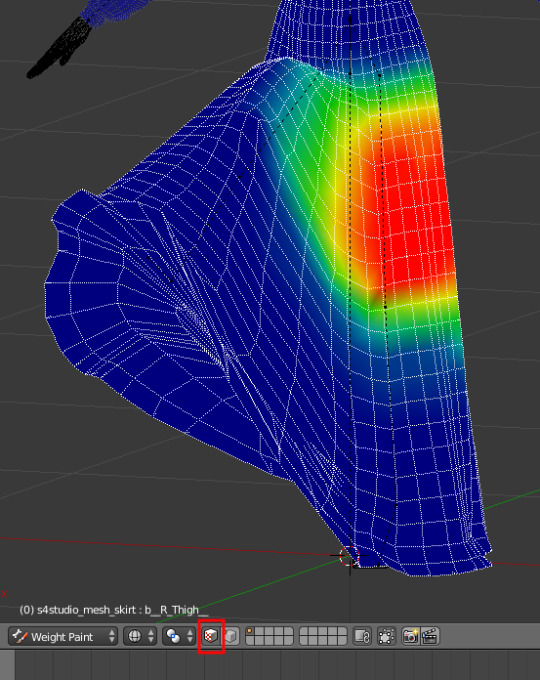
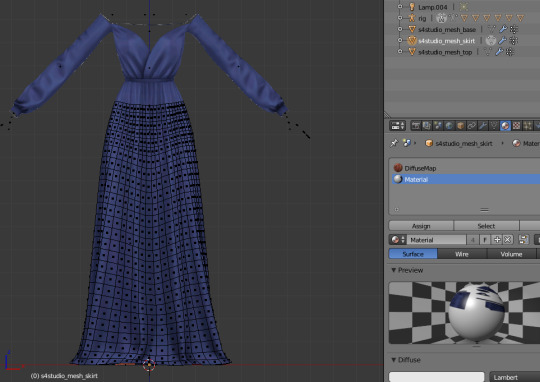
So, back to the actual weight painting – once you understand the basics, it’s really not that hard. Here, I’ve selected the different bones on the leg (b_R_ThighTwist, b_R_Calf b_Pelvis near the top) and gone over them with the Blur tool, and it looks much smoother already.
The next step is to do this, well, everywhere! This involves moving the rig into different positions to see how the mesh moves and rigorous use of the «Limit Total» button to make sure what I see in Blender is what I’m going to see in-game.
I’m not going to give a step-by-step guide here because it’s basically just the same steps over and over until I get a result I’m happy with – using the Add, Subtract and Blur tools on the appropriate vertex groups where I want to fix something, and hitting Limit Total a. lot.
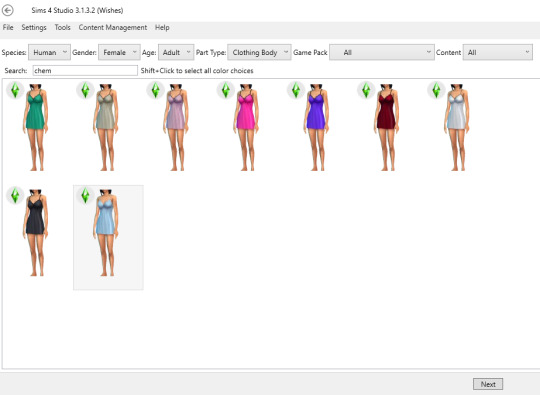
Once I’m happy with how it looks in Blender, I’m going to import my mesh into Sims4Studio and test it in-game...

Aaaand we have a working dress. :)
6 notes
·
View notes
Note
Can I ask you to talk a little bit about your process for backgrounds - specifically the piece you’ve been posting lately? I’m someone who is a lot looser with drawing naturally and far better with backgrounds drawn in traditional media as a result, so I’m trying to get some insight into how people create detailed backgrounds like that digitally.
Sure! Here’s a few things that help me out with backgrounds in general, as well as some detail specific tips:
1. Understanding perspective. I know we all hated drawing those cubes in school art classes, but it really does help. And practice some WEIRD stuff too, just to get a feel for it. One of my college assignments was drawing a spiral staircase in fisheye perspective. My teacher had a very evil glint in his eye when he assigned that...
Anyways.
Also make sure your perspective is a little off kilter. Don’t put your horizon line exactly in the middle, don’t make your vanishing points equidistant, etc. Adds more visual interest to have things a bit off-set.
2. Use/Make Reference. I have a bunch of Pinterest boards of different reference material. Everyone is welcome to check them out if you like! I also have one specifically for scenery. Now, with this said, it is important to understand how to USE reference. It’s not just “I am going to draw this picture” it is “I like the perspective in this one, the lighting in this one, the _______ in this one, the _______ in this one, etc.” and then learning how to effectively combine all those things into a finished piece. Reference also helps you add those little details you’d normally forget about, which lends realism to your work.
For example, without getting up to check, how many of the shelves on your bookshelf are starting to bow under the weight of your books? How many empty shelf-peg holes are there between each shelf? How much variation in height/width is there between your books? Are any of them pushed back/pulled forward compared to the others? What sort of knick-knacks do you have sitting with your books and where? Are all the pieces of the shelf assembled properly or did you accidentally not screw something in properly and leave a little gap somewhere? And these questions can be applied to anything you draw. How many eyes does that aspen tree have? What type of stitching do the curtains have? What’s the right type of lane marking for that type of street? Learning to ask those types of questions will help up the detail in your work because it will help you pick up on things you’d normally miss.
Now, as for making reference, this is something I do a lot as well, especially for complex backgrounds. I use Google Sketchup to build a base model, then draw from that. In the case of the Apothecary illustration it was the shelves/cabinets/walls. It helps with good perspective because I don’t have to try to find super distant vanishing points, I can just rotate the model around until I find something I like and save it in that position as a reference. Like, I just checked on the Apothecary and the left vanishing point is about 30 inches off the page. And that’s just a pain, digitally OR traditionally. But if I make my own reference I don’t have to worry about those vanishing points quite as much. Also, Google Sketchup is super easy to use and comes with built in tutorials, and there is a free version.
3. Start Big, Work Small. This is the biggest thing for me when it comes to complex/detailed backgrounds. Start with the big stuff, THEN get detailed. With the Apothecary that meant drawing the empty shelves first, then tackling the rest one shelf at a time. Basically the process went: Shelves-->empty jars/beakers/whatever-->contents of jars/beakers/whatever. With a forest it might be: Land Forms/Contours-->Distant Trees-->Closer Trees-->Smaller shrubbery and ground cover-->Little details like scars on trees, pebbles/etc. With a room it might be: Walls-->Basic forms of furniture-->Details of furniture like a messy desk, an unmade bed, etc.
It’s basically the same as drawing a person. You start with loose forms to get the position of the whole body right before you start putting clothes/hair/features on the figure.
4. Lazy Nezumi. Lazy Nezumi is a LIFE SAVER for digital art. My process is 10x faster with it than without. LN started as a brush smoothing engine since, for some weird reason, Photoshop never offered a good one? (It tried to add one an update or two ago, but it is still pretty weak.) But LN has since evolved to have a ton of other great tools including a variety of perspective rulers. I mostly use the connected lines setting for perspective work, as well as the perspective ellipse when I need to draw circles in perspective.
5. You’re not a loser. You’re learning! New mediums are hard, especially if it is as big a switch as traditional to digital. If you’re feeling frustrated, take some time to just play. Don’t aim for anything finished, just click all the buttons and try all the brushes and screw around. It takes a lot of the pressure off if your end goal isn’t a finished piece, and that’ll help you loosen up and just see how things work and what you like/don’t like.
Aaaaaaaaaaaaand, that’s all I got. If anyone ever has any other art questions, please don’t hesitate to ask!
214 notes
·
View notes
Text
Tutorial Tuesdays: Heads Up!
It’s been a long time, life is a jerk. Anyway, drawing heads! Before continuing, I recommend reviewing the last Tutorial Tuesdays post on pencil pressure and drawing with basic shapes since those are going to be put into effect. Ready to go? Alright, since this is going to be a long one, click the Read More link and away we go!
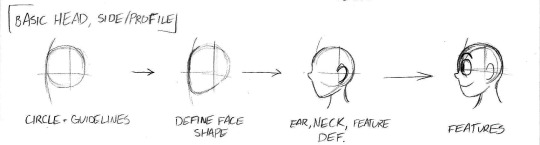
The head is likely the part of any character you’re going to find yourself drawing the most. Expressions, headshots, closeups, busts, you name it. So let’s start by drawing a basic head and start with the most common view, the 3/4 view.

This is the most basic process condensed into four steps. Lightly sketch a circle and a guideline, the former typically is the form of most of the skull and the crosslines will help with placement of the eyes, nose, and ears. Then define the shape of the face, including the cheeks and jawline, with a bit stronger pressure but still keeping pretty light. Sketch in the ear and the curvature of the back of the head, as well as the neck. The furthest line of the neck will be relatively close to where the jawline and ear connect. Then sketch in the features; very lightly sketch in circles where the eyes are--above the horizontal guideline but no further down than touching it--and sketch the eye shape and pupil/iris, alternating sides with each stroke to alleviate the frustration that comes with “drawing the other eye”. You know what I’m talking about. The nose will be close to the guideline intersection, if not actually on it at certain angles. And viola, a basic head at 3/4 view. This same process is used when facing at 3/4 the opposite way.
For a profile view, or looking at the head from the side, same basic four-step breakdown:
You’ll notice that the nose sticks out and you can see where the head connects to the neck at the back. Another guideline helps with ear placement. I should have put the guideline for that on the 3/4 view, but I find that the main guideline and jawline contour work better for me. Use the additional guideline for the ear if it will help with the spatial relation of that feature. More experienced artists may tweak areas to fit their signature style. For example, placement of the lips. In anime, especially more realistically styled anime, the lips appear as very small peaks with the valley between them being there the mouth is.
Now onto probably the second most common view, the front view. Also using the same four step condensed breakdown:
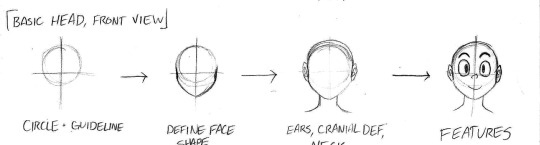
(Some of it cut off, oops) Now you can see how the face is arranged when looking at the viewer straight on. This is the easiest to practice, followed by 3/4, then profile. You can even cheat by using the Symmetry pen in digital programs (just make sure you anchor down the point of reference first with Control+Click!). While basic, this works for just about any human character, though using references is highly encouraged to get a feel for the anatomy before messing with it to fit a particular style.
“I draw anthro animals, does this still work?”
Yes. For both super cartoony stylized characters and more realistically built and furry styles. Let’s start with looking at the fastest thing alive:
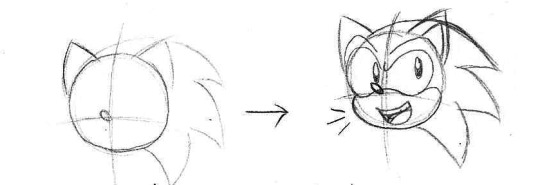
See? Circle, guideline, map out the features, and soon you got a cool boi.
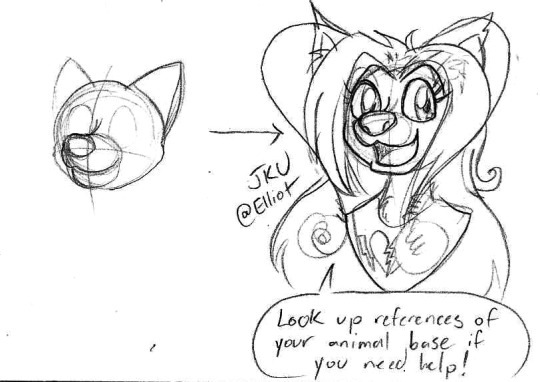
Furries or more realistically styled anthros will tend to have more shapes and forms in their facial construction to better adhere to the anatomy of the animal they’re based on. JKU, my friend Elliot’s fursona, is an alien but the anatomy is based on a dog or a wolf. Study the animal you’re drawing if you need help or even to make a basic breakdown of the shapes you would need.
“How about object heads, like Cuphead?”

Absitively-posolutely! I personally use the circle foundation when drawing the Cup Bros or even just for general mapping the direction they’re looking, but once you master it, you can take the basic shape of the object you’re using, like this candle girl, and manipulate it to get it where you need them to face without relying on the circle.
Alright, now that you understand the basics of drawing a head, let’s move onto
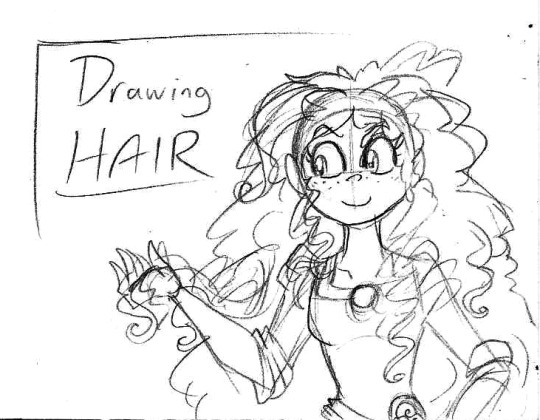
Hair is a total mess and if there’s one thing I will warn beginning artists right now, DON’T DRAW STRAND BY INDIVIDUAL STRAND. It helps to think of hair and draw it in larger chunks and forms as a whole than by each individual one. As I shall demonstrate with my boi Guzma:
Okay, now that we have removed accessories from the picture, let’s set this up.

The process goes by starting with a basic head and the respective features of the character. Now we add the hairline, a visible boundary where the hair coverage begins. You‘ll sketch it for the forehead, the sideburns, and the nape of the neck if you’re in rear views. Now, piece by piece, we sketch the hair; I started with the floof at the top, then the right side of the sketch, then the left. If you have a character with a symmetrical hairstyle/haircut, remember the technique to avoid “the other eye” (or cheat by using the symmetry pen in digital).
The hairline itself varies from character to character or style to style, sometimes more seasoned artists won’t use it since it becomes hidden anyway. It does come in three basic shapes: flat (as seen on Guzma), protruding (it comes out a little bit in the front but following a smooth contour), and a widow’s peak, as seen on Equius:
The hairline is also useful in drawing and styling a character’s bangs or even indicating how the hair parts. Know what else it’s nifty for? It’s actually one of the most noticeable indicators of age. And you knew this example was coming and you probably even saw it coming from a mile away so let’s get it over with.

In 2018, Ace of the Gangreen Gang from The Powerpuff Girls became an official member of Gorillaz, temporarily taking up the role as the bassist while Murdoc was in jail. Since the band members age in real time, the same applies to Ace. Besides the addition of a couple wrinkles, the most noticeable effect time has had on him is the receding hairline and decreased volume/body his hair has compared to when he was within spitting range of becoming a legal adult. I could even do an entirely new tutorial on hair by age, but this is just the basics.
So we talked about hairlines and drawing in large chunks. What about characters with hair accessories or their hair pulled into ponytails or pigtails? Allow Plumeria and Bubbles to demonstrate:

Take your basic head and define the hairline (though it may be impractical on any angle on the PowerPuff Girls). Draw in the part and bangs if applicable and define the volume of the hair close to the head. Lightly sketch a circle on each side where the hair gathers on the head and map out the length of the hair. Define the pigtails first and then the hair accessories. And you good!
For specific textures of hair, look for references or additional tutorials. Bald characters such as Russel Hobbs or Dr. Eggman don’t really need much of a tutorial, but you do want to make sure the head is constructed very well to make it convincing. And on that topic...
TROUBLESHOOTING
These are some traps that beginning artists fall into or rookie mistakes seasoned artists shouldn’t be making on prime pieces. Let’s break them down:
Balloon Heads and Painted-on Faces
These two are beginning (more pronounced for anthro) artist pitfalls and tropes that were very common among the Sonic fandom back when Sonic X was at the peak of its popularity online in the late 2000s and early 2010s. Ohohoho... man, those were some times. Now, I do like Sonic X and even Sonic Underground, but it’s frustrating how prevalent balloon faces are in these professionally--well, mostly professionally--made shows put to television. As demonstrated here:
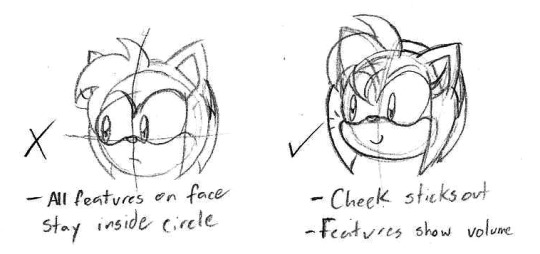
On the left, the example keeps all the features of Amy’s face within the basic circle with no indication of volume. Nothing that would indicate what parts of the face are supposed to stick out and it’s not exactly in a style that makes it simplistic enough to slide. The right, while not perfect, could reasonably be translated to 3D or CGI and the anatomy would check out and make it more convincing. At least, in 3/4 view or front view and some frames of Sonic X can be brushed off as an odd camera angle or going into a moving frame or just being too far away from the camera to properly discern some features. In profile view it’s less forgivable and more common to Sonic Underground and beginning artists.
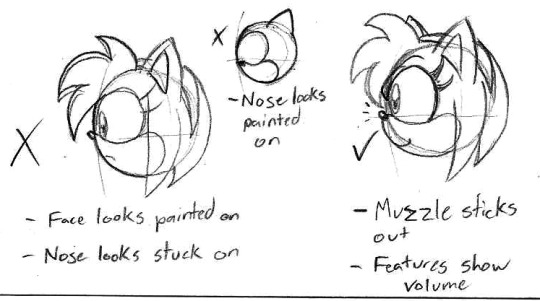
In profile view, balloon heads/painted-on faces are a very noticeable mistake derived from keeping all the features inside the circle. At the very worst you can have the inset in the middle, where the nose is inside the guide circle and looks very much like it was just painted on. This is something that most artists usually grow out of in their last years of elementary school (or for those who use the metric system, primary school). At best, the mistake is just sticking the nose on the outside of the circle without accounting for convincing shape of the face, such as the Amy sketch on the left. On the right, the muzzle and, if you can see it, “eyebrow” stick out to convey how the eyes are covered based on the Mobian skull and the muzzle sticks out to accommodate the internal structure of the face. As seriously as you can take a cartoon character’s anatomy and biology, anyway.

Really the only case I could see these mistakes being fine or harmless is on object heads like Lucius (a billiard ball) and Claire (a sugar bowl) in the rubber hose style. However, the style is deceptively easy in which it may look simple but you have to have a good grasp on the style or it falls into the uncanny valley. Balloon heads and painted on faces seem to be more common to stylized anthro characters, but I’ve made a number of fluffy anime creatures and anime-styled human characters in seventh grade that fall into the trap.
Lopping
More common to human and humanoid characters, lopping is a mistake in which you draw the face alright but the hair at the top of the head really doesn’t look right to the point that the head itself doesn’t look right.
You’ll notice in this drawing of Lapis that the face shape looks okay, the eyes and nose and mouth are where they need to be, the hair is the right style, but it looks... off. Sketching a dotted line to outline the head at its most basic form shows that the hair placement defies the rules of anatomy. Such a mistake is what I call lopping, as it looks like the head was lopped off and the hair is trying to cover it. This is why I stress starting your sketch with basic shapes and then constructing details around the foundation.

Looks much better, right? And since in Steven Universe the gems don’t really have ears (at least, that’s my observation), you can lightly sketch in an oval where the ears normally are (in 3/4 and profile views) to help draw in the face shape and jawline.
As always, practice drawing these regularly and don’t shy away from references if you need something to study or a visual aid or guide. Happy drawing!
Next episode: No plans, but will take requests or suggestions in my inbox/Discord.
17 notes
·
View notes
Text
really getting into the “i wanna make a fursuit” mood

thinking how id change my sonas design to be more fursuit-friendly...my original plan for if i ever got a suit of em was to make a resin mask for the skull face part like the skulldog masks from dreamvision creations that every skulldog suit uses:

but that would be...a LOT. either lots and lots and lots of money to commission one, or me making it myself, and ive never ever worked with resin or anything like that before, so i have no doubts it’d come out very bad. so i figure going with short felt or fleece on top of the foam base with sewn-in felt/fleece markings would be the best approach for my skull head.
the wings would also be a big task, ive seen fursuit wings done before but theyre usually either like, with the hand as part of the wing using feathers as fingers like in this video but as you can see in the ref my sona has hands in there since theyre a raptor, with the feathers extending off the middle finger like in real raptors. i think thatd not only be hard to pull off, but would also make use of the hands...super difficult
also on the hands i want those adorable smooth pawpads. my sona doesnt even have pawpads. theyre a dinosaur. but i love those cute pawpads so much. you know the ones, like on pocari roo’s suit:

i dunno what material those sorts of pads are made of but i want. i want them. im giving my raptor pawpads
and tHEn theres the tail. that big long made-of-bones tail is...super complicated. i might opt for a typical raptor tail (easy to find tutorials on, since dutch angel dragons have the same setup) instead, at least for the first iteration of that suit.
oh also, the digitigrade legs. i tend to not like how digitigrade legs look on suits, since people are plantigrade the legs end up looking clunky. looks pretty fine on fullsuits, but i imagine itd look pretty..not good on partials, like id like to do.
then again i could go for making my ducktales sona instead? who knows.

40 notes
·
View notes
Text
Fic Rec List #4 2/3/2019
First rec list of 2019! As always, thank to all these beautiful writers for sharing. 40 fics on this list this time. If a link doesn't work, please let me know! I’ll be happy to fix it.
You Don't Have to be Alone by @thottybarnes
Summary: In which Bucky Barnes, a soldier who lost his arm on a peacekeeping mission overseas in Syria is having issues adjusting to being a disabled man in modern times. You, Barnes’ best friend since childhood, take it upon yourself to help him the best you can. Bucky x Reader. ��— Oh my god I loved this so much. I just really love your writing.
Safe House by @thottybarnes
Summary: When a mission goes south, you make it a personal mission to make your boyfriend, Bucky Barnes, see the light at the end of the tunnel by taking him to your safe house. Bucky x Reader.
Peppermint Shake by @thottybarnes
Summary: In which Reader happens to buy a peppermint milkshake with a cherry and two straws while on a date with her best guy. 40s!Bucky x Reader—— I love this one so much, its so sweet and endearing.
Hero for Hire by @delicatelyherdreams
Summary: Tired of constantly being sat on the sidelines for missions, Bucky Barnes deciders that he’s going to do his own hero work and office his services to the public as a freelance “hero for hire.” he expects to be asked to rescue cats from threes or help little old ladies cross the street, but he doesn’t expect to get tangled up in your life. He definitely doesn’t expect to fall for you either. But, when you’re a hero for hire, you’ve gotta see the mission through. Bucky x reader. Completed series.—— holy fuck. Y’all, if you only read one fic from this list, read this one!!! Oh my god it is such a ride. I loved this fic with my whole ass heart and I got so freaking invested.
Touch me Tenderly by @delicatelyherdreams
Summary: You’ve never seen his skin, never seen his scars. He’s scared to show them, but maybe all he needs is to feel your tender touch. Bucky x reader.
Day Off by @softlybarnes
Summary: Bucky really wants to take a nap with the reader, but she just wants to read.Bucky x reader. —— Holy crap. This is literally the softest thing I’ve ever read. This is my actual dream, I absolutely loved this and I desperately want this in life. I love how clingy he is and I love how despite how he’s touching her, its still just innocent, grounding touch. I love this fic with my whole ass heart, definitely one of my favorites.
Sad by @softlybarnes
Summary: The reader, who has struggled with depression all her life, slips back into that deep sadness. Bucky is worried and tries his best to help. Bucky x reader. —— I was crying almost the entire time i read this, it’s so beautiful and heartbreaking
Sugar by @softlybarnes
Summary: Bucky survives the war and comes home just a little bit changed. His girl loves him anyway, and she knows exactly how to show it. Bucky x Reader. Smut. —— YOOOOOOOOO. Dude I just love your writing so much, you don’t understand the happiness I feel every time i read one of your fics. I loved this one so much. I love the way to talk to each other and how they carry their relationship.
Casual by @writing-parker
Summary: The reader has been seeing Steve for more than a year now, stuck somewhere between friends with benefits and an actual relationship. He wants to commit to you, but he cant let himself. You overhear a conversation you wish you hadn’t-learning much more about the way Steve feels about you than you ever wanted. Steve Rogers x reader. —— My heart BROKE. Even tho know you see how Steve feels about the reader from his thoughts, I still couldn’t help but hate him. God, this was so good.
Give Him Back by @soopranatural
Summary: The Hulk is not an idiot, he knows when he is needed and he knows when he is not. Bruce Banner x Enhanced!Reader. —— Oh my god. ohmygod ohmygod ohmygod. This is the first Bruce fic I’ve ever read and I feel in love. I love how you characterized Hulk and it was so sweet. This fic definitely left me wanting more Bruce and Hulk fics.
Firefighter!Bucky Drabble by @hootyhoobuckaroo
Summary: If firefighter!Bucky rescued you from a fire, realistically you wouldn’t even know it was him. Bucky x Reader.—— AHHHHHH I never even considered Firefighter!Bucky until now and I can’t stop thinking about it. I loved this sooooo much.
Eggnog by @buckyforbreakfast
Summary: Bucky as a little too much and gets creative with the gingerbread men. Bucky x Reader. —— I know, I know, Christmas passed already but holy crap. I was not about to leave this fic out of the list. Its so cute, I could not contain myself.
Baby by @paradisaicsam
Summary: Different situations in which reader makes Peter flustered by calling him baby. Peter Parker x Reader. —— Oh i loved this one so so much. Its so sweet and endearing.
A Restless Night by @221bshrlocked
Summary: “My room is haunted, so I have to sleep in yours.” Steve x reader. Smut.
Things Change by @fvckingavengers
Summary: After completing a rough mission, Bucky and the reader retreat to her family’s vacation home as a safe house. Bucky x reader.
Effortless by @supernovasandcoronas
Summary: “I’ll be right back” kisses: A puts their hands on B’s shoulders from behind them, where they are sat on the couch. He leads down around, while B turns his head a little, accepting the quick peck. Sam Wilson x reader.
Fresh Eyes by @supernovasandcoronas
Summary: You’re a pharmacist in one of the busiest pharmacies in Brooklyn. When some of the Avengers start picking up their medications from your pharmacy, you know life is about to get infinitely more interesting. Sam Wilson x Poc!Reader
Oxytocin by @supernovasandcoronas
Summary: Touches that may or not lead to something more. Bucky x reader.
Gentle by @invisibleanonymousmonsters
Summary: Y/N has never seen Bucky be anything but gentle and loving. It’s hard for her to believe her boyfriend was ever the world’s deadliest and most lethal assassin. Bucky x reader. —— Oh god, I loved this with my whole ass heart.
Swipe Right by @avengerscompound
Summary: Sam Wilson signs Steve up for Tinder. When the woman he Super Likes during Sam’s tutorial messages him, Steve goes from unwilling dating app user to developing feelings. Steve Rogers x Reader. Completed series.
Breakfast in Bed by @avengerscompound
Summary: Children really do change things They also have terrible timing. Steve x reader.
Dead Serious by @puppy-barnes
Summary: When you accidentally kill a man after a night with friends, you call your boyfriend Bucky to come save the day. Bucky x Reader. —— God, I loved this so much. Its so original and hysterical and I’ve read this so many times.
Polaroids by @spidey-holland67
Summary: May gets Peter a camera for his birthday, ever since then he cant stop taking pictures of you. He always kept them in a box in his room, but one day some one finally finds them. Peter Paker x Stark!Reader. Smut
Sharing by @elivanah
Summary: Steve’s girlfriend finds out that Steve and his best friend used to share their women. Steve x reader x Bucky. Smut. —— If this aint the hottest shit I’ve read in a while.
What Feels Right by @waywardmoeyy
Summary: Castiel makes a move on the reader. Castiel x reader.
Adrenaline Fix by @jaamesbbarnes
Summary: When you need to spice up your life and Bucky in intendedly provides the spice but also the comfort. Bucky x Reader. —— AHHHH IM SO SOFT YOU DONT EVEN KNOW.
Lil Bit Floozy by @piscesbarnes
Summary: Bucky’s more prone to be responsive when you’re a soft drunken mess. Bucky x reader
Snowed In by @beckzorz
Summary: You’re all set for a vacation in the woods. A cozy cabin, a fireplace, solitude… Then a tall stranger falls through your front door. What’s a girl to do? Bucky x reader. —— Hannukah fic!!
Starshine by @a-splash-of-stucky
Summary: The starts feature in some important moments throughout your life. 40s!Steve Rogers x reader —— Absolutely loved this and shed a few tears by the end.
Unusual Request by @a-splash-of-stucky
Summary: In which you dress up as a schoolgirl and have a threesome with Nat and Steve. Steve x Natasha x Reader. Smut.
How Long Will I Love You by @a-splash-of-stucky
Summary: Nothing Lasts forever, except, perhaps, your love for him. Artist!Steve Rogers x Artist!Reader. —— Just break my heart into billions of pieces i guess.
The Quest for Love by @sgtjbuccky
Summary: (Modern-Day!AU) Work has always been a priority for Bucky, leaving things like love long forgotten, and for him it’s no problem, but for Sam and Steve it is the biggest problem to grace this earth. Fed up with Bucky and his constant protests and avoidance of love, they set him up on a series of dates to find the girl of his dreams with the help of the magical spirit of December. Only for Bucky to realize love isn’t always found where one goes looking for it, but may be close by. Bucky x reader. Completed series. —— Ohhhhhhhh my goddddddddd. The love i have for this series is unreal. I love their banter and playfulness and how easy going their whole relationship us. Its so fun and sweet and endearing.
Say It by @sgtjbuccky
Summary: In where you loved Bucky unconditionally, enough to sacrifice your life for his happiness, now Bucky tries to save you. Bucky x reader. Completed series. —— Bruhhhhhhhhh, this is such a good ass series. Unrequited love, sacrifice and soooo much pain. Love this fic with my whole ass heart.
Already Yours by @sgtjbuccky
Summary: Bucky hasn’t had the best of luck trying to charm you, but when confidence finally washes over him, he makes his move only to realize is ain’t as smooth as he used to be, but that may not be a bad thing at all. Based on prompt: “You keep licking your lips and giving me that look, you don’t even know me, yet I’m already yours”. 40s!Bucky x reader.
The Three Times Steve Caught You by @bucky-plums-barnes
Summary: Bucky is back from the war, you have time to make up for. Sometimes it’s interrupted. 40s!Bucky x reader.
Woman Like a Drug by @writingcroissant
Summary: Bucky thinks naughty thoughts and you’re not ready to reveal a secret. Bucky x reader
Out of Touch by @buckitybarnes
Summary: “I think i requested this one before but i really want this fic! Bucky always to goes to hang with the reader when he wakes up with nightmares because he thinks she’s always still up. In reality, reader make FRIDAY wake her up when Bucky gets up at night so she can comfort him and Steve finds out.” Bucky x reader. —— This tore my heart to bits.
I Just Want Attention by @buckysforeverprincess
Summary: You begin to have doubts about your relationship with Steve as he starts to pull away from you. Steve x reader. —— Oh fuck, whatever I had left of a heart was destroyed.
Kinkmas - Day Eight by @beardandbooty
Summary: Subby rope bunny Bucky. Bucky x reader. Smut. —— Technically this is more of an headcanon/drabble (???) than a fic but It was too good to not put it on the list. Also, i love the term rope bunny, and Bucky’s last line in this fic.
Headcanon by @prettyyoungtragedy
Summary: Ask: “Being one of the best assassins ever known, Bucky lord to use his skills and stealth to get handsy with you whenever he can. He can almost have you on the verge of coming on the couch while everyone is in the same room watching movies and they never notice.” Bucky x reader. Smut. —— Also a headcanon, but I loved this a little too much.
#bucky x reader#bucky barnes fluff#bucky barnes#bucky barnes smut#bucky barnes headcanon#steve rodgers x reader#steve rogers fluff#steve rogers smut#steve rogers#sam wilson#sam wilson x reader#sam wilson fluff#peter parker x reader#peter parker fluff#peter parker smut#natasha romanoff#natasha smut#bucky x steve x reader#stucky x reader#bucky barnes imagine#bucky imagine#steve rogers imagine#steve imagine#sam wilson imagine#natasha romanoff imagine#steve x reader x bucky#smut#fanfiction#fan fiction#fic rec
248 notes
·
View notes
Text
Welcome to the blog Tramps Hosiery! I recently came across this brand, and I have to say they are certainly unique! Not only are they about compression hosiery, but those colours and styles they offer are certainly to crush over! I managed to get my hands on 2 pairs; both in the same model but in 2 bold colours!
About Tramps Hosiery
“TRAMPS is a high-quality fashion compression line designed by Tomas Reyes, a New York-based fashion designer, and his sister, Alex Reyes, a long-time hairstylist and salon owner in Austin, Texas. After working on her feet for many years, Alex’s doctor prescribed compression hose to help relieve the pressure in her legs and help with the varicose vein she started to develop. In her search, she grew frustrated by the lack of color and fashion in existing brands of compression hosiery, and she collaborated with Tomas to design the perfect line.
Together, Alex and Tomas created a line of beautiful and comfortable compression-wear that merges fashion and function. Created with customers in mind, TRAMPS offers superior comfort and style while providing compression for better circulation. The clean designs, creative patterns, and signature open-toed style are essential to every wardrobe and are a copyright exclusive to TRAMPS.”
– taken from their website
The Spec
Colour: Tramps Blue
Size: S/M
Denier: Approx 60-80
Compression: 25-30 mmHg
Materials:
Price: $58.00
Website: Tramps Hosiery -Bryannna High Waisted Style Tights
My Outfit
Now it took me a good while to pair these up with an outfit, but I managed with monochrome as a starting point! I thought you cannot go wrong with black and white and then add a good pop of colour into the mix!
My Deets
Cami Top: New Look
Skirt: H&M
Tights: Tramps Hosiery
Shoes: New Look
The Review
From The Website: This high-waist style Large style in the TRAMPS Fashion Compression Hosiery line is designed with 25-30 mmHg graduated compression to give you waist smoothing and body shaping support along with open toe freedom.
Sizing Info:
TRAMPS Fashion Compression Hosiery is designed to be flexible to most sizes with a uniquely knitted fabric that conforms to your body. Our Small/Medium fits comfortably from size 4-10 and Medium/Large style fits comfortably from sizes 6-14.
PLEASE CONSULT YOUR DOCTOR BEFORE YOU WEAR COMPRESSION GARMENTS.

The Packaging: I really do love their whole look. Not only does it come in their own plastic outer packaging (as shown below) but they come individually tissue wrapped in opposite colours and it’s pretty simple. I love the whole concept!
When you get in, you will find that it comes with a slim piece of card that states how to get them on. I will show you how I attempted to do so further down the blog!
Getting Them On: okay so below is me attempting by reading the card given (see above)… And well I will let the video do the talking for me.
youtube
Later that day… When I decided to take that break and let my legs just cool down… I discovered that they have a tutorial video on their website, which you can view here: https://www.trampshosiery.com/pages/how-to-put-on-compression-stockings
On The Legs: I did manage to finally get them on let me add, and when it did they were great!
The denier is pretty high so you will get a lovely block colour, however this will depend on how much the hosiery is stretched out on the legs. It will still remain quite solid. but you may see parts (on me it’s always the thighs) where it slightly becomes a little sheerer than the rest of the leg. It’s fine and actually gives it a lovely ombre effect too!
The quality is spot on! For what you pay, it is certainly worthwhile! I couldn’t damage these even if I tried as they are so fitted to your legs and the denier is pretty high, it would be a mission to snag these! Plus a lot of the material is stretchy so good luck with trying to destroy these!
The fit of them are amazing; they are super tight to begin with (if you’re not used to compression hosiery that is) but you get used to that after you start moving in them. My legs have felt great all day in them, especially as I have been on the move a fair bit. I didn’t feel restricted in any way, which may seem unusual considering the struggle it was to get them on!
The feel of them are so soft and super comfortable to be in; yes these might be a little too thick for summer, but actually works so well for those slightly cooler days. I didn’t feel my legs perspire in these at all and they certainly gave them a great shape too!
The colour I have to say is just divine! That blue is so gorgeous and super bold, I fell in love as soon as I saw it paired together with the outfit.
It’s deep and rich in colour, it looks luxe and it’s my favourite compression pair by miles!
youtube
The Toes & Ankle: now some of you are gonna find this super weird, but I think it’s super awesome! The toes – are toeless which means bring on the open toe sandals and shoes. At first I thought it was really unusual, but when I got them on, I thought it was pretty inventive. Not only does it mean you can wear thicker deniers with peep and open toe shoes, but it doesn’t add any pressure around the toes. I can only imagine how cramped the toes would feel being in compression hosiery all day; heck I have done it before and it isn’t pleasant at times – so to me this is great! I wore closed toe shoes with my outfit, but my next outfit in the pink I will make sure I wear open toe so you can see!
Otherwise I don’t have much to say here – no reinforcements (apart from the heel section) and an all over smooth finish from foot to waistband!
The Waistband: now the waistband is something new. I have done high waisted before but not in a thick pair of hosiery though which was an experience! It came up so high it sat right under my bra! This is why I found it so hard to wear something with it at first as it threw me off completely, but then it was fine once I got used to it.
Now the band can I just say is super comfortable and doesn’t roll down at all. It stays how it shows in the pic below (on the left) all day long. These also have have a boxer brief but it isn’t visible (it ends where the photo ends) so that whole section you feel secure. One thing I noticed was that smooth bum bit at the back (see right image below) where it smooths out compared to the rest of the surrounding section.
Anyways back to the band – this is super nice and so snug to be in. This would certainly work well for winter, but not so great for summer months where you would end up feeling too hot! It’s nicely ribbed and doesn’t dig in at any point either. The compression stop just underneath, so for a good few inches you just get pure comfort.
My Thoughts?
Well I have to say I am super impressed with this pair for sure. Not only do I love the colour, but these have been so great to me. I have no real need to wear compression hosiery unless I’m on a plane (I don’t get up and walk around you see), so it worked if you’re on the move a lot and get tired legs easily – these will certainly keep you going for that little while longer!
I cannot wait to try the pink pair out now!
Tramps Bryannna High Waisted Tights (Blue) Welcome to the blog Tramps Hosiery! I recently came across this brand, and I have to say they are certainly unique!
7 notes
·
View notes
Text
stained glass tutorial? sure
ive had some questions lately about my glass and i just decided to show some of the process. and, its kind of a pet peeve of mine when i see artist draw “stained glass” designs that arent... right. so i figure seeing the way it works will help. i designed this window myself, only because ive been doing that for a few years now and im experienced. i would not recommend it to beginners. even my designs are simple and based off of pre-existing work. but lets jump in (this is gonna be a long post so beware. also, i know my hands look dirty, but its just lead rubbing off. this whole thing involves a lot of poisonous elements and sharp objects.) TUTORIAL UNDER READMORE
so this is the window, a jumping orca for my aunts business. you can see i reworked the bottom corner to be easier to build nearing the end, since you Always Always build into one corner and work your way out, and do the edges at the very very end. those pieces are a bitch to get into place if your design is janky.


this is the piece ill show you, and normally i wouldnt be working down here so soon but i have to get a base to push everything against when i continue the whale. i chose this pretty blue waterglass because... water. and it has good transparency, which is always a plus, especially with varied textures around it.


what i like to do is slip some paper underneath everything so i can trace a pattern for the glass, right inbetween the lead came. so when i cut it out, i leave a little margin to cut enough glass to fit in. the lead came is an H shaped channel, and it holds the glass on both sides like a frame around each piece.


cutting is one of the hardest parts for me, since my hand isnt very steady. try to get as close to the sides as possible. and usually youll waste a lot less if youre better at cutting, or if you have a grinder.

not a perfect cut, but itll have to do. this one ill have to adjust by hand, since i dont have a grinder, ill have to use pliers.

reminds me of the guy on reddit who didnt know about oven mitts. i hate this part.

not a perfect adjustment, but itll do. this is why windows are good for me, because the lead usually hides the nasty edges and holds the glass more securely than a lightcatcher (foiling all the sides and soldering them together) for that you have to have a grinder. for this, i can make do with getting cut a few times.

the fit was a little janky so i fixed it offscreen, but basically curved pieces are the worst. especially if the glass is particularly expensive (this stuff wasnt really since its blue and more clear, but red glass takes actual gold to make. you can see how this racks up.)

got it tapped into place and secured with the nails. and thats it! thats all you gotta do. the most important thing is keeping the textures of the glass consistent on both sides, since most glass is smooth on the back. but youll never see me designing one of those straight-paneled beveled grandma door windows, no. i love me my birds and curves.
anyway, thats about it. if you take up glass as a hobby i strongly encourage you to get a glass grinder (and maybe have a rich relative or some kind of inheritance. the materials for this one ran over 200 bucks and im not even done yet) and be very careful. but its super rewarding and i think its a ton of fun, sore fingers aside.
also, dont touch this stuff then touch your mouth. lead, glass chips, and flux arent a fun snack. but thanks for reading and support your local glass studio!
66 notes
·
View notes
Note
sex trope prompt meme if either so interests you: r/n 2 or 15 and as sfw as you wish
15. pleasant misuse of ties
The bathroom door is ajar when Nathaniel returns from hiserrands, and there is a tuxedo jacket dangling from the doorknob that is fartoo small to belong to him. Curiosity piqued, he goes to investigate.
Rebecca stands before their vanity, her makeup fresh and herponytail neat, buttoning a starched white shirt. She looks up and meets hiscurious gaze with a bright grin.
“Hey, stranger.”
“Hey,” he returns, taking the greeting as invitation,gesturing at the jacket as he steps through the doorway. “Nice suit. What’s theoccasion?”
“Valencia’s short-staffed tonight, and due to some fiascowith a flamingo pink clothing malfunction at their last event, her clientdecided to take the black-tie requirement to its logical extreme. It’s gonnalook like a bunch of penguins out there.” She tops off the last button andsmooths down her collar, turning to inspect herself in profile and noddingapprovingly, hands propped on her hips. “Not that bird suits would ever stop usfrom looking good. My bet is that Heather’s totally gonna kill the look.”
“I’d take that bet.” Nathaniel slides his hands into hispockets as he leans against the back wall, watching his reflection watch her adjusther cuffs. It feels a little like he’s stepped into a parallel universe, standingaround in casual clothing while Rebecca suits up. “Need a top hat? Bowtie?”
Her reflection rolls its eyes at him. “Nah, we’re not sowhimsical, unfortunately. And I would have just dug out your bowtie if I neededit. No, my tie is in the shopping bag, it’s right there at your feet. Could youjust…”
She flaps a hand behind herself, making grabby gestures athim. He smiles and shakes his head, stooping down to do as she asks. He pausesbefore pulling out the contents.
“You seem to have both a clip-on tie and a regular one inhere,” he observes, plucking both out of their tissue paper and holding them outto her with a raised eyebrow. “Which is it?”
Rebecca pouts and yanks the proper tie out of his hands,slinging it around her neck. “That’s just Valencia; she said a clip-on mightmake things easier, but honestly, might as well learn how to do it properly,right? Why half-ass something when you can whole-ass it? Isn’t that what youalways say?”
“…more or less,” agrees Nathaniel noncommittally. “I think Iusually word it differently, though.”
She smiles at him through the mirror as she adjusts the ends.He watches as she starts to loop the narrow end through the initial twist farmore times than he normally takes with his own ties. When the silk seems to bewadding up uncomfortably at the base of her throat, not in any style that he isfamiliar with, he asks, “Do you need any help?”
Rebecca scowls fiercely down at her own hands, holding outthe remaining length of untied silk directly outwards. “Not yet. I watchedlike, three separate tutorials and this should be right. This is supposed to bean Eldredge knot. What do you think?”
Nathaniel looks, not that he’s much of a necktie connoisseurto begin with, but the silk knot under Rebecca’s popped collar resembles amauled rosebud more than anything else.
“It looks dangerous. Are you sure you don’t want the clip-on?The escape mechanism is built right in.”
She rolls her eyes at him through the mirror. “Please. Where’sthe fun in that? Isn’t the whole point of having a tie is to see how to masterhow quickly it can be done? Or undone, as the case may be,” she adds, smirking.“You know what I mean?”
He gives her an unimpressed look that indicates that he absolutelyknows she’s trying to get a rise out of him and it’s definitely not going to work and clears his throat.
“Okay. Again, do you want some help? I can pull up thetutorials again. Or I can, you know, just give you a hand.”
“I mean, if you’re offering,” she says magnanimously, and turnsaround, chin jutted up to grant him access to her throat, and he drops his eyesfrom the mirror to avoid seeing how the flare of interest that runs through himends up translating across his face.
(He’s not totally surprised – Rebecca at her mostprofessional was always a guaranteed turn-on, if a intermittent one, and thesuit helps with that.)
“I’m surprised you don’t know how to do these, actually,” hesays, tugging the ends loose and adjusting the length that drapes across herneck and goes through the motions of a half-Windsor with quick, deft movements.“Didn’t you also do model UN?”
“Yeah, but no ties – it was just dresses usually. My momwould have had kittens and made a bunch of super baseless, correlation-is-not-causationclaims about my sexuality. She already thought I had too much of one.” She coughs,and he loosens the knot, so it is not so close to her throat. “And, again, myspecialty is undoing ties. Redoing them, well, not so much.”
That he knows well enough. Nathaniel turns down her collar,smoothing the points, before stepping away.
“Anything else?” he asks as she turns and makes finaladjustments, and yeah, his voice is pitched a little lower than he intends forit to be, a little more suggestive. She catches his eyes through the reflectionand her eyes gleam and her lips turn up in a soft smile, even as she shakes herhead in the negative.
“Not that I wouldn’t love to see you get me out of this, butI cannot be late for a Valencia event,”she says, with genuine regret but firm resolve. “Especially not a black-tie. She’d actually have just cause to murder me.”
“Probably,” he agrees. He spends time with Paula in aprofessional capacity and Heather is Heather, but Valencia is the friend ofRebecca’s who terrifies and inspires the most respect. He won’t deny that he’sa little disappointed, but in the last year he’s grown to appreciate not onlythe ways Rebecca is firmly, irresistibly the same, but also the ways she haschanged.
“Speaking of black tie, this looks good, thank you.” Rebeccasteps away from the vanity, pausing long enough to go up on her toes to peckhim on the cheek before pulling her suit jacket from its hanger. “We’ll see howthings go, but if this works out, I might make these a part of my regularbusiness attire.”
“Oh?”
“Yeah. It could solve a seriously pressing wardrobe issue.Well, two.” She gestures at the front of her shirt absently with both hands.
“Two problems?” Nathaniel can’t help but ask.
Rebecca’s widening grin warns him, far too late, that itmight have been better not to comment.
“Oh, you know, it’s the age-old question: how much boob istoo much boob?” she says matter-of-factly, and cackles when Nathaniel groansand covers his eyes. “Oh, come on, you’ve heard me complain about Bonnie andClyde before. They’re always peeping out more than is reasonable to show in aprofessional setting.”
“You know, when you were in the Whitefeather office youdidn’t seem all that concerned about it.” Not that he’d been complaining thatmuch at the time, admittedly.
“Well, it’s a serious problem, and things that fly in theWhitefeather office might not fly in the highly competitive world of smallbusinesses.”
“I don’t think most small businesses can afford black-tieevents,” says Nathaniel, still addressing the ceiling, pointedly bypassing achoice comment about how she was responsible to piloting at least half of thequestionable operations that went on at their formerly mutual place ofemployment.
“That’s beside the point.”
“Where is thepoint?”
“It’s better than me bending over and asking you how fardown my shirt you can see, right?”
“I’m leaving now,” he says, and ducks out of the bathroom asshe laughs at him.
~
“Okay, so: ties are not happening,” Rebecca announces whenshe walks through their apartment door much, much later that evening. “They maylook good, but I think I’m going to continue opting out.”
“Oh?” Nathaniel looks up from his laptop. “Too restrictive?”
“Big time.” she continues, sliding off her coat and droppingit unceremoniously over the back of the sofa’s adjacent chair. “Not to mention:they get in the deviled eggs, they smack you in the face if they aren’t securedproperly, and on top of all that, I nearly got strangled by a revolving door.”
“Wow. That’s not good; how did that happen?” asks Nathaniel,slightly alarmed. He twists his body so that he’s sitting up properly on thecouch, closing his laptop and placing it on the coffee table. But Rebeccadoesn’t seem particularly distressed, just working herself up for a good kvetsh.
“Uncertain. There might have been a Roxane Gay sightinginvolved. Maybe. It doesn’t matter.” Rebecca climbs over the back of the chair,ignoring Nathaniel’s exclamation, and collapses into the seat cushion with anextravagant sigh. She tugs at the elastic that holds her ponytail, snapping theband around her wrist and carding both hands through her hair, sighing inrelief. “Ties are not going to be thesolution to my boobage problem. I’ll stick to my plaids and my apron, thank youvery much.”
“What a pity,” says Nathaniel, completely neutral. “How wasthe event? Apart from the whole revolving-door thing.”
Rebecca pulls her tie loose and starts working on the topbuttons of her shirt, leaving the length of silk draped around her neck. “Acomplete and total success, by all measures. Like, the rotating door was a reallow point, don’t get me wrong, but otherwise we were a perfectly trained,obedient flock of penguins.” She stretches, back arching and pointing her toes.“Well, a colony of penguins, if you want to get specific. I know you like that.Or is it a waddle? It might actually be a waddle.”
“Both terms work,” says Nathaniel, distracted by her suit’sdeconstruction, still formal but mussed. He’s usually one to prefer clean linesand neat corners, but now confronted with Rebecca appealingly close, sleeves pushedup and throat exposed, his fingers itch to finish the job.
And given the way that Rebecca is starting to smirk at him,he’s doing a very poor job of hiding his mind’s descent to the gutter.
Not that she seems put off by his interest; she leversherself back on her feet. She tilts her head innocently at him, sloughing offthe tie to wind and unwind it around her fingers in a speculative sort of way thathas Nathaniel pushing himself off the couch so that they stand face-to-face(well, ish). He crosses his arms, mimicking her cocked-head-angle, a nonverbal what are you up to, hm?
Without her heels, she’s missing the extra inches sheusually needs to climb him without help, so Nathaniel is caught off guard when,with a flick of her wrist, Rebecca snaps the length of her tie around his necklike a lasso and drags him right down to her level.
His jaw twinges when his face knocks into hers but he doesn’tmind; they just laugh and adjust, Rebecca’s hand coming up to brush his cheek,while he twists one of his hands up into her hair, mussing it further. Hisother hand plucks at her shirt, untucking it fully from the waistband of herslacks.
He’s thinking about just tipping her back onto the couch whenRebecca breaks the kiss, giggling, but staying close.
“Hey, want to try something?” she asks, a little breathless.“Something new?”
“What could be possibly be new for us?”
“Well, it’s not completelynew…” Rebecca amends, lifting the tie away from his neck and holds it upbetween their bodies, extended between her hands, waggling her eyebrows at him.
“Oh. Okay, I should have expected that.” He laughs. “So,will it be you or me?”
She quirks an eyebrow at him. “I was thinking both of us,actually.”
“Oh?” Nathaniel scrunches up his face thoughtfully. “How isthat going to work?”
“Let me show you?” At Nathaniel’s assenting nod, Rebecca loopsthe skinny end of her tie once around her wrist. Then she reaches between themand takes Nathaniel’s hand, fitting their palms together, and Nathanielalternates between watching her and watching her other hand wind the tie aroundboth of their wrists, in alternating loops, leaving enough space that if theyaren’t holding hands, they have a couple inches of give.
“How’s that?” she asks, tucking the wider end under theloops on his wrist but not knotting them.
“It looks like a confused game of cat’s cradle.”
“It’s a connection point,” corrects Rebecca. “You know thosebody contact exercises? The ones you do in drama class?” When he shakes hishead she continues, “Well, it’s all about knowing where your partner is gonnago. Creating physical shorthand and all that jazz. This isn’t really the samething—we never used props, and the guy I learned it from was a total douchecanoe,but this could be fun with you. Suits are stiff – I’m down for a little more ebb and flow tonight.”
She rocks back and forth on the soles of her feet, obliginghim to do the same.
He considers their hands, still clasped together. “This seemsa little risky.”
“Not if we go slow,” she counters. “But yeah, that’s why Ididn’t tie any knots. Less chance of cutting off blood flow in case we need afast release. I call it an interesting challenge. What do you say?”
It still kind of sounds like an accident waiting to happen,but Nathaniel cannot deny the pinprick of interest, more sweet than heated,that flares somewhere low in his stomach. He interlaces their fingers andbrings their conjoined hands upwards, mindful of how far he can extend, untilshe has to go up on her toes and when he looks at her, he can see how herpupils have grown wide and dark with anticipation.
“I can work with an interesting challenge,” he concedes.Rebecca laughs, wrapping her free arm around his shoulders as he bends hisknees to lift and carry her over to the bed.
Interesting is definitely the right word for it. Takingtheir shirts off is out of the question unless they pause to untie themselves—aconcession neither is willing to make—and Nathaniel’s greater reach, usually apleasurable advantage, now means that he has to move more conscientiously, lesthe accidentally jerk Rebecca out of position. Which happens once. Almost twice.
But they laugh and make it work and the connection does notbreak.
#rebecca x nathaniel#crazy ex girlfriend#ellie writes fic#sadly more sfw than not#but rebecca's in a suit!#i think that counts for something#notbang#writing meme reply#reply
13 notes
·
View notes
Last Seen Blogs

lil-doodle-noodle
Lil-Doodle-Noodle

markofrom1
Marko From

strykerxx
Clueless

katiifaye
katiifaye

sweetfoxmojis
Angels Sanctuary