#image insert with html
Explore tagged Tumblr posts
Visit Tumblr Blog
Explore Tumblr blogs with no restrictions, modern design and the best experience.
Last Seen Tumblr Blogs


Fun Fact
Tumblr’s website traffic is steadily declining.
Text
distributing digital books as pdf files (only) is an abuse of the medium
#make it a goddamn epub#you don't need it to be a pdf trust me. you don't.#you can style an epub.#you can use html and css in it . you can insert images.#please just make it an epub#accessibility#like come on youre gonna make me read your tiny little housefly-poo sized text in a font i dont like?#you're gonna force me to look at page numbers?#do you hate me?
6 notes
·
View notes
Text
*hacker voice* I’m in
#heh. they call me the Coder (failing to insert an image)#it’s ok if I can figure out the bare minimum I will be unstoppable#i will figure this out I am a genius#desperately looking up html tutorials TRUST ME GUYS I know what I’m doing all the time#heh. this coding stuff is easy. wwait why isn’t this working why isn’t th—#fun fact! anything computer related kills my brain cells. anything for the pdbc grindset though#what the FUCK am I doing 🦅🦅🦅🔥🔥🔥
4 notes
·
View notes
Text
Nerd

#tmnt#tmnt idw#fun fact: i hate html because i never figured out how insert an image from my computer rather than the internet#comic panels
2 notes
·
View notes
Text
Oh, you know, just the usual internet browsing experience in the year of 2024

Some links and explanations since I figured it might be useful to some people, and writing down stuff is nice.
First of all, get Firefox. Yes, it has apps for Android/iOS too. It allows more extensions and customization (except the iOS version), it tracks less, the company has a less shitty attitude about things. Currently all the other alternatives are variations of Chromium, which means no matter how degoogled they supposedly are, Google has almost a monopoly on web browsing and that's not great. Basically they can introduce extremely user unfriendly updates and there's nothing forcing them to not do it, and nowhere for people to escape to. Current examples of their suggested updates are disabling/severly limiting adblocks in June 2024, and this great suggestion to force sites to verify "web environment integrity" ("oh you don't run a version of chromium we approve, such as the one that runs working adblocks? no web for you.").
uBlockOrigin - barely needs any explanation but yes, it works. You can whitelist whatever you want to support through displaying ads. You can also easily "adblock" site elements that annoy you. "Please log in" notice that won't go away? Important news tm sidebar that gives you sensory overload? Bye.
Dark Reader - a site you use has no dark mode? Now it has. Fairly customizable, also has some basic options for visually impaired people.
SponsorBlock for YouTube - highlights/skips (you choose) sponsored bits in the videos based on user submissions, and a few other things people often skip ("pls like and subscribe!"). A bit more controversial than normal adblock since the creators get some decent money from this, but also a lot of the big sponsors are kinda scummy and offer inferior product for superior price (or try to sell you a star jpg land ownership in Scotland to become a lord), so hearing an ad for that for the 20th time is kinda annoying. But also some creators make their sponsored segments hilarious.
Privacy Badger (and Ghostery I suppose) - I'm not actually sure how needed these are with uBlock and Firefox set to block any tracking it can, but that's basically what it does. Find someone more educated on this topic than me for more info.
Https Everywhere - I... can't actually find the extension anymore, also Firefox has this as an option in its settings now, so this is probably obsolete, whoops.
Facebook Container - also comes with Firefox by default I think. Keeps FB from snooping around outside of FB. It does that a lot, even if you don't have an account.
WebP / Avif image converter - have you ever saved an image and then discovered you can't view it, because it's WebP/Avif? You can now save it as a jpg.
YouTube Search Fixer - have you noticed that youtube search has been even worse than usual lately, with inserting all those unrelated videos into your search results? This fixes that. Also has an option to force shorts to play in the normal video window.
Consent-O-Matic - automatically rejects cookies/gdpr consent forms. While automated, you might still get a second or two of flashing popups being yeeted.
XKit Rewritten - current most up to date "variation "fork" of XKit I think? Has settings in extension settings instead of an extra tumblr button. As long as you get over the new dash layout current tumblr is kinda fine tbh, so this isn't as important as in the past, but still nice. I mostly use it to hide some visual bloat and mark posts on the dash I've already seen.
YouTube NonStop - do you want to punch youtube every time it pauses a video to check if you're still there? This saves your fists.
uBlacklist - blacklists sites from your search results. Obviously has a lot of different uses, but I use it to hide ai generated stuff from image search results. Here's a site list for that.
Redirect AMP to HTML - redirects links from their amp version to the normal version. Amp link is a version of a site made faster and more accessible for phones by Bing/Google. Good in theory, but lets search engines prefer some pages to others (that don't have an amp version), and afaik takes traffic from the original page too. Here's some more reading about why it's an issue, I don't think I can make a good tl;dr on this.
Also since I used this in the tags, here's some reading about enshittification and why the current mainstream internet/services kinda suck.
#modern internet is great#enshittification#internet browsing#idk how to tag this#but i hope it will help someone#personal#question mark
1K notes
·
View notes
Text
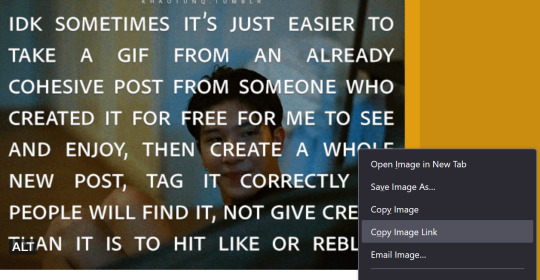
How to credit GIFs
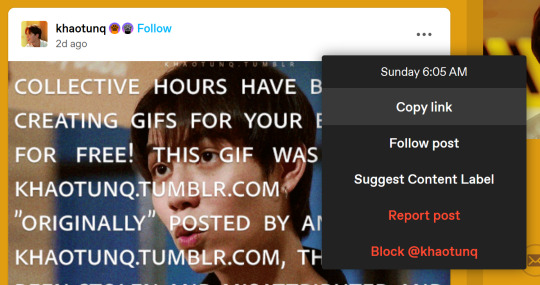
I know there are other posts around this hellsite of how to do this, but because @khaotunq made this amazing post, I wanted to remind some of you of how to include a GIF that credits the original post/creator even if the GIF does not appear in the GIF options.
Option #1:
Step #1 - If you know which GIF you want to use, find the post its from, and click the three little dots to bring up the menu. Click "Copy Link"
Now, in your own post, click the "GIF" button

Step #2 - When the next box appears, paste the link you just copied in it.

Step #3 - The GIF should appear, so click it, and it will insert the GIF with credit to the original post and creator.

HOWEVER, it will only insert the first GIF in the post, so if you want a different GIF in the post, you have to make a small change.
Option #2:
Step #1 - Do everything in Option #1. EVERYTHING! Now, once you have inserted the GIF into your post, it will be the first GIF in the original post as stated in Option #1.
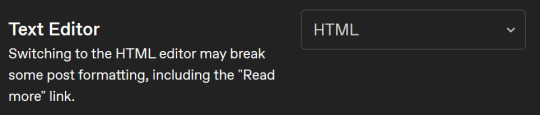
Step #2 - Click the wheel at the top of your post

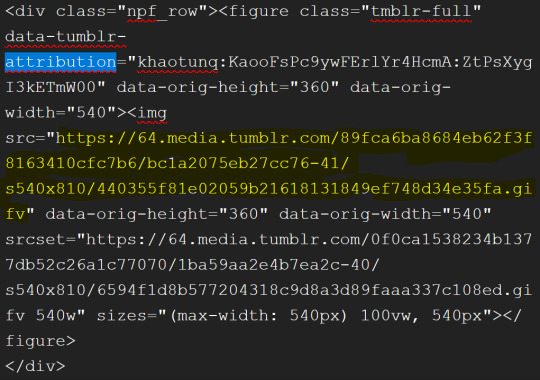
Step #3 - Once you do that a menu box will appear, and where it says "Text Editor," switch from "Rich text" to "HTML"
Step #4 - It might look scary now, but have no fear! Hit "Ctrl +F" to find what you need! Type "attribution" and it will locate the GIF for you.
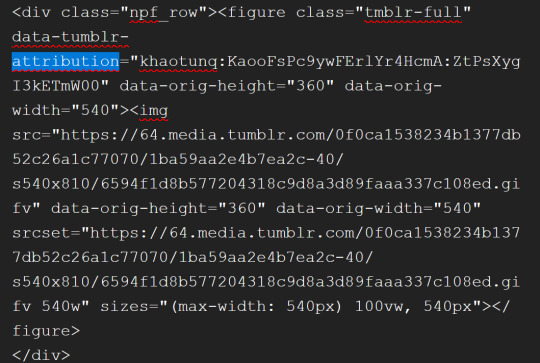
Step #5 - After "attribution" is the GIF's link that you copied earlier in quotes. Look for it!

Step #6 - Now, in another window, go back to the original post with all the GIFs and find the GIF you want. Once you see it, right-click on the GIF, and when the menu pops up, select "Copy Image Link"
Step #7 - You will paste that new link into your post in the same spot the other link was within the quotes. In other words, replace the highlighted yellow part with the new link.
Step #8 - Click the little wheel at the top again and select "Rich text" to switch back to your normal viewing mode.

The new GIF will appear!
It seems overwhelming, but once you get the hang of it, it's easy peasy. And if you think this process is too time-consuming, remember that this is nothing compared to how much work GIF makers put into creating these GIFs for us.
Tumblr is actually very user-friendly with some practice, so do our community a favor and be friendly to the people who put in the effort.
#bl things#myspace taught a lot of us how to be tiny little code changers#bl community#be kind and attribute
326 notes
·
View notes
Text
embedding images on ao3 (or at least how i do it)
step one - create a work skin
this is step is optional, technically, but it'll make for better viewing across different devices. go to your ao3 dash, and on the left menu (or the top menu if you're on mobile) you're going to click on 'skins'. click on 'my work skins', and then click on 'create work skin'. make sure that the type says work skin, and then put in a title. this is just for you, so it doesn't really matter what it is. then in the css box, you're going to copy and paste this exactly:
#workskin img {
max-width: 100%;
height: auto;
}
save it.
step two: host your image
you can't actually host images on ao3, and i don't recommend hosting them on tumblr either. you need a static link for the image and tumblr's are always subject to change. ive never been able to get drive to work for this either but that might just be user error, idk. when i need something hosted for ao3, i use dropbox personally. from here, the instructions are going to be with that in mind, other image hosters might be different.
upload your image and copy the permanent link.
step three: put your image in your wip
in your ao3 wip, scroll down to 'select work skin' and click on the skin that you made earlier
in the text editor itself, make sure that you have it set to rich text rather than html. place your cursor within the editor where you want the image to go and then click on insert/edit image. in the menu that comes up, you're going to paste your image link. if you're using dropbox to host, you have to change the dl=0 at the end of the link to raw=1. i'm not sure if this applies with other image hosters.
if you want to adjust the size of your image in this menu, make sure that the proportions are locked. there will be a little lock icon next to the width and height boxes. i usually size mine at around 750 to 800 on the longest/widest side but this piece is totally up to you. you can also click and drag the image size within the text editor itself, but if the image is very big this may be more difficult.
step four: profit
(for legal reasons this is a joke. thou shalt not profit from fanworks lest ip holders decide to get litigious)
#i was asked for some guidance on how to do this and this seemed like the easiest way to do it#i hope this is helpful#tutorial#how to
50 notes
·
View notes
Text
Friendly reminder that Wix.com is an Israeli-based company (& some website builders to look into instead)
I know the BDS movement is not targeting Wix.com specifically (see here for the companies they're currently boycotting) but since Wix originated in Israel as early as 2006, it would be best to drop them as soon as you can.
And while you're at it, you should leave DeviantArt too, since that company is owned by Wix. I deleted my DA account about a year ago not just because of their generative AI debacle but also because of their affiliation with their parent company. And just last month, DA has since shown their SUPPORT for Israel in the middle of Israel actively genociding the Palestinian people 😬
Anyway, I used to use Wix and I stopped using it around the same time that I left DA, but I never closed my Wix account until now. What WAS nice about Wix was how easy it was to build a site with nothing but a drag-and-drop system without any need to code.
So if you're using Wix for your portfolio, your school projects, or for anything else, then where can you go?
Here are some recommendations that you can look into for website builders that you can start for FREE and are NOT tied to a big, corporate entity (below the cut) 👇👇
Carrd.co

This is what I used to build my link hub and my portfolio, so I have the most experience with this platform.
It's highly customizable with a drag-and-drop arrangement system, but it's not as open-ended as Wix. Still though, it's easy to grasp & set up without requiring any coding knowledge. The most "coding" you may ever have to deal with is markdown formatting (carrd provides an on-screen cheatsheet whenever you're editing text!) and section breaks (which is used to define headers, footers, individual pages, sections of a page, etc.) which are EXTREMELY useful.
There's limits to using this site builder for free (max of 2 websites & a max of 100 elements per site), but even then you can get a lot of mileage out of carrd.
mmm.page

This is a VERY funny & charming website builder. The drag-and-drop system is just as open-ended as Wix, but it encourages you to get messy. Hell, you can make it just as messy as the early internet days, except the way you can arrange elements & images allows for more room for creativity.
Straw.page
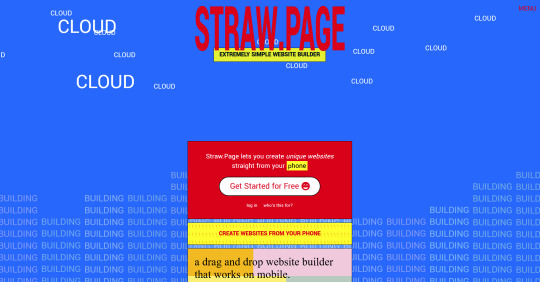
This is an extremely simple website builder that you can start from scratch, except it's made to be accessible from your phone. As such, the controls are limited and intentionally simple, but I can see this being a decent website builder to start with if all you have is your phone. The other options above are also accessible from your phone, but this one is by far one of the the simplest website builders available.
Hotglue.me

This is also a very simple & rudimentary website builder that allows you to make a webpage from scratch, except it's not as easy to use on a mobile phone.
At a glance, its features are not as robust or easy to pick up like the previous options, but you can still create objects with a simple double click and drag them around, add text, and insert images or embeds.
Mind you, this launched in the 2010s and has likely stayed that way ever since, which means that it may not have support for mobile phone displays, so whether or not you wanna try your hand at building something on there is completely up to you!
Sadgrl's Layout Editor

sadgrl.online is where I gathered most of these no-code site builders! I highly recommend looking through the webmaster links for more website-building info.
This simple site builder is for use on Neocities, which is a website hosting service that you can start using for free. This is the closest thing to building a site that resembles the early internet days, but the sites you can make are also responsive to mobile devices! This can be a good place to start if this kind of thing is your jam and you have little to no coding experience.
Although I will say, even if it sounds daunting at first, learning how to code in HTML and CSS is one of the most liberating experiences that anyone can have, even if you don't come from a website scripting background. It's like cooking a meal for yourself. So if you want to take that route, then I encourage to you at least try it!
Most of these website builders I reviewed were largely done at a glance, so I'm certainly missing out on how deep they can go.
Oh, and of course as always, Free Palestine 🇵🇸
#webdev#web dev#webdesign#website design#website development#website builder#web design#websites#sites#free palestine#long post#I changed the wording multiple times on the introduction but NOW I think im done editing it
502 notes
·
View notes
Text
Random AO3 Tips
I have a list of resources on my pinned post, but I don't really have a place for the simple miscellaneous tips and tricks, so here's this!
I didn't know most of these existed for probably far too long, so this post is mostly to spread awareness for new users or those who may not have heard of them before <3
I'll update this post if I learn of any other handy tricks. If you know any, let me know and I'll add it here :D
Basic HTML codes for A/Ns and etc
Note: Screenshots of the HTML "codes" at work are shown under the cut!
Center Text <center>TEXT</center> Clickable Link <a href="LINK">TEXT</a> Hideable Information <details> <summary>SHOWN</summary> HIDDEN </details> Insert Image from Link < img src="LINK" alt="IMAGE DESCRIPTION" width="100%" align="center" />
Italicize/Slant Text <i>TEXT</i> Line Breaks <br>TEXT</br> Paragraphs <p>TEXT</p> Strikethrough Text <strike>TEXT</strike> Underline Text <u>TEXT</u>
Single-post AO3 Guides
short guide on how to tag your own fics
short guide on how to title your fics/stories
how to embed images and links on AO3 [via Rich Text]
how to sign up for AO3-based exchanges (ft. @trafficteamsupportexchange)


Note: This is for formatting with HTML for the work, and for the authors notes where you Rich Text doesn't exist/work. Rich Text, on the other hand, should transfer most of these from whatever document resource you're using, but I've personally had issues with strikethrough not transferring from Google Docs copy-pasted to AO3 Rich Text, so just double check those areas!
#rain's tips#ao3 help#html#html coding#ao3 html#ao3 guide#ao3#archive of our own#ao3 writers#ao3 author#how do i even tag this
39 notes
·
View notes
Text
new website page: ThunderClan family tree!

i figured out html enough to import my google sheets family tree to my neocities website. still working on manually inserting all the images but the names n such are there!
come check out how i have fixed the incessant tumbleweeding of thunderclan
41 notes
·
View notes
Text


The current cover art for The Spirit Tale of Fire Lord Ozai.
The 1st attempt before going back to tweak colors (especially on the background gradient) and a second round of highlights.
Clean close up of the crown itself without the foreground flames obscuring it.
A closer-to-canon version of the crown, removing the scorching/scar and embroidery on the band.
I've used this image in a few places now (Royal Road, Spotify, Discord. Should probs add it to AO3 as SToFLO's main home. See below edit.) for SToFLO, but I haven't really talked about it. So, let's do that!
First, white fire is HARD. (Especially in ATLA's style, which doesn't seem to keep to a brightest/hottest flame near the source pattern, so much as a bright spots where they look good until the flame shape abruptly ends method.) It's ridiculously difficult to keep the flames from looking ghostly (adding some yellows and reds buried under the white so they can just barely be seen helped with that) to say nothing of trying to keep them bright without turning them into a blob of white. I kinda hated myself for making that a plot point while I was working on this. Worse, depending on monitor/phone settings, this image can be either blinding or a dingy gray. I eventually had to accept that I could either scrap them (which I clearly did not do) or make my peace with the situation.
I really like how the reflections on the gold came out on my second attempt. I waffled over doing them the first time because the canon images I found for reference (They were surprisingly hard to find. Everything is either an establishing shot too far out for good detail, or a close up on the face that cuts out the crown.) don't seem to put any special shine on the crown at all. Some feedback encouraged me to at least try it to help tie the foreground and subject into a cohesive image. I'm glad I listened! It looks so much better than the first version for that factor alone.
It's not literal to the fic (barring sudden inspiration -- Agni might enjoy tagging along as a tiny sphere cradled in the crown, just because?) but I effectively slapped Zuko's scar on the crown and amused myself thoroughly doing so. I probably should have gone back and tweaked the background colors again to up the contrast between the two elements. (Maybe if there's a third version I'll remember to alter that.)
The band looked very plain as it was, so I added some embroidery. Flames and waves seemed Fire Nation appropriate, so that's what I ended up adding.
The finished piece is by no means perfect, but overall I'm quite chuffed with how it turned out. I learned a good bit making it, that's for sure.
Edit: I tried adding the image to AO3 in a few different ways, but failed to find any I liked. Doubly so when taking into account the differences in display size/dimensions for desktop/mobile. Formatting across systems is a pain.
Rejected options included: in the summary (couldn't make it look nice with AO3's limited HTML -- no float, table was a clunky workaround at best), in the opening notes (crowded, edging toward bloated), and above the text of the first chapter (same crowding problem, but uglier for being below the horizontal break). Oh well. It was a nice thought.
Edit2: Might go back and try adding it to a later (but still early) chapter, if I can find a place it would make sense to insert it. It should be a complementary addition to the story, not a distraction, ya know?
#commehtating#commehterart#the spirit tale of fire lord ozai#avatar the last airbender#atla#art#fanfiction#fanfic#fire nation#fire lord's crown#fire nation crown#fire nation royal family#fire lord zuko#fire lord ozai
13 notes
·
View notes
Note
Hello there!! First off, I love your work- your creative voice is developed and your art style is delicious. V much an inspiration 😁
Anyway, I've been having trouble with embedding images in my fics, and since you write and draw I thought you might have some tips. I've exhausted Reddit and Ao3's FAQ has been no help. I'll take anything, html tips, better hosting sites for images, etc.
Thanks in advance!!
hiii thank you so much!! AO3 uses limited HTML, so for future referencing you can use any general html guide (w3school etc) to check how to write your code correctly.
this page is the most straightforward reference for embedding pics on ao3
since ao3 cannot host images, you need to upload your pic somewhere before embedding it. i use postimages.org
in the html editor, insert your image with the code:
<img src="URL GOES HERE">
SRC is the source of the image, aka the url. you can resize an image using WIDTH and/or HEIGHT. and if you want to get fancy, you can add hover text using TITLE and alt text with ALT. so, if you wanted to resize a square down to 100px, that would look like this:
<img src="URL" width="100">
you can also align your image as left, right, or centered on the page. just place your image within a <div> tag like so:
<div align="center"> <img src="URL"> </div>
41 notes
·
View notes
Text
okay so this is my, like, little tutorial on how to make gradient text, or text colours different than the ones tumblr offers. both for my lovely moot, @sappho-bambi, and for anyone else who needs it. ♡
i'm, by no means, an expert, or even really knowledgeable, on coding, so this is a super informal explanation, but i hope it works.
--
head onto this website
go to where these two coloured boxes are. the colour of these essentially determine the colours your text will be.

i always choose the colour on the left block first, which determines the colour your line of text will start as. i do this by clicking on the left box, then choosing from the colour-hue-thingy.
okay, so let's say i decide on this pale pink colour. once you've landed the little white and black circle on whichever shade you want, you can just click anywhere else on the page to make the colour-hue-thingy disappear. the colour you've selected for your left box will remain.
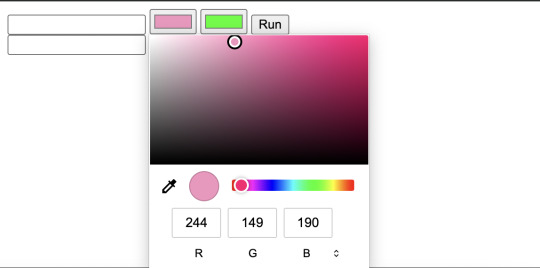
now, if you want your line of text to be the exact same colour, you should take the numbers under the colour-hue-thingy, on top of the R, G and B sections, and just insert them into those exact same boxes as when you click on the box on the right (the green one, which determines the colour that your text will morph into at the end, on its right side). so, see in the images below -- if you want your text to remain the exact same colour through all the letters, take those coordinates of the colour you liked and chose in the left box (the pink one), and just plug those numbers into R, G and B sections of the right box (the green one). that'll give you the exact same colour and will ensure your text is entirely this pale pink colour.


however, if you decide you want to have a different colour on the right end of your text (like, the pale pink heightening to a dark pink, or morphing into a blue colour), then you'll pretty much repeat your first steps. you'll click on the right box, the green one, and use the colour-hue-thingy to select on whichever colour you'd like.
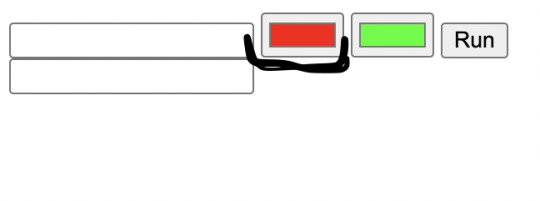
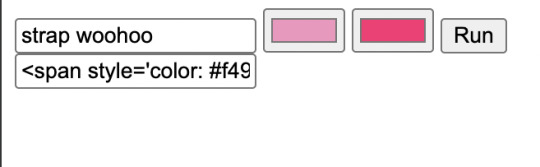
now, for the coding shit. so, copy and paste or write out the line of text you want to be coloured in the first/top white box next to the coloured boxes.

now, click "Run." this will generate the code you need in order make your text this colour(s). the code that shows up in the second/bottom white box is your coloured text's code (the "span style" thing). copy this.

head to your tumblr post, the one you want this coloured text to be in. i just added random text as well so i can show how to specifically change the colour of one line/block of text.

so, click on the wheel on the upper left corner of your post. when you do, a toggle will pop up with different settings for your post. scroll to the section that says "Text Editor." click on where it says "Rich Text," then change that to "HTML." this will basically turn the formatting of your post into one huge code, which will allow you to insert the code of your coloured text.
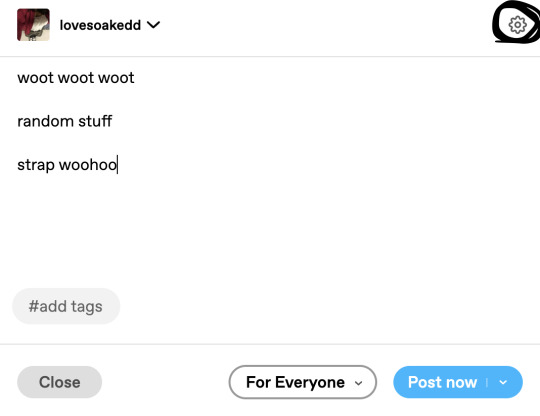


so, your post will now look something like this.
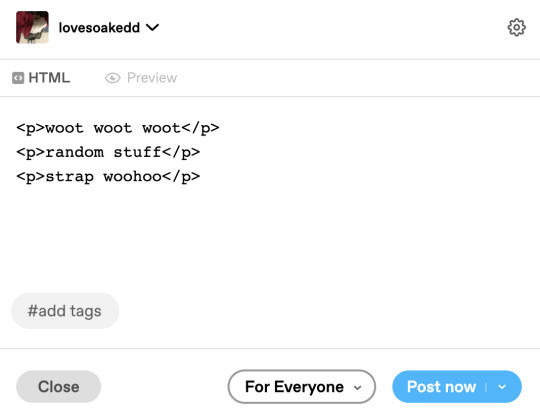
now, highlight the text that you want to insert the code of your coloured text into (in this case, it's "strap woohoo" -- only highlight that, not <p> or </p> since you need those to stay). basically, highlight only the text you've been planning to make coloured this whole time, the "strap woohoo." now, copy and paste the code of your coloured letters (the thing that says "span style," that you copied from the generator), into the highlighted text ("strap woohoo").


looks daunting as fuck, i know 😭 but, this means you've successfully added the code of your coloured text! it's so long because the code accounts for the colour of every single letter. now, save this as a draft, and voila!

and from here, you can bold the text, italicize it. and the more you work with it, the more you'll figure it out intuitively. 😛💗
15 notes
·
View notes
Text
I've now posted my second weekly QL recap post and I'm honestly just really proud of myself. Not just that I've stuck to doing it but also that I've managed to make it something I might actually be able to keep doing because I've made it as easy as possible for myself. That way it's less likely that it'll start feeling like a chore or that it'll take up a lot of my time when I'd rather be talking about the shows than formatting a post.
So because I'm a nerd and I kinda wanna show off a little bit because I'm proud of what I've managed to make, let me tell you exactly what I've set up to make my weekly recap post.
The basis for the post is simple enough: an excel spreadsheet and a python script.
My Spreadsheet of BLs
The spreadsheet is based on My Watchlist on MyDramaList which I literally just do ctrl+A and copypaste into a sheet. This is then automatically compiled into a different sheet where I've made a better overview of all the shows I'm watching and have watched in the past.
Based on this I've set up the weekly overview in a separate sheet shown below
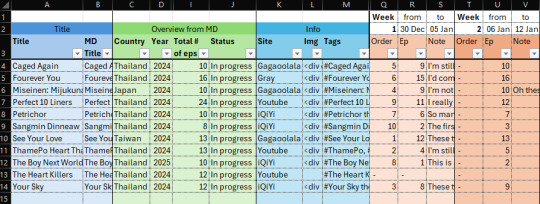
When I'm compiling my weekly recap I can then easily add any new information here.
For new shows I add the information below to the sheet
- MD Title (copied from MyDramaList overview sheet)
- Title (usually copy of MD title with minor edits)
- Site I'm watching the show on
- Tags I want to use for the show
- Episode nr. I'm starting the show on
I also make a banner for the show but I've found a good source for images so it doesn't take long most of the time.
I have to manually upload the banner for the first week but then for the second week a show is in the recap, I can add the HTML for the banner from the previous week's post to the sheet. That way the banner will just be automatically be added to the post every week after that.
Throughout the week I then write notes on each episode I watch into the sheet and before I make the actual post I add the order I want the shows to appear in on the post.
The Script is Where the Magic Happens
When I've finished filling out the spreadsheet for the week I go to my python script, change the week number in the script and run the script.
In the script I've taken the HTML code from my original recap post and set it up so the script fills the information from my spreadsheet for each show into the right places in the HTML code. Since I doubt you guys would find it riveting to look at my full script, here's a little snippet!

When I run the script it then prints out the HTML for the post which I can insert into a new post on tumblr and voila, a weekly recap!!!
I do then have to go through the text for each show and add breaks and spellcheck because that's easier to do here than in the excel cell where I write the notes to begin with. If I have any overall notes or any new banners I have to add, then this is also when I'd do it.
I'm sure there are things you could set up in a better way but this works for me and reduces the amount of time I have to set aside every week for creating the post by a lot. It just makes it easier for me to share my thoughts in a way that's nice to look at without having to spend a ton of time formatting a post each week.
Hope this didn't take away any of the magic behind my posts but just gave a cool insight into the things you can do to make recurring posts easier to make.
Any questions or comments are welcome!
Side note: if you use tumblr on the mobile app and notice that any of the lines with "Episode x of x || Watching on:[site]" are split into two lines, let me know!
That line was surprisingly the hardest to make look the way I wanted because the width of posts and look of text types change depending on whether you're on desktop or the mobile app.
#Sof's a Nerd™ and owning it#I'm actually pretty new to python#so it took me a hot minute to figure out how to wrangle the information out of the spreadsheet and into the HTML script#but at the end I'm pretty satisfied with the result of my hard work#I'd much rather have spent time on the script and spreadsheet in advanced than have to spend a lot of time on the post every Sunday/Monday#it makes it easier to keep up doing the recap posts when I'm busy during the weekend#I was also worried that it would become a chore and as a result also make it a chore to watch BL which is the last thing I want to do#Sof watches BL#Sof Watches Weekly
18 notes
·
View notes
Text
Embedding an Image on Ao3
You cannot host images on Ao3, so you ned to host it off-site, on a format that allows image hosting, such as Tumblr (make sure your post is private, so as not to leak your art), or Squidge.org. Once you have the image url, you can embed it on Ao3.
Embedding an Image in Rich Text
When you have the Rich Text option selected, you will have a bar across the top of the text box with a number of options. To insert an image, put your cursor in the text where you would like the image to appear and select the “Insert/edit image” button (pictured below).

That will bring up a dialogue box where you can include the image URL and some more metadata.

If you would like your image to have alt text (useful for screen readers and accessibility!), all you need to do is write an image description in the image description box.
It’s a good idea to size your image, or it will automatically display at full size, which can run off the edge of the screen. You can either choose to specify an amount of pixels (640 pixels will fit on most computer screens comfortably), or you can put in a percentage. Specifying “max-width 85%” (or 90%, whichever) will automatically size your image to 85% of the screen viewing it, which will make it mobile-accessible.
It's important to note that you need the IMAGE URL, and not the url of a page hosting the image. You can find this by right-clicking on an image and selecting "Copy Image Address".

Image page URLs often start looking like a normal url and might have a "share" as part of the url, like this.
https://antimony-medusa.tumblr.com/private/782903563243470848/tumblr_pqlYRjtCA8qyKsyFI?source=share
The above url will not work to embed.
However, an image URL will often be much more numbers-and-letters-based, and might have a date or the word "media" in it.
https://64.media.tumblr.com/a6b02fe154d74fba37919a27fe507a4d/4afa6d2300b1317f-b2/s1280x1920/91c5ceb5297a9fb0c522eb61ccc4ca7b6c957bf1.pnj
This url would embed.
Embedding an image in HTML
In order to insert an image into your fic using the HTML option, you will need to know the code to insert an image in HTML code. The HTML code to insert an image is straightforward:
<img src="[URL]" alt="[image description]">
Replace [URL] with the URL of the image you want to insert. AO3 does not host images, so your image must be hosted off-site.
If you would like your image to have alt text (useful for screen readers and accessibility!), all you need to do is write an image description instead of [image description] in the code above.
If you would like to set your image to size to your screen, the HTML for that is
<img src=[URL]" alt="[Image Description]" width="max-width 85%" />
Once your image is embedded, you can preview your work to make sure it all works and is sized appropriately, and then you can tag and title it like you would any other work on Ao3 (including the tags "art" or "collage" can be useful), and include the tags you're claiming in your author's note, and then post to your team's collection!
15 notes
·
View notes
Text
9-1-1 Characters: AO3 works per episode
More info, methodology, and the numbers below the cut.

This chart was created with data from AO3, including locked works, from about 9:00 p.m. EDT on 3/28/2025. As lovely creators are always adding new works, it is almost certainly out of date. The bars are color coded by character type: blue for main, yellow for love interests, green for family, purple for other first responders. What does this chart tell us? Good question. A reasonable person might conjecture that characters who appear on the show more often are written about more often, and so by controlling for that, we might see some interesting trends. Waaaay too many confounding variables to draw any kind of rigorous conclusions, but it's interesting nonetheless. I do feel comfortable in saying our dispatch friends need more love <3. Methodology: This divides # of works listed in that character's AO3 tag, by the # of episodes that character has appeared in per IMDb. So a character that appears in two episodes, and has 200 works, would have a WPE of 100. WPE is rounded to the nearest whole number. There's always some subjectivity on who to include, but I tried to give a balance between love interests, family members, and first responders, along with anyone who is or was a main (which does include Albert! I remember season 4). Family members tended to be close together, hence why you don't see Ramon or Margaret - they're so close to their spouse it just felt redundant. I fought the html gods to insert this as a table and not just an image, but they won. Many apologies. % of works is the number of works the character is tagged in divided by the total number of works in the 9-1-1 fandom tag.

#911 abc#tommy kinard#911 fanfic#911 on abc#911 on ao3#stormy does stats#fic stats#adriana diaz#ok i have to admit when i was running this i started laughing at tommy and adrianas WPE#like so high and not a main amazing
17 notes
·
View notes