#including a high quality video and a gif that is as high quality as I can make it
Text
The Massive 3D Model From “Nickelodeon All Star Brawl”:

I wanted to add in a picture of the massive next to the other ships but they’re canonically sized so the literally 6000 km long Massive takes up an entire side of the screen and you can only see a tiny portion of it from the picture’s perspective but I couldn’t get a good looking picture because the Massive (and blender) kept breaking when I made the Massive too big.
[The Massive] [Shuvver] [Spittle Runner] [Zim’s Shock Spear]
#invader zim#the massive#nickelodeon all star brawl#3d model#including a high quality video and a gif that is as high quality as I can make it#the 6000 km long ship has a 3D model
606 notes
·
View notes
Text
Hello Ghesties, Ghouls & Ghoulettes! Welcome to Angels run-down show-down, where I (Angel) do a run down of the Ghovie for all you lovely folk!!
Didn’t get the chance to see the Ghovie aka Rite Here Rite Now? Fear not for I am here! This post will contain a run-down of what happened during the Ghovie.
So this is your warning:
‼️SPOILERS AHEAD ‼️
I will be breaking this down into separate parts:
Lore: contains all lore that was mentioned
Songs: songs that were played
And Theatrics: stage play and other attributes that happened.
Another fair warning: there is a possibility that not everything that happened in the movie is noted here, I may have forgotten some things!! But I will do my best to include everything🤍
Additional notes: many fans including me were worried that this project would be incredibly low quality due to the fact it’s a movie operated by a band. More so worried that the movie would be the same quality as the YouTube episodes. I can confirm that the camera quality for this movie is amazing. You can compare the filmography to Taylor swifts era tour movie. Each shot for rite here rite now is shot with a high-to-low speed motion camera. The audio quality is above and beyond, even nihils ghost is very detailed and realistic. Every film shot is synchronized with the songs and instruments (example: camera changes for each beat/camera focuses on certain ghouls for their assigned solo)
Lore:
Story: the plot of the ghovie is a showcase of their Kia forum concert mixed with short lore scenes. Between every 2-3 songs there would be a scene of Copia running behind stage and talking with imperator and nihil OR getting dressed and ready for his next performance.
When he talked with imperator and nihil, he mostly talked to them about what would happen after the concert. Nihil and imperator told him numerous times that he was “focusing to much on the past and future instead of living in the moment, living right here, right now.”
Copia realizes this before he does his encore, so he goes out and does a great encore assuming he’ll soon die. After the encore and when the concert is finished, unfortunately imperator dies and gives a note to Copia.
The note states that he will not die, but rather be gifted a new higher status in the clergy. In which he’ll further be known as Frater (Latin for brother, which makes sense if we think about the title for sister imperator). And because there is no head for the ghost project they will bring in a new front man. The movie ends before the front man is revealed and we are left on a cliffhanger.
The lore for the ghovie is very similar and the same to what we already know! Not to much was revealed but here were the key points of what was mentioned:
⭐️the other brothers were not directly mentioned or shown on camera. The only references to the other emeritus brothers was the backdrop for the stage (stained glass windows portraying the previous brothers & nihil)
⭐️it was confirmed that Nihil was copias father and that during the kiss the go-goat music video sister imperator was pregnant with Copia.
⭐️Copia even acknowledges nihil as his dad, in one scene where he says “thanks dad”
⭐️sister imperator ends up passing at the end of the movie but becomes a spirit and is seen with the rest of the spirits (nihil and the twins, yes, the twins seem in the YouTube episodes apparently have died)
⭐️the ghouls were not to involved with the lore except for the fact they all surrounded imperators dead body when she passed. (Idk if this counts as lore but) the ghouls also talked in the movie, only for a small scene though. Bass ghoul (Rain) is the ghoul that talked.
⭐️nihil says that he produced three songs. The third song is the one we see during the credits. Song is : the future is a foreign land, as shown here:
SONGS:
The songs that played were the ones that were played at the Kia forum shows. Songs that where played included:
⚡️imperium (pre - opener)
⚡️Kaisarion (opener/curtain pull) (also if I remember correctly there was a short clip of a harp but I’m not sure if it was being played or not during that song.)
⚡️rats
⚡️faith
⚡️spillways
⚡️Cirice (he ciriced the camera making it look like he Ciriced us)
⚡️Absolution
⚡️ritual
⚡️call me little sunshine
⚡️con clavi con dio
⚡️ watcher in the sky
⚡️ if you have ghosts (acoustic version with two cellos, violin & harp ghoulettes. As well as a background vocalist ghoulette who did absolutely amazing! Also papa gives a speech about how “everyone is important and that their presence at that concert was inspiring”)
⚡️dominion
⚡️ Twenties (body painted skeleton dancers came out and performed on stage, they did cartwheels, threw eachother around and even picked up cardi)
⚡️year zero
⚡️spoksonat
⚡️he is (I cried)
⚡️miasma (nihil told Copia that he didn’t want to die, but even when he did he was still happy because he got to perform and bring joy to people temporarily when they revived him. Nihil also told Copia to focus on the good in life)
⚡️Mary on a cross (animated in a scooby-doo style, where nihil chases around imperator as she fights him and runs away)
⚡️ mummy dust
⚡️respite on the spitalfields
⚡️ kiss the go-goat
⚡️dance macabre (skeleton dancers come out for a second time with silk fans)
⚡️square hammer
THEATRICS:
Some silly theatrics that happened include:
💙Copia huffing the gas from a whip-cream can before performing.
💙jumped in a storage transfer crate and had a whole convo with nihil.
💙has a the tour manager (Ashley) come out on stage and change his shoes for him.
💙only Copia can see the spirits of his family, so when he would talk to nihil or imperator, spectators around him would think he’s crazy and talking to himself.
💙many of the behind the scenes crew of the band were included in the movie such as : Ashley(tour manager), and many of the security guards & jesus( you know who lol)
💙remember when everyone was freaking out about the fact there’d be a blowjob reference? Yeah well there was no actual blow job scene, the warning for the blow job was for when Kyle aka Jesus came out and blew away the confetti.
💙there is also a scene at the end in which Copia is flying away from the concert (I guess that’s his preferred way of transportation lol??) he is flying in the hot air balloon we see in the cover for rite here rite now. He flies into space before falling, ouch!
💙during his flight there’s a montage of sister imperator being pregnant with him, during this montage we see twins. Twin babies, twin children. We are unsure if this is a reference to Tobias’s twins or if Copia has a twin.
.
If I forgot to add anything or got info wrong please feel free to leave a comment and I will correct myself as fast as possible!!
Don’t you feel it Angel? I do⚡️
#the band ghost#the band ghost fic#the band ghost fanfiction#the band ghost fanart#rain ghoul#nameless ghoul art#ghovie#aether ghoul#swiss ghost#ghost band#ghost#ghost bc#namelessghoulettes#nameless ghouls x reader#nameless ghouls#papa iv x reader#papa emeritus iv x reader#papa terzo#papa emeritus iv#papa emeritus iii#papa copia#cardinal copia x female reader#cardinal copia x reader#cardinal copia#rite here rite now#Spotify
394 notes
·
View notes
Text

GRID + TORN PAPER + RAINBOW LAYOUT TUTORIAL
(yeah, i'm sorry, but that is the title i came up with)
Hi everyone! This tutorial was requested by an anon, and we're going to make a gifset like this. You need, as usual, basic gifmaking skills and basic photoshop knowledge, but i'll try to explain this as easily as possible!
You'll also need a torn paper brush, which you can download here.
And here are the links to download the fonts used in my gifset: x, x
Okay let's start!
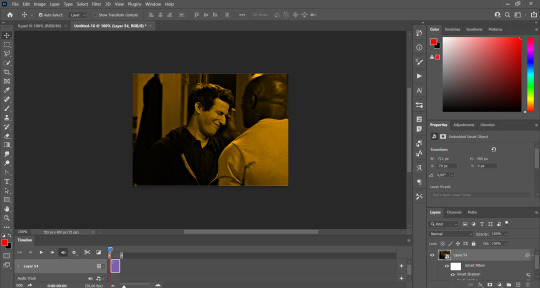
→ First you're going to create a new canvas, and it will be 540x540 px. Make sure to click on create video timeline (if you dont have a timeline, go to window > timeline. We'll leave this canvas there waiting for us :)

Then, onto our first gif. We're going to make the small square gifs first. All i do is resize the image and make it 120 px high, and you'll see why in a moment.
Make sure to remember the number of frames of this gif!! All the gifs we're going to put in the same canvas should have the same amount of frames.
Okay, so we have our first small gif:
As you can see it's a smart object, and I added some brightness, but so far that's all. You can sharpen it, but i like to sharpen until i've colored it. Now onto the important part:
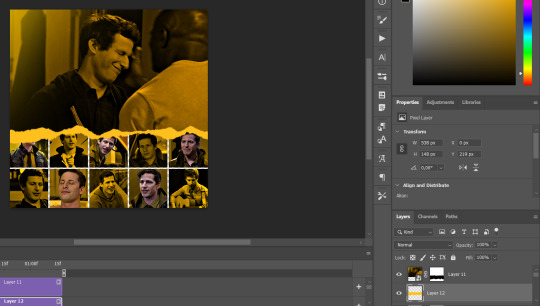
Most of the gifs i worked with were mostly blue (aside from the skin color), which is recommendable, because you can create lots of colors starting from blue, using the hue/saturation adjustment, or camera raw filter. I also recommend you to use a gif that doesn't move a lot, so it'll be easier to color the background:
For the tutorial, we have our predominantly blue gif, but we are going to make it yellow, which is the opposite color, so it's the hardest to get. I hope you can see how i manipulate colors, and do it yourself :)
Here, you can use camera raw filter (filter > camera raw filter) to turn the blues and purples greener, like this:
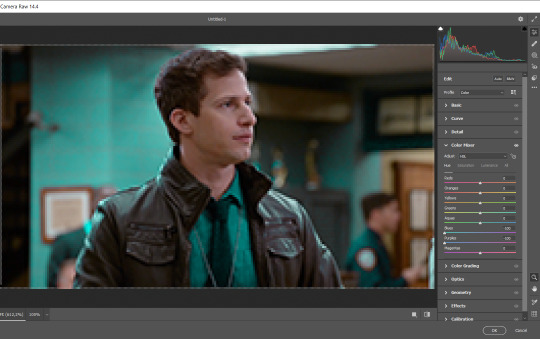
And click ok to exit the camera raw filter. Then, we're going to use hue/saturation (image > adjustments > hue/saturation) to turn it yellow:

Since it was cyan, i changed the cyans, but if you got a much greener result you'll have to use green (duh, right? i dont know i just dont want anyone to get confused akjsdhs)
And you can also add a selective color adjustment to make those yellows more yellow:

The reason i don't directly use hue/saturation is cause it might look ugly and lose quality, or it wont pick up all the colors i want it to but they're also very small gifs so if you wanna do that, do it :)
I sharpen it until this point, but if you already have that's okay.
Now we're going to color the background! For that, you just add a new layer, and set the blending mode to color.
Then you'll use your brush, set it to 20px and 0% hardness, and pick the color you're using for this gif, you can use the eyedropper tool. This is why it's important that the gif doesn't move a lot, so you can color the bg like this:
I colored carefully around the edges, and that's the result. In some gifs from my gif set I colored Jake's jacket too because i was too lazy, but this looks cleaner :)
You might want to select the color layer and the gif layer to convert them both to a smart object, just to make everything easier. So, be careful, because after that you won't be able to change anything!
But let's say you have a scene that you want to include, and it moves too much and has no blue and it's going to be a nightmare to color it.
Well, don't worry, you can! Simply, instead of manually coloring everything, you can just choose to add a gradient map to it (image > adjustments > gradient map), like this:
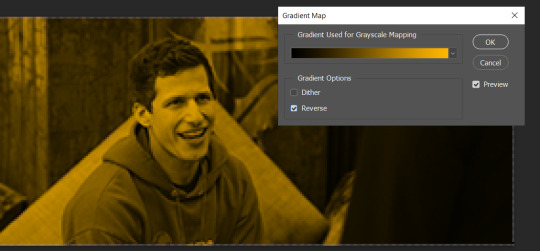
And this is the result:

Just remember, it has to be the same amount of frames as the other ones!
You repeat the process, until you have 10 small gifs. I made around 5 manually colored gifs, and 5 gifs with gradient for each gif. That's a confusing sentence but i hope you get it.
We are going to start pasting the small gifs on our first canvas.
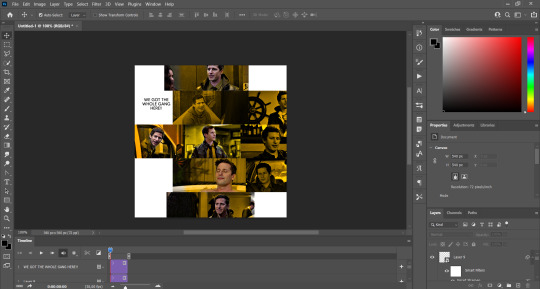
(You can paste them one by one but i did this so you can see my 10 gifs)
You're going to create a square that has to be 108x108 px, using the rectangle tool. You can remove the default white background.

And you may be wondering, why did we not just crop the small gifs into those dimensions? Well, you can do that, but to me it's much easier this way, because sometimes cropping isn't accurate, or it's tedious.
Place the small square on top the gif you're going to crop, right where the face of the character is (or whatever objects you're giffing), and while holding ctrl, click on the square. It will select it:

You're going to create a layer mask:

And then drag that layer mask to the gif:

And voila! It's now the same size as the small square. Once that's done, right click on the layer and convert it to a smart object, because we have to remove that mask. Make the square layer invisible, and start placing your gifs where you want them:
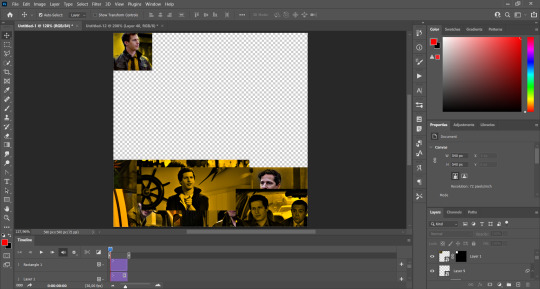
You're going to repeat that process with the rest of the gifs, and then place them all together. Don't forget that if you're making the first gif, they will all be at the bottom of the canvas, if it's one of the middle gifs, one row should be at the top and the other one at the bottom, and when you're making the last gif, they should all be at the top. Here we're making the first one, so they will all be at the bottom:
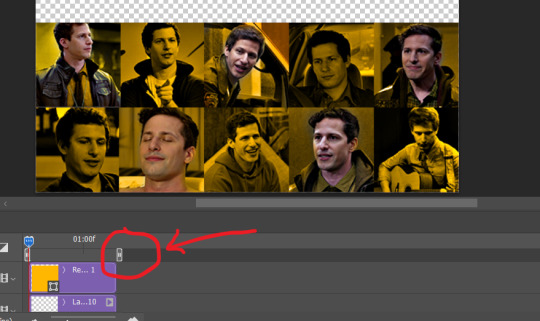
If you forgot to check that all the gifs had the same amount of frames, you can fix it here, just make sure no gif is past this little guy:
Okay! Now, to create the gutter, we're going to add a layer mask to each small gif, so that we can cut some of it.
The gutter has to be 4 pixels, (i recommend you to REALLY zoom in). What i do is make sure the width of the gutter takes 2 pixels from the edges of the gifs, since they are all together. As you can see in the image above, there's no a single empty pixel between the gifs.

This is a close-up of what i'm talking about. I select two pixels from each gif, and go all the way down to create the gutter:

(I hope I'm not over or underexplaining)
I usually use this tool when i have to make so many selections:
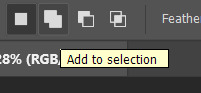
But that was just an example :)
(Another way you can do this, is by changing the size of the small square from the beginning and make it be 104x104 px, but i don't know why that seems more complicated to me ajsdks)
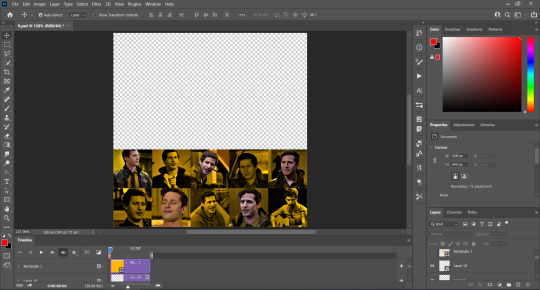
Anyway, this is what we have so far:

Now we're going to create the big gif. Its normal dimensions are usually around 1920x1080, unless you have different dimensions and have to crop it, but whatever it is, we're going to resize it and crop it to be around 550 px wide, and 400 px high:

We'll do the same thing of adding an adjustment of gradient to it to make it the color we're using. For this, i usually add a brightness layer before, because sometimes the gradient is a bit dark.
And using a 600px brush with 0% hardness, you can add some "light" on a new layer, like this:

Selecting all the layers, right-click on them and convert them to a smart object. Again, be careful, because once its a smart object, you wont be able to change any of it!
Then we paste our big gif on the canvas with small gifs, and add a layer mask to it. Using the torn paper brush at 600px, remove some of the gif to shape it like the torn paper. Make sure you're using black, otherwise it won't work correctly:
To make the effect better, add a layer UNDER the big gif, and using the torn paper brush, with the same size, you can paint under it:
Yeah, I covered some of jake's face, but that's how it supposed to look so the effect works!
And finally for the text! I used Granesta, at 150 px, and at -10.00º to make it a bit askew.
We're going to double click on it and give it a color overlay, set to normal, and give it a solid shadow if you want, then place it right here on the corner:
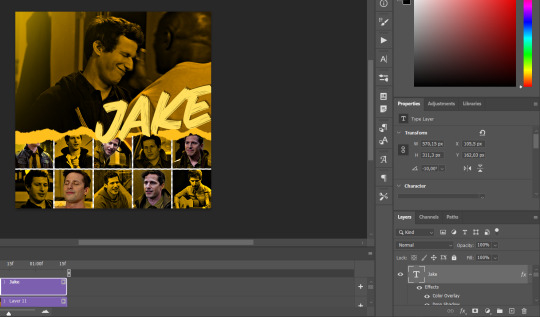
But as you can see, it's too big for the gif. So we're going to add a layer mask to it, and again, shape it the same way that we did with the gif. Make sure they're exactly the same shape, like this:

And that's it! This is our final result:

As always I'm sure there are easier ways to do many of these things, this is just how i do it but if you know an easier way to do it, go ahead. I hope this was at least understandable enough so you can apply the logic of it any way you want :)
If you have any questions you can send me an ask and i'll clarify!
If you found this helpful i'd really appreciate it if you left a tip on my ko-fi!
Happy giffing!
#will i ever learn how to properly explain things 😭#tutorials#uservivaldi#userraffa#userbuckleys#userhallie#tuserheidi#usertina#userfern#usersole#usercera#userzaynab#userisaiah#usernik#userpriyas#usertj
350 notes
·
View notes
Text
My GIF Making process: Screen capturing using MPV player, Organizing files, 3 Sharpening settings, Basic Coloring PSD + Actions set

This is a very long post so heads up.
I’ll try to be as thorough and true as much as possible to the way I make my gifs (I already use Photoshop Actions which I’ve long since set up but now for this tutorial I’m reviewing them to show you the exact steps I’ve learned to create my gifs 😃) and present them to you in a semi-coherent way. Also, please bear with me since English is my second language.
First things first. Below are the things and tools we need to do this:
Downloaded 4K or 1080p quality videos (let’s all assume we know where to get these—especially for high definition movies and tv series—so this post doesn’t get removed, okay? 😛)
Adobe Photoshop CC or the CS versions can work as well, but full disclosure I haven’t created gifs using the CS versions since 2020. I’m currently using Adobe Photoshop 2024.
mpv player. Use mpv player to get those frames/screenshots or any other video player that has a screen grabber feature. I’ve used adapter for the longest time but I’ve switched to mpv because the press to screenshot feature while the video is playing has been a game changer not to mention ultimate time saver for me. For adapter you need to play it in another video player (like VLC player), to get the start and end timestamps of the scene you want to gif which takes me ages before I can even open Photoshop.
Anyway! Please stop reading this post for a moment and head over to this amazing tutorial by kylos. She perfectly tells you how to install and use mpv player, both for Mac and Windows users.
One thing I have to share though, I had a tough time when I updated my MacOS to Sonoma since MPV is suddenly either duplicating frames or when I delete the duplicates the player seems to be skipping frames :/ I searched and found a solution here, though it didn’t work for me lol. My workaround for this in the meantime is decreasing the speed down to 0.70 then start screenshotting—it’s not the same pre Sonoma update but it works so I’ll have to accept it rather than have jumpy looking gifs.
Now, after this part of kylos’ tutorial:

you can continue reading the following sections of my gif tutorial below.
I want to share this little tip (sorry, this will only cater to Mac users) that I hope will be helpful for organizing the screenshots that MPV saved to the folder you have selected. Because believe me you don’t want to go through 1k+ of screenshots to select just 42-50 frames for your gif.
The Control + Command + N shortcut
This shortcut allows you to create a new folder from files you have pre-selected. As you can see below I have already created a couple of folders, and inside each folder I have selected screenshots that I want to include in one single gif. It's up to you how you want to divide yours, assuming you intend to create and post a Tumblr gifset rather than just one gif.

Another tip is making use of tags. Most of, if not all the time, I make supercorp gifs so I tag blue for Kara and red (or green) for Lena—just being ridiculously on brand and all that.
Before we finally open Photoshop, there's one more thing I want to say—I know, please bear with me for the third? fourth? time 😅
It's helpful to organize everything into their respective folders so you know the total number of items/frames you have. This way, you can add or delete excess or unnecessary shots before uploading them in Photoshop.
For example below there are 80 screenshots of Kara inside this folder and for a 1:1 (540 x 540 px) Tumblr gif, Photoshop can just work around with 42-50 max number of frames with color adjustments applied before it exceeds the 10 MB file size limit of Tumblr.

Sometimes I skip this step because it can be exhausting (haha) and include everything so I can decide visually which frames to keep later on. You'll understand what I mean later on. But it's important to keep the Tumblr 10 MB file size limit in mind. Fewer frames, or just the right amount of frames, is better.
So, with the screenshot organization out of the way, let's finally head over to Photoshop.
Giffing in Photoshop, yay!
Let’s begin by navigating to File > Scripts > Load Files into Stack…

The Load Layers window will appear. Click the Browse button next.
Find your chosen screenshots folder, press Command + A to select all files from that folder then click Open. Then click OK.
After importing and stacking your files, Photoshop should display the following view:

By the way, I'll be providing the clip I've used in this tutorial so if want to use them to follow along be my guest :)
If you haven't already opened your Timeline panel, navigate to Windows > Timeline.
Now, let's focus on the Timeline panel for the next couple of steps.
Click Create Video Timeline, then you’ll have this:

Now click the menu icon on the top right corner then go to Convert Frames > Make Frames from Clips

Still working on the Timeline panel, click the bottom left icon this time—the icon with the three tiny boxes—to Convert to Frame Animation
Select Make Frames From Layers from the top right corner menu button.
So now you have this:

Go and click the top right menu icon again to Select All Frames
Then click the small dropdown icon to set another value for Frame Delay. Select Other…

The best for me and for most is 0.05 but you can always play around and see what you think works for you.
Click the top right menu icon again to Reverse Frames.
I think Photoshop has long since fixed this issue but usually the first animation frame is empty so I just delete it but now going through all these steps there seems to be none of that but anyways, the delete icon is the last one among the line of feature buttons at the bottom part of the Timeline panel.
Yay, now we can have our first proper GIF preview of a thirsty Lena 😜

Press spacebar to watch your gif play for the very first time! After an hour and half of selecting and cutting off screenshots! 😛 Play it some more. No really, I’m serious. I do this so even as early (lol) as this part in the gif making process, I can see which frames I can/should delete to be within the 10 MB file size limit. You can also do it at the end of course 🙂
Now, let’s go to the next important steps of this tutorial post which I’ve numbered below.
Crop and resize to meet Tumblr's required dimensions. The width value should be either 540px, 268px, or 177px.
Convert the gif to a Smart Object for sharpening.
Apply lighting and basic color adjustments before the heavy coloring. I will be sharing the base adjustments layers I use for my gifs 😃.
1. Crop and Resize
Click on the Crop tool (shortcut: the C key)

I like my GIFs big so I always set this to 1:1 ratio if the scene allows it. Press the Enter key after selecting the area of the frame that you want to keep.
Side note: If you find that after cropping, you want to adjust the image to the left or another direction, simply unselect the Delete Cropped Pixels option. This way, you will still have the whole frame area available to crop again as needed and as you prefer.
Now we need to resize our gif and the shortcut for that is Command + Opt + I. Type in 540 as the width measurement, then the height will automatically change to follow the ratio you’ve set while cropping.
540 x 540 px for 1:1
540 x 405 px for 4:3
540 x 304 px for 16:9
For the Resample value I prefer Bilinear—but you can always select the other options to see what you like best.
Click OK. Then Command + 0 and Command + - to properly view the those 540 pixels.

Now we get to the exciting part :) the sharpen settings!
2. Sharpen
First we need to have all these layers “compressed” intro a single smart object from which we can apply filters to.
Select this little button on the the bottom left corner of the Timeline panel.


Select > All Layers
Then go to Filter > Convert for Smart Filters
Just click OK when a pop-up shows up.
Now you should have this view on the Layers panel:

Now I have 3 sharpen settings to share but I’ll have download links to the Action packs at the end of this long ass tutorial so if you want to skip ahead, feel free to do so.
Sharpen v1
Go to Filter > Sharpen > Smart Sharpen…
Below are my settings. I don’t adjust anything under Shadows/Highlights.
Amount: 500
Radius: 0.4
Click OK then do another Smart Sharpen but this time with the below adjustments.
Amount: 12
Radius: 10.0

As you can see Lena’s beautiful eyes are “popping out” now with these filters applied. Click OK.
Now we need to Convert to Frame Animation. Follow the steps below.
Click on the menu icon at the top right corner of the Timeline panel, then click Convert Frames > Flatten Frames into Clips
Then Convert Frames > Convert to Frame Animation
One more click to Make Frames From Layers
Delete the first frame then Select All then Set Frame Delay to 0.05

and there you have it! Play your GIF and make sure it’s just around 42-50 frames. This is the time to select and delete.
To preview and save your GIF go to File > Export > Save for Web (Legacy)…
Below are my Export settings. Make sure to have the file size around 9.2 MB to 9.4 MB max and not exactly 10 MB.

This time I got away with 55 frames but this is because I haven’t applied lighting and color adjustments yet and not to mention the smart sharpen settings aren't to heavy so let’s take that into consideration.
Sharpen v1 preview:

Sharpen v2
Go back to this part of the tutorial and apply the v2 settings.
Smart Sharpen 1:
Amount: 500
Radius: 0.3
Smart Sharpen 2:
Amount: 20
Radius: 0.5
We’re adding a new type of Filter which is Reduce Noise (Filter > Noise > Reduce Noise...) with the below settings.

Then one last Smart Sharpen:
Amount: 500
Radius: 0.3
Your Layers panel should look like this:

Then do the Convert to Frames Animation section again and see below preview.
Sharpen v2 preview:

Sharpen v3:
Smart Sharpen 1:
Amount: 500
Radius: 0.4
Smart Sharpen 2:
Amount: 12
Radius: 10.0
Reduce Noise:
Strength: 5
Preserve Details: 50%
Reduce Color Noise: 0%
Sharpen Details: 50%
Sharpen v3 preview:

And here they are next to each other with coloring applied:
v1

v2

v3

Congratulations, you've made it to the end of the post 😂
As promised, here is the download link to all the files I used in this tutorial which include:
supercorp 2.05 Crossfire clip
3 PSD files with sharpen settings and basic coloring PSD
Actions set
As always, if you're feeling generous here's my Ko-fi link :) Thank you guys and I hope this tutorial will help you and make you love gif making.
P.S. In the next post I'll be sharing more references I found helpful especially with coloring. I just have to search and gather them all.
-Jill
#tutorial#gif tutorial#photoshop tutorial#gif making#sharpening#sharpening tutorial#photoshop#photoshop resources#psd#psd coloring#gif coloring#supercorp#supercorpedit#lena luthor#supergirl#my tutorial#this has been a long time coming#guys. i'm BEGGING you. use the actions set - it was a pain doing all this manually again ngl LMAO#i've been so used to just playing the actions#so this has been a wild refresher course for me too 😆
126 notes
·
View notes
Note
Happy with the staff content this year but am I the only one who is disappointed with the PV we got? It's basically a slideshow of art we've already seen, major downgrade from the year 1 PV that had literally all the events. There was a drop in quality of the anniversary PVs over the years and it really shows this year. Sorry if you find this too negative I don't mean to hate I just wish Twst would do better for it's ANNIVERSARY.
[For everyone's reference, here are the anniversary PVs in order of release: 2021 / 2022 / 2023 / 2024]
Mmm, now that you mention it, I noticed this trend with the Halloween PVs 🤔 For year 1, there was a video that showed all members of the NRC casy, even those that did not receive cards at that time. There were then several short variants of the PV released for year 2/Endless Halloween Night (part 1 / part 2 / part 3 / part 4). Altogether, they feature all of the characters, including the students from year 1 but heavily shadowed and with glowing eyes to indicate ghostly possession.
Even Glorious Masquerade features all of the students that get new cards for the event plus Rollo, although there are notably more still shots here. The Stage in Playful Land CM, by comparison, is significantly shorter and only shows us the three SSRs (Ace, Ortho, and Kalim) as well as the two new characters (Fellow and Gidel).
As this anon has said, the anniversary PVs have changed a lot over time too. The first one was the most animated and integrated several event outfits. The second one was also animated a fair amount, but you can tell corners were cut in some places where they transition to photographs/still images. This alone works thematically given that the player is a photographer, but you can still catch dips in quality when it comes to the art style. I remember finding Deuce running and the Kalim + Silver flying scene odd, as well as Jade and Trein's faces strange in general.
Then the third PV rolls around and it only features the third years; the animation also seems to be much more sluggish (although this could be a stylistic choice; not sure). A friend actually recently pointed out to me that Lilia's pose looks like he was pulled straight from other assets; his artwork in the animation is almost the exact same as his smiling expression in the game.
This year's is the most different (+ most static) and, like year 3's PV, only provides "new" content for a select few characters (the dorm leaders). They also reuse pre-existing illustrations already found in the game that don't seem to be picked for any particular reason (like, there are random Master Chef/Culinary Crucibles groovies in there). This direction, I'm guessing, is less costly and more efficient than making an entirely original animation, which is what was done in previous years. (Not that Disney or Aniplex is hurting for money to fund this, lol)
Would I have preferred another PV in the style of year 1's? Yeah, for sure. I want to see other events and their outfits animated! Was what we got this year bad? Not necessarily; I think the production and editing was very technically impressive, but I'm still sad we didn't get anything substantially "new" to chew on (as someone who isn't a fan of most third years or the dorm leaders). Maybe it's just something we perceive as a deficit only because year 1 set the bar so high. It is what it is; whoever was in charge of the anniversary PV was probably doing the best they could with whatever budget they were given 😔 Let's hope that next year's will be a return to form, or that at least the money/effort is being redirected to other bigger projects (maybe the anime?).
#twisted wonderland#twst#notes from the writing raven#disney twisted wonderland#disney twst#spoilers#twst anime#twisted wonderland anime#Silver#Kalim Al-Asim#Lilia Vanrouge#Deuce Spade#Jade Leech#Mozus Trein#Ace Trappola#Ortho Shroud#Rollo Flamme#Gidel#Fellow Honest#Riddle Rosehearts#Leona Kingscholar#Malleus Draconia#Idia Shroud#Ignihyde#Vil Schoenheit#Azul Ashengrotto#Cater Diamond#Trey Clover#Rook Hunt
228 notes
·
View notes
Note
Hi! I don't know if you already have a tutorial but would you mind sharing your gif making process? Thank you!
hiiii anon!
thank you for sending this in :) it's my first time getting a tutorial request hehe i tried to explain each step i do as best as i can.
i'll put the gif making process and tutorial under the cut bc it's image + text heavy
before starting, i'd just like to share what i use in creating gifs:
i'm on mac (i used to do them on windows... the ps steps are the same if you're using one)
i'm currently using photoshop 2022
i use 9xbuddy or video downloadhelper extension on firefox mainly for downloading videos
best quality to download for hq gifs is ideally 1080p and above. (although you can get away with 720p for smaller gif sizes)
i use mplayer-osx extended to get the screencaps/frames for my gifs (if i'm not doing the import option in photoshop)
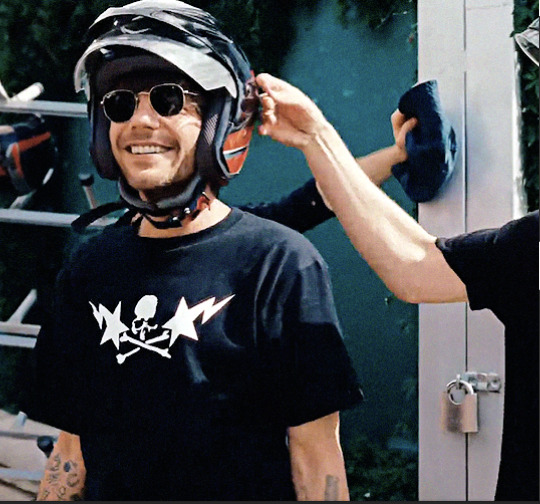
for this tutorial, i'm using the latam highlights video from louis' ig reels to make today's gif. on to the tutorial / process!
please click the screenshots i've included below and zoom in on the texts on them to see them clearly (apologies for the quality!)
IMPORT YOUR FRAMES. once you've downloaded your video, open photoshop and click FILE > IMPORT > VIDEO FRAMES TO LAYERS
SELECT THE PART YOU WANT TO GIF. the shorter, the better because you want to keep it crisp and keep the file under 10mb when you save it after all the layers. here are the settings i use:

toggle the smaller arrows under the bar to select the parts you want to gif. once you have your frames loaded, it should show you a timeline table at the bottom and their corresponding layers on the right side. (if you can't see the timeline, go to WINDOW > click TIMELINE)
3. DELETE EXTRA LAYERS, CROP PARTS YOU WANT TO FOCUS ON, AND RESIZE.

after cropping the parts of the gifs, resize them according to the tumblr sizing to prevent your gifs from looking blurry once you upload them. you can use this size guide for your reference :) the gif's height can be any size as far as i know.
go to IMAGE > IMAGE SIZE > INPUT THE SIZE. for this gif, we'll do 540 x 540
4. CHANGE GIF SPEED and CONVERT TO SMART OBJECT

once you've selected all frames
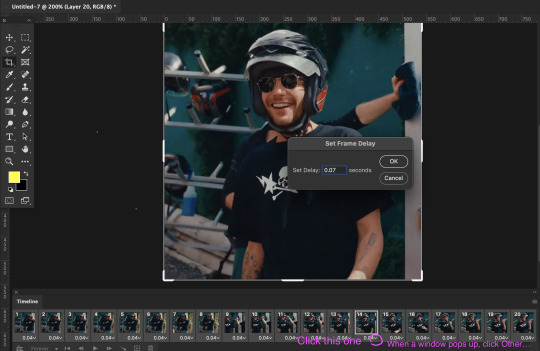
set the delay to 0.07. this is usually the natural, normal speed for gifs on here. it depends on the number of frames you have but i usually do .07 or .05 (sometimes .08 haha)
with all your timeline frames still selected, then select all the layers on the right side. go to SELECT > ALL LAYERS
then convert them to smart object so we can edit all the layers all at once. go to LAYER > SMART OBJECTS > CONVERT TO SMART OBJECT
5. SHARPEN (one of my fave parts!)
this is the basic one that most users use:
STEP 1: go to FILTER > SHARPEN > SMART SHARPEN

radius usually goes from 0.3-0.4
STEP 2: Repeat STEP 1, but this time change the settings to:

you can stop here but i like my gifs crispier and to have more texture! i use the sharpening settings from this tutorial or these sharpening action packs from user brainwasheds. i highly recommend these! i mix and match the settings when i'm not happy with how they look on my gifs. but for this gif we'll use the sharpening settings from this tutorial.
in addition to the settings from that tutorial, i also added FILTER > OTHER > HIGH PASS at 3.4 radius, then set the opacity to 60-80
then lastly add FILTER > ADD NOISE > NOISE at gaussian setting with 1.5 amount, then set opacity to 20-30
6. BRIGHTENING, COLORING, BALANCING, ADDING TEXTURE
now for the fun part!
STEP 1: BRIGHTEN UP THE GIF
this is my go-to way to increase the brightness. go to LAYER > NEW ADJUSTMENT LAYER > BRIGHTNESS / CONTRAST then change its blending mode from NORMAL to SCREEN

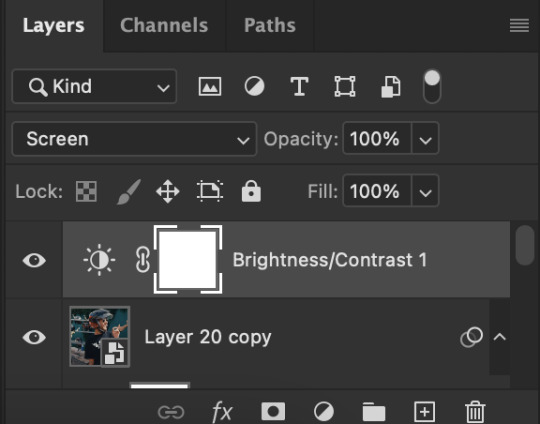

you now have a very bright, highly saturated gif but we'll fix that lol
STEP 2: ADD CONTRAST BY FIXING THE BLACKS AND WHITES
add a new adjustment layer > LEVELS

i usually play around with these. middle and black arrows add shadows and contrast while the white arrows add highlights/brightness to the gifs.

these are my settings! these are not definite bc it varies depending on what you're working on, so adjust them accordingly. next, add another adjustment layer > CURVES

i usually zoom in to locate the darkest / black area using the black dropper. then once that's done, do the same and locate the brightest/white area. this adds further contrast to your gif that wasn't done in the previous step.
STEP 3: COLORING (my fave part!!!)
add a new adjustment layer > SELECTIVE COLOR
this is the part where i like to neutralize the skin color when it gets too yellow or red, make the colors pop, and sometimes change them too.
louis' skin was looking too red heavy, so i wanted to reduce that! i start with balancing out the skin color with REDS & YELLOWS.
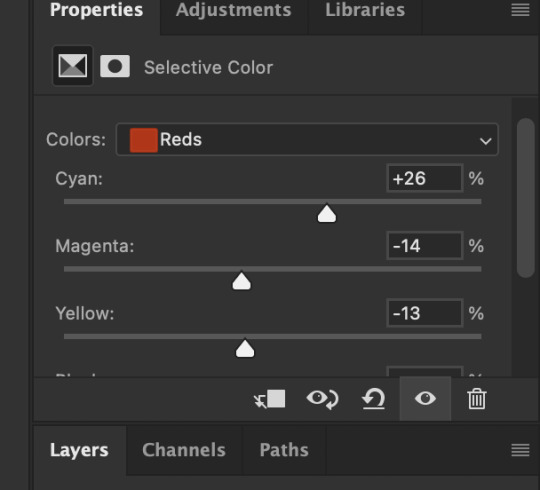

these are my settings for this gif! adjust them and observe the changes it makes on the person's skin. if you know color theory, it's helpful to see how it affects the colors on your gifs. putting the arrows more on the left side, adds more 'cool' tones, whilst putting the arrows to the right side, adds more 'warm' tones.
i like to deepen the blacks on my gifs further so, go to selective color's BLACKS and on the black scale, add more to the right! for this one, i added +10
add a new SELECTIVE COLOR adjustment layer. for this one, we'll make the surrounding colors pop more!


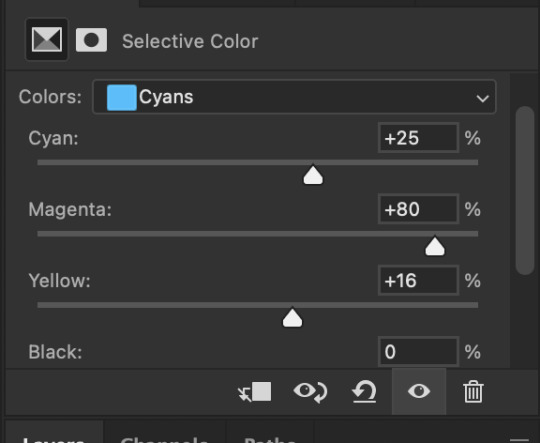

for these settings, i made the leaves more vivid while the teal(?) wall, i adjusted them made it more blue.
next, add a new adjustment layer > COLOR BALANCE
this is where you can make further adjustments on the overall colors of your gif. you can also change the color tone of your gifs here if you want to make it more 'cool' tone or 'warm' tone looking.


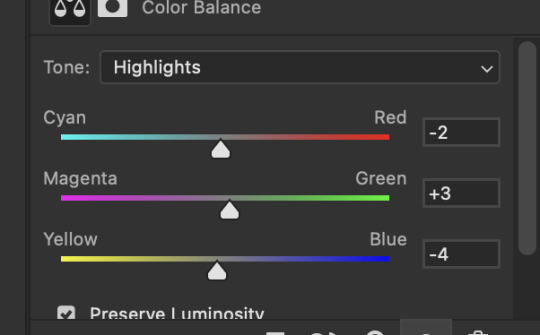
earlier's color theory applies here as well!
6.5. OPTIONAL STEP: ADD TEXTURE/OVERLAYS
after the last step, you can save your gif as is but again, i like adding textures to my gifs so we'll add one. i use the textures/overlays that i got from here :)
i like to use film, grainy textures! add the texture you want on top of all the layers.

then change the blending mode to LIGHTEN or SCREEN. adjust the opacity to 20-40%. for this gif i used screen with 40%.
7. EXPORT AND SAVE YOUR GIF
time to save your gif! click FILE > EXPORT > SAVE FOR WEB

this is my default setting for my gifs. i also tick the interlaced option sometimes.
here's the finished gif:
there you go anon! :) if you have any more questions, just lmk or you can directly dm me off-anon if you want.
i also get inspo, guides, and other tutorials over at @usergif
72 notes
·
View notes
Text
Something I really lament is the move towards digital media. Slowly we start to never own the things we like. Even if we "buy" a digital game, or movie or show. It's locked behind a certain platform or service. Once it shuts down we lose it forever.
(me when big booby anime girl explosion Is taken off of Netflix)
I also feel like there's a certain charm to owning physical media, like things you can hold and the satisfaction from pressing a clicky button or putting a disc or cassette in and seeing it work.
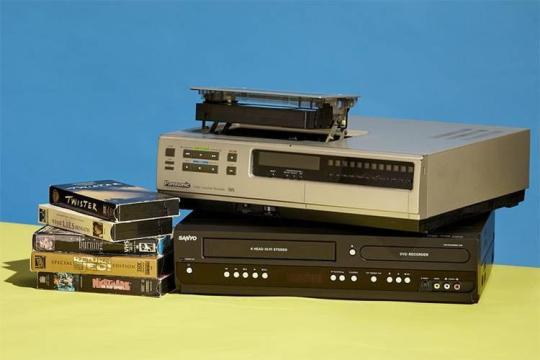
(oooh so classy so retro so.. expensive in the modern day)
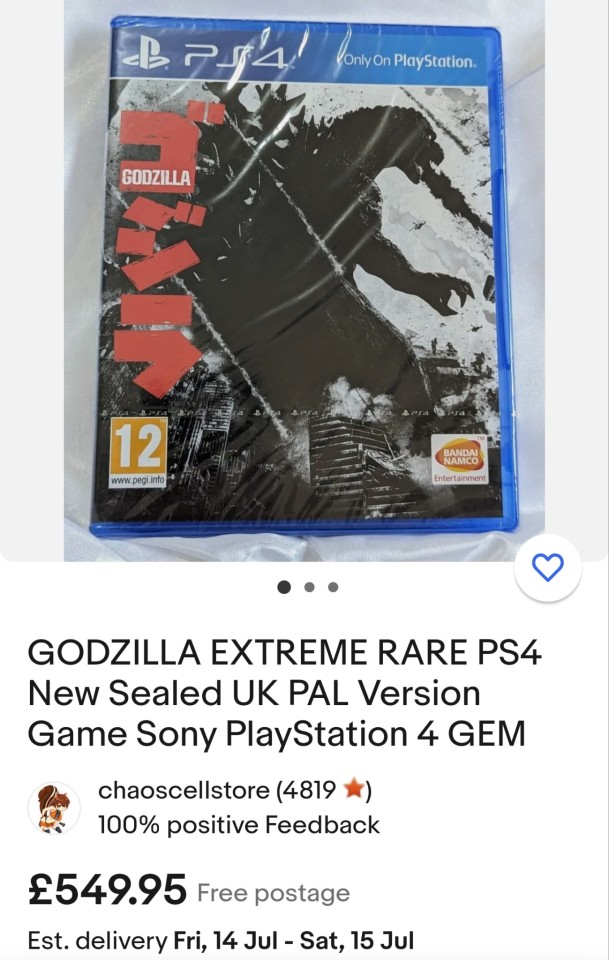
More people should try to make copies of what they own digitally, or try to buy physical media before it's lost from streaming services and digital storefronts forever. Like the case with certain games like Godzilla 2014 and Transformers War for Cybertron. They don't exist digitally anymore. Only hard copies exist outside of emulation and at insane resell prices like... INSANE ones for a mediocre Godzilla game
So yea. Buy some more CDs of those albums you have on replay! Buy a DVD of that niche obscure anime you like! And most importantly PLEASE PLEASE START MAKING HARD BACKUPS OF SHOWS YOU LIKE THAT YOU PIRATE!!! media preservation is important!
(me downloading every episode of Daredevil onto my hard drive to burn to a DVD later so I can give it to all my friends)
This is now going to be a Comprehensive guide on how to rip a CD
POLL TIME!
Burning and Ripping Disc's❤️❤️💕💕🏳️⚧️🏳️⚧️
STEP ONE:
BUY A CHEAP BLU-RAY/DVD DRIVE FOR YOUR WINDOWS COMPUTER
here are some I recommend!!!
i personally use this pioneer one :)))
DVD drives in general are relatively cheap from 30-20 smackeroos, but Blu-ray drives are around 80-100 bucks depending on the manufacturer but offer better support for copying HD video such as on a Blu-ray.
STEP TWO:
FIND A PIECE OF MEDIA YOU ENJOY.
in this case its gonna be a CD!!
i really enjoy Vespertine by Bjork, but i wanna have it on my computer just in case anything happens to my CD. SO. ill open Windows Media Player
(she hasn't changed since 2011 <3333 be urself girl)
NEXT
ill insert the disc into the player. and it'll start playing!
Pause the disc and go into Rip settings
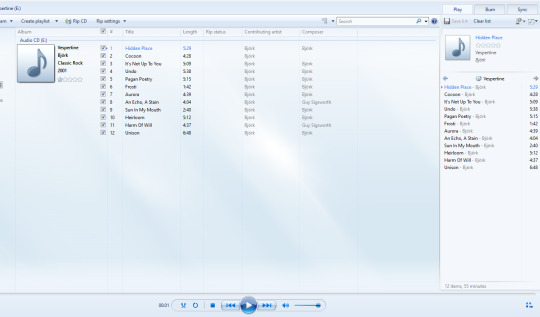

NEXT!! select the format!
if you want to conserve space and don't mind sacrificing audio quality select MP3! if you want to hear the same level of audio quality as preserved on the CD, select a format labelled LOSSLESS. I recommend .WAV files as they'll work with most devices including an android phone or iTunes on PC (more on that later ;3 )
NEXT!
create a folder on whatever u wanna save ur music to! (u can call it whatever u want the world is your oyster bestie)
THEN!!! FINALLY
go into more options on the Rip Settings menu!
select ur folder and press Rip CD!!!!
the fun thing of this now, is that you can pull these files on your computer and put it onto your Android device so you can listen to your hearts content without lugging around your CD in a player at high quality without any subscription service with free reign of who you can give your download to!
But Magenta! what if i have an iPhone?
ohohoo fear not bestie because iTunes on PC has an even EASIER way to do it
because simply putting in a disc with iTunes downloaded prompts THIS

(oooo so new age)
and if you have apple music on your iPhone this will sync to your phone if you logged into iTunes on PC!!
thank you for coming to my TED talk
#vhs#media preservation#piracy#no like for real. please just download the stuff u pirate just in case it gets taken down#ateez#atz#x files#godzilla#Björk
510 notes
·
View notes
Note
Okay how about Cole dating f!reader and one of her ways of showing affection is by making flower crowns for him
Flowers and nature in general being one of her favorite things in life
Hello lovely!! I'll be real, this is the fastest ask I've ever written, with a record-breaking one and a half hours lmao
I hope you enjoy this!!! And thank you for letting me know because I didn't receive the ask the first time (Thanks tumblr.)
|| ꜰʟᴏᴡᴇʀ ᴄʀᴏᴡɴꜱ || ᴄᴏʟᴇ ʙʀᴏᴏᴋᴇꜱᴛᴏɴᴇ x ʀᴇᴀᴅᴇʀ ||
“Another?”
Cole wakes up to flower petals tickling his nose. He lets out a loud sneeze, startling Kai awake. The fire ninja groans, covering his head with his pillow in an attempt to escape the rising sun.
The earth ninja takes the flower crown you had snuck onto his chest in his sleep, a soft smile gracing his lips when he realizes you had probably put it there before you left for work.
His fingers gently brush against the soft pink freesia, now wide awake as he sits up.
You usually went to work at five a.m. on the weekdays, but you only needed to stay there till three p.m. since your job was mainly remote. However, your supervisor was in a different country at another timezone, and you needed to be at the office to look professional.
You despised it, and so did Cole.
He’d notice when you slipped out from under the covers, your side of the bed gradually turning cold. His arms felt empty without you, with your head snug under his and tucked into the crook of his neck.
You hated it too, leaving the comfort of his arms and bed the last thing you wanted before he woke up. So you resorted to leaving little gifts for him before heading off for work. Flower crowns, to be exact.
The habit had started before you, and Cole even started dating. You used to come over to hang out with Jay, the bubbly ninja eager to beat you in every video game he possessed. You had met him in a games store, ready to purchase the latest fighting game.
You noticed a crowd around a gaming machine set up for demos and went over to look. That’s when you spotted the ninja in his blue gi practically smashing the buttons on his controller, earning himself a new high score.
You couldn’t let him take your place as the reigning champion of the game, so you stepped up, challenging him to a match where you utterly destroyed him.
That’s when he invited you for a rematch, a friendly rivalry that sparked your friendship.
When you arrived at the monastery for the first time, you were intimidated by all the ninjas, including their sensei. Though he was kind, it was slightly unnerving how he looked at you with a sense of foreboding.
And then you met Cole.
— — — — — — — —
“Jay, what’re you having for dinner?”
A deep voice startles you out of your concentration, but you don’t dare look up, too engrossed in beating Jay.
“Uh, I dunno, anything, I guess. What’re you getting?” Jay says, eyes trained on the screen. You gnaw on your bottom lip in thought, mentally narrowing down who you had already met and whose attractive voice it could be.
You had already met Zane, Lloyd, and Nya. So that only left either Kai or Cole. It couldn’t be the fire ninja, though, you had seen him being interviewed a while back, and his voice had a slightly higher pitch. This one had more of a baritone quality, a slight rasp at the end that made your stomach do funny little flips.
So this had to be Cole.
You risk a quick glance, doing a double take. Your eyes unashamedly rake over the stranger’s muscular build, catching yourself ogling his biceps. You shake your head, cheeks flushing and praying that neither has caught you staring.
Jay was still focused on the game, and Cole (you assume) was chugging down a glass of water. You find it hard to swallow, noticing how his skin has a glowing sheen from all the sweat. He had probably come back from a workout.
You tear your gaze away before he notices, still feeling the heat in your cheeks. You hear him set down the glass with a soft sigh, your body tense.
Is your hair okay? Did you look homeless? Did he notice you staring?
Your mind races with thoughts until the words ‘Game Over’ flashes on the screen, a victorious shout from Jay snapping you out of your thoughts. You groan, tossing the controller to your side.
“Who’s this?” You turn, willing the flush in your cheeks and neck to subside.
“Oh, I forgot to introduce you guys. Y/n, this is Cole. Cole, this is Y/n, my newest rival!”
“Is that really what I’m being introduced as?” You grin in a joking manner, eliciting a shrug from your friend.
“Cool. Are you sticking around for dinner? Zane might be cooking tonight.” Cole looks straight at you, waiting for an answer.
You’re speechless, managing a nod.
Were you just invited to dinner? With the ninja, no less??
— — — — — — — —
“Here.” You place a flower onto Jay’s head, and he blinks several times before pulling it out of his hair.
“Is this mine?” He asks innocently, and you nod in response.
“HA! Suck it, Kai! You’re gonna be the last to get one!” He shouts across the ship, holding it up triumphantly as you roll your eyes with an amused smile.
You had started the habit of giving flowers and little trinkets you found in nature to the ninjas. Zane was the first to receive one, a tiny acorn you had picked up during your walks in the park to recharge your social battery.
He had cooked a marvelous dinner, and you had randomly given it to him to express your appreciation. He had taken it with a confused yet thankful smile and proudly showed it to the rest during dessert.
The rest of the ninjas became more invested in seeing who was the next one to receive anything. You had triggered their curiosity and anticipation once you had given Nya a beautiful piece of sea glass you had picked up at the beach. She treasured it like it was a diamond, keeping it on her dresser along with her jewelry.
Now, Jay had his small trinket.
Kai was next. He had made the time to help you go grocery shopping when your other friends were busy, driving you there and back in his car. He helped you unload the groceries, thinking nothing of it until you returned to your room for a brief moment, returning with a preserved amber leaf paperweight.
“This is mine?” He asks, wide-eyed. He takes it from your hands when you grin, admiring the flickers of orange in the paperweight, the colours resembling the sparks of a fire. He wraps you up in a brief hug, excited to go home and show it off to the rest.
“Looks like Lloyd and Cole are the last to receive anything.” Kai chuckles, reveling in the fact that he had received it before they did.
Your sheepish grin gives it away. His eyes widened. “Just Lloyd?”
You shake your head with an embarrassed flush.
“Just Cole??”
— — — — — — — —
Truth be told, it was challenging to decide what to give the earth ninja. He was the most put together, the most vigilant of them all.
And the most attractive.
You had briefly considered a smooth pebble, its midnight shade reminding you of his gi. But that wasn’t good enough. You could imagine the disappointment in his eyes, comparing his stone with the other gifts you had gotten the rest of them.
Besides, it was too cliche. A rock? For the Earth ninja?
You’d rather bury yourself six feet under.
You were sitting on a mat near the pond in the monastery, having been invited on a small picnic in the sunny weather. You had gathered an assortment of flowers in front of you, starting to absentmindedly weave together the stems into a flower crown.
The ninjas were chatting away, and their senseis were sitting on the wooden floor of the small pavilion nearby, sipping on tea and watching their students fondly. You were almost done, looping the last flower through the stems.
“Is that mine?”
Your breath hitches when you glance up, the shy yet boyish smile on Cole’s lips making your heart flutter. He sits down beside you, peering over your shoulder to get a better look at the flower crown you hold loosely in your hands.
“Y-yeah.” You hope he doesn’t catch the stutter, though a slight upwards quirk of his lips suggests otherwise.
“That’s a relief,” he laughs, leaning back with his face tilted towards the sun, “I was starting to think you had forgotten about me.”
Your cheeks fill with a familiar heat, shaking your head with wide eyes. “No! I’d never forget.” You suppress an embarrassed groan at how your words came out, but you’re left breathless when you notice the soft dusting of pink on his cheeks.
“That’s good then,” He murmurs, peeking an eye open with a small smile.
You bite down on your bottom lip in thought, summoning up all your courage to reach upwards and place the completed flower crown on the top of his raven-black hair, fingers brushing against his bicep. (Definitely not on purpose, of course. A total accident.)
He grins, sitting upright.
“Nice crown, Cole!” Jay giggles, drawing the attention of the other ninja.
“Why thank you, it was a gift.” He pauses to send a wink your way, but you look down quickly, flustered by the sudden action though you can’t help the shy smile that spreads across your lips.
You look back up as he saunters to the rest of the group, showing off his present. You watch how he laughs at something Kai says, your gaze soft as he glances back at you. You start like a deer caught in headlights. However, he doesn’t look away, nodding absentmindedly at Jay’s remark that goes unheard.
Your mind is blank, a single thought floating around inside.
Flower crowns look good on him.
#ninjago#ninjago x reader#ninjago cole x reader#cole x reader#cole brookstone x reader#ninjago x yn#ninjago x female reader#cole brookestone x female reader
772 notes
·
View notes
Text
Vector Perkins Romantic headcannons <3
this post is extremely self indulgent. I apologize. 🧡


First off, I feel like he'd be a completely oblivious person when someone flirts with him. I mean, it depends what the flirt is, but most of the time he'd have a difficult time picking it up.
And, um. If you are flirting with him, and he catches it, he might think you're messing with him. I mean, yeah, he's awesome, and the coolest villain, like, ever... But, he's also a complete nerd.
He doesn't have any friends, and the last time he tried to make a friend, the guy froze his head and sent him to the moon! (To be fair, he was sort of at fault for it, but, He started it!!!)
But, if you were flirting with him genuinely, I think he'd get all flustered by the idea of someone actually liking him. He'd get all giddy, and dorky, and immediately want to be your friend.
Yeah, he'd ask to be your friend when you're first flirting. He's a dork, he'll get with you though, once he realizes that's an option he can take.
... When he does get with you, he's a complete idiot of a partner. He's an idiot, and he's rich. These two things are horrible together. In a good way! I promise!
He's the type of partner to play video games a lot when you're over. You'd have to pry him off that Wii, if you wanted his attention. But, when he is pried away from it, he would be eccentric to spend time with you. He has TONS of favorite things to do! And he's got money to spend. His dad's money, mostly, but you know.
I've always thought this, but I think his ideal date would be the beach. A nice vacation, walk along the ocean line, collect sand dollars and see if you can see any fish.
He'd make a giant sand castle, I'm talking, abnormally large. He'd upgrade it with high tech security, too. He'd call it his fort away from his fortress. It would, somehow, be a fully functional castle with technology equipped.
He might rent a boat, so you both can go out to sea and 'sea' some sharks. "Not Dolphins", he'd emphasize. "sharks... Dolphins are evil. And - And not the COOL evil, like me. UNCOOL evil."
If you didn't want to go with him to the beach, he'd take you to an aquarium, or villain con, if villain con is going on. He'd buy tons and tons of shark merchandise, and probably leave the aquarium with way more than his hands can handle. Somehow, he's carrying it all, though. Same thing would happen at villain con... only with villain merch.
I feel like if a disco song came on in a public area, wherever it may be, he'd ask you to dance with him, and then start dancing like an IDIOT. Social Anxiety is afraid of him. You both could be in the smack middle of a convenience store, and he'd still start grooving. It would cause people to stop, and stare. Maybe giggle.
No one said dating him would be easy for your ego or public image...
I don't think he'd be big on PDA, but, he wouldn't be opposed to it if you initiated or wanted it. He just doesn't do it himself.
I think one of his love-languages would be gift giving, or quality time. He likes to talk his head off, and he's rich. He'd buy you expensive things you might like, like merchandise for your favorite anime, game, movie, etc.
... When in doubt, feed him. If you don't know what to give him back, you can order him a pizza, or buy some cookies, or just buy him a simple order from a fast food joint. He'll be so happy. He's a simple man. And a snacker. He loves his snacks, the dork.
You secretly order a pizza, and he finds out when it arrives at the door to his fortress and his security system almost shoots the pizza delivery man. You'd have to apologize and tip the man extra for even delivering to such a dangerous doorstep. But Vector would be happy.
Simple relax days with him when you're not going out on dates would include watching him play his video games, lounging on the couch... Talking about marine biology... And, weirdly enough, maybe math.
And, if he feels like it, he might rant a little about how mad he is about Gru sending him to the moon. Or how scary it was...
You guys might fall asleep on the couch together watching some animal planet documentary about marine life.
Living with him would simply feel good. His home is pearly white, deep cleaned and shiny. His fortress probably has no pests, and he probably dusts regularly... Especially if you had an allergy. I mean, the occasional couch change and lint might happen, but for the most part, his place is really clean.
But, you'd have to get used to wiping yourself with the letter V, because the toilet paper, and towel has his logo on it. (I'm... not kidding. It does in the movie.)
He probably has a decent schedule... Weirdly enough, I see him as the extremely organized type. Sleep time at a very specific time, like 10:30 PM. Wakes up really early, like at 8 AM.
He doesn't really... Do anything to NEED this schedule, he just likes to abide by it. if you kept him up too late he'd get lightly mad at you and scold you for keeping him up. Same for if you woke him up too early. He gets bothered when his schedule is messed up.
I like to think he's actually a diagnosed autistic person, so this would be part of the reason he's so specific.
He'd smell really nice after each shower he takes... Probably like some sort of citrus themed shampoo. It would be really nice to get ready to rest with him, and he just came out of the shower, and he smells like fresh oranges.
I think he'd be really comfortable to lay on, too... His chest is comfy to rest your head on, and while he plays the wii, you can lay on him and feel his breathing. You might even fall asleep to the soft sounds of his TV and gaming, with occasional little quips from him when he wins or loses a match.
If he noticed you were falling asleep, he'd turn the TV volume down a bit, and quiet down his quips... He wouldn't stop them, he'd just whisper them. It would be cute to overhear him whisper a soft, 'Yes!' when he wins a round, considerate to you trying to rest on him. He's such a sweet dork.
He'd probably use really corny math pickup lines on you, and he'd flirt really nerdy like. It's really silly, and kind of embarrassing, but in an endearing way.
If he found out something that flustered you in specific, oh, he would drill it into the ground with how much he'd use it.
But, he'd use it sparingly.
He'd wait for the perfect moments to use it.
Oh, he's not big on PDA, but he is big on grand gestures. If it was your anniversary, or your birthday, he'd do something big.
BIG.
I'm talking, getting fireworks, decorating the fortress, maybe even trying to contact your favorite band to get a personal ticket to one of their concerts front row.
NOBODY. I mean, NOBODY is going to not-know you two are dating, by the time he's done with you. He'll make it, very clear. Even if you wanted to hide the relationship.
He's just... Way too happy to be with you to pass up holding you like he held the moon. A prize of all prizes. His beautiful trophy.
All his. 🧡


#mattypattypinkyposts#SELF INDULGENCE IS INSANE TODAY!!!!!!!#this is... crazy long sorry guys I'm being really gay rn#vector perkins#vector x reader#despicable me headcanons#despicable me vector#vector despicable me#sighhhss#🦈🌙#vector perkins headcannons#vector perkins headcanons
66 notes
·
View notes
Note
Alright, looks like my dearest blorbo lost, so here's my long anticipated post mortem propaganda post for her and the 15 dollar game bundle that blew me away. For decency's sake, i'm sealing the meat of this post behind a read more, so as to not accidentally colour of the skies everyone who follows this tourney. (Or at least i'm going to try to. Tumblr is weird, and apologies if it does not work.)
One fateful day, I purchased the Bundle For Ukraine from itch.io. While I was initially put off by the seemingly bargain bin quality of most of the games, I ultimately decided it was worth it. I donated, got the games, and perused through them for anything eye catching. I found Celeste, Zeroranger, a couple of cute tools…
And a little game called Crosscode.
I was… intrigued. I'd saw this game once or twice before, and I was curious. Figuring that it couldn't hurt to try it, I downloaded the game and started it up.

Crosscode turned out to be a very good game.
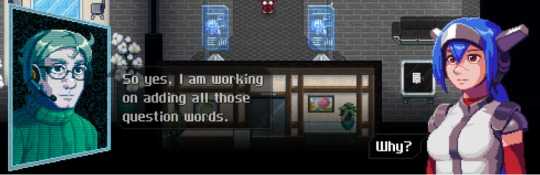
And most of that was because of the main character:
Lea.
In summary, Crosscode is an action rpg game made by Radical Fish and released fully on pc in 2018, with console ports later. It follows the story of Lea, a woman who wakes up inside a futuristic MMO set on a moon in a distant galaxy, where players physically control avatars made out of a high tech substance known as Instant Matter (think hard light holograms, and that's pretty much it.), as she's guided by a programmer in order to recover her lost memories. I can go on and on about just how amazing the game is: how the plot takes a turn from "generic mmo isekai esque" to if someone decided to adapt one of the better black mirror episodes into an action rpg, how polished the combat and puzzles are, and how incredible the music is, but that's not what the main purpose of this tourney is. It's to tell you just how good of a character Lea is.
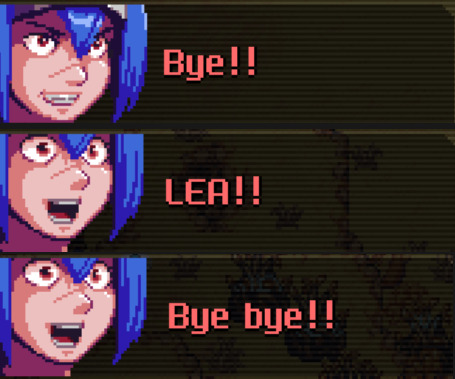
Lea is the main protagonist/player character, a rather shy woman with a real competitive spirit and a cheeky attitude, once she warms up to someone. A major part of her character is due to a major glitch in her avatar's voice module, she's mute (aside from a couple of hardcoded words her programmer friend could put in). "A silent protagonist?" you may ask me. "Like, a player avatar that is deliberately left without any strong characterisation as to allow nearly anyone to insert themselves into?" Nope! Instead of being a blank slate for projection, Lea expresses an incredible amount of character through simply inflection and facial expression.

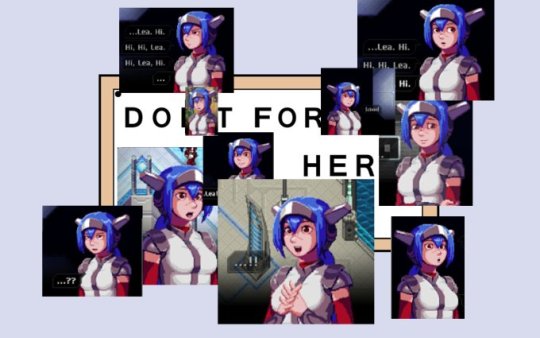
This is only a PART of her spritesheet! Only a smidge, and i'm not even getting into the special sprites she has for certain story events.
Throughout the story, Lea has to tackle difficulties with not being able to communicate as well with players and NPCs, along with typical mmo difficulties, all while she unravels the dark mysteries of what's really going on behind the scenes of Crossworlds...
Despite her difficulties, she's always treated with respect by the game's narrative, which can be seen with the many interactions between her and the surrounding cast (all mainly expressed through her many sprites).
A few of my favourite moments of hers include:
Annoying her programmer friend:


Her reaction to her horns:

Her absolute freak out at being held by a five year old:

Her absolutely intending to get into more antics after a certain sidequest:

And if you need any more motivation to play this amazing game, here's the special reactions she gets when you turn on the New Game Plus cheat that gives you insane damage with every hit:
Yes, the devs made specific sprites just for when you play new game plus with a certain cheat.
Please, do yourself a favour and play Crosscode. It's like twenty bucks on steam without a sale. It's what Sword Art Online would be if it didn't completely suck. It's disability culture. It's the world's best single player MMO. It's a Black Mirror's White Christmas episode adapted into a video game.
And most of all... it has Lea.
Wow. Well unfortunately it seems that read more does not work in asks.
119 notes
·
View notes
Text
CPN: A NEW SIDE TO THE BIRTHDAY STORY 🫶🏼

what i love about these “new” bts and content is we get to revisit some cpns we had from years prior and see something new. the same goes for these stuff from 2021.
references:
compilation of candies from ZZ’s 30th bday
lion triple kill / aquamarine lion head confirmation
is it a cake for wyb’s bday?
here is the xzs douyin update video in question if you haven’t seen it.
everything is fake/interpretation/speculation.
2021, we were not sure if the photoshoot was done on 8/5 but XZS seem to confirm that it was done close to that date and our speculation was correct. The caption for the post was “Meet the time shadow before the finale in the desert”, and talking about the wrap up for this shoot, it was posted on 8/4.

The timeline being correct is important because this is when XZ wore the matching gucci head necklace of WYB 💕 and if this is right, looks like the rest of the bday timeline is correct.
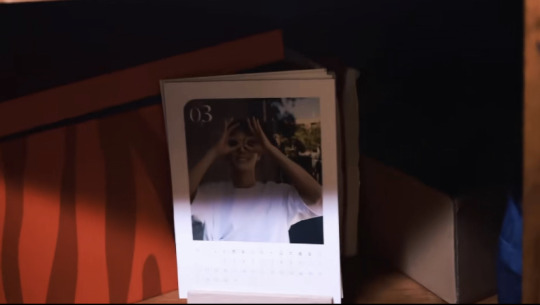
Out of all the calendar photos & Months that could be featured in this video, why this? I know that it was taken for the 2021 birthday shoot which was what the photos in the desert was for but this is not in that set. This one is in Beijing, taken earlier that month. If you look at the photos in that calendar there are a lot and much better ones to include. So why???
Could it be because of that gesture? The same one WYB did last night in the One & Only show?
So who was taking the cue? Is this a coincidence again?
GG is known for doing this so what we CPN yesterday is that WYB decided to use that in the routine. Deliberate or not.
Now as for it’s inclusion in the XZS video, I think it’s more plausible that it’s a clue to confirm WYB’s dance move. I cannot say when these videos are edited, if it’s done waaaaay before it’s release. What I know for sure is how efficient XZS team is when it comes making video edits. They can turn high quality ones in a short span of time, for example the euro trip content. So it’s not completely out of the question for them to have made this recently.
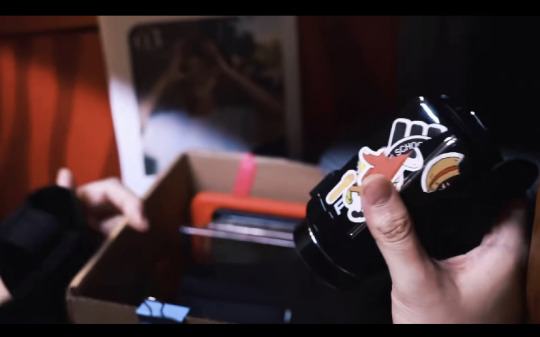
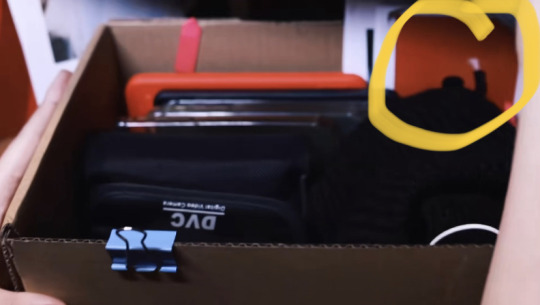
In the “box” was also a beanie. It looks like the one he wore in Universal Studios Beijing. The same place One and Only held the event. Can you be more obvious????

There is also what appears to be a luffy sticker. I wanna know what’s the rest!!!! ( one piece cpn here )
and the chongya pose photo, which was also the pose done by WYB. that’s his signature too, both of them, but for it to be seen today out of all the photos? hmmmm….
There is also the “salute” gesture, was he doing that to practice for Tao’s birthday VCR? but ended up not doing it lol.


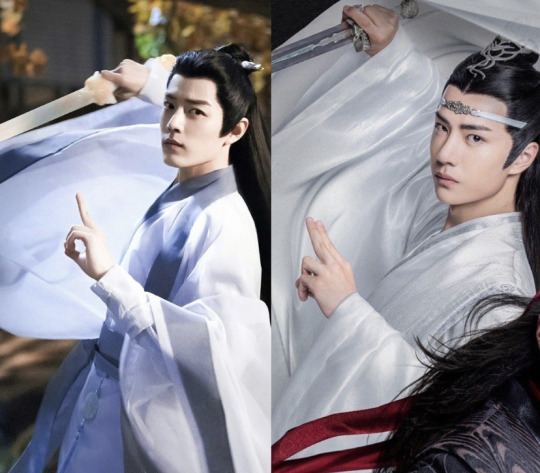
and oh lemme add this too, another shi ying x lwj parallel. 🤍
source.
#bjyx#yizhan#there is no science here i’m just clowning like i always do#i remember that time when these were released to be particularly chaotic 💀💀💀💀
115 notes
·
View notes
Text
Full giffing process - tutorial (*≧ω≦*)
Due to little demand, i will be going thru my complete process for making gifs. so this will cover all the basics i hope! keep in mind this is just the way I personally do things! please feel free to send me asks or dms if you have any doubts or questions!
☆☆☆☆☆☆☆☆
DISCLAIMER: Everything I know about giffing, I've learned from other tutorials, including the VapourSynth Resources I'll be using in this tutorial so I'll leave links to those tutorials I've used here as well!
In Depth Giffing Tutorial (link here)
How to use VapourSynth (link here)
☆☆☆☆☆☆☆☆
(o´▽`o) I'm a windows user so idk if this works exactly the same on mac!
First things first, you will need:
☆ 4k video downloader (download it here!)
☆ Vapoursynth (32bit download / 64bit download)
☆ Photoshop (download it here! -64bit version only)
Okay! The first thing you need to do is make sure you're working with the highest quality material possible to ensure a decent looking gif!
I'd say the minimum quality needed for decent gifs is 1080px. But if you really want to gif that low quality 2 frame milisecond of your fave, i respect that
☆ lives / streams and tiktoks are typically not very high quality
☆ for stage performances such as music shows, ts/tp files are preferred but those can be really hard to get a hold of (this is a whole deeper level of giffing hell and more of an advanced class topic so nevermind this for now!)
☆ those occasional 4k facecams on youtube work fine tho!
☆ for mvs, variety shows etc, you can download the video with good quality from youtube using 4k video downloader
_(:3 」∠)_
Now let's talk about tumblr and it's pre-requisites for a good looking gif post :D
Tumblr can be sooooo annoying about gifs okay.... I find it's best to plan my whole set before I actually start doing anything but hey that's just me. Some things to keep in mind are: dimensions, file size, number of frames and post layout!
☆ Dimensions
You have 3 main options here and it's all about the width!
☆ 1 collumn: single gifs! these should be 540px wide
☆ 2 collumns: split that in half! 268px wide so there's a lil breathing space between the gifs!
☆ 3 collumns: 3's a party! 177px for each gif please
You can go crazy on the height but the width should mostly stick to one of those 3 unless you want tumblr to pull and squeeze your gif around like a piece of gum.
☆ File Size
This is really important because tumblr has a single image size limit of 10mb. Which means that every single gif you make has to be under that size or you won't be able to post it. The other thing about this is that the dimensions, number of frames and ammount of varying colors throughtout your gif will greatly impact on the final file size. Basically, the larger the dimensions and the more frames it has, the bigger the final file will be. Later on I will show you how to check your gif's final size before exporting it!
☆ Number of frames
This has more to do with the length of your gif, the longer it is, the bigger the final file will be. Typically gifs should be under 3 seconds long. So if you are making a set, try to break the moments you want to include in your set by increments of up to 2 - 3 seconds each, otherwise it might not fit all into one single gif. The number of frames is also extremely important when making combined gifs but that's for another tutorial.
☆ Post layout
If you want to make a cool looking gifset (where some gifs are larger in dimension than others, or when you want to have a single gif followed by a line of 2 gifs next to each other), then it might be worth it to plan out the layout before you start making the gifs. This way you ensure you won't have to remake gifs down the line because they don't fit together the way you wanted to.
☆ミ(o*・ω・)ノ
Timestamping
For this step, you will go through the video you want to gif from and you will just write down all the sections you want to use, down to the exact seconds. Example: 02:30 - 02:32.
(^◕ᴥ◕^)
VapourSynth (VS) - Clipping the video
I know VS can look pretty intimidating with it's bare coding and all but I promise it can be your friend. You just have to set it up correctly and pay close attention whenever you're using it. This software is a must for giffing, it will do all your cropping, resizing, sharpening and denoising for you, making sure your gifs look good. It is also indispensable when giffing ts/tp files because it deinterlaces those files so you can clip them.
First, let's set it up. This is the most annoying and difficult part of this tutorial so make sure you pay full attention to every single step!
☆ step 1) download a version of VS here (link).
☆ step 2) unzip the file on your desktop area.
☆ step 3) open the folder and find the file named "vapourscript (drop video file on me)" - make a shortcut of that file and move it to the desktop.
☆ step 4) find the folder named "gifs" - make a shortcut of that file and move it to the desktop.
☆ step 5) drag your video file you want to gif from and drop it on top of the "vapourscript (drop video file on me)" shortcut on your desktop.
☆ step 6) enter the timestamp input, in the first line it will be the starting of your timestamp, in hours format, then hit enter. in the second line enter how long your timestamps lasts, in seconds, also in hours format. then hit enter and let the code run.
☆ step 7) the resizer tab should now load on a web browser, then you will set the dimensions of your gif on the top left corner. you can also adjust the position of your gif within the video screen and zoom in if wanted.
☆ step 8) choose the preprocessor, denoise and sharpening options on the left and tick the boxes on. I usually just stick to the settings i'm using in my video down below.
☆ step 9) now in the VS box, go to file > load, choose the script saved in the gifs folder.
☆ step 10) copy the code from the resizer into the code in the vs screen, under the designated line.
☆ step 11) alter the code exactly like I did in my video down below. save it. this is now your default vs script for clipping your gifs. what you are doing by adding the hastag and the quotation marks is you're disabling those sections of the code. the reason you do that is in case you want to run the preview before exporting. this is because those lines involve some heavy graphic processing which can make the computer slow. I will talk about the script in more detail later on.
☆ step 12) i don't usually use this option but you can also preview your gif and set specific frames to start and end your gif. This is around the 4:30 mark in the video.
☆ step 13) time to export your clip! now you will temporarily remove the marks you added to disable the code and then go to script > encode video. in the popup box, you will select the option "export to MOV", then start so that you can use that video file in photoshop later.
☆ step 14) after you are done exporting, close the encoding box and then close vapoursynth, never agree to save the script when closing it, or that will override your default script.
☆ step 15) now you need to rename the encoded file for your gif. go to the gifs shortcut folder you created on your desktop, then go to output. this is the folder where VS will save all your encoded files. but everytime it saves the file with the same name so you need to come to this folder and change the name for every gif file you encode before you clip a new one, otherwise VS will just replace the previous clip with the new one you just finished.
Here's a detailed walk through of each step in this video tutorial:
youtube
IMPORTANT
After you are done processing your first clipped file, now you have your default script already built in VS, so whenever you run it to clip more videos, this script will already be in your VS screen. So now all you need to do whenever you want to clip more files (to make more gifs) is to adjust the dimensions, positioning and zoom of the video in the resizer screen and then change a few numbers in your script! then run encode to save the clipped file.
☆ To make new clips: go thru steps 5- 7, also do 8 if you want to mess with the denoise and sharpening filters again, but I don't really know much about how those work so I can't help you with this.
Now what you need to alter in the code, each time you are making a new gif:
after you run VS and change the settings in the resizer to what you want, you need to change the zoom numbers and the video positioning in the code.
you need to replace the numbers in the VS script on the left so they match the numbers in the resizer on the right.
Do step 12 if you want to set specific frames to clip. Then steps 13 - 15 and you are done! You need to do all this every single time you want to make a new gif.
Now let me talk a bit more about some of the lines in this script:
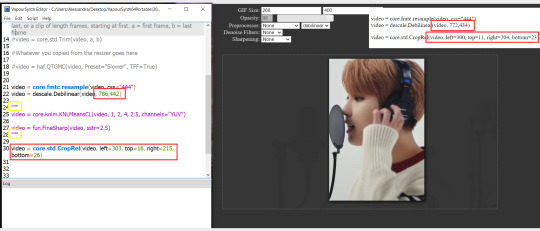
☆ line 14: #video = core.std.Trim(video, a, b)
this line is to set specific frames to trim your video section, your final encoded file will be only the frames inbetween the numbers you input here. a = first frame, b = last frame. you will need to run the preview option in VS in order to see every single frame of your clip and select your first and last frame. I usually do this in photoshop later instead so I don't bother with it on VS unless i'm making combined gifs, in which you need all the clips to have the exact same number of frames. the hashtag at the beginning of this line means that the script won't follow this command when executed. so if you want to include it, you need to remove the hashtag before encoding your file.
☆ line 18: #video = haf.QTGMC(video, Preset="Slower", TFF=True)
this line is for the preprocessor option in VS, that tool is mainly only used when giffing ts/tp files because you need to deinterlace them before you can use them on photoshop. so you will only need to remove the hashtag and enable it when giffing those types of files. when im giffing those files, i usually always keep it with this setting:

I don't really understand much about this so I never mess with it. If you want to know more, I believe there's more info about it in the tutuorials I linked at the beginning of my post.
☆ line 22: video = descale.Debilinear(video, 786,442)
this line is for the zoom of the video screen. you just need to match what you have in your VS script to what you end up with in your resizer.
☆ line 25: video = core.knlm.KNLMeansCL(video, 1, 2, 4, 2.5, channels="YUV")
this line is for the denoising filters, in my case I always use KNLM and this is what it's line looks like. I know you can change those numbers to change the filtering settings but I never messed with it so I'd usually just have it like that.
☆ line 27: video = fun.FineSharp(video, sstr=2.5)
this line is for the sharpening, in my case I always use FineSharp and this is what it's line looks like. I know you can change the number to change it's settings but I never messed with it so I'd usually just have it like that.
note: lines 25 and 27 (which have to do with denoise and sharpening) are the ones within quotation marks in your default script. I believe the quotations work in a similar way as the hashtag, in which the script only executes the lines when the quotations are removed. Which is what you do everytime you are about to encode your clip, otherwise they stay on. I think you should also remove them if you want to test how they affect your gif in the preview screen but i think these filters also require heavier graphic processing which my computer can't handle well so I never do that.
☆ line 30: video = core.std.CropRel(video, left=303, top=16, right=215, bottom=26)
this line is for the positioning of your video screen within the gif dimensions. you just need to match what you have in your VS script to what you end up with in your resizer.
ʕ •̀ o •́ ʔ
Photoshop (PS) - let's make a gif!
Now that we have clipped and preprocessed our video file, it's ready to go to photoshop!
☆ step 1) after you have opened PS, go to File > Import > Video Frames to Layers. Then choose the clipped file you created through VS.
PS should open a box like this:
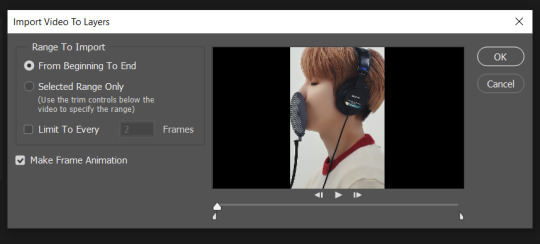
Keep those options ticked and hit OK
☆ step 2) now you need to go to Window > Timeline to bring up the timeline tool box. This window will always be necessary when making gifs. Let's take a look at it, I've marked down all the important buttons you will need:
timeline menu: there are several commands in here, you will need to use some of them later on.
convert to video / frame timeline
play controls to watch your gif
trash can to delete selected frames. (when deleting frames, first delete them here and then delete it's matching layers which are still there after deleting the frames)
frame delay time: this is where you set the time for how long that frame will be visible in your gif
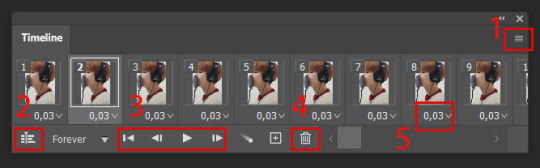
☆ step 3) remember how I mentioned the preview option in VS and how i don't usually use it to trim the frames of my clip? That's because I usually do that at this step of the process, in PS. Notice how each frame is also a layer, and when a frame is selected, the matching layer has the eye symbol next to it turned on. So now you should play your gif and see if there are any frames you don't want to keep, then delete the frames and it's matching layers.
Since we applied sharpening filters back when we were clipping the video on VS, your clip should probably already look pretty decent even before the next steps, so steps 4 - 9 are optional. The coloring part of my video has been sped up.
☆ step 4) click on the timeline menu and select "Select all frames", then go to the select menu at the top of the PS screen and select "All layers". Now click on button 2 of the timeline at the bottom left, switching from the frame timeline to the video timeline.
☆ step 5) before you do anything else, make sure the blue holder is at the beginning of the track before you do anything else. Then go to Filter (at the top of PS) and select "Convert for smart filters". This will convert all the layers into one single layer.
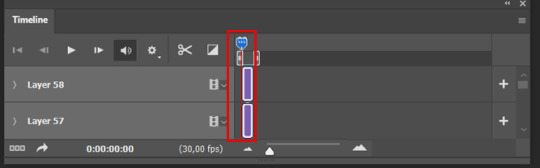
☆ step 6) now make sure the layer is selected, then go to Filter > Sharpen > Smart Sharpen. A box will open with several options:
I usually keep the amount to around 30, I don't touch on radius and you can also mess with reduce noise if you think your gif is looking too sharp. Hit OK when you're done.
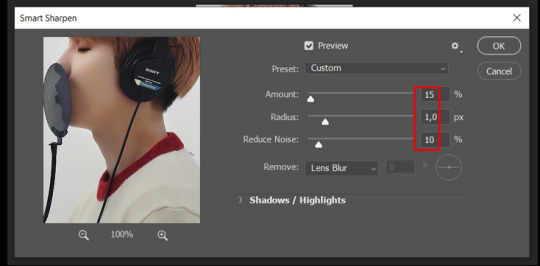
Since this is a filter applied to a smart object (the converted layer that contains all our layer - frames), this means you can turn this filter on or off as long as the layers are in the form of a smart object. You can also go back to it and alter it's settings (like I've done in my video down below)
☆ step 7) now while making sure the blue holder is still at the beginning of the track and the layer is selected, click on the timeline menu that i mentioned above. Then go to Convert Frames, then select Flatten frames into clips.
☆ step 8) again go to the timeline menu, Convert Frames, but now select Make Frames from Clips. Now click on the button at the bottom left of the timeline box, to convert the video timeline back into a frame animation. Then hit continue in the pop up box.
☆ step 9) now you are back to the frame timeline screen from before, but now the first frame is empty. You need to delete that first frame and then check the final frame because sometimes PS also creates another empty frame at the end at this point.
☆ step 10) PS also created a new layer under the layer 0, where the filter is still applied, you can delete this new layer as well. Now for organizational purposes, select all remaining layers (that contain your frames) and group them (you can see how in the video).
☆ step 11) This step is also optional, now I like to add the coloring to the gif. I have a separate tutorial exclusively on this topic. You can check it here:
☆ step 12) This is the time when I also add my signature. This is optional. You need to have the signature layer(s) on top of all the other layers. I usually have it in all black or all white, with lowered opacity of around 40%.
NOTE:
When adding elements (such as a signature) to a gif, it's important to always make sure you have the first frame selected, otherwise PS can move your newly added elements around the canvas on different and random frames. This also applies to anything in the layers pannel that has specific opacities. It's best to already add the elements with the final wanted opacity with the first frame selected.
Exporting + Delay time
☆ step 13) To export: go to File > Export > Save for web (Legacy). PS will open this box:
First I just use the exporting screen to test the delay time of my gif, and to check the gif's final size.
About the size:
The final size is displayed at the bottom left. Remember it needs to be under 10mb. If it's above that, then you will have to go back and delete frames and test again until the size is within the limit.
About the delay time:
To test the delay time, hit that play button and the gif will play at it's default delay time. If it's too fast or too slow, you will hit cancel and change the delay time (at the next step).
For actual exporting:
The highlighted box at the top right of the screen is very relevant now. Make sure the first box has the GIF option selected. At the next box, you can select either perceptual, selective or adaptive. I usually like to use adaptive. At the next box you need to choose either diffusion or pattern. I like to use pattern. Tick the transparency box and then select either pattern or diffusion transparency dither.
Once you are satisfied with all aspects of your gif, hit save to export your final gif.
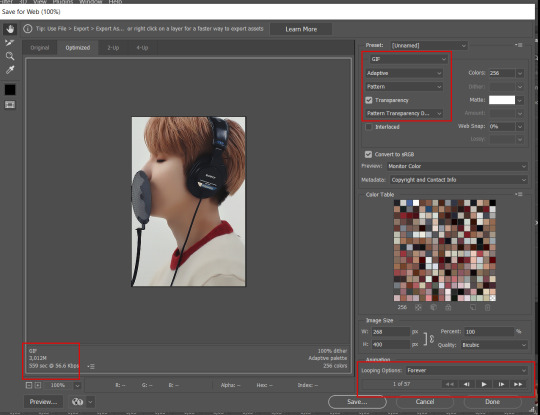
To fix the delay time:
After you have exited the export box, go back to your timeline, click on the menu button at the top right and select "Select all frames". Then, on any random frame, click at the small arrow next to the numbers under the frame. Select the option "Other". That will open a pop up box to alter the delay time. To test it again, use the export box explained above. Once you are satisfied, save your gif! I've also altered the delay time in my video to show you the process.
☆ step 14) After your gif is done and saved, I'd suggest to save your psd file if you added any coloring to it. This is so you can reuse the coloring later in other gifs without having to redo it all. This is useful if mking a set of gifs from the same moment / video.
Here's a detailed walk through of each PS step in this video tutorial:
youtube
I hope this tutorial is helpful! Feel free to send me any asks if you have doubts or need extra help! (つ≧▽≦)つ
183 notes
·
View notes
Note
Do you have any tips or guides on how to make gifs?
I do! Firstly, this guide here is probably the best guide I've seen for gif making. It's concise and easy to follow, and it's what I used to learn myself. They have a lot of resources as far as programs go, but I'll list what I use below. As always, never download and install anything from unknown sources without doing your own due diligence. Run everything through your antivirus and/or virustotal before installing always always always!
This is kinda long, so imma put it under the cut lol. Also note that I use windows (Win10), so things may not work the same way for mac or linux
Before you can actually make the gifs, you need a way to download high quality videos! I like jdownloader 2 because I find the interface to be user friendly, it gives you the option to download multiple elements (like srt files), and it works with more websites than lots of other video downloaders (and their user support is leagues better as well). My second choice is yt-dlp, which isn't necessarily more complex but might look a little more intimidating. Both are great programs, but a quick note about jd2: DO NOT download it from anywhere else but the link above. The developers package adware in all their installers EXCEPT for that one (I hate it too, and I think it's fundamentally unethical, but at least they're up front about it and they have an adware free version). Both methods automatically download the highest quality video available in your source link, so you don't have to worry about fiddling with that.
Now on to extracting frames! My method of choice is ffmpeg. It looks more intimidating than it is, and it's honestly the best way to extract frames imo. Like yt-dlp, it uses your computer's command console, which means you'll need the relevant command lines to run it. This tutorial is great to get you started, and it includes a command line for if you only want to extract frames from a specific part of your video. If you want to extract every frame from the entire video, you can either input the start and end times of the video into that command line, or you can use this version (I use both depending on what I'm doing):
ffmpeg -i "file path" "out-%05d.png"
Always make sure you're working with png files. To make quality gifs you have to start with quality images, and png files, unlike jpg, are lightweight and lossless, meaning you won't end up with compression artifacts and fuzziness
To get the file path for your video, select the file, then in the upper left hand corner of your window select home > copy path. It will copy the path in quotes, so replace the entire section "file path" with the path you just copied. Then copy and paste the entire line into your command console. The tutorial above says this as well, but be sure to create a folder for your frames, go into that folder and click the file path bar at the top of the window, then type "cmd" to open the console. This will ensure your files are dumped in that folder
So now you need a way to actually MAKE the gif. This is... a little more tricky. You can use gimp, I think, though it's certainly not my program of choice. You could buy PS but like... ew. OR you could do what I did and arr it. I use a portable version of CS6 that I downloaded literally a decade ago, and unfortunately the website I got it from isn't up anymore. I did a quick search and found this on reddit, but again, do your due diligence before downloading and installing anything!
Now I'll talk a little bit about my actual process. The actual process of making frames into layers into a gif I got from that first tutorial I linked. I took that process and made an action on PS so that I never have to do it manually again because I'm lazy and my memory is dogshit and I didn't want to have to consult a guide every time I wanted to do something lol. Everything else I learned through experimenting and my own experience as a photographer, so I encourage you to play around with everything to see what you like and what works for you
For coloring, I fiddle with levels, brightness/contrast, and color balance adjustment layers until I'm happy with how it looks. You can use curves instead of levels if you want finer control (or if you want to produce effects like matte), but levels works just as well and has a histogram right there in the panel, which makes it easier to adjust the exposure based on the image's actual data
For sharpening, I have a couple of custom actions I use. Here's what they look like:

The first one (bound to the F2 key) gives a smoother appearance, and I like to use it for kpop gifs where the subjects are already airbrushed and smooth without much texture, or wide shots where detail isn't super important
The second one (bound to the F3 key) is the one I use when I want to preserve texture in the image. Closeups of people where you can see their skin texture, or busy images with lots of detail benefit most from this one
The basic gist of it is, the "sharpen" filter does exactly what it says on the tin and it's usually all the sharpening an image needs, and the "surface blur" filter erases or dampens artifacting created by the sharpening filter. Sometimes I'll run the action twice, or use them both in combination to get the effect I want. Here's what the difference looks like in practice, featuring two very cute dudes:
F2 sharpening action


F3 sharpening action


You'll notice in the first two gifs, there's not much in the way of texture to preserve. Yoongi's skin is smooth and airbrushed, and the scenery is all metal and concrete shot with a wide aperture, which makes the background nice and blurry and smooth. In the second set, Jesse has facial hair and stubbly texture on his throat that I wanted to preserve, so I used the action with the lighter surface blur
My advice on all of this though, again, is to play around with it and see what you like! And if you have any more questions, feel free to ask! I'm by no means an expert, but I'll do what I can to help!
edit: oh, a quick note about speed! The tutorial I linked above mentions changing the delay to 0.05, and that's great for full speed gifs! But if you want them slow like my gifs above, I set the delay to 0.08. Sometimes I'll slow them down even more by setting the delay to 0.09 or 0.1, but any higher and you start to lose some of that smoothness
14 notes
·
View notes
Text
task force 141 + christmas wishlists
Characters: Simon "Ghost" Riley, John "Soap" MacTavish, Kyle "Gaz" Garrick, John Price, Alejandro Vargas, Rodolfo "Rudy" Parra
Warnings: none
A/N: ewww i have finals tmmrw

rodolfo "rudy" parra:
alright so i mentioned this in my stocking stuffers headcanon but we're gonna go in more depth here
rudy's christmas wishlist is really just legos
but like big, expensive lego sets
like i said then, he always compiles a big list of sets he wants each year
this year he's obsessed with the technic/vehicle sets
he got the vespa set for his birthday so that one was crossed off the list
and now he's looking to collect all the ferrari sets
last year he nabbed the ferrari 488 gte "af course #1"
and this year he wants the ferrari daytona sp3
he really likes the technic sets because their like a harder version of the normal lego sets
plus they're a lot more durable which is important to him
he has all his lego sets lined up on shelves around his apartment
and he already has a shelf of lego vehicles
which currently includes the ferrari 488, the vespa, and the lamborghini sián fkp 37 (he bought that for himself after he got a pay raise)
and ofc once he gets all his luxury cars/racecars collected, he plans on moving onto the classic cars collection
john "soap" mactavish:
alright so idk why this headcanon brings me so much joy but it does
but soap really really really wants a dirt bike for christmas
he rode one during a mission around summer time
and ever since then he won't stop raving about how cool it was
if we're being honest he wasn't that good at it
but honestly that just motivated him even more because now he wants one so he can get better at riding it
he wants to be able to do all those crazy flips and tricks they do
and he spends soooo much time researching bikes and watching videos of the tricks
he also doesn't even know when he would get the chance to use it
or where he would practice
since his house is not exactly near prime dirt biking terrain
but he insists he'll figure something out
his dream is definitely the yz250
he just thinks it looks so cool and sleek
but it's like ~$7000 so he doesn't have his hopes up
would definitely implode if he got it tho
john price:
alright so for christmas price really wants a weighted heated blanket
i mean can you blame him?
it gets pretty cold up in his cabin and he just wants to be able to be all warm and cozy
he honestly didn't even realize it was a thing until gaz told him about it
and now he won't stop talking about it
like he keeps hinting about how he wants it
saying things like "god it's cold in here, a nice heated blanket would be great huh?" or "my blanket is getting so thin, one of those weighted blankets would be insane huh?"
what can i say he really wants one
but he also doesn't wanna spend like $100 on one
which is why he's being so coy about it
besides a weighted heated blanket price wants cigars
i mean he always wants cigars but he wants them as a christmas gift this time
he wants really fancy ones that are really high quality
honestly his ideal holiday evening is him on the couch, with warm socks, a tea, a cigar, and his weighted heated blanket and a nice movie on the tv
simon "ghost" riley:
this year (and every year really) simon wants books for christmas
he's a fan of classic literature so he really just wants paperbacks of all the classics
paperback because it's easier to bring on missions
like i said in one of my past headcanons, i think simon was definitely an english literature major in college
so he definitely has a lot of books already
but let's be real you can never have too many books
the books on his wishlist this year include the metamorphosis by franz kafka, journey to the center of the earth by jules verne, and the picture of dorian gray by oscar wilde
okay we're gonna go off on a tangent here
but simon secretly wants to open up a bookstore when he retires
except, and this is gonna get kinda sad here, he knows it's ultimately just a pipe dream bc the chances of him retiring are really slim
yk since he's more likely to be killed in action...
but he still likes the idea of it in case he does make it out of the military alive
kyle "gaz" garrick:
alright so for christmas gaz wants new headphones and a speaker
gaz just lives his life with a soundtrack in the background what can i say
he loves listening to music whenever he can
whether he's working or training or in the shower
i like to think that he used to actually have a really nice set of earbuds
and he usually keeps them in one of the pockets of his uniform
but when he fell out of that helicopter he lost his earbuds
and he was absolutely devastated too because they were so nice
but this time around he wants headphones so that he can really take advantage of the noise cancelling feature
probably not the smartest option considering he's in the military but yk what sometimes gaz just needs a break from the outside and honestly who doesn't?
he also has a really nice speaker but then soap broke it
gaz had it next to him on the couch while he was watching tv or smthing
and then soap sorta hopped over the back of the couch to sit next to him
and then sat straight on the speaker
and since the couch at the base sucks and is therefore pretty hard
plus the fact that soap is probably like over two hundred pounds of muscle
the speaker really had no chance
so yeah gaz really just wants his music back for christmas
and off topic but he's into a lot of oldish hip hop/rap rn
like the notorious b.i.g., ice cube, 2pac, dr. dre
yk sorta like the classics
(im ngl idk if those are classics music genres confuse me)
alejandro vargas:
this year alejandro wants a ps5
maybe this is coming sorta out of left field but i feel like alejandro is lowkey a gamer
which ik doesn't make sense since we've established he's into self care and gamers never shower
jkjk no hate to any gamers im sure most of y'all have tolerable self hygiene
but yeah alejandro is actually super into video games
he has a lot of consoles but he didn't get the ps5 when it first came out so now he wants it
im gonna go off on a few alejandro video game tangents here so get ready
first off i think he and rudy played "a way out" together with no prior knowledge of the game
and so at the ending they were absolutely devastated
they also play overcooked a lot
and they let the other task force members play too
it's always interesting because alejandro takes it really seriously
and so he gets soooo stressed about it it's kinda amusing
also he's super good at super smash bros
and surprisingly he's not really a fan of first person shooter games (ironic i know)
it's just that he does that so much in real life he doesn't want to do it in games too
#bingoboingobongo.com#bingoboingobongo's christmas extravaganza#ghost x reader#soap x reader#gaz x reader#john price x reader#alejandro vargas x reader#rodolfo parra x reader#ghost fluff#soap fluff#gaz fluff#alejandro vargas fluff#john price fluff#rodolfo parra fluff#ghost cod#soap cod#gaz cod#alejandro vargas cod#rodolfo parra cod#john price cod#call of duty#cod#modern warfare 2#mw2
281 notes
·
View notes
Text
Sam LaRusso x Chubby!Reader NSWF Headcanons
OnlyFans AU ○ Fem!Reader
Request: i read ur demetri onlyfans hcs, and i was wondering if you could do something similar but w sam? <3

○ Sam is pretty nervous in the beginning, but some lingerie sets and a ton of kisses later, and she's having the time of her life. She likes the idea of showing off her lingerie because it makes her feel so confident and the making money off of pictures like that is more of an afterthought.
○ For some time, all she wants to do is post pictures because she's nervous to post more than that. No face shots at first, just body pics of her and Reader cuddling in lingerie with their tits pressed together; others include ass grabs and their necks covered in lipstick and hickeys.
○ She eases into the idea of videos slowly, starting with oral and moving onto using toys later on. She gets flustered in front of the camera the first time she uses a toy on herself, spread out on the soft bedsheets with the camera pointed at her cunt. However, as soon as she starts okaying with herself, she forget all about it and becomes very vocal.
○ She loves to hold the camera more often than not, especially if she has Reader between her legs or she's wearing a strap. She'll show off how she preps her strap, either with her own hand and a bottle of lube or Reader's mouth. Then she'll go nice and slow when pushing the dildo into Reader's tight cunt, making a whole show out of it.
○ Short but high quality videos of Sam fucking Reader roughly. They get comments about how people thought Sam was the sub, but are "pleasantly surprised" to see she doms. These are followed up with videos of Reader taking the lead the next time, scissoring the fuck out of Sam and making her a babbling mess with just rubbing their pussies together.
○ They'll do little photoshoots in sexy lingerie and costumes that people pick out. If they get a particularly big paying customer, they'll do whatever costume they want so long as it's within certain guidelines. They post teasing and steamy pictures in the outfits, but never fuck in them. They're more for show than for play.
○ Whenever they get a new toy, Sam likes to make a point that she used some of their onlyfans earnings to get it.
"It's all thanks you guys that I get to use this big, thick dildo on Reader tonight, so thank you."
○ Videos end with either lots of squirting or close up shots of creamy pussies. It's rewarding in of itself because Sam and Reader feel really proud that they get to show off just how good they make each other feel like that.

#samantha larusso headcanons#samantha larusso x chubby reader#samantha larusso smut#samantha larusso x reader#samantha larusso#sam larusso smut#sam larusso x chubby reader#sam larusso headcanons#sam larusso x reader#sam larusso#cobra kai smut thought#cobra kai smut#cobra kai#cobra kai headcanons#cobra kai x reader#cobra kai x chubby reader#cobra kai x plus size reader#chubby reader#plus size reader#wlw headcanons#gemini sensei
91 notes
·
View notes
Text
‼️ dear fob fan reading this ‼️

all of the results are below the cut, as otherwise this would be wayyy too long (warning ahead of reading: this is long but worth the read i promise)! Thank you again to everybody who participated in this, this year the census received double(!!) the amount of responses as it did previously!! i hope you all enjoy the results and find them as interesting as i do, lets get into it:
A couple small disclaimers before the results: due to some technical difficulties i had to make this whole post on mobile, and because of that had to deal with tumblr mobiles image limit! that's why some questions are paired with others even if there isn't a theme between them. Along with this, tumblr naturally ruined the quality of the images a bit, clicking on them helps if you wanna see more detail! hopefully these things don't disrupt the viewing experience too much! enjoy <3
Questions #1 + #2: Eras
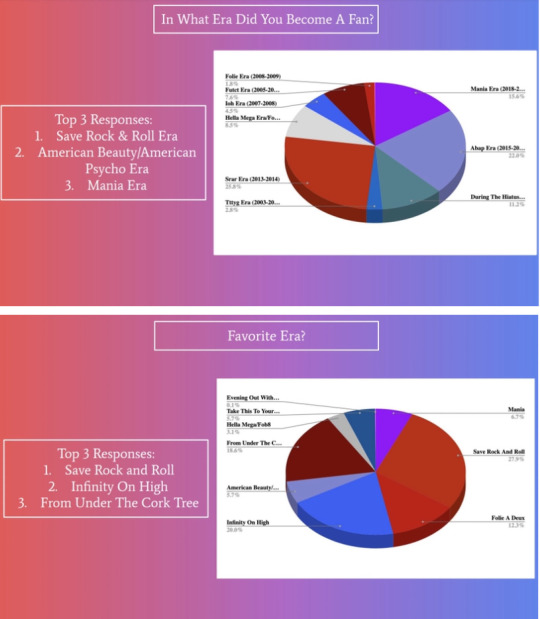
Question #1: Here it was asked what era you became a fan, and the era with the largest response was Save Rock and Roll, with just over a quarter of you all having become a fan in 2013/2014. The most notable thing to point out here is that over half of you become fans after the hiatus! With a good amount becoming fans (8.5%) in just the last couple years!
Question #2: This question was also about the era's of fob, but asking what your favorite era is personally. Coincidentally (or perhaps not 👀), Save Rock and Roll came out on top in this question too as a majority of peoples favorite era of fob (thus far).
Questions #3 + #4: Favorite + Best Album(s)
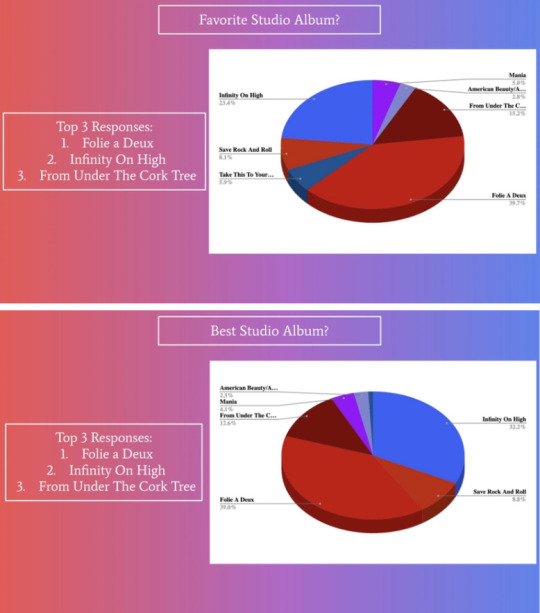
Question #3: Here you were asked to pick which album is personally your favorite, with Folie a Deux being over a quarter of respondents favorite album. This was not too shocking, as Folie came out on top the past two years as well. The love for that album is incredibly strong and unwavering!
Question #4: In this question, the distinction was made in asking which of fobs albums is objectively their best. Part of me knew to expect the answers would be the same as the last one, part of me wondered if maybe things would be shake up- they were not! The only thing that changed was slightly less people believing Folie is their best album, rather than it being their personal favorite (39.7% vs 39%)
Questions #5 + #6: Least Favorite and Worst Album(s)
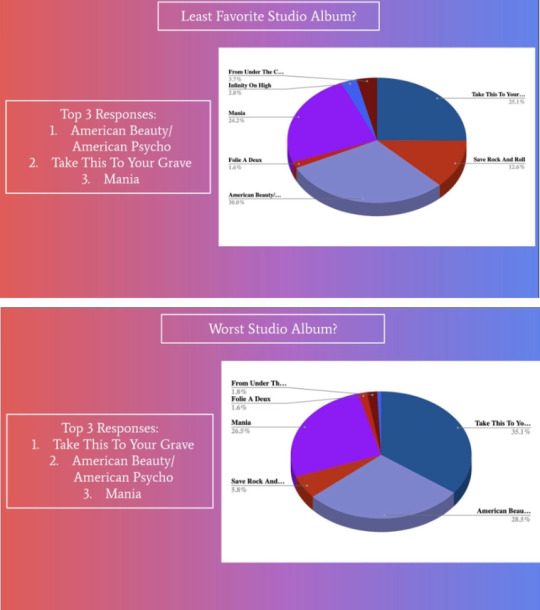
Question #5: Here you were asked the flip of question 3, that being which album is personally your least favorite. Here, the answers were not too shocking (but hurtful) to me as abap stan #1 with over a quarter of you all voting abap as your least favorite fob album. Notably, but perhaps not surprisingly, here is that all the albums people voted as their favorites had a Very minuscule amount of people saying they were fobs worst.
Question #6: Just as the last question, this one was a flip of question 4, and as questions 3 and 4, the top answers for these two were the same. However, the order partly flipped, with take this to your grave being considered their worst album, and abap and mania trailing close behind. Interestingly, despite a large majority of people considering folie their best album, it was not the album with the least votes here- Infinity on high is.
Questions #7 + #8: Eps and Music Videos
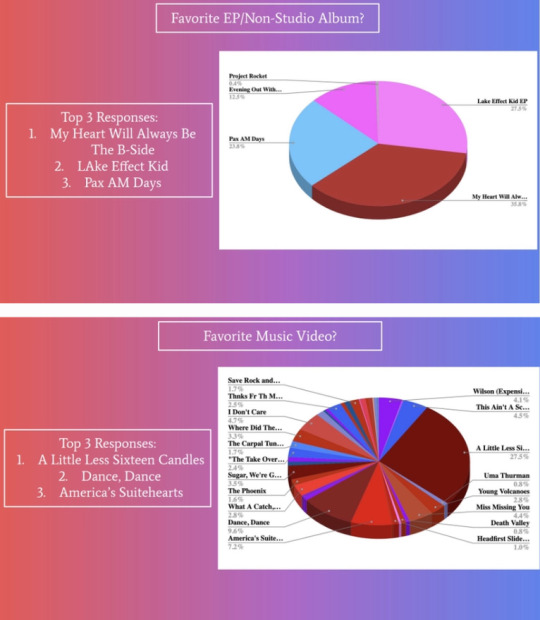
Question #7: Number 7 asked you all to pick which Ep of fobs was your favorite, with My Heart (etc etc) pulling ahead to be your #1 favorite. Interestingly here, this was the first year i included project rocket... And only 2 people picked it. Perhaps it will be the last time i include that option...
Question #8: Unrelated to the previous but they're together anyway lol, this question was a new one asking you all what music video is your favorite! Sixteen candles won by a relatively large margin, though several music videos got shown a lot of love. Essentially, despite there being a clear majority favorite, almost each of their music videos got at least one vote, which is pretty cool to me!
Questions #9 + #10: Your babygirls both fob and otherwise

Question #9: Though it goes without saying that we all love and support each member of fob very very much, we all have our special babygirl, and that was shown here. It appears that a majority of census takers are Patrick girlies (gnc), though each member got a large chunk of votes!
Question #10: Every year this question goes the same, with my chemical romance coming out on top as your guys' favorite fob related/adjacent artist. It feels this year the love for them was even stronger, which is interesting to me! Their resurgence can be felt even in other fandoms, like in this case, which is prettyyyy cool!
Questions #11, 12, + #13: First, Favorite, and Best songs

Question #11: This question made a comeback this year asking which fob song was the first you ever heard. I want to acknowledge that i included an option for can't/won't remember, as i understand that can be a difficult thing to remember sometimes! That answer, rightfully, came out as the second most answered option. However, i wanted to show the actual top songs, so just put those! Something else to note is the shocking wide variety of first songs for people! Very cool.
Question #12: Here you were asked for your personal favorite overall song, with probably no one being surprised that disloyal order came out on top, dominating any other song, as per usual! The love for Folie truly is so song, with 3 of the top 5 songs being songs from Folie.
Question #13: And here you were asked objectively what your favorite song is andddd... disloyal order won this one as well, perhaps rightfully so. Interestingly here, (coffee's for closers) dipped from the list where it was 5th in peoples favorites, being replaced by the ever so popular dance, dance! What a catch makes an appearance here too, maintaining a majority of the top 5 songs being ones from Folie.
Questions #14 +#15: Under and Overrated songs
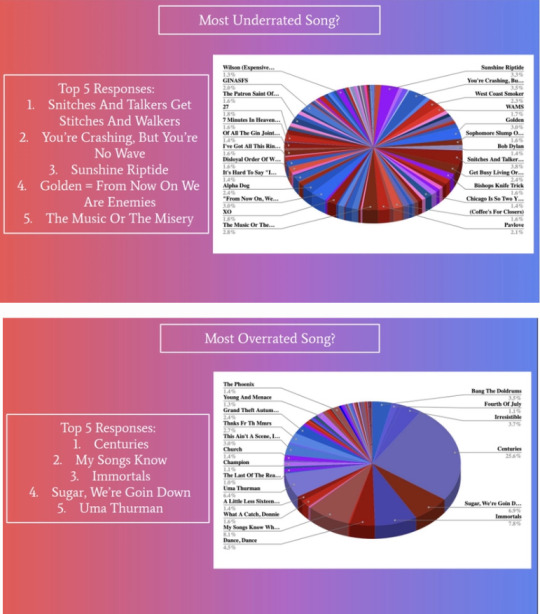
Question #14: One of my favorites to ask every year so far, this one asks which song you believe to be fobs most underrated. Surprisingly to me, Snitches came out as the most underrated. It was interesting to see which songs were chosen for this one, as I feel a lot more mania/posth songs were considered underrated, despite less often being considered favorites!
Question #15: On the flip side, this question asked what fob song is most overrated. Every year, the answers here are very consistent: centuries is their most overrated song. Abap is the album with the most overrated songs. In that way, one could consider abap the antihesis of Folie lmao
Questions #16: Seeing fob live
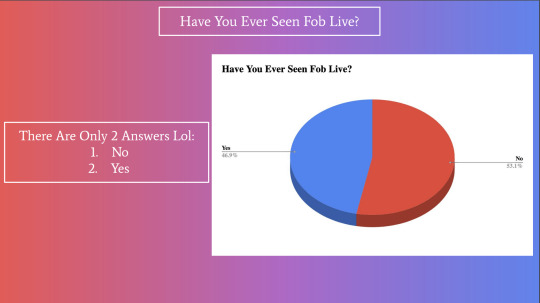
Question #16: Interestingly to me, last year the results were flipped with more people having seen them live than not. However this year, with some newer fans that previously, more people have not seen them than have. hopefully this changes soon!
Questions #17 + #18: This or That
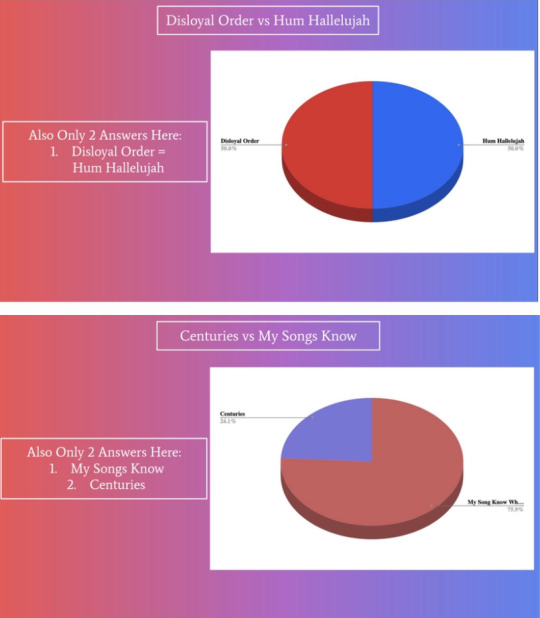
Question #17: Here, I took the top 2 answers for what your favorite fob song was and put them up against each other. The entire time the census was open, this was so so insanely close. A majority of the time, hum hallelujah was beating disloyal order. However, at the last minute, the two songs tied. So i guess we have to wait till next year to see the true favoritez
Question #18: And with this one, these two were the top two answers last year for the most overrated fob song. Centuries was absolutely decimated by My songs, truly solidifying this fandoms apparent distaste for centuries.
Questions #19 + #20: Album Covers and Lyrics
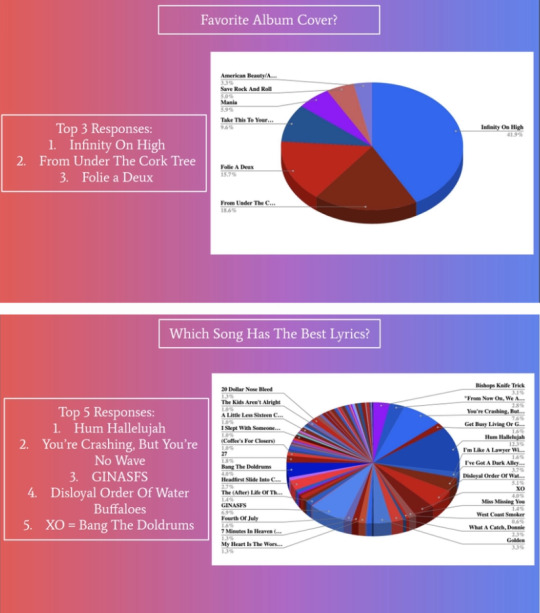
Question #19: A census first, this question asked which album cover is your guys' favorite cover. I was super interested to see how the results of this one came out, as i had my own perception of what i thought is their best cover, but really didn't know what everyone else thought. and infinity on high came out on top! (with me agreeing with that heavily)
Question #20: Last but certainly not least, question 20 asked you all to pick which fob song has the best lyrics. We experienced a tie here, with an interesting variety of songs here. Hum hallelujah, like it has in past years, came out as number 1! Interestingly, despite Folie being the fan favorite and alleged best album, only one Folie song is present here, with a majority of them being from Infinity on high!
And with that, the 2023 fall out boy census has come to a close. Once again, thank you all for participating in this and indulging me and my love for data and statistics lmao! i really do hope this is as enjoyable for everyone else as it is for me. i look forward to year 4 next year, as by then we'll have an entirely new album to add to the mix! mwah <3
I want to add lastly that if you have any further questions, data you wanna see, or general comments about this please feel free to come into my inbox and chat with me!! :D
#HELLO!!!!!! this was such a labor of love oh my god it's finally done#this took sooooo many hours of making the pie charts then the slides and writing everything up and cross referencing past data blah blah#was so fun though i genuinely love doing this so so much the results are always so interesting!!!!#i so look forward to being able to do this w new songs next year oughdhdj#txt#census.txt#fall out boy#fob#so much (for) stardust#love from the other side#patrick stump#pete wentz#joe trohman#andy hurley
224 notes
·
View notes
Last Seen Blogs
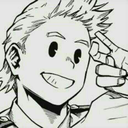
tsukimi-chan
?????

blftc
b̷̧̧̮̈͋ṙ̶̛̗̼̰̩͇̩̯̈́͝e̶̛̪̹̰͆͒̕à̵̘d

livingfreshfoodsusa
Microgreens
yokaidetectiveagency
Yokai Detective Agency of Darkness Falls

everythingoes
hiatus