#media queries css3 tutorial
Explore tagged Tumblr posts
Visit Tumblr Blog
Explore Tumblr blogs with no restrictions, modern design and the best experience.
Last Seen Tumblr Blogs


Fun Fact
Total funding amounts to $125.3M.
Text
HTML5 and CSS3 for Responsive Web Design: Tips, Tricks, and Tutorials

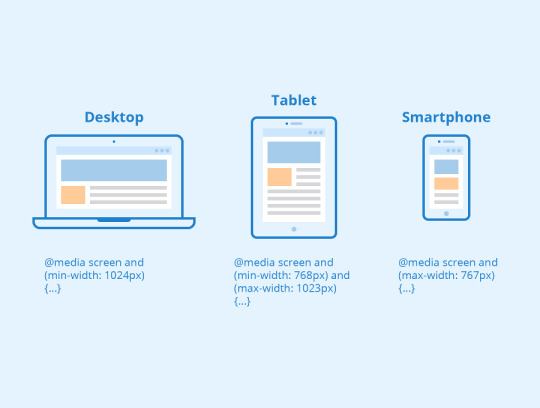
Creating a responsive website means your site will look great and work well on any device, from large desktop monitors to small mobile screens. In this responsive HTML5 and CSS3 tutorial, we will explore some key concepts to help you design a site that adapts to various screen sizes.
First, it's important to control the viewport settings. This tells the browser how to adjust the page dimensions and scaling. Setting the viewport properly ensures that your website scales correctly on all devices.
Next, design your website using flexible layouts. Instead of setting fixed widths, use percentages. This allows the layout to adjust based on the screen size. For example, if your content container is set to 80% of the screen width, it will automatically resize when the screen size changes, providing a consistent look across devices.
Images should also be flexible. Ensuring that images resize within their containers prevents them from breaking the layout on smaller screens. This can be done by setting the maximum width of the images to 100% of their container.
Media queries are essential for responsive design. These allow you to apply different styles depending on the screen size. For instance, you might want to change the layout for screens that are smaller than 600 pixels. Media queries enable you to do this by specifying different CSS rules for different screen sizes.
With these simple steps, you can start building responsive websites using HTML5 and CSS3. Remember, testing your design on multiple devices is crucial to ensure it looks and works perfectly everywhere.
For a more detailed guide, check out this comprehensive tutorial. Happy coding!
0 notes
Text

Learn to create responsive websites with this comprehensive HTML5 and CSS3 tutorial, covering flexible layouts, media queries, and best practices for ensuring optimal performance across all devices.
0 notes
Text
Build Responsive Web Design with Media Queries in 5 Minutes
Build Responsive Web Design with Media Queries in 5 Minutes
Responsive Web Design Top Secret to Build Responsive Web Design in 30 minutes 👍!! Website Hacks🙄 (Hindi) Did you check video on youtube? You can easily make your responsive web design with media queries code. Hope you would like this website, lets understand step by step. What is Responsive Design When we open any webpage in different devices like – mobile, tab, laptop and desktop, then the…
View On WordPress
#css media queries#css media queries in hindi media queries#css media queries responsive design#css media queries tutorial#media queries css#media queries css3 tutorial#media queries for mobile devices#media queries responsive web design#media queries tutorial#responsive web design#responsive web design css#responsive web design hindi#responsive web design html css#responsive web design html css javascript#responsive web design tutorial#responsive website#responsive website design#responsive website design html css#responsive website design tutorial#responsive website design using html and css#website ko responsive kaise banaye
0 notes
Text
Hiya! Just wanted to share some Web Dev learning course videos I found really helpful! They're all pretty long and full of content! These videos can be the foundation of your web development journey and be used as a reference! If you do decide to work through the videos, do remember to code along - the best way to learn is by doing and, with programming especially, creating projects as well to apply what you've learned!
Most of the videos, if not at all, cover things like:
HTML5
CSS3
JavaScript
Responsive Design + Mobile design
jQuery
GitHub Tutorials
Tailwind CSS fundamentals
React fundamentals
Node.js
Next.js and more!
Now, onto the videos themselves below!
Web Development Tutorials For Beginners playlist by LearnCode.academy [link] 💻
Covers: HTML5, CSS, JavaScript, GitHub, Responsive Design

Full Course Web Development [22 Hours] | Learn Full Stack Web Development From Scratch by Codedamn [link] 💻
Covers: HTML5, CSS, JavaScript, React, Tailwind CSS, React Query, Node.js, Next.js
Full Stack Web Development for Beginners by FreeCodeCamp.org [link]
Covers: HTML, CSS, JavaScript, Node.js, MongoDB
Introduction To Responsive Web Design by FreeCodeCamp.org [link]
Covers: HTML, CSS, Flexbox, Media Queries
Web Development In 2022 - A Practical Guide by Traversy Media [link]
Covers: HTML, CSS, JavaScript, Sass, PostCSS, TypeScript fundamentals, Testing, Databases, GrapghQL, WordPress, REST APIs, UI kits & Libraries, Moblie Development fundamentals, Web3
Front End Development Full Course 2022 | Front End Development Tutorial For Beginners by Simplilearn [link]
Covers: Git and GitHub, HTML, CSS, JavaScript, ReactJS, Angular
Learn Web Development from Scratch by Edureka [link]
Covers: HTML, CSS, JavaScript, Node.js, Express.js, MongoDB, TypeScript
┌── ⋆⋅☆⋅⋆
Well, that’s all! I hope the videos are helpful!! 😋
Have a nice day/night and happy programming 👍🏾💗
└── ⋆⋅☆⋅⋆
#xc: programming blog post#resources#coding resources#my resources#study resources#programming resource#programming#productivity#coding study#coding#learn to code#coder#computing#computer science#code#100daysofcode#100 days of productivity#projects#programmer#html#css#javascript#big data#node#project#learn how to code#how to code#100 days of code#codeblr
225 notes
·
View notes
Photo

Responsive menu design with media queries
#responsive menu#responsive design#menu css#menu media queries#media queries#responsive navbar#front-end development#web design#tutorial#css#html#css3#html5
0 notes
Text
Responsive design tutorial 2015

RESPONSIVE DESIGN TUTORIAL 2015 HOW TO
RESPONSIVE DESIGN TUTORIAL 2015 FULL
RESPONSIVE DESIGN TUTORIAL 2015 SERIES
By specifying particular rules in the CSS stylesheet, you will be able to define how the various elements of a web page will be displayed on the device, in this case, depending on the orientation of the device we use. orientation - it sets a vertical or horizontal orientation.Even in this case, you can still use the min and max prefixes. device-width/height - These properties set the width and the height of the rendering surface, that is, the width and height of the entire screen of the device and not simply of the display area of the document.width / height - With these properties, you can set the width and height of the display area including any scroll bar.There are many more valid properties associated with media queries. Thinking about responsive web design, there is a tendency to focus exclusively on the width property, but there quite a few other attributes to consider when designing for a variety of screen sizes. It includes the function to be evaluated (in this case, the minimum width of the browser window) and the corresponding value to test that the rule has been applied (in this case, a value of 500px). ( min-width: 500px) - The second part is the query itself.You might recognize this syntax from writing your own CSS styles, especially if you used this method before when designing printing options for your website. media screen - The first part of a media query is the type of support.Media queries are composed of two main parts: Let’s start by getting our hands dirty with media queries they represent one the most important tools that a web designer has to make their website responsive and mobile-friendly. One of the foundations or responsive design is media queries, which ultimately make the site accessible and usable by the largest number of users, including those who do not use recent versions of popular browsers such as Internet Explorer, Mozilla Firefox, and Chrome.
RESPONSIVE DESIGN TUTORIAL 2015 HOW TO
You’ll see how to implement some rules related to responsive web design, by applying what we have analyzed conceptually in prior articles.
RESPONSIVE DESIGN TUTORIAL 2015 FULL
You’ll learn how to take full advantage of modern web technologies, namely HTML5 and CSS3, applying them step-by-step to each component of your web content.The mockup of the website won’t be unique to one platform, and it’ll provide an example of the possible structure of a portal from several standpoints-imagining the view on three different devices: smartphones, tablets, and desktop PCs. You’ll learn how to create a responsive design mockup, taking into account the main features of a website, the users’ needs, and the way to effectively combine responsive graphics and web design.Let’s start with defining the objectives of this new series, and highlight what you’ll learn. Now it’s time to demonstrate some real-world technical applications of the responsive web design and build a real responsive website. Finally, we’ve explored the problem of cross-browser compatibility and proposed different ways to achieve it. We’ve covered some common problems that a web designer may encounter when managing responsive images (and pointed out potential solutions). We’ve explored the characteristics of four different layout types and their respective fields of implementation. We have explored the various measurement options for fonts in a website, and we’ve covered the best way to approach typography in terms of responsive web design. We’ve seen that there are many aspects to take into consideration throughout the responsive design process: screen size, operating platform, user behavior, and so on. Now, let’s set the stage for a more concrete work.
RESPONSIVE DESIGN TUTORIAL 2015 SERIES
In the last series (“ Understanding Responsive Web Design“), I defined the basic features of this new and important responsive approach to mobile-friendly, device-agnostic design.
0 notes
Text
What are Website Development Courses? - Elegant Training Institute
Website Development Courses refers to activities related to website functionality development. Websites are designed differently; three fundamental components conduct every interaction between a user and a website.
Client or Frontend: The local computer, device, or browser. The big challenge, in this case, is to make sure that a website functions precisely the same way on all browsers.
Server or Backend: Includes site code generation and database handling. The server is the remote computer that is being run “on the other side” and is responsible for site code generation and database handling.
Database: A web database is accessible from a local network or the internet instead of one that has its data stored on a desktop or its attached storage. Used for both professional and personal use, they are hosted on websites. They are software as service (SaaS) products, which means that access is provided via a web browser. For example, all account information of a logged-in user is being stored in the database.

Once the three fundamental components have been identified, it is easy to understand where web development lies in the entire process.
Why Learn Website Development Courses?
As digital literacy increases and everything goes on online from food delivery to shopping goes online, thereby increasing the need for web developers. Web developers build interactive websites for different businesses hence allowing the organizations to offer their services at a global level.
There are several reasons why web development:
There are always web development jobs available.
The job offers high income.
Work from anywhere since the only need is a laptop and an internet connection.
Freelance opportunities are available.
It’s creative and fun.
Best Web Development Courses
Let us now see some best web development courses Online which will help you to become a web developer:

Become a Web Developer by Elegant Training Institute
Elegant training Institute offers self-guided tutorials for beginners intended to learn the basics of web development programming. It provides an in-browser, self-contained development environment where you can learn the fundamental structures of front-end languages like HTML and CSS, before moving on to back-end languages such as Ruby on Rails and Python. This is the best web development course online available nowadays.
What will you learn?
1. Understand The Full Stack
Master the tools that front-end developers use, from HTML to React, plus server-side back-end JavaScript libraries such as Express.js.
2. Build A Web App
Go beyond a landing page. Build the back-end of a web application and even create your API.
3. Show Off Your Skills
Build portfolio-worthy projects while you learn, so you can show recruiters your skills and kick-start your career as a web developer.
Computer Programming by Elegant Training Institute
A beneficial learning site that covers a particular subject with detailed explanations. It features a variety of self-guided tutorials, with experts providing audio and video guidance on the topic. At the same time, interactive on-screen windows show the code and output the results during narration. It is also the best online web development course.

What will you learn?
Intro to JS: Drawing & Animation
Intro to HTML/CSS: Making webpages
Intro to SQL: Querying and managing data
Advanced JS: Games & Visualizations
Advanced JS: Natural Simulations
HTML/JS: Making webpages interactive
HTML/JS: Making webpages interactive with jQuery
The course introduces the essential tools necessary for every web page coder to know. The program begins with searching for the implementation of modern web pages with HTML and CSS. Next, you get to learn to code pages, rearranging components, and resize themselves automatically with changing screen size. You will be able to code up a web page that would be for both the devices i.e., desktop and mobile phone. Further, the course also gives an introduction to javascript, an incredibly powerful language of the web. Lastly, you would build a fully functional web application using Javascript that utilizes AJAX to expose server-side functionality and data to the end-user.
What you will learn:
1.HTML5
2.CSS3
3.Twitter Bootstrap Framework
4.Coding a Simple Website
5.Javascript
6.AJAX
Summary
Choosing a course from millions of courses can be a puzzling task. I hope my list of the mentioned above web developer courses online removes your confusion.
The learning web developer course is both fun and innovative. Moreover, the jobs in this field will not end soon as everyone wants to upgrade their business and go online on digital media to attract and cater more customers with their services.
For more details visit our website: Best Web development course
Contact: +971 54 749 5664
Address: Office Number 620, Al Attar Business Center, Beside Ibis Hotel, Al Barsha 1 Near Mashreq Metro Station, Sheikh Zayed Road, Dubai, UAE
Facebook: https://www.facebook.com/ElegantTrainingAE/
Twitter: https://twitter.com/EPMDTDUBAI
Youtube: https://www.youtube.com/channel/UCp9zBBZkcXWhQXVUYxBYXtQ
Instagram: https://www.instagram.com/eleganttraining/
#Web Designing Course#Best Web Deplopment Courses#Website Development Courses#Dot Net Online Course#SQL Server Course
0 notes
Text
How to do SEo
it guys we have it let's make it responsive now how do you do that well not as you can see it's my response you know not in not responsive enough anyway it doesn't look too good I might say and so what we want to do is create this layout right so we're gonna put the navigation on top of each other we're going to make this image the whole size we're going to put sidebars under content yeah and we have the footer here and only thing we want to do is make use of more of the space because here we only make use of 70% of the space you see it's 15% here 50% here field here we make use of 90% because on a narrow screen you want to make use of more so so we're going to go here and then start with media queries well media queries were quite simple and I explained it to you in the css3 tutorial how they work I think so you should you should know that they're quite easy to implement and well we're going to work now with way with a width of minimum width of 150 pixels and a max width of let's say 600 pixels yeah and then we're going to do that I plan I usually keep it like that so it's everything that comes inside it it's in the media equation basically what you want to do is take this a this whole code and you know transform it the body is usually the same so you know that you don't work on that in the links I want them to stay the same because well I want the page to be similar so what we're going to start is going to start with the body and we're going to take it here and you know look at it yeah so I want the body instead of 70% should be 90% as I told you now you can always see before we refresh it that we make use of more space than it was http://www.seoservicesdelhi.co.in/web-design-and-development-services/ before it's only 15 percent on each side so that's pretty much the only thing that we want to want to do with the body and it's very important to remember that if a variable is not changed or you do not want to change it it's a quite a bad practice to rename to name it here again and so that's why we're pretty much here we're going to we're going to delete this because it's the same clear:both is the same so we don't want it as you can see if we refresh the same nothing happens so yeah can always come back here and in for trouble work on the font size we might want it to be 90% it's a bit bigger as you can see or 95% because it's on mobile and you want to read it or can actually make it 100% you know it's it's a bit too big 9 90 95 % it should be fine that's not what I wanted to do yeah 95% should be fine yes and then we move on we go back up here what's the next will is the main header image we copy that we'll bring it here uh with as I told
1 note
·
View note
Text
What is Css in Website Design? What are the benefits of Css ?
This post will be useful for you if you are new to coding and site design, or if you have already learned HTML and are ready for the next step. As you browse the Internet, you may find that some sites are visually more appealing than others. If you are interested in becoming a web designer, the question is how a programmer can change the appearance of those pages using code. The answer to these questions is CSS or Cascading Style Sheets, which is the language responsible for the visual element of any website. What is CSS? CSS or Cascading Style Sheets is a programming language used to add color, layout and font to a website. CSS is a language that adds formatting and formatting to documents written in a markup language such as HTML. CSS is responsible for the beauty and visual appeal of a page. In addition to changing basic things like colors, fonts, and spacing, CSS is used to optimize pages for web design and to create other advanced images such as floating effects. CSS is not the content of a website, but its visual presentation. In fact, CSS is light, and HTML is its mainstay. How to create a web page? Before we get into CSS, let's define some terms. A web page is a simple text file that connects to the World Wide Web. When your browser enters the URL that the hosted page is accessing. A website is a collection of web pages hosted on a domain. Every web page is made up of three aspects: content, presentation and behavior. Content is basically the elements that make up a page. A collection of text, images, and titles make up content. Content is written in HTML (HyperText Markup Language). In fact, HTML is responsible for defining the content and structure of a web page. CSS can be written directly to an HTML document, but this is not recommended. Because CSS was created to separate content and presentation. This means that a similar HTML document can be created in many different ways. Web pages change depending on the user's page size. In fact, in the last few years, the growth of mobile traffic has increased so that now most of the Internet traffic is through mobile devices. This behavior describes both the user interaction with the web page and the animation in it. Behavior on a page is typically done by a programming language called JavaScript. Why is CSS important? In short, CSS is one of the most powerful tools for designing a web designer. Using it, you can completely change the appearance and user experience of a website. Some of the other benefits you will get from using CSS include: 1. Freedom to place HTML elements anywhere on the webpage, while allowing you to keep your markup (HTML) clean and tidy. 2. Possibility of different settings in how the browser displays a web page. 3. Endless customization options for a web page including font, color, border, hover effects and transition etc. 4. Ability to create, update and maintain styles for a large number of web pages at the same time. 5. Ability to use media queries and relative units to create web pages tailored to the user's screen size What is CSS used for? CSS allows web designers, developers, bloggers, etc. to make websites unique and attractive. CSS allows us to create different layouts for the page, adjust colors and fonts, add effects to images, and more. Although in the past it was possible to add style via HTML or CSS, the latest version of CSS3 is really expandable and allows for more creativity. But why do we use CSS? Finally, it makes our lives easier. CSS allows us to separate the presentation from the structure (HTML) into different files. This is done through an external style sheet using the css extension. Done. (This external style is most preferred because it is much more efficient when making changes.)
Benefits of CSS Separating CSS and HTML files has advantages such as the ability to share style across multiple web pages, reduce complexity, replicate HTML files, improve page load speeds, make global style changes across the entire web quickly and easily, and more. . The advantages of using CSS are as follows: The CSS programming language is simple, but highly customizable. CSS saves time. You can write CSS once and then reuse the same page in multiple HTML pages. You can define a style for each HTML element and apply it to the number of pages of your site. • Pages load faster. If you use CSS, you do not have to write HTML tag attributes every time. CSS formatting puts buttons in logical places, increases their chances of being clicked, and makes browsing websites easier. • Easy to maintain. You can easily apply the changes and all elements on all web pages will be updated automatically. CSS features are much broader than HTML, so you can give the page a better view than HTML attributes. • Multi-device compatibility. Provide content optimization for more than one type of device. Using the same HTML document, different versions of the website can be provided for devices such as desktops and mobile phones or for printing. • Meets global web standards. It is best to use CSS on all HTML pages to be compatible with future browsers.
A variety of CSS styles In the following, we will introduce different types of styles: Internal CSS: Also known as embedded. Internal CSS requires encoding the <style> tag in the <head> section of every page you cod. This style does not apply to the entire website. External CSS: This is usually the easiest way to maintain a website for a long time. All your CSS coding is stored in a separate CSS file, then applied to any page you want. Site loading time may also be improved with external style. Inline CSS: This style is a bit harsher for coders and needs to style each HTML tag. It can also be useful for minor changes and quick preview changes. Conclusion For starters, CSS is a great programming language to learn because it is easy to understand and there are many resources and tutorials available that show you how to use it. Almost all web pages and user interfaces written in HTML use CSS. If this article is useful to you, share it with your friends.
0 notes
Video
youtube
Neumorphism UI Button | Pure CSS Creating Simple & Easy Button Using Neu...
Neumorphism UI Button | Pure CSS Tutorial Creating Simple & Easy Button Using Neumorphism. Neumorphism Buttons || Creating Box Background For Buttons|| Hover Effect. In this video we will see that :- 1.) Neumorphism Buttons. OR 2.)Soft UI 3.)Hover Effect. 4.) Font Awesome 5 Free 5.) Desigining Social Media Icon. 6.) Box-sizing 7.) Box-shadow 8.) Using Translate Property in CSS. 9.) Translate 3D property in CSS.(transform) 10.) Flex Property. 11.) Border-radius Property . -------Click I Button At Top Right For Last Video Last intro video link :- https://youtu.be/BJcTHt5f9kY intro video link :- https://youtu.be/a0048jxjWQQ Here in this is create the buttons background container for the Buttons. Neumorphism is a new word for the new user interface trend.since this is a hard word to pronounce, some people also say SoftUI. Let us start with the root of the word "Neumorphism". it is a combination of two words :- Neu: New + morphic: a varient of Morphous, meaning having a specific shape or form. Today we will see how we can make Neumorphism effects with CSS. It is a very smooth ui effects that you can see in many website or app nowadays. Definition and Usage :- The flex property is a shorthand property for: The flex property sets the flexible length on flexible items. Note: If the element is not a flexible item, the flex property has no effect. Complete Neumorphism Design in One video :- https://youtu.be/vwEoYWftuc4 Color code converter link :- https://www.w3schools.com/colors/colors_converter.asp Follow this link to join my WhatsApp group: https://chat.whatsapp.com/EWB6UGLY8MX8nSn7pGgzLj Telegram Link :- #eazycodes(make code easier)🖥💻 https://t.me/eazycodes Follow this link to join me on Instagram :- https://instagram.com/insta_chourey?igshid=p0zire7pxm7u #eazycodes #neumorphism_Effect #hover_effect_neumorphic_buttons #Buttons #design #css3 #SoftUI neumorphism, css neumorphism, css effectsneumorphism effect, how to create a neumorphism effect,css, html,website,web design,website design, website development, neumorphism web, effect,smooth ui, ui design, ui,ux design, ui/ux, smooth effects, css smooth effects,box-shadow,shadow effect, css3,html5, web,how to,neumorphism css, soft css ui, css trends etc. For any queries Contact me on my Email:- [email protected] -----------Thanks for watching--------------------------- My Channel Link :- http://www.youtube.com/c/EAZYCODES ▌● Don't Forget To Subscribe ● ▌ 😀 Disclaimer: This Video is Just for educational purpose and does not have any intention to mislead or violate Google and YouTube community guidelines and policy. I respect and follow the terms & condition of Google & YouTube.
0 notes
Text
CSS Grid
This week was more focused on the css grid to make some new responsive design for all devices. This week also looked at a re design for the websites design before coding began.
What is the Grid
Css grid is a layout method that is in css, it is designed for the two dimensional layout of items on the web page. The grids support for Chrome, Firefox and Safari was shipped in March 2017. Edge took a bit longer to ship support waiting till October 2017 before support was finally shipped for the browser. The gird is defined by the css and not the html. The grid is used to create layouts that can be redefined by media queries and adapt to different contexts. The grid lets designers and coders place elements in the page where they want and where best suits the design. The grid allows for designers to not have to worry about compromise with basic structure and responsive design in order to work on the web page and things are less likely to over lap due to size changes die to each element having its own area in the grid which also allows the content sot scale for the devices width which is unlike html which allows some elements to overlap if this is required for the design.
There is a simple amount to know in terms of grid terminology. There is the Grid Lines, Gird Tracks, Grid Cell and the Grid Area. Below are the simple explanations for the grids terminologies:
Grid Lines: The grid lines are simply lines that make up the grid. The lines can be horizontal or vertical and they can be refereed to by number or by name in css.
Gird Tracks: The grid tracks are the spaces between the grids and again these can be horizontal or vertical spaces that are defined in the css of the website.
Gird Cell: The grid cell is the space that is created from 4 gird lines, the basic way to think of it is that its one of the squares that the grid makes up. This is the smallest unit that is available in the grid and this is where elements are placed into for the grid. Another easy way to view it is that its similar to a table cell.
Gird Area: The grid area is any area of the gird that is defined by four gird lines. This is similar to a cell but can be any four grid lines. Thinking of the smallest square as a cell and the biggest possible four sided square as the area is an easy way to look at it. The grid can contain multiple cells.

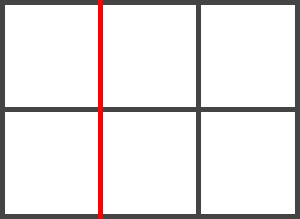
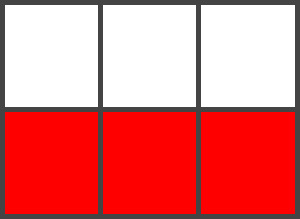
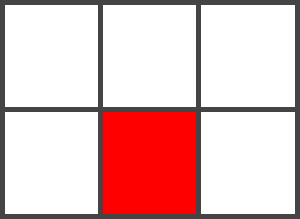
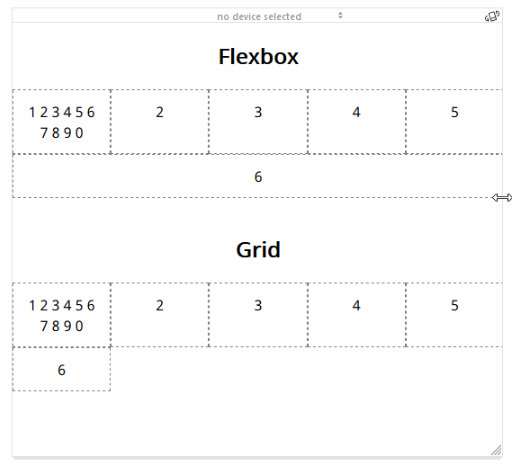
Grid or Felxbox with auto fill and fit
Gird and flexbox are similar ways of making design for the web. There are a few differences the biggest being that flexbox is one dimensional while grid is tow dimensional. The Gird is also container based while flex box is content based meaning that the size for a felx depends on the size of the content and how much it makes the container flex while the grid is container based meaning that the size is determined in the css tag so its more fixed. When using the CSS Grid one can use the repeat tag this will repeat a defined number of columns that are defined such as five columns with spacing of one. Using the min max property one can determine the width of the columns in the row after the amount one would like to show. The difference between using auto fit and auto fill can be seen below. With auto fit the Continent will stretch to fill the entire row but with auto fill the browser will empty the columns to occupy space in the rows.
https://gridbyexample.com/what/
https://dev.to/nunocpnp/css-grid-auto-fit-auto-fill-4hkh
https://www.webdesignerdepot.com/2018/09/grid-vs-flexbox-which-should-you-choose/
Media Queries
A media query is an html/css functionality that allows the elements of the page to scale and readjust to fit different sizes of screens for different media purposes such as viewing a site on a desktop, tablet or phone. This is considered a core technology for responsive design on the web and was implemented as a standard in 2012 along with CSS3 functionalists. Media queries of a media type and one or more expressions that will check for cretin media features mainly the size of a screen. The media query is always in a true or false state in the web browser the query is again always being alerted to media changes so that the second a window changes size it will turn from false to true activating a specific set of styles in the style sheet and when they are not required they are resulted to false where the main css can take over. The main website will be using the main css but other versions of the site for mobiles and tablets will be running on true states of the media query.
https://www.techopedia.com/definition/30449/media-query-responsive-web-design
Where to learn
This short paragraph will briefly describe where the best places to lar some basic web code are. The best place to learn anything it google there are countless forums and articles about certain subjects and people talking about how to do things, in terms of web there are loads of forms where people are more than willing to help out with problems with code and some people put their blogs up showing how to make something in code for free. The best place for video tutorials is of course YouTube, YouTube is similar to google in that there is almost certainly a video fro any topic with active comment sections for help. Videos may be better to learn as they can take people step by step on how to make something and its less alarming to look at a 20 minute video compared to a very long list of text on a blog.The last place to learn is lynda.com, the website is a combination of text and video where one can see a YouTube video with all of the subtitles in a paragraph below, this platform also gives access to all the files one needs and provides additional test or task for people to test themselves and really learn.
Re-Design for website
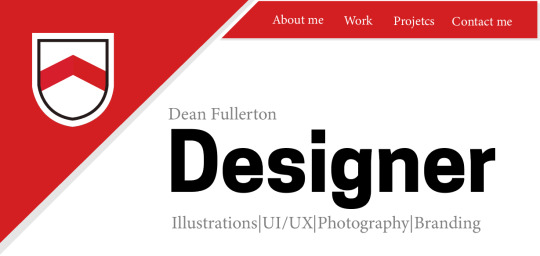
The original design for the website was a first attempt and with any design it was felt that it could be done better or in a way that made more sense. The original showcased the full shield in the centre but in the below image it was deiced to make the word fullerton more prominent as this is what was the key factor to the logo and brand. The colour scheme didn't change but the logo was split in half to not have the logo stacked with the font but more to one side so that the fullerton name would be the first thing the eye seen.

The next design was done in the attempt to create a more bright and modern look to the site. Using black bold text with a brighter colour that matched with the original red of the shield was created and was placed into more angular looking segments for the logo and buttons while the main title text sued the large amount of white space. The word designer was made more prominent as to make it clear as possible what the site was about and the segments had a small shadow behind them to add some 3D elements to the page. The shield was striped back and simplified as it was belied there was to much on the shield and that a simplified version worked more universally especially on mobile devices.
The third iteration of the design went back to using the full logo and tried to replicated the design entirely from the shield causing the white and red split to emulate the split of colours down the middle of the shield and of course the red and white for the family colours as well. The logo was place onto of ones name which was a higher opacity compared to the underlining text or sub headings highlighting what was on the site. The buttons where black and white to be visible on the two sides of the background and where on opposites sides of the shields, the other big additon was putting facebook and twitter links on the main sight in the bottom right corner so that they wouldn't obstruct the main design to much but they also follow the rule of attraction for the eye by being down there.

The final design for the website followed the desire to simplify things and using the very basic of what the user needed to know when they landed on the page. The biggest change was that the name “Fullerton Designs” took up much more space on the page and it was placed on a white background, the buttons where moved to the top and centred so they would be able to stay in the same spot but not be confusing as they wouldn't move or get in the way of page content. The logo was taken again and the crown was taken from the shield and placed on top of the Fullerton name as this replicated what the shield was doing by showing that the family name is what the logo was about and the idea with the shield was to replicate a strong and royal look to emulate the pride in the family name but also in the work but the crown on its own replicates that due to some of the thoughts people think of when they see a crown. The crown was tied with the shield by combing the colours and splitting them down the middle, the things that a person can find on the page were right below the logo and the social media was taken off the landing as this was meant to only serve as a landing for the site.

having the logo looking like this allows for the use of the crown icon to be used as a symbol for the brand and making it versatile as all the pages on the site can replicate the main logo by using this crown as seen below.

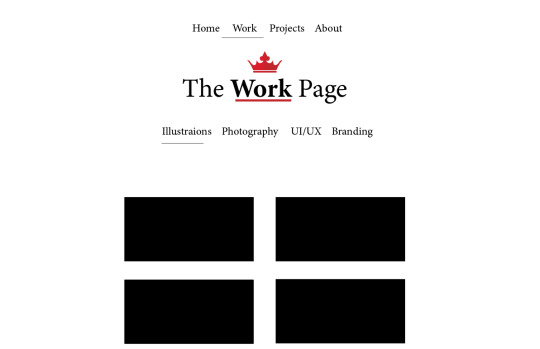
Below are the revised editions of all of the pages in this new design. The first being the work page. The design for the pages was to use a blog like look where the sides of the pages would use a lot of white space while the centre would be where all the content would be and for the work page the css grid would be sued to make a gallery of the best pieces of work that are current for oneself.
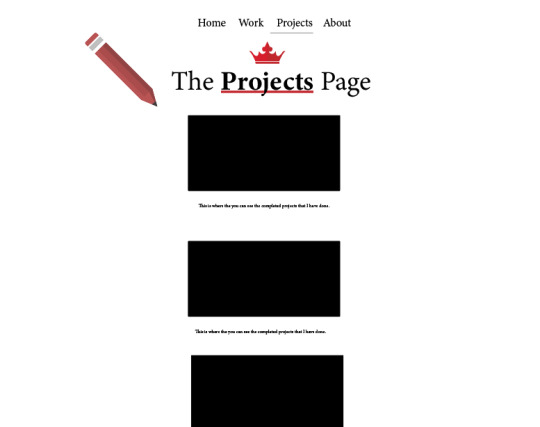
The next page after that is the projects page, the projects page follows the same layout of the work pages due to them being so similar, the main difference being that the projects are placed in a single row column rather than a two rowed column. The other piece of design is a pencil to symbolise the different page and adding some personalisation to it, this is still an element that may be discarded for the site. The actual projects pages again follow this single column style but they also use a gallery that can be clicked giving a brief description of the image and below this a more in depth explanation should the user want to read this. The white space allows for the project pages to be more about the project by making backgrounds that relate tot eh projects as can be seen below.
The last page is the about page which includes a simple description about oneself and highlight the main education qualifications that one possess and is doing but there is also a CTA in the form of a large button for the full download of the cv should someone want to see everything.
0 notes
Text
Coding Tutorial
Folder Organisation:
No use of uppercase letters.

Setup:
Languages:
HTML5 & CSS.
Webstandards:
www.W3.org

HTML Tags:
Keywords surrounded by angle brackets.
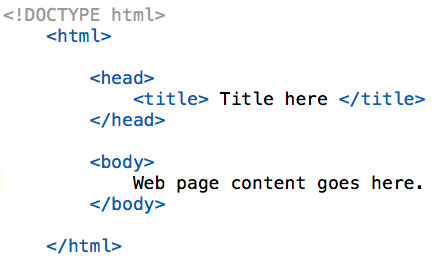
HTML Structure:
Doctype
<HTML>
<head>
(Behind the scene stuff)
Links to CSS, Javascript etc.
</head>
<body>
youtube
Headings:
<h1>
</h>
Nesting:
Placing one element inside another.
<u> <i> dolor </i> </u>
HTML Tags:
Bold vs. Strong
<b> </b> is just an aesthetic.
<strong> </strong> tells Google it’s more important text.
HTML Attributes and Values:
Provide additional information for a tag. These usually have a ‘value’.
<img src=“filename.jpg” alt=“image name”>
The src is an attribute and the value is the file name.
Every image should have an alt tag.

Links:
A hyperlink is a word, group of words or image that you can click on to jump to a new section.
<a href=“about.html”>About Us</a>
youtube
----------------------------
Linking HTML and CSS:
Provides styling to HTML elements. Both of these files need to be linked together.
<link rel=“stylesheet” href=“style.css”>

CSS Selectors: To customize HTML elements/tags in your website you need to ‘select’ it in the CSS and then apply a property/value to it.
youtube
What if I want one a different size? ID’s and Classes:
ID’s you can only use once, classes you can use as much as you want.
Designers Guide to CSS:
Div’s:
The DIV tag in HTML allows us to define a ‘division’ or ‘section’ in our website.
Box Model: This is done in CSS
Consists of margins, borders, padding and the actual content.
Adding Margins:
Adding Borders:
Floats:
Floats is a CSS positioning property. It allows you to sit elements horizontally/next to each other, which creates columns and your website layout.
Generally, you float left.
Pseudo Classes:
Creating links and special effects to some selectors. This most common applied is <a> this allows you to create a link in HTML and then apply a hover.
Border Radius: (CSS3)
By default, all elements have square corners, but with CSS3 you can make them rounded.
Vendor Prefix:
Prefixes or are a way for browsers to add support for new CSS features in an experimentation period. Incase they render out differently to what you wanted.
Lists:
Usually used for navigation.
Unordered vs. Ordered Lists:
CSS List:
Whether to apply the CSS to the list or the list item.
Nav Tag (HTML 5)
<nav>
Navigation List Elements Go Here
(Add list and links here)
</Nav>
Grouping CSS:
Giving the same properties to a number of selectors without having to repeat them by separating the selectors by commas.
*Add image here*
CSS Shorthand:
Can be used to reduce the amount of code you type. Reducing the file size of the CSS file by having less code.
Positioning:
Absolute: positioned relative to the element it is inside of (parent). If no such element is found, it will be positioned to the browser edges.
Fixed: An element with fixed position is positioned to the browser window, It will NOT move even if the window is scrolled.
Relative: Relative to its normal position. They can also contain absolute positioned elements.
Position Values: Once it has been set, you need to set where the element should sit on the page. To do this we have access to 4 properties.
Z-Index:
Specifies the stack order/layers.
CSS Transitons:
Transitions within elements in the HTML.
E.G. easing in and out/rotating.
If it is a one page website you need an anchor point.
<a href=“(Hashtag)projects>Projects</a>
<div id=“projects=>Project Content</a>
Sizing Images:
There are two ways to size an image depending on how much flexibility you need from your code.
Google Web Fonts:
fonts.google.com
Choose the typeface you want plus the different weight options you want.
Click+Button
Get Code.
NOTE: Web safe fonts need to be used as backups, there are 10 of these.
Have options and finish off with the original font you want.
See here for the list:
https://www.w3schools.com/cssref/css_websafe_fonts.asp
Centering Website:
You want to contain ALL of your code inside of a DIV.
Media Queries:
Part of the CSS3 spec and allow us to change stylesheets based on width and height.
The @media rule is used in media queries to apply different styles for different media types/devices.
Media queries can be used to check many things, such as:
width and height of the viewport
width and height of the device
orientation (is the tablet/phone in landscape or portrait mode?)
resolution
Using media queries are a popular technique for delivering a tailored style sheet (responsive web design) to desktops, laptops, tablets, and mobile phones.
You can also use media queries to specify that certain styles are only for printed documents or for screen readers (media type: print, screen, or speech).
In addition to media types, there are also media features. Media features provide more specific details to media queries, by allowing to test for a specific feature of the user agent or display device. For example, you can apply styles to only those screens that are greater, or smaller, than a certain width.
0 notes
Text
Responsive Web Design

Responsive website
Responsive web design has become a household term. A responsive website is must if you want to have a use friendly website as it provide users an optimal viewing experience. Responsive design enables your website to fluidly adapt to different screen sizes. The design automatically adjusts itself as per the screen size of the user, be it desktop or mobile. One can check if a website is responsive by resizing your browser window. The content is always optimized for the relevant screen resolution.
In the below image you can see how the images are properly scale to the size of the each window.

Why Responsive?
The world is not limited to the desktop computers. People are evolving and so is the technology. Mobiles, smartphones and tablets are in trend and they have shifted the internet usage from PCs to these handheld devices. You should ensure that you websites are compatible with these smart devices. It gives a positive viewing and browsing experience to the user.
This isn’t limited to the users, Google has started giving priority to mobile-friendly websites in its search results algorithm. As a result, the site analysis tools have also come up with a mobile configuration which analyse the compatibility of your website on mobile phones.
How to create a Responsive Website?
Now we know all about a responsive website. But the question comes, how to make a website responsive?

Responsive web design uses HTML5 and CSS3. So all you need is to have is the knowledge of HTML and CSS. Below are a few points that are important for you to know before creating a responsive website.
Layout : The first element to look out when building a responsive website is the layout. You have to create a responsive layout for your site keeping both mouse and touchscreen users in mind.
Media : Add media queries according to the W3C. It allows your website to look good on all kinds of display. You have to apply the code to your website to make the embedded images and videos responsive.
In any doubt, you can go for the tutorials that are easily available on the web. There are plenty of free and paid pre-designed themes and layouts in the market that does the work for you.
If you are not a designer buy nature then there are many companies which offer web design services in affordable price. It’s all up to you. You can avail the service from any of the responsive web design company to create websites which are made for every screen size.
Conclusion
A responsive website design is extremely important for growing your customer base online. If you want to have one site that is accessible for different devices, then responsive design is the right choice for you. Now you can yourself decide if you want to make different websites for different devices and write different codes for them or just a single site with single code to run your website on all devices.
Blog Source : http://findnerd.com/list/view/How-to-Create-a-Responsive-Web-Design/42343/
#responsive web design#responsive web design company#responsive website design#responsive webdesign#responsive design and development#responsive web design services#responsive website
0 notes
Link
Web Development - CSS3 - Scratch till Advanced Project Based ##elearning ##UdemyOnlineCourse #Advanced #Based #CSS3 #Development #Project #Scratch #Web Web Development - CSS3 - Scratch till Advanced Project Based Are you coming here after learning HTML and have absolutely no idea about CSS? Or Are you good at both HTML, CSS and just here to refresh the concepts? I've got you both backed up. Learn from Scratch till Expertise Welcome to this course on Cascading Style Sheets! This course provides enough knowledge to both Beginners and Advanced developers. I am sure you wouldn't be disappointed. When should you take this course? When you know HTML Basics. If you don't then check out my Free course on HTML on Udemy, and within hours you will be ready to take up this course. So that shouldn't be an issue. But Why ME? Why THIS course? What will you LEARN here? I have referred the top three resources for CSS and have compiled this course. I present you a complete package of learning and fun. We will start off with the Basics of CSS and then move on to the Advanced concepts like Gradients, Transitions, 2D Transforms, 3D Transforms, Media Queries that help you develop for Desktops, Laptops, Tablets, Mobiles using just one website. Then we will immerse ourselves in building an amazing Project Website STEP-by-STEP with no steps skipped. I will also provide the entire course code and the project code to you, so that you can rather concentrate on Learning the stuff, rather than typing the same code. Who will guide me throughout the course? Relax! I, Personally will be there to guide you throughout the course. If you have any doubts, feel free to message me or Post them in the Q&A Section and you can expect answers As soon as possible. Can I DOWNLOAD the videos and watch it on my phone? YES! All the videos of this course can be downloaded through the Udemy Mobile Application. You can watch them offline whenever you want. How long is the course Valid? LIFELONG. Buy now, study on your own pace and keep the course as your reference for your lifetime! Do I get a Certificate? YES! You get a Certificate for completing this course, I have structured the course with Quizzes and Videos such that the certificate is worth for Mentioning in your LinkedIn profile and your Resume. What if I didn't like the course? Get your money back within the first 30 days of your course registration. But, I guarantee you that this will never happen. ..... What else are you reading at?? Come , jump right into the course & have fun! Happy Developing! Regards, Tharun Who this course is for: Anyone who knows the basics of HTML Anyone who wants to learn Advanced CSS Anyone who wants to refresh their CSS skills Anyone who wants to add weightage to their Job Resume 👉 Activate Udemy Coupon 👈 Free Tutorials Udemy Review Real Discount Udemy Free Courses Udemy Coupon Udemy Francais Coupon Udemy gratuit Coursera and Edx ELearningFree Course Free Online Training Udemy Udemy Free Coupons Udemy Free Discount Coupons Udemy Online Course Udemy Online Training 100% FREE Udemy Discount Coupons https://www.couponudemy.com/blog/web-development-css3-scratch-till-advanced-project-based/
0 notes
Text
10 Awesome Sass Libraries You Should Know About
Sass is one of the most popular CSS preprocessors. It allows you to create programming logic to your code and take advantage of its great features like working with variables, mixins, functions, interitance and nesting. There are hundreds of Sass libraries, frameworks and plugins that are available and can save you a lot of time when creating your website.
In this article we are going to share with you a collection of 10 interesting Sass libraries that we think you should definitely check out.

Gridlex is a simple css grid system for creating modern layouts and submodules. It is easy to use, you just need to wrap your column (.col) elements in a grid container (.grid). It offers responsive designs, based on media-queries and supports nesting grids directly in a column.

This is a free and open-source highly customizable CSS button library createad with Sass. It offers a fast and easy way to add good looking and colorful buttons in your website. There is a large variety of buttons that you can choose from including flat, rounded, glow, 3D and many more.

Bourbon is a simple, lightweight Sass library that offers an easy way to create stylesheets for cross-browser use. It contains almost everything you need to create amazing websites - mixins, functions, and addons. The library is dependency-free and requires no configuration.

A Sass mixin library for creating minimal CSS3 cross-browser form input styles. It includes mixins for text, textarea, search, select, radio, checkbox, and button inputs. Sassy Inputs are customizable and fully keyboard operable.

Saffron is a simple Sass mixing library that offers a fast way to add CSS animations and transitions to your website. It is easy to use, all you need to do is include the mixin in the Sass declaration and set the variable for the effect you want to use. There is a large variety of animation and transitions available- fade in and out, slide in and out, shake, bounce and a lot more.

This is a lightweight and mobile-first CSS framework for creating amazing and responsive websites. It is only 10kb gzipped, and its responsive grid and modern components offer a fast and easy way to craft beautiful designs for all screen sizes.

A Sass mixin for creating angled edges on sections by dynamically encoding SVGs. It creates an svg triangle that is set as a background image, and you can use it's parameters to set the location, hypotenuse, fill color, height and width. It has support for all modern browsers - Chrome, Firefox, Safari, Edge and including IE 9+.
With Typesettings you can set your font-size in modular scale with Ems, vertical rhythm, and responsive ratio based headlines. It has 6px default baseline and maintains vertical rhythm with pixel based borders. Typesettings handles all the math for Ems and uses modular scale values to set font size.

This is a CSS framework based on material design. It is highly customizable and fully responsive. The framework offers a large selection of components like buttons, cards, forms, navbars, pagination and a lot more. It is compatible with Chrome, Firefox, Safari, Edge and IE 11+.

A Sass library that offers an easy way for writing media queries. It has a list of default breakpoint for phone, tablet and desktop, that can be customized the way you like. The library allows you to write media queries with em and rem units and create aliases for often used expressions.
Writing Sass in Bootstrap Studio
Bootstrap Studio, our powerful app for building websites offers an easy way to write and edit Sass files. The built-in code editor allows you to write and organize your code the way you like, fast and without much effort. What is more, the bstudio-sass helper utility automatically compiles your Sass everytime you save your code.
For a more detailed explanation you can check out the writing Sass in Bootstrap Studio tutorial at the Bootstrap Studio website.
Bootstrap Studio
The revolutionary web design tool for creating responsive websites and apps.
Learn more
via Tutorialzine https://ift.tt/2yyndnJ
0 notes
Link
The web design community is great at sharing knowledge. But quite often what we share has some prerequisites attached. You’d likely need to already be a web designer or developer to get something out of it. But what about beginners?
If you’re just starting your journey in web design, you may feel left out. With all of the expert tutorials out there, it can be hard to know where to begin. It’s not the lack of information that is limiting. Rather, it’s the sheer amount of resources that can muddy the picture.
Web design is a vast subject. There are just so many different technologies to learn and paths to take. But those first steps when starting out are universal.
And that’s our focus today. We’ll help to guide you towards becoming a web designer. Whether you want a professional career or to pick up a new hobby, there’s something here to get you on your way.
Learn HTML and CSS: The Foundations of Web Design
Both HTML and CSS have been around for a very long time. On that basis alone, it might be tempting to dismiss them. Yet, these languages have continued to evolve.
They are still the foundation of how websites are built. And a case could be made that they are as important as ever.
Semantic HTML5 structure is vital for things like search engine optimization. CSS3, meanwhile, helps to keep pages looking beautiful, lightweight and interactive. Both languages also play a huge role in accessibility as well.
While there are plenty of tools out there that will write markup and styles for you, it’s still important to learn how HTML and CSS actually work. They’re more intricate than any WYSIWYG editor can properly convey.
It’s this foundational knowledge that will help you plan and build a better end product. Understanding the likes of grid layouts, media queries and how HTML5 handles video are essential.
Don’t hesitate to dive in and learn all the things when it comes to these two.
Build and Maintain a Side Project (Or Two)
Creating a side project is one of the best ways to learn what being a web designer is all about. Not to mention that it can also be a lot of fun.
Pick a subject that you’re passionate about. Maybe it’s books, music or sports. Perhaps you want to build a community for other like-minded people. Whatever it is, jot down some simple goals for the project.
For example, think about how you want the site to look and what sorts of functionality you’ll need. What is it that you want to communicate with visitors? What actions should they take?
The great thing about this type of website is that you can go at your own pace. In fact, it’s often better to start small and enhance things over time. This will help you understand what it takes to maintain a website. You might even learn some lessons on how to build with the future in mind.
You’ll likely make mistakes and run into some roadblocks – but that’s part of the fun. It’s real-world experience, but without the pressure of working with clients.
Experiment with Systems, Frameworks and Apps
When you’re first starting out in web design, it’s tempting to simply go with the most buzzed-about items. That means signing up to work with the most popular CMS, the can’t-miss JavaScript framework or that shiny new code editor.
And it’s certainly okay to go down that path. But there is so much more to do and see. Putting yourself in a bubble right from the start isn’t necessarily the best thing for professional growth. Besides, if you only ever use one particular tool, how do you know what separates the good from the great?
Take some time to try out different tools, whether on a project or just for curiosity’s sake. The experience you’ll gain will help you to develop your niche over time.
Plus, having experience with a number of apps, frameworks and systems could come in handy. When it comes to technology, nothing lasts forever. The more varied your expertise, the better you’ll be able to roll with the changes.
Be Kind to Yourself
If you pay much attention to the web design community, you’ll undoubtedly come across the “rock stars” of the trade. These are the folks who look like they have it made. Their portfolios are full of high-profile, jaw-droppingly gorgeous projects. And they’re often thought leaders in the industry.
While seeing what these great designers are doing can be inspirational, it can also have the opposite effect and lower your confidence. Imposter syndrome is a real thing. The secret is that just about everybody feels this way at one time or another – even the glitterati.
Therefore, don’t be too hard on yourself if you run into difficulties. Whether it’s a bit of code that’s driving you mad or trouble grasping a concept, stick with it. Understand that struggles come with the territory and that hard work can pay off.
Most importantly, don’t feel that you have to measure up to anyone else. We’re all on our own journey and yours is unique.
Enjoy the Opportunity to Grow as a Designer
Taking the first steps towards becoming a web designer is an exciting, if uncertain, time. But even if you don’t fully know what you’re doing just yet, learn to embrace that feeling.
The truth is that you may feel that way again and again as you learn new tools and techniques – even years from now. Learning new things is a key part of the experience. So much of it is a trial-and-error process, but you’ll be better for having gone through it.
Find joy in the opportunity and don’t be afraid of failure. Now, boldly move forth into the world of web design!
0 notes