#react js for frontend
Explore tagged Tumblr posts
Visit Tumblr Blog
Explore Tumblr blogs with no restrictions, modern design and the best experience.
Last Seen Tumblr Blogs


Fun Fact
Tumblr Inc. is funded by 13 investors.
Text
React can help you build a responsive and seamless user experience for web development. You can create intuitive user interfaces on a range of development platforms with React, a JavaScript framework that is incredibly adaptable. React is one of those technologies that you can learn and use quickly across many platforms.
0 notes
Text
let today = new Date("12 December 2023");
Hey coders!
The past couple of months I've been a frontend developer intern at an e-sports company and it's been so amazing! I am realizing that yeah, this is exactly what I want to do! I feel super lucky.
Anyway, today, and for the past like week, I have been struggling with implementing the multiselect from react-select in a form we are building in my team. It's a very complicated field, where you can choose from different lists, with values that need to be replaced and disabled depending on which list you are choosing from and what has already been chosen, so just getting the logic right was tough.
Today I got it working, only to realize I can't style it without all the functionality breaking. Feeling like I've tried everything, I was like: you know what? Fuck it, I'm just gonna make my own. Sooo here I am!
This is the inspo (from react-select):

And this is how far I've gotten(using our on-brand styles):

Anddd here's my (non funcitoning) code:
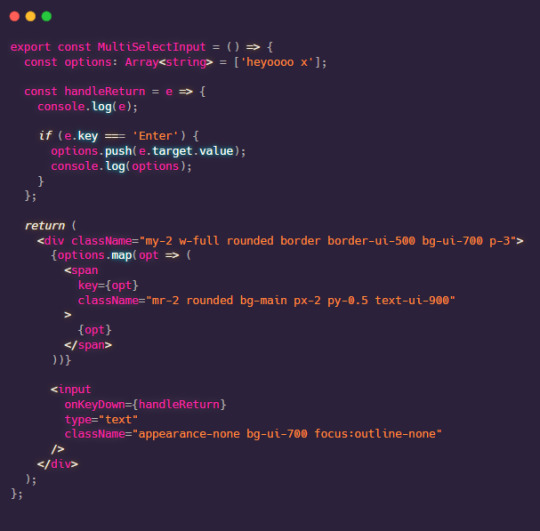
To break it down:
I have a div that contains a span (which will be rendered from an array of options, to be the yellow chip) and an invisible input field
The div is styled to look like an input field, but in reality it's just a div with spans and an invisible input field following the span (lol special thanks to this stack overflow thread)
When the user types, I am listening to what keys they are pressing with a function I am currently calling handleReturn
If the pressed key is "Enter", I will push the current value of the field to the options array
But! This does not do anything at the moment, since the options array does not tell the component to update itself in any way to display the newly added value! For that, I need to make the options array be a state using the useState() hook from React!
When a state is changed, react's useState can tell, and it will rerender (=update) the component, and then my new value will (...should) be shown as well, since it will be using the new array with new values!
Stay tuned for updates(:
#codeblr#react.js#react#reactjs#frontend#frontend developer#web development#compsci#stem#woman in stem#coding#programming#css#html#javascript#js#software engineering#typescript
17 notes
·
View notes
Text
Node.js in Web Designing: A Game-Changer

#nodejs#css#html#javascript#reactjs#programming#python#angular#php#webdeveloper#java#webdevelopment#coding#developer#vuejs#jquery#js#programmer#software#webdesign#react#mongodb#laravel#softwaredeveloper#android#code#mysql#coder#webdesigner#frontend
1 note
·
View note
Text

React Js Training in Electronic City Bangalore
🔥 Dive into the world of React JS with eMexo Technologies in Electronic City Bangalore! 💡 Take advantage of our exclusive offer: Get a flat 30% discount on course fees for a limited time! Don't miss this opportunity to level up your skills and kickstart your journey as a React JS developer with us! 🚀
Course details: https://www.emexotechnologies.com/courses/react-js-certification-training-course/
🌟 Why Choose eMexo Technologies?
Expert Trainers🧑💻
Comprehensive Courses📚
Hands-On Learning💻
Flexible Learning Options💡
Placement Assistance💼
Cutting-Edge Curriculum🛠️
Real-time projects✨
Affordable Pricing🚀
For more info👇
📞 +91 9513216462
🌐 https://www.emexotechnologies.com
#react js course in electronic city#react js training in electronic city#react js#react#frontend#certification course#bangalorejobs#emexotechnologies#electroniccity#bangalore#traininginstitute#course#software development#webdevelopment#career development#techeducation#Ittraining#itcourse#it jobs#it training institute
0 notes
Text
What are the LifeCycle Components in React JS
Understanding the Significance of Lifecycle Methods in React JS
React JS, a powerful JavaScript library for building user interfaces, stands out for its declarative and efficient approach to development. One of its key features that contributes to its efficiency is the use of lifecycle methods. These methods allow developers to execute code at specific phases of a component's lifecycle, providing greater control over the behavior and appearance of the application. In this article, we'll delve into the importance of lifecycle methods in React JS and explore how they contribute to the seamless development of robust and interactive web applications.
1. Initialization - componentWillMount()
The first phase in the lifecycle of a React component is the initialization stage. Here, the componentWillMount() method is invoked just before a component is rendered for the first time. Developers often use this method to perform tasks such as setting initial state values or making API calls that fetch data essential for rendering. It provides a perfect opportunity to configure the component before it appears on the screen.
2. Mounting - componentDidMount()
Once a component is successfully rendered, the mounting phase begins, and the componentDidMount() method is triggered. This method is particularly valuable for actions that require access to the DOM or involve interactions with external APIs. Common use cases include initializing third-party libraries, setting up event listeners, or fetching additional data post-render. It ensures that the component is fully loaded and ready for user interaction.
3. Updating - componentDidUpdate()
As user interactions trigger changes in the application, React enters the updating phase. During this phase, the componentDidUpdate() method is called after a component's state or props are modified. This method is essential for handling tasks like updating the DOM based on new data or interacting with external APIs for additional information. Developers can manage side effects and keep the application state synchronized with the user interface.
4. Unmounting - componentWillUnmount()
When a component is removed from the DOM, the unmounting phase begins. The componentWillUnmount() method is invoked just before the removal. It provides an opportunity for developers to clean up resources, such as clearing intervals, canceling network requests, or unsubscribing from external event listeners. Properly managing resources during unmounting prevents memory leaks and ensures efficient use of system resources.
5. Error Handling - componentDidCatch()
React introduced an error boundary concept to handle errors within components and prevent them from crashing the entire application. The componentDidCatch() method, which is part of the error boundary lifecycle, is invoked when an error occurs in any child component. Developers can use this method to log errors, display fallback UIs, or perform other actions to gracefully handle errors and maintain a smooth user experience.
6. Should Component Update - shouldComponentUpdate()
React provides a performance optimization method called shouldComponentUpdate(). This method allows developers to control whether a component should re-render based on changes in its state or props. By implementing this method, unnecessary re-renders can be avoided, improving the overall performance of the application. It is particularly useful when dealing with complex components or when optimization is crucial for a smooth user experience.
Certainly! Let's explore a few more important aspects of React JS lifecycle methods:
7. State Initialization - getDerivedStateFromProps()
Introduced in React 16.3, getDerivedStateFromProps() is a static method that allows a component to update its state based on changes in props. This method is invoked before every render and is useful for scenarios where the state depends on incoming props.
8. Controlling Updates - shouldComponentUpdate()
While mentioned earlier, it's worth emphasizing that shouldComponentUpdate() plays a crucial role in optimizing performance. By returning false when unnecessary renders are to be avoided, developers can prevent components from re-rendering, leading to more efficient applications.
9. Snapshot Before Update - getSnapshotBeforeUpdate()
In the updating phase, just before the changes are committed to the DOM, getSnapshotBeforeUpdate() is called. This method receives the previous props and state and is often used to capture information from the DOM before it gets potentially changed. This information can then be used in the componentDidUpdate() method.
10. Error Boundary - static getDerivedStateFromError()
When an error is thrown during rendering, the static getDerivedStateFromError() method is invoked. This allows the component to render a fallback UI and also provides an opportunity to log the error information. It's an essential part of the error boundary concept introduced in React.
11. Performance Optimization - React.memo()
Though not a lifecycle method, the React.memo() higher-order component (HOC) deserves mention. It helps in memoizing functional components, preventing unnecessary re-renders if the component's props remain unchanged. This can be particularly useful in optimizing functional components for better performance.
12. Hook Equivalents - useEffect()
With the introduction of Hooks in React, certain lifecycle methods have their functional counterparts. For example, the useEffect() hook serves a similar purpose to componentDidMount, componentDidUpdate, and componentWillUnmount. It allows performing side effects in functional components, further enhancing the flexibility of React development.
13. Concurrent Mode - startTransition()
In Concurrent Mode, a new set of methods like startTransition() has been introduced. This method allows developers to prioritize updates, ensuring that less critical updates don't block more important rendering tasks. This is part of React's ongoing effort to make applications more responsive and adaptable to varying workloads.
14. Context API - useContext()
While not a direct lifecycle method, the introduction of the Context API and the useContext() hook has changed how components consume and share state. It provides a cleaner way to handle state at a broader application level, reducing the need for prop drilling and simplifying state management.
Understanding these additional nuances of React JS lifecycle methods and related features empowers developers to make informed decisions, optimize performance, and embrace the evolving best practices in React development. As React continues to evolve, staying familiar with these features ensures that developers can make the most of the library's capabilities.
Conclusion: Enhancing Control and Efficiency
In conclusion, understanding and leveraging React JS lifecycle methods are essential for developers seeking to build scalable, efficient, and maintainable web applications. Each method serves a specific purpose in different phases of a component's lifecycle, providing opportunities to initialize, update, and clean up resources. By harnessing the power of these lifecycle methods, developers can exercise greater control over their applications, optimize performance, and create seamless user experiences. React's lifecycle methods, when used judiciously, contribute significantly to the library's reputation for building robust and dynamic user interfaces.
0 notes
Text

Fetch data from api and show in table with jquery dataTable plugin.
#react#react js#jquery dataTable plugin#fetch data from api#fetch data from api and show in table#get data from api and show in table#javascript#frontend#webtutorialstack
0 notes
Text
#phpexpertise#react#react development#react developer#frontend developer#react js#react native#react interview questions#react js tutorial#react tutorial#react js interview questions#react bootstrap#frontend react#frontend react developer#frontend react interview questions#senior frontend react interview questions#react hooks interview questions#react hooks#react lifecycle methods#state vs props#storybook#components
1 note
·
View note
Text
A Comprehensive Guide to Flutter Development Services and Front-End Development Services

In today's fast-paced digital landscape, businesses are constantly seeking efficient and effective solutions for their software development needs. Two popular services that cater to these requirements are Flutter development services and front-end development services. In this comprehensive guide, we will delve into the details of each service, discussing their features, benefits, and the role they play in modern application development.
Flutter Development Services:
Flutter development services offer a range of advantages for businesses and developers alike:
1. Hot Reload and Fast Iteration:
Developers can make changes to the code and instantly see the results without the need to restart the application. This feature greatly enhances productivity and accelerates the development process.
2. Expressive and Customizable UI:
Flutter provides a rich set of pre-built widgets and a flexible UI framework, enabling developers to create visually appealing and highly interactive user interfaces. Additionally, Flutter allows for custom widget creation, ensuring that the application's design matches the business's branding and unique requirements.
3. High Performance:
Flutter apps are compiled directly into machine code, which enables them to deliver near-native performance. Flutter leverages the Skia graphics engine and hardware acceleration, resulting in smooth animations, responsive interfaces, and excellent overall performance.
4. Access to Native Features and APIs:
Flutter allows developers to access platform-specific features and APIs by utilizing plugins. This ensures that developers can leverage the full capabilities of the underlying platform while building their applications.
Front-End Development Services:
Front-end development services focus on the creation and implementation of user interfaces (UI) and user experiences (UX) for web and mobile applications. Skilled front-end developers play a crucial role in building visually appealing, intuitive, and user-friendly interfaces. Here are some key aspects of front-end development services:
1. Web Development:
Front-end developers utilize HTML, CSS, and JavaScript to build responsive and interactive web interfaces. They ensure that the website is visually appealing, accessible, and optimized for various devices and browsers. Front-end frameworks like React, Angular, and Vue.js facilitate the development process by providing efficient tools and reusable components.
2. Mobile App Development:
Front-end development services extend to mobile app development as well. With frameworks like React Native and Flutter, front-end developers can create mobile applications using their existing web development skills. They focus on designing and implementing the UI components and ensuring a seamless user experience across different mobile devices.
3. User Experience (UX) Design:
Front-end development services often include UX design expertise. UX designers collaborate with developers to create wireframes, prototypes, and design mockups that align with the client's requirements and provide an optimal user experience. They focus on usability, accessibility, and overall user satisfaction.
4. Responsive Design and Cross-Browser Compatibility:
Front-end developers ensure that websites and applications are responsive, adapting to different screen sizes and orientations. They also conduct thorough testing to ensure cross-browser compatibility, making sure that the application works consistently across various browsers and platforms.
5. Performance Optimization:
Front-end developers optimize web and mobile applications for performance by minimizing file sizes, optimizing code, and implementing techniques such as lazy loading and caching. They aim to deliver fast-loading pages and smooth user interactions.
Benefits of Flutter Development Services:
1. Single Codebase, Multiple Platforms: With Flutter, businesses can develop applications for multiple platforms, including iOS, Android, web, and desktop, using a single codebase. This significantly reduces development time and costs compared to building separate applications for each platform.
2. Hot Reload for Rapid Iteration: Flutter's hot reload feature allows developers to see the changes made in the code instantly on the emulator or device. This feature facilitates quick iteration, bug fixing, and experimentation, enhancing developer productivity and reducing development time.
3. Native-like Performance: Flutter apps are compiled into native code, resulting in excellent performance and responsiveness. Flutter leverages the Skia graphics engine, which enables smooth animations and delivers near-native performance, giving users a seamless experience.
4. Expressive and Customizable UI: It provides a rich set of customizable widgets and a flexible UI framework, enabling developers to create visually stunning and highly interactive user interfaces. This allows businesses to deliver aesthetically pleasing and engaging applications that align with their brand identity.
5. Access to Native Features and APIs: It allows developers to access native features and APIs using platform-specific plugins. This ensures that businesses can utilize device capabilities and offer a native-like experience to their users, including accessing sensors, cameras, and location services.
Benefits of Front-end Development Services:
1. User-Focused Design: Front-end development services focus on creating user-centric interfaces that prioritize usability and deliver an exceptional user experience. Skilled front-end developers understand user behavior and design interfaces that are intuitive, visually appealing, and optimized for engagement.
2. Responsive and Cross-Platform Compatibility: Developers ensure that websites and applications are responsive and compatible across various devices, screen sizes, and orientations. This ensures that users can access and interact with the application seamlessly on desktops, tablets, and mobile devices.
3. Browser Compatibility: These services ensure that websites and applications function consistently across different browsers and browser versions. They conduct thorough testing to identify and resolve compatibility issues, providing a smooth experience to users regardless of their preferred browser.
4. Performance Optimization: Front-end developers optimize the performance of websites and applications by minimizing file sizes, optimizing code, and implementing best practices. They focus on delivering fast-loading pages, reducing latency, and improving overall performance to enhance user satisfaction.
5. Continuous Improvement and Maintenance: It includes ongoing maintenance and support to ensure the longevity and functionality of web applications. They address issues, implement updates, and make improvements based on user feedback and changing business needs.
6. Integration with Back-End Systems: These development services work in collaboration with back-end developers to integrate the front-end interfaces with the underlying systems and databases. This seamless integration ensures the proper functioning and data flow between the front-end and back-end components of an application.
Flutter development services offer benefits such as cross-platform compatibility, rapid iteration, native-like performance, and expressive UIs. Front-end development services, on the other hand, focus on user-centric design, responsive interfaces, cross-platform compatibility, performance optimization, and ongoing maintenance. By leveraging these services, businesses can deliver high-quality applications that provide exceptional user experiences and meet their digital objectives effectively.
Conclusion: Both Flutter development and front-end development play crucial roles in modern application development. Flutter enables cross-platform development, high performance, and expressive UIs, while front-end development services focus on creating visually appealing interfaces, optimizing user experiences, and ensuring web and mobile compatibility. By leveraging these services, businesses can deliver feature-rich applications that meet user expectations and achieve their digital objectives efficiently and cost-effectively.
#flutter development services gurgaon#Frontend Development Services in Gurgaon#Angular Development Services in Gurgaon#React Js Development Services in Gurgaon#Backend Development Service in Gurgaon
0 notes
Text
Unifying Forces: Integrating Python, Node.js, and React for Powerful Web Development

In the rapidly evolving world of web development, the demand for robust and flexible technologies has reached unprecedented heights. As full-stack development gains popularity for its ability to seamlessly combine frontend and backend programming, the integration of Python with Node.js and React has emerged as a dynamic and potent method to create efficient and versatile web applications. This compelling combination offers a multitude of benefits and streamlines the development process, setting the stage for cutting-edge web solutions.
Python, revered for its simplicity and readability, stands as a versatile and widely-used programming language, making it a preferred choice for server-side programming. Meanwhile, Node.js, a powerful runtime environment enabling JavaScript execution on the server side, further amplifies JavaScript's capabilities. On the frontend, React, a JavaScript library developed by Facebook, has revolutionized development with its modular, component-based architecture, facilitating the creation of scalable and maintainable user interfaces.
Together, this integrated trio forms a powerful tech stack that brings forth a host of advantages, enabling developers to craft high-performance and feature-rich web applications. As we dive into the depths of this integration, we will uncover its strengths, explore practical examples, and embrace the immense potential it offers in shaping the future of web development.
Within this article, we will explore the compelling advantages of integrating Python with Node.js and React, examine various integration methods, and delve into practical examples and best practices to leverage this powerful combination for web development projects.
The Potency of Python, Node.js, and React:
1. Python: A Multifaceted Powerhouse Python stands as a high-level, general-purpose programming language celebrated for its readability, simplicity, and versatility. Widely utilized across diverse domains, including web development, data analysis, and artificial intelligence, Python excels at server-side programming. Its extensive library ecosystem and web frameworks like Django and Flask make it a prime choice for backend development.
2. Node.js: Unleashing Speed and Scalability Node.js serves as a runtime environment empowering JavaScript execution on the server side, offering unrivaled speed and scalability. With a non-blocking, event-driven I/O model, Node.js effortlessly handles concurrent connections, making it the go-to solution for real-time applications like chat systems and online gaming.
3. React: Elevating Frontend Development React, developed and maintained by Facebook, introduces a component-based architecture that has taken the frontend development world by storm. This approach allows developers to create reusable UI components, managing complex application states efficiently. Virtual DOM implementation enhances performance by minimizing unnecessary re-rendering, guaranteeing a smooth user experience.
The Synergy of Integration:
When Python, Node.js, and React synergize, developers gain a comprehensive solution for full-stack web development. React with python backend prowess in server-side programming meshes seamlessly with Node.js' speed and scalability, while React's component-based UI development elevates the frontend. This versatile integration allows full-stack programmers to leverage the strengths of each technology and create efficient, maintainable, and high-performance web applications.
Advantages of Integration:
1. Versatility: Uniting Python, Node.js, and React allows developers to tap into their unique capabilities, delivering a complete web application solution. Python manages server-side programming and data manipulation, Node.js facilitates JavaScript on the server, and React simplifies interactive UI creation. This flexibility empowers companies to hire full-stack programmers with expertise in these technologies.
2. Scalability: Both Python and Node.js offer exceptional scalability and performance. Asynchronous libraries and web frameworks in Python handle concurrent requests efficiently, while Node.js' event-driven, non-blocking I/O excels in high-performance applications. React's virtual DOM and efficient rendering ensure frontend responsiveness as the application grows.
3. Performance: Integrating Python with Node.js and React yields high-performance web applications. Python's optimized libraries and frameworks provide swift server-side processing, complemented by Node.js' non-blocking I/O for quick request handling. React's efficient rendering and component-based architecture guarantee fast, responsive user interfaces.
4. Maintainability: A unified codebase featuring Python, Node.js, and React fosters easy maintenance and updates. React's modular structure of components, coupled with Python's clean and readable syntax, ensures a well-organized and maintainable codebase.
5. Faster Development Process: Full-stack developers proficient in Python, Node.js, and React streamline the development process by simultaneously working on both frontend and backend aspects. This reduction in context switching significantly enhances overall productivity.
Best Practices and Tips for Integrating Python with React and Node.js
Choose the Right Integration Method: Evaluate project requirements, team expertise, and performance considerations before selecting an integration method (RESTful API, GraphQL, or microservices). Each has its pros and cons, so choose wisely.
Use Popular Web Frameworks: For server-side development, rely on well-maintained web frameworks like Flask, Django (Python), and Express (Node.js). These frameworks have strong community support and offer a solid foundation for building robust applications.
Keep Frontend and Backend Decoupled: Maintain a clear separation between frontend and backend components to enhance maintainability, scalability, and flexibility. This allows for easier updates and replacements of individual components without affecting the entire application.
Optimize API Requests: Minimize API requests and data transferred between frontend and backend. Techniques like data caching, pagination, and request throttling can enhance API performance and reduce server load.
Prioritize Application Security: Implement security best practices such as input validation, secure API authentication, and proper error handling. Utilize encryption to protect sensitive data and adhere to the principle of least privilege for user roles and access controls.
Test and Monitor Your Application: Regularly test your application throughout development to identify and address issues and performance bottlenecks. Implement monitoring and logging tools to track application performance and detect potential problems proactively.
Maintain Clean and Organized Code: Write clean, well-structured code and follow consistent coding conventions. This ensures ease of understanding, maintenance, and collaboration, especially when working in a team or on existing projects.
Stay Updated with Trends and Technologies: Continuously learn and adapt to the latest advancements in Python, Node.js, React, and related tools and libraries. Staying up-to-date with best practices and technologies will help you build more efficient, secure, and innovative web applications.
Practical Considerations of Integrating Python with React and Node.js
1. Understand Python and Node.js Roles: Recognize that Python offers extensive libraries and clean syntax, while Node.js excels in handling simultaneous connections for real-time applications.
2. Choose the Right Architecture: Select an architecture that allows seamless communication between Python, Node.js, and React. This could involve using Node.js as a bridge or directly calling Python scripts from the Node.js server.
3. Design Robust APIs: Ensure robust API design to facilitate communication between different parts of your software, offering proper error handling and security features.
4. Select Suitable Libraries and Frameworks: Leverage appropriate libraries and frameworks for Python (e.g., Flask, Django) and Node.js (e.g., Express.js). In React, consider using libraries like Redux and React Router.
5. Prioritize Testing and Debugging: Thoroughly test and debug your integrated application using tools like PyTest (Python), Mocha, and Jest (Node.js), and React testing utilities.
Steps for Building Flask and React Applications
Building Flask and React applications involves the following steps:
1. Set Up Flask Back-End: Install Flask using pip and create a Flask application by defining routes for your application. Use the command "flask run" to start the Flask server.
2. Build the React Front-End: Install Create-React-App to bootstrap a new React application. Create React components as building blocks and run the application using "npm start."
3. Connect Flask and React: Set up CORS in Flask to allow communication with React. Use JavaScript's fetch API or libraries like axios to make HTTP requests from React to the Flask back-end.
Conclusion
Integrating Python with React and Node.js offers a powerful tech stack for web development. By following best practices, considering practical aspects, and building applications step-by-step, developers can create efficient, scalable, and innovative full-stack web applications. This combination of technologies continues to gain popularity among developers and companies, making it a valuable skill for full stack developers in the ever-evolving landscape of web development.
#how to integrate python with react#react python#react and python#react with python backend#python react example#python backend react frontend#node js python integration#python and javascript together#javascript and python together
0 notes
Text

Employee Management System Project using React JS + Spring Boot + MySQL | Microservices
An Employee Management System (EMS) that enables administrators to handle departments, supervisors, employees, and salary information more effectively. This project delves into the features of an EMS, such as how directors may easily add departments and designate managers to oversee worker control. Furthermore, the device provides for the collection and monitoring of revenue data for each employee. Learn how this all-in-one solution boosts organisational efficiency, reduces administrative procedures, and ensures precise control of worker records and pay.
#Employee Management System#React JS#Spring Boot#My SQL#Microservices#FullStack Development#Web Development#Software Development#Frontend Development#Service Oriented Architecture
0 notes
Text
Hey all, if any of you know someone looking for a Backend Dev, I got laid off. I'm good with Groovy and SpringBoot and can learn pretty much any environment. I have passing familiarity with Ruby on Rails and Django, and most kinds of commonly used databases.
In the past I've been a Frontend Dev as well. Primarily focused on Bootstrap, Next.JS, and React, using standard HTML/JS/CSS stack.
I've been learning GameBoy programming in my free time and finding a joy in Small Device programming that might extend well to a junior embedded systems job.
I've worked on major systems used by colleges and libraries, and I've worked on a scheduling system with ~500 medical facilities as their customers.
You might have seen my posts about Computer Science. If they seem like they might be relevant to someone's needs and you're willing to act as a recommendation for me, please reach out.
#I normally wouldn't do this but its an emergency#by the way your company probably has a financial incentive for playing the role of recruiter
5 notes
·
View notes
Text

////////Introduction /////////
Although I have not yet fully experienced the importance of community, I believe in the advantage of having someone to trust when ideas are unclear. I am here to connect with people who share my interests and, if possible, help others in their learning process


///////// About Me /////////
Hello everyone! I'm Daniel
based in Argentina.
My journey into the coding world started with free courses on FreeCodeCamp and an exciting bootcamp at DigitalHouse.
///////// Skills /////////
>>> Backend <<<
MySQL
Express
Nest.js
Node.js
>>> Frontend <<<
React
Tailwind
JS
Cypress

Thank you, @izicodes, for giving me the push I needed to start my blog!
10 notes
·
View notes
Text
So in case you're wondering what I've been up to for the last month or so (no one is here), I've been working on this-
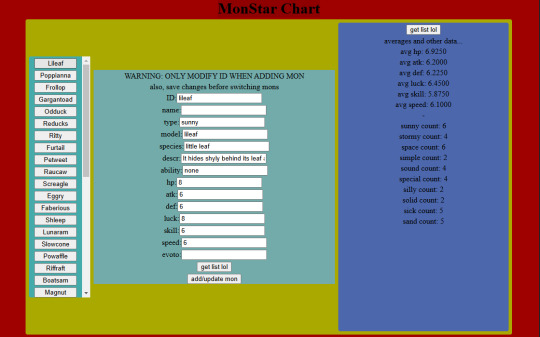
A CRUD app! Because that seems to be what everyone's making these days. It's an editor for monster data. Because, like, all the tutorials were for managing employee data and shit, but this is what data I have that needs managing. It's got a React js frontend and a javascript backend.
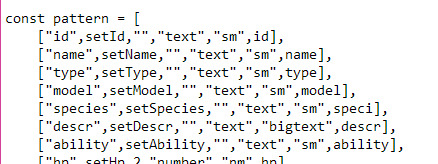
It basically runs off this list of data that spawns the entry rows and stuff, so I can add to it easily or reuse the base code between projects:
That's neat, but it was a real pain in the ass to have to start up both the client and the server whenever I wanted to use it, so I made basically the same thing but in Python with tkinter:
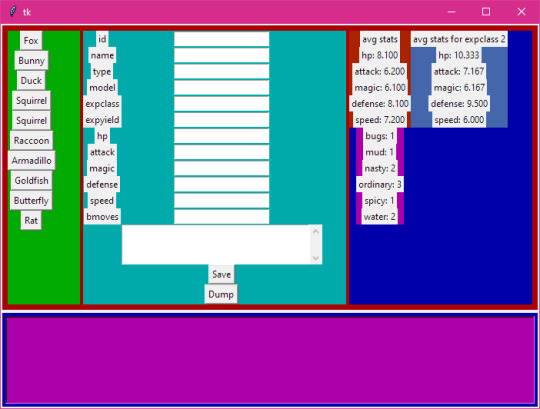
And as an example of reuse here's it being used for moves data-
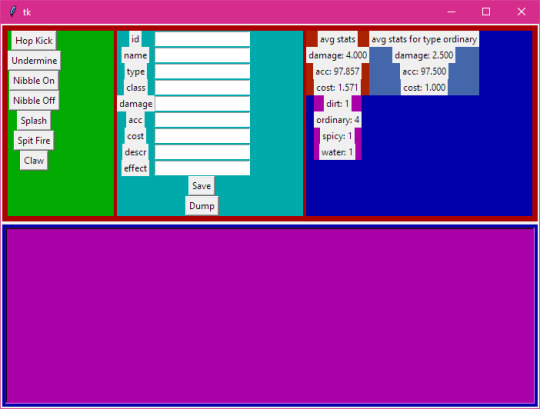
A lot of things are made easier with this. Mainly there's only one data list, whereas the CRUD app needed the state hooks declared, then the data list including the "pointers" to the state variables and setter functions, then the backend needed its own list of the names of the SQL columns.
This version has some extra features like, if you add something to the data list it'll add a column to the SQL database for you. Plus Python is similar to GDScript, so I could bundle a basic version of it with the Mondo code.
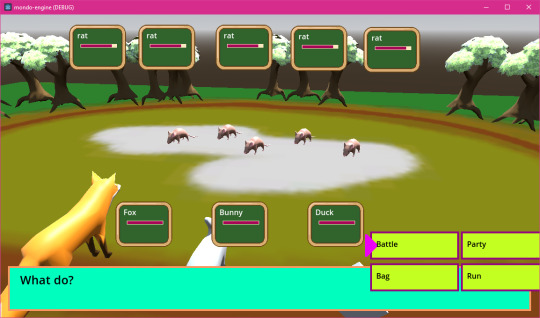
Meanwhile I've been upgrading the battle system to handle multiple mons in one battle-
Next I'm probably going to step back a bit and document the code, because it's becoming a bit messy and I need to clean it up
5 notes
·
View notes
Text
10/09/2023 || Day 78
Horoscope Generator - Log #3
Y'all, this project's hard. Ran into multiple problems with it but I'm slowly solving them.
Problem 1: How to send information from the backend to the frontend, and get React to display that information once it's received without refreshing the page. I did this using a bunch of useEffect hooks. The first main one is to monitor the status and changes of my userSign variable, which is set once the use clicks on a button corresponding to their zodiac sign.

Doing this sends the sign to the backend, which will then do some magic to get that specific sign's daily horoscope (right now, it's just sending a basic testing message). Now we need to actually tackle the problem where now the backend has data I want to send to the frontend, and again we're gonna use the useEffect hook in React. First thing's first though, we need to send that data, and we do that using Node JS and Express JS. I check to see if there are actual values for both the sign and the resulting horoscope, and if so send it forward.
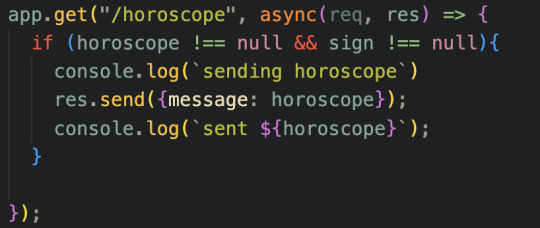
On the frontend side React will GET the data if both conditions listed below are met, ensuring that I'm only making an API call when I have all the information I need to get a proper answer.
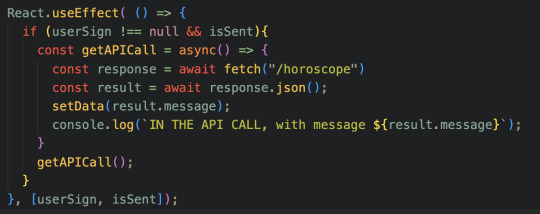
Lastly, the easy part; displaying the message: the App component will check the conditions and if they're met will display the message from the api call.

The other problems I'm running into are more trivial but still super annoying.
Problem 2: Find an api that will give me the daily horoscope for a specific/given sign. All the ones I've found are either paid, or that specific service doesn't work. I actually managed to find a free api that does exactly what I want, but it's only available in Portuguese. Now, I don't speak Portuguese, so this leads into problem 3...
Problem 3: Find a free api that'll translate from a given language to English. I spent a lot of time looking for one and dear god are they hard to find. I managed to find a random one that isn't always 100% accurate, but I'm ok with that. The problem now is that it has a 5,000 character/day limit, so I'll need to come up with a method to simply get all the sign's horoscope for the day and translate it at once, then send it to the frontend to sort through that...
Anyways, those have been my struggles with this project, but here's a small video showing that the information is being sent from the frontend to the backend, and then to the frontend again. In a few days it'll actually have the proper messages, trust me.
18 notes
·
View notes
Text
Next JS vs React: Which Framework to Choose for Optimal Frontend in 2024.

Read more Blogs,
Visit Website, Glasier Inc.
ReactJS development company
Hire Reactjs developers
Hire SaaS developers
Hire Android app developers
Hire IOS developers
#react js vs next js#next vs react#hire react js developers#hire dedicated developers#hire android developers#hire ios developers#react js development company#mobile app development company#ios app development services#custom software development company#custom software development
2 notes
·
View notes
Text
Retrospectiva del #HackAccesibilidad

El pasado 28 de octubre se celebró en las oficinas de Liferay #HackAccesiblidad, un Hackathon sobre accesibilidad web que trataba de dar solución al reto: “crear un minijuego tipo aventura escape room virtual, con un escenario del que hay que lograr salir resolviendo puzzles más o menos sencillos.”
Las reglas que el juego tenía que seguir eran las siguientes:
La tecnología será HTML+CSS+JS. Se podrá usar algún framework de front tipo Angular, React o Vue, pero nunca un framework de desarrollo de juegos. Lo importante no es el juego en sí, aunque también, pero sobre todo que sea accesible.
En el escenario habrá diversos objetos con los que el jugador puede interactuar de distintas formas. Una de las primeras cosas que deberán hacer es pensar en un método accesible de recorrer el escenario para descubrir e interactuar con los objetos.
Las acciones obligatorias deberían ser al menos: mirar y usar; esta última acción debería permitir usar un objeto con otro.
Todos los objetos deben de tener una respuesta para cada acción, aún cuando ese objeto no se pueda usar.
Ni que decir tiene que el reto es sobre accesibilidad, evidentemente también se valorarán otras cosas, como la jugabilidad, la historia, la dificultad, pero es preferible gráficos “cutres” y juego accesible antes que unos gráficos del copón y un juego inaccesible.
Como ayuda a los participantes se desarrollo un ejemplo de juego no accesible https://github.com/angelisco1/prueba-hackaccesibilidad
El hackathon se compuso de dos jornadas:
25 de octubre.-
Con carácter previo a la celebración de hackathon y, para que los participantes tuvieran unas nociones básicas sobre accesibilidad y las pudieran utilizar en su desarrollo, Ramón Corominas (Twitter: @tinitun) impartió un taller presencial y online sobre nociones básicas para la creación de interfaces accesibles, que podéis ver en el enlace: https://www.youtube.com/live/HhdUlP15NM4?si=VqUvnofsjtgGO71p
Taller de cerca de 2 horas de duración, donde se explicaron aspectos tan interesantes como las 5 reglas de ARIA para ayudar a decidir cómo hacer que los elementos sean accesibles:

(1) No uses ARIA, (2) No cambies la semántica nativa, (3) Siempre admitir la navegación con teclado, (4) No ocultes los elementos enfocables, (5) Usar nombres accesibles para los elementos interactivos.
A partir de este momento los participantes podían empezar a desarrollar sus juegos con las reglas propuestas, o bien mejorar el código del ejemplo/juego propuesto.
27 de octubre.-
A las 9:30 empezó la recepción de los participantes en las oficinas de Liferay Durante cerca de tres horas terminaron de desarrollar sus juegos.
A las 12:30 se inició la presentación de los mismos. En concreto fueron tres juegos:
Juego de recolección de monedas en el que había que llegar al final a tiempo y recolectar las monedas que se encontraran en el camino. Desarrollado por Alicia (Buzkall).
Bienvenido al Museo Liferay, donde había una misión: robar el diamante negro Orlov. Desarrollado por Bárbara Cabrera Castro y Victor Galán Grande.
Bienvenido a Escape Bros!, Desarrollado por Valpa Bros (Rubén y Javier Valseca).
Después de la exposición se pasó a deliberar los juegos, teniendo en cuenta aspectos como: nivel de accesibilidad, originalidad de la historia, la jugabilidad, el grado de finalización del proyecto y su dificultad técnica.
Nuestro jurado estaba formado por:
Ramón Corominas: apasionado de la accesibilidad, así como consultor freelance, formador y asesor a todo tipo de empresas e instituciones.
Marcos Castro Vallejo: diseñador de producto / UX y desarrollador frontend, formado en accesibilidad por la ONCE hace casi 15 años. En los últimos años ha estado centrado en el gran reto que supone convertir Liferay DXP en un producto accesible.

El orden de los ganadores fue:
Primer premio: Bienvenido a Escape Bros
Segundo premio: Bienvenido al Museo Liferay
Tercer premio: Juego de recolección de monedas
Todos los participantes se llevaron 200 € de descuento en la compra de cualquier producto de Slimbook salvo los minipcs ZERO y los portátiles Essential, un Hosting Uno de Cyberneticos durante un año, y LViS Lite gratis durante 3 meses.
Para el ganador un Dominio y servidor VPS Básico de Cyberneticos durante un año.
Dar las gracias a Liferay por prestarnos sus instalaciones y colaborar con nosotros, así como a su equipo que nos apoyo durante las jornadas: Álex Arjomandi, Sergio Jiménez, Jesús Domínguez, Luis Díaz Royuela y Elena Bodas.
Dar las gracias a nuestros sponsors: Slimbook, Cyberneticos, Murena, y LVIS.
Tenéis todas las fotos que hicimos en Flickr.
Vídeo resumen
youtube
Nos vemos en la próxima.
2 notes
·
View notes