#sfx tutorial
Explore tagged Tumblr posts
Visit Tumblr Blog
Explore Tumblr blogs with no restrictions, modern design and the best experience.
Last Seen Tumblr Blogs


Fun Fact
The total number of visits Tumblr.com received during January 2021 is 327 million.
Note
Any tips on how to cosplay Undead Jack Goodman
( context plan on going to a Halloween party as him )
actually yes!!! i’ve gone through a fair bit of trial and error on this one so let me give you some tips!!
here’s how i did it.
so. first. the makeup.
you will need
- cotton balls/pads
- liquid latex
- scar wax (optional)
- paper towel tube
- tissues
- red base makeup
- eyeliner pencil of some sort
- fake blood
- black/brown/yellow/purple makeup
so, first, you’re going to want to block out the shape of the injury. i usually just draw it out with the eyeliner pencil (using a reference of course). you’re going to want to go all the way down your neck to the collar of your shirt and as far back to where your hair falls on your neck. if your hair doesn’t hit your neck well. then follow your heart. then, you’ll follow the guidelines you’ve put down with cotton and liquid latex to make it raised. you’ll want to tear up the cotton balls/pads and roll them into thin strips with your fingers. you can make them as long or as short as you want. i usually make them pretty short though, so it’s easier to make sure they follow the lines. once you’ve rolled them, you can place liquid latex over your guideline, and then stick the strip on. if that doesn’t make sense, check out my video tutorial and also the one i attached at the end. then, once you have that, you can start adding texture. i usually put one piece of scar wax on the side of my cheek like here. it should look somewhat like this (but with stuff on your neck too.) this is also the stage where i start attaching little pieces of tissue in shreds to my face with liquid latex to simulate the little floppy pieces of skin that hang off.
next, you can add the fake windpipe! for this, i cut a toilet paper tube in half and then adjust the size until it fits comfortably over my throat. you can attach it with liquid latex, then cover it with another piece of tissue to make it a little more seamless and use liquid latex again to hold it down.
now, you have to go in with the color. start with a red base, then add yellow and black highlights, with a little bit of purple if you’re feeling bold. but don’t use too much purple. then, go absolutely insane with the fake blood. the most important thing is to respect the lines you made before, cause in the movie all the wounds are isolated to one side of his face.
to modify this for the later stages of decay you’d want to use a green base for the rest of your face and use less red and more of the darker colors in the wounds. you could create texture on the rest of your face with liquid latex i think to sort of simulate the shriveled look but i’m not super sure - i haven’t tried anything past the initial fresh hospital look. i’d look up a few zombie makeup tutorials and see if you can figure anything else out!
i based all of mine off of this tutorial, so it might be a helpful watch if you’re confused at all.
youtube
next, the coat. i really wanted the blood to look fresh, so i had kind of a hard time finding fake blood that would work. most of it dries and soaks into fabric, and since the green coat is dark, it just ends up kinda looking like it’s been stained with an unidentified liquid. so i decided to make my own. i mixed gelatin powder, water, and corn syrup with food coloring - mostly red, but a few drops of blue to get a darker more bloody nasty look. in terms of amount, you just kind of have to follow your heart. then, i poured a little over the shoulder, let it drip, then laid it down and did some spot treatment and made sure the coverage was even and there was enough. i’d recommend doing this maybe two nights before you’re going to need the costume - it takes a while to dry but if you let it dry for too long it’ll start to crack when you move. however, it’s the only way i’ve figured out to keep the blood looking fresh. if you want, you can also cut holes in the coat in some places to match how it is in the movie, but i’ve found it honestly doesn’t need it.
then you’re pretty much set! get some dark jeans and hiking boots and boom. you’re jack. would love to see how your costume turns out!
#matty answers#aawil#an american werewolf in london#jack goodman#vfx#sfx#sfx makeup#horror#horror movie#horror makeup#vfx makeup#sfx tutorial#sfxgore#makeup tutorial
7 notes
·
View notes
Video
youtube
Halloween is upon us! And I have created this theatrical Dracula Vampire makeup tutorial that is easy to recreate.
Covering the brows is the most complicated element of this look, however, my method is easy to follow! That being said, you can also cover your eyebrows with Elmer’s glue, wax, concealer/foundation or you could simply enhance your own brows for a sinister finish.
Enjoy trying this look for yourself. Shonagh 🎃
#Shonagh Scott#showmemakeup#Halloween#halloween makeup#halloween costume#halloween ideas#makeup tutorials#makeup tutorial#vampire#vampire makeup#dracula#dracula makeup#makeup artist#sfx makeup#face paint#youtuber#youtube#halloween inspiration
25 notes
·
View notes
Text
inspired by astarion ancunín (bg3)
#my makeup#astarion#astarion ancunin#bg3#baldur’s gate 3#astarion bg3#makeup#cosplay#sfx#sfxmakeup#makeup tutorial#graphic liner
29 notes
·
View notes
Text
LISTEN TO EMO BANDS AND READ CREEPYPASTAS AND MAKE BAD FANART INSTEAD OF GOING TO FUCKING SEPHORA
LET YOUR EMO PHASE CONSUME YOU
grabbing every 13 yo girl by the arms and yelling "YOU LOOK FINE !!!!!!! DON'T SPEND UR ALLOWANCE ON CONCEALERS GO SEE A BAD MOVIE INSTEAD !!!!!!!!!!! BEAUTY IS POETRY AND SONGS AND LAUGHTER W FRIENDS AND COLORFUL LEAVES !!!!!!!!!! GO READ A MARY OLIVER POEM AND YOU'LL BE OK!!!!!!!!!"
#however I can’t really talk bc I was into makeup at 13 too#but that was bc it was and still is another art outlet for me#like I was and still am into the crazy sfx shit that one person can do#half of what I watched was makeup tutorials on how to look like you’re a fucking monster or some shit#I wasn’t really interested in the trendy glam shit I liked the Halloween sfx shit
79K notes
·
View notes
Text
instagram

#cosplay#cosplay community#cosplay tips#cosplay advice#cosplay tutorial#cosplay tag#cosplay talk#cosplay ideas#instagram#instagram post#instagram stuff#art#art advice#art tips#art video#sewing#cosplaying#sfx
1 note
·
View note
Text
Defeating opponents goes better with some music! Let’s setup the initial music system!
youtube
#shawnthebro#ue4#unreal#stb#tutorial#youtube#unrealengine#unrealtutorial#unrealengine4#programming#ue5#unreal engine#unreal engine 4#unreal engine 5#engine#fps#first person#first#person#first-person#music#soundtrack#sound track#sound#track#sounds#sound effects#effects#sfx#fx
0 notes
Text
inspired by ronan lynch (the raven cycle)
15 notes
·
View notes
Note
Heyo! Do you have any tips for making comics? :)
I've been meaning to get back into the swing of it, but concentrating on such a commitment that takes so much time is tough sometimes haha.
How do you make it work? Are there things you avoid/make easier for yourself just to make the process more fun and do-able?
First of all, I’m very happy for you! I think it’s very exciting whenever we return to a craft we were once passionate about. I wish you the best of luck!
This is a big question and I don’t think there’s really one simple answer since all artists are different and have their own strengths and weaknesses.
One of the biggest issues I face is that I have a million ideas but I simply don’t have the time to do them all. I want to share all these ideas but if I gave each and every idea the same amount of attention and detail, I’d hardly get anything done. So here are some things I've learned through my own comic-making experience, but keep in mind it may not be what you're looking for. Also remember this is NOT career advice. I make comics for fun, not for a living. If you’re looking for professional advice I would suggest looking elsewhere 👍
1 - A comic doesn't have to be fully rendered to be entertaining. Although I love to draw and line and color my work, it’s not always necessary. If I feel a punchline is strong enough to stand on its own, I’ll just make it into a doodle comic. In fact, I’ve found that some of my doodle comics perform better than the fully rendered ones! The doodle comics are still very fun for me to draw and they also serve as gestural drawing practice, so in the end it doesn’t feel like I'm making a sacrifice. I'm still getting my ideas out there and I'm still drawing, I'm just prioritizing what gets more attention so I can better manage my time.
2 - Not every panel needs an illustrated background. You definitely need to show backgrounds for establishing shots and when characters are interacting with the scene. But sometimes the focus needs to be entirely on the character and/or what they’re saying. You can choose to have a solid color background and maybe add a few textures to keep it visually interesting. You're still putting in the effort to make your art pop, but you aren’t losing a ton of time by drawing dozens of backgrounds. Color is also a good way to convey mood. I do that a lot in my comics, like this bit from “My Gal”:

^ I was trying to show a progression in excitement here, so having the colors change from cool to warm does a better job portraying that than if I just had a standard, scenic forest background for all the panels.
3 - Use resources: That's what they're there for! Because I make all these comics by myself, I have had to find resources to help me get through some of the steps faster so I can focus more on the story writing and the artwork. For example, to help me save time on lettering, I use the Onomatopedia font and the Manero Panels, SFX and Bubbles brush set for Procreate. I’m still selecting the sound effects and choosing the appropriate bubbles and tails to suit the mood and scale of the text, but this has saved me a ton of time because I’m not drawing each individual element by hand over and over again. Personally, I purchased these resources but I'm sure there are plenty of free tools out there that you can use.
As far as making it more fun... Honestly, I just love comics as an art form so much that learning about all the 'rules' and techniques and 'SOP's behind comics makes it more fun for me to make them. I recommend checking out tutorials and tips (even if you think you already know it all) and you might be surprised at how much it might ignite more of your comic-making passion. For example, I've spent hours on Blambot's "How-To" page and on ComicDevices.com just to try and soak up as much as I can. They're full of fascinating reads that make me want to try out different things!
I hope this helps! Good luck with your comics!
101 notes
·
View notes
Text
Resources for Creating: My Go-To things.
Update: I’ll be updating the list on this page from now on, since Tumblr can’t handle so many hyper-links in one post, on Dreamwidth - right here, so I won't have to update it multiple times. Please note: I keep updating this list, and updates aren't showing up on reblogs. Please check the original post for the most up to date list.
Sooo this is going to be a long comprehensive list. I got back to this game after a long time and with a different computer, with a dedicated graphics card, hurray! It made me want to return to making things, so while gathering back all the necessary stuff, I've complied this list. It might be is updated as I go along, but these are the main things I use. Maby one day i'll even finish something. So here are my go-to resources & tutorials; I'm posting it here for safekeeping, and hopefully others will find it helpful. Everything that's listed is here free. So many wonderful things for free under the cut.
Programs – General:
Creating: Blender. Blender Addons: 3D Print Toolbox – comes with blender, enable it from within the program. Originally for 3d printing. Good for fixing flipped normals, and some quick general repairs. Source Tools And source tools wiki – for exporting as SMD!!!! (SimPe: to enable bump maps for the mesh on import). GMDC Addon for Blender 4.0+ by Nopke.
GIMP. GIMP Addons: G'MIC-Qt. Resynthesizer. Nvidia dds?. Doesn’t it come with Gimp?
Other: Nvidia Texture Tools Exporter (iirc it works with all graphic cards that are compatible, doesn’t require Nvidia). For making Normal / Bump / Cube Maps. For high quality compression.
NormalMaps - Online, For making all types of maps, has good setting menus. A very cool tool.
Converting: Umodel, for Unreal Engine (Static meshes: export as gtlf.2. Animated meshes: export as psk. Requires Add-on). AssetStudio, for Unity. AC Viewer, self implied (+ USD Addon for blender). QuickBMS* and support forum, for basically everything else. (don't forget the required scrips, down the same page). *I haven’t tested it fully yet, but it was recommended here. A tutorial for it is listed further down. Works like a charm.
UV Mapping: UV Mapper, Classic (free) and the most recent Demo (for visualization).
Programs – Sims:
Never Mind the Bollox, Here's Osab and MAGIkarp to the rescue!
Latest version of SimPe, works with a non-default installation path. Chris Hatch's updates.
Home Crafter installation, Post by Huge Lunatic at Sims2Artists.
Repository Wizard, by Pick'N'Mix Mods. A game changer.
DBPF Compare, by Pick'N'Mix Mods.
Object Relocator, also by Pick'N'Mix Mods.
SMD Tools, by Lazy Duchess.
The Compressorizer, by JFade – Lazy Duchess's edit.
Bulk Rename Utility, to change file names in well, bulk. As explained by io here.
Lot Adjustor, by Mootilda at MTS.
Tutorials:
Override the game's graphic settings via Nvidia, as explained by iCad. The settings to Nvidia Profile Inspector she linked to at MTS have been deleted for some reason, here they are via WebArchive.
Meshing in Blender:
Mesh Optimization Info (and links), by Crisps&Kerosene.
Additional - Reducing Polycount:
Tutorial, by Flaming-Chickens (another username on other sites perhaps?)
Edge – Un-subdivide, a quick one by CG Link.
Transfer high poly details to low poly object in Blender, by 3Dnot2D.
Shrinkwrap Modifier - Blender Tutorial for Beginners - Basics, by in2vert.
Placeholder for this Addon that I want to try but haven't found, something for AR that was on facebook's defunct AR.
Scaling tips, by Blender Secrets.
How to fix inverted/ flipped normals, by ipaintsmallthings.
Converting: How to Extract 3D Models, Textures, Music from Unreal Engine Games, by iwanMods.
Extract 2D/3D/SFX Unity Assets fast & easy from your Unity Game, by iwanMods as well.
How to use QuickBMS, by darkhorse.
Guide to Converting 3t2 and 4t2 Part 01 and Part 02, by Chiaroscuro/tenlittlepandas.
Converting TS4 Windows and Doors, by Crisps&Kerosene.
Using Different Material Maps as Shading/Details for Base Texture, in Gimp or Blender, by Pineapple Forest & Crisps&Kerosene: https://www.tumblr.com/crispsandkerosene/764893644571525120/great-info-thats-the-reason-some-conversions?source=share
Texture Editing in GIMP:
Using Gimp Add-ons: G'MicQT. Resynthesizer. Both by Davies Media Design. This guy's channel for Gimp in general – here's a good one to begin with. And another one about layer masks.
Making a texture Tile Seamless: 1. My favorite - How to Make Seamless Textures for Cinema 4D - 3 Levels of Photoshop Wizardry using iPhone Photos, by School of Motion.
2. Simple Trick for More Realistic Texture Patterns in GIMP, by Davies Media Design – Quick and simple, using the Resynthesizer plugin. Good for patterns.
Making walls in SimPe out of a square texture, with minimal quality loss. To be written.
SimPe: Cloneable Objects: A List of Good Objects for Cloning, by IgnorantBliss at MTS.
Huge Lunatic's Tutorials, Her website.
Object Creation for Absolute Beginners, by Moune.
Sims 2 start to finish Object Creation Tutorial, by JWoods, Numenor, Lethe_s & IgnorantBliss.
The Material Definition (TXMT) Guide, by PixelHate – very comprehensive. Part 5 is about Bump/ Normal maps.
Null (Texture-less) Groups, by Skell. For bodyshop, for Objects see an elaboration by Midge the Tree below.
Crisps&Kerosene discovered how to add specular maps to objects! It's incredible there are still new things to discover in this ancient game.
More on Specular Maps, by Pineapple Forest.
Making new flooring & walls with SimPE, by Charisa. Includes adding Bump/Normal maps. She added a file to clone from in the comments below. It works for normal maps as well. Here's cool discovery in the game files.
Expanding footprint: a mini tutorial, by Deedee.
How to add correct drop shadows to objects, by Yuxi, via Wayback Machine.
Making Objects Viewable in Neighborhood View, by iCad.
Making Objects Visible In Build/Buy Mode, Invisible In Live Mode, by Midge the Tree.
Making Seasons-Friendly Trees, by Echo.
Io/ Serabiet's resources list, mainly for Bodyshop but not just.
Pineapple Forest's Tutorials, useful tips for efficiency and optimization.
MTS modding forum in General.
The Sims 2 Tutorials, on Tumblr. A database, is more updated.
Sims2Artists tutorials section.
LeeFish modding forum.
Garden of Shadows, Tree of Knowledge section.
Troubleshooting: What to do if you get a System.OutOfMemoryException Error, SimPe Forum, via WayBack Machine. Thank you @fanseelamb for the find.
How to read object error logs: I just want to know what causes it!!, by Episims.
Common TS2 errors, by Midge the Tree.
General game fuckery: How to Stop Sims 2 Crashing (Memory Allocation Fix and 4GB Patch Repair), by Jessa.
Graphics card problems, LeeFish forum.
Graphics help - DIY, by Kiri. How to fix faulty Texture Memory allocation, and the problems that stem from it. Tumblr can't handle anymore hyper links so here it is: https://celebkiriedhel.tumblr.com/post/189431721483/graphics-help-diy
General: Switching between save folders without renaming them, by Nopke.
Resources:
3D Models Online*: Various furniture designers' websites: Porada, Zanotta, Muuto, Hay, Poltrona Frau, many luxury furniture designer basically.
3D Warehouse, belongs to Sketchfab (get the Collada files).
Scan the World.
Wikimedia Commons. And more.
*(NOT OPTIMIZED).
Textures: Architextures.
Fabrics & Wallpapers: Natural Stones: Wall Plasters:
iCad's Woods. Shastakiss's Cluedo Metals, Yeti Metals, Pirate Woods. Goat's Woods.
Textures from other games: Dishonored, Thieve and much more, by Saricoya at GoS. Dreamfell by io.
Resource sharing threads at Garden of Shadows.
SimPe - General: CEP Extras list, HugeLunatic at Sims2Artists.
TXMT settings for different materials, by Hafiseazale.
Extended SimStandardMaterial Shader for the Sims 2 + Optionally Brighter Sims, by Crisps&Kerosene.
Custom CubeMaps, by Crisps&Kerosene.
Shiny TXMT Settings & Cube Maps Packs, by Pineapple Forest.
Build/ Buy: Templates for Recoloring Maxis items; MTS Templates sction, Hafiseazale (+cc), ZeroDark.
Template for Seasonal Trees, Gwenke at Sims2Artists.
Making Roof Recolors, Tutorial & template by Numenor, great template by iCad.
Pack for making food clutter usable, by DeeDee.
CAS: Default Makeup Packages - BYO Packages, by Huge Lunatic.
Body shape, Io/Serabiet on Tumblr.
Skin template, Io/Serabiet on Tumblr.
Hair texture, iCad.
Color Actions, Pooklet on Tumblr.
That's it for now.
Edit: forgot about CEP extras. Added more links. Edit 02: Added Troubleshooting section under tutorials.
#ts2#ts2 resources#ts2 creation resources#ts2 resources for creators#the sims 2#sims 2#resources#ts2 cc#sims 2 cc#the sims 2 cc#well its cc related#sims 2 resources#the sims 2 resources
67 notes
·
View notes
Note
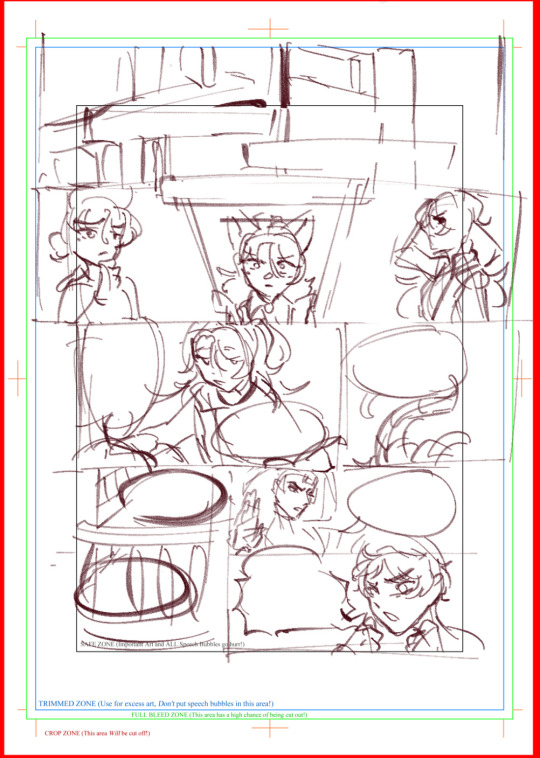
Do you have any tips on for people starting a comic and wanting to post to tumblr? Like pacing ect. Or well any experience you’ve had with your comics? Love your content as well ❤️
If it’s simply for fun, and you’re just trying to gain experience, my biggest advice would be to just START. Don’t worry about it looking perfect. Don’t worry about comparing it to other’s comics. Just try something, and if you find it’s not working, you can always change things up. I have gone through several styles and page layouts since starting. Do I wish those first pages of EW looked just like what I’m doing now? Yes, but if I’d waited around for perfection I would have never started. And I wouldn’t have had nearly as much fun creating it! If people like it, that’s great, but your art is for you. If you’re growing and learning and having fun, then you’ve accomplished something!
Now for some less preachy advice 😂…
—If your comic is gonna be hosted on Tumblr specifically, I would say, make sure you keep the 10 image limit in the back of your mind when you’re pacing things. That can definitely cause some headaches down the line. If you don’t plan ahead, and end up hitting it, you’ll have a sudden cut in your flow. This last update I knew it was gonna be long, so while I did plan, but I could’ve planned better.
—Variety is key!!!!!
Composition changes keep your viewers from getting bored. Sometimes I’ll find myself falling back into the bad habit of just doing the simple back and forth with two characters talking straight on, but changing the camera angle, making establishing shots when you change locations, and over the shoulder shots, etc etc…All these will make for a more interesting viewing. You may think a character needs to be in every single panel to make it interesting, but if you have a lot of dialogue, a simple plain shot—either in top of a solid background, or just over something boring, like a glance at the set, etc—this will let people focus on the words rather than splitting their focus.
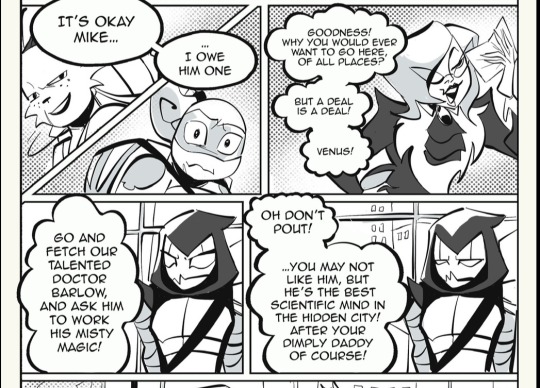
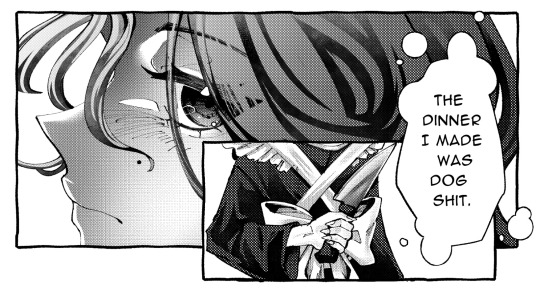
Variety applies to shading as well—whether you’re using color or black/white. Variety in values are SO important for comics. You’re shoving a ton of information in a limited space, so try to keep your values different for items that are close together….it can make things very confusing and turn your line work into indistinguishable blobs if you shade without this in mind.
(Using this panel as an example….)
The top two panels have a variety of darker values and a halftone background—so the next two with Venus, I kept rather simple. I could’ve colored the buildings behind her, but then, she might’ve gotten lost amidst all the grey. There’s not really any trick or solid rule to this, but once you develop your creative eye, you’ll make these choices without even thinking about it.
A few links to helpful tools (they’re all procreate centered I’m afraid 😅)
Outline brush — a free tutorial for Procreate users. This brush kinda mimics the CPS feature that lets you create panels with a nice black outline. I used this brush very often, and it really gives your panels a professional look. Fair warning, it can be glitchy, but it’s free…
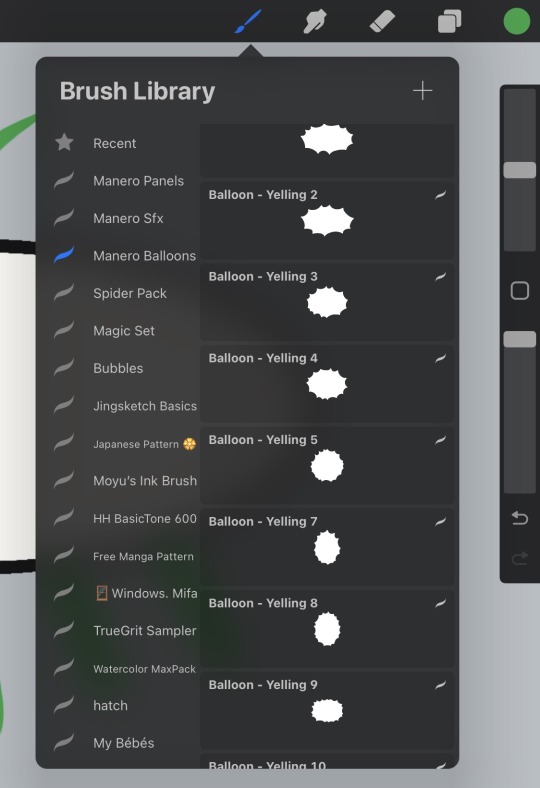
Manero Comic Bubbles and sfx — These brushes are not free, so I would recommend maybe getting in your groove before you try them out. They’re by no means necessary, but I’ve just started using them, and they save me so much time. There’s a HUGE selection of shapes, and they go on with a solid white background, so you don’t have to worry about coloring around your dialogue balloons.

#rottmnt#ask slushie#slushie rambles#I could probably think of more stuff but my brain is fried I’m just really putting the rambling in that slushie rambles tag#art tips#slushie faq
264 notes
·
View notes
Text
ok now that ive had time to collect my thoughts here is my review of the minecraft movie. spoilers kinda but who cares honestly
- this shouldve come out in 2010
- jack black plays himself
- the characters arent characters and none of the dialogue is comparable to that of real people
- jack black and jason mamoa have gay sex halfway through the film
- also, JB and JM are the only people who actually want to be there (or at least they're the only people who want to entertain the idea of it) and it shows
- why did we need the piglins to be villians when illagers literally also exist in the movie and are shown to be villainous
- also, why is there a gay piglin
- the theme "creativity is good and you shouldnt be ashamed to be creative" is a decent enough message but this movie doesnt make that theme worthwhile at all despite it shouting it at you every chance it gets
- the fnaf movie did the trope of "kids lose their parents and the older sibling has to take care of the younger one" better because there were actual stakes to it outside of the a plot
- the entire movie happens in the course of a single day
- the transition between in game noises and stock sfx is jarring at best
- jack black has not one but three musical numbers, two of them come completely out of left field
- also, jack black's quirky "son of a biscuit"-style censorship never stops being out of left field
- dance party ending
- the mcyt cameos are not well planned at all
- enchanted golems are cool and should be added to the base game
- too many checkovs guns that go unfired (the literal nighttime, evokers, real world ingredients in crafting, diamonds and redstone kinda, many more)
- the movie refuses to decide on a main character
- the sister doesnt do anything at all
- to go even further than that, the female duo gets almost zero screen time by themselves when the male trio gets close to a half hour (likely more) on their own
- what the fuck was that exposition my friends and i were crying laughing about it
- green screen work is bad and obviosuly bad
- the only two ost tracks in the movie was an orchestral arrangement of Minecraft c418 and pigstep
- we gotta stop with the all 80s music movie osts. it worked for fnaf because fnaf is meant to be anachronistic and "talking in your sleep" gets used as a leitmotif, minecraft doesnt even attempt that
- we never hear about the end but steve has at minimum 3 elytras
- no jokes about any actual game mechanics
- the movie isnt even really about minecraft at all
- apparently charlie moistcritical said this movie could be a minecraft tutorial, hard disagree, this movie teaches nothing about how to play minecraft
- the c plot is a middle aged woman trying to get with a villager
- the villian's backstory is she lost a talent show. that's it. its also when we hear pigstep
- i hate to keep throwing the fnaf movie comparisons but it also did the dead-end town trope better. the limitations of living in bumfuck nowhere idaho are kinda sorta mentioned but in a tell-not-show way
- none of the jokes are funny for the reasons they want to be
- its an entire two hours long
- post credits scene introduces alex and nothing else
- no herobrine
- the literal children left disappointed
If you're gonna see this movie, do what my group and I did and sneak people into the theater. The film is not worth the movie ticket cost to see.
20 notes
·
View notes
Note
hiii milkyyyy! u’ve been popping out so many manga pages and i’m just so amazed?? i’ve been wanting to get back to manga drawing so can i ask for some tips? like what’s your process and how do you decide the screen tones/sfx/effects/speechbubbles to use? the latter is something i’m struggling with 😭
tyyy 💕
Hi Yudi, thanks for dropping by!
General note: One thing I’ve learned about trying to go for a more manga-esque style is that there’s really no particular way to do it, and EVERY artist does it differently. Everything I do here is a blend of my own style and things from JP artists I admire! However, the most important thing is that panels aren’t meant to be masterpieces but to convey information and get the dialogue going.
This process will be CSP oriented. I’ve made a mini screen tone tutorial (and how to turn on Layer Property) but I did not talk about my own settings ^^ You’re free to do any resolution you want, though I stick to drawing on a B4 template for fun (and imagine that one day my stuff can get published /j). I hope this helps, as I’m still trying to figure my own style and set limits on the details too.
[Process]
Script + Thumbnail
I used to wing stuff for one-pagers, but now I’ve found that scripting and thumbnailing has made my process so much faster. (Omg it’s almost like people make drafts for a reason- @ me cause I hate planning)
There’s no standards of a comic script, and each publisher has their own format. My usual scripts don’t separate pages, since I leave that to the thumbnailing once I do dialogue placement. If trying to imagine panels without seeing them overwhelming, at least get the dialogue down.
The B4 thumbnail template I use is pretty darn big, so it also doubles as the sketching stage. Once the thumbnails are done, I transfer them (screenshot) to a comic file on CSP. Once the set up is done, I do speech bubbles + dialogue first, insert the frames, then get to the line art. Since I don’t think anyone is actually gonna print their works, you’re free to trim your canvas however you want to post online 🫡
Speech Bubbles
Any speech bubble can work and will eventually blend in as the viewer is reading, but I have a vendetta against super flat/digital-looking ones. I made a custom brush for a textured speech bubble pen with line width by adjusting its taper and changing the brush shape. Published manga are a different story, but I like the more organic polygonal bubble shapes from indie artists-

For different shapes and situation… Squares - Narration, Flash/Urchin - Character thoughts/internal monologue, Hexagon - Phone call/text (not a concrete rule but a common pattern)
You can also add emanata (sparkles/symbols) on the bubbles for flairs as you see fit.
Screen tone (Please read the linked mini-tutorial above)
I split my tones into two folders. One specifically for black, and greys.
I first fill in all black areas, the duplicate them. The top layer will be the shadows (remains pure black), and the bottom layer is set to [Opacity 75%] and turned into a screen tone layer with a [frequency of 45-50] (It must always be at a lower frequency than the greys). To add texture, I use a grainy brush to erase bits of pure black on a mask. To show light on the screen tone layer, I use gradient erase on a mask.
For the greys, I split them into three tones (dark grey, medium grey, light grey) all in the same folder so they don’t overlap and it’s easier to fix. I use a [frequency of 75] or any number higher than the screen tone in the black layer. Overall, tones can be as simple and complex as you want, but it’s best to save more detailed tones for important panels. (Planning to change this as I’ve realized how big the B4 canvas actually is, and the frequency doesn’t need to be so high- The size of screen tone is a preference. This example was done on a smaller canvas, so higher frequencies still look less pixelated/small.)
Emanata/SFX
Special effects is whatever the situation calls for! It can to make a blank canvas feel more dynamic, to evoke certain emotions, hint/foreshadow. It’s best used sparingly on important panels you think would be the most important… but how do you get those effects?
THE CLIP STUDIO ASSETS STORE- Or draw/download your own depending on the program (You have no idea- ever since I downloaded too, I can’t unsee them in other works of artists I like 😭) Not used in the example but these are my essentials- You can also find a lot of gems if you straight up search “manga” and see the most popular assets.
Another good place to find comic fonts in general is blambot.com (?). They have quite a bit of free, personal use fonts if you ever need flavour text when italics or bold isn’t enough. (Current font used is Anime Ace 3 Regular BB).
Happy creating and feel free to ask if anything was unclear ^^
29 notes
·
View notes
Text
Headcanons about Lust sans,-- except it's about the jobs he could've have besides being a stripper!
-(Suggestion by a friend) Bikini Bars
-Sex ED teacher
-Sex therapist
-Drag queen
-Probably does Charitys
-Upload Pole Danceing tutorials or just pole Danceing (pole dancing can be it's own thing without stripper stuff..I'm serious, it is own thing- and I love it)
-Sex worker/Stripper/Onlyfans but duh he is one.
-Makeup + nail artist 100% or work at a spa
- SFX makeup artist
-OR NSFW ARTIST (like ink😈✨ whose ace)
-Role model designer
-or a sex toy maker 👁👁?
-fashion designer and is the role model
-SINGER OR DANCER, A IDOL!!!💜
42 notes
·
View notes
Note
I've been using a mix of Krita and Paint tool SAI. I'd appreciate resources for Krita specifically too. Thank you for answering by the way. ♥️
Of course!
So! Here's my guide to making comics with Krita, down to the details such as layer setup, borders, speech bubbles, and SFX.
preface: it took me at least a year to figure this process out; but once when you've figured out the system & a template, it's smooth sailing. let's use this finished spread from the selfship comic last year to go through the process:

i'm going to assume a certian level of digital program proficiency (knowing what layers are, having a general idea of what vector vs raster graphics are, etc) since otherwise this post would be a book lol.
(if the read more does not work: the static permanent link for the full tutorial is on my website here: https://kradeelav.com/diary/tegalog.cgi?postid=312&1740096282
rest of the post under the cut; this one's going to be a long one as is.
let's start with talking about the layers for a single page of the above comic image.

(ignore the "orbs" and "titania bubble" layers - those were oddities for this specific spread.) Going from the top downwards:
SFX - sound effects. this is an optional layer to have if you don't have a lot of sound effects. you can use either render the sound effects by drawing them out (raster) or vector SFX; whatever you're most comfortable with. more on that below.
frame - this is the comic page borders.
speech bubbles - self explanatory. contains both the text inside the bubble and the bubbles themselves.
ink - main lineart & drawing layer; self explanatory.
tone - the shading layer.
(deleted) ruff/sketch - this is the sketchy thumbnail layer that is imported when i first start working on each spread, and naturally gets deleted when the lineart starts looking good on its own.
so!
there's two types of digital rendering krita can do: raster (most similar to drawing with a pencil or tablet) and vector (computer draws mathematical lines and shapes and text that you can manipulate). a lot of programs fully specialize in one or the other but the killer feature of krita is it can do both on a single page; you just need separate layers depending on the rendering..
that's what this "fx" symbol stands for by the way - these are the vector layers....

... and the symbols circled in purple clue you in that they're raster layers (ink, tone, sketch) where you do the actual drawing. with me so far?
speaking of those:
borders/frame
here's what the borders layer looks like + (the print layout layer above everything in black/yellow). the print layout layer is really only useful if you're physically printing this comic (it's basically bleed/trim if you've heard of those terms, ignore this otherwise).

i really struggled with doing borders in krita until finding this tutorial:
youtube
- since the thing is i make a lot of last minute changes. i need to be able to move and edit borders around easily if a panel's not working for me. so the method above makes it incredibly flexible to just ... up and move one, or to make a gutter wider.
i also really need to be able to see what's behind the borders while i'm drawing it to check anatomy sometimes -- the beautiful thing is you can simply turn the layer style to "multiply" and it's effectively transparent with one click.

like this, voila!
lettering
here's the lettering layer(s) with one bubble's text selected.

fair warning: krita is absolute ass with the text tool. it's the biggest failing but in newer versions i do believe they're slowly working on improvements. thankfully this program can do just enough to letter bubbles.
essentially, i use the same trick as the frames shown in the video above. if you slap a "layer style > stroke" on the whole "bubbles" layer, that's where that 2px black border comes from, and that layer-style-as-a-border "follows" every bubble so it's consistent.
(rule of thumb aesthetics-wise is speech bubble borders should be slightly thinner than frame borders, and on average about as wide as your lineart.)
SFX (sound effects)
technically you can hand-ink all of your SFX if vector art scares you or if you don't intend on doing much, but the vast majority of pros use vector work for efficiency. hentai/erotic work also has a lot of SFX versus other (non-NSFW) genres for the immersion factor with bodily functions.
the spread above didn't need a lot, though.

as you can see it's mostly the inorganic orb clinks and then the big SHING. (i put my for-the-web-kradeelav.com signature on the same layer for laziness).
here's part of my current sfx library below just to show you what i start with for erotic strips; usually i start with some base fonts and start moving the letters around individually.

(a lot of these are redone for every project; there's some in here that are already "outdated" in my eyes.)
miscellaneous
my favorite inking brushes are from this free resource pack. my favorite halftone (shading) brushes are from this (also free). thanks for reading!
26 notes
·
View notes
Note
Hello! I was just wondering, how did you learn to make comics? Do you have any resources for making comics? Sorry if this is annoying, I just really want to up my art game, ya know?
I am a terrible person when it comes to any kind of advice so do not take my word as gospel for "Ok I gotta do this now"
ANYWAYS I learned how to make comics by reading them. I have no formal training, I haven't even read any tutorials honestly, save for how to do SFX because those are the most hardest part of comic creation for me - I just see the stuff others do that I think is cool and try to adopt it or reverse engineer it in my head to break down HOW a panel was drawn.
I have no resources other than just go out (or go search online) and find comics that interest you and figure out what catches your eye the most on a page.
AS FOR HOW TO GET BETTER AT MAKING COMICS, you just keep drawing them and your skills increase - just like when you write or when you draw.
If you want better advice - I would recommend watching and reading posts by actual comic creators (or at least ones that take themselves more seriously than me). Comics is a very diverse artform and many people have many ways of executing it.
21 notes
·
View notes
Text
inspired by wyll ravengard (bg3)
#my makeup#wyll ravengard#bg3 wyll#bg3#baldur’s gate 3#makeup#cosplay#sfx#sfxmakeup#eye makeup#makeup tutorial
11 notes
·
View notes