#sims 3 tips and tricks
Explore tagged Tumblr posts
Visit Tumblr Blog
Explore Tumblr blogs with no restrictions, modern design and the best experience.
Last Seen Tumblr Blogs


Fun Fact
The total number of visits Tumblr.com received during January 2021 is 327 million.
Note
I can't remember if you have posts about your picture taking process but I'm really curious how did you get a lot like Prosper Room so crowded and look so lively. Do you pose everyone or do you just get them there and leave them be?
I would love it, if you have time and motivation of course, if you showed us your process for setting a scene and taking pics. I never did those in any sims game tbh and I always love seeing behind the scenes things.
Love you and your work to bits!! ❤️ ❤️
I don't think I have made any posts about my picture-making process because prior to today I don't think anybody has ever asked! But I really appreciate you sending me this ask and your lovely comments. Thank you so much!
For these particular scenes I have 16 Sims in the active family. (I did originally have 20 as stated here but my game kept freezing.) For anyone reading who may be unfamiliar with this process, I add the Sims to the household by clicking on my active Sim and then selecting NRaas>Master controller>Household> Add Sim. I then filter by age and gender so I have a decent cross section of Sims, and enable testing cheats so I can teleport each Sim to the active lot, in this case the Prosper Room. I have a decent gaming rig and can usually add 20 Sims to a lot before my game starts to protest, but as mentioned in an earlier post I had to reduce the number of household Sims in this case to 16, I suspect because the Prosper Room already contains a number of service Sims.
Once all the Sims have been teleported to the lot, I then set about dressing them. This can be a laborious process but I usually have a couple of Sims in the household who have a dozen outfits in their inventories for this very purpose. It is then a simple process using Nraas to transfer one of those outfits to another Sim in the household. I click on my active Sim and then choose NRaas>Master controller>Intermediate>Transfer clothing. A box will then appear as shown below asking for details of the 'Destination Sim' and I then choose 'current lot.'
A list of Sims will then appear of the same age and gender and I just choose the one I want to transfer the outfit to. You can also choose them all if you want!
Now, for my current Prosper Room scenes, I placed meals on all the tables using Nraas Debug enabler: Nraas> Debug enabler>Options sim> make food. (Again, quite a laborious process, because I like there to be a good variety of dishes!) I then instructed the majority of my Sims to sit at the tables and start eating the meals placed in front of them, as seen in the below pic.
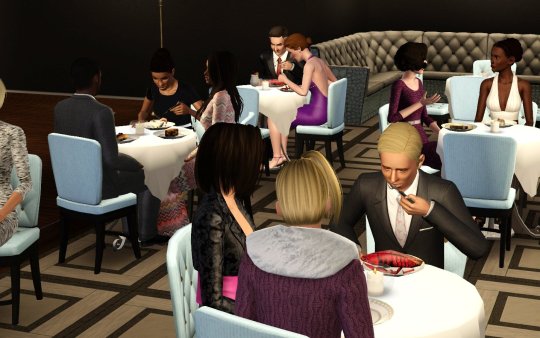
Once they have finished eating, I can make them stay in their seats by having them converse with each other (which is probably the best way of making the scene 'lively') or by using Nraas animator: Nraas>Animator> Animation by category> Play Specific Idle>Seated Idles>a_chairdining_idle sigh_x. The wonderful thing about using Animator is that you can direct Sims where to look, too. (I know you can do that using pose player add-ons if you choose to pose your Sims instead, but if you use Animator the Sims continue looking until you cancel the animation).
I tried to illustrate my answer by using more screenshots but I kept getting warnings that I'd exceeded my character limit, so if anyone reading this needs more clarification of my process please don't hesitate to ask! Thanks again for the wonderful question @oasislandingresident!
87 notes
·
View notes
Photo
I am having this issue hahaha so thanks


TS3 “cannot change style” glitch: A SOLUTION
I was very happily trying jools-simming’s nice tutorial when the dreaded “cannot change style” occured. Saying that I was extremely frustrated is an understatement, but as I discovered by the usual trial-and-error method, there’s a way to fix it!
Make sure you have Nraas’ Debug Enabler installed.
In Live Mode, click on the not-recolorable counter/island/object and select Nraas > Debug Enabler > Options: [object name].
Then select Object > Reset Textures > This object.
Et voilà, you can now use CAST again and change the style of the object as you wish.
Publishing this because who knows, it could be useful to someone else experiencing the same (annoying) glitch :)
680 notes
·
View notes
Text
Some tips for The Sims 3 Buy/Build
Install LazyDuchess’ Smooth Patch to alleviate lag, esp in Buy/Build and CAS.
Keep your CC merged and organized, esp your patterns, this will also alleviate a lotta lag across all modes.
When building on community lots, or any lot rlly, avoid going to the edit world menu, and just put testingcheats enabled into the cheat window, then shift+click the ground of the lot to enter Buy/Build mode. This makes leaving it to save a lot easier, with less “preparing” screens to possibly get hung up in.
Lower your settings, you don’t need any adjacent lots loaded, and you certainly don’t need super water on either. You can always switch these back on when you’re done.
While you’re at it, remove your HQ mod, and turn off your Reshade/Gshade preset, or at least turn off your depth shaders. I only ever turn on my depth shaders when I’m taking screenshots for better fps while playing. The DoF shader esp requires a lotta resources your game could be using to simulate all those 78 townie sims instead.
Save as… vs Save, I Save as… at least every third save. It’s also just good habit to keep backups.
When using the CASt tool, set down everything you plan to CASt first, then switch to a category like the wall tool to avoid eventual lag and drag when using it a lot. Love yourself. You don’t have to suffer using CASt tool in an overpopulated category like misc deco.
Utilize the clone option through testing cheats to duplicate already CASted objects, it’ll keep your design just like the dropper tool, but it’s a lot less time consuming, I promise.
Don’t be afraid to use the swatch save tool for objects you use often, esp community lot objects, as it helps to keep your aesthetic consistent. I also keep all of my favorite streetlamps, benches, and public trash bins etc in a convenient custom collection folder to speed up the process of doing multiple lots in one sitting. These handy tools are there, use them.
The issue with custom counters. They mess up sometimes, if you can’t recolor it suddenly, here’s how to fix that. Now if you can’t place down a cupboard suddenly, even though nothing’s in the way, and you’ve got moveobjects on activated, try putting it on the wall a tile over, and then try adding it to your desired spot again. Lastly if you set down counters or cupboards at a corner, and it messes up the textures, but you can still recolor it, you could do what the video I linked above does, or you could simply pull out the CASt tool, and switch it back to any of its original swatches and click the check, then feel free to recolor it as you want.
Railings will also do the “can’t recolor” trick too, but this is a simple fix, just delete it, and replace it, and you’re good.
“Oh no, I switched between buy and build mode, and now my catalogue won’t load, and I can’t click on anything at all!” Don’t panic, hit F2 and/or F3 on your keyboard, these are shortcuts for switching between them, and if you’re lucky it’ll load properly again. Should you get the bug where you load a category and it’s somehow empty, don’t fret, just click on a different category and this should fix it. Then if you get the bug where all the objects you put down disappear suddenly, sorry your game is haunted. Call an exorcist, or just reload, they might reappear if you do.
Tbh, if you run into any kind of major bugs, it’s likely a sign to either save immediately or just restart your game. These only ever show up when you’ve been at it a while ( at least for me ), therefore starting fresh wouldn’t hurt. Probably also wouldn’t hurt to check whether you might’ve installed something the game didn’t agree with by running Dashboard, or put it through the ol’ Save Cleaner.
Honorable Mention: Keep an eye on the texture sizes and poly counts of objects. I know it’s tempting to build these ultra hyperrealistic lots with clutter at every inch, but unless you’re just doing it for screenshots, or for your story, or using it very sparingly, it is not by any means recommended purely for gameplay. This is just the truth when it comes to any Sims game. You don’t want lag, or max memory crashes, or save errors? The Sims 3 is a 32bit game, that’s almost old enough to drive, be easy on it.
484 notes
·
View notes
Text
TS3 Tips and Tricks: How to Get Tons of Sims at Venues
I saw a forum thread recently from someone asking how to boost crowds at venues. Briefly, here are some tips and tricks that I learned:
Have lots of "party animal" sims in town
Sims with the party animal trait show up the most at Late Night venues, so it helps to populate your town with them.
Have many large roomie households consisting of "singles" in your world (like 6-8 sims). The reason why you want to do this is that households are called to a lot, not individual sims. When a household is called, the game will always try to call as many sims that are available. So, for instance, if a dive bar calls an 8-sim household named "Party Crashers", and four of them are at home at the time, those four will show up. If the bar then calls a 6-sim household called "Living Single" and three of the roommates are available, those three will show up. Now, imagine that a third household is called, and four members show up. That's 11 sims right there!
Get the idea? I have had as many as 20 sims show up using this method.
Don't build too many venues and parks, especially if you have a low population town. I think this is pretty common sense advice. Obviously, if you only have around 30 sims in your town, you won't see a lot of packed venues if you build tons of venues.
Only visit hotspots The game deliberately turns venues into cold spots so that everyone in town shows up at the hotspot. So, if you keep visiting coldspots, it will always seem as if every place is empty.
That's all there is to it. I have heard people say that you need mods and such to have packed venues, but I've never had such a hard time with this issue as to need them.
12 notes
·
View notes
Text
how to move wall decorations / paintings vertically in the sims 3!💚🖼️🎮 (x)
#sims#the sims#sims 3#the sims 3#how to#sims 3 tricks#tricks and tips#how to sims 3#sims 3 videos#move wall decoration vertically#vtuber#vtuberEN#gaming#simsblr#simscore#gamecore#gameblr#momo the gamer!#🎮#💚
0 notes
Text
Poses for The Sims: 90 Packs for Every Occasion (part 1)
In addition to our massive article on how to take photos in The Sims, we’ve decided to release an even bigger collection of poses for every occasion. Feel free to explore all the tips and tricks about photography, then come back for some amazing pose packs – they’re already waiting for you below :)

You can find even more poses in a dedicated Tumblr post – currently the main resource where hundreds or even thousands of packs are collected and organized.
Adult Sims, Solo Shots
Cutie Honey by @hongz0

Download ↑
Emotions 1 by @theserenadeofshadows

Download ↑
Sented poses 2 by @starrysimsie

Download ↑
Photo me by @hongz0

Download ↑
Take My Picture Posepack by @ashlegacies

Download ↑
Smoker by @starrysimsie

Download ↑
COZY DAYS by @wrenmie

Download ↑
Chilling on the couch by @melbrewer367

Download ↑
"Left, Right, & Center” Pose Pack by @grownasssimmer

Download ↑
Male Model Pose Pack N6 by @nell-le

Download ↑
Crying on the Bed by @starrysimsie

Download ↑
CAS
CAS Poses #3 by @thekims4

Download ↑
CAS trait Active by @lanabyakkots4

Download ↑
Romantic Relationships
Love and pizza by @narni-sims

Download ↑
Sweet touches posepack by @ninawhims

Download ↑
Days with you!!! by @pandorassims4cc

Download ↑
You&Me by @starrysimsie

Download ↑
Argument by @narni-sims

Download ↑
Ice cream and talk by @narni-sims

Download ↑
Pose Request #195 by @sciophobis

Download ↑
Love waves 3 by @simmireen

Download ↑
Just One Kiss! by @sciophobis

Download ↑
Cooking Up Romance by @simmisstrait

Download ↑
Dates
Meeting in a Cafe by @aylinmoss

Download ↑
Strength in unity by @katverse

Download ↑
Getaway Car by @sprinkleste

Download ↑
Gentlemen by @simmireen

Download ↑
Go out by @bluexxxxx

Download ↑
Aquarium date by @mdrayvvv

Download ↑
READ PART 2
READ PART 3
🌱 Create your Family Tree with TheSimsTree
❓ Support 🌸 Our Blog
#TheSimsTree#simslegacy#legacychallenge#sims4#sims2#sims3#simsfamily#simstree#sims#sims4legacy#sims4roleplay#sims4stories#sims4couple#thesims4#ts4#ts4cc#plumtreeapp#simsta#simstagram#simsstory#thesims#simspiration#showusyoursims#maxismatch#simstagrammer#sims community#the sims 4#simblr#sims photoshoot#sims 4 poses
372 notes
·
View notes
Text


Endless Summer Collab: Tree Climbers
Hey! I'm SO excited to kick off the week-long Endless Summer collab between myself and some truly amazing posemakers! For the next seven days, there'll be a daily, summer-themed posepack from each of the following participants:
Day 1: Herecirm (Instagram | Twitter | Tumblr | Patreon) Day 2: @irislightsims (YouTube | Twitter | Tumblr | Instagram) Day 3: @simmireen (Instagram | Twitter | Tumblr | Patreon) Day 4: @whimsyalien (Twitter | Tumblr | Patreon) Day 5: @theserenadeofshadows (Instagram | Tumblr) Day 6: @surely-sims (Twitter | Patreon | Tumblr) Day 7 (our host!): @simmerianne93 (Twitter | Instagram | Tumblr | Patreon)
Make sure to follow them so you can collect all 7 packs (and if you're not familiar with their work already... do check it out!!).
Today's gift is a pack of 10 paired poses for 2 kids and a cherry tree, all-in-ones included. Place both teleporters in the centre of the tree, facing forward.
Photo-taking tip: the cherry tree will vanish if the camera is too close. In case you don't already know this trick, you can save camera angles while in tab mode: zoom in, enter tab mode, and hit ctrl+(enter number here). I usually use ctrl+5 or ctrl+6. Now you can leave tab mode, zoom out so that the tree reappears, enter tab mode, and hit the number you just saved - the camera will take you straight there. It saves you having to tediously zoom back in after entering tab!
You will need:- Pose Player - Teleport Any Sim - the upright cherry tree (base game)
Not required, but I find the Buckley Camera Mod useful for those low angle shots!

Download (always free!): SFS | Patreon

TOU: you may adjust for personal use to avoid clipping etc., but please do not reupload/paywall/claim as your own.
I'd love to see them used! You can tag me on Twitter, Instagram, or Tumblr. I repost. ❤️You can easily browse more of my posepacks using my Ko-Fi gallery, since this Patreon page has only existed since posepack 100. Have a request or want to make a commission? Details here!
TOU: you may adjust for personal use to avoid clipping etc., but please do not reupload/paywall/claim as your own.
I’d love to see them used! You can tag me on Twitter, Instagram, or Tumblr. I repost. ❤️
You can easily browse more of my posepacks using my Ko-Fi gallery. Have a request or want to make a commission? Details here!
@ts4-poses @alwaysfreecc ❤️
#ts4-poses#sims 4 posepack#ts4 posepack#sims 4 poses#sims 4 child poses#ts4 kids cc#sims 4 kids poses#alwaysfreecc#herecirmposes#EndlessSummerCollab
370 notes
·
View notes
Text
Q&A
Hi ! I am making this post because I'm not very active here, not to say not active at all here and I see some of you have questions or experiencing some different bugs.
First of all I want to thank you for the kind messages I have received, it really means a lot even if I see your messages only once in a while <3
I will update this post if new issues occur with time so don’t hesitate to check this if you have issues, maybe the answer is already here :)
I have been through all your notes and try to report the issues that happened to several players. If not mentioned underneath, it may be something of a personal issue that comes from conflict with other cc you have installed or just from the game itself as we all know sometimes The Sims 4 can be a little funny !
And also for several reasons like not enough time etc, I am not making submission for cc unfortunately !
TIPS & TRICKS
Appliances disappearing when placed on counters :
You have to make sure the ‘Auto Counter’ is off because it makes disappear cc appliances
- “packages ending by “texture” ” :
To make the cc set take less space in your hard drive, I try to make some similar objects sharing the same textures. The game will only load one set of textures for several items instead of multiple times the same texture for each item. This technique requires the package file having the textures in your mod folder if you use the unmerged version. To make it easier to spot it, I added “texture” at the end of the name of it. If you use the merged version, you don’t have to worry about anything.
If the package with the textures is missing, you will have the items in purple with question marks in your game.
TECHNICAL ISSUES
- Purple items with question marks :
As mentioned above, make sure to have the packages ending by “textures” in your mod folder.
- Wallpapers with question marks :
After the DirectX 11 update, a lot of wallpapers broke. I have updated all of them and reuploaded my Patreon and CurseForge. If you encounter this issue, try to redownload them.
Also, for some reason, the merged version keeps this issue for some players. Try the unmerged version to see if it solves the issue. Unfortunately for some people there is no solution found for this issue as it works fine for the majority of players.
- Windows with question marks :
Auntie Vera’s windows has no solution found as it works for a majority of players but is not working for some without any reason..
The other windows with purple and question marks can happen if you use the merged version. Often, the unmerged version solves the issue.
- Domaine du Clos Kitchen :
I have made some tests with the cabinets and dishwashers and everything works fine on my side. Maybe you can try downloading the unmerged version if that is not the one you’re using. Otherwise I don’t have any clue on what can cause this issue.
- Auntie Vera Plumbing :
while creating the plumbing, I’ve made a mistake on the texture size which happened to create loading issues or stuff like that. The problem has been solved since, you can redownload it for updated plumbing !
RANDOM
- Extensions from previous sets :
I won’t do extra items for the past sets as, but you can do them for yourself if you want too !
- Missing items:
If some items are missing, it may be because they require a specific stuff pack. I tend to make them base game as much as possible, and if not, I will mention it in the description of each set. Also, I can make mistakes so make sure to search by the name of the set in your game just in case.
- Beddings score :
I won’t update previous beddings scores but I took this comment in consideration and the recent and future beddings have higher scores.
- Dark Shadows on cabinets or similar items :
While creating items like fridges etc, I delete occluders so it doesn’t cast strong shadows on elements above like the cabinets. The occluders are used by the game to create more realistic shadows with lights if I’m right, but for some specific items like fridges I use to delete them. That’s why you may have hard shadows while placing fridges from the game under fridge nook cabinets for example.
63 notes
·
View notes
Note
hi lovely!!! i love love ur sims <3
i wanted to ask, do u have any tips on how to make male sims?? also what's ur fav male face presets and stuff!!! it would really help me ehehe
love u!!
HOW I MAKE MY MALE SIMS ?


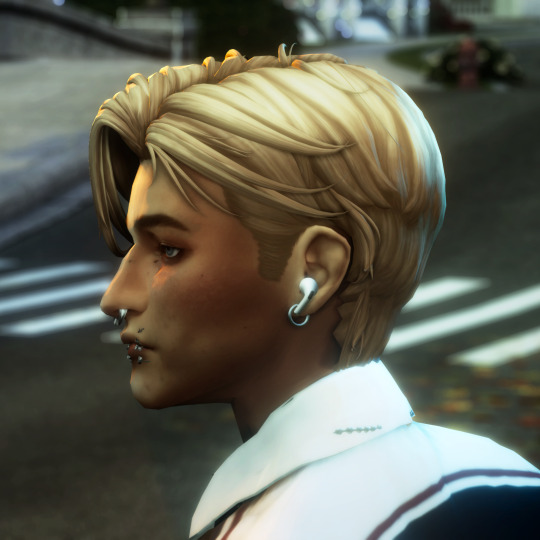
First of all, thank you so so much, it means alot because I always thought my male sims were not that good to be honest lmao. Anyways ! Here are my tips and tricks on how I make my boyos!! 1 - Skinblends! Choosing skinblends is a crucial step because it will be the base of your sim. I mostly use obscurus skins overlays because they have a really nice shading and fits my maxis-mix style. But I know NorthernSiberiaWinds have some good options too. 2 - Skin details!!!! All of my sims (even female) have A TON of skin details layered on top of the skinblend itself. For my males, i'm using alot of shadows and lights, face contour, eyebags, eye mask, lip mask, nose mask, pores, acne etc. Here are creators i'm using : okruee, northernsiberiawinds, faaeish, peachyfaerie, obscurus, sammi xox (for masks), vyxated (for lights) and joshseoh (to add shadow).
3 - Presets : My go to are : Obscurus (my goat) and NorthernSiberiaWinds. But I also sometimes use the basegame eyepresets ! 4 - Proportions! Also related to my simstyle in general but, my male sims have smaller eyes, full eyebrows, defined and bigger noses, defined jawlines, smaller heads. 5 - Makeup : I also apply makeup on my male sims to give them even more details and definition. Eyeshadow/eyebags, small lashes, mouth overlays by obscurus, a tiny bit of blush and/or acne, redness, scars etc. 6 - Inspo : When I go into CAS to make a male sim, I always already have an overall idea of the type of boy I wanna make. It helps me to focus better somehow. What style they would wear, what kind of energy they'd have, hair color etc. Sometimes I even take inspo from a character I liked in a movie/show, anime, video-game etc. I dont personally do it but I suggest to go on pinterest and find inspo on here, it might help you !!
I hope it makes sense, english isnt my first language sooooo... Yeah. I also hope it can help you in any way !! Don't hesitate to dm me on here or twt if you have more questions :) <3
20 notes
·
View notes
Note
hey amelie! i just wanted to ask, how long did it take for you to learn how to build? did you watch youtube tutorials or anything like that? idk, i’ve always wanted to build a house for my own sims but it’s so hard for me to like what i’ve made. did you feel this way too? do you have any tips? sorry i’m such a yapper 😭 have a great day! <3
Hello! Watching simmers like bojanasims, lilsimsie and simlicy on youtube helped me a lot especially when I started building lots myself about one and a half years ago! I listed a few tips for you below!
I also received a similar message from another anon so I'll be answering both here. 🤍
'hiii i recently discovered your yt channel and i love your builds. how did you improve your building skills and how do you make your builds so realistic? 🩵'

Study Real Architecture: Look at real-life houses, apartments, and buildings to understand architectural styles, layouts, and details. This can give you inspiration and ideas for your own builds. My favorites are pinterest and real estate/architect websites.
Plan Your Build: Before starting, come up with a plan and layout for the build. Decide on the overall style (modern, traditional, etc.), number of rooms, color scheme and any special features you want to include.
Get Acquainted with The Basics: Understand the basic tools and controls in Build Mode. Practice using the wall tool, room tool, roof and terrain tools to create a solid foundation for all your builds. There are a lot of really informative tutorials on youtube! (important for beginners)
Pay Attention to Scale and Proportions: Ensure that rooms, windows, doors, and furniture are proportionate to each other. This helps in creating a realistic and cohesive look.
Use Realistic Colors and Textures: Choose colors and textures that are realistic and complement each other well. Consider the overall color scheme of the house and how different materials blend together.
Add Detailing: Pay attention to small details like trim around windows and doors, roof overhangs, and landscaping. These details can make a big difference in the overall appearance of your build.
Experiment with Roofing and Terrain: Roofs and landscaping can significantly impact the realism of your build. Experiment with different roof shapes, angles, and materials. Use terrain tools to create realistic slopes and landscaping features.
Furnish Thoughtfully: When furnishing your builds, think about how real people would use the space. Arrange furniture in a way that makes sense functionally and aesthetically.
Utilize Custom Content (CC): Explore custom content to expand your options for building, furniture and decorative items. This can often help to create a more realistic look as well.
Seek Feedback and Learn from Others: Share your builds in sims discord groups or on Simblr to ask for feedback and look for inspiration. Look at tutorials and speed builds by other players/creators to learn new techniques and tricks. (please don't copy or steal other people's builds to post online though)
Practice Regularly: Like any skill, building in The Sims 4 improves with practice. Experiment with different styles and challenge yourself with more complex builds over time.
Have Fun and Be Creative: Building in The Sims 4 is a creative outlet, so enjoy the process and don't be afraid to try new things in your designs.
139 notes
·
View notes
Text

La Revista oficial de Los Sims
The Official Magazine of The Sims (Previously Official Magazine of The Sims 2) was a Spanish magazine, bimonthly and with a national circulation, dedicated solely and exclusively to the Sim world (SimCity, The Sims, MySims, SimAnimals and Spore.). The first issue went on sale on December 30, 2005, and 33 issues were released. The last one, on March 30, 2012. It included a CD full of official content and Community creations, as well as gifts such as notebooks, pendants or Sims-style stickers.
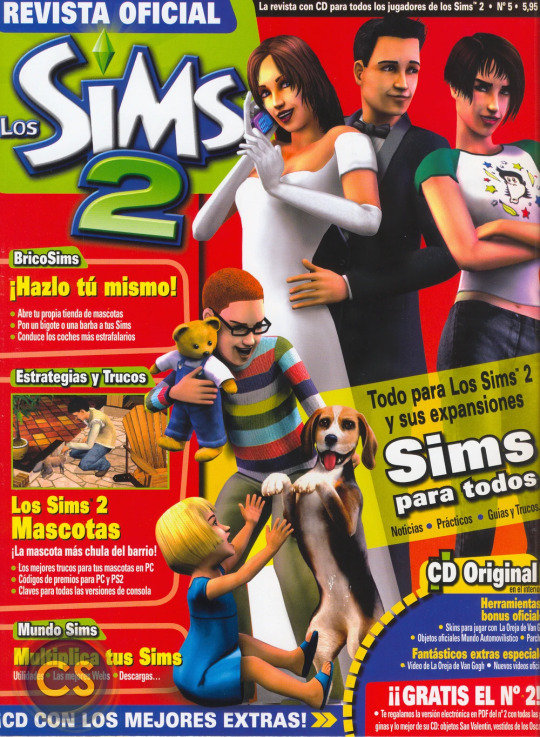
Issue 5

Issue 9

Issue 15 I can't make out exactly what is written, but as I understand at that moment The Sims 3 was released. I remember my pirated Sims 2 disc, which for some reason had screenshots from Sims 3 and had this same couple on the cover.
The magazine is divided into 12 sections, which briefly explain the current events of the past two months, tell the news of each add-on and even patches. The community column contains reader letters, from tips on how to make your Sim happy, to various fan-made content. The issues also contained strategies: all kinds of tricks, interesting curiosities and hidden and not hidden strategies with tables and lists with information from the EA devs. The magazine ran contests giving away expansions and games from The Sims saga, as well as t-shirts, mugs, watches…
Source: Simspedia ES
P.S. I believe there was official magazines in other countries? At least I met some The Sims magazines on Polish and German.
#sims#the sims#the sims 2#sims 2#ts2#video games#game magazine#retro magazines#video game aesthetic#retro gaming#gaming#games stuff
207 notes
·
View notes
Text
Fun trick using EA's Alien Eyes Modifier Slider, located in Eyes/Global. You can adjust the wing tip on eyeliners. This will also minimize the upper eyelid depending on how much you use it, but there's a slider to adjust that as well ( EA's Eye Socket Slider I believe it's called ).
While you're at it, download my all time favorite eyeliner set.
242 notes
·
View notes
Text
Amazing Tutorial on YouTube for Creating Custom Sims 3 TV Channels
I had to share this video, because it has one of the best tutorials to date of how to create your own custom channels to Sims 3 TV. Keep in mind that the process is a little complex. However, I have the sneaking suspicion that once you do this a couple of times, it gets easier to remember all the different steps.
youtube
1 note
·
View note
Text
Getting back into things & flower arranging mod update
Heyoo,
I thought I would write a little update mainly for my own sake but maybe others are interested in my plans too.
I haven't been doing much playing or modding this past year or so, so I'm kind of out of the loop with the game and my past progress on mod updates.
However, I'm hopefully at a point now where I have some more time to get back into things and try to enjoy sims 3 again, as well as return to my older mods and WIPs.
To start, I NEED to finish Flower Arranging 2.0. It's been SO long since I worked on some (imo very exciting) updates, and I just need to get it done and release it. I ran into the problem of occasionally trying to work on it, but getting overwhelmed with the features I planned and then realising that some are kinda useless anyway so working on them was a waste of time...
So the plan is to finish off and release the original features I was working on, and then I can figure out what other features are actually useful and doable. Because otherwise it will just never happen at all.
Features for Flower Arranging 2.0:
New flower arranging interaction with a dialog/LAYO instead of the pie menu, so you can actually see what the arrangements look like, as well as filter by flower and available arrangements
Improved skill journal, with stats and skill challenges
Arrangements have different styles which give different moodlets when viewed (e.g romantic ones)
Arrangements can be scented with flowers to give special effects, some useful, some deadly.......
Maybe some smaller changes, but if they are holding me back from releasing this version then they might banished to v2.1+
So hopefully this will happen soon and you guys will like the update.
Also if you have any tips & tricks for getting back into the game and being inspired again, let me know cos I need it. I miss sims 3 so bad but idk how to play anymore 😢
ok bye
49 notes
·
View notes
Text
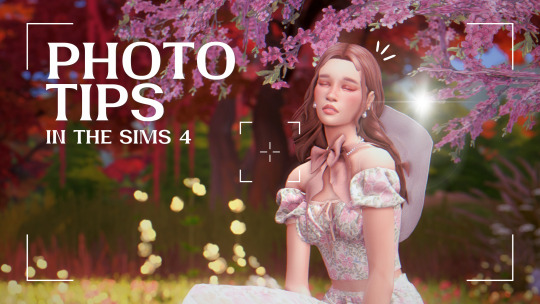
15 Best Sims 4 Photoshoot Lifehacks: Tips, Mods, Poses & Screenshot Editing
We’ve all been through situations with ruined photos because someone photobombed, we missed the perfect sunset, or had to round up party guests who wandered off... The list of little things that can go wrong during a photoshoot is endless. We already wrote a detailed guide on how to take pictures in The Sims, but now we want to share a collection of quick lifehacks to help speed things up.
1. How to make your sim look the right way for a photo
Want your sim to look right at the camera or at a certain spot? Here’s a simple trick:
1) Hit pause in the game
2) Switch to first-person mode with Shift+Tab
3) Turn your sim’s head with the mouse in the direction you need
4) Unpause so your sim turns their head
5) As soon as their head is turned, hit pause again
6) Exit first-person mode with Shift+Tab
7) Snap the screenshot!

Plus, it’s a great way to get more “alive,” imperfect shots :)
2. Better camera
Better Camera Overhaul-V6 by @sulsulduck fixes common camera issues in The Sims 4 gameplay: removes camera bounce off objects, tweaks movement speed on upper floors, lets you flip the camera upside down and bring it all the way down to ground level, makes movements smoother, adds click-and-drag movement, and fixes sim tracking bugs.
youtube
3. You can ask friends to lend their characters for photos
If a big event is coming up (a wedding, graduation, etc.), you’ll definitely need a lot of sims. Finding them for photos is, of course, no problem: you can always hit up Pinterest and download a bunch of decorative sims.
But if these characters need to be active participants in the shot, not just standing around in the background, the search gets a bit trickier. Especially if it’s not just a huge event, but something really important to you. Everything has to be just right :)
First off, we recommend looking for the right sims among your friends in the community – chances are some of them share your taste in aesthetics.
4. Looking for sims in themed groups
Another way to find sims is through various themed groups and channels. Totally obvious tip, but sometimes we forget about these huge archives.
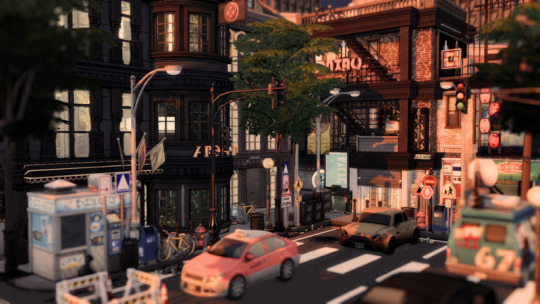
5. Lots for shooting in the street
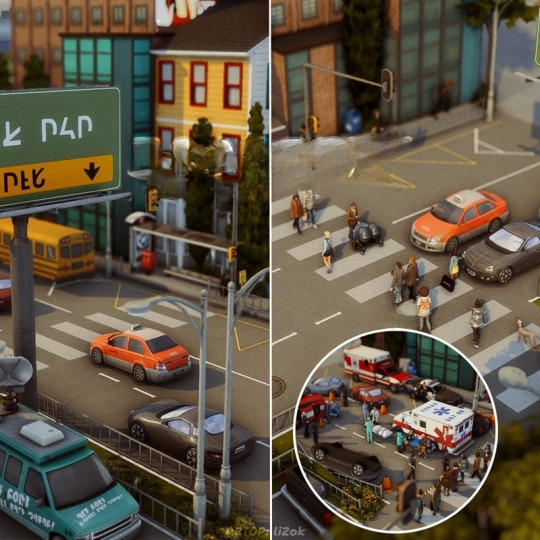
If you need to do a shoot on a busy street, it’s definitely easier to find a ready-made lot. Even better if those lots don’t use CC content. We're sharing links to two great CC-free options for you. Perfect for city photoshoots.
Street without CC + Decorative Sims + Traffic Accident Location by LiZok
New York Street by emeraldstories
6. Separate save for photos
If you set up photoshoots for your sims a lot and often, you know that very often afterwards you need to shoot something else. In your main game, you might have already moved on from that scene, changed everyone’s outfits, and sent them home, but in a special save just for photos everything stays right where you need it.
We suggest getting everything ready for the event in your main game (dress the sims, place the lot, gather all the participants), then make a copy of that save just for screenshots.
7. Check out ready-made saves for cool lots
For your game, not every save from another creator has to be perfect: you can just save the lots you like and use them as locations for your shoots.
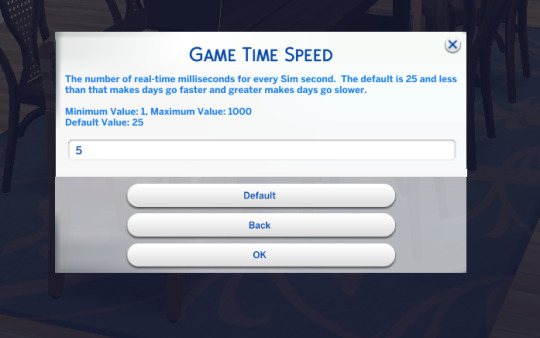
8. Slow down time in the game
One of the most important parts of a photo is lighting. While you’re searching for the right angle, moving things and posing everyone, the best light can be gone. Instead of messing with the in-game clock, you can slow down the passage of time using the Command Center.
Click any computer in the house – MCCC Settings – Gameplay Settings – Game Time Speed
Set it to 100–200 for comfortable shooting.
9. Don’t forget to take photos with the in-game camera too
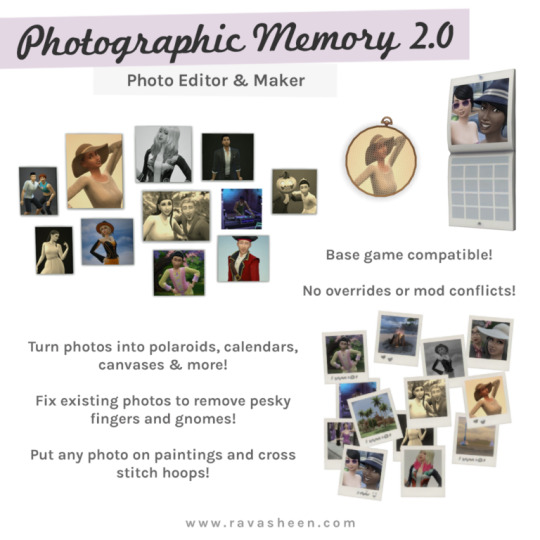
Sometimes we take tons of screenshots, but forget that it can be nice to keep memories of certain events right in the sims’ own house. Use the in-game camera to take photos that’ll stay in your sims’ inventory. After that, you can turn them into fun home decor. You can make them into paintings, calendars, and more. For this, use the Photographic Memory 2.0 mod by @ravasheencc.
10. Clubs for background characters
Basic tip: group other sims into clubs. This helps keep them together so they don’t wander off. Plus, they’ll look great on camera in the background, doing something interesting and bringing life to your photos.
11. How to pose mermaids underwater
To figure it out, check out this clear video.
youtube
12. Make sure styles in the shot match
We’re talking about the characters, of course. If all your sims in the photo are made in Maxis style, one Alpha sim next to them will look odd. Try to keep the style consistent for each shoot. If everyone is styled the same way (doesn’t matter if it’s all Maxis, all Alpha, or a mix on everyone) – that’s perfect.
13. Adjusting character height
If you’re not happy with how the sims look next to each other in terms of height during a shoot, it’s easy to fix using positioning in Wicked Whims. Just turn on positioning and use the up-down arrows.
Click on the sim – Wicked – Actions – Enable Positioning
This also helps solve issues with poses that mess up the height.
14. Put sims in poses so they don’t wander off
If you don’t need certain sims in the shot at the moment, the easiest way to control them is to put them in a pose. This keeps them from leaving the lot too early, or photobombing the background. Once they’re in a pose, use Wicked Whims positioning to move them out of the way so they don’t get in the shot.
15. Post-processing screenshots
Screenshots done up like polaroids look super cozy. If you like that style too, check out the Photokako site. It really streamlines and speeds up the process.
For even more editing options, there’s the DAZZ CAM app. It lets you enhance screenshots right from your phone. By the way, that can be a lot more convenient for getting pics ready for social media.
🌱 Create your family tree with TheSimsTree
❓ Support 🌸 Our Blog
#TheSimsTree#simslegacy#legacychallenge#sims4#sims2#sims3#simsfamily#simstree#sims#sims4legacy#sims4roleplay#sims4stories#thesims4#ts4#ts4cc#plumtreeapp#simsta#simstagram#sims ideas#inzoi#ts4 mods#sims photo#sims graphic#sims tips#Youtube
76 notes
·
View notes
Note
hi! Im so sorry if this is the wrong place to ask, I've looked for answers for this before so I'm just not sure,,
i absolutely adore your sims and your story! Its completely inspired me to create a story w/ my sims as well! the only thing is I'm quite overwhelmed with it all and I don't know where to start :(
do you have any tips? Whats your process? there's so many things to use and I'm just curious what you use! Thanks in advance and no pressure to answer if this is the wrong place :))<33
HAI :D OMG EXCITING <3 no worries! my inbox is always open for assistance and i'd love to help! here's a bunch of tips ranging from writing to technical to artsy stuff:
the start:
⟡ i should preface this story did not begin as one typically would which is say following the example of how to write a novel in a year. my writing style for this project started out with my interest in the characters created. my desire to wanting to know why certain oc's acted the way they did and that's where it all began. what started out as short stories of certain individuals reworked into something much more authentic. this was the hook for me so you gotta find that one sliver of interest and run with it. you can most certainly utilize tools like character sheets, pinboards, storyboards to assist you but i find that if i'm not connected to the story, it's difficult to use them
⟡ with that being said LOL invest the time in fleshing out your character because when you understand how they work, when you believe in them, the easier it'll be in creating scenes and writing dialogue. for me, it's almost intuitive writing for characters to the point where i will easily check myself and rewrite a scene because it didn't align with a certain character
⟡ while the influence of your own ideals/experiences eventually bleed into an oc, it's important to identify that, otherwise a cast of diverse characters eventually feel the same. this was something i struggled with for years which is why i could never really begin until now!
⟡ it's good to ask yourself what sort of story do you want to create. the best question is is it plot driven or character driven? what sort of tone do you want to set? do you want to blend them? i think there's a huge stress on just doing things for fun and not taking things seriously but i do want to challenge others to consider what that might look like for others. sometimes people like to create grand posts or fun slice of life posts and neither is more valid than the other. it's truly up to the author
technical stuff:
⟡ i'm gonna be honest with you, i'm not as organized as i once was in how i go about plotting things however! in the beginning, i would utilize sticky notes with ideas written on them and then shuffle around how i wanted things to play out. now i use a dingy little notebook LMAO but i've heard good things about milanote! as for dialogue, i do use google docs but i do think they're under fire for using your things for ai training or somethin O_O
⟡ i do use photoshop to edit my photos and that usually looks like cropping, color/contrast enhancing and sharpening. i do add dialogue last because when i sharpen it all together, the font looks cwispy! there's this mini tut by @/stinkrascal on how to format the text so it's all even if that's the style you're going for! anyways it changed my LIFE lmao! right here are some free alternatives. also this is an older post in which i shared my process and it includes some tips and tricks with photoshop (you can also see how i used to format text lmaooo)
⟡ knowledge is power. if i find myself really struggling with certain aspects, like maybe the logistics of a character, i'll set aside some time to learn from certain authors, commentators or directors. even if it's a short clip of seeing how they approach something as simple as their thought process behind how a scene supported a character to something as small as the significance of Isha's hat from Arcane
misc writing tips:
⟡ ooh! because tessellate is such a large group of characters, it can be challenging to structuring a plot. so i started off by slowly introducing characters rather than all at once. i also break up character plots into arcs but with that comes filler episodes to help space out big moments. i like to utilize filler episodes as bite sized pieces that introduces the readers to newer characters while also allowing there to be breaks in between. those filler posts highlight certain events, ways of living, etc that might influence how things play out in the future. a good example is kai, we're nearing the end of his arc but all of those little moments in between really helped shaped how things played out!
⟡ when i think of conflict, i think of it a lot like a boiling pot. it starts out at a neutral temperature (your foundation), before bubbles begin to form (minor annoyances between characters), steam hissing (the lead up) to an eventual lid popping off (the conflict). the build up is the most important part to the pay off!
⟡ my best piece of advice for darker themes is really understand the topic and stray away from stereotypes as it diminishes a lot of depth in certain subjects as well as does more harm than good. recognize that at the end of the day a weakness does not define a person as they are a person through and through. approach it with compassion rather than judgement.
⟡ i know i know everyone says to read your dialogue out loud and that is incredibly important however while doing that, think about the flow too. as a writer, because we are goal oriented, sometimes dialogue can be turned into what will progress the plot which makes things feel a bit unnatural and sometimes lacking the proper flow. remember to consider the personality of a character. how is a line delivered through a character who is brash versus one who is a bit more reclusive? also! here's a great video about the stiff dialogue in veilguard that shows what unnatural dialogue can sound like.
⟡ remember, comparison is the thief of joy. it's easy to get caught up in recognition and likes. there was a time where i consistently got 3-5 readers and that was it. there are moments now where certain posts are incredibly inconsistent in engagement and sure, it can be disheartening but then i think about the handful of individuals that consistently comment, the specific asks about how a certain post made them feel seen and interact and i remember why it's i chose to write. it isn't the recognition i seek, it's the connection. it's important to have that one thing that gives you the strength to continue because truthfully, things can be inconsistent and that's okay.
the artsy stuff:
⟡ i am a huge fan of cinema, animation and photography. i think consuming a lot of media and art has helped train my eye especially if i feel as if my screenshots are becoming repetitive. it's good to see how different directors go about framing dialogue. comic panels are amazing as well since artists find new unique ways of captivating an audience through levels like coloring, framing, posing and such! it's honestly why i introduced some vertical shots to black out bars in story posts because of that unique angle! remember, media is meant to inspire you! after watching the latest season of Arcane (haven't finished it yet tho) it genuinely relit a fire under my ass LMAO
⟡ different angles, lighting and positioning can help elevate a story. the aesthetics of a story can really add another layer of depth however it's important to remember that it is a supporting role, not the entire role
⟡ i do use my own reshade and i've formatted it to have similarities of a film camera as well as my preference of color correcting. i lean heavier towards contrast, colors and shadows however i always encourage for people to look into what supports their vision the best! the lightroom shader by quint and pd80's contrast/brightness/saturation shader help with color grading in game as they do have sliders that tweak certain colors. the sepia shader is great for adding a cinematic tint but it can conflict with relight and the way the lights are presented. relight of course can add those shadows in lighting. i'll sometimes have two presets, one for up close shots to further shots because sometimes zooming out can create inconsistencies in your preset as things might look to muggy or like a disco ball LOL (ps what helps with that is adjusting bloom if used and messing around with shadows/midtones/highlights/saturation with that lightroom shader)
last but not least, a story is a labor of love, it's a tool in which authors can utilize the pen to their own manner whether it's to communicate ideas or to simply tell a tale. don't be afraid to dive deep into the layers of your story and remember each piece can be important factor but it's entirely up to you as to where you want that focus to be. it does take a lot of courage to start but i truly believe if it's something you cherish, it'll always be worth it!
i do wish you the best of luck! thank you for trusting me enough to give you some tips and tricks! i tried to lean more into the more finite details as i felt like this is what truly helped me throughout the years! <3 also here is a complimentary meme i made:

28 notes
·
View notes