#terraform tutorial
Explore tagged Tumblr posts
Visit Tumblr Blog
Explore Tumblr blogs with no restrictions, modern design and the best experience.
Last Seen Tumblr Blogs


Fun Fact
Tumblr was attacked by a cross-site scripting worm deployed by the Internet troll group GNAA on Dec 3, 2012.
Video
youtube
Terraform on Azure - Create Basic LoadBalancer | Infrastructure as Code
#youtube#Learn how to deploy a Basic Azure Load Balancer using Terraform (Infrastructure as Code) in this step-by-step tutorial! Discover how to use
0 notes
Text

Fully Underwater Lot Tutorial
@creida-sims @kitkat99
UPDATE January 2025
There is now a much, much easier way to do this. This version of SimPE now includes a tool to change terrain geometry. To edit the terrain in SimPE, go to Tools/Neighborhood/Neighborhood Browser and load your neighborhood. In the Resource Tree, select Neighborhood Terrain Geometry (NHTG) and select the only resource in the Resource List. In Plugin View, click Terrain Editor. It's very intuitive, but basically, you can edit the terrain under a lot to make it be underwater. You can also delete the road with the Road Editor.
I'll keep the old tutorial for archival purposes, but unless you can't or don't want to install this version of SimPE, it is pretty much obsolete.


Some warnings and disclaimers
1. This is not a beginner tutorial. I have tried to explain with as much detail as I can, but still, if you just started playing The Sims 2 I recommend trying out other building tutorials first.
2. I have tested it but there's always a possibility that some new problems will come up. Follow at your own risk. Backup your neighborhoods before trying this. Test it first in a new empty neighborhood.
3. These lots are roadless, so they require specific gameplay conditions to avoid breaking immersion (pun intended).
4. They will behave like normal lots in the sense that sims can walk around and do anything as if they were on land. There's one big problem to consider: when sims go fully underwater, their hair and some parts of their clothing might disappear visually.
So this is more useful for structures that sit above the water, shallow water that doesn't reach a sim's head or, with some modifications, small islands surrounded by water. So unless you want bald mermaids, I don't recommend this for sims that live underwater.
5. If you use Voeille's hood water mod, reflections will look glitchy in lot view, because this is technically not a beach lot. The only solution I found is enabling "Lot view ocean reflections" in RPC Launcher. Otherwise you'll have to deal with glitchy reflections.
6. Before following this tutorial, make sure you know the basics of creating, editing, importing and exporting SimCity 4 terrains. Written tutorial by SimEchoes here, video tutorial by loonaplum here.
Software and mods used
The Sims 2 FreeTime expansion pack (required for the modifyNeighborhoodTerrain cheat)
SimCity 4 (required) Hood Replace by Mootilda (required)
Lot Adjuster by Mootilda (required)
Portal revealer by Inge Jones (required)
Voeille's pond and sea water overhaul and RPC Launcher (optional, see disclaimers)
The Sims 2 Apartment Life and Bon Voyage expansion packs (optional, for "walk to lot/work/school" options)
Cheat codes used
moveObjects on/off
modifyNeighborhoodTerrain on/off
1. Creating/editing a terrain in SimCity 4
1.1. You can edit an already existing terrain or create your own from scratch. In both cases, you need to keep two things in mind: If you want the usable area of the lot to be underwater, such as making houses for mermaids or a coral reef, make sure the water is shallow. No more than a few short clicks with the terraforming tools in SimCity 4. This is because The Sims 2 live mode camera won't go underwater, so making the water too deep might make it uncomfortable to build or play the lot.
If you goal is to build a structure mostly above water, like a ship or an oil rig, you can get away with making the water a bit deeper, but not too much. I've noticed that sometimes the lot terrain tools stop working correctly if there a hill that's too steep.
1.2. Once you've created the terrain, you will need to add a small island on the area where your lot will be. I know it seems contradictory, but trust me, it will make sense. Create and name your city. Use the terraforming tools in city mode to make a tiny island of about 6x2 squares.

1.3. On the island, use the road tool to place a straight road that takes up 4 squares. Then, using the street tool (the last option), place two short streets at each end of the road.
Streets will disappear in TS2, only roads translate to roads in ts2, so why do we place them? Well, placing a street at the end of a road will get rid of the rounded end bit in TS2, which can't be used to place lots. This will be important for the placement of the lot and to make sure the edges of the lot are underwater. If this doesn't make sense yet, don't worry, it might make sense later.
1.4. Save the terrain. Don't exit SimCity 4. Copy your new/edited sc4 terrain from your SimCity 4 folder to your SC4Terrains folder in your Sims 2 documents directory. It is usually
"C:\Users\YOURUSERNAME\Documents\EA Games\The Sims 2 Ultimate Collection\SC4Terrains"

1.5. Back in SimCity 4, we're going to make a second version of this terrain. Remove the roads and streets you made before, with the bulldozer tool. With the level terrain tool in Mayor mode, carefully remove the island, so it's on the same level as the bottom of the ocean/lake. Don't change anything else. Save, exit and copy this second terrain to your Sims 2 SC4Terrains folder. Make sure you rename the file to something different from the first one, like adding "no roads" to the filename. You should have two terrains by the end of this step. One with the small island and one without it.
2. Editing the terrain in The Sims 2
2.1. Open The Sims 2 and create a new neighborhood using your new terrain. Something to keep in mind: if you want the terrain to be a subhood of another neighborhood, make it a subhood from the start. You will not be able to move the lot once it's finished, since it will be roadless. I don't recommend decorating the neighborhood for now. Leave it empty until the end of this tutorial.

2.2. Place the smallest empty lot (3x1) on the island.
2.3. In neighborhood view, open the cheat console by pressing Control + Shift + C, and type
modifyNeighborhoodTerrain on
To quote The Sims Wiki:
"This allows you to alter the neighborhood terrain by raising or lowering it. To use this cheat, be in the neighborhood view, then enter the cheat "modifyNeighborhoodTerrain on" (without the quotation marks), and click over the area you would like to change. To select a larger area, click and drag the cursor to highlight the desired area. Press [ or ] to raise or lower the terrain by one click, press \ to level the terrain, and press P to flatten terrain. When you're finished, type “modifyNeighborhoodTerrain off” in the cheat box (again, without the quotations)."
If you use an English keyboard, these instructions will probably be enough for you. If you don't, I recommend first testing the cheat, because the keys for using this cheat are different in other languages. For example, in my spanish keyboard, the question marks are used to raise and lower the terrain and the º/ª key flattens it.
Another aside: When you select an area using this cheat, a green overlay is supposed to show up. Some lighting mods make this green overlay invisible, like the one I use. If that's your case, you kind of have to eyeball it. Remember that one neighborhood grid square in TS2 is equivalent to 10 lot tiles, or the width of a road. I recommend getting a mod that allows you to tilt the neighborhood camera on the Y axis, which will allow you to have a bird eye's view of the terrain.

2.4. Flatten the terrain around the lot so it's at water level. This cheat won't allow you to edit the terrain inside the lot, so you have to edit the terrain around the lot. Make sure there is plenty of flat underwater space around the island. You should end up with something like the picture above. The water will have some holes, but don't worry, those get filled with water the next time you load the neighborhood.
2.5. Enter the lot and place any object on it. Save the lot and exit the game. This is so LotAdjuster recognizes the lot in the next step.
3. Expanding the lot with Lot Adjuster
3.1. Open Lot Adjuster and select your neighborhood and lot.

3.2. Click "Advanced…". Check "Over the road (only enlarge front yard)". Use the arrows to add 20 tiles to the front yard. Click "Finish" and "Restart".

3.3. Select the same lot again. This time, check "Add and remove roads". Uncheck the road checkbox for the front yard. Add 20 Tiles to the back yard, 20 tiles to the left side and 10 tiles to the right side. Check "Place portals manually". You should end up with a 60x60 lot, which is the biggest size. You might want a smaller lot, but unless you know what you are doing, I recommend starting with this size. You can shrink it later. The goal of making the lot this big is making sure the edges of the lot are underwater. Click "Finish" and exit.
4. Moving portals and flattening the lot

4.1. Make sure you have the portal revealer by Inge installed in your Downloads folder before the next step. Open your game and load your neighborhood. The lot should look something like the picture above.

4.2. Load the lot. Delete the object you placed before. Place the portal revealer on the lot near the mailbox/phone booth and trashcan. It looks like a yellow flamingo and you can find it in Build Mode/Doors and Windows/Multi-Story Windows catalogue. You will notice that when you select the object from the catalogue, some yellow cubes appear on the lot, and when you place the object, the cubes disappear. After placing the portal revealer, pick it up and place it again. This will make the yellow boxes visible again.
So what are those yellow boxes? They are portals. They determine where sims and cars arrive and leave the lot. The ones on both ends of the sidewalk are called pedestrian portals, and in the street, one lane has portals for service vehicles (maids, gardeners, etc.) and the opposite is for owned cars and carpools. You can see the portal's names if you pick them up. Make sure not to delete any of them.
Now, since this is going to be a roadless lot, ideally there won't be vehicles in it. This means that the lot would ideally be accessed through walking only. In community lots, this would not be an issue if you have the Bon Voyage expansion pack, which allows sims to walk to lots.
In residential lots, you might run into some problems. Service NPCs always arrive on vehicles, and unless your sim owns a vehicle, the carpool and school bus will always come to pick sims up for work/school. It might break your immersion to have a vehicle show up underwater or on a ship. There are many options to avoid this: having sims work on an owned business instead of a regular job, not having kids on the lot, making the kids homeschooled, avoiding calling service NPCs… it depends on how you want to play the lot. For example, my icebreaker is a residential lot, only adults live there, some sims live in it temporarily and none of them have a regular job.

All of this is relevant because we're going to move the portals. Where you move the portals depends on you. Think about how you're going to use the lot. In my icebreaker, I placed the car portals (which won't be used) underwater, on a corner of the lot. I placed the pedestrian portals on the ship, to pretend that the walkbys are part of the crew or passengers. But for now, just move the portals, mailbox/phone booth and trashcan to a corner of the lot. To be able to pick up the mailbox/phone booth and trashcan, use the cheat moveObjects on. Delete the street and sidewalk tiles using the floor tool (Control + click and hold left mouse button + drag).


4.3. Flatten the island with the level terrain tool. Save the lot. Almost done! Don't mind the hole in the water, this will be fixed. You will notice that in neighborhood view, the island is still there. This is because the neighborhood terrain under the lot hasn't updated. I don't know why this happens, but it does. Normally, moving the lot would fix it, but we can't move this lot using the game's tools. Instead, we are going to fix the terrain with Hood Replace. Don't exit the game yet.
5. Updating the terrain with Hood Replace
5.1. Create a new neighborhood using the new roadless terrain. Make sure it has the same type of terrain (lush, desert, etc.) as the first one. Again, name it "NO ROADS" or something similar. Exit the game.

5.2. Open HoodReplace. On the left column you will select your "NO ROADS" neighborhood. In the right column, select the neighborhood that has the underwater lot. Check these settings: Replace terrain, replace road, and versioned backups. Leave everything else unchecked. Click Copy.

5.3. Open The Sims 2 and load the neighborhood to check if the changes worked. That concludes the tutorial. At this point you can shrink the lot if you don't want it to be so big. Remember to move the portals to their final placement when you're done building the lot. Also keep in mind pedestrians (walkbys) always walk by the mailbox, so keep the mailbox accessible for sims.
If you're going to have multiple underwater lots, I recommend making them first, and decorating the neighborhood after. Doing this in an already existing neighborhood might be more difficult, mainly because, if you made any changes to the terrain using the modifyNeighborhoodTerrain cheat in the past, they might get reset when using Hood Replace.
154 notes
·
View notes
Text
A Step by Step tutorial on how to not die
(In SAGAU) By yours truly, your ol' pal, Narrator~
Let's see how you fare, can you, whoever "you" are... complete this most wondrous tutorial!?
--
Step One: BELIEVE
oH, you're in a game? Don't just stand idly, you're in an open world game, silly! And fantasy at that, laws in your world do not apply in this world most of the time.
So you best believe (I'm still bejeweled) that you are in a game.
--
Where the hell am I? How did I wake up in a patch of grass...?
...Wait, is that... Violetgrass? No, no, I'm just delusional, I think I pulled an all-nighter on Genshin again.
I'm probably just in a hyper-realistic dream or something. This isn't some isekai fanfiction.
☒
--
Step Two: Assess!
LEt one be different from the rest, as a certain someone had said. Every AU is different from the rest, so you must assess and collect knowledge of your situation!
Are you a revered God, or a hunted Impostor? Or are you just some ordinary guy living in a simulation?
--
If this a dream, I can just wander off and do stuff right? Whatever, I'll wake up anyways.
The first thing I need to do is figure out my current situation.
☑
--
Step Three: Avoid & Approach
Don't staLl. Once you've assessed your situation, you must certain situations that would cause conflict, and approach situations that would be in your favor.
...that's it.
--
"Have you heard? The Creator has announced an Impostor wandering around..."
"Oh my! I hope they catch them soon..."
Don't tell me I'm in a SAGAU fic...
FUCK.
So, I need to lie low and not enter any if the nations. The Rainforest in Sumeru won't be favorable because if the Forest Rangers.
Venti is the Wind God and Wind is well, everywhere so Mondstadt's wilderness is out of the question.
If I traverse somewhere far from Liyue's Harbor and the Adepti Mountain, or whatever it's called... I can hide within the terraformation, right....????
☑
--
Step Four: Survive.
Congratulations! You've done the three Previous steps! Now you just need to survive, right? Can't be that hard.
Just collect resources, seek shelter and maybe grow crop farm! Just avoid anyone and everyone, become a misanthrope or something.
--

#genshin impact#sagau#self aware genshin#sagau cult au#imposter sagau#sagau impostor au#sagau angst#genshin
307 notes
·
View notes
Text
Mapmaking 101
Hello. I recently asked if there was interest in me doing a tutorial on mapmaking. The reaction was receptive, and so here I am.
A good quality map can liven up your next campaign,be a nice addition to your book, or simply be a piece of art to be admired. This tutorial is for hand drawing, although I’d imagine some of these tips and tricks can be applied to digital drawing as well.
You will need:
• A pencil
• A pen
• An eraser
• Good quality drawing paper for the map and notes
• A ruler (optional)
• Masking tape (optional)
Alright! Let’s get started!
-This tutorial will take place over several parts, so keep a lookout for future installments
0.1- Notes
It is a good idea to jot down notes on details that are absolutely fixed. Even if you are starting completely from scratch, having some notes on hand can help with planning, especially if the map is detailed and contains a lot of points of interest.
0.2- Borders
Sometimes maps have borders running along the edge. Whether or not you use one is up to you, but they can be a nice embellishment, or even a storytelling element (a border can give a sense of formality, and can indicate this is an ‘official’ map, made by a group or government as opposed to someone who drew it on their off-time).
A simple way to create a border is to run four strips of tape along the edge of the paper, then tracing the lines before removing the tape. Another way is to place a ruler along the edge, and again, trace along the side. You could also just eyeball the border. The decision is entirely up to you.
- Defining the land-
You will need: Notes, map paper, pencil, eraser, ruler (optional)
We’ll start big, and then zoom in. The example map contains a large landmass and several smaller islands.

Notice that everything is jagged and asymmetrical. Generally, landmasses look ‘natural’ if they aren’t exactly perfect. A perfect circle or square convey artificially, which you may want. Maybe something or someone has terraformed your world through science or magic, or the land may be the remains of an intergalactic vessel! The oddly familiar shape may be because the continent is actually the fossilized remains of giants or gods.
Whatever the shape, trace it onto the paper with your pencil. If going for a natural look, let your hand wiggle as you go. Geometric shapes can be done by eye, but you can also use a ruler, a protractor, or any other shape to trace your lines. If you’re unsatisfied with areas, you can erase the lines and re-do them. And remember, up until you the point put ink to paper, plans, and therefore, the map can change.
In the next installment, we’ll be focusing on the geology of your world.
14 notes
·
View notes
Text
Sunrader's tutorial is exactly what I was looking for:
Terraform Right Side Up | Flipping SC4 Terrains for Sims 2, by Sunrader Sims.
7 notes
·
View notes
Text
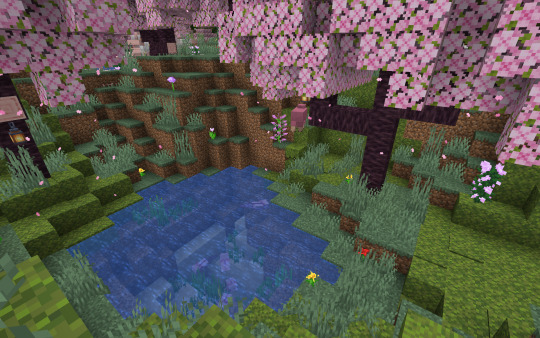
hello! this is a custom cherry blossom island that i made!
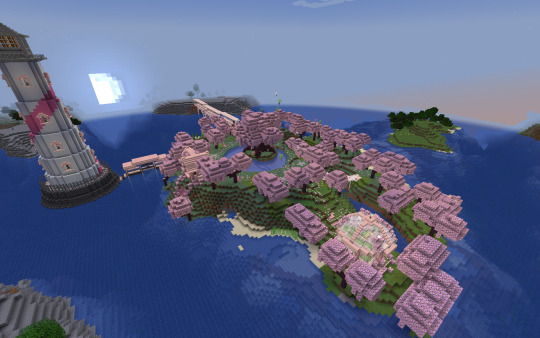
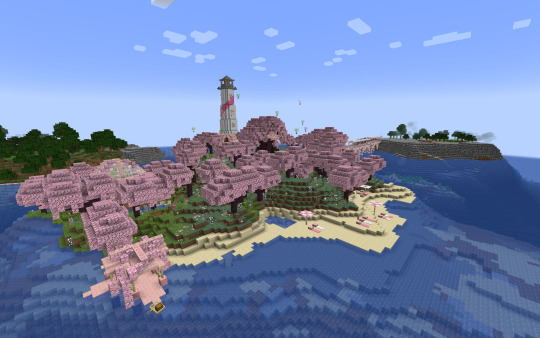
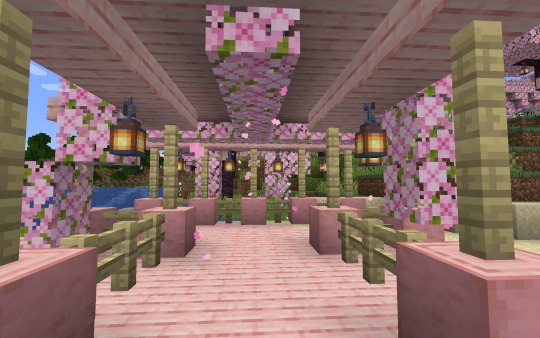
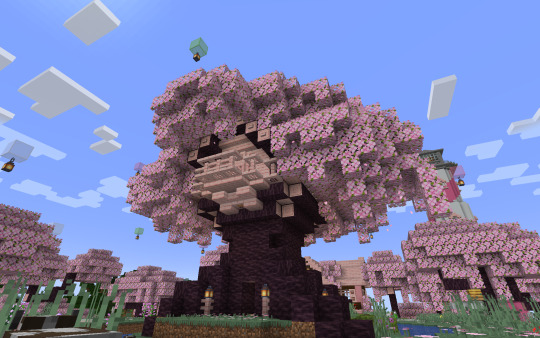
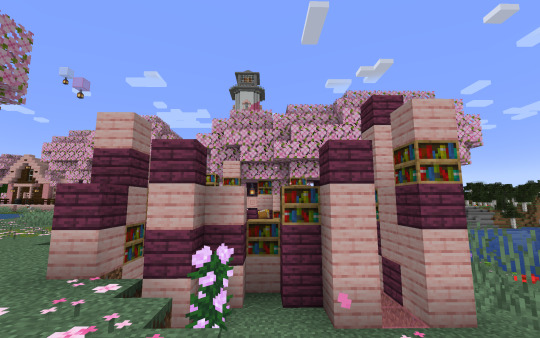
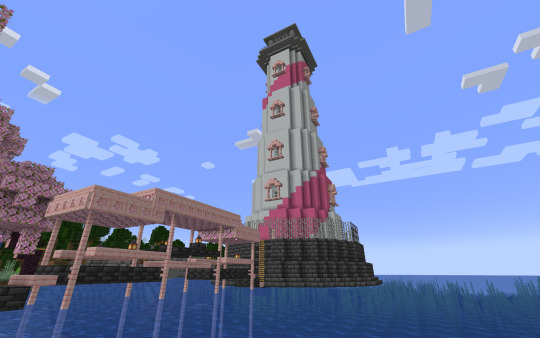
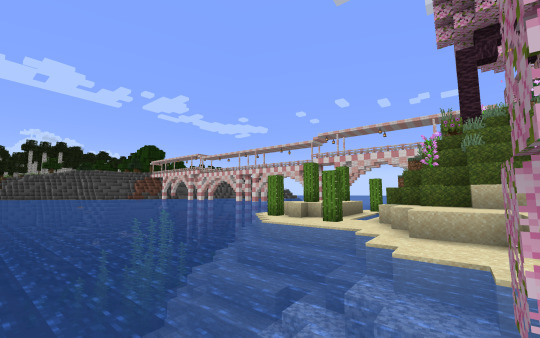
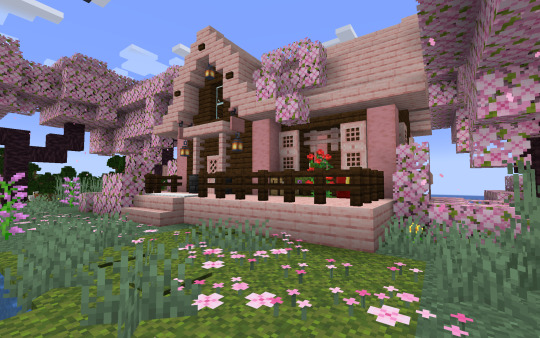


originally i started this in survival, every single piece of grass/sand that is there was originally stone. i hand-mined and replaced all of it, though in some layers if you dig you'll just immediately see stone lol. a couple of the buildings were also done in survival, namely the tree house, lighthouse, house, docks, bridge to the lighthouse, and the enchanting area. this also includes all the glass and concrete for the stars and moon. eventually i got sick of doing it all in survival and switched to creative, cause it was faster and got me more excited on the project lmao
i used 4 tutorials for this, and i'll put them under the cut. some other things i looked at pinterest for inspo so if anyone is curious i can send a pinterest board or specific pins.
overall was a fun learning experience! i love terraforming in minecraft lmao, but building is super hard for me, so it was fun to learn different things through tutorials and just trying shit out. :3
tutorials!
Cherry Blossom Starter House // Croissant Cat
Cherry Blossom Treehouse // Cortezerino
How to Build a Lighthouse // ThisIsDoomGaming
Cherry Blossom Greenhouse // Polar Cat
:3
#spent months on this!#which doesn't seem like a lot but wow#terraforming takes soooo much time if you're doing it block by block lmao#originally i was going to hallow out the island of all stone entirely#but that was way too much fucking work and i got tired of that shit quick LMAO#im genuinely so proud of this#might put dirt on the island where the long bridge connects to#just cause i think the stone is ugly af#for the record did cherry blossoms because this was the first world i ever found a cherry blossom biome naturally#and got super excited lmao#so here's this now#this is vanilla mc btw if it wasn't obvious lmao#thanks for reading btw#minecraft#minecraft builds#minecraft terraforming#waddleschats#waddleschats in the tags
13 notes
·
View notes
Note
Hello! I've been told to ask you this =D
What do you think about Jimmy as a minecraft player, what is he?
It's for a project =3
ooh a project, how fun :0
i should preface this by saying i’m not the BEST person to give this opinion, cuz despite how much i write jimmy, i uh… don’t actually watch his pov? i haven’t seen any of empires (except the hermit’s crossover in s2), i don’t watch his streams, and i don’t watch the one-off vids he posts on his channel. most of my knowledge of jimmy comes from his appearances in other pov’s life series episodes and how ppl portray him in fandom.
howEVER, that said, i’m curious how my interpretation would line up with other ppl’s. i view minecraft players as generally fitting into a few broad categories- tho there can def be overlap between them or a jack-of-all-trades situation. and this prob applies more to people who actually play minecraft professionally (ie. ‘play video games for a living’) than the casual player (such as myself hagshdha).
builders: have a creative eye and practiced skill in building to the point where they can, generally speaking, throw down a decent build on the fly (things that require a lot of planning/detail work often drafted in creative mode first). have good understanding of achieving a certain shape and color with their block placements. may or may not include terraforming ability. generally drawn to the game’s building aspect and spend a lot of time/care making things look good.
redstoners: have an adequate amount of base knowledge for how most redstone components work and interact with each other, tho they may occasionally still use tutorials or take inspiration from others (can only reinvent the wheel so many times). usually capable of making simple redstone machines/contraptions on the fly. generally drawn to the game by the possibility of farms and automation. some take it to extreme game-breaking lengths (doc).
competitors: have highly-trained skill in areas such as PVP, parkour, and/or any other multiplayer server type minigame. think hypixel and MCC. this isn’t to say they don’t have their own solo worlds for building or other projects, or don’t participate in smps, but their main draw to the game initially was competitive multiplayer and it features heavily on their channels. to me, speed-runners/challenge-seekers are a subcategory of this.
explorer: this type doesn’t actually show up often in popular mcyt bc it’s a largely solitary- and in some ppl’s opinion, boring- experience. but these are the players that spend hours in their solo worlds just traveling around, mining out massive caves, or doing any other kind of repetitive grindy work as a manner of relaxation. some ppl really enjoy this aspect of minecraft and it’s a major draw for them. special mention for kurtjmac, a mcyter who’s spent 13 years and counting just walking to the farlands in an old version of the game (tho he does other things on his channel as well).
and now for what category i think jimmy fits best in (which again, doesn’t mean he can’t build or do other things). i don’t have a good name for it rn so i’m just gonna call it ‘the sillies’ (affectionate).
sillies: above all else, they’re here to have fun. most, if not all, of their content is on multiplayer worlds (both public servers and private smps), and on these worlds they are extremely social, making a concentrated effort to interact with others even if not legitimately roleplaying. high amounts of pranks and hijinks abound, as well as ‘committing to the bit.’ lots of videos feature them doing some kind of funny little challenge, game, or mod with their friends. again, that doesn’t mean they can’t engage w the other aspects of the game or be skilled in those categories, but generally, it’s not their main objective and not how they spend most of their time.
that’s what i’ve got! obviously u could split all of these into many subcategories, and your average player is gonna be fairly well-balanced. but for our pro cubitos, i think this is a nice way to categorizing things (and it at least makes sense in my mind).
#hermitcraft#empires smp#solidaritygaming#back in my day minecraft only had two genders: miner and crafter#(LMAOOOOOO)#ty for the ask it was neat to get my thoughts down on this
31 notes
·
View notes
Text
actually if i'm gonna make a games rec post.
here are some games i have enjoyed recent-ish.
kenshi. an open-world squad-based rpg with base-building elements. get stronger by getting beaten up. lose a fight and get knocked out, have your weapons and food taken by the bandits that mugged you and left you bleeding to death. get rescued by some slavers that capture you and sell you into slavery. free yourself from slavery and limp away until you roll in hours later with a whole squad of overpowered fighters. then head a little bit too far south and get murdered by skin bandits. they take your skin. this is a completely self-directed game; there's no "main plot", although arguably "figure out the history of the world" is kind of the main 'story' mystery. there's also a bunch of unique recruitable characters with custom-written interactions. i usually recruit exclusively from freeing slaves but you can do w/e.
wildmender. a survival gardening game. this one came out recently and the devs are still releasing bugfixes; it's unclear if they'll make large content patches in the future. apparently multiplayer can still be pretty glitchy, and there's a water flow bug that i've been finding very frustrating. the way biomes work is kind of unsatisfying. kind of slim content-wise, but still, i really enjoyed what's there. out of all of the climate change terraforming anxiety games i've seen, this has been the one i've most enjoyed.
hellpoint. a scifi soulslike made by a team of like 12 people. previously i had thought things like "it would be neat if dark souls was less linear". hellpoint is a great example of why that might be a nightmare. the areas are connected in such a complex way, with one-way routes and branching unlock keys and secret paths and hidden doors behind hidden doors that it gets profoundly disorienting. a hint: almost every single hidden door in the game (there are a lot) is the middle panel of the same exact three-paneled-wall geometry. once you notice what it is you will see it everywhere. also, the enemy designs are hot.
crystal project. remember playing fan translations of final fantasy v? remember wandering around in old mmos? crystal project is kind of a... turn-based rpg mmo-influenced platformer. with a job system. you can sequence break the game from the tutorial level and also at basically every other point in the game too, although until you know what to look for it might seem like there's a linear critical path. but there's a lot out there. hint: play on easy mode. the combat gets tough later on and the game absolutely expects you to be finding and exploiting some class combinations.
astlibra: revision. a sidescrolling rpg. it must have been released episodically originally or some of the chapter pacing makes no sense. also it was originally released with a mess of art sourced from all sorts of places; 'revision' is a re-release with a more unified art style. it gets extremely anime all the time. there's a whole obligatory section where you have to ask all the women in a town about what kind of panties they're wearing. it's rough. i enjoyed how chaotic the systems are and how much Stuff there is to pick up and upgrade and unlock. the plot goes some unexpected places though it doesn't quite stick the landing, i still enjoyed what it did. also karon should be the love interest instead.
silicon zeroes. a cpu-building puzzle game. this straddles the line between the tech/code games that are literally just "learn a new language and code in it" and ones that are more structure-themed like, idk, spacechem. connect modules to assemble solutions to problems. it takes too long to get to chapter 3, which is where they start asking you to make entire cpus.
ashen. another souls-like. i just really like the environments in this one. the initial area looks gorgeous and the way it changes through the game is really neat to see happen. the seat of the matriarch is wonderfully awful to traverse and i wish there had been two or three more dungeons like it in the game. you can't level up; you gain stats mostly by progressing sidequests and the name quest. i eventually ran out of things to spend money on AND inventory space to store items. the late-game tuning is a little rough but until then it's great. a hint: there are three weapon types and within that type nearly all the weapons are identical. you get thrown so many weapons that don't matter; don't worry about collecting all of them. see above re: running out of space and things to use money for.
i guess it would be cheating to recommend minecraft regrowth or morrowind but i have also been playing those.
31 notes
·
View notes
Text
Moved and upgraded my farms. Left is sugar cane, right is melons and pumpkins. Also figured out the redstone for the crafter (thanks to tutorials on youtube) so melons are auto crafted into their block forms.
If you have suggestions on what kind of buildings I should build to hide these, please let me know. I'm struggling lmao

Next worked on more terraforming. First was an empty spot that led into a cave that I covered, turned into a pond and decorated.
Next was the entrance to the cave I lit up, covered over and am working on turning it into a little lake. There's a waterfall between the two.


2 notes
·
View notes
Text
started playing animal crossing new horizons again ^^ starting over from scratch and i'm following a guide on pinterest on what you should do on our first week to get everything set up so you can actually start planning out your island, and stuff
last time i played, i don't think i ever made it to terraforming before i got frustrated with the game being so hard for me to like (this is what i get when i'n not interested in looking up tutorials i guess) but this time i'm going to be smarter
2 notes
·
View notes
Video
youtube
Terraform on Azure - Create Bastion Service and Host | Infrastructure as...
#youtube#Learn how to deploy secure Azure Bastion Host and Bastion Service using Terraform (Infrastructure as Code)! In this step-by-step tutorial we
0 notes
Text
I think I may have found a way to convert sims 2 neighborhood terrains to the sims 3 create a world tool. I’m not sure if it’s common knowledge already, but with SimCity 4 Terraformer, Gimp, and CAW it’s possible. You don’t even need the Sims 2 or SimCity 4 installed! I’ll hopefully be posting the tutorial tomorrow.
3 notes
·
View notes
Text

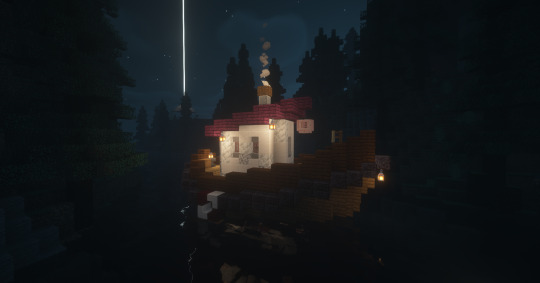
i decided to take a break from terraforming today on milkcraft to learn how to build a boat thank you minecraft tutorials
+ extra of me before boat and screenshot in sildurs shaders
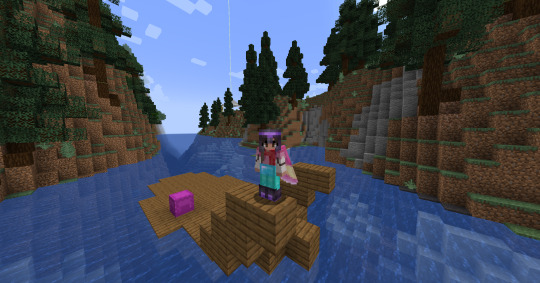
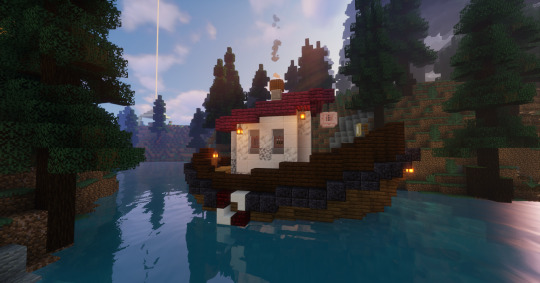
(p.s. the tutorial is this one, i just changed some colors to match my builds ive made in the area!)
5 notes
·
View notes
Text
Stellaris: A Basic Tutorial, Section Two
Following on from section one, hopefully at this point you have a fledgling interstellar society with a Science Ship leaving its home star system for the first time, your Head of Research is leading valuable scientific work, and you know what most of the icons at the top of the screen are. Now we're going to get into some of the other crucial systems, so once again strap yourselves in and let's get to it!
Part 1 - Planetary Management
Unsurprisingly, there's nothing more important to a society than where its people live, so we're going to take a look at where yours live right now. Take a deep breath, prepare to see a fairly unintuitive and information-dense screen, and click on your home Planet, either from the System view or in the Outliner on the right hand side of your screen. It should look something like this:
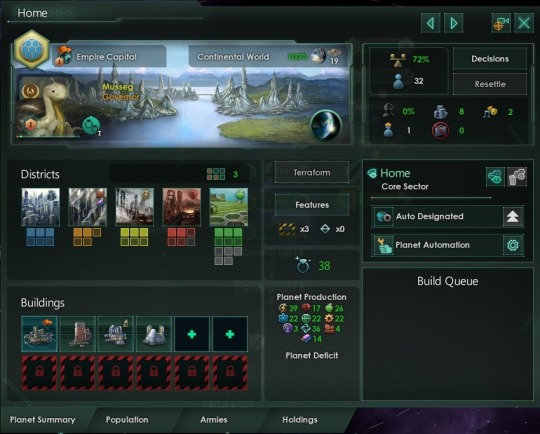
So, let's start from the top - first you should see the Planet's name, which you chose when designing your society, and directly beneath that is the Flag you designed. To the right of the Flag is its planetary designation - there's a variety of these which provide different bonuses to different outputs (such as Mining Worlds, Tech-Worlds and Bureaucratic Centres); after that is what type of Planet it is and its Habitability, followed by its Size (I'll explain that momentarily); the person in front of the city is the Governor, who will be elaborated on later in this post, and in the bottom right of this section is a Planet Modifier.
Going down the screen, we see the Planet's Districts. These are important, as the Jobs they create provide your basic physical Resources, and you should recognise which is which from the descriptions in my previous post; the filled boxes show which ones are built, while the unfilled ones show which can be built - the maximum number is determined by the Planet's Size, and you can fill that entirely with City or Industrial Districts, but the ones providing base Resources have their own individual caps from Features (which will be in the next paragraph). Below these are Buildings: some of these provide the more advanced resources, while others enhance the effects of your Districts, and others have more special effects which I'll leave to you to discover; do note, of course, that you only get a maximum of twelve Building slots per planet, and one of them is always taken up by the Capital Building.
OK, now for the middle. The greyed-out Terraform button is something you can find out for yourselves; Features shows relevant bits of planetary geography, such as fertile plains for Agriculture Districts or ore-rich mountains for Mining Districts, as well as Tile Blockers which limit the District Cap until they're cleared. The number next to the box with hazard colouring shows how many Blockers there are, while the triangles to the right are for special rare Features and Deposits which I won't spoil. The diamond ring symbol below this is Trade Value, which is a whole other system beginners don't really need to understand that I'll try and explain in a few posts' time, and I hope the Planet Production box is self-explanatory.
Top right box now. The percentage is Stability, which gives various minor boosts to the Planet and honestly takes care of itself most of the time, then Pop count - Pops are an abstract representation of how many people are on the Planet, with one Pop working one Job. Planetary Decisions are a very minor feature I barely use and can be safely ignored; Resettlement allows you (if it's legal in your society) to manually send Pops between Planets, but as you most likely only have one Planet right now it's unavailable. The next five numbers are:
Crime, the percentage that's probably at zero right now and will honestly in all likelihood stay at zero for the whole game, because Crime is nearly always irrelevant.
The number next to the buildings is free Housing, how many more Pops the Planet can hold before it gets overcrowded.
The music note and mask represent Amenities, the stuff keeping your people happy. As long as it's not negative you're good.
The figure with the hard hat shows how many free Jobs there are, I generally try to keep 3-6 available in case I get busy managing some other aspect of galactic politics and Pops grow while I'm not looking, because in most societies it's not actually beneficial to maintain a reserve army of the unemployed.
The symbol that looks like it's banning briefcases is your number of unemployed Pops; if I had any here it would also have a partially-filled triangle showing me what Stratum they are, which I'll explain soon.
Below these, we have some other administrative details - which Sector the Planet belongs to (I'll explain that another time), its Designation setting, and its automation settings, which let you take a hands-off approach and let the game manage the Planet for you (don't though, it's shit at it); then at the bottom is the Build Queue, which I hope is self-explanatory.
Everything here has tooltips so I'd encourage you to look over it all and familiarise yourself, because you'll be seeing this screen a lot; for now though, let's take a look at the Jobs tooltip in particular, which shows us what Jobs exist on the Planet and what Strata they are. The game explains this mechanic poorly but it's important, so I'll try and do it better.
Society here is universally divided into three Strata, known in-game as Workers, Specialists and Rulers (and known in the real world as Proletariat, Petit-Bourgeoisie and Bourgeoisie). Rulers are rare, and only tend to work in the Capital Building, Specialists produce advanced Resources (Scientists, Artisans and suchlike) and Workers produce base Resources. When a Pop grows, they automatically fill the highest-available Job (unless you manually prioritise another on the next screen); if a higher one becomes available they'll automatically move up to take it (, but if theirs is removed (say, by demolishing an Administrative Centre) they'll take time to demote. Not all Pops will always be able to enter any Stratum - for example, your society might develop Robots that can function as Workers but lack the processing capability for Specialist tasks, or you might be running an empire with multiple species in different forms of Slavery, where some are permitted to work as Specialists, some kept only as Workers and some deliberately kept out of standard employment as conscripted Defense Armies.
If we go to the next tab of the Planet screen you can see a full breakdown of the information in the tooltip, and clicking on each Stratum heading allows you to see the details of each Job and adjust its Priority; you can also see the Pop Growth Rate, the planet's average Happiness and a pie chart of its demographics.
The next two tabs aren't important right now, so feel free to either close this screen or poke around at it some more until you're comfortable!
Part 2 - Leaders
We've just spent a whole lot of time looking at where your Pops live and work as a whole, now we're gonna focus on the individuals right at the top. Leaders are the movers & shakers of your society, the people who lead the charge into the great unknown or into battle. There are four Classes:
Governors, who govern your society's Sectors, enhancing productivity and making domestic work run smoothly
Scientists, who oversee your Research or explore the depths of space as commanders of Science Ships
Admirals, who lead your Fleets in interstellar conflict
Generals, who lead your Armies in planetary invasions
They're powerful individuals with a wide variety of skills and bonuses, and as such you can only support a limited amount, as represented on the top bar of your screen by the numbers below the gold figure with the star. If you click the matching icon on the left-hand side, you'll see the screen showing all the Leaders you currently have working for you (besides Envoys, who are a sort of pseudo-Leader with their own hard cap and no Traits or levels), along with their Traits, their level, their current assignment and their monthly Unity upkeep cost; below them is all the potential Leaders currently available for you to hire. You can also see their homeworld, their previous job (which is just flavour) and their Ethic, which has minor effects largely related to Factions which I'll explain some other time.
Your most important Leaders are those on the Council, which is viewed from the second icon on the left-hand bar. This consists of your Ruler, your Head of Research and your Minister of Defence (all titles customisable by clicking on them, and you can unlock a couple more positions later); the latter two can be swapped out at any time, but the Ruler is largely out of your hands and decided by your society's Authority type as chosen during setup. Some Leaders have Traits that only activate when they have a seat on the Council, and the Ruler cannot take a regular field job for their Class while ruling; furthermore, some Council positions are restricted to certain Classes, while others are open to any. As well as their general effects (viewed, as ever, through tooltips), the Council is responsible for implementing Agendas, long-term initiatives with subtle effects through their development that are amplified once they're ready to be implemented.
I think that covers Leaders decently enough and this is fairly long so I'll leave it there. In Section Three we'll examine Warfare, because sooner or later you'll probably find an angry neighbour.
As always, any questions or feedback are welcome!
16 notes
·
View notes