#the amount of adjustment layers &masks i used....
Text
i was asked by @matthew-macfadyens for a colouring tutorial, so here we go ! i've been making gifs for almost 4 years now and finally feel comfortable and confident in my skills to make a full tutorial on my colouring process. there are so many different ways people colour gifs, and there's no wrong way, this is just how i do it ! i learned to gif by reading so many tutorials and picking and choosing what works for me, so hopefully this can help someone out !
if this tutorial helps you, please considering supporting me !
buy me coffee ♡

TUTORIAL UNDER THE CUT
what you'll need:
- photoshop ( i use ps cc 2023 & frame timeline )
- basic ps knowledge ( how to make gifs, how to sharpen gifs, general understanding of adjustment layers, layer masks and blending modes )
- a whole lot of patience
helpful resources:
the beginner's guide to channel mixer by @aubrey-plaza
giffing 101 by @cillianmurphy
gif making for beginners by @hayaosmiyazaki
colouring yellow-tinted shots by @ajusnice
becca's mega colouring tutorial by @nataliescatorccio
@usergif
PART ONE: BASE COLOURING
- step 1: curves
- step 2: exposure
- step 3: colour balance
- step 4: selective colour
- step 5: levels
- step 6: brightness / contrast
- step 7: gradient map
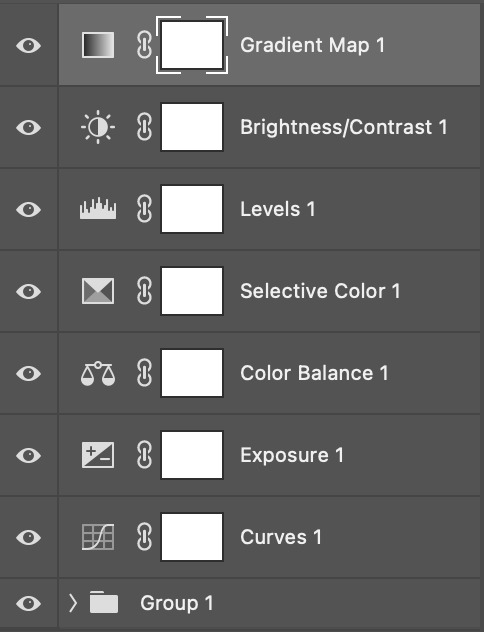
okay so, before we get started, this tutorial is for colouring only. at this point, i've already gotten my screencaps, imported them into photoshop, made the actual gif & sharpened the gif. the above image includes what my typical adjustment layer stack looks like !
STEP ONE: CURVES
a lot of people do the majority of their heavy lifting in curves...i'm not one of those people. i've never gotten the hang of curves and haven't been able to fully taken advantage of everything it can offer. i use curves to mainly brighten up my gif and to start my process.
i use the "auto" button in the curves function - this automatically corrects the curves for your gif ( mainly the brightness / contrast )
you can see that the auto curves has brightened up the gif and evened out the brightness/contrast. i just find this gives a better starting point for the colouring process.
STEP TWO: EXPOSURE
this step is for, you guessed it, brightening the gif more and evening out the contrast and blacks. i don't have any real rules for doing this, the amount i highten the exposure and contrast is different based on the scene and the show, however, i tend to stay around +1 on both exposure and gamma correction.
exposure effects the brightness of the gif and gamma correction effects the blacks and contrast. this step also effects the saturation of the gif, so it's important not to go too crazy. i often end up coming back to this step every now and again to adjust and fiddle with it.
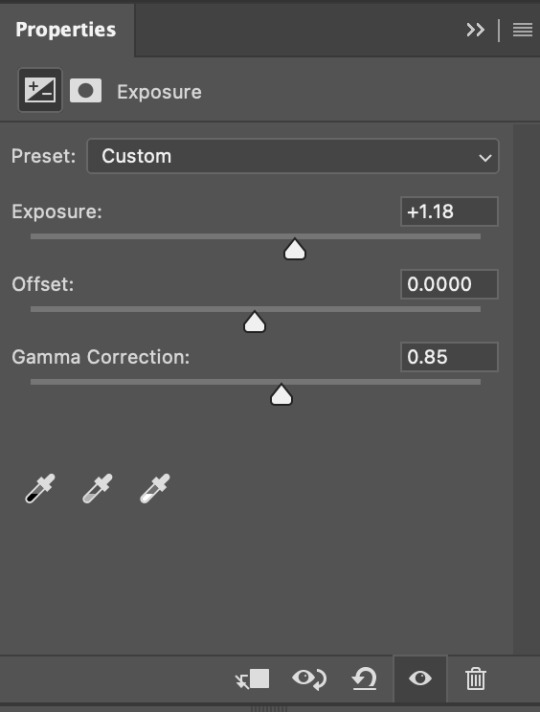
for this gif, i put the exposure at +1.18 and the gamma correction at 0.85
you can see this step serves to add some more brightness and contrast - it also adds some more saturation, that we don't always want, but don't worry, that's what the next steps are for !
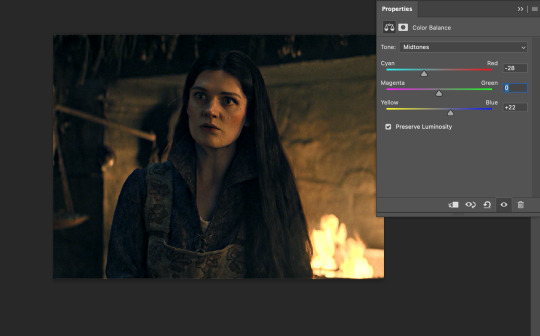
STEP THREE: COLOUR BALANCE
i use this step to do a lot of my heavy lifting - i'm a whore for colour balance. this serves to even out the colours and help neutralize the colours for an easier canvas. it's important to understand the basics of colour theory for this, i recommend checking out the channel mixer tutorial i listed above, because a lot of those steps applies to colour balance.
essentially, there's three separate profiles to edit on - highlights, midtones and shadows. in each profile, you have 3 colour sliders. the top one is your cyan to red, middle is magenta to green, and bottom is yellow to blue. the colouring of the scene will decide where to move your sliders.
for example: if your original scene has a cyan tint to it, you'll want to pull your slider to the right, towards the red to help neutralize the cyan. if your scene has a green tint, you'll want to pull it left towards the magenta. as you move the sliders, you'll notice that sometimes it brings out other colours you don't necessarily need, you can adjust the other sliders to help neutralize further.
i always do my main correction in the midtones profile.
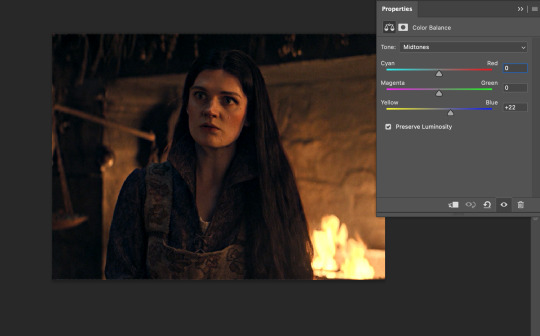
since this scene has a heavy yellow tint, my first step was to adjust the bottom slider. i pulled the slider to the right towards blue at +22. you can see this helped get rid of a lot of the yellow, but adding in the blue warmed up the reds and made it more saturated.
to help with this, i pulled the top slider left towards cyan to help neutralize that red.
i pulled the top slider to -28 and you can see this cut out that heavy saturation and redness. it's looking a lot better, but now it's a little too green for my liking. this is where that middle slider comes in!
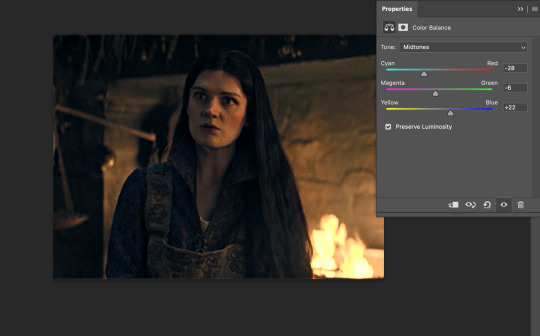
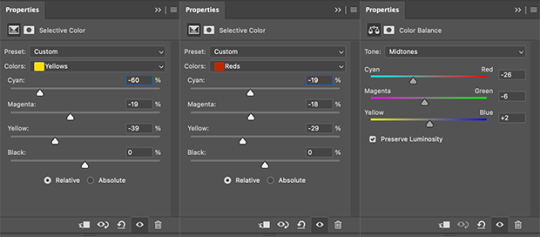
i pulled the middle slider to -6 towards the magenta to help counteract the green that came in. ( i ended up going back in and adjusting the bottom slider to +10 instead, as it was a little to blue )
you can see this step really did the heavy lifting, helping to neutralize the canvas so that it's easier to work with...but it's not quite perfect yet!
STEP FOUR: SELECTIVE COLOUR
a lot of the same principles around colour theory apply to selective colour! this is where i go to adjust the colours according to what my colour palette is. for this gif, the overall colour is going to be purple, so i'll adjust the individual colours with that in mind.
i only ever adjust my red, yellow, white and black profiles! sometimes i'll do the other colours, but that's only for tweaking the final colour. i normally don't touch them at all.
ps: you'll notice i prefer a cooler toned gif, and almost always go for a more magenta looking red/yellow.
i always start with my yellows:

in the yellow profile, i pull my cyan towards the left to -38 (this helps eliminate the green in the yellows) and my yellow slider to the left to -27 (this cools down the yellows. i top it off by adjusting my magenta slider to -10, to help lower the saturation of the yellows.
you'll notice this step got rid of most of the green undertones - that's because the green was nested inside the yellows, so by taking out a lot of the cyan and yellow, you're left with a warmer yellow as opposed to a cooler yellow.

next i go on to my reds. this step will mainly effect the alys's skin tone, but i'm going to do pretty much the same as above but with much less dramatic of a change. lowering your colours in your red profile too much can lead to a very saturated gif, which is not what i'm going for.
i pulled my cyan slider to -19, magenta to -9 and yellow to -15. you can see this helped add some more cooler tones to the reds.
the next profiles are your white and black profiles. i use white to brighten the lightest parts of the gif. no rhyme or reason here, i just pull the black slider towards the left...usually around -25. for the black profile, i always move the black slider towards the right. anywhere from +3 to +8, depending on the gif. for this gif, i did +8. this darkens the blacks and, in my opinion, helps the gif pop!
you can see this step got rid of the yellow tint, gave the gif a more neutral look and adjusted the reds to better compliment a purple colour scheme !
STEP FIVE: LEVELS
this adjustment has three toggles - i'm not 100% sure what each toggle really does, i just know that by pulling the leftmost toggle to the right, it darkens your gif, and pulling the rightmost toggle to the left brightens your gif.

this step is so hard to explain, but really i just pull the toggles around until it looks good...sorry !

STEP SIX: BRIGHTNESS / CONTRAST
this step is exactly what it says on the tin...it brightens your gif. this step is based on your scene and personal preference, there's no real guide to it.
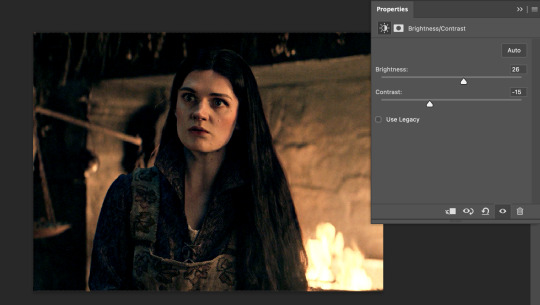
i always pull my brightness slider to the right ( brighter ) and my contrast slider to the left ( less contrast ).
STEP SEVEN: GRADIENT MAP
this last step is something i learned from @nataliescatorccio ! i add a gradient map to the top of my stack, and choose a lighter colour of what i want my overall gif to be. in this case, i used a very light purple!
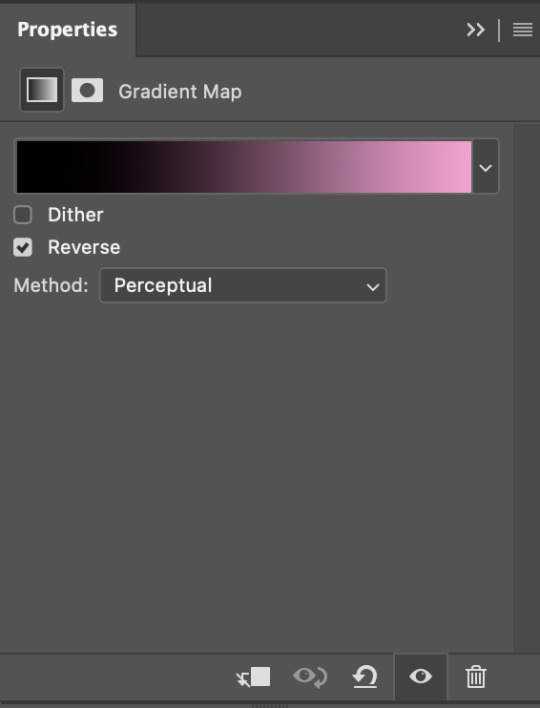
i then set the blending mode to "soft light" and lower the opacity to anywhere from 20-30%. for this gif, i did 30%
this step will help make your colour pop once you do your main colouring!
PART TWO: PAINTING & COLOURING
- step 1: layer 1
- step 2: layer 2
- step 3: layer 3
- step 4: final touches
okay, so my actual colouring process is based in 3 layers. for this gif, i'm using a deep purple/mauve colour !
STEP ONE: LAYER ONE
between your brightness/contrast and gradient map layers, add another blank layer. change the blending mode of this layer to "colour" and set the opacity to 40%.
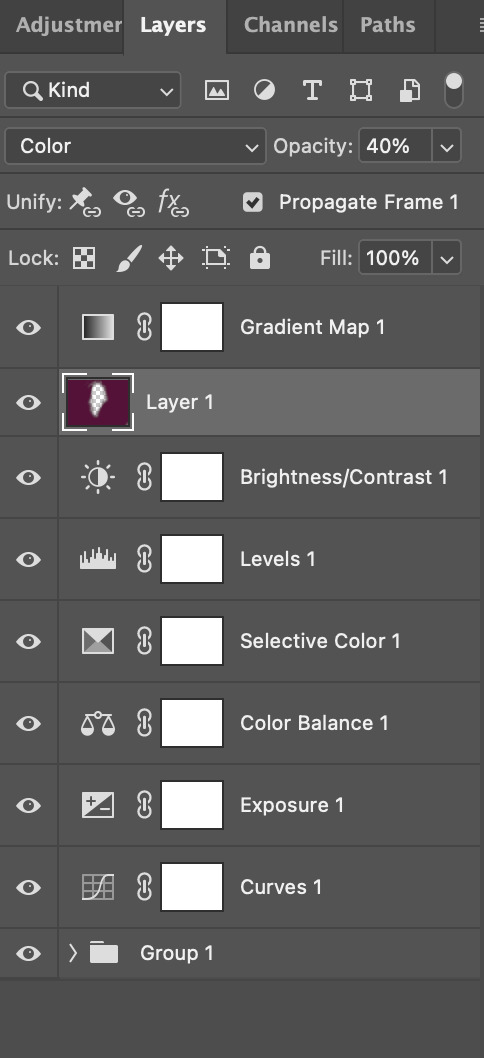
then, using a soft round brush with an opacity of 100% ( size of the brush is your preference, i typically use around 108 ), colour the parts of the gif you want coloured !

you can see this helps us get the canvas to a more uniform purple colour!
STEP TWO: LAYER TWO
for layer two we're going to do the exact same thing. add a layer above your previous, set to "colour" at 40%. we're going to go over the same areas!
you can see this helped get the purple so much more vibrant and closer to what our final colour is going to be!
STEP THREE: LAYER THREE
for our final layer, add another layer above the previous 2, set your blending mode to "multiply" and your opacity to anything from 60%-100%. for this gif, i did 60% !
now, our colouring is pretty much done but you can see that, now that our colour is down, alys's face is still a little too blue/green/yellow for the background purple. the next step, we're going to adjust and add final touches!
STEP FOUR: FINAL TOUCHES
at this point, i went back into my selective colour layer and adjusted my yellows & reds and went back into my colour balance layer to adjust everything overall.

at this point, i'm going to go in and add some adjustments layers above everything - i usually add some brightness/contrast, and a selective colour layer to darken the blacks.
which brings us to our final result:
#usergif#dailyresources#pscentral#ps tutorial#tutorial#coloring tutorial#allresources#userbecca#tusermich#userjoelle#ughmerlin#mialook#*tutorial#**
142 notes
·
View notes
Text

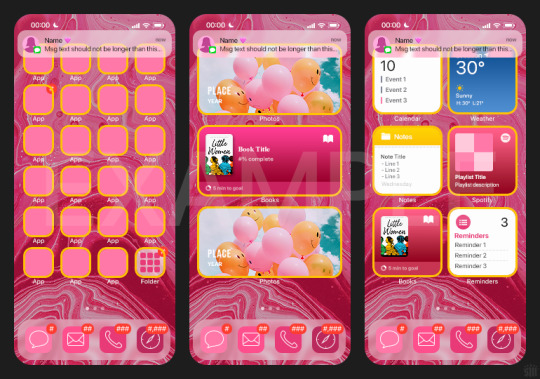
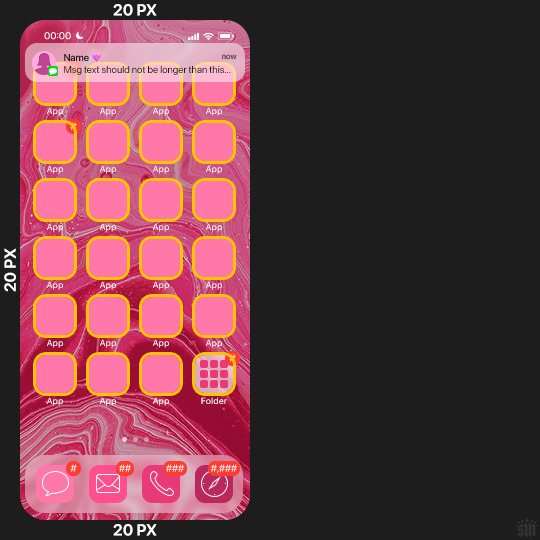
HOW TO: Make an iPhone Layout
+ Downloadable Template
Hi! I've gotten a few messages asking for a tutorial on my iPhone gifsets — but instead of only doing a tutorial (that would probably be triple the length this one already is), I decided to turn my layout into a template with all the bits and bobs! In the "tutorial" under the cut, I'll share everything you'll need, a free template download, and quickly go over how to use this template. :)
Disclaimer: This template uses Video Timeline and this tutorial assumes you have a basic to intermediate understanding of Photoshop.

PHASE 1: THE ASSETS
1.1 – Download fonts. These are the fonts used for all assets I've included in my template:
– SF Pro or SF Pro Display (Regular, Medium, Bold): Either version works, they look nearly identical. You can download directly from https://developer.apple.com/fonts/ or easily find it via Google
– Bebas Neue: Free on Google Fonts, Adobe Fonts, and dafont
– Times New Roman (Bold): Should be a default font in Photoshop

Make sure to download and install any of the fonts you don't already have before opening my template. That way, once you open the template file, all the settings (font size, weight, spacing, color, opacity, etc.) are as intended.
1.2 – Download my template.
Before you use my template, all I ask is that you don't claim or redistribute it as your own and that you give me proper credit in the caption of your post. Making these iPhone gifsets takes me a longgg time and turning this layout into a template took several hours too.
DOWNLOAD TEMPLATE VIA KO-FI ← This template is completely free to download (just enter $0), but if you feel inclined to tip me, I appreciate you! 💖

BTW this template also includes some of my frequently used icons!
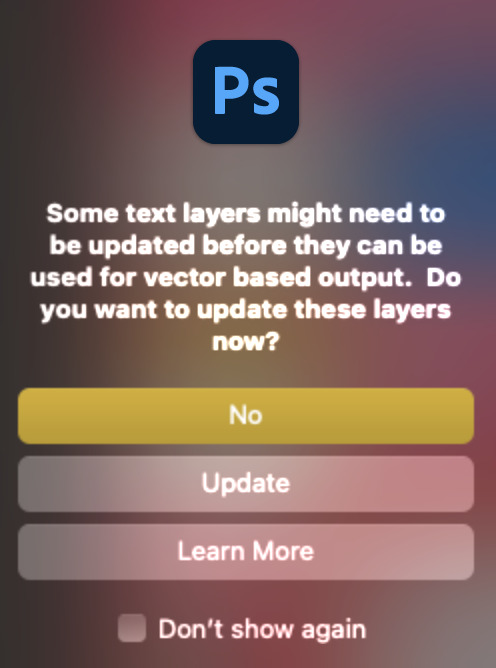
NOTE: If, for some reason, you open the template and see the pop-up shown below, click "NO" — otherwise, the fonts will be all messed up:
And if you see this triangle with an exclamation point by a text layer, don't double-click it — it'll mess up the font as well:

PHASE 2: THE GIFS
I'm just going to briefly go over gif sizes and my recommendations. Also, keep in mind when grabbing your scenes, you'll want all of these gifs to be the same amount of frames.
2.1 – Background Gif: 540 x 540 px.
I recommend this size so you have a good amount of visibility for the gif behind the iPhone wallpaper. I also recommend making this black and white (or in my case, black and white with a slight blue tint — idk I just like the way it looks) so the wallpaper coloring can stand out.
2.2 – Wallpaper Gif: 230 (w) x 500 (h) px.
Keep in mind the very narrow dimensions of the wallpaper! And also keep in mind that you'll have a bunch of apps and widgets covering the image. I try to use wide shots (or layer my clips into looking like wide shots). Also, keep in mind your color scheme for your set and your character's aesthetic! I tend to focus on one or two colors for the wallpaper.
I usually position the wallpaper to the side with 20px bumpers, so there's lots of space to see the background:
2.3 – Large Photo Widget Gif: 201 (w) x 96 (h) px.
2.4 – Small Photo Widget Gif: 94 x 94 px.
PHASE 3: THE TEMPLATE – "IPHONE" FOLDER
In this section, I'll try to quickly walk you through how to use this template and some bits that may require extra instructions. I'll be going through each folder from top to bottom.
3.1 – Status Bar.
Time, Service, and WiFi are pretty self-explanatory. In the Battery folder, you can use the shape tool to adjust the shape layers labeled "Fill (Adjustable Shape!)" to customize the battery level.
3.2 – Message Notification.
Again, these are pretty self-explanatory. I've already masked the circle for the contact photo, so you can simply import any photo and use the transform tool to shrink it down. The circle is 24x24 px. If you don't want to use a photo, there's another folder called Default Initials.
If your message text can't fit the text box, the message should end with ellipses which is how iOS caps off long texts.
3.3 – Blurred Banner (IMPORTANT)
This folder is easy to miss because there's only one placeholder layer in there. On iPhones, the area behind a banner notification and the dock get blurred (including the wallpaper and any apps).
What to do: Make a duplicate of the apps in Row 1 and/or widgets that intersect the message banner, convert them all into one smart object, apply a Gaussian Blur filter (Radius: 3.0 pixels) on the smart object, and move the smart object into this masked folder!
(There's another masked folder in the Wallpaper folder for the dock which I'll go over in that section.)
3.4 – Apps
Turn off the yellow guide if you don't need it to keep things aligned and turn off layers you don't need by clicking the eye icon. Replace the "App" placeholder text with your app name, change the color or gradient of the square to compliment your color scheme, and add your custom app icon overlay!
If you can't find an app icon you need from the ones I provided, flaticon.com is a great resource. Also, if you can only find the filled version of an icon, check out this tutorial for how to make any text or shape into an outline.
Also, each app folder has 4 notification bubble options (1-4 digits). Again, you can toggle these on and off as you need!
3.5 – Big Widgets
I like using these when my wallpaper has A LOT of negative space to fill. I included the Photos and Books widgets in my template, but there are lots of widgets available on iPhones. You can check some of the other ones I've done here, or if you have an iPhone, simply try adding some widgets to your phone!
There are also widgets bigger than these, but they would take up half of the phone screen which is why I don't use them for these edits.
3.6 – Small Widgets
The only thing I'll say about these — because they're pretty straight forward — is there are a lot more weather themes than I included in my template. Also, if you set your character's phone to evening, the weather widget will show a dark background (sometimes with stars), so keep that in mind.
Speaking of, I've included Light Modes and Dark Modes for, I think, every applicable widget.
3.7 – Page Dots
These barely perceptible dots indicate that your character has more pages of apps than shown in your gifset (so if an anon tries to come at you, you can just say "it's on the next page of apps" /j /lh)
3.8 – Dock
Again, the dock has notification bubble options and I've included the default app designs, custom filled designs, and custom outlined designs for iMessage, Phone, Email, and Safari (there's also a FaceTime alternative if that's how your character rolls). These are usually the apps people keep in their Dock, but this is fully customizable too. So, if your character is, like, super obsessed with Candy Crush or something and needs it in thumb's reach — you can put it in the dock.
3.9 – Wallpaper
This whole folder is masked already to a 230x500 px rounded rectangle.
Inside, you'll find another "Blurred Portion" folder for the area behind the message banner notification and the dock.
What to do: Duplicate your gif layer and place it in this folder, remove any sharpening filters, and apply a Gaussian Blur filter (Radius: 3.0 px). Be sure to add any coloring/adjustment layers ABOVE this folder and your original sharpened gif layer.
PHASE 4: EXPORT
We made it!
I hope this template makes it super easy for you to recreate this layout! If you decide to try it out, feel free to tag me with #usernik.
If you notice anything wonky about the template, kindly let me know so I can fix it! And if you have any questions about how to use this template, please don't hesitate to send me a message! I just ask that you try to be specific in your question so I'm able to answer you the best I can!
#gif tutorial#completeresources#userpickles#usersmia#userabs#usertreena#alielook#userkosmos#usershreyu#userzaynab#tuserabbie#useryoshi#usersalty#tuserlucie#usernanda#userelio#userhella#usercats#gfx*#resource*
881 notes
·
View notes
Text
A Scam... Tutorial?
I was watching Photoshop tutorials and YouTube recommended this video to me.

And I was already skeptical. Clarity is an extremely powerful and useful adjustment in Lightroom and Photoshop and I could not think of a reason why anyone would recommend *not* using it to the extent they were using ALL CAPS.
But I was curious if there was a new technique I was unaware of. It's impossible to know everything regarding Photoshop and I learn new stuff all the time.
So I gave the video a chance.
youtube
To quote my late father... what a crock of shit.
I have seen a few scam videos in my time, but I cannot think of ever seeing a digital art tutorial scam. I found myself angry and a strongly worded comment just flew out of my brain.

I continued...
"First, no one should use clarity and texture at 100%. And I think showing the effects at 100%, as if that is a normal workflow, is highly misleading. You are creating a problem that does not exist and then offering a solution to it. And then you are using a provocative title to attract clicks. Not to mention you may be convincing beginners to abandon clarity and texture altogether when it is one of Camera Raw/Lightroom's most powerful tools. People should absolutely use clarity and texture. That is a crazy thing to tell people.
Second, high pass sharpening is… old school. It works but it can create a lot of nasty artifacts if overdone. (Personally I find it too crunchy and prefer smart sharpen on a smart object so it is non destructive). Clarity and texture are much more modern approaches to help bring out detail and I find they actually produce *fewer* artifacts than typical sharpening filters/techniques. And if you have trouble with clarity or texture adjustments in the bokeh areas, then use a local adjustment that doesn't affect those areas. You can even do a separate clarity and texture layer and use the opacity slider and the blend if and masking just like you did with the high pass. Why are you acting like you can only make a global clarity adjustment?
Essentially you are giving a worst case scenario of a clarity/texture adjustment just so you can make your technique seem like it is orders of magnitude better.
And what is even more infuriating is that you can do clarity/texture AND you can do high pass sharpening *together*. Why are you acting like it is one or the other?
I'm so confused by your motivations. Did you invent this clarity problem just so you could make a click bait-y title so you can then sell your little panel thing? And then you used an old school sharpening technique that many have abandoned so it seems like you have secret knowledge that was lost? And I could argue it isn't even a better solution. It's just a different way to achieve similar, if not worse results.
This is like if you put a pound of sugar in lemonade and then said, "Wow, this is way too sweet! You should try my superior lemonade that has a normal amount of high fructose corn syrup."
Lastly, if clarity and texture (set at a reasonable amount) aren't enough to produce sharp, detailed results, then it might be worth considering your actual photography techniques. Modern photography with modern sensors and lenses should be able to produce extremely sharp results without having to juice the hell out of sharpening filters in software. 20% clarity and texture (if that) plus a little bit of smart sharpen is usually more than enough to bring out detail in almost all of my photos and I have never been accused of having soft images.
So, if you are getting soft results, you might need to adjust how you are capturing your images. Are you using a very small aperture like f/22 on that macro image? That could be a diffraction issue. Perhaps it would be better to use a larger aperture at the lens's sweet spot and then do a focus stack.
I mean, I can't think of any other reason a person would need to do 100% clarity and texture unless they completely bungled the actual photography or were still using a kit lens.
I'm sorry but this video is a mess."
Let's look a little closer at what he did to his example.
He started with this.

Then he applied clarity & texture to MAXIMUM. Which, again, is like adding a pound of sugar to lemonade.
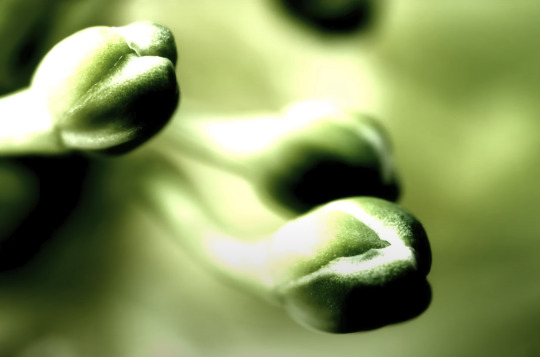
And by golly, it looks pretty bad!
Then he used his secret ancient high pass technique to get this.
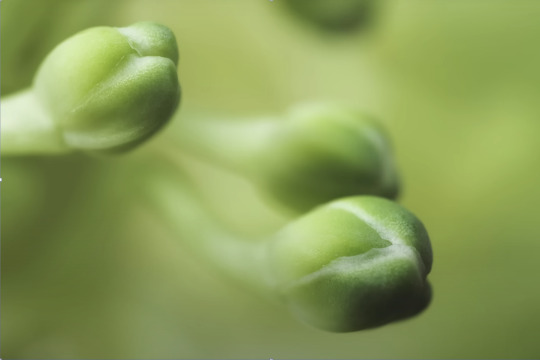
Which looks a hell of a lot like the unsharpened image to me. And the high pass sharpening is probably only visible when zoomed in to 100% on the full resolution image.
Which is one of the issues with this technique. It isn't even noticeable on social media—the place where the majority of photos are viewed these days.
And then after showing you this groundbreaking effect that does almost nothing, he tries to sell you his Photoshop panel.

Yes, that' looks intuitive. Just hit the blue checkmark to do... something?
And what is this green eyeball with a crescent moon inside?

Only $50!

And if you want to know what the purple X button does, you need to pay another $15 for the tutorial on how to use it.

Neat.
Just to prove this is all a scam I'd like to show you an example of my own.
Here is a picture of Otis with no clarity, texture, or sharpening applied.
And here is a reasonable amount of sugar. I set the clarity and texture to where I felt they looked best.
Wow, that looks better. Not only that, you can actually see the difference at social media resolutions!
Now let's add a pound of sugar. MAXIMUM CLARITY GO!
Yep, that looks a bit rough. Because no one does this ever.
And now let's see his high pass sharpening technique.
Barely a difference on social media.
Okay, let's try zooming in 200%. Maybe that will give the high pass sharpening the victory.
Normal...

Reasonable clarity & texture...

FULL BEANS CLARITY & TEXTURE!
High pass...

Just as I said, the high pass introduces crunchy sharpening artifacts.
I can't speak for anyone else, but I much prefer the subtle clarity and texture. Perhaps the details in the eyeballs aren't quite as crispy, but in the version that isn't zoomed in, I don't think you feel like the image is soft and the normal clarity and texture adjustment added contrast and actually noticeable detail to the image.
In the end, except for the pound of sugar, these are all subtle adjustments and other photographers might be the only ones who would ever notice. The original Otis picture was probably fine to most people. So disparaging the clarity slider was even more unnecessary.
Why does this matter?
Being a beginner at photography is frustrating. There are so many resources to choose from and it's very difficult to know who is competent and who you can trust. If someone just starting out was recommended this video they could be easily be convinced it is legit. And it could set them back in their progress because they think useful tools will actually make their photos worse. They will waste a lot of time doing a time consuming old school technique in Photoshop when they probably never needed to even leave Lightroom in the first place. They could move two sliders to get similar or better results and it would only take literal seconds.
Time is valuable to a lot of people. And he seems intent on wasting everyone's time. And what sucks is that I have no real way of exposing this dude on a scale that would do anything.
I also just really hate the idea that educational content is being used to scam people.
This is some PragerU shit right here.
67 notes
·
View notes
Text
Bridges to Belonging
Part One Part Two Part Three Part Four Part Six Part Seven
Summary: Spencer and Y/N go on their date!
Pairing: Spencer Reid x fem!reader
Category: fluff
Warnings/Includes: suggestive conversation, self doubt, glasses Spencer, reader wears glasses/contacts but other than that i'm trying not to give her a physical description, let me know if i do put her in a narrow category!! i know i said she had curves at rossi's dinner party but to be objectively fair every human has at least one curve lmao
Word count: 5.4k
a/n: i am really enjoying writing these two :') life has been so boring since i graduated. if you're wondering how i bust these out so fast, one -- i don't have a life, and two - i wrote all of my essays the night before or the day they were due hahah
main masterlist

It was Saturday morning, and the air held a crispness that hinted at the excitement of the day ahead. Y/N stood before her wardrobe, contemplating her outfit for the day. She opted for something comfortable yet dressy enough for wherever Spencer might be taking her. The outfit was stylish but not overly formal, perfect for a day that could involve a fair amount of walking yet elegant enough for an unexpected dinner venue. She chose layers—a practical choice that allowed for adjustments depending on whether the day turned warm or cool.
As she dressed, a flutter of excitement danced in her stomach, mixed with a tinge of anxiety that she couldn't shake off. Y/N was excited, truly, but she couldn’t help tempering her anticipation with a cautious restraint. Her past experiences with relationships and dates had taught her to guard her heart. More than once, she'd been let down, left to pick up the pieces after what she thought were promising beginnings fizzled into disappointment. These memories, still vivid, cast a shadow over her current excitement, reminding her to brace for any outcome.
Approaching her dresser, Y/N paused, her hand hovering over her contact lens case. Usually, she preferred contacts for a more put together look, especially when putting extra effort into her appearance. However, remembering the discomfort of her contacts drying out during unexpected long hours, she opted for her glasses instead. She hadn't worn them the first time she met Spencer, and a small part of her worried about what he'd think. Would he notice? Would he care?
She glanced at her reflection in the mirror, now framed by the sleek lines of her glasses. Taking a deep breath, she told her reflection, "Just enjoy the day, no matter what comes," trying to bolster her spirits. She wanted to listen to that optimistic voice in her head telling her everything would be fine, that Spencer was different, that this time it wouldn't end in disappointment. Yet, she prepared herself mentally for any scenario, unwilling to let her guard down completely.
Y/N grabbed her essentials—phone, wallet, a light scarf—and slipped them into her bag. As she took one last look in the mirror, she practiced her smile, the one she’d use to mask her nerves when she met Spencer. She hoped the day would prove her fears unfounded, that it would be a turning point from her past experiences. But she kept her expectations in check, a self-protective measure honed by past heartaches.
—
As the morning sunlight streamed through the blinds of his apartment, Spencer Reid found himself standing before the bathroom mirror, his usual nerves mingling with a specific concern today. He adjusted his glasses, the frames unfamiliar against the bridge of his nose, as he leaned closer to examine his reflection. His contacts had dried out, an unfortunate oversight, leaving him no choice but to wear his glasses for the date with Y/N.
He studied himself critically. The glasses were practical, a necessity for his work, but he rarely wore them anymore. There was something about them that made him feel exposed, more like the bookish nerd he had always been, and who he had been made fun of for being, and less like the confident man he hoped to appear as today. What if she doesn’t like them? The question nagged at him, adding an extra layer of anxiety to his already jittery state.
Spencer took a deep breath, trying to center himself. He remembered reading that people often perceive glasses as a sign of intelligence and reliability, traits he hoped Y/N would appreciate. Still, he couldn't help but worry that perhaps she might prefer him without them, or that they might alter the way she saw him—literally and metaphorically.
As he turned away from the mirror, he made his way to his bedroom to choose his outfit. He opted for a smart-casual ensemble that felt comfortable yet presentable: a crisp button-down shirt paired with a well-fitted blazer, and his best jeans. The glasses, he decided, would just have to become part of his look for the day.
With his outfit sorted, Spencer paced his living room, every potential topic of conversation he had prepared buzzing through his mind. His thoughts were filled with bits of trivia about the latest exhibits at the Metropolitan Museum of Art, hoping these would spark engaging discussions between him and Y/N. He rehearsed some points in his head, mapping out how he might transition from discussing ancient artifacts to more personal subjects, like her interests and hobbies.
However, as much as he prepared, his thoughts kept drifting back to his glasses. He paused in his pacing, catching his reflection in the window. The morning light cast a soft glow that somehow made the glasses seem less obtrusive, more a part of him. "Maybe it's not so bad," Spencer muttered to himself, adjusting to his reflection.
He grabbed his notebook from the coffee table, a little ritual that always helped calm his nerves. Scribbling down some last-minute notes about things he wanted to remember—like asking Y/N about her recent projects and ensuring to mention a little-known fact about an art piece he thought she'd appreciate—helped him feel more in control.
Yet, beneath the surface of his meticulous preparations, there was an undercurrent of excitement. This wasn't just any date; it was a date with Y/N, someone who had sparked a level of interest in him that was rare and invigorating. The glasses, he realized, were just a minor detail in the grand scheme of things. What mattered was the connection they might deepen today.
Finally ready, Spencer took one last look around his apartment to ensure everything was in order before leaving. He grabbed his keys and his jacket, pushed up his glasses with a newfound sense of acceptance, and headed out the door. Today, he decided he would focus on the possibilities, not the insecurities. After all, if their connection was genuine, Y/N would see beyond the glasses to the person behind them. And perhaps, in those museum halls filled with timeless artifacts, they could find something just as enduring between them.
—
Y/N arrived at the coffee shop Spencer had texted her about, her heart pounding with a mix of anticipation and nerves. She spotted Spencer already there, waiting for her by the window, a steaming cup in front of him. He looked up as the bell above the door jingled, his face lighting up when he saw her. Despite her nervousness, Y/N felt a warm flutter in her chest at the sight of his welcoming smile.
"Hey, Y/N, over here!" Spencer called out softly, waving her over.
She walked towards him, her steps hesitant but eager. "Hey, Spencer," she greeted, her voice slightly quivering. As she sat down, she noticed his glasses and couldn't help but smile. "I like your glasses," she said, touching the frame of her own as if to point out the coincidence.
Spencer chuckled, a blush creeping up his cheeks. "Thanks, I usually wear contacts, but, you know, they dried out."
"Same here," Y/N admitted, feeling a connection over their shared minor dilemma. "It’s a glasses kind of day, I guess."
Internally, Y/N felt a surge of relief. Seeing Spencer in his glasses, looking unexpectedly handsome, eased her worries about her own appearance. My god, I didn’t think he could get anymore attractive, she thought, her initial anxiety about her own glasses fading away and being replaced with a warmth that couldn’t be helped by removing her scarf. Maybe all of her clothes.
Spencer felt a similar relief, his earlier concerns about his glasses dissolving as he saw Y/N's reaction. She doesn’t seem to mind at all. In fact, she looks adorable in hers. Maybe this isn’t such a big deal after all, he reassured himself. His thoughts remained much more pure than Y/N’s, although he couldn’t help but think about how if he tried to kiss her today their glasses would clink together. The thought made a blush rise up his neck to his cheeks.
There was a brief pause, an almost knowing silence, before Spencer leaned forward, his eyes bright with excitement. "So, I have something planned for us today. I hope you'll like it. We’re going to the Met. There’s a few exhibits I think you’d really enjoy, and then I thought we could grab dinner at a nice place nearby. How does that sound?"
Y/N's eyes widened, her earlier anxieties melting away into genuine excitement. "That sounds amazing, Spencer. I’ve always wanted to go to the Met! And dinner sounds perfect," she replied, her nervousness turning into anticipation.
Spencer seemed relieved by her enthusiasm. "Great! I wasn’t sure what you’d think. I mean, it’s a bit of a train ride, but I thought it might be fun to spend the day in New York."
"It’s more than fun, it’s perfect," Y/N assured him, her smile sincere. "I can’t think of a better way to spend the day." And she meant it, they could talk on the train ride there and back, maybe hold hands, brush thighs. It’s in the little things.
They decided to take their coffee to go, stepping out together towards the train station. As they walked, the initial awkwardness began to fade. Spencer’s eyes occasionally met Y/N’s, each glance accompanied by a shy smile. "I’m really glad you’re here with me," Spencer confessed, his voice dropping to a more intimate tone.
"Me too," Y/N responded, her heart skipping a beat. "I’ve been looking forward to this all week."
Their conversation drifted to lighter topics, each shared laugh bringing them a little closer, building a bridge over their initial anxieties. As they boarded the train, Y/N felt a newfound optimism. Today was not just another date; it was the beginning of something special, she could feel it. And as they settled into their seats, watching the cityscape start to pass by, she believed, for the first time in a long time, that her hopes were well placed.
As the train clattered along the tracks toward New York, Y/N and Spencer found themselves in the comfortable cocoon of their shared booth. The cityscape blurred past, creating a serene backdrop for their burgeoning connection.
"So, Spencer," Y/N began, leaning forward with a playful glint in her eyes, "tell me about the most bizarre case you've ever worked on. I promise I can handle it."
Spencer chuckled, a blush already tinting his cheeks. "Well, there was this one time we dealt with a suspect who believed he was a 21st-century vampire..." As he recounted the peculiarities of the case, Y/N listened intently, occasionally brushing her foot against his under the table, sending a jolt through him each time.
(Pretend this case happened earlier)
"Vampires, huh? Are you sure you aren't one?" Y/N teased, her tone light but suggestive. "You do have a certain... nocturnal charm."
Spencer's laugh was nervous, delighted. She's incredible, he thought. So bold and funny. It's utterly disarming. "I assure you, I'm not a vampire. Just a regular guy who happens to have naturally sunken eyes."
Y/N smiled and giggled, pleased with his playful response. "Good to know. I prefer my dates to be sunlight-friendly. Speaking of which, how do you usually spend your days off when you're not chasing fictional vampires or real criminals?"
Spencer found himself more relaxed as he shared more about his love for reading and rewatching sci-fi movies and TV. Y/N seemed genuinely interested, her responses peppered with witty remarks that kept him on his toes.
"Reading, huh? I should have guessed," she said, taking a sip of her coffee. "Next you'll be telling me you have a cat named Schrödinger."
"No cat," Spencer admitted, grinning. "But I wouldn't mind one. As long as it doesn't interfere with my reading."
Their conversation flowed effortlessly from books to favorite ways to spend a rainy day, each topic drawing them closer. Y/N's confidence and teasing made Spencer's heart race, but he found himself enjoying the thrill of it. She’s so refreshing, exciting even. I haven't felt this engaged in a long time.
As the train rolled closer to their destination, Spencer found himself wishing the ride wouldn't end. Y/N had the rare ability to make him blush and laugh in equal measure, a combination he found intoxicating.
"So, Spencer," Y/N leaned in closer, lowering her voice to a whisper as the train noise crescendoed around them. "If today goes well... would you consider making our next date a night at the opera? I hear it's quite the experience."
Spencer's eyes widened, both at the suggestion and her proximity. "I'd like that," he managed to say, his voice steady despite the butterflies in his stomach. "I'd like that very much."
Y/N smiled, her gaze lingering on his for a moment longer than necessary before she leaned back in her seat, satisfied with his response. Spencer watched her, a smile tugging at his lips, his earlier nerves replaced by anticipation and hope. She’s already wanting another date? I’m still hoping I can work up the courage to kiss her, he thought as the skyline of New York City came into view.
As they stepped into the grandeur of The Metropolitan Museum of Art, the vast spaces filled with centuries of art and history, Y/N's excitement was palpable. Her eyes sparkled with each new room they entered, each piece they observed. Spencer, usually reserved, found himself drawn out by her enthusiasm, his voice animated as he shared insights and facts about the artworks around them.
They wandered through the exhibit "The Philippe de Montebello Years: Curators Celebrate Three Decades of Acquisitions," where Y/N's favorite pieces resided. Her gaze lingered on each work, genuinely appreciating the artistry and the stories Spencer told her about the origins and significance of each piece.
"Did you know this particular painting was considered lost for almost two centuries before it was found in a small, forgotten chapel in Italy?" Spencer pointed to an intricate Renaissance painting, its colors vibrant even after all these years.
Y/N listened intently, her interest deepening with each fact. "I had no idea," she responded, her tone full of genuine fascination. "You know so much about all of this, Spencer. It's incredibly... exciting."
Spencer, caught off guard by her candid compliment, blushed deeply but couldn't suppress the grin that spread across his face. "Really?" he asked, his voice a mix of surprise and delight.
"Yes, really," Y/N affirmed, stepping closer to him. "Your brain is the sexiest thing about you, Spencer. The way you know all these things, the way you're so passionate about sharing them—it’s captivating."
Encouraged by her words, Spencer found himself sharing even more. They stopped in front of a medieval tapestry, its threads telling tales of battles and legends. As he explained the symbolism woven into the fabric, Y/N's admiration only grew. She watched him, not just listening but truly seeing him—someone who had finally found a receptive audience for his wealth of knowledge.
Spencer felt a thrill unlike any other. For so long, he had been used to people tuning out his ramblings, to seeing eyes glaze over halfway through his explanations. But with Y/N, it was different. She hung on his every word, her curiosity feeding his own, her enthusiasm fueling a confidence he rarely felt in social settings.
As they moved through the museum, their conversation flowed effortlessly from art to personal anecdotes, each story Spencer shared bringing a new sparkle to Y/N's eyes. He talked about his mother, his childhood filled with books instead of playdates, and she listened, understanding and nodding, sharing bits of her own life in return.
The day at the Met became more than just a date; it was a revelation for both. For Y/N, it was discovering that someone could match her enthusiasm for learning and experiencing new things. For Spencer, it was the joy of finding someone who not only appreciated his intellect but was genuinely excited by it.
As the museum began to close, and they slowly made their way out, neither of them wanted the day to end. They were lost in a bubble where art and intellect intertwined, where every fact shared was a thread pulling them closer together.
As Spencer and Y/N stepped out of The Metropolitan Museum of Art, the energy of New York City enveloped them once again. The streets buzzed with the usual symphony of honking cars, chattering pedestrians, and the distant siren of an emergency vehicle. Spencer turned to Y/N, a thoughtful look on his face.
“There’s a restaurant not too far from here where the team and I ate after wrapping up a case once,” he suggested. “It’s really good, not too fancy but the food is excellent. It might be a bit of a walk, though, so we could grab a cab if you’re tired from all the museum walking.”
Y/N, reveling in the connection they had fostered throughout the day, shook her head with a smile. “I don’t mind the walk, actually. It’s a beautiful evening, and I’m enjoying spending time with you. Let’s walk.”
Spencer nodded, visibly pleased by her eagerness to extend their time together. They started down the sidewalk, navigating through the bustling crowd. The city seemed to glow with a warm, golden light as the sun began to set, casting long shadows on the pavement.
As they were walking, the crowd around them thickened momentarily as people hurried to cross the street before the light changed. In the midst of this, a passerby stumbled a bit too close to Y/N, jostling her slightly. Instantly, Spencer’s protective instincts kicked in. He placed his hand on her lower back, gently pulling her closer to his side, away from the rush of the crowd.
The contact sent an unexpected jolt through Y/N, a spark that felt electric. Surprised and thrilled by the sensation, she instinctively reached for his bicep, feeling the solid muscle under her hand, and linked her other arm around his. The gesture was intimate, natural, and it seemed to anchor them both amidst the sea of people.
Spencer, who was so often touch-starved and reserved in his physical interactions, felt a warm thrill at her touch. His heart raced slightly, a pleasant buzz of excitement coursing through him. The feeling of her hand on his arm, her body close to his, was unexpectedly comforting and exhilarating. It was a simple gesture, but to Spencer, it felt significant, a physical affirmation of the connection they’d been building all day.
As they walked on, navigating the streets of New York toward the restaurant, Spencer felt a sense of contentment wash over him. Y/N’s presence at his side, the way she fit naturally into his space, made the city around them fade into a soft background. He found himself hoping that the evening would stretch on, reluctant to let go of the moment.
The walk to the restaurant became a leisurely stroll, each step taking them deeper into a shared comfort. They talked easily, laughter mingling with the city sounds, the initial spark at their contact evolving into a steady, warm glow. By the time they reached the restaurant, Spencer and Y/N were closer than ever, both physically and emotionally, eager to continue their evening together.
At the restaurant, the atmosphere was imbued with a sense of romance and intimacy, exactly the kind of place Spencer remembered and hoped would impress Y/N. The lighting was low and warm, casting soft shadows around the room and illuminating the tables with a gentle glow from the candles placed on each one. These candles, unscented and subtle, added a touch of elegance without overwhelming the senses. In the background, a live band played soft, sensual music, their melodies weaving through the conversations and enhancing the romantic vibe of the evening.
They were seated in an intimate curved booth that offered both privacy and comfort, allowing them to share each other's space effortlessly. It was cozy but spacious enough to not feel crowded, perfect for leaning in close and sharing quiet conversations.
Following the waiter's prompt, both Spencer and Y/N opted for red wine, a decision made easier by the fact that neither of them needed to drive back. As they sipped their wine, the rich, bold flavors seemed to deepen the already warm atmosphere, loosening inhibitions slightly.
Y/N, feeling the effects of the wine which always tended to make her feel a bit more daring, turned her full attention to Spencer. She smiled at him, her eyes twinkling with a mischievous light. “You know, I’ve been thinking,” she began in a slightly lower, flirtatious tone, “about how someone as smart as you, with all those facts in his head, must have some hidden talents I’ve yet to discover.”
Spencer, usually more reserved, felt a rush of boldness fueled by the wine and the undeniable chemistry between them. He returned her smile with one of his own, this one tinged with a newfound confidence. “Well, I might have a few surprises left,” he replied, his voice deeper than usual. “But I’m more interested in exploring what makes you... you. Besides, I find myself wanting to know all about your talents, hidden or otherwise.”
Y/N was pleasantly surprised by his reciprocation, the boldness of his words matching her own flirtatious energy. She leaned in closer, lowering her voice to match the intimacy of their booth. “Is that so? Well, I might just have to reveal a few secrets tonight,” she teased, her hand reaching under the table to lightly touch his leg.
The contact sent a thrill through Spencer, and he didn’t pull away. Instead, he welcomed it, letting her hand linger on him. The conversation shifted seamlessly from playful banter to deeper, more personal topics. They talked about their hopes, their fears, and the excitement of new experiences. Spencer found himself opening up more than he usually would, driven by the genuine interest Y/N showed in every word he said.
As the evening progressed, their connection deepened, bolstered by the wine and the enchanting setting. The music from the live band seemed to wrap around them, a soundtrack to the unfolding intimacy. Laughter and shared confidences filled their booth, the rest of the world fading into a distant murmur. For both Spencer and Y/N, the night was shaping up to be more enchanting than they had anticipated, each moment pulling them closer into a mutual fascination that promised only to grow.
As the train whisked them back towards home, the rhythm of the rails seemed to echo the residual buzz of the evening’s wine. Both Spencer and Y/N choose seats next to each other this time, their shoulders occasionally brushing in a comfortable, familiar manner. The closeness felt natural after the evening they had shared. They were both visibly tired, the excitement of the day and the indulgence in wine having drawn a gentle fatigue from them.
Despite the weariness, their conversation continued to flow smoothly, albeit with a quieter, more reflective tone than before. They leaned into each other slightly, the warmth between them palpable in the cool air of the train compartment.
“So, you’re a Doctor Who fan too?” Spencer asked, a hint of surprise and delight coloring his voice as they discovered yet another common interest.
“Yes, absolutely,” Y/N responded with a smile, her eyes lighting up. “I’ve been hooked since I was a kid. There’s just something about the Doctor’s adventures through time and space that’s captivating.”
Spencer nodded enthusiastically, his own fondness for the show sparking further attraction towards her. “I totally agree. It’s the blend of science fiction and deep moral questions that gets me. Plus, the Doctor is a great character—always changing, yet fundamentally the same.”
Their shared enthusiasm for the show spun off into a deeper discussion about their favorite episodes and Doctors, each reference pulling them closer in mutual geekdom. It was during this exchange that Spencer found himself making a spontaneous invitation, surprising even himself with his forwardness.
“You know, if you’re up for it, maybe you could come over sometime and we could watch a few episodes together? I have a pretty decent setup for a Doctor Who marathon,” Spencer suggested, his voice a mix of casual and hopeful.
Y/N’s smile broadened, and she nodded, her heart warmed by the invitation. “I’d love that. It sounds like a perfect plan.”
The ease with which they continued to talk about everything from favorite books to music showed how compatible they were, not just on a surface level but in deeper, more meaningful ways. Their laughter and shared looks filled the space around them, creating an intimate bubble even in the public setting of the train.
As the train neared their destination, both Spencer and Y/N felt a reluctance for the night to end—a sign of the significant connection they had forged. They exchanged sleepy smiles and soft words as the city lights began to grow brighter outside the train windows.
By the time the train pulled into the station, Spencer felt a sense of anticipation for their next meeting. Having Y/N in his apartment, a space he had never shared with a romantic interest before, felt like a big step, but it was one he was now eagerly looking forward to. The night had started as a hopeful date and had blossomed into the beginning of something truly special. As they stepped off the train, their hands found each other almost instinctively, a fitting end to a perfect day and the promise of more to come.
After exiting the train station, Spencer insisted on walking Y/N back to her apartment, citing crime statistics that painted a stark picture of the risks women faced when walking alone at night. Though the mood was light and jovial from their shared experiences of the day, his protective nature was evident, and Y/N appreciated his concern.
The walk to her apartment was filled with light conversation and reflective pauses, both savoring the last few moments together. The city at night provided a beautifully lit backdrop, with street lamps casting soft glows on the sidewalks and the distant sounds of the city nightlife buzzing around them. Their fingers slotted together providing enough warmth to keep fires blazing within them both.
Upon reaching her apartment building, a comfortable silence fell over them as they stood at her doorstep, reluctant to end the evening. "Thank you, Spencer," Y/N said, her voice warm and sincere. "Today was amazing. Truly."
Spencer, his hands now shoved awkwardly into his pockets, nodded, his face showing a mixture of happiness and the usual nervousness that came when he was unsure of what to do next. "I had a great time too, Y/N. I'm glad you enjoyed it. Thank you for going with me."
Sensing his apprehension and wanting to ease his nerves, Y/N stepped closer and, on an impulse, kissed his cheek gently. "Goodnight, Spencer," she smiled, her eyes holding his gaze for a moment longer than necessary.
Spencer's face turned a deeper shade of red, his mouth gaping not unlike a fish before he managed a bashful, "Goodnight, Y/N." As she turned to enter her building, Spencer stood rooted to the spot for a few seconds, a hand reflexively touching the spot on his cheek where her lips had been.
He finally uprooted his feet and hailed a cab to take him home, his mind replaying every moment of the day and the evening, but especially that last, unexpected kiss on his cheek. He was absolutely buzzing with a mix of elation and disbelief. As the city lights passed by the cab's window, he couldn't keep the grin off his face, feeling an excitement he hadn't known in a long time.
Meanwhile, Y/N, after closing the door to her apartment, immediately dialed her mom. The time difference meant it was still early where her mom lived, and she knew she’d be awake. As soon as her mom answered, Y/N gushed, "Mom, I had the best date tonight. You remember I told you about Spencer from the FBI? It was with him."
Her mom's voice, hilarious and encouraging, came through the phone. "Tell me about it! But leave out the gory details."
“Mom!” Y/N whined petulantly but did as she asked anyway—she recounted every detail from the Met visit to the candlelit dinner and the casual yet intimate conversations they had shared. She described how considerate Spencer had been, walking her home and the protective reasons behind it, and she didn’t leave out the part about the kiss on the cheek that had left her feeling a pleasant flutter in her stomach.
"Mom, he’s different, really thoughtful and so smart. I think this could be something special," Y/N admitted, her voice a mixture of hope and a bit of wonder.
Her mom's reply was full of the usual maternal optimism and caution, "Just take it one step at a time. But he sounds wonderful. I’m happy for you."
Hanging up the phone, Y/N felt a contentment settle over her. The night had been perfect, and now, sharing it had made it feel even more real. As she got ready for bed, the memories of the evening played back in her mind, each one a promise of potential tomorrows.
—
Sunday morning came too early for Y/N, her sleep interrupted by a loud banging on her apartment door. Disoriented and a bit alarmed, she pulled herself from the warmth of her bed, wondering who could be at her door at such an early hour. She wasn't expecting anyone, and the unexpected noise had her heart racing slightly as she approached the door.
Living in the city had taught Y/N to be cautious, but she also knew that only a select few knew her address—now Spencer and the Hotchners. With a mix of confusion and caution, she tiptoed to the door and peered through the peephole.
To her surprise and immediate relief, it was Penelope Garcia standing outside, her bright and colorful attire unmistakable even through the distorted view of the peephole. Penelope was holding a large carrier with what looked like coffee and pastries—a peace offering or perhaps a bribe for an early morning intrusion.
Y/N opened the door, her expression a mix of amusement and mock annoyance. "Penelope, what are you doing here this early?" she asked, though her tone was light and welcoming.
Penelope's face lit up with an excited grin, and she practically bounced on the spot. "Girl talk time! I brought reinforcements," she said, lifting the carrier slightly to emphasize the coffee and pastries. "I may or may not have used my magical database skills to find your address. I couldn't wait to hear all about your date with Spencer!"
Y/N couldn't help but laugh, shaking her head as she stepped aside to let Penelope into her apartment. "You're impossible," she said fondly. "But since you come bearing caffeine and carbs, I suppose I can forgive you."
Once inside, Penelope set the treats on the kitchen counter and turned to Y/N with wide, expectant eyes. "So? Tell me everything! Was it as magical as you hoped? Give me all the details!"
As Y/N poured them both coffee, she started recounting the events of the previous evening—from the walk through the Met to the candlelit dinner and the charming walk home. Penelope listened intently, occasionally interjecting with excited squeals or empathetic nods.
Y/N shared how comfortable she felt with Spencer, how their conversations flowed naturally, and how he made her laugh. She even blushed a bit when mentioning the protective gesture he made and the cheek kiss that ended the night.
Penelope was thrilled with every detail, her enthusiasm making Y/N relive the joy of the date all over again. "Spencer really likes you, you know," Penelope said with a knowing smile. "He even texted me because he had to tell someone how great the date went."
Hearing this, Y/N felt a warmth spread through her, her smile broadening. That man is just too sweet, I want to eat him up.
#dr spencer reid#spencer reid fanfiction#doctor spencer reid#spencer reid#spencer reid fic#spencer reid fluff#spencer reid x reader#aaron hotchner#bau family#bau team#criminal minds#criminal minds fandom#david rossi#derek morgan#emily prentiss#jennifer jareau#penelope garcia
61 notes
·
View notes
Text
Moondrunk Monster Pt 1 (Ghost x reader)
Hey so this is my first Call of duty fanfic, so the characters might be wack. The general idea for this one is based off of a Love, Death, Robots episode where werewolves are basically in the military.
You're a retired combat medic that made a mistake, costing you your cushy office job. As punishment, you're sent to an active war zone, where you meet the 141, a squad of werewolves that slowly accept you as their own. (I know, I know I'm bad at summarizing)
Warnings: Extreme violence, smut in the future

Part 1
It was odd to think of how much your life had changed in just a few weeks. At the beginning of the year, you were placed in a cushy job at a base where you were paid large amounts of money to stitch up red-faced recruits and perform physicals on the higher ups–it had been nice, a simple existence where you didn’t have to see blown apart soldiers or hold poor boys down while they screamed and screamed.
But things changed, and for the punishment of your mistake, you were flown here. An active warzone deep in the desert, where there were no boyish recruits eager to please, just grizzled soldiers that look at you like an intruder, a hen in the midst of foxes.
When you were younger, this was easier. You had liked the excitement and adrenaline of danger, of scurrying in the heat of gunfire with your medpack to save lives.
Now you’re older, grumpier, and generally out of shape. They hadn’t given you time to prepare before the Colonel shipped you out here, so here you were in an ill-fitting uniform, setting up your medic bay beside the wolf-soldier’s tent because the Captain insisted that was the only space left in camp.
Their original medic had died after both he and his supplies were blasted to pieces. Captain Graves shortly put in a request for an experienced combat medic, and you could imagine his surprise when he saw you step off the plane, a woman in her early thirties, soft from five years of office work.
The Captain, understandably, hated you. He was saddled with an overweight female medic and a squad of wolves, you were sure the combination put a few extra gray hairs on his head.
Ironically, wolf-soldiers were highly sought after in the military. They were quicker, stronger, and smarter than even the best of the best, able to walk barefoot in the desert without a blister or sniff out an enemy from miles away. You had seen a wolf blown nearly in half get up and walk out of your tent the next day.
Captain’s group was a particularly intimidating bunch. There was Johnny–or Soap, as he preferred–a mohawked wolf with charming blue eyes and a deadly sense of humor. Gaz was the sweetheart of the bunch, smiling at you in a friendly sort of manner whenever you were forced to sit at the end of their lunch table.
Price was their leader, a wide man with a deep voice and commanding presence. Honestly, he reminded you of your father.
Then there was Ghost, the wolf in the skull mask. He was the biggest, all broad shoulders and muscles encased in a healthy layer of fat–and, from what you had learned from your patients, the most dangerous.
On your first day, you had to dig a piece of shrapnel the size of your hand out of his shoulder. Ghost refused when you offered wolf-friendly pain medication, seeming to enjoy your expression as you watched the skin around his gaping wound knit itself back together.
The other soldiers disliked them, simultaneously jealous and fearful of their abilities . The 141 were excluded from the rest, much like you were, so you spent meals at the other side of their table, minding your own business with a novel.
They didn’t seem to mind, after all, you spent half your time digging bullets out of them when the other medics refused to touch them. They weren’t used to humans being kind to them.
You quickly adjusted to life in the desert, sleeping in the back of the med bay in a rickety cot while your patients tossed and turned through the night. You got used to the early mornings and the shitty food, the screaming, the blood, settling back into a life that you had thought you left behind.
This morning was no different. You wake to the noise of shouting, the dark sky telling you it was far from morning.
“Where the fuck is the medic?” Price’s voice dominated over the others. You quickly stumble out of bed, shoving your legs through your pants and hastily buckling them as you hurried outside, wiping the sleep from your eyes.
The scene before you was gruesome. Gaz lay prone on the ground, throat slashed and guts strewn out of his belly like noodles.
If he were a man, he would be dead.
But even a wolf can die, and a body can’t heal around its own intestines.
You were awake in an instant, shouting orders to the men around you as you dropped to your knees. His pulse was slowing as more blood pooled into the dirt, his body unable to replace what he was losing so quickly.
The thing about werewolves is that they are partially human, which allows them to take human blood in small doses if the need calls for it. But the issue was the blood itself.
Every week, you get a shipment of fresh, cold O-negative blood, giving you ample supply for every occasion. But a sandstorm had interrupted the usual shipment yesterday, and while you knew that the shipment was supposed to arrive at noon later today, that didn’t help you now.
Gaz gagged, blood gurgling from his throat.
“Shit, shit,” Soap said, his mohawk slicked with his friend’s blood. “Is he gonna make it, doc?”
Soldiers huddled around you, supplies in their hands. You ripped strips of gauze and placed them over his throat, slowing the bleeding before you started on his gutted stomach.
“We’re out of transfusion blood,” you announced. “Is any soldier here O-negative?”
Silence. No human soldier would volunteer to give his own blood to a wolf.
Except you. You nodded, swiping an alcohol swab into the crease of your elbow before connecting the two of you with an IV, the bright red of your blood flowing into his veins at the gasps of both human and wolf around you.
It would stir up the healing process so you worked quickly, Amon, another medic, joining you as you worked on closing his stomach.
It felt like hours before his pulse grew strong again, but you knew it could only be ten, twenty minutes. You slid the IV out of your arm, blinking as black spots appeared in your vision.
You might have given a bit too much.
Gaz looked at you, his dark eyes replaced by an eerie yellow stare. A chill stole up your spine.
“Good morning,” you said through numb lips, taking a peek under the gauze on his throat. It was now only a pale scar, just a memory of a wound. “Look at that, soldier, you’re practically brand new.”
Gaz smiled weakly, his head falling back into the dirt. Soap whooped, gripping your shoulder in a vicious hug. “Good job, lass, I thought the pup was gone for sure.”
You stumbled at the weight of him, suddenly feeling exhausted. “Amon, will you get him set up in the infirmary? I think I need a moment.”
Price waved Soap off, gripping your elbow in a guiding hold. “Ease off the poor girl, Johnny, she’s dead on her feet.”
Soap merely grinned apologetically, ruffling your bedhead with a rough palm before helping the others move Gaz into the infirmary.
Ghost stood behind you, a reaper in sand-colored tactical pants. Price pushed you gently into Ghost’s direction, “Get her something to eat, Lieutenant.”
“I’m alright,” you tried to insist, a spike of nerves in your belly about being with Ghost. He was the least human of them all.
“That was an order, doc,” Ghost said, his voice a dry rumble as his hand fell on your shoulder. “Go on.”
You allowed yourself to be herded to 141’s tent, having half a mind to curl up in one of their bunks and sleep until dawn, free from the smell of blood and antiseptic.
Their tent was neat and smelled, well, like an animal den–not unpleasant, just overwhelmingly…male.
Ghost nudged you towards the sink without a word.
It took you a moment to see that you were still wearing gloves, caked in Gaz’s blood. You stripped them off, then began soaping up your hands and forearms, scrubbing the red from your skin.
When you were clean, you hovered over a cot, about to take a seat for your shaky legs.
Ghost stiffened from where he was crouched, his hands in a tub of supplies. “Not that one.”
You glanced down, seeing the Scottish flag on the wall, the photos of a couple that looked exactly like Johnny. “Oh, sorry.”
He jerked his head to another cot, this one bare of any decoration except for a cold cup of tea. You assumed it was Price’s, perhaps he doesn’t mind the stench of a human on his sheets.
You took a seat, your hands trembling in your lap. Ghost tossed an army bar your way. “Eat,” he said, in a tone that didn’t invite an argument.
“Ew,” you said, eyeing the packaging. He gave you a dark-eyed look, the kind that probably made wolves bare their bellies and whine. “Oh fine,” you huffed, tearing into it.
It was awful, the kind of chalky that let you know they stuffed enough nutrition and calories in the bland, tasteless bar to keep a soldier going for days. You chewed and watched Ghost shift around in the makeshift kitchen, heating a pot of water over a spindly propane stove.
Was he making-
“Drink this,” Ghost said, passing over a cup of tea. He kept one for himself, pulling up a chair to sit across from you. He was still filthy from whatever mission the Captain had set them on, blood and dirt smeared over his gear and mask.
“Thank you,” you said, sniffing it doubtfully. You were American, so you didn’t have much taste for tea unless it was iced and sweet.
But when someone like Ghost makes you a cup of tea, you drink the fucking tea.
He nodded, turning away from you so he could lift his mask over his mouth to drink his tea. You looked away quickly, focusing your attention on the Scotland flag on Soap’s corner.
The two of you sit in silence for a long time, long enough that your cup is drained and you’re blinking heavily at the darkness still outside.
“Go on,” Ghost said, slipping the cup out of your hand.
You hide a yawn, pushing yourself up from the bed.“It’s alright, LT, I’ve got my own bed somewhere.”
“You have half a dozen men in your tent, love.” Ghost backed you up against the bed, his heavy hand on your shoulder. “Sleep. We’ll keep an eye on Kyle.”
It made sense. You kicked off your boots and curled up on the cot, hiding your throbbing head in a pillow that smelled like gunpowder and musk.
Ghost ducked out of the tent as you laid down, your eyes falling on a skull mask folded up neatly beside the cot.
It was then that you realized this was his bed.
#cod x reader#ghost x reader#cod mw2#simon riley x reader#werewolf!Simon#ghost cod#soap mactavish#john price#gaz mw2
193 notes
·
View notes
Note
Hii !! ♪ Here’s the tutorial for how I make my gifs !! ☆ There’s two type of gifs that I make though.. so I wasn’t sure which one you’d like so I just did both of them !! (even if you did specify it I was going to show you how to do both anyways !!) hopefully this isn’t too hard to comprehend ♪
Type 1:
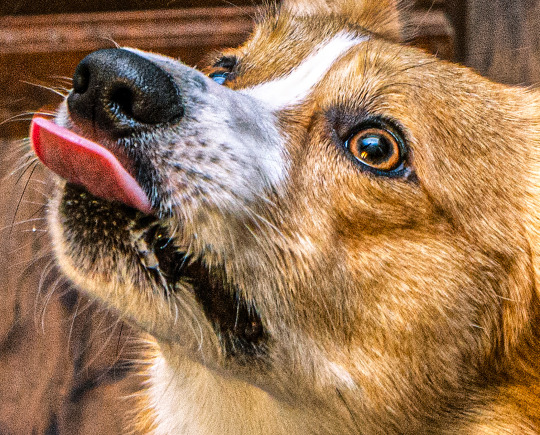
First, you’re going to import a shape (it can be any shape !!) and a transparent png of a character. (in my case it’s me :3)
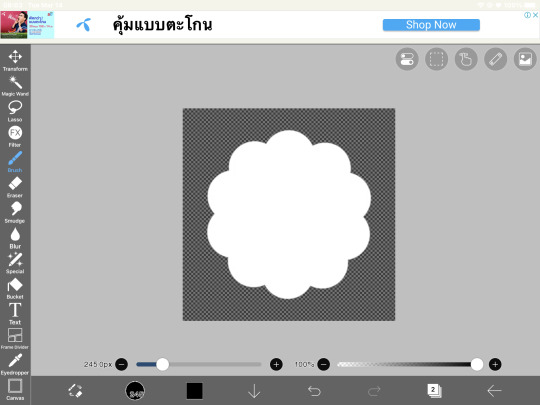
Second, you’re going make a clipping mask layer and import a pattern (can be any pattern !!), then merge the pattern with the shape.
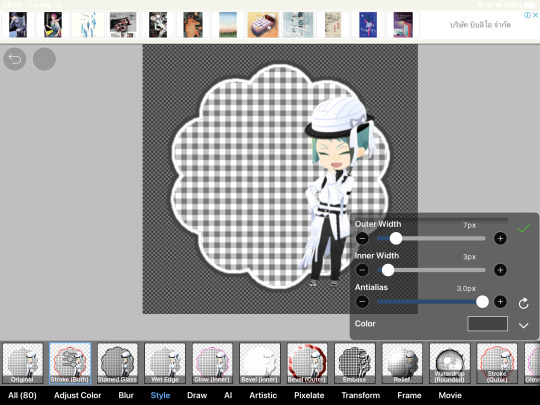

The third step is honestly optional but like.. the final product doesn’t look complete without it.. Anyways, you’re going to use “stroke (both)” on the pattern, you can adjust it to what you think looks good. After you’re done adjusting, pick a color, any color. After that, you can choose for it to stay like that OR you can go on and add more strokes ( ??) I would say the limit of strokes is three, because I personally think any amount over that looks a bit too.. messy.
This is just my personal preference.. but, if you do one stroke please don’t make the color white. If you do two, make it go white, and a color that isn’t white. If you do three, make it go a color that isn’t white, white, and a color that isn’t white. The reason for this is just because I like making my rentries look decent on both light mode n dark more.
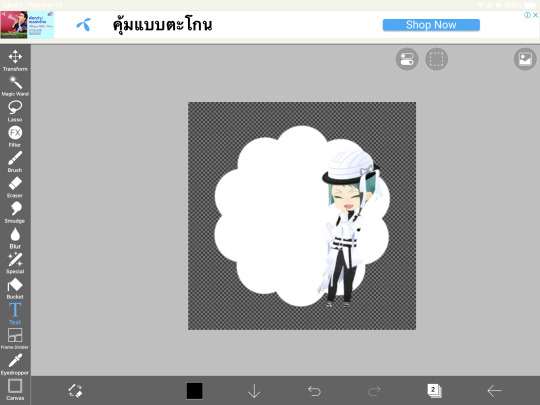
Do the third step again but with the character. Again, this is sort of optional.
You can add text if you’d like, I don’t have any special techniques for text though.
Fifth step, save the image as a transparent png.
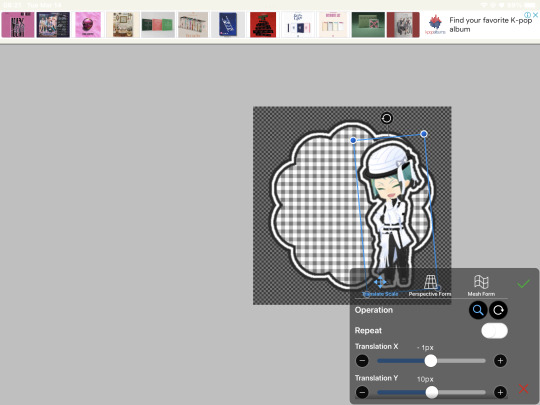
Sixth step, rotate your character a bit, don’t rotate them too much. (´・ω・)
Seventh step, save that image as a transparent png.

Now to make it into a gif. I use ezgif.com. Click the “gif maker” choose your photos, and then click upload and make a gif.
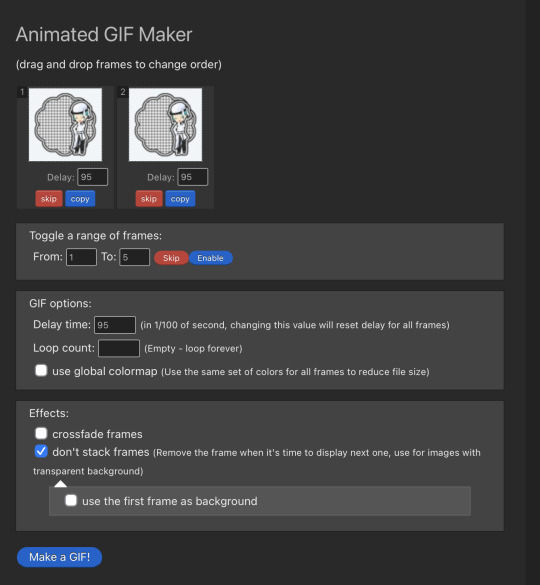
Make sure your settings for the gif is like this, you can change the delay time to whatever you like though.
Click make a gif, save the gif, and you’re done with the first type!
The gif should look like this:
Now, type 2:
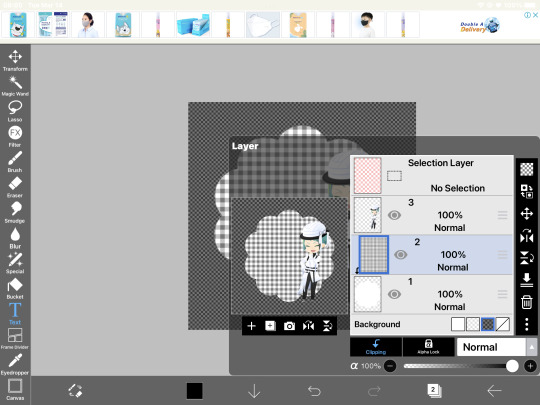
For this type you’re going to import a shape or a frame and any amount of pngs of your character. Put your pngs into the frame/a clipping mask layer on the shape. Save your images as a transparent png. Go to ezgif.com again, put in your images, click “upload and make a gif”
Make your settings look like this. You can choose the fader delay, frame count, and delay time though. Click “make a gif” and you’re done !!
It should look something like this:

(me again :3)
Also for the rentries you listed would you like me to make all of those rentries or are those the specific categories?
By the way what’s an identity rentry because I have no idea
OHHH OKI TY FOR TELLING ME ! ! ! 〜 ☆ also uu look very silly ! ! <- procrastinated too long and forgot to get into tw.st also for the rentry I meant like make the rentry ! ! And identity rentry is like irls :3
640 notes
·
View notes
Text
Tidbit: Placronym Pixelation

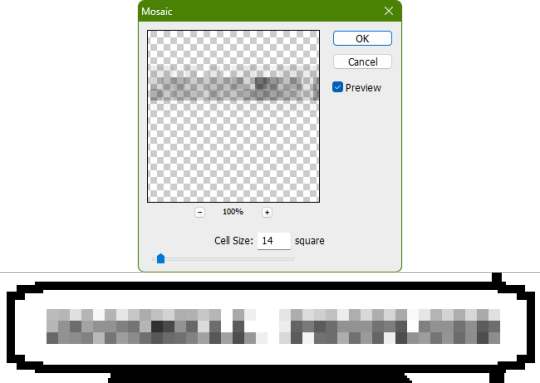
So you got this fresh placroynm that you don't want engraved with a sophomoric name? Not a problem. You can reject that stupid shit with a pixelize/pixelate filter.
Photoshop
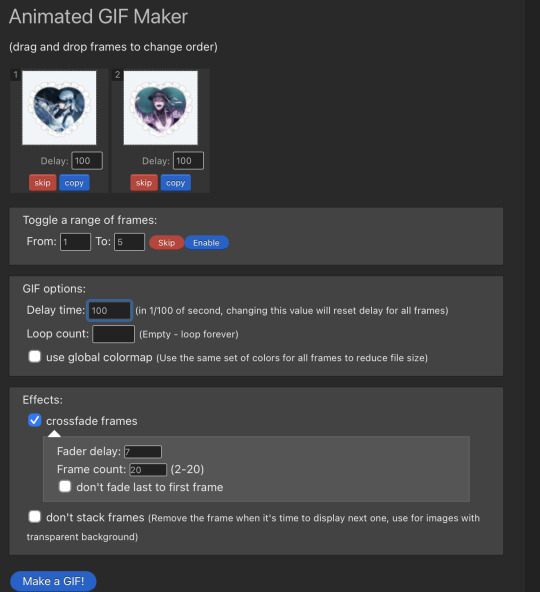
First, you will have to make two more duplicates of your name text layer, so three text layers in total. One for when it's first displayed, one for the first frame of pixelation, and one for the second frame.
With your first duplicate layer selected, go to Filters>Pixelate>Mosaic..., which is a terrible name for it, but hey, I'm no Photoshop developer. Set the cell size to 11.

For the second duplicate layer, set it to 14.
GIMP
Pretty much the exact same steps as in Photoshop, this time the filter is located under Filters>Blur>Pixelize...


I would suggest right-clicking on the text layer and choosing Composite Space>RGB (perceptual) instead of the default (Auto), or going to the top-right corner of the Layers tab and switching the group of blend modes from Default to Legacy. Basically, doing so will make the semi-transparent pixels as dark as they are in Photoshop, otherwise they will appear too light.


Check out the read-more link below for bonus information on easily animating the name being typed out in Photoshop.
ADDENDUM
Typing animation (Photoshop)
Photoshop's frame animation timeline makes doing this a breeze. First, add a layer mask to your text layer. This will add a white box next to the layer's thumbnail.
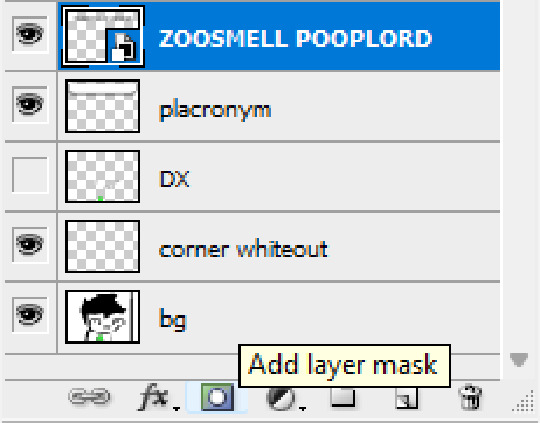
With that layer mask selected (click on it and it will be highlighted in the layers tab), use the marquee tool to make a rectangle selection around the text, then use the paint bucket tool to fill it in with the color black. This will make the text invisible until the layer mask is moved.

Go to Window>Animation if you do not already have the animation timeline open. Click on the little sticky note icon to duplicate the first frame. In newer versions of Photoshop, you will probably first have to click on a button that reads "Create Frame Animation", and the duplicate frames button icon is the "+" in a little square.
Making sure you still have the layer mask selected and not the entire layer, use the move tool and arrow keys to move it all the way to the right, revealing the text on the second frame you've just made. Don't move it too far off now.
Move the typing cursor layer to the right as well, except you don't have to move it all the way at the end, only where it will be last seen.

Make the typing cursor layer visible on the first frame, and not visible on the second.
Select the first frame the animation and click on the tween button. This will add all of the frames in between the first and the second one for you. Make sure you only have "Position" checked under "Parameters". For the numbers of frames to add, here's a neat trick for finding the right amount: count the amount of letters in the name. "ZOOSMELL POOPLORD" is 16 letters, so add 16 frames.
Most of the work is already done, though there might be a couple frames that will need some minor tweaks. Just use the move tool and arrow keys again to finetune the layers' positioning.
This is why it was important to not move the layer mask too far to the right away from the end of the text. Tweening the position spaces it out linearly, evenly, so the farther away the end goal is, the more space each frame will use. Thankfully the font this panel uses is mostly monospaced, and I got a little lucky with my positioning, so I needed to only adjust three or four frames. Way less tedious than having to create each frame of animation myself, at least.

To change the frame delay (the time duration each frame takes up) of the newly created frames, click on the first frame you want to retime, hold down the Shift key, and then click on the last frame. This will make a selection spanning all frames in between. Click on the little dropdown arrow and select 0.1 seconds (100 milliseconds).

Here's the original panel:
And here's my recreation:
Here's the PSD, too.
73 notes
·
View notes
Text


🐚 — SOFT FILTER TUTORIAL ♡
♡ tutorial under the cut
♡ got inspired by those soft icons you always see on pinterest ^_^
♡ i saw this tut on alight motion forever ago and wanted to translate it to photoshop <- it probably exists already HELP
♡ used for my faded wisteria psd !

step 1
♡ duplicate your layer so you have two of the same image
♡ add unsharp mask ( or just sharpen ) to the bottom layer
♡ my unsharp settings are: amount: 50 , radius 1.0 , threshold 0

step 2
♡ add gaussian blur to your top layer , i use anywhere from 5.0 to 10.0 depending how blurry you want it to be . for the example images i used 10.0
♡ set the layer's fill to 50%
♡ you can use opacity instead , you can also adjust the percentage

step 3
♡ add exposure to the top layer
♡ set your settings to exposure: 0.75 , offset: -0.0200 , and gamma correction: 0.75
♡ these settings can ofc be adjusted as well


and you're done !!! ♡
36 notes
·
View notes
Text
hello and welcome to my little blending + colouring tutorial !! in this tutorial, i will be guiding you through colouring blended gifs and how to blend them. i will be using ps 2023. this tutorial assumes you have prior knowledge of basic colouring and timeline !
please note this is the process that i have received the best results from - it might not work for everyone and it likely doesn’t work for every show. but, with the results i have been having, i feel like it’s something i want to share with others !!
p.s. : i will work this tutorial the best i can to accomodate to the new tumblr gif guidelines and bugs !!
GUIDES:
here’s the initial stuff that guided me with my blending and colouring !
blending tutorial by @ helloinej
colouring tutorial by @ helloinej
blending tutorial by @ disaster-lineage
blending tutorial by @ nelsonnicks
keep in mind each of the above have different styles of blending, each also being different to my own. if your final result isn’t the exact same as any tutorial, don’t beat yourself up over it !
STEP 1 - find your scenes.
this step is more important than you think. certain scenes simply don’t blend well and that’s just reality. here’s my preferences:
similar scenes (eg. similar lighting, colouring, setting) blend well.
one moderately well lit scene (ideally not outdoors) + a moderately dark scene (eg. you can clearly get an outline of a face, you’re not adding curves layer after curves layer) CAN blend well, depending.
scenes on two different ends of the spectrum like one daytime outdoors sunshining type scene + midnight dark, obscured faces scenes do not have potential to blend well.
however, you’ll come to know what works through experience !
also make sure that whatever scenes you pick, ideally, there is little to no movement !! this makes it easier when you actually colour the gif later on.
STEP 2 - organize your two gifs.
to blend your gifs, they need to be the same length. i load them into frames first and then i set the speed and trim them to the same amount of frames and layers and then i will crop. then, go convert to timeline > command + option + a (for mac) to select all on the layers + timeline, then right click on your layers and go ‘convert to smart object’.
do this on both of your gifs and then you can sharpen them (i do, so it gives me a better idea of how my gif is looking) or not, depending on how you like to do things.
STEP 3 - the blend.
with my two seperate gifs now, i will take one gif and duplicate it onto the other.
please note that simply performing ‘duplicate layer’ will not be sufficient if you are working with every frame and layer individually. having two seperate smart objects makes things much easier for me and only really changes one or two things that people would normally do.
now, to blend your gifs, go to the gif you duplicated over and change the blending mode to ‘screen’. some people may choose to use ‘lighten’ - do whatever looks best in your opinion.

right now, the background of my top gif is washing out my bottom gif of inej. no worries - we’re going to fix that now.
STEP 4 - the blend part ii (the harder half)
first off, i’m going to adjust the positions of my gifs. the top gif covers too much of the focal point of the bottom gif (inej’s face) so i’m going to move the top one a little to the right and then the bottom one a little to the left so i can get the best view.
now it looks like this:

to begin fixing it, add a ‘layer mask’ to both of the gifs. make sure your foreground colour on your layer mask is set to black. you need a layer mask on both of the gifs because different aspects of each have something interrupting the other.
now, select the ‘gradient’ tool and make sure you have the same setup:
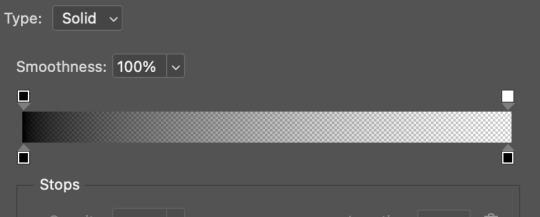
the black colour lets you blend and the transparent end means it does blend. now, using the gradient tool, do this:
and repeat:
(keep in mind i’m not 100% done here !!)
keep using the gradient (or brush) until you’re getting your desired results. do note that when you’re using the gradient tool and, if you have two layer masks (one per gif) that there is a chance that your gradients overlap and the middle point becomes opaque. in that case, i’ll either delete my layer masks and start again, move my gifs or use a brush with a WHITE colour to redo.
play around with your gradient though ! don’t be afraid of messing something up in this process; you can easily go back and fix it. experimenting allows you to learn.
it took me another five minutes to play around and get exactly what i wanted, but what i’m going to do next will actually assist my final result. here’s what it looks like atm:

there’s still a bit of an overlay from that top gif, but when i colour it, it will disappear.
STEP 5 - basic colouring.
this is your curves, levels, colour balance etc. ! there’s not much to say here as everyone does this bit different, but i do advise that whichever gif you work on, you turn off the visibility of the other, and disable the layer mask while you colour. this allows you to achieve the best results.
make sure to use a clipping mask for your colouring layers, and clip them to the corresponding gif.
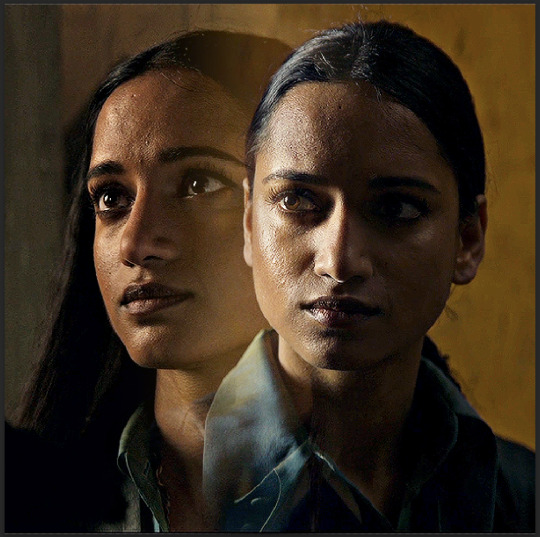
now i’ve completed the basic colouring and i’m ready to give it some actual colour !!
STEP 6 - colourful colouring !!
next up - actually making it look cool !! start by adding 2-3 blank layers (make sure they’re clipped to the respective gif). with the first layer, go back to your gradient tool and draw a gradient on the “darker half” of your gif. if there isn’t one, just choose which one will help it blend best. also disable your layer mask while you do the colouring !!
where that little bit of the top gif was overlapping on the bottom one, i’ve added a black gradient to it so it blends better.

rn it looks a bit weird, but once you change the blending mode to ‘soft light’ it evens out a lot.
then with my other blank layer, i’ll change my brush to my desired colour and set the size to 200px. from there, i’ll do one half of her face then i’ll make ANOTHER layer, and do around the other half, as such:
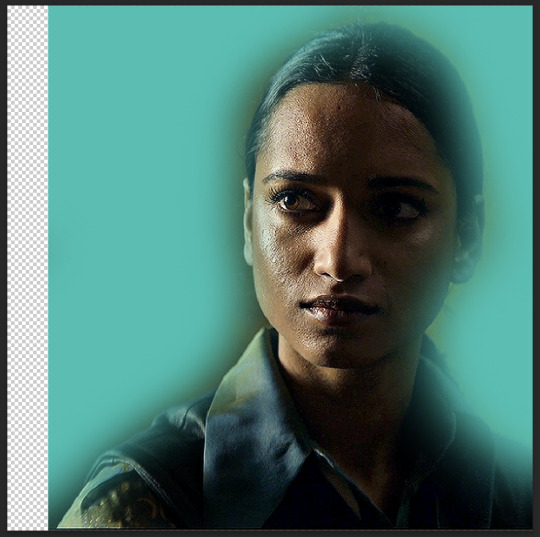
then, set the blending mode to either ‘colour’ or ‘hue’, whichever suits best !
after, make sure to clean up with an eraser so it won’t turn the subjects skin that colour. then, you can repeat the process for the other gif !! feel free to switch your colours up too.
here’s both my gifs, coloured individually:


don’t stress about having the perfect colouring where no skin is obscured by the colouring. it won’t be perfect (eg. there’s a tad bit of cyan on her ear) just as long as it works well with the motion !!
STEP 7 - final clean up and save !
and i’m done ! this process is relatively quick and has been giving consistent and high quality results for me, which has been so good. i’m aware that blending is not a quick thing to learn and wanting to incorporate colour is such a hard thing to start. hopefully this has helped <3
#*tutorial#gif tutorial#ps tutorial#userriel#userraffa#usercim#alielook#userrsun#userv#thingschanged#userzesty#userfaiths
255 notes
·
View notes
Note
Hello! I hope this ask fond you well!! I'm not exactly new to your blog, but this is my first time hoping to request? Though before that I was just hoping to ask of you'd write for Master Kohga?
i am so whipped for that guy ngl- *cough*
Of course! Master Kohga, as I'm finding out, has charmed his way into the hearts of a lot of people! And I honestly love that for him, he's such a goofball.
I wasn't sure what kind of request you wanted, but I had a little something in mind! Sorry this took so long. Final season is upon me so I've been swamped but I'm almost done!
---
"C'mon! C'MON! You said you were gonna be done soon with my surprise!" came the impatient prattling of your superior. His foot tapped away just outside of the kitchen door, a few foot soldiers watching from afar their boss's restlessness. You rolled your eyes as your mittens retrieved the warm delight from the oven before you.
Grateful were you to have such a thing at the Yiga hideout, it seemed as though cooking things was not a strong suit amongst the clan. Not that you felt it was your responsibility...but admittedly you did grow tired of eating banana-centric things all the time - so teaching some of your more eager Yiga clanmates how to cook actual meals proved to be useful. As you set down the baked good on the nearby table, you let the irony of banana being your focus slide off of you, pride settling in instead.
In all of its saccharine glory was the most appetizing banana upside down cake you've ever made: with a layer of browned sugar and sweet caramel glaze over a dense, but rich cake that was sure to have the clan fighting for slices. You were in thought about how long you should wait to let the cake cool before piping on the vanilla whipped cream you'd made, but a pair of hands clapped over your shoulders and immediately moved you to jump.
"YUMMY!" exclaimed Master Kohga, his masked head leaning over your shoulder, "Was this what you had me waiting for?! Ooooh can we cut it now? Please? Please?!"
The Yiga clan leader bounced on his heels with childlike delight, nearly drooling at the mouth beneath his mask at the aroma of the confection wafting through every crevice it could creep through. Allowing your heart to calm down a bit from the sudden fright Master Kohga gave you, you willed your self to let out an exasperated laugh,
"We should probably let it cool first, Master Kohga, sir."
"Oh, what, is it too hot? Don't worry about that, I'll take care of it."
His hands quickly removed themselves from your shoulders, the sound of swift hand movements just behind your ears before a subtle chilly mist blew over your shoulders, the heat of the cake cooling down immediately as soon as a few puffs of the frosty air hit it. Blinking, you quietly took a knife and carved out a piece for your boss, plating it in astonishment at the fact that he thought to so quickly use magic to bring your piping hot dessert to a comfortable, edible temperature.
Clapping, Master Kohga grabbed the plate with excitement, lifting his mask an inconsequential amount, allowing him to shovel the cake into his mouth at a whirlwind pace. Before you even had the opportunity to ask how it was, the plate was shoved into your face,
"Another!" he chirped, still chewing through his last bite.
A new wave of pride soared through you; clearly Master Kohga found your creation delicious, and it filled you with joy to hear his smacks and small, thrilled noises as he ate his second piece.
"Ahhh" he exhaled, adjusting his mask back into place after inhaling his second piece. Master Kohga took occupancy in a nearby seat, leaning back and balancing on the chairs legs, "You know you're my favorite, right?"
The thrum in your chest almost blew your cover of the blush that threatened to creep up on your face. Swiftly you turned to grab some extra plates from your cabinet for your clanmates. Now was not the time for your tiny, miniscule, insignificant crush on your boss to surface. So, with some quick thinking you decided to instead scoff playfully, "How many Yiga soldiers have you said that to, sir?"
But your teasing question wasn't met with the answer you expected. Instead of Master Kohga's jovial laughter of 'being caught' or a defensive 'Hey!'...you were met instead with silence.
"Just you."
You fingers gripped the plates in white-knuckled anxiety, and you turned to your boss who sat upright now. Though it was difficult to often gauge where his eyes were from behind that mask, you were deadly sure they were burning into you right at this moment. The air in your lungs held stagnant, that blush you tried to hold back now wisping across your cheeks and neck.
"I mean it," he continues, "You're my favorite."
Suddenly he's before you, and you realize how much smaller you are compared to his stature when he's not slouching. His hand drapes over yours for a brief moment,
"Wouldn't have any reason to lie about that neither"
Your heart is beating wildly in your chest, blood pumping in your ears as your bewildered expression looked up at the never-changing painted eye of his Yiga mask. Next you knew, Master Kohga had one of the plates in your hands between his fingers, hurling the disc effortlessly toward the kitchen door. It was caught with ease by a footsoldier, who meekly shrunk into himself once he realized he willingly came out of hiding.
"It's rude to eavesdrop you know!" Master Kohga shouted, stomping his foot.
Four other Yiga clansmen appeared next to the first, straightening up at attention for their superior.
"Sir!" one of them spoke, "We're sorry sir, we just...the smell of bananas and sugar was so strong we couldn't help it..."
The sigh Master Kohga let out was akin to a father who had just caught his children stealing cookies from the jar, "Well hurry up then before I decide you don't get any."
A raucous cheer sounded in the kitchen, the soldiers lining up for slices and taking plates carefully from your hands.
You, on the other hand, were still trying to process Master Kohga's words against the sounds of pleased chewing and eager appreciation. When you finally came to your senses you scanned the room to see your Yiga brethren still enjoying their cake and chattering amongst themselves about their day so far.
Master Kohga was nowhere to be seen.
#ooooooOOOOOOHHHHH WHAT COULD HE MEANNN#legend of zelda#legend of zelda: breath of the wild#legend of zelda: tears of the kingdom#loz: botw#loz: totk#breath of the wild#tears of the kingdom#master kohga#master kohga x reader#x reader#botw fanfic#totk fanfic#breath of the wild fanfiction#tears of the kingdom fanfiction#yiga clan#fluff#master kohga imagines
67 notes
·
View notes
Note
do you think you could please do a tutorial for your greys anatomy edit (kinda similar to your brittana edits) i'm shocked if no one has ever asked you before for tutorials (and if you do i'd love to see them) your edits are so gorg and you're incredibly talented !
Totally! Bare with me, this is my first tutorial in like 8 years. Haha. I'll show you how I made this one:
For reference, I use Photoshop CS5. (My computer hates the newer versions. It'll run three different video editing softwares but hates photoshop. Idk lol.)
Okay, first you want to make 2 gifs with the same amount of frames. That's important. And then you want to convert them to a smart object.
So we have these two gifs.

Now, depending on what you're doing, you can do this next step now or you can color your gifs how you like, save them separately and then reopen them with all the coloring on them. Sometimes I do this if I'm working with a lot of effects but since these two gifs have the same coloring, we're going right click on one of them (it doesn't matter which one tbh) and you're going to select "duplicate layer"
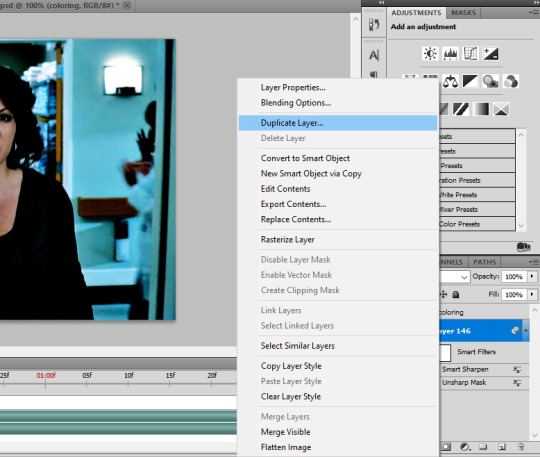
A little box will pop up and this is where you're going to select the project name that you want to essentially paste this gif on top of.
Set the top gif to Screen.
The first thing I usually do is sharpen them.
So I use Smart Sharpen and Unsharp Mask with these settings:
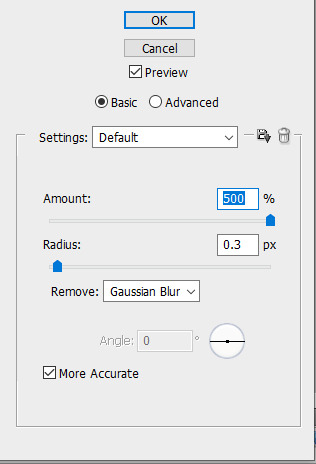

With Unsharp Mask, you have to tweak them depending on the gif, quality, what effect you're going for, etc.
Then we add some basic coloring:
Now, I have a base for specific shows because all shows are colored different. Grey's is more blue toned whereas Glee is more yellow toned. However, since coloring is a bitch sometimes, I'll add a PSD that I use ALOT. You can download it here.
So now that we've sharpened and added some coloring, this is what we have (separately):
This is what it looks like after I set it to Screen (and I moved the top gif a little to the right.)
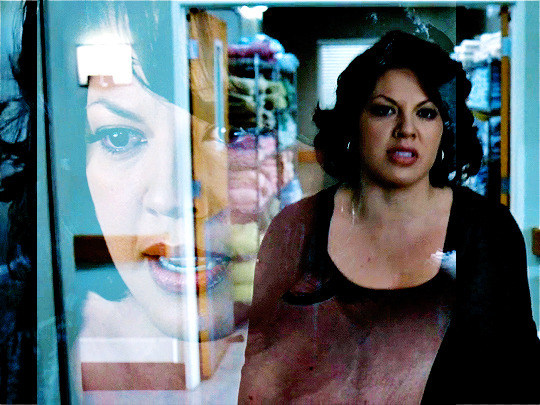
Obviously, we need to get rid of those lines and make it so that each gif is more visible.
So now we blend.
On the top gif, you're going to add a layer mask to that gif. So with that top gif selected, you're going to select the mask button that looks like this:
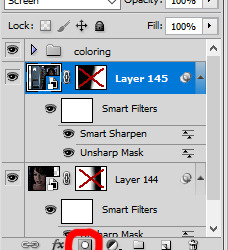
Select your brush tool and use a soft brush to erase what you want from the background of each gif. (Make sure to repeat the previous steps to get a layer mask on the bottom gif.)
I have this now, after using the brush tool.

As you can see, it's very blue and I wasn't feeling blue for this gif so we want to change blue color. That's where the Selective Color comes in.
We're going to get rid of that cyan tone. So you're going to add adjustment layer and select Selective Color.
All I did for this one was adjust the cyan tones in the drop down box.
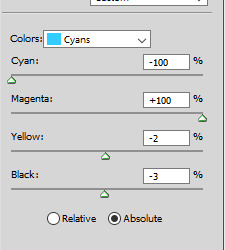
Now we have a pretty purple tone!
Now, we're going to add a light grey squareish box this to outline.
Set the blending mode to exclusion. To get the bar (and we'll do this again with the text) you're going to select the FX icon.
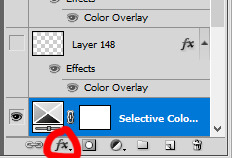
Select Color Overlay. A box will popup. You're going to set the blending mode to Color and then select whatever color you want the bar to be. (If it comes out with too much white, adjust the color of the bar itself to a darker shade.)
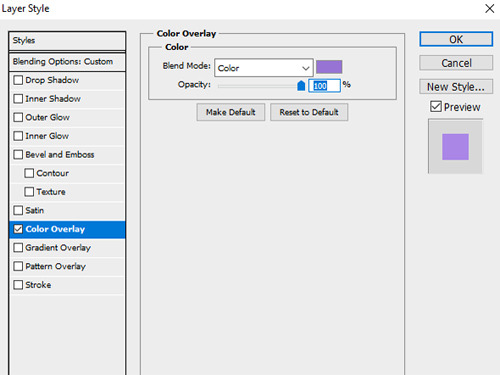
Lastly, we're going to add our text. For this gif I used Magnolia Script and Montserrat.
To get the purple effect on the "The Story" text, you're going to do the same thing you just did for the bar.
Voila! I hope this helped. If you need any further assistance, I'm always happy to help!
#tutorial#gif tutorial#blending tutorial#usergif#completeresources#mine#also anon you’re so fucking sweet
120 notes
·
View notes
Note
Less about OCs, but I'm interested to know what your process is like when creating a piece as detailed as that one you posted for Valentine's Day. How do you go about it? And do you happen to do time-lapse videos?
hmm can't say I can give an explanation that's terribly interesting or satisfying lol... I'm almost entirely self-taught, so "process" is a very loose and nebulous concept for me, and it changes from piece to piece. the one common thread among my works is that they all involve obscene amounts of trial and error. I don't have any recent time-lapses because I never think to record them, but if I did you would definitely see how often I feel the need to adjust and redo every little thing.
for the Valentine's Day piece, because it was a "remake" I had the benefit of a much more solid foundation than usual to start out with. however you can still see where I ended up deviating from the sketch phase - most obvious being her pose, the design of her hair, and the details of her sandals. (there were also meant to be candles on the dresser, but I forgot and didn't feel like adding them back in later and so I decided a vague suggestion of candlelight was enough lmao)

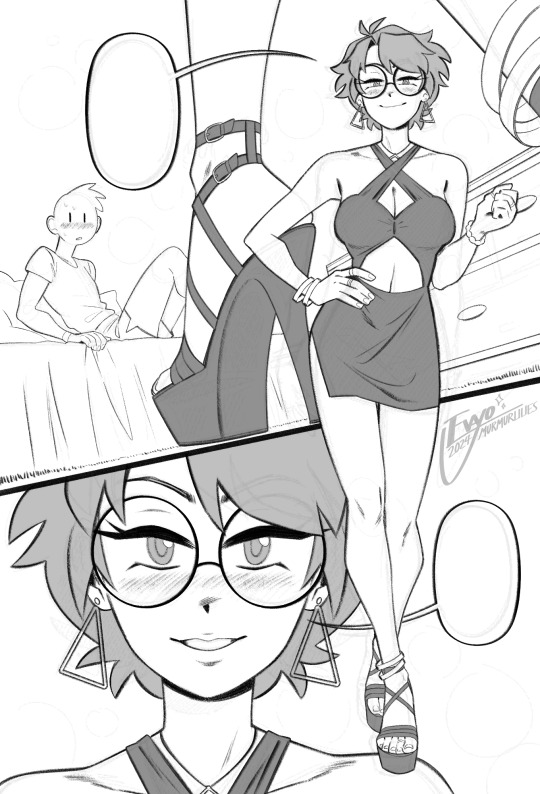
anyways, compared to everything else, sketching and linework are fairly straightforward and come most easily to me. there really isn't much to say, just scribble some messy lines and then whittle away at and draw over them till they magically become less messy!
when it comes to coloring and shading, things get a lot weirder and more complicated. this is where my process tends to vary the most, because it really depends on the mood of the piece. for this one I wanted something dark and seductive, so I covered the whole image in a layer of burgundy red, then painted the "lighting" on top across several Overlay layers. additional shadow details were brushed in on Multiply layers using deep purple instead of straight black, but ultimately I didn't want them to be too dark, as that initial layer of red was meant to serve as the primary "shadow" of the piece.
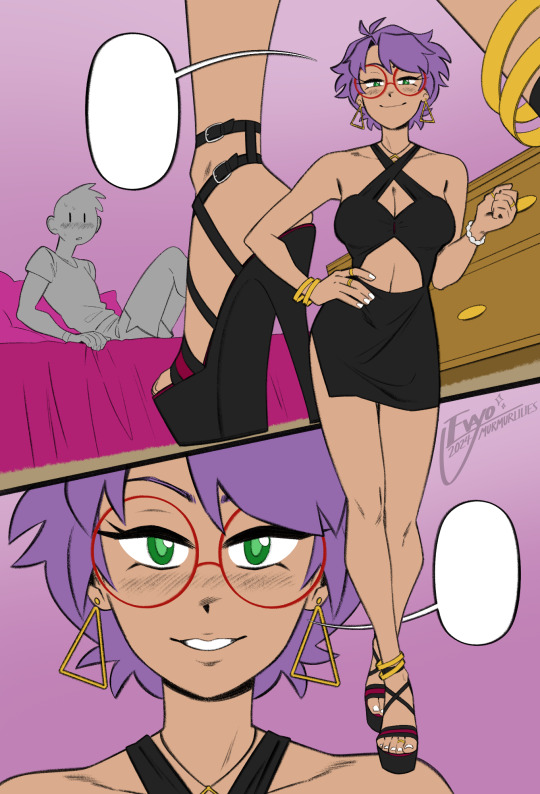
this is also usually where I decide which lines I want to "color" with clipping masks, which can either make certain elements pop or feel softer. it sorta brings the whole image together, giving it a much more painterly look overall. from there all that's left is to keep making adjustments and adding little details - the glittery effect on her dress was one of the last things I added, I thought it looked really nice!
...ok now take everything I just said and throw it all in a blender. because even though it might sound fairly orderly, the truth is I'm constantly making changes to all stages of my works, even the earliest ones, all the way to the end. I'll still be making adjustments to the linework and such after I've already put so much effort into the lights and shading! it's not the most efficient way of doing things... but again, trial and error. my perfectionism gets the better of me...
anyways I apologize if NONE of this made any sense, like I said I never had any formal training in art, so I'm not very good at teaching or explaining it!! at the end of the day my process is less about what makes logical sense and more about finding what feels right in a given moment. at the very least I hope it was a fun read lmao 🥳
#evayo asks#evayo art#glassborn#ocs#fun fact: i had no idea what to put in those dialogue bubbles till like an hour before upload LMAO... she could've been saying anything 🙊#art
40 notes
·
View notes
Text
HOW TO: Do A Crystallize Gif Transition
Hi! I was asked to explain how I did the transition effect in this gifset, so here's a quick tutorial! Disclaimer: This tutorial assumes you have an intermediate understanding of gif-making in Photoshop using Video Timeline and requires the use of keyframes.

PHASE 1: THE GIFS
1.1 – Determine how many frames you need.
Since you need at least 2 scenes for a transition, consider limiting the amount of frames you'll use per scene. For a transition between 2 scenes that's 540x540px, I would recommend no more than 30 frames per scene (for a final gif that's 60 frames). Even that may be pushing it depending on your coloring. Just be sure to consider the dimensions and colors of your gifs in relation to the amount of frames to keep your final gif under Tumblr's 10MB limit.
1.2 – Import frames, crop, resize, convert to smart object for Video Timeline, color, blend, etc.
Do this as you normally would! If you need a tutorial for the basics, here's my tutorial. :) Please note, the methods in this tutorial only work with gifs that are converted into smart objects in the Video Timeline workspace.
Tip A: I recommend using scenes where there's a lot of one color (or scenes where you can manipulate it to look like that). The crystallize filter on a gif creates A LOT of movement that can feel a bit chaotic. Having your gif be primarily one color reduces the eye strain a bit imo.
Tip B: I like how this effect looks with blended scenes because it allows me to use different "crystal" sizes (more on this in Step 2.2). Check out the USERGIF Resource Directory for plenty of blending tutorials!
1.3 – Move all your gifs into one document, group into folders, and arrange.
Once everything's in one doc, keep everything organized in a group folder! I have just two scenes, so that's Folder 1 & 2. Within those folders are the gifs I blended, which I labeled by gif color. Then, simply drag Folder 2 so it continues right after Folder 1. (Make sure none of your adjustment layers from Folder 2 accidentally affect Folder 1! You can do this by clipping your adjustment layers to match the length of the gif as I did, or using clipping masks.)
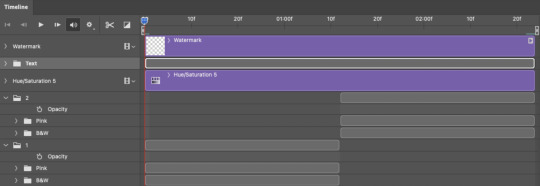
(Ignore that lone Hue/Saturation layer lol. I decided last-minute that I wanted my gif to lean more pink than red.)
PHASE 2: THE FILTERS
2.1 – Duplicate each scene.
We're going to use opacity keyframe animations on these duplicated scenes that allow it to go from "normal" to "effect" and vice versa. The filters will only be applied to the duplicates. In the screenshot below, all of my duplicates are highlighted:

2.2 – Apply the Crystallize Filter.
Above your sharpening settings, apply this filter by going to Filter → Pixelate → Crystallize. On the pink gifs, I made the crystals bigger (cell size: 45), and on the black and white gifs, I did a cell size of 25.
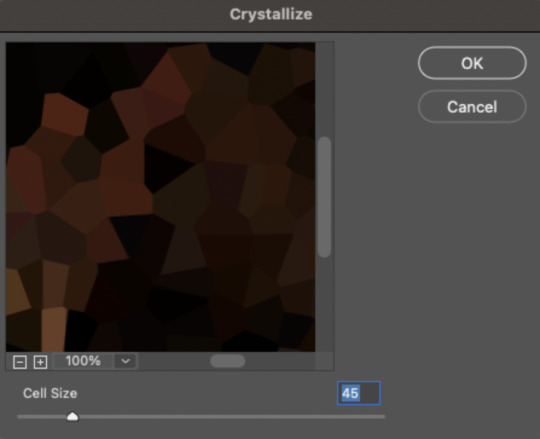

The different sizes help break up the uniformity of the crystals imo, creating more of a mosaic-like look, which is what I wanted to match my gifset concept.

2.3 – Apply the Oil Paint Filter (Optional).
Filter > Stylize > Oil Paint. Here are my settings (they're the same for both crystal cell sizes):
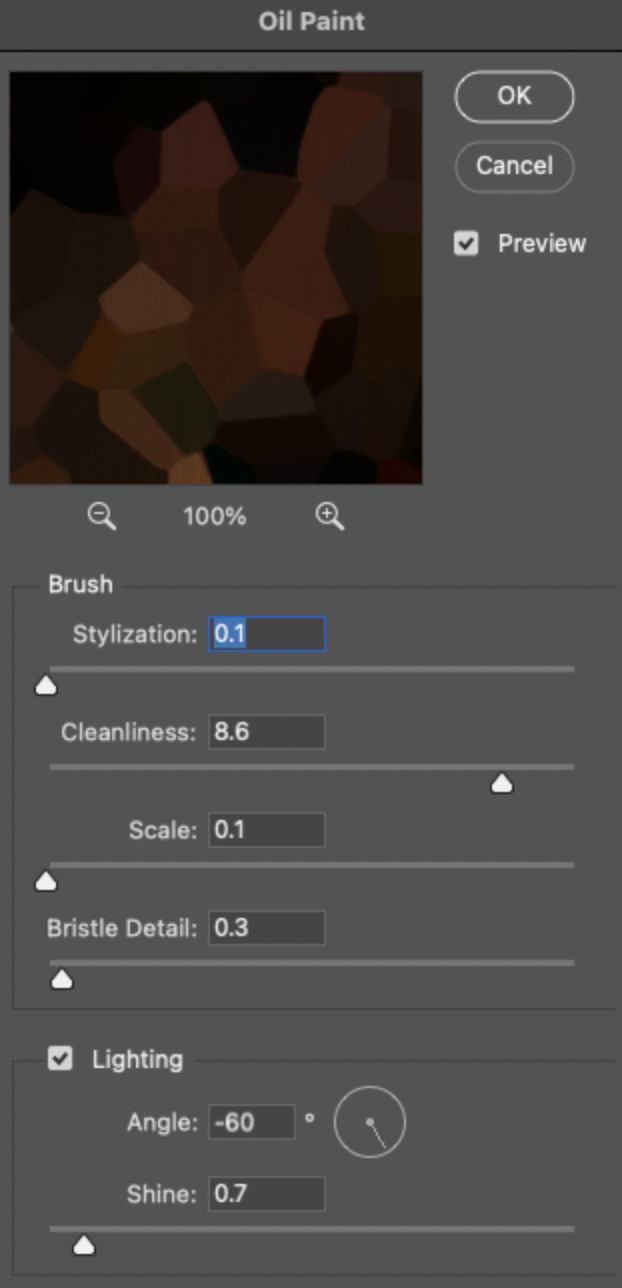
Brush – Stylization: 0.1, Cleanliness: 8.6, Scale: 0.1, Bristle Detail: 0.3
Lighting – Angle: -60, Shine: 0.7
This filter helps soften the cells a bit while adding some texture (left: no oil paint; right: with oil paint):

2.4 – Repeat steps 2.2 & 2.3 on all duplicated scenes.
PHASE 3: THE KEYFRAMES
3.1 – Add opacity keyframes.
The very start and end of each scene needs an opacity keyframe set to 100% opacity. Move 0.09 seconds from each of those points, and place another opacity keyframe, this time set to 0% opacity. We're basically making the crystals fade in and out. Please reference the screenshot below for keyframe placement:

If you need more info on opacity keyframes, check out Phase 2 from this fade transition tutorial I did on usergif.
3.2 – Repeat step 3.1 on all duplicated scenes.
All the keyframes in Folder 1 should line up exactly and all the keyframes in Folder 2 should line up exactly!
PHASE 4: THE DUPLICATES
4.1 – Convert back to Frame Animation.
If you're not sure how to do this, I've written out the steps here. I rec the action linked in my general gif tutorial which I shared earlier!
4.2 – Delete duplicate frames.
Whenever you use keyframe animations, you'll get duplicate frames. That's just how it works, unfortunately. If you follow my steps exactly (specifically the 0.09-second spacing, which follows my tried-and-true 0.03-second rule), you'll have a total of 12 duplicate frames exactly — 3 duplicates per keyframe section. Just manually delete them! You can spot the duplicates by eye, but with this spacing, it's usually the 2nd, 5th, and 8th frame for each transition section. The selected frames below were my duplicates:
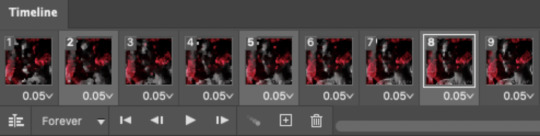
If you want to learn more about why there are duplicates and the math behind it all, I explained it in more detail in this ask.
4.3 – Export and you're done!
I hope this tutorial helps! Let me know if you have any questions :)
#gif tutorial#completeresources#usershreyu#usernanda#useryoshi#userzaynab#userrobin#usersalty#userhella#alielook#uservivaldi#tuserabbie#useraish#userabs#tuserlucie#mialook#resource*#gfx*
339 notes
·
View notes
Note
hi, this edit is cool, would you please tell me how do you make the circle shape and text like that in the second gif?
https://mikelogan.tumblr.com/post/727834848573669376/forgiveness-is-warm-like-a-tear-on-a-cheek-think
hi!! i'm so sorry this took me so long to answer, but i've hardly been on my desktop for the last couple months and haven't been giffing. finally getting around to this and thank you for the kind words!

in this tutorial, i'll show you what i did as well as another way to achieve the same effect:
once you've made your gif and colored it the way you want, you can get the circle effect one of two ways. i'll show you how i did it first and then a more "normal" way lol
i actually had this circle texture laying around and for whatever reason, i decided to use that. so i popped that onto the canvas and used ctrl+T to center it both vertically and horizontally
then i used a glitter texture over the top of the circle layer and applied a clipping mask so that the glitter only shows up on the circle and not the entire gif. to do this, make sure your glitter (or whatever texture you decide to use) layer is ABOVE the circle and then right-click on the glitter layer and select "create clipping mask." you should see this lil arrow on the layer now:
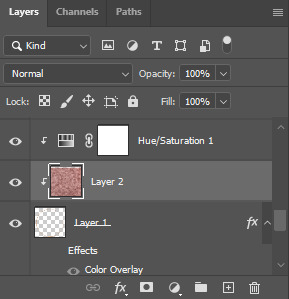
as a quick note about textures/overlays: chances are that if you just google "glitter texture png" or something similar, you'll find tons, but the png portion is important because pngs have transparent backgrounds. this wouldn't work if the circle texture was a jpeg because its background is not transparent and the overlaying of the glitter texture would appear on every pixel, basically just taking the shape of the entire jpeg rather than just the circle.
i have a resources (basically anything downloadable, from overlays to actions to psds) tag on my gifmaking sideblog as well as one specifically for textures and overlays. i also utilize the websites freepik, pngegg, and pngwing for pngs (especially freepik).
to make the glitter layer the same pink/purple color i used, i ended up using a hue/saturation layer above it and also applied a clipping mask to that layer so it only affected the glitter layer. this step is totally optional depending on the coloring you're going for. you might be happy with the glitter texture exactly as it is. you could also skip the hue/saturation layer and instead apply a color overlay to the glitter layer, select the color you want, and set it to screen or another similar blending mode. to do this, double-click on the glitter layer, select color overlay from the menu, choose whatever color you want, make sure the opacity is set to 100%, and adjust the blend mode to whatever you think looks best.
the "normal" way to do the circle would just be to use the ellipse tool (right-click on the rectangle tool and choose ellipse) and input your desired dimensions. to get a perfect circle, the width and height have to be the same as one another. then you'd continue on with the rest of the process.
for the text, create your main text layer. these were my settings for a 540px canvas:
i also added a drop shadow to the layers with these settings (double-click the text layer to bring up this menu):

then i duplicated the text layer 6 times. select the first duplicated layer (the second line), use ctrl+T and your arrow keys (i only used the down arrow) to move the text down the desired amount of space. i made sure i moved each line down exactly 25 pixels, which is equal to 25 presses of the down arrow. i just think it looks nice when they're equally spaced. with each subsequent layer, i just dropped the opacity.
starting with the original text layer, i used: 100% -> 80% -> 60% -> 40% -> 20% -> 10% -> 5%, but this was just my personal preference.
anyway, that's pretty much it! but if you have any additional questions on this tutorial or any other set, just send me a message and i'll do my best to get to it much quicker than this one 💙
13 notes
·
View notes
Note
12 and 14 for the iterator ask game? (if i can ask more than 1) the height one seems interesting since they specialize in astronomy
(this ask has been sitting in my inbox for a while because I was thinking about the answers, sorry)
12. How tall is your iterator? Is this an average height for a standard iterator?
Three Stars Above Clouds' actual can (the box part) is the same size as other standard iterators, but their legs are longer, and they're not all the same length. TSAC is located in the mountains and stands on uneven ground, so their legs are different lengths to compensate. They also have additional struts anchoring their legs to the mountainside for stability, because avalanches are very common in the region. I guess that means they're slightly taller than average, just considering their actual superstructure.
As for their altitude, their can is located on a mountain summit above the cloud layer. TSAC is heavily based on the Vera Rubin Observatory, which will be located in the mountains of the Atacama Desert in Chile, about 2.6 km above sea level. I also took inspiration from the observatories on top of Mauna Kea in Hawaii, which is about 4.5 km above sea level.
In this post I did a rough calculation of how big I think iterators are, and they came out to about 2.24 km in height... I don't want TSAC to be nearly as tall as the mountain they stand on, so I'll say their mountains are about 4-5 km tall.
TSAC's city also has a very tall spire with an observatory on top, to get an even better view. (Generally you get clearer views the higher you go.) The spire is about 1 km tall.
Taking all of that together, that makes the altitude of TSAC's highest point a little over 7 km above sea level. (As a point of reference, Mount Everest is 8.8 km tall.)

I edited the height diagram from the aforementioned post to show how TSAC compares to other typical iterators altitude-wise.
I've seen some people theorize that the masks the Ancients wear could double as respirators, because oxygen might become a concern atop iterator cities. Given the height of TSAC's city, either those respirators are mandatory, or the citizens have bioengineered themselves to survive in the low-oxygen environment. Visitors coming into TSAC's city from other iterator cities would very likely suffer some form of altitude sickness while their bodies adjusted to the oxygen levels.
14. Has your iterator ever modified any part of their body (puppet, city, structure components, things that make up the structure like neurons, inspectors, etc.)?
Three Stars Above Clouds' structure is largely the same as it was when they were first built. However, as the amount of data they archived grew, storage became a concern, so they asked their engineers to modify their Memory Conflux to accommodate. TSAC has a large room in their memory conflux dedicated just to archiving data pearls.
In this post I detailed a purposed organism called a Courier whose job is to transport pearls around an iterator superstructure. I'm not sure if this is something all iterators have, or if Couriers were created specifically for TSAC to help them handle their high volume of pearls. But TSAC definitely has lots of them.
After mass ascension, TSAC was hesitant to make any changes to their body, because their engineers were no longer around to fix any issues. However as their equipment ages, they're willing to give it a try out of necessity.
They did make a major change to their city and walls, by encouraging vultures to roost there. They accomplished this through a combination of luring vultures with the lasers in their observatories, and encouraging the growth of vulture grubs (I'm not sure how they accomplished this, they probably dipped into bioengineering a little to grow vulture grubs and then modified the chemical balance in their city to encourage them to grow).
TSAC also probably used their limited manufacturing power to create the raw material vultures use for their masks (iirc Moon mentions it's a combination of bone and synthetic material). As a result, TSAC's city and the upper part of their walls are a mess of vulture nests. In TSAC's version of The Exterior, their equivalent subregion to The Wall is even called The Roost because there's so many vultures. TSAC is fine with it if it means the vultures will help keep scavengers away.
TSAC tends to be very single-minded about their research and dedicates their attention to little else, but I imagine tending to the vultures on their structure would be a nice pastime if they ever somehow got bored.
(Original ask game here)
9 notes
·
View notes
Text

Process snapshot!
I love this trick for getting just a little edge colour on complicated shapes using clipping mask, layer mask, and gaussian blur! These steps are for Photoshop but a similar principle should work in most programs.
The object whose edges you're highlighting needs to be on its own layer.
Create a new layer above your Main Layer. Select the new layer, then click and drag THE MAIN LAYER to the [+] sign at the bottom right of your layers palette. This will give your new layer a layer mask matching your Main Layer's shape. Select the layer mask and reverse it using ctrl+I on your keyboard (or by going to Image > Adjustments > Invert).
Fill your new layer with a bright colour, then apply the layer mask.
Make your new layer a clipping mask above your Main Layer. The colour will alllllmost disappear - this is where Gaussian Blur comes in!
With your new layer still selected, go to Filter > Blur > Gaussian Blur and adjust the slider until you have the amount of blur you want. Apply the blur!
Last step: use Image > Adjustments or layer opacity to adjust your edge colour until it's just right.
Unlike making a selection and then using Stroke, this method produces a strong and reliable colour. The double mask also ensures that even small unconnected areas have the technique applied to them. It can be a pain to shift+select too many small areas!
#process snapshot#digital painting tips#photoshop tips#it might seem complicated but once you walk thru it#it's fast and easy to do
24 notes
·
View notes
Last Seen Blogs