#the elmer’s glue might be part of the problem
Text

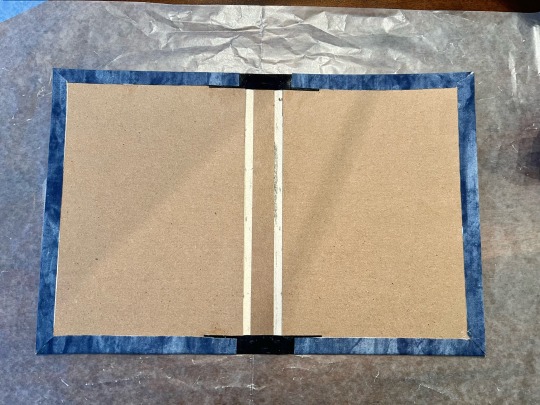
Attempt number two. Now it dries overnight and hopefully tomorrow I can glue in the text block.
#the dry fit seems ok#fingers crossed the glue and fabric didn’t do anything weird#honestly not sure about the structural integrity of the cover#but we’re gonna roll with it#everything held together with elmer’s glue and prayers at this point#the elmer’s glue might be part of the problem#but it’s cheap easy materials for practice#I’ll order good glue before I try another#life at nerdy holler#nerdy makes a book
7 notes
·
View notes
Text
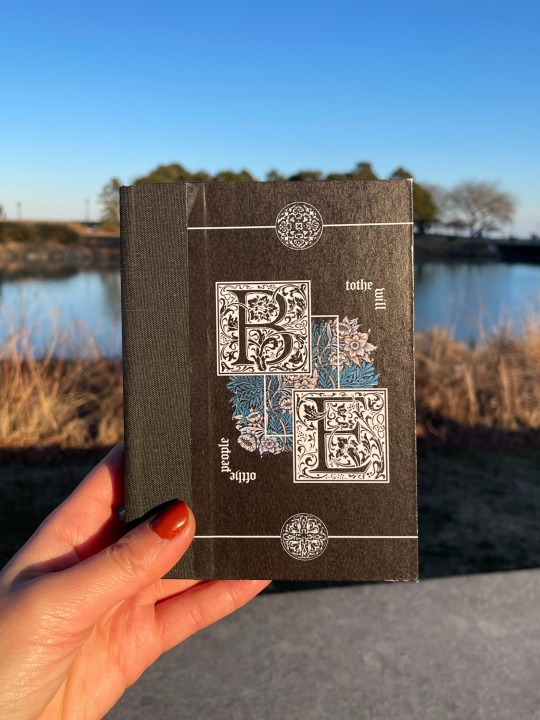
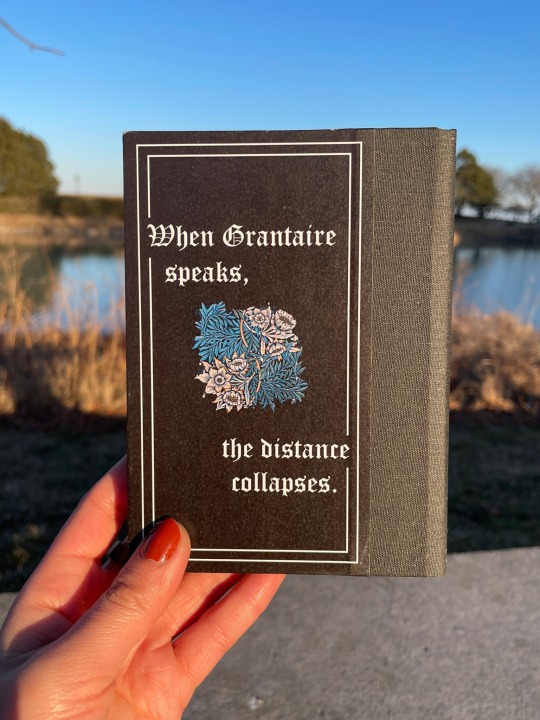
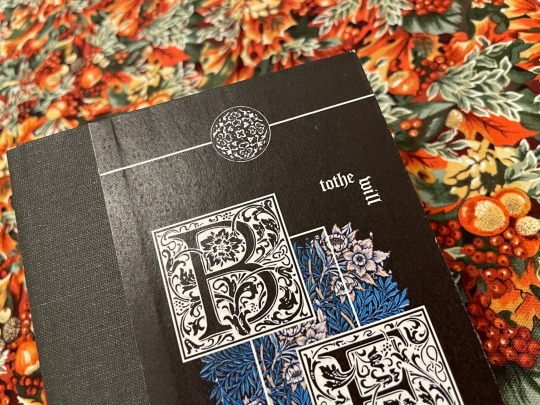
BE by tothewillofthepeople
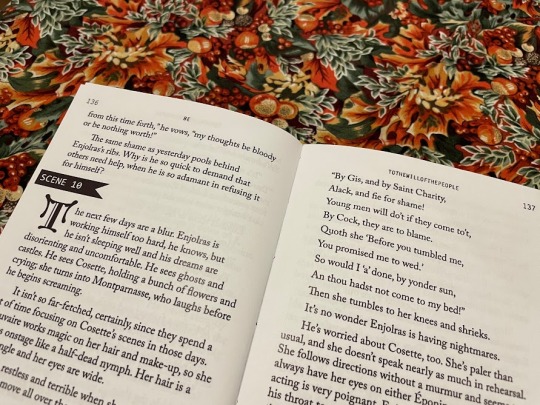
Grantaire is earnest in this, and it’s heartbreaking. Enjolras can’t look away. This is just a rehearsal. Grantaire is still wearing skinny jeans. They have lights and phones and textual analysis and thousands of years of history between now and then and yet–
When Grantaire speaks, the distance collapses.
(Grantaire as Hamlet.)
Title: Middle Ages Deco
Headers/Accents: Letter Gothic Standard
Body text: Adobe Caslon Pro
Case title: Goudy Initialen
38,667 words | 224 pages
Binderary book 1: a long-favourite EXR fic. I love wild Les Mis AUs and I love Shakespeare and this is all of that in such a lovely lovely form. Stage manager Enjolras is inspired. Also, I've been frothing at the mouth to use my special blackletter fonts and go suuuper overboard designing and this was Perfect for that purpose.
More pictures/design/process under the cut.
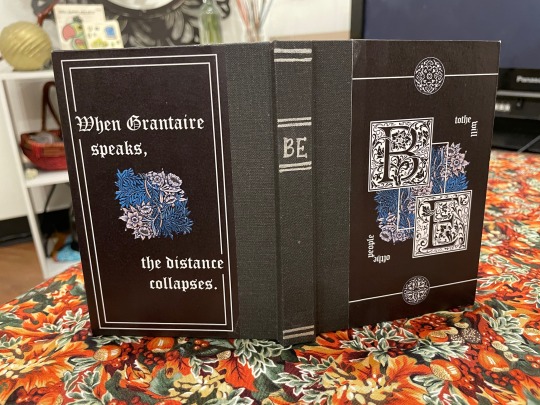
Design and Construction
Case: Flat-back case binding with bradel board covers and spine. The spine cloth is Hollander's pearl linen in charcoal grey. The painted titles were done in Amsterdam acrylic ink in silver, with a pair of scissors because I don't own a painting brush and likely never will. The cover papers are printed on 80gsm white printer paper and glued with a regular Elmer's glue stick and PVA on the turn-ins, and the whole case is sprayed with workable fixatif to (hopefully) preserve it longer-term.
Covers: The front and back covers were designed in Photoshop. The centre image is a William Morris pattern, and the top and bottom little circles are Renaissance printer's ornaments (pngs by the lovely @helle-bored of Renegade Bindery) that I vectorized in Illustrator (Illustrator and I were sworn enemies until this month. Now we're forced friends. Like enemies to lovers).
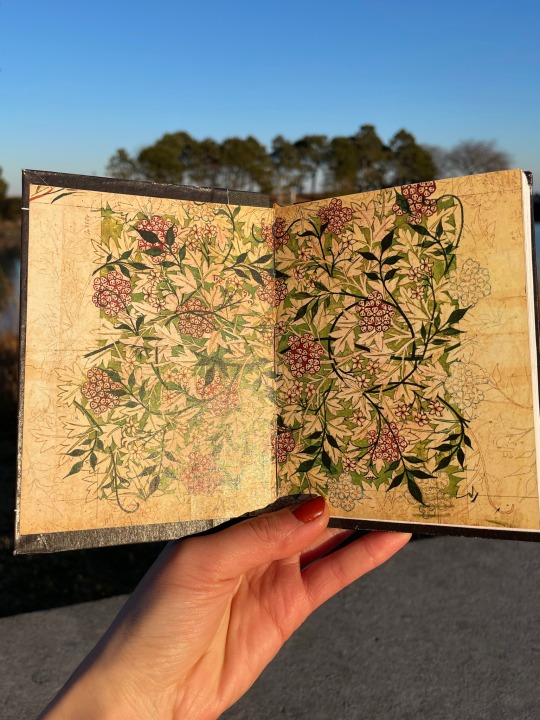
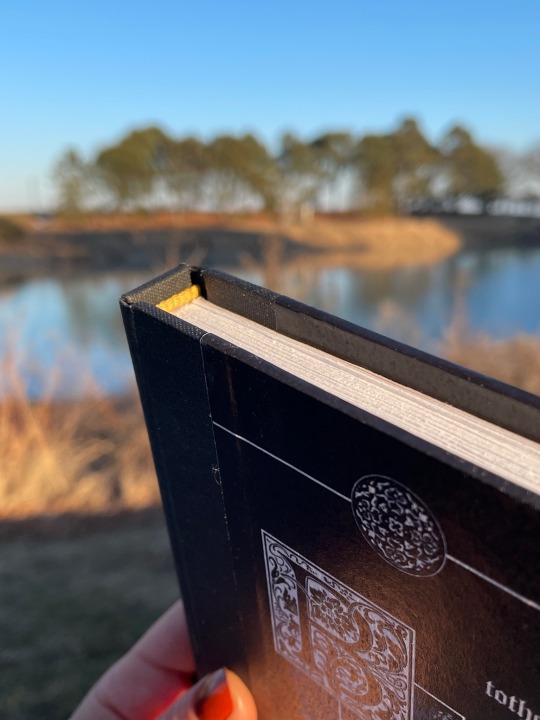
Insides: Endpapers are a William Morris pattern recoloured in Photoshop to be a richer green and red, obv, for EXR. Printed with inkjet on 80gsm printer paper and glued to gold cardstock, and sewn into the textblock. Endbands are pre-sewn from Hollanders, dyed gold with acrylic ink to match the endpapers.
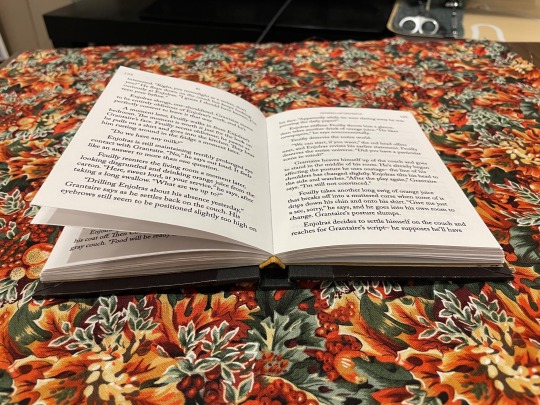
Typesetting
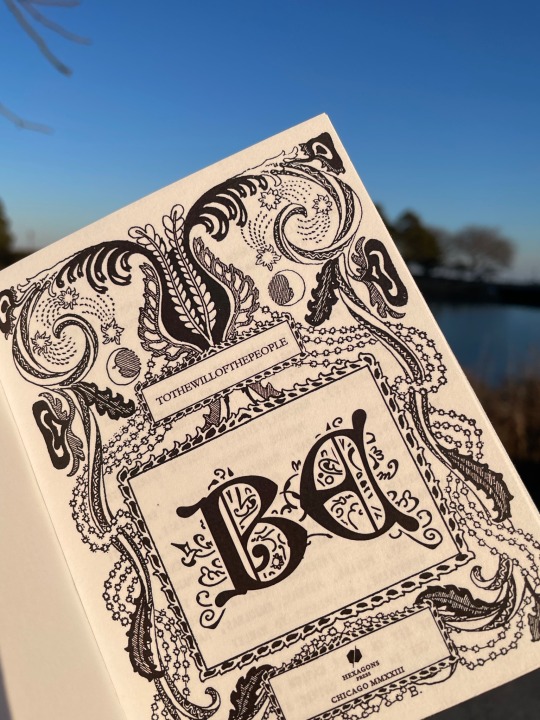
Typeset was done in InDesign. This is a one-shot with scene breaks, so to match the theatre theme of the piece I replaced the horizontal line breaks with flagged scene numbers. I tried to strike a balance in the typesetting between classic Shakespearean aesthetic with the blackletter drop caps and cover fonts versus what you might see in a theatre script book with the monospace accents. The title spread uses a transparent decorative frame, again from Helle's collection; the large box in the middle with the title was part of the original frame and then I duplicated and resized it for the author name and my imprint.
We All Do It, or, the Mistakes Section
I somehow managed to print the cover papers nine inches tall and didn't see a problem with it until they came off the printer. Truly who knows how that happened.
I was working on the case at two in the morning and cut the spine cloth the wrong length three separate times...earned the measure once cut twice badge big time for that one.
The endpapers were an ordeal and a half for real. What I learned: print them too big and glue the cardstock to the back, then trim the paper to size, not the other way around otherwise you'll end up with big ugly gaps where the trimming was a few millimeters off. Whoops.
And...more pictures
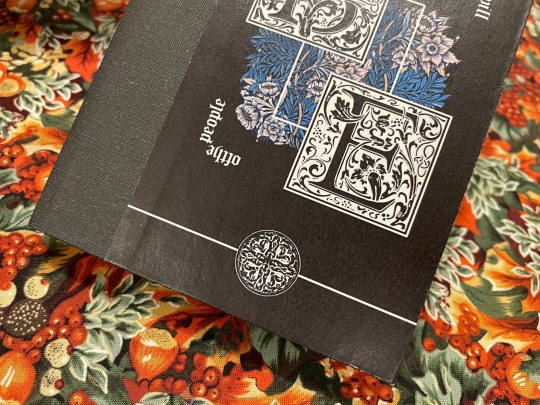
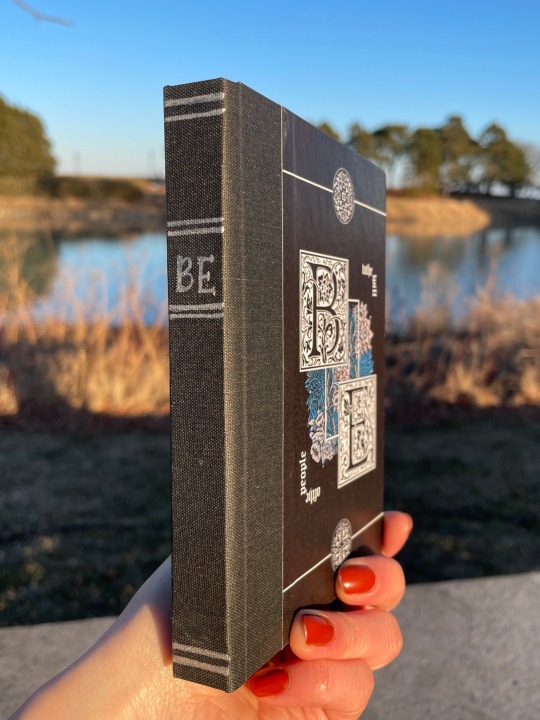
I'm particularly pleased with how the covers here came out so here's closeups. Also, the arc on the spine that you can see in the endband on the last one is really pleasing to me lol I fought a war trying to get the flatback hinge calculations right.
222 notes
·
View notes
Note
could you tell us about question 7 in the ask game? Also 1 if that's ok.
Hi! Yeah, of course! No problem at all =D
Question #7: What's a struggle you wish more people talked about?
Oh, there's honestly so much. I wish more people talked about the struggles and importance of accessible household items, I think. I don't think people talk enough about how accessibility is really important when considering buying certain things.
For instance, I struggle to open the handle at the house my family and I live in. We bought our new house a few years ago, and we couldn't change the handle. My parents have been intending to change it, but they haven't.
We are also currently looking to get a new vehicle, which means we have to check how accessible it is for me. How hard it is getting in, how much leg room I have, where the handles are, and how easy it is to handle/drive.
Accessibility is about more than ramps and wheelchair accessible vehicles. Even though I don't 'look disabled' (whatever that means), I still have to consider accessibility wherever I go and anytime I'm looking at something new.
It could simply be the difference between squeezing a tacky glue bottle vs. squeezing an Elmer's glue bottle, which is a struggle I have dealt with. Tacky glue bottles are CONSIDERABLY harder for me to use due to wrist strength than Elmer's glue is.
It's as simple as needing someone else's help to put on a fitted sheet, or having glass containers that are hard to open. I don't 'look disabled', but I am. And because I deal with wrist pain and my disability affects my wrists, it leads to issues with wrist strength.
So while there are many struggles I'd like to hear about more, I think that is my choice.
Question #1: What disability/ies do you have? (and are they mental, physical, or both?)
I have one diagnosed disability. I believe I have some undiagnosed ones (autism, ADHD, anxiety, depression, c-PTSD and/or PTSD, either celiac or non-celiac gluten sensitivity, and hyperthyroidism).
But for the sake of accuracy, I am only going to explain my diagnosed disability =)
I don't think I have gone into full on detail of what my disability is, even on my main blog. I honestly can't remember.
I have an autoimmune disease called RF (rheumatoid factor) negative polyarticular juvenile idiopathic arthritis. Because I am 20, this would (I think) be referred to as juvenile-onset arthritis, but again, for the sake of accuracy, I am going to give the diagnosis I have on my medical record. By 'juvenile' it means that it is diagnosed/occurs when someone is 16-17 or younger.
Polyarticular means 5 or more. This means that at least five joints in my body are affected by my arthritis. In my case, I have arthritis in every single joint in my body.
It affects my neck, jaw, spine, collarbones, ribs, shoulders, elbows, wrists, fingers, hips, knees, ankles, toes, etc. All of it. Pretty much my entire skeleton is affected. I mostly tend to have problems with my knees, jaw, and wrists. But they are all affected. Because of my disability, I do deal with chronic pain. I struggle when walking sometimes, though I often push myself due to familial expectations, and the fact that I don't like 'complaining'. I also can't stand for long periods of time because of my disability.
My disability is physical. It is mobility related. My disability is categorized as a physical disability, an autoimmune disease, a chronic illness, a musculoskeletal condition, a connective tissue disorder, and a mobility impairment, which is honestly a mouthful XD
I think my arthritis has affected other parts of my body that don't inherently have to do with my joints (potential livedo reticularis on my legs, watery eyes, etc.), though because those aren't confirmed, I just went with what the condition is said to cause (the other issues might be caused by RA, which I am technically not diagnosed with [though I feel like I might have seronegative RA, which would just end up being the more adult type of the JIA I have])
Thank you for the questions!
#physical disability#cripple punk#cripplepunk#crip punk#cpunk#physically disabled#physical disabilities#juvenile idiopathic arthritis#juvenile arthritis#arthritis#auto immune disease#autoimmune#invisible disability#disabilities#ask game#chronically ill#chronic illness#chronic pain
9 notes
·
View notes
Text

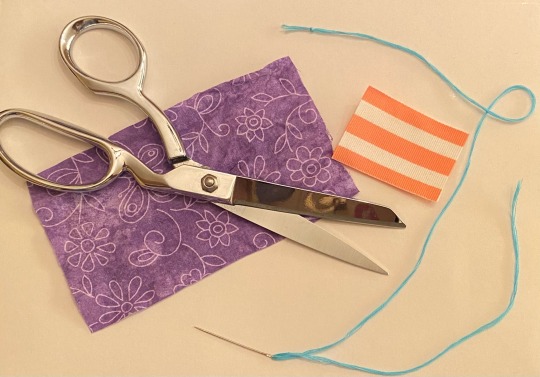
Tutorial for a simple straight stitch, specifically for sewing on patches!
MATERIALS
❥ Needle, threaded and knotted at one end
❥ Scissors
❥ Patch (shown here as striped ribbon)
❥ Item you’re sewing your patch onto (shown here as purple fabric)
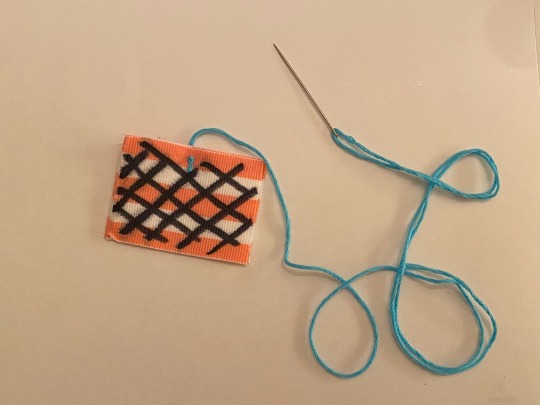
Start with just your patch. Pull the thread through so that the knot lies on the BACK of your patch.
Pin your patch face-up to whatever you’re sewing it onto.
Then, moving your needle over (about 0.5 to 1cm from your starting place), push it through BOTH the patch and the fabric. Pull it taut.

Flip your piece over to the back. Again, move the needle over slightly then push it through, making sure to catch the fabric AND the patch. Pull it taut.
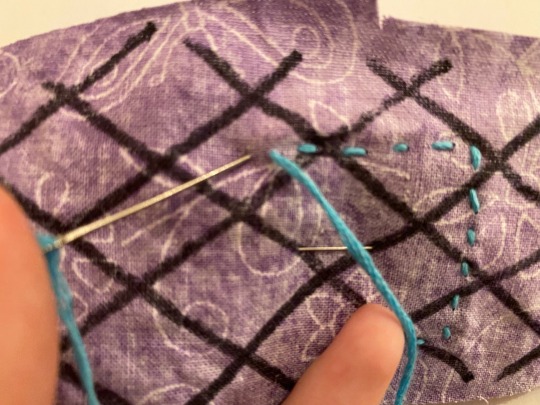
(TIP: make the stitches on the backside as small as you’re comfortable with if you’re sewing your patch onto a bag or piece of clothing. You don’t want the things in your bag or parts of your body catching on and tearing your stitches! I haven’t had a stitch break because it snagged from the outside, but I often snag them from the inside!)
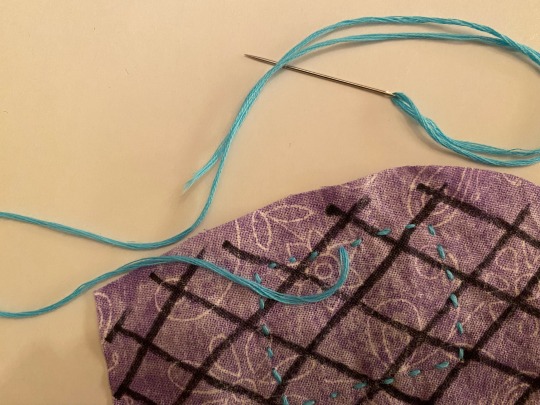
Flip it back over and repeat, moving the needle over and then pulling it taut, flipping the piece over, and repeating.
Once your piece is sewn all the way around, make sure your needle is on the backside of your fabric, like shown:
Push your needle through a neighboring stitch

Pull that until there’s a slight loop, wind your needle into that loop, and pull it taut.

Repeat if you want it extra secure.
You can cut the tail there! If you’d rather hide the thread tail, here’s how I do it.
1 Push the needle through the fabric but NOT the patch
2 Feed the needle through the patch so it comes out somewhere in the middle.
3 Pull it so taut that it wrinkles
4 While it’s wrinkled, cut the tail as close to the patch as you can. You might have to wiggle the patch back and forth, but the tail should end up hidden behind the patch

And that’s it! Here’s how it’ll look:

COMMON PROBLEMS:
-Stitches don’t hold/cause the fabric to fray: You’re stitching too small or too close to the edge! Make your stitch wider and move away from the edge of your fabric!
-Needle refuses to go through patch: either your needle is dull or your patch is too thick!
First, try sharpening your needle: If you have a pincushion, it should have a little emery strawberry! Push the needle tip into the strawberry and twist! If you don’t have a pincushion, get a nail file and twist the needle tip carefully on the filing edge.
If sharpening the needle doesn’t work, then your patch might be too thick! If you try to force a long needle (like the No.5 DMC I’m using) into too-thick fabric, it might bend and break. I recommend getting a short, thin, sharp needle and a thimble. If you don’t have a thimble, my method when I was younger was to duct tape a soda cap to my thumb and use that as a thimble. If your needle still won’t go through even when it’s small, thin, sharp, and you’re pushing it through with a needle, then try superglue. That’s honestly my best advice.
-stitches are messy/different sizes: this one honestly just takes practice! if it REALLY bothers you, get a ruler and a pen and mark dots along where you’re going to sew, 0.5cm apart from one another. It’ll take some trial and error getting the needle on the dots from the back, but from the front it’ll be a breeze.
-Thread keeps knotting/breaking: Another problem solved by practice, try using a shorter piece of thread or pulling it through more gently.
-Patches end up “bubbled” instead of laying flat: First, try adding more pins to hold it on. If that doesn’t work, take an Elmer’s washable glue stick and glue the patch on before you pin it down. You’ll have to use an emery strawberry or an emery board to clean your needle every once in a while, but the glue washes right out when you’re done.
DM me, send an ask, or leave a reply if you need any extra help, I’m finishing up a big commission right now but I should answer within a day or two.
Hope your creating goes well! If you wanna support my work, check my pinned for some ways to do that. I send my love!
❤️Kay
70 notes
·
View notes
Text
The Forces of Nature || Ch.10
Pairing: Peter Parker x Superhero!Reader
Summary: “There’s this kid out there that can control the wind or something. I think she’s a great addition to the team. Let’s recruit her.”
SERIES MASTERLIST || PP MASTERLIST
Click the picture for better quality


"Step five. Let her know you're Spider-Man. I don't know how, but she'll have to know." Peter muttered to himself as he silently read step five that was on the recruiting method which was pinned on the bulletin board in his room above his desk. For the next three days since Friday night, a.k.a the night he did step four, he had been reading and re-reading step five over and over.
After all, telling Y/N that he was Spider-Man was different and he had never done it before. Ned, aunt May, and MJ found out and figured it out on their own. "At this point, Y/N may have already figured out." Peter told himself, but he immediately shook his head.
However, it was impossible for Y/N to figure out because she and him weren't really close before. Therefore, Y/N has never really paid attention to Peter. Y/N may have picked up a few of MJ's traits here and there, but she never got MJ's way of observing. Again, Peter asked Scott for help when he took a break from patrolling on a Monday afternoon.
"Hey, what's up, Petey?" Scott smiled as he answered the phone. He munched on some chips while watching television. Peter scrunched up his face because it sounded like some weird ASMR mukbang video on YouTube.
"Yeah, hi. I need your help again." Peter said as he lifted his mask until his mouth so that he could speak properly and so that he could be understood.
Scott put his phone away from his ear and looked at Luis and grinned, "Hey dude, guess what."
"What?" Luis smiled.
"I'm talking to Spider-Man on the phone!" Scott bragged. "We're, like, besties now. He asks me for help. Like, I'm so honored! So, so honored."
If Peter didn't have any steps to be followed or if he weren't recruiting anyone, he would've laughed at Scott. But now, he didn't. He was desperate for help. He didn't know what to do.
"Um, Mr. Lang? You still there?" Peter asked.
Scott quickly pressed the phone on his ear again and said, "Yeah! And don't call me Mr. Lang. I sound old or whatever. Call me Scotty!"
"That sounds kind of weird." Peter admitted. "I'll, uh, I'll call you Scott instead."
"Sure thing, spider-bro!" Scott said excitedly as he looked at Luis, who gave him two thumbs ups. "Anyway, what did you need help with?"
"I don't know how to tell Y/N that I'm Spider-Man." Peter said in a hushed voice, afraid that someone might hear him despite sitting on the rooftop.
Scott nodded and hummed, "Well, I don't know what to say. I guess, just ease your way through it before actually telling her."
"How?" Peter questioned.
"I don't know." Scott shrugged. "Drop hints for a few days or something and when the time is right, just say it. Tell her."
"Scott, that's genius!" Peter grinned. "Thank you!"
"No problem, Spidey!" Scott chuckled. "I'll talk to you soon, okay?"
"Okay. Bye! Tha-"
Scott hung up and put his phone on the coffee table. Luis was shocked, "I can't believe you hung up on Spider-Man."
"I mean, I have to act chill, you know? I don't want to let him know that I'm freaking out!" Scott shrieked. "Like, he called ME!"
"Yeah, that's awesome!" Luis laughed and gave Scott a high five. Meanwhile, Peter was already planning on what hints to drop before telling Y/N about his secret.
-
Tuesday
Today's the first day that Peter would showcase his spider powers to Y/N. He didn't know which skill to show first. Although, that question was already answered when Y/N walked in school pushing a very very big box full of different items.
Peter jogged up to her and he said, "Good morning, Y/N!"
She gave him a sweet smile as she wiped her sweat with the back of her hand. She mumbled a small 'good morning' before pushing the big heavy box again.
"Allow me." Peter stopped her as he picked up the big heavy box with ease. Y/N looked at him in shock.
"Peter, oh my god." Y/N said. "Where the hell were you when I needed you? We literally live near each other."
"Sorry about that." Peter said as the two of them walked to her locker. "I woke up late and I went straight here. I was surprised that I got here first and when you entered the school with a big heavy box, I figured out why."
Y/N chuckled and opened her locker. Peter looked down at the loosely closed box and was able to take a peek at the things inside it. Peter furrowed his eyebrows in confusion and looked at Y/N, "Um, what's all this, anyway? Are you running away or something?" He joked.
"No!" Y/N laughed and shook her head. "Those are all the old things from my community theater. I figured I could take it and bring it here and donate it to the theater club. Plus, the glee club need props too."
Peter nodded and pursed his lips, "Right, right. I forgot that you joined all of the clubs."
"Not all. I didn't join the cheer squad." Y/N smiled politely before closing her locker.
"Why didn't you?" Peter asked. In his opinion, not that anyone was asking, she would be a perfect fit in the cheer squad.
"I didn't want to risk my power for memory." Y/N whispered. "I can't touch the ground directly, remember? What if I'm on the bottom of the pyramid and the rocks start forming some memory on the field or something? I can't risk that. No one else knows about my powers except for you and Eunice."
'And the Avengers.' Peter thought. He nodded and said, "Yeah, that's understandable. Anyway, do we head off to the auditorium first before going to class? Or do we take this big ol' box with us to history?"
"Auditorium, please." Y/N smiled.
"Lead the way, Barbra Streisand." Peter chuckled as they walked together.
"You know Barbra Streisand?" She asked with a laugh.
"Of course, I do! I mean, not personally, but I do know her. I've seen her movie with Seth Rogen and her carpool karaoke with James Corden."
"That rhymed! Are you a rapper now?" Y/N laughed.
"Who knows?" Peter shrugged. "Maybe I'm the next Eminem." He joked.
The pair arrived at the auditorium and she made sure they placed the box on stage in the middle for the theater club moderator to see. Y/N pulled out a paper from her backpack and wrote down: My community theater decided to get rid of our old props. I figured I should donate them here instead of throwing it away. Sincerely, Y/N Y/L/N.
Y/N looked through her bag and pouted when she realized that she didn't have any tape or anything that could stick. Peter saw this and remembered that he put some leftover web fluid in a container in his backpack.
"I, uh, I have something sticky." Peter blurted out as he quickly looked inside his backpack for the container.
"Pete, you're my friend and all, but that sounded wrong." Y/N giggled. Peter's face flushed red, but didn't pay attention to it as he handed her the container. It was in an old Elmer's glue container.
Y/N thanked him before squeezing out the 'glue' at the back of the paper. Her face lit up when she didn't see the typical white color of the glue. She was surprised that it was transparent. "Okay, tell me where you shop for school supplies. This transparent glue is my new everything!" She said as she gave back the 'glue' and pasted the paper on the front side of the box.
"Uh, I didn't buy it. I actually made them." Peter said, which wasn't a lie. He really did make it, it just wasn't glue, that's all.
Y/N nodded. She was impressed. She grabbed her backpack and said, "Can you make me some?"
"Sure!"
The pair walked out of the auditorium in silence and the silence continued on even when they reached the classroom. It wasn't an awkward silence like before. It was comfortable.
"Peter?" She called his attention as they sat down in their respective seats.
"Hm?" He hummed.
"Thanks for carrying the box. If I had known you were that strong, I would've called you before I left my apartment." Y/N chuckled.
"No problem." Peter smiled. "I'm really glad I could help. Helping people is a part of me." He hinted, as if his super strength and web fluid weren't enough hints.
"You know, Spider-Man is like that." Y/N smiled. "That's why I admire him so much. I just wish I could know who he is."
"I know right? Same here." Flash said from behind her. Y/N and Peter turned to look at him as Flash shrugged.
Flash looked at Peter and nodded at him, "'Sup, dickwad?"
Peter gave him a thumbs up before he and Y/N turned around to wait for the teacher.
-
Wednesday
Y/N came to school that day wearing the most early 2000's look ever. She also wore pink as an homage to the most famous Mean Girls quote, "on Wednesdays, we wear pink". She wore a slightly fitted, long sleeved, pink shirt with a pink skirt and heels. She was dressed as Karen Smith. MJ, Ned, and Peter were surprised with her outfit.
"What's with the Mean Girls get up?" Ned asked with an amused smile on his face.
"Ned's right." MJ said as she looked at Y/N up and down. "I've never seen you wear pink before, but you actually look good in it."
Peter nodded, "Yeah, I agree."
"No mean remarks, Peter?" MJ asked and eyed him suspiciously. Peter just shook his head before he smiled at Y/N, who smiled back at him.
Later that day during lunch, Y/N was walking to her seat when she slipped on the floor. With Peter's enhanced reflexes, he immediately caught Y/N before she fell and he was able to catch her tray and her food.
Y/N gasped and she looked at Peter with wide eyes, "How did you do that?! You're so cool!"
Peter shrugged as he set down the tray before helping Y/N sit down so that she wouldn't slip again. MJ and Ned looked at each other because both of them knew that Peter was up to something and they had to corner him and ask him about it.
When the day ended, Y/N had to go to the auditorium for theater club. Finding Peter alone by his locker, Ned and MJ immediately cornered Peter. When Peter turned around, he was surprised to see MJ and Ned.
"Um... hey guys." Peter said.
"You're being really obvious, Peter." Ned said.
MJ nodded, "Yeah. I thought you being Spider-Man was supposed to be a secret. Why are you being obvious?"
Peter sighed. There was no choice but to come clean, "I need to drop hints about my powers to tell her that I'm Spider-Man."
"Why do you need to tell her?" MJ asked.
Peter opened his mouth to say something, but he immediately closed it. MJ didn't know about Y/N's powers and it wasn't his secret to tell. As much as his feelings were complicated towards Y/N, he would never tell her secret to anyone else. He wouldn't do that to anyone, even Flash Thompson. Thankfully, he thought of a quick cover up.
"Because I want her to know. We're friends after all." Peter reasoned.
-
Thursday
When Peter arrived at Y/N's apartment to pick her up like he did every morning, it was announced that classes were cancelled because of the storm.
"Peter, why don't you stay here for a while? You and Y/N can hang out here while I go to work." Eunice offered.
Y/N smiled, "Yeah, Pete! We can bake or something."
Peter shrugged, "I suppose I could stay." He pulled out his phone to text aunt May that he'd be staying at Y/N's apartment until it was safe to go out.
Eunice eventually went to work an hour later and the two teens were doing different things. Peter made himself comfortable in the couch as he watched Mean Girls. Y/N was busy in the kitchen as she cooked brunch for the two of them.
The two of them didn't know or didn't notice that it was all domestic at that moment. They failed to notice that they both looked good together. At one point, Peter paused the movie and stood up to stretch. He walked to the kitchen and watched her.
"You could've told me that you were cooking. I could've helped you." Peter said. He grabbed plates and set the table. It was the least he could do.
"Nonsense! You're a guest, Peter." Y/N smiled. "I'm done, anyway." She brought the food to the table and sat down. Peter sat down across from her and they ate in comfortable silence.
"This is really good." Peter said as he broke the quiet ambiance of the dining area. She grinned and thanked him.
"I have to tell you something, Y/N." Peter gulped. He figured it was time to tell her. They were alone together and neither of them could walk out due to the storm.
"What is it?"
Peter took a deep breath and said, "I'm Spider-Man."
Y/N stared at him and smiled, "That's cute, Pete. I'm Spider-Man too. Anyone can wear a mask."
"No, no, no. I mean it, Y/N." Peter sighed. "I really am Spider-Man."
"How am I supposed to believe you, Peter?" She raised an eyebrow.
"One, because I believed you when you told me about your powers. Two, I lowkey showed you." Peter said.
"I used my super strength to pick up the heavy box, I used my web fluid for your paper and told you it was glue, I told you that I loved helping people-"
"Helping people isn't a power, Peter. It's a choice and the web fluid thing sounds wrong."
"I also used my enhanced reflexes and agility to catch you when you slipped at the cafeteria. I'm Spider-Man." Peter added. Y/N stared at him and said nothing. "Please say something, Y/N."
Y/N blinked a few times and cleared her throat, "Well, thanks for telling me. I'm just mostly embarrassed because you know about my big crush on Spider-Man and YOU ARE Spider-Man."
"Oh, right." Peter blushed. "I forgot about that."
"And please continue to forget about it." Y/N chuckled lightly. "Anyway, let's talk about something else. What's it like being the friendly neighborhood hero?"
"Oh, you have no idea how hard it is. But I love my job." Peter said.
The rest of the day was spent with Peter talking about his patrolling stories and Y/N showing off her powers and Peter also showing Y/N his wall-crawling ability. He even showed her his web-shooters.
"I can show you my web-shooters!" Peter said excitedly.
"You know, no matter what you call it, it really sounds wrong." Y/N laughed. "It's like you're going to show me your penis or something."
"I never thought I'd hear you say 'penis'." Peter looked at her.
She shrugged, "What can I say? I'm surprising."
"That's true." Peter nodded in agreement as they smiled at each other.
* * * *
sorry it took a long long time x
𝐏𝐄𝐓𝐄𝐑 𝐏𝐀𝐑𝐊𝐄𝐑 𝐓𝐀𝐆𝐋𝐈𝐒𝐓: @myblueleatherbag @harryismysunflower @buckys-little-hoe @justanothermarvelmaniac @itstaskeen @sandystoriess @heeeyitskay @slytherin-chaser @quaksonhehe @yaya4302 @lil-mellow-bunbun @starlight-starks @swiftmind @alex-stancati @sovereignparker
𝐆𝐄𝐍𝐄𝐑𝐀𝐋 𝐓𝐀𝐆𝐋𝐈𝐒𝐓: @marvelousell @justasmisunderstoodasloki @rubberducky-jrr @petersholland @osterfieldnholland @miraclesoflove @god-knows-what-am-i-doing @perspectiveparker @hollands-weasley @itstaskeen @call-me-baby-gir1 @the-panwitch @iamaunicorn4704 @chloecreatesfictions @holland-styles @halfblood-princess-505 @spidey-reids-2003 @herbatkazmiloscia @whatthefuckimbisexual
#peter parker#peter parker fanfiction#peter parker fanfic#peter parker fic#peter parker x reader#peter parker x y/n#in-a-lot-of-fandoms-tbh
43 notes
·
View notes
Text
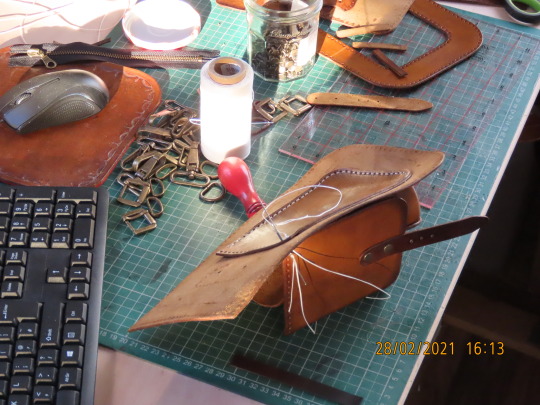
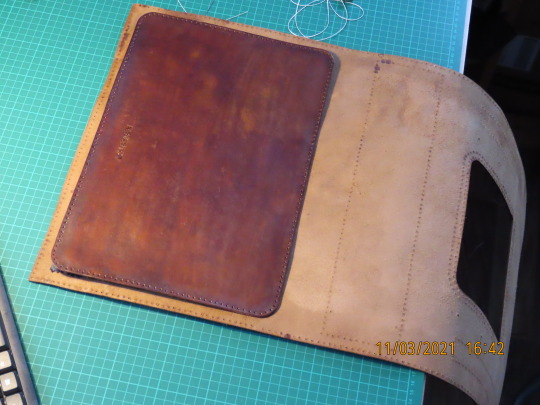
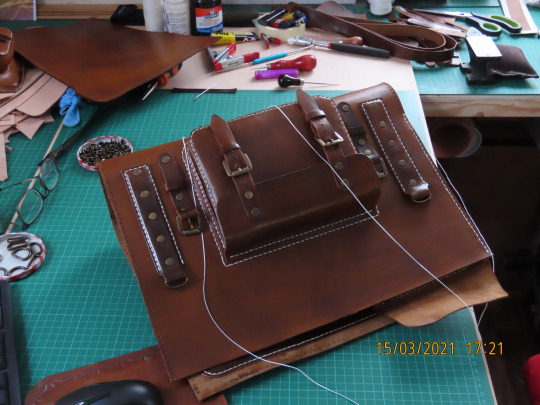
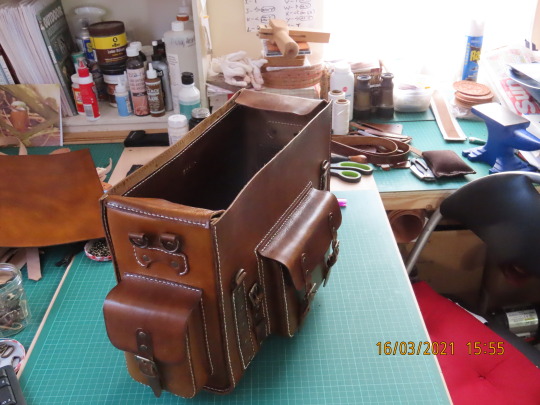
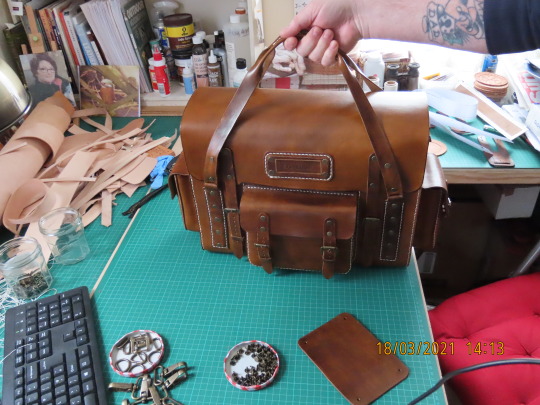
‘Explorer’ Bag.
Hi Guys, I finally managed to find the time to build the ‘Explorer’ Bag. It may have been my hands that put this together but all Credit for the Original Idea and the Pattern goes to ‘Tony See’ at Dieselpunkro. He makes some amazing patterns and sells them at very affordable prices. Ok, lets go. First I bought the pattern from Dieselpunkro, downloaded it, stuck all the pieces together as required and then cut out and stuck to the 6-7oz leather I chose to use ready to transfer from paper to leather. You don’t want a thin leather for this that will just fall/collapse it’s shape, but you also don’t want it so thick that it’s difficult to bend cut and stitch. I also chose a Veg Tan and dyed it myself, more on that later, but you can buy a factory ready dyed piece if you so choose.
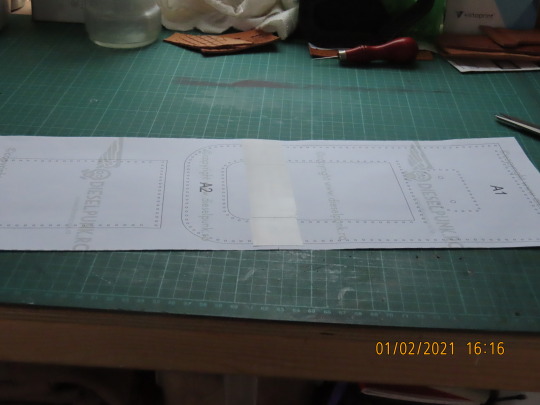
Pic 1 : Stick all the pattern pieces together as required to create the ‘full’ patterns, I use Decorators white / Cream paper tape, it doesn’t mark the leather to any great degree when you take it off.
Pic 2 : The patterns come in several pieces, this main boddy section pattern was in about three pieces but just stick them together as shown on the instructional video on YT.

Pic 3 : Here is the main body section after the pattern is removed, the holes are punched through the patterns before removal.

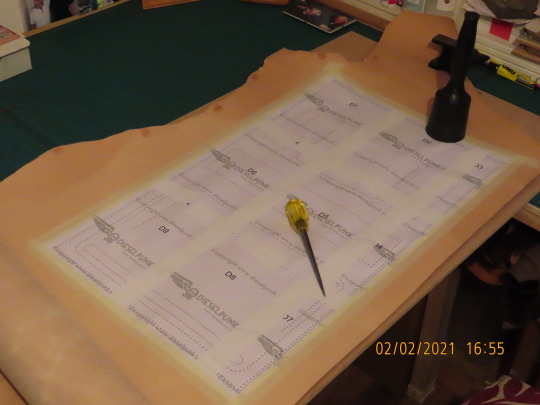
Pic 4 : Here you have one of the side psections with Pattern stuck to the leather with decorators tape and I used a 1.5mm hole punch for the stitch holes and a larger one ( what ever you feel necessary for your rivets to fit ) where necessary.

Pic 5 : All the patterns are treated the same and eventually you will end up with a big pile of cut out and punched pieces as seen here, there were 64 pieces here, the most I’ve ever done.

Pic 6 : Here are the same pieces all dyed ready to start the build. I decided on a Nice walnut color by Fiebings, I achieved this particular look by rubbing harder in certain areas as it was drying and then it was down to a bit of luck. At this point I could not know what the final look would be, but from past experiences I had a ‘hopeful’ idea. Once dyed I coated in ‘Tan Kote’ and wiped it off before buffing to a shine, this also added darker areas here and there.
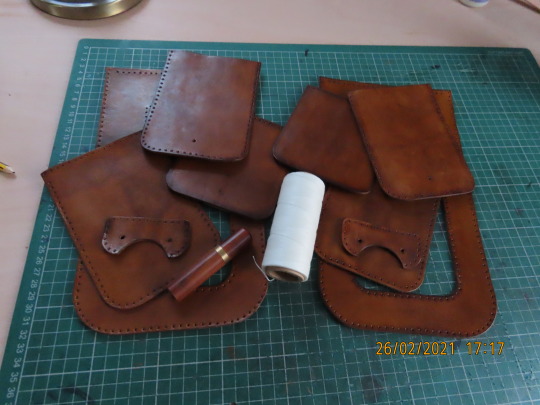
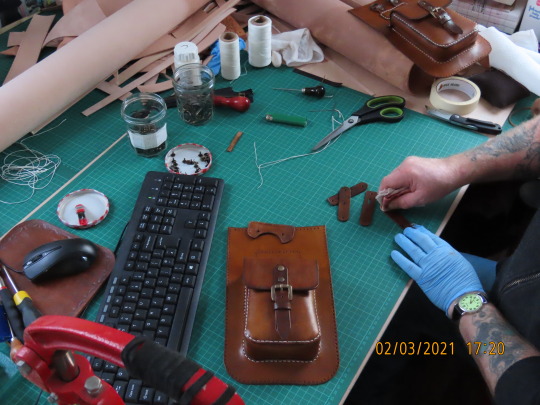
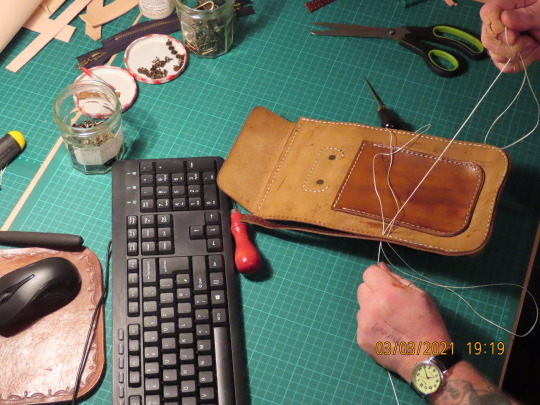
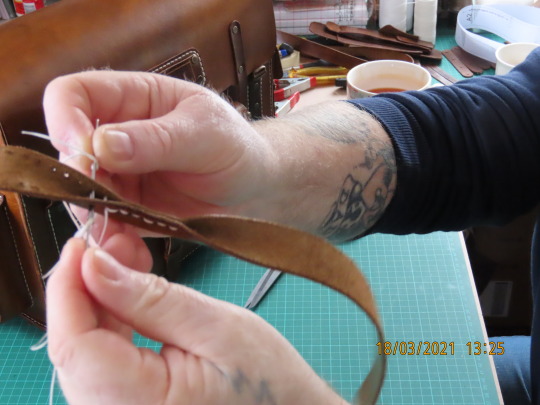
Pic 7 : I started by putting together a side pouch so seperated the pieces of the two. I used a waxed thread and a saddle stitch, which was the stitch I used on all of this bag.

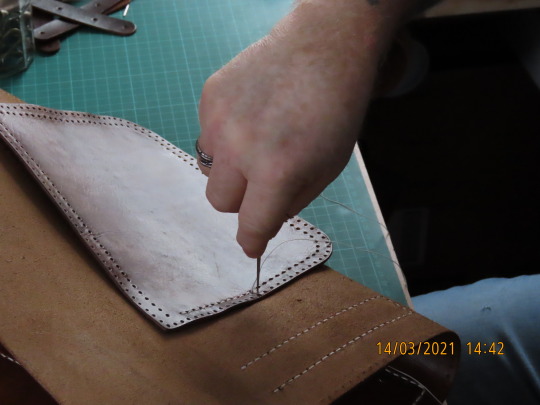
Pic 8 : Somehow I forgot to take pics of the first stitching, which was adding the side to the front piece of a pouch, you can see it through the back piece I’m about to start stitching here. this pic shows me placing the front and side section ‘through’ the hole to stitch the inner edge of the side piece ‘inside, there will also be another piece of leather going over the hole at the back, that makes three layers of leather to stitch through, hence why your hole punching should be done carefully and slowly, if all in their correct place they will match up and make for a reatively ‘easy’ (ish) time of it.

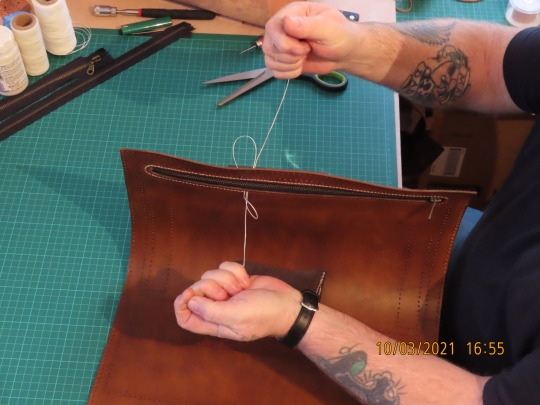
Pic 9 : seen from the back, the stitching joing the three pieces, the front and side pieces now being attached to the side panel and attaching the ‘back’ panel to fully create the pouch, lots of stitching on this Project and you might find your fingers getting very sore, I have a little ‘thing’ I now do which cuts down the number of times I have to pull the thread tight thereby reducing the strain on my fingers considerably. I now stitch forwards four holes pulling them in..but loose after the fourth is in I then pull all four tight, I find It saves my fingers ...oh also, don’t pull so tight like you are trying to strangle it...with all those stitches....’it ‘will’ hold, believe me.
Pic 10 : The pouch is now attached to the actuall ‘side’ section, well...’one’ of them, remember you have to make two of them. You can see the ‘flap’ sitting on top waiting to be attached, if you zoom in you can see the holes in a line where it will attach to.

Pic 11 : Holding in position to test fit.
Pic 12 : Here you can see the process, it always seems, no matter how deep I sink the 1.5mm punch for the stitch holes I still have to push an ‘awl’ through each one to open enough to pass the two needles more easily.
Pic 13 : Ready for the next step, attaching the pices that will hold the D’rings for shoulder strap attachement and attaching the fasten strap and Buckle. Here I’m rubbing hard to darken at the ends, just my touch, if you are making one..it’s your project you go with your own ideas.
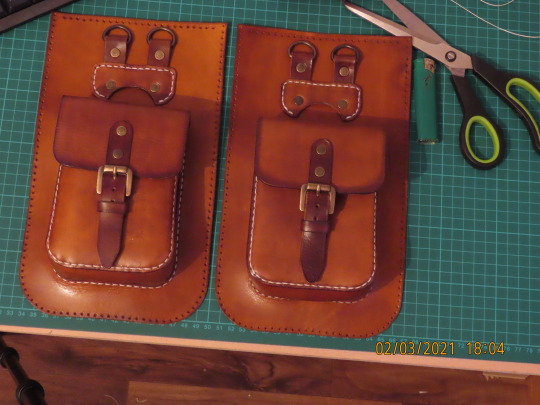
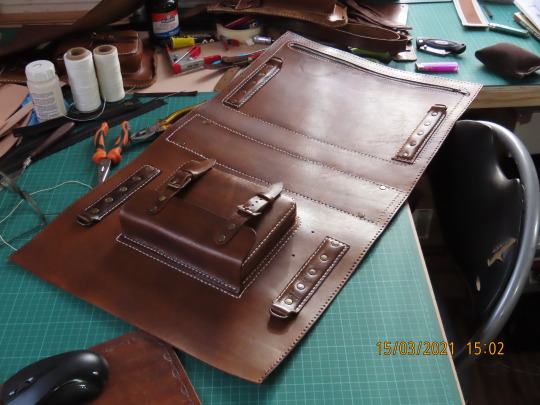
Pic 14 : Both side panels with pouches now ready to stitch the small inner flaps that will prevent things from falling out of the main bag.

Pic 15 : I attached the small inner flaps to each side pouch section using a Saddle stitch.

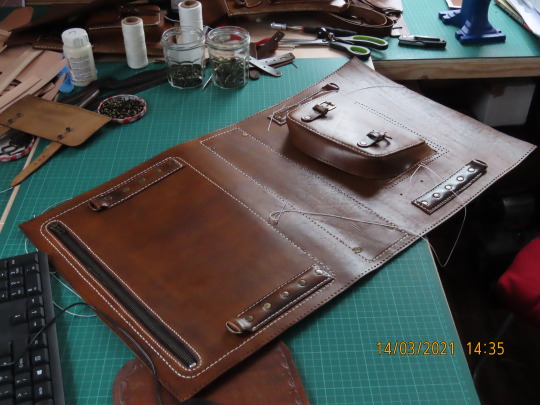
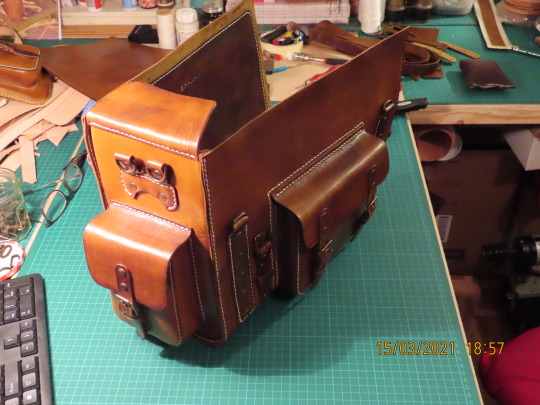
Pic 16 : I next stitched ( Yup...I said there was a lot . )...the ..errrm, not sure what this bit is called so just for the purpose of moving forward i’ll call it the ‘skirt’ piece...So, I stitched the ‘skirt’ piece to the outside of both side pouch sections as shown here.
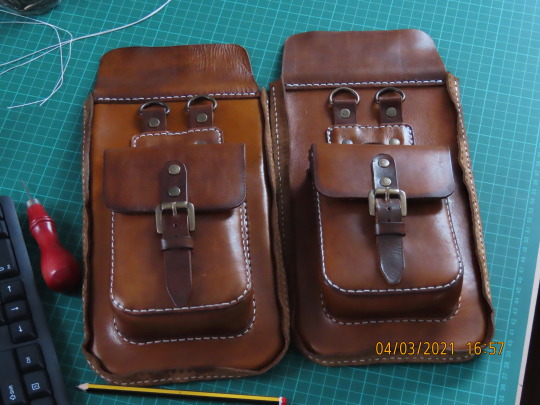
Pic 17 : Ta daaa..looking great. Very impressed with how the color looks, I love the ‘aged’ look on leather.
Pic 18 : An extra pic to show it going all the way around and to prove it was my sore hands that did it..hahaha.

Pic 19 : Next I cut the zipper to the required length, glued it into place trying to keep the zip central and then punched stitch holes all around it. I have found, that after marking the hole for the zipper that once cut it leaves very little of the edge of the zipper to attache to the leather...it’s very close to the edge, so I now try to cut the zipper hole less wide than what the pattern says, I find it easier to attach it and punch the holes with more material under and around it. But you will find your own way with it as I have done, if my tip helps you then that’s great.
Pic 20 : As well as the contact cement I used to stick it in position I’m also using a saddle stitch and stitching around the zipper for extra strength.
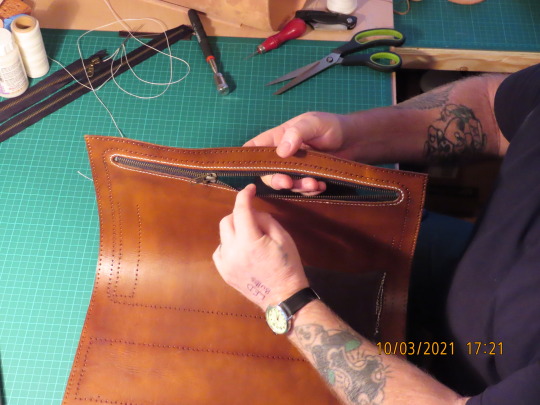
Pic 21 : Done, the zipper works fine.
Pic 22 : Now I’m attaching two of the ‘four’ Handle strap holders with D-rings., you can see the positions for the other two on the left.
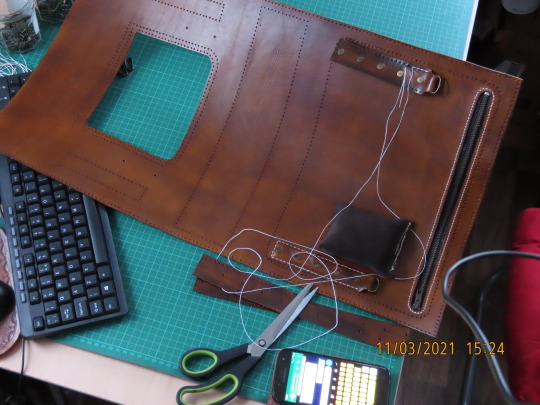
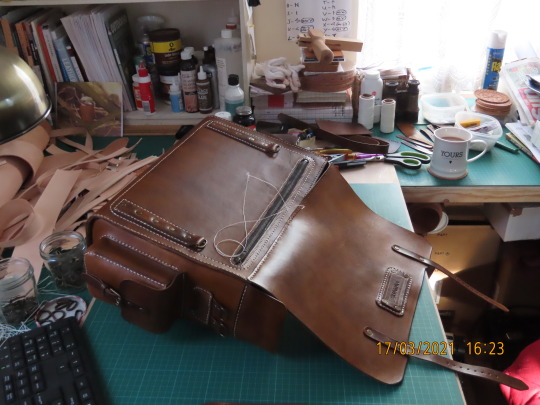
Pic 23 : After adding my ‘Sharman’ mark to the inner back piece I stitched it in place to finish the creation of the zipper pocket.

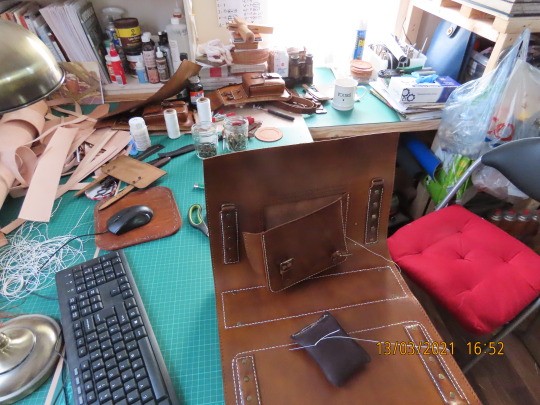
Pic 24 : Whilst stitching the back to the zipper pocket I had the other side flapping around everywhere so had to get creative and here’s how I resolved the problem, I tied string around the other flap and threw it over a beam in the work shop...worked a treat.

Pic 25 : All four bag handle connectors are now in position as seen here, stitched and rivetted. I’ve chosen to use the Antique rivets, buckles and D-rings for this project and it seems to suit it very well.

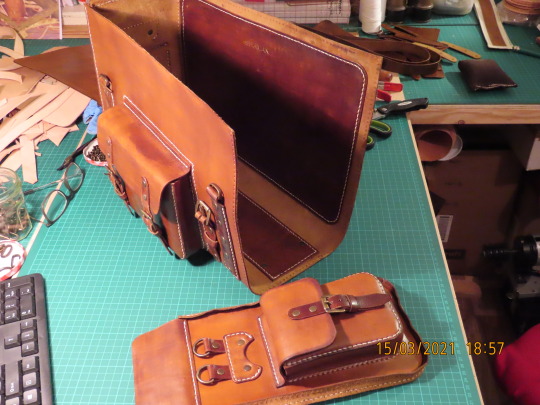
Pic 26 : Next I fitted the inner bottom strengthener piece.
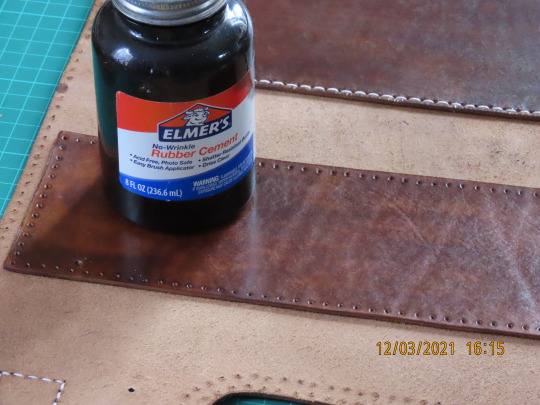
Pic 27 : I used Elmers rubber solution glue to stick the bottom strengthener into position so that I could adjust it if I needed to whilst stitching, as it turned out the holes had lined up really well and the job went smoothly.
Pic 28 : All stitched in,ready to move forward. Incase I didn’t mention it already I also dyed the flesh side of the leather, the walnut gives it a nice look I think.

Pic 29 : I added rivets too, there’s no chance of this coming off, it’s glued, stitched and rivetted with x4 antique rivets.

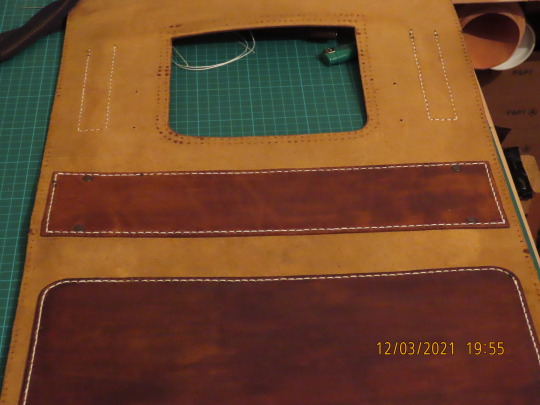
Pic 30 : Now I had to put together the outside pouch which will be on the front below the main flap, I did it the same as the side pouches, attached the side to one edge then attached the buckle systems as shown here, after that I stitched the other edge ‘through’ the hole and stitched it underneath to the inside edge at the same time attaching the back section which will finish the creation of the pouch.
Pic 31 : Attaching the pouch to the front of the main body section. The following pics from 32 to 39 are extras to show the stitching a bit closer.

Pic 32 : the reason to stitch the edge on the inside is to give a much smoother look along the edge when completed.
Pic 33 : having to use a stitch awl to widen each hole slightly, I stabbed muself more than a few times, so many that I had to wash my hands and coat in antiseptic cream each night. All that ontop of arthritis and carpul tunnel issues, sometimes it can be a little hard to manipulate the needles, but...if at first you don’t succeed ehy.

Pic 34 : you can see the three layers here the outer, the gusset tucked under and the flesh side of the ‘backing’ piece.

Pic 35 : showing the spike (Awl) that keeps stabbing me.

Pic 36 : Needles come through fine now.
Pic 37 : Another view of the whole thing. It’s starting to make me believe I can actually do this if I just keep going.
Pic 38 : Pouch attached.

Pic 39 : View of the bottom section now strengthened. I decided later to add some metal ‘Bag feet’..not part of the plan..but Didn’t want to do all this work just to have the bottom get scratched up without at least trying to prevent it. I’ll show that at the end.

Pic 40 : I then realised, I wasn’t quite done with that as the inside backing piece had an ‘outer’ line of stitches as well, as seen here, but if you are someone that gets frustrated easily I would find another hobby, by this point I had been making this for two weeks because real life kept getting in the way and stopping me, very frustrating but hey..what can ya do except suck it up and keep moving forward.

Pic 41 : People wonder why they have the holes so big..well the good thing is they allow two needles to pass through smoothly, if you are doing hundreds of stitches you really don’t want them getting snagged all the time, but anyway not to worry because once done I either lay it on an anvil if it will fit or put a small anvil under it inside on my hand..and tap with a carpenters hammer gently flattening all the thread and closing the holes a bit more. I always tell people, there will always be a point where you will think something bad about the job you are doing...don’t give up, keep going forward and you will be surprised at just how good it ‘ will’ look when ‘Everything’..all the polishing and treatments etc are completed. remember, until it’s fully completed it’s just a W.I.P. ..a work in progress so don’t judge it until it’s done.
Pic 42 : The front pouch fully attached.

Pic 43 : Here I have sat the side section in place whilst I begin to stitch it to the main body.

Pic 44 : Same thing ..another angle.
Pic 45 : attaching side panel..Other angle.
Pic 46 : First side panel attached fully to main body.
Pic 47 : Other side section ready to fit. The colors are not really as different as the lighting makes them look check out pic 48 for what it really looks like.

Pic 48 : halfway there.
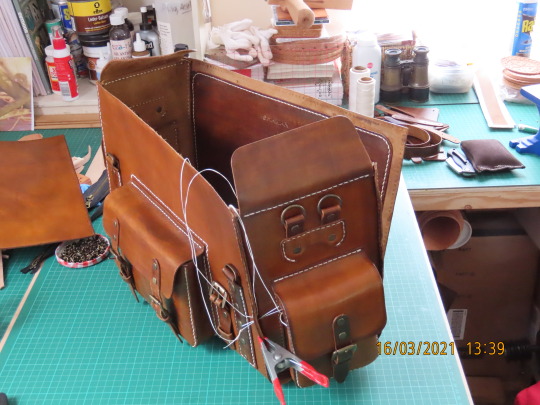
Pic 49 : Clips come in very handy at times like this, the section itself is wanting to fall all the time, ..problem solved.

Pic 50 : Using the Awl to widen the hole, not fun when it catches you...but all part of the game.
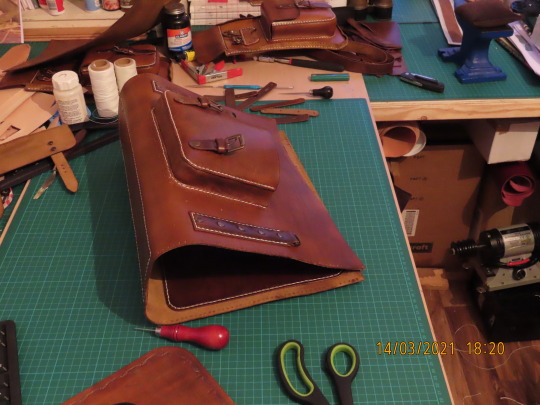
Pic 51 : Done, both side sections now firmly attached and the whole thing is starting to come together.

Pic 52 : Now it needs the main flap, but that needs some work first.

Pic 53 : Different angle.

Pic 54 : View of the back and the zipper pocket.
Pic 55 : First I had to attach the closure straps using rivets (Double Cap, you can use single cap but I prefer double.) I also stamped the ‘Shaman’ Mark on the Leather label then riveted that to a back piece and stitched that to the front edge of the main flap as seen here, now..we’re ready.
Pic 56 : Again I used a saddle stitch for extra strength, once at the other end ..just because I wanted to...I came all the way back again, no real reason to do that, it’s perfectly fine without the extra, but I ‘m keeping this bag and I wanted it, so I did.

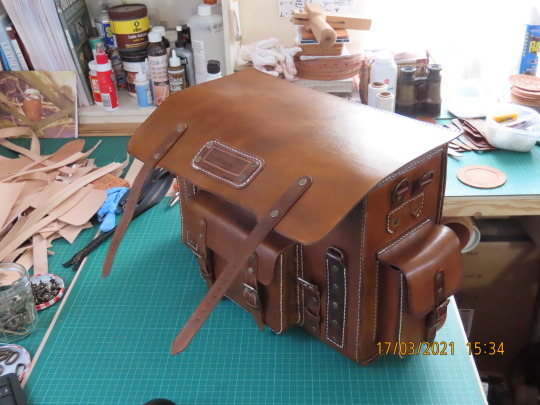
Pic 57 : main flap...Attached.

Pic 58 : Main flap rear view.

Pic 59 : Angle shot shows how well all the colors have matched.

Pic 60 : Now I have to make x2 bag handles.
Pic 61 : Using the saddle stitch. All you need to do here is stitch all the holes together pulling the two sides together as shown and make two of these.
Pic 62 : Connect the bag handles to the D-rings as seen here. I used rivets to fasten them on.

Pic 63 : I attached the clip end sections using rivits and stitching to the main shoulder strap at either end, then the clips were attached, again using rivets.

Pic 64 : Attach the shoulder strap to the side rings.

Pic 66 : As I said earlier, I attached ‘Metal bag feet’ to try to avoid damage to the base from dragging, might not stop everything but should help and looks good I think.

Pic 66 : And we are done. This took me four weeks in the end, but we’ve had a lot of ‘Life’ getting in the way. If I had nothing else to do but this I reckon I could do it in about a week to ten days. I wouldn’t recommend this particular project to a beginner mainly because of the expense, I wouldn’t practice on this one. But there are many more projects out there online and if it suits you to do so you could visit my Blog ‘A Journey into Leather Craft’ and check out my archive, you’ll see the things I’ve made from the very first knife sheath to this amazing bag. I can’t believe I made this, Just shows you never really know what you can do until you try. I look forward to the next project, hope you will come back and check out the next one. To all those who have followed my projects for a long time thank you, hope you enjoy them and hope I have inspired some of you to give it a go yourself. If you are new, thanks for stopping by for a look, hope you liked what you found and hope you will also come back for the next one, maybe tell your friends about my blog, I’d appreciate that. Until then, as always, stay safe and to all the makers out there, Stay Crafty.
#leather#leather craft#leather bags#hand made#hand made goods#posh bags#expensive bags#expensive goods#hell yeah
7 notes
·
View notes
Text
I love a good epoxying in the morning. Whenever I've got something that needs to be stuck together, I'm always fighting the impulse to jam some two-part space-age turbopolymer in there and make sure it never comes apart ever again. And why not? Epoxy is quick, easy, and probably only slightly more harmful to my lungs than two packs of unfiltered 1970s Pall Malls ingested in under five minutes.
This isn't just me, either. All of my friends who actually get things done instead of just barely fight entropy on a million shitboxes swear by exotic adhesives. For instance, I've got this buddy who has a camper in the back of his truck, so he can go live in it when shit really starts to pop off in the next couple of months. Problem is, the camper wobbles like Jell-O, because it's forty years old and the sides are only nominally attached to the frame, which is not really attached all that well to itself either. Now the thing is more epoxy than frame, and it's so rigid the frame of the forty year old truck it's bolted to is starting to look wobbly by comparison. You know what might help that frame? A little friend that starts with "3M" and ends in "4000 UV-cured marine adhesive sealant."
There are some downsides, of course. Most structural epoxies are relatively permanent, unless you want to hold onto the manual that came with the sealant and figure out what combination of chemical magic and heat will make it give up the ghost. And by the time most of my cars have had something else fall apart that necessitates I need to take the thing apart again, it's been like two months and I've already sold them on. Who has that much storage to hold onto all the little safety brochures? I barely hold onto the registration and insurance paperwork.
By far, though, the most significant downside is cost. These are made to be used sparingly by professionals, and the cost represents the fact that they are made by mixing endangered whale semen with witch magic or something. If you're some moron in a garage who thinks "opening a window" is adequate ventilation for the cure process and ends up using litres of the stuff for every project, then you're going to spend a lot of money at Glues & Screws, the adhesives-selling store that I made up in my dreams. The secret is to go scoop the leftover stuff out of the dumpsters at construction sites, auto body shops, and other places "professionals" throw out their half-used tubes because the Boss Man is paying for it all. Of course, it helps to ignore the expiry date. If it won't cure, just slather more on until it does.
It's true that most of my stuff is basically held together at this point with a very heavy dollop of Satan's own variant of Elmer's Glue, and that entombing rust holes in said arts and crafts project does not actually "fix" the rust. What's important is that it looks good, and doesn't carry the same stigma as Bondo. Now, if you'll excuse me, I need to go clean out my caulking gun again, because it got cold overnight and my door shot out all of its plugs.
28 notes
·
View notes
Photo


Preservation Week 2020: Minneapolis Public Library Bindery
How do you keep one of the nation’s largest public library collections ready for eager patrons? A team dedicated to the preservation and repair of library materials is an important part of the answer. The Hennepin County Library Preservation Department (part of our team in Special Collections) has a long history of keeping our books in top-notch shape. In honor of the American Library Association’s Preservation Week, here is a behind the scenes peak at the Preservation Department’s predecessor--the Minneapolis Public Library Book Bindery.
From the earliest days of the library, the bindery was an essential function. In 1899, only 10 years after the library first opened its doors, over 10,000 books came through the bindery. By the 1940s, that number had passed 60,000 books per year. Creating new and replacement bindings was the most common work of the bindery, but bindings were by no means the only repairs. The bindery staff tackled everything from mounting maps to making scrapbooks. Replacing missing pages presented one of the greatest challenges for the bindery. Bindery Superintendent Oscar Berg explained it to the Minneapolis Star like this:
Books with a page missing offer the most tedious problems....It’s necessary to look through the whole volume to find the missing page, and then the trouble shooter has to hunt through stacks of worn out books for a volume which has the missing page. Sometimes we don’t have an old copy with the needed page on hand. Then we type out the page on a special machine, and insert the typed page when the book is resewed. (Feb. 12, 1927)
Berg was certainly an authority on the bindery. If a book entered the bindery between 1907 and 1956, odds are it bore his handiwork. After finishing eighth grade, Berg began his library career at age 14. By 1920, he was the superintendent of the bindery department. He led the bindery until his retirement 36 years later.
While many of the tools of the book repair trade have changed, some things remain the same. Hennepin County Library Preservation Specialist Frank Hurley recognizes the glue pot and the sewing frame in these 1947 bindery photos. Both are still at home in the library. The glues used to repair books have changed over the years, and this glue pot has become a holder for brushes and tools. The sewing frame, however, is still put to use from time to time. You might even be able to pick it out in some of our earlier Tumblr posts.
Interested in more bindery history? Explore the Minneapolis Public Library Annual Reports in the Hennepin County Library Digital Collections.
Interested in learning more about how to preserve your books and mementos? The American Library Association has free webinars and resources on their Preservation Week website.
#minneapolis#minnesota#libraries#Minneapolis Public Library#books#binding#bookbinding#preservation#1940s#public libraries#Preservation Week
60 notes
·
View notes
Text
Library Adults Create
So I wanted to write about the adult craft classes that I run at my library. If there’s anyone on here that enjoys crafts or needs ideas for their own classes, maybe this will give you a few. Basically the way I choose crafts is to mindlessly scroll through Pinterest until I see something that isn’t too complicated or costly.
The craft that we made this month I called “Playful Spring Flowers”, which are just paper hyacinths. Basically old ladies will loose their damn minds over anything flower in these classes so it’s always a good fallback.

I found a video tutorial here: https://www.youtube.com/watch?v=Hj2O7mbx_8c
So when I did this craft I actually used half an 8.5 x 11 for making the stem and flower petals. Then a quarter of an 8.5 x 11 as the leaves. I just didn’t want to have to make all the measurements in cm cause we had scrap flyers we could use anyway.
Now there’s a couple things about this craft depending on who’s doing it. In my class the demographic is primarily older women with dexterity issues. The part where they have to roll the petal didn’t go all that well. Since my class needs to be an 1hr 30min I had them all make three flowers per person. I figured that the rolling of the petals would be hard for them so what I did was give them a coffee stirrer to try and help. Half of them used it and the other half didn’t. If you have a problem with your hands something just a little bigger might be better. Thinking back on it straws might have helped, just steal some from the local Mickey D’s next time you get a burger if you want.
Next is actually applying glue to the paper and getting it to attach to the paper. The video shows the petal part being slathered in glue. The thing about that is that paper and wet gluey stuff combined tends to make paper rip, just a touch. I ended up having to go and cut random pieces of the paper again cause the people in my class would go just a little overboard and the paper would rip. So just use it in moderation. There’s probably some craft glues that would do better, but we’re a public library on a budget so Elmer’s is all up in that house.
Overall it was a pretty good craft, but just like everything else, there are some things that I would do differently in hindsight. Hopefully if you try it out you have fun with it and maybe it’ll give you some other ideas, along the way whether it’s a hobby or you do it for a class.
#books#reading#tumblrians#crafts#paper crafts#paper flowers#flowers#hyacinth#craft class#library#public library#books and libraries#books and reading#books and art
3 notes
·
View notes
Video
youtube
Poly Role Models: Andy Eye
PolyRoleModels: So welcome to PRM, would you like to introduce yourself?
Andy Izenson: Sure! My name is Andy Izenson. I am a uh mediator and uh attorney. And I live in Brooklyn. Um I’ve been uh practicing polyamory for about 10 years and…
PolyRoleModels: Well that was that was my first question.
Andy Izenson: That’s all I’ve got. I really like…
PolyRoleModels: Well that was my first question. So what does your relationship dynamic look like?
Andy Izenson: Well at the moment, I would say it looks a little bit like- you know those- that uh that non-Newtonian material you make when you mix like corn starch and Elmer’s glue?
PolyRoleModels: Yes I’m-
Andy Izenson: Where like it kinda expands to fill the space available to it and it wiggles and poke it hard, it gets firm, but you push your hands into it gently and it gets kind of soft.
PolyRoleModels: I feel like this is the best explanation I’ve ever gotten for someone’s polyamory.
Andy Izenson: So it’s uh it’s not linear. It’s fluid and it’s complicated and it’s exciting. Uhm I have some partners that I’ve been with for a really long time. I have some that blast into and out of my life intermittently in brief explosions of wonderment.
I have some that are close by and some that are far away. I have a very broad understanding of what love is and what a relationship is. And I try not to nail things down too much.
PolyRoleModels: Good answer. Um what aspects of polyamory do you feel you excel at?
Andy Izenson: Oh gosh, um, I’m really excited so you know the distinction that some people make is between parallel polyamory and what is called kitchen table polyamory. Where parallel is you have your relationships but they don’t interact with each other.
PolyRoleModels: Yeah.
Andy Izenson: Kitchen table is everyone comes down to the table and has breakfast in the morning.And the latter is the kind that is really more my speed.
PolyRoleModels: Okay.
Andy Izenson: I think if I’m good at anything, it’s that I’m really lucky in the people that I have around me. Um because if uh If they’re such exemplary and incredible and brilliant people, of course they are going to have wonderful relationships with each other as well as with me.
So it just positions me in this beautiful shifting complicated web of interpersonal relationships you know? That are- that are, some are sexual some are not, some are romantic, some are not, but the important thing is that everyone has each other’s back in whatever way makes senses for those individual people in the web.
PolyRoleModels: Yeah, my polyamory is the same way. So what do you feel like you struggle with?
Andy Izenson: Well I mean feelings are difficult, right? Like having feelings is the worst. Talking about feelings is challenging. Um and I feel like for a lot of us, there’s really a- a pressure to perform like everything is awesome all the time and you never have bad feelings because bad feeling means something is wrong. So lately I’ve been finding myself really challenged not to take bad feelings as a sign of a problem.
PolyRoleModels: Yeah
Andy Izenson: You know, I can feel insecure, I can feel scared, I can feel angry. I can feel um- I can feel anxious and the only thing that’s necessarily evidence is my own feeling. And I can’t deal with that feeling by pretending it’s not there, or by trying to shift the material circumstances of my world to make it go away. I have to actually address my feelings head on and using my words like a grown up.
PolyRoleModels: Got you.
Andy Izenson: And that’s challenging for many people. And it gets exponentially more challenging the more people are involved.
PolyRoleModels: Well the next question is how do you address it, but it sounds like you kind of answered that in there.
Andy Izenson: Well I think the way I address it is by- is with trust. Like if the reason that it’s scary to express a bad feeling or to express a fear or anxiety or you know, or anger. If the reason that it’s scary is because I’m afraid that my relationship isn’t strong enough to hold that negativity, or I’m afraid that you know my partner would only want to be with me if everything was fine and easy, then the tool to address it is trusting my partner, trusting the relationship, trusting the communication the relationship and knowing that it’s strong enough to hold those things even though they’re painful.
PolyRoleModels: Alright in terms of risk aware or safer sex, what do you and your partners do to protect one another?
Andy Izenson: Well we uh, everyone’s got their own practice. And so for the relationships that are sexual, um we have-um whenever anyone wants to change a you know, a part of their practice and everything that’s connected in there has to be informed and it’s really about everybody having their own agency in their body and finding ways that everyone’s personal practice and personal agency can fit together in a way that makes everybody- doesn’t push anybody beyond their own acceptable level of risk.
And it is a complicated practice and sometimes it takes a lot of [adjusting] because safer sex conversations are never just about safer sex. You know, it’s never just about you know what barriers you’re using and what types of relationships you do or don’t want to use barriers with. There’s always more feelings underneath that about trust and safety and bodies, you know about sex and all of that comes in play even if you think that- even if on the surface level you’re just taking about latex.
PolyRoleModels: Yeah. Um what is the worst mistake you’ve made in your polyamory history and how did you rebound from that.
Andy Izenson: I uh I have made this mistake more times that I’m happy about and it’s the mistake of thinking that um that the feeling of love is strong enough to overcome any problem.
PolyRoleModels: Yeah.
Andy Izenson: And typically there’s one problem that I keep finding that to be not true about and it’s the problem of a partner that’s not actually polyamorous.
PolyRoleModels: I see.
Andy Izenson: And I keep, in my history, I have repeatedly thought “this person loves me so much and I love them so much and we’re gonna figure out a way to make it okay” but it just- it always ends up with both partners feeling and having tangible evidence to suggest that they’re not enough.
Because if my partner wants me to be monogamous with them, then nothing I can give them is enough to make up for the deficit they feel from me giving love to other people and they feel like nothing they can give me nothing you know, nothing about their love for me unless it’s evidenced to be enough by the fact of me becoming monogamous with could possibly be enough.
And so I’ve- I’ve just followed that feeling of love um when the circumstances were- you know when that misalignment was there, um more than a few times. Because I just you know I was just so idealistic. I just believed in that love so much. But that is that has proved itself for me repeatedly to be a mistake.
PolyRoleModels: Yeah I definitely understand that. I’ve yeah, I know about that one. Um so what self-identities are important to you and how do you feel like being polyamorous intersects with those self-identities?
Andy Izenson: I would say that the first identity I would say is important there is uh that I would self-identify as anit-capitalist. And it’s my belief that capitalism and enforced monogamy are really tied together. Because we get taught by all of the culture and the media and stories that we get told. We get taught that love is finite. That when work and love work in a scarcity economy, there’s only so much to go around and you have to prove yourself to be worthy of it or else there won’t be any for you.
And it’s completely ridiculous, but capitalism is an orthodoxy. It only works if you believe in it. And so it has to infiltrate every corner of our worldview in order to stay strong. And so of course it infiltrates our understanding of love. But I think we can start to liberate our bodies of capitalism by liberating our hearts from it’s orthodoxies. And if we imagine instead of being scarce that love could be abundant, it changes everything. And um if you think about it, it is completely ridiculous to imagine that love is scarce.
If you light a candle with another candle, the first candle is not less on fire. And so I think in a practice of living in a way that is resistant to what capitalism tries to teach us, it’s about letting love be abundant and blossom into everything that it can be and not constrain it with the fear that is the substance of capitalism.
PolyRoleModels: Understood.
Andy Izenson: Yeah so I’m also queer and trans. And uh and those things are relevant both by reason of you know I don’t think living in Brooklyn and being queer and trans you really can be monogamous. I don’t think that’s really a thing. But also because both those things involve thinking critically about the stories that I was told when I was growing up about who I was supposed to be and how I was supposed to live. And uh and going through them and taking out the things that I actually wanted.
That actually made sense to me. And keeping those and throwing away the rest and building something new around them. So in the same way as when I was young, everyone, you know, all of the stories that I was told about what my life was going to be involved monogamy, involved heterosexuality. They involved being a certain gender. They involved living a certain way and once you start, once you get sort of a crow bar in there and open yourself a little bit to the possibility that the stories you were told about who you were supposed to be might not be applicable or might not be real at all.
They all sort come tumbling down and then you get this glorious opportunity to create the self that you actually want to be. And build yourself up. Um in a way that is critical of and resistant to the way that those blueprints are constraining.
PolyRoleModels: Fair, I’ve had conversations about masculinity with Bex Caputo of the Dildorks saying roughly the same thing.
Andy Izenson: Yeah, I love what Bex has to say.
PolyRoleModels: Yeah, yeah, we both do.
PolyRoleModels: Do you have any groups, projects, websites, blogs, etc. that you’re involved with that you’d like to promote?
Andy Izenson: Uhm, well let’s see. I’m a I have a- there’s a law firm that I work at. It’s Diana Adams law and mediation. We do education and advocacy and representation for people in non-traditional and polyamorous and queer and chosen families. So we do family law but from the perspective of your family is what you make it. And we shift and uh tweak and change the law to fit what our families actually look like instead of trying to change our families to fit the law.
PolyRoleModels: I see. Is that limited to NY?
Andy Izenson: So the direct representation that we can do you know in terms of actually being somebody’s lawyer is limited to NY, but we do education all over and also the mediation and alternative justice stuff that we do is you know, that can go anywhere also. So you know helping families create family agreements and build structures for sustainability and mutual care um no that’s not state specific.
PolyRoleModels: Awesome.
Andy Izenson: The other project that I’m very excited about. It’s called The Res and it’s a queer and trans intentional community and land project in um in upstate NY near Poughkeepsie. I know you may get hate mail for me calling that upstate. It’s in the Hudson valley. Upstate is anywhere north of the Bronx.
PolyRoleModels: That’s how I feel about it. I grew up in the tristate area. So yeah, that’s my take on it to
Andy Izenson: Great and so that is that’s a project that I’m really- I’m really putting my whole heart into. It’s my own poly family that’s starting it and all of the- all of the work that I’ve been doing, learning about alternative justice systems and community building tools and communication tools and all of these things.
I’m putting all of that towards building a community for us that is strong and resilient and sustainable and builds out of mutual error and trust. Uh and probably by the time this airs, it’s really gonna be up and running. In such a way that people who need to get out of the city can come and stay. You know, we’ll be hosting events. Will be you know, doing- having retreats. And uh I would love for you to see it, Kevin, it’s really beautiful.
PolyRoleModels: That sounds really good. That sounds like somewhere I want to visit.
Andy Izenson: You gotta come visit. It’s worth it.
PolyRoleModels: Awesome awesome. Hey, I really appreciate you taking the time, especially having just hopped off a plane ten seconds ago from Germany, so I appreciate the time
Andy Izenson: My jet lag is starting to fade, but it’s tenacious.
PolyRoleModels: Yeah, Yeah, fair so again thanks for being a part of this. Being a part of PRM.
Andy Izenson: Thank you and good luck with your book tour
PolyRoleModels: Alright, thank you.
---
Support Inclusive Polyamorous Representation at https://www.patreon.com/PolyRoleModels
32 notes
·
View notes
Text
Kurtbastian one-shot - “Crafting Chaos” (Rated PG)
With Kurt sick, Sebastian steps up to help Thomas with an arts and crafts project for school, which puts them both in a sticky situation. (1198 words)
Notes: I needed some domesticky floof, so here it is. This actually happened to me once upon a time. xD
Part 45 of Daddies
Read on AO3.
“Hey guys,” Kurt says softly, attempting to smile even though every inch of his face hurts, his nose so clogged he can barely breathe. He was hit from all sides with every sinus based infection known to man after his last business trip. All he wanted to do was climb in bed, never to be seen until his cold cleared up and he looked vaguely human again. But now that he’s home, all he wants is to be with his two best boys … who have been keeping a respectful distance in order to let him rest. And Kurt appreciates that. But the silence in the house has left him uneasy. It’s always said that the scariest sound in the world when you have children is silence.
The same can be said for his own son and husband.
But Kurt finds them in the living room, sitting on the sofa, both concentrating hard on something Kurt can’t see with his burning, watery eyes. “I’ve been looking all over for you. I thought you might have gone out somewhere.”
“Not a chance,” Sebastian says, lifting his gaze to look at his husband wobbling towards them. “We weren’t going to leave you home alone in your hour of need.”
“That’s very chivalrous of you.”
“What are you doing out of bed, Papa?” Thomas asks, but with his eyes glued to a piece of material in his lap that he’s carefully applying buttons to. “Daddy said we needed to let you sleep for as long as possible.”
“I was asleep. But I suddenly remembered that you have a big art project for school due tomorrow that you wanted me to help you with …” Kurt’s eyes sweep over the mess on the floor, a cornucopia of Popsicle sticks, fabric scraps, tubes of acrylic paint, buttons and googly eyes “… but it looks like your Daddy may have that covered.”
“I knew you might not be up to making puppets, so I decided to help Tom-Tom here,” Sebastian explains, beaming up at Kurt with a smile of pure paternal pride.
But as Sebastian isn’t exactly the arts and crafts type, Kurt can’t help being a little bit wary.
“A-ha. And where did you get the material?”
Sebastian rolls his eyes. He knew this question was coming. “Don’t worry. I didn’t go rummaging through your craft supplies. I know better than that.” In his pained state, Kurt hmphs, but quietly. Sebastian only knows better because he accidentally used a remnant of $300-a-yard silk – a discontinued print that Kurt had squirrelled away from his last fashion show in Milan in the hopes of having it recreated specifically for items in his line - for one of Thomas’s previous art projects.
Kurt’s dream of recreating that print never came to fruition. But to this day, Hepburn has the snazziest neckerchief ever seen at their local dog park.
“So, what are you using?”
“Some old t-shirts of mine,” Sebastian answers.
“And some old socks,” Thomas adds. “We found the buttons under my bed. And I got the eyes at school.”
“Brilliant.” Kurt squints harder at the puppets both his husband and son are constructing on their laps, joining seams with a liquid that should look white, but is instead clear, and leaving an oily spot behind. “Ok, but how are you keeping them together? I can’t really see two inches in front of my face, but that doesn’t look like Elmer’s glue you’re using.”
“I didn’t have enough Elmer’s glue for all the puppets,” Thomas explains, sitting up so his Papa can get a better look at the six puppets lying on his lap, three on each leg, waiting to be completed.
“We were going to make a run to Michaels,” Sebastian says, “but we didn’t want to leave you alone. So I improvised.”
“With what?”
Sebastian holds up the small blue tube he’s been working with and shows it to Kurt. “Super glue.”
“Super glue!? You’re using Super Glue!?” Kurt looks from Thomas’s lap to Sebastian’s, layered with almost as many puppets as his son has. “And you’re working on your lap!?”
“Yeah …?” Sebastian says, unconcerned.
“Did you put some wax paper underneath? Or maybe a board?” Kurt leans down to get a better look, but stops halfway when the room begins spinning.
“Nah. This was all kind of spur of the moment.”
“Sebastian!”
“What?”
“Haven’t you ever used Super Glue before?”
“Nope. Why would I? When do I glue anything? I leave that stuff to you. You don’t let me fix anything anyway … not after the bicycle incident. Besides, it’s just a few puppets. What could possibly go wrong?”
Kurt closes his eyes, the headache he woke up with swiftly turning into a migraine during the course of this conversation. No good thing in the world ever happens after someone utters that particular question. Glue experience or not, his husband should know better. At the very least, he should learn to read directions.
“Uh, Thomas? Honey?”
“Yeah, Papa?”
“Could you stand up for me, please?”
“Sure. Okay,” Thomas says, putting down his tube of glue and beginning to move his puppets to the floor.
“Don’t move the puppets,” Kurt instructs, putting a hand to Thomas’s shoulder the best he can while only bending over the tiniest bit. “Just … stand up.”
“Oh. Alright.” A confused Thomas rises to his feet, but starts giggling once he gets there. Standing upright, he has six puppets adhered to his legs, not budging a hair, even when he begins to jump up and down.
“I have puppet pants!” he cheers, lifting his left leg and giving it a good shake.
“Yes, you do.” Kurt sighs. “Come with me, Tom-Tom. We’ll scrape the puppets off your pants.”
“Are … are we going to hurt them? I put a lot of work into them.”
“Not a one,” Kurt promises. “And with any luck, we won’t put too many holes in your pants, either.”
“So, Super Glue puts holes in fabric?” Sebastian asks as Kurt leads their son away to his bedroom.
“No, but peeling the Super Glue off Thomas’s pants might. It shouldn’t be that big a problem, though. It’s not like those are his favorite pants.”
“Uh, well, I might have a problem.”
“Yeah? And what’s that? Are you wearing three-thousand dollar Gucci jeans or something?”
Kurt turns back to his husband, staring up at Kurt with inexplicable anxiety etched into every line of his face. Kurt blinks blurry eyes, trying hard to bring Sebastian’s current predicament into focus, and notices that Sebastian has been gluing his puppets down with his legs outstretched.
His bare legs outstretched.
“I’m wearing shorts,” Sebastian admits. Kurt watches his husband give one of his puppets a test tug, wincing when he discovers the puppet has adhered completely to his skin.
“Oh boy. Well, I hope you weren’t too attached to your leg hair.” Kurt waves for his husband to join them, trying his hardest not to laugh at Sebastian’s sticky situation. But the sight of his husband standing dejectedly with six Popsicle puppets stuck to his legs almost does Kurt in. “Because you’re not going to be in a few minutes.”
29 notes
·
View notes
Text
Wish Upon A Star
AO3 FFN
Characters: Blossom, Boomer, Brick, Bubbles, Butch, Buttercup, Him, and Mojo
Summary: When you wish upon a star it’s actually a satellite, and your wish has been recorded and cataloged. An agent is now assigned to your case.
PRO CH1 CH2 CH3 CH4 CH5
After getting out of their father's car, they each took a look at their schedule. You see, today is technically the start of the new school year, their junior year to be precise. They had gone to the student portal the day before and printed off the papers so they wouldn't have to go to the office like everybody else, after all that was just a hassle. They commented on which classes they shared, and although they were all in AP and honors classes, they had different teachers. So far they all shared B lunch; Bubbles has Mythology and Folklore and Gym with Blossom. The only class Bubbles shared with Buttercup was their forensics class. Blossom only shared Mandarin Chinese 3 with Buttercup. Other than that, they had similar classes all at different times. At least they'd be able to help each other with the homework for those classes.
Once they checked where all their classes were, they parted ways and went to their lockers. Usually, the Utonium sisters were the only ones who brought all the stuff they needed on the first day of school. That was simply due to the fact that teachers typically only handed out syllabuses one the first day and very rarely ever handed out homework. That wouldn't happen until later in the week. Still, the girls thought it best to come prepared and brought a couple notebooks with them in a small bag to each class just in case. After all, they didn't want to get one of those teachers that actually teach them on the first day.
Buttercup groaned as she heard the first bell ring, telling her she had six minutes to get to her fist class. 'I bet they're going to make us learn each others name's and try those stupid get-to-know me friend games' she thought, scoffing. Nobody likes them and yet the teachers continue to do them. Sure, it's probably just the teachers trying to do something to help them remember the names of their students, but god was it annoying. So there she was, making her way to her Astronomy class, opting to take that instead of chemistry. Even though it was something she was interested in, she didn't want to be anywhere first thing in the morning. Normally she would have free period for first to do her homework/sleep, but that was the only time for the class that had the teacher she liked. Her name was Ms. Keane and she taught some of the science classes along with the math classes. Her sisters and her always tried to get into her classes because they were the most fun and she didn't assign homework over breaks. Though she was nice, people learned pretty easily not to test her. She was scary when she was mad, because she wouldn't even yell. She was calm and that's as irrational as the numbers she teaches!
Bubbles, meanwhile, was on the other side of the school trying to make it to her art class on time. It was her favorite class and she was excited to have it first thing in the morning. She, unlike Buttercup, was a morning person. However, do not try to wake her up before she plans to, she might as well become another person and be scarier than her elder sister. Her teacher Ms. Kintoki, was the sweetest person on the planet and didn't mind if you were a little bit late. Even so, Bubbles loved being in her class every year and was determined not to be late. Though, if it was another one of her classes, she would've just walked at her normal pace. Still, she was excited to be back and see all her friends. She had gotten a part time job over the summer working at Water World alongside her one with the agency and hadn't gotten to see them as much as she had liked, which also caused her previous relationship to fail. However, those thoughts didn't bother her for longer than a second as she happily skipped into her classroom, determined to make the day a great one despite her recent melancholy thoughts.
When the first bell rang, Blossom was already at her English class. She liked being on time, if not early, to every class she had. It was the perfect way to ensure she got the seat she wanted, especially if the teacher didn't enforce a seating chart. She liked sitting in the second row, closest to the window. That way she could still pay attention to the teacher as well as look out the window and see the view. It helped her thinking process, if she got stuck on an idea or problem, the window would (seemingly in her mind) point her in the correct direction. It always helped calm her down when she was stressed and since she always did all her work on time and knew the answers when they didn't think she was paying attention, the teachers would let her be. Plus, getting to the class early meant she would have time to read her latest novel before the class actually started. It allowed her time to relax and take her mind off of her troubles, especially when she was particularly stressed out from work, school, or her extracurricular activities. The teacher who was there started putting get-to-know me papers on the desks and Blossom mentally sighed. Like her younger sister Buttercup, Blossom held no fancy for this particular activity. She didn't particularly care about getting to know her other classmates, and was happy with the friends she already had thank-you-very-much. It was pointless and the only one who didn't see it that way was her cheerful baby sister, Bubbles. While Blossom was not a fan of doing it, she filled it out anyway but didn't vocalize her distaste of it like Buttercup did. All she could do was do it, she wasn't the one who made the curriculum anyway, so she just had to hold out and do it for every single class she would have that day. Upon filling out the sheet Blossom also sent a text to he current boyfriend Dexter, he was so sweet to her and she almost wished they went to the same school. He went off to a private school whist she opted to stay with her sisters, and although she missed him she doesn't regret choosing to stay at Townsville High.
Where as both Bubbles and Blossom were already at their classes, Buttercup barely made it to her's before the late bell rang. She chose the only seat available, one row from the back of the class and plopped into the seat. The teacher had decided to wait for any stragglers before introducing herself to the class, whether or not they knew her. She handed out both the syllabus and get-to-know me sheets to the class as some people groaned while others filled them out. Buttercup, obviously was among the people groaning. Doing this sheet every year for every class but gym was a pain in the ass and she was glad this would be her last year of doing it. Begrudgingly, she started filling out the paper as Ms. Keane had given her a pointed look. It wasn't like anybody cared about this anyway, but whatever. If she had to fill it out she would, just don't expect her to be that forthcoming with the answers or when she had to introduce herself to the class. She was always particularly short with her answers and the teachers didn't give a damn as long as she filled it out. After all, participation counted. Buttercup was among the first who was done with her paper so she put her head on the desk and listened discretely to her music not wanting her iPod to get taken away. It wasn't long before the class finished and they were put into groups of four, being instructed to switch papers and discuss with their peers. Thankfully, Buttercup was able to stay in her seat as Ms. Keane split them up. Next to her was Mitch, who she didn't even realize was in this class, and two other kids she didn't know. Her and Mitch bumped fists as he sat down next to her and waited for the other two to introduce themselves first. Across from Buttercup sat a blond haired boy (hair a bit of a darker shade than the platinum color that was her sister's hair) whose name was Boomer. He liked photography and played baseball. The one next to him was a pale boy named Elmer, his hair even lighter than Bubbles, almost white in color. Buttercup briefly remembered the glue eating boy from her kindergarten class, he had moved away the next year, but clearly he was back. She learned that he wanted to be a lawyer when he was older, to be able to stand up for those who couldn't. When Mitch introduced himself, he said he was aiming to be the best rock star in the world. Lastly was Buttercup.
"Names Buttercup," She told them in a bored voice, "I want to join the MMA and go on to be a world renowned fighter." Finishing her statement with a shrug. After introductions were all said and done, Ms. Keane went over the syllabus with them as well as her no late work policy.
With Blossom, her class was forced to stand up and introduce themselves individually. She was not at all fond of this idea because while she came off as a confident person, she secretly had a fear of public speaking. Out of the three of her sisters, she was the most intricate with speaking her thoughts; however her youngest sister was the best at speaking in front of others, even if her mouth got ahead of her brain sometimes. Blossom was actually a very anxious person, though most people didn't notice, she did have her quirks. She had her bad habits of chewing on her nails when nervous, as well as biting her lips and the inside of her cheeks. she would also put her hands behind her back in an attempt to keep people from seeing her fidget with her hair bands. Mentally preparing herself for when it came to her turn, she recited what she was going to say in her head like a chant. 5 more people left before her, she straightened out her paper and pencil. 3 people left and she tucked a stray hair behind her ear. 1 person before her, she took a deep breath and stood as soon as they sat down.
"Hello, my name is Blossom," She started, "A hobby of mine is reading, I'd like to become an engineer one day, and my best subject is trigonometry."
The person behind her went next as she sat down with a sigh of relief. It was done. She wouldn't have to do this again until next period. She was fine. It was okay. She wouldn't have to do this in her college classes. She was fine. She managed to calm herself down a bit and briefly listened to her other classmates introductions, wanting this day to get done with sooner rather than later. Resting her head on her left hand, she looked out the window and spotted a blue jay's nest. The mama bird was feeding it's four babies. She smiled at them before turning her attention back to the class, trying a bit harder to pay attention to her classmates.
Bubbles, unlike her sisters, was having a grand old time. She was making friends and learning about her new classmates, after all she had met nearly all of them. She was as chipper as the birds outside and was excited to meet new people,more than happy to fill out the sheet and discuss it with her classmates. She was glad to find out Robin was in her class, at least there was one person she knew. Although, new friends were good too! She had met all of her table-mates and even ventured to the other tables. There were five other people that sat at the table with her. The first one was to her right and named Eliza. She had brown hair in a pixie cut and wanted to become a composer when she was older. The one to the right of Eliza was Robin who wanted to become a journalist. Next was the boy to Bubbles left, his name was Jeff and he was in a wheel chair. Bubbles only slightly remembered him from her kindergarten class, the shaggy blond hair jolting her memory. He liked to do tricks at the skate park. The next two were Floyd and Lloyd who had also been in her kindergarten class and some others growing up. They were closer to Buttercup's friend Mitch than they were to her. They just wanted to "chill" is all they said. She had also met some other people from her class, but the one's at her table would be who she'd be spending the most time with. She'd introduced herself and told them how she aimed to be a veterinarian when she grew up and how she'd probably be an art teacher after that, telling them about her college classes and about her sisters. She had also asked them all a crap ton of questions when she realized she was probably talking their ears off and apologized for getting so excited with a nervous chuckle. After that, their teacher went over the syllabus, answering any questions, and let them do as they please for the rest of the class period. Bubbles just knew it was going to be a good day, her sisters did not share her outlook.
Today had been a long day, much to Bubbles disappointment, and had not gone that well. She had left her lunch at home, so she was forced to share bits of food with her sisters, who did not have that many vegetarian options. Then she had gotten locked in the bathroom of the gym and was very embarrassed for the rest of the period. Also, since she's so clumsy, she scraped her knee in the hallways walking to class and now she had rug burn. Never the less, she was not going to let this ruin her day. She was determined to make this day a good day, so when she got home she's going to paint to relieve her stress.
Blossom was just anxious to get home so she could finish her book before dinner, ready to get her mind off of the day she had. Some kid had the nerve to stick gum in her hair! So she was forced to put peanut butter in it to get it out and now she had to wash it. Maybe she'll do that first and then finish her book? She didn't know, she just was ready to get home. Buttercup felt the same, she was going to relax up in her room on her bed playing video games before she had to start dinner. She was making burgers (vegi ones included) tonight so she would have to thaw them out. Maybe she'd make green beans while she was at it along with fries? Oh well, she still had a while to think about it.
It didn't take them long to walk home, they just lived a couple blocks away and the Professor wan't able to pick them up since he didn't always get off work that early. He had odd office hours and would often lose track of time so easily he wouldn't get home until 9 or 10 at night. He was currently studying stem cells in an attempt to better understand them and see which diseases they could cure or help.
Anyway, as soon as they got home, each girl went off to do their own thing. Blossom washed her hair and instead of finishing her novel, decided to get a head start on her English project for her college class as well as did some reading of her chemistry text book. Bubbles ended up painting a beach with a mermaid looking out to the ocean before she decided to turn on her classical music to help her focus on her yoga stretches. Meanwhile, Buttercup set out the meat to thaw and took out vegetables for Bubbles to eat other than green beans. Instead of playing video games and being anti-social in her room, she sat downstairs and caught up on "Arrow" on Netflix. At four was when Buttercup started preparing dinner for her sisters and her, putting in an extra serving for the Professor just in case. Bubbles had come down a bit early and helped her finish up the food while Blossom set the table and poured them all glasses of water. It wasn't long before the food was done and Buttercup set it on the table, with the exception of the Professor's whose food she put in Tupperware™ for him later.
"This food is really good guys!" Blossom exclaimed after taking a bite of her burger, "Thanks for dinner."
"No problem," Buttercup replied, taking her seat in between her sisters.
"Thanks for making a vegi-burger for me," Bubbles said gratefully, after all she knew how Buttercup didn't like to make them. Secretly Buttercup was insecure if she was making them right, just wanting to accommodate for her sister. She merely shrugged, continuing to eat her burger while Blossom and Bubbles shared a knowing smile before getting back to their food. Buttercup wasn't always used to thanks or compliments, so when she received them she acted like she didn't care or awkwardly looked away.
They continued to make small talk as they finished their dinner, not really wanting to talk about school but still wanting to hang out together. By the time they finished eating, it was still pretty early to go to bed, so they decided to continue watching some episodes of Riverdale together, it was a rare occasion for them to find a show they all liked and were interested in. After all, Buttercup liked more action, Bubbles more romance or rom-com's, and Blossom had her documentaries. Of course there were some shows and movies that the other girls liked but wouldn't admit (Buttercup loves My Big Fat Greek Wedding), but even if one of them didn't like a show or whatever their sister was watching, they'd still watch it with them. After all, that's what you do for family, watch shows you're not interested in with them.
At 9 PM they called it a night and got ready for bed, took their sleep medicine, said their good nights, and found the most comfortable spot in bed before the agency's ringtone started up on all three girls' laptops effectively ruining their attempt to sleep. So they all got up and turned on their computers to answer and saw their sister's faces on the screen as well as the Director's. They greeted him, waiting respectfully (or with annoyance in Buttercup's case) for him to give them their assignment. Why else would he be bothering them on a school night?
"We've just got the biggest wish this agency has seen in years," He informed them, "It is your duty to make it come true."
Just then their computers dinged with a notification from their emails. All three girls looked at it, but Blossom was the only one who made a move to open it, Bubbles and Buttercup entirely too tired to even try. After all, they had school tomorrow and classes to go to.
"Can this wait till tomorrow?" Buttercup whined, she wanted to go to bed okay? The Director gave her a look, and she promptly sat back up in her chair, choosing instead to look at the document he sent. Her eyes widening at the mission brief.
"Are you sure about this sir," Buttercup hear Blossom ask incredulously, "Wouldn't more experienced operatives be better for this assignment?" She made a good point, as her sister's didn't feel they were ready for this kind of responsibility of someone's wish.
"You are SAINT's best operatives and the whole agency feels you three would be best suited for this mission," Was all he said before bidding them a good bye and ended the call. It was only seconds after that both Buttercup and Bubbles went to Blossom's room to talk about it.
"We're not ready!" Buttercup yelled as quietly as she could with out bothering the neighbors.
"He thinks we are," Bubbles countered, though she felt the same as Buttercup.
"We've done more intense mission's than these," Blossom reminded them, recapping their missions in other countries to save kids from their parents, married couples from each other, etc, etc. They offered people new lives and freedom from their demons.
"But this," Buttercup said, pointing to Blossom's monitor, "Is out of our league."
"We'll talk more about this tomorrow," Blossom replied, "Right now we need to get some sleep."
Her sisters agreed with her, slipping into her bed and shutting off the lights, each too tired to go back to their respective rooms.
When the Professor got home, he had a mini panic attack when Bubbles wasn't in her bed and immediately ran to check on Blossom, but relaxed and found a smile rise to his face upon seeing they'd stayed in Blossom's room for the night. Luckily, Blossom had a king sized bed that would fit all three. The only reason for this is because Blossom took their old room from when they still all slept in it. After they'd grown too old to share a room, the Professor accommodated for each of them. Bubbles got the guest bedroom with a queen sized bed, her room was just a bit smaller than Blossom's which allowed her room for her art as well as her stuffed animals, and Buttercup got the bedroom in the attic which had a twin sized bed in it. Buttercup didn't feel she needed a huge bed and just needed room for her desk, as well as her guitar and CD's. Blossom's and Bubbles' rooms were connected by a bathroom, which meant she normally had to wait a bit if she woke up any earlier to get ready. Though she usually opted to take a shower at night, after she was already all sweaty and gross. The Professor had offered his room up to one of the girls so one wouldn't have to sleep in the attic, but Buttercup said she liked it up there anyways.
Fortunately, they had a shed in the back yard so they didn't have much stuff in the attic. It was when the girls were 10 that the Professor started fixing up the attic and fumigating it for his second eldest. He also had inspectors come in and check it out when he was done. The he painted it a dark green color for her, put dark wood flooring in, as well as moved all her stuff up there in a way he'd hoped she would like. He did the same with his other two daughters and got them new sheets as well. When they all got home on their 11th birthday, it was finally finished and the girls couldn't be happier. Blossom finally had room for her books, Bubbles for her stuffed animals, and Buttercup for her sports equipment. The girls had given him the biggest smiles he'd ever seen and gave him each a big hug. Finally they had room to be themselves without getting on each other's nerves. Snapping out of his thoughts, he whispered good night to his girls and slipped out of the room, quietly shutting the door behind him and going off to bed.
#powerpuff girls#rowdyruff boys#fanfiction#powerpuff fanfic#blossom#bubbles#buttercup#brick#boomer#butch#professor utonium#HIM#Mojo Jojo#sara bellum#ms keane#my writing#bitternessbitesback
2 notes
·
View notes
Text
Top 10 Tools in the Garage
Top 10 Tools in the Garage
In your garage what would actually make the top 10 battle stuff. So here are our top 10 things that every dude needs in his garage.
# Ten
A pair of work gloves, you have no idea how many times I have destroyed my knuckles doing whatever in my garage because I didn't have a pair of gloves on. Well, I've learned and now any time I'm scraping, banging or sawing anything, I've got a pair of gloves on. And, trust me on this it's not dumb to have a pair of gloves on even if it feels a little bit awkward. Because, the moment that you crush a knuckle or cut your hand open is right before you thought, oh I don't need gloves this is dumb. So remember a good pair of gloves is actually pretty cheap and it's easy just to leave in your garage and just pick up every time. Right before you get ready to do something like crunching or sawing or scraping.
# Nine
You know what blind people say? They say go, man, I wish I had a pair of safety glasses on, right before I burn my eyeballs out. All right looks when you're working on a small one project no matter really what they are in your garage. But, it is always a good idea to have a pair of protective glasses on. Now, don't just use the shades that you're used to wearing while you're cruising around town, because safety glasses actually have like very hard ballistic plastic in them and they'll keep your eyes safe. No matter really what you're doing in your garage. Safety glasses are super cheap they're like five bucks. So, you have got no excuse for having a couple of pairs of these. Hanging around wherever they're convenient, convenient enough for you to remember to pick them up and put them on before you start sawing fashion or doing any.
# Eight
Two-part epoxy, now I'm sure you've probably used to having like super glue around the house and it's so frustrating. Because every time you go to use it it's all dried up. Well, you'd never have that problem with two-part epoxy it lasts forever. So, because it's in two parts so it never reacts just like Elmer's glue will eventually solidify over time but, two-part epoxy will never do that to you. Now the first thing you will lose is the top because they'll stick around so long but man you can use anything. I usually use a screw once I lose the top super easy probably only around five to ten bucks and it'll last you forever and
It’s awesome because it solidifies in like five minutes. it's better than super glue because it's stronger and it lasts forever and you can never go wrong because the simple stuff always comes in two different color bottles super easy to use so two-part epoxy.# Seven
Number Seven Is always easy, because man everybody always talks about needing a knife well, guys always use knives for all sorts of stuff right? well, the problem with knives is they always go dull but you know what it doesn't go dull razor blades why because they're super cheap and you can replace them as much as you need to so number seven is my trusty box cutter and a pack of 100 razor blades which will last you forever. I use razor blades for all sorts of stuff and I swear I'm only like halfway through this pack that I've had for like four years.
# Six
A socket and wrench set. Okay now for a socket set what you need is a simple but high-quality socket set. A good simple one will last you forever because they're super durable. this is literally the first socket set I ever bought and I bought a name-brand knowing that it would last forever and congratulations it has lasted forever. I think I've had this one for somewhere around six to seven years never had any issues what so ever. You’d be amazed at how often you actually use a socket set whether it's putting together your kid's bike or change the spark plug on your lawn mower, man a socket set is important to have. One of the only things you need to remember when you get a socket set is you want it to have the metric and American sizes, because depending on what you're working on it's going to be one of the one or the other so it's good to just have a simple set with the most common sizes in both metric and American. I know you're wondering when he is going to actually start talking about the real common tools.
Well right now. # Five
Number five is you need the best toolset all right don't go out and spend a thousand dollars you can get a really good toolkit for about fifty bucks and I just talked about a socket set you can actually get a socket set and toolkit together for around hundred dollars. It would be great as well but, I kind of consider them two separate things so what really comes in the basic toolset that I'm talking about of course a hammer, screwdrivers, and pliers don't get all fancy. All you need is the basics to get stuff done around the house but these are some must-have items in the garage. So a basic tool kit will have all three sets of those three things so, get a basic toolkit and don't spend more than 50 bucks. If you do your way into more stuff than you probably love, right?
# Four
A hacksaw, if you're not familiar with a hacksaw this is what they used to cut through limbs in the Civil War all right? Like, cut people's legs off, okay probably not. But I'm sure it was something close the cool thing about a hacksaw is it honestly can replace pretty much any other saw out there because it cuts through anything the problem is it doesn't necessarily cut as fast as other saws but it will cut anything you need inside your garage. So if you're going to pick one saw or one really good cutting tool it would be a hacksaw. Now the basic hacksaw handle that you can just get with a blade this thing cost like five bucks because so you've got no excuse for not having one of these in your garage. If you want to spend just a little bit more you can get one of the good basic hacksaw blade holders and it'll last you forever but everyone needs a hacksaw in their garage.
# Three
Top three the Battle Royale and here our top three finishers number three a cordless impact wrench or drill, and of course you recognize the good old black and gold of DeWalt, if you get a cordless drill it will last you forever if you get a good one DeWalt is awesome craftsman is awesome Black & Decker is awesome but I still think DeWalt is the king. but they can get super expensive you don't need a super expensive cordless impact wrench or drill you can get a great cordless impact wrench or drill for under $100 and it should last you a long time. Cordless drills come in unbelievably handy for years and years you're putting together furniture or you're fixing your kids toys a great drill will last you a long time and you will use it a good jillion times so get a good one to invest a little bit of money and I promise it'll always treat you right.
Things just got interesting because we're already there, Number two
# Two
This one might surprise you, but in our garage, we’ve our pressure washer. Notice that I have one that I can lift it with one hand and it's not gas-powered super-ninja turbo. Alright, you don't need to peel paint when your pressure washer stuff, but you do need a pressure washer to cut the time on some of the most common jobs you'll always do, just clean patio, furniture or taking old stuff and turning it into new stuff. A pressure washer comes in ridiculously handy and you don't need a super powerful one plus they get crazy expensive crazy fast. You can spend under hundred dollars and get a pretty good small pressure washer unit that will last you for years and you'll be able to do the most common things you need a pressure washer for and you will be happy that you have one.
All right so go for # One
We’re finally to number one. What is the number one tool I just could not live without? And I think every guy should have in his garage whether he realizes it or not is my trusty air compressor, once again, realized that I don't have a giant air compressor in my garage. Because they're not painting cars or nailing boards or anything crazy like that. So it is always helpful to have an air compressor because this thing has saved my tail so many times. How many times have you gotten up in the morning ready to go to work you got an important meeting and also you have a flat tire, holy cow! What are you going to do well if you have an air compressor it's not a crisis it's just a simple 5-minute fix. Now when you have an air compressor there are other things you can use it for and you'd be surprised how often you actually use this go-to tool usually I use it. you could dust things and you get the two connectors the one for tires and the one for dusting and spraying down stuff. And you can always use it for power tools later on if you really want to, having said that you don't need to spend more than about a hundred and twenty dollars you can still get a really good three-gallon compressor. Three gallons is a perfect balance between a tiny compressor, which would take a really long time to fill up tires and something like that. And, a good balance between that and a giant ten, fifteen, twenty and thirty-gallon compressor for like which you need for paint cars and stuff like that. You can actually use a three gallon to power small spray guns, air impact wrench and things like that for smaller projects. so it's still really handy and it's perfect for medium-sized jobs and small jobs that always seem to pop up in my garage
So there you have it the Battle Royale of all the tools that I use in my garage and I think every dude should have in his garage.
So, if you disagree, no problem, tell me the things that you think that you need in your garage and every dude should have. I can pretty much wing it in my garage as long as I have these ten things. Besides that man, I'm in trouble! So, wherever I go and I move a lot, I always have these ten things in my garage. So, if you've got any questions to post them in the comments.
For more tools review you can visit the site: https://toolsverge.com/. You could find here more important tools review for your job site work.
1 note
·
View note
Text
Upon the Twentieth Visit

Member: Jeonghan
Genre: fluff/Slice of Life (idk if this is a fanfic genre but yeah)
Word Count: 1,536
The potion shop on the corner of Walnut Avenue was exactly 21 minutes and 43 seconds away from Jeonghan’s college dorm— so long as he left in between rush hours and flew at exactly 23 miles per hour— assuming his broom was in the proper condition, however today it was not. Jeonghan had visited the said potion shop 19 times since he began his freshman year at Agnes Sampson Magic Academy, however less than ½ of those shifts you (the reason he showed up) had worked. In conclusion, although Jeonghan had wasted an discommoding amount of time and an even more inconvenient amount of money at the small shop, his twentieth visit was when things actually began for the two of you. Additionally, his twentieth visit just so happened to be his most embarrassing.
Jeonghan had always prided himself at how early he began flying. A broom wasn’t something simple like a bike, so when he successfully began riding one at the age of 7 it was a surprise to everyone. From the first moment his dad lifted his small frame on the old wooden broom when he was younger he fell in love with flying. He never could find himself able to throw the old broom he first rode out, no matter how many splinters he got in awkward places, or how slow it began to fly; even when it snapped 2.7 miles away from the potion shop he was still determined to fix it. Last time his broom broke like this he called his roommate Woozi who very sweetly told him to buy a new broom by trying to throw the old one in the trash while Jeonghan was sleeping. Luckily, Jeonghan found it a day later after searching every square inch of their small dorm.
Instead of calling his stubborn roommate Jeonghan walked along an empty cobblestone path that no one seemed to use anymore. While he walked he tried to convince himself it was a good thing he didn’t fly. How else would he have found a shop that carried the most beautiful parchment made from the softest goatskin he had ever felt. Where else would he have heard a new recipe using the enchanted Chanterelles that grew on the edge of a hill he liked to visit. If only he could have entered your potion shop more gracefully and not with half of his broom in one hand and the rest in the other. If only his twentieth visit didn’t happen to be part of the roughly 44% chance that you would be working there.
When he first entered the small shop your back was turned to him, but as soon as he made his way out of the entry way and into one of the dimly lit aisles the small pygmy puff that always lingered next to you made a loud squealing noise causing your head to flip around. “Hello, we just got a shipment of abalone shells from a few towns over. I know you were looking for those.” You smiled at him sweetly, almost naively— almost as if you didn’t know that Jeonghan was smitten with you. Almost as if you didn’t know that Jeonghan had been looking for the abalone shells in hopes of creating a potion of good fortune that would hopefully make him catch your eye.
At first Jeonghan thought he could try a love spell, but that was hardly fair. Not only were spells of love temporary at best and extremely difficult to execute, but they were also not widely accepted. It also seemed very difficult for Jeonghan to gather the necessary items no matter what way he looked at it; it’s not like he could just ask for a lock of your hair. Besides, his specialties didn’t lie in potion making. In fact, he began going to this store to improve on the subject in hopes that he could pass his 101 class.
“I was actually hoping you could help me with something else.” Jeonghan began in a shaky voice that hardly reflected his usual tone. His gaze fluttered down to your name tag as soon as a few quick seconds passed with eye contact. His eyes traced over the stylistic font of your name tag over and over again as he had done so many times. If there was a spell to hide the blush on his cheeks whenever he was near you he would have found it by now.
You walked over and Jeonghan watched the pygmy puff (that he thinks was called Sucy) wander in figure eights around your feet with each step, like a dance that seemed effortless but nonetheless impressive between the two of you. As soon as your eyes saw the broom in two pieces in Jeonghan’s hands they widened in sympathy. “Oh wow, I hope that wasn’t expensive. Did you get into an accident?”
“The broom is really old,” He spoke almost in a whisper as he stared down intently at his hands. He tried to ignore the nerve-wracking feeling of your gaze as it examined his face, he could feel a river of red flood his cheeks without remorse. Shit.
“May I?” Jeonghan didn’t fully understand what you meant by that, but you could have asked anything in your sweet melodic voice and he would have said yes. Your hands brushed quickly over his own taking the dark maple wood ends of the broom in each of your hands. A spark imploded in his chest when the contact of skin occurred, reminding him of when he was younger and still learning to use a wand; he was ten all over again and his wand just fizzled and back fired a spell too intricate.
He was snapped from his daydream when you began to walk to a table across the room, and just like a dependent pygmy puff, he followed listening to you mumble quietly to yourself. You stopped at a table with the word ‘Adhesives’ labeled. Jeonghan cringed to himself when he realized how dumb he must have looked to someone skilled in potions. “The adhesives we make here aren’t that strong so I don’t know if they’ll work. Usually people make the potions on their own, so I might just have to send you home with a few things.” You spoke all while keeping a smile present on your face, all while keeping him completely enticed. The potions teacher he had should have really taken notes from you because if you taught that class he was sure he would have clung to every word.
You popped open a bottle with a orange tint that smelled vaguely of Elmer’s Glue, but also somehow vaguely of wet dragon scales; it was a combination of smells that Jeonghan never knew could exist, but now he would surely never forget the pungent scent. “I took a potion class last semester,” Jeonghan spoke absentmindedly for the first time as he watched you deeply focus on apply the adhesive. “I passed, but barely.”
“That’s probably because Professor Spellman teaches the course. I’ve never met someone who teaches something so boring.” A lock of you hair flopped down over your eyes and before Jeonghan even thought to not he moved in and swept it behind your ear. A soft pink dusted your cheeks, something Jeonghan noticed right away, only making his own shade of shy rise back up again as well.
It was a humble silent until you broke it by letting out an annoyed huff. “It’s just as I thought, the adhesive here isn’t strong enough. I can give you the herbs necessary for creating an adhesive that will work correctly and still allow the magic to flow through, but it’s pretty advanced.”
Jeonghan bit the inside of his cheek, not pleased with the answer. “What do I do until then?”
“You have two options. One, I could fix it for you, but if you want it done tonight you’ll have to come to my house because all my tools are there. Or you cou-”
“I would love to.” He stated quickly trying to hide the nerves in his voice from the boldness that came with putting himself out there. If there was a spell to hide the blush on your cheeks the two of you could have used it in that moment. For once it was your eyes glued to the floor and Jeonghan’s staring at you happily. “Do you want to get something to eat beforehand? I don’t need to fly that bad.” He said with a chuckle as you nodded your head with that bright smile on your face that made Jeonghan’s heart do backflips.
It took Jeonghan nearly one hour and twenty three minutes to get to the potion shop on Walnut Street the twentieth time he visited. It was then precisely sixteen minutes before he left with his longtime crush to eat the sweetest sugared plums and try the bouillabaisse (something neither of you were that fond of). You fixed his old broom without a problem after four hours (although secretly you could have done it in two). And you never told him what the second option was for fixing his broom: duct tape.
-peach
#seventeen scenarios#jeonghan scenarios#seventeen imagines#jeonghan imagines#jeonghan fluff#seventeen fluff#jeonghan#kpop scenarios#kpop imagines#kpop fluff#fluff
103 notes
·
View notes
Photo
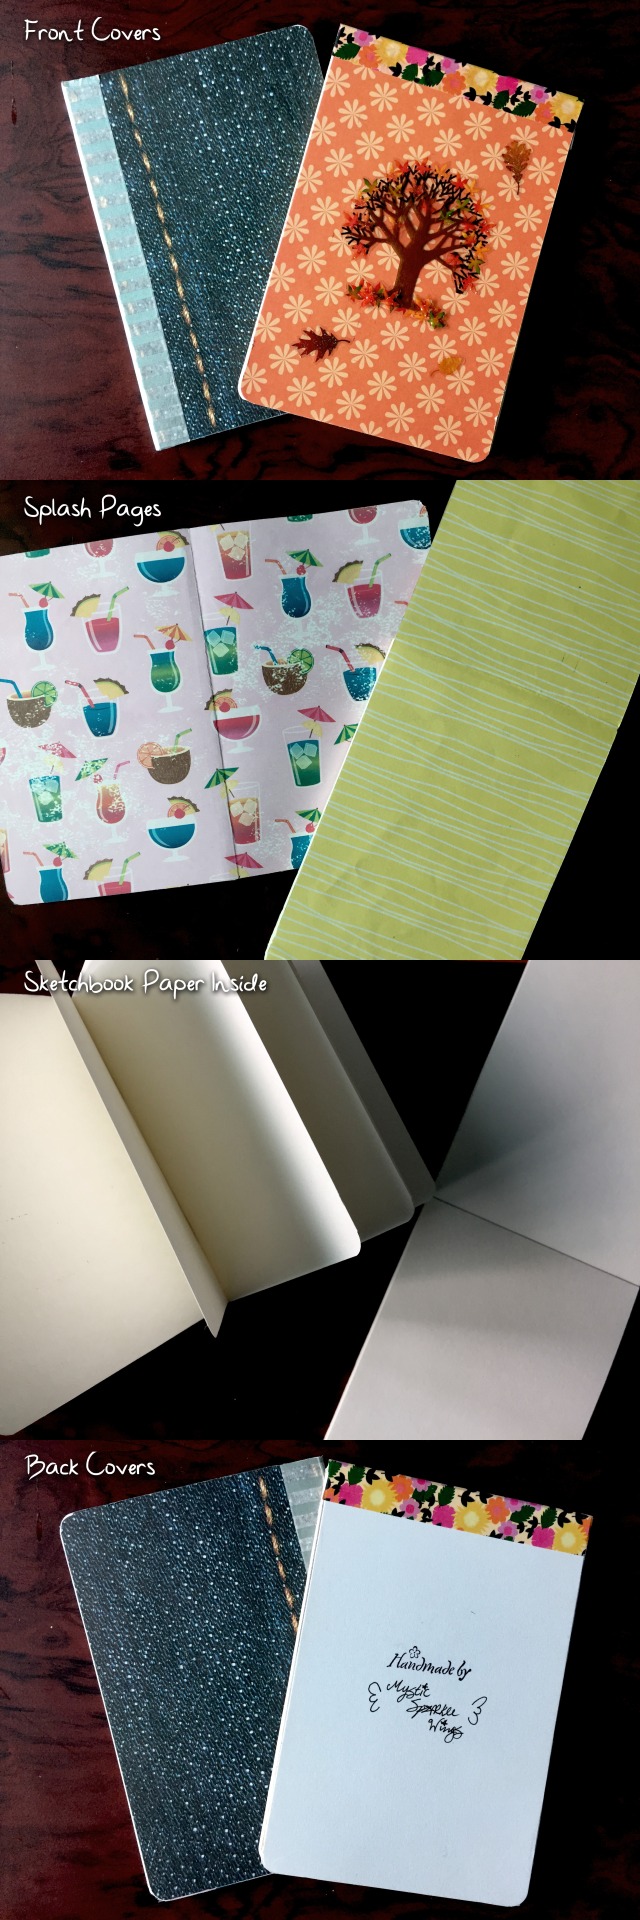
Homemade Mini Sketchbooks!
More of a crafty thing today, but hey at least I'm still taking a break from all the swatch chart stuff
I've watched a few different videos over the past few months talking about bookbinding and making your own custom sketchbooks and artwork storage/organizing, etc. And at some point it just kind of clicked that I wanted to give those sorts of things a try, just to see what I could do and make my book/paper organization life a little more interesting than just the store-bought stuff.
Not pictured here: I recently acquired a disc-bond planner/notebook to try out, since disc binding seems like a great hybrid system between a spiral-bound notebook and a binder for someone like me who prefers spiral-bound stuff but likes the option of taking pages in and out or moving them around. The only problem is disc binding stuff is kinda expensive, so it'll be a while before I've built up a small collection of supplies/options to pick from.
I also purchased some book rings and extra folders and stuff from DollarTree a while back and have since used a combination of those things and some old divider pages and pieces from old notebooks to put together a sort of makeshift custom binder/book that I keep all my swatches and reference pages for my various art supplies in. It's kinda neat, but not so fancy that I feel like showing off photos of it.
These little roughly 4"x6" sketchbooks were pretty much testers to see what I could do with what supplies I have. I made two to try out two different binding directions (side/right bound and top-bound) and two different kinds of glue: Elmer's CraftBond Tacky Glue, and Aleene's Original Tacky Glue. Neither is necessarily "preferred" glue for bookbinding (as you can get specific PVA glue just for bookbinding) but they dry flexible, are made for crafty/paper things, and one was on clearance for $1.97, the other came from DollarTree, so I figured I'd give them a shot before investing in more expensive glue.
I'll run down my process in a second, but I do just want to say the main thing I felt like I really needed a proper supply for/could have done better had the urge to finally make some books not struck me in the middle of the night was a press to hold my block of individual pages for the inside together while applying the glue. Traditionally, this is done with a fancy-looking contraption called a book press, but I don't have one of those and they are also surprisingly expensive. So my option was to stack a bunch of books together, and I admittedly didn't do as good of a job with that as I could have, but now I know better for next time. But because of this and the odd hours I was keeping, the pages aren't aligned super nicely, a couple are a little loose, and I did have one page fall out of the top-bound/orange cover book.
That said, I made these at roughly the same time, going over the same steps for both and working on one while I waited for the other to dry, etc.
I started with the covers by taking some metallic cardstock I have and cutting it down to the 4"x6" size I wanted, and then for the front and back covers on the blue book and the front cover on the orange book I grabbed some scrapbook paper I had and cut that down to size and used double-sided tape to attach the paper to the pieces of cardstock (yes, the blue one that looks like denim/jeans is actually paper and not fabric! I got a pad of paper like that from DollarTree because I thought it might come in handy, and it does look pretty cool for a book cover!). I purposely left the back cover on the orange book blank/as just the plain cardstock just to see how it looked.
Alternatively, I could've used just paper (which I thought would be too thin/easily messed up) or chipboard--that brownish cardboard stuff that makes up the back part of a lot of store-bought sketchbooks--for the covers, but A. I didn't have any individual pieces and B. I didn't feel like chopping up the back of any existing sketchbooks I had. Not for just these testers, anyway. I also could have used glue to attach the decorative paper, but gluing paper like that tends to make it warp/wrinkle/boil/bubble if you're not careful, and also once the glue is stuck down it is STUCK, and so I figured I'd have a little more room to breathe in getting the paper placement right with the tape.
Funnily enough, the tape ended up being way more forgiving than I thought, but I'll talk about that in a bit.
Once I had the covers decorated with the paper the way I wanted, I moved on to the most tedious/longest part of the process: The paper on the inside.
I recently picked up a cheap sketchbook with paper I'm not super-duper crazy about, and I had pretty much already decided that would be the paper I used for these little tester books. It's still usable, it's just not my more expensive favorite paper. And there's plenty of it, so I didn't mind "wasting" it on these books.
I ripped out 20 pages from the sketchbook, expecting to get two smaller pages for the books I was making out of each larger page, but I actually ended up getting three smaller pages out of each, and so instead of 20 pages for each of the minis, I ended up with 30. This was a good thing since it gives the books a bit more weight/thickness and made the binding steps a little easier as a result.
I stacked all of the pages for each book together and got one edge as even as possible--although I could've done better and gone through and lined up a few pages at a time to get them a little bit more flush together--and then very carefully placed the stack between some heavy books to hold them together and handle them still so I could apply the glue to bind the pages together.
I unscrewed the tops of each kind of glue and applied it to the spines/paper stacks with a brush. Each book got three coats of glue total, just to make sure things were nice and secure. (Or you know as secure as possible for homemade in the middle of the night)
While I was waiting for each coat of glue to dry, I took the covers and some more scrapbook paper and measured out the splash pages--just double the width of the cover so it can be folded over into two pages--to make the books feel a little fancier. (I'm not totally sure that's what they're called but that's what I'm calling them--I mean the interior pages between the book covers and the actual book pages). Then I used the double-sided tape again to attach the paper to the inside of each cover, and I found out by accident that while the double-sided tape is nice and sticky, it is actually repositionable! It doesn't totally rip up the paper if you try to unstick it! (Well, as long as you're kinda careful, anyway). And so I was able to reposition the splash pages until I felt like they were as straight/aligned as they were going to get.
And while I was still waiting just to make sure the glue was dry before moving on, I decided to add some stickers to the orange book cover just to jazz it up a little. The plain flower print was fine, but I felt like it needed something and I was probably never going to use the stickers for anything else (I'm a sticker collector/hoarder), so on the book they went!
By this time the blocks of paper were ready, and so I removed them from the stack of books and one at a time, pulled off a piece of wide washi tape for the spine of each and then very carefully aligned the covers to the blocks of paper and used my desk to help fold the tape around the spine as crisply as possible. (This step could have also been done on the splash pages and the covers attached afterward to hide the tape, but my tape is pretty so I'm okay with it being exposed).
Now, I could have left the books just like that, but I wanted to be just a little bit fancier and used a paper punch to round the exposed corners of the covers and pages. This added a LOT of polish to the final look since as I mentioned earlier my pages weren't aligned super evenly.
And just to be cheeky I did use a stamp and signed my name on the back cover of the orange book too. I'm honestly not sure which of the two I like better in the end--they both came out better than I was expected for my first tries!
Honestly, this is more of a time-consuming task than it is difficult or expensive (at least the way I did it, you could very easily make this a SUPER expensive thing based on the materials and equipment you use, but the absolutely essential stuff can all be purchased pretty cheaply; a lot of it even just from the dollar store for $1!) and so it was pretty fun, and the end result is really satisfying because, "oh, yeah, I made this book!" And you don't have to stick with a small size like I did--you can make full-size sketch/notebooks this way too! Or you can use these methods to just upgrade existing sketchbooks and stuff that you have to covers or sizes you like better.
I haven't quite decided what I'm going to attempt next, but I do want to play around with making more of my own books like this, and I'll likely post them here to share when I do.
Also, let me know if you guys would be interested in a more in-depth/picture/video tutorial of some kind for the process of how I made these and if there's enough interest I'll see what I can do!
Also I promise I'm going to respond to my correspondence soon I've just been really busy the past few weeks and haven't been able to sit down and give it my full attention--but I do read everything as it comes in, rest assured!
____
Artwork © me, MysticSparkleWings
____
Where to find me & my artwork:
My Website | Commission Info + Prices | Ko-Fi | dA Print Shop | RedBubble | Twitter | Tumblr | Instagram
0 notes
Text
Corner Floating Shelves

Looking to add a little personality to an empty corner of your room? These floating shelves are a great weekend project that will upgrade the look of any room. And the best part? They cost under $15 in wood each to make!
I made these floating shelves for a corner in my open dining room that just seemed out of place and needed a little definition to pull it together with the rest of the space. Since there was nothing in the area, I decided to make the shelves wider to not only help fill up the space, but also add character to the shelves. If you are working with a smaller space or you want the shelves to blend in more to the area, you can easily modify the instructions to make thinner shelves to fit your needs. You can also change out the wood you are using. For this project I used Whitewood common boards since I was staining the shelves. If you are going with a natural, unfinished look you might want to upgrade your wood choice.
Corner Floating Shelves
Materials (for a pair of floating shelves):
1â³ x 10â³ x 8â² Whitewood Common Board 16.07
1â³ x 4â³ x 12â² Whitewood Common Board 9.85
2â³ x 4â³ x 8â² Board (this is going to be used for the wall bracer so a simple 2â³ x 4â³ is all you need) 3.67
1â³ 18 Gauge Brad Nails
1.5â³ 18 Gauge Brad Nails
Rust-oleum Dark Walnut Wood Stain
Minwax One Coat Polyurethane
Elmerâs Wood Filler
Tack Cloth (optional)
#9 2.5â³ Construction Screws
Wall Anchors (as needed for hanging)
Equipment:
Table Saw
Sander
Miter Saw
Corner Clamp (optional)
Nail Gun
Hand Drill
Countersink Drill Bits
All applicable safety equipment per manufacturer recommendations
Making the Brackets:
Once you have decided where you want your shelves, itâs time to get started with this cheap and easy corner floating shelf build. The first thing you are going to want to do is make the wall bracket that will hold up the shelves.

For the brackets you are going to want to take your 2â³ x 4â³ and cut:
(8) 5.5â³ long blocks
(2) 31â³ x 1.5â³ x 1.5â³
(2) 20â³ x 1.5â³ x 1.5â³
For the 1.5â³ x 1.5â³ strips, I cut the 2â³ x 4â³ to length then cut the board in half lengthwise after trimming .25â³ off each side (to help square up the wood from the rounded edges). You could also buy 1.5â³ pre-cut boards but I wanted to use what I had on hand.
Next you are going to want to assemble the bracket. To put the pieces together I countersunk and predrilled two holes per support and corner piece. Once all my holes were predrilled, I just added a little glue and drilled 2.5â³ #9 construction screws into the boards.
Floating shelf bracket
While I donât always countersink my screws, I thought it was important to make sure the wood didnât split and that the screws would be flush against the wall once it was hung.

Making the Shelves:
Now that the brackets are made itâs time to make the shelves that will fit over them. Since there was nothing in the space where I am putting the shelves, I wanted them to be a little thicker to help fill the space and make a statement. Therefore I am making them 3.5â³ thick. You can modify this as you need for your space, just remember it has to be at least fit over the bracket you made.
The sides of the shelves are going to be made from the 1â³ x 4â³ board. Since itâs already the width that I wanted, Iâm just cutting it to the length that I want. For these cuts, one side needs to be cut at a 45° so the sides fit together without having the ends of the boards exposed. If you are painting your shelves instead of staining, the ends of the boards being exposed wont be a problem so you could skip the 45° cuts to make this project a little easier. For the listed cut dimensions, the length is going to be from the longest side of the board with the 45° cut. So you will need to make the following cuts:
(4) 8 1/16â³
(2) 15 5/8â³
(2) 2â² 3/8â³

To put the pieces together I used 1Ⳡ18 gauge brad nails and wood glue. Make sure all your angles are 90° or you will have trouble attaching the top and bottom of the shelves. To do this I used a corner clamp but you can use an angle square to hold the wood firmly in place before securing with the nail gun. For the inside corner piece I used 1 1/2Ⳡbrad nails to make sure the nails were long enough to secure the wood.


Once the glue dried I double checked that the shelf would fit around the bracket. Iâve learned the hard way that it pays to triple check everything even if youâve measured carefully. I left a little room between the bracket and the shelf on purpose so donât be alarmed if it is not a snug fit.

Now itâs time for the top and bottom of the shelves. For this you are going to want to take your 1â³ x 10â³ x 8â² Board and cut:
(4) 7 5/16â³ x 22 15/16â³
(4) 7 5/16â³ x 23 5/8â³

Once the pieces were, cut I glued the pieces together to make the (4) top and bottom shelves for the floating shelves.

After the glue had dried, I glued and nailed the top and bottom shelves to the side pieces.

When the top and bottom were secure and dry, I added wood filler to any area that needed it. I like to use the Elmer color change wood filler so I donât waste any time waiting for the wood filler to dry, with this I can tell immediately when it is ready to sand, plus itâs really easy to apply.

Once the wood filler dried, I sanded the whole piece down with 120 grit and 220 grit sand paper. When the piece was sanded to my liking, I wiped it down with a tack cloth, but you can wipe it down with whatever you have on hand. Just make sure itâs free of dust.

Now it is time to stain! I used Rust-oleum Dark Walnut Wood Stain, then finished the shelves with Minwax One Coat Polyurethane. I like this polyurethane because it gives it a slight gloss and a little texture to the wood. Once it is dry you can hang it!
To hang I pre-drilled 4 holes into the bracket, 2 on each side and anchored the brackets to the wall. I also used a (2) 1.5â³ wood screws to secure the under side of the shelf to the bracket.

Disclaimer: Please make sure with all your projects that you have read your equipmentâs safety manual and are following the recommended safety precautions. We are not responsible for the results of your DIY projects as results can vary based on skill level, materials, and equipment.
Via https://wickedhandy.net/corner-floating-shelves/
source http://wickedhandy1.weebly.com/blog/corner-floating-shelves
0 notes
Last Seen Blogs

jochumsenellis
The Love of Astrup 558

andyfaithlight
мой дневник преображения🕊️

diacomsky
Без названия

darkesteme
till human voices wake us
neryguzman
L o g o s | n g 7