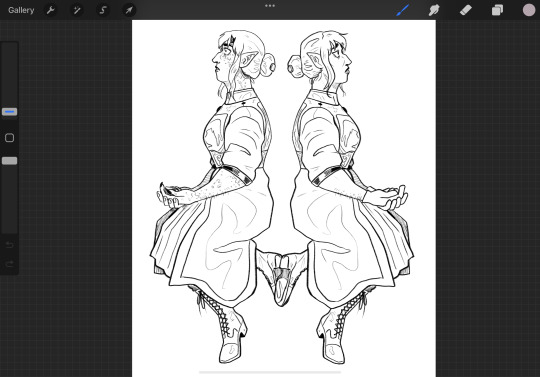
#the procreate app is too big for it lol
Text
sighs deeply.
i think i need a new ipad.
#my current one is... just... not... really working very well anymore...#slowly falling apart...#it keeps crashing = 3 = and i have no storage space lmao;;;#the procreate app is too big for it lol#so i might... need to... invest... in a new one...#sighs. why does everything need to cost mONEY#personal#txt posts#vent
68 notes
·
View notes
Note
Hiiii
Your work is soooo coolllllll!!!
If I may ask, what was your process in making the MM pants?
-XO
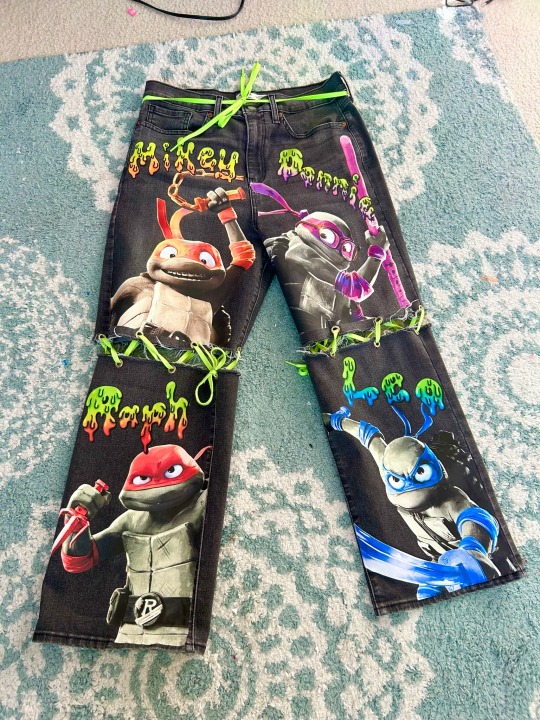
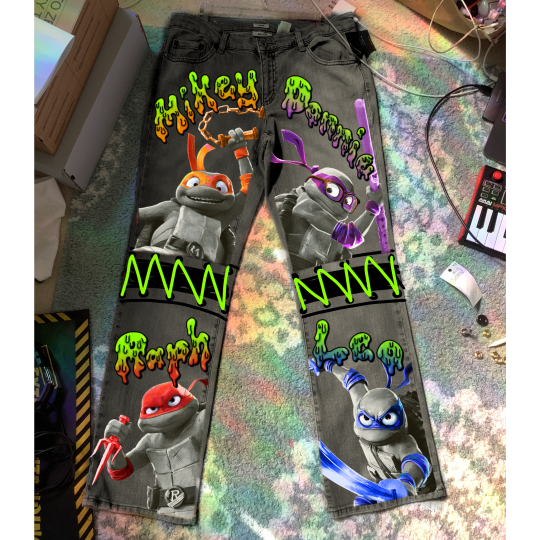
Hiii! Thank you so much!! And Great Question! I didn't take too many pictures of every single part of the process so this is going to be mostly words if that's ok 😅
but here's
How I Made The Mutant Mayhem Pants
First We Need Our Materials:
An Idea or A Drawing Of Your Design
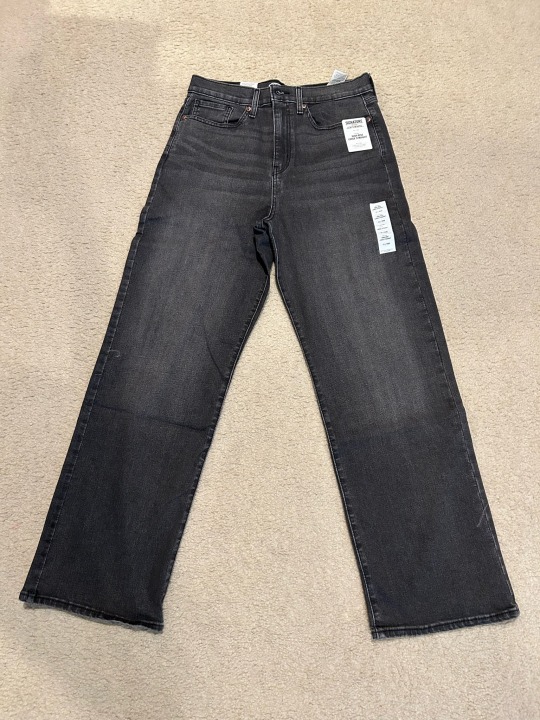
A nice pair of pants ( The wider the pants leg the more space for your design! So I personally prefer to not use skinny jeans but at the end of the day it's up to you! :D )
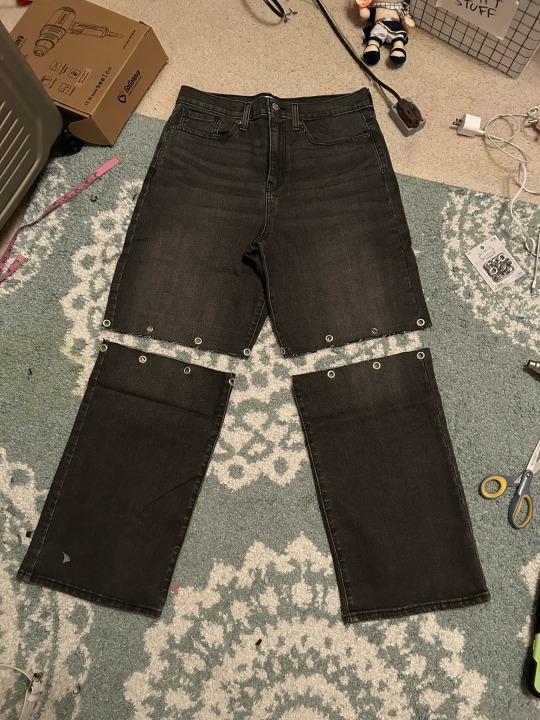
Eyelets
Heat Transfer Paper
Something Non permanent to mark your pants ( I used heat erasable fabric pens )
Scissors
Parchment Paper
Clothing Iron
Shoelaces ( or whatever you want to connect the pants like chains or ribbon or safety pins etc. )
Step 1: Design
I use the app Procreate on my iPad to design all my projects! I just take a picture of the piece of clothing whether it's shoes or clothes and edit/draw my design on top of it until I'm happy with it! ( which usually takes a really long time 🤣 these took me 14+ hours to design )
Also here's a secret tip I used for this project: I put a denim overlay over the gray parts of the design before printing it so that when I printed it on the pants it blended in perfectly with the denim jeans! You can't even tell it was printed on, it looks like it was always there!!
Step 2: Cutting the Pants!
Use the Non-Permanent Pen where you want the opening of the pants to be. ( if you're making them for yourself then you can always double check by trying them on before cutting them just to make sure that they're being cut in the right place! ☝️🏽 )
Then once the markings are good, cut the pants!
Step 3: Eyelets!
Once I had the pants cut, I marked where I wanted the eyelets to go with my non permanent pen. Then I added them in one by one! If you've never worked with eyelets before it's not that hard. You can find a bunch of tutorials on Youtube! That's what I did lol! There's NO SHAME in being a beginner! :D ( Also beginner tip: practice putting the eyelets in the scrap pieces of pants that you just cut off )
Step 4: Printing and Cutting out the design
Get your heat transfer paper and print whatever your design is with a printer! If you have a big design like mine I had to use 2 pieces of heat transfer paper for each turtle!
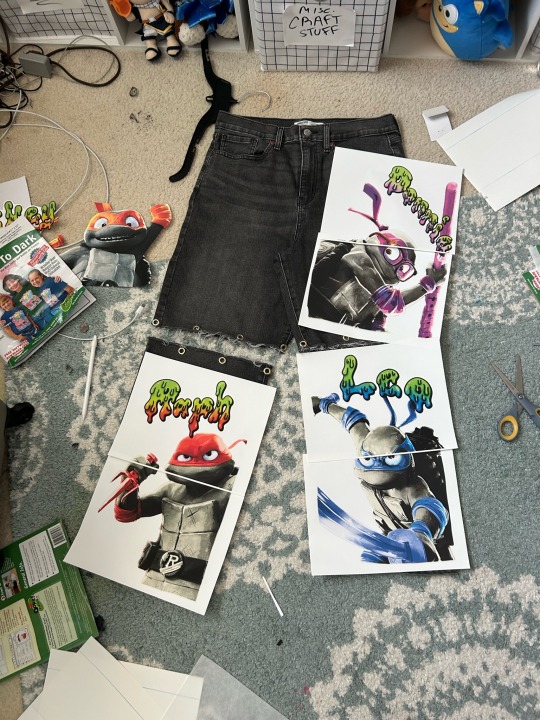
Then after I took this picture I cut them out! Then I sat them on the jeans again for a couple of minutes just to make sure that they were perfect and I didn't need to re-print them! ( also to make sure I liked the order they were in. I put my favorite 2 ninja turtles at the top so that if I wanted to remove the shoelaces and wear these pants as shorts I would only be left with my favorites...so sorry leo and raph 😅)
Step 5: Ironing Them On
Place the design where you want it, cover it with parchment paper, and then iron it on the highest setting with no steam! THE NO STEAM IS VERY IMPORTANT, PLZ DON'T FORGET TO DUMP THE WATER OUT OF THE IRON BEFOREHAND ☝️🏽
Step 6: Shoelaces
Put the Shoelaces ( or whatever you used to keep em together! :D ) inside the eyelets. Then I just tied them like I would tie a shoe but it doesn't really matter how you tie them as long as they're secure!
Step 7: Cry and Marvel at your astounding work
And there you have it!
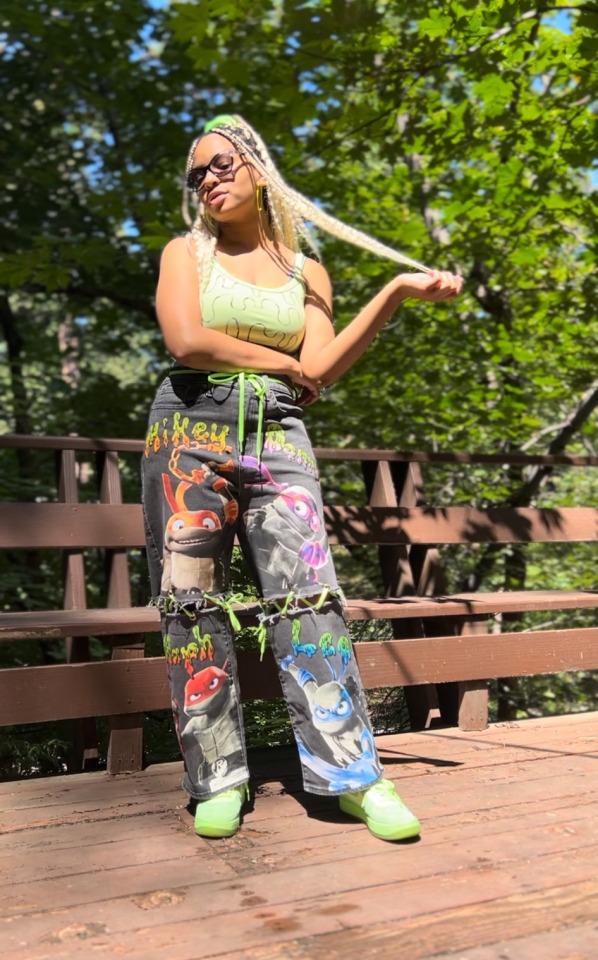
That how I made the Mutant Mayhem pants!!
Next time I do a project like these I'll take more pictures of every step, but until then I hope this was helpful!!
If ya ever make these or use this tutorial for anything plzzz tag me! I wanna see what ya make!! :DDD
And if there was any part of this tutorial you want me to elaborate on OR you know/found a better way to do some of the steps then please let me know!!! :D
#tutorial#crafts#handmade#tmnt mutant mayhem#mutant mayhem#teenage mutant ninja turtles#tmnt merch#art#custom#qna#fashion#tmnt#teenage mutant ninja turtles: mutant mayhem#bunnilime#my art
30 notes
·
View notes
Note
Hii Chy, I wanna ask since Christmas is coming up: What drawing software do you use/do you recommend? I use Krita, but would love to use something different.
And any plans for the festivities? I know Scratch would love a surprise gingerbread house 🤩
Hello! I use Procreate since it was the first drawing app I discovered when I was testing out tablets in the store years ago, so I have a soft spot for it. I recommend it! Procreate is also getting an animation maker soon too so I’m excited about that!
The only downside is that sometimes when resizing a image it either pixelate or blurs the drawing at times randomly. And depending on the size of your canvas you get limited layers (which I’m sure other drawing apps probably have this too, idk, this is just an main annoyance to me really).
For festivities, I’m a sucker for driving around looking at Christmas lights, so I’m excited to see those set up around my town soon. Also just making holidays treats this time of the year. Also I live is a small town that has a BIG Christmas/Holiday market every year, which is always fun!
The idea of making a Gingerbread house with Scratch would involve constantly trying to stop him from eating the house and little decorative sweets before it’s finished lol!!
#also I SAW YOUR SCRATCH POST HDHJFHJ#honestly I was so NERVOUS to reply with that ‘oh geez that’s me’ picture because I didn’t want to make you uncomfortable#but I’m relieved and happy I’m one of your favorite artists!!#💌 letters 💌#latifolia336
14 notes
·
View notes
Text

QA Episode 35 The Big Melt
Queen Aleena: “My children had few chances to simply enjoy themselves, so when the opportunity arose they took full advantage”
Sorry guys… I did a Christmas one in the summer… what was I thinking…
Just hear those sleigh bells jingling, ring tingle tingling too… LOL
Tools used: iPad gen 6, Apple Pencil gen 1, Procreate app
2 notes
·
View notes
Note
Hey dear, how are you? I just wanted you to know that your art is really amazing!!! if you have a taglist (or something) could you please tag me in your next BoB works? I just want to make sure I'm not missing out! Also, what kind of app/software do you use for your drawings? I have a Wacom pen tablet that I use mostly to make maps and cartography stuff, but nothing compared to your amazing arts hahaha and I found extremely difficult at first so I can only imagine the amount of work, practice and skills that it takes to come up with such amazing stuff like yours. Anyway take care!! lots of love <3
Hi! Omg thank you so much that’s so kind of you too say 💜 (I’m a big fan of your blog as well ;) )
I don’t have a taglist yet, but maybe gonna make one soon! But I will make sure to tag you in and band of brothers related stuff :)
Until very recently I always used the free program Autodesk sketchbook. It’s great for beginners but still has a lot of cool brushes and many functions. I used to draw on a old Lenovo laptop. Unfortunately a few months ago it completely gave up (it’s served me long and wel tho RIP🫡)
I saved up for a Apple tablet and bought the programs called Procreate. It’s €15 and unlike many other drawing programs just a one time payment and you can use it for the rest of your life! It’s really cool if you already have some digital art experience and your looking for something a little bit more fancy ✨
Also omg yess you’re right digital drawing is difficult hahaha, I have been drawing/painting since I was five but digital arts is like a whole other form of creating and you kinda have to re-learn everything you know😭 I still find working digitally very challenging haha
So just keep practicing, watching YouTube tutorials with tips and trick, and just drawing things you love! ❤️
(Sorry for the long reaction lol)
2 notes
·
View notes
Note
have you thought about a docked laptop setup? i have a lot of my own energy/disability issues and i'm looking into it for when i can upgrade. getting a good laptop that can do most things, but having the ability to dock it to an external gpu and a monitor setup when you want to do work or play big games at your desk is like. one of the better ways to get a split setup that lets you move to bed when you're low energy without much hassle
money's the main thang for sure. i have a solid desktop setup, so i don't really have to worry about performance or anything like that.
portability for digital art is a little tricky for me just 'cause i am very particular about how stuff feels. it's a sensory thing, and when it's off, drawing feels like 7000 pins in my wrist and arm (mentally) lol.
so if my brain is in cintiq mode, it's wanting everything sensory about my cintiq - how it feels to push the pen on the screen, how much glide/friction there is, etc. also cursor/hover stuff, which doesn't exist on the ipad i have.
it also does not help that my cintiq is a 13hd, so it uses wacom's lovely (awful) 3-in-1 cable, which is already finicky enough without daisychaining usb/hdmi extenders lol
so usually i'll just swap to my ipad, if the sensory overlords deem it acceptable. anddd that brings up the other nested issue:
my ipad is a 6th gen ipad, the first non-pro one that can use the pencil. it's at the point where i can't have another app open while drawing whether it's clip studio or procreate. it's just old and i've used the hell out of it. it also doesn't support hover, so another sensory problem.
honestly if i could afford it, i'd probably just get the biggest, newest ipad pro. it has hover capability and would be comparable to my cintiq size wise. i could use this w/astropad and be able to hop to and from my desk without issue for the most part. also the novelty of a new toy could help push me through the adjustment period of getting used to going back and forth lol.
i'd be able to use it more dependably for drawing wherever, as well as serving most needs i'd want out of a laptop.
buuuut i am still in a perpetual state of not being able to afford my basics, let alone think about any technological upgrades/changes. sooo i just have to tell my autistic ass to calm down and wait it out, hopefully i can address it before i die!! :D
(ty for the suggestion btw!! i hope you find something that works for you, too!)
3 notes
·
View notes
Text
posted this on twt but I’m gonna ask here too jic
does anyone have any recommendations for drawing apps that can handle a 24x36 canvas LOL… I only use Procreate but for class we need a canvas that big and I have no idea what to do since I’m horrible using other tablets and things like that 🥲🥲
0 notes
Photo
when i first started this show i had a dream that i went to summer camp and chat noir was there and these were his pjs
#i know this looks bad but i drew it as soon as i woke up so i wouldn't forget#he had big ole pink slippers too#also ignore the little doodles off to the side lol#chat noir#miraculous fanart#miraculous ladybug#miraculous lb#OH also i finally figured out how to upload my doodles from my ipad#its hell#i have to email myself and then upload it on my pc bc procreate will not let me export anything to any other app
581 notes
·
View notes
Text
ines asked me to post my first ipad/procreate timelapse. sooo.... decided to work on figuring out how i want to portray my special boy
def still treading learning curves in both respects
(the art i quickly referenced is by littleulvar; i was just trying to figure out the brush and its settings she said she uses — i tried to figure out how to crop this to just ed but gave up)
#edward elric#fmab#ipad pro#procreate#procreate app#fma fanart#fullmetal alchemist#procreate timelapse#digital art timelapse#wip by aeroknot#art by aeroknot#i forget the model’s name but obvi i took some liberties#also it didn’t record me flipping the canvas for some reason? but i know it did on another file i worked in? idk#maybe this file’s too big to record those steps so it just defaulted to not including them? lol again idk
9 notes
·
View notes
Text
Artist’s Spotlight - Steorie
Drum roll, please!! It is my great pleasure to introduce as our first artist interviewed in this new series, the one, the only, Steph aka @steorie! Do you want to know more about one of the most prolific artists in the fandom, the one behind several fandom-famous fanart (including our lovely icon)? Then wait no more! Enjoy her interview (and go follow her, in the odd chance you don’t already).
S: Ok, uhm, where to start? 😆 I’m a tattoo artist from Germany and try everything to get my studio going right now. Other than that I’m either reading or drawing in my free time. I’m boring like that.
GT: How did you become a tattoo artist?
S: Oh my, I kinda stumbled into this. I was very unhappy with my job back at the time and a friend of mine (who is heavily tattooed) said that if I can draw I could tattoo it too. (which isn’t all that easy in the end 😅) But yea, I went and started an apprenticeship in a studio for a few months, then quit my job and started working as a tattoo artist full time. And I’ve been doing that for a good 3 1/2 years now.
GT: Has it paid off?
S: Oh most definitely. One of the best decisions I’ve ever made. :)
GT: I gather you've always been artistic. Did you take any art classes or just practiced by yourself?
S: I never went to an art school. I just have always been drawing since I can remember. :) I love watching livestreams of other ppl drawing/creating things, though. I learnt a lot that way.
GT: Do you remember when you started doing fanart? Or at least doing it consciously?
S: Hmm, I think proper fanart that wasn’t some horrible doodles where no one could see what it was supposed to be, might be fanart for sailor moon and dragon ball. 😌 Think I was around 11/12? But I’m not really sure though. 😅
GT: Hahaha I'm sure your doodles were still great. But omg, two of my favorite animes! Who are your favourite characters on them?
S: Usagi and Rei. <3 their friendship was everything to me. I also love Vegeta! I have a soft spot for mean looking ppl with a big heart. ❤️
GT: Love Rei! I'm an Aries like her, so I had something to relate to her. And I love love love Vegeta, though my favorite is Trunks. But Vegebul remains one of my favorite ships.
Do you remember your first ships ever on any show?
S: Vegeta and Bulma are one of my all time fav OTPs. Also Seiya and Usagi are I think, my first ever ship, back when I didn’t even know what shipping was. 😆
GT: Nice to know we have two OTPs in common! What are some of your other ships? Do you still make fanart for them as well?
S: I dont have a lot of shows that im invested in THAT much that i have the urge to draw fanart for it. But im still madly in love with Agron and Nasir from the Starz Show Spartacus. (Everyone needs to watch this tbh!)
Another one of my first otps in a show are Michael and Maria from the original Roswell Show back in the 2000. They had the best chemistry too. :)
GT: How would you describe your fanart style?
S: Uh…oh my, let me think. 😆🤔I’m a big ol romantic deep down in my heart. lol I guess that shows in my style? Also I love bright colors. I want people to start smiling when they see my art. 🙈❤️
GT: I would say the colors definitely are your most easily recognizable attribute!
Walk us through your process, please.
S: I have to admit that I never do any sketches tbh. I just start directly with the lineart once I got inspired with an idea and go for it. I mostly do digital art. I work on an iPad Pro and use the procreate app. I have a lot of back and forth going on when I start to color. I use lots of different layers and settings and fool around with the colors and filters until I like what I see. Oh my gosh, I’m so bad at explaining. In the end I just BS my way through art and hope for the best.
GT: And what does inspire you? Where do you get your idea from?
S: I mostly get inspired by the show itself. But there are so many mindblowing fanfictions out there as well that constantly give me ideas. Also music and the lyrics of songs I love. :)
GT: How often do you start a new piece? And, on average, how long does it take you to complete it?
S: I usually don’t work on more than one piece at a time. I need to focus on one and don’t want to work on anything else before I finish the current drawing. I usually need a week, maybe two? Depends on how detailed the drawing is going to be, if I’m going to color it, if I will add a background and so on. :) My submission for the Gallavich zine (which you guys will hopefully hold in your hands soonish!) took me about 28 hours for example.
GT: Wow! That's dedication! And it shows.
Do you take prompts? What about commissions?
S: I don’t have enough time for requests. :( but I do take commissions from time to time if I can manage it next to my main job. :)
GT: What are some of your own favorite Gallavich fanarts?
S: Definitely the one you are using as an icon right now. And maybe one I did back in 2014 when I first started watching the show. It’s of them from season one, sharing a smoke in their winter coats. :)
GT: They're both great! And once more, thank you for letting me use your art as an icon.
What are some of the other people in the fandom you admire?
Anyone goes, not only here either, and not just artists.
S: You are very welcome. :))
Oh, there are so many talented people out who make the fandom such a special place. Let me think for a second.
Art wise I’m in love with Lulu‘s (@luluxa) painting. The way she colors her pieces is absolute art goals. So very impressive. Also she adds so many details and makes it such an experience to look at her art. Phenomenal!c❤️ I also adore Mitchell’s (@psychicskulldamage) art! His chibi comics are sooooo freaking adorable and funny! The style is also so unique and it brings me so much joy whenever he shares something new. ☺️💓
Another huge inspiration and talent I admire is Gray (@gallavichy). Her stories just go straight to my heart and I have taken a lot of inspiration for drawings from her stories. The emotions she inflicted in me with her writing is unbelievable.
There are so many more ppl who needs to be mentioned but these three immediately come to mind. :)
GT: When did you first start watching Shameless?
S: I started back in 2014, when season 4 aired.
GT: And what attracted you to Ian and Mickey's relationship?
S: Well, first of all, the chemistry between Noel and Cam is just sooo good and they are both so amazing together. It’s so much fun to see them together on screen. I fell in love with Ian and Mickey’s teasing, bickering and how they fought so hard at such a young age to be together, in whatever way they could be at certain times. The connection they shared, even if they were apart and couldn’t be with each other, it was always obvious to them that they were each other’s person though. And that fascinated me and I was in deep. :’)
GT: Did you join the fandom right away? How was the fandom back then different from now?
S: Omg it’s been so long. 😂 I was still very much into Spartacus at the time and only sloooooowly stepped into shameless. But the fandom was immediately so very welcoming and supportive, I was in deep quickly. lol I would say the fandom hasn’t changed much? At least from what I experienced. Still lots of amazing art, stories, discussions and memes going around, next to ppl fighting tooth and nail about certain topics. 😅 We are a lot of very passionate people, so it never gets boring. 😆❤️
GT: Truly.
You mentioned the fandom being welcoming and supportive. Have the comments on your art always been positive?
S: Surprisingly, yes! The art I made during s4-5 for shameless is still my most popular shameless related stuff, if we take a look at the notes at least. It really blew my mind.
GT: Let's go back to Shameless. What's your favorite season of the show?
S: I would have to say season 4. It was just phenomenal. From the acting, to the story telling, to the whole mood of the season. I was just so invested in everyone's storyline. Frank and his failing liver, Fiona in jail and how she endangered Liam, Debs slowly becoming a young woman, SHEILA, even Sammi was fun to watch and her storyline with Frank really got to me, how she showered him and was there to bring his drinking buddies from the alibi to Sheila’s house when he was too weak to make it there on his own. Of course I don’t have to mention how brilliant yet gut wrenching Ian and Mickey’s journey throughout the season was. Just chefs kiss on all fronts.
GT: I just love Sheila.
Do you have a favorite episode and/or scene?
S: I mean my fav episode has to be 10.12. :)
GT: I think we all collectively died when we watched that!
What did you think of the ending?
S: Tbh, yes. As far as it concerns only Mickey and Ian. (I didn’t like all the endless open endings for everyone else though) Their future looks so bright right now. I couldn’t ask for more. I’m sure they will have a good, sweet life together. <3
GT: Do you have any headcanons for their future?
S: I’m sure, they will expand their business as they mentioned in 11.10. Hire some guys, buy more cars and so on. I could imagine them each doing something different later on though and only function as the bosses of the transport business. I hope Ian can work in the EMT, nurse field again somehow? And as for Mickey, I could see him do more with his passion for art. Maybe he will work as a tattoo artist himself one day. 😆❤️
GT: I agree, I'd also love for Ian to go back to being an EMT, he was actually good at it. And hell yes to tattoo artist Mickey!
S: Other than that I think they will eventually move back to the South Side again, maybe buy a house? And I hope they are gonna travel together once their probation is over. See the world and everything it has to offer. :’) Maybe visit Mandy, wherever she is and then Fiona in Florida.
GT: I so wish they'd at least mentioned Mandy again!
If you could go back and change one thing in canon, what would it be?
S: I think I wouldn’t change anything? Well, obviously I wish I could undo any harm ever done to them, but that’s not how it works. Yea, I think I wouldn’t change a thing storytelling wise. I would have wanted to see them on THE date. No matter which season but it would have been some nice fanservice if they had shown them at sizzlers or something else on a date. ☺️
Okay wait.
Ian sleeping with that woman in season 7. Cause I think he was always sure about his sexuality and it was kind of unnecessary? (You could maybe link it back to his bipolar and him being kinda already a bit unbalanced after the fight with Caleb and maybe his meds didn’t work properly anymore, but even then I’m not that sure he would have done it?)
GT: What's the most challenging thing about creating fanart about them?
S: It’s the coloring for me. I can do lineart for hours and hours but once it’s time for color I’m like …lmao
GT: And what's the most fun part?
S: Oh definitely the hair.❤ I loooooove drawing hair. And Ian's and Mickey's are kinda unique, which makes it even more fun. 😊
GT: What are your favorite themes of tropes to draw?
S: Uh, I don’t have any? 😳
GT: Hahah, that's ok. Great, actually. But are there any themes or tropes you won't do?
S: Uh, I dunno…do you have examples of what kind of tropes are out there?😅
GT: Well, for instance, I know you didn't use to make smut art until very recently. What made you decide to go for it? (not that we're complaining)
S: Ah, i get it now. Well, I’m still very picky about nsfw stuff. I usually prefer to leave some things to the imagination, you know. But i kinda got bored a bit, drawing always the same kinda stuff and you can learn so much about anatomy if you draw ppl being intimate with each other! 😆 So yea,i learnt once again to never say never.
GT: Hahah
About about future works. Do you have any WIPs or ideas for future art?
S: I have a few things I wanna draw (but so little time.) I also work on a fun commission right now. If ppl are interested in WIPS or something like that, I sometimes post WIP stuff on my twitter. :)
GT: Nice to know!
Same as here right, @steorie?
S: Yes. :)
GT: Speaking of, I meant to ask you, why steorie? Is it a combination of your name and something else?
S: Haha yes, actually. 😅 it’s so lame. I always made a typo when writing my name on the keyboard when I was younger and Steph most often became Steo. The rie got added cause I liked the sound of it. 😂😂😂
GT: Well, it's definitely unique!
That's about it, love! Thank you so much for being the first in this series!
Leave a message to your numerous fans.
(I'm not joking btw)
S: Thank u so very much for reaching out and having this fun chat with me. :)
Just thanks to everyone for the constant support over the years. I read each and every tag and comment you guys leave on my stuff! Thank you, thank you! ♡
78 notes
·
View notes
Text
ibis paint x VS procreate VS clip studio paint ios review
DISCLAIMER: i’ve been using procreate since i got my ipad in 2020 while i just picked up ibis paint x yesterday. i have been using clip studio paint for desktop since ~2016, though i mostly use the desktop version over the ios version. this review will mostly be my first impressions of ibis paint x compared to procreate and csp for ios!
PROCREATE:
at this point, procreate is probably THE industry standard for ipad drawing programs. it’s got a very minimal layout designed for use on your ipad and lots of options for touch and gesture controls.
i find that procreate feels less like drawing on a display tablet and more like just drawing on an ipad if that makes sense? display tablets have a very specific feel to them when you use them with desktop programs, and procreate doesn’t have that same feeling to me. it’s very intuitive and you can definitely tell it’s designed FOR ipad.
THE PROS:
the layout
its simple, minimalistic layout is extremely accessible for the ipad specifically and once you get used to it, becomes easy and convenient to navigate (especially if you customize the settings to your liking)
THE BRUSHES!!
good god i could sing my praises for the default brushes all day long. to this day, i use a slightly revised version of the default HB pencil brush for EVERYTHING from sketching to coloring and refining.
in addition to the default brushes, which are relatively simple to customize and adjust in the brush editor, you can also import brushes other people have made into the software. since procreate is so widely used, it’s really easy to find some nice ones online!
tilt support with apple pencil
procreate is compatible with tilt support on your apple pencil, meaning that the way your apple pencil tilts impacts the brush’s effect on the canvas! notably, i use this like a normal pencil where i will hold the brush at a low angle as i’m drawing and shading to produce a less opaque and wider line (mimicking the effect you get when you use the side of the pencil tip as opposed to the point)
THE CONS:
limited amount of layers
depending on how big your canvas is, procreate limits the amount of layers you can use to prevent overloading your ipad. while i haven’t run into any problems with this since i merge my layers as i go, it’s an important factor to consider if you tend to do big complicated pieces with lots of layers. (on an 8x10″ 300DPI canvas, you can have up to 70 layers. if you were to make the canvas bigger, that number would noticeably go down)
ipad exclusive
you can ONLY download procreate on ipads, which means that if you have an android tablet or have a display tablet that hooks up to a computer, you’re out of luck.
cmyk support is slightly glitchy
while yes procreate DOES technically support cmyk mode, it’s not as straightforward as you’d expect. if you save a cmyk document as a PSD file with the layers intact, this results in a small white border around each of your layers. not entirely sure why it does this but it’s kind of annoying :/ (i am unsure whether they fixed this in any recent ios OR procreate updates though!)
TL;DR:
procreate is an overall excellent software to pick if you have an ipad! that’s not to say it doesn’t have its flaws, but overall it’s the industry standard for a reason.
IBIS PAINT X
while i’m a new user of this program, i gotta say i do like it a lot from what i’ve seen! ibis paint has two options on the app store: Ibis Paint and Ibis Paint X.
ibis paint is the free-to-use version, in which you can either pay to unlock the brushes OR watch ads to unlock them for a certain amount of time.
ibis paint x is the paid app, but it only cost ~$10 which is honestly not bad. i splurged on this version because i do NOT have the patience to watch ads for brushes LOL
i find that ibis paint definitely feels different than procreate. there’s a nice stabilizing feel to the brushes so they aren’t wobbly in any places, but i think you can turn that off too. in my opinion, this app feels more like a desktop app on a display tablet except condensed and optimized for ipad use!
(NOT like clip studio paint, where they basically took the entire desktop app and threw it on an ipad, making it feel very cluttered)

THE PROS:
brushes galore
oh my god there are so many cool brushes that feel very distinct and different from the procreate brushes?? these feel much more like the brushes you’d find on clip studio paint or paint tool sai almost. the stabilization, like i mentioned, is very nice as well! it feels very natural and doesn’t result in too much lag in the stroke like you see sometimes in other programs. it looks like you can also customize every brush to your liking, though i have not done any experimenting with that yet!
also, when you use a brush it shows the outline of that brush on the canvas wherever you use it, much like photoshop and clip studio paint for desktop!
no layer limit! (that i’ve found yet)
while if you make a large document the app gives you a small warning pop-up claiming that larger canvases result in more lag in the app, i have yet to see that lag in action with my usual 8x10″ 300DPI canvases.
THE CONS:
no tilt support
i think this is the main reason why this app feels more like a desktop app on a display tablet for me, because all the display tablets i’ve used have not had tilt support on them. this isn’t a huge world-shattering problem though imo? it’s just something to note when comparing the two softwares
i have no idea if this app supports imported brushes
since this app isn’t as widely used as procreate, i have no idea if it supports exporting and importing custom brushes. if it does, it might be kind of hard to find good brushes for it since it’s not as notorious as other drawing softwares out there
(i’m also unsure whether it even has cmyk support too!)
TL;DR:
this app is really great for what it is! it only costs 10 bucks on the app store to unlock all the brushes, but it offers a paid subscription to unlock more features. i haven’t felt the need to upgrade though since there is already so much packed into Ibis Paint X as is.
CLIP STUDIO PAINT IOS
i honestly only use csp for ios when i have to work out the perspective of a piece because the perspective rulers are RIDICULOUS in csp. however, i figured i’d throw it in the review since i do have experience with it! (mostly on desktop tho)
csp is my go-to software when drawing on desktop now because it is so much easier to use and so much handier than photoshop for illustration, since it was designed FOR comic/manga artists and illustrators specifically.
i find i don’t usually use this app for casual sketching though because it’s essentially the same as the desktop version, just shrunk down for an ipad. this makes the screen feel very cluttered and somewhat complicated to navigate since an ipad screen is so small. (especially since i rely a lot on keyboard shortcuts when using desktop csp, but most of the time do not have my bluetooth keyboard handy for my ipad)

THE PROS:
no layer limits!
again, unlike procreate, there’s no layer limit on here! i would imagine if you made an absurdly big file and then added a ton of layers to it, the performance of the app would be impacted since it’s not the desktop app, but other than that there are no restrictions!
RIDICULOUS perspective ruler
when i learned how to use the csp perspective ruler it changed my LIFE. easily the best part of csp by far. (with the addition of other assets created by others, it can be even easier to use too!)
3d models in the app
clip studio paint has a library of free-to-use 3d models you can access from the program, and then pose or change the angle of as you see fit. you can also download more from the online store!
lots of brush options
since many people use clip studio paint for desktop, there are so many options for custom brush packs, which iirc are all compatible with ios! (my personal recommendation is frenden’s 800 brush pack for 15 dollars)
if you know how to use the desktop app, you know how to use the ios app
like i mentioned before, the ios version is essentially the same as the desktop version with a few shortcuts for easy ipad access. (EXAMPLE: if you swipe to the right on the left side of the screen, you can access a small menu of keyboard shortcuts in case you don’t have access to a bluetooth keyboard)
THE CONS:
subscription-based service
unlike its desktop app, the ios app is a subscription-based service. CSP Pro is $4.99 per month, while EX is $8.99 per month. annually, Pro is $24.99 per year while EX is $71.99 per year. (csp for desktop is a one-time payment that goes on sale for 50% off basically every month)
really cluttered
there’s so much going on in the app that it can be sort of overwhelming, esp on an ipad’s smaller screen. there’s a lot of clicking the different menus open and closed because if you keep them constantly open they take up too much space on the screen, and give you very little drawing room.
no tilt support
again, i don’t think there’s tilt control on this app either. but it doesn’t severely impact the performance or feel of anything. it’s just something to keep in mind!
TL;DR:
i personally think that if you want to use clip studio paint you’re better off getting the desktop version since that is what it was designed for and also it’s only a one-time payment that goes on sale pretty often. but if you do a lot of perspective drawing on your ipad like i do, it’s handy to have!
11 notes
·
View notes
Note
hihi!! i thought you get better soon, don't rush yourself if you're not feeling well, okay? also, i just wanted to quickly ask what apps you use to make your headers and if you have any advice on making them? thank you and pls don't forget to take care of yourself!!
thank you dear 💖💖 i'm feeling a little better now so hopefully i'll be fully recovered tomorrow ☺️ and remember to take care of yourself too hihi
[cont. below]

and my headers... i use photoshop so would not recommend it to people if u have other options bc of the prices and ethicality .
i'm not too familiar with the go-to editing apps for mobile devices these days since i only rly use desktop to edit, i think procreate is a paid one? and for free ones the standard canva/picsart + phonto. for desktop pixlr, krita, and photopea, and canva as well honestly
i don't really know what to say about advice actually 😅. i guess it depends on what you're going for with your blog? if you need help with smth specific feel free to appear in my DMs lol i don't mind and i don't bite 😽
since i don't really have specific advice i guess i'll just list what i usually consider when i make my own headers, which is 1) making sure the title is readable (or at least that it's big enough to be noticeable) 2) choosing a color (or palette) that matches either the character or the tone of the fic 3) adding something related to fic plot in the design
but also that's just me! my old blog used to be cafe themed so i used to make all the headers look like menu's 😌 so you can totally theme headers around your blog aesthetic instead, or have reusable headers for every character! whatever floats your boat!!

7 notes
·
View notes
Text
Art Advice #4 - A Beginner’s Guide to Digital Art
Hi all!
This weeks entry into my Art Advice tag, where I offer various advice for artists of any skill level, is about digital art! Now, I am by no means an expert at digital (I’ve been doing it for nearly 8 years at this point and that is almost entirely self taught), but I have picked up a few pointers in that time which will hopefully help anyone just starting out!
(this blogpost is a little over 2000 words long btw)
A Beginner’s Guide to Digital Art
I know that the world of digital art has changed drastically in the 8 odd years since I started, but I’d still say that some of the options I started out with will be just as good for anyone who’s starting out now!
As always, I’ll be splitting this into sections to make it easier for you to navigate this post!
Part 1 - Equipment/Hardware
There are a lot of drawing tablet options on the market at the moment, and I’m not going to pretend that I know anything about half of them lol. But I think for a beginner, don’t worry about going for the most expensive option, even if the reviews are really good or your favourite artist uses it, especially if it is way above your budget!
An important thing to know is that there are two types of tablet. One is the plug-in kind. These are essentially a pad which you plug into your laptop or computer and draw on that whilst looking at the screen (they basically work the same way as a plug in mouse works). The other kind is the screen variety, which is a lot more like what most of us know as ‘tablets’ nowadays. And you draw directly onto the screen.
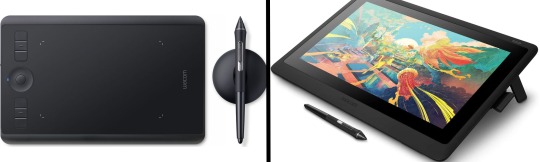
(a plug-in vs on screen tablet, both from Wacom)
Now, as for choosing between these, it is honestly a personal choice. But I’d say if you’re just wanting to try digital and you’re on a budget, a plug-in tablet can be really useful since it gets you used to the mechanics of what digital is like, and they are often significantly cheaper than the screen alternatives. I would say that plug-in tablets are a big learning curve, especially if you’re used to doing traditional stuff, but I do know a lot of professional artists who still use this kind of tablet when doing their work, so if it’s something you can get used to I would definitely consider it! Also, they’re often a lot more portable than some screen tablets! The first one I had was a Huion (a model so old that I can’t even find a link to it now lol), and I also know that Wacom are a well known brand that do some decent plug-in tablet. I’d recommend you do your own research on other brands and options, though!
Screen tablets are often a lot more expensive, but if you’re used to traditional art, they are a lot easier to get a handle of! But I know if you already have something like an iPad, or other general use tablets, then they offer apps that you can use to draw on (as well as things like the Apple pen, or other stylus’). The big difference between using these general tablets and ones specifically designed for drawing is pretty much purely a personal choice. I personally prefer the bigger screen of my XP-Pen tablet, along with a special screen protector that removes the shininess of the tablet screen and makes it feel more like ‘paper’ over when I used a general use tablet it draw. But if you already have an iPad, or something similar, then it’s honestly a really great starting point!
I think it’s important for me to mention that you don’t need fancy equipment to be an artist. The incredible Elicia Donze has revealed countless times how she has very basic equipment but still manages to produce the most stunning artworks! All you really need is some kind of drawing apparatus and a lot of patience lol! Getting good at any kind of art takes a lot of time and effort, but I would definitely say it’s worth it when you’re able to look back at your progress!
Part 2 - Software/Drawing Programs
Much like with the hardware discussion, choosing which program to use is entirely down to personal preference. I personally have never really liked Photoshop purely because it’s really complicated, but I know so many artists swear by it.
I think the main aspect to consider when you’re starting out is whether you want to pay for a program. Software like Photoshop, Clip Studio Paint and Procreate are some of the popular ones I hear about a lot of people using, but all require you to purchase or subscribe to them. So if you’re young or on a very tight budget, I’d honestly recommend the free alternative versions of these, such as Krita (Krita is quite a large program, but it has a lot of really awesome features and is very similar to Photoshop!), Gimp (this one is similar to Krita, but has slightly less options, I’d honestly recommend Gimp for anyone who does photo editing though!) or FireAlpaca (this is the one I use, by the way and it’s a pretty simple program, but has a lot of fantastic features and is perfect for how I work!). These don’t have as many features as some of the paid alternatives, but I honestly think all you really need to start digital art is some kind of ‘canvas’ and set of brushes!
Another great free program for beginners I’d recommend is MyPaint, which is great for doodling and just getting used to how digital art feels in comparison to traditional! It also has a bunch of ‘traditional style’ brushes, to make it look like charcoal or watercolour (which I’m sure the paid alternatives have too, but it’s always better when it’s free, I find lol...)

(this is an example of a drawing I did on MyPaint using the ‘charcoal’ effect brush!)
Most of the sites are pretty self explanatory, with sections dedicated to different brushes (I’ll go into the types of brushes later on in this post btw!), adjusting brush size, shape and opacity, a colour wheel, etc. You also have a section dedicated to ‘layers’ (another thing I’ll go into more detail later), and various ‘filters’ and editing options and effects you can add to your work to make it more interesting!
I’d really just recommend playing around with programs until you find your one!
Part 3 - The Pros of Digital Art!
I realise this section should probably earlier in this blog post lol, but I kinda wanted to go into what digital art can achieve in comparison to traditional art, and how beginner artists can utilise this!
I definitely didn’t take advantage of certain aspects of digital art when I first got into it, and they’re things that would have definitely made my life a whole lot easier lol!
Digital art allows you to tweak drawings as you do them. So if you accidentally drew the eye too far to the right, then you can easily move it to the right place. (I usually do this by selecting whichever area is wrong, cutting it out and then pasting it into a new area... And yes, there is probably a better and quick way of doing this but...I haven’t found that way yet lol...). And I honestly think that this has allowed me to look a lot more at a reference image in order to figure out where I’ve gone wrong with a drawing! Whereas with traditional art, I usually spend so long trying to get an eye right, that even if it’s slightly in the wrong place, I don’t want to completely redo that section. Digital allows you to completely rub out sections without leaving indents, which is honestly such a saving grace!
Another pro of digital is the Undo/Ctrl Z function! This means you can easily go back to before you made a major mistake with just a click of Ctrl Z... Though I have to say that this function has honestly ruined traditional art for me... Oh what wouldn’t I give for a real life Ctrl Z... But yeah, this is a great part of digital art and definitely something you will grow to love lol!
Another great thing about digital is that it allows you to flip and turn a canvas as you’re drawing on it. I spent a lot of time trying to turn my tablet around in order to draw certain parts of a piece before I realised you can turn the canvas itself without having to move yourself or your tablet!
Layers are another part of digital that can be super useful, and I have to be honest but I don’t really use them a lot. I know a lot of artists create layers for every section of their artworks (so, one for the linework, one for colouring, a separate one for the background, etc etc...). And there’s something really great about being able to paint without worrying about smudging into a previous section of the painting. This works well for my work since I do a lot of bright backgrounds. I also often create a lot of ‘versions’ of my works, so it’s useful to be able to change the background without affecting the main figure of the piece! (I have to say that I often work in one big layer when I’m doing paintings, just because I like how it feels more like ‘traditional’ art that way, but layers are such a brilliant tool, and definitely something you should play around with!)
The eyedropper tool is another one that is really useful! Although I never colour pick from my reference photos, I know some artists find this useful when they were just starting out (especially if you’re not sure what colour to make shadows or how to mix skin tones, etc etc). The eyedropper basically means you don’t need to mix your colours every time
Part 4 - Just some other things I wish I had known about when I was starting out lol...
This last section is just dedicated to a few things that I would have liked to have known when I was just starting out all those years ago.
First one is fluffy/textured brushes!
I spent most of my art life from 2013 until 2016 using ‘round’ brushes which are notoriously hard to blend with, so I’d recommend either downloading some fluffy/textured brushes (DeviantArt was where I got mine from a few years back, but there are probably other places you can get them for free too!) to your program of choice, since most of the programs I’ve used haven’t had fluffy/textured brushes as pre-set.
I may make another post about how I blend in my artworks if that’s something people would be interested in?
(this is an example of textured brush blending vs round brush blending... I usually opt for round brushes for rougher blending styles and the textured brushes for more smooth and ‘realistic’ blending... for a lot of pieces, though, I use both brushes (the round brushes are good for details!) in the same way that you use different sized brushes for real paintings!)
The next thing I wish I’d discovered earlier is the Brush Stabiliser option. Some programs may do this automatically, but the one I use (FireAlpaca) requires you to manually change the amount of stabilising you have on your brush. This is particularly useful if you want to draw neat lines or straight lines (the stabiliser essentially slows down the ‘ink’ as you’re drawing). I only recently started using the stabiliser, and although I still like having it mostly turned ‘off’ for doing sketchy work, it does make doing line work a lot easier, and also gives pieces a more polished look!
Next advice is to explore all the options you can in whatever program you use!
I feel like with certain programs, you can get overwhelmed by choice and you end up just using a few of the functions. But I’d really recommend just playing around with these programs, trying all the filters and editing options to get used to how the program works. You can often find interesting ways to adjust your artworks this way! In a way I’d recommend this way of working more than finding tutorials made by other people... Unless there’s a specific function you want to learn how to do, just having fun with digital art is a major part of it’s appeal to me!
~
There are probably a lot of other options I could go into, but this is already over 2000 words long, so I’ll leave it here for now lol! (I may do a part 2 though so... keep a look out for that!)
As always, if you have any questions to things I’ve said here, or are just looking for more advice, don’t hesitate to message me!
And if you like my work on here (art & blog posts) feel free to support me on my Ko-Fi! <3
#art advice#digital art#art advice for beginners#digital art for beginners#artist advice#digital art tips#artists on tumblr#just want to say again that i am not an expert at this at ALL lol#i just want to offer some really basic advice to anyone interested in starting out with digital!
101 notes
·
View notes
Note
How did you learn to use procreate? 🥺 It seems so difficult or I’m just dumb LOL. Have you watched any tutorials on how to use that app. I love your art work btw xx
Hi ! Omg this is a big question..
Ok so at the beginning I also felt that it was suppperrr difficult to use even though I was painting/drawing for a couple of years. The medium is completely different so it takes time to adjust.
For me what overwhelmed me was the big blank canvas, and the amount of features available.. like where the helll do you start! But I’ve picked up a few things along the way.
Firstly, I worked on the procreate phone app on my iPhone and a stylus from Amazon. I didn’t want to commit to an iPad without figuring out if digital drawing is for me. So I worked on that for 2 months. This allowed me to understand the interface and the features it had. Anything I did not understand, i used a YouTube tutorial. Reddit was also a useful resource if I wanted to improve technique or find resources. I’ve seen people recommend reading the procreate handbook which contains an in-depth analysis of all the features available.
Once you have a good knowledge of the app you can apply this to the digital canvas. I’d say use a reference picture and try to draw a basic outline of it with a basic round brush and block in the main colours. Also Use your creativity too and allow yourself to paint whatever you want. If you feel like you’re thinking too much about it (this happens) try doing it when you’re a little tired, your mind will feel a little more free and you can be present and draw.
Tiktok is a good resource as there are loads of digital artists on there. You can Watch time lapses of digital artists on YouTube. This way you can understand how a digital artist creates an image and the different details that go into it.
Ok and also you’re not going to be able to make a masterpiece without warming up. I actually learnt this very recently. So to tackle this I’ve been doing warm up exercises for both practice and improving my technique. This will allow you to become comfortable with creating shapes/drawing lines which is the foundation of every single drawing. I used this YouTube tutorial https://youtu.be/35rju_APLqQ to warm up. It’s really good to get into the mood of drawing and improves your skill.
I also think that digital drawing is linked to your physical drawing. This means if you improve your physical drawing skills with a simple pencil n paper you will see more improvement in your digital art. The biggest thing I recommend is to start drawing things you can see. A mug on your desk, your lamp, a tree in the garden. Sketch as much as you can. Literally the foundation of a good digital drawing is a good first sketch. If you neglect this your final piece will probably look. A little off even if you use the right colours/brushes etc.
I do a first underlay painting in a bright colour .. it reminds me a lot of the technique that oil painters use. This way I can build my detail. Then I use another layer to add detail. I always use the colour dropper to find colours on the reference picture. I use several diff shades to make it pop. Also as it can be tiring I like to work in 20min- 30 min slots. So I try get some detail in. Then work on it another day so I can see what needs more work. This way u can build a detailed picture without tiring urself.
Once you start practicing all of these things, you can tailor your art style but in the beginning I’d say keep your mind open. Look at different types of art, there’s line art , you can replicate oil paintings/acrylic paintings etc. there’s basically a tonnn of freedom w digital painting because you have unlimited resources at your hands.
Also I’d say download new brushes and create something. This pushes u out of the comfortable brushes u use.
Now all of this can be overwhelming at first but as you master one brush/one feature over time things become a little easier.
In addition to learning all this, I’d say follow digital artists on Instagram. Often they post tutorials and you can get a glimpse into their work.
Other tips I’ve used to make my work better is
1. Use a lower opacity on the brush to create more detail. Depending on what style you’re drawing when u have more shades of colours/more brush strokes it gives it way more depth
2. Use light and dark to make your work pop.
3. Consider your palette - warm tones and cooler tones always look good together.
4. If you’re creating a digital painting don’t use black. Instead use a colour above it? Black can have a tendency to look flat so when u use a let’s say dark brown.. it looks more realistic as not many things are completely black rather it is an assortment of shades.
5. Use the editing feature. If u look at ur painting n u think it doesn’t look good. U can amend the colours/shape on the adjustments bit of the app.
6. Participate in art challenges/ build an Instagram portfolio. You can meet like minded ppl and it will inspire u to continue improving your skill.
There is a lot to it imo.. digital art is not any easier than physical art but. Stick to it. U will see lots of improvement if u do a little bit each day, or each week!! It is definitely hard at the beginning but like any skill when u put time and practice into it u will see improvement.
If u are struggling to understand theory, I’d recommend doing an art course online or in person. This way u are being guided by an expert rather than just self learning. Art has a lot of theory in it and it can be difficult to grasp it all especially if u are teaching yourself.
I think that is everything. There is also a tiktokker I recommend. He is SUPER good and offers practical advice. His advice has helped me shed a lot of anxiety ab my art recently. Their @ is @handmouthdancer . Really recommend them!!
Ok if u have any more questions let me know. I love art n I love speaking about it !
#my MAIN advice is practice But don’t Neglect Theory#sjdjdjd smh I wrote sm n now I need to make Lunch.
7 notes
·
View notes
Note
I used to want to be an artist but then i stopped drawing for like 7 years. I want to go back but i'm scared and dont know where to start. So yes, i am interested in those drawing videos can you post them if you dont mind? ^_^
Of course!! I am in the same situation as you actually. I used to draw a lot in middle school (2010-2012) but my depression worsened during high school and in college, I’d only draw as a distraction, never seeking to study or improve. I decided to get back this year, since I decided drawing was the only thing I could see myself doing professionally. I felt very lost, because how do you get back? How do you know what’s your actual, current, art skill? What are your weaknesses? Your strong points?
That’s how I learned to study the fundmentals of art. Because visual art is not a skill. It is a set of skills, if you are very good at anatomy but not really when coming to painting your art is going to look differently than someone who learned anatomy in how to draw manga books but paint like a pro. I am going to divide this post in categories, Also, all the videos I link I also recommend all the channels they are from! My favorites are The Drawing Database, Sycra and Ganev, Sycra and The Drawing Databse have a little of everything and are great at explaining. Ganev is a bit sarcastic but I like the way he teaches. I took some parts of the text of this post from here.
How do I begin?
How do you even get back at art? What tips should you use? These are general tips videos, usually nice to draw along.
/the fundmentals and how to get started/ /5 tips for better drawing/ /perfect pratice/ /beginner’s guide/ /5 tips for digital art/ /10 tips to improve/ /why your drawings are stiff/ /what level is your art/ /improve your art fast/ /drawing basics/ /how to hold and control your pencil/ /intuitive drawing method/ /iterative drawing/
The Fundamentals: Proportion & Placement
Proportion is relationship between one element and another.
In the visual arts proportion relates most importantly to the abstract quality of scale and placement. You know how stereotypically an artists puts a pencil to their eye when looking at an object? They’re mesuring the proportion of the object in question and how to represent it corectly in the drawing.
/principles of proportion/ /ways to create illusion of space/ /drawing the human figure/
/how to draw proportions playlist/ /how to use proportion in character design/ /basic anatomy and proportions part one/ /part two/ /part three/ /part four/ /proportion basics/
Form & Construction
The idea of form is how we see the 3D objects in or world and transform them into 2D in the paper/canvas. It’s understading that eveyrthing is made up of basic forms.
/dynamic sketching part one/ /part two/ /how to draw forms/ /structure/ /building form/ /another how to draw forms/ /how to visualize 3D forms/ /form study process/
Perspective & Depth
Perspective is knowing that as things move away from the viewer’s eye, things seem to get smaller. Get familiarized with terms like horizon line and vanishing point. This is the basic that must be understood to learn perspective.
Here’s a good article about this.
/an intro video on the subject/ /step by step tutorial/ /perspective basics part one/ /part two/ /part three/ /part four/ part five /part six/ /another basics video/ /20 perspective lessons/ /eye level tip/ /linear perspective/ /simple form perspective/ /drawing the figure in perspective/
Anatomy
Anatomy is something I think it’s one the most crucials things to learn in order to make your drawing look good. Once you understand how joints work you’ll be able to see how bones and muscles move. And this goes for anything with a skeleton. It’s one of those things of you learn the rules before breaking them. I am linking different playlists, since linking different videos on various parts of anatomy would take forever. Just study a body part at time: head, eyes, nose, lips, ears, shoulders, neck, hairline, breats, torso, hands, feet etc.
/how to do an anatomy tracing/ /playlist 1 / /draw the head from any angle/ /anatomy for artists/ /draw facial features/ /how to draw and paint/ /playlist 2/ /draw 3/4 head with loomis method/ /playlist 3/ /drawing a head in 3 hours (this one is great to draw along with the artist)/ /how to draw a body/ draw a head with loomis method part 1/ /part 2/ /part 3/ /decipgering bridgman’s anatomy/ /anatomy quick tips/
Gesture
Gesture drawing is a method of capturing figures in exaggerated poses, usually drawn quickly. It is important to undersand that the goal of all gesture is to study the figure and see how it moves. I like looking at poses and copying them. Here’s a good article.
/how to draw gesture/ /how to draw any pose/ /draw interesting poses/ /a guide on gesture drawing/ /tips for expressive dynamic poses/ /figure drawing tips/
Composition
The overall layout of a piece is very important. Artists often consider things like the rule of thirds or the infamous golden ratio. Neither truly defines a composition, but they can both go into your decision making.
/composition in art/ /understanding composition/ /10 composition tips/ /beginner’s guide to composition/ /art fundamental: composition/
Value
Studying value is very much the study of light and shadow. But there is a technical side of light that you’ll want to pay attention to if you’re going for technical rendering.
/guide on rendering/ /seeing light and shadows in daily life/ /10 minutes to a better painting/ /understaing colors and values/ /shading basics/ /ambient occlusion/ /shadow colors/ /tips on how to shade/ /draw shadows on objects and people/ /lighting tutorial/
Color Theory
Color theory is understanding which colors go good with eachother, and knowing the pyschology behind it. (what are cool colors? what colors make someone feel comfortable?) It is fundamental in art for you to understand the relationship between colors and what makes them look good. Best color theory books. A comprehensive guide to color theory.
/hue value saturation in photoshop/ /color theory for noobs/ /understanding color/ /what you should know about colors/ /warm and cool colors/ /the basic elements/ /choose colors that work/
Traditional Media
If you draw in traditional media, all videos above can be used easily. These are just videos for general tips in traditional media, there isn’t many since my focus is digtal ^^’
/watercolor tips/ /draw with colored pencils/ /blending colored pencils/
/4 how to draw lessons/ /Block in colors/ /holding the brush/ /
Digital Media
Digital art is how everyone’s been doing art these days. It doesn’t matter if you’re doing with your phone or your computer. I don’t do art on my phone, I know the most used app is mediabang for android and procreate for apple, and I think anyone who is able to do art with their finger is very skilled. If you are like me and prefer doing art on your computer, you probably have your tablet. If not, well you should have. Not having a tablet is not an option if you want to get better at art ^^’ Best tablet for beginners in 2020. Or you can just buy an old used one, if it still works, and you are a beginner, a small intuos is all you need. When talking about softwares, the three big ones I see people using are: Photoshop, Clip Paint Studio and Paint Tool Sai. The best one is CPS, but I find Sai easier to navigate, but CPS is extremely complete and I hope to be able to master it someday. CPS Tutorials. I don’t have much to say about photoshop, people use it mostly because they’ve been using it forever lol I divide my digital painting process in steps: Sketch/Lineart/Color Blocking/Shading/Blending/Color correction.
Sketch is the basics, draw your idea. Lineart is to clean your sketch. Color Blocking is to color your drawing one color, so it’s easier to work in it. Shading is to understand where the lighting sources are coming from and apply them. Blending is to blend the colors of your drawing with brushes. Color correction is when I use filters of hue/saturation and others to make the drawing more appealing. These require understadings of the software of your choice which I am not very good at the moment so I can’t give you more tips than that ^^’ Hopefully these videos can help.
/perspective grid/ /clean line art/ /coloring process/ /make lineart interesting/ /best brushes for digital painting/ /skin shading tutorial/ /lineart vs painting/ /art in clip studio paint/ /hair tutorial/ /3 tips for improving/ /10 digital art mistakes/ /color block tutorial/ /shading skin/ /from lineart to painting/ /cleaner lineart/ /add texture to your art/ /improve your art with better shadows/ /the importance of brushes/ /use layer modes/ /improve your lines/ /how to blend colors/ /another blending tutorial/ /color blocking/
Exercises
It’s no secret that to improve on art, you must pratice. Everyday, even if it’s just a little! A great way to pratice is make use of youtube picture in picture function to draw along in your software of choice.
/pratice drawing forms/ /proportion exercises/ /perspective exercises/ /value studies/ /creative drawing exercises/ /simple drawing esercises/
Resources
Senshi stocks, a deviantart page full of poses photos.
Quick poses, pictures of models, contains nudes.
Character design references
DesignDoll, create a personalized sketch doll and make it pose.
Phew!!! This took forever to make and is way more than you asked for, but I decided to go all in so I can have a masterpost for me too and for anyone else interested in art. As soon you can understand the fundamentals, you can do your own research and study, youtube is really great for this. I hope this helps, let’s get better at drawing together!!! Ganbarimashou (ง •̀_•́)ง
#anon#askbox#I feel there's a lot more to add but I'm tired I've been working on this sicne yesterday ^^'#Like there's more softwares and resources I could link you I know of that#So when I think of something else I may add to this psot#post#if you feel overwhelmed because this is a lot of info you can start with the beginner section of this psot#and sycra's channel
85 notes
·
View notes
Note
Hi I was wondering if you have any recommendations for tablets and stuff for someone interested in getting in to digital art. I really love your art and idk just wanted some advice from some so talented
Aaah you’re so sweet, I’m so happy you enjoy my work and flattered you’d want to ask me for advice/recommendations! I can give you a quick rundown on what equipment I’ve used over the years if it helps-it’s not a super long list haha, I basically used the exact same thing for years lol
So my first ever drawing tablet was the Wacom Bamboo fun tablet (pictured below!), which I received as a Christmas gift when I was around 13 I believe! And I basically used that baby for about 10 years for all my digital drawing Akshsj

And it held up! *pats the silver tablet fondly* I remember jokingly calling it Ol’ Reliable to my Illustration classmates back in college when I told them how long I’d had the thing lol
Can’t remember having any outstanding problems with it the whole time I used it-only the occasional inconvenience of having to reinstall drivers for it if I got a new laptop or if I was having troubles with Paint Tool Sai (which was my primary drawing program for a majority of those years as well, along with occasionally dabbling in Clip Studio Paint)
I remember Wacom brand pen tablets being pretty good for beginners, especially price wise-though again, I’ve had mine for 10+ years so I’m not sure about their price margins today and how they might compare. I’d def recommend doing some research and seeing if any of the current models look like they’d work for you, or maybe look into some pen tablet alternatives besides the wacom brand-they’ve definitely had some competition on the scene in the past couple years that might work better for you! (I’ve heard good things about Huion tablets, mostly through word of mouth, but that might be a good alternative! Can’t give my full rec on it since I’ve never used one, but it could be something to look into!)
If you’re looking into any art programs to use, as I mentioned above I used Paint Tool Sai as my primary program for many years! I have extremely fond memories of it and still think of it as a great art program-it’s around $50 if I remember correctly? And definitely worth it in my opinion. The other program I mentioned above was Clip Studio Paint-also an amazing digital art program, and very robust! It has tons of amazing features, but it’s definitely on the pricier end (pricing will depend on which version you get too)-the silver lining for this program though is that the website/developers host amazing sales periodically throughout the year and you can get the program at a great discount! That’s how I snagged my copy, so if you look into and it seems like a program you’d like to use, definitely keep an eye out for those sales! 🙌
Now after close to 10 years of using my Wacom Bamboo fun, I finally decided it was time to upgrade-so I made the jump to the iPad! That’s what I use for basically all my work now a days, along with Procreate (an amazing art program on the iPad, can’t recommend it enough) and the Clip Studio Paint app! Unless you already have an iPad though, I wouldn’t recommend it as a beginners set up since an iPad+Apple Pencil is a big price commitment upfront-but I thought I’d mention it if you were curious on what I currently use!
This turned into a bit of a ramble, but I hope you can find use in some of it! Wishing you all the best on your future digital art endeavors, and rooting for you all the way! 😊 🙏
#asked and answered#art queries#this ended up long but I hope it was a little bit helpful!#if you do happen to already have an iPad and don’t mind getting an Apple Pencil/or a cheaper pen equivelent-#then I really can’t recommend procreate enough! I use it for basically all my art now and it was only like $10?#an absolute steal for the wealth of features it provides 👏#and if anyone’s got any other questions about my art/process/experiences please feel free to ask! 😊 🙏#I’d love to help if I can!
10 notes
·
View notes
Last Seen Blogs

thuocnamtrieuhoa
ThuocNamTrieuHoa.vn
diepvuonghy
Hy dở hơi

tik3d
Untitled
tik3d
Untitled
how-the-feathers-have-fallen
Icarus' Burning Nest