#top android tutorials
Explore tagged Tumblr posts
Visit Tumblr Blog
Explore Tumblr blogs with no restrictions, modern design and the best experience.
Last Seen Tumblr Blogs


Fun Fact
Forty percent of Tumblr users are between the ages of 18 to 25.
Text
Top Free Gaming Launchers on Android – Organize Your Games Like a Pro!
If you’re a fan of gaming on your Android device, you know that managing your emulators, games, and apps can get messy. That’s where game launchers come in! These frontends act as a central hub for all your games, making it easy to organize, launch, and customize your gaming experience. The best part? Today, we’re focusing exclusively on free game launchers — meaning no subscriptions, no in-app…
0 notes
Text

a rundown on the listed e-sim platforms from this tweet from mirna el helbawi. visit esimsforgaza to learn about this effort. (they also have a tutorial on how to purchase an esim and send it to them)
update v12 (5/21/24) holafly (israel and egypt), nomad (regional middle east), simly (palestine and middle east), mogo (israel), and airalo (discover) are currently in the highest in demand. if it has been more than 3 weeks since you initially sent your esim and your esim has not been activated, you can reforward your original email with the expiration date in the subject line. you can see gothhabiba’s guide for how to tell if your esims have been activated. if your esim has expired without use, you can contact customer service to renew or replace it.
troubleshooting hint 1: if you are trying to pay through paypal, make sure you have pop-ups enabled! otherwise the payment window won't be able to appear. (this issue most frequently seems to occur with nomad)
troubleshooting hint 2: if you are trying to purchase an esim using the provider's app, it may block you from purchasing if your phone does not fit the requirements to install and use their esims. use their website in your browser instead and this problem should go away.
nomad
for the month of may, first time referrals give 25% off for a person's first purchase and 25% off the referrer's next purchase! it's a great time to use someone's referral code from the notes if you are a first time buyer.
you can use a referral code to get $3 off your first purchase and also make it so the person whose code you used can buy more esims for gaza. many people have been leaving their referral codes in the replies of this post and supposedly a referral code may eventually reach capacity so just keep trying until you find one that works! BACKPACKNOMAD is another code to get $3 off your first purchase, it's been working for some people but not others so try out a referral code instead if you can't get it to work. NOMADCNG is a code for 5% off any middle east region nomad esims posted by connecting gaza. it can be used on any purchase, not just your first but is generally going to give less off than the first-purchase only codes, so use those first. it can be used in combination with nomad points. AWESOME NEW CODE: nomad esim discount code for 75% off any plan, NOMADCS25 do not know how long it lasts but this is an amazing deal esp. since they are really low on esims right now! (nomad promo codes do not work on plans that are already on sale, unlimited plans, and plans under $5)
weekly tuesdays only code on nomad web, PST timezone! it gives 10% off plans 10gb and above. NOMADTUE
nomad also seems to be kind of sluggish sometimes when it comes to sending out emails with the codes. you can look for them manually by going to manage -> manage plans -> the plan you purchased -> installation instruction and scroll down to install esim via QR code or manual input then select QR code to find the QR code which you can screenshot and email to them. often just the act of logging back into your nomad account after purchase seems to cause the email with the code to come through though.
mogo
mogo's website is fucking annoying to navigate and i couldn't find any promo codes, but their prices are massively on sale anyway. you have to pick if you want your esim to be for iphone, ipad, or android for some reason. according to statcounter, android makes up approx. 75% of mobile markets in palestine while iphone represents approx. 25%. so i would probably recommend prioritizing donations of android esims but if you can afford multiple, try buying an iphone one too? if i can find any official direction from the connecting gaza crew on this i will update with it.
a good referral code to use for mogo is 8R29F9. the way things are worded are confusing but as far as i can tell, if you use it we both get a 10% discount on your first purchase. (the referrer gets a 10% voucher that allows them to top up in use esims, they are someone who i know has bought a lot of esims and will be able to make good use of the top-up discount vouchers!) also upon signing up it automatically generates a password for you which you can change by downloading the app. (check your email to find your account's current password)
holafly (also looking for holafly esims for egypt now)
holafly is pricier than the others and the only promo code i could find was ESIMNOW for 7% off. someone in the tags mentioned GETESIM7 as another 7% off code they had received, so if you have already used ESIMNOW or can't seem to get it to work, try GETESIM7. another 7% off code is HOLAXSUMMER7 which is valid until june 2nd. referral codes only seem to give 5% off and they don't stack. (i don't remember the source, it was on some sketchy coupon site i don't want to link to and only can recommend because i tried it myself) you can also use my referral link for 5% off if you can afford the 2% worse deal on your end, it will give me $5 credit which i can put towards buying more esims. connecting gaza has also posted the promo code HOLACNG for 5% off but since it is less than the 7% off codes and as far as i can tell does not give credit towards others to buy esims like the referral links, i would consider it lower priority for use.
simly (note: simly must be downloaded as an app to be used, the website link is to help people confirm they are downloading the right app)
i have not personally used simly so i am going to be going off of the sixth slide of mirna el helbawi's instagram guide, with some corrections from someone who has successfully purchased an esim from simly. after downloading the app and making an account, search for palestine or middle east and purchase your preferred package. the page the app takes you to after your purchase should have the QR code to send to the esimsforgaza email, it won't show up in your email receipt. someone kindly left her referral code in the tags of this post, it gives $3 off your first purchase and will give her $3 credit to put towards purchasing more esims for gaza. the code is CIWA2. (if this referral code doesn't work, try one from the notes of this post!) according to someone in the notes, ARB is a simly promo code for 25% off esims that is still working as of march 3rd.
airalo
some people have noted issues trying to sign up for airalo using the browser version of the website, it worked for me but if you are struggling you can give the mobile app a try and that should work. you can use a referral code to get $3 off your first purchase and give the code suppler a $3 credit for buying more esims. KARINA9661 is a code sourced from this post which is also a wonderful example of how using people's referral codes can really make a difference. if for some reason that referral code isn't working, you can find more in the notes of the original esim post i made here.
@/fairuzfan also has a tag of esim referral codes for various platforms!
(note: mogo and holafly both link to israel esims as there are no general regional packages for the middle east like on nomad and the esims for gaza website specifically linked to the israel package on mogo, so i linked to the equivalent on holafly.)
#esims for gaza#esims#gaza#palestine#free palestine#connecting gaza#despite not having used simly myself i'm fairly experienced with esim services at this point so i will likely be able to answer some#questions and i also have someone familiar with simly i can ask if i am not sure of the answer myself. so please go ahead and ask questions#if you're struggling with donating an esim from any of these sources!
6K notes
·
View notes
Note
Got any tips in shading stuff in black and white digitally?
Hi Anon!
You're in luck! I'm currently wrapping up a book which is shaded digitally, so I've been thinking a lot about this recently.
How I do this is by no means the only way, so take from these tips as much or little as you want! When I add grays and shadows to a line art drawing, I try to think about these things:
Preparing the image
I like to work with a file that has a white background and a layer with only line art on top of it. Between these two layers I add new layers where I use the pen tool and bucket to fill areas with black, then I lower the opacity for that layer to get a value that I want.


This method works well for me, and for simpler pieces I don't need more than 3 layers with different values - light, medium and dark grays.
I work in Clip Studio. Here's a picture of the layers of a recent drawing. Each layer is actually completely black but you can see the opacity percentages by each layer. Lower percentage -> brighter value. This makes it super duper easy to change the value of a layer, no need to repaint it, just change the opacity!

Value composition
For the best result, do a couple of value sketches with a limited set of values and find something that works well for the image. Getting the values right is what will improve the image the most! Here's a quick tutorial on muddycolors. Muddy Colors is a very nice art blog to check out. Looking at grayscale storyboard drawings or value sketches are great ways to pick up on this too.
I try to group values when working with grays. Take this image for example:

The character in the foreground has mainly dark grays, which separates her from the background, which has mostly light grays. Then the windows are white and the roof black.
Value composition is a huge and complex area and I recommend anyone wanting to learn to be more conscious about their values and to do value sketches. Analysing art you think has good values is great too.
Shadows
Not every piece needs shadows, but they can add a lot to an image! I use three kinds of shadows when I work in grayscale.
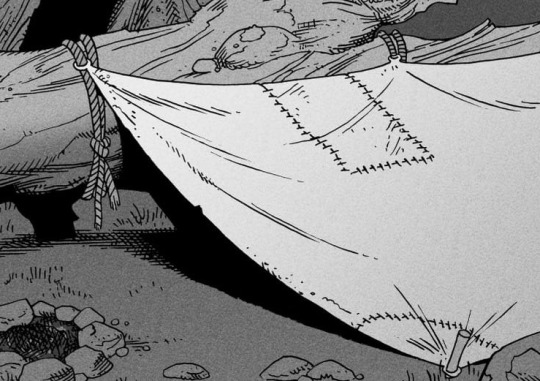
Inked shadows - these shadows are added during the inking stage and usually show areas where light would have almost no way of getting there, such as under this tent.
Gradient shadows - these shadows usually represent something getting further and further away from a light source or an area that would bounce light. This tree receives a tiny bit of light from a campfire on the ground and moonlight that bounces on the ground and up, fading as we get higher up in the tree. But mainly I add these gradients in ways that look cool and will help the overall composition.

Hard shadows - these shadows appear when a strong light casts shadows and can be used on a shape or to cover something. Here's a werewolf with shadows on its back, which gives it a better sense of mass and is interesting visually!

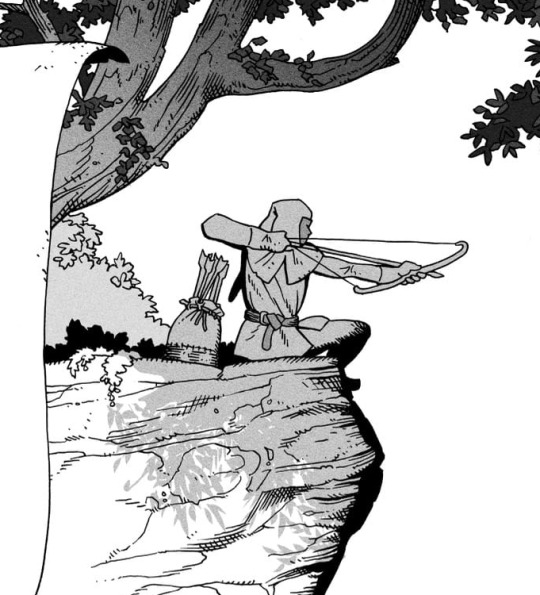
You can also cover an area in shadow like this, where the tree casts a shadow down on the archer and the cliff.
Texture
I like to add a layer of noise as a finishing touch. In Clip Studio you can create a noise layer with Filter->Render->Perlin noise... Find a balance of scale and amplitude that works for the image, then change the layer mode to "Vivid Light" and lower the opacity of the layer to around 30%. I like how this looks, it's not super visible usually but helps make the drawing feel less artificial and digital.

I hope that helps! Here are some nice links too:
Muddy Colors
Android Arts
Gurney Journey - Read his books!
Happy drawing!
351 notes
·
View notes
Text
WOWOW on Demand Sign Up Tutorial
Hello, I am back (?)

Quick tutorial in case anyone wants to sign up (and later cancel) for a WOWOW on Demand account in order to watch Justice in the Dark when it airs at midnight JST on the 7th of March (aka Thursday night going into Friday morning).
Under the cut to reduce spam!
Before you start, please know that whilst you will sign up on the website, you will only be able to watch the shows using the phone app itself, because the website blocks VPNs.
You will need:
The ability to install the WOWOW on demand apk on your android phone (for iPhone users, it's available on the Jp app store, but I can't help beyond that)
A VPN (I used surfshark)
Access to a JP phone number (I used the number given on my forwarding service)
A credit card
2530 JPY per month (JITD is expected to end sometime in June 2025)
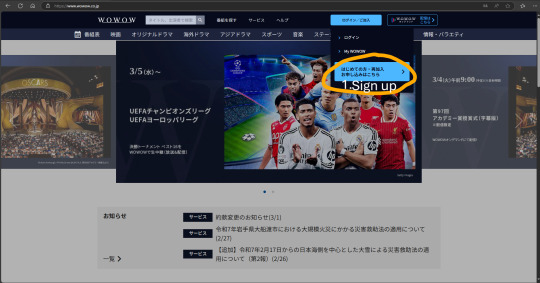
STEP 1: Set your VPN to Japan, go to the WOWOW website as shown, and click on the blue tab circled in orange
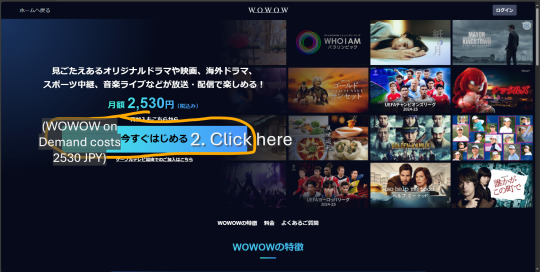
STEP 2: This just informs you that the service costs 2530 JPY/mth. Click the blue tab again.
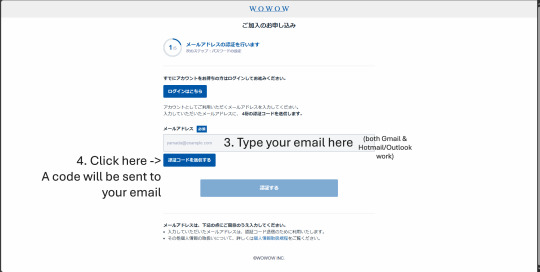
STEP 3: Key in your email and click the button to receive a 4-digit OTP (it will be the first and only string of 4 digits you see in the mail). Major email domains should work.
STEP 4: You should receive the OTP within 3-5mins. If you don't receive the email, check your junk folder etc I lost patience after 2 mins and clicked the button 😅
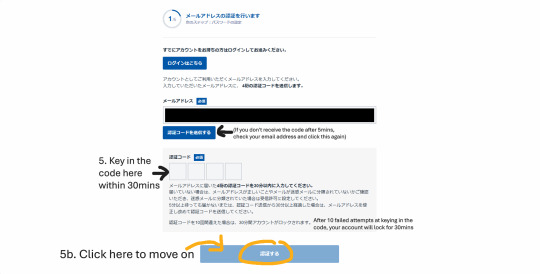
STEP 5: This is all pretty self-explanatory. Don't ask me to translate the T&C/privacy agreement because I didn't read it either 😬
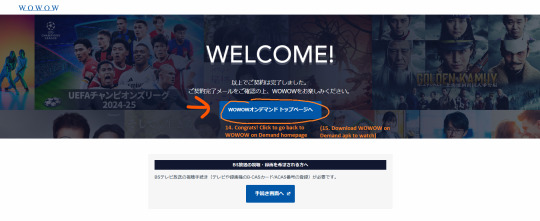
Congratulations! You have successfully created a WOWOW Online account (this is the normal account which lets you watch free videos/livestreams for eg, Spirealm Ep 1 is free to watch for now).
Next, you want to create a WOWOW on Demand account, which is the service that will give you access to JITD, the rest of Spirealm episodes, and if you are in Japan with a BS Cable subscription, the ability to watch and record WOWOW shows on your TV.
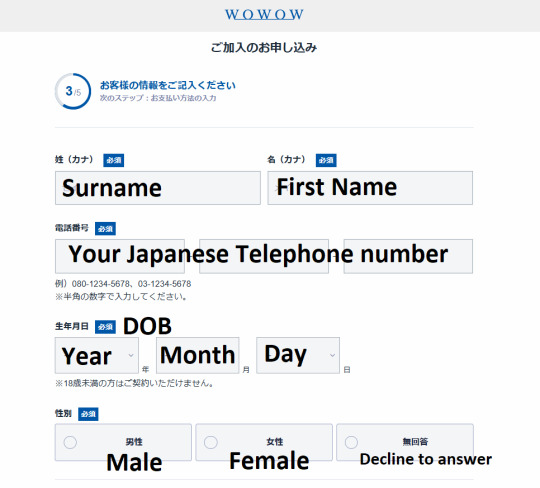
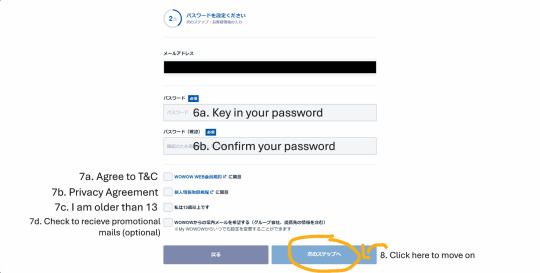
STEP 6: FINALLY we get to the most important bit, so of course I forgot to screencap it. For your Surname and First name, you will need to type it in Japanese text, so go ahead and google translate your name. For the phone number, I used the number from my Jp forwarding service (tenso), but I did try again by changing a few numbers, and it actually went through to step 4 so... if you don't have a forwarding service, you could try random numbers following the 03-1234-5678 format? Don't quote me on that.
Click the blue button at the bottom (which I accidentally cropped out) to move on.
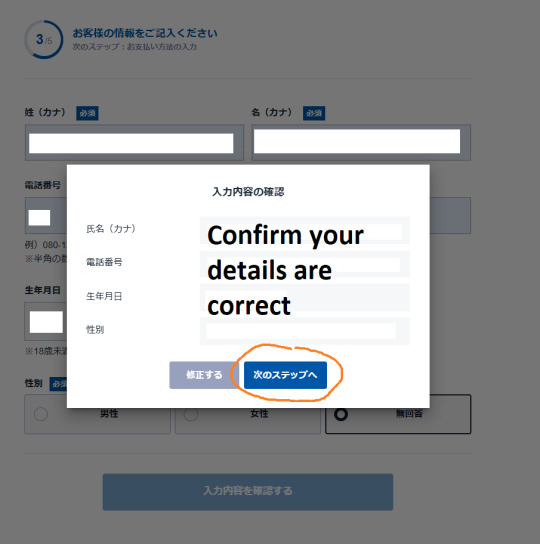
STEP 7: A confirmation window will pop up, keep clicking the blue button...
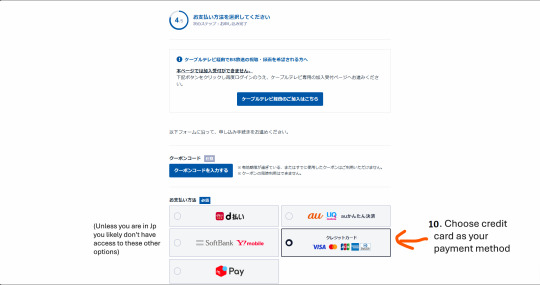
STEP 8: Almost there. Ignore all the blue buttons and choose the credit card payment option.
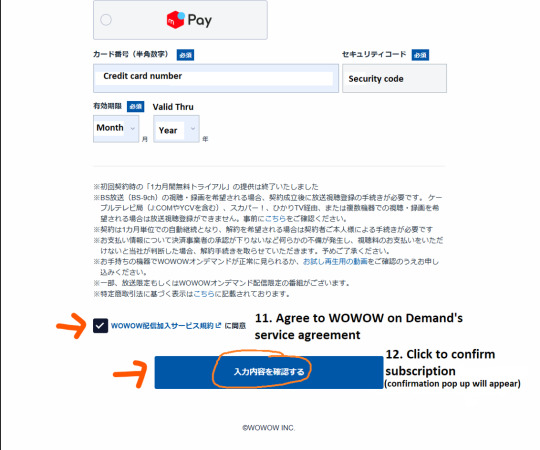
STEP 9: Scroll down and key in your credit card details (doesn't have to be Japanese), agree to the service agreement and then hit the blue button again. You will not be charged yet.
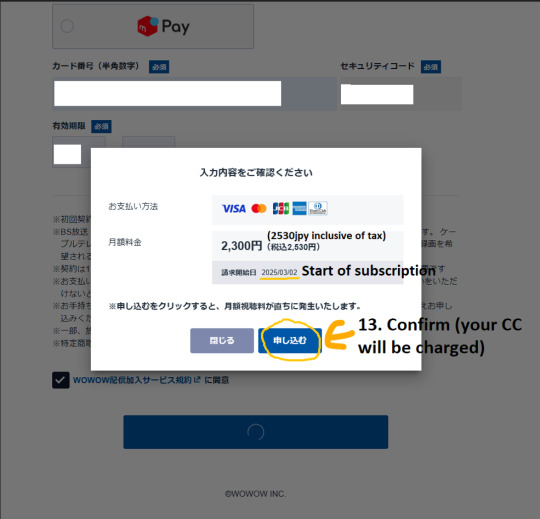
STEP 10: Confirm you really do want to spend 2530 JPY x per mth (which for JITD would be 3 months = 7590 JPY = USD$50) and click the blue button again. Your CC will be charged here.
Congrats! You're done (and broke)! Now, using your log in details, log on to the app and search 光淵 or こうえん (you will need to use your VPN on your phone too)
HOW TO CANCEL WOWOW
You will be able to watch shows for one month from that date your subscription was charged. Ie, if charged on the 3rd of July, and you cancelled on the 31st of July, you would be able to access WOWOW on demand till the 2nd of August (1 month from the 3rd of July). Hence, please remember to cancel a few days before your subscription is charged, just in case the application takes a few days to be processed.
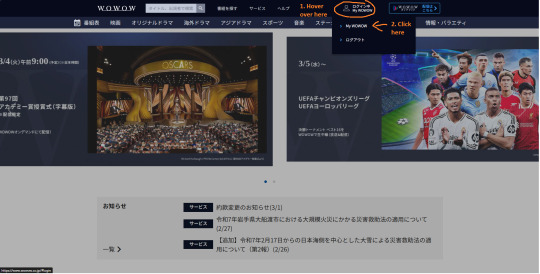
STEP 1: Log in and go to My WOWOW
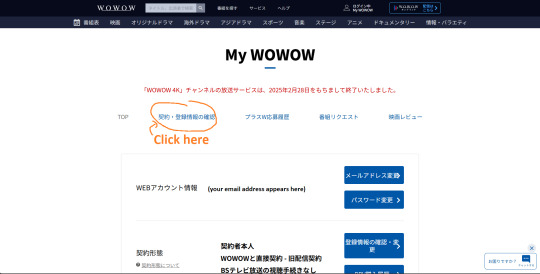
STEP 2: You'll be brought to your profile page, choose the 2nd option from the left (right next to the word TOP)
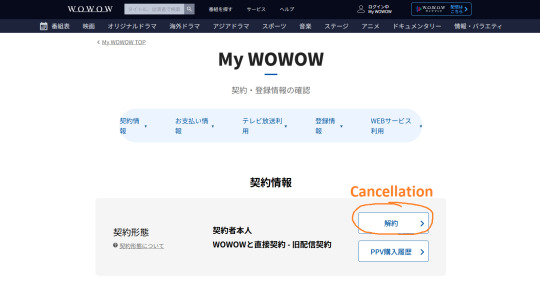
STEP 3: Look for the 解約 button
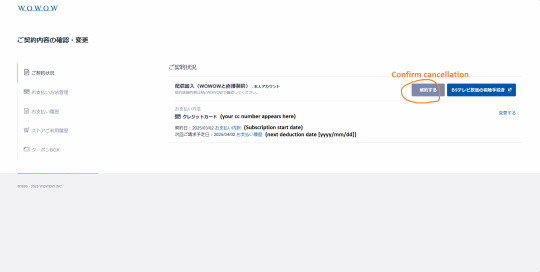
STEP 4: Look for the same word, and confirm cancellation
That's it! (When july comes, if there are extra steps required, I'll post a follow up 😅
Happy watching everyone!
#how to#jitd#wowow on demand#justice in the dark#mo du#silent reading#i'm sorry I disappeared#life got in the way as usual#thank you to everyone who sent me messages#i have not opened tumblr since MPW ended#i'm sorry if I worried anyone!!
59 notes
·
View notes
Text
my life has been greatly improved after i did this and i want to help my fellow mobile warriors, but there are no full clear tutorials on it out there, so im making my own
under the cut there'll be an overly extensive but hopefully helpful tutorial on how to use revanced (of youtube revanced fame) to get a patched version of the tumblr mobile app which can reverse annoying UI changes, get prev tags back, and get rid of tumblr live permanently
first of all, this only works on android. sorry. but that said here we go
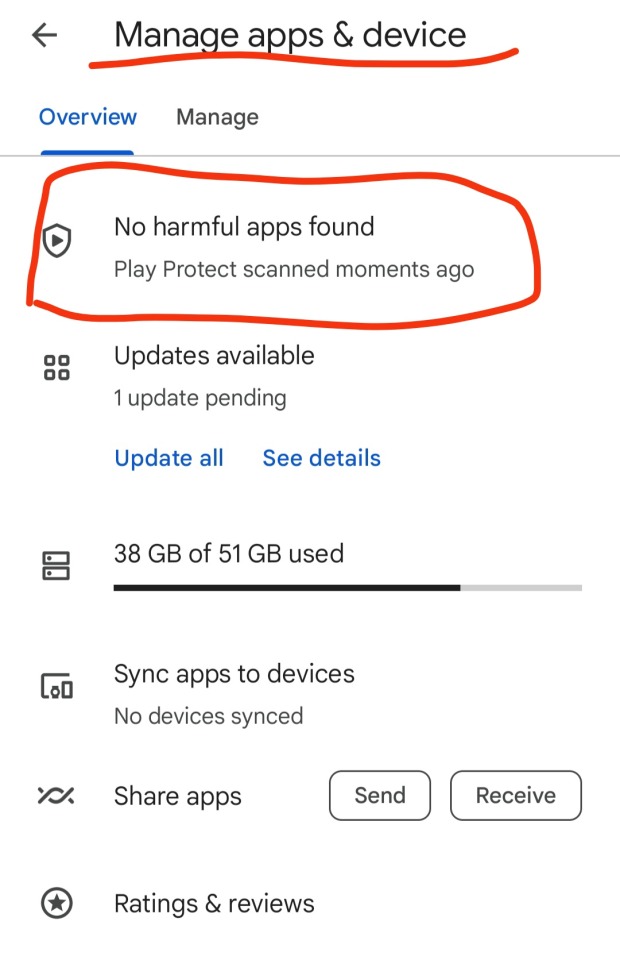
firstly go on the play store and turn off Play Protect. you'll generally need to turn off/ignore any safety checks you get, and allow to "download from unverified sources" (dw this process is safe, you can turn these back on after you're done)

uninstall the tumblr app you currently have on your phone (the one from the play store)
download Vanced MicroG and ReVanced Manager. install both. ReVanced Manager will become an app you'll need to use for this
go to this link. generally youre supposed to be careful when downloading apks off the internet, but i can testify the ones from apkmirror are safe
now this is where the magic happens. apkmirror has the apks for ALL versions of the tumblr app, from the most recent one as far back as 2015
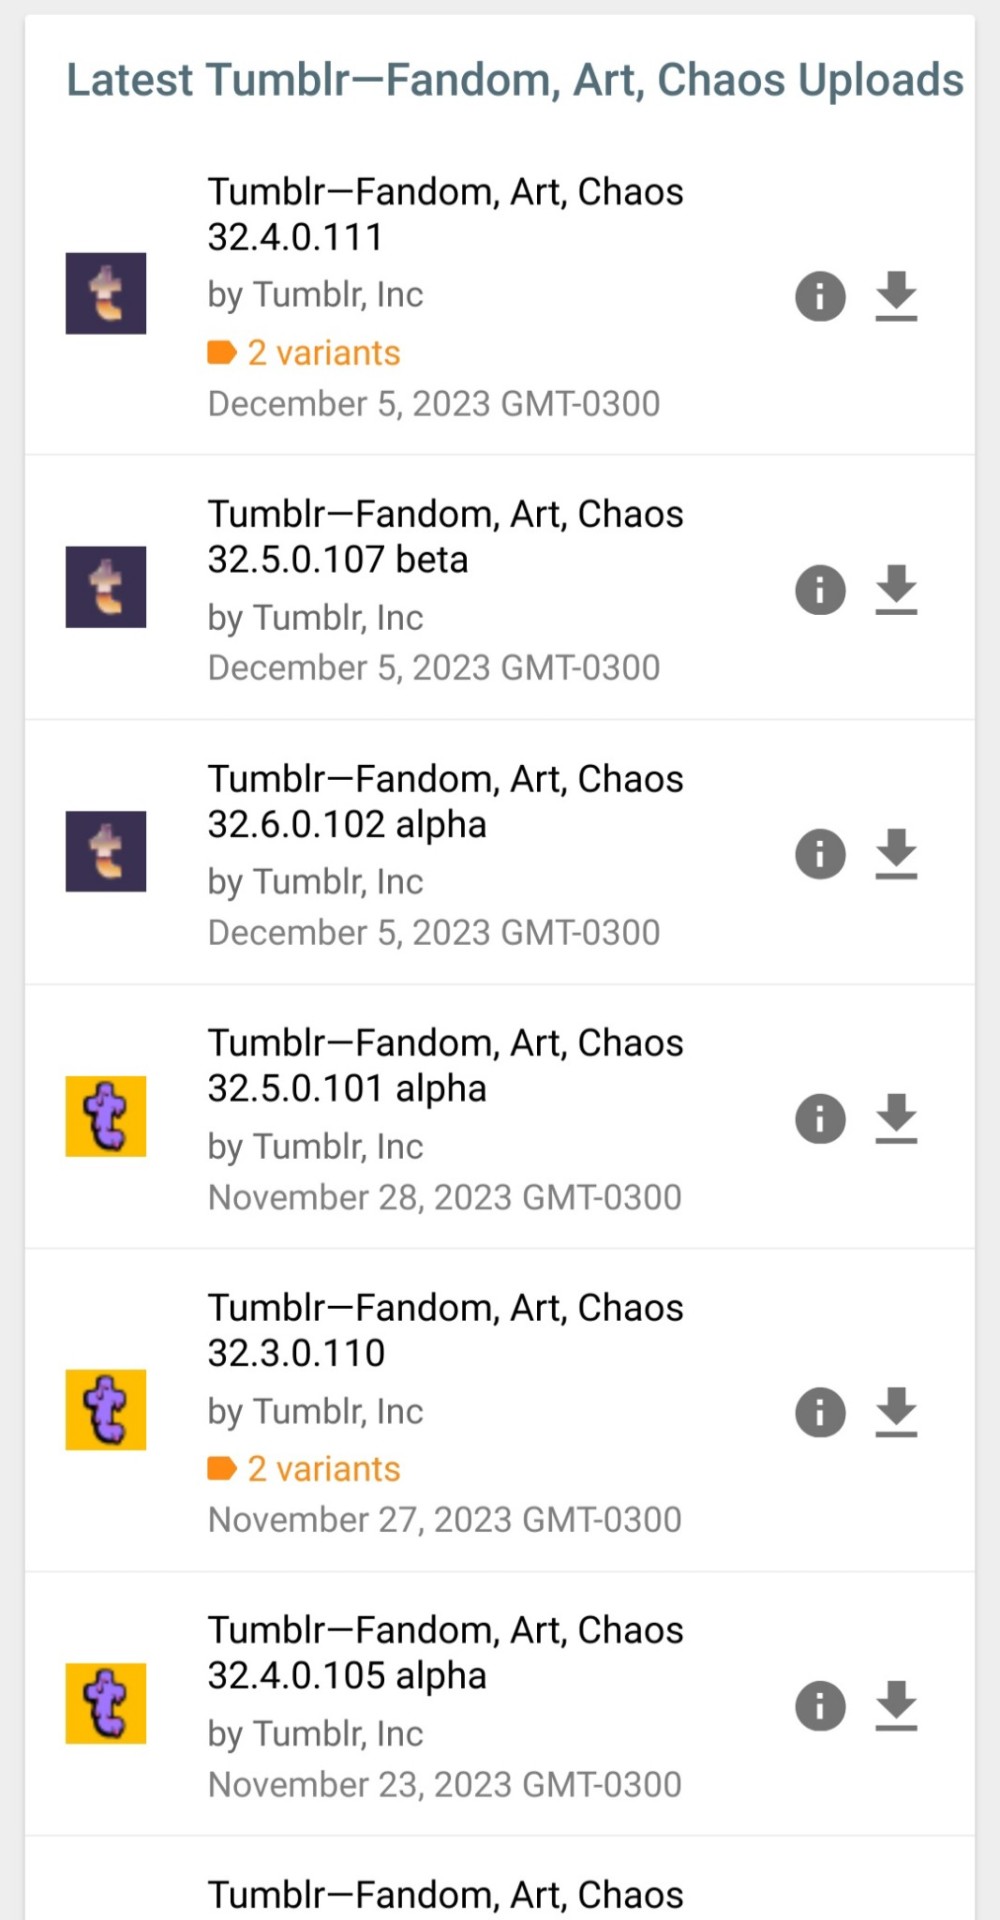
this is how you can reverse any changes to the tumblr app you dont like, simply get an apk from before the change was made
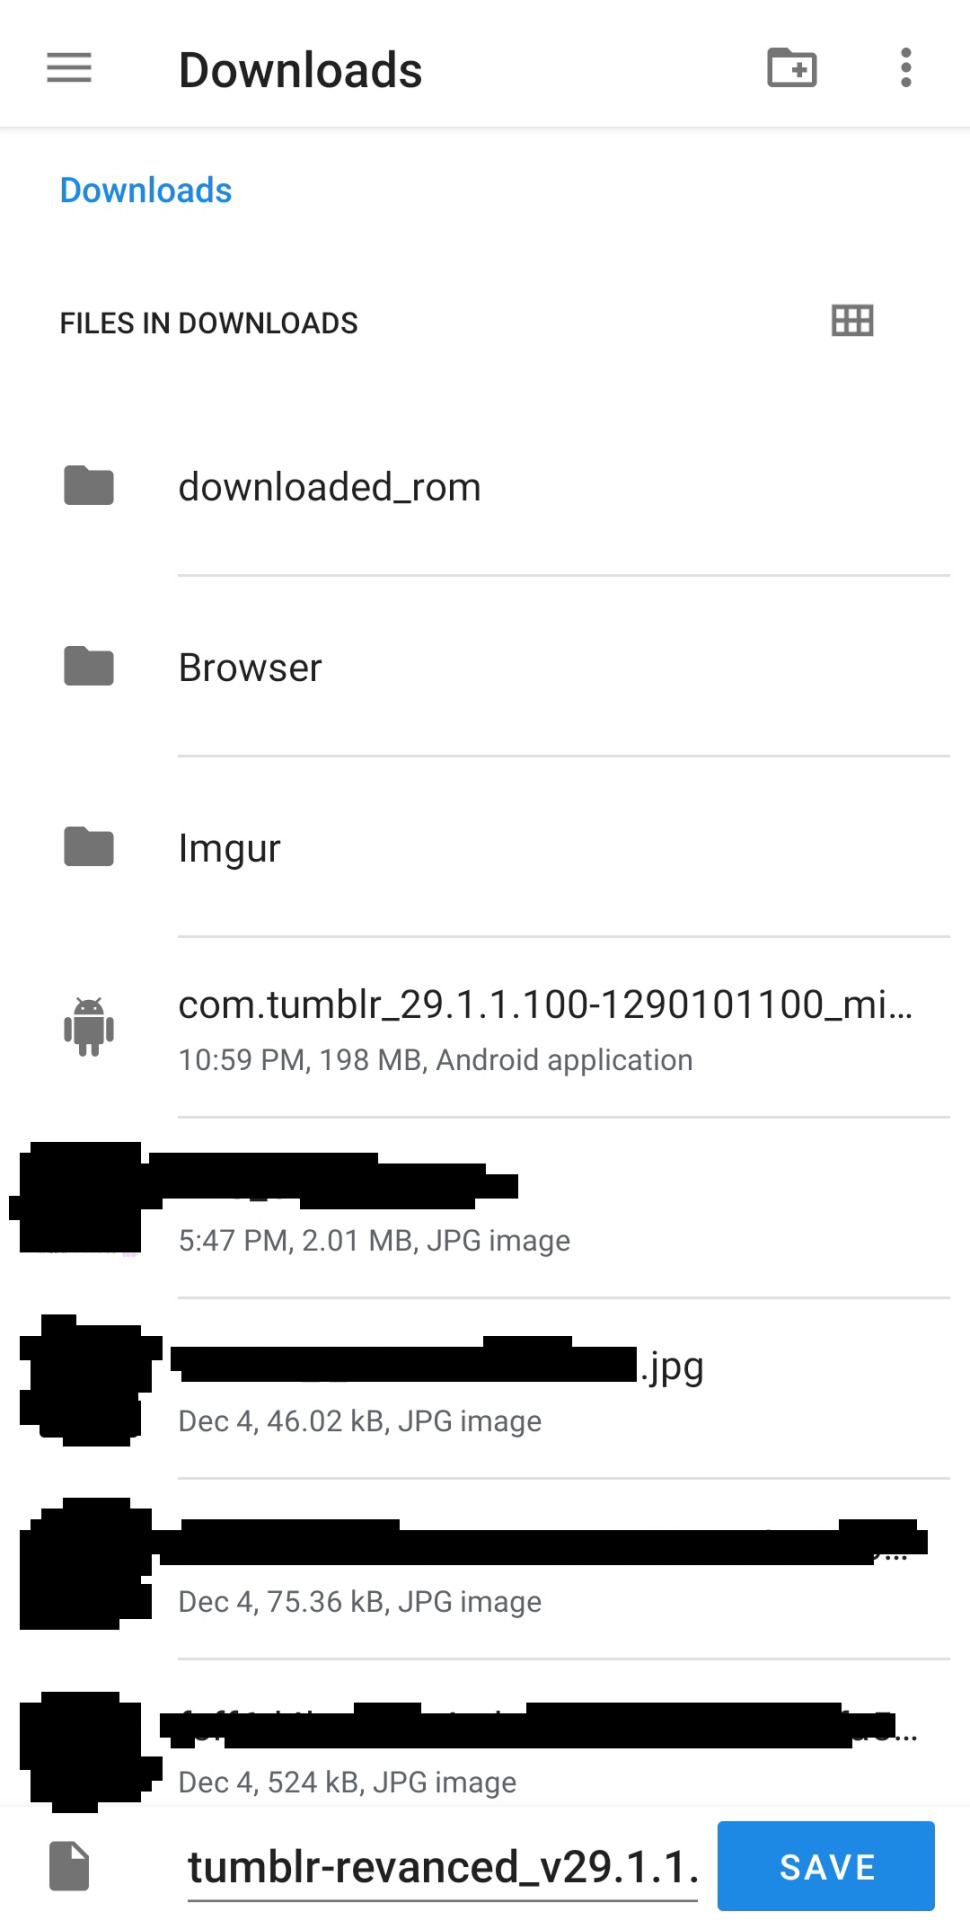
the one im currently using is v29.1.1.100

pros of this one:
- the old image viewer (you can click on images to zoom in without the weird transparent background and scrolling taking you to unrelated posts)
- prev tags (aka you can click on a post or a reblog to be taken directly to that version of the post or the reblog instead of just going to the top of op's blog)
- general reversal of recent UI changes, like the DM redesign and the update that made everything smaller and round
having chosen an apk, download it. i heard some people say you should only download and not install it right away, but mine only worked when i had it installed, so it might depend for you
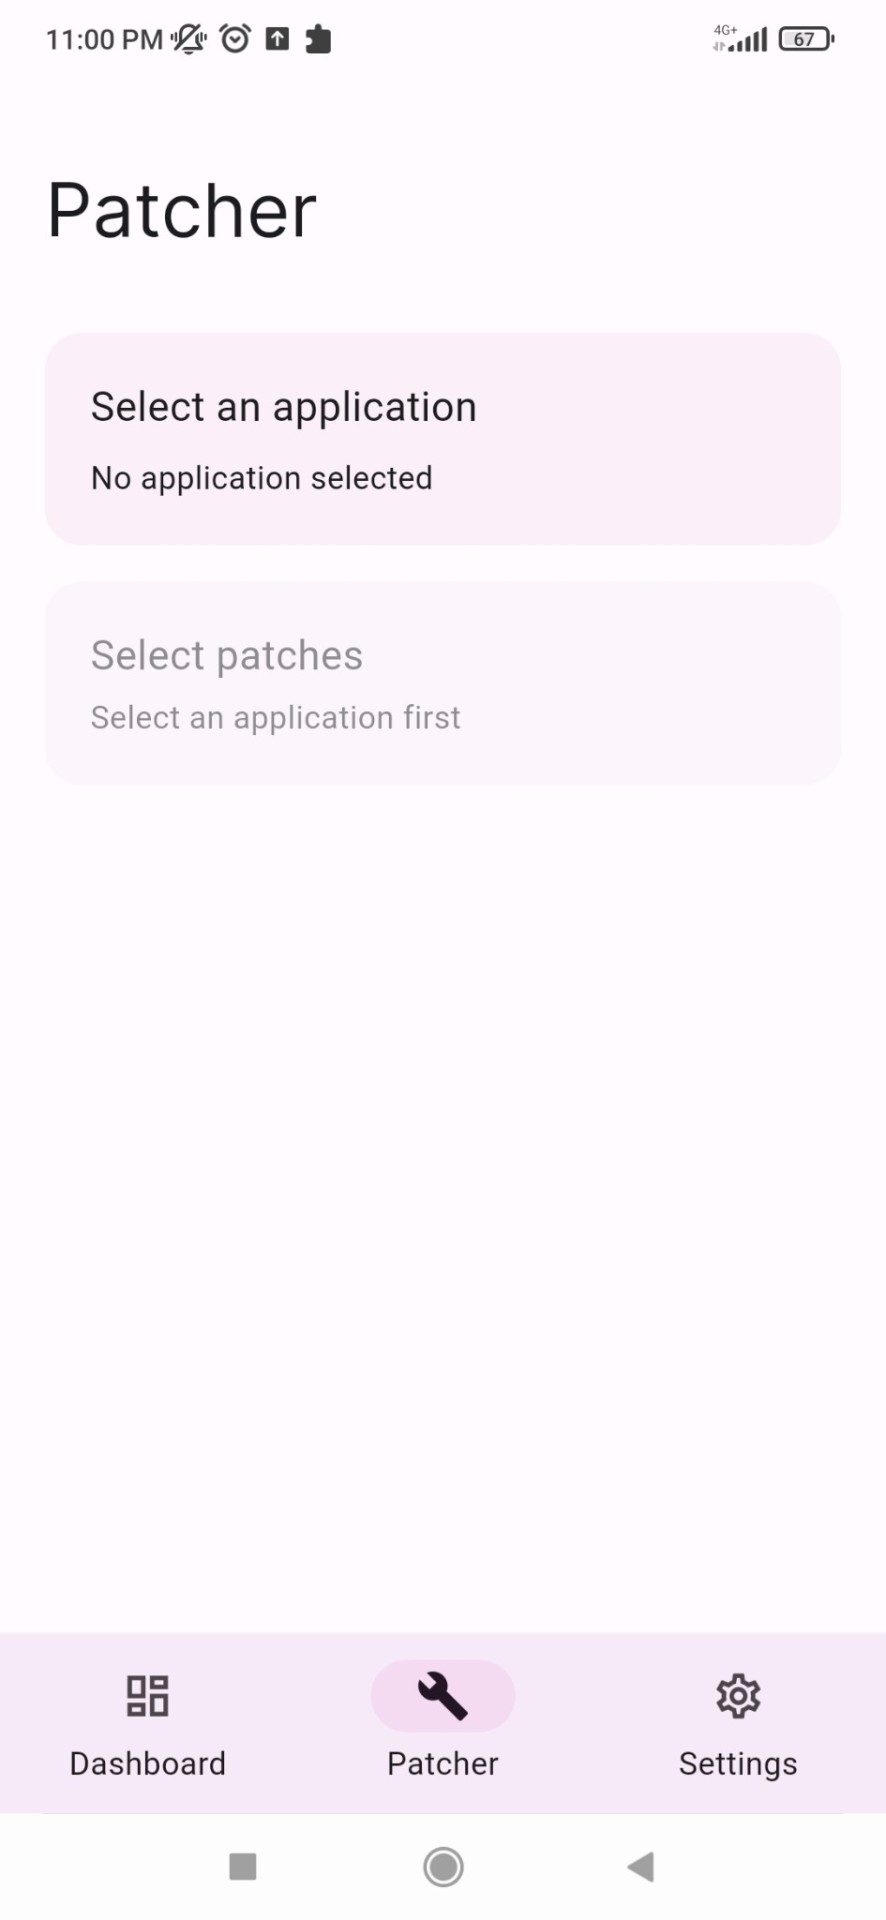
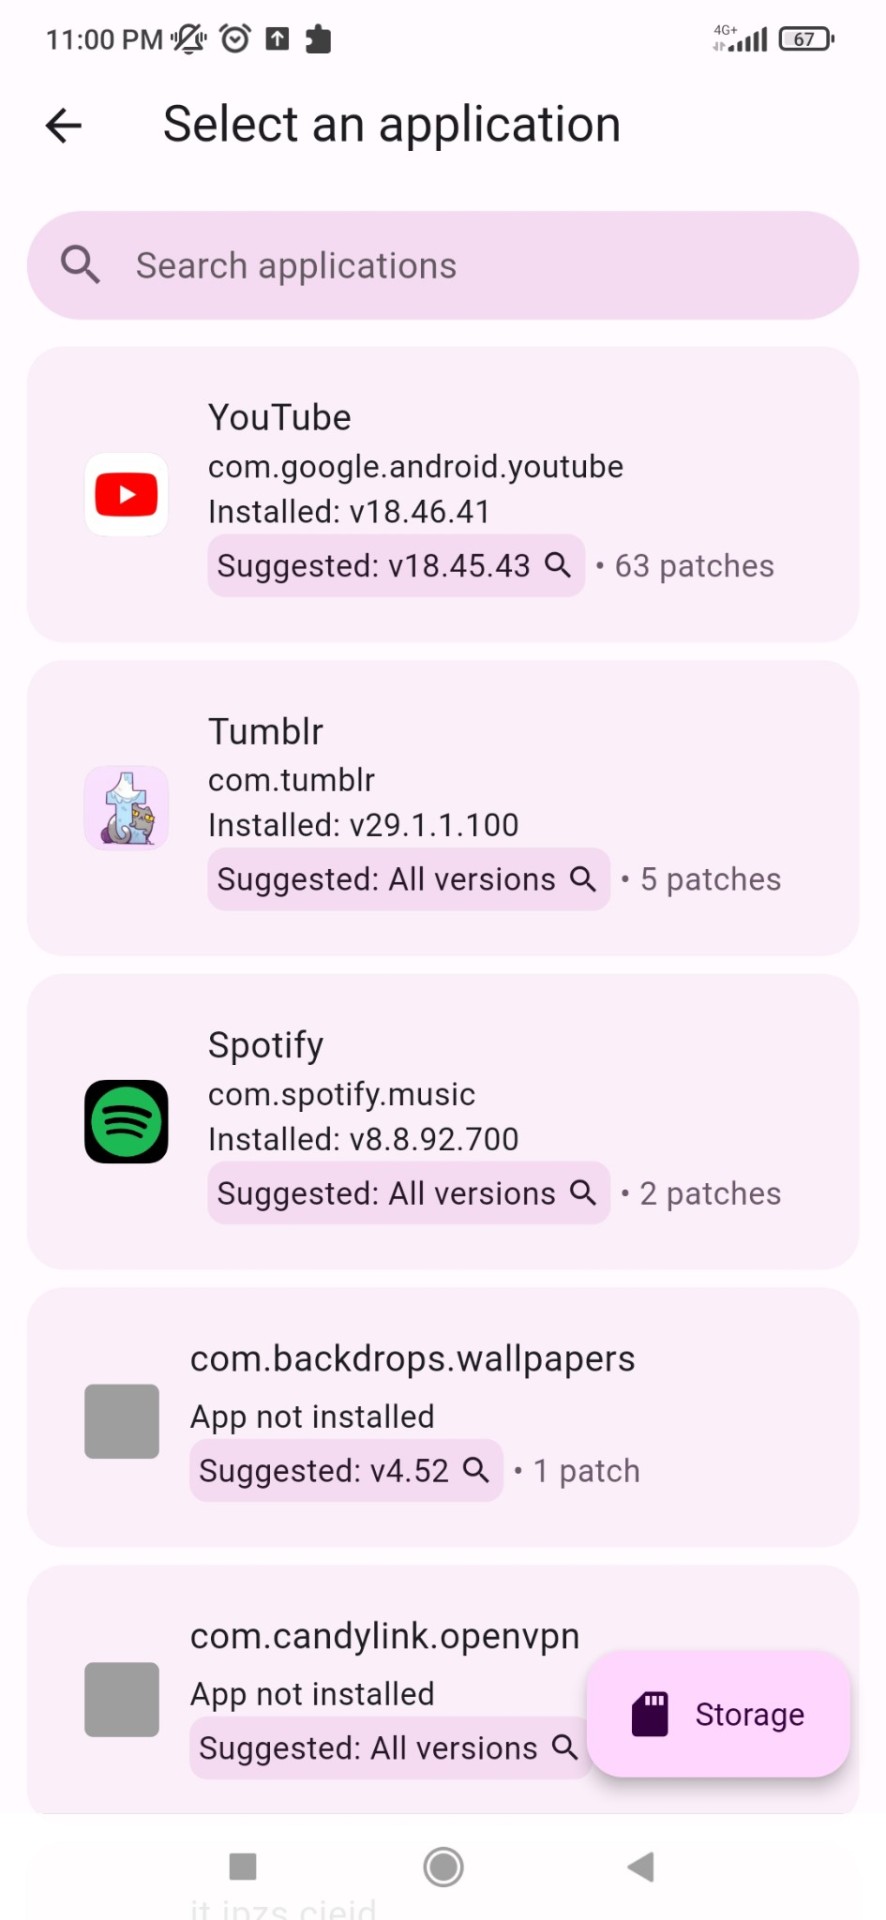
now go to the ReVanced Manager app you downloaded earlier
go to the Patcher tab, and there click on Select and application, there you can select the tumblr apk you just downloaded
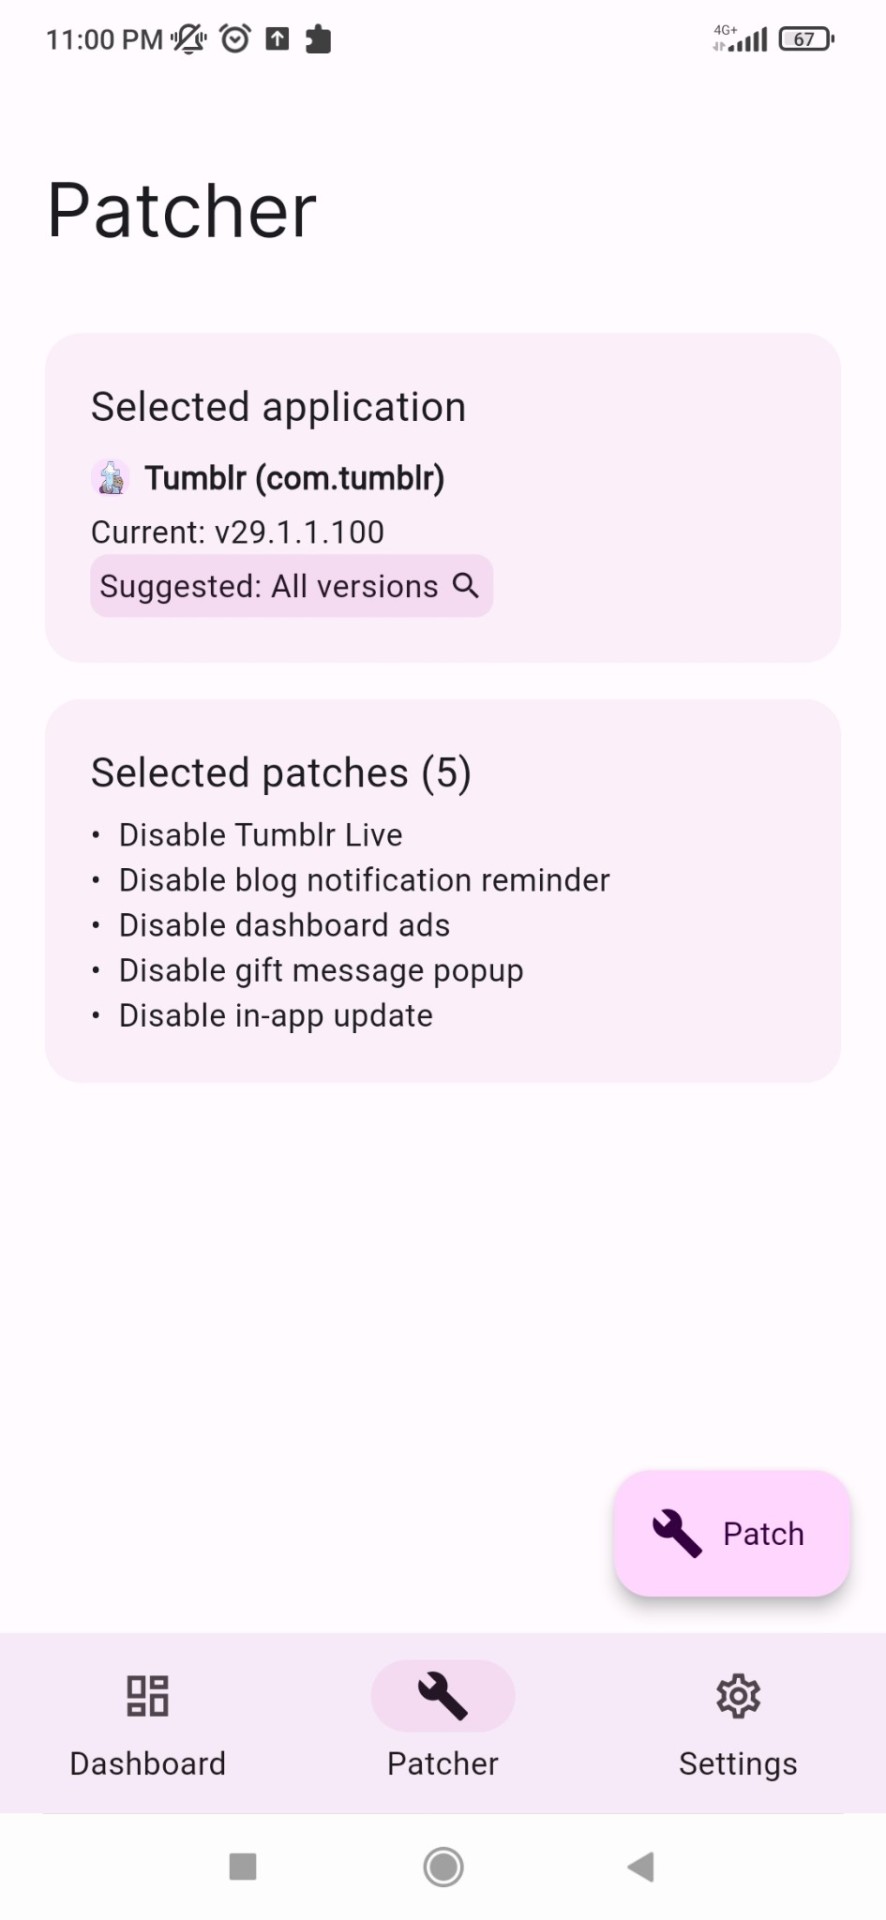
there you can see the available patches, simply click on patch and wait until its done
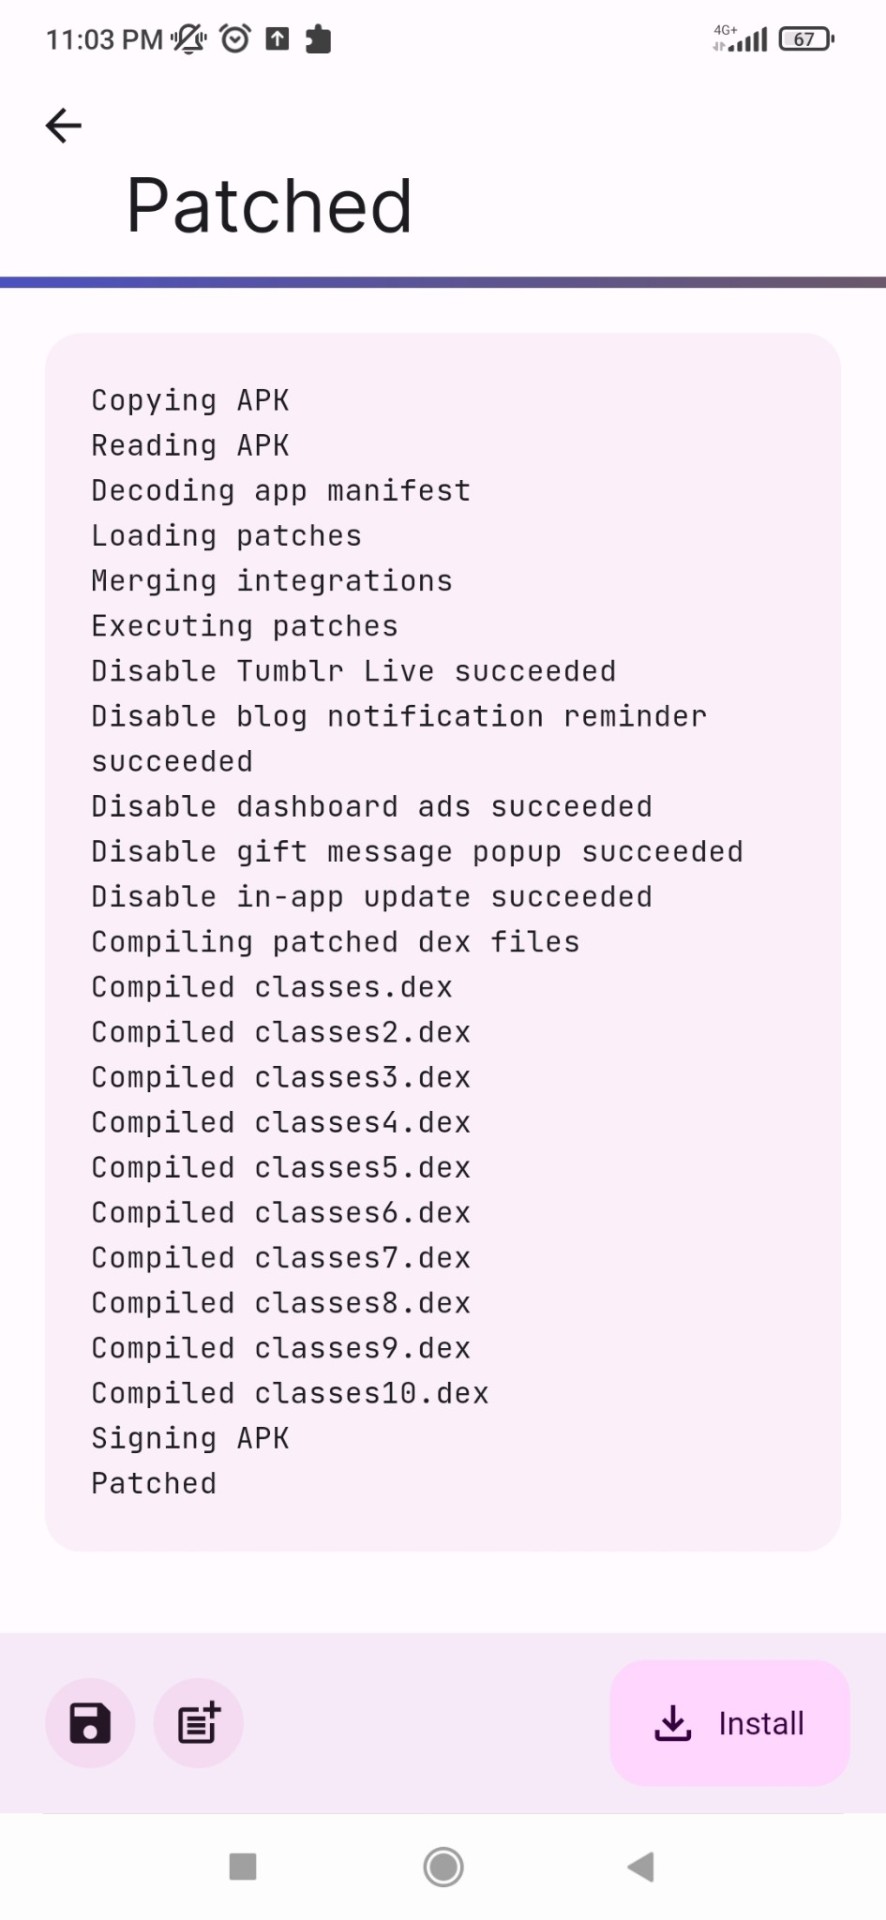
i believe if you did not need to install your apk earlier you can just click "install" and install the patched version right away.
but for me, since i had to install my apk, what i had to do was, once my app was patched, click on the folder icon on the bottom left, save the patched app to my phone files (besides the og one, not replace it), then i went to my file manager, deleted the original apk, THEN installed the revanced version
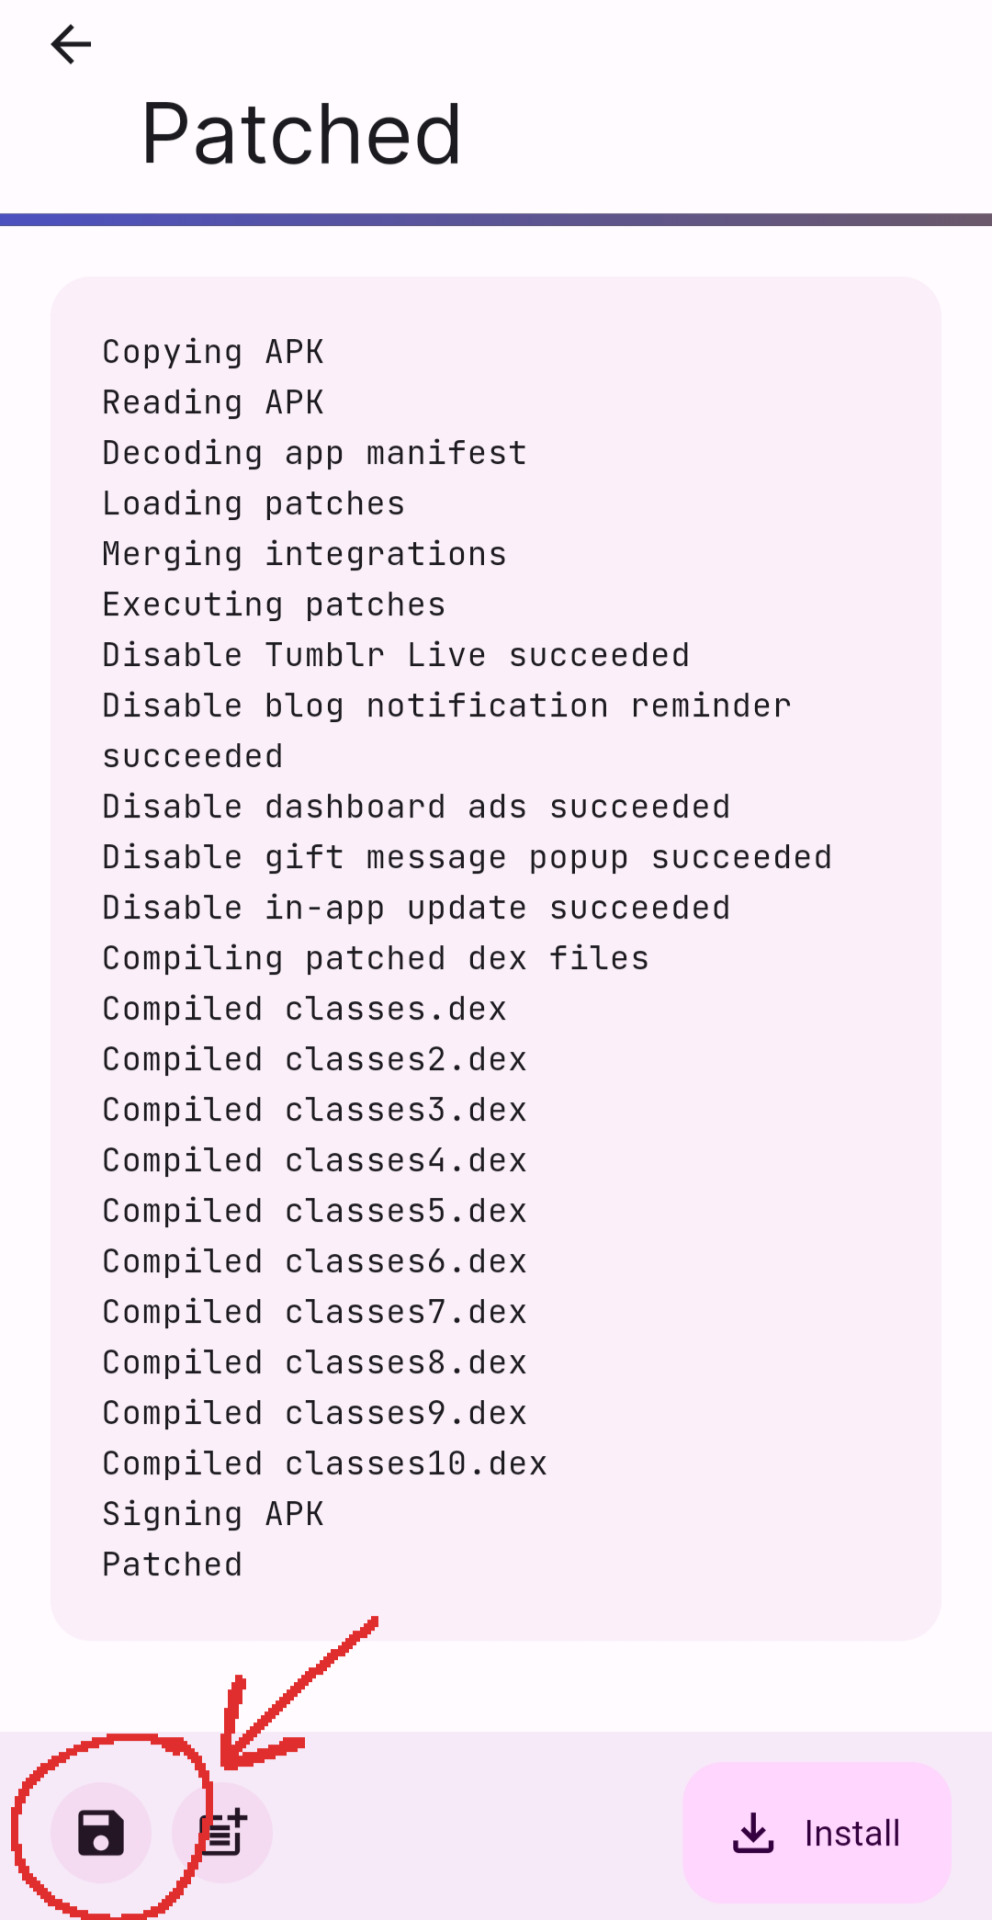
idk if you'll need to do this but it was a pain for me to figure this out so if it helps someone else 👍
and with that its done! if you manage to install it sucessfully, you can just open the app, log in, and youll see if its working if tumblr live is completely gone and all other changes are applied o7
#finally finished writing this. time to release it into the wild#hope this helps somebody else my life is so much easier now#🧃.txt
377 notes
·
View notes
Text
How to Download Audio Posts on Tumblr Mobile (2024) Android
Post in video X
Things you'll need: FireFox, Xkit Rewritten extension, and an Android Device
Link to my other tutorial: How to Download Videos on Tumblr Mobile X
Step by Step guide under the cut

Find an audio post
Scroll down and click on the share button (the arrow button)
Click on the FireFox icon (if it's not there click on the 'Other' icon and scroll until you see the Firefox icon)
Firefox will open the audio post in your browser
Click on the kabab menu in the upper right hand corner( 3 vertical dots)
Click on 'Add-ons'
Go to the top of the menu and click 'Add-ons Manager'
Scroll to the bottom of the menu and click 'Find more Add-ons'
It'll take you to a Firefox extension webpage
Type 'Xkit' in the search bar above
Click on Xkit Rewritten
Click add to Firefox
A popup will appear. Click add
*optional: click add to private browsing ( for convenience)
Click 'okay, got it'
Click on the Kebab menu again and go to Add-ons
Click on 'Add-on Manger'
Look for Xkit Rewritten and click on it
Click on settings
Scroll to the bottom of the menu
Enable 'Vanilla Audio' by pressing the switch
Back out of all the menus
Go back to the audio post
A new grey scrub bar will appear on the purple audio post bar
Long press on the grey scrub bar (the timestamp area is a good spot)
Click 'Save file to device '
Your device may ask you to complete the action using an app. Click on Firefox
Then you're done
You can rename the audio file you just downloaded in your file directory app. You can most likely find it under audio and in the downloads folder
I'm sorry if the tutorial sounds condescending. I just want to make it as clear as possible. Also I do understand that Xkit can be used for more than downloading audio posts. This is mainly for people who don't use desktop Tumblr
#Tumblr#audio post#audio shitpost#tutorial#tumblr help#video#how to download audio posts on Tumblr Mobile#xkit#xkit rewritten#Firefox#lanky kong#lanky kong jumpscare
74 notes
·
View notes
Text
UBUNTU TOUCH | DAY ONE
If you didn't see one of my previous posts, I've got a phone to experiment with, and I'm gonna be trying out various mobile operating systems! (Primarily linux based! Not that android isn't linux but lets be real.) please ignore my greasy ugly hand Installation Process: The installation actually wasn't that bad! Was kinda awkward trying to get the phone updated to the correct version without upgrading too far, but after that was dealt with everything else was taken care of very smoothly and easily with the UB Ports custom installer! Didn't have a fail state, nor did the phone brick! I'd rate this an 8/10! Setup and Tutorial: Setting up the phone after the install was very fast, frankly there wasn't much to set up. Thankfully it's not like Google or Apple where they ask for your firstborn son before even asking for your SIM card. Just needed to set up a password/passcode, set up my SIM (Which was thankfully automatic kinda, details later) and confirm a Wi-Fi connection if I wanted to!) Tutorial however, was a bit lackluster. While it was descriptive, it also only popped up on my first time seeing each screen. (E.g. I didn't get the tutorial for the phone app until I opened the phone app.) While I don't think this is necessarily a bad thing, it also means I would need to walk through every inbuilt app to make sure the tutorials are all done. kinda annoying in my personal opinion. Overall I'd rate this 6~7/10. Usage and Experience: For day one this isn't super important, however first impressions do matter for most people. The OS as a whole was very snappy, and never froze or lagged in any of my testing. Additionally, the pull-down shade is very nice! Could be simplified a little more so that you don't need to scroll sideways, and it would also be nice to see more settings overall since the system seems to be quite bare for settings at the moment. However one of the things that really bothers me as a button-enjoyer is the OS not having a button navigation method. The only way to navigate between screens is to swipe from the sides, top or bottom as gestures, similar to Apple and the recent Android iterations. These gestures don't even work perfectly either, which makes it more annoying that I don't have a home button or back button. If there is a home-swipe or back-swipe, then the tutorial did not detail it, and I cannot find it anywhere in the settings. Overall, it's a 4/10 but with LOTS of potential! Functionality: This focus' almost entirely on how it functions as a phone, and if it's problematic for any reason. So far it seems great outside of one issue, as commented on earlier (This is the details later bit lmao). Plugged an active SIM card into the phone and it automatically logged the APN and other important information which was very nice. Tested the mobile data and texting, and found no issues except for maybe being unable to send MMS (Need to double check that it was not a file size issue.) However, this entire time I've not had the ability to make or take calls. I'm not sure why, the APN, provider, and everything in the settings is correct to what I can tell. I may attempt to either reinstall the dialer application, or erase and manually set the APN in the event that might fix it. If I cannot get calling to work this score will look a lot uglier. Overall, it's a 7~8/10! for now.
App Availability: Seems great! The built in app-store, or "OpenStore" is pretty cool, and seems to have a lot of useful apps. I did notice a small fraction of android apps that I could use (Like Slack, thanks workplace -ﻌ-) but they were just WebUI apps, which isn't bad, but it's bad. I haven't attempted to set up or use Waydroid, but I will not have that change the score at all since using Android apps (kinda barely) defeats the purpose of an alternative operating system. Overall score, 8/10, but needs a deeper dive.
I'll likely put out another update at either 15 days or 30 days!
Whenever you guys think you want one!
8 notes
·
View notes
Text


I finished Citizen Sleeper 2: Starward Vector on PC a couple of weeks ago. A sublime game like its predecessor.
The sequel continues with strong narrative and excellent, thought-provoking, industry top-tier writing. The in-depth descriptions made it easy to use my imagination and visualize the situations. The story was interesting enough to have me playing for hours and not wanting to put the game down. Some familiar faces from the first game appear but the story is standalone, so you're not required to play the first game to understand Citizen Sleeper 2. I highly recommend playing the first one though.
You are a Sleeper, an android with a malfunctioning body, with no recollection of your past. To make things worse, you find out someone is chasing you. Escape, survive, connect with various individuals and help them achieve their goals, pet a cat, try to get your fragile frame repaired, learn a thing or two about yourself in the process.

I started the game with Operator class. I liked the jacket in the character illustration and I thought it would be fun to go with a different kind of class this time, as I picked Machinist in the first game.


The tabletop-inspired RPG mechanics have been expanded with features like stress accumulation and recruitable crew members that help on missions. This time there's also 3 difficulty options to choose from to tailor the experience to your liking. I started with the default "risky" difficulty setting but lowered it to "safe" as I gimped my own progress by getting into a condition where almost all of my dice were broken and I felt it made playing tedious. I must have missed some important info regarding the mechanics (very likely I've dismissed tutorial screens in a "yeah yeah, just let me get into the game!" manner).


The character art is wonderful and there's a diverse cast of interesting characters. I didn't get quite the same level of connection to the characters this time, I recall the first game had me care about some of the characters more deeply and feel the feels when things went south.
The soundtrack should get a special mention. The music fits the vibe and style of the game really well. It's melancholic but also sounds a bit more optimistic compared to the first game's tunes. Almost as if it's there to tell you that even though you're struggling you're going to be alright. I've bought both games' soundtracks on Steam and they make for a great playlist on work days. As a side note, hearing the Citizen Sleeper soundtrack convinced a colleague of mine to purchase the game when I recommended it to them.
I played the game at launch and there were a few occasions where the UI stopped reacting to controller button presses. I briefly had to switch to mouse + keyboard to make it respond to controller inputs again. I also had trouble selecting locations on the space travel map with controller. The selection kept snapping to further locations instead of the one I wanted to target between my current location and the further location. This was another case where I often had to swap to mouse input. Luckily these were minor inconveniences and didn't halt progress.
Another complaint I have about the game is that I was not allowed to take my time and finish quests/objectives at my own pace. There were a couple of weird situations where the game suddenly whisked me away to another location and I didn't understand why. This caused a waste of resources as travelling between locations consumes ship fuel. I was not able to unlock ability points for my Sleeper when quests were left unfinished and this in turn made contracts difficult to complete successfully. Not all locations in the game have resources like food available either, which risked the Sleeper's condition deteriorating.

I had clocked in 18 hours when I reached the ending of Citizen Sleeper 2 and I came away impressed with what the team had achieved. I think I liked the first Citizen Sleeper a bit more but I recommend both of the games to anyone who enjoys sci-fi and/or good writing.
11 notes
·
View notes
Text

[Image description: Preview panel for the comic strip at the link below. Servalan of Blake's 7 is entering a room where Guinan of Star Trek: The Next Generation is waiting sitting in one of two easy chairs with two cocktails on a table between them. Servalan is saying, "Well, the plan to destroy Liberator's crew with the android duplicate of a resistance leader fell apart." Guinan is saying, "Awww." Unfortunately there are not image descriptions at the main Hero Of Three Faces site. End description.]
The Hero of Three Faces is fanfiction crossovers, but it’s comic strips with stick figures, but they’re triangles. Preview panel only. Click here for full cartoon. Or see the on-site navigation tutorial. Or see this blog’s FAQ, or my archive tumblog’s FAQ. Cartoons may contain unmarked spoilers. Cartoons linked from Tumblr 10:00 (Central US time) daily are the previous day’s new update and the posts are pinned to the top of this blog. Cartoons linked from Tumblr 22:00 daily are from the archive and the posts are pinned only during annual summer hiatus of new updates.
Thanks for reading.
7 notes
·
View notes
Text
An AO3 app? -- The next installment in my AO3 posting.
I'm going to preface this by telling you that I don't entirely understand the urge or need to have an app for everything, but then again, I am closer to 30 than 20, so maybe that's the difference. Moving on.
So I've seen a lot of people saying that they wish there was an AO3 app. Presumably these people read AO3 on their phones or tablets. The thing is, there is NO AO3 app. If you see an app in the App Store or the Play Store claiming to be an AO3 app, it is fake, and you should not download it.
Say it with me kids:
"ao3 does not have an app and will not have an app."
The thing is, there's a really good reason why it will never happen. If you've been on this site (tumblr) long enough you'll either remember or have heard about the great tumblr porn ban (aka the ban on "female presenting nipples"). Believe it or not there was time where the tumblr (official) policy on adult content was "go nuts, show nuts. whatever." <-- actual quote btw.
A big reason why the tumblr porn ban ever happened was because of the tumblr app, specifically, the tumblr app for iOS. Apple decided one day that they thought that the tumblr app contained too much "sensitive content" and they banned tumblr's app from the Apple App Store, until such time as tumblr took what they believed sufficient corrective action for this "issue." Apple also believed that tumblr's app was hosting CP, which they considered a violation of their TOS.
So, in response to Apple banning them from the app store (which did not effect current users of the tumblr app, only potential new tumblr users), tumblr rolled out the adult content ban, so that they could get re-instated on the App Store. Like many other new "features" and "updates" to this site, the roll out was clunky, badly done and deeply unpopular. It was easily one of the worst changes for this site, in no small part because of how clunky it was; lots of innocuous posts were incorrectly flagged, and many bloggers found their entire blogs flagged, with little recourse in the initial wake of the ban. Critically, this event saw a great many users on tumblr leave this platform for twitter. How this affected site culture is up to debate.
Why am I telling you this? Well, as I am sure you, as an AO3 user are well aware, AO3 hosts a great deal of "adult content," of many persuasions and forms. They are explicitly against censorship of any kind. The app store is NOT against all censorship. These are two conflicting values. Since AO3 (and by extension OTW) has no interest in purging content from their site on behest of a megacorp (which btw is also why they rely on donations only and don't serve advertisements), they have no interest in developing an app, given the potential for restrictions.
Besides, AO3's website is simple, clean, and mobile responsive. Why fix something that ain't broke??
But, wait, if you're the target audience I'm hoping to reach with this post, you still want an app for AO3 on your home screen!
Never fear, my app loving youngsters! There is a way for you to create an "app" icon on your iPad or iPhone's home screen for AO3 (or any other site you like really) Apologies Android users; I don't have an Android, so I can't show you something analogous to this on Android, and don't know if they have it. Ditto on Kindle Fire.
This tutorial will use both safari and Firefox*. I won't show you Chrome (derogatory) because I don't have it and don't use it.
*Side note, switching to Firefox today is a great thing that you can do for yourself. You can easily import all of your Chrome bookmarks if that's what worries you.
In Firefox:
Step 1. Visit AO3 in the Firefox browser.

Step 2. Tap the hamburger menu in the right hand side of the top ribbon to reveal the browser and page settings and options menu, and locate the "Share" option (highlighted in blue below):

Step 3. In the "share" menu popup, locate and tap the "Add to Home Screen" option (highlighted in blue below):

Step 4. Give your new "app" (secretly just a bookmark) a title. You can leave it as the default, but I suggest shortening it so that the entirety of it shows on your home screen. You can name it whatever you want.

In Safari:
Step 1. Visit AO3 in the Safari browser.

Step 2. Tap the share icon in the right hand side of the top ribbon and scroll down until you find the "Add to Home Screen" option (highlighted in green below). Tap this option.

Step 3. In the "add to home screen" pop up, type whatever name you want in the name field (highlighted in green below). You can leave it as the default, but I suggest that you change it to something shorter so it displays in full with the icon on the home screen.

Either way, you should end up with an icon on your home screen that looks like this:

This is not an "app" BUT it is an icon on your home screen. When you tap the icon, it takes you to the home page of AO3, in whatever browser you created the bookmark in. You can move it around however you'd like, just like a real app, and put it any folder you'd like.
So that's all I have for this chat.
See you again next time I get inspired to write an ao3 chat/tutorial post for newbies!
Final note, If any of my followers have Android devices or Kindle Fire devices and want to add a photo tutorial for this on those platforms to this post, please feel free to, since I don't have any devices with either of those OSes, and thus could not do that myself.
#archive of our own#fanfiction#ao3#ao3 how to#iPad#ios#long post for ts#ao3 chats#ao3 for newbies#margaret babbles#mine
20 notes
·
View notes
Text
How to Watch IPTV on Phone?

How to Watch IPTV on Phone: Full Step-by-Step Guide
In today’s fast-paced world, the ability to stream your favorite live TV channels, sports, and movies directly from your smartphone is more convenient than ever. Thanks to IPTV (Internet Protocol Television), you can now watch high-quality content on the go, right from your Android or iOS phone.
This complete guide will show you how to watch IPTV on your phone, step-by-step, with real examples from IPTV providers like StreamView IPTV and Digitalizard. Whether you use Android or iPhone, this tutorial will help you get started easily.
What is IPTV?
IPTV (Internet Protocol Television) delivers live TV channels and on-demand video content through internet connections, rather than traditional cable or satellite. With IPTV, all you need is:
A reliable IPTV subscription (e.g., Streamview IPTV or Digitalizard),
An IPTV player app,
A good internet connection.
Requirements to Watch IPTV on Your Phone
To watch IPTV on your smartphone, you need:
📶 Stable internet connection (minimum 10 Mbps recommended)
📲 A compatible IPTV app for Android or iOS
🔐 Your IPTV credentials (M3U playlist link or Xtream Codes)
🔄 An updated Android or iOS device
How to Watch IPTV on Android Phone? Step-by-Step Guide
Step 1: Get Your IPTV Subscription
Sign up with a reliable IPTV provider like:
🔹 Streamview IPTV – Offers M3U and Xtream Code login, with 24/7 channels and VOD content.
🔹 Digitalizard – Known for HD quality and global channels, compatible with many IPTV players.
Once registered, they’ll email you:
M3U Playlist URL
Or Xtream Codes (Username, Password, and Server URL)
Step 2: Download a Reliable IPTV Player App
Some of the best IPTV apps for Android:
IPTV Smarters Pro
TiviMate IPTV Player
XCIPTV Player
GSE Smart IPTV
Go to Google Play Store, search for one of these apps, and install it.
Step 3: Load IPTV Playlist
Open the IPTV app (e.g., IPTV Smarters Pro).
Choose how you want to login:
Load Your Playlist or File URL (M3U)
Login with Xtream Codes API
Enter the details you received from Streamview IPTV or Digitalizard.
Tap Add User and wait for the channels to load.
Start streaming your favorite live TV channels, sports, or movies.
How to Watch IPTV on iPhone (iOS)? Step-by-Step Guide
Step 1: Subscribe to IPTV Service
Choose from verified providers like:
Streamview IPTV – Offers multi-device support including iOS.
Digitalizard – Offers fast delivery of login details and mobile-compatible links.
Step 2: Download an IPTV Player App for iOS
Top IPTV apps for iPhone:
IPTV Smarters – Player
GSE Smart IPTV
iPlayTV
Smarters Player Lite
Go to the App Store, search for one of these apps, and install it.
Step 3: Configure the App
Open the IPTV app on your iPhone.
Select either Xtream Codes Login or M3U Playlist option.
Enter:
Server URL
Username
Password (provided by Streamview IPTV or Digitalizard)
Tap Login and wait for the channel list to load.
Enjoy streaming HD content directly on your iPhone.
Key Features You’ll Enjoy
When using services like Streamview IPTV or Digitalizard, here’s what you typically get:
✅ 10,000+ Live TV Channels
✅ Video On Demand (Movies, TV Shows)
✅ 24/7 Sports & PPV Channels
✅ EPG (Electronic Program Guide)
✅ Catch-up & Recording Options (depends on player)
✅ Anti-freeze Technology
Use a VPN for Secure Streaming
To protect your privacy and avoid ISP throttling, it’s recommended to use a VPN while streaming IPTV on your phone. Apps like NordVPN, ExpressVPN, or Surfshark work great with mobile devices.
Troubleshooting Tips
Buffering? Switch to a lower-quality stream or use a VPN.
Can’t login? Double-check M3U/Xtream details or contact support.
App not loading? Clear cache or reinstall the IPTV player.
Final Thoughts
Watching IPTV on your phone is one of the easiest ways to enjoy live TV, sports, movies, and shows wherever you go. Whether you're using Android or iPhone, all you need is a trusted IPTV provider like Streamview IPTV or Digitalizard, and a reliable IPTV player app.
With a simple setup and internet access, you’ll have 24/7 entertainment right in your pocket.
FAQs
Can I watch IPTV on multiple devices?
Yes, both Streamview IPTV and Digitalizard support multi-device use. Check your plan for simultaneous connections.
Is it legal to use IPTV on my phone?
Using licensed IPTV services is legal. Avoid using pirated or unverified sources.
Do I need a VPN for mobile IPTV?
A VPN is not mandatory but is highly recommended for security and privacy.
Can I record IPTV on my phone?
Some apps like XCIPTV support recording on Android. iOS options may be limited.
#blog#blog intro#ask blog#blogging#shifting blog#tech#iptv subscription#best iptv#iptv#iptv service#iptv usa#abonnement iptv#iptv firestick
3 notes
·
View notes
Text
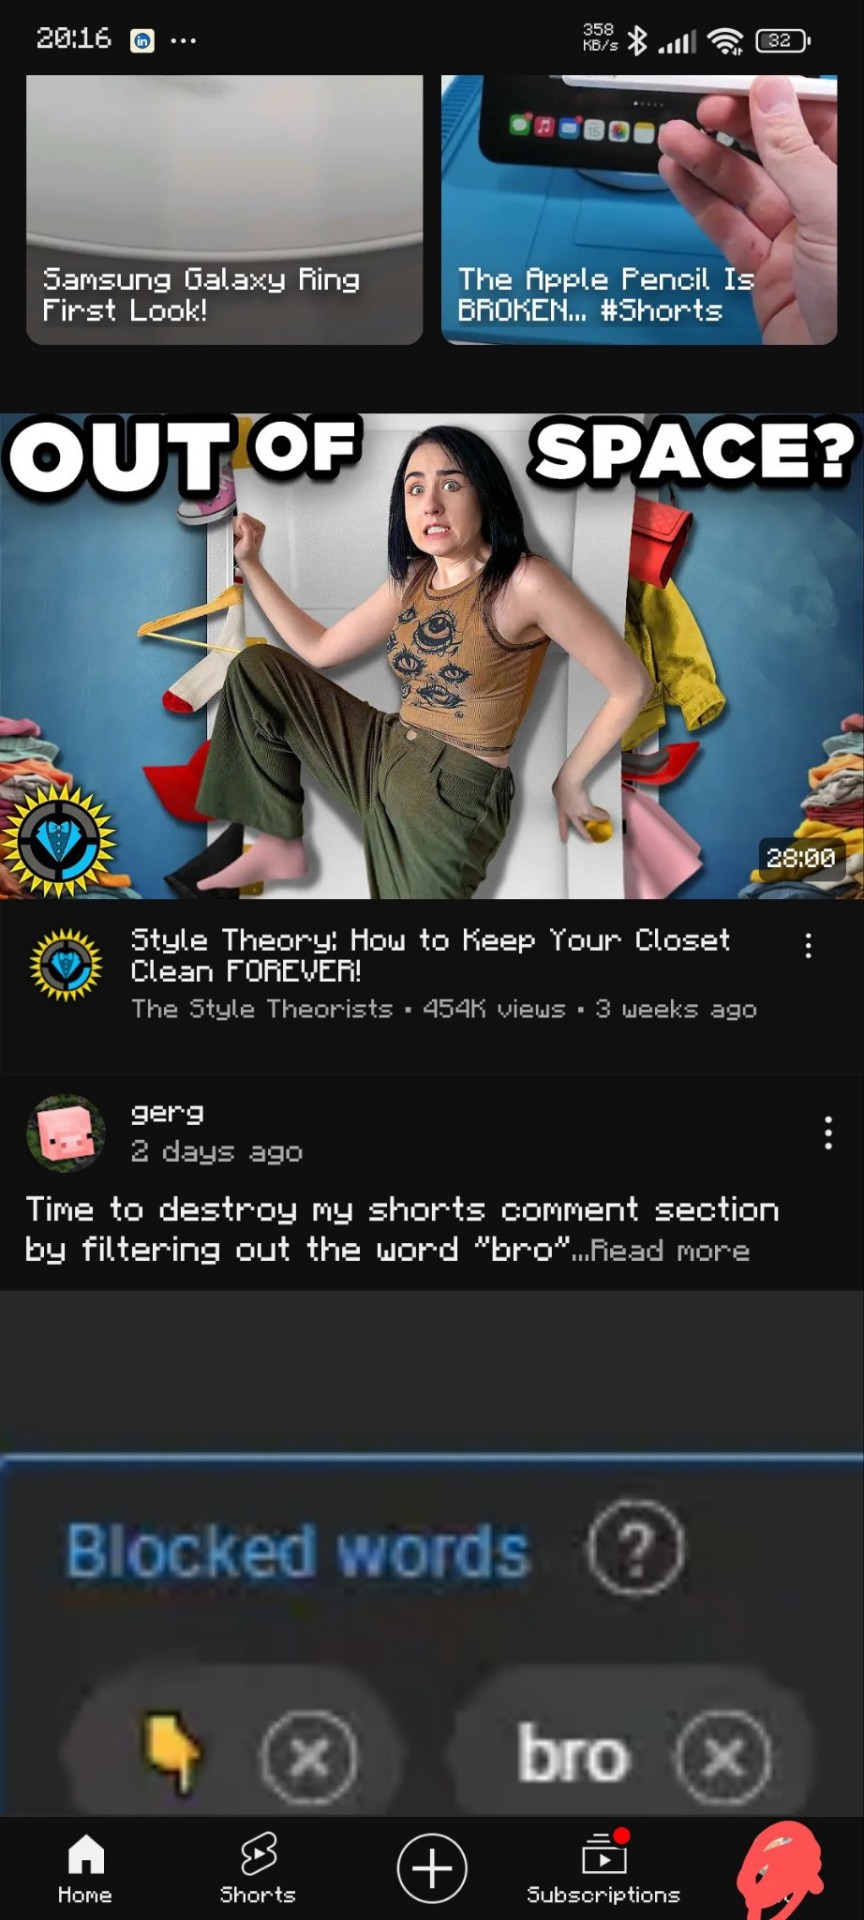
I despise short form content.
I hate YouTube shorts and I hate Instagram reels. I hate not having control over the time I spend on these 2 particular apps and just how easy it is to get lost — after all, that's what they are designed to do.
If you're on the same boat as me and don't want to download some sketchy shit to stop those urges, let me show how to completely remove ads, shorts, reels and skip annoying sponsors with just the Firefox mobile browser.
Below the cut is an (I hope) comprehensive guide on how to achieve the dream homepage
Before I begin, I need to say that:
I am not sponsored by anything mentioned
This is only tested on an android device
There is a trade off in performance in both apps
Notifications will direct you to the hellscape that is the original app
The font in the screenshots is not something native to Firefox, I just love pixels
Here is a pros and cons list to using my method
YouTube pros:
No ads
No sponsorships (mostly)
No shorts
No community posts
Background play (finicky)
More privacy
Extentions for this are all widely used
Cons:
Outdated UI
Unable to have a video minimised at the bottom of the screen by scrolling down
Slower to load vids on homescreen (not by much)
Full screen is a bit finicky sometimes
Important to note:
I don't know if this impacts data usage
Video quality is the same
I've been using this for at least a month, imho the pros outweigh the cons by a BIG margin.
Instagram pros:
No ads
No reels
Quicker access to direct messages
Cons:
Definitely a lot more laggy
Refreshes are sometimes needed
Extention is not used by many
Important to note:
Same as YouTube, but I have not used this for a while. I figured out that what I can do with YouTube is applicable with Instagram today.
Having said that
Let us begin
The thing that this whole "hack" revolves around is the ability to use extensions in the mobile version of the Firefox browser.
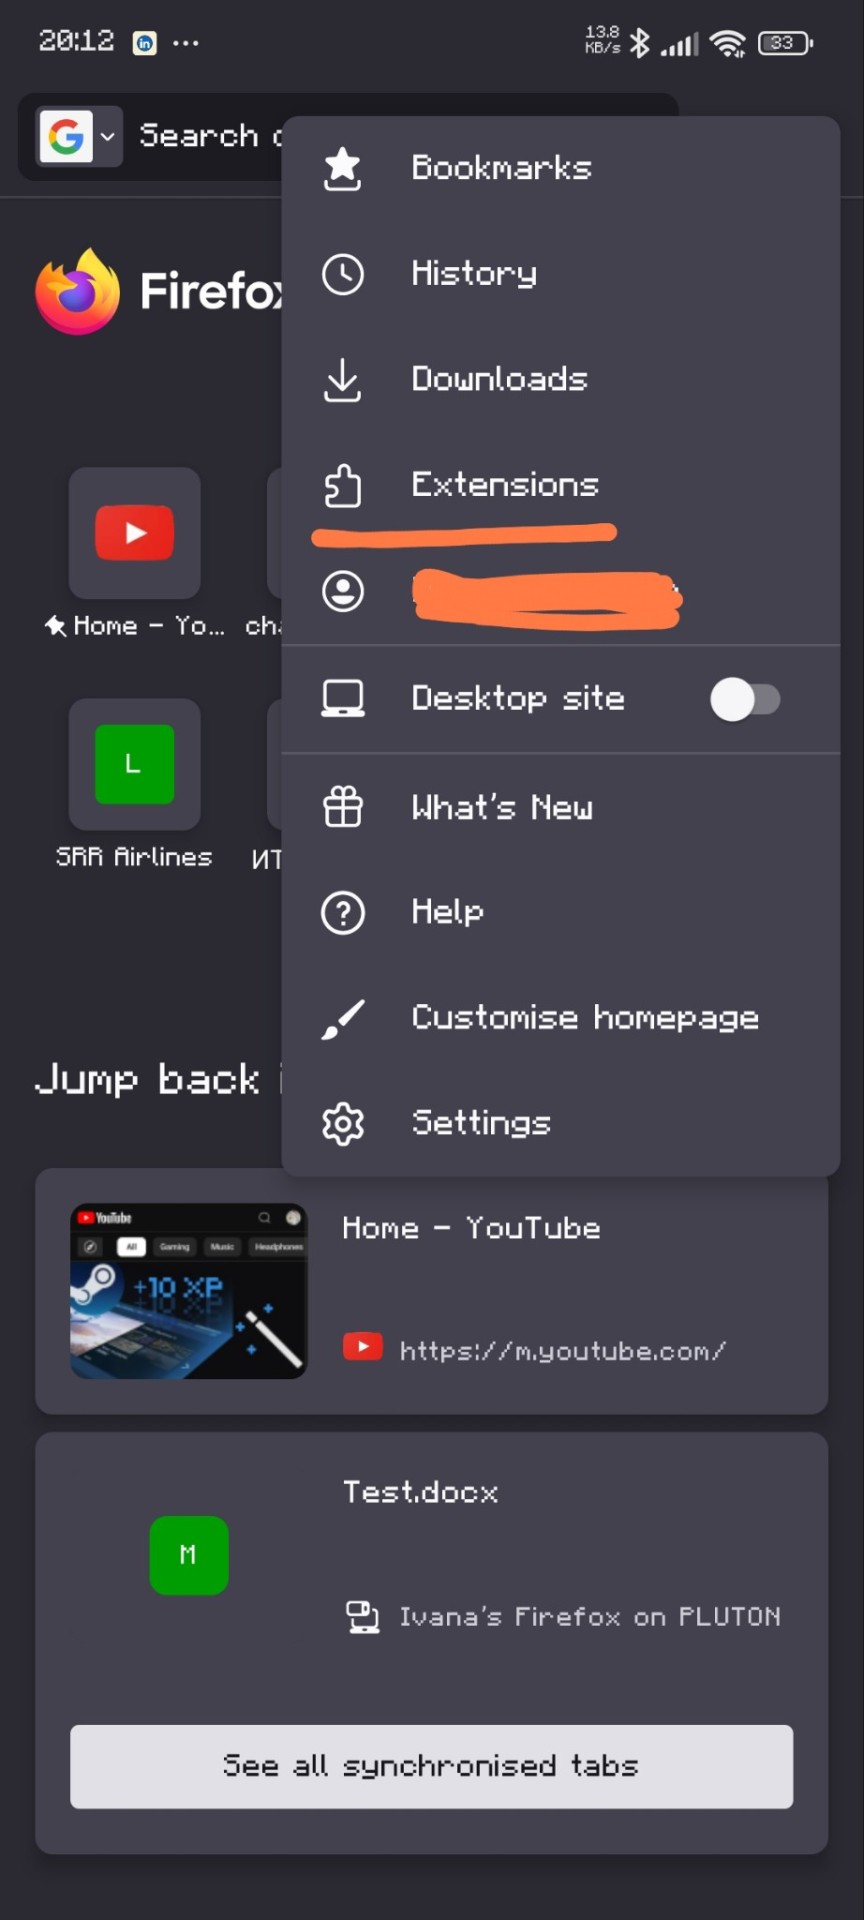
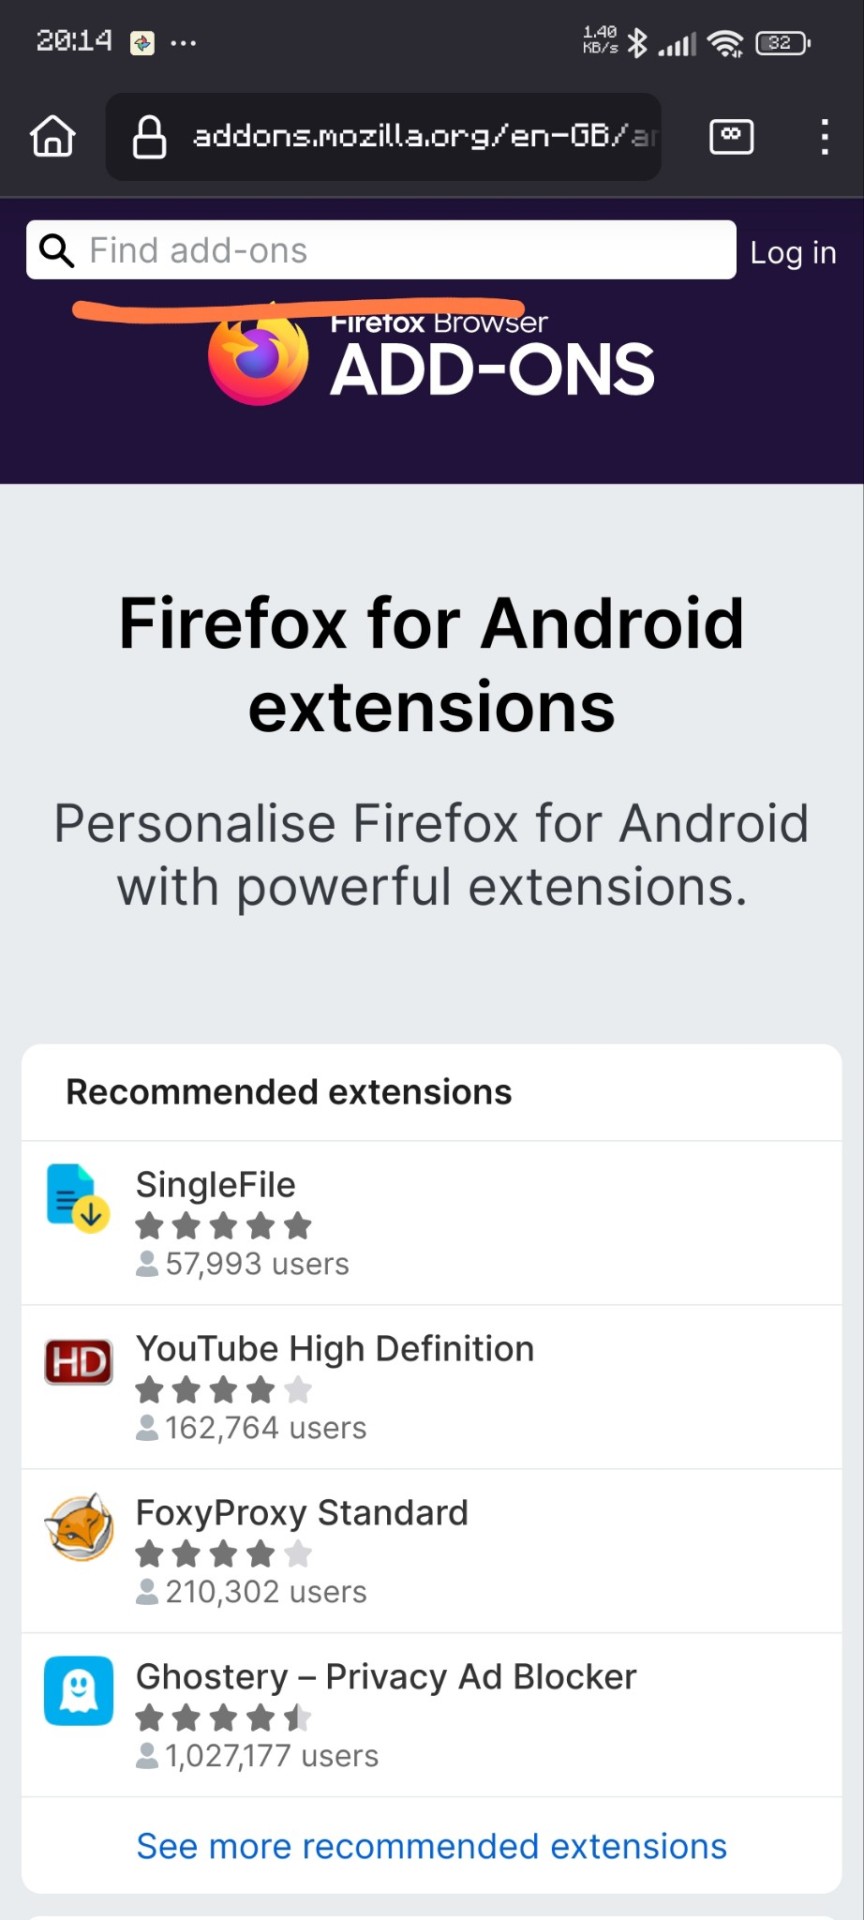
Once you have downloaded the browser (it'd probably ask you to make an account, I don't know if it's a necessity), you'd want to go to the settings(top right) then the Extensions menu (fourth one top down). Scroll down to the "Find more Extentions" button and then search.

Here are the extensions I have
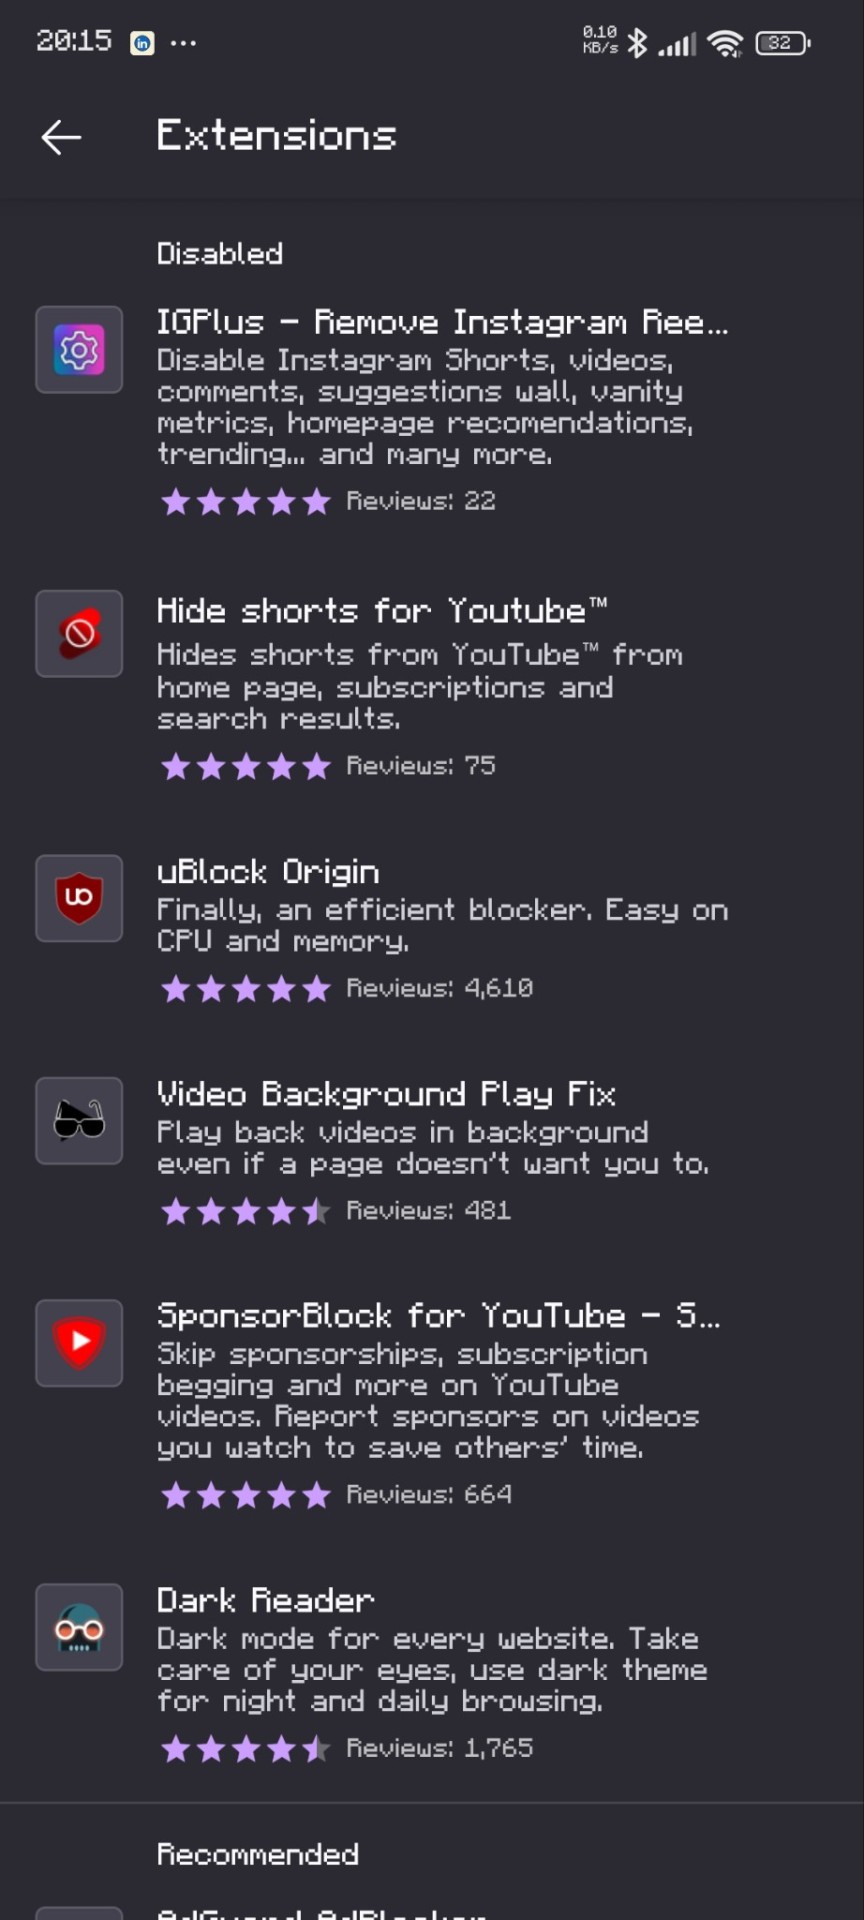
Not all of these are necessary, this is just my setup. Firefox is my default browser so i use other stuff too.
That's it! Here are some before and afters:
YouTube
Before:
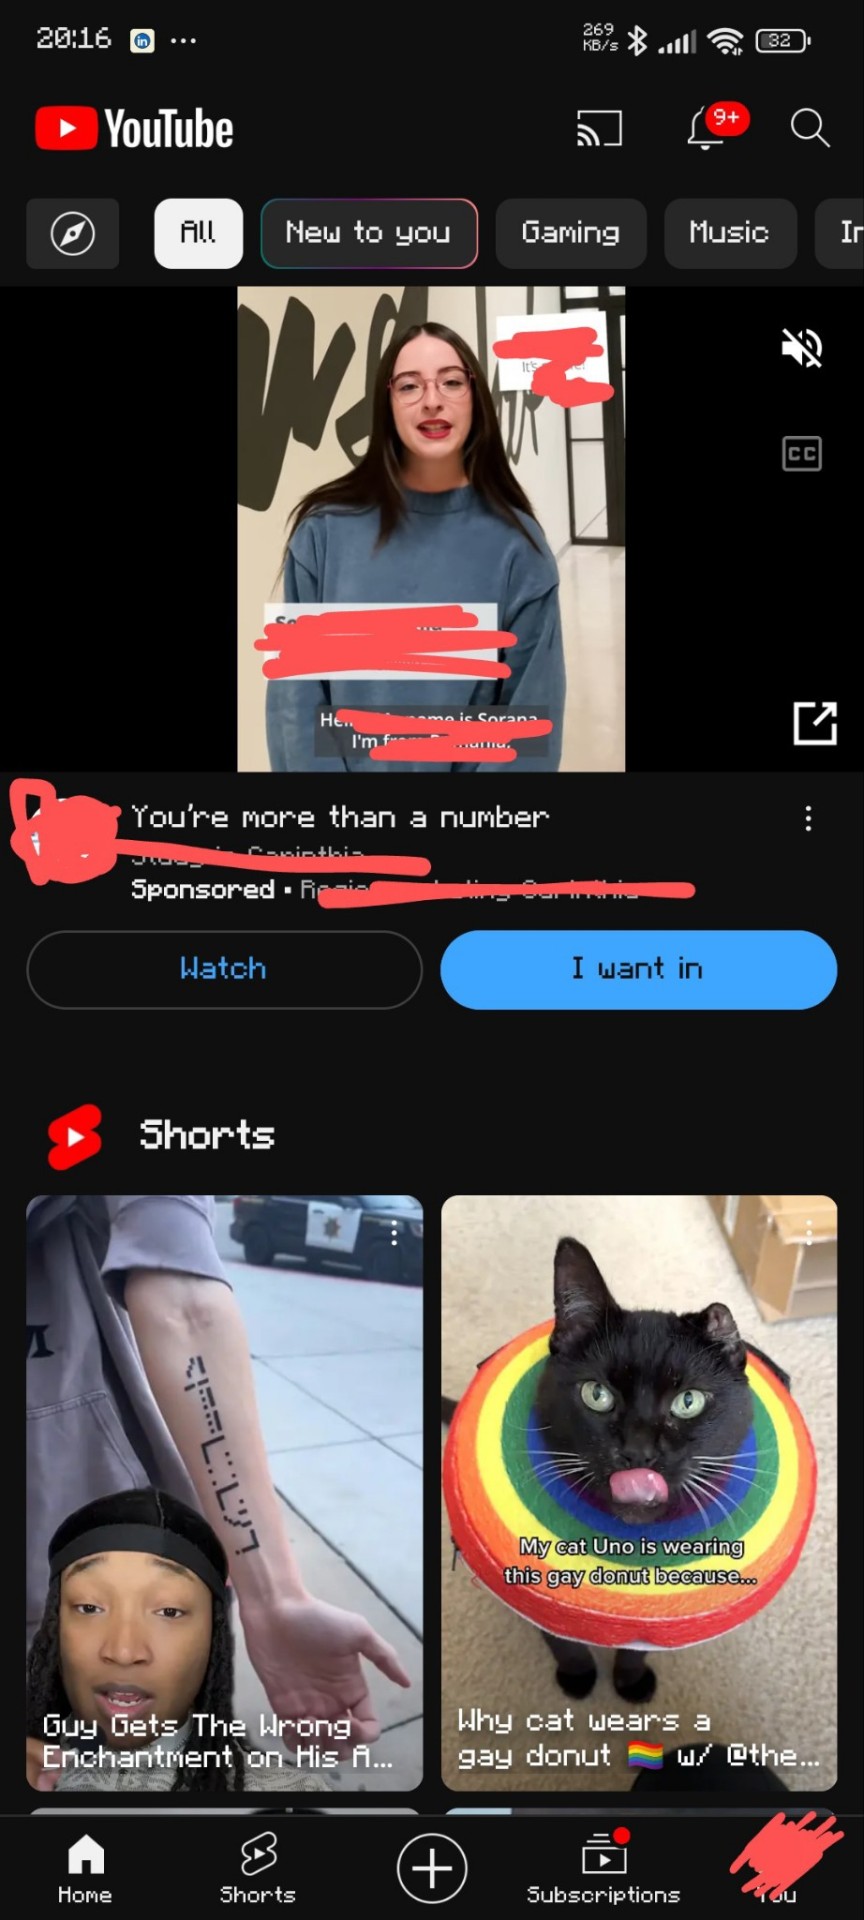
After:
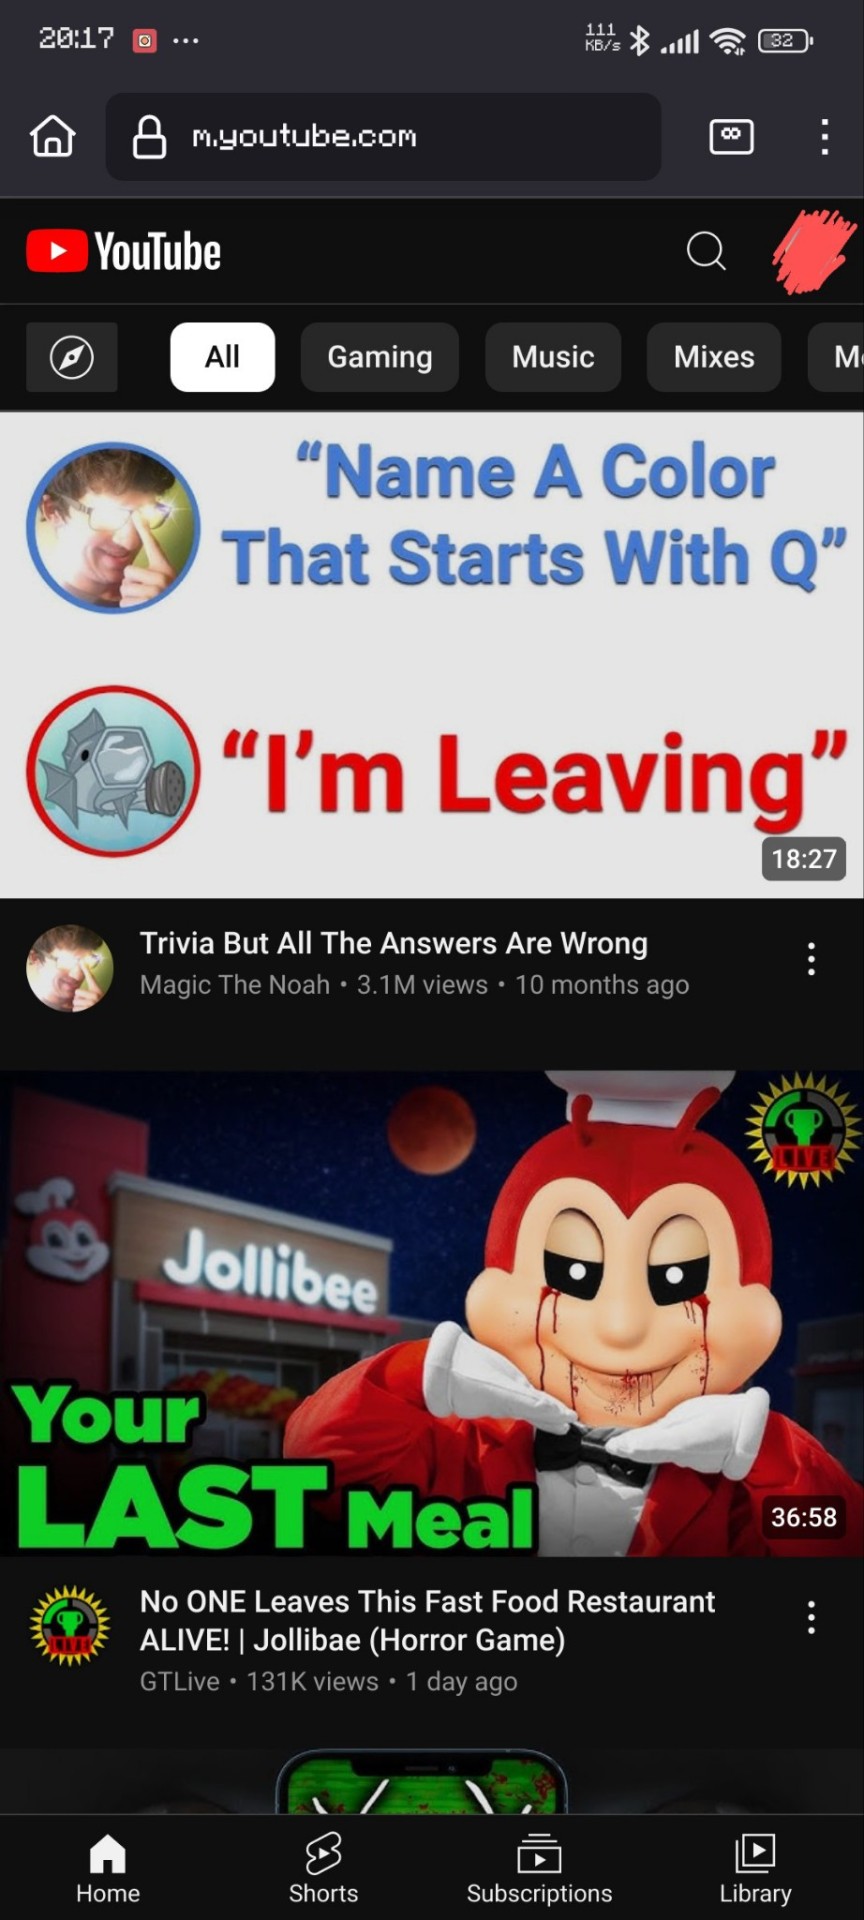
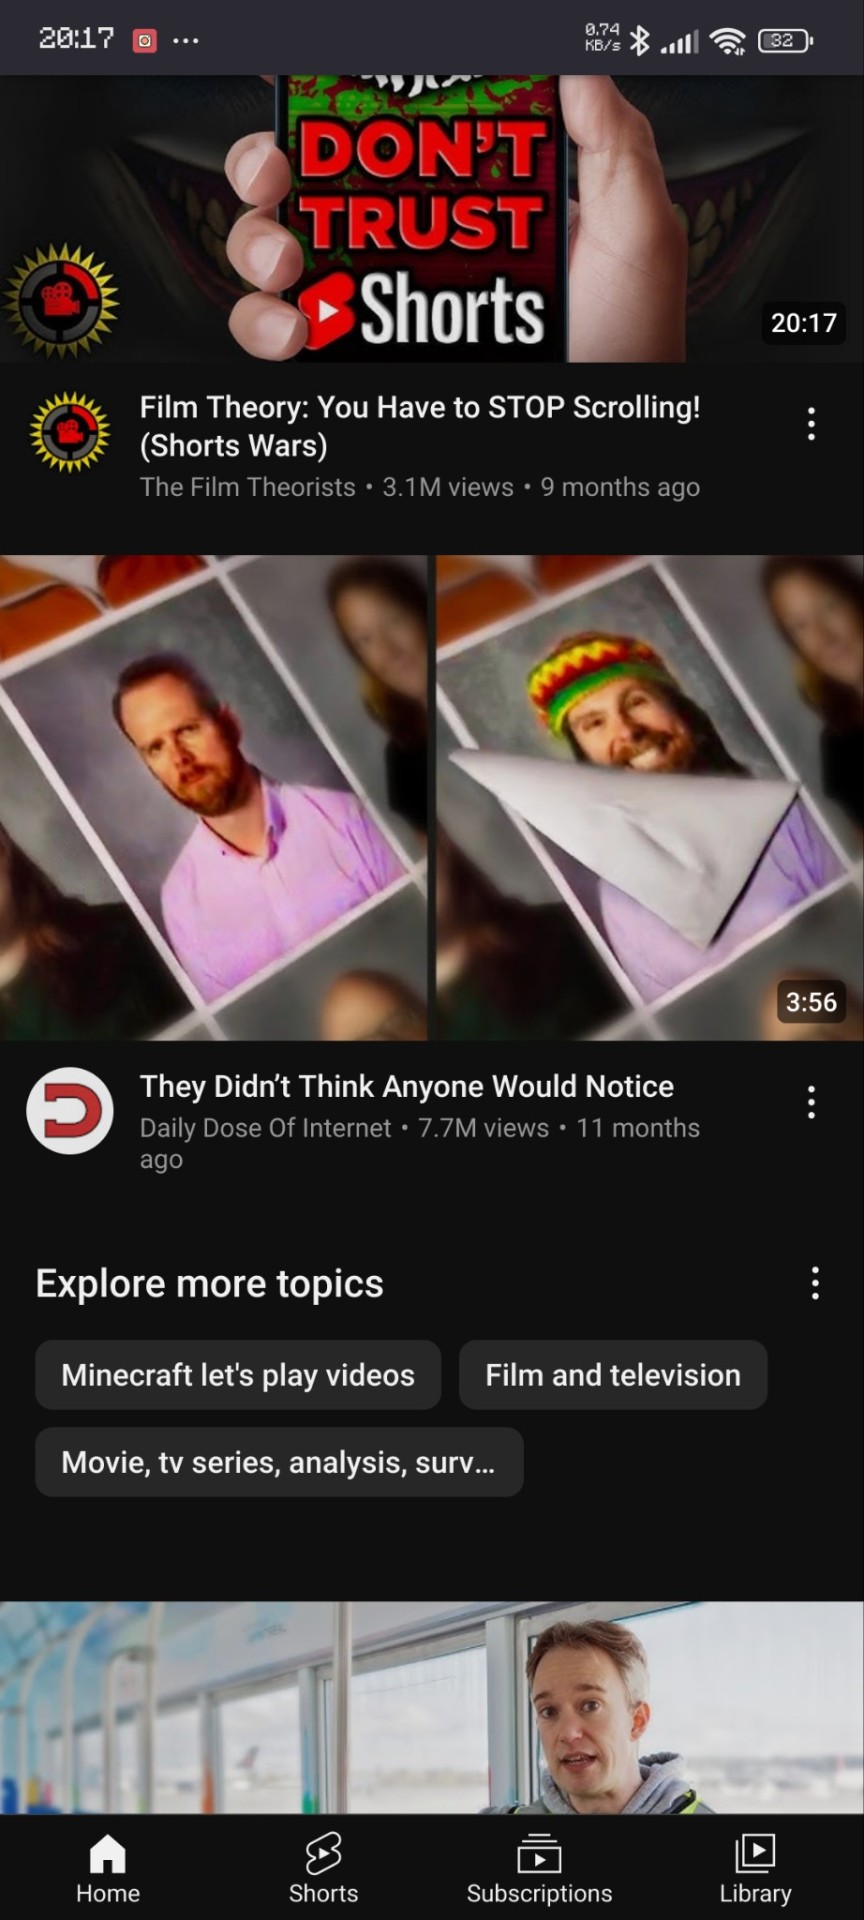
(thank you matpat for the perfect video for this lol)
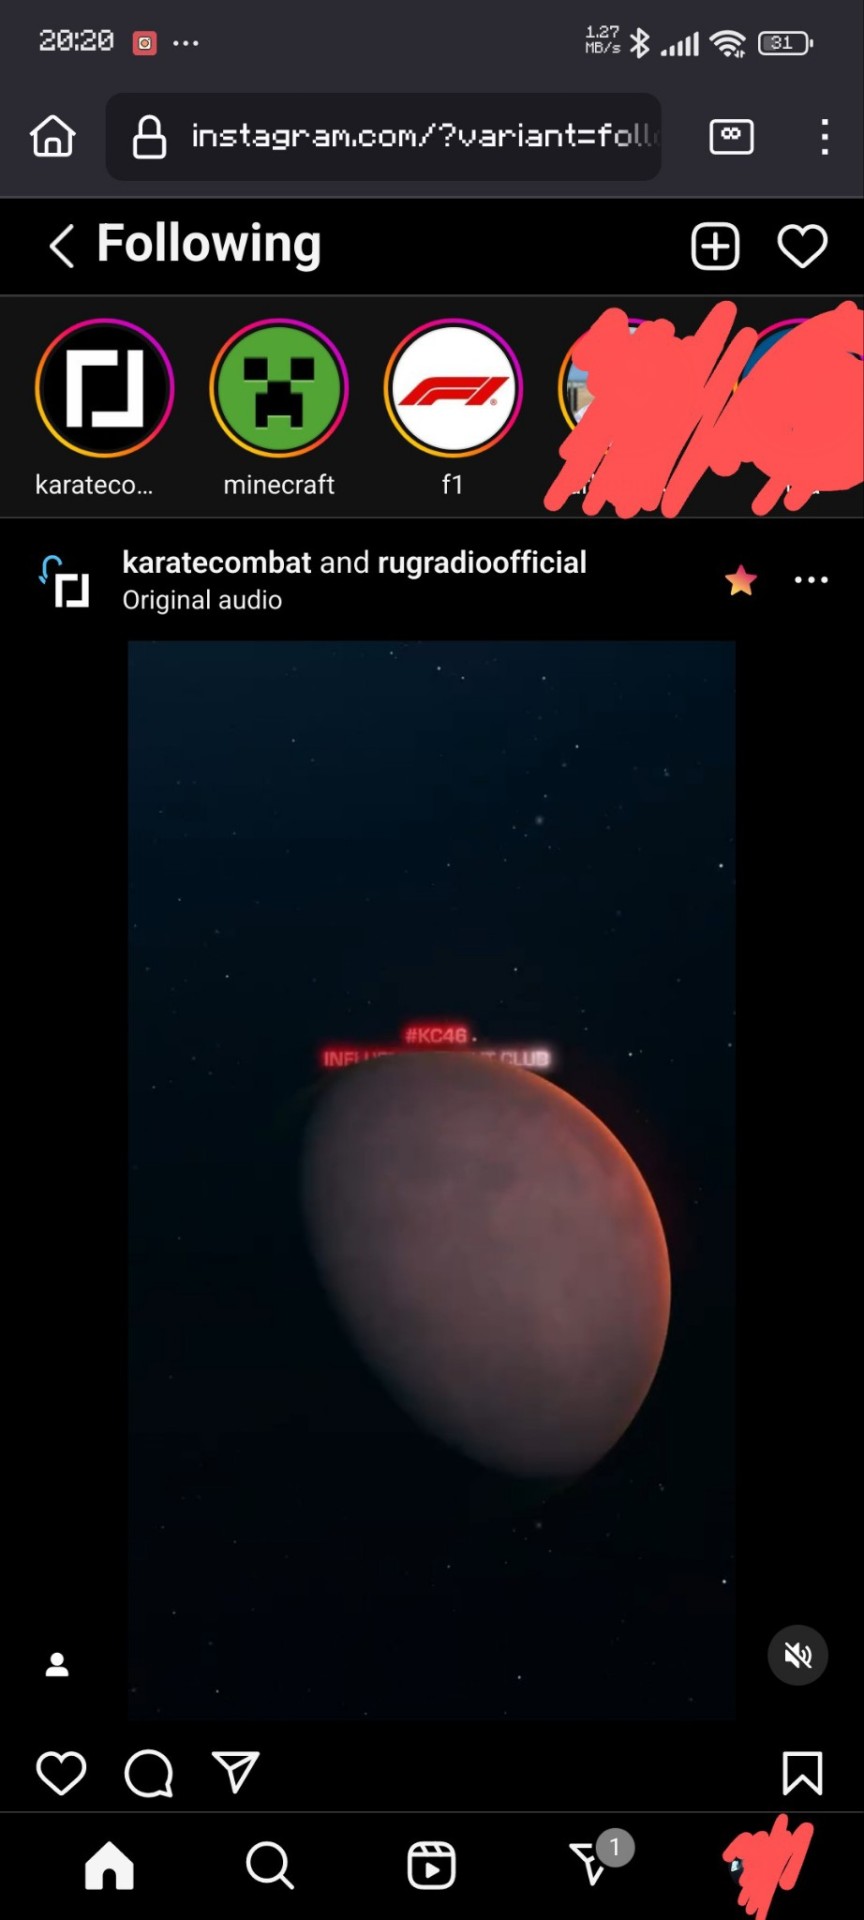
Instagram
After:
(I'm out of pics per post so only the after)
Hopefully I've managed to be of help. I'll answer any questions that you may have!
Oh, and if you guys want I can give a shorter tutorial on how to add a shortcut to these sites to your home screen.
#adblock#instagram#youtube#life hacks#no ads#shorts#instagram reels#reels#not sponsored#quality of life#adhd hacks#ig lol#online tutoring#tutorial#firefox#advice#advise#reblog to save a life
17 notes
·
View notes
Text
Obsidian Quickstart Guide: Because the video Tutorials make everything more confusing than it needs to be
Set up three folders, Notes, Templates, Attachments.
Go into the Settings. In Files and Attachments, set the attachments folder to attachments and in Templates, set the Templates folder to Templates.
Make a New Note in the Templates called "General" and put this in it:
Category: Subject:
Your "Category" is going to be either #Notes or #moc, which stands for "map of Content", we'll get into that later. Your "Subject " is going to be the Subject or subjects of the note. Make your Subjects one or two words like "Biology" or "Books". While writing your subject, surround them with double square brackets like [[this]]. This will make them into links to ghost articles. Don't worry about that. Just keep making those subjects and reuse them when relevant. Studying Biology? Your subject like should have [[Biology]] in it. When you write your links, if your subject has already been linked, you can select it in the drop down menu.
Also in your notes, if you see something that is a major subject in your notes, like say, a species or an author, highlight the word and hit the [ button twice to make them into a ghost note too. don't just keep links in your subject line.
Do this for all your notes. If you have a vault for "everything", note down everything and anything following these steps. If you have a vault specifically for one subject, just note down everything for that subject.
Eventually if you look in your graph view you'll see a load of dots representing your articles with lines representing links. The Ghost Notes will be greyed out. Some of the Ghost Notes will be larger than the rest. Once they get big enough, click on one to Make it a normal note.
Write Category: #moc at the top. This will be your map of content.
Download the "AutoMOC" plugin from the community plugins. Once you activate it it should appear in your sidebar.
Go into your freshly made Map of Content, write # Backlinks to make a heading, and then click under it and click AutoMOC. This will link to all the articles linked there. You can also put notes about the Subject the MOC talks about.
If you have more than one device, put your Vault on a Pendrive. Not everyone can afford Obsidian Sync but Obsidian are designed to be all text files to they are ultra-portable. The Pendrive I have is a Dual USB - USB-C drive meaning I can plug it into my phone and access my notes through the Android App, as well as on Windows and Linux, so I can take notes while out and about. It's an Emergent system so go for it.
38 notes
·
View notes
Text
tutorial on how to download ao3 fanfics!
you have a fanfic you love? do you have a fanfic that has a lot of chapters and you want to save it somewhere? I have a solution!
For this to work you need a reading app. I use Apple Books, but you can also use Files and Kindle. I also believe Google Play Books will work but since I don't know I didn't include it.
I also want to add that I have an iphone but I'm sure this will work for android
Find the fanfiction you want to download.
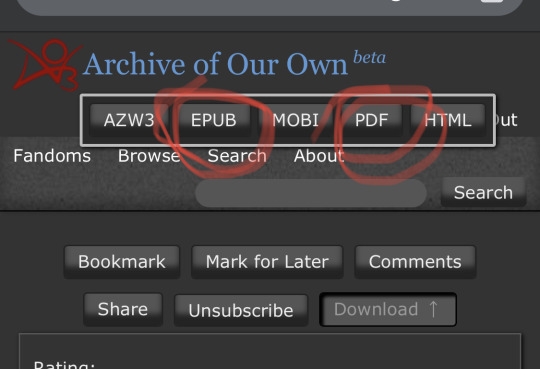
2. See that download button on the top? press it and a bit above it some options will show up. There should be AZW3, EPUB, MOBI, PDF, and HTML.

3. Click either EPUB and PDF. If you are using Kindle and Apple Books click EPUB. If you are using Files click PDF. (For Google Play Books you can use either.)
4. It will start downloading. Once its done downloading, click where ever the download location is. (Chrome it will be on the bottom for phone, I am unsure for others

5. It should bring up a list of the apps that are able to "hold" the file. Click the one you have. for files you will have to click save to files

6. Go to which ever app you chose if it doesn't automatically bring you there.
7. Click the fanfiction and it will either A.) open the fic or B.) download the fic. Don't worry if it starts to download again, especially if its on Files. After its done downloading, you can read it.
8. Enjoy!
55 notes
·
View notes
Text
How to get Utau and other voice synthesizers on your phone
Hi! Here's the tutorial on how to get Utau or any voice synthesizer on your cell phone
First you need to install a Windows emulator,In this case since I'm using Winlator
-Download winlator
Winlator is for Android however there are alternatives for iOS that also work
After installing the APK you open it and create a new container

You will change on settings "Windows 7" for Windows 11 or 10,why? Because some voice synthesizers don't work on Windows 7
After creating a container and configuring the settings you will open it and you'll see this
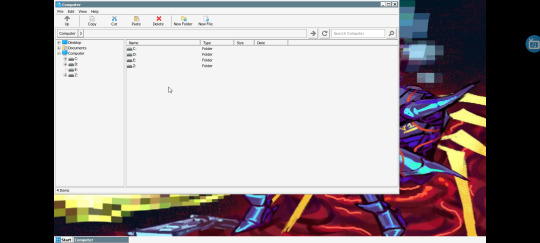
You will go to "D:" and touch date two times, so it will put first the setup files that you downloaded because since it is in Japanese sometimes phones don't recognize it and don't show it on normal search so it's better and easier searching for date of downloading
Once you find the setup file of the voice synthesizer that you want, you will cut it with the bottom of cut that's on top of the screen and I recommend pasting it on the desktop or creating a carpet on the desktop and pasting it inside,then you will open it and do the whole setup thing (To open you have to touch the screen 2 times however it's very hard and is easier to select it with the finger and the option to open will appear)

Don't worry, the shortcut will automatically appear on the desktop and will be saved in the container so you just have to install it once then you just run it and congratulations! You have Utau on your phone now

Personal recommendation:
I recommend installing Desh keyboard because it allows you to write on Romanji or Hiragana which is pretty useful when using japanese voice synthesizers,also add Japanese to your phone system so there isn't any issue but if there was,then here's a tutorial that can help if Winlator doesn't recognize japanese
Configuring Winlator if it gives you issues (It didn't happen to me but depends on the phone):https://youtu.be/0rRexzzijWw?si=5wTA3UA4uKqNzb4l
-Downloading Desh keyboard
Another solution to this is using Romanji encode voicebanks which you can find some here
Also some voice synthesizers are in zips and not in setups so to solve this you click it and use the unzipper Winlator has,however if you want something better I recommend installing WinRAR on Winlator.
Btw:You can get all the zips on my pinned post
Also thanks @jevinthecomputer for asking for this tutorial <3.
3 notes
·
View notes
Note
What do you use for you comic edits? Always incredible work btw
thank you so much!! i try haha
i use photopea!! it's an online and free alternative to photoshop that is available on both desktop and mobile <3
i have not been able to get a new laptop due to some personal circumstances, so i just have my android phone to do stuff on, and photopea has been really helpful for me!
i also use some supplementary sites, such as:
remove.bg — for making pngs! ( it works amazingly 99% of the time, but it doesn't work for comic pages unless you have a pretty uniform background, which is why i don't really make pngs of comic book characters... because i'm lazy. also going to link this tutorial i had made here! )
ezgif — for some basic gif editing here and there + for conversion of files
photomosh — for applying some really cool effects! it's especially amazing for turning photos into gifs through their effects
and so on! i also rely on pinterest, deviantart, dafont, and this very hellsite to find editing resources (fonts, pngs, templates, texture overlays, etc) as well as inspiration!
video editing software can sometimes come in handy if there's a certain effect you want to pull off (especially with transitions), because you can always convert gifs to videos and vice versa; i used to have adobe premiere for that, but on android, capcut has been really great :)
i don't use it much but canvas is pretty neat too!
this is all i can think of at the top of my head, if you have any particular questions, i'm always happy to help out!! 🩵
4 notes
·
View notes