#trimsheet
Explore tagged Tumblr posts
Visit Tumblr Blog
Explore Tumblr blogs with no restrictions, modern design and the best experience.
Last Seen Tumblr Blogs


Fun Fact
BuzzFeed published a report claiming that Tumblr was utilized as a distribution channel for Russian agents to influence American voting habits during the 2016 presidential election in Feb 2018.
Photo


Mehdi Beheshti
Texture Artist
artstation linkedin youtube
More from «Artstation» here
#texturing#unreal5#imperfection#mirage3dart#substance painter#course#substance#Corona#Character Modeling#drawing#unrealengine#art#material#environment#artstation#noai#marmoset#tutorial#unreal#Substance Designer#Mehdi Beheshti#Textures Materials#gameart#TrimSheet#roughness#hardsurface#marmoset toolbag#Tutorial#artist#3dsmax
4 notes
·
View notes
Text


I am going to be in #TheBsideOfDesign on the 24 of November in #LaSalle #Pachuca with a small #workshop about #Trims and #Modular structures
#maya #substancepainter #unrealengine5 #3d #3dart #3dartist #enviornment #prop #gameart #gameartist #realistic #3dmodel #3dmodelling #games #lowpoly #realtime
#3d#3dart#gameart#3dartist#freelancer#prop#lowpoly#fantasy#medieval#zbrush#modular#trims#trimsheet#gameartist#unreal#unreal5#video games#games
3 notes
·
View notes
Text
Portfolio, Documentation and Pitch (Aryan Raj Adhikari)
Development Tests #1
Since, I have finished with the compilation of all of the possible references to help assist me in my final project journey, I start carrying a couple of tests to make sure that I am well equipped when I start the production phase.
The first thing I did was to analyze the concept art and break it down into different elements.
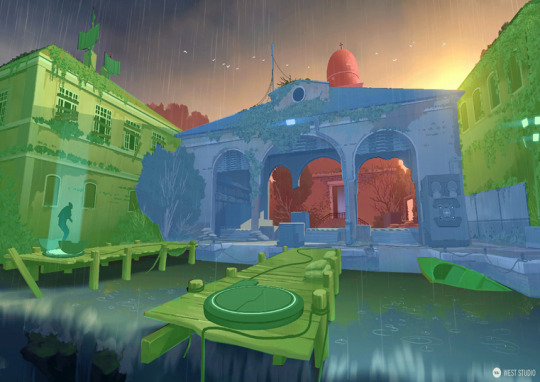
Figure 1 (Concept art breakdown)
The concept art has been broken down into 3 elements; foreground elements in green tone, midground elements in blue tone and the background elements in the red tone.
The foreground elements include the bridge, the portal contraption, the cables, the boat, the floodlights and the two buildings on either side. The building however could also be classified under the midground elements but I placed it in the foreground elements. The midground elements include the main archway building, the platform, crates, the sandbags and the main tree actor in the left corner. The background elements include the dome structure, the distant background building and the foliage and assets that are present in the vicinity.
The architectural assets include the two buildings on either side, the the archway structure and the background dome. The foliage include variations of trees, ivy plants, moss and water pads. The modular assets in the art are mostly the wooden panel and the beams that make up the pier bridge while the small assets include the boat, crates, cables, the teleporter, the floodlights, panels and the sandbags.

Figure 2 (Rough blockout inside UE5)
I went ahead and created a simple blockout inside Unreal Engine 5 to figure out the general layout composition and the shape language of the overall level. I used simple primitives like cubes, spheres and cylinders for a faster and efficient blockout.
Resizing and duplicating the assets as necessary, I then set a camera with the proper focal and zoom settings to match the perspective and locked it so I can work on that view exclusively while tweaking it later on.
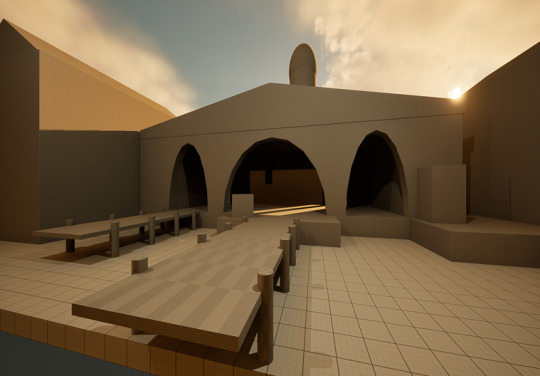
Figure 3 (Rough lighting pass inside UE5)
A simple lighting pass was set to match the general lighting mood for the scene, making it more similar to the concept artwork. I added a directional light to replicate the lightness of a sun and used a similar color tint to try and mimic the color composition of the concept artwork. I changed the position of the sun to get the similar sun glare in the corner and locked the manual exposure settings of the entire composition.

Figure 4 (Rough cloud cards)
I created a simple rough blockout for the cloud cards in Photoshop. This doesn't reflect the final cloud cards. I painted over the blockout in a new layer with an absolute white color using a wet brush. While working on the color, I also tweak the edges of the cloud using the eraser brush and the move selection brush. I started with a soft blue highlight tint for the silhouettes and a saturated blue highlight for stronger shadow emphasis. Finally, I manipulated the color of the hue/saturation to match the concept art composition which can also be done later inside Unreal Engine.

Figure 5 (Cloud FX test)
I modeled the cloud cards inside Blender and imported it to Unreal Engine. I created a material for the cards using its color and opacity masks. The material for the cloud cards utilizes the material functions and a master material with an instance material to control the parameters of the clouds.
It includes parameters like brightness, desaturation, hue shift and tint color to control the cloud cards. It also includes parameters like distortion speed and distortion strength to control the distortion flow of the clouds.
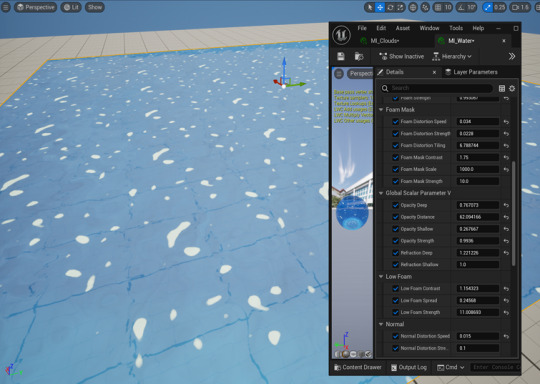
Figure 6 (Water FX test)
I created a water shader inside the Unreal Engine 5 entirely. The instance material of the water controls the parameters of the water shader. It includes a lot of parameters for the water FX that includes foam masks, normal, the low foam masks, the refraction settings and slots to change the opacity and the color map.
It also includes slots for noise maps that can be plugged to change the foam and normal masks which control the flow behavior of the water shader.
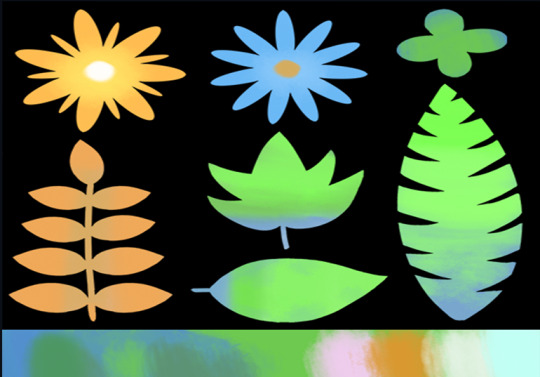
Figure 7 (Rough foliage cards)
I also decided to tackle the foliage as it could prove to be a bit difficult. However, it was really easier than what I had anticipated. Just like with the cloud cards, I created a rough foliage card with different leaf and flower variations and colored it with a wet brush. I then exported a color map and an opacity map which was used inside Blender with the help of a particle system to create flowers and bush. It was then imported inside Unreal Engine where I created a foliage material that can be referenced for any variation.

Figure 8 (Foliage material test)
The materials for the foliage was created inside Unreal Engine 5. It contains a plethora of parameters like billboard properties, color control, a PBR map and shadows which can be tweaked as necessary. I also included parameters for subsurface that help control the tint in the foliage for a subtle gradient silhouette. This material also creates a simple wind parameter to control the flow of the foliage.

Figure 9 (Rough tree test)
I also went ahead and experimented with the trees based on the concept artwork. I decided to use TreeIT, a free alternative to SpeedTree. Although a lot less versatile than SpeedTree, it met the requirements I had to create a nice tree and I have decided to use TreeIT moving forward.
I used one of the rough foliage card as a test for the leaf billboards for the tree. Inside TreeIt, I can control a lot of different parameters for branches, branchlets, barks, leaves and its overall scale and deformation. It proved to be a very viable alternative to SpeedTree while experimenting with it. I will require 2-3 different variations of a small tree to populate my scene later on.
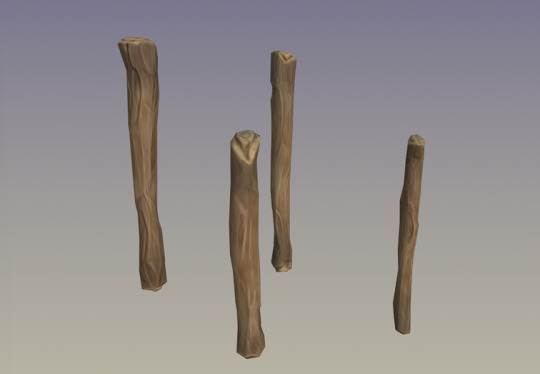
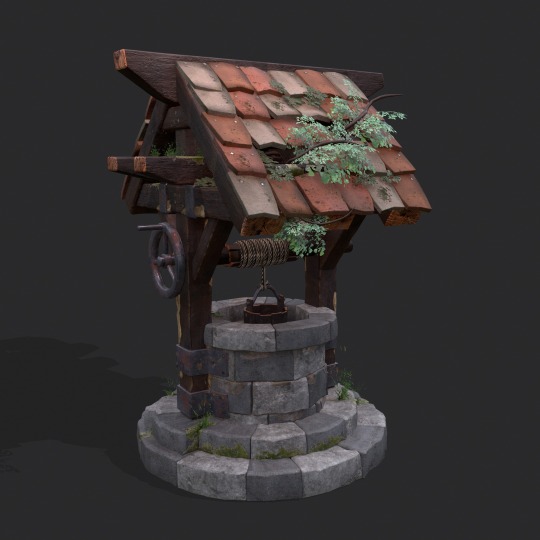
Figure 10 (Modular kit and shader test)
I created rough wooden logs as a modularity test to see if I could use these and build upon some of the scenes. I created 4 different variations of wooden logs. Sculpting it for stylization details and then importing it into Substance Painter for a shader test, it was a really rewarding and a fun process. I tried to mimic the shader of the logs as much as possible to that of the concept art. It is done with a simple procedural setup and utilizes black masks to add grunge maps as overlay details on top of the logs. Adobe recently released a 'Stylization' filter for Painter which allows you to replicate a stylized look based on presets which you can further tweak. The 'Handpainted' effect really allowed for a brushed touchup with grain noises being eliminated. This still requires much work but this test proved to be very useful.
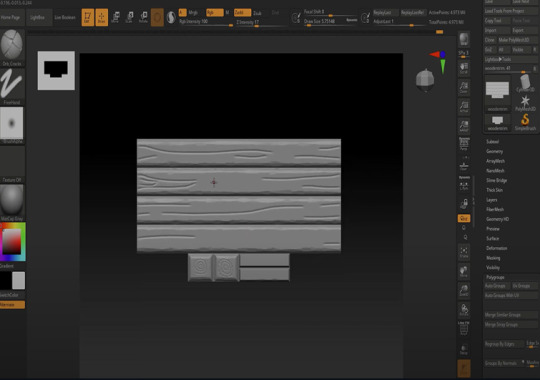
Figure 11 (Trimsheet test)
Instead of creating multiple different variations of wooden planks from scratch, I decided to undergo a trimsheet test to see if its viable for this project. I created a rough trimsheet in Blender and imported it to ZBrush where I sculpted wooden details onto it.
However, due to time constraint, I couldn't go further past this phase but I am confident that this approach would work for a lot of assets present in the concept art and I will employ this approach.
Having carried out these tests, I am happy to say that I am well equipped to tackle the final project head on. Still a bit more needed for testing which will be done in due time but for the meanwhile, I am really satisfied with this result.
0 notes
Note
Hey Heinn! I find your work truly inspirational!
I’d love to hear about your process for terrain! The modelling/texturing process is something I never really see discussed for this style!
With my own experiment I’m guessing either built entirely in blender using trimsheets to texture, or using probuilder in Unity and then texturing with a tileset?

I manually unwrapped it in Blender with an atlas, with some heavy Unwrap -> Reset spamming. Still have to actually try and learn Probuilder and Sprytile for real. Most of the lighting in the scene is also hand-painted vertex colors (in Blender), some things are influenced by the main directional light per-vertex (in Unity). One thing I also tried for quick and easy texturing is using Polybrush and painting vertex colors, using them to blend four textures. Which looks decent, but not as sharp. I think something like that + some heightmap / mask blending could look pretty neat. However, with this you do lose vertex colors for actual.... color (which I found to be pretty important for the look).
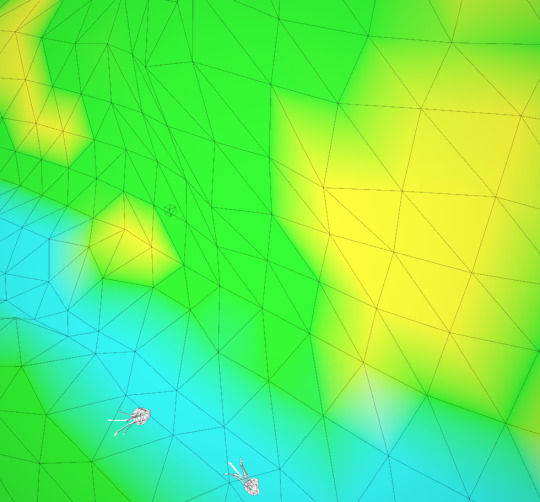

For the mesh itself I didn't do much other than uuuuh go for it. Tried to keep quads consistent size to make unwrapping with reset easier.
A few pretty cool resources to look at are the ones below. As of lately I've been really inspired by the Rayman levels, they really are very expressive with just relatively simple tricks.
64 notes
·
View notes
Text
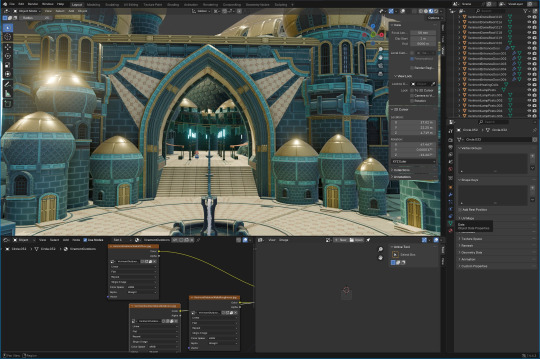
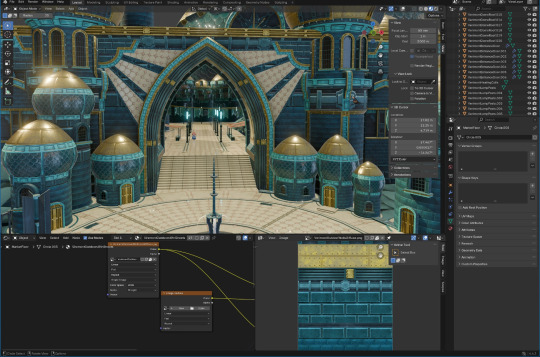
Viremont Plaza Visual Update
I finally had the time to adjust the trimsheet texture and I think it adds a lot of life to the buildings now!! I still need to do some adjustments maybe with normal maps and some lighting experiments. Some before and after adjustment shots.
#original#gamedev#reaper of the starless sea#rotss#blender#3d#unity3d#indiegamedev#indiedev#original art#plaza#wip
4 notes
·
View notes
Text
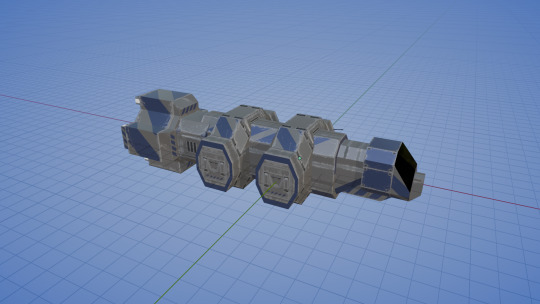
Giving the AC220 (a ship from my game) a bit of a facelift. It's a zippy little transport craft, and now the exterior is less than a crappy trimsheeted block. The interior definitely still needs work (despite it's 3 iterations so far) as it's model is starting to show it's age. Think this exterior is much better :3
4 notes
·
View notes
Text
I got good pictures (of myself)! But I am like NOTTTTT prepared for work tomorrow At All and I am souper sore and tired. BUT I looked FABULOUS for the last day, and I danced all four legs right clean off. I will poast some pictures later.
For now I am ALL FIRED UP from the technical presentations!!!!!! I already use trimsheets now I’m way hype about multi channel detail normal masking shenanigans. My texture memory performance is NOT optimized rn. But I am going to fix it. Going to get myself all spick and spamn. ugggggh it’s so exciting and my eye lenses (NEW!) looked INCREDIBLE
8 notes
·
View notes
Text
What is a trimsheet and how is it used in environment art? Check it out in this video!
#indie game#character art#character design#game dev#indie game dev#original character#digital art#indie dev#my art
6 notes
·
View notes
Text

[ID: A video and gif of the same 3D-modeled wooden dragon toy on a plywood workbench with a large cast iron and copper C-clamp, a bottle of wood glue with a red label and cap, and wood shavings. In the video, the dragon toy is rolling in place with its wings flapping and legs walking driven by the turning of its wheels. The glue's label is legible in higher resolution, its front reading "Now 15% More Volume, Bugs' Glue Carpenter's Adhesive; Bonds Stronger than Wood, Sandable & Paintable, Easy Water Clean-Up. Interior/Exterior, 16 fluid ounces (437 milliliters)." The Bugs' Glue logo is a redheaded woodpecker colored in orange and cream on the red background and the sticker is a little worn and peeling up at the lower right corner. The plywood worktop is disconnected from anything, the background a flat tan color.
The gif shows many stages through the creation of the glue bottle and environment, starting with only the toy, then the clamp appearing fully formed, the glue bottle without details, gaining sculpted normals of the ridges on its lid and the bottle midline, its label getting a blue outline and large monochrome woodpecker logo before its final design, the rest of the materials finalizing, wood shavings appearing in the foreground, subtly different (simpler) versions of the clamp and bottle replacing themselves before turning back to the high res models, the worktop appearing under everything, 2x4 boards forming legs and support underneath as well as studs in the wall, and finally particle board backing the studs. The shavings, particle board, 2x4s, and plywood are all light colors and the most recent render is glowing golden with the environment light bouncing off all of it. End ID]
I've been slacking on getting progress posts here while getting into the weeds of making a game-worthy glue bottle and various trimsheet wood bits. The plywood worktop here is not trim-based, just adapting the same node groups I started the toy with, but the 2x4s, wood shavings and chips (not pictured), and very much still-in-progress OSB/particle board are all very modular materials. A pegboard and either newspaper or shop cloth are still planned (the pegboard high res is modeled) but still to reveal how efficient versus detailed I end up going. Otherwise, I have artistically piling the wood shavings, planning the animation, and making a nice dramatic garage lighting setup still to go before I then try to copy it as best I can (using all my nice lower-poly models) in Unreal Engine for the experience.
3 notes
·
View notes
Text


All weekend I've been overhauling Ctesiphon's textures. After digging around the resources available on the Quake Mapping discord I was inspired to make some new stuff to replace the very plain textures I previously had.
While I'm working in krita, the workflow from this video has been a huge help as it was pretty close to how I was already trying to do things. https://www.youtube.com/watch?v=S6Eu8Cti9nI
This guide on how to use trimsheets also gave me the epiphany that I should actually make some trimsheets myself. https://www.youtube.com/watch?v=piiYIExIN6E
The hard part now is that after messing around with Trenchbroom it's become pretty clear that I should just abandon my own custom editor and use that. Back when I started, TB was much more primitive and would've required significant retooling to be useful to me. Now though, I've resolved to do my mapping in a more Quake-like manner and if I can extract my map compiler and lightmapper into command-line utilities (like they really ought to be anyway) then there's no real reason not to just use Trenchbroom.
I'll have to think about it this week. I already use the plain .map format for building maps in my editor, and being plain-text allows me to selectively add things to a custom Trenchbroom game config.
3 notes
·
View notes
Text
Final Masters Project: Forefront (Decal Mesh)

Figure 1: Decal trimsheet + decal mesh workflow. (Hu, 2025)
I was aware of decals usage in Unreal Engine to create quick and optimised details to assets and environment. However, I was not aware about the usage of Decal mesh until I came across Jolyn Hu's ELEGY OF THE CLAN: Ghost Of Tsushima Inspired Art on ArtStation. She successfully projected highly detailed normal and material maps onto low-poly mesh models, effectively creating the illusion of complex surface detail without sacrificing performance. Additionally, her use of edge decals blended seamlessly with the trimsheet, demonstrating a great understanding of texture integration. It was truly a remarkable execution of optimisation and visual quality.
youtube
Video 1: EVERYTHING You Need To Get Started Texturing Large Game Assets. (Tiedie, 2023)
This method was also briefly discuss in Tiedie's guide to texturing game assets where he talks about decal mesh.
I did some research about this interesting way to optimise game assets. Essentially, decal meshes, or mesh decals, are an effective technique for adding detail without excessive geometry from sculpting. Instead of embedding detail directly into the base mesh or relying solely on shader effects, decal meshes allow artists to overlay small textured meshes onto surfaces. This approach is particularly useful for adding items like dirt, stickers, or edge wear, which would otherwise require complex geometry or large textures. Since Mesh decals are imported as decals for static meshes, they can benefit from instancing, geometry batching, and selective optimisation.
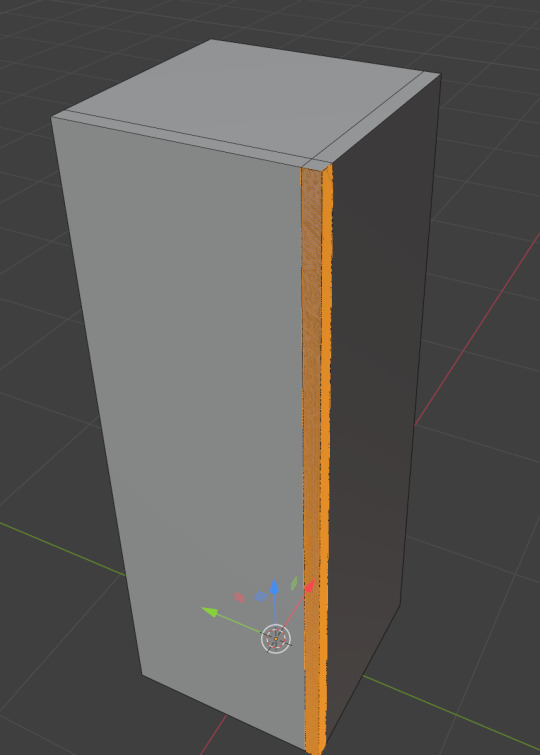

Figure 2: Subdividing selected corner. [Left] Figure 3: Sculpted corner. [Right]
After watching several YouTube tutorials, I consolidated the knowledge I had gathered and conducted a brief test to better understand the workflow. For this experiment, I duplicated and separated a corner section of an existing model, then performed a quick sculpting pass in Blender. The process was kept minimal since it was intended only as a testing exercise.

Figure 4: Final appearance.
Following the sculpting process, I exported both the low poly and high poly versions of the corner mesh into Substance Painter. Using the baking workflow, the detailed information from the high poly version was successfully projected onto the low poly model. Once the baked textures were exported, I imported the low poly mesh, which consists of only three polygons, into Unreal Engine. A decal material was applied using only the normal map to achieve the intended visual effect, as shown in Figure 4.
This decal mesh exercise and research helped me grasp how to efficiently add high-detail visuals to game assets without burdening the game performance. Overall, this hands-on approach has boosted my confidence in creating stunning game environments by using this optimising technique effectively.
References
Abdellatif, T. (2022) Creating Immersive Game Worlds with Unreal Engine. [online] The Rookies. Available at: https://discover.therookies.co/2022/01/26/creating-immersive-game-worlds-with-unreal-engine/?utm_source=chatgpt.com. [Accessed: 15 June 2025].
FastTrack Tutorials. (2021) Creating Edge Damages for 3D Assets using Decals. [online] YouTube. Available at: https://youtu.be/5-pDKn1jVgk?si=EJp88lF50ceBpNXN. [Accessed: 15 June 2025].
Haggerty, M. (2019) [Tutorial] Enhancing your Scenes with Natural Looking Mesh Decals and Skirts. [online] Medium. Available at: https://medium.com/gametextures/tutorial-enhancing-your-scenes-with-natural-looking-mesh-decals-and-skirts-bc5afe389689. [Accessed: 15 June 2025].
Hu, J. (2025). ELEGY OF THE CLAN: Ghost Of Tsushima Inspired Art. [online] ArtStation. Available at: https://www.artstation.com/artwork/1NkrRX. [Accessed: 15 June 2025].
The DiNusty Empire. (2020). Setting Up Mesh Decals. [online] YouTube. Available at: https://www.youtube.com/watch?v=Aihha0sAOJI&t=282s. [Accessed: 15 June 2025].
Tiedie. (2023). EVERYTHING You Need To Get Started Texturing Large Game Assets. [online] YouTube. Available at: https://youtu.be/QcqJckp_q3M. [Accessed: 15 June 2025].
0 notes
Text
Blog Post #24- 11/04/2025
So today I realised that I still hadn’t given my project a proper name so I asked ChatGPT for some help brainstorming names, and after a bit of research and back-and-forth, I finally settled on the name "Bio-Genesis".
Bio-Genesis refers to the origin or beginning of life, which perfectly resonates with the theme of my environment. The name captures the core concept of the environment—an attempt to spark a second beginning of life on a dead planet. I think it adds a meaningful layer to the story I'm telling with the environment.
After finalizing the name, I spent some time watching tutorials on trim sheets by FlippedNormals. I had heard the term a few times but hadn’t fully grasped how useful they actually are until now. What I learned is that trim sheets are basically texture maps that allow you to reuse the repeating textures/elements across multiple assets. Instead of creating unique textures for every single object, you can smartly UV map different parts of your meshes to sections of one single trim sheet—saving a ton of memory and time.
youtube
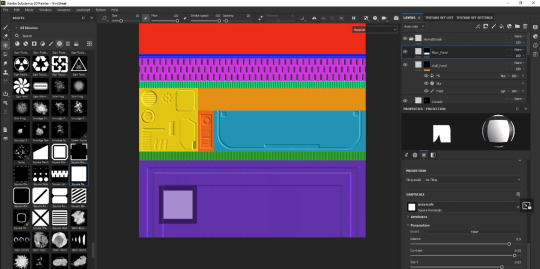
Another tutorial I found was by Adobe Substance 3D which highlighted how to make Trim sheets in Substance 3D Painter (Trim sheets are a way to texture many assets with just a single set of textures, allowing for very efficient use of texture memory. In this video you learn the planning and initial setup of your trimsheet in painter.) and break down all the scene textures' into a single UV map and also how to easily create sci-fi panels/tiles using a Tile Generator alpha texture and even create your own (which will bascially act as a normal) to create small details like vents/ by painting the normal map detail that i can paint..
Another really helpful tutorial I found was by Adobe Substance 3D which highlighted how to make Trim sheets in Substance 3D Painter. It explained how to create trim sheets directly in Substance 3D Painter, which is super useful for texturing multiple assets using just one texture set, making everything much more memory efficient.
The video also covered how to create sci-fi panels and tiles using a Tile Generator alpha texture. What I found especially cool was how you can even make your own alphas and use them as a normal map painting base, which is great for adding tiny surface details like vents, grooves, and bolts directly within the normal map channel. This means I don’t have to model those small features—just paint them in, which is so much faster and keeps the geometry clean. It was exactly what I was looking for!
Overall, it gave me a much clearer idea of how to use trim sheets efficiently and creatively, especially for my sci-fi environment.
youtube
Sources:
FlippedNormals, (2020). What are Trim Sheets? [video] YouTube. Available at: https://youtu.be/uUJShalzWy8 [Accessed 11 April 2025].
Adobe Substance 3D, (2022). Trim Sheets in Substance 3D Painter. [video] YouTube. Available at: https://youtu.be/dE4LWGMwypc?si=8wdMjZKA7_MrEDGk [Accessed 11 April 2025].
0 notes
Text
Blog 24: Nodes
Substance 3D Designer is also a node based software. It also helps to create trimsheets which helps to create detailed textures and saves from modelling those intricate details

In above centre is node graph,bottom two are rendered view in 3D and 2D respectively. Left bottom is a library that contains nodes and these nodes are made of more nodes if you jump in them. On top, those nodes are called atomic or operational nodes.
0 notes
Text
Blog Post 41: FastTrack Tutorials: Elevating Modular Sci-Fi Workflows
Date: April 8, 2025
Recently, FastTrack Tutorials have expanded their offerings for modular sci-fi environments with even more advanced courses. Their structured methods — focusing on modular asset creation, trimsheet optimization, and environment lighting — strongly influenced how I approached my pre-production document for Sector M17.
Watching their latest tutorials emphasized the importance of:
Starting with strong modular kit design
Focusing on reusability without sacrificing detail
Planning lighting and atmosphere during pre-production, not as an afterthought
Following FastTrack’s evolving workflow practices helped me refine my planning, ensuring Sector M17 would be both visually rich and technically efficient.
#gameart#environmentdesign#gamedev#unrealengine#scifienvironment#3dart#leveldesign#maya#sectorM17#artstation#fasttracktutorials#apexlegends#speedtree#gaeaterrain#digitalart#environmentartist#gameartist#scifiart
0 notes
Text
Portfolio, Documentation and Pitch (Aryan Raj Adhikari)
3D References #1
After researching on the real life counterparts for the assets present in the concept artwork and analyzing its color palette and stylization techniques employed, I move on to the 3D references for the assets present. It's really important to get both real life and similar 3D references for the assets you are going to create and I wanted to be well equipped before undertaking this huge solo project.

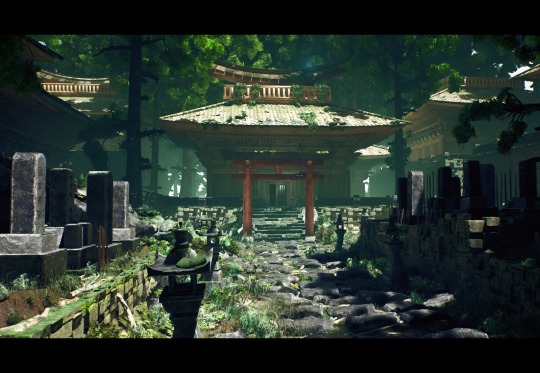
Figure 1 (Archway reference, (Queiroz, 2022))
This is an artwork reference for the arches created by Edinho Queiroz. Beautiful demonstration of stylized textures with soft, exaggerated color palettes and subtle edge highlights that avoid realism. The pond consists of lilies, fishes and reeds adding life and calm with well rendered reflections that provide clarity and depth to the water. Overall, it is a very well balanced artwork with nicely integrated foliage with bounce lighting, minimal noise and crisp shadows.

Figure 2 (Dome reference, (Maruško, 2022))
This is an artwork reference for the dome architecture created by Miha Maruško. This artwork is beautifully created with dressing of dome architectures all around with high fidelity realism and painterly flair. The central blue-and-gold palette of the main dome structure captures immediate attention as it is heavily ornated, feels and looks regal. Rich greens and the earthly muted stone tones with turquoise dome and magenta blooms scream exotic and intoxicating.

Figure 3 (Italianate reference, (Phillip, 2018))
This is an artwork reference for the Italianate architecture that sport those long windows from Martin Phillip. It is a really beautiful diorama that emits the ever so classic Italian air. This borders on stylized realism with clean and warm tones. The long windows present in the architecture is very similar to the ones present in the concept artwork. The warm directional sunlight with soft shadows is perfectly manipulated to evoke vibes of a late afternoon.

Figure 4 (Boxy building reference, (Bowie, 2023))
This is an artwork reference from Lanaea Bowie created by Naughty Dog Studios for 'The Last of Us Part I'. The distant buildings in the background and the small architecture in the midground sport the boxy architecture present in the concept artwork and will prove to be a great reference during the production phase. This artwork is hyper realistic and there are perfect decal details on the architecture with overgrown foliage that depicts a post-apocalyptic scenario, similar to what I am going for. Very moody lighting with little to no bloom which helps dramatize the urgency of this word.

Figure 5 (Wooden pier reference, (Meltser, 2017))
This is an artwork reference for the rickety wooden floor panels by Tomer Meltser that shows a beautiful modular kit for the entire pier with different variations. This is based in a stylized realism shader with excellent utilization of lighting and vibrant color palette that make the environment pop out even more. The grunge details present are very accurate to its real life counterparts but can be stylized even further for my own project. This is also a perfect artwork to use as reference for when creating a trimsheet and modular kit.
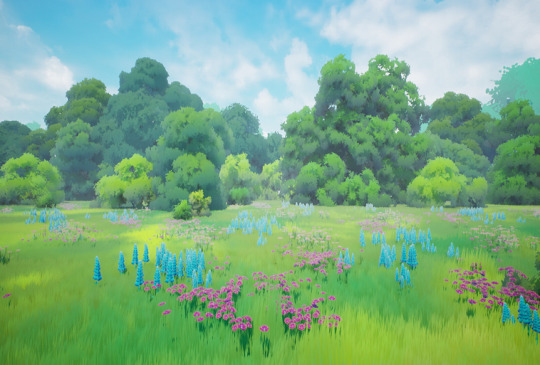
Figure 6 (Foliage reference, (Zavhorodnia, 2023))
This is an artwork reference for the variations of foliage by Viktoriia Zavhorodnia. It depicts a heavy stylized foliage with trees with lots of fluffy grasses and flowers with noise masks for different shading of the landscape. This can be achieved using a Runtime Virtual Textures system to create the property of inheritance for the grass assets on the landscape. The trees have proper specular shading to demonstrate different tone highlights with dense billboards.
I have completed the research of the main architectural and foliage 3D references that look similar to the ones present in the concept artwork and now I move towards 3D references for assets.
REFERENCES
Queiroz, E., 2022. ArtStation. [Online] Available at: https://www.artstation.com/artwork/qQvzPN [Accessed 23 April 2025].
Maruško, M., 2022. ArtStation. [Online] Available at: https://www.artstation.com/artwork/KOrmAB [Accessed 23 April 2025].
Phillip, M., 2018. ArtStation. [Online] Available at: https://www.artstation.com/artwork/dd1Rw [Accessed 23 April 2025].
Bowie, L., 2023. ArtStation. [Online] Available at: https://www.artstation.com/artwork/14vvrq [Accessed 23 April 2025].
Meltser, T., 2017. ArtStation. [Online] Available at: https://www.artstation.com/artwork/kWeny [Accessed 23 April 2025].
Zavhorodnia, V., 2023. ArtStation. [Online] Available at: https://www.artstation.com/artwork/VynVDR [Accessed 23 April 2025].
1 note
·
View note
Text
Major Project ; Texturing the Trimsheet
Blog #35
I imported a low poly trim sheet, which was basically just a 4 x 4 plane into substance painter after that I went into the baking section and imported the high poly version of the trim sheet then I started the baking process after that I started texturing.


there are a lot of problems with the tiling of the blocks but at least now I can say that I understand the process of making a trim sheet
I will, of course redo all the trim sheets, and do them properly when I start working on the major project.
0 notes