#tutorial: translation hover
Explore tagged Tumblr posts
Visit Tumblr Blog
Explore Tumblr blogs with no restrictions, modern design and the best experience.
Last Seen Tumblr Blogs


Fun Fact
Tumblr is available in 18 languages.
Text

here's a tutorial on how to have multilingual shenanigans without having to link back your translations in the ANs or something like that but also make it look nice in EPUB format? Here's my take on it. :)
mm whatcha say?: Changing Text On Hover for Multilingual Fics (A Download Friendly Workskin)

go forth and be free my lovelies
this is heavily inspired by @teekettle's tutorial on AO3!!
41 notes
·
View notes
Text
How I added "instant translation" to the non-english text on my fic: a very easy 3 step guide
Hello!
I recently posted a Wolfstar fanfic called Instance of Happenstance and received a lot of compliments on a small piece of code I used. Both @marigold-hills and @leavesthatarebrown suggested I share how I did it, so here I am, finally explaining it in a Tumblr post!
Before diving into the details, I want to clarify that I didn't write this code myself.
Initially, I tried following this tutorial, but I stumbled upon a better solution in the comments of that post. The code on the tutorial itself does work, but a) it's harder to use and b) it doesn't work as well if you're planing to have multiple paragraphs that you need to show the translation on the same fic.
The solution someone presented on the comments, however, is very simple and easy to use for as many paragraphs as you need, but the explanation there wasn’t too clear, so I decided to expand on it to make it easier for others to implement.
All credit to Ao3 users La_Temperaza (who wrote the orginal post) and Nikkie2571 (who posted this code on the comments).
What Does This Code Do?
This code adds an interactive feature to your fanfic, allowing readers to hover over a specific paragraph (or tap on it if they’re on mobile) to instantly change the text to something else — also set by you.
While this can be used for various purposes, I think it's particularly useful to display instant translations of non-English dialogue/text directly in the story. The code offers a much smoother alternative to the clunky “see end notes for translation” thing—which, let's be honest, can be a pain for readers, especially in long chapters.
For example, in instance of happenstance, Sirius discovers an old journal written entirely in French. I wanted to maintain the sense of mystery and intrigue that would be lost if I simply said the journal was in French, but wrote the text in English.
This solution let me keep the best of both worlds—retaining the authenticity and the immersion of the French, while still making the story easy to follow for the readers.
Now, I know this sounds complicated, but I assure you, it's not!
Down bellow is a quick, 3 steps tutorial on how to do it. I hope this is helpful! (:
(I'm doing this on the computer, if you're doing it on mobile, the layout of the website might be different from my printscreens)
Step 1 - Create The Work Skin
I'm gonna go right to the point here, but if you want to know about Work Skins in detail, I suggest this Ao3 Article.
On your Ao3 Dashboard, click on the fourth link on the sidebar, which is "Skins".
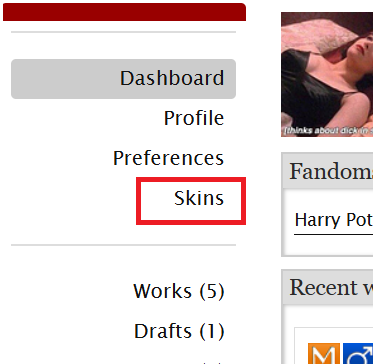
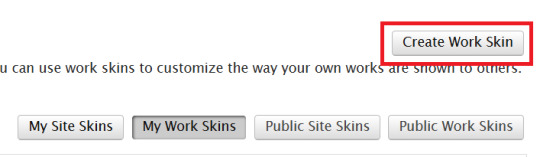
Then, on the page that opens up, click on "My Work Skins"

Then, on the top of the page, select "Create Work Skin"
Now, you'll see the form to create your skin, which looks like this:
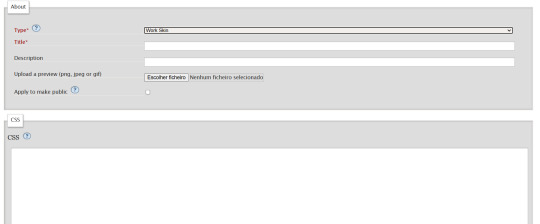
Leave the "Type" as "Work Skin". On the Title, you can give any name you want to your skin, but I suggest you choose the same title as your fic or something like "instant translation", so you'll know what it's about later.
You don't have to worry about any of the other fields, except for the CSS one, where you should copy and paste exactly what I'll put bellow:
#workskin .change_on_hover:not(:hover) .on, #workskin .change_on_hover:hover .off { display: none; }
So, now, you'll have something like this...
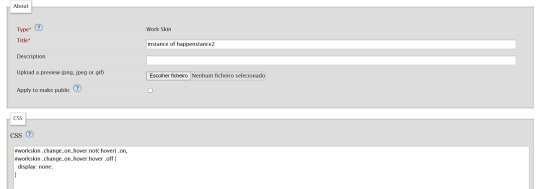
... and you just have to click "save" on the bottom of the page, and this step is done.
Step 2 - Apply the Skin you created to your fic
For a new work, click on "New Work" as usual. If it's a fic you're already posting, you can add this as well, just click the "Edit" button.
Now, on the form of your fic, on the "Associations" tab, right under the menu where you select the language of your fic, you'll see a "select a work skin" option.
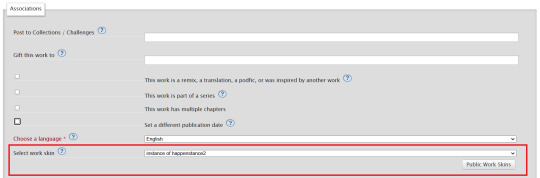
On this field, you should select the workskin you just created on the previous step, searching by the name you gave it on the "Title" field.
Step 3 - Insert the text
The code we're gonna use is this one:
<p class="change_on_hover"> <span class="off"> paragraph in foreing language </span> <span class="on"> paragraph in english </span> </p>
If you have no idea what this means, hold my hand, we're gonna get through it together!
First, copy your fic’s text into the AO3 text box as you normally would. Then, switch the text box to HTML mode so you can see the underlying code.

Now, scroll down until you find the paragraph you want to translate. After pasting, it will likely look something like this:

Note how each paragraph in HTML starts with <p> and ends with </p>. These tags indicate where a paragraph begins and ends.
Our goal is to modify that first <p> tag so it tells the browser, “Hey, this paragraph is different from those other ones. It should change when hovered over or clicked.”
To do this, we’ll change <p> to <p class="change_on_hover">. This marks the paragraph as special—one that should switch text when interacted with.

Now note how instead of having a single paragraph, we need two versions of the text:
In blue, the original (non-English) text, which will be shown by default.
In red, the translated (English) text, which will appear when the reader hovers over or clicks on it.
For the original text, wrap it inside a <span class="off"> tag, ending with </span> like this:
<span class="off"> insert here the whole text of the paragraph in the foreign language </span>
For the translated text, wrap it inside a <span class="on"> tag, also ending with </span>. This will replace the original text when hovered over or clicked:
<span class="off"> insert here the whole text of the paragraph in english </span>
And don't forget to end the whole thing again with </p>
Again, here's how it looks on my fic:

With the paragraphs that come before and after the translated text, just leave them as they are. They should still start with <p> and end with </p>. No changes needed!
You can use this method for as many paragraphs as you want, whether in the same chapter or across different chapters. As long as the Work Skin is active, the effect will work seamlessly throughout your fic.
#fanfiction#ao3#ao3 work skins#work skins#translation on text#ao3 fanfic#ao3 coding#tutorial#step by step#fanfic#wolfstar#marauders
81 notes
·
View notes
Text
everyone's loving the 'hover to translate' feature in one of my recent buddie fics (I Could Die In Your Kiss). should i make a tutorial post on how to do that?
#buddie#buddie fanfic#ao3 writer#ao3 html#911 abc#eddie diaz#evan buckley#bathena#henren#madney#buckley diaz family#buddie fanworks
25 notes
·
View notes
Text
Diabolik Lovers PSVita Emulation
This is a tutorial on how to emulate and play on your own PC/Android the following Diabolik Lovers titles:
Diabolik Lovers Haunted Dark Bridal - Limited V Edition (with fan-translated english patch)
Diabolik Lovers More Blood - Limited V Edition (with fan-translated english patch)
Diabolik Lovers Vandead Carnival
Diabolik Lovers Dark Fate
Diabolik Lovers Lunatic Parade
Diabolik Lovers Lost Eden
Before we start, the first thing you'll need is something to emulate these games on. This tutorial uses Vita3k, so I reccomend you use that lol. You can download it here: https://vita3k.org
For those who want to play on their PC, keep reading. But for thoes who want to play on their android, scroll further down :)
PC
Unzip the vita3k folder you just downloaded (If you don't have a program to do this, I reccommend WinRAR. [just download it, no need to buy it] But I'm sure any will do)
Open the Vita3k.exe file to install it
Follow the installation instructions
When prompted to install firmware and font files please do so, don't skip by pressing next. You can find them here: firmware and font.
Select the install button for each, and then select said files from your downloads (or wherever you downloaded to files to) when prompted.
Click next when you have installed both. On the next page, click next again after selecting settings and preferences.
Now close Vita3k down and reopen it again.
You are ready to install some Dialover games XD
(if you run into any issues just DM me via either tumblr or discord)
NoPayStation has the PKG for all the above games.
Select the game you wish to download (click the name, it should open a pop-up window)
Then download the PKG file
Keep this pop-up window open, you'll need it for later.
Once done, in Vita3k, click file > install .pkg. Then select the game you just downloaded.
It will ask to verfiy the PKG, so you can select either work.bin OR zRIF. (work.bin involves downloaded another file from NoPayStation. While zRIF is just a code you can copy and paste)
If you chose work.bin: download the work.bin file from the game's pop-up in NoPayStation. then select it when prompted in Vita3k.
If you chose zRIF: copy the zRIF key from the popup window from before. (make sure you select the whole thing, it's quite long). Paste the key where prompted to in Vita3k.
The game should now install (if it hovers around 60-70% for a while don't stress)
Now, if you're installing either HDB or MB, keep reading, otherwise, you should be good to play the game :)
Here are the english patch links for both games: HDB english patch link MB english patch link
Inside Vita3k, right-click on the game you just installed, press Open folder > Application > data. Now replace the GAME.cpk with the one you just downloaded. (it has the english translation in it)
Close Vita3k again, then reopen it.
You are now ready to play Diabolik Lovers >:)
Andriod
Credit to the lovely @mp3minded for this tutorial. I don't have an andriod phone so I didn't consider it, but it's a great idea haha.
Vita3k should have downloaded as an apk.
You should now navigate to wherever the apk file was downloaded using a file manager app on your android. Click on it and install it. (if you don't have one, I have used ZArchiver personally, so you can try that).
Now download firmware and font files. You can find them here: firmware: http://dus01.psv.update.playstation.net/update/psv/image/2022_0209/rel_f2c7b12fe85496ec88a0391b514d6e3b/PSVUPDAT.PUP font: http://dus01.psp2.update.playstation.net/update/psp2/image/2022_0209/sd_59dcf059d3328fb67be7e51f8aa33418/PSP2UPDAT.PUP?dest=us
When asked whether or not to create a new emulator path in Vita3k, make one just to be safe.
You are ready to install some Dialover games XD
NoPayStation has the PKG for all the above games.
Here are the direct links to each of the games;
HAUNTED DARK BRIDAL: https://nopaystation.com/get/PSV/PCSG00272/IFDIABOLIKLOVERS/1/pkg?version=1.01
MORE BLOOD: https://nopaystation.com/get/PSV/PCSG00476/DIABOLIKLOVERSMB/1/pkg?version=1
VANDEAD CARNIVAL: https://nopaystation.com/get/PSV/PCSG00472/DIABOLIKLOVERSVC/1/pkg?version=1
DARK FATE: https://nopaystation.com/get/PSV/PCSG00530/DIABOLIKLOVERSDF/1/pkg?version=1
LUNATIC PARADE: https://nopaystation.com/get/PSV/PCSG00826/DIABOLIKLOVERSLP/1/pkg?version=1
LOST EDEN: https://nopaystation.com/get/PSV/PCSG00910/DIABOLIKLOVERSLE/1/pkg?version=1.01
Select the game you wish to download (click the name, it should open a pop-up window)
Then download the PKG file
Now keep this pop-up window open, as you'll need it to copy the zRIF key.
Once done, in Vita3k, click file > install .pkg. Then select the game you just downloaded.
It will ask to verfiy the PKG, so you can now go back and copy the zRIF key from the popup window from before. (make sure you select the whole thing, it's quite long). Paste the key where prompted to in Vita3k.
The game should now install (if it hovers around 60-70% for a while don't stress)
Now, if you're installing either HDB or MB, keep reading, otherwise, you should be good to play the game :)
Here are the english patch links for both games: HDB english patch link MB english patch link
This is the most complex step, so take it slow if you need to. First, find the new folder you made for your Vita3k Emulation, and follow this exact pathway for each game. HDB; ux0 > app > PCSG00272 > data. MB; ux0 > app > PCSG00476 > data.
Now replace the GAME.cpk file with the one you just downloaded. (it has the english translation in it).
Close Vita3k again, then reopen it and/or clear Vita3k’s cache before you start up the game. Set up your button config in Vita3k too.
You are now ready to play Diabolik Lovers
Gatekeepers of the english fan-translation patch be damned. If Daisuke Iwasaki won't release an offical english version of Diabolik Lovers (and a Chinese one instead apparently 😭) then I'm emulating his damn game. I've bought a bunch of offical merch anyway, not like I haven't supported the company lol.
Happy gaming my fellow vampire enthusiasts :3

46 notes
·
View notes
Text
Limbus Company Update 2025/04/10
Weekly Update Bug fixes: Certain triggers stayed after usage, working even for the defensive skills for E.G.O gifts, IDs and enemies. It affected "Wobbling Keg", "Omnivibro-octovecti-bell" from gifts, passives of (support) Dieci Hong Lu and (combat) Cinq Meursault on Uptie 4. Also Enemies possessing "Censored Courage" from L.C.B Regular Check-up. This should be no longer an issue. Certain effects of Gaze of Contempt E.G.O. gift didn't work properly. Doubling the effect on Max Upgrade and not triggering effects to enemies that hit ally that got targeted by multiple (2+) attacks properly. Epicenter E.G.O. gift effect had been fixed connected to self tremor recovery. Fixed Focused Encounter information unlocking (yay). Parts appearing in UI of Abnormality Dream-devouring Succulent no longer not load properly. In MD, choice event in Nocturnal Sweeping Pack for The Middle has now Envy affinity advantage. Mobile app client additional downloads that occurred during game play didn't return players to main screen. Steam client mouse and shortcut bug issue had been fixed. Hovering over Win Rate or Damage button and using shortcut works properly now. Custom Translation application fixes. For some reason pausing a dungeon stage made Tutorial "Skip" button appear (Are they working on tutorial that this appeared?) Simplyfing skill descriptions by removing more/less to +X/-X dmg skills. Sinclair E.G.O. - Lantern unnecessary text Keyword had been removed. Translation mentions of Heishou Pack had been adjusted in Canto 7.
Hotfix 2025/04/03: Yi Sang Fell Bullet EGO description had been clarified that Poise application works on two random allies. Newly released The Middle Little Brother Sinclair had few errors, like not loading Identity Portrait animation on skill 3 and clarification in skill description for EN players about stacking of aggro per skill slot. Both had been fixed.
300 Lunacyy! Yippe!
Rodion will threaten all ducks to be made in Peking style for her fancy arrival.
4 notes
·
View notes
Text
Resources; Favourite Sites for Anythings Colours Related.
This List is being updated. Updates won't show up on reblogs. visit the original post to view the most up to date post.
• Encycolorpedia, a Fantastic Site. Hex Codes, Colour Analysis, Colour Codes of Brands and more:
This site has lots of information and cool features. It's my favourite for everything's Colour related. It can also analyse a picture uploaded from pc. Not to mention how easy it is to make palettes with.
Edit: how cool is the image analysis. On pc its possible to hover over the image and sample it's colours.
I lost its bookmark and found it recently, so might as well share.
I'll add a bunch more in the future.
26.05.25 Update:
Color Hexa: good features.
W3 School. Notice the different translations of colour standards into hexa.
Colour Pod's resources page is nice [Firefox users can sample colours straight from the browser].
Contrast Tools, to verify readability.
More Info about readability & some colour codes & palettes.
That's it for today. Happy Simming!
2 notes
·
View notes
Text
Ao3 Life-Saver Skin
I'm literally jumping in joy right now. I found a wonderful guide on how to create an AO3 work skin, specifically one centered on translations.
For instance, instead of using the end notes to translate something or put the translation in the textsperated by parentheses you can just click the highlighted text for the words to automatically translate. I haven't tested it yet but I have seen it in a fic before so it does work.
Please look at it if you're translating from a langauge that isn't your native one. Give this user love too, they deserve to be appreciated for the hard work they've done. You simply have to copy and paste the code. They also have tutorials for another work skins as well.
How To Change Text on AO3 When the Cursor is Hovering Over It (Or Clicked on Mobile) (999 words) by La_Temperanza Chapters: 1/1 Fandom: No Fandom Rating: General Audiences Warnings: No Archive Warnings Apply Additional Tags: Fanwork Research & Reference Guides Series: Part 15 of AO3 Work Skins/Tutorials Summary: This a tutorial/live example on how to have text change or appear once a cursor is hovering over it. Helpful for pop-up spoilers, language translations, quick author's notes, etc.
13 notes
·
View notes
Note
Hey there! I'm just curious how you do the hovertext for the translations in Bloodletting. Is there a resource you use for how to do it, or do you have any tips for it? I'm working on a fic where hover text would be useful and was just curious if you had any tips ^-^
Hey friend! I posted a mini tutorial for the method I use here.
I will note, there are multiple ways to create hovertext and edit how it appears/etc. After I wrote that mini tutorial, I did end up going back to make the boxes on bloodletting a little skinnier so they didn't go off the page. I can show you how to do that if you want, just DM me!
I keep meaning to put together a little compilation of all the hovertext methods I've seen used, just so folks can choose the one they like best. I need to get on that...
22 notes
·
View notes
Note
yeah the corrupt text is known as Zalgo text, it comes in various degrees of 'corruption', but despite how many people use it it's not actually recommended. it can be really hard to read even at its least corrupted, and they're terrible with screenreaders (either skipping over Zalgo text or reading it out letter for letter). I suppose on AO3 you could try incorporating it into a hovertext thing where hovering reveals normal letters but it's worth keeping in mind.
oh don’t worry, hover text on ao3 was the plan for just that reason! i try to be as screen reader friendly as possible (I'm actually fairly sure all of my fic are as close as you can get), but there’s also something to be said about using visuals in writing that just won’t translate to audio. with all this in mind tho, it will only be one word once, with the lowest level of visual corruption possible, and a hover translation was always the plan! tho I do have to find a tutorial on the kind that work on mobile bc I abhor footnotes
#thanks for the answer and insight!! genuinely#as thats all very important things to remember#cj answers
4 notes
·
View notes
Note
Please Help Me! 🙏
So I’ve seen before on Ao3 where it’s written in English but the character speaking changes from English to Spanish/etc. You was able to tap on the foreign language and it would translate to english from something that the author would do. 
I’ve tried looking up ‘Ao3 tap translation’ because that is literally what it is and now I can find it anywhere. I want to do it in my story instead of leaving the translation in the notes. The foreign language would be underlined indicating that you could tap it to translate.
It’s not google translate I can tell you that, I have a iPhone and I don’t even have google app. I could be wrong but I’m pretty sure it exists and I want to know how to do it.
Hi! I'm answering your ask even if you found how to do it so others can find it too.
So, it technically isn't a translation system, more of a hiding system. Which means that you will have to translate the bits you want to be bilingual.
I used it twice. Once for translation, once to hide CW parts within the fic.
This system uses CSS and needs to be put in a special skin that you will use only for one work. Also it's only for each <p> tags (iirc), which can become annoying after a while if you have a lot of lines or several paragraphs.
As a reader: you need to allow work skin/creator's skin in order to have the full experience.
For download: I downloaded the fics I did with this code in it in .epub and .pdf and... It doesn't appear. At all. So I'm still looking for a way, but with my knowledge of how to use all of that, downloading the fic is useless because there will be lines missing.
Here is a guide on how to do it (it's also part of a work skin tutorial series, if ever you want a looksie):
12 notes
·
View notes
Text
Mastering the Art of CSS Translate Property
Do you want to elevate your CSS skills? 🌟 💡 Ever wondered how to create stunning web animations and smooth transitions? Check out our latest blog post: Mastering the Art of CSS Translate Property: A Comprehensive Guide with 7 Examples In this guide, you will learn all about the CSS Translate property and how it works, along with key insights on the Transform property. Discover 7 hands-on examples, including how to create sliding menus, animated flip cards, stylish draggable elements, centered image galleries with hover effects, smooth and responsive modals, expanding search bars, and dynamic search bars. Don't miss out on these powerful techniques to enhance your web projects! 🚀 Read the full guide now and start creating amazing CSS animations today! 👇
#WebDesign#CSS#FrontendDevelopment#WebDevelopment#CSS3#Programming#WebDev#Animation#UXDesign#JavaScript#skillivo#skillivoBlogs $hashtag#slidingMenus#animatedFlipCards#CSSmodals
3 notes
·
View notes
Text
Air Twister Review
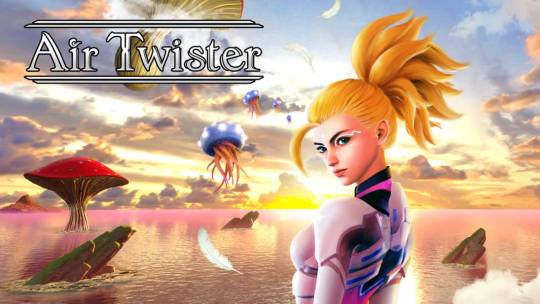
by Amr (@siegarettes)
Air Twister
Developers - YS Net
Publisher - ININ Games
PC, PS5, PS4, XBOX, Switch
The latest from legendary SEGA arcade creator Yu Suzuki, Air Twister has finally escaped its exclusivity period with Apple Arcade and arrived on other platforms. From a glance it's clear that Suzuki and his team were aiming to create a follow up to Space Harrier, with surreal visuals and saturated colors that'd feel right at home in SEGA's fantasy worlds. Scored by Dutch composer Valensia, doing his best Queen impression, Air Twister makes a splashy first impression despite the clearly limited budget. But as the game continues it's clear that Suzuki's vision lacks any real cohesion, rendered in hasty sketches rather than the efficient and masterful strokes of his work at SEGA.

The longer the game goes the more assets repeat, without concrete themes to tie them together. The dynamic camera evokes the sweeping vistas of Panzer Dragoon and company, but environments come off as more as a set of prefabs that line a rollercoaster ride, without any idle animation, with even the water being static.
All of this was only obvious to me thanks to the languid pace of the game. Enemies sweep lethargically into the screen, and bullets are so slow enemies have often left before they can hit you.
The lock on system is translated directly from how it worked on iOS, lacking a targeting cursor, and requiring you to trace enemies with your character before hitting the fire button, which doubles as your rapid fire button. It works counter to genre conventions, removing the tension between rapidly pelting enemies with weaker fire or delaying your shots for a more powerful homing attack.
There's also no cool down between homing shots, so often the best way to deal damage is to slam the attack button, which will launch both rapid and homing shots at the same time. Curiously, you can aim your attacks at an angle with the right stick, but without a cursor it's highly inaccurate, and the tutorial doesn't even bother telling you about it.
It's all sloppy and ill considered, and the soundtrack follows suit . With a full album worth of new and existing tracks and a level progression completely on rails, Air Twister had everything lined up for a perfectly synced score. Instead it continually repeats songs, despite having enough songs to give each stage its own theme. Songs clash with the visuals instead of complementing them, adding to that sense of an incoherent whole.

If there is a consistent theme to Air Twister, it's that repitition, which ultimately what drags it down. Every run is forced to start from the beginning, keeping the game stuck at that initial sleepy pace before it picks up at the halfway point.
Variety only comes through navigating the Adventure Map, a convoluted map structured like a skill tree, where each node requires a certain amount of points earned during runs. Most rewards are either a slight boost to your health or the number of enemies you can lock onto, both which start at a beyond generous amount, or slight variations on customization items like makeup or hair styles. It takes nearly an hour to earn meaningful rewards, which is maybe for the best, since the first weapon I unlocked basically gave me unlimited screen clearing bombs.

The PC version has no meaningful interface changes, making basic navigation a pain. To take the aforementioned Adventure Map as an example, unlocking nodes requires you to either hold down a mouse button for an extended time, or tediously hover over and confirm each node with a controller, with no options to simply click a node further down the path and automatically unlock previous points. The navigation language isn't consistent either, with options like costume changes confirming if you simply hover over them. It's a shoddy and confusing mess, optimized for neither controller nor mouse.
Air Twister, simply put, is kind of a mess. It's not an unlikeable one, and at times it's even fun. But for the most of its runtime the experience is one of humming boredom, punctuated by confusion.
2 notes
·
View notes
Text
TRADUTOR COM BANDEIRAS
Bom isso fica muito fofo no seu theme se seu tumblr receber visitar de pessoas de outros paises, e essa ferramente pode ser muito util e e super pequena
PREVIEW:

Eu só coloquei 3 bandeiras por que se não ia ficar muito extenso e ia acabar ficando feio mais se quer todos os países acesse o site de origem no final do tutorial. Bom primeiro coloque o código a seguir entre <style> e </style> que o hover e a personalização das nossas bandeirinhas:
.google_translate img { filter:alpha(opacity=100); -moz-opacity: 1.0; opacity: 1.0; border:0; } .google_translate:hover img { filter:alpha(opacity=30); -moz-opacity: 0.30; opacity: 0.30; border:0; } .google_translatextra:hover img { filter:alpha(opacity=0.30); -moz-opacity: 0.30; opacity: 0.30; border:0; }
Bom e melhor não mexer em nada nesse código pra não ocorrer de bagunçar o nosso efeito. Agora você vai colar o código a seguir aonde quer que apareça o nosso efeito :
<center><a class="google_translate" href="#" rel="nofollow" title="English" onclick="window.open('http://translate.google.com/translate?u='+encodeURIComponent(location.href)+'&langpair=pt%7Cen&hl=en'); return false;"><img alt="English" border="0" align="absbottom" title="English" height="32" src=http://lh6.ggpht.com/_pt7i0nbIOCY/SWwjycGEnLI/AAAAAAAAA1o/7p6S3-tipsA/English_thumb%5B3%5D.png?imgmax=800 style="cursor: pointer;margin-right:13px" width="24"/></a> <a class="google_translate" href="#" rel="nofollow" title="French" onclick="window.open('http://translate.google.com/translate?u='+encodeURIComponent(location.href)+'&langpair=pt%7Cfr&hl=en'); return false;"><img alt="French" border="0" align="absbottom" title="French" height="32" src="http://lh3.ggpht.com/_pt7i0nbIOCY/SWwj1AdOWZI/AAAAAAAAA1w/lWUkGNrOFYo/French_thumb%5B5%5D.png?imgmax=800" style="cursor: pointer;margin-right:13px" width="24"/></a><a class="google_translate" href="#" rel="nofollow" title="Portuguese" onclick="window.open('http://translate.google.com/translate?u='+encodeURIComponent(location.href)+'&langpair=pt%7Cpt&hl=en'); return false;"><img alt="Portuguese" border="0" align="absbottom" title="Portuguese" height="32" src="http://lh4.ggpht.com/_pt7i0nbIOCY/SWwkG0osjzI/AAAAAAAAA2g/_kM2A16R_Ho/Portuguese_thumb%5B1%5D.png?imgmax=800" style="cursor: pointer;margin-right:13px" width="24"/></a></center>
O código e bem complicado então e melhor não mecher em nada só mude as imagem se quiser aonde esta negritado, e de Update Preview pra ver se esta tudo certo e salve.
Tutorial Original : AQUI
0 notes
Note
hey there :)
i recently re-read "heaven help the fools" and i love the hoover function you are using in the story.
I was checking the tutorial for the skin by La_Temperanza but some things I didn't quite get like where to put the code exactly inside the "Work Text". Maybe you could help me out since you did such amazing work in your story? 👉👈
thank you so much in advance 💜💚
Bro, hi :DD
Okay, so I found working with this skin a little tricky and it took me a lot of trial and error to get it right, so I'll try to explain it as best as I can.
The code will go in the place of the word/phrase you want to translate in your work. For example, on my doc when working on "heaven helps the fools", I'll have my text with whatever I'm translating in between brackets, so it's easier to just CTRL+F when I paste it on the HTML editor, kind of like this:
Then when you're on AO3 you can just search for the brackets and paste your code in their place, kind of like this:
Another thing is that the placement of the code gets easier or harder to format depending where in the story you're using it. For example, it's easier to put it at the beginning of a paragraph, like above, than when you have your translation in the middle of a paragraph like this:
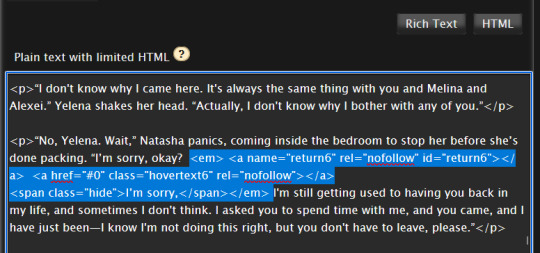
Because then you have the beginning of the paragraph, the code, and then the rest of the paragraph. (I say it's trickier because if it gets messed up somehow then it's just harder to find out exactly where it went wrong)
Also, for the work text, you'll want to always edit on the HTML editor. I found out the hard way that if I go to the Rich Text side for any reason then the skin just stops working (not sure if I did something wrong to cause that tbh, but I avoid going on Rich Text now when using this skin)
And since I can't go to the Rich Text side, I got to using this AO3 Posting Script (I don't know if you already use it, so I'm linking it here just in case)
It makes things a lot easier to then go into the HTML editor on AO3 and just paste the code at the right places.
Also, if you're interested, I made some changes to the code that I think worked out well.
For the bit of code that goes on the skin, I use the exact same as La_Temperaza's, but for the part that goes into the work text, I tweaked a few things.
For context, this is La_Temperanza's template:
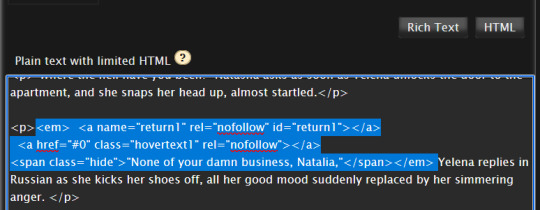
<a name="return1" id="return1"></a><a href="#return1" class="hovertext1"><span class="hide">Text with Creator's Style turned off</span></a>
and here is what I use on my work (minus the spaces)
< em> < a name="return1" rel="nofollow" id="return1" > < /a >< br /> < a href="#0" rel="nofollow" > < /a > < br /> < span > < em > "Text with creator's style turned off" < /em > < /span > </em>
the < em> /</em > is so that both the text and translation are in italics whether the creator's style is turned on or not. The href="#0" is so that when you click the hover text, it doesn't take you to the bottom/top of the page.
(Those changes were partly based on another tutorial I saw, but I can't find it right now :/)
This is it, I think. I hope it helps!❤️
#also hope it makes sense#but if it's a little confusing please feel free to DM me#seriously#I'd be more than happy to help :)
1 note
·
View note
Text
Setting up an Auto-Booper
There's still plenty of time to boop people, and I've got a break during work, so here's a quick and easy guide on how to absolutely ruin someone you know's notifications. All you'll need for this is a laptop or desktop that you can just leave idling for a long time, and a macro program. For this we'll use Mini Mouse Macro, which can be downloaded here.
When you open up the program you'll want to check the "Mouse" checkbox so that it tracks your mouse movements. I'd also suggest clicking on the Settings icon and checking the "Hotkeys" option in the drop down. I'll use the default settings for the tutorial, but you can set your own. The most important ones are Record Macro (CTRL+F8), Stop Macro (CTRL+F10), and Stop Playback (CTRL+F6). Stop Playback is the most important one because it's how you eventually stop booping people.
Go to the person you want to boop's blog. Find a text post, otherwise find an image post and delete the pictures using inspect element (right click on the picture, select the inspect option, press the delete key, keep deleting until the post shrinks down to just tags and text). I've found that doing this near an image can sometimes cause the image to get clicked and break the boop cycle. Hover over the boop link. Press Record Macro (CTRL+F8). Click the boop link, then navigate over to the boop button on the pop up. Click the boop button and then navigate back to the hovering over the boop link. Press Stop Macro (CTRL+F10).
Your macro list should look something like this: Left Click Down -> Left Click Release -> Mouse Movement -> ... -> Mouse Movement -> Left Click Down -> Left Click Release -> Mouse Movement -> ... -> Mouse Movement. This translates to clicking the boop link, moving the mouse to the boop button, clicking the boop button, and then moving back to the boop link. Make sure you don't scroll the page from this point on.
Check over the macro to make sure it looks right, then press the Play Macro (CTRL+F11) to check that it works. If it does, then check the "Loop" checkbox and set it to loop however many times you want to boop someone (just type "loop" in the box if you want to keep booping them until you tell it to stop). Watch to make sure it works for a couple of iterations. If it does, then you're good to go. Feel free to let it run without you, though I would suggest checking in every couple of hours to make sure Tumblr hasn't broken your boops yet (this was a big issue last time, but seems to be better this time around).
Once you're done, press Stop Playback (CTRL+F6) to get it to exit out of the loop. I would really suggest remembering your keybind for Stop Playback because your mouse will be moved by the macro when you try to navigate back to Mini Mouse Macro. Remember to boop responsibly and have a happy Halloween
1 note
·
View note
Text
Physical signs of emotions
In my tutorial we were talking about how I would display emotions in typography when emotions aren't physical. I was suggested to look at body language and facial expressions and see how these could translate into typography. After researching this I want to do some visual experiments so I can see if this will work well before writing it into my learning agreement.
Body Language
Research by Patty Van Cappellen suggests that body language also plays a role in expressing emotion.
For example it was found that 'people perceived an expansive posture as representing dominance. But joy and awe were also represented by expansive postures—even more so than dominance—with hope involving the least expansive posture of the bunch.'
'Arm and head positions also mattered. For example, joyful postures were depicted by arms raised above the head and the head tilted upward, while awe postures showed hands touching the face or hovering near the head. Dominant postures, on the other hand, tended to display arms akimbo (hands on hips, elbows out) with the head facing forward.'
We’re finding signature arm positions for each emotion,”
“the expression production of emotions is a full-body experience.”
'Mirroring earlier results, the participants found that expansive postures with arms held high represented positive emotion—like extraversion and warmth—with arms akimbo representing dominance and negative emotion. This supports the idea that people look to body language to read others’ emotions.'
'“This study shows that assuming particular postures can create or construct an emotion experience,” says Van Cappellen. “A typical joy posture elicits more positive emotions than other postures.”'
This study highlights the importance body language has on perceiving and expressing emotion. I definitely want to do some visual experiments based on this research - exploring how type can take on different body language and what emotions this can envision.
Facial Expressions
Facial expressions are the more obvious way of expressing emotion so this is definitely something I want to explore. I think it could be interesting to explore technology and how it could plot points on the face - as these move it would manipulate the type to express emotion. I think that talking over text with someone you often lose the tone of what you are saying and someone can get the wrong idea - using type it could help express the tone and emotions in what someone is saying. I also think that this could have applications for people that struggle to read facial expressions.

Emotional faces communicate both the emotional state and behavioral intentions of an individual - they also activate behavioral tendencies in the perceiver, namely approach or avoidance.
Facial emotional expressions are salient social cues in everyday interaction. Behavioral data suggest that human facial expressions communicate both the emotional state of the poser and behavioral intentions or action demands to the perceiver (Horstmann, 2003).
https://psycnet.apa.org/record/2003-06021-005
0 notes